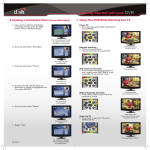
1
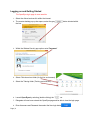
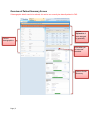
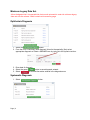
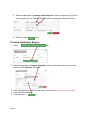
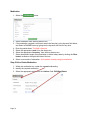
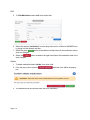
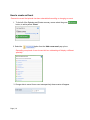
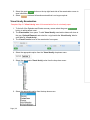
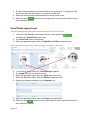
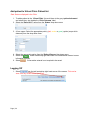
OpenEyes Programme Office Virtual Clinic OpenEyes for Nurses/Technicians and Health Care Assistants (User Manual) Published by OpenEyes Programme Office Document version 0.1 Date: 24th Nov 2014 www.openeyes.org.uk V Document published by OpenEyes Programme Office In case of any query please contact OPO team – Ext 4752 Source – IT PMO_L drive /OPO documents repository/TrainjngMaterials Colour Key: OpenEyes Form links, OpenEyes navigation links, Notes, Field names Aims This session is designed to introduce delegates to OpenEyes by presenting Healthcare professionals the technology to be able to document the clinical journey of patients under their care. The session aims to give the best practices on better patient care and management. The Nurse/ Technicians /Health Care Assistants will use mainly episode and events screen within OpenEyes for diagnosis, examinations and prescriptions. The following features are included in this course: Contents Aims........................................................................................................................................... 1 Documentation History ............................................................................................................... 3 Document Status .................................................................................................................... 3 Logging on and Getting Started ................................................................................................. 4 Overview of Patient Summary Screen........................................................................................ 5 .................................................................................................................................................. 5 .................................................................................................................................................. 5 .................................................................................................................................................. 5 .................................................................................................................................................. 5 .................................................................................................................................................. 5 Minimum Legacy Data Set. ........................................................................................................ 6 Ophthalmic Diagnosis............................................................................................................. 6 Systematic Diagnosis ............................................................................................................. 6 Previous Ophthalmic Surgery ................................................................................................. 7 Medication .............................................................................................................................. 8 Stop, Edit or Delete Medication .............................................................................................. 8 Stop .................................................................................................................................... 9 Edit ....................................................................................................................................10 Delete ................................................................................................................................10 CVI Status.................................................................................................................................11 Allergies ....................................................................................................................................11 Family History ...........................................................................................................................12 Social History ............................................................................................................................12 Episodes and Events ................................................................................................................13 Page | 1 Episodes and Events’ summary screen ....................................................................................14 Graph of IOP History .............................................................................................................14 Graph of IOP History .............................................................................................................15 ..............................................................................................................................................15 Graph of Visual Acuity History ...............................................................................................15 Visual Fields History ..............................................................................................................16 .................................................................................................................................................16 .................................................................................................................................................16 Episode Details .....................................................................................................................16 How to create an Episode .........................................................................................................17 How to create an Event .............................................................................................................18 History Examination ..................................................................................................................19 Visual Function Examination .....................................................................................................19 Visual Acuity Examination .........................................................................................................20 CCT examination ......................................................................................................................21 Intraocular pressure Examination ..............................................................................................22 Dilation ......................................................................................................................................22 Visual Fields Legacy Event .......................................................................................................23 Add patient to Virtual Clinic Patient list ......................................................................................24 Logging Off ...............................................................................................................................24 Page | 2 Documentation History Date Version number Revision details Written by Approved by 24/11/2014 0.1 First draft of document Victoria Aina OpenEyes Programme Office Removal of Virtual Clinic screen shots and access description. Description of how to add patients to VC list. Victoria Aina OpenEyes Programme Office and 29/01/2014 0.2 Document Status This is a controlled document. This document version is only valid at the time it is retrieved from controlled file store, after which a new approved version will replace it. On receipt of a new issue, please destroy previous issues (unless a specified earlier issue is base lined for use throughout the programme Page | 3 Logging on and Getting Started The OpenEyes login page is case sensitive. 1. Select the clinical services link within the intranet. 2. The remote desktop pop up box opens, select the grey button situated within the box. 3. Within the Window Security pop up box enter ‘Password.’ 4. Select Clinical services folder (for the live environment). 5. Select the Training folder (Training environment). 6. Launch Open Eyes by selecting (double clicking) the Icon. 7. Delegates will now have entered the OpenEyes page and be able to view the login page. 8. Enter Username and Password then select the blue login button Page | 4 . Overview of Patient Summary Screen If demographic details need to be altered, this action can currently be altered/updated in PAS. Patient demographics Patient ‘Episode/s’ of care arranged by speciality’ Links takes you to last event recorded. Patient Clinical Summary. Page | 5 Minimum Legacy Data Set. Inform delegates that it is expected that doctors and optometrists enter the minimum legacy data sets into the relevant fields located on the summary page. Ophthalmic Diagnosis 1. Select the button. 2. From the list of ‘Commonly used diagnosis’ linked to the speciality (firm) select appropriate diagnosis or Select a SNOMED term by typing into the dynamic text box . 3. Enter date of diagnosis. 4. Select the green button to save diagnosis entered. 5. Select to discard information entered in the diagnosis area. Systematic Diagnosis 1. Select Page | 6 button. 2. Select the appropriate ‘Commonly used diagnosis’ linked to the speciality (firm) from the drop down menu or Select a SNOMED term by typing into the dynamic text box. 3. Enter date of diagnosis. 4. Select the green button. Previous Ophthalmic Surgery 1. Select button. 2. Select the appropriate ‘Common operations’ option from the drop down menu or enter free text in the ‘Operation’ box below. 3. Select the appropriate ‘side’ from the option of ariel circles. (only select if appropriate) 4. Enter the date of operation. 5. Select the green button. Page | 7 Medication 1. Select the button. 2. Select medication from the drop down menu. 3. If the medication required is not listed, search the formulary in the dynamic field below and Select a SNOMED term by typing into the dynamic text field for any other. 4. Enter the patient dose. This field is free text 5. Select the appropriate ‘route’ from the drop menu. 6. Select the appropriate ‘frequency’ from the drop down menu. 7. Select date patient began using medication or select todays date by clicking the ‘Blue button’ located on the right hand side of the box. 8. Select current state of medication. Is the patient currently using the medication. Stop, Edit or Delete Medication 1. Within the medication box, under the ‘current’ subheading. 2. Identify the required medication. 3. Select the appropriate action from the ‘Actions’ field: Edit|Stop|Delete. Page | 8 Stop 1. To ‘Stop’ medication ensure the following fields are completed, ‘date stopped’ and ‘reason stopped’ select the appropriate option form the drop down menu then select green button . 2. The medication will move from the ‘current’ medication sub heading to the ‘previous’ medication subheading. Page | 9 Edit 5. To ‘Edit Medication’ select ‘edit’ from action field. 6. Select the required ‘medication’ from the drop down menu or Select a SNOMED term by typing into the dynamic text box. 7. Select the green button located bottom left hand area of the medication area to save any changes. 8. Select the button located on the right hand side of the medication area not to save changes Delete 1. To delete medication select ‘delete’ from action field. 2. From the pop up box, select the red button from within the pop up box. 3. The medication will be removed from the list of medication. Page | 10 CVI Status Doctors are required to record the current visual impairment of their patient. Note a default date ‘1 Jan 2000’ and status ‘Unknown’ is pre-populated in the fields. 1. To add or edit the CVI status of a patient click on the green button. 2. Under the ‘Edit CVI Status’ subheading complete the following fields ‘Status’ and ‘Date’ by selecting the appropriate fields from the drop down menu. 3. Select the green button so save changes. Allergies Within the ‘Allergies’ field select the green button. 1. Select the appropriate allergy from the ‘Add allergy’ field. 2. Select the green Page | 11 button, to save changes. Family History 1. To complete family history select the green button. 2. select the appropriate options from the drop down menus to complete the following fields ‘Relative,’ ’Side’ and ‘Condition’. 3. Select the green button to save changes. Social History 1. To complete the Social History select the green 2. button. Select the appropriate option from the drop down menu to complete the following fields: ‘Occupation,’ ’Driving Status,’ ‘Smoking Status,’ ‘Accommodation,’ ‘Carer,’ and ‘Substance Misuse’ 3. Complete the following free text fields: ‘Comments,’ and ‘Alcohol Intake’. Page | 12 4. On the right hand side of the main screen under the ‘All Episodes’ subheading select the blue ‘Create episode/add event’ link. Episodes and Events An episode is an on-going period of clinical care. A patient can have more than one episode of care at the same time at which point they may be under the care of a different consultant/and or speciality (firm). An ‘Open Episode’ (current) has a start date but no end date. A ‘Closed Episode’ has a start and end date. This represents a period of clinical care that has now finished for a particular specialism(firm) led by a specific consultant. An Event is any activity that takes place during a patient appointment e.g.; booking a procedure, examinations, Clinic letters. This is recorded within open eyes. Page | 13 Episodes and Events’ summary screen 1. The ‘Episodes and Events’ summary screen opens. The ‘Summary Screen’ displays the following information: Graph of IOP History Page | 14 Overview Principal Diagnoses Refraction CCT IOP Comments Clinic Interval Investigations Visual Field progression and last Visual fields Glaucoma Management Plan extracts Target IOP Graph of IOP History Move the bar to view history of data Graph of Visual Acuity History Move the bar to view history of data Page | 15 Visual Fields History Select image to zoom into detail view Move the bar to view history of data Episode Details View episode details View episode status Page | 16 How to create an Episode How an Episode is created is dependent on the screen. If creating an Episode from the ‘Patient Summary’ screen follow from step 1. If already in the ‘Episodes and Events’ summary screen follow from step 2. 1. On the right hand side of the ‘Patient Summary’ screen under the ‘All Episodes’ subheading select the blue link. 2. From the ‘Episodes and Events’ summary screen select left hand side of the screen. 3. Select the green box to create new episode of care. Page | 17 located on the button from the ‘Create new episode’ pop up How to create an Event Ensure the correct firm/episode has been selected before adding or changing an event. 1. To the left of the Episodes and Events summary screen select the green button, to add a patient ‘Event.’ 2. Select the option from the ‘Add a new event’ pop up box. Depending on episode of care chosen this box subheading will display a different speciality. 3. Change date to record for an event retrospectively these events will appear. Page | 18 History Examination Complete Step 3 if ‘History’ area of the examination form is not already open. 1. To the left of the Episodes and Events summary screen select the green button, to add a patient event. 2. The ‘Examination’ form opens. To add the ‘History’ data scroll down to the grey ‘Optional Elements’ and select the + sign beside the ‘History’ label 3. The ‘History’ area of the examination form opens. 4. Select the appropriate options from the drop down menu or free text to enter the required information in the area below. 5. Select the green button on the top right hand side of the examination screen to save information entered. 6. Select to discard information entered Visual Function Examination Complete Step 3 if ‘Visual Function’ area of the examination form is not already open 1. To the left of the Episodes and Events summary screen select the green button, to add a patient event. 2. The ‘Examination’ form opens. To add ‘Visual Function’ examination data scroll down to the grey ‘Optional Elements’ and select the + sign beside the ‘Visual Functionl’ label to enter data for ‘Visual Function.’ 3. The ‘Visual Function’ area of the examination form opens. 4. Enter information in the ‘Visual Function’ comment box area. Page | 19 5. Select the green button on the top right hand side of the examination screen to save information entered. 6. Select to discard information entered that is no longer required. Visual Acuity Examination Complete Step 3 if ‘Visual Acuity’ area of the examination form is not already open 1. To the left of the Episodes and Events summary screen select the green button, to add a patient event. 2. The ‘Examination’ form opens. To add ‘Visual Acuity’ examination data scroll down to the grey ‘Optional Elements’ and select the + sign beside the ‘Visual Acuity’ label to enter data for ‘Visual Acuity.’ 3. The ‘Visual Function’ area of the examination form opens. 4. Select the appropriate option from the ‘Visual Acuity’ drop down menu. 5. Select the appropriate ’Visual Acuity’ value from the drop down menu. . 6. Select the appropriate option from the drop down menu. Page | 20 7. Select the green button on the top right hand side of the examination screen to save information entered. 8. Select to discard information entered that is no longer required. CCT examination 1. To the left of the Episodes and Events summary screen select the green button, to add a patient event. 2. The ‘Examination’ form opens. To add CCT examination data scroll down to the grey ‘optional elements’ and select the + sign beside the CTT label to enter data for CTT. 3. The ‘CTT’ area of the examination form opens. Complete the necessary fields. If both eyes are not being examined select the X button to close the eye examination field of the eye that is not being examined. 4. To save information entered select the green button located top right hand corner of the examination form. 5. Once saved the following message will be displayed. Page | 21 Intraocular pressure Examination Follow step 1 if ‘Intraocular Pressure’ area of examination screen not already open. If open follow from step 2. 1. To add the data from ‘Intraocular Pressure ’ examination scroll down to the grey ‘optional elements’ and select the + sign beside the ‘Intraocular Pressure’ label. 2. Select the green button located bottom left hand side of the ‘Intraocular pressure’ area of the screen. 3. 4. 5. 6. Enter the mm Hg data. Select the appropriate instrument. Record any relevant comments into the box below. Select the green button on the top right hand side of the examination screen to save information entered. 7. Select if information entered is not required to be saved. Dilation Follow step 1 if ‘Dilation’ area of examination screen not already open. If open follow from step 2. Multiple dilation drugs can be recorded select add to enter additional dilatation. 1. To add the data from the ‘Dilation’ examination scroll down to the grey ‘optional elements’ and select the + sign beside the ‘Dilation ‘tab. 2. To record the data of the drops administrated to patient, select the appropriate drug from the drop down menu. Page | 22 3. The time of administration is set automatically to the current time. To change click into the time box and type desired time to override the default time. 4. Select the number of drops administrated from the drop down menu. 5. Select the green button on the top right hand side of the examination screen to save information entered. Visual Fields Legacy Event Ensure the appropriate event date is recorded within the ‘Event Date’ field. 1. To the left of the Episodes and Events summary screen select the and select the ‘Visual Field’ legacy Event. 2. The ‘Visual Field’ event screen opens. 3. Select the appropriate option from the ‘Right Eye’/’Left Eye’ drop down menu. Only select options both eyes if historical image is required for both eyes. 4. 5. 6. 7. 8. To view the full image, select the ‘view full image’ hyperlink. The ‘image’ will open in a separate screen. Select the appropriate option from the ‘ability’ drop down menu. Select the appropriate option from the ‘Glasses’ drop down menu. Record any relevant comments in the ‘Comments’ box. 9. Select the appropriate option from the ‘Results’ drop down menu. 10. Select the green button on the top right hand side of the examination screen to save information entered Page | 23 Add patient to Virtual Clinic Patient list Data Sets are displayed in the Clinic. 1. To add a patient to the ‘Virtual Clinic’ list scroll down to the grey ‘optional elements’ and select the + sign beside the ‘Clinic Outcome’ label. 2. Select the ‘Refer to VC’ option from the ‘Status’ drop down menu 3. A form opens. Select the appropriate priority (red, amber or green) option (as per clinic data sets) from the drop down menu. 4. Select the appropriate option from the ‘Referral Source ’drop down menu. 5. Select the button located top right hand side of the examination screen to save information entered. 6. Select if information entered is not required to be saved Logging Off 1. Select from the tab located top right hand corner of the screen. This can be seen from any screen within OpenEyes. Page | 24