1
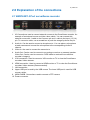
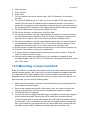
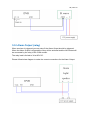
EM6104R1 / EM6108R1
Surveillance Recorder
2 | ENGLISH
EM6104R1 / EM6108R1 Surveillance Recorder
Table of contents
1.0 Introduction ........................................................................................................... 3
1.1 Packing contents ............................................................................................... 3
2.0 Explanation of the connections .............................................................................. 4
2.1 EM6104R1 4 Port surveillance recorder ............................................................ 4
2.2 EM6108R1 8 Port surveillance recorder ............................................................ 5
3.0 Using the surveillance recorder ............................................................................. 5
3.1 Connecting the surveillance recorder to your television or monitor ..................... 5
3.2 Connecting the mouse to the surveillance recorder ........................................... 6
3.3 Connecting the surveillance recorder to your network ........................................ 6
3.4 Connecting the surveillance recorder to the power grid...................................... 6
3.5 Installing the surveillance recorder’s software (optional) .................................... 6
4.0 Using the setup wizard .......................................................................................... 7
5.0 Manual settings ..................................................................................................... 9
5.1 Setting up passwords ........................................................................................ 9
5.1.1 Setting up a user account ........................................................................... 9
5.1.2 Setting up an admin account ...................................................................... 9
5.2 Setting up date and time .................................................................................. 10
5.3 Setting up network settings .............................................................................. 10
5.4 Selecting the screen language......................................................................... 11
6.0 Connecting a camera .......................................................................................... 12
6.1 Connecting a (regular) coaxial camera ............................................................ 12
6.2 Checking the cameras image .......................................................................... 12
6.3 Connecting a PTZ camera ............................................................................... 13
6.4 Setting up the surveillance recorder for PTZ usage ......................................... 13
6.5 Checking the PTZ camera ............................................................................... 14
6.6 Adjusting the surveillance recorder’s resolution ............................................... 14
7.0 Making recordings ............................................................................................... 15
7.1 Resolution and bit rate of the recordings .......................................................... 15
7.2 Recording manually ......................................................................................... 16
7.3 Recording continuously ................................................................................... 16
7.4 Recording during motion detection .................................................................. 16
7.5 Time based recording with motion detection .................................................... 17
8.0 Setting up an alarm notification............................................................................ 18
8.1 Setting up an alarm notification during motion detection .................................. 18
8.2 Sending an email during alarm notification....................................................... 18
9.0 Control the recordings of the surveillance recorder .............................................. 19
9.1 Searching for recordings at a specific time....................................................... 19
9.2 Making a backup of a recording ....................................................................... 20
10.0 Accessing the surveillance recorder locally ........................................................ 21
10.1 Take a snapshot using the web interface ....................................................... 21
10.2 Recording using the web interface ................................................................. 22
3 | ENGLISH
10.3 Playback the recordings ................................................................................ 23
11.0 Accessing the surveillance recorder externally and the use of DDNS ................ 23
11.1 Accessing the surveillance recorder through the Internet ............................... 23
11.2 Using DDNS .................................................................................................. 24
11.2.1 What is DDNS? .......................................................................................24
11.2.2 Setting up DDNS in the surveillance recorder ..........................................24
12.0 Playback images on your smartphone or tablet ................................................. 25
12.1 Setting up the surveillance recorder for your smartphone or tablet ................. 25
12.2 Port Forwarding on the EM4571 Gigabit 300N Router ................................... 26
12.3 Setting up your smartphone or tablet ............................................................. 26
13.0 Mounting a (new) hard disk................................................................................ 27
14.0 IO connections .................................................................................................. 28
14.1 Sensor inputs (ALM IN) ................................................................................. 28
14.2 Alarm Output (relay) ...................................................................................... 29
15.0 Other functions .................................................................................................. 30
16.0 Frequently Asked Questions and other related information ................................ 31
17.0 Service and support ........................................................................................... 31
18.0 Warning and points of attention ......................................................................... 32
19.0 Warranty conditions ........................................................................................... 33
1.0 Introduction
Congratulations with the purchase of this high-quality Eminent product! This product
has undergone extensive testing by Eminent’s technical experts. Should you
experience any problems with this product, you are covered by a five-year Eminent
warranty. Please keep this manual and the receipt in a safe place.
Register your product now on www.eminent-online.com and receive product updates!
1.1 Packing contents
The following parts need to be present in the packing:
•
•
•
•
•
•
•
•
EM6104R1/EM6108R1 Digital Surveillance Recorder
Power supply
Remote control
2 Batteries
Mouse
4 screws for HDD
User manual
CD-ROM with software and manual
4 | ENGLISH
2.0 Explanation of the connections
2.1 EM6104R1 4 Port surveillance recorder
1. IO-Connections used to connect external sources to the Surveillance recorder. An
example of an external source could be a door switch. You can connect this
external source with 1 cable to the Common pin and 1 cable to the Input (1,2,3,4)
pin. To connect a cable, use a screwdriver to push the orange lip above the pin.
2. Audio-In: Can be used to connect a microphone to. You can place a microphone
at each camera and connect the microphone to the corresponding Audio-In
channel.
3. Video-In: Are used to connect the camera’s to.
4. Audio-Out: Can be used to connect to an analogue receiver or powered speaker.
Video-Out: Can be used to connect a CVBS cable to receive the surveillance
recorder’s image(s).
5. VGA connection. Used to connect a VGA monitor or TV to view the Surveillance
recorders Video streams.
6. HDMI connection. Used to connect a HDMI monitor or TV to view the Surveillance
recorders Video streams (Recommended).
7. LAN connection.
8. Upper USB port is used by the USB mouse. The lower USB port is used for USB
memory sticks.
9. 485A & 485B. Connections used to connect a PTZ camera.
10. Power connector.
5 | ENGLISH
2.2 EM6108R1 8 Port surveillance recorder
1. IO-Connections used to connect external sources to the Surveillance recorder. An
example of an external source could be a door switch. You can connect this
external source with 1 cable to the Common pin and 1 cable to the Input
(1,2,3,4,5,6,7,8) pin. To connect a cable, use a screwdriver to push the orange lip
above the pin.
2. Audio-In: Can be used to connect a microphone to. You can place a microphone
at each camera and connect the microphone to the corresponding Audio-In
channel.
3. Video-In: Are used to connect the camera’s to.
4. Audio-Out: Can be used to connect to an analogue receiver or powered speaker.
5. Video-Out: Can be used to connect a CVBS cable to receive the surveillance
recorder’s image(s).
6. VGA connection. Used to connect a VGA monitor or TV to view the Surveillance
recorders Video streams.
7. HDMI connection. Used to connect a HDMI monitor or TV to view the Surveillance
recorders Video streams (Recommended).
8. LAN connection.
9. Upper USB port is used by the USB mouse. The lower USB port is used for USB
memory sticks.
10. 485A & 485B. Connections used to connect a PTZ camera.
11. Power connector.
3.0 Using the surveillance recorder
During the following chapters we will explain how to setup the Eminent surveillance
recorder and how to install the cameras. It is recommended to setup the surveillance
recorder and install the cameras at your desk before installing and mounting the
surveillance recorder kit at the desired location. This way, you can easily setup the
surveillance recorder and check whether the cameras are working correctly.
3.1 Connecting the surveillance recorder to your
television or monitor
1. Take the surveillance recorder out of the packaging.
2. Connect the surveillance recorder to a monitor/TV which has a VGA or HDMI
connection. Also, you can connect the surveillance recorder to a special security
monitor which has a BNC connection. If you connect the surveillance recorder to a
6 | ENGLISH
television which has a cinch connection, then you can use an optional BNC to
cinch converter. (You can also use the surveillance recorder without the use of a
monitor, then you can view the images of the surveillance recorder via your
network, using a computer).
3. Connect a HDMI cable to the HDMI connection of the surveillance recorder, or
connect a video cable to the VGA connection of the surveillance recorder, or
connect a video cable to a BNC ‘VIDEO-OUT’ connection of the surveillance
recorder.
4. Connect the other end of the HDMI cable to a HDMI connection on your TV or
monitor, or connect the cable to the VGA connection of your monitor, or connect
the video cable to a BNC connection of your monitor.
3.2 Connecting the mouse to the surveillance recorder
1. Take the mouse out of the packing.
2. Connect the USB mouse to the USB port on the surveillance recorder which has
the tag ‘Mouse’.
3.3 Connecting the surveillance recorder to your network
1. Connect a network cable to the ‘RJ45’ port of the surveillance recorder.
2. Connect the other side of the network cable to your modem, router or switch.
3.4 Connecting the surveillance recorder to the power grid
1. Connect the plug of the power supply to the ‘DC +12V IN’ of the surveillance
recorder.
2. Connect the power supply to a wall outlet.
3. During the following boot of the surveillance recorder, it can take up till 90 seconds
before you will see an image.
3.5 Installing the surveillance recorder’s software
(optional)
1.
2.
3.
4.
5.
6.
Turn on your computer.
Place the CD-ROM in your computer’s CD-ROM or DVD player.
The software will start automatically.
Choose your language.
Choose ‘Install Mini Player’.
Follow the steps shown on screen to install the software.
7 | ENGLISH
4.0 Using the setup wizard
Once the surveillance recorder has been started, a setup wizard will be shown. Using
this wizard, you can setup the basic settings of the surveillance recorder.
Note: The surveillance recorder will always start in the English language until you
have chosen a language!
Hint: If you do not want the setup wizard to be shown again, you need to mark ‘don’t
display this window again’.
Step 1:
The wizard starts with the text ‘Welcome to the Setup Wizard’. Click ‘Next’.
Step 2:
In the following screen, you can setup a password for the ‘admin’ account. Fill out a
password at the ‘Password’ field. Confirm your chosen password at the ‘Retype
password’ field. Click ‘Next’.
Step 3:
Select your ‘Video format’. Select ‘PAL’. Also, select your language. In this case,
‘English’.
Click ‘Time’ if you want to set the correct date and time. Also, you can select the ‘Time
format’ and ‘Time zone’. At ‘Time server’, you can select an online time server which
will synchronize the date and time. Mark ‘Auto update’ if you want the time and date to
be updated automatically.
Click ‘DST’. In the following screen, you can select the daylight saving time, by placing
a mark at ‘Enable’. Also, you can set the ‘Offset’ in hours. For example: One hour. You
can also set the starting and end date of the daylight saving time (DST) at the ‘From’
and ‘To’ fields. Click ‘Next’.
Step 4:
In the following screen, you need to select whether you want to obtain an IP-Address
by DHCP or setting an IP-Address manually. Usually, obtaining an IP-Address
automatically is sufficient. If you want to obtain the IP-Address automatically, click
‘Next’.
However, it can be handy to set the IP-Address data manually, or, if you do not have a
DHCP server in your network. In that case, select ‘Use the following IP address’ and
fill out the correct data such ‘IP address’, ‘Subnet mask’ and ‘default gateway’. (you
can use the mouse to select and change the data). Also, fill out a correct ‘Preferred’
and ‘Alternate DNS Server’. Click ‘Next’.
8 | ENGLISH
Step 5:
A new screen appears. The network connection will be tested first. Then an overview
appears. This overview shows the IP-Address data, DNS server addresses and your
(Internet) WAN IP-Address. Click ‘Next’.
Step 6:
If you want to use a DDNS account, you can set the ‘DDNS’ option to ‘Enable’ in the
following screen and then select your DDNS provider. Also, you need to fill out the
hostname, user name and password of your DDNS account.
Click ‘Port’. In this screen, the ‘Media port’ and the ‘Web port’ are shown. The ‘Media
port’ is used by devices such as smartphones which are accessing the surveillance
recorder externally. The ‘Web port’ is used by computers which are accessing the
surveillance recorder externally. If needed, the ‘Media port’ and ‘Web port’ can be
changed manually. Click ‘Next’.
Step 7:
In the following screen, you can select from which channel (CH) you want to record.
Each channel represents a connected camera. If a mark is placed at ‘Enable’ at the
corresponding channel, it means recording from this channel is activated. You can
also select whether audio needs to be recorded at ‘Audio’. At ‘Mode’, you can select
whether the recordings need to take place constantly, or scheduled.
Click ‘Bit rate’ and select the desired resolution at ‘resolution’. You can choose
between D1 (720x480), HD1 (720x240), CIF (360X240), WCIF (480×240), WHD1
(960×240) and WD1(960×480). At ‘Frame rate’, you can select the frame rate (amount
of images shown per second). ‘25’ is the highest frame rate possible (but depends on
the amount of channels and chosen resolution). 25 frames per second delivers images
which are shown as fluently as possible. The lower the frame rate, the less fluently the
recorded image will appear. A higher frame rate will consume more hard disk space.
At ‘Quality’, you can select the quality of the image. Setting the quality to ‘Best’, means
the quality is as good as possible. However, setting a higher quality also means more
hard disk space will be used. Click ‘Next’.
Step 8:
At the following screen, you can see the status of the internal hard disk and the
capacity of the internal hard disk. At ‘Overwrite’, you can select the ‘by capacity’
option, which means the oldest recorded files will be overwritten when the hard disk
reaches its maximum capacity.
If you want the files to be overwritten after a pre-set amount of days, select ‘by days’
and set the amount of days.
Place a mark at ‘Format’ and then click ‘Format’ to begin formatting the internal hard
disk. Please be patient while the hard disk is being formatted. Click ‘Save’
Step 9:
Click ‘OK’ to finish the setup wizard.
9 | ENGLISH
5.0 Manual settings
If you have not used the setup wizard, or you want to manually setup a password to
prevent third parties to gain access, or you want to manually set the date and time,
you can manually set the surveillance recorder. And, if your surveillance recorder has
been connected to your network, you can manually set the IP address data.
5.1 Setting up passwords
In order to prevent third parties gaining access to the settings of the surveillance
recorder, you can setup a password in the surveillance recorder. There are two
different types of accounts which can be used to setup a password. A user account
with a password and an admin account with a password. A user account is supposed
to be used for the ‘normal’ user which can only view images and cannot alter any
settings. If needed, you can also create a user account and add privileges you want to
add for this user account.
An admin account is supposed to be used for the person who is able to view and alter
all settings.
5.1.1 Setting up a user account
1. Make sure the surveillance recorder is completely started, and you can see the
surveillance recorder’s image on your screen.
2. Click ‘Start’.
3. Fill out the password you have set during the wizard and click ‘Login’ or do not fill
out a password if you have not used the wizard or if you do not have set a
password and click ‘Login’.
4. Click ‘Basic.
5. Click ‘User’.
6. Click ‘Add user’.
7. Fill out a user name for this account at ‘User name’. Use the mouse and the
onscreen keyboard to fill out the data and click ‘Enter’ to confirm.
8. Fill out a password for this account at ‘Password’. Use the mouse and the
onscreen keyboard to fill out the data and click ‘Enter’ to confirm.
9. Confirm the password at ‘Retype password’. Use the mouse and the onscreen
keyboard to fill out the data and click ‘Enter’ to confirm.
10. Click ‘Authority’.
11. If this account may only have access to the camera’s images (no privilege to
change anything), click ‘Clear’.
12. Click ‘Apply’.
13. Click ‘OK’ at the ‘successfully saved’ screen.
14. Click ‘Exit’ until you are at the ‘User’ menu.
Note: Your password may contain a maximum of 16 characters.
5.1.2 Setting up an admin account
1. Click ‘Add user’.
10 | ENGLISH
2. Fill out a user name for this account at ‘User name’. Use the mouse and the
onscreen keyboard to fill out the data and click ‘Enter’ to confirm.
3. Fill out a password for this account at ‘Password’. Use the mouse and the
onscreen keyboard to fill out the data and click ‘Enter’ to confirm.
4. Confirm the password at ‘Retype password’. Use the mouse and the onscreen
keyboard to fill out the data and click ‘Enter’ to confirm.
5. Click ‘Authority’.
6. Since we are creating an admin account, we need to make sure all items are
selected.
7. Click ‘Apply’.
8. Click ‘OK’ at the ‘successfully saved’ screen.
9. Click ‘Exit’ until you are at the main menu.
Note: Your password may contain a maximum of 16 characters.
5.2 Setting up date and time
1.
2.
3.
4.
5.
6.
7.
8.
9.
10.
11.
12.
Click ‘Basic’.
Click ‘Date/Time’.
Fill out the date, year and time at the ‘Date/Time’ field.
You can set the display of date, time and year at the ‘Date Format’ field.
Fill out the time display at the ‘Time format’ field. You can choose between ’24Hour’ and ’12-Hour’.
Select the correct time zone at the ‘Time zone’ field.
Place a mark at ‘Auto update’ if you want the time and date to be updated
automatically.
Select a time server at the ‘Time server’ field. You can select an online time server
which will synchronize the date and time.
Click ‘DST’. In the following screen, you can select the daylight saving time, by
placing a mark at ‘Enable’. Also, you can set the ‘Offset’ in hours. For example:
One hour. You can also set the starting and end date of the daylight saving time
(DST) at the ‘From’ and ‘To’ fields.
Click ‘Apply’ to save these settings.
Click ‘OK’ at the ‘successfully saved’ screen.
Click ‘Exit’ until you are at the main menu.
5.3 Setting up network settings
1. Click ‘Advance’.
2. Click ‘Network’.
3. ‘Obtain an IP address automatically’ and ‘Obtain DNS server automatically’ are
selected by default. This is the ideal setting if you have a DHCP server within your
network and you do not want to setup the network data manually.
4. If there is no DHCP active within your network, or you want to manually fill out an
IP-Address, place the mark at ‘Use the following IP address’ and fill out the correct
data such as ‘IP address’, ‘Subnet mask’ and ‘Default gateway’. (You can use the
11 | ENGLISH
mouse to select and change the data). Also, fill out a correct ‘Preferred’ and
‘Alternate DNS server’.
5. Click ‘Apply’ to save these settings
6. Click ‘OK’ at the ‘successfully saved’ screen.
7. Click ‘Exit’ until you are at the main menu.
Attention! In order to access the surveillance recorder using the Internet, make sure
you have filled out the IP-Address data correctly. If not, a connection from the Internet
may not be established.
5.4 Selecting the screen language
The on screen display and webpage of the surveillance recorder are available in
several languages. This manual is based on the English language which is the default
language setting of the surveillance recorder . You can select your own language with
these instructions:
1.
2.
3.
4.
5.
6.
Click ‘Basic’.
Select ‘Language’ at the right side of the screen.
Select your desired language from the list.
Click ‘Apply’.
Click ‘OK’ at the ‘successfully saved’ screen.
Click ‘Exit’ until you are at the main menu.
12 | ENGLISH
6.0 Connecting a camera
6.1 Connecting a (regular) coaxial camera
Depending on the type of surveillance kit, there are a number of camera’s supplied. In
the following chapter, we will explain how to connect these cameras.
Before mounting the cameras you need to take the following precautions:
•
•
•
•
•
1.
2.
3.
4.
5.
6.
7.
8.
Make sure the cameras can indeed view the area you want to guard. It can be
handy to test some locations before mounting the cameras
Do not place the cameras directly to the window or other glass surfaces to prevent
reflections
The night vision of the cameras is limited compared to viewing the image during
day time. So make sure the cameras are mounted in such a way, the night vision
is sufficient to view the intended area(s) during night time
Avoid direct sunlight into the camera, it could cause overexposure
Place the camera on a spot which is not too easy for unwanted people to
sabotage the camera
Click ‘Logout’ in the main menu.
Click ‘Yes’ at the ‘Are you sure you want to log out’ question.
Press the ‘Power’ button on the front of the surveillance recorder.
Click ‘Yes’ at the ‘Are you sure that you want to go to the Standby mode?’
question, after which the surveillance recorder reverts to the standby mode.
Take the camera out of the packing.
Connect the video cable of the camera to a ‘Video In’ connection of the
surveillance recorder.
Connect the power supply of the camera to a wall outlet.
Connect the power cable of the power supply to the power connection of the
camera.
6.2 Checking the cameras image
1. Now you have connected a camera, the cameras image can be checked.
2. Turn on the surveillance recorder by pressing the power button at the front of the
surveillance recorder.
3. As soon as the surveillance recorder has been started, you will see that the
screen is divided into several squares. Each of the squares represents a camerainput.
4. If you have connected the camera to the ‘Video-In 1’ connection, you will see the
cameras image appear in the upper left corner of your monitor.
Double-click the square which represents the cameras image, to see the cameras
image in full screen.
13 | ENGLISH
6.3 Connecting a PTZ camera
It is also possible to connect a PTZ (Pan Tilt Zoom) camera to the DVR such as the
EM6029 Zoom Camera 30X Indoor (not included). Use the following steps to connect
a PTZ camera to the surveillance recorder.
Note: Make sure the surveillance recorder is not connected to the power grid
anymore. Please remove the power plug from the wall outlet first!
1. Connect a video cable (BNC) to the ‘Video-Out’ connection of the camera.
2. Connect the other end of the video cable (BNC) to one of the ‘Video-In’
connections of the surveillance recorder.
3. Take a UTP network cable (For example: The Eminent EM6062) and remove 5cm
of the mantle of both ends of the cable. You need to make sure the bare UTP
wires are exposed.
4. Now strip the cable at both ends. Make sure you maintain about 5mm of bare
copper.
In the following steps, we have stripped the following UTP wires: Blue and blue-white.
5. Connect the blue UTP wire to the ‘485A’ connection of the surveillance recorder.
6. Connect the blue-white UTP wire to the ‘485B’ connection of the surveillance
recorder.
7. Check whether you have connected the wires properly to the surveillance
recorder.
8. Connect the blue UTP wire to the ‘485A’ connection of the PTZ camera.
9. Connect the blue-white UTP wire to the ‘485B’ connection of the PTZ camera.
10. Check whether you have connected the wires properly to the surveillance
recorder.
11. Connect the power cable of the power supply. For example: the EM6060 (not
included) to the 12V connection of the camera. You can also use the EM6160
Power supply (not included) with splitter to which you can connect up-to eight
camera’s.
12. Reconnect the power cable of the surveillance recorder to the wall outlet again,
after which the surveillance recorder starts.
6.4 Setting up the surveillance recorder for PTZ usage
1. Make sure the surveillance recorder is completely started, and you can see the
surveillance recorder’s image on your screen.
2. Click ‘Start’
3. Fill out the password you have set during the wizard and click ‘Login’ or do not fill
out a password if you have not used the wizard or if you do not have set a
password and click ‘Login’.
4. Click ‘Advanced’.
5. Click ‘P.T.Z.’.
14 | ENGLISH
6. Click ‘Enable’ at the channel your PTZ camera is connected to.
7. Make sure the ‘Pelco-D’ protocol is selected at the same channel the PTZ camera
is connected to.
8. Make sure the ‘Baud rate’ is set to the same baud rate as your PTZ camera is set
to. Refer to the manual of camera for more details.
9. Make sure the correct ‘Address’ is selected at ‘Address’.
10. Click ‘Apply’.
8. Click ‘OK’ at the ‘successfully saved’ screen.
11. Click ‘Exit’ until you are at the main menu.
12. Click ‘Log out’ and log out.
6.5 Checking the PTZ camera
1. Now you have connected a PTZ camera, the cameras image and function(s) of
the PTZ camera can be tested.
2. Click the ‘P.T.Z’ icon at the lower right part of the screen.
3. Fill out the password you have set during the wizard and click ‘Login’ or do not fill
out a password if you have not used the wizard or if you do not have set a
password and click ‘Login’.
4. A new screen appears with several new icons and new functions. If you have
connected the PTZ camera properly and the ‘Baud rate’ settings are correct, you
will be able to use the PTZ functions. For Example: If your camera has Pan/Tilt
options, you can use the directional buttons onscreen to move the camera’s
image. Use the ‘Zoom+’ button to zoom in. Use the ‘Zoom-’ button to zoom out
etc.
6.6 Adjusting the surveillance recorder’s resolution
It is possible to change the screen resolution. Use the following steps to change the
resolution:
1. Make sure the surveillance recorder is completely started and you see the image
of the surveillance recorder on screen.
2. Click ‘Start’.
3. You need to login using an admin account. Fill out the password you have set
during the wizard and click ‘Login’ or do not fill out a password if you have not
used the wizard or if you do not have set a password and click ‘Login’.
4. Click ‘Basic’.
5. Select ‘VGA resolution’ at the right side of the screen.
6. Select the desired resolution.
7. Click ’Apply’.
8. Click ‘OK’ at the ‘Successfully saved’ screen.
9. Click ‘Exit’ until you are at the main menu.
15 | ENGLISH
7.0 Making recordings
The default setting of the digital video recorder is set to record images all the time.
There are several other manners to make recordings as well. You can make
recordings manually, time based recordings, make recordings when motion is
detected, but you can also make recordings which are time based combined with
motion detection. Besides the different manners to make recordings, you can also
adjust the quality and resolution of the recordings. We will explain how to alter the
settings.
To make sure the surveillance recorder keeps recording, even when the hard disk has
reached its capacity, the ‘Overwrite’ option is activated by default. Using this option,
the oldest recordings will be overwritten automatically to maintain sufficient disk
space.
7.1 Resolution and bit rate of the recordings
1. Make sure the surveillance recorder is completely started and you can see the
surveillance recorder’s image on screen.
2. Click ‘Start’.
3. You need to login using an admin account. Fill out the password you have set
during the wizard and click ‘Login’ or do not fill out a password if you have not
used the wizard or if you do not have set a password and click ‘Login’.
4. Click ‘Basic’.
5. Click ‘Record’.
6. Click ‘Bit rate’.
7. Choose the desired resolution at ‘Resolution’. You can choose between D1
(720x480), HD1 (720x240), CIF (360X240), WCIF (480×240), WHD1 (960×240)
and WD1(960×480).
8. At ‘Frame rate’, you can select the frame rate (amount of images shown per
second). ‘25’ is the highest frame rate possible and delivers an images which is as
fluently as possible. The lower the frame rate, the less fluently the recorded image
will appear. A higher frame rate will consume more hard disk space.
9. Click ‘Quality’.
10. At ‘Quality’, you can select the quality of the image. Setting the quality to ‘Best’,
means the quality is as good as possible. However, setting a higher quality also
means more hard disk space will be used.
11. Click ‘Apply’.
12. Click ‘OK’ at the ‘Successfully saved’ screen.
13. Click ‘Exit’ until you are at the main menu.
Note: The higher you set the resolution, frame rate and quality, the better the picture
on screen will look. However, the higher these settings, the more disk space is needed
for the recordings.
16 | ENGLISH
7.2 Recording manually
1. Make sure the surveillance recorder is completely started and you can see the
surveillance recorder’s image on screen.
2. Click the ‘Rec’ button at the lower right part of the screen.
3. You need to login using an admin account. Fill out the password you have set
during the wizard and click ‘Login’ or do not fill out a password if you have not
used the wizard or if you do not have set a password and click ‘Login’.
4. The surveillance recorder will start recording the camera’s image.
5. If you want to stop the recording, you need to click the ‘Stop record’ button at the
lower right part of the screen.
7.3 Recording continuously
1. Make sure the surveillance recorder is completely started and you can see the
surveillance recorder’s image on screen.
2. Click ‘Start’.
3. You need to login using an admin account. Fill out the password you have set
during the wizard and click ‘Login’ or do not fill out a password if you have not
used the wizard or if you do not have set a password and click ‘Login’.
4. Click ‘Basic’.
5. Click ‘Record’.
6. Make sure the channel(s) you want to record from are marked. (Place a mark at
‘Enable). Also, the ‘Mode’ needs to be set to ‘Always’.
7. Click ‘Apply’.
8. Click ‘OK’ at the ‘Successfully saved’ screen.
9. Click ‘Exit’ until you are at the main menu.
7.4 Recording during motion detection
1. Make sure the surveillance recorder is completely started and you see the
surveillance recorder’s image on screen.
2. Click ‘Start’.
3. You need to login using an admin account. Fill out the password you have set
during the wizard and click ‘Login’ or do not fill out a password if you have not
used the wizard or if you do not have set a password and click ‘Login’.
4. Click ‘Advance’.
5. Make sure the channel(s) (CH) you want to record from using motion detection are
marked (Place a mark at ‘Enable).
6. Click the field below ‘Sensitivity’.
7. Select the sensitivity of the motion detection for the selected channel. You can
make a selection between ‘1’ till ‘8’. ‘1’ is the most sensitive, ‘8’ is the least
sensitive.
8. Click the ‘Setting’ field below ‘Area’.
9. The image of the selected channel (CH) will be shown. By default, the entire
screen is selected as motion detection area (green colour). By pressing the left
17 | ENGLISH
10.
11.
12.
13.
mouse button and keeping it pressed while simultaneously moving the mouse, you
can select a specific area on screen. The selected area will be given a grey
colour. It means the grey coloured area is excluded from motion detection. If
movement is detected in a motion detected area (green colour), the grid will revert
to a red colour.
Click the right mouse button once.
Click ‘Apply’.
Click ‘OK’ at the ‘Successfully saved’ screen.
Click ‘Exit’ until you are at the main menu.
7.5 Time based recording with motion detection
Making recordings using motion detection on specific times, saves hard disk space
compared to other methods of recording. Therefore, older recordings will be stored
longer. ‘Time based recordings with motion detection’ is recommended to use.
1. Make sure the surveillance recorder is completely started and you see the
surveillance recorder’s image on screen.
2. Click ‘Start’.
3. You need to login using an admin account. Fill out the password you have set
during the wizard and click ‘Login’ or do not fill out a password if you have not
used the wizard or if you do not have set a password and click ‘Login’.
4. Click ‘Advance’.
5. Click the ‘Settings’ field below ‘Schedule’.
6. In the following screen you will see the days of the week (Sun. till Sat.).
7. If you want the surveillance recorder to start recording in case an event occurs
during a selected time frame, you need to make sure ‘Alarm’ is selected. Also
refer to chapter 8.
8. Select a red coloured square next to a day and double-click this square.
9. You can now select a ‘Start time’ and an ‘End time’. This means, if you have set
the ‘Start time’ to ’22:00:00’ and the ‘End time’ to 23:59:00’, the alarm
notification(s) will become active between ’22:00 and 23:59’. If motion is detected
during this time frame, an alarm notification will become active and this ‘event’ or
motion detection will be recorded.
10. Click ‘OK’.
11. Click ‘Apply’.
12. Click ‘OK’ at the ‘Successfully saved’ screen.
13. Click ‘Exit’ until you are at the main menu’.
If you want to use the ‘standard’ recording during a specified time, instead of recording
during an event, then select ‘None’ instead of ‘Alarm’. Only a recording will take place
the moment motion is detected.
18 | ENGLISH
8.0 Setting up an alarm notification
You can setup the surveillance recorder in such a way, an alarm notification will be
given at the same moment motion is detected. Also, you can setup the amount of time
this alarm notification will last. This alarm notification can be a buzzer (beeping
sound), e-mail, snapshot and an alarm output. Use the following steps to setup an
alarm notification.
8.1 Setting up an alarm notification during motion
detection
1. Make sure the surveillance recorder is completely started and you see the
surveillance recorder’s image on screen.
2. Click ‘Start’.
3. You need to login using an admin account. Fill out the password you have set
during the wizard and click ‘Login’ or do not fill out a password if you have not
used the wizard or if you do not have set a password and click ‘Login’.
4. Click ‘Advance’.
5. Click the ‘Settings’ field below ‘Trigger’.
6. Select the type of alarm notifications: You can choose between ‘Record’,
‘Snapshot’, ‘Send E-mail’ and ‘Alarm output’. You can also make an extra
selection at ‘Alarm output’. You can select a ‘Buzzer’ and the duration of this
‘Buzzer’ sound. For Example: Select ‘10s’ at ‘Buzzer’. This means a buzzing
sound will be heard during ten seconds if motion is detected. You can also set the
duration of the recording time if motion is detected at ‘Pre-record’ and ‘Post
record’ (‘Record’ needs to be enabled’.
7. Click ‘OK’.
8. Click ‘Apply’.
9. Click ‘OK’ at the ‘Successfully saved’ screen.
10. Click ‘Exit’ until you are at the main menu’.
8.2 Sending an email during alarm notification
Hint: It is also possible to setup the e-mail option using the web interface of the
recorder. Setting up the e-mail option using the web interface is usually faster and
easier. Once the settings have been saved using the web interface, the settings will be
saved to the surveillance recorder itself.
1. Make sure the surveillance recorder is completely started and you see the
surveillance recorder’s image on screen.
2. Click ‘Start’.
3. You need to login using an admin account. Fill out the password you have set
during the wizard and click ‘Login’ or do not fill out a password if you have not
used the wizard or if you do not have set a password and click ‘Login’.
4. Click ‘Advance’.
5. Click ‘Comm’.
19 | ENGLISH
6. Click ‘E-mail’.
7. Set ‘Email’ to ‘Enable’.
8. Select the interval time. For Example: ‘30s’. This means a snapshot of the camera
which detects motion detection, will be send to your e-mail address every 30
seconds.
9. Fill out your (provider’s) SMTP server at the ‘Mail server (SMTP)’ field.
10. Fill out the port number of your (provider’s) SMTP server at the ‘Port’ field.
Usually, port 25 is used. However, sometimes another port is used by certain mail
providers. For Example: Gmail uses port number 465 for SSL Authentication en
port number 587 for TLS Authentication. If you are not sure which port to use,
please refer to your mail provider.
11. If your mail provider uses security/authentication, you need to set the ‘Connection
security’ to ‘SSL/TLS’.
12. Fill out the username of your e-mail account at ‘User name’.
13. Fill out the password of your e-mail account at ‘Password’.
14. Fill out the recipients e-mail address at ‘To’. For Example: If you want to send an
alarm notification to your own e-mail address, you need to fill out your own e-mail
address at the ‘To’ field.(max. 30 characters).
15. Click ‘Apply’.
16. Click ‘OK’ at the ‘Successfully saved’ screen.
17. Click ‘Exit’ until you are at the main menu.
Hint: You can also setup an alarm notification in case of video loss. You can setup this
feature by clicking ‘Advance’ in the main menu. Click ‘Alarm’ and then click ‘Video
loss’. Here you can setup the alarm trigger(s) in case of video loss.
9.0 Control the recordings of the surveillance
recorder
When the surveillance recorder has recorded images, you can search and playback
these recordings. There are several manners to playback these recordings: You can
search for recordings made at a specific time and you can search for recordings made
during an event such as motion detection. You can make a backup of the recorded
files and transfer them to a USB memory stick. This is ideal when recorded files need
to be handed over to a qualified authority.
9.1 Searching for recordings at a specific time
1. Make sure the surveillance recorder is completely started and you see the
surveillance recorder’s image on screen.
2. Click ‘Start’.
3. You need to login using an admin account. Fill out the password you have set
during the wizard and click ‘Login’ or do not fill out a password if you have not
used the wizard or if you do not have set a password and click ‘Login’.
4. Click ‘Search’.
20 | ENGLISH
5. A new screen appears.
6. At the left side of the screen, you will see ‘Record type’.
7. If you want to search for a ‘normal’ recording which has been made on a specific
date, you need to set the ‘Record type’ to ‘Normal’. Also, select the date you want
to search on at the calendar which is shown at the upper left part of the screen.
8. Click ‘Search’ after which the ‘normal’ recordings of the chosen date will be shown
at the right part of the screen.
9. Double-click a specific recording, after which the recording will be played on
screen.
10. If you want to search for an ‘Alarm’ recording which has been made on a specific
date, you need to set the ‘Record type’ to ‘Alarm’. Also, select the date you want
to search on at the calendar which is shown at the upper left part of the screen.
11. Click ‘Search’ after which the ‘Alarm’ recordings of the chosen date will be shown
at the right part of the screen.
12. Double-click a specific recording, after which the recording will be played on
screen.
13. Right-click the mouse to return to the previous screen.
Note: If you want to make a backup of a recording, continue with chapter 9.2
Hint 1: You can also select the channel (CH). Each channel (CH) represents a
camera. If you only want to search for recordings which are made by a specific
camera, you need to deselect the other channels (CH) and only mark the channel
(CH) you want to use.
Hint 2: You can use the ‘Start time’ and ‘End time’ option to search for recordings
which are made between specific time frames.
9.2 Making a backup of a recording
The surveillance recorder is able to copy recordings to a USB memory stick by using
the surveillance recorder’s USB 2.0 port. This way, recorded files can be used as
evidence. Copying the recordings can take a while, depending on the size of the
recordings.
1. Place a USB memory stick in the USB 2.0 port of the surveillance recorder.
2. Once you have searched and found a recording you want to backup as shown in
chapter 9.1, you need to place a mark in the square in front of the specific
recording(s).
3. Then click ‘Backup’.
4. You will see an on screen notification ‘Backing up the data, please wait’.
5. As soon as the backup has been made, you will see the notification ‘Backup is
successful’.
6. Click ‘OK’.
7. You have now made a backup of the recording.
8. Right-click the mouse until you are at the main menu.
21 | ENGLISH
9. The file(s) from which you have just made a backup, are AVI files by default. This
means most capable media players are able to play these types of files.
10.0 Accessing the surveillance recorder
locally
You can view the live video of the surveillance recorder and change settings on your
Windows computer using Internet Explorer.
To be able to access the surveillance recorder using your computer, you need to
make sure the surveillance recorder is connected to your network.
1. Make sure the surveillance recorder is completely started and you see the
surveillance recorder’s image on screen.
2. Click ‘Start’.
3. You need to login using an admin account. Fill out the password you have set
during the wizard and click ‘Login’ or do not fill out a password if you have not
used the wizard or if you do not have set a password and click ‘Login’.
4. Click ‘Information’.
5. Click ‘Network’.
6. Check if the DVR has received an IP-Address, and check the ‘Web port’ number.
7. Open your computer’s web browser (Internet Explorer). If you are using Windows
Vista, Windows 7 or Windows 8, you need to right-click the ‘Internet Explorer’ icon
and choose ‘Run as Administrator’ after which the web browser will be opened.
8. Enter the IP-Address from the DVR in the address bar followed by the web port
number. For example, if the DVR has the IP address 192.168.1.120 and web port
number ’80’, you need to enter ‘http://192.168.1.120:80’ in the address bar.
9. Press the ‘Enter’ key on your keyboard to open the page.
10. You will now see a login page where you can enter your username and or
password. Fill out the password you have set during the wizard and click the
green arrow or press the ‘Enter’ key on your keyboard, or do not fill out a
password if you have not used the wizard or if you do not have set a password
and click the green arrow or press the ‘enter’ key on your keyboard.
11. It is possible an ActiveX component of Eminent Europe needs to be installed
before you can continue. Install this ActiveX component.
10.1 Take a snapshot using the web interface
1. Fill out the IP-Address of the surveillance recorder in the address bar of the web
browser and press the ‘Enter’ key. Or, fill out the IP-Address of the surveillance
recorder followed by the port number you have set. If you have port ‘85’ as ‘HTTP’
port, you need to fill out the IP-Address of the surveillance recorder followed by
the port number. For Example: http://192.168.1.25:85
2. You need to login using an admin account. Fill out the password you have set
during the wizard and click ‘Login’ or do not fill out a password if you have not
22 | ENGLISH
used the wizard or if you do not have set a password and click ‘Login.
3. Click the ‘Live View’ icon after which the live image(s) of the camera(s) will be
shown.
4. Click the ‘Capture’ button at the lower part of the screen after which the image will
be captured.
5. The captured image will be shown directly.
Hint: You can always view the captured images again. Click ‘Configure’ and copy the
‘Snap Path’ or write this path down. If you open your Windows Explorer (or Internet
Explorer) and then paste the path into the address bar, you will see a folder with the
name of the recorder’s IP-Address. Open this folder and then open the ‘Capture’
folder. After this, open the channel folder to view the image.
10.2 Recording using the web interface
You can also make a record and/or backup using the web interface of the surveillance
recorder. Use the following steps to do so:
Hint: In order to be able to make a recording using the web interface when using
Windows Vista, Windows 7 or Windows 8, you need to make sure you have started
Internet Explorer as ‘Administrator’. You need to right-click the ‘Internet Explorer’ icon
and choose ‘Run as Administrator’ after which the web browser will be opened.
1. Fill out the IP-Address of the surveillance recorder in the address bar of the web
browser and press the ‘Enter’ key. Or, fill out the IP-Address of the surveillance
recorder followed by the port number you have set. If you have port ‘85’ as ‘HTTP’
port, you need to fill out the IP-Address of the surveillance recorder followed by
the port number. For Example: http://192.168.1.25:85
2. You need to login using an admin account. Fill out the password you have set
during the wizard and click ‘Login’ or do not fill out a password if you have not
used the wizard or if you do not have set a password and click ‘Login.
3. Click the ‘Live View’ icon after which the live image(s) of the camera(s) will be
shown.
4. Click the ‘Rec’ button at the lower part of the screen after which the images will be
recorded.
5. Once you have recorded the images you want, click the ‘Rec’ button once more to
stop the recording.
Note: All available channels will be recorded once you click the ‘Record’ button.
Hint: It is possible to set a ‘sub stream’ and a ‘main stream’ recording. A ‘sub stream’
is a recording which will use less frames per second and uses a lower resolution,
which means the necessary amount of storage capacity is less compared to using a
‘main stream’ recording. A ‘main stream’ recording uses the regular resolution and
shows the images more fluently. Also, when using a smartphone to view the life
images, the ‘sub stream’ option will require less network capacity, since the resolution
23 | ENGLISH
and frames per second are lower. This way, the smartphone will be more capable to
show the life image. The ‘sub stream’ and ‘main stream’ options can be found at the
bottom of the page of the web interface.
10.3 Playback the recordings
Hint: Make sure you have installed the software as described in chapter 3.5.
1.
2.
3.
4.
5.
6.
7.
8.
9.
10.
11.
12.
13.
14.
15.
Make sure the web page of the surveillance recorder is still opened.
Click the ‘Configure’ button at the top of the screen.
Click ‘Local Settings’.
You will see a rule name which is named ‘Record Path’. Select and copy the text
which is shown at the text field behind ‘Record Path’, or write down this record
path.
Open the software you have installed in chapter 3.5.
Click the ‘Open’ button in the lower left part of the screen.
Click ‘Open File’.
Browse to the recorded file(s) using the path you have just copied or you have just
written down.
If correct, a folder which has the same name as the IP-Address of your
surveillance recorder will be shown.
Open this folder.
Open the ‘Record’ folder.
There are several new folders visible. Each folder represents a camera channel.
Open the correct folder.
You will see a file. This file is the recording you have just made.
Click this file after which the file will be played automatically.
Note: The supplied software is only intended to be used to view recordings made
using the web interface. This software is not able to convert the recorded files!
11.0 Accessing the surveillance recorder
externally and the use of DDNS
Sometimes, you cannot be on location, but you want to be able to continue monitoring
the spaces the surveillance recorder is watching. In that case you can access the
surveillance recorder using the Internet. In order to access the surveillance recorder
through the Internet, you need to know your (Internet) WAN IP-Address.
11.1 Accessing the surveillance recorder through the
Internet
You have to open or forward port 80 and 9000 in your router in order to access the
surveillance recorder through the Internet. Refer to the manual of your router how to
forward these ports.
24 | ENGLISH
Hint: Refer to chapter 12.2 for a detailed explanation how to open ports in an EM4571
wLINK 300 wireless N router.
Once you have made the correct settings, type the following to access the surveillance
recorder: http://12.34.56.78 (Where you have to fill out your WAN IP address on the
same spot as the numbers).
Note: If the ‘Web port’ number is different then port ‘80’, you need to forward this port
number instead of port ‘80’. For Example: If port number ‘85’ is set at ‘Web port’, you
need to forward port ‘85’.
Hint: In order to view your WAN IP address, type in your address bar the following:
www.eminent-online.com/ip
11.2 Using DDNS
Some ISP’s do change your WAN IP-Address once a month or even every week. In
that case, you are no longer able to access the surveillance recorder externally. In
such a case, the use of DDNS is the ideal solution: Thanks to DDNS you can access
the surveillance recorder externally, no matter if your WAN IP address has been
changed.
11.2.1 What is DDNS?
With the use of DDNS you can link a domain name to your WAN IP-Address
permanently, even if your WAN IP-Address has been changed. Without DDNS, you
would lose the connectivity with your network equipment the moment your WAN IPAddress has been changed.
A big advantage of using DDNS is the use of a fixed name, instead of the use of an
IP-Address. You only have to remember the self-created domain name instead of a
whole number sequence. Also, your network equipment will remain accessible, even if
your WAN IP-Address has been changed. The domain name, linked to the WAN IPAddress, will remain the same. This way, you will always be able to login if you have
an Internet connection available.
Hint: Create a DDNS account on: www.dyndns.org (Paid service) or create a DDNS
account on http://www.no-ip.com (Free service). There are many other DDNS services
which can be found using the internet.
11.2.2 Setting up DDNS in the surveillance recorder
1. Make sure the surveillance recorder is completely started and you see the
surveillance recorder’s image on screen.
2. Click ‘Start’.
3. You need to login using an admin account. Fill out the password you have set
during the wizard and click ‘Login’ or do not fill out a password if you have not
25 | ENGLISH
4.
5.
6.
7.
8.
9.
10.
11.
12.
11.
used the wizard or if you do not have set a password and click ‘Login’.
Click ‘Advance’.
Click ‘Comm’.
Set ‘DDNS’ to ‘Enable’.
Select your DDNS provider at ‘Server’.
Fill out your hostname or domain name at ‘Host name’.,
Fill out the username of your DDNS account at ‘User name’.
Fill out the password of your DDNS account at ‘Password’.
Click ‘Apply’.
Click ‘OK’ at the ‘Successfully saved’ screen.
Click ‘Exit’ until you are at the main menu.
Hint: If you have already setup a DDNS account in your router, there is no need to
setup a DDNS account in the surveillance recorder.
12.0 Playback images on your smartphone or
tablet
It is possible to view the camera’s images using your smartphone or tablet. Android
systems en iOS systems are supported by using specially designed Eminent Apps.
Android devices: Visit Google’s ‘Play Store’. Search “Eminent DVR” and install the
‘DVR’ App from Eminent.
IOS devices: Visit Apple’s ‘App Store’. Search “Eminent DVR” and install the ‘DVR’
App from Eminent.
12.1 Setting up the surveillance recorder for your
smartphone or tablet
1. Make sure the surveillance recorder is completely started and you see the
surveillance recorder’s image on screen.
2. Click ‘Start’.
3. You need to login using an admin account. Fill out the password you have set
during the wizard and click ‘Login’ or do not fill out a password if you have not
used the wizard or if you do not have set a password and click ‘Login’.
4. Click ‘Advance’.
5. Click ‘Network’.
6. Click ‘Port’.
7. You will see two port numbers which are listed at ‘Media port’ and ‘Web port’.
Write down these numbers. If the shown port numbers are already in use within
your network, you can click a port number and change the port number to another
port number.
Hint: The port numbers, specified at ‘Media port’ and ‘Web port’, need to be forwarded
in the firewall of your router. If you do not forward or open these ports, images cannot
26 | ENGLISH
be seen on your smartphone or tablet. Refer to the manual of your router how to open
ports. During the next chapter we will explain how to open ports on the EM4571
Gigabit 300N Router.
12.2 Port Forwarding on the EM4571 Gigabit 300N Router
Sometimes, opening ports in your router can be difficult. Therefore, we have created a
special chapter which explains how to open/forward the ‘Media port’ and ‘Web port’ in
the Eminent EM4571 Gigabit 300N Router.
Please note: If your router is from another type or brand, you need to refer to the
manual of your router. The following steps are purely intended as example:
1.
2.
3.
4.
5.
6.
7.
8.
9.
10.
11.
12.
13.
14.
15.
16.
Open your computer’s web browser (For example: Internet Explorer or Firefox).
Type ‘http://192.168.8.1’ in the address bar.
Press the ‘Enter’ key on your keyboard or click ‘Go to’.
Click ‘Setup Tool’.
You will now be asked for a ‘Username’ and a ‘Password’. Fill out ‘admin’ in the
‘Username’ field and ‘admin’ in the ‘Password’ field and press the ‘Enter’ key.
The main menu is shown.
Click ‘Advanced Setup’ in the left menu.
Click ‘Port Forwarding’ below ‘NAT/Routing’ in the left menu.
In the field ‘LAN IP-address’ you can fill out the IP-Address of the surveillance
recorder for which you want to open the specific port(s).
Select the correct protocol in the ‘Protocol’ field.
Fill out the necessary port numbers at the ‘External port’ field. Fill out the start or
begin port in the first field, in this case the ’Media port’ number. In the second field
you can fill out the end port, in this case the ’Media port’ number.
Fill out the same port number in the ’Internal Port’ field.
Fill out a name in the ‘Rule Name’ field. For Example: ’Smartphone’ or ‘Tablet’.
Click ‘Add’.
Click ‘Save’.
Repeat the same steps to forward the ‘Web port’ number.
12.3 Setting up your smartphone or tablet
The surveillance recorder can be used with smartphones or tablets which are using
the Android operating system or which are using the iOS operating system.
The following steps were done using a Samsung Galaxy S+ smart phone with
firmware version 2.3.5
1. Android devices: Visit Google’s ‘Play Store’. IOS devices: Visit Apple’s ‘App
Store’.
2. Search for the ‘DVR’ App from Eminent.
3. Download and install the App.
27 | ENGLISH
4.
5.
6.
7.
8.
9.
10.
11.
12.
13.
14.
15.
16.
Open the App.
Press ‘Device’.
Press ‘Add’.
Fill out a device name at the ‘device name’ field. For Example: ‘Surveillance
recorder’.
Fill out the IP-Address at the ‘IP’ field. If you are using the ‘DVR’ App locally, you
need to fill out the local IP-Address of the surveillance recorder. If you want to
access the surveillance recorder externally (using the internet), you need to fill out
the (Internet) WAN IP-Address of the location the surveillance recorder is located.
Fill out the ‘Media port’ number at the ‘Media Port’ field.
Fill out the ‘Web port’ number at the ‘Web Port’ field.
Fill out the surveillance recorder’s Administrator username if you want to login as
an Administrator at the ‘UserName’ field. Fill out the surveillance recorder’s User
username if you want to login as an normal user at the ‘UserName’ field.
Fill out the surveillance recorder’s Administrator password if you want to login as
an Administrator at the ‘password’ field. Fill out the surveillance recorder’s User
password if you want to login as an normal user at the ‘password’ field.
Set the amount of channels (camera connections) your surveillance recorder has.
Press the ‘Save’ button to save your configuration.
A settings overview appears with the name you have given at step 7. Press this
name to view the camera’s image.
Use the function buttons on the screen of your smartphone or tablet to start
recording images. Use the PTZ (if a PTZ camera is connected) functions to control
your PTZ camera.
13.0 Mounting a (new) hard disk
Some surveillance recorder kits are equipped with a hard disk, which should provide
enough storage capacity. But it can occur you want to replace the supplied hard disk
for a hard disk with a larger capacity. Also, some surveillance recorders are not
equipped with an internal hard disk which means you need to mount a hard disk. For
both scenarios, you can use the following steps:
1. Make sure the surveillance recorder is disconnected from the power grid and all
other cables are disconnected.
2. Remove the screws from the side of the casing. Also, you need to remove the
screws at the backside and side, which are holding the casing on its place.
3. Carefully lift the cover upwards.
4. You will now see the original hard disk if your surveillance recorder was supplied
with an internal hard disk. Remove the SATA cables form the hard disk and
remove the hard disk en remove the screws from the hard disk and then remove
the hard disk. If your surveillance recorder was not supplied with an internal hard
disk, you will see four mounting holes for an internal hard disk. Connect the new
hard disk using the SATA cables and carefully place the hard disk in the
28 | ENGLISH
5.
6.
7.
8.
9.
10.
11.
12.
13.
14.
15.
surveillance recorder. Make sure the hard disk is aligned with the four screw holes
and use the (supplied) screws to fix the hard disk.
Place the cover back onto the casing and tighten the screws again.
Connect al necessary cables and start the surveillance recorder.
Once the surveillance recorder has been started, click ‘Start’.
You need to login using an admin account. Fill out the password you have set
during the wizard and click ‘Login’ or do not fill out a password if you have not
used the wizard or if you do not have set a password and click ‘Login’.
Click ‘Disk’.
You will now see the status of the internal hard disk.
Place a mark at the ‘Format’ box.
Click ‘Format’.
Click ‘Yes’ at the ‘Are you sure you want to format this drive’ question after which
a ‘Formatting’ screen appears. Please be patient while the hard disk is being
formatted.
Click ‘OK’ at the ‘Formatting success!’ screen.
The internal hard disk is now ready to be used.
As long as the (new) hard disk has not been formatted using the menu of the
surveillance recorder, the surveillance recorder will make a beeping sound. This is an
indication the hard disk is not ready to be used.
14.0 IO connections
14.1 Sensor inputs (ALM IN)
The EM6104 and EM6108 have external alarm inputs. The EM6104 has four alarm
inputs and the EM6108 has eight alarm inputs.
Each alarm input can trigger a pre-programmed action. To setup the actions, please
go to the advanced settings menu of the surveillance recorder. Select the Alarm menu
and the Sensor tab.
Please select the type N/O (Normally Open). Now you can give each sensor a name.
On the schedule menu you can program when the sensor should trigger the
surveillance recorder.
In the settings menu you can select which actions should be executed when a sensor
is triggered.
Please follow below diagram to make the correct connections to the sensor inputs.
29 | ENGLISH
14.2 Alarm Output (relay)
When an alarm is triggered you can setup if the Alarm Output should be triggered.
When the Alarm Output is triggered the relay will be activated and the NO contact will
be connected by the relay to the COM contact.
The relay load is limited to 3A at 30V DC.
Please follow below diagram to make the correct connections for the Alarm Output.
30 | ENGLISH
15.0 Other functions
In the menu of the surveillance recorder, you will find a few functions which have not
been explained yet. In this chapter we will shortly explain these functions.
Main menu (default screen)
Auto Sequence:
This function is located in the main menu of the surveillance
recorder. By using this function, the surveillance recorder will use
all available channels and shows each channel separately on
screen. The surveillance recorder will switch to another channel
automatically. You can change the ‘Auto sequence’ settings if you
are logged in the main menu and then select
‘Basic Display Auto sequence’.
Main menu (When logged in)
Disk:
Here you can view the status of the built-in hard disk. You can
format the hard disk which is built-in the surveillance recorder.
You can also enable or disable the overwrite option, which is on
by default.
Information:
View the software status, MAC Address and serial number of the
surveillance recorder at ‘Device’. Also, the network data can be
shown at ‘Network’. At ‘Record’, you can see the amount of disk
space the recording (s) will consume per hour. Also, the
Resolution, Frame Rate and Quality are shown. Note: The higher
the Resolution, Frame Rate and Quality, the more disk space is
needed!
Maintenance:
Perform a firmware update, reset the device back to factory
defaults or restart the device.
Basic Display menu
Name:
It is possible to change the name of the camera channel which is
shown in the camera’s image. Go to ‘Basic Display’ and then
click the field below ‘Name’. You can now change the name of the
channel below ‘Name’. You can change the camera’s name for
each channel.
Time/Name OSD: It is possible to change the OSD text which is shown in the
camera’s image. Go to ‘Basic Display’ and then click settings
below ‘To/Name’. You can now change the position of the channel
number and date. You can also disable the OSD text.
31 | ENGLISH
16.0 Frequently Asked Questions and other
related information
The latest Frequently asked questions for your product can be found on the support
page of your product. Eminent will update these pages frequently to assure you have
the most recent information. Visit www.eminent-online.com for more information about
your product.
17.0 Service and support
This users manual has been carefully written by Eminent’s technical experts. If you
have problems installing or using the product, please fill out the support form at the
website www.eminent-online.com/support.
You can also contact us by phone. Below you will find a list with phone numbers for
each supported country.
Country
Belgium (Dutch)
Belgium (French)
Denmark
Finland
Germany
Italy
Norway
Spain
Sweden
The Netherlands
UK
Hungary
Hungary
Hungary
Phone number
070 277 286
070 277 286
+45 69918565
+35 8942415826
+49 (0)30 887 89 298
+39 0240042016
+47 21075033
807 080 042
+46 840 309985
0900-3646368
+44 (0)203 318 9998
1-4088902 (From Budapest)
06-1-4088902 (From the rest of
Hungary)
+36 1-4088902 (International)
Rate per minute*
€0.30
€0.30
Local Costs
Local Costs
Local Costs
Local Costs
Local Costs
€0.41
Local Costs
€0.10
Local Costs
Local Costs
Local Costs
Local Costs
32 | ENGLISH
18.0 Warning and points of attention
Due to laws, directives and regulations set out by the European parliament, some
(wireless) devices could be subject to limitations concerning its use in certain
European member states. In certain European member states the use of such devices
could be prohibited. Contact your (local) government for more information about this
limitations.
Always follow up the instructions in the manual*, especially where it concerns devices
which need to be assembled.
Warning: In most cases this concerns an electronic device. Wrong/improper use may
lead to (severe) injuries!
Repairing of the device should be done by qualified Eminent staff. The warranty
immediately voids when products have undergone self repair and/or by misuse. For
extended warranty conditions, please visit our website at www.eminentonline.com/warranty.
*Tip: Eminent manuals are written with great care. However, due to new technological
developments it can happen that a printed manual does not longer contain the most
recent information.
If you are experiencing any problems with the printed manual or you cannot find what
you are looking for, please always check our website www.eminent-online.com first for
the newest updated manual.
Also, you will find frequently asked questions in the FAQ section. It is highly
recommended to consult the FAQ section. Very often the answer to your questions will
be found here.
33 | ENGLISH
19.0 Warranty conditions
The five-year Eminent warranty applies to all Eminent products, unless mentioned
otherwise before or during the moment of purchase. After buying a second-hand
Eminent product the remaining period of warranty is measured from the moment of
purchase by the product’s initial owner. Eminent warranty applies to all Eminent
products and parts, indissolubly connected or mounted to the product it concerns.
Power supply adapters, batteries, antennas and all other products not directly
integrated in or connected to the main product or products of which, without
reasonable doubt, can be assumed that wear and tear during use will show a different
pattern than the main product, are not covered by the Eminent warranty. Products are
not covered by the Eminent warranty when exposed to incorrect/improper use,
external influences or when opening the service parts of the product by parties other
than Eminent. Eminent may use refurbished materials for repair or replacement of
your defective product. Eminent cannot be held responsible for changes in network
settings by internet providers. We cannot guarantee that the Eminent networking
product will keep working when settings are changed by the internet providers.
Eminent cannot guarantee the working of web services, apps and other third party
content that is available through Eminent products. Eminent products with an internal
hard disk have a limited warranty period of two years on the hard disk. Eminent could
not be held responsible for any data lost. Please make sure that if the product stores
data on a hard drive or other memory source, you will make a copy before you return
the product for repair.
When my product gets defective
Should you encounter a product rendered defective for reasons other than described
above: Please contact your point of purchase for taking care of your defective product.
EM6104R1-EM6108R1 | 05-2014