1
University of Aberdeen Computing Science
Project in E-Commerce Technology
Java 3D Car Shop (Report)
Feng Qi
th
5 September 2005
Supervisor: Dave Ritchie
Declaration
I declare that this document and the accompanying code have been
composed and designed by myself, and describe my own work, unless
otherwise acknowledged in the text. It has not been accepted in any previous
applications for a degree. All verbatim extracts have been distinguished by
quotation marks, and all sources of information have been specifically
acknowledged.
Feng Qi
3rd September 2005
MTP E-Commerce Technology
Department of Computing Science
University of Aberdeen
I
Acknowledgements
Firstly, I would like to thank my supervisor Dave Ritchie for his support and
assistance throughout the course of project. His help has greatly appreciated.
I also would like to thank all supervisors Involved with the E-Commerce MTP
in the Computing Science Department: Frank Guerin, Alun Preece, Bruce
Scharalu, Ehud Riter, Pete Edwards, and Tim Norman. Their courses gave me
a great help during the project developing process.
Finally, I would like to send my appreciation to my family, with my parents’
support I got this great chance to study in the UK.
II
Abstract
Java 3D is one of the most popular technologies used for developing 3D
applications on the internet. This project focuses on designing a 3D Shopping
scene for E-Commerce website and offering the consumers a more realistic
and enjoyable shopping experience on the internet. The JD Car Shop provides
a 3D shopping scene and an E-Commerce website that can accomplish
transactions online. This report is describing the developing process of the
system from each component of it.
III
Contents
Table of Contents
Declaration ······················································································I
Acknowledgements ········································································II
Abstract ·························································································III
Contents ······················································································· IV
1. Project Background ..........................................................................1
1.1. Project Introduction ····································································1
1.2. Motivation ··················································································2
1.2.1. Market Demand ............................................................................. 2
1.2.2. Technical Motivation ...................................................................... 2
1.3. Background Information·····························································3
1.3.1. Three-Dimensional World .............................................................. 3
1.3.2. Electronic Commerce with J2EE ................................................... 4
1.3.3. Automotive Industry ....................................................................... 5
1.4. Related Software and Technical Concepts ································5
1.4.1. Software ........................................................................................ 5
1.4.2. Concepts ....................................................................................... 6
2. Java 3D Design..................................................................................9
2.1. Java 3D Overview······································································9
2.1.1. Benefits to End Users .................................................................. 10
2.1.2. Java 3D Architecture.................................................................... 10
2.2. Car Loader Applets Design ······················································11
2.2.1. Source of the Car Models ............................................................ 12
2.2.2. Developing Process..................................................................... 12
2.3. Exhibition Hall Applet Design ···················································17
2.3.1. Scene Design .............................................................................. 17
2.3.2. Navigation Design ....................................................................... 19
2.3.3. Establish Scene ........................................................................... 25
2.3.4. Load Objects ............................................................................... 29
2.3.5. Decorate Scene........................................................................... 30
2.3.6. Light up the Scene....................................................................... 32
IV
3. E-Commerce Website Design ........................................................35
3.1. Overall Design ·········································································35
3.2. User Interface Design ······························································35
3.3. Database Design ·····································································37
3.4. Implantation of E-Commerce Website ·····································38
3.4.1. Framework Design ...................................................................... 39
3.4.2. Security........................................................................................ 41
3.4.3. Integrating with Applets................................................................ 43
4. Testing and Evaluation ...................................................................45
4.1. Testing Platform ·······································································45
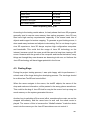
4.1.1. Hardware platform ....................................................................... 45
4.1.2. Software Platform ........................................................................ 46
4.2. Testing Results ········································································46
4.3. Finding Bugs············································································47
5. Discussion and Conclusion ...........................................................48
5.1. Discussion ···············································································48
5.2. Future Works ···········································································48
5.3. Conclusion ···············································································49
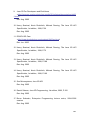
6. Bibliography ....................................................................................51
6.1. References ··············································································51
6.2. Web Source ·············································································53
Appendix
List of Figures
Figure 1: The components of project ·······························································8
Figure 2: Java 3D coordinate system ······························································9
Figure 3: Basic Java 3D scene graph structure ·············································10
Figure 4: Structure of car loader applet··························································13
Figure 5: Screenshot showing Car Loader Applet ·········································16
Figure 6: Sketch of the scene from the top side view ····································17
Figure 7: Basic structure of exhibition hall applet···········································18
Figure 8: Structure of the ViewBranch ···························································20
V
Figure 9: Screenshot showing Navigation Testing Applet ······························22
Figure 10: Coordinates of the building points ················································26
Figure 11: Sketch of the front wall from the front side view····························26
Figure 12: Sketch of the car model bulletin board ·········································31
Figure 13: Structure of the SceneBranch·······················································32
Figure 14: Final achievement of exhibition hall applet ···································34
Figure 15: The flow of shopping online ··························································35
Figure 16: Screenshot showing user interface design ···································37
Figure 17: Structure of the website ································································39
Figure 18: Mechanism of user account protection ·········································43
Figure 19: Screenshot showing Java 3D car shop ········································45
List of Tables
Table 1: Java 3D object hierarchy··································································11
Table 2: Navigation keyboard behaviors ························································22
Table 3: Attached person keyboard behaviors ···············································24
Table 4: Pillars’ information ············································································28
Table 5: Objects’ information··········································································30
Table 6: Structure of the database ·································································38
Table 7: Permissions of different user groups ················································41
Table 8: Expending time list ···········································································46
Table 9: Expending memory list ·····································································47
Appendix
1. User Manual
2. Maintenance Manual
VI
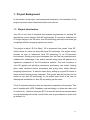
1. Project Background
In this section of the report, the background information, the motivation of the
project and some other related information are outlined.
1.1. Project Introduction
Java 3D is one kind of standard that enables programmers to develop 3D
applications on the internet. With 3D technologies, E-commerce websites are
no longer staying in the 2D world. Java 3D technology can help consumers get
completely different shopping experiences online.
The project is called “JD Car Shop”. JD is abstracted from words “Java 3D”,
which means an online car shop with Java 3D technology. The project mainly
focuses on how to implement Java 3D technology in an E-Commerce
environment. Getting some good examples from the real car manufacturers’
websites like Volkswagen1, the author decided using Java 3D applets as a
significant component of the E-Commerce website. The main functions of
Java 3D applets are attracting consumers purchasing cars online, helping
them make decisions before purchasing and giving them totally different
shopping experiences. To achieve these aims, setting up a good 3D scene to
demo products becomes very important. This project was the first time for the
author to use Java 3D technology, so the author spent most of his time on
learning the mechanism of Java 3D and setting up the scene.
The E-Commerce website is also an important component of the project. This
part is together with J2EE, Database, and web design, so there were also a lot
of works to do. However during the ECT courses the author has already learnt
enough knowledge about this, and this time was a good chance to review and
go deeper in it.
1
1.2. Motivation
As mentioned before the main task of this project is to develop an online
E-Commerce website for selling cars with Java 3D and J2EE technologies.
The motivations of the project are mainly come from two aspects:
1.2.1. Market Demand
There are more than 2.5 million cars sold in the UK each year, so the online
car shops are going to have a huge market and potential. The biggest
advantage of selling cars online is that it can greatly reduce the cost. The
online car shops can always offer much lower prices than the normal high
street car shops. Because they do not need to pay the salaries for staffs who
sell the cars, they do not need to pay for the fee of sorting the cars as well.
Selling cars online also can save consumers’ time, different from purchasing a
car in a store, all you have to do online is enter you credit card detail and wait
for the car coming to your house.
The traditional way to sell cars online is just pasting some photos on the
website and offering some technical details. However these are not always
enough for most customers, they desire more information about the products
before purchasing them. Java 3D offers a good solution for this, with Java 3D
technology, the customers can not only see how the cars look like but also can
feel how the real cars will be. So establishing an E-Commerce website with
Java 3D technology is the best way to attract customers purchasing cars
online.
1.2.2. Technical Motivation
Although Java 3D has many advantages for demonstrating products, it is not
widely used on the internet nowadays. Most of E-Commerce websites are still
using 2D images to show products especially in car area. There may be some
technical reasons, like Java 3D as 3D standard has not been widely accepted;
also to run a Java 3D application affluently users need to have some software
and hardware supports. So to build an integrated E-Commerce website with
2
Java 3D technology could be a very good attempt. Through this project we can
get some useful experiences on how to use Java 3D technology in a realistic
commercial domain. Also it will be helpful in the further use of Java 3D.
1.3. Background Information
1.3.1. Three-Dimensional World
Being different from the traditional two-dimensional (2D) images,the image
generated by three-dimensional (3D) technology is an optical illusion of depth
brought into appearance. 3D objects have volume and could be measured and
described using three orthogonal directions2. In a 2D world, using weight (X
axis) and height (Y axis) is enough to describe an object, however in a 3D
world, a new frame of reference Z axis, which is used to describe the depth of
the object, is brought into the system. Comparing with the 2D technology, 3D
technology offers more information about the describing objects and is more
similar to the realistic world.
3D technology is being used more and more widely in many areas in recent
years, for example, computer entertainment and demonstration of new
products. There are different industry standards in the 3D graph domain.
z
OpenGL: It is the dominant industry standard created by Silicon Graphics
(SGI). OpenGL was designed to be cross platform architecture and is
supported by a verity of operating systems, hardware providers and
applications. The application programming interface (API) of OpenGL is
written in the C programming language.
z
DirectX: Another industry standard developed by Microsoft. DirectX also
enables developers to write programs across hardware features without
knowing exactly the configuration of users’ systems3. Now DirectX is
packaged together with Microsoft’s Windows system and is widely
supported by many computer game providers.
z
Java 3D: A standard offered by Sun Microsystems. Java 3D is a
3
client-side Java API, so it allows developers to program 100 present in
Java. As a part of Java class libraries, Java 3D succeeds the advantages
of Java language, like Sun promises Write-Once-Run-Anywhere. Java 3D
especially suits for developing 3D applications on the internet and was
mainly applied in this project.
1.3.2. Electronic Commerce with J2EE
Electronic Commerce (E-Commerce) is any kind of transactions done partly or
completely over a network4. There are different kinds of models in
E-Commerce, such as business to business (B2B), business to consumer
(B2C) and business to employee (B2E) etc.
Even though E-Commerce is a quite new concept, scientists started
researching in this area in the late 70’s last century. The conduct of
E-Commerce was called EDI (Electronic Data Interchange), and was used to
transfer information such as prices, indents etc. between enterprises. EDI was
well developed in the 1980’s, and then in the 1990’s internet as a means for
commerce became a reality. This should thanks to the development of basic
internet facilities and the evolution of new types of computer languages and
databases. Due to its cheapness and speed, it is widely used by different kinds
of companies. Similarly, customers are starting preferring shopping on the
internet. This combination brought an E-Commerce explosion in the year 2000.
According to the Forrester Research’s data (http://www.forrester.com), till 2002,
the electronic commerce between enterprises was 327 billion US dollars.
The Java 2 Platform, Enterprise Edition (J2EE) defines the standard for
developing enterprise applications5. J2EE server is a platform which providers
data integrity, resource management and security for enterprise users. J2EE
allows enterprise users to set up their systems on the distributed systems. So
it is a good solution for enterprise users to set up their E-Commerce websites
on the internet.
4
1.3.3. Automotive Industry
Car has been invented for more than one hundred years. It has already gone
into everyone’s lives and brings huge benefits and conveniences for people.
There are more than 50 million cars made each year in the world. Even though
most of them are sold through traditional way, which is based on the high
street car shop, selling cars online has been noticed by many auto
manufacturers as a new effective method. Many of them have already set up
their online websites for selling cars. They also provide extra services like
finance suggestions or technical support online. Obviously selling cars online
is showing a big potential.
1.4. Related Software and Technical Concepts
To develop this project the author has used different kinds of software. A short
introduction of each type of software and explanation of some basic technical
concepts are going to be given.
1.4.1. Software
z
Eclipse: Eclipse is an open source platform for developing Java programs.
Eclipse was originally developed by IBM, but it is developed by the Eclipse
Foundation, which is an independent not-for-profit consortium of software
industry vendors, now. It is allows users to install different types of plug-in
from the third part, so it can be used for other types of client application as
well. Eclipse is a very popular IDE (Integrated Development Environments)
and is used by many of Java programmers. In this project, the author used
Eclipse to write most of Java code.
z
JBoss: JBoss is a J2EE certified platform for developing and deploying
enterprise Java applications, Web applications, and Portals6. JBoss is also
an open source software that allows users to free download from its
website.
z
MySQL: MySQL is the world most popular open source database. I used
5
MySQL to set up the database of the E-Commerce website which sorts the
orders’ users’ and cars’ information.
z
3ds Max: A 3D software package developed by Autodesk. With 3ds Max,
setting up 3D models, pasting texture for the objects become an easier
thing. However in this project I just used it to transform the format of 3D
files and past texture for them.
z
Lombozs: Lomboz is an eclipse plug-in for J2EE developers by extending
eclipse JDT. It employs some of the proven open-source technologies
such as: Jasper, XDoclet, Axis and Ant. Supporting the complete
development cycle: Code, deploy, test and debug7. With Lombozs’ help
the J2EE developers can generate some code automatically.
z
JVM, J2SE SDK & Java 3D API: These are the fundamental software for
developing this project. J2SE SDK is especially for the developers and if
you want to run the project properly you have to install JVM and Java 3D
API.
1.4.2. Concepts
In this part a few basic technical concepts will be explained. This may help you
get a better understanding when you read the parts that related to these
concepts.
z
Applet: Applet is a kind of program written in Java language than can be
used in html pages. Applets do not need server side support. It can be
executed in any type of browsers which have JVM installed.
z
Servlet: Servlet is container that deals with the users’ requirements and
sends the result back to the users through the JSP pages. Servlet can
communicate with http sessions and send data across beans.
z
EJB: Enterprise Java Bean is the sever side component architecture for
6
the Java 2 Platform. EJB is based on Java technology that enables J2EE
application running on a distributed system. There are two types of EJB
which are entity bean and session bean.
z
Java Script: JS is a new type of script language that can be embedded
into Html pages. JS can give some responses to the users’ behaviors such
as mouse or keyboard behaviors and make some dynamic effects.
z
JSP: JavaServer Pages has simplified the page and extension
development models with the introduction of a simple expression
language, tag files, and a simpler tag extension API, among other
features7. With JSP technology we can easily built our web interface that
integrates with J2EE.
z
CSS: Cascading Style Sheets is a simple mechanism for adding style to
Web documents. It could set the colour, front and format of the web pages.
The CSS file can be applied in JSP pages and keep the page in a uniform
appearance.
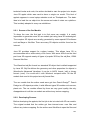
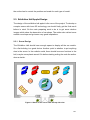
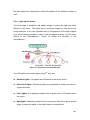
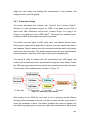
The components of the project are shown in Figure 1. In the following sections
the author is going to give more detail things about the project and explain the
developing process.
7
Figure 1: The components of project
8
2. Java 3D Design
Java 3D applets design is the core part of this project. In this section the
course of Java 3D applets design will be described from five key stages:
preparing work, scene design, implementation, execution and refinement.
Initially I supposed to have the Java 3D applets communicate with J2EE
Servlet, this means when a user click the product (Car model) the applet can
send data to the session and Servlet can process the users’ requirements from
the applets. After doing some researches in this part I found that there were
too many works involved in and it seemed impossible to achieve this aim in
allotted project time. So I decided to give it up and spent more time on setting
up the scene.
2.1. Java 3D Overview
“Java 3D is a network-centric, scene graph-based API, That revolutionizes 3D
graphics application development.”9 This is the Java 3D definition given by
Sun. Java 3D is a branch of desktop Java technology, however it is not
included in standard Java Virtual Machine (JVM) and Java Software
Development Kit (Java SDK), so if you intend to develop Java 3D applications
and run them properly you have to install Java 3D API as well.
Java 3D coordinate system is right handed. Its orientation semantics is that +Y
is the local gravitational up, +X is horizontal to the right, +Z is directly toward
the viewer (see Figure 2). The default unite is meter10.
+Y
+X
+Z
Figure 2: Java 3D coordinate system
9
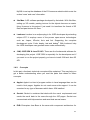
2.1.1. Benefits to End Users
Java 3D was designed with several goals in mind. The main advantage of
Java 3D is that Java 3D implementations can offer the very high level
performance to application users. Java is a high-level object-oriented
programming language. Java 3D as Java component extends this property, so
it enables developers to develop sophisticated applications and applets rapidly.
This can improve time to market. Performance scalability is also a point I want
to mention, with Java 3D technology applications and applets can well perform
on a wide range of hardware and there is no platform specific application
tuning required. In a word Java 3D is the best solution that we could find for
internet 3D graphic usage.
2.1.2. Java 3D Architecture
A 3D scene graph is consisted by a range of Java 3D objects which are called
nodes. They are arranged in a tree structure. So the Java 3D structure is quite
similar to a tree, there are root, branches and leaves. The Java 3D
components are represented as a tree. Figure 3 shows the structure of a
sample application:
Figure 3: Basic Java 3D scene graph structure
z
VirtualUniverse: VirtualUniverse object is like the root of a tree. It consists
10
of a list of Locale objects which contain a collection of scene graph nodes.
Normally there is only one VirtualUniverse object needed in an application.
z
Locale: Locale is like the trunk of a tree. It acts as a container for
collection of subgraphs of scene graph. A locale has no parent in the
scene graph and is rooted by BranchGroup nodes. It is implicitly attached
to a virtual universe when it is constructed.
z
BranchGroup: BranchGroup is the root of a subgraph of a scene that can
be compiled as a unit, attached to a virtual universe, or included as a child
of another subgrapgh.
z
TransformGroup:
TransformGroup
specifies
a
single
spatial
transformation, via a Transform3D object; it can position orient and scale
all of its children.
Table 1 shows the overall object hierarchy used by Java 3D, more detail for
specific portions of the hierarchy that involved in the project will be provided in
the following sections.
VirtualUniverse
Javax.media.j3d
Locale
View
PhysicalBody
Screen3D
Canvas 3D (extends awt.Canvas)
SceneGraphObjet
PhysicalEnvironment
Node
Group
Leaf
Java.vecmatch
Transform3D
NodeComponent
Matrix classes
Tuple classes
Table 1: Java 3D object hierarchy
2.2. Car Loader Applets Design
The design process is like climbing a mountain. We always start at a lower
level. This was the first time for the author to use Java 3D technology, so the
author did a lot of research works in this area. After reading some Java 3D
11
technical books and code, the author decided to start the project at a simple
Java 3D applet which was used to demo a single car model. This kind of
applets appears in some laptop websites such as Thinkpad.com. The basic
idea is to load the car object into the scene and make it rotate on a platform.
This is widely adopted in many car exhibitions.
2.2.1. Source of the Car Models
To demo the cars, the first task is to find some car models. It is nearly
impossible to generate some 3D car models just using Java 3D technologies.
The complex 3D objects are usually generated by some special 3D software
such as Maya or 3ds Max. There are many 3D objects could be found on the
internet.
Java 3D provides support for runtime loaders. This allows Java 3D to
accommodate with a wide variety of file forms. With some APIs from the third
part Java 3D supports nearly all types of popular 3D files, like obj files, VRML
files and 3ds files.
The Wavefront obj file format is a standard 3D object that is default supported
by Java 3D. Obj file defines the geometry and other properties for objects in
Wavefront's Advanced Visualizer. It can be in ASCII format (.obj) or binary
format (.mod). You could edit it with Window’s notepad editor. All the 3D
models that used in this project are obj format files.
The car models that the author used were got from Dosch Design11. Dosch
Design is a 3D objects provider, it sells different types 3D models such as cars,
plants etc. The car models offered by them are very good quality, the only
disappointment is all the car models are without any texture mapping.
2.2.2. Developing Process
Before developing the applets, the first job to do is to deal with 3D car models.
The original models that the author got from internet were .max files and
without any texture mapping. So the author used 3ds Max to open the files and
12
set material for the cars. The author had to set the colour and texture for each
part of the car, for example, the body of the car should be metal and choose
some bright colours like red or blue, the seats of the car should be leather with
black or brown colour. Then the author exported the objects as .obj files. There
were two files generated, one was .obj file sorting object information another
was .mtl file sorting texture information. To import the 3D objects with texture
information we should put these two files in the same root.
Then second job to do is draw a sketch for the applet. Because this is just a
simple applet to demo one car, the main objects in the scene are car model
object and platform.
The final job to do before developing applet is deciding the structure of the
applet. Java 3D is arranged as a tree. So deciding the structure for the graph
scene before programming obviously can save lots of time when you are
writing code. This is just a basic scene, so the author just wrote one class for it.
And as the beginning point the author used SimpleUniverse object instead of
VirtualUniverse object. Figure 4 shows the structure of car loader applet.
Figure 4: Structure of car loader applet
The difference between SimpleUniverse (SU) and VirtualUniverse (VU) is the
VU allows developers to have more flexibly than SU. The SU class hides some
13
of the complexity of manually defining the view side of the scene graph.
However if the scene is simple, using SU is a better choice, because many
proprieties of the scene have been set ready.
ObjectFile class offered by Sun Microsystems implements the Loader
interface for the Wavefront .obj file format. With this class the author can load
the car model into the scene. Java 3D API also offers some very good demo
programs to show how to use this class. So following the example the author
can simply achieve this.
The original size of the car model is not suitable. The author defined a new
TransformGroup as the parent of car loader TransformGroup. The author used
this node to control the scale of the car models. The child node of the car
loader TransformGroup is used to set up the platform. The author chose
cylinder that defined in “com.sun.j3d.utils.geometry” class to represent as the
platform, then past texture for it. The texture used is wood, because comparing
with other materials, it looks better.
To give user a better of view of the car model, it is good to add a rotation
behavior. In this case the user can check the car model from 360o. Using
“RotationInterpolator” object can achieve this function. This class extends
Interpolator. It modifies the rotational component of the target TransformGroup
by linearly interpolating between a pair of specified angles.
public
RotationInterpolator
(Alpha
alpha,
TransformGroup
target,
Transform3D
axisOfRotation, float minimumAngle, float maximumAngle)
Alpha value is mapped onto predefined behavior. Alpha class defines a
function that covers current time (in milli-seconds) to a value between 0 and 1.
-1 in alpha value means keep looping, the author used -1 as alpha value in this
applet to make sure the users got enough chances to see the car.
The target TransformGroup is objTrans which sorts the car model, the objcy
(platform) is child node of objTran, so this can make sure the car is rotating
14
together with the platform.
Setting up a background image for the applet is another job need to do. To
past a background image for the applet is much better than leaving it black.
The image was generated by “Fireworks” (It is software developed by
Macromedia that is used to generate images using on the internet). The
achieve method is using the “TextureLoader” method to load the image and
set it as background.
Adding some background music can offer users a better viewing experience
and make the applet become more attractive. Java 3D supports sound effect.
There are three types of sound models supported by Java 3D. They are:
z
Background Sound: It defines an unattenuated, nonspatialized sound
source that has no position and direction12. (the definitions blow are from
the same source)
z
Point Sound: The point sound node defines a spatially located sound
whose waves radiate uniformly in all directions from some point to space.
z
Cone Sound: It is one kind of point sound but the sound source is directed
along a specific vector in space.
The sound model the author used in this applet is background sound. The
Java 3D only support some formats of sound files such as .wav or .au., .mp3
and .midi files are not supported by Java 3D. The music used in this applet is
called “Children” which was created by Robert Miles. The rhythm of this music
is good for showing the cars.
To add sound effect in the scene, the first thing to do is setting a
“MediaContainer”, and then the sound node can be added to the
BranchGroup.
MediaContainer soundContainer = new MediaContainer(soundurl);
15
In some cases, for example the user is playing some other music, he may not
like applet to play sound. So adding a control function for switching off the
music is necessary here. The way is to add a sphere represent as the
controller, and add pick behavior to control whether playing music or not. In
order to give user a notice, the author also used the pick behavior to control
the appearance of the sphere. If the music is playing, the sphere is green; if
user clicks the sphere to stop the music, the appearance of sphere will change
to red. The user can resume playing music, if he clicks somewhere else.
The pick behavior extends “PickMouseBehavior”; actually it just depends on
the mouse behaviors. If the mouse clicks the target object the scene will be
updated. To control the sound node the author used “sound.setEnable()”
method. The default value of this is true, which means the music is being
played, if the user activates the pick behavior, the value will be set to false, the
music is stopped.
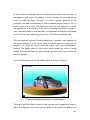
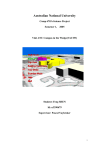
The final achievement of the car loader applet is shown in Figure 5.
Figure 5: Screenshot showing Car Loader Applet
The author got five different types of cars, and set up five applets for each of
them. The reason for this is because the sizes of car models are different, so
16
the author had to control the position and scale for each type of model.
2.3. Exhibition Hall Applet Design
The design of the exhibition hall applet is the core of the project. To develop a
complex scene with Java 3D technology, we should firstly get the final result
before in mind. So the main preparing work to do is to get some relation
images which show the decoration of car shops. The author also visited some
realistic car shops and got some very good inspirations.
2.3.1. Scene Design
The Exhibition Hall should have enough space to display all the car models.
So a flat building is a good choice. Another point is whether to put anything
else in the scene. In the realistic world, there should be some furniture in the
hall, may be some plants as well. So before starting writing the code the author
drew a sketch.
Figure 6: Sketch of the scene from the top side view
17
The sketch shown in Figure 6 is the design of scene. There are five different
models of cars displayed in the room. The blue rotundity that you see In the
middle of scene is a rotating platform. It is used to show the recommendation
car or the best selling car. You can also see two pillars in the room. I set up
these was from the architecture view, because the room is quite big so we
need two pillars here to share the weight of the ceiling. On the left side of the
scene there is a sofa, it is used to give customers a rest place, and you may
also see some plants in the scene, they are used to beautify the scene. On the
front side wall, there are doors and windows. So the scene is a typical car
shop. All these details made the scene similar to the realistic word.
Then the author designed the scene in Java 3D structure, the basic idea was
to classify the components of scene into different groups, for example, all the
car models, sofa, and plants are .obj files, and were put in one branch, this can
make the structure of scene much clearly and easy to manage.
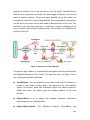
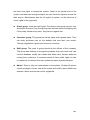
Figure 7 shows the basic structure of exhibition hall applet.
Figure 7: Basic structure of exhibition hall applet
There are six different branches under the locale object. Each of them is
represented as one type of scene component. The ViewBranch controls the
view of scene. The SceneBranch sets up the light and fog effects of the scene.
The RoomBranch sets up the room structure, such as ceiling, ground, walls
18
etc. The PillarBranch mainly sets up all the pillars of the room. The WallBranch
sets the front wall, it is set as an individual branch because the front wall has
the door and windows, and it is more complex than other walls in the room.
The ObjBranch is used to load all the 3D models into the scene.
2.3.2. Navigation Design
To give users exciting experiences during the shopping process, the
navigation function is very important in this project. Obviously the customers
should be enabled to navigate in the scene. Because the scene is a large
volume, which can not be shown in one screen, so in order to test the scene
appearance during the developing process the author need to develop the
navigation function first. The first step was to find some examples in this area,
Java 3D does offers a navigation function which is:
SimpleUniverse u = new SimpleUniverse(canvas);
TransformGroup vpTrans = u.getViewingPlatform().getViewPlatformTransform();
KeyNavigatorBehavior keybehavior = new KeyNavigatorBehavior (vpTrans);
keybehavior.setSchedulingBounds (bounds);
scene.addChild (keybehavior);
The “KeyNavigatorBehavior” enables users use keyboard to control the
camera position moving in the scene, however this class is not very suit for my
requirements. It is just a very simple class which is used in the SimpleUniverse.
The function of “KeyNavigatorBehavior” is also quite limited, for example, the
user can not control the moving speed and he can not attach anything else on
the view as well. So the author intended to design a method by himself.
The view class in Java 3D offers a camera-based view models, it is low level
APIs which gives developers control over all rendering parameters13. With the
view class and the KeyEvent class the author could set up the view model
which is needed. The basic theory is: the users’ keyboard behaviors are
listened in by keyEvent method, and then we can set different cases for the
different behaviors and calculate the position of view using Transform3D. After
19
getting the location of the view we can set it to the target TransformGroup.
With the view model we can render the result image according to the moving
state of camera position. There are many benefits using this model, for
example we could have more setting flexibility, the moving speed, staring point
can be set by our need, we can also attach a BranchGroup on the view. This
function is very important, because if a virtual user could be attached on the
view, it will be more similar to realistic world. The structure of ViewBranch is
shown in Figure 8:
Figure 8: Structure of the ViewBranch
Through the figure above, it is clear that the navigation function is achieved by
two keyboard behaviors: Cam_Trans_Turn and Cam_Rot_Up_Down. Here a
few of concepts should be declared:
z
ViewPlatform: The view platform is leaf node in the Java 3D structure; it
locates a view within a scene graph. The parents of the view platform
specify its location, scale and orientation within the virtual universe14.
Within this scene, the author gave the starting position of the view
platform.
z
PhysicalBody: It is an object that contains calibration information
describing the user’s physical body.
z
PhysicalEnvironment:
The
difference
between
PhysiclBody
and
20
PhysicalEnvironment is the PhysicalEnvironment is used to describing the
physical world.
z
Screen3D: Screen3D is an object that contains information describing the
display screen’s physical property. It provides a 3D version of the AWT
screen object.
The view object coordinates all aspects of the rendering process. It contains all
the parameters and references of objects, and it can determine how to display
scene image to the windows. All these four objects above are attached or set
to the view. The way is: Firstly, the author defined a float object “step”. It is the
moving size when the direction key is pressed. This can be used to control the
moving speed of camera position. When the key is pressed the two behaviors
class will be woke up. “switch … case” was used to define different types of
behaviors. In each case, it calculates a new Vector3f value, and sets this value
to the Transforms3D object, and then we can get the instantaneous position
information of the target TransformGroup. The following code shows how the
move forward position is calculated.
public TransformGroup target_TG;
private float step = 0.5f;
private Transform3D KeyNavTransf3D = new Transform3D();
private Transform3D trans_rot = new Transform3D();
public void processStimulus(Enumeration criteria) {
WakeupOnAWTEvent eventToWakeUp;
AWTEvent[] events;
if (criteria.hasMoreElements()) {
eventToWakeUp = (WakeupOnAWTEvent) criteria.nextElement();
events = eventToWakeUp.getAWTEvent();
keyEvent = (KeyEvent) events[0];
int keyCode = keyEvent.getKeyCode();
target_TG.getTransform(KeyNavTransf3D);
KeyNavTransf3D.get(translation);
switch (keyCode) {
case KeyEvent.VK_UP:
trans_rot.set(new Vector3f(0.0f, 0.0f, -step));
break;
default:
trans_rot.set(new Vector3f(0.0f, 0.0f, 0.0f));
}
21
KeyNavTransf3D.mul(trans_rot);
target_TG.setTransform(KeyNavTransf3D);
}
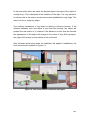
Because the navigation class was established before setting up the exhibition
hall scene, so a simple applet was written to test this method. The scene of
this applet is just some crossing lines, so the author could test whether the
navigation function works properly. The testing applet is shown in Figure 9:
Figure 9: Screenshot showing Navigation Testing Applet
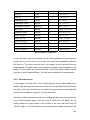
In the two behavior classes there are ten different behaviors are defined, six
translations and four rotations are included. These are all the possible
navigation behaviors. The behaviors are classified in the table 2:
Cam_Tran_Turn
Cam_Up_Down
Move Forward
Up Arrow
Move Backwards
Down Arrow
Move Up
Page Up
Move Down
Page Down
Turn Left
Right Left
Turn Right
Right Arrow
Move Side Wards Left
Shift + Left Arrow
Move Side Wards Right
Shift + Right Arrow
Rotate Up
Rotate Down
Home
End
Table 2: Navigation keyboard behaviors
When the defining key is pressed the camera position will do the
corresponding moving, and if the key is released the view will stop moving.
22
With these behaviors, the users can control the view navigate in the scene
freely. Another function the author intended to achieve was to attach a person
on the view, so when the camera position is changing the virtual person will
follow the camera position, it seems like the applet user is controlling the
person moving. In some aspects this is like a RPG (Role Play Game) game.
The way to attach a person on the view is to set an individual BranchGroup,
which is not belonging to the target TransformGroup. Therefore when the
camera position is changing, the view to the person will not be changed. This
is like the person always staying in the same position of the scene, so when
the scene graph is changed it looks like the user can control the person.
However there is a weakness to attach the person in this way. The navigation
function really is moving in the first person’s view. It is like your eyes moving in
the scene, but when a person is attached on the view, the user’s view is
changed to the third person’s view. The user is looking at the person moving.
This will cause the conflict of visual angle sometimes, especially when the
view is rotating or the view position is quite near to the objects. The scale of
the attached person related to the scene will become no sense at all. But in
some cases this would not cause serious problems. When the user is
navigating in the hall it looks acceptable.
The way to solve this problem is to allow users to detach the attached person.
This function is very necessary even through there is no visual angle
conflicting problem. Because when the applet’s users intend to check more
details of the products, the attached person will affect their view effect. So it is
good for users to remove the attached person in some cases. On the other
hand, with a person navigation in the scene can give users more realistic
feeling. The attached person can be a reference in some cases, for example,
when a user is checking a car; he possibly has no idea with the volume
concept of the car. It is very difficult for him to know the size of the car,
however if there is person in front of the car we can have an approximate
guess. Because we all know that a person is around 1.7 meter high. Having an
attached person in many cases can be very useful. So the attached person
should be allowed to add in the scene again after being removed.
23
Because the scene I am going to set up is quite similar to the realistic world, so
there is no scene to add two buttons on the screen to control weather detach
or add the attached person. The best way to do this is using keyboard
behaviors. When the user press a key the attached person will be detached or
added. This is very convenience for the users. The keyboard behaviors have
already been done during the developing process of navigation, so the author
did not need to design a new class for this. I added two new cases in the
“switch… case” method. The ① in figure 8 is showing this relation.
Cam_Tran_Turn
Detach User
Delete
Add User Again
Insert
Table 3: Attached person keyboard behaviors
Because
the
attached
person
is
the
child
node
“Rot_Up_Down”
TransformGroup, so to detach or add user is to add or remove a BranchGroup
node from TransformGroup. Java 3D allows developers to do this with “TG.
addChild (BG)” or “TG.removeChild (BG)”. To achieve this, the capability of
TransformGroup and BranchGroup should be set fist.
UserBranch.setCapability(BranchGroup.ALLOW_DETACH) //attached person branch
TG_Rot.setCapability(TransformGroup.ALLOW_CHILDREN_READ);
TG_Rot.resetGroup.setCapability(TransformGroup.ALLOW_CHILDREN_WRITE);
TG_Rot.resetGroup.setCapability(TransformGroup.ALLOW_CHILDREN_EXTEND);
The child and parents branch should be in the same class, so I wrote the
“Cam_Trans_Turn” class as an inner class of the ViewBranch class. The finial
performance is exactly match what I wanted.
The last aspect of navigation function is resetting the camera position,
because the scene to set up is very large, the applet’s users will get lost
sometimes. If the camera position can be reset, this will not be a problem any
more. The author designed this function together with the attached person. If
the user clicks the attached person, then the view will be reset.
24
The method to achieve is adding pick behavior in user BranchGroup, when the
system detect the mouse clicking on the bound of attached person, then set a
new Transform3D value to TransformGroup, then camera position will be reset
to the starting point.
The navigation function designed is fitted for the requirements. During the
establishing scene process we can test the result with the navigation function.
2.3.3. Establish Scene
After having navigation function, the establishing scene process can be started.
The fist thing has to be thought about is the size of the scene. The default unit
of Java 3D is meter, here the author was not just following the default unit.
Because the attached person will be used as a reference, the author decided
the screen size first then scaled the attached person in a sensible size, finally
established the size of the scene according to the attached person.
The attached person’s height according to the Java 3D scale is 3 meters,
however the real height of the person should be 1.7 meters, so the unit in the
applet’s scene world be 3/1.7 = 1.8 meter, this means the one meter in Java
3D world change to the applet’s scene is 0.6 meter. The volume of the building
to establish is 100*10*30 in Java 3D unit. Changing to the realistic world the
size should approximately be 60*6*18.
After deciding the scale of the scene, the author could decide the location of
the building in the scene. Eight points can be arranged to six sides, the six
sides can buildup a cube. The building to design can be considered as a cube
in some aspects. The fist job to do is decided the location of these eight points.
The figure 10 shows the coordinates of these points.
25
Figure 10: Coordinates of the building points
After setting the coordinates of these points, the author could start establishing
the car shop. The first step was to set up two sides to represent the building,
the starting job is always difficult, the author used “QuadArray” object to the
array of vertices as individual quadrilaterals. Then set this QuadArray as a
Shape 3D node, and added it to the Room BranchGroup. The first two sides
established are ground and back side walls. Then the author could use
navigation function to walk in the scene and test weather the size of building is
big enough.
After this, it is ready to design the other walls, the left and right side walls are
the same as the ground and back side walls, however the front side wall is
different from them. The front wall will include the windows and door, so the
author set up a separate BranchGroup for the front side wall. The sketch of
front side wall is shown in Figure 11.
Figure 11: Sketch of the front wall from the front side view
The Wall BranchGroup includes the four windows, four podiums and a door.
The author used “QuadArray” to represent as windows, here the appearances
of the windows should be set to transparency, Java 3D allows developer to set
26
transparency attributes. The sample code is showing below:
Appearance app = new Appearance();
TransparencyAttributes ta = new TransparencyAttributes();
ta.setTransparencyMode(ta.BLENDED);
ta.setTransparency(0.6f); //set transparency value
app.setTransparencyAttributes(ta);
With the method above, the windows were established ready there. The
author used some very thin cubes to represent the podiums. The door is more
complex than other components of the front side wall. Like most of realistic car
shops, the author intended to establish a glass door for the building. The door
is not a single object. It is composed by six different parts. They are left side
door panel (main body of the door), door handle and a bar used to separate
the door. On the right side part, the door has same components. The door
should be opened, so there is an angle between two sides of the door, they
are vertical to each other.
The scene outside the building should also be considered. The author was not
just set up a single building for selling cars, but intended to set a complete
scene in a virtual world. So the outside view should also be similar to the
realistic world, however it does not need to be too complex. The outside scene
designed is a piece of lawn and a road onside it. With these, the scene is more
similar to the real world.
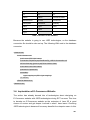
The Final components of the basic scene are the pillars. There are eight pillars
in the scene. Two of them are inside the building; the others are on the front
side wall. The author used boxes and cylinders in the “j3d.utils” class to
represent the pillars. The table 4 shows the type and location information of
pillars.
27
Name of the pillars
Type
Size
Coordinates
Left_inside
Cylinder
π * 1.0 * 10.0
-20.0f, 0.0f, 0.0f
Right_inside
Cylinder
π * 1.0 * 10.0
20.0f, 0.0f, 0.0f
Left_to_Right_wall_A
Box
1.2 * 10.0 * 1.2
-40.0f, 0.0f, 15.0f
Left_to_Right_wall_B
Box
1.2 * 10 .0* 1.2
-25.0f, 0.0f, 15.0f
Left_to_Right_wall_C
Box
1.2 * 10 .0* 1.2
-10.0f, 0.0f, 15.0f
Left_to_Right_wall_D
Box
1.2 * 10 .0* 1.2
10.0f, 0.0f, 15.0f
Left_to_Right_wall_E
Box
1.2 * 10 .0* 1.2
25.0f, 0.0f, 15.0f
Left_to_Right_wall_F
Box
1.2 * 10 .0* 1.2
40.0f, 0.0f, 15.0f
Table 4: Pillars’ information
For each pillar the author set up a new TransformGroup and used Tnasform3D
object to set the location information, and then added all these
TransformGroups to the root object of the pillar BranchGroup.
Therefore it is clear that the basic scene is composed by “RoomBranch”,
“WallBranch” and “PillarBranch”. After getting the basic scene, the next step to
achieve is pasting the texture for the objects. Whether the textures are good or
not will determine the final appearance of the whole scene.
The first step of pasting texture process is looking for some examples of the
real buildings, and find out which materials they usually use. For example,
metal, marble, glass or tiles. Then decide which materials are going to be used
for this scene. Most of the materials were found on the Internet, and some of
them were made by digital camera. The way to past texture for the object is
very simple, first the Java 3D will load the texture then set it to the appearance
of the object. Here is a piece of sample code that shows how to past texture:
Appearance app = new Appearance();
TextureLoader tex = new TextureLoader(new java.net.URL(“path of the image”), null);
app.setTexture(tex.getTexture());
The way of past texture for a plane is a little different from the way of objects;
we should set the “PolygonAttributes” for the appearance first.
28
After all these works being done, the basic scene was established. It is a
building stand tall and upright on a big lawn.
2.3.4. Load Objects
The next task to take is loading all the necessary objects into the scene. As
mentioned in the car loader applet design process, Java 3D support *.obj 3D
models. For this applet, the author wrote a class for loading objects. It is a
BranchGroup, when this class is called by other classes, the only thing need to
do is passing the path information of 3D file to this class, then 3D object files
are loaded into the scene, this makes the loading process much easier.
There are thirteen 3D objects have been loaded into the scene. Three lamps
and three plants are using the same model, so there are nine different 3D
models used in this scene.
The main jobs to do in this part are setting the position of the objects and
controlling the scale of them. The original objects are not in the same scale,
some of them are very large however some of them are very small. The way to
control the scale of them is similar to the “PillarBranch”, the author set up a
new TransformGroup for each single object, and use Tansform3D to set the
position and scale of them. The table 5 shows the related information of the
objects.
29
Object Name
Load File
Scale
Coordinates
Audi_A4
A4.obj
4
-35f, -3.8f, -7f
Audi_TT
TT.obj
4
-15f, -3.6f, -7f
Volkswagen_Golf
Golf.obj
3.5
0f, -3.3f, 0f
Volkswagen_Borat
Bora.obj
4
15f, -3.7f, -7f
Volkswagen_Passat
Passat.obj
4
35f, -3.8f, -7f
Sofa_Left
Sofa.obj
3
-43.5f, -4.15f, 9.5f
Reception_Desk
Desk.obj
3.5
0.0f, -3.67f, -11f
Plant_in_Right
Plant.obj
1
45f, -4f, 13f
Plant_out_Left
Plant.obj
1
-5.0f, -4f, 20.0f
Plant_out_Right
Plant.obj
1
5.0f, -4f, 20.0f
Lamp_top_Left
Light.obj
1.2
-35.0f, 4.8f, 0.0f
Lamp_top_Middle
Light.obj
1.2
0.0f, 4.8f, 0.0f
Lamp_top_Right
Light.obj
1.2
35.0f, 4.8f, 0.0f
Table 5: Objects’ information
In the real word, most of car shops have a rotating platform to demo the best
selling car or the new car. In this scene, the author also intended to achieve
this function. The way to achieve this in this applet is quite similar to the car
loader applet; the author also used a cylinder to represent as the platform, and
added it to the demo car TransformGroup. Finally the author added rotation
behavior in this TransformGroup. The final result matches the requirements.
2.3.5. Decorate Scene
In this stage, the main work to do is perfecting the scene, and adding some
details. This will make the scene more similar to the real. Mainly the author did
two jobs in this step, the first one is to add the shop’s name on front side wall
and add the companies’ logos on the back side wall.
Obviously, when a person access to a building the first thing comes into his
eyes is the building’s name. This car shop is called “JD Car Shop”, so the
author added the shop’s name in the middle of the front wall with Java 3D
“Text3D” object. “A Text3D object is a text string that has been converted to 3D
30
geometry15.” The text string object determines the content to be written, and
“Front3D” object describes the front style of the text string. Also there should
be some notice information on the reception place. “Welcome” on the back
side wall was also using “Text 3D” object.
All the cars sold in the shop are from two different manufacturers Audi and
Volkswagen. It can be a good idea to hang their logos on the back side wall. I
used “QuadArray” object here, and past their logos as the textures. The
appearance of this is quite similar to the real world.
Another point is also the most important job in this stage. When customers are
navigating the scene, they can see different models of car, but most of them
may not know what model the car is. It is quite necessary to set up an object to
show the car models’ information. To achieve this aim, the author designed a
bulletin board. The sketch of the design is showing in Figure 12.
Figure 12: Sketch of the car model bulletin board
The Part A is a board which is used to show the car model’s information. “Box”
object is used to represent as the board. The Part B is a bar linking Part A and
Part C together, here the author used “Cylinder” to represent this. The Part C
is the bottom of this bulletin board. It was also used “Cylinder” to represent.
The information on the Part A is using “Text2D” object. Like most of bulletin
boards in the real world, metal texture is used for this object. The most difficult
part of this is to calculate the position of each part. The author established five
31
this kind objects for showing the model information of five different models of
cars.
2.3.6. Light up the Scene
The final stage of exhibition hall applet design is setting the light and other
effects for the scene. The lights have a profound impact on how the scene
finally looks like. It is a very important topic in 3D graphics. So the light of lights
is at end of design process in order to test the applet properly. I set all these
effects in the “SenceBranch”. Figure 13 shows the structure of the
SenceBranch.
Figure 13: Structure of the SceneBranch
Java 3D defines four basic types of light16, they are:
z
Ambient lights: It is applied and influence to the whole scene.
z
Directional lights: Directional lights are positioned at infinity and shine in
a given direction.
z
Point lights: It is radiating outward from a given point in 3D space within
the scene.
z
Spotlights: Radiating outward from a given point and with a given spread
angle, to allow the width of the light’s beam to be specified.
32
The first three types of the lights were used in this applet. In the real world, the
sunlight is main source of the light. The author intended to set up sunlight in
the scene, therefore a yellow sphere is established to represent as the sun,
and then used the point light as the sunlight. The lamp-house of the point light
is the location of the sun. With the point light we can see the intensity of light
changing on the objects. However using point light is not enough to emblaze
the whole scene, so the ambient light is also necessary here. Because in the
real world, the sunlight is strong enough to radiating the whole earth, however
in the java 3D world, the point light can only radiating part of the scene. Using
ambient light the whole scene is lighted. To get the perfect result, the
directional lights are also necessary. I used them to control the balance of
lighting effect.
To set the lights for the scene, the first thing to know is the light properties. The
light node has a set of different parameters. It includes light colour, light source,
position, direction, and Influencing Bounds. Light colour is defined by the term
of the red, blue and green. For example, the sunlight is white; it is composed
by these three basic colours with the maximum value. Each of the three
colours is represented by a floating point value that ranges from 0.0 to 1.0.
(0.0f, 0.0f, 0.0f) is black, (1.0f, 1.0f, 1.0f) is white. With the light colour the
intensity of lights can be controlled.
The course of setting up the lights for the scene was keep trying different
values of the light properties and testing them with the scene. Then found out
which kind of setting could get the best appearance. This cost long time and
need some patience; however the final result was acceptable. I got the light
changing on the object when the view is moving.
The author also set the background of the scene in this branch. The
background here is represented as the sky. So we just need to set one colour
for the background. The colour was from a digital photograph. The author
picked the colour attributes of the sky in the photo, and set this colour as the
background of scene. It looks naturally.
33
In the real world, when we watch the beyond object, the edge of the object is
usually blurry. This is because of the limitation of the sight. It is very attractive
to achieve this in this scene, because the scene established is very large. The
way to do this is using fog object.
The working mechanism of fog object is setting a influence bounds, if the
distance between view and object is less then this bounds, the object will
present the real colour of it, however if the distance is more than the bounds
the appearance of the object will change to the colour of fog. With fog object,
the edge of the scene is more similar to the real world.
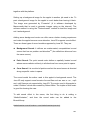
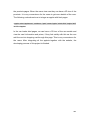
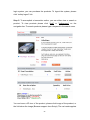
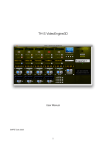
After all these works being done, the exhibition hall applet is established, the
final achievement is shown in Figure 14:
Figure 14: Final achievement of exhibition hall applet
34
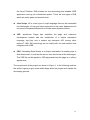
3. E-Commerce Website Design
One purpose of this project is using Java 3D technologies in the realistic
E-Commerce environment. Therefore developing a typical E-Commerce
website is an important component of this project. In this section the process
of developing back end website with J2EE technologies is described.
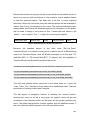
3.1. Overall Design
To develop an E-Commerce website, the whole shopping process should be
made certain first. When the customers access to the website, what they
should do and which functions are necessary to accomplish a transaction are
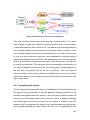
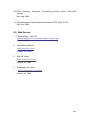
the things to identify. The figure 15 shows the flow of shopping online.
Figure 15: The flow of shopping online
Figure 15 clearly shows the entire key steps when a consumer shopping on
the internet. To build up the website, the main tasks are from three aspects:
user interface design, database design and implementation with J2EE
technologies.
3.2. User Interface Design
When a user access to a website, the first thing comes into his eyes is the
front page. To catch a customer’s attention and make him stay longer in your
35
website, the UI design is an essential element.
To design a website, the first step is to design the template for the website.
The author divided the page into three different parts. They are header, footer
and main body. The header is used to show the website’s name, logo and
navigation bar. All the copyright information is stored in the footer part. The
main body includes three parts: left, middle and right. The login form is laid on
the left. Products and account information are showing in the middle. The right
side part is used to control the different screen resolutions. The author
intended to give the best appearance for all kind different users, so different
screen resolution should be thought about.
The next step is choosing the colours for the website. My point of view is using
some bright colour to attract the customers; however the main function of the
web pages is showing information, so the body part should be white, because
white is the best colour for showing information. The colours of fronts should
also be thought about. Black was used for most of fronts. For some very detail
parts, the author chose the colours depended the personal feeling.
The style of web page wanted is bright, simple and tiny. So there is no
unnecessary information on the page. The author used “CSS” to control the
format of the pages. I set up a “CSS” file and using it to store all the fronts and
colours information. With “CSS” technologies all the web pages are appeared
in a uniform style.
The UI design is designing a web page in html format. During the design
process the author mainly used two softwares: “Dreamweaver” and
“Fireworks”. Both of them are developed by Macromedia. With “Dreamweaver”,
developers could generate many html codes automatically. For example w
“Dreamweaver” can generate the tables which are used most frequently
elements in html pages without actually writing any html code. This can
increase my working efficiency. “Fireworks” can generate some web format
images in an easy way. To decorate a web page, you may need to put some
images, using “Fireworks” you can save lots of time.
36
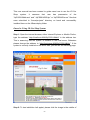
The design of UI is using tables to divide the page into different parts and set
the text and images in the right places. There is not a strict rule to define which
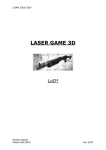
way is the best. It mostly depends on the personal feeling and interests. Figure
16 shows the UI design for JD Car Shop.
Figure 16: Screenshot showing user interface design
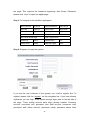
3.3. Database Design
Database stores all the products, customers and orders information. It likes
human’s memory. For this E-Commerce websites, the author designed three
tables for storing these threes types of information, all the data are stored in
MySQL database. Table 6 shows the structure of database.
37
Products
Users
Orders
ID
ID
ID
Name
Name
Customer Name
Manufacturer
E-mail
Product ID
Description
Password
Quantity
Data
Type
Cost
Price
State
Type
Table 6: Structure of the database
Because the website is going to use J2EE technologies, so the database
connection file should be also set up. The following XML code is the database
connector.
<datasources>
<local-tx-datasource>
<jndi-name>fqiDS</jndi-name>
<connection-url>jdbc:mysql://localhost/fqi_cs5914</connection-url>
<driver-class>org.gjt.mm.mysql.Driver</driver-class>
<user-name>root</user-name>
<password></password>
<metadata>
<type-mapping>mySQL</type-mapping>
</metadata>
</local-tx-datasource>
</datasources>
3.4. Implantation of E-Commerce Website
The author has already learned lots of technologies about designing an
E-Commerce website with J2EE technologies during ECT courses. This time
to develop an E-Commerce website as the extension of Java 3D is good
chance to review and get deeper involved in what I have learnt. Choosing
J2EE technologies is because it has many benefits for enterprise users. In this
38
stage the main tasks are finishing the development of the website and
integrate it with Java 3D applets.
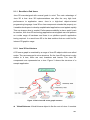
3.4.1. Framework Design
The author developed the website with “Xdoclet” and “Lomboz Plug-in”.
Xdoclet is a code generation engine for J2EE; it can parse source files to
derive with XML description and source. Lomboz Plug-in is a plug-in for
Eclipse. It can deal with many J2EE tasks17. With these two assistant tools,
coding with J2EE technologies becomes much easier.
The author used two types of EJB: entity bean and stateful session bean.
Entity beans represent the application’s objects; they can operate the data in
the database. Session beans deal with conversational state while entity beans
entity beans hold the data. The stateful session bean will keep data between
client accesses18. Java bean was used to develop the shopping cart.
The servlet is used to dealing with the requirement from JSP pages and
contact with session bean then operate data through the entity beans. Finally
the JSP pages get responses from servlet and present them to the end-users.
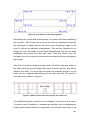
The structure of the website frame is shown in Figure 17:
Figure 17: Structure of the website
After setting up the EJBs the next work to do is designing servlet. Before
deciding all the necessary functions, we have to make use how many kinds of
users are necessary to have. The author classified the users of website into
four different groups: guest, consumers, staffs and administrators. Each group
39
has their own rights to access the system. Guest is the lowest level of the
system, and when the level goes higher the user has more rights to access the
data source. Administrator has the full rights of system, so the structure of
users’ rights is like a pyramid.
z
Guest group: It has the least rights. The users in this group can just view
and search the cars. Even though they can add cars into the shopping cart,
if they really intend to buy them, they have to register first.
z
Customer group: This group has all the rights which guests have. They
can really purchase cars on the website and view their own orders.
Through registration a guest can become a customer.
z
Staff group: The users in group should be the officers of the company.
This group has authority to mange the products; they can insert new cars
into the database, modify cars’ details and delete cars. Actually staffs are
coming from customers, if someone intends to have staffs’ rights, he has
to register as a customer first then update his status by administrators.
z
Admin: There is only one administrator in the system. He has full system
control privileges. He can view all the orders and modify users’ details and
statuses. Admin account can not be registered.
40
Status
GUEST
CUSTOMER
STAFF
ADMIN
Actions
View products
r
r
r
r
Search products
r
r
r
r
Shopping cart
rw
rw
rw
rw
Hand in orders
─
r w (own)
r w (own)
r(all)
View orders
─
r
r
r
Modify password
─
w
w
w
Modify products
─
─
rw
rw
Insert products
─
─
w
w
Delete products
─
─
w
w
Modify users
─
─
─
rw
*(r) permission to read
(w) permission to write
w (own)
(-) no access at all
Table 7: Permissions of different user groups
Table 7 shows the key functions of the website. All these functions are
operating the database in the end. The basic mechanism is when a user login
the system, the system reads the database and checks the user’s password
and status. If all the information is correctly matched, then set user’s
information into session; otherwise deny user accessing into the system. Each
time when the user sends an action to the system, the system uses session to
check if the user has this permission. If so operate the database and
accomplish the user’s requirement, if not send error information back to the
user. The access control policy for JD Car Shop is suite for many similar B2C
E-Commerce websites.
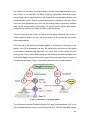
3.4.2. Security
Selling products online, the security issue is always an important topic.
Protecting the consumers’ private information properly can win the consumers’
trust and attract them coming back again. The main security functions that
implemented on the JD Car Shop are encrypting and login policy. To
accurately identify a consumer’s statue is the first aim to achieve.
41
To identify a customer, there are variety ways, e.g. passwords, digital
certificates or biometrics. The way JD Car shop using is passwords validate.
The advance of password is under most circumstances people are in
completely control the information that keep in their head19. However keeping
secret is not a easy job, we get many things to remember everyday and the
easiest way to remember password is to make it something we have already
remembered, so many customers choose their birthdays or pets’ names as
passwords. This is horrible for the websites, because they have responsibility
to keep customers’ information security. Therefore set up a password policy is
very necessarily for the websites. However if the password policy is too
complex, websites will lost some potential customers. More than 80% people
will leave the website after failing to register three times. (Because their
confirm password is not the same as password) How to set up a password
policy make password neither too easy to gust nor too hard to remember is
important for websites. To present users choosing an unsafe password, I
designed a password policy for the website. The user makes sure his
password at least includes one number, one lowercase, one uppercase and
length of password must between 6 and 18. Otherwise he can not successfully
register.
After user choosing a legal password, the website should protect the password
safety. So encrypting the passwords is also very important. JD Car Shop is
using SHA-1 to encrypt the passwords.
To present users’ password being checked by others, the login policy should
also be notices. The way I protect user’s account is defining an account state.
The state is including open, close and locked. The relationship of them is
shown in Figure 18.
42
Figure 18: Mechanism of user account protection
This case actually checks user’s state and login system actions, If a user’s
state is open, he gets five change to login the system, after five times failure
system will locked the user’s account up, if the hacker keep cracking password
even thought he gets the correct password, the system will not let him in, so he
can not know weather he get the correct password or not, If the real user want
to login the system he has to type the correct password in another machine
(different IP address) in the first time, if the password is correct, the system will
let him in and tells him someone was trying to crack his account, and ask him
to modify the password. The real user will not be annoyed by the system, he
can use his features normally, however if the user typed a wrong password in
the first time, the system will not let him in anymore. This could prevent
hackers cracking locked user’s password. If administrators found an account
kept being cracked, he could close the account. So system will not let this user
login in any cases.
3.4.3. Integrating with Applets
The final step of developing this project is integrating E-Commerce with Java
3D applets. The main function of Java 3D applets is showing products, so the
exhibition hall applet should be shown in the front page. However when the
users open the front page, they intend to see the content of page immediately
but loading applet will cost some time. So my solution is offering a Java 3D
image on the front page and the visitors could view the applet through the link.
The car loader applets are used to demo the cars, so I integrated them with
43
the products pages. When the users view cars they can have a 3D tour of the
products. It is very convenience for the users to get more details of the cars.
The following code shows how to integer an applet with html pages.
<applet code="appletname" codebase ="path" name="applet" width="800" height="600"
id="id"></applet>
In the car loader html pages, we can have a 3D tour of the car models and
view the cars’ information and prices, if they feel satisfy with this car the can
add the car into shopping cart through this page. This is very convenience for
the users. After integrating all the applets together with the website, the
developing process of this project is finished.
44
4. Testing and Evaluation
After almost all the designed functions achieved, the next step is to test the
system. In this section the author will test and evaluate the system, and find
out if the system is working properly. The final achievement of this project is
shown in Figure 19.
Figure 19: Screenshot showing Java 3D car shop
4.1. Testing Platform
The testing platform is author’s own laptop and system. (IBM T40 – 76C)
4.1.1. Hardware platform
Intel Centrino™ 1.5GHz CPU;
512 DDR RAM;
ATI Radeon 7500 Graphic Card with 32MB Ram;
SoundMax Compatible Audio Card;
45
40GB hard-disk;
A Compatible Mouse.
4.1.2. Software Platform
Windows XP Professional with SP2;
Internet Explorer 6.0
JVM (Java Virtual Machine) 1.4.2_05
J2SE SDK 1.4.2_05;
Java 3D for Windows (OpenGL Version) SDK for the JDK (includes Runtime) 1.3.1;
MySQL;
Apache-ant-1.6.2;
Lomboz plug-in for Eclipse and Xdoclet 1.2.2;
Eclipse 3.0;
JBoss 4.0.0.
4.2. Testing Results
All the designed functions are running correctly, the main testing aspects are
expending time and memory. Table 8 and Table 9 show the testing results.
Testing Items
Expending time
Building Ear file with Eclipse
52 seconds
Building Jar file with Eclipse
2 seconds
Building War file with Eclipse
16 seconds
Loading JBoss Server
25 seconds
Loading Exhibition hall applet
38 seconds
Loading Car Loader applets
2 seconds
Table 8: Expending time list
46
Testing Items
Expending memory
JBoss Sever
85,664KB
JSP Pages
12,152KB
Exhibition hall applet
148,416KB
Car Loader applets
66,828KB
Table 9: Expending memory list
According to the testing results above, it clearly shows that Java 3D programs
generally tend to require more memory than native programs. Java 3D can
also have high memory requirements, especially if the scene loads lots of
objects and images for texture mapping. To generate a good looking scene, it
does need many textures and objects to decorating. So it is not cheap to get a
nice 3D experience, Java 3D always requires high configuration computers
and bandwidth. This could limit the usage of Java 3D technology on the
internet, because not all the users would like spend a long time viewing a 3D
scene. However with the growth of the computer and internet industries, many
things we through they were dreams are becoming truth now, so I believe the
Java 3D technology will have bigger potential in the future.
4.3. Finding Bugs
During the project testing process, I was quite happy with its performance. I
solved most of the bugs during the developing process. The two bugs should
be outlined are Text3D and sound effect.
When the users navigate in the scene, the text3D objects, the name of the
shop and welcome information, will be pasted in the wrong places sometimes.
This could be the bug of Java 3D itself or may be the scene I set up using too
much memory so the system generates this error.
Another bug is switching off the sound effort, sometimes the music can not be
stopped immediately, and the users have to wait until the whole music is
played. The reason of this is because the “MediaContainer” loads the whole
music into the memory so the Java 3D sometimes can not control it.
47
5. Discussion and Conclusion
5.1. Discussion
The purpose of the MSc project is to undertake a substantial programming
project and draw many skills that related to the taught part of the MSc
programme. Java 3D technology is starting being used in some E-Commerce
websites. Its advantages show a good prospect for using it with E-Commerce.
Java 3D obviously has many advantages on developing 3D applications on
the internet, however it has many limitations. The biggest weakness of Java
3D is comparing with other 3D standers Java 3D is not very efficiency. For
example, when you run a Java 3D application with the same scene, it will cost
several times more memory than you run an application written with OpenGL.
This is because Java is one kind of high-level developing language. Also Java
3D is not mature enough, it still has many bugs that haven’t been solved.
The initial project proposal is to offer customers a more realistic and enjoyable
shopping experience and allow them to work through a 3D virtual shop and
examine virtual 3D products before making a purchase. In this aspect I think
the final achievement was a success. I have got the virtual shop scene and
most functions that I assumed was accomplished in the end. The final
appearance of the scene is acceptable.
5.2. Future Works
Even through this project has been finished in an acceptable level; there are
still some aspects could be developed in the future. The main aspect about the
Java 3D scene is the collision detecting. With this function the virtual world will
be more similar to the real word. However according to the time reason, I can
not get involved into this. The scene I have now the view of user can cross the
wall, therefore collision detecting is worth to achieve.
Another point is applets communicate with servlet. This was a function I
48
intended to achieve. The applets I am using in this project are mainly for
showing products. They are not integrating very close with the website. So if
the applets can communicate with servlet or pass data to the session, they can
become more useful. However after doing some researches on this part I
noticed that it was not that easy to achieve, because the applets are not
running on the server. For the security reasons, Java limits the applets’
communication ability. So the applets can only communicate with servlet in a
very complex way and this is not my major research aspect, so finally I gave
up this idea.
The applets used in this project are website based, but at the end of this
project I got an interesting idea, because the loading applets will cost a long
time and users may not want to wait on the internet. It may be a good idea to
design a client side java 3D application. This can also use the same scene and
models but not based on the website. The users can download the application
to their local systems, and run the application if they intend to buy a car they
can hand in an order through the application. The application generates an
encrypted XML file storing the user’s personal detail and order information.
Then the application sends this file to the company’s server through SOAP or
Web Service. I got this idea too late in the project, so I have no time to achieve,
however this could be very interesting to implement in the future.
5.3. Conclusion
This was the first time that I had coded with Java 3D. I had a lot of fun during
the course of developing. Especially when I designed the 3D scene, it liked
you build a building by yourself. To test how to make Java 3D technology work
together with E-Commerce website was also interesting. It was a useful
attempt for the future usage of Java 3D technology.
During the course of developing project, I have learnt the mechanism of how
Java 3D working, especially the architecture of Java 3D. The biggest harvest I
got from the course of doing this project is I improved my problem solving
ability. Because I had never used Java 3D before, newly all the things were
49
new for me. For example, when I installed Java 3D SDK on my laptop, it did
not work at all. This annoyed me nearly one week, finally I found that Java 3D
only could work on my machine with a special version of graph card driver.
Also during the coding process I learnt lots of data structure and 3D design
knowledge, Java 3D has many its own data types and deigning a 3D scene is
quite different from drawing a 2D picture, you have to think about the light,
scale, coordinate and how to navigate in the scene. The most thing important
thing is: I think this project is good starting point for me to use CG (Computer
Graphics).
The final achievement is better than I assumed. At the beginning of this project
I found some Java 3D example applications, most of them are very simple.
They are far from what we supposed a 3D world should be. Java 3D seems
weak at setting up 3D scene. So the main job I intended to do was setting up a
good virtual 3D shopping scene, I found many good 3D models and used all
the necessary Java 3D knowledge to assemble them into a 3D scene. The
final appearance of the 3D scene is good. All the necessary functions for
navigating in the scene have been achieved. Also I designed more than one
Java 3D applets. I think these 3D applets can give customer a big help for
making a purchase decision. During the developing process I used many
aspects of Java 3D technology, suck as light, fog, sound, behaviors, etc. So I
am quite confident with my technologies with Java 3D now. Also the develop
process of E-Commerce website is well accomplished. The website has all the
necessary functions and security protection of customer’s information. With
this website, the customer can accomplish a transaction online.
Overall, this project offers an E-Commerce environment using Java 3D
technologies. The Java 3D scene has been set up and can help user make a
purchase decision. And the website has all the necessary features to
accomplish a transaction. The final achievement was good.
50
6. Bibliography
6.1. References
1. New Passat Saloon 360O Interior
<http://volkswagen.co.uk/new_cars/passat_saloon/360>
Rev. Aug. 2005
2. 3-D
<http://en.wikipedia.org/wiki/3d>
Rev. Aug. 2005
3. What is DirectX
<http://www.webopedia.com/TERM/D/DirectX.html>
Rev. Aug. 2005
4. Frank Guerin, Introduction To Electronic Commerce Technology lecture
notes, 2004-2005 session
Rev. Aug. 2005
5. Java 2 Platform Enterprise Edition
<http://java.sun.com/j2ee/index.jsp>
Rev. Aug. 2005
6. JBoss Application Server
<http://www.jboss.com/products/jbossas>
Rev. Aug. 2005
7. Home of Lomboz
<http://www.objectlearn.com/index.jsp>
Rev. Aug. 2005
8. JavaServer Pages Technology
<http://java.sun.com/products/jsp/>
Rev. Aug. 2005
51
9. Java 3D For Developers and End-Users
<http://java.sun.com/products/java-media/3D/collateral/presentation/sld00
3.html>
Rev. Aug. 2005
10. Henry Sowizral, Kevin Rushforth, Michael Deering, The Java 3D API
Specification, 1st edition, 1998, P.26
Rev. Aug. 2005
11. DOSCH 3D Cars
<http://www.doschdesign.com/products/3d/Cars.html>
Rev. Jun. 2005
12. Henry Sowizral, Kevin Rushforth, Michael Deering, The Java 3D API
Specification, 1st edition, 1998, P.72
Rev. Aug. 2005
13. Henry Sowizral, Kevin Rushforth, Michael Deering, The Java 3D API
Specification, 1st edition, 1998, P.188
Rev. Aug. 2005
14. Henry Sowizral, Kevin Rushforth, Michael Deering, The Java 3D API
Specification, 1st edition, 1998, P.190
Rev. Aug. 2005
15. Sun Microsystems, Java 3D API
Rev. Aug. 2005
16. Daniel Selman, Java 3D Programming, 1st edition, 2002, P.150
Rev. Aug. 2005
17. Bruce Scharalu, Enterprise Programming lecture notes, 2004-2005
session
Rev. Aug. 2005
52
18. Bruce Scharalu, Enterprise Programming lecture notes, 2004-2005
session
Rev. Aug. 2005
19. Jason Albanese, Network Security Illustrated. PDF, 2004, P.129.
Rev. Dec. 2004
6.2. Web Source
1. Personal Blog – Java 3D
<http://spaces.msn.com/members/qfds/?mkt=en-gb>
Set. Jun. 2005
2. Java Official Website
<http://java.sun.com/>
Access. Jun. 2005
3. Audi UK Home
<http://www.audi.co.uk/>
Access. Jul. 2005
4. Volkswagen UK Home
<http://volkswagen.co.uk/home>
Access. Jul. 2005
53
User Manual
This user manual has been created to guide users how to use the JD Car
Shop
system.
It
assumes
that
user
has
possession
of
the
“fqiCS5914Web.war” and ” fqiCS5914EJB.jar” or “fqiCS5914Ear.ear” files that
were submitted to “/home/projects” directory on hawk and successfully
installed them on the JBoss deploy folder.
Guard to Using JD Car Shop System
Step 1: Open the internet browser, either Internet Explorer or Mozilla Firefox,
type the address “http://localhost:8080/fqiCS5914Web/” in the address bar.
This is assuming that the system is installed in the local sever, Otherwise
please change the address to “http://hostname:8080/fqiCS5914Web/”. If the
system is correctly installed on the sever side, you will see the following page.
Step 2: To load exhibition hall applet, please click the image in the middle of
-1-
the page. This requires the browsers supporting Java Script. Otherwise,
please click “room” to open the applet page.
Step 3: To navigate in the exhibition hall applet:
Move Forward
Up Arrow
Move Backwards
Down Arrow
Move Up
Page Up
Move Down
Page Down
Turn Left
Right Left
Turn Right
Right Arrow
Move Side Wards Left
Shift + Left Arrow
Move Side Wards Right
Shift + Right Arrow
Rotate Up
Home
Rotate Down
End
Detach User
Delete
Add User Again
Insert
Step 4: Register or Login the system:
If you are the new customer of the system, you need to register first. To
register, please click the “register” on the navigation bar. If you have already
registered, you can login in the system through login area on the left side of
the page. Three testing account have been already created. Customer
account: username: test, password: test; Staff account: username: staff,
password: staff; Admin account: username: admin, password: admin. After
-2-
login system, you can purchase the products. To logout the system, please
click “safety logout” link.
Step 5: To accomplish a transaction online, you can either view or search a
product. To view products please click “Audi” or “Volkswagen” on the
navigation bar. To search products please type a keyword in the search area.
You can have a 3D tour of the product, please click image of the product, or
the link below the image (Browser support Java Script). The car loader applets
-3-
will play music, to switch off the music, please click the green ball on the left
bottom side of the applets. If you feel satisfy with the products, please enter
the quantity you intend to buy, and then press “Add to cart” button. The
products are added into shopping car. If there are no mistakes, press ”Submit”
button to hand in the order, or “Remove” button delete the products from your
shopping cart. If you intend to buy more products, press “Continue”.
Step 6: The users of the system could check their account information. They
can modify their passwords and check their orders history. If the users’
statuses are staff or admin, they could modify delete or insert products. If the
user’s status is admin, he could modify users’ statuses and information. The
admin has privilege to view all the orders.
-4-
Maintenance Manual
This maintenance manual is guide for both users and developers to install the
JD Car Shop on their system. It also provides the description of system files
for the future development. All the files mentioned in this document are based
on the project software submission.
System Dependencies
Recommend hardware configuration:
To glidingly running this program, I suggest you hardware system should be:
Intel Pentium 4 2G or higher processor, 512M Ram, 200M of available
hard-disk space, independent 3D graphic card with 32M RAM, a mouse.
Software requirements:
Operating System: Windows XP with SP2
For Users: JVM (Java Virtual Machine) 1.4.2_05, Java 3D for Windows
(OpenGL Version) Runtime for the JRE 1.3.1, Internet Browser.
For Developers: J2SE SDK 1.4.2_05, Java 3D for Windows (OpenGL Version)
SDK for the JDK (includes Runtime) 1.3.1, MySQL, apache-ant-1.6.2, Lomboz
plug-in for Eclipse, Xdoclet 1.2.2, Eclipse 3.0, JBoss 4.0.0.
Please check the libraries path of your system, and make sure all the required
software are correctly installed. Here is an example showing how to set
libraries configuration.
CLASSPATH:
.;C:\JAVA\j2sdk1.4.2_05\lib\tools.jar;C:\JAVA\j2sdk1.4.2_05\lib\dt.jar;
C:\java\mysql-connector-java-3.0.15-ga\mysql-connector-java-3.0.15-ga-bin.jar;
PATH:
C:\JAVA\j2sdk1.4.2_05\bin;C:\JAVA\mysql\bin;
C:\JAVA\apache-ant-1.6.2\bin;C:\JAVA\jboss-4.0.0\bin;
-1-
JAVA_HOME C:\JAVA\j2sdk1.4.2_05
JBOSS_HOME C:\JAVA\jboss-4.0.0
XDOCLET_HOME C:\JAVA\xdoclet-1.2.2
Guard to Installing JD Car Shop System
Step 1: Set up Database, Please copy the “fqi_cs5914” folder which is under
“Database” folder to “${MySQL}/data/” folder. Or you can use phpMyAdmin’s
import function to import “fqi_cs5914.sql” file into the database.
Step2: Linking database please copy the database connection file “fqi-ds.xml”
to
the
JBoss
deploy
folder
which
should
be
"${jboss.home}/server/default/deploy/”.
Step3: Setting up sever side configuration, please copy “fqiCS5914Ear.ear”
(only this single file) or “fqiCS5914Web.war and fqiCS5914EJB.jar” (make
sure
these
two
files
copy
together), to the JBoss deploy folder
(${jboss.home}/server/default/deploy/).
Step4: Run JBoss.
To import source of the project into Eclipse, please import the “fqi_CS5914”
folder into Eclipse. Then run the “build.xml” under the root. Please notice that,
you may need to change the path of “jboss.home” to where you installed your
JBoss. All the configuration works have already been done If the build file does
not work please try to build .war and .jar separately and make sure you have
correctly install ant.
Please notice that if you can not build the file correctly you may need to open
the
“build.properties”
files
“../fqi_CS5914/fqiCS5914Web/WEB-INF/”,
“../fqi_CS5914/fqiCS5914EJB/META-INF/”
-2-
which
are
under
and ”../fqi_CS5914/fqiCS5914Ear/META-INF/” folders, and change the path to
your system’s configuration.
List of Source Code Files
File Name:
Description
Type
CarLoder_A4.java
CarLoder_Bora.java
Car models loader applet for loading each single car.
A
Audi.java
Generate Audi logo to decorate the exhibition hall applet
A
Back.java
Set up the back wall of hall building
A
Bottom.java
Generate a bottom line for decorating the scene
A
Cam_Rot_Up_Down.java
Camera position rotating up and down behavior
A
Front.java
Set up the front wall of hall building
A
Ground.java
Set up the floor of the hall building
A
Land.java
Set up the ground outside the hall building
A
Left.java
Set up the left side wall of the hall building
A
Main.java
Exhibition hall applet
A
ObjBranch.java
Load and set position of the .obj files
A
ObjFile.java
Load object files
A
PillarBranch.java
Generate and set location of pillars of the hall building
A
Right.java
Set up the right side wall of the hall building
A
Road.java
Set up the road outside the hall building
A
RoomBranch.java
Room branch of the scene
A
SceneBranch.java
Set up the light, fog and background effects for the scene
A
Top.java
Set up the ceiling of the hall building
A
ViewBranch.java
Set up view and navigation behaviors.
A
Vw.java
Generate Volkswagen logo to decorate the exhibition hall applet
A
WallBranch.java
Front wall of the exhibition all building
A
Windows.java
Set up windows for the front wall
A
FqiCartBean.java
Java bean for the shopping cart usage
W
CarLoder_Golf.java
CarLoder_Passat.java
CarLoder_TT.java
-3-
FqiOrdersBean.java
Entity bean for database orders table
W
FqiProductsBean.java
Entity bean for database products table
W
FqiUsersBean.java
Entity bean for database users table
W
FqiViewBean.java
Session bean
W
FqiServlet.java
Servlet of the website
W
fqi.css
Css file set the fonts and style of pages
W
allorders.jsp
List all the orders
W
allProducts.jsp
List all the products
W
applet.jsp
Loading car loader applet
W
cart.jsp
Shopping cart
W
checkout.jsp
Confirm order
W
detail.jsp
Show the detail of products
W
error.jsp
Show error information to users
W
footer.jsp
Footer of the pages
W
header.jsp
Header of the pages
W
index.jsp
Front page of the website
W
insert.jsp
Inset a new product into database
W
list.jsp
List products by type
W
load.jsp
Loading exhibition hall applet
W
modify.jsp
Modify products’ details
W
order.jsp
Showing the detail of the order
W
password.jsp
Changing user’s password
W
reg.jsp
Registration page
W
room.jsp
Exhibition hall applet
W
search.jsp
Showing search results
W
success.jsp
Showing success information to users
W
userlist.jsp
List all the users’ details
W
welcome.jsp
Showing user’s account information
W
*(A) Applet files
(w) website files
-4-