1
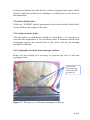
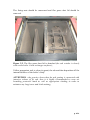
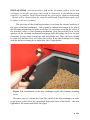
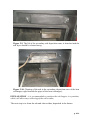
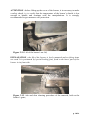
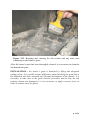
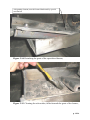
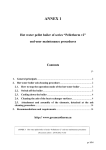
ANNEX 1
Hot water pellet boiler “ERATO Pelletherm 30 v2”
end-user maintenance procedures
Contents
стр.
1. General principals ........................................................................................ 2
2. Hot water boiler ash cleaning procedure ................................................... 2
2.1.
How to stop the operation mode of the hot water boiler ................... 2
2.2.
Switch off the boiler............................................................................... 3
2.3.
Cooling down the boiler ........................................................................ 3
2.4.
Cleaning the ash of the heat exchanger surfaces................................ 3
2.5. Attachment and assembly of the elements, detached at the ash
cleaning procedure......................................................................................... 13
3. Recommendations and requirements ....................................................... 14
http://www.erato.bg
ANNEX 1 Hot water pellet boiler “ERATO Pelletherm 30 v2” end-user maintenance procedures
(Document edition : 31.08.2010 15:55)
p. 1/14
1. General principals
The fuel of the hot water pellet boiler “ERATO Pelletherm 30 v2” is
wood pellets (or any other, verified and described in the user manual of the
boiler) and the residual of the combustion process is mineral ash. The quantity
of the ash depends on the fuel mineral mass content, i.e. fuel’s quality. The
practice shows that main part of the ash residue is collected in the ash hopper of
the boiler, however ash is deposited on the heat exchanging surfaces as well and
other surfaces that are in direct contact with the flue gases (the burner, the flue
gas fan, etc).
The ash residue quantity, collected in the main ash hopper (positioned in
the combustion chamber) should be cleared periodically, considering the
operating mode of the boiler as well as the fuel quality.
The practice shows that according to the ash in that hopper should be
cleaned (thrown away) periodically – between one and five days (the fuel should
cover the requirements, depicted in the user manual of the boiler).
It is advisable to clean the convective part of the heat exchanger – by
utilizing the applied the specialized lever – it should be plugged in the profiled
orifice and swing the lever in both direction several times (which actually will
activate the semi-mechanized cleaning system of the boiler).
The total ash cleaning procedure should be performed once per month –
advisably , but not more that two months period of hot water boiler’s operation.
The period between ash cleaning of the boiler should be clarified at practice, as
it depends mainly on the fuel quality.
2. Hot water boiler ash cleaning procedure
ATTENTION – it is strongly recommended to have self protection – utilize
gloves, protection glassed and appropriate clothing, as the risk of injuries is
high at high temperatures of the surfaces in the combustion chamber of the unit.
The following sections will describe the cleaning ash cleaning procedures in
details.
2.1. How to stop the operation mode of the hot water boiler
The nominal operation of the boiler should be stopped by switching off the
“START” signal by switching off the START/STOP switch, positioned on
the control board of the boiler (in principal one could turn the boiler off by
adjusting set-point of the operating thermostat of the boiler to the minimum
p. 2/14
position) and should wait until the fuel, which is burning in the burner will be
entirely combusted and the heat exchanger is cooled down to safe levels of
the temperature;
2.2. Switch off the boiler
Utilize the “POWER” switch (positioned on the control board of the boiler)
to turn off the power supply of the unit;
2.3. Cooling down the boiler
After the boiler is switched off it should be cooled down – it is necessary to
wait until the temperature of the circulating water is moderate and the heat
exchanging surfaces are cooled down to safe levels and the ash cleaning
procedure could start.
2.4. Cleaning the ash of the heat exchanger surfaces
Before the ash cleaning it is necessary to open the top cover of the heat
exchanger body.
Unscrew the
fixing nuts and
remove the flue
gas duct lid
Figure 2.1. The top cover of the heat exchanger is lifted up.
p. 3/14
The fixing nuts should be unscrewed and flue gases duct lid should be
removed.
Figure 2.2. The flue gases duct lid is detached (the ash residue is clearly
seen on the boiler’s heat exchanger surfaces);
Utilize appropriate tool to clean (to grate) the ash and char deposition off the
internal surfaces of the boiler’s body.
ATTENTION : the practice shows that the ash grating is connected with
intensive release of fly ash, thus it is highly recommended to wear air
breathing protective mask as well as appropriate clothing in order to
minimize any lung issues and cloth staining;
p. 4/14
Figure 2.3. Ash deposits cleaning;
Figure 2.4. Brushing the ash layer of the heat exchanger surfaces;
The next step of the cleaning procedure is to clean the ash deposits on the
third part of the flue gases duct of the boiler.
p. 5/14
Figure 2.5. Cleaning the ash deposits off the heat exchanger surfaces, as well
as off the ash cleaning mechanism;
The ash should be thoroughly cleaned off the metal parts (of the cleaning
mechanism and the heat exchanger as well).
p. 6/14
EXPLANATION : the ash particles, laid on the horizontal surface of the heat
exchanger (at the flue gas pipes side) could be cleared by a specialized vacuum
cleaner or it could be swept down through the pipes to the surfaces underneath
– the ash will be cleaned from the surfaces underneath. Detailed description will
be shows in the next sections;
The next step of the cleaning procedure is to clean the internal surfaces of
the pipes of the heat exchanger – this is done by manual movement of the pipe’s
ash cleaning mechanism. In order to do this it is necessary to swing the cover of
the interface orifice of the cleaning mechanism, plug the profiled lever in the
aperture of the cleaning mechanism actuating shaft and swing the lever in both
directions several times (clockwise and anti-clockwise). Then the lever should
be removed and the cover will close the orifice. Keep the cleaning lever along
with the boilers cleaning kit or anywhere else if appropriate;
Figure 2.6. Attachment of the heat exchanger pipes ash cleaning actuating
lever;
The next step is to detach the front face panel of the heat exchanger in order
to get access to the lid of the second ash deposition zone of the boiler – the area
right above the burner and below the pipes.
p. 7/14
Figure 2.7. Unscrew the front panel fixing screws and remove the panel;
Figure 2.8. Detaching the front panel of the heat exchanger;
The next step is to unscrew the fixing nuts of the lid, which closes the
secondary ash deposition zone of the three way flue gas duct of the heat
exchanger. Notice that the lid is tightened in order to prevent and flue gases
leakage or ambient air both in and out of the flue gas duct.
p. 8/14
Figure 2.9. The lid of the secondary ash deposition zone is detached and the
ash layer should be cleaned away;
Figure 2.10. Cleaning of the ash in the secondary deposition zone of the heat
exchanger (right beneath the pipes of the heat exchanger);
EXPLANATION : it is recommended to position the ash hopper in a position,
which will allow easy collecting of the ash residue;
The next step is to clean the ash and char residue, deposited in the burner.
p. 9/14
ATTENTION : before lifting up the cover of the burner, it is necessary to make
a safety check, i.e. to verify that the temperature of the burner’s details is low
enough to handle and continue with the manipulations. It is strongly
recommended to get measures self protection.
Figure 2.11. Lift of the burner's arc lid;
EXPLANATION : the lid of the burner is freely mounted and no fixing items
are used. It is positioned by special locking pins, fixed to the lower part of the
burner in its front side.
Figure 2.12. Ash and char cleaning procedure of the material, laid on the
burner’s grate;
p. 10/14
Figure 2.13. Brushing and cleaning the ash residue and any other char
remaining on the burner’s grate;
After the burner’s grate has been thoroughly cleaned, it is necessary to clean the
ash beneath the grate..
EXPLANATION : the burner’s grate is detached by lifting and alongside
pulling action. It is possible to have difficulties when detaching the grate due to
the deposited ash and eventually any thermal deformation of the details. It is
necessary to take care at the grate removal procedure and to keep the ash
grating element not damaged (it is not necessary to apply excessive force in
order to remove away the grate).
p. 11/14
Ash grating element, moved forward-backward by special
mechanism
Figure 2.14. Detaching the grate of the specialized burner;
Figure 2.15. Cleaning the ash residue, fallen beneath the grate of the burner;
p. 12/14
The next steps is to take away the ash hopper, placed on the bottom of the
combustion chamber, to deposit away the ash residue in special fire protected
container. The cooled down ash could be utilized as soil fertilizer.
Figure 2.16. Tacking the ash hopper out of the combustion chamber;
2.5. Attachment and assembly of the elements, detached at the ash
cleaning procedure
The attachment procedure should be done in reverse sequence of the steps,
depicted in the previous sections of the manual.
ATTENTION: it is necessary to ensure air-tightness if the lids of the flue gases
duct of the boiler (these are the lid of the ash deposition secondary zone, as well
as the top lid, covering the flue gases duct of the heat exchanger), in order to
ensure high reliability and efficiency of the appliance.
p. 13/14
3. Recommendations and requirements
It is highly recommended to perform the above described procedure of ash
deposition cleaning as it will ensure high efficiency and reliability of the boiler.
It is recommended to ash clean the unit on a period of a month of operation, but
it is necessary to clean the ash on operation period of no more than two months,
considering the operating mode of the boiler as well as the ash content of the
raw fuel;
ATTENTION:
• After each cleaning procedure, the boiler should be checked out – the
correct attachment of the element, the air-tightness of the lids and the
boiler’s functionality;
• At the end of the heating season it is necessary to perform thorough ash
cleaning of the boiler, because the mineral ash acts as corrosive reagent
and reduces the reliability of the boiler. It is recommended to take away of
the fuel hopper any pellets (of other fuel if utilized) as the pellets could
absorb moisture from the ambient air and cause clogging of the fuel
transport auger, issues with the ignition, etc.;
The above depicted ash cleaning procedure is OBLIGATORY. In case that the
ash cleaning and boiler’s maintenance procedures are not followed, it is
possible to decrease the efficiency and performance reliability of the boiler,
even operation failure could be achieved (for example clogging of the ash
cleaning mechanism, flue gas fan blockage, etc.).
p. 14/14