1
If it balances check that the proper account is selected (i.e., regular checking or bingo
checking) and that the date matches the date the deposit was made. Click Save & Close
to save the deposit.
Step 13 – Enter each check written to bring QBs current with all checks written in your
checkbook. This is done by entering bills and paying bills from the Vendors Navigator.
Moose International has issued policy that we must enter bills and pay bills.
Select Enter Bills. It is necessary to enter a bill for each check written.
Do this for each check that was written to bring it current with your checkbook.
There are a limited number of expense accounts by category that have been pre-populated
in QBs by Moose International. The accounts previously used in LOOMIS are
significantly different in the new Chart of Account, therefore, it will be necessary to
establish additional accounts during the update process. This is also true for various
other accounts needed by a Lodge. Review the Sample Lodge COA on the CA/NV
website and determine the structure as it relates to each segment of your Lodge, i.e.,
Lodge, Social Quarters, Kitchen, Bingo and Gaming.
To create a new account open the Company Navigator and select Chart of Accounts to
display the current Chart of Accounts for the your Company. Click on “Account” in the
lower left hand corner and choose “New”.
Click on the “Type” to select the type of account that is to be created. Expense accounts
should be created as Expense.
The next field to be populated is the “Number” field. This is where the account number
you wish to assign is created. You will assign the next number in the numbering
sequence. (i.e., 5420.00 because the last number in the assignments is 5415.00, which is
for Licenses & Permits). Review the structure in the parent and sub-accounts to
determine what number to establish next. Remember that in the chart of accounts it will
always be XXXX.XX. A 4-digit number, a period, and then 2 more digits.
Enter the Name that you wish to be displayed in the Chart of Accounts. When it is a sub
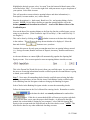
account of the another account we must select the
radio button and select
the appropriate parent account by using the drop down. Click the
button to save the new account.
“OK”
This account will now be an available option for us to select when entering the bills.
Step 14 – Pay each bill to record the checks written. Select Pay Bills.
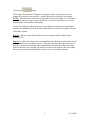
The Pay Bills window will be displayed.
Select each bill to be paid by clicking in the
field. In the Payment Method field
check the Assign check no. radio button to ensure that the proper check number can be
entered for each bill.
4
12-27-2006