Download User`s Manual - EXP Computer, Inc.

Transcript
User’s Manual
FCC COMPLIANCE STATEMENTS
This equipment has been tested and found to comply with the limits for a Class B digital device,
pursuant to Part 15 of the FCC Rules. These limits are designed to provide reasonable protection
against harmful interference in a residential installation. This equipment generates, uses and can
radiate radio frequency energy and, if not installed and used in accordance with the instructions, may
cause harmful interference to radio communications. However, there is no guarantee that interference
will not occur in a particular installation. If this equipment does cause harmful interference to radio or
television reception, which can be determined by turning the equipment off and on, the user is
encouraged to try to correct the interference by one or more of the following measures:
Reorient or relocate the receiving antenna.
Increase the Distance between the equipment and receiver.
Connect the equipment into an outlet on a circuit different from that to which the receiver is connected.
Consult the dealer or an experienced radio/TV technician for help.
CAUTION
CHANGE OR MODIFICATIONS NOT EXPRESSLY APPROVED BY
PARTY RESPONSIBLE FOR COMPLIANCE COULD VOID THE USER
AUTHORITY TO OPERATE THE EQUIPMENT.
TRADEMARKS
PCMCIA are the trademarks of Personal Computer Memory Card International Association.
MS-DOS, Windows, Windows 95/98/Me/2000/XP/NT and MSCDEX are trademarks of Microsoft
Corporation.
*All of the third-party brands and names are the property of their respective owners.
CONTENTS
INTRODUCTION ...........................................................................................................
1
SYSTEM REQUIREMENTS ..........................................................................................
1
PART NAMES AND FUNCTIONS................................................................................
2
HARDWARE INSTALLATION.....................................................................................
4
SOFTWARE INSTALLATION FOR WINDOWS 95/98 ...............................................
6
SOFTWARE INSTALLATION FOR WINDOWS Me ..................................................
9
SOFTWARE INSTALLATION FOR WINDOWS 2000 ...............................................
11
SOFTWARE INSTALLATION FOR WINDOWS XP ..................................................
14
SOFTWARE INSTALLATION FOR WINDOWS NT ..................................................
16
SOFTWARE INSTALLATION FOR DOS/WINDOWS 3.1 .........................................
18
USING HARD DISK WITH PCMCIA INTERFACE ....................................................
20
ADVANCED USAGE ....................................................................................................... 23
PARTITION THE EXTERNAL HARD DISK ........................................................... 24
USING FDISK UNDER WINDOWS 98SE/Me ................................................... 24
USING DISK MANAGEMENT UNDER WINDOWS 2000/XP ........................ 26
CHANGE THE DRIVE LETTER ASSIGNED TO HDD .......................................... 29
INTRODUCTION
The PCMCIA hard disk is a portable compact hard disk drive that attached with the PCMCIA interface
of computer. The external hard disk provides a fast and easy way to add more storage space to your
computer. Plus, the Plug & Play feature gives you a great convenience on the road. The external hard
disk can be easily connected to computer for using, and can even be disconnected and re-connected
while the computer is running.
SYSTEM REQUIREMENTS
♦ Notebook or desktop computer with PCMCIA 2.1 Type II or III socket.
♦ Windows 95/98/Me/2000 or Windows XP (The Hot Insert/Remove function is reachable with
these OS).
♦ Windows NT, or DOS/Windows 3.1 (These OS don’t support Hot Insert/Remove function).
-1-
PART NAMES AND FUNCTIONS
Your external hard disk may differ slightly from the figures shown, however the controls will operate as
described below.
1. LED:
Power-on and Data-access indicator LED.
2. Interface Connector:
This interface connector connects to the PCMCIA interface cable.
3. Power Source Switch:
PC: Means this hard disk is powered by the PCMCIA socket of computer.
DC: Means this hard disk is powered by an external power source.
Usually, when the external hard disk get the power from the PCMCIA socket of computer, and it
should work properly. But, with some models of computer, the supplied power from the PCMCIA
socket is poor to drives the hard disk drive. In this situation, an external power is needed. If you
experience this problem, please contact dealer for the external power.
4. External Power Jack:
This jack connects to an external power source.
If the jack labeled as ‘5V’, you must use a 5Volts AC adapter or PS/2 power source cable as the
external power source.
If the jack labeled as ‘DC IN’, you must use a 12Volts AC adapter as the external power source.
-2-
-3-
HARDWARE INSTALLATION
Note:
♦ If you want to use an external power to powers the hard disk, please use the AC adapter or PS/2
power source cable provided by manufacturer, using an incorrect external power could result in
permanent and unpredictable damage to the drive.
♦ This external hard disk supports Hot Insert/Remove function only under Windows
95/98/Me/2000/XP, with the other operating systems, please insert the PC Card of interface
cable before power-on computer, and remove this card after power-off computer.
1. Insert the plug of the PCMCIA interface cable into the Interface Connector of drive. Press firmly
until the interface connector is seated correctly.
2. Make sure the Power Source Switch is at the correct position.
PC: get power from the PCMCIA socket of computer.
DC: get power from the external power.
Note: If you are using an external power to powers the external hard disk, the sequence is,
change the Power Source Switch to ‘DC’ position, then connect the external power to the
External Power Jack of the drive, and attach the external power to the outlet.
3. You are now ready to install the device drivers, please follow the related software installation guide
to install the device driver.
-4-
Get power from PCMCIA socket
Get power from the external power
-5-
SOFTWARE INSTALLATION FOR WINDOWS 95/98
The following installation procedures are extracted from the Windows 98SE installation. The
installation for Windows 95 is almost same.
1. Boot-up your computer into Windows, making sure
the device driver for ‘PCMCIA Socket’ has been
installed and is available. To check this, right-click
‘My Computer’, click ‘Properties’ and then ‘Device
Manager’ to open the ‘Device Manager’ window.
Refer to the figure shown alongside to see if the
PCMCIA Controller is installed without error.
2. Ensure the PCMCIA interface cable and then the external power connections (if you are using the
external power) are made as described in Hardware Installation. Slowly insert the PC Card of
interface cable into the PCMCIA socket of computer and press firmly until the connector is seated
(Please note that the PC Card is keyed to guide for proper insertion).
3. If this is the very first time you are connecting the
drive to computer, the ‘Add New Hardware
Wizard’ dialog box appears as shown.
4. Click Next, then select ‘Search for the best driver for your device’ box, and click Next.
-6-
5. Select ‘Floppy disk drives’ box and insert the
device driver diskette into floppy drive. Click
Next.
6. Wait for few seconds, Windows will find a driver
from the floppy diskette, select ‘PCMCIA
HARDDISK (D6)’, and click Next.
7. Ensure the driver file that Windows found is ‘A:\
PCMHD.INF’. Click Next.
-7-
8. After the necessary files are copied into your
internal hard disk, a screen will appear as the
figure, click Finish.
9. Windows will complete the installation and then detect the hard disk drive inside the external hard
disk kit and get it to work. After system read the content of the hard disk drive (about few seconds),
you will find a new drive letter has been assigned for the drive in ‘My Computer’.
10. If the external hard disk doesn’t appear in ‘My Computer’ or doesn’t work properly, please go into
‘Device Manager’ to check whether the devices are installed as the table and figure.
11. If the device driver already installed properly but the
hard disk still not present in ‘My Computer’, it means
the hard disk drive inside the kit is a whole new disk
drive that doesn’t contain any partition, Windows
95/98 won’t assign a drive letter for the disk drive
without any partition. Please refer to the ‘Partition the
External Hard Disk’ chapter, to prepare your hard
disk drive.
Installed Device Drivers
PCMCIA HARDDISK (D6)
Location
Installed under ‘Hard Disk Controllers’.
The real name of the hard disk drive inside the Installed under ‘Disk Drives’ (the name list in the
kit
figure may differ from your hard disk drive).
-8-
SOFTWARE INSTALLATION FOR WINDOWS Me
1. Boot-up your computer into Windows, making sure
the device driver for ‘PCMCIA Socket’ has been
installed and is available. To check this, right-click
‘My Computer’, click ‘Properties’ and then ‘Device
Manager’ to open the ‘Device Manager’ window.
Refer to the figure shown alongside to see if the
PCMCIA Controller is installed without error.
2. Ensure the PCMCIA interface cable and then the external power connections (if you are using the
external power) are made as described in Hardware Installation. Slowly insert the PC Card of
interface cable into the PCMCIA socket of computer and press firmly until the connector is seated
(Please note that the PC Card is keyed to guide for proper insertion).
3. On the first screen, insert the device driver
diskette into floppy drive, select ‘Automatic
search for a better driver (Recommended)’, and
then click Next.
4. Windows will find two driver files from
the floppy diskette and list as the figure
shown alongside. Select ‘PCMCIA
HARDDISK (D6)’ and then click OK.
-9-
5. Ensure the driver file that Windows found is ‘A:\ PCMHD.INF’. Click Next, Windows will install
the driver from the diskette. After the necessary files are copied into your internal hard disk, a
screen will appear as the figure shown on right, click Finish.
6. Windows will complete the installation and then detect the hard disk drive inside the external hard
disk kit and get it to work. After system read the content of the hard disk drive (about few seconds),
you will find a new drive letter has been assigned for the drive in ‘My Computer’.
7. If the external hard disk doesn’t appear in ‘My Computer’ or doesn’t work properly, please go into
‘Device Manager’ to check whether the devices are installed as the table and figure.
8. If the device driver already installed properly but the
drive still not present in ‘My Computer’, it means the
hard disk drive inside the kit is a whole new disk
drive that doesn’t contain any partition, Windows Me
won’t assign a drive letter for the disk drive without
any partition. Please refer to the ‘Partition the
External Hard Disk’ chapter, to prepare your drive.
Installed Device Drivers
PCMCIA HARDDISK (D6)
Location
Installed under ‘Hard Disk Controllers’.
The real name of the hard disk drive inside the Installed under ‘Disk Drives’ (the name list in the
kit
figure may differ from your hard disk drive).
- 10 -
SOFTWARE INSTALLATION FOR WINDOWS 2000
1. Boot-up your computer into Windows, making sure
the device driver for ‘PCMCIA Adapters’ has been
installed and is available. To check this, right-click
‘My Computer’, click ‘Properties’ then ‘Hardware’
and then ‘Device Manager’ to open the ‘Device
Manager’ window. Refer to the figure shown
alongside to see if the PCMCIA Controller is installed without error.
2. Ensure the PCMCIA interface cable and then the external power connections (if you are using the
external power) are made as described in Hardware Installation. Slowly insert the PC Card of
interface cable into the PCMCIA socket of computer and press firmly until the connector is seated
(Please note that the PC Card is keyed to guide for proper insertion).
3. Windows will find a new hardware named ‘PCMCIA PnPIDE’, and start up the ‘Found New
Hardware Wizard’, click Next on the first screen.
4. On this screen, select ‘Search for a suitable
driver for my device (Recommended)’,
click Next.
- 11 -
5. Insert the device driver diskette into floppy drive, only select ‘Specify a location’, leave the other
check boxes be empty (don’t select them), and click Next. When the wizard asks for the path, type
‘A:\WIN2000’ in ‘Copy manufacturer’s files from’ location, click OK.
6. Wait for few seconds, Windows will find a
driver from the floppy diskette, make sure
the file that Windows found is
‘A:\Win2000\PCMHD2K.INF’. Click
Next.
7. Click Yes on the ‘Digital Signature Not Found’ screen.
- 12 -
8. After the necessary files are copied into
your internal hard disk, a screen will appear
as the figure, click Finish.
9. Windows will complete the installation and then detect the hard disk drive inside the external hard
disk kit and get it to work. After system read the content of the hard disk drive (about few seconds),
you will find a new drive letter has been assigned for the drive in ‘My Computer’.
10. If the hard disk drive inside the kit is a whole
new disk drive that doesn’t contain any
partition, you can’t read/write data from/to it,
please refer to the ‘Partition the External Hard
Disk’ chapter, to prepare your hard disk drive.
Installed Device Drivers
Location
PCMCIA HARDDISK (D6) (Windows 2000) Installed under ‘IDE ATA/ATAPI Controllers’.
The real name of the hard disk drive inside the Installed under ‘Disk Drives’ (the name list in the
kit
figure may differ from your hard disk drive).
- 13 -
SOFTWARE INSTALLATION FOR WINDOWS XP
1. Boot-up your computer into Windows, making
sure the device driver for ‘PCMCIA Adapters’
has been installed and is available. To check this,
right-click ‘My Computer’, click ‘Properties’
then ‘Hardware’ and then ‘Device Manager’ to
open the ‘Device Manager’ window. Refer to the
figure shown alongside to see if the PCMCIA
Controller is installed without error.
2. Ensure the PCMCIA interface cable and then the external power connections (if you are using the
external power) are made as described in Hardware Installation. Slowly insert the PC Card of
interface cable into the PCMCIA socket of computer and press firmly until the connector is seated
(Please note that the PC Card is keyed to guide for proper insertion).
3. Windows will find a new hardware
named ‘PCMCIA PnPIDE’, and start
up the ‘Found New Hardware Wizard’.
On the first screen, select ‘Install the
software automatically’, insert the
driver diskette into floppy drive, and
then click Next.
- 14 -
4. Wait for few seconds, Windows will find device driver from the diskette and install it
automatically. After the necessary files are copied into your internal hard disk, a screen will appear
as the figure shown on right, click Finish.
5. Windows will complete the installation and then detect the hard disk drive inside the external hard
disk kit and get it to work. After system read the content of the hard disk drive (about few seconds),
you will find a new drive letter has been assigned for the drive in ‘My Computer’.
6. If the hard disk drive inside the kit is a whole new disk
drive that doesn’t contain any partition, you can’t
read/write data from/to it, please refer to the ‘Partition the
External Hard Disk’ chapter, to prepare your hard disk
drive.
Installed Device Drivers
PCMCIA HARDDISK (D6) (WINXP)
Location
Installed under ‘SCSI and RAID Controllers’.
The real name of the hard disk drive inside the Installed under ‘Disk Drives’ (the name list in the
kit
figure may differ from your hard disk drive).
- 15 -
SOFTWARE INSTALLATION FOR WINDOWS NT
Note:
♦ Make sure the Windows NT system is version 3.51 or higher.
♦ Since Windows NT does not support ‘Hot Insert/Remove’ feature, this external hard disk should
be connected to computer prior to starting Windows NT. Likewise, do not remove this drive
before you shut down the computer.
♦ In Windows NT, the I/O and IRQ settings of PCMCIA IDE device cannot be changed.
Therefore, if the setting of this hard disk conflicts with other device, change the I/O or IRQ of
other device to avoid conflicts.
♦ We recommend you install a Card Service program, e.g. SystemSoft’s CardWizard for Windows
NT. This kind of program will help Windows NT to assign resource for PCMCIA device
properly, and reduce the conflict situation.
1. Do not connect the external hard disk to computer, just power-on the computer and boot into
Windows.
2. Click on Start ! Settings ! Control Panel ! SCSI
Adapter. The ‘SCSI Adapter’ dialog box appears.
3. Click Drivers tab, and then click Add button.
4. Click Have Disk button to continue. Windows NT will then prompt you to insert the manufacturer’s
driver diskette. Insert the device driver diskette into floppy drive. Specify the directory as
A:\WINNT (or B:\WINNT whichever contains the diskette) and click OK.
- 16 -
5. Select ‘PCMCIA HARDDISK’ and then click
OK.
6. Follow the on-screen instruction to continue. After the installation is complete, Windows will
prompt you to restart to activate the new device driver. Restart and power-off the computer.
7. Ensure the PCMCIA interface cable and then the external power connections (if you are using the
external power) are made as described in Hardware Installation. Slowly insert the PC Card of
interface cable into the PCMCIA socket of computer and press firmly until the connector is seated
(Please note that the PC Card is keyed to guide for proper insertion).
8. Power-on the computer, after boot into Windows, the external hard disk will be assigned a drive
letter in ‘My Computer’, the drive is ready for use.
- 17 -
SOFTWARE INSTALLATION FOR DOS/WINDOWS 3.1
Automatic Installation
Follow the instructions below to proceed with automatic installation.
1. Insert the device driver diskette into a floppy disk drive on your computer.
2. Change the working directory to the floppy drive containing the device driver diskette by typing A:
then press ENTER.
3. At the DOS prompt (A:\>), type INSTALL followed by the ENTER key.
4. Press ENTER or click OK button to continue. The screen will display as the following:
1) Directory to install driver: Type the
directory that you want the driver files
are copied to, and then press the TAB
key to forward to the next field.
2) Set I/O port to: The default setting is
320-32F.
5. After completing the selection, press TAB key to the Install button, and press ENTER to continue.
6. The rest of the installation should proceed automatically, the CONFIG.SYS file on your computer
will be updated automatically.
7. Reboot your computer and the hard disk drive will be recognized automatically.
- 18 -
Manual Installation
You may also manually install the external hard disk device driver.
Note: The filename of the DOS device driver is different with the different version of driver package,
it could be ARIHD.EXE or NVIHD.EXE. However, you can find this driver in the root folder
of the diskette, the filename will be present as xxxHD.EXE. The following example is assumed
the filename is NVIHD.EXE, replace the filename if you get the different driver file.
1. Copy the file NVIHD.EXE from the device driver diskette to a directory in your main hard disk
(e.g. C\PCMHD).
2. Add the following line to the BOTTOM of your CONFIG.SYS file:
DEVICE=drive:\path\ NVIHD.EXE /P:320
Where drive:\path specifies the directory containing NVIHD.EXE.
/P
is used to set the I/O ports, and the valid numbers are 320, 340, and 360.
Note: If your CONFIG.SYS file is already loaded with PCMCIA software, such as Cardsoft of
SystemSoft or Cardtalk of Databook, it is necessary to add the above line after the
PCMCIA software. Otherwise, the PCMCIA interface card will not be initialized properly.
The CONFIG.SYS file example:
LASTDRIVE=Z
DEVICE=C:\DOS\HIMEM.SYS
DEVICE=C:\DOS\EMM386.EXE NOEMS X=D000-D3FF
FILES=40
BUFFERS=20
Rem put PCMCIA software here.
DEVICE=C:\PCMHD\NVIHD.EXE /P:320
5. Reboot your computer to activate the external hard disk drive.
- 19 -
USING HARD DISK WITH PCMCIA INTERFACE
To Connect The PCMCIA Hard Disk To Your Computer
♦ Windows 95/98/Me/2000, and WindowsXP:
1. Boot into the Windows system.
2. Insert the plug of the PCMCIA interface cable into the Interface Connector of drive.
3. Make sure the Power Source Switch is at the correct position:
PC: get power from the PCMCIA socket of computer.
DC: get power from the external power.
4. If you are using the external power, connect the external power to the External Power Jack at the
rear panel of the drive. And then attach the external power to the outlet.
5. Slowly insert the PC Card of interface cable into the PCMCIA socket of computer and press firmly
until the connector is seated. Your external hard disk is now ready for use in few seconds.
♦ Windows NT, and DOS/Windows 3.1:
1. Power-off the computer.
2. Insert the plug of the PCMCIA interface cable into the Interface Connector of drive.
3. Make sure the Power Source Switch is at the correct position:
PC: get power from the PCMCIA socket of computer.
DC: get power from the external power.
4. If you are using the external power, connect the external power to the External Power Jack at the
rear panel of the drive. And then attach the external power to the outlet.
5. Slowly insert the PC Card of interface cable into the PCMCIA socket of computer and press firmly
until the connector is seated.
6. Power-on computer, the external hard disk will ready for use after boot into the operating system.
- 20 -
To Disconnect The PCMCIA Hard Disk From Your Computer
♦ Windows 95/98, and Windows Me:
1. Click on the icon
(or
) on system tray and a dialog box appears beside this icon.
2. Click ‘Stop PCMCIA HARDDISK (D6)’ in the dialog box.
3. Wait for few seconds until the system prompts ‘The PCMCIA HARDDISK (D6) can now be safely
removed from the system’. Click OK, and then remove the PC Card of the cable from computer.
♦ Windows 2000:
1. Click on the icon
on system tray and a dialog box appears beside this icon.
2. Click ‘Stop PCMCIA HARDDISK (D6) (Windows 2000)’ in the dialog box.
3. Wait for few seconds until the system prompts ‘The PCMCIA HARDDISK (D6) (Windows 2000)
can now be safely removed from the system’. Click OK, and then remove the PC Card of the cable
from computer.
♦ Windows XP:
1. Click on the icon
on system tray and a dialog box appears beside this icon.
2. Click ‘Safely remove PCMCIA HARDDISK (D6) (WINXP)’ in the dialog box.
3. Wait for few seconds until system prompts ‘The PCMCIA HARDDISK (D6) (WINXP) can now be
safely removed from the system’, and then remove the PC Card of the cable from computer.
♦ Windows NT, and DOS/Windows 3.1:
1. Power-off the computer.
2. Remove the PC Card of the cable from computer.
- 21 -
- 22 -
ADVANCED USAGE
" Partition the External Hard Disk
" Change the Drive Letter Assigned to HDD
- 23 -
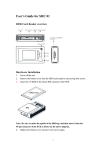
PARTITION THE EXTERNAL HARD DISK
Using FDISK Under Windows 98SE/Me
FDISK is a program to create one or more partitions of the hard disk, after the partition was built and
formatted, data can be write to the hard disk.
To partition the external hard disk, you must execute FDISK under the MS-DOS mode under Windows
98SE/Me, please follow the steps:
1. Boot-up the computer into Windows 98SE/Me system. Plug the external hard disk to computer, and
make sure it is recognized.
2. Go into the MS-DOS mode by click on Start ! Programs ! MS-DOS Prompt.
3. At the DOS prompt, type ‘FDISK’ and press Enter.
4. In the first screen of FDISK, answer the question: Do you want to enable large disk support?
Y
if you want to create a partition larger than 2GB (FAT32).
N
if you want to create a partition small than 2GB (FAT16).
5. The next screen is ‘FDISK OPTIONS’,
IMPORTANT: you must type 5 on this screen to change the current fixed disk drive, the default
fixed drive set by FDISK is your internal hard disk, if you don’t change it to the
external hard disk, the data of your internal hard disk will be destroyed.
Note: If the option 5 doesn’t appear on this screen means the external hard disk is not installed
properly, please check with the software installation.
- 24 -
6. In the ‘Change Current Fixed Disk Drive’ screen, type the disk drive number that assigned to the
external hard disk (usually, the external hard disk is the fixed disk drive number 2).
7. Back to ‘FDISK OPTIONS’ screen, type 4 to display the content of the fixed disk drive, check the
content to make sure the current drive is the external hard disk.
8. Now you can create (type 1) or delete (type 3) the partition of the external hard disk.
9. After you finish FDISK, re-boot computer to activate these changes.
- 25 -
Using Disk Management Under Windows 2000/XP
Note: The external hard disk can’t works with ‘Dynamic Disk’ type. Do not upgrade the external
hard disk to ‘Dynamic Disk’ type, always use it with ‘Basic Disk’ type.
1. To partition the external hard disk under Windows 2000 or Windows XP, please plug the external
hard disk and make sure it is recognized, then,
♦ In Windows 2000: click Start ! Settings ! Control Panel ! Administrative Tools !
Computer Management to open ‘Computer Management’ window.
♦ In Windows XP: click Start ! Control Panel ! Performance and Maintenance !
Administrative Tools ! Computer Management to open ‘Computer Management’ window.
2. Click on ‘Disk Management’ on the left part of this window, all connected disk drives will be listed
in the right part. Find out the largest number of Disk #, for example, on the below picture, Disk 1 is
the largest number, and it is the external hard disk. On the right side of the Disk 1 is the status of the
partitions of this disk drive, you can create a new or delete an exist partition by right-click on this
area. The next steps will describe how to create a new partition on this external hard disk.
Note:
If the hard disk in the external hard disk kit is a whole new hard disk without any
partition, when the Disk Management is opened, a ‘Stop’ mark indicates this
drive is an ‘Unknown’ type of disk (refer to the figure shown on right side). In
- 26 -
this situation, Windows system won’t allow you to create partition with this drive. In the
meantime, you can:
♦ In Windows 2000: Windows will start up the ‘Write Signature and Upgrade Disk Wizard’
immediately. You can use this ‘Wizard’ to initial the hard disk to the ‘Basic Disk’ type and
can then create partition in the drive.
♦ In Windows XP: you can right-click on the ‘Stop’ mark, and then click ‘Initialize disk’ to
initial the hard disk to the ‘Basic Disk’ type and can then create partition in the drive.
3. If the type of the hard disk drive is ‘Dynamic’, you must change it to the ‘Basic’. To do this,
right-click on the status area (left area) of Disk 1, and then click ‘Revert to Basic Disk’ from the
options. Wait for few seconds, the type of the hard disk drive will be changed to ‘Basic’ type.
4. To create a new partition in the external hard disk, right-click on the right area of Disk 1, click on
‘Create Partition…’, the ‘Create Partition Wizard’ appears, click Next.
5. Select ‘Primary partition’, click Next.
6. Specify the size that you want this partition to be, click Next.
7. Assign a drive letter for this partition, please use the default value, and click Next.
8. Refer to the figure shown below, select ‘Format this partition with the following settings’, choose
the File system, and specify a name for the Volume label, select ‘Perform a Quick Format’, then,
click Next.
- 27 -
9. Click Finish, now the formatting is proceed, after the process is done, the ‘Disk Management’
window is changed as below. Make sure the status of the partition is ‘Healthy’.
10. Now, a partition is created in the external hard disk, you can write data to it, and if you want, one or
more partitions can be created in the same hard disk drive, just repeat the above steps.
- 28 -
CHANGE THE DRIVE LETTER ASSIGNED TO HDD
To change the drive letter for the external hard disk under Windows 98SE or Me, for example, from
drive ‘D’ to drive ‘E’, follow the instructions below.
1. Open ‘Control Panel’, then ‘System’, click on ‘Device Manager’ tab, double click on ‘Disk
Drives’, select the model of the external hard disk, then click on ‘Properties’ button.
2. Click on ‘Settings’ tab, check the ‘Removable’ box under ‘Options’, then change the ‘Start drive
letter’ and the ‘End drive letter’ to the letter you wish to assign for the hard disk.
3. Click OK, the drive letter will be changed after restart computer.
- 29 -
P/N: 7450488-00