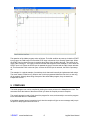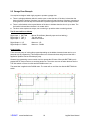
1
LogiSoft
PROGRAMMABLE LOGIC
CONTROLLER PROGRAMMING
SOFTWARE
USER MANUAL
ioSelect
2/20/2009
IOS-LogiSoft-User-Manual-V03a.doc
Disclaimer
IoSelect makes no representations or warranties with respect to the contents
hereof. In addition, information contained herein are subject to change without
notice. Every precaution has been taken in the preparation of this manual.
Nevertheless, IoSelect assumes no responsibility, express or implied, for
errors or omissions or any damages resulting from the use of the information
contained in this publication.
All trademarks belong to their respective owners.
ioSelect
www.ioselect.com
2
LogiSoft User Manual
TABLE OF CONTENTS
1.
2.
3.
AN OVERVIEW OF THE LOGISOFT PLC PROGRAMMING PACKAGE .................................................. 6
INSTALLING LOGISOFT ............................................................................................................................. 6
Setting Up LogiSoft ........................................................................................................................................ 8
3.1
STARTUP .............................................................................................................................................. 8
3.2
CREATING A NEW PROJECT.............................................................................................................. 8
3.3
SETUP PC COMMUNICATIONS.......................................................................................................... 8
3.4
File->Get Prog. Info ................................................................................................................................ 9
3.5
ENTER LADDER EDIT MODE............................................................................................................. 9
3.6
EDIT->TAGS ......................................................................................................................................... 9
3.7
EDIT->Communications ....................................................................................................................... 11
3.8
EDIT->Comms Settings ........................................................................................................................ 12
4. LADDER PROGRAMMING........................................................................................................................ 13
4.1
LADDER TOOLBAR ELEMENTS. ..................................................................................................... 13
4.1.1
Horizontal Wire............................................................................................................................. 13
4.1.2
Vertical Wire................................................................................................................................. 13
4.1.3
Normally Open Contact ................................................................................................................. 13
4.1.4
Normally Closed Contact............................................................................................................... 13
4.1.5
Positive Edge Contact.................................................................................................................... 13
4.1.6
Negative Edge Contact .................................................................................................................. 13
4.1.7
Function Contact ........................................................................................................................... 14
4.1.8
Normal Output............................................................................................................................... 14
4.1.9
Inverted Output ............................................................................................................................. 14
4.1.10 Set Output ..................................................................................................................................... 14
4.1.11 Reset Output.................................................................................................................................. 14
4.1.12 Function Output............................................................................................................................. 14
4.1.13 Comment....................................................................................................................................... 14
4.1.14 Delete Element .............................................................................................................................. 14
4.1.15 Delete Line.................................................................................................................................... 15
4.1.16 Insert Line ..................................................................................................................................... 15
4.1.17 Copy Lines .................................................................................................................................... 15
4.1.18 Move Lines ................................................................................................................................... 15
4.1.19 Shift Element Right ....................................................................................................................... 15
4.1.20 Shift Element Left ......................................................................................................................... 15
4.2
CREATING A SAMPLE PROGRAM................................................................................................... 16
4.2.1
Step 1............................................................................................................................................ 16
4.2.2
Step 2............................................................................................................................................ 16
4.2.3
Step 3............................................................................................................................................ 16
5. COMPILING................................................................................................................................................ 17
6. PROGRAMMING THE PLC........................................................................................................................ 18
7. DEBUGGING THE PLC .............................................................................................................................. 19
7.1
View I/O status in Debug Mode............................................................................................................. 19
7.2
View Memory in Debug Mode. ............................................................................................................. 20
7.3
Start/Stop PLC in Debug Mode. ............................................................................................................ 20
8. LADDER LOGIC......................................................................................................................................... 21
8.1
PLC Operation. ..................................................................................................................................... 21
8.2
PLC Memory. ....................................................................................................................................... 22
8.3
Basic Rung Configurations.................................................................................................................... 24
8.4
Ladder Program Processing. .................................................................................................................. 26
8.5
Ladder Programming Elements.............................................................................................................. 27
8.5.1
Ladder Inputs - Normally Open/Closed Contact ............................................................................. 27
8.5.2
Ladder Inputs - Positive/Negative Edge Contact............................................................................. 27
8.5.3
Ladder Inputs – Function Contact .................................................................................................. 27
8.5.3.1 Function Contact – (Mem = Mem) ............................................................................................ 28
8.5.3.2 Function Contact – (Mem = Const) ........................................................................................... 29
8.5.3.3 Function Contact – (Mem /= Mem) ........................................................................................... 29
ioSelect
www.ioselect.com
3
LogiSoft User Manual
8.5.3.4 Function Contact – (Mem /= Const) .......................................................................................... 29
8.5.3.5 Function Contact – (Mem >= Mem) .......................................................................................... 30
8.5.3.6 Function Contact – (Mem >= Const) ......................................................................................... 30
8.5.3.7 Function Contact – (Mem < Mem) ............................................................................................ 30
8.5.3.8 Function Contact – (Mem < Const) .......................................................................................... 31
8.5.4
Ladder Outputs – Normal/Inverted Output ..................................................................................... 31
8.5.5
Ladder Outputs – Set/Reset Output ................................................................................................ 31
8.5.6
Ladder Outputs – Standard Functions............................................................................................. 32
8.5.6.1 Function Output – (Timer 0.1Sec & Timer 0.01Sec) .................................................................. 32
8.5.6.2 Function Output – (TimerA 0.1Sec and TimerA 0.01Sec) .......................................................... 33
8.5.6.3 Function Output – (Counter) ..................................................................................................... 34
8.5.6.4 Function Output – (Cntr Up/Down – Type 1)............................................................................. 34
8.5.6.5 Function Output – (NOP).......................................................................................................... 35
8.5.6.6 Function Output – (END).......................................................................................................... 35
8.5.6.7 Function Output – (LD Load Accumulator) ............................................................................... 35
8.5.6.8 Function Output – (OUT).......................................................................................................... 36
8.5.6.9 Function Output – (AND) ......................................................................................................... 37
8.5.6.10
Function Output – (OR)......................................................................................................... 38
8.5.6.11
Function Output – (XOR)...................................................................................................... 39
8.5.6.12
Function Output – (CMP)...................................................................................................... 40
8.5.6.13
Function Output – (ADD)...................................................................................................... 40
8.5.6.14
Function Output – (SUB) ...................................................................................................... 41
8.5.6.15
Function Output – (MUL) ..................................................................................................... 41
8.5.6.16
Function Output – (DIV) ....................................................................................................... 42
8.5.6.17
Function Output – (INC) ....................................................................................................... 42
8.5.6.18
Function Output – (DEC) ...................................................................................................... 42
8.5.6.19
Function Output – (INV) ....................................................................................................... 43
8.5.6.20
Function Output – (MOV)..................................................................................................... 43
8.5.6.21
Function Output – (SHL)....................................................................................................... 43
8.5.6.22
Function Output – (SHR) ...................................................................................................... 44
8.5.6.23
Function Output – (CALL).................................................................................................... 45
8.5.6.24
Function Output – (SUBR) .................................................................................................... 45
8.5.6.25
Function Output – (RET)....................................................................................................... 45
8.5.6.26
Function Output – (RAND) ................................................................................................... 46
8.5.7
Ladder Outputs – Advanced Functions........................................................................................... 46
8.5.7.1 Function Output – (LDD Load Double) ..................................................................................... 46
8.5.7.2 Function Output – (OUTD Out Double) ................................................................................... 47
8.5.7.3 Function Output – (ANDD)....................................................................................................... 47
8.5.7.4 Function Output – (ORD).......................................................................................................... 48
8.5.7.5 Function Output – (XORD)....................................................................................................... 48
8.5.7.6 Function Output – (CMPD)....................................................................................................... 49
8.5.7.7 Function Output – (ADDD)....................................................................................................... 49
8.5.7.8 Function Output – (SUBD) ....................................................................................................... 49
8.5.7.9 Function Output – (MULD) ...................................................................................................... 50
8.5.7.10
Function Output – (DIVD) .................................................................................................... 50
8.5.7.11
Function Output – (INCD)..................................................................................................... 50
8.5.7.12
Function Output – (DECD).................................................................................................... 50
8.5.8
Ladder Outputs – Float Functions .................................................................................................. 51
8.5.8.1 Function Output – (LDF Load Float)......................................................................................... 51
8.5.8.2 Function Output – (OUTF Out Float) ........................................................................................ 51
8.5.8.3 Function Output – (CMPF Compare Float)................................................................................ 51
8.5.8.4 Function Output – (ADDF) ....................................................................................................... 52
8.5.8.5 Function Output – (SUBF) ........................................................................................................ 52
8.5.8.6 Function Output – (MULF) ....................................................................................................... 52
8.5.8.7 Function Output – (DIVF)......................................................................................................... 52
8.5.8.8 Function Output – (BTOF)........................................................................................................ 52
8.5.8.9 Function Output – (FTOB)........................................................................................................ 52
8.5.8.10
Function Output – (PWRF) ................................................................................................... 53
8.5.9
Ladder Outputs – Trigonometric Functions .................................................................................... 53
8.5.9.1 Function Output – (ACOSF) ..................................................................................................... 53
ioSelect
www.ioselect.com
4
LogiSoft User Manual
8.5.9.2 Function Output – (ASINF)....................................................................................................... 53
8.5.9.3 Function Output – (ATANF)..................................................................................................... 53
8.5.9.4 Function Output – (COSF) ........................................................................................................ 53
8.5.9.5 Function Output – (SINF) ......................................................................................................... 53
8.5.9.6 Function Output – (TANF)........................................................................................................ 54
8.5.9.7 Function Output – (SQRTF)...................................................................................................... 54
8.5.9.8 Function Output – (RADF) ....................................................................................................... 54
8.5.9.9 Function Output – (DEGF)........................................................................................................ 54
8.5.9.10
Function Output – (LOGF).................................................................................................... 54
8.5.9.11
Function Output – (EXPF)..................................................................................................... 54
8.5.10 Ladder Outputs – Communications Functions ................................................................................ 55
8.5.10.1
Function Output – Serial Communications – (COMM) ........................................................... 55
8.5.10.2
Function Output – TCP/IP Communications – (TCOM)......................................................... 57
9. LADDER PROGRAM EXAMPLES............................................................................................................. 60
9.1
Motor Control Example......................................................................................................................... 60
9.2
Garage Door Example........................................................................................................................... 62
9.3
Up/Down Counter Example................................................................................................................... 65
ioSelect
www.ioselect.com
5
LogiSoft User Manual
1. AN OVERVIEW OF THE LOGISOFT PLC PROGRAMMING PACKAGE
The LogiSoft PC software package is used to configure and program PLC products manufactured by
IoSelect.
The software runs on a Windows XP operating system and has been written to be very user friendly and
quick to learn. Most of the programming can be performed with only mouse operations.
LogiSoft has built in intelligence to auto configure itself according to the type of PLC being used. This
includes selecting the correct amount of I/O memory, and variable memory depending on the capabilities
of the PLC.
The PLC program being designed is ‘written’ in the well known ladder logic language and saved as a
project file. This project file holds the program, all the auto parameters for the PLC type chosen, and the
tag names the user has given to the I/O. The software combines ladder logic with function blocks to allow
the use of mathematical functions and manipulation of analog variables.
LogiSoft has a modbus master configuration section which allows easy setting up of the PLC for
communications. This feature is only enabled if the PLC supports this function.
2. INSTALLING LOGISOFT
Step 1
Insert the CD-ROM into the CD Drive. The software installer should start without assistance. If the
software installer does not start, browse to setup.exe in the root directory of the CD and double-click on it;
then click on OK to start the setup.
ioSelect
www.ioselect.com
6
LogiSoft User Manual
Step 2
Select the Installation Folder if required. It is recommended that the suggested folder is used for the
installation.
Step 3
Finally confirm the setup and complete the setup procedure. You will notice that a LogiSoft shortcut has
been added to the user Start Menu in the ioSelect group. Remove the CD-ROM from the CD Drive.
ioSelect
www.ioselect.com
7
LogiSoft User Manual
3. Setting Up LogiSoft
3.1 STARTUP
To launch the LogiSoft Application Program click on the shortcut on the Desktop called LogiSoft.
This will load the startup screen which is blank until a project has been created or opened.
3.2 CREATING A NEW PROJECT
To create a new project click on the file menu item with the mouse. A drop down sub-menu will appear on
the screen. Click on new and a box will appear on the screen which asks you to select the PLC type. It is
important that you select the correct type according to the hardware you want to program. This is
because the auto-configuration will initialize the I/O and memory according to the type of PLC you have,
and this configuration is very likely to be different with other PLC types.
Once the PLC type has been selected, click on select to continue. A new box will now open on the
screen which asks for the file name of the project you want to create. You must also select a suitable
working directory for your projects at this point. After typing in the project name (no extension is required)
click on save and you will now have created a project.
You will notice that at the top left of the screen the project name and path is displayed, along with the
PLC type.
3.3 SETUP PC COMMUNICATIONS
Click on the file menu item again and this time click on Setup->PC Comms. This action will open a box
on the screen which allows you to enter the programming port address (ID) of the PLC and also set the
Comm Port of the PC. All PLC’s are initially configured for an ID of 1, so there is no need to alter this
parameter at the moment. The PC Comm port must be changed according to the RS232 port that the
PLC is to be connected to.
ioSelect
www.ioselect.com
8
LogiSoft User Manual
3.4 File->Get Prog. Info
When you click on the File menu item and then the Get Prog. Info button a box will open on the screen
which reads the program name from the PLC, date created and the date downloaded. This can be used
to inform the user at a later date which program has been downloaded into the PLC. Initially when the
PLC is new and there is no program loaded this data will not be available. Click on the Close button to
close the box.
3.5 ENTER LADDER EDIT MODE
Click on the ladder menu item to go into the ladder edit mode. This will enable other menu items and the
toolbar for selecting programming items will also become active.
You will notice a yellow box appear on the screen. This box indicates the cell in the screen which was last
edited.
3.6 EDIT->TAGS
Now that the software is in Ladder Edit mode the first step is to edit the description of the I/O tags that are
going to be used in the program. This step is not mandatory but will help you better identify the inputs and
outputs if you give them a meaningful name and description.
ioSelect
www.ioselect.com
9
LogiSoft User Manual
Click on the menu item Edit and then Tags to open the box which displays the I/O tags. The I/O tags are
divided into categories. These categories are: Inputs, Outputs, Timers, Counters, Relays, and System.
The first pull-down select box is used to choose the category you want to edit. The default is always the
Inputs.
The next pull-down box allows you to select which of the Inputs you want to edit. In LogiSoft digital Inputs
are called labeled as I with the number of the input, so Input 8 is I8.
Once you have selected the Input you want to edit click on the name box with the mouse (not the pulldown arrow) and type in a new name. For example change Input 1 (IP1) to read START.
It is now possible to give this input a description by entering text in the description box.
Once you have completed a TAG you must click on the Add button to ensure the data you have entered
is added to the project. This must be done before you start editing the next tag or the data you have just
entered will be lost.
Once you have completed edit the tag names and descriptions you must click on Close to exit this box.
It would be a good idea to save the project at this point by clicking the mouse on the file->save menu
item.
ioSelect
www.ioselect.com
10
LogiSoft User Manual
3.7 EDIT->Communications
Now click on the menu item Edit and then Communications. If this option is available on the PLC you
are using then a box will appear on the screen which is labeled Edit Modbus Communications.
If this feature is not available on your PLC then this option will not be available and you should go onto
the next section.
When the Edit Modbus Communications box appears on the screen the Modbus Master select box will
not be selected. This means that the PLC will be a Modbus slave. If you want the PLC to be a modbus
slave, or you will not be using this communications option, then leave this box unselected and click on the
Close button to exit the box.
When you select the Modbus master box the setup table will become active. This box allows you to
configure up to 20 modbus poll blocks. This means that the PLC will be a Modbus Master and will be able
to read or write modbus registers with up to 20 other Modbus slave devices. These devices could be
other PLC’s, Mod-MUX I/O modules or operator interface’s etc.
The first column in the table is the Modbus Address(ID) of the slave that the PLC is going to communicate
with. This value can range from 1 to 253 and will depend on the addressing capability of the slave unit.
The second column is the modbus function. Enter a 3 if you want to read registers from a remote slave
unit, or 16 if you want to write to registers in a remote slave unit. Note that digital I/O must be read or
written as 16 bit modbus registers.
The third column is the local address. This is the address of the memory in the PLC where values are to
be written to (function 3) or read from (function 16) depending on the function. See the Memory map of
the PLC in the manual for the PLC that you are using to get the correct address for these registers.
The forth column is the range of the registers. This is the number of registers to be read or written.
ioSelect
www.ioselect.com
11
LogiSoft User Manual
The fifth column is the remote address. This is the address of the memory in the slave unit where values
are to be read from (function 3) or written to (function 16). You will need to refer to the memory map of
these registers in the manual for the slave unit.
Once you have completed entering the data into the table you must click on the Submit button to enter
them into the project. Finally when you are complete you can click on the Close button to exit this box.
3.8 EDIT->Comms Settings
Now click on the menu item Edit and then Comms Settings. If this option is available on the PLC you are
using then a box will appear on the screen which is labeled Setup PLC RS485 Comms Port.
If this feature is not available on your PLC then this option will not be available and you should go onto
the next section.
The parameters which are setup in this box are not for the programming port on the PLC, but the second
port which is used for RS485 Modbus Communications.
The Network ID is default to 1 and this is suitable for Modbus Master communications. If the PLC is to be
a Modbus slave then this ID must be changed so that the PLC has a unique ID on the RS485 network.
Valid addresses are from 1 to 253.
The baud rate, parity and stop bits must be setup to match the parameters of the RS485 network. Default
values are baud rate = 19200, 8 data bits, no parity and 1 stop bit.
Once the values have been selected with the pull-down bars the data can be entered into the project by
clicking on the Select button.
ioSelect
www.ioselect.com
12
LogiSoft User Manual
4. LADDER PROGRAMMING
4.1 LADDER TOOLBAR ELEMENTS.
The toolbar on the screen contains a collection of elements which may be chosen for generating the
ladder diagram. The element must first be selected by clicking on it with the mouse. If you position the
mouse pointer over the element a text description will pop up on the screen and if you click the mouse
button over the element the text status bar at the bottom of the screen will show the element that has
been chosen.
To add the element to the program you must move the mouse to the desired position on the ladder
diagram area and click the mouse button. The element will be added to the ladder program. If there are
options for this element then another box will open up on the screen for you to make further selections. A
brief description of the elements are given below. A more detailed description can be found further in the
manual.
4.1.1 Horizontal Wire
The horizontal wire is used to connect elements of the ladder diagram together from left to right and
makes a series (AND) connection. It is the same as using a wire jumper in an electric circuit. For a circuit
to be complete, there must be a continuous connection from the left hand side of the ladder diagram to
the right hand side of the ladder diagram.
4.1.2 Vertical Wire
The vertical wire is used to connect elements of the ladder diagram together from top to bottom and
makes a parallel (OR) connection. It is the same as using a wire jumper in an electric circuit.
4.1.3 Normally Open Contact
The normally open contact is equivalent to a relay contact or switch contact. In the PLC the normally open
contacts may be inputs, outputs, timers, counters, internal relays in memory, or system statuses. The
contact represents a single binary bit which is either off (0) or on (1).
4.1.4 Normally Closed Contact
The normally closed contact is equivalent to a relay contact or switch contact except that the status is
inverted. If an input is on then the normally closed contact will be off.
4.1.5 Positive Edge Contact
The positive edge contact is a normally open contact which closes for a single PLC scan when the
normally open contact goes from open to close. This contact is often called a “one-shot”.
4.1.6 Negative Edge Contact
ioSelect
www.ioselect.com
13
LogiSoft User Manual
The negative edge contact is a normally open contact which closes for a single PLC scan when the
normally open contact goes from close to open. This contact is often called a “one-shot”.
4.1.7 Function Contact
The function contact enables the ladder program to do complex functions which have a Boolean result.
4.1.8 Normal Output
The normal output represents a physical output or could be an internal relay in memory in the PLC. The
output is turned off if the result of the ladder rung connected to the output is off, or turned on if the result
of the ladder rung is on.
4.1.9 Inverted Output
The inverted output is the same as the normal output except that if the ladder rung is off then the output
will be on.
4.1.10 Set Output
The set output represents a physical output or could be an internal relay in memory in the PLC which is
turned on when the ladder rung goes from off to on. If the rung goes from on to off then the output will
remain latched on.
4.1.11 Reset Output
The reset output represents a physical output or could be an internal relay in memory in the PLC which is
turned off when the ladder rung goes from off to on. If the rung goes from on to off then the output will
remain off (unlatched).
4.1.12 Function Output
The function output represents a function block which may contain a timer, counter or other mathematical
function. This function will only be executed if the rung is on.
4.1.13 Comment
The comment toolbar enables you to enter a text comment onto the ladder program. Comments are
normally used to describe the operation of the following ladder circuit and are very useful for explaining to
a third party the operation of a circuit.
4.1.14 Delete Element
When the delete element toolbar is firstly selected from the toolbar, and then any element on the ladder
program can be deleted by clicking the mouse pointer over that element.
ioSelect
www.ioselect.com
14
LogiSoft User Manual
4.1.15 Delete Line
The delete line toolbar is used to delete all the elements on a complete line on the ladder program. The
arrows coming together show the line being deleted and the program being shifted to close the gap.
4.1.16 Insert Line
The insert line toolbar is used to insert an empty line on the ladder program. The arrows facing apart
show the ladder program being shifted apart to make space for the new line.
4.1.17 Copy Lines
The copy line toolbar is used to copy one or more lines from a part of the ladder program to another part.
This is useful to save time re-entering repetitive lines of ladder program.
4.1.18 Move Lines
The move line toolbar is used to move one or more lines from a part of the ladder program to another
part. This is useful if it is necessary to re-order the sequence of the ladder program and saves you from
having to re-enter the program.
4.1.19 Shift Element Right
The shift element right toolbar is used to move the selected element one position to the right. This task
will only be performed if the position on the right is not already occupied.
4.1.20 Shift Element Left
The shift element left toolbar is used to move the selected element one position to the left. This task will
only be performed if the position on the left is not already occupied.
ioSelect
www.ioselect.com
15
LogiSoft User Manual
4.2 CREATING A SAMPLE PROGRAM
The following example takes you through the steps of creating a simple ladder program. You may need to
refer back to the previous chapters for some of the actions.
4.2.1 Step 1
Create a new project called sample1. Click the mouse pointer on File->New on the menu and after
selecting the PLC type you are using type in the name sample1.
4.2.2 Step 2
Edit some tag names to make them more descriptive. Click on Edit->Tags on the menu and select Input
1. Change the name to START and click the ADD button. Select Input 2 and change the name to STOP
and click the ADD button. Finally select Output 1 and change the name to FAN1, and click the ADD
button. Click Close to exit. Click on File->Save to save the project.
4.2.3 Step 3
In this step you will enter a ladder program using the element toolbar.
Click on the normally open contact
Select the START input from the box.
Click on the horizontal wire
toolbar. Now click on the ladder program Row1,Column2.
Click on the normally closed contact
Select the STOP input from the box.
Click on the normally open contact
Select the FAN1 output from the box.
Click on the vertical wire
Click on the horizontal wire
Row1,Column12.
toolbar. Now click on the ladder program Row1,Column1.
toolbar. Now click on the ladder program Row1,Column3.
toolbar. Now click on the ladder program Row2,Column1.
toolbar. Now click on the ladder program Row2,Column2.
toolbar. Now click on the ladder program Row1,Column4 to
Finally click on the normal output
toolbar. Now click on the ladder program Row1,Column13.
Select the FAN1 output from the box.
Click on the menu item File->Save to save the project.
ioSelect
www.ioselect.com
16
LogiSoft User Manual
The operation of the ladder program works as follows: The initial condition at power-up is that the START
input is open, the FAN1 output is off and the STOP input is closed as it is a normally closed input. When
the START input is closed, the rung is complete along Row1 from the left to the right. This results in the
output FAN1 coming on. The FAN1 contact now closes and keeps the FAN1 switched on, even when the
START input is off. When the STOP input is operated the circuit is broken and the FAN1 output switches
off. This causes the FAN1 contact to open, so when the STOP input is removed, the FAN1 output stays
off.
The example1 is a typical example of a start/stop circuit that would normally be implemented with relays.
The circuit shown is called a rung. When a new circuit is programmed below the first circuit, a new rung
will be created. Although these rungs form part of the same ladder program, they are treated as
independent circuits.
5. COMPILING
The ladder program can now be compiled by clicking the mouse pointer on the Compile menu item. The
text status line at the bottom of the screen will tell you when the compile process is complete.
The compile process is used to firstly check the program for errors, and secondly to convert the program
into a format that the PLC understands.
If the ladder program has an incomplete circuit, then the compiler will give an error message and jump to
the place on the program where the error is.
ioSelect
www.ioselect.com
17
LogiSoft User Manual
6. PROGRAMMING THE PLC
Once the ladder program has been successfully compiled, the PLC can be programmed with the ladder
program. This is done by clicking the on the Program menu item.
Before the PLC can be programmed you must make sure that the PLC has been switched on and the
Programming Port of the PLC has been connected to the RS232 COM port of the PC using the special
programming cable from IoSelect.
When you start programming the PLC the software checks that the PLC type is the same as the type you
selected for your project. If the types are not the same an error message will be displayed and
programming will be aborted.
As soon as the programming is complete, the PLC will start running automatically. If you switch on the
START input you will see that the FAN1 output stays latched on. If you switch on The STOP input you will
see the FAN1 output switch off. This action can also be monitored on the PC if you now go into DEBUG
mode.
ioSelect
www.ioselect.com
18
LogiSoft User Manual
7. DEBUGGING THE PLC
To enter Debug mode click the mouse pointer on the Debug menu item. If you switch on the START input
you will see that the circuit is complete from left to right across the ladder program and this is shown by a
red line on the screen. Any part of the circuit that is on will be in red. Any part that is off will not have the
red line. If you now switch off the START input you will see that the circuit is being latched on by the
FAN1 contact. The diagram below shows the red line where the circuit is complete. To go back to edit the
ladder program click the mouse pointer on the Ladder menu item and this will stop the debug mode.
7.1 View I/O status in Debug Mode.
If you click the mouse pointer on the PLC->View I/O menu item a box will open which shows a list of the
digital I/O in the PLC. You can use the scroll bar to move up or down the list. When a digital input/output
is OFF it is in red and when it is ON it is in green. The purpose of this box is to show you the status of any
of the digital inputs whilst the PLC is running. This is a very useful tool for fault finding you ladder
program.
Try switching the START input on and off slowly and you will see the status change on the screen.
It is possible to toggle the state of an output by double clicking the mouse in the state column. If the state
is OFF, then a command will be sent to the PLC to turn the output on. Once the output has turned on, the
state will change to ON. Note that you cannot toggle the state of an input or system value.
ioSelect
www.ioselect.com
19
LogiSoft User Manual
7.2 View Memory in Debug Mode.
If you click the mouse pointer on the PLC->View Mem menu item a box will open which shows a list of
the memory registers in the PLC. You can use the scroll bar to move up or down the list. The list does not
have pre-defined values as with the I/O box. The reason for this is to give you flexibility in what you view
on the screen at any one time. For instance you might want to view the current value of timer 1 which
might be in memory address 12.(refer to the memory map of your PLC to get the correct address). Type
12 into the first column and you will see the current value automatically change in the value column. If you
now want to view a value your program has in memory address 98 you would enter the number 98 into
the second row, first column and the corresponding value will be shown in the value column.
If you want to alter the value of a memory location, then all you have to do is double click the mouse in
the value column. This action will bring up another box which allows you to enter a new value from the
keyboard. Clicking the mouse pointer on the Update button will write the new value to the PLC memory.
Try changing the value in memory address 98 to 1234.
7.3 Start/Stop PLC in Debug Mode.
When you are in debug mode it is possible to stop the PLC and then start the PLC again by clicking the
mouse pointer on the PLC->Start PLC or PLC->Stop PLC menu items. You can still view all the memory
addresses and I/O statuses when the PLC has been stopped.
ioSelect
www.ioselect.com
20
LogiSoft User Manual
8. LADDER LOGIC
This section explains the layout of the memory, the layout of a ladder program and each of the elements
that can be used in a ladder program.
8.1 PLC Operation.
When the PLC is running a program it runs in a continuous loop. Each pass around the loop is called a
CPU SCAN. The scan time consists of the time taken to read the inputs, run the ladder program, write the
outputs, and to do housekeeping work such as updating the timers, handling the communications and any
other PLC specific tasks.
The diagram below shows a typical PLC scan cycle.
SELF TEST
READ INPUTS
RUN LADDER PROGRAM
WRITE OUTPUTS
COMMUNICATIONS,ETC
The PLC reads the inputs from the physical hardware and copies their values to memory. The PLC
ladder program uses the information from memory. This makes the PLC faster and avoids cases
where an input changes from the start to the end of the program.
The PLC steps through the ladder program one rung at a time. The program reads the inputs from
memory and after performing the programmed tasks, the output memory is updated with the output
information.
When the program is complete the physical outputs are updated from the output memory.
The scan time is the time to go once through all of these steps. The part of the scan cycle that is within
the control of the programmer is the ladder program. A short ladder program will result in fast scan times
whilst more complicated programs which make use of many mathematical functions will take longer. It is
up to the programmer to be aware of the response required for the system and to design the program
accordingly.
ioSelect
www.ioselect.com
21
LogiSoft User Manual
8.2 PLC Memory.
The PLC has a block of memory which is used to store the statuses of inputs, outputs, timers, counters,
internal relays, system relays, and variables. The size of the memory depends on the PLC that is being
used. You will need to refer to the manual on your PLC to get the exact details.
Each element is identified by a Symbol and an Address.
X
xxx
Element SYMBOL
Element ADDRESS
There are three types of elements.
1. Relay elements: These operate in a similar way to a relay and their state is either ON or OFF.
2. Memory elements: These are 16 bit memory registers and are represented as numbers 0 –
65535.
3. Combination elements: These include Counters and Timers which have both relay and memory
elements.
Element
Type
Inputs
Symbol
PLC Memory Map
Address Range
I
1 – max Inputs
Outputs
O
1 – max Outputs
Timers
T
1 – max Timers
Counters
C
1 – max Counters
Relays
R
1 – max Relays
System
S
1 – max System
Memory
M
0 – max Mem
Constant
K
0 – 65535
ioSelect
www.ioselect.com
22
Description
Used as a contact in the ladder
program. Is connected to the physical
inputs on the PLC.
Used as a contact or relay in the
ladder program. Is connected to the
physical outputs on the PLC.
Uses Memory for the Current Value
and Preset Value. Uses contacts for
the compare output.
Uses Memory for the Count Value and
Preset Value. Uses contacts for the
compare output.
May be used as temporary contacts or
relays. Does not have any physical
connection to inputs or outputs.
These are contacts which are
generated by the PLC such as 1sec
pulse contact, etc. Refer to manual on
PLC.
Memory is used to store temporary
variables for calculations using the
output function element.
Decimal Constant.
LogiSoft User Manual
A typical memory map of a PLC would look like to following example.
Memory
Address
M0
M1
M2
M3
M4
M5
M6
M7
M8
M9
M10
M11
M12
M13
M14
M15
M16
M17
M18
M19
M20
M21
M22
M23
ioSelect
15
T16
C16
R16
R32
S16
14
T15
C15
R15
R31
S15
13
T14
C14
R14
R30
S14
12
T13
C13
R13
R29
S13
www.ioselect.com
11
T12
C12
R12
R27
S12
10
T11
C11
R11
R27
S11
9
T10
C10
R10
R26
S10
8
T9
C9
R9
R25
S9
23
7
6
5
4
3
2
1
0
I 8
I 7
I 6
I 5
T8
C8
R8
R24
S8
T7
C7
R7
R23
S7
T6
C6
R6
R22
S6
T5
C5
R5
R21
S5
I 4
O4
T4
C4
R4
R20
S4
I 3
O3
T3
C3
R3
R19
S3
I2
O2
T2
C2
R2
R18
S2
I 1
O1
T1
C1
R1
R17
S1
Element
Type
INPUT
OUTPUT
TIMERS
COUNTER
RELAYS
RELAYS
SYSTEM
TIMER1
TIMER2
TIMER3
“
TIMER16
COUNTER 1
COUNTER 2
COUNTER 4
“
COUNTER16
USER MEM
USER MEM
USER MEM
“
“
“
“
LogiSoft User Manual
8.3 Basic Rung Configurations.
The program is made up with input elements in columns 1 to 12 and output elements in the final column
13. A complete circuit may use only one or may use many rows. This circuit is called a rung.
Some basic configurations of rungs are shown below.
The example below shows a simple rung with a single Input and Output.
It is not always necessary for a rung to have an input contact. If the program is used to always switch
an output on then the rung would look like this. It is essential that each rung has at least one output
relay or an output function, otherwise the circuit would do nothing.
It is not always necessary to have an END output function at the end of a program except if the
program uses subroutines. Subroutines are placed after the end function and are only run if called by
the ladder program. You can also use an END in the middle of a program if you only want to test a
portion of the program. Any rungs after the END will be ignored.
Input contacts can be put in series. This is known as an and function. For example in the diagram
below, Input 1 AND Input 2 must be on for the Output 1 to go on.
Input contacts can be put in parallel. This is known as an or function. For example in the diagram
below, Input 1 OR Input 2 must be on for the Output 1 to go on.
ioSelect
www.ioselect.com
24
LogiSoft User Manual
A row can be split so that outputs can also be put in parallel. This is used when the same condition is
used to switch more than one output. For example in the diagram below, Input 1 will turn on Output 1
AND OUTPUT 2.
It is also possible to put input contacts in the split. For example in the diagram below, Input 1 will turn
on Output 1. Input 1 AND Input 2 will turn on OUTPUT 2.
The series and parallel ladder circuits can be combined into a single rung. For example in the
diagram below, the Output 1 will turn on if either Input 1 AND Input 2 is on, OR, Input 3 AND Input 4
is on.
ioSelect
www.ioselect.com
25
LogiSoft User Manual
8.4 Ladder Program Processing.
When the PLC runs the ladder program it steps through each of the elements starting at the top left and
ending at the bottom right. When the PLC gets to the END of the program it starts from the beginning
again.
The example below shows the typical sequence of processing a program.
Start of Rung
1
2
4
5
End of Rung
3
6
From left to
Right and top
to bottom
7
8
Step 1:
Step 2:
Step 3:
Step 4:
Step 5:
Step 6:
Step 7:
Step 8:
ioSelect
9
10
11
12
Load Input 1.
Input 1 AND Input 2.
(Input 1 AND Input 2) OR Input 3.
((Input 1 AND Input 2) OR Input 3) AND (NOT Input 8).
OUT Output 1.
Load Input 6.
OUT Output 2
OUT Output 3. etc..
www.ioselect.com
26
LogiSoft User Manual
8.5 Ladder Programming Elements.
This section gives a detailed explanation of the elements that you can use to create your ladder program.
8.5.1 Ladder Inputs - Normally Open/Closed Contact
The normally open contact is equivalent to a relay contact or switch contact. It can either be in the on or
off state, and can be a physical input or output, or a point in memory. The normally closed contact is
simply the inverse of a normally open contact.
In the following example, when input I1 is on the output O1 will go on.
In the following example, when input I1 is off the output O1 will go on.
8.5.2 Ladder Inputs - Positive/Negative Edge Contact
The positive edge contact is a normally open contact which closes for a single PLC scan when the
normally open contact goes from off to on. The negative edge contact closes for a single PLC scan when
the normally open contact goes from on to off.
In the following example, each time input I1 goes from off to on, the output O1 will go on for one scan.
In the following example, each time input I1 goes from on to off, the output O1 will go on for one scan.
8.5.3 Ladder Inputs – Function Contact
ioSelect
www.ioselect.com
27
LogiSoft User Manual
The function contacts are function blocks which produce an ON or OFF result and can be treated as a
ladder input.
8.5.3.1 Function Contact – (Mem = Mem)
The function compares the contents of two memory locations. If they are the same then the result will be
on otherwise the result will be off.
In the following example, when the value in memory M12 is equal to the value in memory M13 the output
O1 will turn on.
ioSelect
www.ioselect.com
28
LogiSoft User Manual
8.5.3.2 Function Contact – (Mem = Const)
The function compares the contents of a memory location with a constant number. If they are the same
then the result will be on otherwise the result will be off.
In the following example, when the value in memory M12 is equal to 10 the output O1 will turn on.
8.5.3.3 Function Contact – (Mem /= Mem)
The function compares the contents of two memory locations. If they are not the same then the result will
be on otherwise the result will be off.
In the following example, when the value in memory M12 is not equal to the value in memory M13 the
output O1 will turn on.
8.5.3.4 Function Contact – (Mem /= Const)
The function compares the contents of a memory location with a constant number. If they are not the
same then the result will be on otherwise the result will be off.
In the following example, when the value in memory M12 is not equal to 10 the output O1 will turn on.
ioSelect
www.ioselect.com
29
LogiSoft User Manual
8.5.3.5 Function Contact – (Mem >= Mem)
The function compares the contents of two memory locations. If the value in the first memory is greater
than or equal to the value in the second memory the result will be on otherwise the result will be off.
In the following example, when the value in memory M12 is greater or equal to the value in memory M13
the output O1 will turn on.
8.5.3.6 Function Contact – (Mem >= Const)
The function compares the contents of a memory location with a constant number. If the value in memory
is greater than or equal to the constant then the result will be on otherwise the result will be off.
In the following example, when the value in memory M12 is greater or equal to 10 the output O1 will turn
on.
8.5.3.7 Function Contact – (Mem < Mem)
The function compares the contents of two memory locations. If the value in the first memory is less than
the value in the second memory the result will be on otherwise the result will be off.
In the following example, when the value in memory M12 is less than the value in memory M13 the output
O1 will turn on.
ioSelect
www.ioselect.com
30
LogiSoft User Manual
8.5.3.8 Function Contact – (Mem < Const)
The function compares the contents of a memory location with a constant number. If the value in memory
is less than the constant then the result will be on otherwise the result will be off.
In the following example, when the value in memory M12 is less than 10 the output O1 will turn on.
8.5.4 Ladder Outputs – Normal/Inverted Output
The normal output represents a physical output or could be an internal relay in memory in the PLC. The
output is turned off if the result of the ladder rung connected to the output is off, or turned on if the result
of the ladder rung is on. The inverted output is simply the inverse of a normal output.
In the following example, when input I1 is on the output O1 will go on.
In the following example, when input I1 is on the output O1 will be off.
8.5.5 Ladder Outputs – Set/Reset Output
The set output represents a physical output or could be an internal relay in memory in the PLC which is
turned on when the ladder rung goes from off to on. If the rung goes from on to off then the output will
remain latched on. The reset output is simply the opposite and is turned off when the ladder rung goes
from off to on.
In the following example, when input I1 goes on the output O1 will be set on. When input I1 is off the
output O1 will stay on.
ioSelect
www.ioselect.com
31
LogiSoft User Manual
In the following example, when input I1 goes on the output O1 will be reset off. When input I1 is off the
output O1 will stay off.
8.5.6 Ladder Outputs – Standard Functions
The function outputs are function blocks which perform a set task if the result of the rung is on.
8.5.6.1 Function Output – (Timer 0.1Sec & Timer 0.01Sec)
The Timer 0.1Sec is a single input timer with 0.1 Second time base and the Timer 0.01Sec has a
0.01Second time base. The functionality of these timers is the same.
There a number of timers available numbered from 1 upwards to the maximum depending on the PLC
being used. The timer will run as long as the input is on. The timer will be reset to zero when the input is
off.
The timer also has a built in compare function. The compare function compares the timer value with a
value in memory or a constant. If the timer value is less than the memory value or constant then the timer
output will be off, otherwise it will be on.
In the example below, the timer T1 will start timing when the input I1 is turned on. When the timer value is
greater or equal to 40 (4 seconds) the timer output will turn on. When the input I1 turns off (after 6
seconds), the timer T1 will stop and the timer value will be reset to zero.
I1
T1
Timer
Value
ioSelect
0
www.ioselect.com
10
20
30
32
40
50
0
10 x 0.1Sec
LogiSoft User Manual
8.5.6.2 Function Output – (TimerA 0.1Sec and TimerA 0.01Sec)
The TimerA 0.1Sec is an Accumulating timer with 0.1 Second time base and the TimerA 0.01Sec has a
0.01Second time base. The functionality of these timers is the same.
There a number of timers available numbered from 1 upwards to the maximum depending on the PLC
being used. The timer will run as long as the input is on and stops when the input is removed. The timer
will continue when the input is on again. The timer will be reset to zero when the reset input is on.
The timer also has a built in compare function. The compare function compares the timer value with a
value in memory or a constant. If the timer value is less than the memory value or constant then the timer
output will be off, otherwise it will be on.
In the example below, the timer T1 will start timing when the input I1 is turned on. If input I1 is turned off
then the timer will stop. The timer will continue when the input is turned on again. When the timer value is
greater or equal to 40 (4 seconds) the timer output will turn on. When the input I2 turns on (after 6
seconds), the timer T1 will stop and the timer value will be reset to zero.
I1
T1
I2
Timer
Value
ioSelect
0
10
www.ioselect.com
20
30
40
33
50
0
10 x 0.1Sec
LogiSoft User Manual
8.5.6.3 Function Output – (Counter)
Up counter with reset input. The counter will count up when the count input goes from off to on. The
counter will be reset to zero when the reset input is on. The counter output will go on when the count
value is greater or equal to the preset value. The counter is addressed as the counter number from 1 to
max Counters depending on the PLC being used.
In the example below, the counter C1 will increment on each off to on transition of the input I1. When the
counter value is greater or equal to 4 the counter output will turn on. When the input I2 turns on, the
counter C1 will stop and the counter value will be reset to zero.
8.5.6.4 Function Output – (Cntr Up/Down – Type 1)
Up/Down counter with reset input. The counter will count up when the Up count input goes from off to on.
The counter will count down when the Down count input goes from off to on. The counter will be reset to
zero when the reset input is on. The counter output will go on when the count value is greater or equal to
the preset value.
In the example below, the counter C1 will increment on each off to on transition of the input I1. The
counter C1 will decrement on each off to on transition of the input I2. When the counter value is greater
or equal to 5 the counter output will turn on. When the input I3 turns on, the counter C1 will stop and the
counter value will be reset to zero.
ioSelect
www.ioselect.com
34
LogiSoft User Manual
8.5.6.5 Function Output – (NOP)
This function performs no operation. It can be inserted for debugging purposes when you want the result
of a rung to do nothing.
In the example below, the Input I1 will do nothing.
8.5.6.6 Function Output – (END)
Placing this output function in the ladder program will indicate the end of the program. Any ladder
program after this function will not be run.
8.5.6.7 Function Output – (LD Load Accumulator)
The accumulator is a 32 bit working register which is used for all mathematical operations. The
accumulator must first be loaded with a value before any of the mathematical functions are used.
The LD function loads the accumulator from memory(M) or with a constant(K). As memory and constants
are only 16 bits, they are loaded into the lower 16 bits of the accumulator. The upper 16 bits are set to
zero.
The example loads the accumulator with the value in memory address 12. Note that if the function is
joined directly to the left hand side of the rung, that the function will be called every PLC scan.
Memory M12
1
5
1
4
1
3
1
2
1
1
1
0
9
8
7
6
5
4
3
2
1
0
0
0
0
0
0
0
0
0
1
1
0
0
1
1
1
0
Bit
Accumulator Lower
Accumulator Upper
3
1
3
0
2
9
2
8
2
7
2
6
2
5
2
4
2
3
2
2
2
1
2
0
1
9
1
8
1
7
1
6
1
5
1
4
1
3
1
2
1
1
1
0
9
8
7
6
5
4
3
2
1
0
0
0
0
0
0
0
0
0
0
0
0
0
0
0
0
0
0
0
0
0
0
0
0
0
1
1
0
0
1
1
1
0
ioSelect
www.ioselect.com
35
Bit
LogiSoft User Manual
8.5.6.8 Function Output – (OUT)
The lower 16 bits of the value in the accumulator is copied to memory(M).
In the example, the value in the accumulator is copied to memory address 44.
Memory M12
1
5
1
4
1
3
1
2
1
1
1
0
9
8
7
6
5
4
3
2
1
0
0
0
0
0
0
0
0
0
1
1
0
0
1
1
1
0
Bit
Accumulator Lower
Accumulator Upper
3
1
3
0
2
9
2
8
2
7
2
6
2
5
2
4
2
3
2
2
2
1
2
0
1
9
1
8
1
7
1
6
1
5
1
4
1
3
1
2
1
1
1
0
9
8
7
6
5
4
3
2
1
0
0
0
0
0
0
0
0
0
0
0
0
0
0
0
0
0
0
0
0
0
0
0
0
0
1
1
0
0
1
1
1
0
Bit
Memory M44
ioSelect
1
5
1
4
1
3
1
2
1
1
1
0
9
8
7
6
5
4
3
2
1
0
0
0
0
0
0
0
0
0
1
1
0
0
1
1
1
0
www.ioselect.com
36
Bit
LogiSoft User Manual
8.5.6.9 Function Output – (AND)
This function logically AND’s the lower 16 bits of the accumulator with memory(M) or with a constant(K).
The result is placed in the accumulator.
If the memory M12 has the value:
0000 0000 0000 0011
and the memory M44 has the value:
0000 0000 0000 0110
the result copied to memory M44 will be: 0000 0000 0000 0010.
Memory M12
1
5
1
4
1
3
1
2
1
1
1
0
9
8
7
6
5
4
3
2
1
0
0
0
0
0
0
0
0
0
0
0
0
0
0
0
1
1
Bit
LD
3
1
3
0
2
9
2
8
2
7
2
6
2
5
2
4
2
3
2
2
2
1
2
0
1
9
1
8
1
7
1
6
1
5
1
4
1
3
1
2
1
1
1
0
9
8
7
6
5
4
3
2
1
0
0
0
0
0
0
0
0
0
0
0
0
0
0
0
0
0
0
0
0
0
0
0
0
0
0
0
0
0
0
0
1
1
Bit
AND
Memory M44
1
5
1
4
1
3
1
2
1
1
1
0
9
8
7
6
5
4
3
2
1
0
0
0
0
0
0
0
0
0
0
0
0
0
0
1
1
0
Accumulator Upper
Bit
Accumulator Lower
3
1
3
0
2
9
2
8
2
7
2
6
2
5
2
4
2
3
2
2
2
1
2
0
1
9
1
8
1
7
1
6
1
5
1
4
1
3
1
2
1
1
1
0
9
8
7
6
5
4
3
2
1
0
0
0
0
0
0
0
0
0
0
0
0
0
0
0
0
0
0
0
0
0
0
0
0
0
0
0
0
0
0
0
1
0
Bit
OUT
Memory M44
ioSelect
1
5
1
4
1
3
1
2
1
1
1
0
9
8
7
6
5
4
3
2
1
0
0
0
0
0
0
0
0
0
0
0
0
0
0
0
1
0
www.ioselect.com
37
Bit
LogiSoft User Manual
8.5.6.10 Function Output – (OR)
This function logically OR’s the lower 16 bits of the accumulator with memory(M) or with a
constant(K). The result is placed in the accumulator.
If the memory M12 has the value:
0000 0000 0000 0011
and the memory M44 has the value:
0000 0000 0000 0110
the result copied to memory M44 will be: 0000 0000 0000 0111.
Memory M12
1
5
1
4
1
3
1
2
1
1
1
0
9
8
7
6
5
4
3
2
1
0
0
0
0
0
0
0
0
0
0
0
0
0
0
0
1
1
Bit
LD
3
1
3
0
2
9
2
8
2
7
2
6
2
5
2
4
2
3
2
2
2
1
2
0
1
9
1
8
1
7
1
6
1
5
1
4
1
3
1
2
1
1
1
0
9
8
7
6
5
4
3
2
1
0
0
0
0
0
0
0
0
0
0
0
0
0
0
0
0
0
0
0
0
0
0
0
0
0
0
0
0
0
0
0
1
1
Bit
OR
Memory M44
1
5
1
4
1
3
1
2
1
1
1
0
9
8
7
6
5
4
3
2
1
0
0
0
0
0
0
0
0
0
0
0
0
0
0
1
1
0
Accumulator Upper
Bit
Accumulator Lower
3
1
3
0
2
9
2
8
2
7
2
6
2
5
2
4
2
3
2
2
2
1
2
0
1
9
1
8
1
7
1
6
1
5
1
4
1
3
1
2
1
1
1
0
9
8
7
6
5
4
3
2
1
0
0
0
0
0
0
0
0
0
0
0
0
0
0
0
0
0
0
0
0
0
0
0
0
0
0
0
0
0
0
1
1
1
Bit
OUT
Memory M44
ioSelect
1
5
1
4
1
3
1
2
1
1
1
0
9
8
7
6
5
4
3
2
1
0
0
0
0
0
0
0
0
0
0
0
0
0
0
1
1
1
www.ioselect.com
38
Bit
LogiSoft User Manual
8.5.6.11 Function Output – (XOR)
This function logically Exclusive OR’s the lower 16 bits of the accumulator with memory(M) or with a
constant(K). The result is placed in the accumulator.
If the memory M12 has the value:
0000 0000 0000 0011
and the memory M44 has the value:
0000 0000 0000 0110
the result copied to memory M44 will be: 0000 0000 0000 0101.
Memory M12
1
5
1
4
1
3
1
2
1
1
1
0
9
8
7
6
5
4
3
2
1
0
0
0
0
0
0
0
0
0
0
0
0
0
0
0
1
1
Bit
LD
3
1
3
0
2
9
2
8
2
7
2
6
2
5
2
4
2
3
2
2
2
1
2
0
1
9
1
8
1
7
1
6
1
5
1
4
1
3
1
2
1
1
1
0
9
8
7
6
5
4
3
2
1
0
0
0
0
0
0
0
0
0
0
0
0
0
0
0
0
0
0
0
0
0
0
0
0
0
0
0
0
0
0
0
1
1
Bit
XOR
Memory M44
1
5
1
4
1
3
1
2
1
1
1
0
9
8
7
6
5
4
3
2
1
0
0
0
0
0
0
0
0
0
0
0
0
0
0
1
1
0
Accumulator Upper
Bit
Accumulator Lower
3
1
3
0
2
9
2
8
2
7
2
6
2
5
2
4
2
3
2
2
2
1
2
0
1
9
1
8
1
7
1
6
1
5
1
4
1
3
1
2
1
1
1
0
9
8
7
6
5
4
3
2
1
0
0
0
0
0
0
0
0
0
0
0
0
0
0
0
0
0
0
0
0
0
0
0
0
0
0
0
0
0
0
1
0
1
Bit
OUT
Memory M44
ioSelect
1
5
1
4
1
3
1
2
1
1
1
0
9
8
7
6
5
4
3
2
1
0
0
0
0
0
0
0
0
0
0
0
0
0
0
1
0
1
www.ioselect.com
39
Bit
LogiSoft User Manual
8.5.6.12 Function Output – (CMP)
This function Compares the accumulator lower 16 bits with memory(M) or with a constant(K). If the value
in the accumulator is less than the value in memory/constant then system bit S6 is turned on. If the value
in the accumulator is equal to the value in memory/constant then system bit S7 is turned on. If the value
in the accumulator is greater than the value in memory/constant then system bit S8 is turned on. The
value in the accumulator is left unchanged.
If the memory M12 has the value 123 and the memory M44 has the value 125 then the system bit S6 will
be on and the system bits S7 and S8 will be off.
8.5.6.13 Function Output – (ADD)
This function Adds the memory(M) or constant(K) to the accumulator. The result is stored in the
accumulator.
ACC = ACC + M/K
ioSelect
www.ioselect.com
40
LogiSoft User Manual
8.5.6.14 Function Output – (SUB)
This function subtracts the memory(M) or constant(K) from the accumulator. The result is stored in the
accumulator.
ACC = ACC - M/K
8.5.6.15 Function Output – (MUL)
This function multiplies the accumulator with the memory(M) or constant(K). The result is stored in the
accumulator. The result can be a value up to 32 bits.
ACC = ACC X M/K
ioSelect
www.ioselect.com
41
LogiSoft User Manual
8.5.6.16 Function Output – (DIV)
This function divides the 32 bit accumulator by the 16 bit memory(M) or constant(K). The result is stored
in the accumulator.
ACC = ACC / M/K
8.5.6.17 Function Output – (INC)
This function increments the memory(M) directly and does not use the accumulator.
Mem = Mem + 1
8.5.6.18 Function Output – (DEC)
This function decrements the memory(M) directly and does not use the accumulator.
Mem = Mem - 1
ioSelect
www.ioselect.com
42
LogiSoft User Manual
8.5.6.19 Function Output – (INV)
This function inverts the bits in the accumulator.
ACC = ~ACC
8.5.6.20 Function Output – (MOV)
This function moves a variable in a memory location to a new location. The accumulator must already
contain the address of the memory location to be moved.
M44 = M43
8.5.6.21 Function Output – (SHL)
The bits in the accumulator are shifted left by the value in memory(M) or constant(K). The lower bits are
filled with zeros. In the example below, the accumulator is loaded with the value 5 or 0000 0000 0000
0101 binary. The accumulator is then shifted left 3 times to give the result 40 or 0000 0000 0010 1000
binary.
ioSelect
www.ioselect.com
43
LogiSoft User Manual
8.5.6.22 Function Output – (SHR)
The bits in the accumulator are shifted right by the value in memory(M) or constant(K). The upper bits are
filled with zeros. In the example below, the accumulator is loaded with the value 5 or 0000 0000 0000
0101 binary. The accumulator is then shifted right twice to give the result 1 or 0000 0000 0000 0001
binary.
ioSelect
www.ioselect.com
44
LogiSoft User Manual
8.5.6.23 Function Output – (CALL)
This function is used to call a subroutine. The constant(k) is the label of the subroutine.
8.5.6.24 Function Output – (SUBR)
This function is the start of a subroutine. The constant(k) is the label of the subroutine which is called by
the call function.
8.5.6.25 Function Output – (RET)
This function must be placed at the last line of a subroutine. The function can also be used in the
subroutine for a conditional return.
The example below calls a subroutine number 1 when input 1 is on. The subroutine SUBR ladder
diagram is placed after the END function and labels the start of the subroutine. The RET function is used
to tell the PLC that this is the end of the subroutine and to jump back to the main program. A maximum of
20 subroutines can be used in a ladder program.
ioSelect
www.ioselect.com
45
LogiSoft User Manual
8.5.6.26 Function Output – (RAND)
This function places a random number from 0 to 100 in the accumulator.
8.5.7 Ladder Outputs – Advanced Functions
The advanced function outputs are function blocks which perform advanced tasks. You must check the
manual for your PLC to see which of these functions are available in your PLC.
8.5.7.1 Function Output – (LDD Load Double)
The accumulator is a 32 bit working register which is used for all mathematical operations. The
accumulator must first be loaded with a value before any of the mathematical functions are used.
The LDD function loads the 32 bit accumulator from memory(M) or with a constant(K). As memory is only
16 bit registers, the LDD function loads the lower 16 bits of the accumulator from the memory location (M)
and the upper 16 bits from the memory location (M+1).
The example loads the lower 16 bits of the accumulator with the value in memory address 12 and the
upper 16 bits of the accumulator wit the value in memory address 13. Note that if the function is joined
directly to the left hand side of the rung, that the function will be called every PLC scan.
Memory M12
Memory M13
1
5
1
4
1
3
1
2
1
1
1
0
9
8
7
6
5
4
3
2
1
0
1
5
1
4
1
3
1
2
1
1
1
0
9
8
7
6
5
4
3
2
1
0
0
0
0
0
0
0
0
0
0
0
0
0
1
1
1
0
0
0
0
0
0
0
0
0
1
1
0
0
0
0
0
0
Bit
Accumulator Lower
Accumulator Upper
3
1
3
0
2
9
2
8
2
7
2
6
2
5
2
4
2
3
2
2
2
1
2
0
1
9
1
8
1
7
1
6
1
5
1
4
1
3
1
2
1
1
1
0
9
8
7
6
5
4
3
2
1
0
0
0
0
0
0
0
0
0
0
0
0
0
1
1
1
0
0
0
0
0
0
0
0
0
1
1
0
0
0
0
0
0
ioSelect
www.ioselect.com
46
LogiSoft User Manual
8.5.7.2 Function Output – (OUTD Out Double)
The lower 16 bits of the accumulator are copied to the memory (M) and the upper 16 bits of the value in
the accumulator are copied to memory(M+1).
In the example, the lower 16 bits of the accumulator are copied to memory address M44 and the upper 16
bits to memory M45.
8.5.7.3 Function Output – (ANDD)
This function logically AND’s the accumulator with memory(M) and memory(M+1) or with a constant(K).
The result is placed in the accumulator.
If the accumulator has the value: 0000 0000 0000 1100 0000 0000 0000 0011
and memory M44 has the value:
0000 0000 0000 0110
and memory M45 has the value: 0000 0000 0001 1000
the result in the accumulator:
0000 0000 0000 1000 0000 0000 0000 0010
ioSelect
www.ioselect.com
47
LogiSoft User Manual
8.5.7.4 Function Output – (ORD)
This function logically OR’s the 32 bit accumulator with memory(M) and memory(M+1) or with a
constant(K). The result is placed in the accumulator.
If the accumulator has the value: 0000 0000 0000 1100 0000 0000 0000 0011
and memory M44 has the value:
0000 0000 0000 0110
and memory M45 has the value: 0000 0000 0001 1000
the result in the accumulator:
0000 0000 0001 1100 0000 0000 0000 0111
8.5.7.5 Function Output – (XORD)
This function logically Exclusive OR’s the 32 bit accumulator with memory(M) and memory(M+1) or with a
constant(K). The result is placed in the accumulator.
If the accumulator has the value: 0000 0000 0000 1100 0000 0000 0000 0011
and memory M44 has the value:
0000 0000 0000 0110
and memory M45 has the value: 0000 0000 0001 1000
the result in the accumulator:
0000 0000 0001 0100 0000 0000 0000 0101
ioSelect
www.ioselect.com
48
LogiSoft User Manual
8.5.7.6 Function Output – (CMPD)
This function Compares the 32 bit accumulator with memory(M) and (M+1) or with a constant(K). If the
value in the accumulator is less than the value in memory/constant then system bit S6 is turned on. If the
value in the accumulator is equal to the value in memory/constant then system bit S7 is turned on. If the
value in the accumulator is greater than the value in memory/constant then system bit S8 is turned on.
The value in the accumulator is left unchanged.
If the memory M12 has the value 123 and the memory M44 has the value 125 then the system bit S6 will
be on and the system bits S7 and S8 will be off.
8.5.7.7 Function Output – (ADDD)
This function Adds the memory(M) and (M+1) or constant(K) to the 32 bit accumulator. The result is
stored in the accumulator.
ACC = ACC + M+1/M
or ACC = ACC + K
8.5.7.8 Function Output – (SUBD)
This function Subtracts the memory(M) and (M+1) or constant(K) from the 32 bit accumulator. The result
is stored in the accumulator.
ACC = ACC – M+1/M
ioSelect
or ACC = ACC - K
www.ioselect.com
49
LogiSoft User Manual
8.5.7.9 Function Output – (MULD)
This function Multiplies the memory(M) and (M+1) or constant(K) with the 32 bit accumulator. The result is
stored in the accumulator.
ACC = ACC X M+1/M
or ACC = ACC X K
8.5.7.10 Function Output – (DIVD)
This function divides the 32 bit accumulator by the memory(M) and (M+1) or constant(K). The result is
stored in the accumulator.
ACC = ACC / M+1/M
or ACC = ACC / K
8.5.7.11 Function Output – (INCD)
This function increments the memory(M) and (M+1) directly and does not use the accumulator.
(M+1/M) = (M+1/M) + 1
8.5.7.12 Function Output – (DECD)
This function decrements the memory(M) and (M+1) directly and does not use the accumulator.
(M+1/M) = (M+1/M) - 1
ioSelect
www.ioselect.com
50
LogiSoft User Manual
8.5.8 Ladder Outputs – Float Functions
The float functions are function blocks which perform mathematical tasks using the IEEE 754 floating
point notation. These functions use two memory locations and are 32 bit functions. The range of the
values extend from +/- 1.18E-38 to +/- 3.39E+38.
The 32 bit floating point format is as follows:
31 30
S
23
Exponent
22
0
Mantissa
The value of the number is:
(-1)S * 2(Exponent –127) * 1.Mantissa
Float Constants can be written with or without the exponential. For example 123.4 can also be written as
1.234E2.
You must check the manual for your PLC to see which of these functions are available in your PLC.
8.5.8.1 Function Output – (LDF Load Float)
The floating point functions use a separate accumulator which must first be loaded with a value before
any of the floating point mathematical functions are used.
The LDF function loads the 32 bit float accumulator from memory(M) or with a constant(F). As memory is
only 16 bit registers, the LDF function loads the lower 16 bits of the accumulator from the memory
location (M) and the upper 16 bits from the memory location (M+1).
8.5.8.2 Function Output – (OUTF Out Float)
The OUTF function copies the 32 bit float accumulator to memory(M). As memory is only 16 bit registers,
the OUTF function copies the lower 16 bits of the accumulator to the memory location (M) and the upper
16 bits to the memory location (M+1).
8.5.8.3 Function Output – (CMPF Compare Float)
This function Compares the 32 bit float accumulator with memory(M) and (M+1) or with a constant(K). If
the value in the accumulator is less than the value in memory/constant then system bit S6 is turned on. If
the value in the accumulator is equal to the value in memory/constant then system bit S7 is turned on. If
the value in the accumulator is greater than the value in memory/constant then system bit S8 is turned
on. The value in the accumulator is left unchanged.
ioSelect
www.ioselect.com
51
LogiSoft User Manual
8.5.8.4 Function Output – (ADDF)
This function Adds the memory(M) and (M+1) or constant(F) to the 32 bit float accumulator. The result is
stored in the float accumulator.
FACC = FACC + M+1/M
or FACC = FACC + F
8.5.8.5 Function Output – (SUBF)
This function Subtracts the memory(M) and (M+1) or constant(F) from the 32 bit float accumulator. The
result is stored in the float accumulator.
FACC = FACC – M+1/M
or FACC = FACC - F
8.5.8.6 Function Output – (MULF)
This function Multiplies the memory(M) and (M+1) or constant(F) with the 32 bit float accumulator. The
result is stored in the float accumulator.
FACC = FACC X M+1/M
or FACC = FACC X F
8.5.8.7 Function Output – (DIVF)
This function divides the 32 bit float accumulator by the memory(M) and (M+1) or constant(F). The result
is stored in the float accumulator.
FACC = FACC / M+1/M
or FACC = FACC / F
8.5.8.8 Function Output – (BTOF)
This function copies the 32 bit accumulator to the 32 bit float accumulator. A type conversion is carried
out from a 32 bit integer to a 32 bit floating point value.
FACC = ACC
8.5.8.9 Function Output – (FTOB)
This function copies the 32 bit floating point accumulator to the 32 bit accumulator. A type conversion is
carried out from a 32 bit floating point value to a 32 bit integer.
ACC = FACC
ioSelect
www.ioselect.com
52
LogiSoft User Manual
8.5.8.10 Function Output – (PWRF)
This function raises the 32 bit float accumulator by the power of the value in memory(M) and (M+1) or
constant(K). The result is stored in the float accumulator.
FACC = FACC(M+1/M)
or FACC = FACC(F)
8.5.9 Ladder Outputs – Trigonometric Functions
The trig functions are function blocks which perform mathematical tasks using the IEEE 754 floating point
notation. The unit for the functions is in RAD’s.
You must check the manual for your PLC to see which of these functions are available in your PLC.
8.5.9.1 Function Output – (ACOSF)
This function performs the Arc Cosine of the 32 bit float accumulator. The result is stored in the float
accumulator.
FACC = ACOS(FACC)
8.5.9.2 Function Output – (ASINF)
This function performs the Arc Sine of the 32 bit float accumulator. The result is stored in the float
accumulator.
FACC = ASIN(FACC)
8.5.9.3 Function Output – (ATANF)
This function performs the Arc Tangent of the 32 bit float accumulator. The result is stored in the float
accumulator.
FACC = ATAN(FACC)
8.5.9.4 Function Output – (COSF)
This function performs the Cosine of the 32 bit float accumulator. The result is stored in the float
accumulator.
FACC = COS(FACC)
8.5.9.5 Function Output – (SINF)
This function performs the Sine of the 32 bit float accumulator. The result is stored in the float
accumulator.
ioSelect
www.ioselect.com
53
LogiSoft User Manual
FACC = SIN(FACC)
8.5.9.6 Function Output – (TANF)
This function performs the Tangent of the 32 bit float accumulator. The result is stored in the float
accumulator.
FACC = TAN(FACC)
8.5.9.7 Function Output – (SQRTF)
This function performs the square root of the 32 bit float accumulator. The result is stored in the float
accumulator.
FACC = SQRT(FACC)
8.5.9.8 Function Output – (RADF)
This function converts the degree value of the 32 bit float accumulator to the radian. The result is stored
in the float accumulator.
FACC = RAD(FACC)
8.5.9.9 Function Output – (DEGF)
This function converts the radian value of the 32 bit float accumulator to degrees. The result is stored in
the float accumulator.
FACC = DEG(FACC)
8.5.9.10 Function Output – (LOGF)
This function performs the logarithmic function on the value in the 32 bit float accumulator. The result is
stored in the float accumulator.
FACC = LOG(FACC)
8.5.9.11 Function Output – (EXPF)
This function performs the exponential function on the value in the 32 bit float accumulator. The result is
stored in the float accumulator.
FACC = EXP(FACC)
ioSelect
www.ioselect.com
54
LogiSoft User Manual
8.5.10 Ladder Outputs – Communications Functions
8.5.10.1 Function Output – Serial Communications – (COMM)
The RS485 communications port can controlled directly from the ladder logic program instead of using
the Modbus Poll Blocks as previously described. The Modbus Master tick box must not be selected. This
puts the RS485 communications port in Modbus Slave mode until the COMM function is called.
The communications function COMM is used to setup the parameters and to initiate a communications
poll which could be a read or a write. Some of the parameters are initialized to default values on power up
of the PLC. If you do not need to change these parameters then you do not need to include them in the
ladder logic program. Other parameters are kept after the first communications poll has been completed,
so if the value does not change then it is not necessary to reload them each time.
The parameters are listed below:
PL410 Communications Parameters
Parameter
0
1
2
3
Name
Port Number
Protocol
Slave ID
PLC Memory
Address
4
5
Range
Slave
Memory
Address
6
Timeout
7
Function
Description
Select the RS485 Port
(Default = 1)
Modbus = 0, Memory = 1
(Default = 0)
The network address of the slave device.
This is the address of the memory in the PLC where values are
to be written to or read from, depending on the function. See
the Memory map of the PLC in the manual for the PLC that you
are using to get the correct address for these registers.
This is the number of registers to be read or written.
This is the address of the memory in the slave unit where
values are to be read from or written to. You will need to refer
to the memory map of these registers in the manual for the
slave unit.
This is the time that the communications driver will wait for a
response from the slave device before a timeout error occurs.
The time is a multiple of 10 milliseconds.
This is the Modbus function that determines if the poll is a read
or a write. The following functions are supported:
1 - Read a range of bits.
3 - Read a range of registers
15 - Write a range of bits.
16 - Write a range of registers.
This parameter must always be the last parameter called as it
also starts the communications transmission.
There are two system bits that are associated with the communications port. These are the CommReady
bit and the CommError bit.
The CommReady bit is normally off and will indicate that the communications port is ready for a new
message. As soon as the new message has started transmitting, this bit is set to on. This bit is used in
the ladder logic program to prevent a second message from being sent out before the previous message
is complete. The example shows how it is used. The bit is cleared to off when the reply has been received
from the slave. If no reply comes back, then the timeout will expire and the bit will be cleared off. The
CommError bit will be set on to indicate an error.
ioSelect
www.ioselect.com
55
LogiSoft User Manual
ioSelect
www.ioselect.com
56
LogiSoft User Manual
8.5.10.2 Function Output – TCP/IP Communications – (TCOM)
The Ethernet communications port can controlled directly from the ladder logic program to send Modbus
TCP/IP messages to remote slave devices.
The communications function TCOM is used to setup the parameters and to initiate a communications
poll which could be a read or a write. Some of the parameters are initialized to default values on power up
of the PLC. If you do not need to change these parameters then you do not need to include them in the
ladder logic program. Other parameters are kept after the first communications poll has been completed,
so if the value does not change then it is not necessary to reload them each time.
The parameters are listed below:
PL410 Communications Parameters
Parameter
0
Name
Port Number
1
2
3
Protocol
Slave ID
PLC Memory
Address
4
5
Range
Slave
Memory
Address
6
Timeout
7
Function
8
Mode
Description
502 = MODBUS TCP/IP
40001 = MODBUS UDP – only used with MOD-MUX TCP/IP
modules
Modbus = 0, Memory = 1
(Default = 0)
The network address of the slave device.
This is the address of the memory in the PLC where values are
to be written to or read from, depending on the function. See
the Memory map of the PLC in the manual for the PLC that you
are using to get the correct address for these registers.(Mxxx)
This is the number of registers to be read or written.
This is the Modbus address of the memory in the slave unit
where values are to be read from or written to. You will need to
refer to the memory map of these registers in the manual for
the slave unit. ie: Modbus 40003 = 3.
This is the time that the communications driver will wait for a
response from the slave device before a timeout error occurs.
The time is a multiple of 10 milliseconds.
This is the Modbus function that determines if the poll is a read
or a write. The following functions are supported:
1 - Read a range of bits.
3 - Read a range of registers
15 - Write a range of bits.
16 - Write a range of registers.
0 - TCP/IP
1- UDP
This parameter must always be the last parameter called as it
also starts the communications transmission.
There are two system bits that are associated with the communications port. These are the CommReady
bit and the CommError bit.
The CommReady bit is normally off and will indicate that the communications port is ready for a new
message. As soon as the new message has started transmitting, this bit is set to on. This bit is used in
the ladder logic program to prevent a second message from being sent out before the previous message
is complete. The example shows how it is used. The bit is cleared to off when the reply has been received
from the slave. If no reply comes back, then the timeout will expire and the bit will be cleared off. The
CommError bit will be set on to indicate an error.
ioSelect
www.ioselect.com
57
LogiSoft User Manual
ioSelect
www.ioselect.com
58
LogiSoft User Manual
ioSelect
www.ioselect.com
59
LogiSoft User Manual
9. LADDER PROGRAM EXAMPLES
This section describes some practical applications and how they can be implemented using the PLC. The
purpose is to show you how ladder programs can be constructed and to see how the various elements
are used.
9.1 Motor Control Example
This example can be used for most applications for the control of motors via a PLC including pumps,
conveyors, mixers, etc.
The START input must be held on for 5 seconds before the motor starts. The STOP input stops the
motor. The Emergency Stop will stop the motor and stay latched until the Reset input is pressed.
The I/O used will be as follows:
Digital Input 1:
Digital Input 2:
Digital Input 3:
Digital Input 4:
START
STOP
ESTOP
RESET
Digital Output 1: MOTOR
Manual Start Push-Button
Manual Stop Push-Button
Emergency Stop, aux contact from emergency stop circuit.
Alarm reset Push-Button
Motor run relay
Control Logic:
The first step is to do the detecting and latching of the emergency stop alarm. The alarm will only be
cleared when the alarm condition is cleared and the operator resets the alarm. We use the internal relay
R1 as the emergency stop alarm relay.
Next a timer with a limit of 5 seconds (50 X 0.1sec) is connected to the Start input. The timer output will
switch on when the START input is pressed for longer than 5 seconds.
ioSelect
www.ioselect.com
60
LogiSoft User Manual
Finally we do the program which drives the output to the motor having considered all the input signals.
It is possible to add other alarm circuits for motor tripped and motor running feedback signals which use
the Reset input in an identical manner to the emergency stop circuit above.
ioSelect
www.ioselect.com
61
LogiSoft User Manual
9.2 Garage Door Example
It is required to design a ladder logic program to operate a garage door.
There is a single pushbutton which is used to open or close the door. If the door is down then the
button will start it opening. If the door is up then the button will start it closing. If the door is opening or
closing then the door will stop and if the button is pressed again then the door must change direction.
There is a limit switch at the top and bottom of the door to indicate when the door is up or down. The
limit switch is closed when the door is in contact with it.
The door motor requires two relays, one to make it go up and the other to make it go down.
The I/O used will be as follows:
Digital Input 1: BUTTON
Digital Input 2: TOP_L
Digital Input 3: BOT_L
Manual Push-Button (Normally open and non-latching)
Top limit switch
Bottom limit switch
Digital Output 1: UP
Digital Output 2: DOWN
Motor run - UP
Motor run - DOWN
Control Logic:
There are many ways of solving this program depending on the ladder elements chosen and on your
personal style of programming. This example shows one of these solutions and gives an idea how a
application problem can be solved step by step.
We start by programming a motor control circuit to operate the UP motor. When the BUTTON input is
pressed the UP motor must turn on and stay latched on. The motor must turn off when the door hits the
TOP limit switch or if there is a fault and the DOWN motor is on.
The same idea is applied to the DOWN motor. The motor will run until the door hits the BOTTOM limit
switch.
ioSelect
www.ioselect.com
62
LogiSoft User Manual
The next step is to add the stop facility. We add a circuit that uses internal relay R5 as the STOP contact.
The BUTTON can only be used to STOP the motor if the motor is already going up OR down. We also
change the BUTTON contacts to a one-shot when the BUTTON is pressed. This prevents the circuit from
generating a race condition if the button is held on. The STOP contact (R5) is added to the UP and
DOWN motor control circuits.
The next thing we have to take care of is that the BUTTON must only operate the STOP relay if the motor
has moved off the limit switch. In the circuit we add the two limit switch contacts in series with the UP and
DOWN contacts.
ioSelect
www.ioselect.com
63
LogiSoft User Manual
The final problem to be solved is that when we stop the door mid-travel and then push the BUTTON to
change direction, the door always UP. The reason for this is because the UP ladder circuit runs before
the DOWN ladder circuit so the UP motor always turns on first. To solve this we need to remember which
direction we were traveling in when we stopped the motor. This is done by adding another internal relay
R3 which we call U/D_L or UP/Down latch. When the door goes UP we set this relay on. When the door
goes down we reset this relay to off. If we now add the contact from this relay to be in series with the
BUTTON for each of the motor controls then if the motor was going up the U/D_L normally closed contact
will be open. This prevents the motor from going up again after a stop and so the down circuit can be
operated.
Now try adding a timer so that a LIGHT on output 3 comes on for 10 seconds each time the button is
pressed. The BUTTON sets the LIGHT on. This starts the timer. When the timer reaches the set point
(100 X 0.1S = 10Sec), the timer contact closes which resets the LIGHT to off and on the next scan the
timer is stopped.
ioSelect
www.ioselect.com
64
LogiSoft User Manual
9.3 Up/Down Counter Example
It is required to generate an up/down counter which has 2 up inputs and 2 down inputs. The counter
must switch on a light when a maximum count of 1500 has been reached.
The standard counter function block cannot be used as this only has 1 input for up and 1 input for
down so we must use another technique.
The I/O used will be as follows:
Digital Input 1:
Digital Input 2:
Digital Input 3:
Digital Input 4:
UP1
UP2
DOWN1
DOWN2
Manual
Manual
Manual
Manual
Push-Button
Push-Button
Push-Button
Push-Button
Digital Output 1: LIGHT
Control Logic:
As it is not possible to use the built in counter function we need to make our own counter. Use memory
M45 to store the counter value. Check that this memory is available on your PLC. If it is not then choose
another memory address.
To implement the UP count we can use the INCREMENT (INC) function and to do the DOWN count we
can use the DECREMENT (DEC) function. As we only want to count once every time the inputs go on, we
need to use the positive edge contact (one-shot).
ioSelect
www.ioselect.com
65
LogiSoft User Manual
Now to switch on the light when the count reaches 1500 we can use the compare function as follows.
Whenever the count goes over 1500 the light will come on and when the count goes back below 1500
then the light will go off.
ioSelect
www.ioselect.com
66
LogiSoft User Manual