1
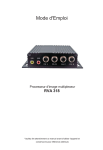
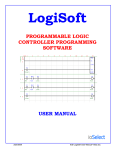
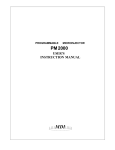
Specifications
Measurement Range
Operating Temperature
Resolution
Accuracy (at 68° to
78° F ambient)
Field of View
Emissivity
Battery
Battery Life
-27° – 230° F
14° – 122° F
0.1° F; 0.01 second
±2%, ±4° F
Readings may be affected if
within an electromagnetic field.
1:1
0.95
one CR2032 lithium cell (included)
40 hours
Important Safety Information
Use Precautions
1. Do not use for food safety or
medical applications.
2. This product is not a toy. Do not allow
children to play with this item.
3. Use as intended only.
4. Inspect before every use; do not
use if parts loose or damaged.
6. Risk of Fire and Burns. Do Not Open,
Crush, Heat or Incinerate battery.
Dispose of internal battery properly
in accordance with applicable law.
7. Maintain product labels and nameplates.
These carry important safety information.
If unreadable or missing, contact
Harbor Freight Tools for a replacement.
5. Contains button cell battery. Keep
out of reach of children. Discard used
batteries immediately. Do not allow
children to play with this device.
Service Precautions
1. Wear ANSI-approved safety
goggles and heavy-duty work
gloves when replacing battery.
Page 2
For technical questions, please call 1-888-866-5797.
Item 93983
Controls
Sensor lens
LCD
Meas.
Button
Mode Button
Item 93983
For technical questions, please call 1-888-866-5797.
Page 3
Clock Setup
<->
(Standby mode)
(Power on)
<->
(12/24-hour setting screen)
Note:
The display will go to standby
mode and show the current time and room
temperature after use if the clock is set.
If the clock is not set, the display will shut
off after use, conserving battery power.
3. Press “Meas.” to make the “24” icon flash,
which indicates the 12/24-hour setting
screen.
Press “Meas.” again to set 12/24-hour
Format from 24-hour to 12-hour.
1. Press “Meas.”.
4. Press “Mode” to switch to hour
setting. Use “Meas.” to change it.
2. Press “Mode” six times and the “Set” icon
starts to flash, indicating setup mode.
5. Press “Mode” to switch to minute setting
mode. Use “Meas.” to change it.
6. Press “Mode” when complete.
7. To disable standby mode and enable the
automatic shutoff, remove the battery
for at least a minute and do not set
the clock after replacing the battery.
Temperature Unit Setup
1. Press “Meas.” once to turn the unit on.
2. Press “Mode” five times and
the temperature unit icon starts
to flash (either °C or °F).
3. Press “Meas.“ to toggle the
unit between °C and °F.
4. Press “Mode” when complete.
Page 4
For technical questions, please call 1-888-866-5797.
Item 93983
Thermometer Operation
Note: The Distance to Spot size
ratio is 1:1. Make sure the target
area is within the field of view.
Note: Applications include Water, Milk, Cloth,
or Skin (non-medical, for entertainment only).
Normal Mode
1. Make sure the sensor lens is
clean and undamaged.
2. Press “Meas.” once to turn the unit on.
3. When you press “Meas.”, you will get the
temperature immediately. If you hold down
“Meas.”, the reading of measurement
will be continuously updated.
4. Device will automatically power off/standby
if left idle for more than 15 seconds.
Lock Mode
1. Make sure the sensor lens is
clean and undamaged.
4. Press “Meas.” to confirm and start
continually reading temperature.
2. Press “Meas.” once to turn the unit on.
5. The thermometer will continue
measuring temperatures up to an hour,
or until “Meas.“ is pressed again.
3. Press “Mode” three
times and the unit
will display the LOCK
icon, shown right.
Minimum / Maximum Reading Mode
1. Make sure the sensor lens is
clean and undamaged.
2. Press “Meas.” once to turn the unit on.
3. Press “Mode” once for Minimum (MIN)
mode or twice for Maximum (MAX)
mode. The display will show the icon
for the mode chosen (MIN/MAX).
5. Press “Meas.” to start reading
temperature. The display will only show
either the lowest or highest temperature
read, depending on the mode.
6. Device will automatically power off/standby
if left idle for more than 15 seconds.
4. Press “Meas.” to confirm.
Item 93983
For technical questions, please call 1-888-866-5797.
Page 5
Timer Operation
1. Press “Meas.” once to turn the unit on.
2. Press “Mode” four times and the
“count” icon starts to flash.
->
Hours:Minutes.Seconds = 00:3.36
(resolution=0.01sec)
3. To start or stop timer, press “Meas.”.
To reset the timer, press “Mode”
with the timer stopped.
4. Press “Mode” again to exit the timer mode.
Record Serial Number Here:
Note:
If product has no serial number, record month and year of purchase instead.
Note:
Replacement parts are not available for this item.
Page 6
For technical questions, please call 1-888-866-5797.
Item 93983
Maintenance
1. Keep the sensor lens clean using
a soft cloth or cotton swab dipped
in water or rubbing alcohol. Allow
the lens to dry fully before use.
2. Storage temperature: -4° – 149° F
Battery Replacement
1. If the display appears as above, the battery 3. Turn open the cover on the
is too low to allow further operation.
rear of the thermometer.
2. Allow the unit to turn off or go to standby
mode. The device may malfunction
if the battery is removed while on.
4. Replace with another CR2032
battery in the same orientation.
Troubleshooting
Icon
Problem
Icon
Problem
Temperature
above 230° F.
Other error message.
Temperature
below -27° F.
Unit will not shut
off. Notice LOCK
icon in center of
example screen.
If
Ambient temperature
changing too rapidly
for accurate reading.
Unit will not shut off.
Notice thermometer
in lower right corner
of example screen.
If
Ambient temperature
outside 14° F to
122° F range.
Item 93983
For technical questions, please call 1-888-866-5797.
Page 7
Limited 90 Day Warranty
Harbor Freight Tools Co. makes every effort to assure that its products meet high quality
and durability standards, and warrants to the original purchaser that this product is free from
defects in materials and workmanship for the period of 90 days from the date of purchase.
This warranty does not apply to damage due directly or indirectly, to misuse, abuse, negligence
or accidents, repairs or alterations outside our facilities, criminal activity, improper installation,
normal wear and tear, or to lack of maintenance. We shall in no event be liable for death,
injuries to persons or property, or for incidental, contingent, special or consequential damages
arising from the use of our product. Some states do not allow the exclusion or limitation of
incidental or consequential damages, so the above limitation of exclusion may not apply to you.
THIS WARRANTY IS EXPRESSLY IN LIEU OF ALL OTHER WARRANTIES, EXPRESS
OR IMPLIED, INCLUDING THE WARRANTIES OF MERCHANTABILITY AND FITNESS.
To take advantage of this warranty, the product or part must be returned to us
with transportation charges prepaid. Proof of purchase date and an explanation
of the complaint must accompany the merchandise. If our inspection verifies the
defect, we will either repair or replace the product at our election or we may elect
to refund the purchase price if we cannot readily and quickly provide you with a
replacement. We will return repaired products at our expense, but if we determine
there is no defect, or that the defect resulted from causes not within the scope
of our warranty, then you must bear the cost of returning the product.
This warranty gives you specific legal rights and you may also
have other rights which vary from state to state.
3491 Mission Oaks Blvd. • PO Box 6009 • Camarillo, CA 93011 • 1-888-866-5797