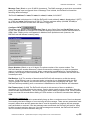
1
Ver 1.32p
ReFlexIO
User Manual
ReFlexIO User Manual
1.132p
Document Information
Document Control
Document Title
ReFlexIO User Manual
Symbols Used In This Manual
Press: button press sequence
Information: information about the current section
Caution: important safety or operational information
ReFlexIO User Manual
Specifications subject to change without notice. www.ioselect.com
Page:
2
ReFlexIO User Manual
1.132p
Safety Warnings
RF Exposure
9XTend Spread Spectrum Radio, 900 MHz
This equipment is approved only for mobile and base station transmitting devices.
Antenna(s) used for this transmitter must be installed to provide a separation
distance of at least 30 cm from all persons and must not be co-located or operating
in conjunction with any other antenna or transmitter.
CAUTION
XStream Spread Spectrum Radio, 2.4 GHz
This equipment is approved only for mobile and base station transmitting devices.
Separation distances of (i) 20 centimetres or more for antennas with gains < 6
dBi or (ii) 2 meters or more for antennas with gains > 6 dBi should be maintained
between the antenna of this device and nearby persons during operation. To ensure
compliance, operation at distances closer than this is not recommended.
Antenna
The ReFlexIO antenna port shall only be connected to internal antennas located
within the same building as the ReFlexIO equipment.
CAUTION
Modifications
CAUTION
Use of unauthorised antenna or other changes or modifications not expressly
approved by the party responsible for compliance could void the user's authority to
operate this product.
Lithium Battery
CAUTION
Only to be serviced by competently skilled Electronics aware personnel.
If battery is removed from the device, it should be returned to the supplier or
disposed of in accordance with local regulations.
Risk of explosion if battery is replaced by incorrect type.
Battery type is CR1220 Coin Battery 12mm diameter, 2mm thickness.
Positive side of battery to face upwards when in battery holder.
Fire Risk
A supply voltage above the specified limits may cause fire.
CAUTION
Limited Power Source
The ReFlexIO shall be powered by an approved limited power source compliant with
the requirements of IEC60950 -1, clause 2.5.
CAUTION
Safety Extra-Low Voltage (SELV)
The ReFlexIO has been assessed as SELV throughout, all ports shall be connected
to approved SELV circuits or an approved isolation unit shall be used.
CAUTION
ReFlexIO User Manual
Specifications subject to change without notice. www.ioselect.com
Page:
3
ReFlexIO User Manual
1.132p
Table Of Contents
1.
Thank You! ............................................................................................................................... 5
2.
Quick Start................................................................................................................................ 6
3.
Viewing Data ............................................................................................................................ 9
4.
Security Access ..................................................................................................................... 12
5.
Configuration (Using Display Buttons) ............................................................................... 14
Configuration - Parameters........................................................................................................................................... 14
Configuration - IO Points............................................................................................................................................... 15
Configuration - Comms ................................................................................................................................................. 17
Configuration - Factory Defaults ................................................................................................................................... 18
6.
Manual Override..................................................................................................................... 19
7.
Advanced Configuration (Using ReFlexIO Manager) ......................................................... 20
Advanced – PC Communications ................................................................................................................................. 20
Advanced – Upload From ReFlexIO ............................................................................................................................. 21
Advanced - Status ........................................................................................................................................................ 22
Advanced - Configuration – Parameters ....................................................................................................................... 23
Advanced - Configuration – Communications............................................................................................................... 26
Advanced - Configuration – IO Points........................................................................................................................... 31
Advanced - Configuration – Counters ........................................................................................................................... 35
Advanced - Event Logs................................................................................................................................................. 36
8.
Communication Drivers ........................................................................................................ 37
Driver - Kingfisher Series II ........................................................................................................................................... 37
Driver - Modbus ............................................................................................................................................................ 41
9.
Using Communication Devices ............................................................................................ 43
PSTN Modems and GSMs............................................................................................................................................ 43
Trio M Series Radio ...................................................................................................................................................... 44
MaxStream External Spread Spectrum Radio .............................................................................................................. 45
RS485 Device............................................................................................................................................................... 47
10.
Upgrading Firmware ......................................................................................................... 48
11.
ReFlexIO Display Map....................................................................................................... 49
12.
Factory Default Settings................................................................................................... 51
13.
Specifications.................................................................................................................... 53
14.
Mounting Instructions ...................................................................................................... 57
15.
Ordering ............................................................................................................................. 58
16.
Wiring Diagram.................................................................................................................. 59
ReFlexIO User Manual
Specifications subject to change without notice. www.ioselect.com
Page:
4
ReFlexIO User Manual
1.
1.132p
Thank You!
Congratulations on your purchase of the Kingfisher ReFlexIO Wireless IO system. Some of the
ReFlexIO’s best features are shown below. The next chapter - Quick Start, shows how to get your
ReFlexIO ready for action super fast!
ReFlexIO Features
IF input x THEN
output y
OLED Display
and 4 status
lights
Event logging
3 button data
entry and basic
configuration
Various comms options: Spread
Spectrum Radio card (no radio
license required) or Serial Card
(can connect an external PSTN
modem, GSM, Spread Spectrum
Radio, Trio M Series Radio etc.)
Low power
consumption
Responds to Modbus or
Kingfisher Series II messages
MODBUS or
Can initiate communications or
respond to poll messages
Conditional
Outputs
Connect A GSM
to Your ReFlexIO
and send an
SMS Alarm to
your phone
G3
G3
or
RTU or
Host
Device
Simple communications – each
ReFlexIO communicates with one
other device only (another
ReFlexIO, a Kingfisher RTU or a
Modbus master device)
Can be powered
by its mini-USB
port when used
with ReFlexIO
Manager
Advanced options can be
configured using ReFlexIO
Manager.
Get your free copy by contacting
ioSelect (www.ioselect.com)
2 Digital
Inputs
2 Analog Inputs
2 Digital Outputs
2 Analog Outputs
ReFlexIO User Manual
Specifications subject to change without notice. www.ioselect.com
Page:
5
ReFlexIO User Manual
2.
1.132p
Quick Start
Read this section if you want to setup your ReFlexIO with minimum effort!
ioSelect
STATUS INDICATORS
STEADY:
FLASH:
POWER
IO
SCAN
TX/RX
ALARM
OK
FAULT
ON
OFF
TX/RX
TX/RX
ALARM
DISPLAY BUTTONS
UP
DOWN
ENTER / OK
ESCAPE *
BACK * #
* Press keys together
#
Back is used when changing a setting. Allows cursor to move one position backwards.
1. POWER: Power up the ReFlexIO by connecting a DC power supply as shown in the wiring
diagram towards the back of this manual.
2. ANTENNA: Ensure that the antenna is connected to the spread spectrum radio board (if
installed).
ReFlexIO User Manual
Specifications subject to change without notice. www.ioselect.com
Page:
6
ReFlexIO User Manual
1.132p
3. OPERATION MODE: A ReFlexIO has 3 operation modes to choose from as detailed below.
Note: if you would like to send an SMS, you must select the Modbus Slave operation mode.
Back to Back
G3
G3
#1
#2
Inputs from one
ReFlexIO are
transferred to the
outputs of the other
ReFlexIO and vice
versa.
PRESS
Remote IO
Modbus Slave
Kingfisher RTU
Host Device
G3
G3
#1
#2
...
G3
G3
G3
#249
#1
#2
Each ReFlexIO
responds to
Kingfisher Series II
read or write
messages and
exception reports
new data.
...
G3
#249
Each ReFlexIO
responds to Modbus
read or write
messages. SMS
messages can also be
sent by the ReFlexIO.
1
2
3
Press ENTER (the
screen below will then
be displayed *). With
the highlight on
Configuration, press
ENTER again.
Select Factory
Defaults (by
pressing the UP or
DOWN buttons) and
then press ENTER.
Select the defaults
you want and then
press ENTER.
* If security has been enabled, you will need to enter a PIN number (please see the Security Access chapter for more
information).
4. DEFAULT SETTINGS: The factory defaults will configure the ReFlexIO to have 2 digital inputs,
2 digital outputs, 2 analog inputs (0-20mA) and 2 analog outputs (0-20mA). These settings can be
changed from the OLED screen Configuration, IO Points. A list of all the default settings is
contained in the Factory Default Settings chapter.
5. DEVICE ADDRESSES: The factory defaults will set the ReFlexIO Local Address to 1 and the
Remote Address to 2 (or 0 if in Modbus Slave mode). Each ReFlexIO must have a unique local
address. The remote address may be another ReFlexIO or a KF2 RTU (not applicable in Modbus
Slave mode). Note: when configuring the Remote ReFlexIO, these addresses are entered in
reverse as illustrated below.
G3
Local Address 1
Remote Address 2
G3
Local Address 2
Remote Address 1
The addresses can be changed from the OLED screen - Configuration, Parameters, Device
Addresses.
ReFlexIO User Manual
Specifications subject to change without notice. www.ioselect.com
Page:
7
ReFlexIO User Manual
1.132p
6. COMMS: Spread spectrum radio settings or Serial Card settings can be changed from the
Configuration, Comms OLED screen. Exception reporting can be disabled and the background
comms period can also be changed from this screen.
Spread Spectrum radio card: if it is possible that your ReFlexIO will overhear another spread
spectrum radio, you may need to change the hopping channel from the Configuration, Comms, SS
Radio, Hopping Channel screen. Please ensure that both radios use the same hopping channel.
The Vendor ID can also be changed if necessary by using ReFlexIO Manager.
Serial card: the default settings set the baud rate to 4800 bps and the serial type to RS232. If using
a PSTN modem or GSM for answering calls or dialling out (dialling out is not supported in Modbus
Slave mode), change Serial Type to PSTN. If using a GSM for SMS paging, set serial type to
RS232 or PSTN (if wanting to answer calls as well) and baud rate to 9600.
7. PARAMETERS: The Configuration, Parameters OLED screen will allow you to change the
ReFlexIO’s time and date, SMS destination phone number and PSTN dial-out phone number (a
dial-out phone number is not used in Modbus Slave mode). Note: by default, when an SMS phone
number is configured, an SMS message will be sent whenever a digital input changes state.
8. ADVANCED CONFIGURATION: ReFlexIO Manager allows all the ReFlexIO options to be
configured using a PC. Some advanced options include: event logging, spread spectrum radio
Vendor ID, number of communication retries, communication timeout, failsafe outputs, PSTN
modem settings (eg. initialisation string) and SMS paging (text to send and analog input triggers).
Please see the chapter – Advanced Configuration for more details.
9. DRIVERS: To communicate with a ReFlexIO using a KF2 RTU or a Modbus device, please see
the chapter – Communication Drivers.
10. CONNECTING DEVICES: To connect an external communication device to your ReFlexIO,
please see the chapter – Using Communication Devices.
11. STATUS SCREENS: If you want to know what any of the status information means, please
see the chapter – Viewing Data.
12. FIXED INPUTS AND OUTPUTS: To temporarily set the inputs and outputs to a fixed value,
please see the chapter – Manual Override (useful for testing).
Done!
ReFlexIO User Manual
Specifications subject to change without notice. www.ioselect.com
Page:
8
ReFlexIO User Manual
3.
1.132p
Viewing Data
The OLED display shows the status of local and remote data. By pressing the UP or DOWN
buttons the following screens can be viewed:
Start-up Screen
Displays Serial No, Firmware revision and current system time.
Communications
Status
Displays communications statistics including signal strength and
total messages.
Rx Signal [If SS Radio installed]: (0, -110 to -40 dBm or 6-54) Radio
received signal strength. 0 denotes no signal received while -40 dBm or 54
denotes excellent signal strength. Note: the 9XTend radio uses the dBm
range while the 24XStream radio uses the 6-54 range. Value is updated
automatically every 2 minutes. To request an immediate update, press both
the middle and right buttons.
Serial Type [If Serial card installed]: (RS232 or RS485) Serial interface
type of the Serial option board.
Messages: Total number of initiated messages (ie. exception reports and
polls) since the last power up. A message is only counted after successful
communications or after all the retries have expired. Displays ‘N/A’ when in
Modbus Slave mode (ReFlexIO does not initiate messages).
Successes: Number of successful initiated messages since the last power
up. Displays ‘N/A’ when in Modbus Slave mode (ReFlexIO does not initiate
messages).
Failures: Number of communication failures since the last power up. A
failure is counted for each failed message (after all retries for that message
have failed). Displays ‘N/A’ when in Modbus Slave mode (ReFlexIO does
not initiate messages).
Overrun: The ReFlexIO has an 8-message communications buffer. If a
new message is generated when the buffer is full, it is ignored and counted
as an overrun. Overruns indicate that the ReFlexIO is generating excessive
exception reports or is polling too fast. Displays ‘N/A’ when in Modbus
Slave mode (ReFlexIO does not initiate messages).
ReFlexIO User Manual
Specifications subject to change without notice. www.ioselect.com
Page:
9
ReFlexIO User Manual
1.132p
View Alarms
Displays any local or remote* alarms in the system.
Comms: Communications failure to remote device. Reset after a
successful poll or exception report or after a power reset. A
communications fail will cause the ReFlexIO to enter failsafe mode and set
all remotely controlled outputs to failsafe values (if failsafe has not been
disabled using ReFlexIO Manager).
PIN: Set if incorrect PIN has been entered 3 times. Reset on successful
PIN or power reset.
Low Voltage: Supply voltage is below the low voltage setpoint. Reset
when the supply voltage is restored to or above the low voltage setpoint
(10.8V by default)
View IO Status
Displays the current local and remote* IO (input and output) status.
Remote IO Status:
Remote IO Status is automatically updated after each poll. To request an
immediate update, press both the middle and right buttons.
* Remote data is not displayed when in 'Remote IO' operation mode
ReFlexIO User Manual
Specifications subject to change without notice. www.ioselect.com
Page:
10
ReFlexIO User Manual
1.132p
View Status
Displays local and remote* status data.
Supply Volts: (9.0-30.0V DC). The input supply voltage.
Temperature: (-20 to 70°C)
IO Scanning: (Yes, No) If Yes, the inputs are read and the outputs are
set at the configured IO Scan Rate. IO Scanning can be set off from the
Manual Override screen. IO Scanning is also automatically stopped
while the Configuration screen is active.
Counter 1, Counter 2: (0-4,294,967,295) As configured by ReFlexIO
Manager. To reset the counters, press both the left and middle buttons.
(Counters are not displayed for the remote ReFlexIO.)
* Remote data is not displayed when in 'Remote IO' operation mode
Settings Screen
Displays configuration information.
Mode: (Remote IO, Back To Back or Modbus Slave) Operation mode.
Can be changed from the screen - Configuration, Factory Defaults.
Local Address: The address of the local ReFlexIO.
Remote Address: The address of the remote ReFlexIO or Host RTU.
Displays ‘0’ when in Modbus Slave mode (ReFlexIO does not initiate any
messages).
RF Data Rate [If SS radio installed]: (9600 or 19200 bps) Radio
frequency data rate of the spread spectrum radio.
Baud Rate [If Serial card installed]: (4800, 9600, 19200 or 38400 bps)
Data rate of the serial option card.
Comms Rate: How often to poll the remote ReFlexIO or Host RTU.
Displays ‘N/A’ when in Modbus Slave mode (ReFlexIO does not initiate
messages).
Exception Report: When ON allows the local ReFlexIO to notify the
remote ReFlexIO or host RTU when any IO changes.
Security: When ON a PIN number must be entered before anything can
be changed
ReFlexIO User Manual
Specifications subject to change without notice. www.ioselect.com
Page:
11
ReFlexIO User Manual
4.
1.132p
Security Access
This chapter is only relevant if security has been enabled on your ReFlexIO (security is disabled by
default).
Screen displayed when ENTER is pressed and security is enabled.
Press ENTER to change between digits and press the UP or
DOWN buttons to change the value of each digit. 1000 is the
default PIN. If an incorrect PIN is entered 3 times in a row, the
screen below will be displayed.
During Security Lockout, only the status screens can be viewed.
The Configuration or Manual Override settings cannot be changed.
A Security Lockout will last for 30 minutes by default. Resetting the
ReFlexIO power supply will allow you to enter a PIN number again
without having to wait for 30 minutes.
Recovering A ReFlexIO When PIN not Known
With the startup screen or a status screen displayed, press and
hold the UP (left) and ENTER (right) buttons for 5 seconds. An 8
digit Unlock Key will then appear as shown below.
Caution! When an Unlock Key is generated by the ReFlexIO,
the configured PIN number is cleared and replaced by a new value.
Supply the Unlock Key to ioSelect (www.ioselect.com). You will
then be issued with a temporary PIN to gain access into the
ReFlexIO to change your PIN.
Power-up Security Fail
The ReFlexIO has failed its power-up security check. Please return
the ReFlexIO to your distributor.
ReFlexIO User Manual
Specifications subject to change without notice. www.ioselect.com
Page:
12
ReFlexIO User Manual
ReFlexIO User Manual
Specifications subject to change without notice. www.ioselect.com
1.132p
Page:
13
ReFlexIO User Manual
5.
1.132p
Configuration (Using Display Buttons)
The most common ReFlexIO options can be configured using the 3 display buttons. All of these
options are described below. Changes are only activated when the configuration mode is exited.
Note: If a button has not been pressed for 3 minutes (by default), the ReFlexIO will automatically
exit the configuration screen and return to IO display mode. Additional options can be configured
using ReFlexIO Manager as described in the chapter - Advanced Configuration.
Configuration - Parameters
PRESS
1
2
3
Press ENTER (the
screen below will then
be displayed). With
the highlight on
Configuration, press
ENTER again.
With the highlight on
Parameters, press
ENTER again
Select the parameter
you want to change
(by pressing the UP
or DOWN buttons)
and then press
ENTER
Device Addresses: (001-249) Allows the local and remote device address to be set. Ensure these
are set to different addresses eg. 1 and 2. The remote address may be another ReFlexIO, ioProWDL or a Kingfisher RTU. The Remote address is automatically set to 0 in Modbus Slave mode.
Time & Date: Allows time to be set in the format HH.MM.SS and the Date to be set in the format
DD:MM:YYYY.
Network ID: (00 to FF Hex, default=AE) The Network ID is used at the start of all messages. Only
messages that have the same Network ID are recognised and processed by the local ReFlexIO. If
there are two ReFlexIO networks that could overhear one another, it is recommended that each
network have its own Network ID. To minimise interference from another device using a spread
spectrum radio, please see the section Configuration - Comms, SS Radio, Hopping Channel.
IO Scan Rate: (250ms, 1s, 5s, 30s, 1min, 5min, 15min) The period at which the ReFlexIO scans
all its IO.
Security: (Enable PIN, Disable PIN, Set PIN) When Enable PIN is selected, a PIN number will be
required before entering the Configuration or Manual Override screens.
Phone Numbers: (blank or up to 19 digits) Allows the SMS destination phone number and the
PSTN dial-out phone numbers to be configured. The first blank character ends the phone number
eg. if 9876_5432 is configured, the number dialled will be only 9876. A phone number can be
cleared by setting the first digit to blank. Note: configuring an SMS phone number will enable the
SMS message to be triggered by a change in one of the digital inputs (by default).
ReFlexIO User Manual
Specifications subject to change without notice. www.ioselect.com
Page:
14
ReFlexIO User Manual
1.132p
Configuration - IO Points
PRESS
1
2
3
Press ENTER (the
screen below will then
be displayed). With the
highlight on
Configuration, press
ENTER again.
Select IO Points (by
pressing the DOWN
button) and then press
ENTER
Select Analog IO or
Digital IO and then
press ENTER
Analog IO - AI1 Settings / AI2 Settings
Input Type: (Digital or Analog) If set to digital, the input is registered as ON or OFF according to
the Setpoint and Deadband settings (as detailed below). If set to Analog, the analog value is
measured and an exception report is triggered according to the Setpoint and Deadband settings.
Analog Range: (0-20mA or 4-20mA) The current range of the analog input device. Only relevant if
Input Type = Analog.
Setpoint: (000.0 to 100.0 %) If Input Type is set to digital, the input is registered as ON and an
exception report is requested when the input rises above the Setpoint plus Deadband settings. The
input is registered as OFF and an exception report is requested when the input falls below the
Setpoint minus Deadband settings.
Dead Band: (000.0 to 100.0 %) Deadband is an area of the input range where no action occurs.
When Input Type is set to Digital, deadband is used with Setpoint to determine when the input is
ON or OFF. When Input Type is set to Analog, Deadband is the amount the input must change to
trigger an exception report. Examples:
ON (if Input Type=Digital)
VALUE (if Input Type=Analog)
ON (if Input Type=Digital)
VALUE (if Input Type=Analog)
85%
80%
75%
Setpoint
80%
5% Deadband
0% Deadband
OFF (if Input Type=Digital)
VALUE (if Input Type=Analog)
ReFlexIO User Manual
Setpoint
OFF (if Input Type=Digital)
VALUE (if Input Type=Analog)
Specifications subject to change without notice. www.ioselect.com
Page:
15
ReFlexIO User Manual
1.132p
Analog IO - AO1 Settings / AO2 Settings
Output Type: Digital or Analog.
Analog Range: 0-20mA or 4-20mA (only relevant if Output Type = Analog).
Failsafe: (000.0 to 100.0 %) Value to output in failsafe state.
ON Value: (000.0 to 100.0 %) Value to output when configured as a Digital output.
OFF Value: (000.0 to 100.0 %) Value to output when configured as a Digital output. Typically set
to 0 %.
Digital IO
DO1 Failsafe / DO2 Failsafe: (ON or OFF) Value to output in failsafe state (if enabled).
ReFlexIO User Manual
Specifications subject to change without notice. www.ioselect.com
Page:
16
ReFlexIO User Manual
1.132p
Configuration - Comms
PRESS
1
2
3
Press ENTER (the
screen below will then
be displayed). With
the highlight on
Configuration, press
ENTER again.
Select Comms (by
pressing the DOWN
button) and then
press ENTER
Select the comms
option you wish to
configure and then
press ENTER
SS Radio (if installed *)
Note: the following settings can be changed after the radio has been powered for more than
30 seconds.
Hopping Channel: (XTend radios: 0-9, XStream radios 0-6, default=0) Each pair of ReFlexIO
spread spectrum radios must be set to the same hopping channel to enable them to communicate.
To minimise interference from another ReFlexIO or device using a spread spectrum radio, a
hopping channel that is different to the offending radio should be used.
RF Data Rate: (Normal or High) Normal sets the transmission rate to 9600 bps and High sets the
transmission rate to 115,200 bps. It is best to use Normal for most networks particularly when
transmitting over long distances. Note: this setting is not applicable for XStream spread spectrum
radios.
Serial Card (if installed *)
Type: (RS232, RS485 or PSTN) Serial interface type of the serial card. PSTN allows a dial-out
phone number to be configured. To send an SMS, select RS232 or PSTN. The initialisation string
and other dialling settings can also be changed using ReFlexIO Manager.
Baud Rate: (4800, 9600, 19200 or 38400 bps) Serial card baud rate.
Comms Rate: (500ms, 1s, 5s, 30s, 1 minute, 15 minutes, 30 minutes, 1 hour, 1 day) How often to
poll the remote device. If the ReFlexIO receives a message, it resets its poll timer and starts timing
again. Note: Comms Rate must be set at least as long as the communications link 'Timeout' (as set
using the ReFlexIO Manager software; default=800ms). Disabled when ReFlexIO is in Modbus
Slave mode. A Comms Rate of 5 seconds or greater should be used for PSTN communications to
avoid overruns.
Exception Report: (Yes or No) When set to Yes, a communications message will be transmitted
when a digital input changes state, an analog input rises above the setpoint plus deadband
settings, an analog input falls below the setpoint minus deadband settings or an alarm is triggered.
Disabled when ReFlexIO is in Modbus Slave mode.
* An option card can only be configured after the ReFlexIO has detected it. The ReFlexIO will automatically detect the
option card when the ReFlexIO is reset to Factory Defaults (please see the topic Configuration, Factory Defaults.
ReFlexIO User Manual
Specifications subject to change without notice. www.ioselect.com
Page:
17
ReFlexIO User Manual
1.132p
Configuration - Factory Defaults
Loads the default settings corresponding to 'Back To Back', 'Remote IO' or ‘Modbus Slave’ as
listed in the Factory Default Settings chapter of this manual. Note: the ReFlexIO will automatically
detect the option card type and load the corresponding defaults (if no option card is installed, the
Serial Card defaults will be loaded).
PRESS
1
2
3
Press ENTER (the
screen below will then
be displayed). With
the highlight on
Configuration, press
ENTER again.
Select Factory
Defaults (by pressing
the DOWN button)
and then press
ENTER
Select the factory
defaults you require
and then press
ENTER
Selecting any of the Factory Defaults will overwrite user changes to the
Parameters (eg. addresses), IO Points and Comms settings. Any user settings
will need to be re-configured.
ReFlexIO User Manual
Specifications subject to change without notice. www.ioselect.com
Page:
18
ReFlexIO User Manual
6.
1.132p
Manual Override
The value of both the inputs and the outputs can be forced to any state from this screen. When the
screen is exited, the input and output values will be restored to their former values if scanning is
left set to ON. If scanning is turned OFF or set to a time delay, the manual values will be
maintained until scan is set back ON or the scanning delay expires. This screen is automatically
exited after 3 minutes (by default) of inactivity.
PRESS
1
2
3
Press ENTER (the
screen below will then
be displayed). Select
Manual Override (by
pressing the DOWN
button) and then
press ENTER.
Select Inputs or
Outputs (by pressing
the DOWN button)
and then press
ENTER
Select the IO you wish
to override such as
AI1 and press ENTER
Manual Override Inputs
AI1: (0.0 - 100.0 %) Analog Input 1
AI2: (0.0 - 100.0 %) Analog Input 2
DI1: (ON, OFF) Digital Input 1
DI2: (ON, OFF) Digital Input 2
Manual Override Outputs
AO1: (0.0 - 100.0 %) Analog Output 1
AO2: (0.0 - 100.0 %) Analog Output 2
DO1: (ON, OFF) Digital Output 1
DO2: (ON, OFF) Digital Output 2
Manual Override - Scan Settings
Scan Select: (OFF, ON, 30 minutes, 4 hours, 1 day) When the Manual Override screen is exited, if
Scan Select is set OFF or set to a time delay, the input and output override settings will be
maintained until scan is set back ON or the Scan Select delay expires.
ReFlexIO User Manual
Specifications subject to change without notice. www.ioselect.com
Page:
19
ReFlexIO User Manual
7.
1.132p
Advanced Configuration (Using ReFlexIO Manager)
ReFlexIO Manager allows all the ReFlexIO options to be
configured and saved in a configuration file. The configuration
file can then be downloaded into a ReFlexIO. ReFlexIO
Manager can also upload the configuration that is currently
running in a ReFlexIO. All the ReFlexIO Manager settings are
described in this chapter.
Advanced – PC Communications
When attempting to communicate with your ReFlexIO for the first time, ReFlexIO Manager will
display the following window.
ReFlexIO Manager uses one of the PC's USB ports to communicate with the ReFlexIO. After
connecting a ReFlexIO to your PC using a USB to mini USB cable, please ensure that the
ReFlexIO Address, Network ID and Security PIN match the settings in the ReFlexIO. Click
CONNECT to attempt to communicate with the ReFlexIO. Note: the ReFlexIO can be powered by
its mini USB port when used with ReFlexIO Manager (the communications option board is not
powered using this setup).
Please see the chapter - Upgrading Firmware for more information about upgrading firmware.
Com Port: (COM1 to COM9) Windows assigns a COM port number to the ReFlexIO device.
Usually it will be the highest COM port number in the pull down list. You can check which COM
port has been assigned by connecting a ReFlexIO to your PC. Go to the Windows desktop, rightclick My Computer and select Manage. A window will appear (as shown below). Click Device
Manager on the left hand side of the window. Then double-click Ports on the right hand side. The
COM port assigned to the CP210x device (as used for the ReFlexIO) will then be displayed as
shown below.
ReFlexIO User Manual
Specifications subject to change without notice. www.ioselect.com
Page:
20
ReFlexIO User Manual
1.132p
Note: ReFlexIO Manager will only accept up to COM9. If COM10 or higher has been assigned to
the ReFlexIO port, this can be changed by double-clicking ‘CP210x USB to…’ (as shown above)
and assigning a lower COM port number.
ReFlexIO Address: (1-249) This setting must match the Local Address configured in the
ReFlexIO. The Local Address can be checked by viewing the SETTINGS screen on the ReFlexIO.
Network ID: (00 to FF Hex, default=AE) This setting must match the Network ID configured in the
ReFlexIO. If the default setting has been changed, it can be checked from the ReFlexIO screen Configuration, Parameters, Network ID.
Security PIN: (0000-9999, default=1000) This setting must match the PIN number configured in
the ReFlexIO. ReFlexIO Manager requires the Security PIN number even if security is disabled in
the ReFlexIO. Please see the topic Security Access if the PIN number is not known.
Advanced – Upload From ReFlexIO
Uploads the ReFlexIO configuration into ReFlexIO Manager. The configuration can then be
updated and downloaded back into the ReFlexIO. Note: please ensure that the latest versions of
ReFlexIO firmware and ReFlexIO Manager are being used to ensure version compatibility.
ReFlexIO User Manual
Specifications subject to change without notice. www.ioselect.com
Page:
21
ReFlexIO User Manual
1.132p
Advanced - Status
Displays the current status of IO and other parameters in the ReFlexIO. Values are refreshed once
a second.
ReFlexIO User Manual
Specifications subject to change without notice. www.ioselect.com
Page:
22
ReFlexIO User Manual
1.132p
Advanced - Configuration – Parameters
Operation Mode: (ReFlexIO Back to Back Pair, ReFlexIO Remote I/O, Modbus Slave)
Loads default settings for the selected operation mode as described below. Note: if you would like
to send an SMS, you must select the Modbus Slave operation mode.
Back to Back
G3
G3
#1
#2
ReFlexIO User Manual
Remote IO
Modbus Slave
Kingfisher RTU
Host Device
G3
G3
#1
#2
...
G3
G3
G3
#249
#1
#2
Specifications subject to change without notice. www.ioselect.com
...
G3
#249
Page:
23
ReFlexIO User Manual
Inputs from one ReFlexIO
are transferred to the
outputs of the other
ReFlexIO and vice versa.
Each ReFlexIO responds to
Kingfisher Series II read or
write messages and
exception reports new data.
1.132p
Each ReFlexIO responds to
Modbus read or write
messages. SMS messages
can also be sent by the
ReFlexIO.
For all modes, the default settings will configure the ReFlexIO to have 2 digital inputs, 2 digital
outputs, 2 analog inputs (0-20mA) and 2 analog outputs (0-20mA). For a list of all the default
settings, please see the chapter - Default Settings. The default settings can all be configured using
ReFlexIO Manager.
Device Addresses: (Local: 001-249, Remote: 1-249) Allows the local and remote device address
to be set. Each ReFlexIO must have a unique local address. The remote address may be another
ReFlexIO, an ioPro-WDL or a Kingfisher RTU (not applicable in Modbus Slave mode). Note: when
configuring the Remote ReFlexIO, these addresses are entered in reverse as illustrated below.
G3
Local Address 1
Remote Address 2
G3
Local Address 2
Remote Address 1
Network ID: (00-FF Hex, Default=AE) The Network ID is used at the start of all messages. Only
messages that have the same Network ID are recognised and processed by the ReFlexIO. If there
are two ReFlexIO networks that could overhear one another, it is recommended that each network
have its own Network ID. To minimise interference from another device using a spread spectrum
radio, please see the topic Configuration, Communications, Hopping Channel.
IO Scan Rate: (250ms, 1s, 5s, 30s, 1min, 5min, 15min) The time period at which the ReFlexIO
scans all its IO. Note: the IO Scan Rate should be fast enough to allow the ReFlexIO to detect
each IO change. Eg. if a digital input changes from ON to OFF and then back to ON again between
IO Scans, the ReFlexIO will not detect or respond to this change.
Low Voltage: (9.0 – 25.5 V, default=10.8 V) When the supply voltage drops below this setpoint, a
low voltage alarm is triggered.
Screen Shutdown Timeout: (1 – 3600 seconds, default=300 seconds [5 minutes]) If a button has
not been pressed for this amount of time, the ReFlexIO will automatically switch off the OLED
display to conserve power and exit from any data entry screen.
Security PIN Number: (0000 - 9999, default=1000) The PIN number is used to protect the
ReFlexIO screens from unauthorised access. Once the PIN is enabled from the ReFlexIO display,
it will request the PIN every time the display is accessed.
Keypad Lockout Time: (0-65535 seconds, default=1800 seconds [30 minutes]) If an incorrect PIN
number is entered 3 times since the last correct PIN, a PIN alarm will be triggered and a new PIN
number will not be able to be entered for this amount of time. Setting 0 will disable this function.
ReFlexIO User Manual
Specifications subject to change without notice. www.ioselect.com
Page:
24
ReFlexIO User Manual
1.132p
Logging
The ReFlexIO is able to store up to 1000 logs. Each log has a time and date stamp accurate to 1
second. Logs are kept in battery backed memory and are maintained even if the ReFlexIO is unpowered.
Digital Inputs: logged on change of state when enabled.
Digital Outputs: logged on change of state when enabled.
Analog Inputs: logged periodically according to the 'Analog Logfile Interval' (as detailed below)
when enabled.
Analog Outputs: logged periodically according to the 'Analog Logfile Interval' (as detailed below)
when enabled.
System Events: logged on change when enabled.
System Alarms: logged on change when enabled.
Counters: logged each time the counter trigger setpoint is reached when enabled.
Set Status Bit When Logfile Reaches 90%: When the log file reaches 90% full (900 logs), a bit is
set in a ReFlexIO register than can be accessed by SCADA systems. A function can be written in
the host RTU that downloads the logs from the ReFlexIO depending on the status of this bit. For
further information on accessing the ReFlexIO registers, please see the chapter Communication
Drivers.
Stop Logging When Log Full: Stops logging events once the log file is full (1000 events). The
ReFlexIO will start logging again once the logs are cleared using ReFlexIO Manager.
Analog Logfile Interval: (0 - 65535 seconds, default=3600 seconds=1 hour) If logging of Analog
inputs or outputs is enabled, the data will be logged periodically according to this setting. Setting 0
disables this function.
Front Page OLED Display: (2 lines of up to 19 ASCII characters per line) The first two lines
displayed on the OLED start-up screen. Note: the way these lines will appear on the OLED screen
is shown to the left of these settings (Front Page Layout). Spaces can be inserted at the beginning
of each line to centre the text.
ReFlexIO User Manual
Specifications subject to change without notice. www.ioselect.com
Page:
25
ReFlexIO User Manual
1.132p
Advanced - Configuration – Communications
A number of communication options can be configured according to the Option Card, Serial Type
and the Operation Mode that has been selected. Options that do not apply to each selection are
grayed out.
Option Card
Type: (SS Radio or Serial Card) The installed option card. If no option card is installed, the
ReFlexIO uses the Serial Card default settings. After uploading a configuration, this setting will
display how the ReFlexIO option card was last configured (the ReFlexIO will detect the installed
option card if reset to factory defaults using the OLED display buttons). Note: if a Type is specified
using ReFlexIO Manager that does not match the configured option card in the ReFlexIO,
ReFlexIO manager will give a warning. The mismatched configuration can still be downloaded but
the option card will no longer work.
Spread Spectrum Radio
(Configurable when Option Card Type is set to SS Radio)
Vendor ID: (XTend: 0-32767, XStream: 16-32767, default=13106) Sets the ID number of the
Spread Spectrum radio. All radios on the same network need to have the same Vendor ID in order
to communicate with each other. It is recommended that you change the Vendor ID to avoid
interference with other spread spectrum radio networks.
Hopping Channel: (XTend: 0-9, XStream: 0-6, default=0) Each pair of ReFlexIO spread spectrum
radios must be set to the same hopping channel to enable them to communicate. To minimise
interference from another ReFlexIO or device using a spread spectrum radio, a hopping channel
that is different to the offending radio should be used.
RF Data Rate: (Normal [default] or High) Normal sets the transmission rate to 9600 bps and High
sets the transmission rate to 115,200 bps. It is best to use Normal for most networks particularly
when transmitting over long distances. Note: this setting is only applicable for XTend spread
spectrum radios.
ReFlexIO User Manual
Specifications subject to change without notice. www.ioselect.com
Page:
26
ReFlexIO User Manual
ReFlexIO User Manual
Specifications subject to change without notice. www.ioselect.com
1.132p
Page:
27
ReFlexIO User Manual
1.132p
Serial Card
(Configurable when Option Card Type is set to Serial Card)
Serial Type: (RS232, RS485 or PSTN) PSTN allows an initialisation string to be set to the external
modem, manages dialling out (not applicable to Modbus Slave mode) and allows the modem to
answer calls. When using PSTN, the ReFlexIO will wait for a Carrier Detect signal before
transmitting a message. For SMS paging, a serial type of RS232 or PSTN can be used. Use
RS232 if an initialisation string is not required and the modem/GSM does not need to dial out.
Baud Rate: (4800, 9600, 19200 or 38400 bps) Uses a data format of 8 data bits, 1 stop bit, no
parity bit.
Configure Paging
This button only appears when Option Card Type is set to Serial Card and Serial Type is set to
RS232 or PSTN and Operation Mode is set to ReFlexIO Modbus Slave (as configured in
Advanced – Configuration - Parameters, Operation Mode). Click this button to configure SMS
paging settings (requires an external GSM modem). The external GSM modem must also be
capable of sending SMS messages in text mode (PDU format is not supported). Note: new SMS
messages are discarded if the GSM is already online.
Send SMS on Digital Input Change: (Enabled [default] or Disabled) An SMS message will be
triggered when an enabled input changes state.
Send SMS at Analog Input Threshold: (0.0 [default] to 100.0%) An SMS message will be
triggered when the analog input rises above the Setpoint plus the Deadband or if it falls below the
Setpoint minus the Deadband. Eg. as shown above, an SMS message will be triggered when
analog input 1 exceeds 97.0% or falls below 93.0%. No SMS messages will be sent if Setpoint is
set to 0.0%.
SMS Phone Number: (up to 20 digits) The SMS destination phone number (where to send the
SMS message to). If this phone number is blank, SMS paging is disabled.
ReFlexIO User Manual
Specifications subject to change without notice. www.ioselect.com
Page:
28
ReFlexIO User Manual
1.132p
Message Text: (Blank or up to 50 ASCII characters). The SMS message to send when an enabled
analog or digital input is triggered. Note: if Message Text is blank, the ReFlexIO will send the
following default message:
“ReFlexIO #address,D1 state,D2 state,A1 value,A2 value,19:34,28/07”
Where address is displayed as 1-249 [the ReFlexIO’s local address], state is displayed as 0 [OFF]
or 1 [ON] and value is displayed as 0-100 [%]. The time and date stamp (HH:MM, DD/MM) is
taken from the ReFlexIO’s clock when the alarm is triggered.
Configure PSTN
This button only appears when Option Card Type is set to Serial Card and Serial Type is set to
PSTN. Click this button to configure PSTN dial-out settings (requires an external PSTN modem or
GSM). Note: Dialling out is not supported in Modbus Slave operation mode (however, the
ReFlexIO can still answer incoming calls).
Phone Number: (Blank or up to 20 digits) The phone number of the remote modem. The
ReFlexIO dials this number whenever it needs to transmit a message (ie. to send an exception
report or to perform a background poll). When a connection is established (ie. Carrier Detect is
present), the message is then transmitted. Note: If Phone Number is left blank, the ReFlexIO will
not attempt to dial.
Dial Retries: (0-9) The number of times that the ReFlexIO will attempt to re-dial the remote
modem. If Dial Retries is set (ie. non-zero) and a connection is not established within the Dial
Timeout (please see below), the ReFlexIO will hang up and then immediately dial again. The
ReFlexIO will keep redialling until a connection is established or the Dial Retries are exhausted.
Dial Timeout (sec): (0-999) The ReFlexIO will wait for this amount of time to establish a
connection (ie. for carrier detect to be present. Carrier detect usually occurs a short time after the
remote modem has answered). Time is counted from when dialling is initiated. Dial Timeout should
be set to at least 30 seconds when dialling a PSTN modem or at least 45 seconds when dialling a
GSM.
Automatically Hanging Up
A ReFlexIO can be configured to automatically hang up after a certain amount of time has elapsed
from sending the last message or from receiving the last message. There are two parameters used
to specify these times and the parameter that is used is dependent on whether the last message
was transmitted or received. If the last message was transmitted, the ReFlexIO will wait for 'Hang
Up After' seconds and then hang up. If the last message was received, the ReFlexIO will wait for
'On Line Inactivity' seconds and then hang up.
ReFlexIO User Manual
Specifications subject to change without notice. www.ioselect.com
Page:
29
ReFlexIO User Manual
1.132p
On Line Inactivity (sec): (0-999) The ReFlexIO will hang up after this amount of time has elapsed
since the last message received. A value of 0 disables the function.
Hang Up After (sec): (0-999) The ReFlexIO will hang up after this amount of time has elapsed
after connection or after sending the last message. A value of 0 disables this function.
Remaining Online
To remain online after connection, set 'On Line Inactivity' to 0 and 'Hang Up After' to 0 in both
ReFlexIOs in the PSTN link. If the line is disconnected, the ReFlexIO will reconnect when the next
message is initiated.
Init String (Max 30 Chars): The initialisation string to send to the modem on power up and on exit
from the configuration menu. By clicking the External Modem / GSM button, the Initialisation String
will be set to AT&FTE0V0S0=2&W. Note: the external modem must be powered up when the
ReFlexIO sends the initialisation string.
ReFlexIO Communications
(Not configurable if Operation Mode is set to ReFlexIO Modbus Slave in the Parameters section)
Retries: (0-10, default=5) Number of times to retry sending a message if the previous attempts
have failed. Once all retries have failed, a communications fail is signalled.
Timeout: (0-32767 x10 milliseconds, default=80=800ms) The time that the ReFlexIO will wait for a
reply to the first message attempt before trying again. The timeout is increased for each
successive attempt according to the following formula:
Message Timeout (ms) = Timeout (ms) + (100 x [Remainder of (ReFlexIO Address/8)]) + (200 x
Retry Number)
Example: ReFlexIO (address 10) attempts to send a message with 3 retries. Timeout = 800ms.
(Note Remainder of ReFlexIO Address 10 divided by 8 = 2). If all attempts fail, a comms failure
alarm is signalled after 5000 ms (5 seconds).
First Attempt
G3
No reply
0
Retry 1
G3
Retry 2
No reply
800
G3
2000
Message Timeout
= 800 + 100x2 + 200x1
= 1200 ms
Retry 3
No reply
G3
No reply
3400
Message Timeout
= 800 + 100x2 + 200x2
= 1400 ms
Comm s
Failure
5000
Message Timeout
= 800 + 100x2 + 200x3
= 1600 ms
Tot al
Time
(ms)
Comms Rate: (500ms, 1s, 5s, 30s, 1 minute, 15 minutes, 30 minutes, 1 hour, 1 day) How often to
poll the remote device. If the ReFlexIO receives a message, it resets its poll timer and starts timing
again. Note: Comms Rate should be at least as long as the communications link Timeout (as
detailed above) to avoid communication overruns (too many messages).
Loss Of Comms Failsafe: When enabled the ReFlexIO will set its analog and digital outputs to
the configured failsafe settings when a comms failure alarm occurs. If disabled, outputs will hold
last state on comms failure.
Report By Exception: When enabled a communications message will be transmitted when a
digital input changes state, an analog input changes by more than the deadband setpoint or a
system alarm occurs. ReFlexIO User Manual
Specifications subject to change without notice. www.ioselect.com
Page:
30
ReFlexIO User Manual
1.132p
Advanced - Configuration – IO Points
Analog IO - Analog Inputs
Input Type: (Digital or Analog) If set to digital, the input is registered as ON or OFF according to
the Setpoint and Deadband settings (as detailed below). If set to Analog, the analog value is
measured.
Analog Range: (0-20mA or 4-20mA) The current range of the analog input device. Only relevant if
Input Type = Analog.
Setpoint: (000.0 to 100.0 %) If Input Type is set to digital, the input is registered as ON when the
input is greater than the Setpoint plus Deadband settings. The input is registered as OFF when the
input is less than the Setpoint minus Deadband settings.
Deadband: (000.0 to 100.0 %) Deadband is an area of the input range where no action occurs.
When Input Type is set to Digital, deadband is used with Setpoint to determine when the input is
ON or OFF. When Input Type is set to Analog, Deadband is the amount the input must change to
trigger an exception report. Examples:
ON (if Input Type=Digital)
VALUE (if Input Type=Analog)
ON (if Input Type=Digital)
VALUE (if Input Type=Analog)
85%
80%
75%
Setpoint
80%
5% Deadband
0% Deadband
OFF (if Input Type=Digital)
VALUE (if Input Type=Analog)
ReFlexIO User Manual
Setpoint
OFF (if Input Type=Digital)
VALUE (if Input Type=Analog)
Specifications subject to change without notice. www.ioselect.com
Page:
31
ReFlexIO User Manual
1.132p
Analog IO - Analog Outputs
Output Type: (Digital or Analog) When set to Analog, the ReFlexIO will output either 0-20mA or 420mA.
When set to Digital, the ReFlexIO will output the ON Value or OFF Value as detailed below.
Analog Range: (0-20mA [default] or 4-20mA) The current range of the Analog Output.
Failsafe: (000.0 to 100.0 %) Value to output in failsafe state. Failsafe is only activated if Loss Of
Comms Failsafe has been enabled in Advanced - Configuration, Communications and the output is
being controlled by the remote device.
ON Value: (000.0 to 100.0 %, default=100%) Value to output when Output Type is set to Digital.
Eg. If the ON value is 100% and the Analog Range is 0–20mA, then the analog output when ON
will be 20mA.
OFF Value: (000.0 to 100.0 %, default=0%) Value to output when Output Type is set to Digital. Eg.
If the OFF value is 0% and the Analog Range is 0–20mA, then the Analog output when OFF will be
0mA.
Digital IO - Digital Outputs
Local Failsafe Loss Of Comms: (ON or OFF) Value to output in failsafe state. Only applicable if
Loss Of Comms Failsafe has been enabled in Advanced - Configuration, Communications and the
output is being controlled by the remote device.
ReFlexIO User Manual
Specifications subject to change without notice. www.ioselect.com
Page:
32
ReFlexIO User Manual
1.132p
IO Functions - Input Options
Digital Input Local 1/2: (Instant) Input will be ‘ON’ when activated. Future versions will have other
Input options such as time based and delay events.
Analog Input Local 1/2: (Instant) Input will be ‘ON’ when activated. Future versions will have other
Input options such as time based and delay events.
IO Functions - Output Events
Output events allow each output to be controlled by one input condition and one output option.
ReFlexIO User Manual
Specifications subject to change without notice. www.ioselect.com
Page:
33
ReFlexIO User Manual
1.132p
Function Input
NOT USED: Always OFF.
System Alarm: ON when a system alarm is active. System alarms: Low Voltage, Communications
Failed or Incorrect PIN.
Communications Failed: ON when the ReFlexIO has lost communications with the other
ReFlexIO or Remote Host. OFF when communications have been re-established.
Invalid User PIN: ON when the user enters an incorrect PIN number 3 times. Function is OFF
when the user enters a correct PIN number or power is reset.
Local Analog Input 1/2: ON when the analog input reaches the setpoint plus the deadband. OFF
when the analog input falls below the setpoint minus the deadband.
Local Digital Input 1/2: ON when the digital input is energized. OFF when the digital input is
connected to ground / 0 volts.
Remote Analog Input 1/2: ON when the remote analog input reaches the setpoint plus the
deadband. OFF when the remote analog input falls below the setpoint minus the deadband.
Remote Digital Input 1/2: ON when the remote digital input is energized. OFF when the remote
digital input is connected to ground / 0 volts.
Remote Counter 1/2: Counter to be used to output 50% duty cycle pulses according to the
frequency of the remote counter value and reset time. Note: The Output Option (as detailed below)
needs to be set to ‘Frequency Output’ for the function to work. This is useful where you would like
to count an input at the remote device for a period of time, and then output that same frequency at
the local device.
Example: A pulse train is connected to remote digital input 1. At the remote device, counter 1 is
assigned to Digital input 1. The counter 1 value is sent to the local device at the end of the reset
period and the counter is reset to zero. The count value and the reset period are also sent to the
local device. The local device will then output the counter value over the reset period with a 50%
duty cycle.
Output Options
NO ACTION: Holds last IO state.
ON When Valid: For Digital Outputs, when Function Input is ON, output is set ON (closed).
For Analog Outputs and Function Input = Local or Remote Analog Input, then the output follows
the input. If The Function Input is an alarm or digital input and is ON, the analog output will output
the configured ON Value.
OFF When Valid: For Digital Outputs, when Function Input is ON, output is set OFF (open).
For Analog Outputs and Function Input = Local or Remote Analog Input, then the output is the
inverted value of the input (ie. 100 - analog input %). If The Function Input is an alarm or digital
input and is ON, the analog output will output the configured OFF Value.
Frequency Output: Outputs 50% duty cycle pulses according to the counter value and reset
period of the Remote Counter.
ReFlexIO User Manual
Specifications subject to change without notice. www.ioselect.com
Page:
34
ReFlexIO User Manual
1.132p
Advanced - Configuration – Counters
The following options are only available when Operation Mode is set to ‘ReFlexIO Back To Back
Pair’ in Configuration, Parameters.
Input: (Digital Input 1, Digital Input 2) The local digital input change to count.
Trigger: (0-4,294,967,295) When using a Reset time (as configured below) the ReFlexIO will
trigger an exception report when the counter reaches the Trigger setpoint. A setting of 0 disables
this feature.
Reset: Resets the counter after this time has expired and triggers an exception report. Available
options are:
• Poll period (resets after each poll)
• 1 minute (resets every minute from the beginning of the hour)
• 1 hour (resets on the hour)
• 6 hours (resets at 12PM, 6AM, 12AM and 6PM)
• 12 hours (resets at 12 noon and 12PM)
• 1 day (resets at midnight)
• 1 week (resets at midnight on Sunday)
• No Reset
(Note: the counter value can be saved in the log each time it is reset.)
ReFlexIO User Manual
Specifications subject to change without notice. www.ioselect.com
Page:
35
ReFlexIO User Manual
1.132p
Advanced - Event Logs
Update Logs: Uploads all the event logs in the ReFlexIO.
Clear ReFlexIO Logs: Clears all the event logs in the ReFlexIO. If logging of system events is
enabled in the ReFlexIO (as configured in Parameters, Logging), a new system log - 'Reset Logs'
will be created with an index of 0.
Event Log Details
Index: (0-1000) A reference number assigned to each event log. When the event log is full, the
next log generated is assigned index 0 again. The event log can be prevented from over-writing
itself by enabling the Stop Logging When Log Full option in Advanced Configuration, Parameters,
Logging.
Date/Time: Displayed in the following format DD-MMM-YYYY hh:mm:ss
Source: The reason for generating the event log. Possible sources are:
SYSTEM LOG: Triggered by ReFlexIO manager when the event logs are cleared or the clock is
set.
DIGITAL IN: Digital inputs have changed state.
DIGITAL OUT: Digital outputs have changed state.
ANALOG IN: An analog input has changed by more than the deadband setting.
ANALOG OUT: An analog output has changed by more than the deadband setting.
ALARM: A system alarm has occurred (eg Comms, Security or Low Voltage)
COUNTER TRIG: Trigger setpoint of counter was reached.
COUNTER RESET: Counter was reset.
Type: The various types of event logs are as follows:
DIGITAL OUT: Digital output status
DIGITAL IN: Digital input status
ANALOG OUT 1: Analog output 1 value
ANALOG OUT 2: Analog output 2 value
ANALOG IN 1: Analog input 1 value
ANALOG IN 2: Analog input 2 value
ALARM LINK: Communications link status
ALARM VOLTAGE: Supply voltage status
ALARM SECURITY: Security PIN status
COUNTER 1: Counter 1 value
COUNTER 2: Counter 2 value
VOLTAGE: Supply voltage value
Value: For all status event logs, 0=OK and 1=Alarm. Otherwise the value displayed is the analog
value or parameter. For DIGITAL inputs or outputs, 0=both Chs OFF, 1=Ch1 ON, 2=Ch 2 ON,
3=Chs 1&2 ON.
ReFlexIO User Manual
Specifications subject to change without notice. www.ioselect.com
Page:
36
ReFlexIO User Manual
8.
1.132p
Communication Drivers
Communication drivers allow data registers to be polled from and written to a ReFlexIO. For reliable
communications, these registers can be polled every 500ms or greater.
Driver – KF2 RTU
If the ReFlexIO is setup as a ‘Remote IO’ device it can then communicate with a Kingfisher Series
II RTU using the KF Series II protocol. Remote IO mode allows exception reports to be sent by a
ReFlexIO to a Series II RTU and allows outputs to be written to a ReFlexIO.
Interface Cable
Kingfi sher Series II
RTU Serial Port
DB9 Male (ADP-08-M)
RJ45
Series II
RJ45 Pinout
12345678
TXD 1
RXD 2
GND 4
DCD 5
CTS 3
RTS 6
DTR 8
3 TXD
2 RXD
5 GND
1 DCD
8 CTS
7 RTS
4 DTR
MaxStream
XTend-PKG-R or
XStream-PKG-R
Note: various other interface cables can be used (eg. for GSM or PSTN modem communications). Please
see the KF II Hardware Manual (available by contacting us at www.ioselect.com) for cable details. If a spread
spectrum option board is being used in the Series II RTU, an interface cable is not required.
Serial Test Cable
Heatshrink (Wires joined inside as shown below)
Kingfi sher Series II
RTU Serial Port
RJ45
RJ45
G3 Serial Card
Null Modem Cable (Serial Crossover)
Series II
RJ45 Pinout
TXD 1
RXD 2
GND 4
CTS 3
RTS 6
12345678
ReFlexIO User Manual
6 TXD
5 RXD
4 GND
7 CTS
8 RTS
RJ45 Socket
87654321
Specifications subject to change without notice. www.ioselect.com
Page:
37
ReFlexIO User Manual
1.132p
Series II RTU Setup
(Using Toolbox software)
• Set the RTU address in the range 1 to 249.
•
Set port Type to RS-232 if using a serial cable, Trio M Series Radio, MaxStream external
spread spectrum radio or Spread Spectrum option board. Set port Type to PSTN if using a
dialup modem or GSM.
•
If using a Trio M Series radio, ensure Baud Rate is set to match the radio speed. If using a
spread spectrum radio option board, set Baud Rate to 9600 (for 9XTend US / Australian radio)
or 19200 (for 24XStream International radio).
•
For all setups, Pre TX and Post TX can be left set to 0 ms and Protocol can be left set to
'Series 2'.
•
Network List – add a link with the ReFlexIO device address and the port number of the
communications device as configured above.
•
Phone Directory – if using a dialup modem or GSM, configure a phone number corresponding
to the ReFlexIO address.
•
If using a spread spectrum radio (option board or external), please initialise it with the settings
detailed in the chapter - Using Communication Devices, MaxStream External Spread Spectrum
Radio.
Polling A ReFlexIO Using A Series II RTU
Configure ladder logic to poll network registers from the ReFlexIO using the RX DATA block (an
example is shown below)
│Poll Timer
Port Busy? Get IO Data │
│ #T1
#YPST3.2 RTU 2 │
├──[PERIOD]───────────────────────────────────────────────┤/├───────(RX_DATA)──┤
│ 60 Seconds
#NR2.1 │
The above example polls the ReFlexIO (address 2) every 60 seconds, provided that port 3 is not
busy. The RX Data block was setup as shown below.
ReFlexIO User Manual
Specifications subject to change without notice. www.ioselect.com
Page:
38
ReFlexIO User Manual
1.132p
Exception Reporting from a ReFlexIO to a Series II RTU
When a ReFlexIO exception reports it sends the first 12 registers as detailed below. Exception
reporting is setup in the ReFlexIO as detailed in the topic Advanced - Configuration Communications.
ReFlexIO Kingfisher Registers
Register *
#NRrrr.1
#NRrrr.2
#NRrrr.3
#NRrrr.4
#NRrrr.5
#NRrrr.6
Description
Ch 1 (LSB) = Digital input 1 status
Ch 2 = Digital input 2 status
Analog input 1. 0-26208 = 0-100% = 0-20mA or 4-20mA
For over-range:
0-20mA input: 0-32760 = 0-125% = 0-25mA
4-20mA input: 0-34398 = 0-131.25% = 4-25mA
Analog input 2. Same range as above.
General alarms
Ch 1 ON = Comms Fail
Ch 2 ON = Low Voltage alarm
Ch 3 ON = Incorrect PIN alarm
Supply Voltage to the ReFlexIO (0 to 300 = 0.0 to 30.0V)
SS radio received signal strength. There are two ranges depending on which
type of radio is installed.
0= no signal received
9XTend radio (900MHz): -110 (weak) to -40 (strong) dBm
24XStream radio (2.4GHz): 6 (weak) to 54 (strong)
The 9XTend signal strength is stored as
65426 to 65496 (unsigned) = -110 to -40 (signed) dBm.
#NRrrr.7
#NRrrr.8
#NRrrr.9 and
#NRrrr.10
#NRrrr.11 and
#NRrrr.12
#NRrrr.13
#NRrrr.14
#NRrrr.15
#NRrrr.16
#NRrrr.17
#NRrrr.18
#NRrrr.19
ReFlexIO internal temperature. -20 to 70°C (already scaled)
Status indications
Ch 1 ON = IO Scanning ON
Ch 2 ON = if ReFlexIO in override mode, IO data has changed.
Ch 3 ON = log buffer is >90% full (=900 logs)
Ch 4 ON = new counter 1 value
Ch 5 ON = new counter 2 value
(Remote ReFlexIO sends counter value and then resets it back to zero)
Counter 1. 32-bit long integer (1 to 4,294,967,296)
Counter 2. 32-bit long integer (1 to 4,294,967,296)
Counter periods. Used by remote ReFlexIO for frequency generator outputs.
Ch 1 - 15: Index into counter table
Ch 16 ON = Use table (ms): 500, 1000, 5000, 30 000, 60 000, 90 000, 180
000, 360 000, 86 400 000
Ch 16 OFF = Use table (s): 0, 60, 3600, 21 600, 43 200, 604 800
Ch 1 = DO1 raw output state – Read/Write #
Ch 2 = DO2 raw output state – Read/Write #
AO1 raw output value. 0-26208=0-100% - Read/Write #
AO2 raw output value. 0-26208=0-100% - Read/Write #
Ch 1 = DO1 actual output state - Read only
Ch 2 = DO2 actual output state - Read only
AO1 actual output value. 0-26208=0-100% - Read only
AO2 actual output value. 0-26208=0-100% - Read only
* rrr = ReFlexIO address
#
The raw outputs are modified by the ReFlexIO output options before the actual output is set.
ReFlexIO User Manual
Specifications subject to change without notice. www.ioselect.com
Page:
39
ReFlexIO User Manual
1.132p
Setting ReFlexIO Outputs Using A KF2 RTU
The following network registers can be sent to a ReFlexIO to set the outputs:
#NRrrr.14
#NRrrr.15
#NRrrr.16
Ch 1 = DO1 output state
Ch 2 = DO2 output state
AO1 output value (0-26208=0-100%)
AO2 output value (0-26208=0-100%)
Where 'rrr' is the ReFlexIO address to set the outputs in.
Notes:
• Only network registers (eg #NR2.14) can be sent to the ReFlexIO. Local registers (eg #R14)
will not be accepted.
• To set outputs in a ReFlexIO, first set the network register(s) in the Series II and then send the
network register(s) to the ReFlexIO using a TX DATA block.
• When sending a digital output, the whole register is sent to the ReFlexIO (eg #NRrrr.14) and
not just a single bit (eg #NRrrr.14.1).
• The ReFlexIO applies any configured output options and events to all new outputs.
An example TX Data block that will write to all the ReFlexIO outputs (address 2) is shown below.
Polling The ReFlexIO Outputs
To check the state of the ReFlexIO outputs, the read-only registers #NRrrr.17, #NRrrr.18 and
#NRrrr.19 can be polled from the ReFlexIO. These registers contain a copy of the actual ReFlexIO
outputs. The output registers #NRrrr.14, #NRrrr.15 and #NRrrr.16 can also be polled. However, if a
user is about to set the ReFlexIO outputs in the Series II RTU and a poll occurs at the same time,
the user settings will be overwritten by the polled data.
Uploading Event Logs From A ReFlexIO
Event logs can be uploaded from a ReFlexIO using a Kingfisher Series II RTU and the Rx Update
ladder logic block. The Series II RTU will upload all the logs since the index of the last log that was
uploaded. If no logs have been uploaded then the Series II RTU will upload all the logs in the
ReFlexIO.
ReFlexIO User Manual
Specifications subject to change without notice. www.ioselect.com
Page:
40
ReFlexIO User Manual
1.132p
Driver - Modbus
By setting the Factory Defaults to ‘Modbus Slave’, the ReFlexIO will then respond to Modbus
messages received by its option card. The ReFlexIO will not initiate exception reports in this mode.
All the ReFlexIO Modbus registers listed below can be read using a Modbus message (note: if
registers outside the listed range are requested, a comms fail will occur). Only Modbus registers
40014, 40015, and 40016 can be written to. The ReFlexIO supports the following Modbus function
codes: FC03 Read Holding Registers, FC06 Preset Single Register and FC16 Preset Multiple
Registers.
Setting ReFlexIO Outputs Using Modbus
When setting a digital output, the whole Modbus register is sent to the ReFlexIO (ie. 40014) and
not just a single bit (eg. 40014.1). The ReFlexIO then applies any configured output options and
events to all new outputs.
ReFlexIO User Manual
Specifications subject to change without notice. www.ioselect.com
Page:
41
ReFlexIO User Manual
1.132p
ReFlexIO Modbus Registers
Register
Description
40001
Ch 1 (LSB) = Digital input 1 status
Ch 2 = Digital input 2 status
Analog input 1. 0-26208 = 0-100% = 0-20mA or 4-20mA
For over-range:
0-20mA input: 0-32760 = 0-125% = 0-25mA
4-20mA input: 0-34398 = 0-131.25% = 4-25mA
Analog input 2. Same range as above.
General alarms
Ch 1 ON = Comms Fail
Ch 2 ON = Low Voltage alarm
Ch 3 ON = Incorrect PIN alarm
Supply Voltage to the ReFlexIO (0 to 300 = 0.0 to 30.0V)
SS radio received signal strength. There are two ranges depending on which type of radio is
installed.
0= no signal received
9XTend radio (900MHz): -110 (weak) to -40 (strong) dBm
24XStream radio (2.4GHz): 6 (weak) to 54 (strong)
The 9XTend signal strength is stored as
65426 to 65496 (unsigned) = -110 to -40 (signed) dBm.
ReFlexIO internal temperature. -20 to 70°C (already scaled)
Status indications
Ch 1 ON = IO Scanning ON
Ch 2 ON = if ReFlexIO in override mode, IO data has changed.
Ch 3 ON = log buffer is >90% full (=900 logs)
Ch 4 ON = new counter 1 value
Ch 5 ON = new counter 2 value
(Remote ReFlexIO sends counter value and then resets it back to zero)
Counter 1. 32-bit long integer (1 to 4,294,967,296)
40002
40003
40004
40005
40006
40007
40008
40009 and
40010
40011 and
40012
40013
40014 *
40015 *
40016 *
40017
40018
40019
Counter 2. 32-bit long integer (1 to 4,294,967,296)
Counter periods. Used by remote ReFlexIO for frequency generator outputs.
Ch 1 - 15: Index into counter table
Ch 16 ON = Use table (ms): 500, 1000, 5000, 30 000, 60 000, 90 000, 180 000, 360 000,
86 400 000
Ch 16 OFF = Use table (s): 0, 60, 3600, 21 600, 43 200, 604 800
Ch 1 = DO1 raw output state – Read/Write #
Ch 2 = DO2 raw output state – Read/Write #
AO1 raw output value. 0-26208=0-100% - Read/Write #
AO2 raw output value. 0-26208=0-100% - Read/Write #
Ch 1 = DO1 actual output state - Read only
Ch 2 = DO2 actual output state - Read only
AO1 actual output value. 0-26208=0-100% - Read only
AO2 actual output value. 0-26208=0-100% - Read only
* Only registers 40014, 40015 and 40016 can be written to. Writing to any other registers will result in a comms fail.
#
The raw outputs are modified by the ReFlexIO output options before the actual output is set.
ReFlexIO User Manual
Specifications subject to change without notice. www.ioselect.com
Page:
42
ReFlexIO User Manual
9.
1.132p
Using Communication Devices
The serial option card allows various external communication devices to be connected and used
with a ReFlexIO. The ReFlexIO does not support initialisation strings or hardware flow control and
so these settings must first be configured in the communication device as detailed below.
PSTN Modems and GSMs
Interface Cables
DB25 Male
G3 Serial Card
Banksia PSTN Modem
RJ45
RJ45 Socket
87654321
TXD 6
RXD 5
GND 4
DCD 2
CTS 7
RTS 8
2 TXD
3 RXD
7 GND
8 DCD
20 DTR
5 CTS
4 RTS
DB15 Male
High Density
G3 Serial Card
Wavecom GSM
RJ45
RJ45 Socket
87654321
TXD 6
RXD 5
GND 4
DCD 2
CTS 7
RTS 8
2 TXD
6 RXD
9 GND
1 DCD
12 RTS
Software Settings
The following settings have been confirmed to work with Banksia PSTN modems (MyModem56V)
and Wavecom GSMs (WM02-G900). These modems require a number of settings that can be
configured by connecting the modem to your PC COM port and then setting the following AT
commands using Windows HyperTerminal (data format: 8 data bits, no parity and 1 stop bit).
Wavecom GSM
AT <enter>
ATS0=2 <enter>
AT&D0 <enter>
AT&S0 <enter>
AT+IFC=0,0 <enter>
AT&W <enter>
Modem responds with OK if communicating with the PC correctly
Auto answer after 2 rings
Ignore DTR
DSR always ON
Do not use hardware flow control
Save settings to permanent memory
Banksia PSTN Modem
AT <enter>
Modem responds with OK if communicating with the PC correctly
ATS0=2 <enter>
Auto answer after 2 rings
AT&D0 <enter>
Ignore DTR
AT&S0 <enter>
DSR always ON
AT&K0 <enter>
Do not use hardware flow control
AT&W <enter>
Save settings to permanent memory
ReFlexIO User Manual
Specifications subject to change without notice. www.ioselect.com
Page:
43
ReFlexIO User Manual
1.132p
Trio M Series Radio
Interface Cable
DB9 Male
G3 Serial Card
RJ45
RJ45 Socket
TXD 6
RXD 5
GND 4
DCD 2
CTS 7
RTS 8
TRIO M Series Radio
(Modem Fitted)
Eg MR450
3 TXD
2 RXD
5 GND
1 DCD
87654321
Software Settings
Trio M Series radios are configured using the Trio TVIEW software. When configuring each radio, please
ensure the radio uses the same baud rate as the ReFlexIO serial card (typically 9600 bps) and PTT Control
is set to Auto On Data. These settings are highlighted below.
ReFlexIO User Manual
Specifications subject to change without notice. www.ioselect.com
Page:
44
ReFlexIO User Manual
1.132p
MaxStream External Spread Spectrum Radio
The following information applies to using a MaxStream external spread spectrum radio with a
ReFlexIO, a PC or with another communications device (eg display panel).
Interface Cables
DB9 Male
G3 Serial Card
RJ45
3 TXD
2 RXD
5 GND
1 DCD
8 CTS
7 RTS
4 DTR
TXD 6
RXD 5
GND 4
DCD 2
CTS 7
RTS 8
DTR 3
RJ45 Socket
87654321
PC COM Port *
DB9 Male
DB9 Female
TXD 3
RXD 2
GND 5
DCD 1
CTS 8
RTS 7
DTR 4
Kingfi sher
Series II RTU
Serial Port
Series II
RJ45 Pinout
MaxStream
XTend-PKG-R or
XStream-PKG-R
3 TXD
2 RXD
5 GND
1 DCD
8 CTS
7 RTS
4 DTR
MaxStream
XTend-PKG-R or
XStream-PKG-R
DB9 Male (ADP-08-M)
RJ45
TXD 1
RXD 2
GND 4
DCD 5
CTS 3
RTS 6
DTR 8
3 TXD
2 RXD
5 GND
1 DCD
8 CTS
7 RTS
4 DTR
MaxStream
XTend-PKG-R or
XStream-PKG-R
12345678
* A USB version of the MaxStream radio is also available. A standard USB cable can then be used
to connect the radio to a USB port on a PC.
Spread Spectrum Repeater Setup
Repeater
MaxStream
XTend-PKG-R or
XStream-PKG-R
(G3
Optional)
End Node
End Node
The ReFlexIO internal spread spectrum radio cards are automatically configured to operate as End Nodes.
End Nodes can communicate directly with one another. A repeater can also be added between any 2 end
nodes to extend the radio coverage. Please refer to Software Settings below to configure the repeater radio.
Radio Switch Settings
Please ensure that the MaxStream radio switches are set as follows (note: there are no switch
settings on the USB version):
XTend
O
N
1 2 3 4 5 6
XStream
Set for: RS232,
RS485 termination=None and
TX/RX mode=User Defined
(Switch 1, 5 and 6 set ON)
ReFlexIO User Manual
O
N
1 2 3 4 5 6
Set for: RS232,
RS485 termination=None
and Parity=None
(Switch 1 ON)
Specifications subject to change without notice. www.ioselect.com
Page:
45
ReFlexIO User Manual
1.132p
Software Settings – Using MaxStream X-CTU Software
Note: radios in a network can only communicate if they have the same settings for Vendor ID and
Hopping Channel.
• Connect a powered up MaxStream radio to your PC’s COM port (eg COM1).
•
Run the MaxStream X-CTU program supplied with the radio.
•
From the PC Settings tab, ensure X-CTU is setup to use the right COM port, 9600 baud
(XTend) or 19200 baud (XStream), 8 data bits, no parity and 1 stop bit.
•
Click the Test / Query button to check communications to the radio.
•
From the Modem Configuration tab, click the Read button. All the radio settings will be read
into the program.
•
From the Networking & Security section of the radio settings:
Set Hopping Channel to the same number as all the other radios in your network.
Set Destination Address to FFFF Hex.
Set Source Address to a unique value in your network (all radios in the network should have a
different Source Address in the range 0-FFFF Hex).
Set RF Mode to Repeater or Repeater End Node (Repeater is used to relay messages to
another radio and will also allow the local radio to communicate).
Note: Modem VID (Vendor ID) should be set to the same number as all the other radios in
your network. This can be set using a terminal program as described below.
•
If using an XTend radio, scroll down to the RF Interfacing section of the radio settings and
change BR to 0 (ie. set RF data rate to 9600 bps).
•
Click the ‘Write’ button. The settings will now be written and saved in the radio.
Software Settings – Using A Standard Terminal Program *
Radio parameters can be set using Windows HyperTerminal (or the Terminal window in the
MaxStream X-CTU software). Once connected to the radio, type +++ to put the radio in command
mode. Then enter the relevant AT commands below. Note: radios in a network can only
communicate if they have the same settings for Vendor ID and Hopping Channel.
+++
ATRE <enter>
ATHP0 <enter>
ATDTFFFF <enter>
ATMY15 <enter>
ATID3332 <enter>
ATMD5 <enter>
ATBR0 <enter>
ATWR <enter>
Radio responds with OK when ready to receive commands
Reset the radio to factory defaults
Set Hopping Channel to 0 (default) or in the range XTend 0-9, XStream 0-6
Set Destination Address to FFFF Hex.
Set Source Address to eg. 15 (must be unique) or in the range 0-FFFF Hex
Set Vendor ID to 3332 Hex (default) or in the range XTend 0-7FFF Hex,
XStream 10-7FFF Hex.
Set RF Mode
For XTend: 5=Repeater, 6=End Node.
For XStream: 3=Repeater, 4=End Node.
Only required if using an XTend radio. Sets RF data rate to 9600 baud.
Save settings to permanent memory
* When configuring a Kingfisher Series II RTU Spread Spectrum Option card, the Toolbox Comms
Terminal is used. Setup the Comms Terminal to use the Remote RTU Port Number that
corresponds to the option card and then enter the above settings.
ReFlexIO User Manual
Specifications subject to change without notice. www.ioselect.com
Page:
46
ReFlexIO User Manual
1.132p
RS485 Device
Interface Cable
Each ReFlexIO can communicate with another ReFlexIO or device connected to the RS485 bus.
Only one ReFlexIO or device can talk at a time. Maximum RS485 Wire Length: 600m.
G3 SERIAL CARD
G3 SERIAL CARD
G3 SERIAL CARD
GND
RX
RX+
TX-
...
TX+
GND 4
8
7
RX+
TX- 65
RX
TX+
GND 4
8
TX+
RX+ 7
TX- 65
RX
GND 4
TX+
8
120
Ohm*
7
RX+
TX- 65
RX
120
Ohm*
G3 RJ45 Socket
87654321
RS485 DEVICE
* Line termination recommended for 38400 baud
Software Settings
Ensure that the ReFlexIO Serial Card is setup to operate in RS485 mode. Please see the topic
Configuration, Comms, Serial Card.
ReFlexIO User Manual
Specifications subject to change without notice. www.ioselect.com
Page:
47
ReFlexIO User Manual
1.132p
10. Upgrading Firmware
After connecting a ReFlexIO to your PC’s USB port, select the menu Tools, Download Firmware.
The communications dialog box will appear.
Click CONNECT to attempt to communicate with the ReFlexIO. If communications are successful,
ReFlexIO Manager will check the ReFlexIO’s hardware version. There are 2 versions of ReFlexIO
hardware: v1.05 or v1.07 and newer. These can be loaded with firmware files
‘ReFlexIO_[version].ReFlexIO5’ and ‘ReFlexIO_[version].ReFlexIO7’ respectively.
If the hardware version can be detected or if a previous download failed, you will be prompted with
a firmware selection dialog box. Select the firmware file that matches your ReFlexIO hardware
version.
Manually Checking The Hardware Version
Remove the left hand (when looking from the front)
side cover by inserting a flat screwdriver into the
screwdriver slot on the back of the ReFlexIO. Gently
push the screwdriver in at an angle (around 45
degrees). The side cover will then separate from the
ReFlexIO case. The hardware version is written in the
top right hand corner of the circuit board.
While downloading firmware, the OLED and LEDs are switched off. If a firmware download fails
(eg. comms are interrupted during download), the OLED and LEDs will remain switched off.
Firmware can still be downloaded again provided the ReFlexIO is powered up.
If the download is successful, the new firmware version will be displayed on the ReFlexIO Startup
Screen.
ReFlexIO User Manual
Specifications subject to change without notice. www.ioselect.com
Page:
48
ReFlexIO User Manual
1.132p
11. ReFlexIO Display Map
Configuration
PARAMETERS
DEVICE ADDRESSES
TIME & DATE
NETWORK ID
IO SCAN RATE
SECURITY
LOCAL ADDRESS
Set Local Address (001-249)
REMOTE ADDRESS
Set Remote Address (001-249)
TIME (hh:mm:ss)
Set Time
DATE (dd:mm:yyyy)
Set Date
Set Network ID (00-FF Hex)
Set IO Scan Rate (250ms, 1 sec, 5 sec, 30 sec, 1 min, 5 min, 15 min)
ENABLE PIN
Security Enabled!
DISABLE PIN
Security Disabled!
Set PIN (0000-9999)
PHONE NUMBERS
Set SMS No.(Blank or up to 19 digits)
Set PSTN No.(Blank or up to 19 digits)
Configuration
IO POINTS
ANALOG IO
AI1 SETTINGS
AI2 SETTINGS
AO1 SETTINGS
AO2 SETTINGS
DIGITAL IO
ReFlexIO User Manual
INPUT TYPE
Analog or Digital
ANALOG RANGE
Analog Range (0-20 mA or 4-20 mA)
SETPOINT
000.0-100.0%
DEADBAND
000.0-100.0%
INPUT TYPE
Analog or Digital
ANALOG RANGE
Analog Range (0-20 mA or 4-20 mA)
SETPOINT
000.0-100.0%
DEADBAND
000.0-100.0%
OUTPUT TYPE
Analog or Digital
ANALOG RANGE
Analog Range (0-20 mA or 4-20 mA)
FAILSAFE
000.0-100.0%
ON VALUE
000.0-100.0%
OFF VALUE
000.0-100.0%
OUTPUT TYPE
Analog or Digital
ANALOG RANGE
Analog Range (0-20 mA or 4-20 mA)
FAILSAFE
000.0-100.0%
ON VALUE
000.0-100.0%
OFF VALUE
000.0-100.0%
DO1 FAILSAFE
ON / OFF
DO2 FAILSAFE
ON / OFF
Specifications subject to change without notice. www.ioselect.com
Page:
49
ReFlexIO User Manual
Configuration
COMMS
SS RADIO
SERIAL CARD
COMMS RATE
Configuration
Manual
Override
FACTORY DEFAULTS
INPUTS
OUTPUTS
SCAN SETTINGS
ReFlexIO User Manual
HOPPING CHANNEL
Set Hopping Channel (0-9)
RF DATA RATE
Normal / High
TY PE
RS232 / RS485 / PSTN
BAUD RATE
4800, 9600, 19200 or 38400
1.132p
Set Comms Rate (500ms, 1 sec, 5 sec, 30 sec, 1 min, 15 min, 30 min, 1 hour, 1 day)
EXCEPTION REPORT
Report by Exception ON / OFF
BACK TO BACK
Back to Back defaults loaded!
REMOTE IO
Remote IO defaults loaded!
MODBUS SLAVE
Modbus Slave defaults loaded!
AI1
000.0-100.0%
AI2
000.0-100.0%
DI1
ON / OFF
DI2
ON / OFF
AO1
000.0-100.0%
AO2
000.0-100.0%
DO1
ON / OFF
DO2
ON / OFF
OFF, ON, 30 min, 4 hours, 1 day
Specifications subject to change without notice. www.ioselect.com
Page:
50
ReFlexIO User Manual
1.132p
12. Factory Default Settings
IO Settings
Digital Inputs
Back to Back / Remote IO / Modbus Slave
DI1: Type
DI2: Type
Discrete
Discrete
Analog Inputs
AI1: Input Type
AI1: Analog Range
AI1: Threshold
AI1: Dead Band
AI2: Input Type
AI2: Analog Range
AI2: Threshold
AI2: Dead Band
Analog
0-20mA
75%
10%
Analog
0-20mA
75%
10%
Digital Outputs
DO1: Type
DO1: Failsafe
DO2: Type
DO2: Failsafe
Discrete
OFF
Discrete
OFF
Analog Outputs
AO1: Output Type
AO1: Analog Range
AO1: Failsafe
AO1: ON Value
AO1: OFF Value
AO2: Output Type
AO2: Analog Range
AO2: Failsafe
AO2: ON Value
AO2: OFF Value
Analog
0-20mA
0%
100%
0%
Analog
0-20mA
0%
100%
0%
Programming Settings
DO1: Output Option
DO1: Event Type1
DO1: Event Type2
DO2: Output Option
DO2: Event Type1
DO2: Event Type2
AO1: Output Option
AO1: Event Type1
AO1: Event Type2
AO2: Output Option
AO2: Event Type1
AO2: Event Type2
Timers
Keypad Lockout Time
Analog Log Timer
Screen Shutdown Time
ReFlexIO User Manual
Back to Back / Remote IO / Modbus Slave
ON/Follow
Remote DI1
Not Configured
ON/Follow
Remote DI2
Not Configured
ON/Follow
Remote AI1
Not Configured
ON/Follow
Remote AI2
Not Configured
Back to Back / Remote IO / Modbus Slave
1800 seconds (30 minutes)
3600 seconds (1 hour)
300 seconds (5 minutes)
Specifications subject to change without notice. www.ioselect.com
Page:
51
ReFlexIO User Manual
Options
Back to Back / Remote IO / Modbus Slave
Save DI to Log
Save DO to Log
Save System Alarms to Log
Save System Events to Log
Save AI to Log
Save AO to Log
Save Counter on reset to log
Set bit when log reaches 90%
Do not Log after Full
Log Counter on Setpoint reached
Date Format
General Settings
IO Scan Rate
Poll Rate
Exception Reporting
Communications Timeout
Number of Retries
Date & Time
Network ID
Security
PIN Number
Low Voltage Setting
Low Power Mode Setting
Wake up method
Control Mode Scan Settings
Comms Settings
ON
ON
ON
ON
OFF
OFF
OFF
OFF
OFF
OFF
DDMMYY
Back to Back
Remote IO
1 min
1 sec
1 hour
ON
Modbus Slave
Disabled
Disabled
800 ms
5
HH:MM:SS PM, DD/MM/YYYY
AE
OFF
1000
10.8V
OFF
TIMED
ON & Exit
Back to Back / Remote IO / Modbus Slave
Spread Spectrum Tx Power
Spread Spectrum RF Data Rate
Spread Spectrum Vendor ID
Spread Spectrum Dest. Address
Spread Spectrum Hopping Channel
Spread Spectrum Repeater Mode
Serial Card Baud Rate
Serial Card Interface Type
SMS Paging Defaults
PSTN Phone Number
PSTN Dial Retries
PSTN Dial Timeout,
Online Inactivity, Hang Up After
PSTN Initialisation String
Counters
1000 mW (9XTend), 50 mW (24XStream)
9600 bps
ID=13106
DT=65535 (FFFF Hex)
HP=0
XTend: MD=6 (End Node); XStream: MD=4 (End Node)
Always operates as an End Node. Can be used with a Spread
Spectrum Radio in Repeater mode.
4800 bps
RS232
No phone number, No analog input triggers, Digital inputs enabled
None
0
60 seconds
AT&FTE0V0S0=2&W
Back to Back / Remote IO / Modbus Slave
Counter 1 Input
Counter 2 Input
Counters 1 and 2 Trigger
Counters 1 and 2 Reset
ReFlexIO User Manual
1.132p
DI1
DI2
10
No Reset
Specifications subject to change without notice. www.ioselect.com
Page:
52
ReFlexIO User Manual
1.132p
13. Specifications
General
Configuration / Diagnostic Port
Mini USB 2.0 (host powered)
A USB to Mini USB cable is used by ReFlexIO Manager to
communicate between a PC and a ReFlexIO.
Communications options
Spread Spectrum Radio or Serial Card (RS232/RS485)
Supported Protocols
Modbus Slave, KF Series II
OLED Display
Mono or Color 96 x 64 pixel OLED (Organic Light Emitting Diode)
Displays 19 characters x 8 lines of text
LEDs (left to right)
LED1: Power
LED2: IO Scan
LED3: Comms
LED4: Alarm
Push buttons
Three - UP (left), DOWN (middle) and ENTER (right)
Log Capacity
1000
Log Accuracy
Communications Links
1 second
CE, FCC, CSA, UL, C Tick (pending) Zone 2 (Class One, Div 2)
compatible for use in hazardous areas
This Class B digital apparatus complies with Canadian ICES-003.
1
Failsafe Outputs
Yes
Real Time Clock
Yes
Operating Temperature
-40 to 70°C
Relative humidity
5 to 95% (non-condensing)
Compliance
ON = power OK, flashing = power low
ON = IO scanning, flashing = IO not scanning
ON = comms message in progress
Flashing = system alarm (typically comms fail)
Electrical
Supply Voltage (to POWER IN
terminal) from suitable customer
power supply
9 to 30V DC, nominally 12V or 24V.
Input has a 1A resettable fuse, reverse and over-voltage protection.
Current Consumption
20 mA @ 12VDC minimum
400 mA @ 12VDC with 1W spread spectrum radio transmitting
600 mA @ 12VDC with radio transmitting and output current at max.
200 mA @ 30VDC with 1W spread spectrum radio transmitting
400 mA @ 30VDC with radio transmitting and output current at max.
500 mA @ 9VDC with 1W spread spectrum radio transmitting
700 mA @ 9VDC with radio transmitting and output current at max.
Output Current (via POWER OUT
terminal)
200mA maximum. Excessive over-current polyfuse protected.
(Uses supply voltage applied to POWER IN terminal)
Monitoring
Supply Voltage, Low Supply Voltage alarm
ReFlexIO User Manual
Specifications subject to change without notice. www.ioselect.com
Page:
53
ReFlexIO User Manual
1.132p
Analog Inputs
Number of inputs
2
Current Range
0-20mA or 4-20mA
Can read up to 25mA for over-range inputs.
Protection
Surge and transient protection up to a 10MJ pulse and up to 5V continuous.
Over current and over voltage protected.
Resolution
12-bit ADC
Accuracy
+ 0.25 % @ 25°C
Maximum Voltage
5 VDC
Input impedance
250Ω
Analog Outputs
Number of outputs
2
Current Range
0-20mA or 4-20mA
Can output up to 25mA for over-range outputs.
Protection
Surge and transient protection up to a 10MJ pulse and 35V continuous. Over
and reverse voltage protected.
Resolution
12-bit DAC
Accuracy
+ 0.25 % @ 25°C
Maximum Load
1275Ω @ 30VDC analog output supply voltage
* Note: Max. Load = (VDCin - 0.5)/0.02 - 200 Ω
VDCin = Voltage supply used to drive analog output
Digital Inputs
Number of inputs
2 to 4 (analog inputs can be configured as digital inputs)
Input Voltage Range
3 to 30VDC = ON
0 to 1.4VDC = OFF
Protection
Surge and transient protection up to a 10MJ pulse and up to 50V continuous.
Input Impedance
150 kΩ
Pulse Counting
2Hz maximum
Pulse must have ON and OFF times of at least 250ms each.
Digital Outputs
Output Type
Open drain, sinking to ground
Number of outputs
2 to 4 (analog outputs can be configured as digital outputs)
Switching Voltage
30 VDC maximum (switches to ground)
Switching Current
200 mA maximum
Protection
Surge and transient protection up to 500MJ pulse.
Pulse Outputs
2 Hz maximum, 50% duty cycle.
ReFlexIO User Manual
Specifications subject to change without notice. www.ioselect.com
Page:
54
ReFlexIO User Manual
1.132p
Please see www.maxstream.net/products for more information
Spread Spectrum Radio Option
Parameter
9XTend
24XStream
USA, Canada, Australia *
International
902-928MHz (USA, Canada)
915-928MHz (Australia)
2.4000-2.4835GHz
1-1000 mW configurable
50 mW
Up to 900 m
Up to 180 m
Up to 22 km
Up to 5 km
Up to 32 km
Up to 8 km
115200 or 9600 bps
9600 bps
3.7W maximum
0.75W maximum
Picture
Countries Supported
Frequency
Transmit Power
Range Indoors
Range Outdoors
(must have line of sight)
Range with Yagi
(must have line of sight)
RF Data Rate
Power Consumption
Spread Spectrum Type
FHSS (Frequency Hopping Spread Spectrum)
Antenna Connector
RPSMA (reverse polarity SMA) Male (on radio)
Receiver Sensitivity
-110dBm @ 9600 bps
-105 dBm
o
Operating Temperature
-20 to 70 C
* The 9XTend radio for Australia is slightly different to the model for the USA and Canada.
Serial Option Card
Baudrate
4800, 9600, 19200 or 38400 bps
Data Format
8 data bits, no parity bit, 1 stop bit
Interface Types
RS232 or RS485
Operating Temperature
-40 to 70°C
Isolation
2.5 kV
RS485 Line Drive
32 Receivers
RJ45 Socket Pinout
ReFlexIO User Manual
Pin
1
2
3
4
5
6
7
8
RS232
DSR
DCD
DTR
GND
RXD
TXD
CTS
RTS
RS485 (4 Wire)
N/C
N/C
N/C
GND
RXTXRX+
TX+
RJ45 Socket
RJ45 Plug
87654321
12345678
(EIA-561 / RS232D Standard)
Note: Kingfisher Series II RTUs use different pin numbering.
Specifications subject to change without notice. www.ioselect.com
Page:
55
ReFlexIO User Manual
1.132p
Dimensions
Overall
ReFlexIO User Manual
175mm H x 35 mm W x 128 mm D (includes mounting brackets)
Specifications subject to change without notice. www.ioselect.com
Page:
56
ReFlexIO User Manual
1.132p
14. Mounting Instructions
Use 4 screws to attach the ReFlexIO to a suitable flat mounting surface.
Ensure there is adequate ventilation below and above the unit and that any objects do not obstruct
the ventilation holes.
ReFlexIO User Manual
Specifications subject to change without notice. www.ioselect.com
Page:
57
ReFlexIO User Manual
1.132p
15. Ordering
ReFlexIO User Manual
Specifications subject to change without notice. www.ioselect.com
Page:
58
ReFlexIO User Manual
1.132p
16. Wiring Diagram
IO POWERED BY ReFlexIO
IO POWERED EXTERNALLY
ANALOG INPUTS (0-20 or 4-20 mA)
ANALOG INPUTS (0-20 or 4-20 mA)
AI CH x
+
-
Analog
Input
2-wire
transmitter
AI CH x
COMMON
+
-
Analog
Input
3-wire
transmitter
+
-
Analog
Input
4-wire
transmitter
POWER OUT
ioSelect
Analog
+ Input
AI CH x
COMMON
+ Power
- Supply
POWER OUT
AI CH x
COMMON
PWR
POWER OUT
POWER OUT
AI CH x
COMMON
* Use R=470Ω 0. 5W if P ower Out=12VDC
or use R= 1.2KΩ 1W if Power Out=24V DC
This will provide an input of ~16mA
+
Analog
- LOAD
AO CH x
FIELD CONTACT
(0-20mA
or 4-20mA)
+
Wired as a
POWER
Digital Input
SUPPLY
COMMON
R Ohm s*
* Use R=470Ω 0.5W if Power Supply=12V DC
or use R=1.2KΩ 1W if Power Supply=24VDC
This will provide an input of ~16mA
COMMON
AO CH x
Max. IO and
Power Out
wire length:
30 met res.
4-wire
transmitter
Analog
Input
AI CH x
ANALOG OUTPUTS
POWER OUT
+
-
PWR
FIELD CONTACT
Wired as a
Digital Input
R Ohm s*
AI CH x
2-wire
Transmitter
DIGITAL INPUTS
ANALOG OUTPUTS
- POWER
+ SUPPLY
+
Analog
- LOAD
(0-20mA
or 4-20mA)
DIGITAL INPUTS
FIELD CONTACT
FIELD CONTACT
DI CH x
DI CH x
+
POWER OUT
POWER
SUPPLY
COMMON
DIGITAL OUTPUTS
+
POWER OUT
DO CH x
LOAD
DO CH x
DIGITAL OUTPUTS
+
LOAD
+
POWER
SUPPLY
COMMON
-
INPUT POWER
POWER IN
+
OV
- POWER
9-30V DC
SUPPLY
-
+
OPTIONAL
12V BACKUP
BATTERY
DIODE *
-V
OV
OPTIONAL
12V BACKUP
BATTERY
ReFlexIO User Manual
Max. power supply to POWE R IN wire
length: 10 met res.
+ +V
POWER IN
Adjust to 13.8V DC when
using a backup battery.
+
PSU3
AC/DC Power supply available from RTUnet.
Adjust to 14.4V DC when using a backup
battery. Note: the PSU3 should be installed
according to local regulations.
* Diode prevents the battery discharging through the PS U3
power supply. Use 1N5404 diode or equivalent (3 amp)
Specifications subject to change without notice. www.ioselect.com
Page:
59
ReFlexIO User Manual
ReFlexIO User Manual
Specifications subject to change without notice. www.ioselect.com
1.132p
Page:
60