1
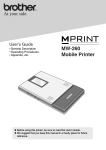
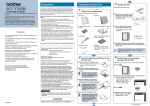
Views of the Device
Accessories
10
4
1
2
13
11
12
15
14
5
6
7
16
3
17
18
8
19
20
9
21
23
22
27
28
24
29
30
31
25
26
1
2
3
4
5
6
7
8
9
10
11
12
13
14
15
16
17
18
19
20
21
Soft key 1
QWERTY keyboard
Soft key 2
Scan key (Left)
Record key
Volume up
Volume down
RESET button
Eyelet for wrist strap(Left)
Stylus
Scanner
Power button
Wi-Fi/Bluetooth LED
Telephone receiver
GSM/Battery LED
Display
Soft key 3
Soft key 4
Start key
OK key
Talk key
22
5-way navigation key
23
24
25
26
27
28
29
30
31
End key
Speaker
Battery pack
Microphone
Scan key(Right)
Eyelet for wrist strap(Right)
Mini-SD card slot
Mini USB connector
Earphone Jack
Hardware Keypad / Installing SIM Card and Battery
To enter capital letters/numbers, or to delete/back by using the
hardware keyboard:
Performs the command shown in the label above the button
A hardware keyboard similar to a standard one on your PC
Performs the command shown in the label above the button
The “Fn” key is used to access the symbols in blue on the keypad. Press this key once and the
Press the key to scan and decode bar code/2D code
icon
appears; the next character you enter will be a symbol or number (for example: @abc). Press the “Fn”
Press and hold this key to record a voice note
a
Press the Volume up button to turn up the PDA receiver volume
key twice can enter numbers and symbols constantly (for example: $25). You can also hold down the “Fn”
h
key and press another key at the same time to enter its corresponding symbol.
g
Press the Volume down button to turn down the PDA receiver volume
Press this key once, the next character you enter will be a capital letter (for example: Abc). Hold down
Press the RESET button with stylus to soft-reset your device
this key and press another key at the same time to enter capital letters constantly. Alternatively, you can
Fix a wrist strap here
press the “Fn” key once and then press this key (
Write, draw, or make selection on the touch screen
Point the reading window of the scanner in the direction of bar code/ 2D code
f
b
Power on or off the device
appears) to enter capital letters constantly. For
returning to enter lowercase letters, press the “Fn” key and then the “Cap” key.
Press this key to erase the letter in the left side of the cursor. Press the “Fn” key once (
appears)
then press this key to delete the first letter in the right side of the cursor. To disable the “Fn” key, press it
Indicates Wi-Fi/Bluetooth Status
Listen to a phone call here
again (
Indicates GSM/Battery LED
You can press this key to enter symbols or special characters such as accented letters (e.g. à, é…etc.).
Qu
ick
2.8-inch TFT LCD with touch screen
c
Performs the command shown in the label above the button
Gu
ide
Manual
e
Performs the command shown in the label above the button
Pull down the Start menu
Press this key to dial or answer a call
d
Press this button up, down, left, or right to move through menus; carry out the selection by pressing the center button.
Listen to audio media or listen to a phone call hands-free
Remove to place battery and SIM card
Speak into the microphone when talking on the phone or recording a voice note
Press the key to scan and decode bar code/ 2D code
Fix a wrist strap here
Insert a mini-SD card to expand device memory
Mini USB connector for PC sync and battery charging
Connect a 2.5 mm Earphone
After pressing a character, press the “Fn” key and then the “Sym” key once to show an accent type of
this character. To show another accent type, repeat the same steps until the desired type is displayed.
See page 27 in the user manual for corresponding symbols for each character/key.
Installing the SIM Card
Press OK key to make a selection
End a call or close Phone application
will disappear).
a
b
c
d
e
f
g
h
AC Adapter
Stereo Headset
USB Cable
Getting Started CD
User Manual/Quick Guide
Pouch
Battery
Stylus
Recharge the device battery
Listen to a phone conversation hands-free
If you want to use phone features, you must install a GSM SIM card.
•Push the back cover down and slide it open.
•Place the SIM card in the SIM card slot with the
gold contacts facing down. The SIM card’s cutoff corner should match the cut-off corner in the
SIM card slot.
Connect the device to a PC
Windows MobileTM Getting Started Disc
Provide instructions of device functions
Protect the device
Rechargeable Li-ion polymer battery
Write, draw, or make selection on the touch screen
Installing the Battery
•Place the battery in position by pressing it’s
protrusions on the side of the battery against the
sockets inside the battery slot.
•Press the battery down into the battery slot and
close the back cover.
Synchronizing Information
ActiveSync synchronizes information on your phone with information on your PC such as
Outlook content. ActiveSync can also synchronize over a wireless or cellular network with
Exchange Server, if your company or service provider is running Exchange Server with
Exchange ActiveSync.
Specifically, you can use ActiveSync to:
•Synchronize information such as Outlook e-mail, contacts, calendar, or tasks information on
your phone with your PC, as well as pictures, video, and music.
•Synchronize Outlook e-mail, contacts, calendar appointments, and tasks on your phone
directly with Exchange Server so that you can stay up to date even when your PC is turned
off.
•Copy files between your phone and your PC without synchronizing.
•Select which types of information are synchronized and specify how much information is
synchronized. For example, you can choose how many weeks of past calendar appointments
to synchronize.
Installing and setting up ActiveSync
Phone Features
Getting Started / Today Screen Components
You can use your phone to make, receive, and keep track of calls, and send text
messages (SMS, Short Message Service) and MMS (Multimedia Messaging Service)
messages. You can also dial a phone number directly from Contacts, and easily copy SIM
contacts to Contacts on the phone.
The Phone Screen
From the Phone screen, you can open, call, or find a contact, and even save a new
number in Contacts. To access the Phone screen, do any of the following:
•Press the Talk key (
•Tap
).
> Phone.
Powering On/Off the Device
Press the POWER button to turn on the device. The POWER
button is located on the top side of the device. When you power
on the device for the first time, you are asked to calibrate the
device. Please refer to the “Calibrating your device” section in the
user manual for calibration steps. Press the POWER button again
to switch the device to sleep mode. You can still receive phone
calls and messages when the device is operating on sleep mode.
To power off the device completely, press and hold the POWER
button for 3 seconds and the system will prompt you to power off
the device.
Icon Indicators
Making a Call from Contacts
1. On the Phone screen, tap Contacts.
2. Tap the desired contact and tap Call or press the TALK Key to dial.
Status indicators appear at the top of the screen and on the Today screen.
The following table lists common status indicators and their meanings.
New e-mail or text message (SMS)
Connection is not active
New voice mail
Synchronization in progress
New instant message
Ringer on
Voice call
Ringer off
Voice call in progress
Roaming
Data call in progress
No Voice mail
Calls are forwarded
Voice mail Lines 1
•Create a synchronization relationship between your PC and the device.
Call on hold
Call Forwarding Lines 1
•Configure an Exchange Server connection to synchronize directly with Exchange Server. To
synchronize your device with Exchange Server, obtain the name of the Exchange Server,
your user name, password, and domain name from your administrator before completing
the wizard.
Missed call
Alarm
Battery level 1
GPRS available
Battery level 2
GRPS in use
Low battery
No SIM card installed
Extremely low battery
Wi-Fi connection in progress
Battery charging
Ringer in vibration mode
Signal strength
Function key on
Bluetooth bonding in progress
Synchronization error
No signal
Barcode reader off
Flight mode
Barcode reader on
No service
PC Connection is active
1. Install ActiveSync on your PC, as described on the Windows Mobile™ Getting Started Disc.
After Setup completes, the Synchronization Setup Wizard automatically starts when you
connect your device to the PC.
2. Follow the instructions on the screen to complete the wizard. In the Sync Setup Wizard, you
can:
•Choose information types to synchronize.
Making a Call from Call History
Call History displays calls you have made, received, and missed.
1. On the Phone screen, tap the Call History button on the Phone keypad.
2.Select the name or phone number to call.
3.Tap Call or press the TALK key.
Call History
1.Calls you received
2.Calls you made
3.Calls you missed