1
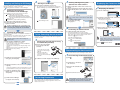
Introduction
Quickstart Guide
Thank you for purchasing the BROTHER DOCUMENT VIEWER
SV-100B.
The Quickstart Guide provides a simple explanation of the
operating procedures leading up to the use of the SV-100B
(herein referred to as the unit).
Carefully read "SV-100B User's Guide (Main Unit)" and
"SV-Manager User's Guide (PC Software)" for cautionary
points and detailed explanations ensuring safe operation
and increased convenience when using this equipment.
Trademarks
· The names of the operating systems have been abbreviated in
this document.
· The Official Name of Windows® XP is Microsoft® Windows® XP
operating system.
3 Charge the Unit
Preparations Before Use
This device is an easily portable, convenient document viewer that uses
electronic paper. This device makes a large amount of documents portable
and the contents can be immediately displayed. Even when the power is
turned OFF, the contents can still be displayed. The device can be used for
extended periods as the device is set to power-saving mode even while the
device is displaying a document.
Store this document in a safe and readily accessible location after
reading.
· The contents of this document may change without prior notice.
· The contents of this document, in part or in whole, may not be duplicated
or reprinted without prior consent.
· Although this document has been checked for accuracy, contact us if there
are any questionable points or errors.
· This company shall not be responsible for any damage cause by
earthquakes, fires (unless this company is found liable), third party acts,
other accidents, intentional act or negligence by the customer, misuse, or
other special conditions.
· This company shall not be responsible for any other damage (loss, loss of
income, loss of earnings, interruption of business, loss of means of
communication) caused by the use or the unusable state of this device.
· In the event that this device is defective due to the manufacturing process
of this company, this product shall be replaced. This company shall not be
obligated to replace the product under any other circumstance.
· This company shall not be responsible for any damage caused by the
malfunction of the device due to the connection of third party devices or
software.
[1] Open the connector cover.
Confirm the items included before using the device.
1 Confirm the Included Items
Confirm the unit and the items included.
Connector
Cover
[2] Connect the round plug of the AC
adapter to the unit's AC adapter
connector and the power plug to
an AC100V outlet.
Main Unit
Soft Case
microSD Memory Card
(2GB)
Special Recharging AC Adapter
USB Cable
Battery (Special Rechargeable
Lithium Ion Battery)
[3] Confirm that the Status Lamp
(orange light on the left) is lit.
· It takes about 3 hours to charge
the battery.
Lit
Orange Lamp
· The Official Name of Windows® Vista is Microsoft® Windows®
Vista® operating system.
· Microsoft®, Windows®, Excel, Word, Power Point®, and Windows
MobileTM are registered trademarks of the Microsoft
Corporation in the US and other countries.
· Bluetooth® is a registered trademark of Bluetooth SIG, Inc.
Brother Industries has a license to use this name.
· Acrobat® and Adobe are registered trademarks or trademarks of
Adobe Systems Incorporated in the US.
· microSDTM is a trademark of SD Association.
· Any other company, product, or service name listed in this
document is the registered trademark or trademark of the
respective company
Brother International Corporation
100 Somerset Corporate Boulevard Bridgewater,
NJ 08807-0911 USA
TEL : (908) 704-1700
This software is based in part on the work of the Independent JPEG Group.
Quickstart Guide
Federal Communications Commission (FCC) Declaration of Conformity
(For USA Only)
Responsible Party: Brother International Corporation
100 Somerset Corporate Boulevard Bridgewater, NJ
08807-0911 USA
TEL: (908) 704-1700
declares that the product
Product Name: Brother Document Viewer SV-100B
Model Number: SV-100B
complies with Part 15 of the FCC Rules. Operation is subject to the
following two conditions: (1) this device may not cause harmful
interference, and (2) this device must accept any interference received,
including interference that may cause undesired operation.
This equipment has been tested and found to comply with the
limits for a Class B digital device, pursuant to Part 15 of the FCC
Rules. These limits are designed to provide reasonable protection
against harmful interference in a residential installation. This
equipment generates, uses, and can radiate radio frequency energy
and, if not installed and used in accordance with the instructions,
may cause harmful interference to radio communications. However,
there is no guarantee that interference will not occur in a particular
installation. If this equipment does cause harmful interference to
radio or television reception, which can be determined by turning
the equipment off and on, the user is encouraged to try to correct
the interference by one or more of the following measures:
· Reorient or relocate the receiving antenna
Increase the separation between the equipment and receiver.
· Connect the equipment into an outlet on a circuit different from
that to which the receiver is connected.
· Consult the dealer or an experienced radio / TV technician for help.
· The enclosed interface cable should be used in order to ensure
compliance with the limits for a Class B digital device
FCC WARNING
· Changes or modifications not expressly approved by Brother
Industries, Ltd. could void the user's authority to operate the
equipment.
CAUTION
LW9135001
RISK OF EXPLOSION IF BATTERY IS REPLACED BY AN INCORRECT TYPE.
DISPOSE OF USED BATTERIES ACCORDING TO THE INSTRUCTIONS.
* This document
CD-ROM
(including Quickstart Guide,
User's Manual, and bundled
software)
2 Insert the Battery and Memory Card
into the Unit
Mark
[1] Slide and remove the battery cover.
· Push the mark in the center to unlock
and open. Slide and remove the
cover.
[4] Charging is complete when the Status Lamp (orange
light on the left) turns off. Remove the AC adapter plug
from the unit.
The battery can be charged using a USB connection
with the PC. It takes about 5 hours to charge the
battery in this manner.
4 Confirm that the Unit can be
Powered ON and OFF.
Confirm that the unit operates by turning the power ON/OFF.
[1] Press
.
[2] Securely insert a new battery into
the unit ensuring the terminals make
contact.
Insert the battery and match
the + and - signs printed on
the face of the battery to the
terminals on the unit.
[3] Turn the metallic terminals of the
memory card to the display panel
and push until the memory card locks.
Be careful not to touch the
metallic terminals when
handling the memory card.
This may result in poor
contact.
[4] Securely close the battery cover.
Ensure that the battery cover
has been securely closed. If
the cover is not properly
closed, water leakage may
cause this device to
malfunction.
Press
[2] After the Status Lamp (green) flashes, confirm that the
folder name appears on the screen.
· Confirm that the name of the top
folder "SV-100B" and the
subfolders, "Main folder" and
"Security folder", display.
[3] Press
.
Press
Press
[4] When the Status Lamp (green)
flashes, confirm "Shut down
automatically in 10 sec."
(Continued overleaf)
Installing and Starting the SV-Manager
Convert and register files, i.e. Word, Excel, PDF, etc., using the SVManager to browse the contents on this unit.
The following explains the installation of the SV-Manager.
1 Confirming the Operating
3 Starting the SV-Manager
[1] Double click the SV-Manager shortcut icon.
· The application can also be started from [All Programs]
[Brother SV-Manager] from the Windows Start Menu.
Environment of the SV-Manager
The resolution can be adjusted according to the details
of the contents. Refer to "SV-100B User's Guide (Main
Unit)".
The SV-Manager starts.
[3] Confirm the License Agreement.
Click [Agree] and click [Next].
[4] The created contents register
after the [Now registering]
dialog appears.
To Use: Connecting the Unit to the PC
Connect the unit to the PC using the USB cable to register the
contents to the unit.
1 Connect the Unit with the PC Using
[1] Confirm the display status on the unit.
· Scroll and confirm there are no pages missing.
· The unit switches between normal and magnified display
image when
is clicked. A single dot on the unit is
displayed as a single dot on the PC.
· Click
for Thumbnail display.
· Click
for Fit to Width display.
· Click
for Fit Page display.
[1] Select the "Main folder".
[2] Confirm the selected folder name on the hierarchical
display and select the file.
· The file appears as mark.
[1] Directly connect the unit with
the PC using the USB cable
(included).
· Connect directly to the USB
port of the PC without using a
USB hub.
· When the USB cable is
connected to the PC, the
power to the unit automatically
turns ON.
Disconnecting the Unit from the PC
Disconnect the USB connection connecting the unit to the PC.
1 Disconnecting the Unit from the PC
[1] Click
.
[2] Confirm the "SV-100B" display on the SV-Manager.
[4] Follow the instructions on the screen and click [Next]
or [Install].
[3] Disconnect the USB cable from
the unit.
· Change the installation location by clicking [Browse] on the
[Select Installation Location] screen and select a location.
[5] Confirm the "SV-Manager Setup
Wizard Complete" message and
click [Finish].
[4] Close the connector cover.
Converting Documents
The following explains the simplest method to create and
register unit-specific files using the application software of the
created source content.
[3] Turn the page by pressing the Page Down key and
browse the contents.
There are various convenient functions and browsing
methods while the folders are displayed in a table and
contents are displayed. Refer to "SV-100B User's
Guide (Main Unit)" for details.
[4] Press
the USB Cable (Included)
[2] Confirm that the "SV-100B" is
"No connection".
[6] Confirm that the SV-Manager
icon appears on the desktop.
1 Displaying the Content
Hierarchical Display
Selected Folder Name
2 Confirming the Content Details
2 Installing the SV-Manager
[1] Set the bundled CD-ROM into the CD drive.
The [SV-Manager Setup] screen appears.
· Double click the "svsetup.exe" file in the CD-ROM if the
setup screen does not appear.
· Click [Execute svsetup.exe] when the [Auto Play] screen
appears.
· When the [User Account Control] dialog appears in
Windows Vista, click [Continue].
[2] Click [Next].
Display and browse the registered content on the unit.
Press
Install the SV-Manager before connecting the unit
to the PC. If the "New Device Detected" starts after
connecting, click [Cancel] and close the Wizard.
Follow the same procedures when installing onto
Windows Vista.
[1] Open the application software of the created source
content.
Displaying the Content on the Unit
Press
[2] Login using a user with the authority to install
application software.
The following uses an example of an application installation on
Windows XP SP2.
The printer driver is also installed at the same time. The printer
driver converts the contents to the unit-specific file.
Specific Files from Contents
[2] Open the [Print] dialog using the application software.
[3] Confirm that the printer is set to "Brother SV-100B" and
print.
The SV-Manager operates in the following environment.
OS: Windows XP Home/Professional
(32bit English and Spanish Edition SP2/SP3)
Windows Vista Ultimate/Business/Home Premium,
Home Basic (32bit English and Spanish Edition SP1)
USB1.1/2.0 Port
CD-ROM Drive (required during installation)
[1] Confirm the operating environment of the PC.
1 Creating and Registering Unit-
Connector Cover
Ensure that the connector cover has been securely
closed. If the cover is not properly closed, water
leakage may cause this device to malfunction.
and close the file.