1
%DUULFDGH
User’s Guide
Table of Contents
1. About your Barricade
1
Barricade Features ...................................................................................................... 1
Package Contents ....................................................................................................... 2
System Requirements ................................................................................................. 2
Connections and Components .................................................................................... 3
Specifications ............................................................................................................. 5
2. Installation and Setup
7
Requirements.............................................................................................................. 7
LAN Installation......................................................................................................... 7
Barricade Setup using Windows ................................................................................ 8
Barricade Setup using Macintosh ............................................................................. 11
Other LAN Devices.................................................................................................. 14
3. Administration
15
Overview .................................................................................................................. 15
Connecting to the Barricade ..................................................................................... 16
Main Menu ............................................................................................................... 17
Managing Shares, Groups, and Users....................................................................... 20
Common Administrative Tasks ................................................................................ 22
4. Internet Access
25
Overview .................................................................................................................. 25
Basic Setup ............................................................................................................... 25
Filtering .................................................................................................................... 26
Special Applications................................................................................................. 27
Virtual Servers.......................................................................................................... 28
5. Windows Client Setup
29
Overview .................................................................................................................. 29
TCP/IP Setup............................................................................................................ 29
Network Logon ........................................................................................................ 32
i
Using the Barricade's Storage................................................................................... 33
Using the Barricade's Printer .................................................................................... 35
Internet Access via the Barricade ............................................................................. 36
6. Macintosh Client Setup
39
Overview .................................................................................................................. 39
TCP/IP ...................................................................................................................... 39
Accessing Disk Storage............................................................................................ 40
Using the Barricade's Printer .................................................................................... 40
Internet Access via the Barricade ............................................................................. 41
Changing your Password.......................................................................................... 44
7. Troubleshooting
45
Windows................................................................................................................... 45
Macintosh ................................................................................................................. 48
Internet Access ......................................................................................................... 50
Copyright 2000. All Rights Reserved.
Document Version: 2.0
P/N 9560DC00BA
All trademarks and trade names are the properties of their respective owners.
ii
$ERXW\RXU%DUULFDGH
Congratulations on the purchase of your new Barricade. The Barricade provides
shared storage, shared printer usage, and shared Internet access to both Macintosh
and Windows users on your LAN.
Barricade Features
♦
Create or Extend your LAN. The built-in 7-port switching hub supports
10BaseT and 100BaseTX to allow connection of any existing devices, while the
10/100BaseT Uplink port provides for connection to another hub.
♦
Supports Windows and Macintosh. Clients can be either Microsoft Windows PCs (Windows 95, 98, ME, NT4.0, 2000), or Apple Macintoshes.
♦
Built-in Print Server. LAN users - both Windows and Mac - can share the
printer attached to the Barricade, converting it to a "Network Printer".
♦
No Client Software. No software needs to be installed on either Windows or
Macintosh clients.
♦
File Management using OS tools. Once your PC has access to the Barricade, you can manage your folders and files using the familiar tools provided by
your operating system. For example, Windows users will see the Barricade as
an additional drive in Windows Explorer and My Computer.
♦
DHCP Server Support. A DHCP (Dynamic Host Configuration Protocol)
Server provides a dynamic IP address to PCs and other devices upon request.
The requesting devices are called DHCP Clients.
The Barricade can act as either a DHCP Server OR a DHCP Client.
♦
Multi Segment LAN Support. If you have a Router, PCs on other LAN
segments can also use the Barricade.
♦
Easy Setup. A Quickset Windows program is provided to allow speedy configuration of the Barricade
♦
Full Administrator Control over Disk Usage. The LAN Administrator can
control usage of the Barricade's disk storage by the following means:
♦
•
Users: To control access to the Barricade, each user has a password
The Administrator can also limit the Disk Storage available to a user.
•
Groups: Users are organized into Groups. A user can be in many Groups.
•
Shares: A "Share" is a folder (directory) on the Barricade which a User
Group can access. Only the Barricade Administrator can create Shares.
(Users can create folders within the Share.)
•
Access Rights: Access to Shares can be Read-Only, Read-Write, or No Access. Conveniently, access to Shares is set by Group, not by individual user.
Remote Management. The Barricade can be managed from a workstation
anywhere on the LAN, using a WEB browser.
Page 1
♦
Internet Access. The Internet Access feature allows all LAN users to share a
single Internet Account, using either the serial port (for analog modem or ISDN
TA) or the WAN port (for ADSL or Cable modems). The built-in firewall protects your LAN against external attacks.
♦ Advanced Internet Features. The Barricade incorporates a number of advanced features to add value to your Internet Access:
• Special Applications allows LAN users to use non-standard applications
such as Video-conferencing, Instant Messaging, and other 2-way Internet
applications.
•
Virtual Servers allows Internet users to access Web, E-Mail, FTP and
other Servers on your LAN, while still sharing the IP Address provided by
your ISP.
•
Filtering functions provide protection for LAN users. You can block highrisk components such as ActiveX controls. Also, the Site Filter feature allows you to create your own lists of "Allowed" and "Banned" sites. And the
"Log" function can record any attempted accesses which are blocked by the
Site Filter.
Package Contents
The following items should be included:
♦
The Barricade Unit.
♦
Power Adapter
♦
CD-ROM, containing this User Manual and the Barricade Utility program for
Windows 95/98/ME/NT4.0/2000.
♦
Printed User Manual.
If any of the above items are damaged or missing, please contact your dealer as soon
as possible.
System Requirements
♦
Ethernet Network employing 10BaseT or 100BaseTX.
♦
TCP/IP protocol.
The following client PCs are supported:
Page 2
♦
PC using Windows 95/98/ME or later.
♦
PC using Windows NT4.0 or Windows 2000.
♦
Apple Macintosh with AppleShare and system 7.5 or later.
Connections and Components
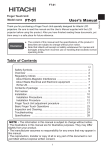
All connections and switches are on the rear panel. Please take a few minutes to familiarize yourself with your new Barricade.
Figure 1: Barricade Rear Panel
Power Switch
This is a spring-loaded "Soft Switch".
If Off, press once to turn On.
If On, press once to start the Disk Shutdown sequence.
During Shutdown, the Ready LEDs will blink.
100Base LEDs
These LEDs match the LAN (Hub) connectors. If the
matching LAN connector is using 100BaseT, the LED will
be ON. If using 10BaseT, the LED will be OFF.
LAN (Hub) ports
These Ethernet connectors are for the PCs and other devices
on your LAN. Both 10BaseT and 100BaseT connections can
be used simultaneously.
Note: If Port 7 is used, then the "Uplink" port (see below)
can NOT be used.
Uplink Port
Use this port only to connect to a standard port on another
Hub. The other Hub can be either 10BaseT or 100BaseT.
Note: If the "Uplink" port is used, then Port 7 can NOT be
used.
Link LEDs
These LEDs match the LAN (Hub) connectors. If the
matching LAN connector is in use, the LED will be ON.
Power Input
Connect the supplied power adapter here.
Page 3
Reset IP Button
(IP/Password)
If the Barricade's IP Address or password is lost, press and
release this button. The Barricade will beep once to indicate
the reset has occurred.
The Barricade password will be cleared, and its IP Address
set to the default value of 192.168.123.254, with a Network
Mask of 255.255.255.0
You can then connect to the Barricade and set the correct IP
Address and password.
WAN Port
Connect your ADSL or Cable modem here.
This Ethernet port supports 10BaseT and 100BaseT, and has
2 built-in LEDs. The amber LED (on the left) indicates a
100BaseT connection. The green LED (on the right) indicates a 10BaseT connection.
Printer Port
Standard parallel printer port. A printer connected here
becomes a "network printer", and can be shared by Windows and Macintosh users.
Serial Port
Standard serial port. Connect an analog modem or ISDN TA
here if you wish to provide shared Internet access to LAN
users via the serial port.
LEDs (Front Panel)
There are five (5) status LEDs on the front panel, as follows:
Page 4
Ready
Normally ON.
This blinks during Startup or Shutdown, and turns OFF after the
shutdown is completed.
Error
(Amber)
Normally OFF.
However, it will be On during the power-on self test. Once the
self-test is completed, it will turn OFF. If it stays ON, there is a
hardware error.
During a software upgrade, both the Ready and Error LEDs
will blink.
Disk Full
Normally OFF.
Blinking indicates the disk is 98% full.
ON indicates the disk is completely full.
Disk
Flashes during normal operation, when the Hard Disk is accessed.
WAN
Flashes when data is transmitted or received via the WAN
(Internet Access) port
Buzzer
The buzzer will beep as follows:
♦
1 Beep - Reset button or power switch is pressed.
♦
2 Beeps (Repeated every 5 seconds for 1 minute) - Barricade is a DHCP client,
but no DHCP Server responded to the DHCP client request.
♦
3 Beeps (Repeated every 15 seconds for 3 minutes) - Hard disk usage exceeds
98%.
♦
5 Beeps (Repeated every 15 seconds for 3 minutes) - Overheating; automatic
shutdown will start 3minutes after 1st beep.
Specifications
Dimensions
210mm (W) * 271mm (D) * 66mm (H)
8" (W) * 11" (D) * 3" (H)
Operating
Temperature
5° C to 40° C
Storage
Temperature
-10° C to 60° C
Network Protocol
TCP/IP, AppleShare, SMB
Network Interface
7-port Switching hub
Auto-sensing Ethernet
10BaseT or 100BaseTX UTP, RJ45 connector
WAN Interface
1 Auto-sensing Ethernet
10BaseT or 100BaseTX UTP, RJ45 connector
Printer Port
1 Centronic parallel port
Serial Port
1 RS232 serial port
LEDs
Rear: - 16 LAN connection status,
2 WAN port connection status.
Front: - 5 status/operation
Power
12V DC , maximum 3.6 amps.
100- 240 V AC, 50-60Hz power adapter provided.
Page 5
FCC Statement:
This device complies with the limits for a Class B digital device, pursuant to Part 15
of the FCC Rules. Operation is subject to the following two conditions:
(1) This device may not cause harmful interference.
(2) This device must accept any interference received, including interference that
may cause undesired operation.
CE Marking Warning
This is a Class B product. In a domestic environment this product may cause radio
interference in which case the user may be required to take adequate measures.
K
Page 6
Caution!
This device contains a battery. There is a danger of explosion if the battery is incorrectly replaced. Dealer replacement of the battery is recommended. Replace only
with the same or equivalent type. Dispose of used batteries according to the manufacturer's instructions.
,QVWDOODWLRQDQG6HWXS
Requirements
♦
Ethernet Network employing 10BaseT or 100BaseTX.
♦
TCP/IP protocol.
LAN Installation
1. Connect Network Devices
♦
Use standard LAN cables to connect any existing devices to the Barricade's
LAN (Hub) ports. The Barricade will accept 10BaseT or 100BaseTX, and full
or half duplex. All types may be used simultaneously.
♦
If required, use a standard LAN cable to connect the Barricade's "Uplink" port
to a standard port on another Hub. The other Hub can be either 10BaseT or
100BaseT. Note that if using the "Uplink" port, port 7 on the Barricade can
NOT be used.
2. Connect Printer and Modem
♦
If you wish to share a printer, use a standard printer cable to connect the printer
to the Barricade's parallel port.
♦
If you wish to provide shared Internet access via the Barricade, connect your
modem:
•
If using an Analog Modem or ISDN TA, use a standard serial cable to connect your modem to the Barricade's serial port.
•
If using an ADSL Modem or Cable modem, connect the modem to the Barricade's WAN port. Use the cable supplied with your Modem. If no cable
was provided, use a standard LAN cable.
3. Connect Power
♦
Connect the supplied power adapter to a power outlet and the Barricade.
♦
Press and release the rear-mounted power switch to begin the start-up procedure.
4. Check the boot process
♦
During the self-test (2 or 3 seconds), ALL of the LEDs will be ON.
♦
During the boot process, the Ready, Error and Disk Full LEDs will be ON.
♦
Once the boot process is completed, the Ready LED should be ON and the
Error LED should be OFF. If the Error LED stays On, there is a hardware
problem. Repeated beeps also indicate a failure to boot correctly.
Page 7
Barricade Setup using Windows
♦
For basic operation, only the following setup is required.
♦
For the full range of options available to the Network Administrator, refer to
Chapter 3 - Administration.
Software Installation
1.
Insert the supplied CD-ROM into the drive of your Windows 95/98/ME or
Windows NT4.0/2000 system.
2.
If the Setup program does not start, run SETUP.EXE in the root directory.
3.
Click the Barricade Utility button.
4.
Follow the prompts to install the Barricade Utility.
Using the Barricade Utility
1.
Start the program. Normally, the program will start immediately after installation. Otherwise, use the Start Menu option created by the installation.
2.
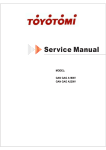
The screen will look like the example below. The left section displays a list of
all Barricades. The right section displays data about the currently-selected Barricade. (If no Barricades are listed, see the Troubleshooting section.)
3.
Ensure that the desired Barricade is selected in the left panel, then click the
Setup Wizard icon.
Figure 2: Barricade Utility
6HWXS:L]DUG
Page 8
4.
If you are prompted for a User Name and Password, enter admin for the user
name, and the password you have assigned to the admin user (By default, there
is no password, so the Password field can be left blank.)
5.
The Setup Wizard will then start. Step through the Wizard and complete each
screen. The following data will be required:
Server
Server Name:
The Default Name is shown. Change this if you wish.
Comment:
Comments (e.g. Location of the Barricade) are optional.
Time Zone
Select your time zone from the list.
Date/Time
Enter the local date (mm/dd/yyyy format) and time.
Microsoft Networking
Workgroup Name:
Normally, this name should match the Workgroup
name used by PCs on your LAN.
WINS
If your LAN has a WINS (Windows Internet Naming
Service) Server, check the box and enter the IP Address of the WINS Server.
TCP/IP
6HOHFWLQJ'+&3
&OLHQWZLOOGLVDEOH
,QWHUQHW$FFHVVYLD
WKH%DUULFDGH
Obtain an IP Address
automatically
(DHCP Client)
If you have a DHCP or Bootp server on your LAN,
you can enable this setting. The Barricade will then
obtain its IP Address from the DHCP or Bootp
server.
However, because this is a Server, it is preferable to
use a Fixed IP Address.
Also, the "DHCP Client" setting will disable
Internet Access via the Barricade.
If your LAN does not have a DHCP server, then you
must select Fixed IP Address.
Fixed IP Address:
This option is required if you wish to use the DHCP
Server function. It is also necessary to allow the
Barricade to act as an Internet Gateway, providing
shared Internet access to LAN clients.
Page 9
IP Address:
The current value will be displayed. If this is not
valid for the current location, a warning message will
displayed.
You can enter a new value, or use the "Suggest New
Values" button to get the Wizard to select an unused
value from the Address range used on your LAN.
Network Mask:
Gateway:
Enable DHCP Server:
Start IP Address:
Finish IP Address:
The must match the value used by PCs on your LAN.
The default Barricade value is 255.255.255.0
If you have a Router, enter its IP Address here.
Otherwise, leave this at the default value.
If checked, the Barricade will provide an IP Address
and related data to PCs on request. PCs will only
make such as request if they are set to act as DHCP
clients. (See Windows Client Setup and Macintosh
Client Setup for details of DHCP Client configuration.)
The first value for the range of IP Addresses to be
allocated by the DHCP Server.
The last value for the range of IP Addresses to be
allocated by the DHCP Server
Ensure that the range is large enough for the number
of DHCP clients (the PCs and other devices making
DHCP requests).
Internet Access
6.
Page 10
Access Method
Select the appropriate setting. If Internet access via
this Server is not required, select None.
Internet Access Setup
This screen will vary depending on the Internet
Access method used. This data is available from your
ISP.
When the Wizard is complete, the Barricade is operational, with the following
limitations.
•
All Windows users will be given "Guest" access rights. This allows Printer
usage, and access to the public folder.
•
The advanced Internet-related features (Special Applications, Filtering,
Virtual Servers) are not configured. See Chapter 4 for further details of the
advanced Internet functions.
•
Macintosh users can only access Barricade storage with the guest network
logon, or by logging on as admin with no password. (The admin user has
access rights to ALL folders.)
•
Macintosh users can only access the printer if it is a LaserWriter or compatible.
To overcome these limitations
♦
♦
Use the Browser-based Administration interface to perform the required Barricade configuration. This is invoked with the Administration icon on the
Barricade Utility's main screen. See Chapter 3 for details on using the Administration interface.
Configure the client PCs as required:
•
Details on Client setup for Windows PCs are contained in Chapter 5.
•
For Macintosh systems, refer to Chapter 6.
Barricade Setup using Macintosh
If your PC is not running Windows 95/98/ME/NT4/2000, you cannot use the
SETUP program on the CD-ROM.
Instead, you must connect to the Barricade, and configure it, using your Web
Browser. Your Web Browser must support JavaScript V1.1.
The interface has been tested to work on the following Browsers:
♦
Netscape Navigator 4.08 or later
♦
Internet Explorer 4.0, 5.0, and 5.5
Connecting to the Barricade
1.
2.
Ensure your system has a compatible IP Address and Network Mask (Subnet
Mask).
•
The Barricade's default values are 192.168.123.254 for the IP Address,
with a Network mask of 255.255.255.0. Your PC should use the same Network Mask, and an IP Address in the range 192.168.123.1 to
192.168.123.253.
•
On the Macintosh, you can check using Apple - Control Panel - TCP/IP.
(If this option does not exist, then TCP/IP has not been installed. Use your
Apple system disk to install TCP/IP.)
Connect to the Barricade using your Web Browser:
a) Start your Browser
b) In the Address box, enter the following:
HTTP://ip_address
Where ip_address is the IP Address of the Barricade, as in the following example:
HTTP://192.168.123.254
Page 11
c) You will be prompted for a name and password.
Enter admin for the name, and leave the password blank. Later, if you set a
password for the admin user, you will be required to enter it here to gain
access to the Barricade.
3.
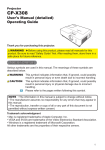
On the first screen, click the Administration button to continue. You will then
see the main menu, as shown below.
Figure 3: Web Interface - Main Menu
,IWKLV6HUYHULVVHW
WREHD'+&3
&OLHQWLWFDQQRW
SURYLGH,QWHUQHW
$FFHVV
Page 12
4.
5.
Select Network.
•
Configure the TCP/IP tab. Use the on-line help as necessary.
•
If desired, change the settings on the AppleTalk tab.
•
Save your data.
Macintosh users can now access the Barricade, provided they use the Guest
button on the Network login, or login as admin.
•
As guest, they will have access to the public share. The Barricade Administrator can grant access to other shares by changing the access rights to the
everyone group.
•
The admin user has access rights to ALL folders. By default, the admin
user has no password, but one can and should be assigned.
•
Internet Access is not enabled. Use the Web Administration interface to
configure the Barricade for shared Internet Access.
•
For further details on using the Web Administration interface, refer to
Chapter 3 - Administration.
Printer Setup
♦
If using a LaserWriter, no setup is required. Just perform the client setup procedure in Chapter 5 - Macintosh Client Setup.
♦
If not using a LaserWriter, Mac clients must install the printer driver for the
Barricade's printer.
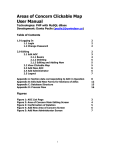
Also, the System - Printer Port screen (below) must be correct. Select "Other"
for Printer connected to Barricade and ensure the Printer Object Type is correct. Check your printer's documentation to find the Printer Object Type.
Once this is done, the procedure in Chapter 5 - Macintosh Client Setup can be
performed.
Figure 4: System - Printer tab
Setup for Internet Access
See Chapter 4 for details on configuring and using the Internet Access function.
Page 13
Other LAN Devices
If you have a Router, or an existing DHCP Server, it may need to be configured.
Router and/or DHCP Server Configuration is required ONLY if using the
Barricade to provide shared Internet Access.
Note:
If the Barricade is acting as a DHCP Client (rather than a DHCP Server),
than it can NOT provide shared Internet Access.
If the Barricade has a fixed IP Address, it CAN provide shared Internet
Access. So it is possible to use an existing DHCP Server on your LAN,
provided the Barricade is not a DHCP Client.
Router Configuration
♦
If your LAN has a Router or Routers, it or they must be configured to pass
Internet packets to the Barricade.
♦
Generally, this is done by setting the “Default Route” to be the Barricade. If
necessary, check your Router’s documentation for details of this procedure.
Existing DHCP Server Configuration
If your LAN is using another DHCP Server (rather than the Barricade’s), configure
the DHCP Server to provide the Barricade's IP Address as the Gateway IP Address.
Page 14
$GPLQLVWUDWLRQ
Overview
The Barricade administrator can control Barricade usage by creating and managing
Users, Groups, and Shares.
♦
Users: Each user is identified by their User Name and Password. The Administrator can create Users, and also limit the amount of Disk Storage available to
a user.
♦
Groups: Users are organized into user Groups. A user can belong to many
Groups.
♦
Shares: A "Share" is a folder (directory) on the Barricade which users can access. Only the Barricade Administrator can create Shares. However, within a
Share, users who have access to that Share can create other folders (directories)
as well as files.
♦
$SSOH6KDUHGRHV
127VXSSRUW
5HDGRQO\
DFFHVVVRDFFHVV
LVDOZD\V5HDG
:ULWH
Access Rights: Access to a share can be "Read-only" or "Read-Write". To reduce administration workload, access to a Share is granted to a User Group,
rather than to individual users.
Note:
•
A Share can be accessed by only 1 Group, but a Group can access many
Shares.
•
The admin user, and any other users who are added to the administrator
group, ALWAYS have Read/Write access to ALL shares and folders.
•
The guest user has Read/Write access to the public share. This can be
changed, and access to additional shares can be granted, by changing the
access rights for the everyone group.
•
Users who do not have a User Name on the Barricade are automatically
given the guest login.
Web Interface
To create and manage users, groups and shares, a Web-style interface is provided.
The Barricade contains a HTTP server. This enables you to connect to it, and configure it, using a Web Browser. The Web Browser must support JavaScript V1.1
The interface has been tested on the following Browsers:
♦
Netscape Navigator 4.08 or later
♦
Internet Explorer 4.0, 5.0, and 5.5
Page 15
Connecting to the Barricade
Windows Users
$GPLQLVWUDWLRQ
1.
Start the Barricade Utility, and select the desired Barricade.
2.
Click the Administration icon.
3.
You will be prompted for the password, as shown below
Figure 5: Password Prompt
Enter admin for the User Name. By default, there is no password, but if you
have set a password for the admin user, enter it here.
You will then see the Welcome screen.
Click the Administration button to proceed to the Main Menu. See the next
section for details.
Other Users
1.
Start your WEB browser
2.
In the Address box, enter the following:
HTTP://ip_address
Where ip_address is the IP Address of the Barricade, as in the following
example:
HTTP://192.168.123.254
3.
You will be prompted for the password, as shown in Figure 5: Password
Prompt above. Enter admin for the User Name. By default, there is no password for the admin user, but if you have set a password, you must enter it here.
You will then see the first screen. If you have multiple Barricades, you can use
the Connect button to switch to another Barricade. Otherwise, click the Administration button to proceed to the Main Menu.
Page 16
Main Menu
The Main Menu screen looks like the example below:
Figure 6: Web Interface - Main Menu
The options on the main menu are divided into 2 groups:
♦
Configuration
♦
Storage Management
Configuration Group
Network
♦
TCP/IP - Configure IP Address, DHCP Server function, and DNS (Domain
Name Server).
♦
AppleTalk - Set the AppleTalk Zone. The default value is "*", which allows
access by all zones.
♦
Microsoft - Configure Microsoft networking; set Workgroup Name, Code Page
(alphabet) and WINS (Windows Internet Naming System).
Internet
Use this option to provide shared Internet access to LAN users.
♦
Connection - Select the method of Internet Access used (Serial or WAN port),
and selectively enable or disable Internet-related services available to LAN usPage 17
ers. The Configure button on this screen provide for setup of the selected Internet Access method.
♦
Filter - Enable and configure the Component Filter and the Site Filter (Allowed
and Banned site lists). The Filter Log is also accessible from this screen.
♦
Special Apps - Use non-standard Internet Applications which would normally
be blocked by the built-in firewall.
♦
Virtual Servers - Allow Internet users to access Web, E-Mail, FTP, and other
Servers on your LAN.
♦
Status - Check the status of the Internet connection.
♦
General - Set the Barricade name, date and time, and Time Zone.
♦
E -Mail - Configure the Barricade to send E-Mail messages when there is a
problem.
♦
Printer Port - Configure the Printer. This is helpful but not essential for Windows users.
It is essential for Macintosh users when the printer connected to the Barricade is
NOT a LaserWriter or compatible.
♦
Shutdown - Shutdown the Barricade, or create a shutdown schedule.
System
Utilities
These utilities are not required for normal operation.
♦
Disk - Check the disk for errors, similar to Scandisk. If multiple disks are fitted,
you can also format a new disk.
♦
Upgrade - Upgrade the Barricade software.
♦
Disk - Check disk usage. This data is read-only.
♦
Printer - Check the printer status, and delete the current print job, or all print
jobs.
♦
System - Check System status. This data is read-only. From this screen, you
can also view the system log.
Status
Page 18
Storage Management Group
Use these options to manage Shares, Users, Groups, and access to shares. See the
later section Managing Shares, Groups and Users for further details.
Browse
Browse the Shares and folders on the Barricade. This allows you to:
♦
See the relationship between Shares and folders on the hard disk.
♦
View the directory structure on the Barricade.
♦
View the current Groups, modify their access to Shares, and add or delete Users
from any Group.
♦
Create new Groups, or delete existing Groups.
♦
Create, delete and modify Shares. A "Share" is a folder (directory) which Users
can access.
♦
Access rights are set by Group rather than by individual user.
♦
View the list of existing users, and modify individual user data.
♦
Create or delete individual users.
Groups
Shares
Users
Note:
•
The guest and admin users cannot be deleted.
•
The admin user cannot be removed or moved from its existing group "administrator”.
•
By default, the admin user has no password. Assigning a password is recommended.
•
The admin user, and all other members of the administrator group, always
have Read/Write access to all shares and folders.
•
The properties for the guest user cannot be changed.
Page 19
Managing Shares, Groups, and Users
This section has additional information to assist the Barricade Administrator in
managing and controlling access to the Barricade.
Terminology
♦
A Share is a folder on the Barricade which can be accessed by client PCs on the
LAN. Only the Administrator can create Shares.
♦
Access Rights (Read-only or Read-Write) are permissions to use a Share.
Access Rights are granted to a Group (group of users), rather than to individual
users.
♦
Each Share can only be accessed by a single Group.
♦
A Group can have access to many Shares.
♦
Each individual User can belong to many Groups.
Special Shares, Users and Groups
When delivered, the Barricade will have the following shares, groups and users.
These cannot be deleted, and only limited modifications may be performed.
Shares & Folders
HDD1
public share
spool folder
•
This is the root folder. Backing up this share backs up all
data on the drive.
•
The administrator group ALWAYS has Read/Write access
to this share.
•
By default, the everyone group has Read/Write access to
this folder. This can not be changed, so ALL users always
have Read/Write access to the public share.
•
This share can not be deleted.
•
System folder, holding print jobs waiting to be printed.
This folder can be accessed via the Browse menu option.
•
Deleting a file cancels the corresponding print job.
•
This group cannot be deleted.
•
All users are members of this group, and cannot be removed from this group.
Groups
everyone
Page 20
administrator
•
ALWAYS has Read/Write access to ALL shares.
•
This group cannot be deleted.
•
The admin user cannot be removed from this group, but
other users may be added or deleted.
•
This user cannot be deleted.
•
The admin user is a member of the administrator group,
and therefore has Read/Write access to all shares.
•
By default, the admin user has no password, but a password
can be assigned. Assigning a password is recommended.
•
This user cannot be deleted.
•
The guest user is a member of the everyone group, and so
has the access rights of the everyone group.
•
The properties of the guest user can NOT be changed.
Users
admin
guest
Nested Shares
The Barricade allows a folder inside a share to be a share. This allows "nesting" of
shares to any depth. If using this feature, remember that:
♦
In Windows' Network Neighborhood, all shares are listed on the same level the "nesting" is completely invisible.
♦
When a user accesses a share, they will see only folders, never shares. Users
cannot tell whether or not a sub-folder is in fact a nested share.
♦
Anyone with access to the outer share automatically has the same access rights
to any inner shares. So the most sensitive data must be kept in the outermost
share, not the innermost share. This is illustrated below.
Share (folder)
secret (/secret)
confidential (/secret/sensitive_data)
published (/secret/sensitive_data/publish_data)
If have access, have same access rights to "published"
If have access, have same access rights to "confidential" and
"published"
Figure 7: Nested Shares
Page 21
Multiple Access Rights
♦
Access to a Share can be assigned to only 1 Group, but using nested Shares
may result in multiple groups being able to access a Share.
In the example above, if access to the shares "secret", "confidential", and "published" were assigned to the groups "managers", "supervisors", and "staff"
respectively, then all 3 groups would have access to the share "published".
♦
If an individual user is in 2 groups with different access rights, they would receive the Least Restrictive access permission.
Common Administrative Tasks
Task
Procedure
Protect Barricade
configuration
Assign a password to the Admin user. Select Users, then
select the Admin user, and click Modify.
Create Users
Users menu option. Click New User.
Edit User Details
Users menu option. Select the user, then click Modify.
Create Groups
Groups menu. Click New Group.
Change Group
Membership
•
Select the Group on the Groups screen, and click
Members.
•
OR, select the User on the Users screen, and click
Groups.
Create Shares
Shares menu option. Click New Share.
Set Access to Shares
Groups menu.
Select the Group, then click the Shares button. On the
Group/Share Relationship screen, you can select the
Share(s) and the type of access for this Group.
File Management
Within any Share to which you have access, you can use
Windows Explorer to perform file management. Users in
the Administrator group can access any share, and can
also access the share "HDD1", which is the root directory on the Barricade.
Note:
You may sometimes see the following files, which have
been generated by AppleTalk clients:
.Apple Desktop
.Apple Double
Network Trash Folder
Do NOT delete these files!
Page 22
5HDG\/('
EOLQNVGXULQJ
VKXWGRZQ
Backup data on the
Server
Use your backup program to backup any folder.
Shutdown the
Server
User either of the following methods:
To backup all files, users in the Administrator group can
backup the HDD1 folder.
•
Press the rear-mounted power switch ONCE.
•
Use the System - Shutdown menu option to perform
a remote or scheduled shutdown.
Printer and Printing Management
Task
Procedure
Configure the
Printer Port
Windows Clients
The correct printer name should be entered on the
System - Printer screen. This has no effect on operation,
but helps uses identify the printer when they browse the
network.
Manage Print Jobs
Macintosh Clients
See the following section.
Select Status, then the Printer tab. This screen indicates
how many print jobs are currently in the queue.
The Delete Current Job button can be used to delete the
current job if it is not printing correctly.
Use the Delete all Jobs button to delete all jobs in the
print queue.
Printer Setup for Macintosh
♦
If using a LaserWriter, no setup is required. Just follow the procedure in Chapter 5 - Macintosh Client Setup.
♦
If not using a LaserWriter, Mac clients must install the printer driver for the
Barricade's printer.
Also, the System - Printer Port screen (below) must be correct.
Select "Other" for Printer connected to Barricade and ensure the Printer Object
Type is correct. Check your printer's documentation to find the Printer Object
Type.
Once this is done, the procedure in Chapter 5 - Macintosh Client Setup can be
performed.
Page 23
Figure 8: System - Printer tab
Page 24
,QWHUQHW$FFHVV
Overview
The Internet Access feature allows all LAN users to share an Internet Account via
the Barricade's WAN port or serial port. This feature uses NAT (Network Address
Translation) to allow all PCs on your LAN to share the one (1) external IP Address
provided by your ISP (Internet Service Provider).
Requirements
♦
Barricade must be installed and configured
♦
TCP/IP network protocol must be installed on each PC.
♦
Modem/ISDN TA for access via the Serial Port, or ADSL/Cable modem for access via the WAN (Ethernet) port.
♦
Internet Account with ISP (Internet Service Provider)
Operation
Once both the Server and the Clients are configured, operation is completely automatic and transparent to the users.
Basic Setup
1.
Connect to the Barricade as described in Chapter 3.
2.
From the main menu, select Internet Access. The Connection tab will be displayed.
3.
Select the appropriate Internet Access method, and click the Configure button.
4.
Enter the required details on the resulting screen, using the on-line help if required. This data is available from your ISP (Internet Service Provider).
Page 25
Filtering
Component Filtering
On the Filter screen, you have the option of blocking any of the following Web
page components:
♦
Java Applets - These are small programs which run inside the Browser, to provide additional functions. Many stock market sites use Java applets.
♦
JavaScript - Simple programming code embedded in HTML (Web) pages.
Scripts perform functions such as checking user input and enhancing the user
interface with pop-up messages and other features. Some sites require
JavaScript in order to navigate the site effectively. These Scripts are normally
harmless, but can be used to open additional Browser windows to display ads.
♦
ActiveX Controls - A Microsoft alternative to Java Applets, with increased
power but also higher security risk. Microsoft's "Windows Update" system uses
ActiveX controls, so disabling this setting will disable the "Windows Update"
feature on each PC.
♦
Cookies - Cookies are small data (text) files which your Browser stores on your
disk, and then sends back to the Server later. Cookies are required to use most
shopping sites, but can be used by advertisers to track your browsing habits.
Site Filtering
This feature allows you to restrict Web site access by LAN users.
Site Lists
You can create your own site lists, of "Banned" and/or "Allowed" sites. Then you
can choose to ALLOW access only to sites on the "Allowed" list, or BLOCK only
those sites on the "Banned" list. (Both lists can not be used simultaneously, because
then it is not clear what to do with sites which are in neither list.)
To Use the User-defined Site List
Select the appropriate option for User-defined Site Lists on the Filter tab. Then click
the Edit List button and enter sites into the "Allowed" and/or "Banned" lists, using
either URLs or IP Addresses. You can also upload a file containing URLs to add to
the list.
Page 26
Special Applications
This feature is only required if you wish to use Internet applications which require
2-way communication, multiple connections, or combined TCP/UDP connections.
Examples of such applications are Internet Videoconferencing, Telephony, Games
Servers, and other special-purpose Servers. A number of "Special Applications" are
already defined, and listed on the Special Apps tab.
Generally, you will become aware of the need for this feature when an Internet application is unable to function correctly.
To enable an existing Special Application:
•
Select it from the list
•
Check the Enable checkbox
•
Click Update.
To change an existing Special Application:
•
Select it from the list,
•
Make the required changes in the Properties fields. (The on-line help provides details about each of the Properties fields.)
•
Click the Update button..
To Add a new Special Application
•
Click the Clear Form button
•
Enter the required data in the Properties fields. This data is available from
the Service Provider.
•
Click the Add button
Note that some Special Applications do not use both "Incoming" and "Outgoing" Protocols and Port Numbers. In this case, leave the port numbers blank for
the unused section, and select "Auto" for the protocol.
If only a single port number is required for either "Incoming" or "Outgoing",
enter it in the Start field, and leave the Finish port number blank.
PC Configuration for Special Applications
Once PCs are configured for Internet Access, no changes are required for these Special Applications. Just install, configure, and use the desired program according to
the instructions provided with the program.
Page 27
Virtual Servers
This feature allows you to make a server on your LAN accessible to Internet users.
Normally, Internet users would not be able to access a server on your LAN because:
♦
Any Server on your LAN does not have a valid external IP Address.
♦
Attempts to connect to devices on your LAN are blocked by the firewall in the
Barricade.
The "Virtual Server" feature solves these problems and allows Internet users to connect to your servers, as illustrated below.
Figure 9: Virtual Servers
Note that, to Internet users, ALL of your Virtual Servers seem to have
the same IP Address. This IP address is allocated by your ISP.
To make it easier for Internet users to connect to your Virtual Servers, it is better to
have your ISP assign you a fixed IP Address.
To Use the Virtual Server feature
Page 28
1.
Install and configure the desired Server software on a PC on your LAN.
2.
Enable the desired Server type on the Virtual Server screen on the Barricade,
and enter the IP Address of the system running the Server software.
3.
Advise users of the IP Address required to connect to the Virtual Servers. This
IP Address is supplied by your ISP, and is shown on the Barricade's Virtual
Server screen.
:LQGRZV&OLHQW6HWXS
Overview
Supported versions of Windows are:
♦
Windows 95/98/ME or later
♦
Windows NT 4.0 or Windows 2000
The following items need to be checked or configured:
♦
TCP/IP protocol.
♦
Network Logon
♦
Mapping to the Barricade's storage.
♦
Network Printer installation for the Barricade's printer.
♦
Internet Access configuration.
The sample screens shown are from Windows 98. Other versions of Windows are
similar but not identical.
TCP/IP Setup
1.
Select the Control Panel - Network option on the Start Menu. You should see a
screen like the one following.
Figure 10: Network Configuration
2.
If a line like the one highlighted (TCP/IP -> Network card) is not listed, then
you need to install the TCP/IP protocol by selecting Add - Protocol - Microsoft
- TCP/IP - OK.
Page 29
3.
With the TCP/IP entry highlighted, click on the Properties button. The IP Address tab will be selected. You should then see a screen like the following.
Figure 11: IP Address (Win 95/98)
To act as a DHCP Client:
♦
Click on the radio button to Obtain an IP address automatically, as shown
above. If the DHCP Server in the Barricade has been enabled, it will now provide an IP Address and related data to your PC when it boots.
♦
Restart your PC. (DHCP only functions when your PC starts.)
If using "Specify an IP address" (Fixed IP Address):
No changes are required unless using the Barricade to provide shared Internet
Access.
In this case, the Default Gateway Address must be set to the Barricade’s IP Address,
as described below.
To set the Gateway IP Address:
Page 30
1.
Navigate to the TCP/IP Properties screen, as described above.
2.
Select the Gateway tab.
3.
Enter the Barricade’s IP Address in the New Gateway field, and click the Add
button.
Figure 12: Gateway IP Address
4.
Click OK to save and exit.
5.
Restart your PC.
Page 31
Network Logon
To use the Barricade, you must Logon to the Network correctly:
1.
Check your Window logon using Start - Settings - Control Panel - Network.
Ensure the Primary Network Logon is set to Client for Microsoft Networks, as
shown below.
Note: If this is already set, there is no need to make any changes.
Figure 13: Window Logon
2.
Windows will prompt you to Logon to the Network when it boots.
You must logon. If you press ESC, or click Cancel, no network resources will
be available. When you logon, you need to use a valid User Name and Password.
Page 32
•
If the Barricade Administrator has defined users on the Barricade, use the
User Name and password they supply.
•
If you use a User Name and password which is not recognized by the Barricade, you can still use it, with guest access rights. By default, this allows
read/write access to the "public" share, but the Administrator can set the
guest access rights as they wish.
Changing your Barricade Password
Once the Barricade Administrator has given you a valid User Name on the Barricade, you can use the following procedure to change your password.
7KHSDVVZRUGIRU
WKHDGPLQXVHUFDQ
127EHFKDQJHG
XVLQJWKLVPHWKRG
7KH$GPLQLVWUDWRU
LQWHUIDFHPXVWEH
XVHG
1.
Start your WEB browser
2.
In the Address box, enter:
HTTP://ip_address/user.pl
Where ip_address is the IP Address of the Barricade.
e.g.
HTTP://192.168.123.254/user.pl
If you do not know the IP Address of the Barricade, ask the Barricade administrator.
3.
You will be prompted for your name and password. Enter your existing user
name and password.
4.
On the next screen, enter your new password.
5.
Save, then close your Browser.
Using the Barricade's Storage
To use the Barricade's storage, you should "Map" a drive letter to each folder on the
Barricade folder which you wish to access. The "Network Drive" will then be available to all Windows programs. The procedure is as follows:
1.
Double-click the Network Neighborhood icon on the desktop.
2.
On the "View" menu, select Details. The Comment column will now be visible.
3.
Locate the Barricade, as shown below. If it is not listed, double-click Entire
Network. Then double-click the Workgroup that the Barricade is in. (By default,
the Barricade is in Workgroup.)
Figure 14: Network Browse
Page 33
4.
Double-click the icon for the Barricade.
5.
Right-click a folder (directory) to which you have access, and select Map Network Drive, as shown below.
Figure 15: Map Network Drive
6.
Select a drive letter for this folder, and check the Reconnect at Logon checkbox.
(If this is not done, the mapping will be lost when you shut down your PC.)
Then click OK.
7.
This drive will now be available in Windows Explorer, and from the File-Open
or File-Save As dialog in all Windows applications.
Notes:
♦
When you try to access a folder, you may be prompted for a password, as
shown below:
Figure 16: Network Resource Password Dialog
If your Windows logon name is the same as your user name on the Barricade,
but the passwords are different, you can enter your Barricade password here.
Page 34
But if your Windows logon name does not exist on the Barricade, you will
have only guest access rights, and there is no password which you can enter in
this dialog.
♦
When browsing the Barricade using Windows Explorer or another file manager, you may see the following files, which have been generated by AppleTalk
clients:
.Apple Desktop
.Apple Double
Network Trash Folder
Do NOT delete these files!
Using the Barricade's Printer
1.
Find out what printer is connected to the printer port on the Barricade.
2.
User Network Neighborhood to locate the Barricade, as shown in Figure 14:
Network Browse.
3.
Double-click the Barricade icon. A printer icon should be shown.
4.
Right-click the printer icon, and select Install. The Add Printer wizard will
start.
5.
Select the Manufacturer and Printer matching the printer connected to the Barricade.
6.
Follow the prompts to complete the installation.
7.
The new printer will then appear in your Printer list, and can be used from any
Windows application
•
Use the normal Windows commands to manage the printer:
•
Use Start - Settings - Printers to list all your printers.
•
Double-click the printer to view or delete the documents in the print queue.
•
Use File - Set as Default to make the selected printer the default printer.
•
Use File - Properties to view or modify the properties of the selected
printer.
Page 35
Internet Access via the Barricade
Each PC requiring shared Internet Access needs to be configured for:
♦
Gateway IP Address (TCP/IP)
♦
Internet Access method
♦
Proxy Server
Gateway IP Address (TCP/IP)
If using DHCP, no changes are required. Otherwise, the Gateway IP Address must
be set to the Barricade's IP Address, as described in TCP/IP Setup on page 29.
Internet Access Method
1.
Select Start Menu-Settings-Control Panel-Internet Options.
2.
On the Connection tab, click the Setup button.
3.
Select "I want to set up my Internet connection manually, or I want to connect
through a local area network (LAN)" and click "Next".
4.
Select "I connect through a local area network (LAN)" and click "Next".
5.
Ensure all of the boxes on the following Local area network Internet Configuration screen are unchecked.
6.
Continue the Wizard, selecting any desired options, until you click the "Finish"
button.
Proxy Server Settings
The following Proxy Server settings are required.
Connection Type:
HTTP
Proxy Address:
IP Address of the Barricade (e.g. 192.168.123.254)
Port Number:
3128
The Proxy settings for any other protocols should be left blank.
Do NOT check Use the same proxy server for all protocols.
Procedure for Windows & Internet Explorer
Page 36
1.
Select Start Menu-Settings-Control Panel-Internet Options.
2.
On the Connection tab, click the LAN Settings button.
3.
On the Local Area Network (LAN) Settings screen, check both the Use a proxy
server and Bypass proxy server for local addresses checkboxes, as shown
above.
Figure 17: Windows Proxy Server Settings
4.
Click the Advanced button, and enter the Proxy information for HTTP.
Do NOT check Use the same proxy server for all protocols.
5.
Click OK to save and exit.
Page 37
Procedure for Netscape Navigator
1.
Start Netscape Navigator, and select Edit - Preferences from the menu.
2.
Navigate to the Advanced - Proxies screen, select the Manual Proxy Configuration radio button, then click the View button.
Figure 18: Netscape Proxy Settings
3.
Enter the Proxy information for HTTP. Leave the other fields blank.
4.
Click OK to save and exit.
Procedure for Other Programs
Generally, other programs will use the Windows information. If necessary, check
the documentation for the program to see how to set proxy information. Remember
that only the HTTP protocol uses the Proxy Server.
Operation - Internet Access
Once both the Barricade and client PCs are configured, operation is completely
automatic. Just use your Web browser, FTP client, E-Mail program etc normally.
If no Internet connection exists, and you are using an analog modem, there will be a
short delay while the modem dials.
Page 38
0DFLQWRVK&OLHQW6HWXS
Overview
To use the Barricade, you require:
♦
Macintosh OS Version 7.5 or later, with AppleShare.
♦
The Barricade Administrator must create a value User Name on the Barricade
for each Mac user. Otherwise, Mac users will only be able to access the Barricade by using the guest login.
The following items need to be checked or configured:
♦
TCP/IP protocol.
♦
Accessing the Barricade's Disk Storage.
♦
Network Printer installation for the Barricade's printer.
♦
Internet Access configuration.
TCP/IP
Generally, no changes are required.
However, if you previously used a fixed (static) IP Address, but now wish to use the
DHCP Server function in the Barricade, follow this procedure to make your Macintosh a DHCP Client:
1.
Select Apple - Control Panel - TCP/IP.
2.
Select Ethernet, then Setup, then DHCP.
Page 39
Accessing Disk Storage
1.
Select Chooser from the Apple menu.
2.
Click the AppleShare icon.
3.
If necessary, select the appropriate zone. (By default, the Barricade is accessible
from any zone.)
4.
Select the Barricade from the list of File Servers, and click OK.
5.
In the Log-in dialog, enter your Name and Password. These must match the
values stored on the Barricade, or you will not be able to gain access. If the Barricade Administrator has not created a User Name for you, click the Guest
button. This will allow access to the public share.
6.
A list of "Shares" (Barricade folders) will be displayed. Use the checkbox to indicate which Shares you wish to access. If you select a Share to which you do
not have access permission, you will see an error message.
7.
Click OK to finish. An icon for each Share will appear on your desktop. You
can use these like any other folders.
Using the Barricade's Printer
1.
In Chooser, select the printer type matching the printer connected to the Barricade.
2.
From the list on the right, select the Barricade, then click Create.
(Refer to Troubleshooting if the Barricade’s printer is not listed.)
3.
The new printer will be created, and can be used like any other printer.
Note:
The Printer Object Type, and LaserWriter/Other setting, on the Printer tab
of the System menu option, must be correct. See Printer Setup on page 13
for details.
Page 40
Internet Access via the Barricade
Internet Access Setup
To set your Macintosh up to connect to the Internet through the Barricade using
DHCP:
1.
Open the TCP/IP Control Panel.
2.
Select Ethernet from the Connect via pop-up menu.
3.
Select Using DHCP Server from the Configure pop-up menu.
The DHCP Client ID field can be left blank.
4.
Close the TCP/IP panel, saving your settings.
Note:
If using manually assigned IP addresses instead of DHCP, the only change
required is to set the Router Address field to the Barricade's IP Address.
Proxy Server Setup
The following Proxy Server settings are required.
Connection Type:
HTTP
Proxy Address:
IP Address of the Barricade (e.g. 192.168.123.254)
Port Number:
3128
The Proxy settings for any other protocols should be left blank.
Procedure for Internet Explorer
1.
Start Internet Explorer, and select Edit - Preferences from the menu.
2.
Navigate to Network - Proxies and check the Web Proxy checkbox.
Page 41
Figure 19: IE Proxy Settings (Macintosh)
3.
Click the Settings button, and enter the Proxy Data.
4.
Click OK to save and exit.
Do NOT enable any of the other Proxy settings.
Procedure for Netscape Navigator
Page 42
1.
Start Navigator, and select Edit - Preferences from the menu.
2.
Navigate to the Advanced - Proxies screen.
3.
Select Manual Proxy Configuration, then click the Configure button.
Figure 20: Netscape Proxy Setup (Macintosh)
4.
Enter the Proxy data for HTTP.
Leave the other fields blank.
5.
Click OK to save and exit.
Page 43
Changing your Password
Once the Barricade Administrator has created a valid User Name on the Barricade
for you, you can use the following procedure to change your password.
7KHSDVVZRUGIRU
WKHDGPLQXVHUFDQ
127EHFKDQJHG
XVLQJWKLVPHWKRG
7KH$GPLQLVWUDWRU
LQWHUIDFHPXVWEH
XVHG
1.
Start your WEB browser.
2.
In the Address box, enter:
HTTP://ip_address/user.pl
Where ip_address is the IP Address of the Barricade, as in the following
example:
HTTP://192.168.123.254/user.pl
If you do not know the IP Address of the Barricade, ask the Barricade administrator.
Page 44
3.
You will be prompted for your name and password.
Enter your existing user name and password.
4.
On the next screen, enter your new password.
5.
Save, then close your Browser.
7URXEOHVKRRWLQJ
Windows
Problem 1:
The Barricade Utility doesn't list any Barricades.
Solution 1:
Check the following:
•
The Barricade is properly installed, LAN connections are OK,
and it is powered ON.
•
Ensure that your PC and the Barricade are on the same network
segment. (If you don't have a router, this must be the case.)
•
Ensure that your PC has the TCP/IP network protocol loaded. In
Windows, this is done by using Control Panel-Network. If an
entry for TCP/IP -> Network card is not listed, use Add - Protocol - Microsoft - TCP/IP to add it.
You then need to select the new entry (TCP/IP -> Network card),
click Properties, and configure the IP Address tab.
If your LAN has a DHCP Server, you can select "Obtain an IP
Address automatically".
•
Otherwise, you must select "Specify an IP Address", and enter
values for IP Address and Subnet Mask. The Barricade's default
IP Address is 192.168.123.254, with a Subnet Mask of
255.255.255.0. Remember that each device needs a unique IP
Address, and the same Subnet Mask.
Problem 2:
Using the Barricade Utility, the Barricade is listed, but the Admin
button doesn't work.
Solution 2:
This will happen if the Barricade's IP Address is not compatible with
your PC.
Use the Quick Setup button to assign a compatible IP Address and
Network Mask (Subnet Mask) to the Barricade, then Refresh the
listing.
Page 45
Problem 3:
The Barricade is configured, but I can't find it in Network Neighborhood.
Solution 3
Try using Start - Find - Computer, and enter the Barricade's name. If
this does not work, use Control Panel - Network to check the following:
•
TCP/IP protocol is installed. If not, use Add - Protocol - Microsoft - TCP/IP to install it.
• Check the network Bindings:
Ensure the TCP/IP protocol is bound to your Network card (NIC).
Select your Network card, click Properties, and then the Bindings
tab. If TCP/IP is not bound (checked), check it.
Ensure the TCP/IP -> Network card entry is bound to the Client for
Microsoft Networks service.
Select the TCP/IP entry for your Network Card, click Properties, and
then the Bindings tab. If Client for Microsoft Networks is not bound
(checked), check it.
•
If you don't have a router, check that your IP Address is compatible with the Barricade's. This means it needs to be from the same
address range (e.g. 192.168.123.1 to 192.168.123.254) and using
the same Subnet Mask (e.g. 255.255.255.0)
•
If you DO have a router, check that your Gateway IP Address is
set correctly. Ask your LAN administrator for the correct value.
Problem 4
When I click on the Barricade icon in Network Neighborhood, I get
prompted for a password.
Solution 4
This can happen in the following situations:
•
The Logon name you used on your PC is recognized by the
Barricade, but the password is not. Simply enter your Barricade
password, or make your Windows password the same as the Barricade password.
•
The logon name you used on your PC is NOT recognized by the
Barricade, and was converted to guest, with guest access rights.
Ask the Barricade Administrator to create a user name for you.
(Use the same name as on your PC.)
•
You do NOT have access permission for this share.
Ask the Barricade Administrator to grant you access.
Note: Windows uses the Computer name, as shown on Control Panel
- Network - Identification, as the default Logon Name. But you can
create a new Windows logon name by merely entering a new name
and password at the Logon prompt.
Page 46
Problem 5
When using the Web interface, some of the data will not fit on the
screen, and there is no scrollbar.
Solution 5
This will only happen if you use extra large fonts, either in your
Browser or in Windows. You must reduce the font size:
•
In your Browser, select View - Fonts to change the font size.
•
In Windows, use Control Panel - Display - Settings - Advanced
to change the font size. Either of the 2 standard settings - Small
or Large (125%) - should work.
Problem 6
A print job does not print. No error message is displayed.
Solution 6
This can happen if the amount of free disk space is not sufficient to
spool (queue) the print job. Disk Usage can be checked using the
Status - Disk screen on the Administrator interface. If this is the
problem, you must delete some print jobs:
•
Using the Administrator interface, select Status - Printer.
•
Use the Delete current job to delete the current print job, or
Delete all jobs to delete all print jobs.
These options can also be used if for some reason a print job or jobs
does not print correctly.
Page 47
Macintosh
Page 48
Problem 1:
Can’t connect to the Barricade to configure it.
Solution 1:
Check the following:
•
The Barricade is properly installed, LAN connections are OK,
and it is powered ON.
•
If your LAN has a router, ensure that your Mac and the Barricade Device are on the same network segment.
•
If any PC or device on the LAN is already using the Barricade's
default IP Address of 192.168.123.254, that PC or device must
be turned OFF until the Barricade is allocated a new IP Address.
•
Ensure that your Mac is using an IP Address within the range
192.168.123.1 to 192.168.123.253 and thus compatible with the
Barricade's default IP Address of 192.168.123.254. Also, the
Subnet Mask should be 255.255.255.0.
This can be checked using Apple - Control Panel - TCP/IP.
Problem 2:
Barricade's printer is not listed on my Mac.
Solution 2:
•
On the Barricade's System - Printer screen, check the Printer
Object Type. If this is not correct, the Barricade's printer will
not be listed on the Macintosh.
Check the Printer's User Manual for this data, or contact the
printer supplier.
•
On each Mac, check that the Printer Driver is installed.
If not using a LaserWriter, each Mac must have the printer driver
for the printer installed. Otherwise, the correct printer type can
not be selected, so the Barricade will not be listed.
Problem 3:
The printer does not work at all, or does not work properly.
Solution 3:
On the Barricade System - Printer screen, check the following:
•
Printer Connected to the Barricade is set correctly ("LaserWriter" or "Other").
•
Printer Object Type is set correctly. If this is incorrect, then
Mac clients may be able to select an incorrect printer.
Problem 4
The printer was working, but now it doesn't. The printer seems
OK, and no error message is displayed.
Solution 4
This can happen if the amount of free disk space is not sufficient to
spool (queue) the print job. Disk Usage can be checked using the
Status - Disk screen on the Administrator interface.
If this is the problem, you must delete some print jobs, as follows:
•
Using the Administrator interface, select Status - Printer.
•
Use the Delete current job to delete the current print job, or
Delete all jobs to delete all print jobs.
These options can also be used if for some reason a print job or jobs
does not print correctly.
Problem 5
When using the Web interface, some of the data will not fit on
the screen, and there is no scrollbar.
Solution 5
You must reduce the font size. In your Browser, select View - Fonts
to change the font size.
Page 49
Internet Access
Problem 1:
I can't connect to any Web sites from my PC.
Solution 1:
Check the modem:
•
Ensure that the cable and line connections are OK.
•
Check that the modem is ON.
Check the Barricade:
•
Connect to the Barricade's "Administration" interface, and select
Internet on the main menu.
•
Click Configure on the Connection tab, and ensure that the
configuration data is correct.
•
Select the Status tab.
•
Examine the log messages to determine if there is a problem.
Refer to the on-line help for details of the log messages.
•
Depending on your connection method, you may have a Dial or
Connect button. If so, you can use these to see if a connection is
successfully established.
•
If the connection is being successfully established, the client PC
should be checked.
If the connection is not being established, the problem is in the
WAN connections or configuration.
Check the PC:
TCP/IP
•
Ensure that your PC has the TCP/IP network protocol installed
and set correctly.
•
Refer to Client Configuration for details.
Internet Access
•
Ensure that your PC is set to access the Internet via the LAN,
rather than a "Dial-up" connection.
•
Refer to Client Configuration for details.
Proxy Server
Page 50
•
The Barricade's Proxy Server should only be used for the HTTP
protocol. Other protocols should NOT use the Barricade as a
Proxy Server.
•
Refer to Client Configuration for details.
Problem 2:
I can access the Internet, but some applications don't function
correctly.
Solution 2:
The non-functional applications may require a "Special Applications"
entry, or the existing entry may need to be Enabled.
Using the Administration interface, select Internet from the main
menu, and then select the Special Apps tab.
•
If an entry for the application exists, ensure that it is Enabled.
•
If the entry is already Enabled, check that the Properties values
are correct. (If the Properties fields show "n/a", there are no useradjustable settings.)
•
If there is no entry for the application, you can add one. The
required data is available from the service provider. Refer to the
on-line help for further details.
Note:
Not all applications will function correctly, even after adding a
"Special Application" entry. This is due to the difficulty of distinguishing a non-standard application from an attack on your LAN.
Generally, the Barricade's firewall will assume "suspicious" behavior
is an attack, and will block it.
Page 51