1
ġ
ġ
ġ
Fotomate user manual
FOTOMATE
Digital Photo Frame
User Manual
FM 300 10inch - Black
FM 301 10inch - White
IJ
ġ
ġ
ġ
ġ
ġ
Fotomate user manual
Cautions
Precautions and maintenance
● For indoor use only
● To avoid risk of fire or electric shock, do not expose the unit to moisture or
condensation.
● To avoid overheating, do not block the ventilation holes on the back of the
Digital Photo Frame.
● Keep the Digital Photo Frame out of direct sunlight.
● Do not dismantle the Digital Photo Frame. There is a risk of electric shock
and there are no user-serviceable parts inside. Dismantling the Digital
Photo Frame will void your warranty.
Cleaning the LCD Screen
● Treat the screen carefully. Because the screen of the Digital Photo Frame
is made of glass and it would easily be broken or scratched.
● If fingerprints or dust accumulate on the LCD screen, we recommend using
a soft, non-abrasive cloth such as a camera lens cloth to clean the LCD
screen.
● Moisten the cleaning cloth with the cleaning solution and apply the cloth to
the screen.
WARNING:
Please power off the unit before inserting or removing a card or USB
device.
Failure to do so may cause damage to the card/USB and the unit.
To reduce the risk of fire or electric shock, do not expose this
appliance to rain or moisture.
ij
ġ
ġ
ġ
ġ
ġ
Fotomate user manual
&21*5$78/$7,21621<285385&+$6(2)7+(
)2720$7(',*,7$/3+272)5$0(
*$85$17((:$55$17<&$5'
352'8&76(5,$/180%(5
7KLVSURGXFWFDUULHVDPDQXIDFWXUHÿVJXDUDQWHHRIPRQWKV
6HHHQFORVHGERRNOHW
3OHDVHFRPOHWH\RXUGHWDLOVRQWKLVIRUPDQGVHQGWR
9LD(PDLODGPLQ#FQVPDUNHWLQJFR]D
)D[
3RVW3R%R[5DQGEXUJ
&RUUHVSRQGHQFHZLOOEHVHQWWR\RXRQQHZGHYHORSPHQWVDQG
SURPRWLRQV
1$0(
3267$/$''5(66
&2'(
(0$,/
6725(:+(5(352'8&7:$6385&+$6('
'$7(2)385&+$6(
6$/(63(5621
)25)857+(5,1)250$7,213/($6(&217$&7285+(/3'(6.21
Ĵ
ġ
ġ
ġ
ġ
ġ
Fotomate user manual
1. Basic connections for devices on the machine ........ Error! Bookmark not
defined.
2.
Connection methods for audio and video . Error! Bookmark not defined.
2.1
Connection method for video ............. Error! Bookmark not defined.
2.2
Output method for audio .................... Error! Bookmark not defined.
3. Supported Interfaces ................................................................................ 7
4. Illustration of button layout on the remote control .... Error! Bookmark not
defined.
5. System Settings ........................................................................................ 9
5.1 Photo Setting ........................................................................................ 10
5.1.1 Display Interval .............................................................................. 10
5.1.2 Transition Effect ............................................................................. 10
5.1.3 Browse ........................................................................................... 10
5.1.4 Auto Play ....................................................................................... 11
5.2
Display Setup .................................................................................. 12
5.2.1 TV Standard................................................................................... 12
5.2.2 Brightness ...................................................................................... 12
5.2.3 Contrast ......................................................................................... 12
5.2.4 TFT Brightness .............................................................................. 13
5.2.5 TFT Contrast.................................................................................. 13
5.2.6 TFT Saturation ............................................................................... 13
5.3 Custom Setup....................................................................................... 14
5.3.1 OSD Language .............................................................................. 14
5.3.2 Encoding ........................................................................................ 14
5.3.3 Logo type ....................................................................................... 15
5.3.4 Repeat mode ................................................................................. 15
5.3.5 Media ............................................................................................. 15
5.3.6 Default ........................................................................................... 16
5.4 Exit ....................................................................................................... 16
6. Photo ...................................................................................................... 16
7. Music ...................................................................................................... 17
8. Photo+Music ........................................................................................... 17
9. Movie ...................................................................................................... 18
10. Calendar ................................................................................................. 18
ĵ
ġ
ġ
ġ
ġ
ġ
Fotomate user manual
10.1 Display................................................................................................ 18
10.2 Set Date ............................................................................................. 19
10.3 Exit ..................................................................................................... 19
11. Clock....................................................................................................... 19
11.1 Display................................................................................................ 20
11.2 Set Time ............................................................................................. 21
11.3 Exit ..................................................................................................... 21
12. Alarm ...................................................................................................... 21
12.1 Enable ................................................................................................ 21
12.2 Set Time ............................................................................................. 22
12.3 Exit ..................................................................................................... 22
13. Auto-Power ............................................................................................. 22
13.1 Power On Enable ............................................................................... 23
13.2 Power off Enable ................................................................................ 23
13.3 Set Time ............................................................................................. 23
13.4 Exit ..................................................................................................... 24
13. Edit ......................................................................................................... 24
14.1 Select Source ..................................................................................... 24
14.2Copy .................................................................................................... 24
14.2 Delete ................................................................................................. 25
14.3 New Folder ......................................................................................... 26
14.4 Format Photo Frame .......................................................................... 27
14. Favorite ................................................................................................... 27
15. Basic Operations .................................................................................... 27
16.1 Power Key: Power-on/Power-off ........................................................ 27
16.2 Function: main menu .......................................................................... 27
16.3Automatic Picture Rotation .................................................................. 28
16.4 Basic Playback Functions................................................................... 28
Stop: ....................................................................................................... 28
Pause: .................................................................................................... 28
Menu: return to File Management Mode ................................................. 29
Digest: return to Browse Mode ............................................................... 29
Screen Saver: ......................................................................................... 29
F.FWD: fast-forward play ........................................................................ 29
F.REV: fast rewind .................................................................................. 30
Ķ
ġ
ġ
ġ
ġ
ġ
Fotomate user manual
Slow: Slow Motion .................................................................................. 30
NEXT: Go to the next file. ....................................................................... 30
PREV: Go to the previous file. ................................................................ 30
Repeat: Repetitive Playback ................................................................... 30
Info: Information Display ......................................................................... 31
Zoom: Enlarge Images ........................................................................... 32
Vol+/-: Volume ........................................................................................ 33
Mute: ....................................................................................................... 33
Rotate JPG Images: ............................................................................... 33
JPG Browse Mode: ................................................................................. 35
Media Manager: ...................................................................................... 35
P/N: Switching between NTSC and PAL ................................................ 36
ķ
ġ
ġ
ġ
ġ
ġ
Fotomate user manual
1. Input / Output:
DC9-12V/1.5A
2. Video / Audio Connection:
2.1 Video Connection
Output: CVBS Out
2.2 Audio Connection
Output: 2Ch stereo
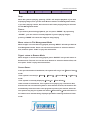
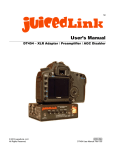
1. Supported Interfaces
y
SD: with dimensions of 24mm x 32mm x 2.1mm (about the size of a postage
stamp) as shown in the illustration:
y
MS: dimensions for the MS Card are 50mm x 21.5mm x 2.8mm, which is the
exclusive memory card format for Sony's digital products, as shown in the
illustration:
y
xD: with dimensions of 20mm x 25mm x 1.7mm, which is the exclusive
memory card for Fujifilm and Olympus digital products, as shown in the
illustration:
ĸ
ġ
ġ
ġ
ġ
ġ
y
Fotomate user manual
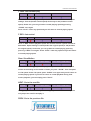
USB: supports 1.1 and 2.0
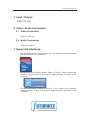
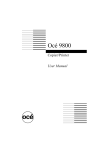
4.IR Key_Map:Direction for use
荦ġ
荧
荥ġ
荩ġ
荨ġ
荪ġ
荫ġ
荬ġ
荭ġ
专ġ
且ġ
丕ġ
荮ġ
(key_map)
Ł KEY_POWER
ł KEY_MUTE
Ĺ
ġ
ġ
世ġ
ġ
ġ
ġ
Fotomate user manual
Ń AVOUT SW
ń KEY_PHOTO: SHUT KEY to phto play
ŅKEY_MUSIC: SHUT KEY to music play
ņKEY_MOVIE: SHUT KEY to play
Ň KEY_PAUSE
ň KEY_EXIT:return to poweron menu whenever.
ʼn KEY_UP
Ŋ KEY_DOWN
ŋ KEY_LEFT: Move left or rotate left 90 degree.
Ō KEY_RIGHT: Move right or rotate right 90 degree.
ō KEY_ENTER: confirm key.
Ŏ KEY_CALENDAR: Shut key to calendar.
(15) KEY_SETUP: to enter setup mode.
(16) KEY_VOL_UP
(17) KEY_VOL_DOWN
(18) KEY_SCB: Fast to play backward.
(19) KEY_SCF: Fast to play forward.
(20) KEY_PREV: play the prev photo/music/movie.
(21) KEY_NEXT: play the next photo/music/movie.
5.System Settings
ĺ
ġ
ġ
ġ
ġ
ġ
Fotomate user manual
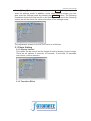
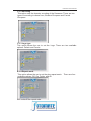
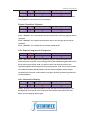
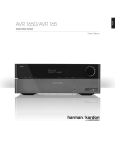
Select˰Setup˱ from the main menu, press the PLAY button, and you will
enter the settings mode. In addition, under other function modes, you can
also enter the settings mode by pressing the SETUP button. The following
illustration shows the initial screen in the settings mode, and in the following
section we will introduce the various functions of the settings mode.
The adjustment screen for the SETUP menu is as follows:
5.1 Photo Setting
5.1.1 Display Interval
This option can be used to set the length of time for display of each image.
There are six options: 5 seconds, 10 seconds, 15 seconds, 30 seconds,
one minute, or three minutes.
5.1.2 Transition Effect
IJı
ġ
ġ
ġ
ġ
ġ
Fotomate user manual
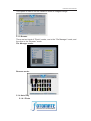
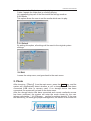
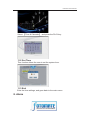
This option is used to set the transition effect as images change.
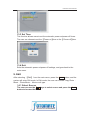
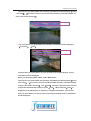
5.1.3 Browse
There are two kinds of “Photo” modes, one is the “File Manager” mode, and
the other is the “Browser” mode.
File Manager mode:
Browser mode:
5.1.4 Auto Play
5.1.4.1 Photo
IJIJ
ġ
ġ
ġ
ġ
ġ
Fotomate user manual
This setting can be set to either “on” or “off”. This setting decides
whether or not to activate the automatic display function after
entering the “Photo” mode. If this option is set to “on”, then the
system will enter “slide show mode” after you enter “Photo”; if it is
set to "off", then the system will enter either File Manager mode or
Browser mode, according to the Browse settings set by the user.
5.1.4.2 Music
This setting can be set to either “on” or “off”. This setting decides
whether or not to activate the automatic play function after entering
“Music” mode. If this setting is set to “on”, then the system will
enter file mode and initiate automatic play after entering “Music”; if
this setting is set to “off”, then, after entering “Music” file mode, the
user will have to manually press the “Play” button.
5.1.4.3 Movie
This setting can be set to either “on” or “off”. This setting decides
whether or not to initiate the automatic play function after entering
“Movie” mode. If this setting is set to “on”, the system will
automatically play the video after entering “Movie”; if this setting is
set to “off”, then after entering the “Movie” file mode, the user will be
allowed to manually browse the videos.
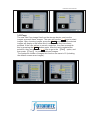
5.2
Display Setup
5.2.1 TV Standard
The user can select according to their standard television system. The
options are: NTSC, PAL, and AUTO.
5.2.2 Brightness
This option allows the user to set the brightness of the television screen.
They can choose from three different options: normal, bright, and soft.
IJij
ġ
ġ
ġ
ġ
ġ
Fotomate user manual
5.2.3 Contrast
This option can be used to set the screen contrast. The contrast is
divided into 15 different levels, from -7~0~7, with larger numbers
representing greater contrast.
5.2.4 TFT Brightness
If an LCD display is used this option can be used to set the screen
brightness. The brightness is divided into 15 levels, from -7~0~7, with
the larger (positive) numbers representing greater brightness.
5.2.5 TFT Contrast
If an LCD display is used, this option can be used to set the screen
contrast. The contrast is divided into 15 different levels, from -7~0~7,
with larger numbers representing greater contrast.
IJĴ
ġ
ġ
ġ
ġ
ġ
Fotomate user manual
5.2.6 TFT Saturation
If the user uses an LCD display, this option can be used to set the
saturation of the display. The saturation is divided into 15 levels, from
-7~0~7, with larger numbers representing a higher degree of saturation.
5.3 Custom Setup
5.3.1 OSD Language
This option can be used to set the language for the OSD (on screen
display). The user can choose from: English, French, German, Italian,
Spanish, Portuguese, Dutch, and Polish.
IJĵ
ġ
ġ
ġ
ġ
ġ
Fotomate user manual
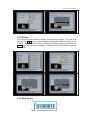
5.3.2 Encoding
This option sets the character encoding of the filenames. There are two
types of encoding to choose from, Western European and Central
European.
5.3.3 Logo type
This option allows the user to set the Logo. There are two available
options: Default and Favorite.
5.3.4 Repeat mode
This option allows the user to set the play repeat mode.
available options: Off, One, Folder, and All.
Off: turns off the repeat mode.
IJĶ
ġ
ġ
There are four
ġ
ġ
ġ
Fotomate user manual
One: repeats the file that is currently playing.
Folder: repeats the folder that is currently playing.
All: repeatedly plays all of the files inside the storage medium.
5.3.5 Media
This option allows the user to set the media which want to play.
5.3.6 Default
By setting this option, all settings will be reset to the original system
settings.
5.4 Exit
Leaves the setup menu, and goes back to the main menu.
2. Photo
After choosing ˰Photo˱ from the main menu, press the PLAY key, and the
system will automatically detect whether or not a storage device has been
connected (USB drive or memory card). If no storage device has been
connected, the system will go back to the main menu.
After the storage device has been connected and correct read/write access
has been confirmed, the system will enter the mode chosen by the user
(please refer to the ˬ4.1.3 Browse˭ section for settings details). If the user
has selected ˰File Mode˱for playlist management, the screen on the lower left
IJķ
ġ
ġ
ġ
ġ
ġ
Fotomate user manual
will appear; if the user chooses ˰Browse Mode˱for playlist management, the
screen on the lower right will appear.
Under ˰Photo˱ mode, the system only supports the display of images in JPG
format.
3. Music
After choosing ˰Music˱ from the main menu, press the PLAY key, and the
system will automatically detect whether or not a storage device has been
connected (USB drive or memory card). If no storage device has been
connected, the system will go back to the main menu. After the storage device
has been connected and correct read/write access has been confirmed, the
system will enter˰Media Manager˱for playlist management, as shown in the
illustration.
In the ˰Music˱ mode, the system only supports the playing of music files in
MP2/MP3/WMA format. If the user has turned on the ˰Music˱ automatic
playing function, then music will automatically be played when the system
enters ˰Music˱ mode.
4. Photo+Music
After choosing ˰Photo+Music˱ from the main menu, press the PLAY key, and
the system will automatically detect whether or not a storage device has been
connected (USB drive or memory card). If no storage device has been
connected, the system will go back to the main menu. After the storage device
IJĸ
ġ
ġ
ġ
ġ
ġ
Fotomate user manual
has been connected and correct read/write access has been confirmed, the
system will enter˰File Manager˱for playlist management, as shown in the
illustration. Under˰Photo+Music˱ mode, the system supports the displaying of
pictures and the playing of music, and the supported file types are: JPG, MP2,
MP3, and WMA. If the user turns on the ˰Photo+Music˱ automatic playing
function, then the system will initiate automatic display and playback after
entering ˰Photo+Music˱ mode.
5. Movie
After choosing ˰Movie˱ from the main menu, press the PLAY key, and the
system will automatically detect whether or not a storage device has been
connected (USB drive or memory card). If no storage device has been
connected, the system will go back to the main menu. After the storage device
has been connected and correct read/write access has been confirmed, the
system will enter˰File Manager˱for playlist management, as shown in the
illustration. Under ˰Movie˱ mode, the system supports movie playback in the
following formats: DAT, MPG, VOB, and AVI.
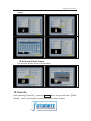
6. Calendar
After selecting ˰Calendar˱ from the main menu, press the PLAY button, and
you will enter the date setting mode.
10.1 Display
IJĹ
ġ
ġ
ġ
ġ
ġ
Fotomate user manual
This option provides the ˰Calendar˱display function. The date displayed
in the calendar is the current date set in the system.
In addition to displaying the current date, the user can use the
keys
to browse different months, or use the keys to browse different
years.
10.2 Set Date
This function allows users to set the system date.
10.3 Exit
Exits date settings and goes back to the main menu.
IJĺ
ġ
ġ
ġ
ġ
ġ
Fotomate user manual
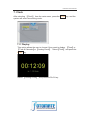
7. Clock
After selecting ˰Clock˱ from the main menu, press the PLAY key, and the
system will enter time setting mode.
11.1 Display
This option allows the user to choose if they want to display ˰Time˱or
˰Time & Calendar˱or ˰Analog Clock˱. Select˰Time˱, and press the
PLAY key.
Select ˰Analog Clock˱, and press the PLAY key.
ijı
ġ
ġ
ġ
ġ
ġ
Fotomate user manual
Select ˰Time & Calendar˱, and press the PLAY key.
11.2 Set Time
This function allows the user to set the system time.
11.3 Exit
Exits the time settings, and goes back to the main menu.
8. Alarm
ijIJ
ġ
ġ
ġ
ġ
ġ
Fotomate user manual
After selecting ˰Alarm˱ from the main menu, press the PLAY button, and the
system will enter the alarm settings mode.
12.1 Enable
This function allows users to activate炷On炸 or de-activate 炷Off炸 the
alarm.
12.2 Set Time
This function allows users to set the alarm time. When the alarm function
has been activated, a prompt will appear. Press any key to exit the alarm
mode.
ijij
ġ
ġ
ġ
ġ
ġ
Fotomate user manual
12.3 Exit
Exits the alarm settings, and goes back to the main menu.
13. Auto-Power
After selecting ˰Auto-Power˱ from the main menu, press the PLAY button,
and the system will enter the automatic power-on/power-off settings mode.
13.1 Power On Enable
This option allows the user to either activate (On) or de-activate (Off) the
automatic power-on function.
13.2 Power off Enable
This function allows the user to activate (On) or de-activate (Off) the
automatic power-off function.
ijĴ
ġ
ġ
ġ
ġ
ġ
Fotomate user manual
13.3 Set Time
This function allows users to set the automatic power-on/power-off times.
The user can choose to set the ˰Power-on˱time or the ˰Power-off˱time.
13.4 Exit
Exits the automatic power-on/power-off settings, and goes back to the
main menu.
9. Edit
After selecting ˰Edit˱ from the main menu, press the PLAY button, and the
system will enter Edit mode. In Edit mode, the user can choose Copy Photoˣ
MusicˣPhoto/MusicˣMovie or all type.
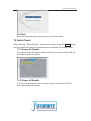
14.1 Select Source
The user can use the
keys to select source and press the PLAY
button to browse the files.
ijĵ
ġ
ġ
ġ
ġ
ġ
Fotomate user manual
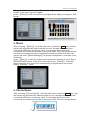
14.2Copy
The user can Copy image files from the storage device, and use the
images as screen saver images. The user can use the
keys to select
images. After choosing images, press the PLAY button, and the selected
images will display a red frame which indicates that they have been
selected. If the user wishes to cancel a selection, they can accomplish
this by pressing the PLAY button again. After the user completes the
selection, they can press the keys to go to the ˰Edit˱ option, and
then press ˰Copy˱ to save the selected images.
The maximum number of images this function can save is 15 (including
the default screen saver images).
ijĶ
ġ
ġ
ġ
ġ
ġ
Fotomate user manual
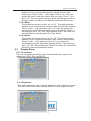
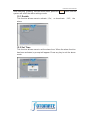
14.2 Delete
This function allows users to delete screen saver images. The user first
can use the
keys to select images which wish to delete and go to the
˰Edit˱ option, and then after entering the delete mode by pressing the
PLAY key, you can see a dialogue; Press yes and the selected image will
be deleted.
14.3 New Folder
ijķ
ġ
ġ
ġ
ġ
ġ
Fotomate user manual
This function allows users to create a folder to deposit the selected
images
14.4 Format Photo Frame
This function allows users to format Nand.
10. Favorite
After selecting˰Favorite˱, press the PLAY button, and you will enter ˰Slide
Show˱ mode, and be able to preview the screen saver images.
ijĸ
ġ
ġ
ġ
ġ
ġ
Fotomate user manual
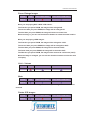
11. Basic Operations
16.1 Power Key: Power-on/Power-off
Format
JPG
MP2 / MP3 / WMA
DAT / MPG / VOB / MP4
Support
16.2 Function: main menu
Press ”FUNCTION” to directly enter the main menu. The user can then
press the
buttons to select the desired function.
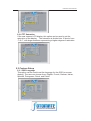
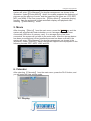
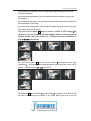
16.3Automatic Picture Rotation
Format
JPG
MP2 / MP3 / WMA
DAT / MPG / VOB / MP4
Support
When displaying images, if you rotate the frame 90 degrees to the right,
the image will also rotate 90 degrees accordingly, so that the original
angle will still be maintained, as shown in the illustration:
This is the original angle
This is the angle after the frame is
rotated 90 degrees
16.4 Basic Playback Functions
Format
JPG
MP2 / MP3 / WMA
ijĹ
DAT / MPG / VOB / MP4
ġ
ġ
ġ
ġ
ġ
Fotomate user manual
Support
Stop:
When the system is playing, pressing “STOP” will stop the playback. If you were
displaying images, then you will enter Browse mode or File Management mode;
if you were playing a movie, then the movie will cease playing and you will enter
the File Management mode.
Pause:
If you wish to pause during playback, you can press “PAUSE”. By repressing
“PAUSE” , you can return to normal playback. If you are playing images,
pressing “PAUSE” will cause the images to stop playing.
Menu: return to File Management Mode
When images or movies are being played, pressing “MENU” will take you back to
File Management mode. Users can use the arrow buttons to select the desired
files, and then press “PLAY” to play the selected file.
Digest: return to Browse Mode
When images or movies are being played, press “DIGEST” and you will return to
Browse mode. The user can use the arrow buttons to select the desired files, and
then press “PLAY” to play the selected files.
Screen Saver:
In the special situations listed below, the system will not go into˰
˰Screen Saver˱
mode:
-If the system is currently in˰Photo˱, ˰Music˱, ˰Photo+Music˱, or˰Movie˱
mode.
-If the system is currently displaying˰Time˱or ˰Time & Date˱.
Under normal circumstances, if the system is not playing any continuous data,
and the user has not used the system in more than 20 seconds, the machine will
automatically enter the screen saver program to protect your monitor; when the
user presses any key, the system will exit the˰Screen Saver˱mode and return to
the same screen that was being displayed just before entering the Screen Saver
mode.
ijĺ
ġ
ġ
ġ
ġ
ġ
Fotomate user manual
F.FWD: fast-forward play
Format
JPG
MP2 / MP3 / WMA
DAT / MPG / VOB / MP4
Support
Press “F.FWD” and the playback speed will increase to search forward. Speed
settings: from x2 (double normal speed) all the way to x32 (32 times normal
speed). Under x32, you can go back to normal playing speed by pressing
“F.FWD” once again.
Press “PLAY” under any speed and you will return to normal playing speed.
F.REV: fast rewind
Format
JPG
MP2 / MP3 / WMA
DAT / MPG / VOB / MP4
Support
Press “F.REV” and the playback speed will increase and the system will search
backwards. Speed settings: from x2(double the original speed) to x32(32 times
the original speed). Under x32, you can go back to normal playing speed by
pressing “F.REV” once again. Press “PLAY” under any speed and you will return
to normal playing speed.
Slow: Slow Motion
Format
JPG
MP2 / MP3 / WMA
DAT / MPG / VOB / MP4
Support
Press “SLOW” during playback and playback speed will decrease. The speed
will be set according to the number of times you press “SLOW”: from 1/2 speed
to 1/32 speed. Under 1/32 speed, press “SLOW” once again and you will return to
normal playing speed. If you wish to return to normal playback during slow
motion playback, you can simply press ”PLAY”.
NEXT: Go to the next file.
Format
JPG
MP2 / MP3 / WMA
DAT / MPG / VOB / MP4
Support
During playback or when the system is stopped, press “NEXT” and the system
will jump to the next file and play it.
PREV: Go to the previous file.
Ĵı
ġ
ġ
ġ
ġ
ġ
Format
JPG
MP2 / MP3 / WMA
Fotomate user manual
DAT / MPG / VOB / MP4
Support
During playback or when the system is stopped, press “PREV” and the system
will jump back to the previous file and play it.
Repeat: Repetitive Playback
Format
JPG
MP2 / MP3 / WMA
DAT / MPG / VOB / MP4
Support
Press “REPEAT” once and the file that is currently playing will be repeated.
Press “REPEAT” for a second time and the folder that is currently playing will be
repeated.
Press “REPEAT” for a third time and all the files in the storage device will be
repeated.
Press “REPEAT” for a fourth time to exit the repeat mode.
A-B: Repeat A segment to B segment
Format
JPG
MP2 / MP3 / WMA
DAT / MPG / VOB / MP4
Support
Press “A-B” and the system will repeatedly play the segment between two
selected points in the file. The starting point for the repeated segment will be the
point where you pressed ”A-B” for the first time, and the end point for the
repeated segment will be the point where you pressed “A-B” for the second time.
The OSD will display A-B Repetition and the chosen segment will be played
continuously. Press the ”A-B” button once again and the system will go back to
normal playback.
Info: Information Display
Format
JPG
MP2 / MP3 / WMA
DAT / MPG / VOB / MP4
Support
“INFO” provides you with information on the file that is currently playing. The
background color will be set according to the interface style set by the user,
When you are playing JPG images:
ĴIJ
ġ
ġ
ġ
ġ
ġ
Fotomate user manual
The first time you press INFO, the following information will be displayed:˰
˰menu
\ file name˱, ˰the order of this file inside the folder directory / the total number of
files in this folder directory˱.
The second time you press INFO, the following information will be displayed:
˰resolution˱, ˰date˱.
The third time you press INFO, you will go back to the original display, and no
information will be displayed.
When you are playing DAT / MPG / VOB / MP4 videos:
The first time you press INFO, the following information will be displayed:˰menu
\ file name˱ , ˰the order of this file inside the folder directory / the total number
of files in this folder directory˱, and ˰Time˱. However, after three seconds, the
system will automatically display only the˰Time˱. When only the˰Time˱is
displayed, press INFO again to display the complete information. The second
time you press INFO, you will go back to the original display, and no information
will be displayed.
Ĵij
ġ
ġ
ġ
ġ
ġ
Fotomate user manual
Zoom: Enlarge Images
Format
JPG
MP2 / MP3 / WMA
DAT / MPG / VOB / MP4
Support
When you are playing DAT / MPG / VOB videos:
The first time you press ZOOM, the image will be enlarged 2X.
The second time you press ZOOM, the image will be enlarged 4X.
The third time you press ZOOM, the image will return to normal size.
When zooming in, you can use the direction buttons to select the zoom location.
When you are playing JPEG images:
The first time you press ZOOM, the image will be enlarged to 150%.
The second time you press ZOOM, the image will be enlarged to 200%.
The third time you press ZOOM, the image will be shrunk to 25%.
The fourth time you press ZOOM, the image will be shrunk to 50%.
The fifth time you press ZOOM, the image will be restored to normal size (100%).
When the image is enlarged, you can use the direction buttons to select the area
on display.
Vol+/-: Volume
Format
JPG
MP2 / MP3 / WMA
DAT / MPG / VOB / MP4
MP2 / MP3 / WMA
DAT / MPG / VOB / MP4
Support
Maximum 16, minimum 0
Mute:
Format
JPG
Support
Press ”MUTE” once and the system will mute, press it again and sound will be
restored.
Rotate JPG Images:
Format
JPG
MP2 / MP3 / WMA
DAT / MPG / VOB / MP4
Support
ĴĴ
ġ
ġ
ġ
ġ
ġ
Fotomate user manual
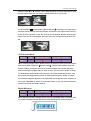
By pressing the left button, you can rotate JPG images 90 degrees to the left
(counter-clockwise)
By pressing the right button, you can rotate the image 90 degrees to the right
(clockwise)
By pressing the up button, you can flip the image horizontally, reversing the left
and right sides of the image.
By pressing the down button, you can flip the image vertically, reversing the top
and bottom sides of the image.
The left arrow button can be used to rotate a JPG image˰90
degrees to the left (counter-clockwise)˱. As shown in the sequential
figures below, the front of the car is rotated counter-clockwise in
the
directions.
The right arrow button can be used to rotate ˰90 degrees to the right
(clockwise)˱. As shown in the sequential figures below, the front of the car is
rotated clockwise in the
directions.
The up button
can be used to ˰flip horizontally˱, resulting in an image with left
and right sides reversed. As shown in the figure below, the front of the car
Ĵĵ
ġ
ġ
ġ
ġ
ġ
Fotomate user manual
switches from to , and the entire image has been reversed from left to right,
but the vertical sides do not change, the top of the car is still on top.
The down button can be used to ˰shift vertically˱, resulting in an image that is
reversed in terms of top and bottom sides. As shown in the figure below, the top
of the car was originally on top, but ends up on the bottom. But the left and right
sides of the car are not changed, the front of the car is still pointing towards the
left.
JPG Browse Mode:
Format
JPG
MP2 / MP3 / WMA
DAT / MPG / VOB / MP4
Support
When viewing images, press “STOP” and the system will enter the browse mode.
After the system enters the ˰Browse mode˱, fifteen 3x5 thumbnail clips will
appear, making it easy for the user to view the images in the folder directory.
After selecting the images that you wish to view, you can press “PLAY” to enter
the Slide Show mode. At this time, the user can select the Rotate function, and
then select the image that they wish to rotate and then press “PLAY” to rotate
the selected image 90 degrees to the right. After the image has been rotated, you
can press “RETURN” to return to the browse mode, or you can select the Reset
function to cancel all rotation actions.
Media Manager:
Format
JPG
MP2 / MP3 / WMA
DAT / MPG / VOB / MP4
Support
When the user inserts a storage device such as a portable drive or SD card, after
the system analyzes the file format, the user will be able to conduct playlist
ĴĶ
ġ
ġ
ġ
ġ
ġ
Fotomate user manual
management through the File Manager. The recognizable multimedia file types
include: JPEG, MP2, MP3, WMA, DAT, MPG, VOB, and MP4.
The window on the left of the File Manager is used to manage the folders inside
the storage medium. The window on the right displays the files inside the
particular folders.
P/N: Switching between NTSC and PAL
Format
JPG
MP2 / MP3 / WMA
DAT / MPG / VOB / MP4
Support
When playing, press “P/N”, and you will be able to choose from two output
modes. The user can choose either NTSC or PAL, according to their viewing
preferences and system requirements.
Ĵķ
ġ
ġ
ġ
ġ
ġ
Fotomate user manual
Manufactured and Distributed by
No 2 Noble Road
Bordeaux. Randburg
Tel ( 011 781 6001 )
www.cnsmarketing.co.za
Ĵĸ
ġ
ġ