1
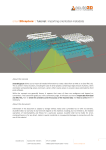
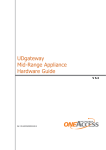
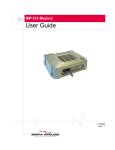
addLINK Radio Module
Demo Kit
Technical Manual
ISSUE : 1.2
UPDATE : 27/12/2002
Adcon RF Technology SA
Les Cardoulines - Bâtiment B4
1360 route des Dolines
06560 Valbonne
Sophia Antipolis - France
Tel.: +33 (0)4 97 21 33 10
Fax : +33 (0)4 97 21 33 11
www.adcon.com
[email protected]
Proprietary Notice:
The information in this document is subject to change without notice.
Company or product names mentioned in this document may be trademarks or registered trademarks of
their respective companies.
All rights reserved. Neither the whole nor any part of the information contained in this publication may be
reproduced in any material form except with the written permission of Adcon RF Technology.
This publication is intended only to assist the reader in the use of the product. Adcon RF Technology.
shall not be liable for any loss or damage arising from the use of any information in this publication, or any
error or omission in such information, or any incorrect use of the product.
COPYRIGHT Adcon RF Technology 2002
File: addLINK Demo Kit Technical Manual
Rev: 1.2
Page: 2
TABLE OF CONTENTS
TABLE OF CONTENTS..........................................................................................3
TABLE OF ACRONYMS.........................................................................................4
1. INTRODUCTION ...............................................................................................5
1.1 AIM OF DOCUMENT ..........................................................................................................5
1.2 DESCRIPTION ...................................................................................................................5
2. INSTALLATION .................................................................................................6
2.1 DEMO KIT CONNECTIONS .................................................................................................6
2.2 MTC WORKBENCH SOFTWARE INSTALLATION ....................................................................6
3. BASIC OPERATION: USING MTC......................................................................7
3.1 THE DESKTOP ...................................................................................................................7
3.1.1 The menu bar....................................................................................................................... 9
3.1.2 The tool bar........................................................................................................................ 11
3.1.3 The application Tree .......................................................................................................... 12
3.2 PEER-TO-PEER DIALOG ....................................................................................................14
3.2.1 Configuration ..................................................................................................................... 14
3.2.2 Dialog................................................................................................................................. 15
3.3 NETWORK DIALOG .........................................................................................................17
3.3.1 Configuration ..................................................................................................................... 17
3.3.2 Dialog................................................................................................................................. 18
4. ADVANCED OPERATION ...............................................................................20
4.1 COMMUNICATION MODES ..............................................................................................20
4.2 DEMO MODE .................................................................................................................21
4.3 STAND-BY MODE FOR MEASURES ....................................................................................21
4.3 PROGRAMMING MODE ...................................................................................................22
4.3.1 Connections ....................................................................................................................... 22
4.3.2 Software ............................................................................................................................. 22
5. APPENDIX: INTERFACE SCHEMATICS ...........................................................24
5.1 INTERFACE WITHOUT MICROCONTROLLER ........................................................................24
5.2 INTERFACE WITH MICROCONTROLLER .............................................................................25
COPYRIGHT Adcon RF Technology 2002
File: addLINK Demo Kit Technical Manual
Rev: 1.2
Page: 3
TABLE OF ACRONYMS
Reference: ETSI Standard (FINAL DRAFT prl-ETS [300-220] – June 1999 release)
ACRONYMS
ACK
ASCII
AT
BER
CER
CR
CTS
DAC
dBm
ETSI
ETR
EEPROM
F
FM
FSK
IF
I/O
I&Q
ISM
HF
LF
LNA
NACK
PCB
PLL
PROM
PSTN
RF
RSSI
RTS
Rx
RxD
SAW
SMD
TBD
Tx
TxD
UART
VCO
Xoff
Xon
DEFINITION
ACKnowledgement
American Standard Code for Information Interchange
ATtention (for Hayes commands)
Bit Error Rate
Character Error Rate
Carriage Return (for Hayes commands)
Clear To Send (for flow control)
Digital to analog Converter
Decibel milliwatts: Unit of signal power.
European Telecommunication Standard Institute
ETSI Technical Report
Electrically Erasable Programmable Read Only Memory
Frequency
Frequency Modulation
Frequency Shift Keying
Intermediate Frequency
Input/Output
In phase & Quadrature
Industrial, Scientific and Medical
High Frequency
Low Frequency
Low Noise Amplifier
Not ACKnowledgement
Printed Circuit Board
Phase Lock Loop
Programmable Read Only Memory
Public Switched Telephone Network
Radio Frequency
Receive Strength Signal Indicator
Request To Send (for flow control)
Receiver
Receive Data
Surface Acoustic Wave (for SAW filter)
Surface Mounted Device
To Be Defined
Transmitter
Transmit Data
Universal Asynchronous Receiver Transmitter
Voltage Control Oscillator
Software equivalent of a low CTS line
Software equivalent of a high CTS line
COPYRIGHT Adcon RF Technology 2002
File: addLINK Demo Kit Technical Manual
Rev: 1.2
Page: 4
1. INTRODUCTION
1.1 Aim of document
The aim of this document is to present the technical aspects of the standard addLINK radio
module demo kit, named D addLINK-868-NB-A-MC.
After a short introduction describing the radio module and its installation principles, the
operation of the D addLINK-868-NB-A-MC will be detailed in two distinct paragraphs, differentiating
a basic operation using the MTC software and a more complex advanced operation.
A useful set of appendix will then introduce the alternative configurations of the D addLINK868-NB-A-MC radio module.
1.2 Description
The addLINK radio module Demo Kit supplies the following items:
¾ 2 Demo radio units
¾ 2 serial cables, including power supply jack
¾ 2 Power supplies (12V, 300 mA)
¾ 2 lithium batteries 3.6V, 1000 mAh capacity, 40 mA minimal intensity, ½AA sized.
¾ 1 CD containing all required software and documentation
¾ An installation notice
This Demo Kit will allow any user to test the standard addLINK radio module which works on
the 868 MHz frequency band. The addLINK radio module is directly soldered to its interface host
board.
The configuration steps described in the following paragraphs are for the MTC software
program. Communication using a standard terminal emulation program (e.g. Win3.11 standard
terminal emulation program. French version provided in the CD) is also possible, involving more
detailed configuration.
COPYRIGHT Adcon RF Technology 2002
File: addLINK Demo Kit Technical Manual
Rev: 1.2
Page: 5
2. INSTALLATION
2.1 Demo Kit Connections
1.
Connect the Demo Kit to the PC via the RS-232 connector with the provided serial cable
2.
Connect the power supply to the demo kit via the power supply jack on the serial cable
CAUTION: Two kinds of power supply are available on the addLINK Demo Kit: the power supply
itself and a battery. When it is connected, the power supply has priority on the battery. The
battery takes over when the power supply is disconnected. This results in a wee decrease of the
module performances as the voltage level provided by the battery is lower.
3.
Check that both stand-by mode (STBY) and programming (PROG) switches (SW1 and SW3
respectively) are turned OFF.
4.
Switch the demo kit ON.
5.
Check that the red LED (LD5) as well as the green LED (LD2) goes ON when power supplying
the demo kit.
2.2 MTC Workbench Software Installation
1.
Put Adcon Master CD into the PC. The CD is autolaunched and displays a browser
on the Adcon database page.
2.
Go to the ‘addLINK’ page by clicking on the corresponding link.
3.
Install the MTC Workbench software by clicking on the “MTC Workbench
Installation” link. The software is automatically installed in “C:\Program
Files\Adcon\MTC\” (this directory can be changed).
COPYRIGHT Adcon RF Technology 2002
File: addLINK Demo Kit Technical Manual
Rev: 1.2
Page: 6
3. BASIC OPERATION: USING MTC
3.1 The desktop
The Modem Test & Configuration (MTC) Workbench is an Adcon software framework to
test and configure all modems supplied by Adcon RF Technology.
Several and diversified modems, connected to the PC/workstation via various hardware
interfaces (RS232, RS422, ...), can be tested and configured at the same time. The framework
provides a desktop to display, test and configure multiple modems, including addLINK radio
module, with a standard set of functions, common for each modem.
Once launched, the MTC software displays the following desktop and message:
The auto-configuration has to be launched for the software to detect the connected radio
module, i.e. ‘Yes’ has to be pressed.
COPYRIGHT Adcon RF Technology 2002
File: addLINK Demo Kit Technical Manual
Rev: 1.2
Page: 7
Once the auto-configuration is done (a few minutes, depending on the number of serial
ports), the following desktop is displayed:
The auto-configuration success can be checked visually by clicking on the COM1 node. The radio
modem should appear as a child node in the Tree window:
The radio modem is now ready to be tested and configured with the different options of the
MTC software. Those options are described below.
COPYRIGHT Adcon RF Technology 2002
File: addLINK Demo Kit Technical Manual
Rev: 1.2
Page: 8
3.1.1 The menu bar
The menu bar is fully configurable and is defined in the application configuration file:
Each menu is composed of several submenus corresponding to specific functions or actions. All
menus and submenus are described in the following paragraphs. Each function and option will be further
described in the next chapters.
Ö The ‘File’ Menu
The ‘File’ menu is composed of ‘Exit’ an submenu which quits the software program.
Ö The ‘Settings’ Menu
The ‘Settings’ menu is composed of the following submenus:
Language: Allows the user to change the software’s operation language (English, French and
German are available for the moment). The default language is English.
User level: Allows the user to switch from a basic operation desktop to an advanced operation
desktop and vice-versa. The current description concerns the basic user level configuration. For
the advanced user level configuration description, refer to the MTC Workbench User Manual.
Ö The ‘Modem’ Menu
The ‘Modem’ menu is composed of the following submenus:
Channel scanning: Displays a window which presents either the radio channel’s occupation rate
or the signal’s level received by the radio module.
Note: It is not applicable to addLINK modules.
Autoconfiguration: Allows the user to launch an auto-configuration on one or on all ports from
the desktop (e.g. for connection loss or modem replacement).
Ö The ‘Peer-to-peer’ Menu
The ‘Peer-to-peer’ menu is for basic operation configuration and is composed of the following
submenus:
Configuration: Displays a window allowing quick configuration of two radio modules for peer-topeer dialog. The parameters concerned are the operating mode and the radio channel.
Dialog: Displays an advanced terminal dialog window between two given radio modules, the
ports of which are chosen by the user.
COPYRIGHT Adcon RF Technology 2002
File: addLINK Demo Kit Technical Manual
Rev: 1.2
Page: 9
Ö The ‘Network’ Menu
The ‘Network’ menu is composed of the following submenus:
Configuration: Displays a window allowing quick configuration of two radio modules for network
dialog. The parameters concerned are the operating mode (Network client, server or addressed
secured), the network and clients’ IDs, and the radio channel.
Dialog: Displays an advanced terminal dialog window between two given radio modules already
configured with all necessary network parameters (i.e. mode, network and clients’ IDs). The ports
are chosen by the user.
Ö The ‘Windows’ Menu
The ‘Windows’ menu lists the different windows already opened and allows the user to change
the active window. Note that both ‘Tree’ and ‘About ports’ windows will always appear in that list as
they can not be closed.
Ö The ‘Help’ Menu
The ‘Help’ menu is composed of an ‘About’ submenu which displays a window containing all
information about the software development such as software version, copyright, author, etc:
COPYRIGHT Adcon RF Technology 2002
File: addLINK Demo Kit Technical Manual
Rev: 1.2
Page: 10
3.1.2 The tool bar
The tool bar contains shortcut buttons corresponding to the main functions of the menu bar
described in the previous paragraph. Some of those are only applicable in certain conditions and are
therefore disabled elsewhere.
1
2
3
4
The buttons’ functions are listed in the following table.
N°
NAME
FUNCTION / ACTION
1
Channel scanning
Channel scanning of the current radio module
2
Auto-configuration
Operates new auto configuration on all or selected ports
3
Opens peer-to-peer dialog
4
Opens network dialog
Opens peer-to-peer dialog window between two chosen ports
Opens network dialog window between two chosen ports
COPYRIGHT Adcon RF Technology 2002
File: addLINK Demo Kit Technical Manual
Rev: 1.2
Page: 11
3.1.3 The application Tree
Once the auto configuration is done, the software builds and displays the application tree using
the serial ports defined in the system, the connected modems detected during auto configuration and the
modem configuration files found in the application configuration file.
The application tree is composed of two windows that can not be closed: the ‘Tree’ window and
the ‘About Ports’ window. They are described below:
Note: The application tree, i.e. the Tree window especially, can not be exploited in basic user level
configuration. In basic level configuration, the Tree is just used as information.
COPYRIGHT Adcon RF Technology 2002
File: addLINK Demo Kit Technical Manual
Rev: 1.2
Page: 12
Ö Tree Window
The top part lists the different serial ports and their connected modems when
applicable. Whenever a modem is connected to a port, a node
appears at that port.
Clicking on that node will display the modem type as a child node:
The bottom part lists the different configuration files available, sorted by type of
modem. It is not available in basic user level configuration.
Ö Ports Window
The ‘About port’ window gives information about the status of each serial port detected by the
system during auto configuration:
OPEN
Modem connected to corresponding port. Port in use
(E.g. a tool is operating on that port.)
CLOSED
Modem connected to corresponding port. Port not in use
NOT CONNECTED No modem connected to corresponding port
Note:
The legend (i.e. ports status) can be hidden by disabling the ‘Legend’ button.
COPYRIGHT Adcon RF Technology 2002
File: addLINK Demo Kit Technical Manual
Rev: 1.2
Page: 13
3.2 Peer-to-peer dialog
The first tool available with the MTC software is the peer-to-peer dialog tool, allowing the user to
communicate between two addLINK radio modules. From the menu bar, the ‘Peer-to-peer’ menu is to be
selected.
3.2.1 Configuration
From the menu bar, the ‘Peer-to-peer/Configuration’ submenu has to be selected. A window
allowing the user configuring two compatible radio units for peer-to-peer dialog is displayed:
Both operating mode and communication channel should be chosen by the user. Once the
configuration is done, pressing ‘OK’ or ‘DIALOG’ allows the user to validate it:
If ‘OK’ was pressed, pressing ‘Yes’ quits the peer-to-peer configuration window and the user has
then to select the peer-to-peer dialog tool either from the menu bar or the tool bar. If ‘DIALOG’ was
pressed, pressing ‘Yes’ opens the peer-to-peer dialog window (See paragraph 7.2). Pressing ‘No’ cancels
the configuration in both cases.
COPYRIGHT Adcon RF Technology 2002
File: addLINK Demo Kit Technical Manual
Rev: 1.2
Page: 14
3.2.2 Dialog
From the menu bar, the ‘Tool/Peer-to-peer dialog’ (Advanced user level) or the ‘Peer-topeer/Dialog’ (Basic user level) submenu has to be selected. A window allowing the user choosing on
which ports the peer-to-peer dialog tool has to be operated is displayed. The same window is displayed
when using the tool bar.
Once the choice is validated by the user, the following peer-to-peer dialog window is displayed:
The peer-to-peer dialog window is composed of two identical panels, one for each module. The
different fields and buttons of those panels are described below:
Title: displayed on top of the panel, it gives the type of module and the port it is connected to
(E.g. addLINK-868@COM1) as well as its function, when applicable (i.e. Master or slave)
‘Received data’: This non-editable field displays the data received on the radio link from the other
module. The red dot indicates the status of the communication: it goes to green if a message is
being received.
‘Nb msg’: Provides the number of messages received by the module since the beginning of the
dialog.
‘Data to send’: Displays the data to be sent by the user to the other module. The red dot
indicates the status of the communication: it goes to green when a message is being sent.
‘Frame length’: Provides the length of the frame to be sent by the user.
‘Send continuously’: Enabling this option allows the user to transmit data (from ‘Data to send’)
permanently to the other modem. The time out (i.e. ‘Each […] ms’ field) is configurable but
should be greater than 500 ms.
‘Auto reply’: Enabling this option allows the user to send every received frame back to the
transmitter.
COPYRIGHT Adcon RF Technology 2002
File: addLINK Demo Kit Technical Manual
Rev: 1.2
Page: 15
‘Not received’: Indicates the number of messages that were not received by the unit during the
dialog.
‘Nb msg sent’: Provides the number of messages sent to the other module.
‘Elapsed time’: Specifies how long the modem has been transmitting when the send continuously
option is enabled.
‘Errors’: Provides the number of errors occurring during a transmission. Those errors are counted
in characters.
‘Send’ button: Sends the frame previously entered by the user in the ‘data to send’ field to the
other module.
‘Clear Send’ button: Clears the ‘data to send’ field as well as the ‘received data’ field of the other
module.
‘Stop’ button: Stops a permanent transmission (when ‘send continuously’ is enabled).
The two other buttons at the bottom of the window are general for both modules:
‘Display’ button: Displays a summary of the dialog established between the two radio units:
‘Clear All’ button: Clears all the window’s fields (described above).
‘Exit’ button: Quits the peer-to-peer dialog window.
COPYRIGHT Adcon RF Technology 2002
File: addLINK Demo Kit Technical Manual
Rev: 1.2
Page: 16
3.3 Network Dialog
For client/server communications between several addLINK radio modules, the MTC features the
network dialog tool, similar to the peer-to-peer dialog tool. From the menu bar, the ‘Network’ menu has
to be selected.
3.3.1 Configuration
From the menu bar, the ‘Network/Configuration’ submenu has to be selected. A window allowing
the user configuring two compatible radio units for network dialog is displayed:
The operating mode, communication channel and network number should be chosen by the user.
For addressed secured mode configuration, the clients’ IDs also have to be chosen by the user. Once the
configuration is done, pressing ‘OK’ or ‘DIALOG’ allows the user to validate it:
If ‘OK’ was pressed, pressing ‘Yes’ quits the network configuration window and the user has then
to select the network dialog tool either from the menu bar or the tool bar. If ‘DIALOG’ was pressed,
pressing ‘Yes’ opens the network dialog window (See paragraph 7.2). Pressing ‘No’ cancels the
configuration in both cases.
COPYRIGHT Adcon RF Technology 2002
File: addLINK Demo Kit Technical Manual
Rev: 1.2
Page: 17
3.3.2 Dialog
From the menu bar, the ‘Tool/Network dialog’ (Advanced user level) or the ‘Network\Dialog’
(Basic user level) submenu has to be selected. A window allowing the user choosing on which ports the
network dialog tool has to be operated is displayed. The same window is displayed when using the tool
bar.
Once the choice is validated by the user, the following network dialog window is displayed:
The network dialog window is composed of two identical panels, one for each module. The
different fields and buttons of those panels are described below:
Title: displayed on top of the panel, it gives the type of module and the port it is connected to
(E.g. addLINK-868@COM1) as well as its function, when applicable (i.e. Server or Client N°n)
‘Received data’: This non-editable field displays the data received on the radio link from the other
module. The red dot indicates the status of the communication: it goes to green if a message is
being received.
‘Nb msg’: Provides the number of messages received by the module since the beginning of the
dialog.
‘Data to send’: Displays the data to be sent by the user to the other module. The red dot
indicates the status of the communication: it goes to green when a message is being sent.
‘To [Client/Address n]’: Indicates to which client or modem the frame is to be sent
‘Frame length’: Provides the length of the frame to be sent by the user.
‘Send continuously’: Enabling this option allows the user to transmit data (from ‘Data to send’)
permanently to the other modem. The time out (i.e. ‘Each […] ms’ field) is configurable but
should be greater than 500 ms.
‘Auto reply’: Enabling this option allows the user to send every received frame back to the
transmitter.
COPYRIGHT Adcon RF Technology 2002
File: addLINK Demo Kit Technical Manual
Rev: 1.2
Page: 18
‘Not received’: Indicates the number of messages that were not received by the unit during the
dialog.
‘Nb msg sent’: Provides the number of messages sent to the other module.
‘Elapsed time’: Specifies how long the modem has been transmitting when the send continuously
option is enabled.
‘Errors’: Provides the number of errors occurring during a transmission. Those errors are counted
in characters.
‘Send’ button: Sends the frame previously entered by the user in the ‘data to send’ field to the
other module.
‘Clear Send’ button: Clears the ‘data to send’ field as well as the ‘received data’ field of the other
module.
‘Stop’ button: Stops a permanent transmission (when ‘send continuously’ is enabled).
The two other buttons at the bottom of the window are general for both modules:
‘Display’ button: Displays a summary of the dialog established between the two radio units:
‘Clear All’ button: Clears all the window’s fields (described above).
‘Exit’ button: Quits the network dialog window.
COPYRIGHT Adcon RF Technology 2002
File: addLINK Demo Kit Technical Manual
Rev: 1.2
Page: 19
4. ADVANCED OPERATION
The following paragraph described the main aspects of addLINK radio module advanced
operation, i.e. all operating modes, programming, evaluation, etc. More detailed information about
addLINK radio module advanced operation is available in the “addLINK Radio Module Technical Manual”
revision 2.0 (i.e. Hayes commands, registers, detailed operation, etc).
4.1 Communication Modes
The addLINK radio module demo kit can operate under five different communication modes:
•
Hayes or ‘AT’ mode: this is the module’s parameters programming mode.
•
Transparent mode: This is the default communication mode of the radio module. An
addLINK radio module behaves like a wired serial link, i.e. it does not only transmit to the
radio channel every data received on the serial link, but also transmits on the serial link the
information received on the radio channel. Basically, it reproduces the half-duplex function of a
RS-485 cable.
•
Secured Transparent mode: Frame encapsulation is added to the transparent mode, so that
each data transfer is “data verified” (start and end bytes). This mode shall be operated for
point-to-point communications only.
2 types of flow control are available:
Ö Hardware : CTS/RTS (the module manages RTS signal only)
Ö None.
•
Addressed Secured mode: This is similar to a network mode, only there is no server and
every module can communicate with each other, addressing each frame to whom it is sent
to. This mode offers an optimal radio link quality, providing transparent mode with the
security of the transparent secured mode.
•
I/O Copy mode: In I/O Copy mode the I/O lines of an addLINK module are copied to the other
addLINK module. Once programmed in I/O copy mode, modules start I/O copy as soon as they
get out of Hayes mode. They stop as soon as one module returns to Hayes mode.
COPYRIGHT Adcon RF Technology 2002
File: addLINK Demo Kit Technical Manual
Rev: 1.2
Page: 20
4.2 Demo Mode
A demonstration operating mode is available on the addLINK radio module. Basically, it shall be
used for performances range tests as it allows removing the serial connection and moving the radio
module around.
To configure the module to demo mode, only one register needs to be modified, S220, the
operating mode register:
Ö
If S220 is set to ‘10’ (ATS220=10<CR>), the unit is configured as Master in Demo
mode
Ö
If S220 is set to ‘11’ (ATS220=11<CR>), the unit is configured as Slave in Demo
mode
The demo mode is kind of similar to a Master & Slave mode, only the units are communicating
continuously:
Ö
The master sends data frames to the slave and its yellow LED is flashing
Ö
If the data is correctly received, the slave lights its green LED, sends back the data to
the master and its yellow LED is flashing
If the data is received with errors, the slave lights its red LED
Ö
Ö
Ö
If the master correctly receives back a data frame, it lights its green LED and restarts
the process after 100 ms.
If the master receives a frame with errors or doesn’t receive any frame after a 50ms
time-out, it lights its red LED. After 100 ms, the master restarts the process.
Feature
Red LED
Green LED
Yellow LED
Designation
LD5
LD2
LD4
4.3 Stand-by Mode for measures
In order to make measurements available on the demo kit (e.g. for integration application),
the radio module can be put in stand-by mode:
1. Toggle the stand-by switch (see correspondence table below) ON.
2. Turn the demo kit ON. Check both red and green LEDs (see correspondence table) go
ON.
3. An ammeter can then be connected to the current measurement connector (see
correspondence table).
Feature
Stand-by switch
Red LED
Green LED
Current measurement connector
COPYRIGHT Adcon RF Technology 2002
File: addLINK Demo Kit Technical Manual
Rev: 1.2
Designation
SW1
LD5
LD2
J5
Page: 21
4.3 Programming Mode
4.3.1 Connections
1.
Connect the development kit to the PC via RS-232 connector
2.
Connect the development kit to the power supply via the Molex power supply connector
3.
Toggle the programming switch (SW3) ON
4.
Turn the Development kit ON. Check that the red programming LED (LD1) goes ON
4.3.2 Software
1.
Launch the MTC Workbench software
2.
Once the desktop is displayed, select the ‘programming\Flashing’ submenu. The following
window is displayed:
3.
This window allows the user choosing proper serial port, file type (*.stf and *.ste for Adcon files,
*.a90 for customer-generated files), modem type (i.e. addLINK) as well as the programming files
(addLINK Adcon standard files provided on the CD), available by clicking on the ‘BROWSE’
buttons. The ‘OK’ button should then be pressed for validation.
4.
Once the choice is validated, the ‘START’ button is to be pressed. The following programming
window is displayed, showing the programming status and evolution:
COPYRIGHT Adcon RF Technology 2002
File: addLINK Demo Kit Technical Manual
Rev: 1.2
Page: 22
5.
Once the programmation is done, the ‘CLOSE’ button is enabled and quits the programming.
6.
Turn the Development kit OFF.
7.
Toggle back the programming switch OFF.
8.
Turn the Development kit back ON.
9.
Check that the red LED is flashing when powering up the board
COPYRIGHT Adcon RF Technology 2002
File: addLINK Demo Kit Technical Manual
Rev: 1.2
Page: 23
5. APPENDIX: Interface Schematics
5.1 Interface without Microcontroller
Antenna
addLINK
Std-by
COPYRIGHT Adcon RF Technology 2002
File: addLINK Demo Kit Technical Manual
Rev: 1.2
Prog.
RS-232
Page: 24
5.2 Interface with Microcontroller
Antenna
addLINK
Std-by
COPYRIGHT Adcon RF Technology 2002
File: addLINK Demo Kit Technical Manual
Rev: 1.2
Prog.
Page: 25
RS-232