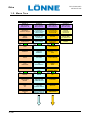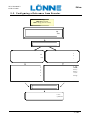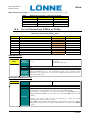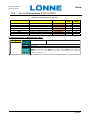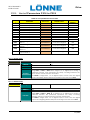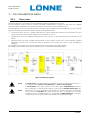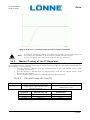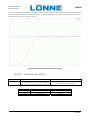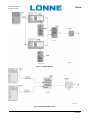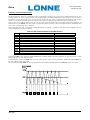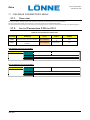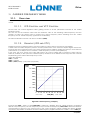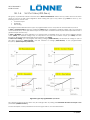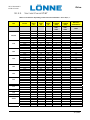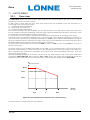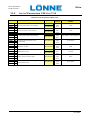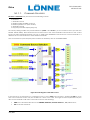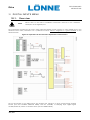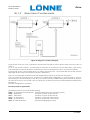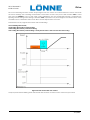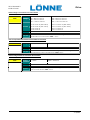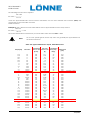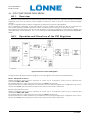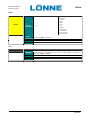
1
• 20120724 • iDrive MULTIFUNCTION AC DRIVE USER MANUAL - Programming Instructions - Issued on 24/7/2012 R.01 English • This manual is integrant and essential to the product. Carefully read the instructions contained herein as they provide important hints for use and maintenance safety. • This device is to be used only for the purposes it has been designed to. Other uses should be considered improper and dangerous. The manufacturer is not responsible for possible damages caused by improper, erroneous and irrational uses. • Lönne Scandinavia AS is responsible for the device in its original setting. • Any changes to the structure or operating cycle of the device must be performed or authorized by the Engineering Department of Lönne Scandinavia AS. • Lönne Scandinavia AS assumes no responsibility for the consequences resulting by the use of nonoriginal spare-parts. • Lönne Scandinavia AS reserves the right to make any technical changes to this manual and to the device without prior notice. If printing errors or similar are detected, the corrections will be included in the new releases of the manual. • The information contained herein is the property of Lönne Scandinavia AS and cannot be reproduced. Lönne Scandinavia AS enforces its rights on the drawings and catalogues according to the law. Lönne Scandinavia AS Liamyrane 12 – N-5132 Nyborg, Norway Tel. +47 55 39 10 00 – Fax +47 55 39 11 00 www.lonne.com [email protected] PROGRAMMING INSTRUCTIONS iDrive 0. TABLE OF CONTENTS 0.1. Chapters 0. 1. 2. 3. 4. 5. 6. 7. 8. TABLE OF CONTENTS ............................................................................................................................ 2 0.1. Chapters .................................................................................................................................................................2 0.2. Figures .....................................................................................................................................................................7 0.3. Tables.......................................................................................................................................................................8 0.4. How to Use this Manual ......................................................................................................................................11 0.4.1. Overview..........................................................................................................................................................11 0.4.2. Special Applications Dedicated to IDrive Drives......................................................................................11 0.4.3. Menus and Submenus ...................................................................................................................................12 0.4.4. Alarms and Warnings.....................................................................................................................................14 USING THE DISPLAY/KEYPAD UNIT ................................................................................................... 15 1.1. 1.2. 1.3 1.4. 1.5. 1.6. 1.7. 1.8. 1.9. 1.10. 1.11. 1.12. Overview...............................................................................................................................................................15 Menu Tree .............................................................................................................................................................16 Navigation ............................................................................................................................................................18 Parameter Modification .....................................................................................................................................19 Programming the Root Page ............................................................................................................................19 Using the MENU Key ............................................................................................................................................20 ESC Key .................................................................................................................................................................21 RESET Key (Alarm and Control Board Reset) ..................................................................................................22 TX/RX Key (Download/Upload from/to the Keypad) ...................................................................................22 LOC/REM Key (Keypad Pages) ........................................................................................................................24 SAVE/ENTER Key...................................................................................................................................................24 Indicator LEDs on the Display/Keypad ............................................................................................................25 3.1. 3.2. 3.3. 3.4. Main Speed/Torque Reference ........................................................................................................................27 Speed/Torque Limit Reference .........................................................................................................................27 PID Reference ......................................................................................................................................................27 PID Feedback Reference ..................................................................................................................................27 4.1. 4.2. 4.3. 4.4. 4.5. 4.6. 4.7. 4.8. 4.9. 4.10. 4.11. 4.12. Multimotor.............................................................................................................................................................28 Voltage/Frequency Pattern ..............................................................................................................................28 Slip Compensation ..............................................................................................................................................28 Speed Searching .................................................................................................................................................28 Controlled Stop in Case of Power Failure (Power Down) ............................................................................28 DC Braking ............................................................................................................................................................28 Motor Thermal Protection ..................................................................................................................................28 Prohibit Speeds ....................................................................................................................................................29 Digital PID Regulator ...........................................................................................................................................29 Bridge Crane Application ..................................................................................................................................29 Setting Two Alternative Command Sources and Reference Sources .......................................................29 Fire Mode ..............................................................................................................................................................30 5.1. 5.2. 5.3. 5.4. 5.5. Overview...............................................................................................................................................................31 Programming a Reference................................................................................................................................31 Configuring the External Torque Limit ..............................................................................................................35 Configuring the Feedback from Encoder ......................................................................................................36 Configuring a Reference from Encoder .........................................................................................................37 6.1. Overview...............................................................................................................................................................38 7.1. 7.2. 7.3. “IFD” Control Algorithm ......................................................................................................................................40 “VTC” Control Algorithm ....................................................................................................................................43 “FOC” Motor Control ..........................................................................................................................................45 8.1. 8.2. 8.3. 8.4. Overview...............................................................................................................................................................50 Motor Measures Menu .......................................................................................................................................51 PID Regulator Menu ............................................................................................................................................57 Digital Inputs Menu .............................................................................................................................................61 DESCRIPTION OF INPUT AND OUTPUT SIGNALS ............................................................................ 26 REFERENCES AND FEEDBACKS ........................................................................................................ 27 PROGRAMMABLE FUNCTIONS ........................................................................................................... 28 PROGRAMMING EXAMPLES................................................................................................................ 31 START-UP MENU .................................................................................................................................. 38 FIRST STARTUP .................................................................................................................................... 40 MEASURES MENU ................................................................................................................................ 50 2/482 PROGRAMMING INSTRUCTIONS 9. iDrive 8.5. 8.6. 8.7. 8.8. 8.9. 8.10. 8.11. 8.12. References Menu ................................................................................................................................................64 Outputs Menu ......................................................................................................................................................68 Temperature Measures from PT100 Menu ......................................................................................................70 Autodiagnostics Menu .......................................................................................................................................71 Data Logger Measures Menu ...........................................................................................................................73 Digital Input Settings Menu ................................................................................................................................75 Fault List Menu .....................................................................................................................................................76 Power Off List Menu ............................................................................................................................................77 9.1. 9.2. Overview...............................................................................................................................................................78 List of Parameter P263 and Fire Mode Enable Password .............................................................................78 PRODUCT MENU ................................................................................................................................... 78 10. PASSWORD AND USER LEVEL MENU ........................................................................................... 82 11. DISPLAY/KEYPAD MENU ................................................................................................................. 84 12. RAMPS MENU ................................................................................................................................... 92 13. INPUTS FOR REFERENCES MENU............................................................................................... 105 14. MULTISPEED MENU ....................................................................................................................... 126 15. PID MULTIREFERENCES MENU.................................................................................................... 129 16. PROHIBIT SPEED MENU ................................................................................................................ 133 17. REFERENCE VARIATION PERCENT MENU ................................................................................. 135 18. SPEED LOOP AND CURRENT BALANCING MENU...................................................................... 138 19. FOC REGULATORS MENU ............................................................................................................. 143 20. ANALOG AND FREQUENCY OUTPUTS MENU ............................................................................ 146 21. TIMERS MENU................................................................................................................................. 165 22. PID PARAMETERS MENU .............................................................................................................. 171 10.1. 10.2. 11.1. 11.2. 11.3. 11.4. Overview...............................................................................................................................................................82 List of Parameters P000 to P003.........................................................................................................................82 Overview...............................................................................................................................................................84 Root Page .............................................................................................................................................................84 Keypad Page and Local Mode .......................................................................................................................85 List of Parameters P264 to P269.........................................................................................................................86 12.1. Overview...............................................................................................................................................................92 12.1.1. Description of the Speed Ramps............................................................................................................92 12.1.2. Description of the Torque Ramps ...........................................................................................................95 12.2. List of Parameters P009 to P033.........................................................................................................................96 13.1. 13.2. 13.3. 14.1. 14.2. 15.1. 15.2. 16.1. 16.2. 17.1. 17.2. 18.1. 18.2. 19.1. 19.2. Processing Speed/Torque References ..........................................................................................................105 Scaling Analog Inputs REF, AIN1, AIN2 ..........................................................................................................109 List of Parameters P050 to P074a ....................................................................................................................113 Overview.............................................................................................................................................................126 List of Parameters P080 to P100.......................................................................................................................126 Overview.............................................................................................................................................................129 List of Parameters P080a to P099a .................................................................................................................131 Overview.............................................................................................................................................................133 List of Parameters P105 to P108.......................................................................................................................134 Overview.............................................................................................................................................................135 List of Parameters P115 to P121.......................................................................................................................137 Overview.............................................................................................................................................................138 List of Parameters P125 to P152.......................................................................................................................139 Overview.............................................................................................................................................................143 List of Parameters P155 to P173.......................................................................................................................143 20.1. Overview.............................................................................................................................................................146 20.1.1. Factory-setting of the Analog Outputs ...............................................................................................146 20.1.2. Analog Outputs .......................................................................................................................................146 20.1.3. Frequency Output...................................................................................................................................148 20.2. Variables .............................................................................................................................................................149 20.2.1. Operating Mode of Analog and Frequency Outputs ......................................................................150 20.2.2. Analog Output Programming Examples .............................................................................................151 20.3. List of Parameters P176 to P215.......................................................................................................................155 21.1. 21.2. 22.1. 22.2. 22.3. Overview.............................................................................................................................................................165 List of Parameters P216 to P229.......................................................................................................................167 Overview.............................................................................................................................................................171 PID Regulator Tuning – Method of Ziegler and Nichols ..............................................................................172 Manual Tuning of the PI Regulator .................................................................................................................173 3/482 iDrive PROGRAMMING INSTRUCTIONS 22.3.1. Proportional Action (P) ...........................................................................................................................173 22.3.2. Integral Action (I) ....................................................................................................................................175 22.3.3. Derivative Action (D) ..............................................................................................................................177 22.3.4. Tuning Actions at Constant Speed ......................................................................................................177 22.4. Anti-windup ........................................................................................................................................................177 22.5. List of Parameters P236 to P260.......................................................................................................................178 23. PID2 PARAMETERS MENU ............................................................................................................ 186 24. DIGITAL OUTPUTS MENU .............................................................................................................. 188 25. AUXILIARY DIGITAL OUTPUTS MENU .......................................................................................... 221 26. MEASURE CONTROL FROM PT100 .............................................................................................. 225 27. FIELDBUS PARAMETERS MENU................................................................................................... 228 28. VIRTUAL DIGITAL OUTPUTS (MPL) MENU ................................................................................... 230 29. INPUTS FOR REFERENCES FROM OPTIONAL BOARD ............................................................. 255 30. AUTOTUNE MENU .......................................................................................................................... 261 31. CARRIER FREQUENCY MENU ...................................................................................................... 265 32. MOTOR CONTROL MENU .............................................................................................................. 270 33. LIMITS MENU................................................................................................................................... 306 23.1. 23.2. Overview.............................................................................................................................................................186 List of Parameters P436 to P460.......................................................................................................................187 24.1. Overview.............................................................................................................................................................188 24.1.1. Factory Settings .......................................................................................................................................188 24.1.2. Structure of the Digital Outputs ............................................................................................................188 24.2. Programmable Operating Modes (Diagrams) ............................................................................................198 24.3. Examples .............................................................................................................................................................201 24.4. List of Parameters P270 to P305.......................................................................................................................206 25.1. 25.2. 26.1. 26.2. 27.1. 27.2. Overview.............................................................................................................................................................221 List of Parameters P306 to P317.......................................................................................................................221 Overview.............................................................................................................................................................225 List of Parameters P318 to P325.......................................................................................................................225 Overview.............................................................................................................................................................228 List of Parameters P330 to P331.......................................................................................................................228 28.1. Overview.............................................................................................................................................................230 28.1.1. Factory Setting .........................................................................................................................................230 28.1.2. Structure of the Virtual Digital Outputs ................................................................................................230 28.2. Operating Diagram of the Virtual Digital Outputs ......................................................................................236 28.3. List of Parameters P350 to P385.......................................................................................................................240 29.1. 29.2. Scaling Analog Inputs XAIN4, XAIN5 ..............................................................................................................255 List of parameters P390 to P399 ......................................................................................................................256 30.1. Overview.............................................................................................................................................................261 30.1.1. Motor Autotune and Adjusting Loops .................................................................................................261 30.1.2. Checking the Encoder Operation .......................................................................................................263 30.2. List of Inputs I073 - I074 ......................................................................................................................................264 31.1. Overview.............................................................................................................................................................265 31.1.1. IFD Control and VTC Control .................................................................................................................265 31.1.2. Example (IFD and VTC) ..........................................................................................................................265 31.1.3. FOC Control .............................................................................................................................................267 31.1.4. Any Control Algorithm ............................................................................................................................267 31.2. List of Parameters C001 to C004 .....................................................................................................................268 32.1. Overview.............................................................................................................................................................270 32.1.1. Electrical Specifications of the Connected Motor ...........................................................................271 32.1.2. Motor Ratings ...........................................................................................................................................271 32.1.3. Parameters of the Equivalent Circuit of the Asynchronous Machine ...........................................272 32.1.4. V/f Pattern (IFD Only)..............................................................................................................................273 32.1.5. Example 1 - V/f Pattern Parameterization ..........................................................................................274 32.1.6. Example 2 - V/f Pattern Parameterization ..........................................................................................275 32.1.7. Slip Compensation (IFD Only) ...............................................................................................................275 32.1.8. Torque Control (VTC and FOC Only) ...................................................................................................276 32.2. List of Parameters C008 to C128 .....................................................................................................................277 32.3. Tables Including the Parameters Depending on the Drive Size................................................................293 32.3.1. Voltage Class 2T/4T .................................................................................................................................293 32.3.2. Voltage Class 5T/6T .................................................................................................................................301 33.1. 4/482 Overview.............................................................................................................................................................306 PROGRAMMING INSTRUCTIONS 33.2. iDrive List of Parameters C043 to C135 .....................................................................................................................307 34. CONTROL METHOD MENU ............................................................................................................ 311 35. DIGITAL INPUTS MENU .................................................................................................................. 324 36. ENCODER/FREQUENCY INPUTS MENU ...................................................................................... 349 37. BRAKING RESISTANCE MENU ...................................................................................................... 357 38. DC BRAKING MENU ........................................................................................................................ 360 39. POWER DOWN MENU .................................................................................................................... 368 40. SPEED SEARCHING MENU ........................................................................................................... 375 41. AUTORESET MENU ........................................................................................................................ 381 42. MOTOR THERMAL PROTECTION MENU ...................................................................................... 383 43. MAINTENANCE MENU .................................................................................................................... 390 44. PID CONFIGURATION MENU ......................................................................................................... 391 45. BRIDGE CRANE MENU ................................................................................................................... 405 46. DATE AND TIME MENU .................................................................................................................. 407 34.1. Overview.............................................................................................................................................................311 34.1.1. Command Sources .................................................................................................................................312 34.1.2. Speed/Torque REFERENCE Sources......................................................................................................314 34.1.3. Alternative Command and Reference Sources................................................................................317 34.1.4. Torque Limit Source .................................................................................................................................318 34.1.5. Remote/Local Mode ..............................................................................................................................318 34.2. How to Manage the Reference Sources ......................................................................................................319 34.3. List of Parameters C140 to C148 .....................................................................................................................321 35.1. Overview.............................................................................................................................................................324 35.1.1. START ..........................................................................................................................................................326 35.1.2. ENABLE (Terminal 15:MDI2) ....................................................................................................................327 35.1.3. RESET (Terminal 16:MDI3) ........................................................................................................................328 35.2. Factory-setting of the Digital Inputs ...............................................................................................................328 35.3. List of Parameters C149 to C188c and I006 ..................................................................................................329 36.1. Overview.............................................................................................................................................................349 36.1.1. When ES836 is NOT Used ........................................................................................................................349 36.1.2. When Using ES836 or ES913 ....................................................................................................................350 36.1.3. When Using Two Encoders .....................................................................................................................351 36.2. List of Parameters C189 to C199 .....................................................................................................................353 37.1. 37.2. Overview.............................................................................................................................................................357 List of Parameters C210 to C212 .....................................................................................................................358 38.1. Overview.............................................................................................................................................................360 38.1.1. DC Braking at Start and Non-condensing Function .........................................................................360 38.1.2. DC Braking at Stop ..................................................................................................................................362 38.1.3. DC Braking Command Sent from Terminal Board.............................................................................363 38.2. List of Parameters C215 to C224 .....................................................................................................................366 39.1. 39.2. 40.1. 40.2. 41.1. 41.2. Overview.............................................................................................................................................................368 List of Parameters C225 to C235 .....................................................................................................................371 Overview.............................................................................................................................................................375 List of Parameters C245 to C249 .....................................................................................................................378 Overview.............................................................................................................................................................381 List of Parameters C255 to C258 .....................................................................................................................381 42.1. Overview.............................................................................................................................................................383 42.2. Choosing the Characteristic Parameters .....................................................................................................384 42.2.1. IEC Class ....................................................................................................................................................384 42.2.2. Maximum Locked Rotor Time – Basic ..................................................................................................384 42.2.3. Maximum Locked Rotor Time – Enhanced .........................................................................................386 42.3. Thermal Protection Trip Delay .........................................................................................................................387 42.4. List of Parameters C264 to C274 .....................................................................................................................388 43.1. 43.2. 44.1. 44.2. 44.3. 44.4. 45.1. 45.2. 46.1. Overview.............................................................................................................................................................390 List of Parameters C275 to C278 .....................................................................................................................390 Overview.............................................................................................................................................................391 Operation and Structure of the PID Regulator ............................................................................................391 List of Parameters C285 to C294 .....................................................................................................................394 Keeping Fluid Level Constant (Example) ......................................................................................................402 Overview.............................................................................................................................................................405 List of Parameters C300 to C302 .....................................................................................................................405 Overview.............................................................................................................................................................407 5/482 iDrive 46.2. PROGRAMMING INSTRUCTIONS List of Parameters C310 to C316 .....................................................................................................................410 47. TIMED FLAGS MENU ...................................................................................................................... 413 48. SERIAL COMMUNICATIONS .......................................................................................................... 417 49. SERIAL LINKS MENU ...................................................................................................................... 420 50. FIELDBUS CONFIGURATION MENU ............................................................................................. 424 51. EXPANSION BOARD CONFIGURATION MENU ............................................................................ 433 52. PROFiDrive BOARD CONFIGURATION MENU .............................................................................. 434 53. DAYLIGHT SAVING TIME ............................................................................................................... 437 54. DATA LOGGER MENU .................................................................................................................... 440 55. EEPROM MENU............................................................................................................................... 442 56. ALARMS AND WARNINGS ............................................................................................................. 444 57. 58. CUSTOM PARAMETERS ................................................................................................................ 472 INDEX ............................................................................................................................................... 481 47.1. 47.2. 47.3. 48.1. 48.2. Overview.............................................................................................................................................................413 Examples .............................................................................................................................................................413 List of Parameters from C330 to C357............................................................................................................414 Overview.............................................................................................................................................................417 MODBUS–RTU PROTOCOL ................................................................................................................................417 49.1. Overview.............................................................................................................................................................420 49.1.1. Watchdog Alarms ...................................................................................................................................420 49.2. List of Parameters R001 to R013 ......................................................................................................................421 50.1. Overview.............................................................................................................................................................424 50.1.1. Alarm A070 (Communication Suspended) ........................................................................................424 50.2. List of Parameters R016 to R017 ......................................................................................................................424 50.3. Exchanged Parameters ...................................................................................................................................427 50.3.1. From the Master to the IDrive ................................................................................................................427 50.3.2. From the IDrive to the Master ................................................................................................................431 51.1. 51.2. 52.1. 52.2. 53.1. 53.2. 54.1. 54.2. 55.1. 55.2. 56.1. 56.2. 56.3. 56.4. 56.5. 56.6. 56.7. 6/482 Overview.............................................................................................................................................................433 List of Parameters R021 to R023 ......................................................................................................................433 Overview.............................................................................................................................................................434 List of Parameters R025 to R045 ......................................................................................................................434 Overview.............................................................................................................................................................437 List of Parametres R050 to R053 ......................................................................................................................437 Overview.............................................................................................................................................................440 List of Parameters R115 and R116 ...................................................................................................................440 Overview.............................................................................................................................................................442 List of Inputs I009 to I012 ...................................................................................................................................443 What Happens When a Protection Trips .......................................................................................................444 What To Do When an Alarm Trips ...................................................................................................................445 Alarm List .............................................................................................................................................................446 List of the DRIVECOM Alarm Codes ...............................................................................................................466 Warnings .............................................................................................................................................................468 Warning List.........................................................................................................................................................469 State List ..............................................................................................................................................................471 PROGRAMMING INSTRUCTIONS iDrive 0.2. Figures Figure 1: Menu Tree. ................................................................................................................................................................17 Figure 2: Navigation example...............................................................................................................................................18 Figure 3: Display/keypad. ......................................................................................................................................................25 Figure 4: Example of S ramps. ...............................................................................................................................................93 Figure 5: Speed profile without Rounding Off and with Rounding Off 2 (example). ..................................................94 Figure 6: Speed profile with Acceleration Reset - Yes to No (Example)........................................................................95 Figure 7: Speed Reference computing. ............................................................................................................................106 Figure 8: Torque Reference computing. ...........................................................................................................................108 Figure 9: Computing Speed Analog Reference from terminal board: AIN1. .............................................................110 Figure 10: Computing Inputs REF (1) and (2) (examples)...............................................................................................111 Figure 11: Computing REF Input (Example 3). ..................................................................................................................112 Figure 12: Prohibit Speed ranges. .......................................................................................................................................133 Figure 13: Speed Control (example). ................................................................................................................................136 Figure 14: Dual Parameterization function (example). ..................................................................................................138 Figure 15: Typical structure of the Analog Outputs. ........................................................................................................147 Figure 16: Structure of the Frequency Output. ................................................................................................................148 Figure 17: Curve (voltage; speed) implemented by AO1 (Example 1). .....................................................................151 Figure 18: Curve (voltage; speed) implemented by AO1 (Example 2). .....................................................................152 Figure 19: Curve (voltage; speed) implemented by AO1 (Example 3). .....................................................................152 Figure 20: Curve (voltage; speed) implemented by AO1 (Example 4). .....................................................................153 Figure 21: Curve (voltage; speed) implemented by AO1 (Example 5). .....................................................................154 Figure 22: Using Timers (example). .....................................................................................................................................166 Figure 23: PID Block Diagram. .............................................................................................................................................171 Figure 24: Permanent oscillation with Kpc critical gain. .................................................................................................172 Figure 25: Response to a system tuned with the method of Ziegler and Nichols. .....................................................173 Figure 26: Response to the step based on the value of Kp when Ti is kept constant...............................................174 Figure 27: Response to the step when Kp is too large. ...................................................................................................175 Figure 28: Response to the step based on the value of Ti when Kp is kept constant...............................................176 Figure 29: Response to the step when the values of Kp and Ti are too small. ...........................................................176 Figure 30: PID Sleep and Wake-up Mode when P237a is set to 1. ...............................................................................180 Figure 31: MDO block-diagram. .........................................................................................................................................188 Figure 32: DIGITAL Mode. .....................................................................................................................................................198 Figure 33: ANALOG Mode. ..................................................................................................................................................199 Figure 34: DOUBLE DIGITAL Mode. .....................................................................................................................................199 Figure 35: General structure of the parameterization of a digital output. .................................................................200 Figure 36: Digital output for speed thresholds (example). .............................................................................................202 Figure 37: Electromechanical brake command (example). ........................................................................................203 Figure 38: Block diagram of the virtual digital outputs (MPL). .......................................................................................230 Figure 39: Example of MPL functionality............................................................................................................................236 Figure 40: Carrier frequency (example). ...........................................................................................................................265 Figure 41: Equivalent circuit of the asynchronous machine. ........................................................................................272 Figure 42: Types of programmable V/f curves. ................................................................................................................273 Figure 43: Torque control with speed limit. .......................................................................................................................281 Figure 44: Current limit decreased based on the carrier frequency. ..........................................................................306 Figure 45: Selecting the command sources. ....................................................................................................................312 Figure 46: Selecting the source references. .....................................................................................................................317 Figure 47: Inputs that can be selected to implement control functions. ....................................................................324 Figure 48: Controlling Run and Direction when the STOP Input is not programmed. ...............................................333 Figure 49: Controlling Run and Direction when the STOP Input is programmed. ......................................................334 Figure 50: Using two encoders (example). .......................................................................................................................351 Figure 51: DCB Hold and DCB at Start. ..............................................................................................................................360 Figure 52: DCB at Start with VTC Control. .........................................................................................................................361 Figure 53: DCB at Stop..........................................................................................................................................................362 Figure 54: Manual DCB (Example 1). .................................................................................................................................363 Figure 55: Manual DCB (Example 2). .................................................................................................................................364 Figure 56: Manual DCB (Example 3). .................................................................................................................................365 Figure 57: Power Down (Example). ....................................................................................................................................369 Figure 58: Speed Searching (Example 1). .........................................................................................................................376 Figure 59: Speed Searching (Example 2). .........................................................................................................................377 Figure 60: Trip current drop depending on speed values..............................................................................................383 7/482 iDrive PROGRAMMING INSTRUCTIONS Figure 61: Set up of parameter C267 depending on the LRC/FLC ratio. ....................................................................386 Figure 62: Trip delay of alarm A075 based on the IEC Class. ........................................................................................387 Figure 63: Structure of the PID Regulator. .........................................................................................................................391 Figure 64: Reference source and feedback source selection. ....................................................................................392 Figure 65: PID ramp reference. ...........................................................................................................................................393 Figure 66: Details of the PID regulator structure. ..............................................................................................................393 Figure 67: Keeping fluid level constant (Example). .........................................................................................................402 0.3. Tables Table 1: Coding of Measures M031, M032. .........................................................................................................................61 Table 2: Coding of Measures M033, M034, M035. .............................................................................................................63 Table 3: Coding of Measures M036, M036a, M036b. ........................................................................................................63 Table 4: Coding of Measure M056. ......................................................................................................................................68 Table 5: Coding of Measure M056a. ...................................................................................................................................68 Table 6: Coding of Measure M056b. ...................................................................................................................................68 Table 7: Coding of Measure M061. ......................................................................................................................................69 Table 8: Data Logger connection status. ...........................................................................................................................74 Table 9: Coding of the functions assigned to the digital inputs. ....................................................................................75 Table 10: List of parameter P263 and Fire Mode Enable Password. ..............................................................................78 Table 11: Indexes corresponding to the different models (sizes) of the IDrive Drive...................................................79 Table 12: Voltage classes of the PD. ....................................................................................................................................79 Table 13: Fan control modes. ................................................................................................................................................80 Table 14: Coding for fan activation .....................................................................................................................................80 Table 15: List of parameters P000 to P003. ..........................................................................................................................82 Table 16: List of parameters P264 to P269. ..........................................................................................................................86 Table 17: Preset PID units of measure. .................................................................................................................................90 Table 18: Example of a Speed Ramp. .................................................................................................................................92 Table 19: List of parameters P009 to P033. ..........................................................................................................................96 Table 20: Parameters used for the Inputs for References Menu. ..................................................................................105 Table 21: Analog Input Hardware Mode. .........................................................................................................................109 Table 22: List of parameters P050 to P074a. .....................................................................................................................113 Table 23: List of parameters P080 to P100. ........................................................................................................................126 Table 24: List of parameters P080a ÷ P099a......................................................................................................................131 Table 25: List of parameters P105 to P108. ........................................................................................................................134 Table 26: List of parameters P115 to P121. ........................................................................................................................137 Table 27: List of parameters P125 to P152. ........................................................................................................................139 Table 28: List of parameters P155 to P173. ........................................................................................................................143 Table 29: Variables to be selected for the Analog and Frequency Outputs. ............................................................149 Table 30: Programming AO1 (0÷ 10V). ..............................................................................................................................151 Table 31: Programming AO1 (ABS 0 ÷ 10V). .....................................................................................................................151 Table 32: Programming AO1 (ABS 0 ÷ 10V). .....................................................................................................................152 Table 33: Programming AO1 (ABS 0 ÷ 10V). .....................................................................................................................153 Table 34: Programming AO1 (± 10V). ................................................................................................................................153 Table 35: List of parameters P176 to P215. ........................................................................................................................155 Table 36: List of parameters P216 to P229. ........................................................................................................................167 Table 37: Coding of P226: Timers assigned to digital inputs MDI 1÷4. ..........................................................................169 Table 38: List of parameters P236 to P260. ........................................................................................................................178 Table 39: List of parameters P436 to P460. ........................................................................................................................187 Table 40: Digital Output Mode. ..........................................................................................................................................189 Table 41: List of the selectable digital inputs and analog outputs...............................................................................190 Table 42: Test functions. .......................................................................................................................................................195 Table 43: MDO parameterization for PD Status OK. ........................................................................................................201 Table 44: MDO parameterization for drive Run OK. ........................................................................................................201 Table 45: MDO parameterization for speed thresholds. ................................................................................................202 Table 46: MDO parameterization for electromechanical brake command. ............................................................203 Table 47: MDO parameterization for the PWM function. ...............................................................................................204 Table 48: MDO parameterization for the Ready state of a PLC supervisor. ...............................................................205 Table 49: List of parameters P270 to P305. ........................................................................................................................206 Table 50: List of parameters P306 to P317. ........................................................................................................................221 Table 51: List of parameters P318 to P325. ........................................................................................................................225 8/482 PROGRAMMING INSTRUCTIONS iDrive Table 52: List of parameters P330 to P331. ........................................................................................................................228 Table 53: List of Programmable Measures for P330 ÷ P331. ...........................................................................................229 Table 54: Digital Output Modes. .........................................................................................................................................231 Table 55: Test functions. .......................................................................................................................................................232 Table 56: MPL parameterization for Dry Run Detection. ................................................................................................237 Table 57: MPL parameterization for Pipe Fill function. ....................................................................................................239 Table 58: List of parameters P350 to P385. ........................................................................................................................240 Table 59: Analog input hardware mode. .........................................................................................................................255 Table 60: List of parameters P390 to P399. ........................................................................................................................256 Table 61: Programmable “Motor Tune” functions. ..........................................................................................................262 Table 62: List of inputs I073 - I074........................................................................................................................................264 Table 63: Maximum value of the output frequency depending on the IDrive size. .................................................267 Table 64: List of parameters C001 to C004. ......................................................................................................................268 Table 65: Description of the parameters classified by motor. .......................................................................................271 Table 66: Motor ratings. ........................................................................................................................................................271 Table 67: Parameters of the equivalent circuit of the asynchronous machine.........................................................272 Table 68: Motor parameters used by control algorithms. ..............................................................................................272 Table 69: IFD control parameters for the connected motors........................................................................................274 Table 70: Parameters setting Slip Compensation (IFD Control). ...................................................................................275 Table 71: List of parameters C008 to C128. ......................................................................................................................277 Table 72: Equivalence between AC mains range and DC range. ..............................................................................279 Table 73: Parameters depending on the Drive Size and Model / Class 2T/4T / 1. .....................................................293 Table 74: Parameters depending on the Drive Size and Model - Class 2T/4T / 2. .....................................................295 Table 75: Parameters depending on the Drive Size and Model - Class 2T/4T / 3. .....................................................297 Table 76: Parameters depending on the Drive Size and Model - Class 2T/4T /4. ......................................................299 Table 77: Parameters depending on the Drive Size and Model - Class 5T/6T / 1. .....................................................301 Table 78: Parameters depending on the Drive Size and Model - Class 5T/6T / 2. .....................................................302 Table 79: Parameters depending on the Drive Size and Model - Class 5T/6T / 3. .....................................................304 Table 80: Parameters depending on the Drive Size and Model - Class 5T/6T / 4. .....................................................305 Table 81: List of parameters C043 to C135. ......................................................................................................................307 Table 82: Remote command inputs from serial link. .......................................................................................................313 Table 83: Reference inputs from serial link. .......................................................................................................................315 Table 84: List of parameters C140 to C148. ......................................................................................................................321 Table 85: Unprogrammable functions. ..............................................................................................................................325 Table 86: Terminals used for other inputs. .........................................................................................................................325 Table 87: Terminal board: Factory-setting. .......................................................................................................................328 Table 88: List of parameters C149 to C188c and I006 ....................................................................................................329 Table 89: Multispeed selection. ..........................................................................................................................................335 Table 90: Selected Speed reference. ................................................................................................................................336 Table 91: Multiramp selection. ............................................................................................................................................339 Table 92: Selected ramp. .....................................................................................................................................................339 Table 93: Motor selection.....................................................................................................................................................342 Table 94: Selection of the speed reference variation. ...................................................................................................343 Table 95: Variation of the selected speed reference. ...................................................................................................343 Table 96: Selection of PID Multireferences........................................................................................................................348 Table 97: List of parameters C189 to C199. ......................................................................................................................353 Table 98: Coding of C189. ...................................................................................................................................................354 Table 99: Coding of C199. ...................................................................................................................................................356 Table 100: List of parameters C210 to C212. ....................................................................................................................358 Table 101: List of parameters C215 to C224. ....................................................................................................................366 Table 102: List of parameters C225 to C235. ....................................................................................................................371 Table 103: List of parameters C245 to C249. ....................................................................................................................378 Table 104: List of parameters C255 to C258. ....................................................................................................................381 Table 105: Suggested values for the motor thermal time constant. ............................................................................384 Table 106: Typical datasheet for 4-pole, 50Hz-400V motors. .........................................................................................385 Table 107: List of parameters C264 to C274. ....................................................................................................................388 Table 108: List of parameters C275 to C278. ....................................................................................................................390 Table 109: Reference sources from serial link. ..................................................................................................................394 Table 110: List of parameters C285 to C294. ....................................................................................................................394 Table 111: List of parameters C300 to C302. ....................................................................................................................405 Table 112: List of Parameters C310 to C316......................................................................................................................410 Table 113: List of Parameters C330 ÷ C357 .......................................................................................................................414 9/482 iDrive PROGRAMMING INSTRUCTIONS Table 114: List of parameters R001 to R013. ......................................................................................................................421 Table 115: List of parameters R016 to R017. ......................................................................................................................424 Table 116: List of parameters R021 to R023. ......................................................................................................................433 Table 117: List of parameters R025 to R045. ......................................................................................................................434 Table 118: List of Parameters R050 to R053. ......................................................................................................................437 Table 119: List of parameters R115 and R116. ..................................................................................................................440 Table 120: Preset connections. ...........................................................................................................................................441 Table 121: List of programmable inputs I009 to I012. ......................................................................................................443 Table 122: List of the possible alarms. ................................................................................................................................446 Table 123: List of the DRIVECOM alarm codes ................................................................................................................466 Table 124: Warning list. .........................................................................................................................................................469 Table 125: State list. ...............................................................................................................................................................471 10/482 PROGRAM MMING INSTRUCTIO ONS iDrive e 0.4. How to Use thiis Manu ual 0. 4.1. O VERVIE EW er Manual (P Programming g Instructions)) provides an ny informatio on required tto setup and monitor the e This Use drives of the e IDrive seriess manufacturred by Lönne e Scandinavia AS SpA. Setup/monitoring may m be obtained using on ne of the follo owing option ns: • Disp play/keypad unit; • Serial link throug gh RS485 stan ndard port orr ES822 (isolatted optional serial board)) RS485/RS32;; • ES85 51 (optional Data Loggerr and commu unications bo oard). For the e instructionss on how to o use and re emote the display/keypa d ad unit, plea ase refer to the IDrive’ss Installation Instructions Manual. M y information sent to/from m the drive via v the displlay/keypad unit may be e Any obtained d also via seririal link using the RemoteD Drive softwarre applicatio on offered by y Lönne Scandinavia S ws the follo owing functions: image e AS. RemotteDrive allow acquisitio on, keypad simulation, oscilloscope functions a and multifun nction tester,, data log gger, table c compiler including history data, para ameter setup and data a reception-transmissio n-storage fro om and to a calculato or, scan func ction for the e n of the connected c drives d (up tto 247 drives may be e automatic detection connected). his manual provides our own ded dicated softw ware via seria al communic cation link. Th p any y You can alsso create yo information concerning addressing (A Address field d) and scaling g (Range field) for the drivve interfacin ng. 0. 4.2. S PECIALL A PPLIC ATIONS D EDICAT TED TO ID D RIVE D RIVES R ware is suppllied with the drives of the e IDrive series, that can be e used for pa articular applications. The e Special softw menu tree, the program mming mode and navigattion mode off the IDrive are used; para rameters or menus m will be e moved) whetther required/(not require ed) for the implemented application. a added/(rem The dedicated applications implem ment the mosst common automation applicationss, thus replac cing PLCs orr ey reduce to o a minimum m the electric c equipmentt required, thus ensuring g dedicated control boards, and the lower mainttenance costts. Such opera ating modes can be im mplemented through the e firmware updating u an nd/or through additionall interface bo oards. The following applications are curren ntly available e: Identifier NOTE Application A PD IDrive Driv ve (standard motor contro ol) PM IDrive - Mu ultipump PR IDrive - Re egenerative In order to install you ur applicatio on SW and update the firrmware packages of the e iDrive drive, d you c can use the e Remote Drive D softwa are provided d by Lönne e Scandin navia AS. Ple ease refer to the Remo oteDrive’s Usser Manual for detailed d instructio ons. g optional functionality is given in separate manuals co overing iDrive’s optionall Any detail concerning applicationss. 11/482 PROGRAMMING INSTRUCTIONS iDrive 0.4.3. M ENUS AND S UBMENUS This User Manual (Programming Instructions) is divided into different Menus. Their sequence is the same as their display sequence in the display/keypad and the RemoteDrive software. Programming parameters and Measure parameters are divided into: Mxxx Measures (always Read Only): Mxxx Range Active Address Function Drive representation (integer) Display on the display/keypad and the RemoteDrive (may be a decimal figure) plus unit of measure Type of control (IFD / VTC / FOC) the measure is related to ModBus address which the measure can be read from (integer) Measure description Pxxx Parameters (always R/W): Pxxx Range Default Level Address Control Function 12/482 Drive representation (integer) Display on the display/keypad and the RemoteDrive (may be a decimal figure) plus unit of measure Factory-setting of the Factory-setting of the parameter parameter (as displayed) (as represented for the drive) plus unit of measure User level (BASIC / ADVANCED / ENGINEERING) ModBus address which the parameter can be read from (integer) This optional field is displayed when a parameter is not active for all types of motor controls (IFD / VTC / FOC) Parameter description PROGRAMMING INSTRUCTIONS iDrive Cxxx Parameters (Read Only when the drive is running and the motor is operating; R/W when the drive is in stand-by or in Run, but the motor is stopped: see P003 in PASSWORD AND USER LEVEL MENU). Cxxx Range Drive representation (integer) Default Factory-setting of the parameter (as represented for the drive) Level Address Control Function Display on the display/keypad and the RemoteDrive (may be a decimal figure) plus unit of measure Factory-setting of the parameter (as displayed) plus unit of measure User level (BASIC / ADVANCED / ENGINEERING) ModBus address which the parameter can be read from/written to (integer) This optional field is displayed when a parameter is not active for all types of motor controls (IFD / VTC / FOC) Parameter description Rxxx Parameters (Read Only when the drive is in Run; R/W when the drive is in stand-by or in Run, but the motor is stopped: see P003 Condition required for changing C parameters in the PASSWORD AND USER LEVEL MENU). Rxxx Range Drive representation (integer) Default Factory-setting of the parameter (as represented for the drive) Level Address Control Function NOTE Display on the display/keypad and the RemoteDrive (may be a decimal figure) plus unit of measure Factory-setting of the parameter (as displayed) plus unit of measure User level (BASIC / ADVANCED / ENGINEERING) ModBus address which the parameter can be read from/written to (integer) This optional field is displayed when a parameter is not active for all types of motor controls (IFD / VTC / FOC) Parameter description Unlike Cxxx parameters, Rxxx parameters become active only after the drive has been switched off and switched on again, or after resetting its control board by pressing the RESET button for more than 5 seconds. 13/482 PROGRAMMING INSTRUCTIONS iDrive Ixxx Inputs. These are not parameters, but inputs (the values allocated to these inputs are not stored to nonvolatile memory. Ixxx value is always 0 when the drive is powered on). Ixxx Range Level Address Control Function Drive representation (integer) Display on the display/keypad and the RemoteDrive (may be a decimal figure) plus unit of measure User level (BASIC / ADVANCED / ENGINEERING) ModBus address which the input can be read from/written to (integer) This optional field is displayed when a parameter is not active for all types of motor controls (IFD / VTC / FOC) Input description NOTE Use the ESC key to enter the value of an Ixxx input. If the SAVE/ENTER key is used, W17 SAVE IMPOSSIBLE (warning) is displayed. NOTE When changing a Pxxx or Cxxx parameter via the display/keypad, you may activate its new value immediately (flashing cursor) or when you quit the programming mode (fixed cursor). Typically, numeric parameters immediately come to effect, while alphanumeric parameters have a delayed effect. NOTE When changing a Pxxx or Cxxx parameter via the RemoteDrive, the drive will immediately use the new parameter value. 0.4.4. A LARMS AND W ARNINGS The last part of this User Manual covers alarms (Axxx) and warnings (Wxxx) displayed by the drive: Axxx Description Event Possible cause Solution 14/482 PROGRAMMING INSTRUCTIONS 1. iDrive USING THE DISPLAY/KEYPAD UNIT 1.1. Overview This section contains several examples about navigating in the display/keypad unit and the UPLOAD and DOWNLOAD functions of the programming settings of the drive when using the keypad. More details about the keypad settings (contrast, backlight, etc.) are given in the section covering the display/keypad in the Installation Instructions Manual. Details about custom navigation in the root page, the measures in the Keypad page and the Root page and the custom unit of measure of the PID controller are given in the DISPLAY/KEYPAD MENU in this manual. When using the navigation “by menu” mode (P264 = BY MENU), the structure of the menu tree that can be explored using the display/keypad is described in the Menu Tree section. The complete tree structure is displayed, but the actual structure depends on the user level set in P001 and on the implemented programming. For example, if only motor 1 is programmed (C009=1), the menus relating to motors 2 and 3 will not be displayed (Motor 2/3 Configuration and Motor 2/3 Limit). Also, if the type of motor control is C010=IFD Voltage/Freq., the BRIDGE CRANE MENU will not be displayed. When P264 = Linear (linear navigation), the parameters displayed are no longer grouped into menus, and you can scroll through all parameters using the ▲ and ▼ keys. When P264 = Modified Pars. Only, only the parameters having different values than the factory settings are displayed, and you can scroll through all parameters using the ▲ and ▼ keys. The Navigation section shows how to use function keys to navigate through the parameters and to change parameter values (P264 = BY MENU). The function keys and their functionality are described below. 15/482 PROGRAMMING INSTRUCTIONS iDrive 1.2. Menu Tree MEASURES/COMMANDS PARAMETERS CONFIGURATION PRODUCT IDENTIFIER INVERTER OK M00=+0.00rpm M02=+ 0.00 rpm [MEA] PAR CF IDP INVERTER OK M00=+0.00rpm M02=+ 0.00 rpm MEA [PAR] CF IDP INVERTER OK M00=+0.00rpm M02=+ 0.00 rpm MEA PAR [CF] IDP INVERTER OK M00=+0.00rpm M02=+ 0.00 rpm MEA PAR CF [IDP] MEASURE MENU M Parameters Cannot be changed PARAMETERS MENU P Par. that can be changed when the motor is running CONFIGURATION MENU C-I-R Parameters can be changed when motor off PRODUCT MENU Language Selection and Inverter Data [PAR] PASSWORD AND ACCESS LEVEL [CFG] [MEA] PID REGULATOR [PAR] DISPLAY/KEYPAD [CFG] MODULATION FREQUENCY [MEA] [PAR] [CFG] MOTOR N.1 / 2 / 3 CONFIGURATION [MEA] MOTOR MEASURES DIGITAL INPUTS [MEA] RAMPS [PAR] REFERENCES [MEA] [MEA] [CFG] MOTOR N.1 / 2 / 3 LIMITS MULTISPEED [CFG] CONTROL METHOD PAR] PT100 TEMPERATURES [CFG] PID MULTIREFERENCES DIGITAL INPUTS [MEA] AUTODIAGNOSTICS [PAR] [MEA} PAR] REFERENCE VARIATION PERCENT [CFG] DATA LOGGER MEASURES DIGITAL INPUTS SETTINGS PAR] SPEED LOOP AND CURRENT BALANCE [CFG] DC BRAKING [PAR] [CFG] [MEA] [MEA] [CFG] PROHIBIT SPEED FAULT LIST “FOC” FIELD ORIENTED CONTROL POWER OFF LIST [PAR] ANALOG OUTPUTS AND FREQUENCY OUTPUTS [MEA] 16/482 INPUTS FOR REFERENCES [PAR] OUTPUTS AUTO TUNE ENCODER/ FREQUENCY INPUTS BRAKING UNIT MAINS LOSS [CFG] SPEED SEARCH [IDP] iDrive START-UP MENU Press ENTER to start [IDP] PRODUCT PROGRAMMING INSTRUCTIONS iDrive [PAR] [CFG] TIMERS [PAR] ALARM AUTORESET [CFG] PID PARAMETERS [PAR] PID2 PARAMETERS [PAR] THERMAL PROTECTION [CFG] MAINTENANCE TIME COUNTERS [CFG] DIGITAL OUTPUTS PID CONFIGURATION [PAR] AUXILIARY DIGITAL OUTPUTS [CFG] BRIDGE CRANE [PAR] PT100 MEASURE SETTINGS [CFG] DATE AND TIME [PAR] [CFG] FIELDBUS PARAMETERS TIMED FLAGS [PAR] VIRTUAL DIGITAL OUTPUTS [CFG] [PAR] [CFG] INPUTS FOR REFERENCES FROM ES847 SERIAL LINKS FIELDBUS CONFIGURATION [CFG] EXPANSION BOARD SETTINGS Figure 1: [CFG] PROFiDrive BOARD CONFIGURATION Menu Tree. [CFG] DAYLIGHT SAVING TIME [CFG] DATA LOGGER [CFG] EEPROM 17/482 PROGRAMMING INSTRUCTIONS iDrive 1.3 Navigation Figure 2: Navigation example. Keypa d Page MENU INVERTER OK M00=+0.00rpm M02=+ 0.00 rpm [MEA] PAR CF IDP SAVE ENTER ∧ ∨ SAVE ENTER ESC MEASURE MENU [MEA] ∨ ∨ [PAR] PASSWORD AND ACCESS LEVEL MOTOR MEASURES ∧ ES PARAMETERS MENU P Pars. that can be changed when the motor ∧ is running M Parameters Cannot be changed ∧ INVERTER OK M00=+0.00rpm M02=+ 0.00 rpm MEA [PAR] CF IDP ∧ ∨ [MEA] PID REGULATOR ∨ [PAR] DISPLAY/KEYPAD SAVE ENTER ESC Access to Ramps menu P009 Acceler. ∧ Ramp 1 → 10.00s Navigation within Ramps menu P010 Deceler. Ramp 1 SAVE ENTER → 10.00s Access to parameter modification P010 P010 Deceler. Ramp 1 ∨ ∨ → █ 10.00s Parameter modification P010 P010 Deceler. Ramp 1 → █ 20.00s If the ESC key is pressed to quit, the new parameter value will be acknowledged but not saved to non-volatile memory, and will therefore be lost at power off. Press SAVE/ENTER to confirm parameter alteration. 18/482 ∧ ∨ INVERTER OK M00=+0.00rpm M02=+ 0.00 rpm MEA PAR [CF] IDP SAVE ENTER ESC CONFIGURATION M. C-I-R Parameters Can be changed when motor off ∧ [CFG] ∨ INVERTER OK M00=+0.00rpm M02=+ 0.00 rpm MEA PAR CF [IDP] SAVE ENTER ESC PRODUCT MENU Language selection and Inverter data ∧ ∨ ∨ [IDP]iDrive Start-Up Menu Press ENTER to start AUTO TUNE ∧ ∧ ∧ ∨ [CFG] CONFIGURATION OF MOTOR N. 1 ∨ [IDP] PRODUCT PROGRAMMING INSTRUCTIONS iDrive 1.4. Parameter Modification Factory setting allows parameter modification. The parameters included in the Parameters Menu (Pxxx parameters) can be changed at any moment, whereas the parameters included in the Configuration Menu (Cxxx, Rxxx, Ixxx parameters) can be changed only when the motor is stopped. For safer operating conditions, the configuration parameters must be changed only when the drive is disabled (the ENABLE command is inactive): to do so, P003 must be set to 0 (stand-by only). To disable parameter changes, just change P000 (write enable) and save its new setting. P000 and P002 (password) are both factory-set to 1. If P000=0, an inexpert user cannot change parameter values, but if P000=1, an advanced user will be able to change the parameter values. For even safer operating conditions, you can change the password stored in P002; in that case, you must set P000 accordingly. NOTE Note down and keep at hand the value set in P002. Press the SAVE/ENTER key for parameter modifications; when a flashing cursor appears, press ▲ and ▼ to change the parameter value. Do one of the following to quit the editing mode: Press ESC → the parameter value used by the drive is changed and is maintained until the drive is shut down. Press SAVE/ENTER → the parameter value is stored to non-volatile memory and is not deleted when the drive is shut down. Inputs (Ixxx) cannot be saved to non-volatile memory and are automatically set to their default values. Rxxx parameters become active only when the drive control board has been reset by pressing the RESET key for a few seconds or by switching off the drive. 1.5. Programming the Root Page When the drive is turned on, the Root page is displayed as the starting page. The Root page allows you to access the main menus (Measures, Parameters, Configuration, Product ID) or to shift to the Keypad pages using the MENU key. Root page I M E N V E R T E R O K + + A [ 1 5 0 0 0 A R ] 0 . 0 . C F P 0 0 I r p m r p m D P You can customise the root page using parameter P265 (see the DISPLAY/KEYPAD MENU). 19/482 PROGRAMMING INSTRUCTIONS iDrive 1.6. Using the MENU Key The MENU key allows going to the next menu. From the Root page, press the MENU key to enable circular navigation. A N Y I N A P A G E ME N U Start-Up Menu [*] P E N T A [ I D P ] S I N U S S T A R T - U P ME N U P r e s s E N T E R t o s t a r t MENU Measures Page + 0 . 0 H + 0 . 0 + 0 . 0 0 r p + 0 . 0 0 r p → → → → MENU → → → R e f MENU → → → T MENU 20/482 KEYPAD Pages (if any…) + 0 . + 0 + 0 . 0 0 + 1 5 0 0 . 0 0 z A m m MENU 0 . r r H 0 p p z A m m …KEYPAD Pages (continued) [**] + 0 . 0 H + 0 . 0 + 0 . 0 0 r p + L i m 1 5 0 . 0 N z A m m Root Page I N V E R T E R O K + 1 5 0 0 . 0 0 r p m + 0 . 0 0 r p m ME A P A R C F [ I D P ] NOTE [*] The Start-Up menu is available only if P265=3:Start-Up (see the DISPLAY/KEYPAD MENU). NOTE [**] The Keypad pages are available only if the relevant references / feedback / limits are activated (see the CONTROL METHOD MENU and the PID CONFIGURATION MENU). PROGRAMMING INSTRUCTIONS iDrive 1.7. ESC Key Press the ESC key and to move up one level in the menu tree. In the example below, starting from parameter C015 in the MOTOR CONTROL MENU inside the Configuration Menu, you can move up to the Root page by pressing the ESC key. Page C015 Parameter of Configuration Menu, Motor 1 or ESC + ▲ C 0 1 5 F r e q u m o t o r → ▼ ▲ 5 C F 0 . 0 H z G ] C O N F I M O T or + N A L Startup Page of Configuration Menu, Motor 1 [ ESC N O M I e n c y 1 G U R O R A T I N . O N 1 ▼ Root page I M E N V E R T E R O K + + 1 5 0 A R [ 0 . 0 . C F 0 0 ] A P 0 0 I r p m r p m D P When using the SAVE/ENTER key to change a parameter including multiple fields (ESC> is displayed for the ESC key) press ESC to move to the next field. In the example below, 2 programmable fields are displayed for P269: P 2 K e y s : L O C / S C > E SAVE ENTER 6 9 D i s R E M N O a b l F e W D / R E N O V Press “SAVE/ENTER” to enter the editing mode P K E 2 6 9 D i s a b l e e y s : L O C / R E M F W D / R E S C > N O N O V ▼ Press “▼” to change the parameter value P K E 2 6 9 D i e y s : L O C / R E S C > Y E s M S a b F l e W D / R E N O V ESC Press “ESC” to move to the next field P K E 2 6 9 e y s : L O C / S C > D i s R Y E E M S a b F l e W D / R E N O V Press the following keys to quit the last page displayed: • ESC (new values are not saved to Eeprom) • SAVE/ENTER (new values are saved to Eeprom). 21/482 PROGRAMMING INSTRUCTIONS iDrive 1.8. RESET Key (Alarm and Control Board Reset) The RESET key is used to reset the drive after an alarm trips and the cause responsible for the alarm has been removed. Press the RESET key for more than 5 seconds to reset the control board and reinitiate it. This procedure may be useful when changes made to Rxxx parameters (which activate only after resetting the equipment) must immediately come to effect, with no need to switch off the drive. 1.9. TX/RX Key (Download/Upload from/to the Keypad) Use the keypad to perform the UPLOAD (parameters stored in the drive are copied to the keypad) and DOWNLOAD (parameters stored in the keypad are copied to the drive) functions. Press the TX/RX key to go to the UPLOAD page; press the TX/RX key again to toggle between the UPLOAD and DOWNLOAD pages. NOTE NOTE A Warning is displayed (one among W41 to W46) when trying to DOWNLOAD parameters to a drive whose SW Version, IDP, PIN or current/voltage classes are different from those of the drive previously used for parameter UPLOAD. In that case, download is not allowed. The DOWNLOAD function allows the parameters stored in the keypad to be copied to the drive. However, parameters are not stored to the non-volatile memory of the drive. To store the downloaded parameters to the non-volatile memory of the drive, go to the EEPROM menu and execute a “Save Work” command once the download procedure is complete. Otherwise, when power is lost, the parameters downloaded to the drive are lost. The TX/RX key is disabled under the following conditions: • no password is entered in P000 • the OPERATOR mode is activated with the MENU Key (P264b = OPERATOR) • the drive is running. In the example below, you can go to the UPLOAD page from any page (the upper LED starts flashing). If you then press the TX/RX key, you can go to the UPLOAD and DOWNLOAD pages. Any page A N Y P A G E TX/RX P i p t UPLOAD Page a r a me t e r U P L O A D n v e r t e r →k e y p a d : r e s s S A V E / E N T E R o c o n f i r m P k p t DOWNLOAD Page D O WN L O A D a r a m. e y p a d →i n v e r t e r : r e s s S A V E / E N T E R o c o n f i r m TX/RX TX/RX TX/RX Press SAVE/ENTER from the UPLOAD (/DOWNLOAD) page to confirm UPLOADING (/DOWNLOADING). The relevant LED will come on (fixed light). If the SAVE/ENTER key is not pressed for confirmation within 10 seconds from the selection of the UPLOAD (/DOWNLOAD) page, the starting page is automatically displayed. While UPLOADING, W08 UPLOADING (flashing warning) appears. If parameters are successfully uploaded, the following warning appears: W11 UPLOAD OK 22/482 PROGRAMMING INSTRUCTIONS iDrive If not, the W12 UPLOAD KO warning appears. Retry parameter upload. 23/482 PROGRAMMING INSTRUCTIONS iDrive While DOWNLOADING, W07 DOWNLOADING (flashing warning) appears. If parameters are successfully downloaded, the following warning appears: W09 DOWNLOAD OK If not, alarm A073 trips, and download must be retried before restarting the drive. 1.10. LOC/REM Key (Keypad Pages) To enable the Local/Remote operating mode (Remote sources are command and/or reference sources other than the display/keypad) press the LOC/REM key in the display/keypad, or use a digital input configured as Loc/Rem (see C180). NOTE The LOC/REM key is enabled when no digital input is configured as Loc/Rem, or when a digital input is configured as a Loc/Rem button (see C180a). The LOC/REM key is disabled when a digital input is configured as a Loc/Rem selector switch (see C180a). C148 sets whether toggling between Remote mode and Local mode is activated only when the drive is disabled, or whether toggling from Remote to Local mode does not affect the drive running conditions (bumpless commands), but it does affect the reference. You can also choose to keep running conditions and reference unaffected (any command is bumpless). For more details, please refer to the description of parameter C148 (CONTROL METHOD MENU). In LOCAL mode (the L-CMD and L-REF LEDs come on), when drive references and commands are sent via display/keypad, the Keypad page allows changing the given reference using the ▲ and ▼ keys (see P266 in the DISPLAY/KEYPAD menu). When not in LOCAL mode, press the MENU key to access the Keypad pages from the root page. Only the Keypad pages relating to the Keypad source will be displayed along with the Measure Keypad page. Example: Parameter C147 (Torque Limit Reference Selection) is set to Keypad. From the root page, press the MENU key once to display the Measure Keypad page, and press the MENU key twice to display the Keypad page relating to the torque limit and allowing changing the torque limit reference using the ▲ and ▼ keys. The Keypad page allows entering custom measures (see parameters P268b to P268e in the DISPLAY/KEYPAD menu). From the Keypad pages, press the SAVE/ENTER key to access the Keypad Help page containing any details about the measures displayed in the Keypad page. 1.11. SAVE/ENTER Key The SAVE/ENTER key allows selecting a lower level when navigating within the programming menus. It also allows changing a parameter value (to change a parameter value, press the SAVE/ENTER key from the page of the parameter you want to change). An example is given in Figure 2. From the Keypad pages, the SAVE/ENTER key allows accessing the Keypad Help page containing any details about the measures displayed in the Keypad page. 24/482 PROGRAMMING INSTRUCTIONS 1.12. iDrive Indicator LEDs on the Display/Keypad Eleven LEDs are located on the keypad, along with a 4-line, 16-character LCD display, a buzzer and 12 function keys. The display shows the parameter values, the diagnostic messages and the variables processed by the drive. The figure below shows the location of the indicator LEDs and their functionality. Figure 3: Display/keypad. REF LED - Green LIMIT LED - Yellow Reference for speed, frequency or torque = Motor acceleration No active limit Voltage or current limit active or Reference on BRAKE LED - Yellow Ordinary run RUN LED - Green Motor Either one is active: - DC current brake - IGBT braking - Ramp extension. not Motor powered, but no torque Motor powered and running L-CMD LED – Green Commands sent from sources other than keypad Commands sent both from keypad and terminal board Commands sent from keypad only ALARM LED - Red Inverter OK Alarm tripped TX and RX LEDs - Green RX TX No parameter transfer in progress L-REF LED - Green Reference sent from sources other than keypad Reference sent both from keypad and terminal Download: waiting Upload: waiting for confirmation Parameter downloading from keypad to inverter Parameter uploading from inverter to keypad FWD and REV LEDs – Green FWD REV Total reference = 0 Reference sent from keypad only KEY LED off LED flashing LED on (fixed) Total reference of frequency/ speed/torque is being sent and is positive Total reference of frequency/ speed/torque is being sent and is negative. NOTE See also the OPERATING AND REMOTING THE KEYPAD section in the IDrive’s Installation Instructions manual. 25/482 iDrive PROGRAMMING INSTRUCTIONS DESCRIPTION OF INPUT AND OUTPUT SIGNALS 2. The control board of the drives of the IDrive series is provided with the following inputs/outputs: • • • • • • 3 Analog Inputs (single-ended REF input, differential AIN1 & AIN2 inputs) that can be programmed as voltage/current inputs via SW1 DIP-switch (see Configuration DIP-switches in the IDrive’s Installation Instructions Manual). 3 Analog Outputs that can be programmed as voltage/current inputs via SW2 DIP-switch (see Configuration DIP-switches in the IDrive’s Installation Instructions Manual). 8 MDI Multifunction Digital Inputs; 3 of them (MDI6, MDI7, MDI8) are fast-acquisition inputs allowing acquiring frequency signal or encoder signals. MDI6 can be used to acquire a frequency signal called FINA; if used in conjunction with MDI7, it also allows acquiring a push-pull encoder signal called Encoder A. MDI8 can be used to acquire a frequency input called FINB (this avoids acquiring encoder B via ES836 or ES913 option board). 4 MDO Multifunction Digital Outputs; MDO1 is a Push-pull output, MDO2 is an Open Collector output and MDO3-4 are relay outputs. Electrical ratings of the control board inputs/outputs are given in the IDrive’s Installation Instructions Manual. When programming: • Analog Inputs, see the INPUTS FOR REFERENCES MENU • Analog Outputs, see the ANALOG AND FREQUENCY OUTPUTS MENU • Digital Inputs, see the DIGITAL INPUTS MENU • Digital Inputs used as Frequency/Encoder Inputs, see the ENCODER/FREQUENCY INPUTS MENU • Multifunction Digital Outputs, see the DIGITAL OUTPUTS MENU CAUTION The drive is factory-set with the REF input configured as 0-10V and AIN1-AIN2 inputs configured as 4-20mA. SW1 dip-switches, which are located on the control board, must be set as follows: ON SW1 1 26/482 2 3 4 5 PROGRAMMING INSTRUCTIONS 3. iDrive REFERENCES AND FEEDBACKS The drive references are the following: • Main speed/torque reference • Speed/torque limit reference • PID reference • PID feedback 3.1. Main Speed/Torque Reference If a speed control (e.g. C011 = Speed for Motor 1) is used, the main reference is a speed reference, while if a torque control is used (e.g. C011=Torque or C011=Speed for Motor 1, but the digital input is closed for the Slave programmed with C170), the main reference of the drive is a torque reference. The main reference can be one of the following: • Analog/digital inputs programmed as sources (see parameters C143-C146 in the CONTROL METHOD MENU) • PID output if C294 PID Action = Reference • Digital inputs programmed as Multispeed (see MULTISPEED MENU) only when the main reference is a speed reference. 3.2. Speed/Torque Limit Reference If a speed control is used (e.g. C011 = Speed for Motor 1) and a VTC or FOC algorithm is used, you can program a source as an external torque limit (see parameter C147 in the CONTROL METHOD MENU). If a torque control is used and an external speed limit has been set up (e.g. C011 = Torque with Speed Limit for Motor 1) and a FOC algorithm is used, you can program one source as an external speed limit (see parameter C147 in the CONTROL METHOD MENU). 3.3. PID Reference If the internal PID regulator is enabled (C291 different from Disabled), its reference is given by default by the sum of the three sources programmed as references (see parameters C285-C287 in the PID CONFIGURATION MENU). Different types of PID reference control (Two PIDs and 2-zone mode) are available based on the setting in parameter C291a (PID Control Mode). 3.4. PID Feedback Reference The PID feedback by default is the sum of the three sources programmed as feedback (see parameters C288C290 in the PID CONFIGURATION MENU). Different types of PID feedback control (Two PIDs and 2-zone mode) are available based on the setting in parameter C291a (PID Control Mode). 27/482 iDrive 4. PROGRAMMING INSTRUCTIONS PROGRAMMABLE FUNCTIONS 4.1. Multimotor The IDrive drive provides 3 separate sets of parameters allowing configuring three control algorithms for 3 types of motors: • C009 Number of configured motors =2 • C173 Digital input for Motor 2 = MDI6 When MDI6 is open, the parameters relating to Motor 1 are used for the motor control; when MDI6 is closed, the parameters relating to Motor 2 are used for the motor control (see the MOTOR CONTROL MENU and the MULTISPEED MENU). 4.2. Voltage/Frequency Pattern When using a Volt/Freq IFD control algorithm (e.g. C010 = V/F IFD for Motor 1), you can select different types of V/f patterns (see the V/f Pattern (IFD Only) section). 4.3. Slip Compensation When using a Volt/Freq IFD control algorithm (e.g. C010 = V/F IFD for Motor 1), you can set the slip compensation function for a more accurate speed control (see the Slip Compensation (IFD Only) section). 4.4. Speed Searching When using a Volt/Freq IFD control algorithm (e.g. C010 = V/F IFD for Motor 1), you can set the speed searching function for the motor speed of rotation, which is useful when the drive controls a motor which is already running (as for motors connected to fans). See the SPEED SEARCHING MENU for more details. 4.5. Controlled Stop in Case of Power Failure (Power Down) See the POWER DOWN MENU to set a controlled stop in case of power failure. 4.6. DC Braking When using a Volt/Freq IFD or Vector Torque VTC control algorithm, you can set DC braking at start or at stop. The DCB Hold function can be set for the Volt/Freq IFD function. See the DC BRAKING MENU for more details. 4.7. Motor Thermal Protection The Motor Thermal Protection function protects the motor against possible overloads. This function can be obtained via a PTC acquired in AIN2 analog input—up to 6 PTCs can be series-connected—or it can be a software protection implemented through an algorithm reproducing the motor thermal image. See the MOTOR THERMAL PROTECTION MENU for more details. For more details about using AIN2 input, please refer to the IDrive’s Installation Instructions Manual. 28/482 PROGRAMMING INSTRUCTIONS iDrive 4.8. Prohibit Speeds Prohibit speeds are speed ranges corresponding to mechanical resonance frequencies. They prevent the drive from running at the preset speed ranges. See the PROHIBIT SPEED MENU for more details. 4.9. Digital PID Regulator The IDrive drive is provided with a digital PID (proportional, integral, derivative) regulator that can be used to implement the following: • Analog output • Main reference of the drive (Speed/Torque reference) • Correction of the main reference • Correction of the output voltage (only for Volt/Freq IFD control) See the PID PARAMETERS MENU and the PID CONFIGURATION MENU for more details. 4.10. Bridge Crane Application For lifting applications, such as a bridge crane, it may be useful to consider the actual time required to release the safety electromechanical brake (the delay between the electrical command and the actual opening of the brake) and the closure of the electromechanical brake. For a detailed description of the benefits offered by the parameters relating to lifting applications, see the BRIDGE CRANE MENU. 4.11. Setting Two Alternative Command Sources and Reference Sources You can set a digital input as a selector switch allowing selecting two alternative control sources and reference sources. Example: A selector switch is required to select control mode B (the drive references and commands are sent via fieldbus) and control mode A (the drive reference is sent via AIN1 analog input and commands are sent via keypad). The following parameters shall be set up accordingly: C179 MDI for source selection= MDI6 C140 Selection of control source n. 1 = Keypad C141 Selection of control source n. 2 = Fieldbus C143 Selection of reference n. 1 = AIN1 C144 Selection of reference n. 2 = Fieldbus When MDI6 digital input in the terminal board is open (terminal 19), the command sources and reference sources n. 1 are selected (Keypad and AIN1 analog input, control mode A). When MDI6 is closed, the command sources and reference sources n. 2 are selected (Fieldbus, control mode B). CAUTION In the example above, if C179 = Disable, the OR logic for the Keypad and Fieldbus is considered, whereas the Fieldbus and AIN1 control sources are considered as summed up. See also parameter C179 in the DIGITAL INPUTS MENU. 29/482 PROGRAMMING INSTRUCTIONS iDrive 4.12. Fire Mode When the digital input programmed as FIRE MODE is activated, all the protecting functions of the drive are ignored, so that no alarm trips when the drive is operating. CAUTION NOTE The Fire Mode function must be used only when it is strictly necessary, such as in fire pumps, to protect human lives. This function must never be used to prevent alarms from tripping in domestic or industrial applications. To activate the parameters relating to the Fire Mode, enter the Password in the PRODUCT MENU . This Password is provided by Lönne Scandinavia AS’s Service Department. The drive Serial Number is required (see the Serial Number parameter in the PRODUCT MENU ). The following parameters can be accessed only after entering the Password enabling the Fire Mode: • P032 Acceleration Ramp in Fire Mode (see the RAMPS MENU) • P033 Deceleration Ramp in Fire Mode (see the RAMPS MENU) • P099 Speed Fire Mode (see the MULTISPEED MENU) • C186 MDI Enabling Fire Mode (see the DIGITAL INPUTS MENU) The Fire Mode is enabled when closing the MDI set through C186. The drive will use the speed reference set in P099 and the ramp times set in P032, P033. All alarms will be ignored, except for the following: A041 A044 A048 A050 A051 A053 IGBT FAULT Side A OVERLOAD SW OVER VOLTAGE IGBT FAULT A OVERLOAD HW A PWMA Not ON IGBT Hardware Side A, general alarm Software Overcurrent DC-bus voltage exceeding Vdc_max Hardware Fault from IGBT Drive, side A Hardware Overcurrent, side A Hardware Failure, Side A IGBT cannot be fired Control Board Failure When the Fire Mode is active, innumerable alarm autoresets are automatically enabled. CAUTION 30/482 If an asterisk (*) appears next to INVERTER OK on the display, the product guarantee is no longer valid. The asterisk appears if at least one condition requiring the activation of a protection feature occurs when the inverter is running in Fire Mode. PROGRAMMING INSTRUCTIONS 5. iDrive PROGRAMMING EXAMPLES 5.1. Overview This section illustrates some programming examples for particular functions of the IDrive drive. Flowcharts are used for easier reference. For any detail concerning individual parameters, see the relevant sections in this manual. 5.2. Programming a Reference Speed/ Torque Flowchart A Speed/Torque Reference PID PID Ref./Fdb Flowchart B 31/482 PROG GRAMMING G INS STRUCTIONSS iDrive FLOWCHARTT A Setting P00 00 Write Enab ble P001 = Eng. (User Level) Se lecting th he Referen nce Sourc ces In the Motor 1 Config guration men nu, select the e type ed/torque re eference (C0 011). The Control C of spee Method menu includ des the parrameters sele ecting e. the referrence source You can n set up to fo our sources, which w are sum mmed up to each e other.. For speed d control, and a if referenc ces are to be e sent also from digital inputs, see the Multispeed M m menu. Forcin ng the Refference So ources Sources: REF AIN1 AIN2 Pulsse Input (MD DI8) Encoder Inpu ut Ref Analog Input I AIN1 Analog g Input AIN2 Analog g Input Frequency In nput Enco oder The refe erence scaling is obttained through tthe parameters included in the Input Refference men nu. Each sou urce is assigned to a parame eter setting itts min. value and max. value e for the min../max. orque refe erence of speed/to the connecte ed motor (e.g. Motor 1 speed s reference e: C028 for min. speed, C029 for max. sspeed. Torque re eference: C047 forr min. torque, C048 for max. t ) 32/482 Source es : Serial Link L link us Fieldbu Keypa ad display y/keypad Preset Speed Re eference from m serial Re eference from m fieldbus Re ef. from Re eference from m digital inp put No refere ence scaling g is require ed. Speed referencess are expre essed in rpm m, torque referencess are expresssed as a pe ercentage of the mo otor rated torrque. Saturattion of the reference values dep pends on M Min. Speed and Ma ax. Speed parameters rs (speed control), and on Miin. Torque and Max. ( con ntrol). (E.g. Torque parameters (torque peed: C028 fo or min. speed d, C029 for Motor 1 sp max. spee ed; Motor 1 torque: C0447 for min. torque, C0 048 for max. torque) t PROGRAM MMING INSTRUCTIO ONS iDrive e FLOWCHARTT B Settiing P000 Write e Enable P001 = Eng. (User ( Level) Sellecting the Referen nce/Feed dback The e PID Confiiguration me enu includess the e parame eters sele ecting the e refference/feed dback source e. Yo ou can set up p to three so ources, which h are e summed up p to each other. Forc cing the Referenc ce/Feedba ack So ources Sou urces: REF N1 AIN AIN N2 Pulsse Input Enc coder Ref Analog Input g Input AIN1 Analog AIN2 Analog g Input Frequency Input (MDI8) coder Input Enc The re eference sca aling is obtain ned through the param meters includ ded in the Re eference me enu. Each source is assigned to o a parame eter settin ng its min. va alue and ma ax. value for the dback value e. min./max. PID Refference/Feed meters menu. See the PID Param P P245 Min., P2 246 Max. Referrence Feedback P P247 Min., P2 248 Max. Sources : Referen nce from seria al link Serial Link Fieldbus Referen nce from field dbus Keypad Ref. from m display/ke eypad Feedback reference r on nly : Iout Output current Vout Output voltage Vdc DC bus voltage Pout Output power No N reference e scaling is required. References R are a expressed d as a perce entage. As a feedback reference, ou utput currentt (Iout), output voltage (Vout), DC bus b voltage (Vdc) are available, which w refer (as full-sc cale values)) to the following: Rated R curren nt of the se elected mottor (Mot.1 C018) C Rated R voltag ge of the se elected mottor (Mot.1 33/482 PROGRAMMING INSTRUCTIONS iDrive EXAMPLE The speed of a motor is to be controlled via a 0 ÷ 5 V analog input. Speed range is 0 ÷ 1500 rpm; two digital inputs are available to increase three speed values with steps of 100rpm. Setting the min. and max. speed: The parameters for the motor min./max. speed are C028 = 0 rpm, C029 = 1800 rpm. Setting the analog reference: Default setting: the analog reference is sent from REF input (C143 = REF). The speed range for the analog input must be 0 ÷ 1500 rpm. Default setting in the INPUTS FOR REFERENCES MENU for REF analog input: P050 = 3: 0 –10 V Type of reference for REF input P051 = 0.0 V Min. value for REF input P052 = 10.0 V Max. value for REF input P052 is the voltage value for REF input for a speed reference of 1800rpm (C029) For a speed reference of 1500rpm with 5 V, P052 is to be set as follows: (Max. speed REF): (5 V) = (C029): (Vx) Vx = 5 V *1800rpm /1500rpm = 6 V If P052 = 6V, a speed reference of 1500rpm is set for REF with 5V. Setting the reference from digital inputs: Default setting: two digital inputs for multispeed values. Digital Inputs Menu: C155 = MDI4; C156 = MDI5 Depending on the status of digital inputs MDI4 and MDI5: MDI4 MDI5 Multispeed 0 0 0 1 0 1 0 1 2 1 1 3 In the MULTISPEED MENU menu, set the speed steps as follows: P080 = 1: Sum Speed P081 = 100rpm Multispeed 1 P083 = 200rpm Multispeed 2 P085 = 300rpm Multispeed 3 P080 → Multispeed function: the selected multispeed is summed up to the reference for the analog input. P081, P083, P085 are the steps depending on the selected multispeed for digital inputs MDI4, MDI5. 34/482 PROGRAM MMING INSTRUCTIO ONS iDrive e 5.3. Configu uring th he Exterrnal Torrque Lim mit Setting P0 000 Write Enable P001 = Eng. (Accesss Level) Sele ecting the Referenc ce Sourc ce The Con ntrol Method menu conta ains parame eter C147 for the selection n of th he torque limit source. Forrcing the Reference R e Sourc ces Sourc ces: REF AIN1 AIN2 Pulse Input Encod der EF Analog Inp put RE AIN1 Analog In nput nput AIN2 Analog In Frrequency Inp put (MDI8) Encod der Input The re eference sca aling is obtained through h the param meters includ ded in the Reference R me enu. Each source is assigned to o a param meter ng its min. va alue and ma ax. value forr the settin min. /max. torqu ue of the co onnected m motor (e.g. Motor 1: C0 047 for min. torque, t C048 8 for max. torque). The to orque ramp set in param meters P026- P P027 of the Ramps menu is assigned to the limit torqu ue reference.. Sources: Serial Link Fieldbus Keypad Referen nce from seria al link nce from field dbus Referen m Ref. from display//keypad No reference sca aling is required. es are e expressed Reference as a percentag ge of the m motor rated torque. Saturation of the reference values o min./maxx. torque parrameters depends on (e.g. Moto or 1: C047 fo or min. torqu ue, C048 for max. to orque). e ramp set iin paramete ers P026The torque P027 of the e Ramps me enu is assigne ed to the limit torque e reference. 35/482 PROG GRAMMING G INS STRUCTIONSS iDrive 5.4. Configu uring th he Feedb back fro om Enc oder Setting P P000 Write En nable P001 = Eng. (Acce ess Level) Settting the Sp peed Feedbac ck In the M Motor Control menu, set C012 a as a speed fe eedback from Encode er. Selec cting the Encoder E ENCODER A Push-Pu ull, single-end ded 24V en ncoder connec cted to digita al inputs MDII6 and MDI7. nu, do NOTE: In the Digital Inputs men not sett any function for MDI6 6 and MDI7 In the Encoder/Freq quency Inp put menu, set the source for Encoderr A edback: set C189 [A=FFBK speed fee B=NO] (if also a encoder B or frequen ncy input FIN B are ussed, see tthe f C189 in tthe programmiing options for Encoder/Frrequency Inp put section). Set the number of pls/rev p for tthe encoder being used d (parame eter EN NCODER B Encoder acqu uired via opttion board S836 (see e the IInstallation ES In nstructions manual for the Configuration C of the jumpe er and the dip-switches d for the enco oder type and a supply) In n the Encod der/Frequenc cy Input me enu, se et the sou urce for Enc coder B spe eed fe eedback: se et C189 [A= =NO B=FBK]] (if also a encoder A or freque ency input FIN NA are a used, see e programm ming options for C189 C in the Encoder/Frrequency Input se ection). Set the number of pls/rev ffor the encoder being b used (p parameter C1191) Ch hecking th he Chec ck to see if th he encoder iss properly co onnected. CAUTTION: the mo otor must starrt running. In th he Autotune menu, set I073=Encode er Tune and d close the enabling conta act of the drive d (MDI2). When autottune is over, one of the following messsages is displa ayed: •W31 1 Encoder Ok (encoder d direction ma atches with the motor dirrection of rotation) ers in the 59 Encoder Fault F (wrong g encoder re eading: check paramete •A05 Enco oder/Frequen ncy Input me enu and check wiring. If encoder B is used, chec ck the config guration of th he dip-switch hes in the encoder board d and the confiiguration of the t jumper se electing the encoder e supply mode.) When n performing g the Autottune functio on, the encoder signal used as f db k i t ti ll t d( C199) 36/482 PROGRAM MMING INSTRUCTIO ONS iDrive e 5.5. Configu uring a Referen nce from m Enco der SSetting P000 W Write Enable P001 = Eng g. (Access Lev vel) See flowcharrt A for the e referenc ce selecttion and sset the encoder as the refere ence sourrce Selectting the Encoder EN NCODER A P Push-Pull, sing gle-ended 24V V encoder conn nected to dig gital inputs MDI6 M and MDII7. NOTE: IIn the Digital Inputs menu u, do not set any function for f MDI6 and MDI7. In the Encoder/Fre equency Input menu, se t urce for Enco oder A spee ed reference e: the sou set C18 89 [A=REF B= =NO] (if also encoder B o r frequency input FIN B are used, see e amming opttions for C189 C in the e progra Encode er/Frequency Input sectio on). Set the e number off pls/rev for the encode er being u used (param meter C190). ENCODER B Encoder acquired a with h option board d ES836 (see e the Installatio on Instruction ns manual fo or the configu uration of the e jumper an nd the dip-sw witches for the e In the e Encoder/Frrequency Inp put menu, se et the sourc ce for Encode er B speed re eference: sett C189 [A=NO B= REF] (if also encod der A or frequency ogramming options o input FIN A are ussed, see pro for C189 C in the Encoder//Frequency Input sectio on). Set th he number of pls/rev for tthe encoder being used (parameter C191). Checkin ng the Reference If the e sign for the rreference fro om encoder is not correct, you should re everse it by setting C199 =[ = FBK XX REF YES ]. 37/482 PROGRAMMING INSTRUCTIONS iDrive 6. START-UP MENU 6.1. Overview For easier startup of the IDrive drive, you can activate the Start-Up Menu. The Start-Up Menu is a wizard allowing programming the main parameters for the connected motor and the parameters for PID control. The parameters in this menu are the same as described in the FIRST STARTUP section. The Start-Up Menu is displayed when the IDrive drive is first started. The Start-Up Menu can be reactivated at any time. To do so, set P265 in “Start Up” mode (see the DISPLAY/KEYPAD MENU) and power on the IDrive drive again. The following is the root page of the Start-Up menu: [ I D P ] S I NU S P E N T A S T A R T - UP ME NU P r e s s E N T E R t o s t a r t Press ENTER to enter the wizard. Before entering the control parameters, you are asked to choose a dialogue language: P 2 6 3 L a n g u a g e →@ @ @ @ @ @ @ @ @ @ @ @ @ @ @ then you are asked to choose the display mode of the Start Up Menu: Whe S t a a c t →@ @ n d o r t - U i v a t @@@@ e s t he p Me n u e ? @@@@@@@@@ Choose one of the following: 1 2 3 4 : : : : EV E ON L N EX N E V R Y S T A R T - U P Y N OW T S T A R T - U P E R If you select “EVERY START–UP”, the wizard appears whenever the IDrive drive is powered on; if you select “ONLY NOW”, you can scroll through the menu and the wizard is disabled as soon as you quit the menu; if you select “NEXT START–UP”, the menu is displayed only when the IDrive drive is next started up; if you select “NEVER”, the Start-Up menu is disabled. 38/482 PROGRAMMING INSTRUCTIONS iDrive Parameters included in the Start-Up menu: Parameter Description C008 Rated mains voltage Visibility C010 Type of control algorithm C012 Speed feedback from encoder [only if FOC is active] C013 Type of V/f pattern [only if IFD is active] C015 Rated motor power C016 Rated motor rpm C017 Rated motor power C018 Rated motor current C019 Rated motor voltage C021 No-load current of the motor C028 Min. motor speed C029 Max. motor speed C034 Voltage preboost P009 Acceleration ramp time P010 Deceleration ramp time C043 Current limit while accelerating [only if IFD is active] C044 Current limit at constant rpm [only if IFD is active] C045 Current limit while decelerating C048 Torque limit C189 Encoder operating mode [only if IFD is active] [only if VTC/FOC are active] [only if FOC is active] C190 Encoder A pls/rev [only if FOC is active] C191 Encoder B pls/rev I073 Autotuning selection I074 Motor tuning selection [only if FOC is active] [only if VTC/FOC are active] [only if VTC/FOC are active] C265 Motor thermal protection C267 Motor thermal time constant [only if FOC is active] [only if IFD is active] [only if protection is active] After setting the last parameter and moving the cursor forward, the following page will appear: P t D t r e s s U P A R R OW o qu i t OWN A R R OW o c o n t i n u e Press ▲ to quit the Start-up menu. The default page of the system will be displayed. 39/482 PROGRAMMING INSTRUCTIONS iDrive 7. FIRST STARTUP For the signal wiring and power wiring, please refer to the IDrive’s Installation Instructions manual. Parameter programming is detailed in the START-UP MENU. 7.1. “IFD” Control Algorithm iDrive drives are factory set with the IFD (C010) control algorithm, allowing the first startup of the equipment. The default functions of the drive terminals are given in the table below. For more details, please refer to the IDrive’s Installation Instructions manual. 1) Wiring: Follow the instructions stated in the “Caution Statements” and “Installation” sections (Installation Instructions Manual). 2) Power on: Power on the drive and do not close the link to the START input to prevent the motor from running. 3) Parameter Access parameter P000 (Key parameter) and set its code (default value: 00001). Use the ESC, ▲,▼ and SAVE/ENTER keys to access the programming modification: parameters. Also refer to the Menu Tree. 4) Supply voltage: Set the real supply voltage for the drive. You can set either mains voltage range or the DC supply stabilized by a Regenerative IDrive drive. To set the type of power supply for the drive, access the MOTOR CONTROL MENU and set configuration parameter C008 to the value corresponding to the installation concerned. 5) Motor parameters: Set C010 (Control Algorithm) as IFD Voltage/Frequency; set the motor ratings as follows: - C015 (fmot1) rated frequency C016 (rpmnom1) rated rpm C017 (Pmot1) rated power C018 (Imot1) rated current C019 (Vmot1) rated voltage C029 (Speedmax1) max. allowable speed. For loads with square torque with respect to the rpm (centrifugal pumps, fans, etc.), set C034 (preboost1) to 0%. Press SAVE/ENTER each time a new parameter value is set. 6) Autotune: For the IFD control algorithm, the Autotune function is not necessary but is always recommended. First remove the ENABLE command, then access the AUTOTUNE MENU and set I073 [1: Motor Tune] and I074 = [0: All Ctrl no rotation]. Use the ESC key to accept changes. Close the ENABLE command and wait until tune is complete (Warning “W32 Open Enable” is displayed). The drive has computed and saved the values for C022 (stator resistance) and C023 (leakage inductance). If alarm “A097 Motor Wires KO“ trips, check the motor wiring. If alarm “A065 Autotune KO” trips, this means that the ENABLE command has opened before autotune was complete. In this case, reset the drive sending a command from terminal MDI3, or press the RESET key in the display/keypad and perform the autotune procedure again. 7) Overload: 40/482 Set parameters in the LIMITS MENU depending on the max. desired current. PROGRAMMING INSTRUCTIONS 8) Startup: iDrive Activate the ENABLE input (terminal 15) and the START input (terminal 14) and send a speed reference: the RUN LED and REF LED will come on and the motor will start. Make sure that the motor is rotating in the correct direction. If not, select the Engineering Level (P001) and set parameter C014 (Phase Rotation) to [1:Yes], or open the ENABLE and START inputs, remove voltage from the drive and, after waiting at least 5 minutes, reverse two of the motor phases. 41/482 PROGRAMMING INSTRUCTIONS iDrive 9) Possible failures: If no failure occurred, go to step 10. Otherwise, check the drive connections paying particular attention to supply voltages, DC link and input reference. Also check if alarm messages are displayed. In the MEASURES MENU, check the reference speed (M001), the supply voltage to the control section (M030), the DC link voltage (M029), and the condition of control terminals (M033). Check to see if these readouts match with the measured values. 10) Additional parameter modifications: When parameter P003 = Standby Only (condition required for changing C parameters), you can change Cxxx parameters in the CONFIGURATION menu only when the drive is DISABLED or STOPPED, whereas if P003 = Standby + Fluxing, you can change Cxxx parameters when the motor is stopped but the drive is enabled. Before changing any parameters, remember that the correct code for parameter P000 must be previously set up. You can write down any custom parameters in the table provided on the last pages of this Programming Manual. 11) Reset: If an alarm trips, find the cause responsible for the alarm and reset the drive. Enable input MDI3 (terminal 16) for some time, or press the RESET key on the display/keypad. NOTE 42/482 When the IFD control algorithm is used, only speed references can be set up. PROGRAMMING INSTRUCTIONS iDrive 7.2. “VTC” Control Algorithm 1) Wiring: Follow the instructions stated in the “Caution Statements” and “Installation” sections in the IDrive’s Installation Instructions Manual. 2) Power on: Power on the drive and do not close the link to the START input to prevent the motor from running. 3) Parameter modification: Access parameter P000 (Key parameter) and set its code (default value: 00001). Select the Engineering access level setting P001= Eng. Use the ESC, ▲,▼ and SAVE/ENTER keys to access the programming parameters. Also refer to the Menu Tree. 4) Supply Set the real supply voltage for the drive. You can set either mains voltage range or the DC supply voltage: stabilized by a Regenerative IDrive drive. To set the type of power supply for the drive, access the MOTOR CONTROL MENU and set configuration parameter C008 to the value corresponding to the installation concerned. 5) Motor Set C010 (Control Algorithm) as VTC Vector Torque Control. Set the motor ratings as follows: parameters: - C015 (fmot1) rated frequency - C016 (rpmnom1) rated rpm - C017 (Pmot1) rated power - C018 (Imot1) rated current - C019 (Vmot1) rated voltage - C029 (Speedmax1) max. speed desired. Also set C022 (resistance of one stator phase for a star connection or one third of one phase resistance for a delta connection) and C023 (stator leakage inductance of one phase for a star connection or one third of the leakage of one phase for a delta connection). The value for C022 corresponds to half the resistance value measured with an ohm-meter between two phases of the motor. If values to be set for C022 and C023 are not known, motor autotune is required (see step 6), otherwise, go to step 7. Press SAVE/ENTER each time a new parameter is set. 6) Autotune: First remove the ENABLE command, then access the AUTOTUNE MENU and set I073 [1: Motor Tune] and I074 = [0: All Ctrl no rotation]. Use the ESC key to accept changes. Close the ENABLE command and wait until tune is complete (Warning “W32 Open Enable” is displayed). The drive has computed and saved the values for C022 (stator resistance) and C023 (leakage inductance). If alarm “A097 Motor Wires KO“ trips, check the motor wiring. If alarm “A065 Autotune KO” trips, this means that the ENABLE command has opened before autotune was complete. In this case, reset the drive sending a command from terminal MDI3, or press the RESET key in the display/keypad and perform the autotune procedure again. NOTE With the Autotuning function, calculate the value of the leakage inductance (C023). From the resulting value, manually subtract the value in mH of the output inductance installed between the drive and the motor. 7) Overload: Set parameter C048 in the LIMITS MENU based on the maximum torque that can be generated expressed as a percentage of the motor rated torque. 8) Startup: Activate the ENABLE input (terminal 15) and the START input (terminal 14) and send a speed reference. The RUN LED and REF LED will come on and the motor will start. Make sure that the motor is rotating in the correct direction. If not, set parameter C014 (Phase Rotation) to [1:Yes], or open the ENABLE and START inputs, remove voltage from the drive and, after waiting at least 5 minutes, reverse two of the motor phases. 43/482 iDrive PROGRAMMING INSTRUCTIONS 9) Speed If overshoot occurs when the speed setpoint is attained or if a system instability is detected regulator (uneven motor operation), adjust the parameters relating to the speed loop (SPEED LOOP AND CURRENT BALANCING MENU). Set the two parameters relating to integral time (P125, adjustment: P126) as [Disabled] and set low values for the parameters relating to proportional gain (P127, P128). Set equal values for P127 and P128 and increase them until overshoot takes place when the setpoint is attained. Decrease P127 and P128 by approx. 30%, then decrease the high values set for integral time in P125 and P126 (keep both values equal) until an acceptable setpoint response is obtained. Check to see if the motor runs smoothly at constant speed. 10) Possible If no failure occurred, go to step 11. Otherwise, check the drive connections paying failures: particular attention to supply voltages, DC link and input reference. Also check if alarm messages are displayed. In the MEASURES MENU, check the speed reference (M000), the reference speed processed by the ramps (M002), the supply voltage of the control section (M030), the DC-link voltage (M029), the condition of the control terminals (M033). Check to see if these readouts match with the measured values. 11) Additional parameter modifications: When parameter P003 = Standby Only (condition required for changing C parameters), you can change Cxxx parameters in the CONFIGURATION menu only when the drive is DISABLED or STOPPED, whereas if P003 = Standby + Fluxing, you can change Cxxx parameters when the motor is stopped but the drive is enabled. Before changing any parameters, remember that the correct code for parameter P000 must be previously set up. You can write down any custom parameters in the table provided on the last pages of this Programming Manual. 12) Reset: 44/482 If an alarm trips, find the cause responsible for the alarm and reset the drive. Enable input MDI3 (terminal 16) for some time, or press the RESET key on the display/keypad. PROGRAMMING INSTRUCTIONS iDrive 7.3. “FOC” Motor Control 1) Wiring: Follow the instructions stated in the “Caution Statements” and “Installation” sections in the IDrive’s Installation Instructions Manual. 2) Power on: Power on the drive and do not close the link to the START input to prevent the motor from running. 3) Parameter modification: Access parameter P000 (Key parameter) and set its code (default value: 00001). Use the ESC, ▲,▼ and SAVE/ENTER keys to access the programming parameters. Select the Engineering access level setting P001= Eng. Also refer to the Menu Tree. 4) Supply voltage: Set the real supply voltage for the drive. You can set either mains voltage range or the DC supply stabilized by a Regenerative IDrive drive. To set the type of power supply for the drive, access the MOTOR CONTROL MENU and set configuration parameter C008 to the value corresponding to the installation concerned. 5) Motor parameters: Set C010 (Control Algorithm) as FOC Field Oriented Control. Set the motor ratings as follows: - C015 (fmot1) rated frequency C016 (rpmnom1) rated rpm C017 (Pmot1) rated power C018 (Imot1) rated current C019 (Vmot1) rated voltage C029 (Speedmax1) max. speed desired. If the no-load current of the motor is known, in C021 (Io) set the value of Io expressed as a percentage of the motor rated current. If the no-load current of the motor is not known, but the motor can run with no connected load, start the motor at its rated speed, read the current value detected by the drive (parameter M026) in the Motor Measures Menu and use it as the first attempt value for Io. NOTE If the connected motor must run at a higher speed than its rated speed (flux weakening), measure the noload current value of the motor at its rated speed, not at its max. speed. If the no-load current of the motor is not known and the motor cannot run in no-load conditions, use a first attempt value for Io that is automatically computed by the drive, as described in step 7. NOTE When parameter C021 (Io)=0, the drive will automatically set a value depending on the motor ratings whenever the motor autotune (step 7) is performed. Once a no-load current value is entered in C021, the value of the parameter relating to mutual inductance (C024) will be automatically computed when parameters I073= [1: Motor Tune] and I074= [1: FOC Auto no rotation] are set up as for current autotune (C024 is computed even if no autotune procedure occurs). Also set C022 (resistance of one stator phase for a star connection or one third of one phase resistance for a delta connection) and C023 (stator leakage inductance of one phase for a star connection or one third of the leakage of one phase for a delta connection). The value for C022 corresponds to half the resistance value measured with an ohm-meter between two phases of the motor. If values to be set for C022 and C023 are 45/482 iDrive PROGRAMMING INSTRUCTIONS not known, motor autotune is required (see step 6), otherwise, go to step 7. Press SAVE/ENTER each time a new parameter is set. 46/482 PROGRAMMING INSTRUCTIONS 6) Encoder TEST: iDrive The motor must run when testing the encoder. Access the ENCODER/FREQUENCY INPUTS MENU; set the source of the encoder signal used as a speed feedback (Encoder A in terminal board, Encoder B from ES836 or ES913 option board); enter the number of pulse/rev and the number of the encoder channels (more details are given in the relevant section in the Installation Instructions Manual). In MOTOR CONTROL MENU, set the parameter relating to the speed feedback from encoder: C012 = Yes. Access the AUTOTUNE MENU and set parameter I073 (Select Autotune Type) as “Encoder Tune”. Use the ESC key to confirm changes. Close the ENABLE command and wait until encoder tune is complete (“W32 Open Enable” is displayed). Once encoder tune is complete, the display will show one of the following messages: “W31 Encoder Ok”; the speed feedback is correct. If the speed detected by the encoder is opposite to the desired speed, the drive will automatically reverse the feedback sign (parameter C199). “A059 Encoder Fault”; the speed detected from the encoder is not consistent with the control speed. Possible causes: - Wrong number of pls/rev of the encoder - Wrong power supply of the Encoder (e.g. +5V instead of +24V): check the encoder ratings and the position of jumpers and dip-switches for the encoder supply in the optional encoder board - Wrong configuration of the dip-switches for the encoder selection (push-pull or linedriver encoder) in the optional encoder board - No connection to the encoder channel (check wiring) - At least one Encoder channel is faulty (replace the encoder). 7) Autotune of the First remove the ENABLE command, then access the MOTOR CONTROL MENU and set stator resistance and I073 (1: Motor Tune) and I074 = (0: All Ctrl no rotation) . Use the ESC key to accept leakage inductance: changes. Close the ENABLE command and wait until autotune is complete (warning “W32 Open Enable” is displayed). The drive has computed and saved the values for C022 and C023. If alarm “A097 Motor wires KO“ trips, check the motor wiring. If alarm “A065 Autotune KO” trips, this means that the ENABLE command has opened before autotune was completed. In this case, reset the drive sending a command from terminal MDI3, or press the RESET key in the display/keypad and perform the autotune procedure again. 8) Autotune of the First remove the ENABLE command, , then access the AUTOTUNE MENU and set I073 (1: current loop: Motor Tune) and I074 = (1: FOC Auto no rotation). Use the ESC key to accept changes. Close the ENABLE command and wait until autotune is complete (warning “W32 Open Enable” is displayed). The drive has computed and saved the values for P155 and P156. If alarm “A065 Autotune KO” trips, this means that the ENABLE command has opened before autotune was completed or that the autotune algorithm failed. In this case, reset the drive sending a command from terminal MDI3, or press the RESET key in the display/keypad and perform the autotune procedure again. NOTE If the ENABLE command was not opened before autotune was over, decrease by 5% the no-load current value set in C021 and perform autotune again. 47/482 iDrive PROGRAMMING INSTRUCTIONS 9) Tuning the rotor The rotor time constant (C025) is estimated with a special autotune procedure allowing time constant: the motor to run even in no-load conditions. First remove the ENABLE command, then access the AUTOTUNE MENU and set I073 (1: Motor Tune) and I074 = (2: FOC Auto + rot) . Use the ESC key to accept changes. Close the ENABLE command and wait until autotune is over (warning “W32 Open Enable” is displayed). When autotune is complete, the value obtained for the rotor time constant is automatically saved in parameter C025. If the motor cannot run in no-load conditions, use a first attempt value for Io that is automatically computed by the drive, as described in step 7. 10) Startup: Now that all the parameters have been set for the FOC motor control algorithm, activate the ENABLE input (terminal 15) and the START input (terminal 14) and send a speed reference: the RUN LED and REF LED will come on and the motor will start. Make sure that the motor is rotating in the correct direction. If not, set parameter C014 (Phase Rotation) to [1:Yes], or open the ENABLE and START inputs, remove voltage from the drive and, after waiting at least 5 minutes, reverse two of the motor phases. 11) Speed regulator If overshoot occurs when the speed setpoint is attained or if a system instability is adjustment: detected (uneven motor operation), adjust the parameters relating to the speed loop (SPEED LOOP AND CURRENT BALANCING MENU). Set the two parameters relating to integral time (P125, P126) as [Disabled] and set low values for the parameters relating to proportional gain (P127, P128). Set equal values for P127 and P128 and increase them until overshoot takes place when the setpoint is attained. Decrease P127 and P128 by approx. 30%, then decrease the high values set for integral time in P125 and P126 (keep both values equal) until an acceptable setpoint response is obtained. Check to see if the motor runs smoothly at constant speed. 12) Possible failures: 48/482 If alarm “A060 Fault No Curr.” trips, this means that the current loop is not properly tuned. Follow the instructions given in step 8 and decrease the value of I0 (parameter C021 in the MOTOR CONTROL MENU). If the motor is noisy when starting, this means that the rotor time constant is not correct. Follow the instructions given in step 9 again, or manually change the value of the rotor time constant (parameter C025) for a smooth motor startup. If no failure occurred, go to step 13. Otherwise, check the drive connections paying particular attention to supply voltages, DC link and input reference. Also check if alarm messages are displayed. In the Motor Measures Menu, check the speed reference (M000), the reference speed processed by the ramps (M002), the supply voltage of the control section (M030), the DC link voltage (M029), the condition of the control terminals (M033). Check to see if these readouts match with the measured values. PROGRAMMING INSTRUCTIONS iDrive 13)Additional parameter modifications: For the optimization of the motor performance, adjust parameters C021 (no-load current), C024 (mutual inductance), C025 (rotor time constant). Consider the following: • C021 Too high values → Lower torque, especially at rated speed, because most part of the voltage imposed by the drive is used to magnetize the motor instead of generating a proper motor torque; • C021 Too low values → Because of the motor flux weakening, higher current ratings are needed; • C024 Mutual inductance → This is computed each time the no-load current level is changed. This is not binding for the motor control, but strongly affects the correct estimation of the output torque; in case of overestimation, decrease C025, and vice versa; • C025 Optimum value → To obtain the optimum value of the rotor time constant, the best way consists in performing several attempts with a constant load but with different values of C025. The optimum value is the one ensuring to obtain the output torque with the lower current (see M026 in the Motor Measures Menu). When parameter P003 = Standby Only (condition required for changing C parameters), you can change Cxxx parameters in the CONFIGURATION menu only when the drive is DISABLED or STOPPED, whereas if P003 = Standby + Fluxing, you can change Cxxx parameters when the motor is stopped but the drive is enabled. Before changing any parameters, remember that the correct code for parameter P000 must be previously set up. You can write down any custom parameters in the table provided on the last pages of this Programming Manual. 14) Reset: If an alarm trips, find the cause responsible for the alarm and reset the drive. Enable input MDI3 (terminal 16) for some time, or press the RESET on the display/keypad. 49/482 PROGRAMMING INSTRUCTIONS iDrive 8. MEASURES MENU 8.1. Overview The Measures Menu contains the variables measured by the drive that can be used by the user. In the display/keypad, measures are divided into subgroups. The measure subgroups are the following: Motor Measures Menu This menu contains: the values of the speed reference at constant rpm, the values of the reference being used and the speed values of the connected motor expressed in rpm; the drive rated frequency; the torque reference at constant rpm, the torque demand and the motor torque output, the torque limit reference at constant speed and the torque limit being used expressed both in Nm and as a percentage of the rated torque of the selected motor; the flux reference and the electrical variables measured by the drive mains side, the DC-bus and output. PID Controller Menu This menu contains the values relating to the PID controller of the IDrive drive. Digital Inputs Menu This menu contains the state of the drive digital inputs and the indication of the functions programmed for the digital inputs of the IDrive drive. References Menu This menu contains the following values: analog references, the encoder input and the frequency input references, the speed/torque or reference/feedback values of the PID coming from serial link or fieldbus. Outputs Menu This menu contains the state of the drive digital outputs, analog outputs and frequency outputs. Temperatures from PT100 Menu This menu contains the temperature values detected in the first four analog channels of ES847 I/O expansion board (this menu is available only if ES847 is fitted). Autodiagnostics Menu This menu contains the temperature values, the operation time counter and the supply time counter, the active alarm and the drive status. Data Logger Measures Menu This menu contains the status of the type of connections (serial links, Ethernet and modem) supported by ES851 Data Logger board (this menu is available only if the Data Logger ES851 is fitted). Digital Input Settings Menu This menu contains the functions assigned to the digital inputs. Fault List Menu This menu contains the trip log of the last eight alarms tripped and the values of some measures being used when the alarm trip was stored. PowerOff Log Menu This menu contains the value of some measures being used at the drive power off. 50/482 PROGRAMMING INSTRUCTIONS iDrive 8.2. Motor Measures Menu This menu contains speed values, torque values and electrical variables measured by the drive on the mains side, DC bus and output. M000 Speed Reference at Constant RPM M000-1 Range ± 32000 (integer part) ± 99 (decimal part) ± 32000.99 rpm Note: The actual range depends on the selected motor, because it is defined by the value set in the parameters for the motor max. speed and min. speed. C028–C029 Motor 1 C071–C072 Motor 2 C114–C115 Motor 3 Active Address Active only when a speed reference is used for the selected motor. 1650 (integer part) 1651 (decimal part) Function Value of the speed reference obtained when the motor rotates at constant speed, once the preset ramp time is over. M002 Speed Ramp Output M002-3 Range ± 32000 (integer part) ± 99 (decimal part) ± 32000.99 rpm Note: The actual range depends on the selected motor, because it is defined by the value set in the parameters for the motor max. speed and min. speed. C028–C029 Motor 1 C071–C072 Motor 2 C114–C115 Motor 3 Active Address Active only when a speed reference is used for the selected motor. 1652 (integer part) 1653 (decimal part) Function This is the measure of the speed value processed with respect to the ramp time. M004 Motor Speed M004-5 Range ± 32000 (integer part) ± 99 (decimal part) ± 32000.99 rpm Active Address Always active. 1654 (integer part) 1655 (decimal part) Function Motor speed value. M006 Drive Output Frequency M006 Range ± 10000 ± 1000.0 Hz (see Table 63) Active Address Always active. 1656 Function This is the measure of the voltage frequency output of the drive. 51/482 PROGRAMMING INSTRUCTIONS iDrive M007 Torque Reference at Constant Speed (Nm) M007 Range ± 3200 ± 3200 Nm Note: The actual range depends on the torque limit values set for the selected motor. C047–C048 Motor 1 C090–C091 Motor 2 C133–C134 Motor 3 Active Address Active only when a torque reference is used for the selected motor. 1657 Function This is the measure of the torque reference required at constant speed and expressed in Nm. M008 Torque Demand (Nm) M008 Range Active Address Function ± 32000 ± 32000 Nm Note: The actual range depends on the rated torque and the torque limit values set for the selected motor. C047–C048 Motor 1 C090–C091 Motor 2 C133–C134 Motor 3 Active for VTC and FOC controls only. 1658 With speed control: Torque demand of the speed regulator for the type of control used. With torque control: Torque reference processed with respect to the preset torque ramp time. M009 Torque Generated by the Motor (Nm) M009 Range ± 32000 ± 32000 Nm Active Address Active for VTC and FOC controls only. 1659 Function Approximate value of the torque produced by the connected motor. M010 Torque Reference at Constant RPM (%) M010 52/482 Range ± 500 ± 500 % Note: The actual range depends on the torque limit values set for the selected motor. C047–C048 Motor 1 C090–C091 Motor 2 C133–C134 Motor 3 Active Address Active only when a torque reference is used for the selected motor. 1660 Function This is the measure of the torque reference required at constant speed and expressed as a percentage of the motor rated torque. PROGRAMMING INSTRUCTIONS iDrive M011 Torque Demand (%) M011 Range Active Address Function ± 500 ± 500 % Note: The actual range depends on the torque limit values set for the selected motor. C047–C048 Motor 1 C090–C091 Motor 2 C133–C134 Motor 3 Active for VTC and FOC controls only. 1661 With speed control: Torque demand of the speed regulator expressed as a percentage of the motor rated torque. With torque control: Torque reference processed with respect to the preset torque ramp time and expressed as a reference of the motor rated torque. M012 Torque Generated by the Motor (%) M012 Range ± 500 ± 500 % Active Address Active only for VTC and FOC controls. 1662 Function Approximate value of the torque produced by the motor and expressed as a percentage of the rated torque of the selected motor. M013 Torque Limit Demand before Ramps (Nm) M013 Range Active Address Function ± 32000 ± 32000 Nm Note: The actual range depends on the preset torque limit values and the rated torque of the selected motor. C047–C048 Motor 1 C090–C091 Motor 2 C133–C134 Motor 3 Active for VTC and FOC controls only. 1663 This is the limit value for the torque at constant speed. If an external torque limit is used, the value of this measure is the torque limit obtained at constant speed; on the other hand, if the torque limit is internal to the drive, this value is the actual torque limit expressed in Nm. M014 Torque Limit Demand after Ramps (Nm) M014 Range ± 32000 ± 32000 Nm Note: The actual range depends on the preset torque limit values and the rated torque of the selected motor. C047–C048 Motor 1 C090–C091 Motor 2 C133–C134 Motor 3 Active Address Active for VTC and FOC controls only. 1664 Function This is the torque limit value being used, expressed in Nm. 53/482 PROGRAMMING INSTRUCTIONS iDrive M013a Speed Limit before the Ramps M013a Range Active Address Function ± 32000 ± 32000 rpm Active for FOC only. 1726 Limit value at constant speed of the motor speed of rotation in “torque control with speed limit” mode (C011=2 for Motor 1; C054, C097 for Motors 2 and 3). M014a Speed Limits after the Ramps M014a Range Active Address Function ± 32000 ± 2000 rpm Active for FOC only. 1727 Current limit value of the motor speed of rotation in “torque control with speed limit” mode (C011=2 for Motor 1; C054, C097 for Motors 2 and 3). M015 Torque Limit Reference before Ramps (%) M015 Range Active Address Function ± 500 ± 500 % Note: The actual range depends on the torque limit values set for the selected motor. C047–C048 Motor 1 C090–C091 Motor 2 C133–C134 Motor 3 Active for VTC and FOC controls only. 1665 This is the limit value for the torque at constant speed expressed as a percentage of the rated torque of the selected motor. If an external torque limit is used, the value of this measure is the torque limit obtained at constant speed; on the other hand, if the torque limit is internal to the drive, this value is the actual torque limit. M016 Torque Limit Reference after Ramps (%) M016 Range Active Address Function ± 500 ± 500 % Note: The actual range depends on the torque limit values set for the selected motor. C047–C048 Motor 1 C090–C091 Motor 2 C133–C134 Motor 3 Active for VTC and FOC controls only. 1666 This is the torque limit value being used expressed as a percentage of the motor rated torque. M017 Flux Reference M017 54/482 Range 0 ÷ 500 0 ÷ 5.00 Wb Active Address Active for VTC and FOC controls only. 1667 Function Flux reference required and expressed in Weber (Wb). PROGRAMMING INSTRUCTIONS iDrive M026 Output Current M026 Range 0 ÷65535 0 ÷6553.5 A Note: The actual range depends on the drive size. Active Address Always active. 1676 Function Measure of the RMS of the output current. M026a Motor Thermal Capacity M026a Range Active Address Function 0 ÷ 1000 0.0 ÷ 100.0% Always active. 1728 Heating of the connected motor. This parameter indicates the current level of the motor heating following I2t pattern set in the MOTOR THERMAL PROTECTION MENU. This value is expressed as a percentage of the allowable asymptotic value. M027 Output Voltage M027 Range 0 ÷65535 0 ÷65535 V Note: The actual range depends on the drive voltage class. Active Address Always active. 1677 Function Measure of the RMS of the output voltage. M028 Output Power M028 Range 0 ÷65535 0 ÷6553.5 kW Note: The actual range depends on the drive size. Active Address Always active. 1678 Function Measure of the active power produced by the drive. M028a Energy Consumption M028a Range Active Address Function 0 ÷1000000000 0 ÷10000000.00 kWh Always active. 1723-1724 (LSWord, MSWord) Counter of the drive energy consumption. This is a value expressed in 32 bits divided into two 16-bit words: the low part and the high part. 55/482 PROGRAMMING INSTRUCTIONS iDrive M029 DC-Bus Voltage M029 Range 0 ÷1400 0 ÷1400 V Active Address Always active. 1679 Function Measure of the voltage in the drive DC-link. M030 Supply Voltage M030 56/482 Range 0 ÷1000 0 ÷1000 V Active Address Always active. 1680 Function Measure of the RMS value of the drive supply voltage. PROGRAMMING INSTRUCTIONS iDrive 8.3. PID Regulator Menu This menu contains the measures relating to the input and output values of the internal PID regulator. M018 PID Reference at Constant RPM (%) M018 Range ±10000 ±100.00 % Note: The actual range depends on the max. value and the min. value of the PID reference set in parameters P245–P246. Active Address Always active. 1668 Function This is the measure of the PID reference expressed as a percentage. Scaling is detailed in the PID PARAMETERS MENU and the PID CONFIGURATION MENU. M018a PID2 Reference at Constant RPM (%) M018a Range Active Address Function ±10000 ±100.00 % Note: The actual range depends on the max. value and the min. value of the PID2 reference set in parameters P445-P446. This measure is active if enabled from C291a 1731 This is the measure percent of the reference selected with C286 for the PID2 or the 2zone mode. Scaling is detailed in the PID2 PARAMETERS MENU and the PID CONFIGURATION MENU. M019 PID Reference after Ramps (%) M019 Range ±10000 ±100.00 % Note: The actual range depends on the max. value and the min. value of the PID reference set in parameters P245–P246. Active Address Always active. 1669 Function This is the measure of the PID reference after the ramps expressed as a percentage. Scaling is detailed in the PID PARAMETERS MENU and the PID CONFIGURATION MENU. M019a PID2 Reference after Ramps (%) M019a Range Active Address Function ±10000 ±100.00 % Note: The actual range depends on the max. value and the min. value of the PID2 reference set in parameters P445-P446. This measure is active if enabled from C291a 1732 This is the measure percent of the current PID reference after the ramps selected with C286 for the PID2 or the 2-zone mode. Scaling is detailed in the PID2 PARAMETERS MENU and the PID CONFIGURATION MENU. 57/482 PROGRAMMING INSTRUCTIONS iDrive M020 PID Feedback (%) M020 Range ±10000 ±100.00 % Note: The actual range depends on the max. value and the min. value of the PID feedback set in parameters P247–P248. Active Address Always active. 1670 Function This is the measure of the PID feedback expressed as a percentage. Scaling is detailed in the PID PARAMETERS MENU and the PID CONFIGURATION MENU.. M020a PID2 Feedback (%) M020a Range Active Address Function ±10000 ±100.00 % Note: The actual range depends on the max. value and the min. value of the PID2 feedback set in parameters P447-P448. This measure is active if enabled from C291a 1733 This is the measure percent of the PID2 feedback selected with C286 for the PID2 or the 2-zone mode. Scaling is detailed in the PID2 PARAMETERS MENU and the PID CONFIGURATION MENU. M021 PID Error (%) M021 Range Active Address Function ±10000 ±100.00 % Note: The actual range depends on the min. and max. saturation values of the reference and the feedback set in parameters P245– P246 for the reference and in P247–P248 for the feedback. Always active. 1671 This is the measure of the PID input error expressed as a percentage. See also the PID PARAMETERS MENU and the PID CONFIGURATION MENU. M021a PID2 Error (%) M021a Range Active Address Function 58/482 ±10000 ±100.00 % Note: The actual range depends on the min. and max. saturation values of the reference and the feedback set in parameters P445-P446 for the reference and in P447–P448 for the feedback. This measure is active if enabled from C291a 1736 This is the measure percent of the PID2 input error or the 2-zone mode input error (difference between the reference selected with C286 and the feedback selected with C289). Please refer to the PID2 PARAMETERS MENU and the PID CONFIGURATION MENU. PROGRAMMING INSTRUCTIONS iDrive M022 PID Output (%) M022 Range Active Address Function ±10000 ±100.00 % Note: The actual range depends on the min. and max. saturation values of the PID output set in parameters P236–P237. Always active. 1672 This is the measure of the output produced by the PID regulator and expressed as a percentage. Please refer to the PID PARAMETERS MENU and the PID CONFIGURATION MENU for the scaling of the PID output. M022a PID2 Output (%) M022a Range Active Address Function ±10000 ±100.00 % Note: The actual range depends on the min. and max. saturation values of the PID output set in parameters P436–P437. This measure is active if enabled from C291a 1718 This is the measure of the output produced by the PID2 regulator and expressed as a percentage. Scaling is detailed in the PID2 PARAMETERS MENU and the PID CONFIGURATION MENU. M023 PID Reference after Ramps M023 Range Active Address Function ±32000 Note: The actual range depends on the max. value and the min. value of the PID reference set in parameters P245–P246 and on the gain level set in P257. Always active. 1673 This is the measure of the reference after the ramps being used for the PID regulator, as M019 but multiplied by the gain level set in P257 (see also the PID PARAMETERS MENU and the PID CONFIGURATION MENU). As for the display/keypad, the unit of measure can be programmed with parameters P267, P267a in the DISPLAY/KEYPAD menu. M023a PID2 Reference after Ramps M023a Range Active Address Function ±32000 Note: The actual range depends on the min. and max. values of the PID2 reference set in parameters P445-P446 and on the gain level set in P457. This measure is active if enabled from C291a 1737 This is the measure of the reference being used for the PID2 or the 2-zone mode, as M019a but multiplied by the gain level set in P457 (see also the PID2 PARAMETERS MENU and the PID CONFIGURATION MENU). As for the display/keypad, the unit of measure can be programmed with parameters P267b, P267c in the DISPLAY/KEYPAD menu. 59/482 PROGRAMMING INSTRUCTIONS iDrive M024 PID Feedback M024 Range Active Address Function ±32000 Note: The actual range depends on the max. value and the min. value of the PID feedback set in parameters P247–P248 and on the gain level set in P257. Always active. 1674 This is the measure of the feedback being used for the PID regulator, as M020 but multiplied by the gain level set in P257 (see also the PID PARAMETERS MENU and the PID CONFIGURATION MENU). As for the display/keypad, the unit of measure can be programmed with parameters P267, P267a in the DISPLAY/KEYPAD menu. M024a PID2 Feedback M024a Range Active Address Function 60/482 ±32000 Note: The actual range depends on the max. value and the min. value of the PID2 feedback set in parameters P447–P448 and on the gain level set in P457. This measure is active if enabled from C291a 1738 This is the measure of the feedback being used for the PID2 regulator or the 2-zone mode as M020a but multiplied by the gain level set in P457 (see also the PID2 PARAMETERS MENU and the PID CONFIGURATION MENU). As for the display/keypad, the unit of measure can be programmed with parameters P267b, P267c in the DISPLAY/KEYPAD menu. PROGRAMMING INSTRUCTIONS iDrive 8.4. Digital Inputs Menu This menu allows checking the state of the command sources for the digital inputs (local terminals, serial link and fieldbus), the terminal board resulting from their combination and the terminals which are actually used for the drive control. The terminals which are actually used to control the drive also consider any timers applied to the digital inputs. M031 Delayed Digital Inputs M031 Range Active Address Function Bit-controlled measure See Table 1 Always active. 1681 State of the virtual control terminal board used by the drive. This is the terminal board resulting from the combination of the preset command sources (local terminal board, serial link and fieldbus), where the ENABLE command is given by the AND logic of all the ENABLE commands. For the other inputs, the OR command between the different command sources is used. See also the CONTROL METHOD MENU and the TIMERS MENU. M032 Instant Digital Inputs M032 Range Active Address Function Bit-controlled measure See Table 1 Always active. 1682 State of the virtual control terminal board before applying the timers to the digital inputs (if no timer is applied, it matches with M031). This is the terminal board resulting from the combination of the preset command sources (local terminal board, serial link and fieldbus), where the ENABLE command is given by the AND logic of all the ENABLE commands. For the other inputs, the OR command between the different command sources is used. See also the CONTROL METHOD MENU and the TIMERS MENU. Table 1: Coding of Measures M031, M032. Bit n. 0 1 2 3 4 Digital Input MDI1(START) MDI2(ENABLE) MDI3(RESET) MDI4 MDI5 Bit n. 5 6 7 8 9 Digital Input MDI6/ECHA/FINA MDI7/ECHB MDI8/FINB ENABLE S ENABLE M033 Local Control Terminal Board M033 Range Bit-controlled measure See Table 2 Active Address Always active. 1683 Function State of the digital inputs in the drive terminal board. M034 Control Terminals from Serial Link M034 Range Active Address Bit-controlled measure See Table 2 Always active. 1684 61/482 PROGRAMMING INSTRUCTIONS iDrive Function 62/482 State of the digital inputs in the terminal board controlled via serial link. PROGRAMMING INSTRUCTIONS iDrive M035 Control Terminal Board from Fieldbus M035 Range Bit-controlled measure See Table 2 Active Address Always active. 1685 Function State of the digital inputs in the terminal board controlled from fieldbus. Table 2: Coding of Measures M033, M034, M035. Bit n. 0 1 2 3 Digital Input MDI1(START) MDI2(ENABLE) MDI3(RESET) MDI4 Bit n. 4 5 6 7 Digital Input MDI5 MDI6/ECHA/FINA MDI7/ECHB MDI8/FINB M036 Auxiliary Digital Inputs in the Terminal Board M036 Range Active Address Function Bit-controlled measure See Table 3 Always active. 1686 State of the 8 auxiliary digital inputs in ES847 or ES870 terminal board. M036a Auxiliary Digital Inputs via Serial Link M36a Range Active Address Function Bit-controlled measure See Table 3 Always active. 1713 State of the 8 auxiliary digital inputs via serial link. M036b Auxiliary Digital Inputs via PROFIdrive M036b Range Active Address Function Bit-controlled measure See Table 3 Always active. 1717 State of the 8 auxiliary digital inputs via PROFIdrive. Table 3: Coding of Measures M036, M036a, M036b. Bit n. 0 1 2 3 Digital Input XMDI1 XMDI2 XMDI3 XMDI4 Bit n. 4 5 6 7 Digital Input XMDI5 XMDI6 XMDI7 XMDI8 63/482 PROGRAMMING INSTRUCTIONS iDrive 8.5. References Menu This menu contains the measures of the possible reference sources for speed, torque or PID available in the terminal board (analog inputs, frequency inputs and encoder input) and sent via serial link or fieldbus. M037 REF External Analog Reference M037 Range Function of the preset type Function of the type of reference (voltage/current) set in of reference P050. The numerical value always includes two decimal (voltage/current). figures; the unit of measure is V or mA. Active Address Always active. 1687 Function Measure of the voltage /current value detected by the drive in REF analog input. M038 AIN1 External Analog Reference M038 Range Function of the preset type Function of the type of reference (voltage/current) set in of reference P055. The numerical value always includes two decimal (voltage/current) figures; the unit of measure is V or mA. Active Address Always active. 1688 Function Measure of the voltage /current value detected by the drive in AIN1 analog input. M039 AIN2 External Analog Reference M039 Range Function of the preset type Function of the type of reference (voltage/current) set in of reference P060. The numerical value always includes two decimals; (voltage/current). the unit of measure is V or mA. Active Address Always active. 1689 Function Measure of the voltage /current value detected by the drive in AIN2 analog input. M039a XAIN4 External Analog Reference M039a 64/482 Range Function of the type of reference (voltage) set in Function of the preset type of P390. The numerical value always includes two reference. decimals; the unit of measure is V. Active Address Active only if set via parameter R023. 1729 Function Measure of the voltage value detected by the drive in XAIN4 analog input. PROGRAMMING INSTRUCTIONS iDrive M039b XAIN5 External Analog Reference M039b Range Function of the type of reference (current) set in Function of the preset type of P395. The numerical value always includes two reference. decimals; the unit of measure is mA. Active Address Active only if set via parameter R023. 1730 Function Measure of the current value detected by the drive in the XAIN5 analog input. M040 Speed Reference from Serial Link M040 Range ± 32000.99 rpm ± 32000 Note: The actual range depends on the selected motor, because it is (integer defined by the value set in the parameters for the max. speed and min. part) speed of the selected motor. ± 99 C028–C029 Motor 1 (decimal C072–C073 Motor 2 part) C114–C115 Motor 3 Active Address Always active. 1690 (integer part), 1691 (decimal part) Function This is the value of the speed reference set via serial link. M042 Speed Reference from Fieldbus M042 Range ± 32000 (integer part) ± 99 (decimal part) ± 32000.99 rpm Note: The actual range depends on the selected motor, because it is defined by the value set in the parameters for the max. speed and min. speed of the selected motor. C028–C029 Motor 1 C072–C073 Motor 2 C114–C115 Motor 3 Active Address Always active. 1692 (integer part), 1693 (decimal part) Function This is the measure of the speed reference set by the fieldbus. M044 Torque Reference from Serial Link M044 Range ± 5000 ± 500.0 % Note: The actual range depends on the torque limit value set for the selected motor. C047–C048 Motor 1 C090–C091 Motor 2 C133–C134 Motor 3 Active Address Always active. 1694 Function This is the measure of the torque reference set via serial link and expressed as a percentage of the rated torque of the selected motor. 65/482 PROGRAMMING INSTRUCTIONS iDrive M045 Torque Reference from Fieldbus M045 Range ± 5000 ± 500.0 % Note: The actual range depends on the torque limit values set for the selected motor. C047–C048 Motor 1 C090–C091 Motor 2 C133–C134 Motor 3 Active Address Always active. 1695 Function This is the measure of the torque reference set by the fieldbus and expressed as a percentage of the rated torque of the selected motor. M046 PID Reference from Serial Link M046 Range Active Address Function ±10000 ±100.00 % Note: The actual range depends on the min. value and the max. value of the PID reference set in parameters: P245–P246 Always active. 1696 This is the measure of the PID reference set via serial link and expressed as a percentage. M047 PID Reference from Fieldbus M047 Range ±10000 ±100.00 % Note: The actual range depends on the min. value and the max. value of the PID reference set in parameters: P245–P246 Active Address Always active. 1697 Function This is the measure of the PID reference set by the fieldbus and expressed as a percentage. M048 PID Feedback from Serial Link M048 66/482 Range ±10000 ±100.00 % Note: The actual range depends on the min. value and the max. value of the PID feedback set in parameters: P247–P248 Active Address Always active. 1698 Function This is the measure of the PID feedback set via serial link and expressed as a percentage. PROGRAMMING INSTRUCTIONS iDrive M049 PID Feedback from Fieldbus M049 Range ±10000 ±100.00 % Note: The actual range depends on the min. value and the max. value of the PID feedback set in parameters: P247–P248 Active Address Always active. 1699 Function This is the measure of the PID feedback set by the fieldbus and expressed as a percentage. M050 Encoder Reference M050 Range ± 32000 ± 32000 rpm. Active Address Always active. 1700 Function Reading of the encoder set as a reference source (see the ENCODER/FREQUENCY INPUTS MENU and the CONTROL METHOD MENU). M051 Frequency Input Reference 10000 ÷ 100000 Hz. M051 Range Active Address Function 1000 ÷ 10000 Note: The actual range depends on the frequency min. value and max. value set in P071-P072. Always active. 1701 Frequency readout in the digital input set as a reference source (see the ENCODER/FREQUENCY INPUTS MENU and the CONTROL METHOD MENU). 67/482 PROGRAMMING INSTRUCTIONS iDrive 8.6. Outputs Menu This menu allows checking the status of the digital outputs, the analog outputs and the frequency outputs located in the terminal board. M056 Digital Outputs M056 Range Bit-controlled measure. See Table 4 Active Address Always active. 1706 Function Status of digital outputs MDO1÷4 and status of the precharge contactor. Table 4: Coding of Measure M056. Bit n. 0 1 2 3 Digital Output MDO1/FOUT MDO2 MDO3 MDO4 Status of the precharge contactor 6 M056a Virtual Digital Outputs M056a Range Bit-controlled measure. See Table 5 Active Address Always active. 1675 Function Status of virtual digital outputs MPL1÷4. Table 5: Coding of Measure M056a. Bit n. 0 1 2 3 Digital Output MPL1 MPL2 MPL3 MPL4 M056b Timed Flags M056b Range Bit-controlled measure See Table 6 Active Address Always active. 1741 Function Status of timed flags TFL1 ÷ 4. Table 6: Coding of Measure M056b. Bit n. 0 1 2 3 68/482 Timed Flag TFL1 TFL2 TFL3 TFL4 PROGRAMMING INSTRUCTIONS iDrive M057 Frequency Output M057 Range Active Address Function 10000÷100000 10000 ÷ 100000 Hz Note: The actual range depends on the min. value and the max. value of MDO1 digital output set as a frequency reference. Values are set in P204 and P205 (see ANALOG AND FREQUENCY OUTPUTS MENU). Always active. 1707 This is the frequency measure produced by MDO1 digital output when set as a frequency output. M058 AO1 Analog Output M058 Range Active Address Function ±100 ±100 % Always active. 1708 Value percent of analog output AO1, referred to the preset max. output value (maximum absolute value between P182 and P183, see ANALOG AND FREQUENCY OUTPUTS MENU). M059 AO2 Analog Output M059 Range Active Address Function ±100 ±100 % Always active. 1709 Value percent of AO2 analog output referred to the preset max. output value (maximum absolute value between P190 and P191, see ANALOG AND FREQUENCY OUTPUTS MENU). M060 Analog Output AO3 M060 Range Active Address Function ±100 ±100 % Always active. 1710 Value percent of AO3 analog output referred to the preset max. output value (maximum absolute value between P198 and P199, see ANALOG AND FREQUENCY OUTPUTS MENU). M061 Auxiliary Digital Outputs M061 Range Active Address Function Bit-controlled measure. See Table 7 Always active. 1711 Status of the auxiliary digital outputs located on the expansion board. Table 7: Coding of Measure M061. Bit n. 0 1 2 Digital Output XMDO1 XMDO2 XMDO3 Bit n. 3 4 5 Digital Output XMDO4 XMDO5 XMDO6 69/482 PROGRAMMING INSTRUCTIONS iDrive 8.7. Temperature Measures from PT100 Menu This menu displays the temperatures detected in the first four analog channels of the expansion board. Scaling complies with DIN EN 60751 for PT100: 100 ohm @ 0 °C and 0.385 ohm/°C. ES847 Expansion Board must be fitted on the equipment. See also the EXPANSION BOARD CONFIGURATION MENU M069 PT100 Measure in Channel 1 M069 Range –500 ÷2600 –50.0 ÷260.0 °C Active Address This measure is active only if programmed from parameter R023. 1719 Function Temperature detected in analog channel 1. M070 PT100 Measure in Channel 2 M070 Range –500 ÷2600 –50.0 ÷260.0 °C Active Address This measure is active only if programmed from parameter R023. 1720 Function Temperature detected in analog channel 2. M071 PT100 Measure in Channel 3 M071 Range –500 ÷2600 –50.0 ÷260.0 °C Active Address This measure is active only if programmed from parameter R023. 1721 Function Temperature detected in analog channel 3. M072 PT100 Measure in Channel 4 M072 70/482 Range –500 ÷2600 –50.0 ÷260.0 °C Active Address This measure is active only if programmed from parameter R023. 1722 Function Temperature detected in analog channel 4. PROGRAMMING INSTRUCTIONS iDrive 8.8. Autodiagnostics Menu This menu allows the user to check the functioning times and the relevant counters (for maintenance purposes) of the IDrive drive; it also allows reading out the analog channels used for temperature sensors and the relevant temperature values, as well as the drive status. M052 / M054 Functioning Times M052 / M054 Range Address Function 0 ÷ 2147483647 (0 ÷ 7FFFFFFFh) 0 ÷429496729.4 sec Supply Time: 1702-1703 (LSWord, MSWord) Operation Time: 1704-1705 (LSWord, MSWord) This screen displays the ST (supply time) and the OT (operation time). The Operation Time is the activation time of the drive IGBTs. Both values are expressed in 32 bits divided into two 16-bit words: the low part and the high part. Functioning Times: S M O M u 0 p 0 p 5 e 5 p 4 r 2 l = a = y t i o 5 n 2 3 9 T : T : i 2 i 3 m e 5 : m e 5 : 0 1 5 1 M062 Ambient temperature Measure M062 Range ± 32000 ± 320.0 °C Active Address Always active. 1712 Function Ambient temperature measured on the surface of the control board. M064 IGBT Temperature Measure M064 Range Active Address ± 32000 ± 320.0 °C Always active. 1714 Measure of the IGBT temperature. If the temperature readout is <–30.0 °C or >150.0 °C, warning W50 – NTC Fault appears. Function Note: Not all models are provided with the NTC sensor (see Table 13 in the PRODUCT MENU). If this sensor is not provided, the measure is forced to 32,000, corresponding to +320.0 °C. 71/482 PROGRAMMING INSTRUCTIONS iDrive M065 Operation Time Counter M065 Range 0÷65000 0÷650000h Active Address Always active. 1715 Function Time elapsed after resetting the operation time counter. The Operation Time is the activation time of the drive IGBTs. M066 Supply Time Counter M066 Range 0÷65000 0÷650000h Active Address Always active. 1716 Function Time elapsed after resetting the supply time counter. M089 Drive Status M089 Range See Table 125. Active Address Always active. 1739 Function Describes the current condition of the IDrive drive. M090 Active Alarm M090 72/482 Range See Table 122. Active Address Always active. 1740 Function Alarm tripped at the moment. PROGRAMMING INSTRUCTIONS 8.9. iDrive Data Logger Measures Menu This menu displays the status of the types of connections (serial links, Ethernet and modem) supported by ES851 Data Logger board. This menu can be viewed only if the Data Logger board is fitted. See also the DATA LOGGER MENU. M100 Data Logger Status (Line 3) M100 Line 3 Range Active Address Function 0÷2 0: NOT FITTED 1: OK not interlocked 2: OK interlocked This measure is active only if programmed from parameter R021. 1336 0: NOT FITTED, ES851 is not installed on the IDrive drive. 1: OK not interlocked, ES851 is operating independently of the drive where it is installed. To program ES851, a connection to a computer via the RemoteDrive software is required, or a special preset set via display/keypad is required (see the DATA LOGGER MENU). 2: OK interlocked, ES851 is ready to be configured even through the display/keypad of the drive where it is installed. M100 ES851 Fault (Line 4) M100 Line 4 Range Active Address Function 0 ÷ 6, 99 ÷ 104 0: No alarm 1: Parameter save fault 2: Log write error 3: FBS configuration failure 4: RS232 Modbus configuration failure 5: RS485 Modbus configuration failure 6: TCP/IP stack configuration failure 99: Flash card lacking or inaccessible 100: Invalid stream access 101: TCP/IP socket fault 102: Dial out connection failure 103: Control board clock failure 104: Modem initialization failure This measure is active only if programmed from parameter R021. 1340 This indicates a general alarm tripped for ES851. In case an alarm trips, please contact LÖNNE SCANDINAVIA AS’s CUSTOMER SERVICE and mention the alarm code and name. 73/482 PROGRAMMING INSTRUCTIONS iDrive M101 Connection Status M101 Range Active Address Function Bit-controlled measure See Table 8 This measure is active only if programmed from parameter R021. 1338 Status of the connections supported by ES851. Note that the COM1 serial link is RS232 by default, whereas COM 2 is RS485 by default. For more details, please refer to the Programming Instructions manual for the Data Logger ES851. Table 8: Data Logger connection status. Bit n. 0-7 Connection Type of modem connection failure 8-10 Status of the connection via modem 11 COM1 12 COM2 13 Ethernet 14-15 Reserved Description 0: None 1: Dial KO 2: Connect KO 3: Authentication KO 4: IPCP KO* 5: Modem not yet initialized 6: Modem init KO 7: Modem not configured 8: Modem not dial out 16: Connect end (echo time out) 32: Connect end (idle time out) 64: Connect end (term expired) 0: No conn. 1: Dialing 2: Connecting 4: Connected 5: Attempt finished 0: No data exchange 1: Data exchanged 0: No data exchange 1: Data exchanged 0: No connection 1: Connection * In computer networking, the Internet Protocol Control Protocol (IPCP) is a network control protocol for establishing and configuring Internet Protocol over a Point-to-Point Protocol link. The IPCP configures, enables, and disables the IP protocol modules on both ends of the point-to-point link. 74/482 PROGRAMMING INSTRUCTIONS 8.10. iDrive Digital Input Settings Menu This menu allows checking the functions assigned to the digital inputs. Table 9: Coding of the functions assigned to the digital inputs. Displayed Items STOP REVERSE EN–S DISABLE MVel0 MVel1 MVel2 MVel3 Cw/CCw DCB UP DOWN UDReset Alarm 1 Alarm 2 Alarm 3 MRmp0 MRmp1 JOG SLAVE PID Dis KpdLock Mot 2 Mot 3 Var 0 Var 1 Var 2 PID UDR LOCAL Brk Lock FireM Src. Sel nTlim START_B STOP_B REVERSE_B MRef0 MRef1 MRef2 PID Csl START ENABLE RESET EncA EncB FinA FinB Multi Function Assigned to the Digital Inputs Stop function Startup with negative speed ENABLE in safety condition Drive disable Multispeed 0 Multispeed 1 Multispeed 2 Multispeed 3 Reversal of the direction of rotation DC braking Reference increase Reference decrease Reset of speed setpoint due to UP/DOWN command Auxiliary trip 1 Auxiliary trip 2 Auxiliary trip 3 Multiramp 0 Multiramp 1 Jog mode Selection of Slave Mode PID Disable Display/keypad unit Selection of Motor 2 Selection of Motor 3 Reference Variation 0 Reference Variation 1 Reference Variation 2 PID Reference Reset due to UP/DOWN commands Selection of Local mode Mechanical brake locking Fire Mode enabled Reference/command source switch External torque limit disable START function, terminals B STOP function, terminals B Startup with negative speed, terminals B PID Multireference 1 PID Multireference 2 PID Multireference 3 PID Control Selection START function ENABLE function Alarm RESET Encoder A Input Encoder B Input FINA Frequency input FINB Frequency input More than one function allocated to the same input 75/482 PROGRAMMING INSTRUCTIONS iDrive 8.11. Fault List Menu Scroll the Fault List Menu to display the codes of the last eight alarms tripped. Press the SAVE/ENTER key to access the alarm submenu and navigate to each value measured by the drive when the alarm tripped. The diagram below shows a navigation example for the Fault List Menu (relating to alarm n.1 in particular). Note that n.1 is the last alarm tripped and n.8 is the first alarm tripped. The measures marked with Mxxx are the same measures covered in this section. If the Data Logger ES851 is installed (even the ES851 RTC version only) and parameter R021 Data Logger is set to 2: ENABLE, the date and time when the alarm has tripped are displayed instead of the Supply Time (ST) and the Operation Time (OT) respectively. Navigation Example - Fault List Menu. A l a r m S P E E D Save/Enter n . 1 →A 0 8 0 T R A CK I N G Esc A I C F l n O O a r m 1 Me a s u r e s v er t e r S t a t u s N S T. R P M L I MI T C MOT OR 1 A T S O l a r m 1 Me a s u r e s r i p T i me T 9 2 : 1 6 : 1 8 T 4 5 : 2 0 : 1 2 A M M M l 0 0 0 a 0 0 0 r m 1 Me a s 2 + 1 4 5 4 + 4 5 8 + 5 5 A M M M l 0 0 0 a 0 2 3 r m 1 9 + 9 0 A M M M l 0 0 0 a 6 0 2 r m 4 6 6 A l a r m D i g i t a E M0 3 1 ■ 1 u 2 0 . r r r 2 e p p N s m m m Me a s u r e s 5 5 . 4 N m 5 5 1 V d c 3 9 4 V a c Me a s u + 3 2 . + 0 . + 1 5 . 1 M l I E s 1 ■ ■ e n 2 ■ r e s 4 ° C 0 H z 2 A a p 3 □ s u 4 □ u t 5 □ r e s s 6 7 8 □ □ □ s . u 3 u r e s 5 k W t s ■ 4 ■ ∧ ∧ ∧ ∧ ∧ ∧ ∧ A M D M l 0 i 0 a 2 g 5 r m 1 8 + i t a l 6 1 □ Me a 8 I n p 2 □ A M M M l 0 0 0 a 5 5 6 r 8 9 0 Me a s u r e s ) – 8 5 % ) + 3 5 % ) – 1 0 % ∧ m 1 ( A O1 ( A O2 ( A O3 ∧ A l a r m M0 6 2 76/482 1 Me a s u r e s + 2 7 . 0 ° C PROGRAMMING INSTRUCTIONS 8.12. iDrive Power Off List Menu This menu contains the measures of some characteristic variables detected at the drive power off, in conjunction with the alarm (if any) tripped at that moment. Press the SAVE/ENTER key to access the submenu and navigate to the measures detected by the drive when the alarm tripped. Measures and codes are the same as the ones shown in the Fault List Menu. If the Data Logger ES851 is installed (even the ES851 RTC version only) and parameter R021 Data Logger is set to 2: ENABLE, the date and time when the alarm has tripped are displayed instead of the Supply Time (ST) and the Operation Time (OT) respectively. The diagram below shows a navigation example for the Power Off List. Navigation Example – PowerOff List Menu A l a r m P o we r A l a r m a t Of f N u mb e r Esc Save/Enter 0 0 0 I I C F n n O O v e r t v e r t N S T. C M e e R O r O r S P M T OR F F Me a t a t u s L I MI T E 2 I T S O n v e r t e r OF F Me a r i p T i me T 9 5 : 2 0 : 1 2 T 4 5 : 2 0 : 1 2 I M M M n 0 0 0 v 0 0 0 e r t e r 2 + 4 + 8 + I M M M n 0 0 0 v 0 2 3 e r t e r O 9 + 9 5 5 0 3 9 I M M M n 0 0 0 v 6 0 2 e r t e r 4 + 6 + 6 + OF F Me 1 4 5 2 r p 4 5 0 r p 5 5 . 3 N a m M M F F Me a 5 5 . 4 N m 1 V d c 4 V a c ▲ ▲ ▲ ▲ ▲ ▲ OF F 3 2 . 0 . 1 5 . Me a 4 ° C 0 H z 2 A ▲ I n v e r t e r D i g i t a l I E E s 1 ■ ■ M0 3 1 ■ O n 2 ■ F p 3 □ F Me a u t s 4 5 6 7 8 □ □ □ □ □ I M D M n 0 i 0 v 2 g 5 e r t 8 i t a 6 1 e r OF F Me a + 8 . 5 k W l O u t p u t s □ 2 □ 3 ■ 4 ■ I M M M n 0 0 0 v 5 5 6 e 8 9 0 e O O O r ( ( ( t A A A r OF F 1 ) = – 2 ) = + 3 ) = – M 8 3 1 e 5 5 0 ▲ ▲ a % % % ▲ I n v e r t e r M0 6 2 + OF F Me a 2 7 . 0 ° C 77/482 PROGRAMMING INSTRUCTIONS iDrive 9. PRODUCT MENU 9.1. Overview The Product Menu includes parameter P263 Language, allowing the user to select a dialog language; it also contains the Fire Mode enabling Password and the following information (read-only) about the product: Product Name and Type Implemented Software SW Versions Serial Number Manufacturer 9.2. List of Parameter P263 and Fire Mode Enable Password Table 10: List of parameter P263 and Fire Mode Enable Password. Parameter FUNCTION P263 Language Fire Mode Enable Password User Level BASIC BASIC 1:ENGLISH MODBUS Address 863 0 868 DEFAULT VALUE P263 Language P263 0÷4 Range Default Level Address Function CAUTION 78/482 0: ITALIANO 1: ENGLISH 2: ESPANOL 3: PORTUGUES 4: DEUTSCH 1 1: ENGLISH BASIC 863 The dialog language is factory set to English. Use parameter P263 to choose a different language. The software implemented in the display/keypad is called MMI (man/machine interface); its version is displayed in the SW screen of the Product Menu. By request, Lönne Scandinavia AS can provide the extended version of the MMI software containing languages different from the ones mentioned above. PROGRAMMING INSTRUCTIONS iDrive Product Name and Type Product Name and Type Fan control: bits 0 to 3 0 ÷ 3 – see Table 16 Voltage class: bits 4 to 7 0 ÷ 3 – see Table 12 Drive size: bits 8 to 15 0 ÷ 81 – see Table 11 Type: 1593 This screen displays the name of the product (iDrive) and the type of product (see example below). Range Address Function P P T r E y o d N T p e u c A 0 t 0 2 N a m e 0 4 T _ The product name (iDrive) appears in the second line of the display/keypad. The third line shows the voltage class, the size of the drive and the type of fan control. In the case shown in the example, the voltage class is 4T (400V), the size of the drive is 0020 and the fan operation is not controlled by the drive (character _ ). The numbers corresponding to the different models of the IDrive Drive are given in the table below: Table 11: Indexes corresponding to the different models (sizes) of the IDrive Drive. Index 0 1 2 3 4 5 6 7 8 9 10 11 12 13 14 15 16 17 18 19 Model 0003 0004 0005 0006 0007 0008 0009 0010 0011 0012 0013 0014 0015 0016 0017 0018 0019 0020 0021 0022 Index 20 21 22 23 24 25 26 27 28 29 30 31 32 33 34 35 36 37 38 39 Model 0023 0024 0025 0030 0032 0033 0034 0035 0036 0037 0038 0040 0042 0049 0051 0060 0062 0067 0069 0074 Index 40 41 42 43 44 45 46 47 48 49 50 51 52 53 54 55 56 57 58 59 Model 0076 0086 0088 0113 0129 0131 0150 0162 0164 0172 0179 0180 0181 0200 0201 0202 0216 0217 0218 0250 Index 60 61 62 63 64 65 66 67 68 69 70 71 72 73 74 75 76 77 78 79 Model 0259 0260 0290 0312 0313 0314 0366 0367 0368 0399 0401 0402 0457 0459 0523 0524 0526 0598 0599 0600 Index 80 81 82 83 84 85 86 87 88 89 90 91 92 93 94 95 96 Model 0748 0749 0750 0800 0828 0831 0832 0850 0960 0964 0965 1128 1129 1130 1296 1800 2076 Table 12: Voltage classes of the PD. Index 0 1 2 3 Class 2T 4T 5T 6T 79/482 PROGRAMMING INSTRUCTIONS iDrive The type of fan control is marked by 3 characters: Table 13: Fan control modes. Character Description F The fan activation is controlled by the inverter. S The fan operation is correct: when a fan fault is detected, the relevant alarm trips. A NTC sensor is fitted, that acquires the heatsink temperature. The fan activation threshold N is set in parameter C264. Table 14: Coding for fan activation Code 0 1 2 3 4 5 6 7 Symbol ---SF-FS--N -SN F-N FSN Fan control No No Yes Yes No No Yes Yes Fan status No Yes No Yes No Yes No Yes NTC No No No No Yes Yes Yes Yes SW Application SW Application Function This screen displays the type of software application which is implemented in the drive (e.g. Multipump, Regenerative, etc...). See Lönne Scandinavia AS’s Catalogue about Software Accessories. For the application software downloading instructions see the relevant User Manuals. Range 0 ÷ 65535 User SW Versions SW Versions Address Function 0 ÷ 65.535 Texas: 233 MMI: 1489 Motorola: 1487 This screen displays the SW versions implemented on the IDrive drive: Texas → SW version of the DSP Texas MMI → SW version of the display/keypad Motorola → SW version of Motorola microprocessor Serial Number Serial Number Range Address Function 80/482 0 ÷ 9999999 0 ÷ 9999999 1827-1828 (LSWord, MSWord) This is the serial number of the drive. The serial number is required when contacting LÖNNE SCANDINAVIA AS’s CUSTOMER SERVICE in order to activate the Fire Mode. This measure is expressed in 32 bits divided into two 16-bit words: the low part and the high part. PROGRAMMING INSTRUCTIONS iDrive Fire Mode Enable Password Fire Mode Enable Password 0 ÷ 9999 Range Default Level Address Function CAUTION 0 ÷ 9999 0 0 BASIC 868 To enable the Fire Mode, please contact LÖNNE SCANDINAVIA AS’s CUSTOMER SERVICE and give the Serial Number of the drive where the Fire Mode is to be activated. Enter the password given by the Customer Service. The Fire Mode Enable Password is set to 0 when the Restore Default is performed. Manufacturer Manufacturer Function The name of Lönne Scandinavia AS is displayed followed by Lönne Scandinavia AS’s website (santerno.com). You can also send a Modbus query message to read the product ID. Product ID Product ID Range Address Function 1 ÷ 65535 476 You can read the product ID from address 476. The eight high bits give the first character of the ID, the eight low bits give the second character of the product ID. E.g. for PD (IDrive Drive): MODBUS value read from address 476: 20548d → 0x5044H 50H → Character ‘P’ 44H → Character ‘D’ 81/482 PROGRAMMING INSTRUCTIONS iDrive 10. PASSWORD AND USER LEVEL MENU 10.1. Overview The Password and User Level menu allows changing the programming parameters and sets their visibility. • • • • P000 enables parameter modification P001 sets the user level P002 allows to change the password set in P000 P003 conditions required to change C parameters 10.2. List of Parameters P000 to P003 Table 15: List of parameters P000 to P003. Paramete r FUNCTION User Level DEFAULT VALUES MODBUS Address P000 Write enable BASIC 00001 513 P001 Programming level BASIC 0:[Basic] 514 P002 Write enable password ENGINEERING 00001 510 P003 Conditions required to change C parameters ADVANCED StandBy+Fluxing 509 P000 Write Enable Factory setting is P000 = 1 (parameter write is enabled). To access parameter P000 allowing parameter write, access the Password and User Level Menu from the Parameters Menu. P000 Range 00000÷32767 Default Level 00001 00001 BASIC Cannot be accessed via serial link. Parameter write via serial link is always enabled. Set the correct value in P000 to enable parameter write. The default password for P000 is 00001. You can enter a custom password in P002. Address Function 82/482 00000: [No] ÷32767 PROGRAMMING INSTRUCTIONS iDrive P001 User Level P001 Range Default Level Address Function 0÷2 0: Basic 1: Advanced 2: Engineering 0 0 : Basic BASIC 514 The inverter programming parameters are grouped by access levels based on their functions (more or less complex functions). Some menus, or some parts of menus, are not displayed when a given access level is selected. When the BASIC access level is selected once the inverter parameterization is correct, navigation is easier, as only frequently accessed parameters are displayed. The User Level is stated for each parameter. P002 Password for Write Enable P002 Range Default Level Address Function CAUTION 00001 ÷ 32767 00001 ÷ 32767 00001. ENGINEERING 510 Once write is enabled after entering the correct password in P000, you can use parameter P002 to enter a custom password. The new password allowing parameter write enable is the value entered in P002. Note it down and keep it handy! P003 Conditions for C Parameter Modifications P003 Range Default Level Address Function 0÷1 0:[Stand-by only] ÷ 1:[StandBy+Fluxing] 1 1:[StandBy+Fluxing] ADVANCED 509 Factory setting allows C parameters to be programmed even when the inverter is enabled. However, the motor must be stopped. If P003=0: [Standby only], C parameters can be changed only when the inverter is disabled. This parameter also affects the behaviour of the digital inputs for LOC/REM and motor selection: when those inputs change, they produce their effect only when C parameters are allowed to be changed, according to the value in P003. CAUTION If P003 = 1:[StandBy+Fluxing] when changing a C parameter, the drive automatically disables (stops modulating) and the motor starts idling. NOTE If C020 = 0: IFD [Voltage/Frequency], C parameters may be set up when the Enable input is active and the motor is stopped independently of P003. 83/482 PROGRAMMING INSTRUCTIONS iDrive 11. DISPLAY/KEYPAD MENU 11.1. Overview NOTE It is recommended that the “Operating and Remoting the Keypad” section in the IDrive’s Installation Instructions Manual be read as well. The Display/Keypad Menu contains programming parameters to do the following: Set the navigation mode within the drive menus; Select the Root Page; Select measures from the Root Page and the Keypad Page; Select the type of Keypad Page displayed in Local mode; Set custom PID units of measure; Disable the LOC/REM or FWD/REV keys in the keypad. The Root Page, the Keypad Page and Local mode are detailed in the following sections. 11.2. Root Page I N V → → M E A E + + R P T E 1 5 A R R 0 0 0 C O K . 0 . 0 F [ 0 0 I r r D p p P m m ] The Root page is factory-set as the startup page to be displayed when the drive is turned on. NOTE You can access the four main menus only from the root page: MEA → Measures; PAR → Programming parameters; CF → Configuration parameters; IDP → Product identification. Line 1 on this page displays the drive operating status (see the description of parameter M089). Lines 2 and 3 display two measures which may be selected with parameters P268, P268a. These measures can be scaled through parameters P268y and P268z. Line 4 displays the four main menus of the drive. The selected menu is displayed in square brackets: use the ▲ and ▼ keys to select a different menu. Press the SAVE/ENTER key to access the selected menu. 84/482 PROGRAMMING INSTRUCTIONS 11.3. iDrive Keypad Page and Local Mode → → → R e f → → → R M M M e + + 0 0 6 0 2 6 0 0 4 f + Keypad + + 0 . 1 5 0 0 . 0 . 0 0 0 0 0 0 . r r H 0 p p z A m m Keypad Help M o t . F r e I ( R M S ) M o t o r S 1 5 0 0 . 0 0 q O p r . u t d p m SAVE/ ENTER To access the Keypad pages, press the MENU key from the Root Page or press the LOC/REM key after selecting the Local mode. The measures displayed on the Keypad page can be set up through parameters P268b to P268e. From the Keypad page, press the SAVE/ENTER key to display the Keypad Help page, describing the measures displayed on the Keypad page. The Keypad Help page is displayed for a few seconds. NOTE If parameter P264b (Navigation mode via MENU key) is set to Operator, navigation is locked once the Keypad Page is displayed. Hold down the ESC key for a few seconds to resume navigation. The following Keypad Pages are available: Measures only → four lines displaying measures only Speed → line 4 shows the speed reference, that can be changed with the ▲ and ▼ keys. Torque → line 4 shows the torque reference, that can be changed with the ▲ and ▼ keys. Limit Torque → line 4 shows the limit torque reference, that can be changed with the ▲ and ▼ keys. PID → line 4 shows the PID reference, that can be changed with the ▲ and ▼ keys. If the Local Mode is NOT selected, pressing the MENU key allows viewing only the pages containing the references sent via keypad (see the CONTROL METHOD MENU and the PID CONFIGURATION MENU). LOCAL MODE In LOCAL mode (the L-CMD and L-REF LEDs come on when the Local mode is active), only the commands and references sent via keypad are enabled, while any other control source or reference source is disabled (see the CONTROL METHOD MENU, the DIGITAL INPUTS MENU and the INPUTS FOR REFERENCES MENU). The keypad page displayed when the LOC/REM key is pressed depends on the setting of parameter P266 (Type of Keypad Page in Local Mode): P266 = Measures Only → Page containing 4 preset measures; no reference can be changed. P266 = Ref.Activated → Line 4 in the Keypad Page enables changing the drive reference: the speed reference if a speed control is activated (“Ref” displayed), the torque reference if a torque control is activated (“TRef” displayed). If the drive reference is the PID output (C294 PID Action = 1:[Reference]), the PID reference is given (“PRef” displayed). Use the ▲ and ▼ keys to change the reference displayed in line 4 on the Keypad Page. P266 = Ref.Activated+Spd → To be used only when the drive reference depends on the PID output when a speed control is used (C294 PID Action = 1:[Reference]). When the LOC/REM key is pressed for the first time, “PRef” is displayed in line 4 and the PID reference may be adjusted; when the LOC/REM key is pressed twice, the PID is disabled and the speed reference can be changed (“Ref” displayed). Use the▲ and ▼ keys to change the reference shown in line 4 on the Keypad Page. 85/482 PROGRAMMING INSTRUCTIONS iDrive 11.4. List of Parameters P264 to P269 Table 16: List of parameters P264 to P269. Parameter FUNCTION P264 Navigation mode P264a Circular navigation Navigation mode with the MENU P264b key P265 Root page Type of Keypad page in Local P266 Mode P267 Preset PID units of measure P267a Custom PID units of measure P267b Preset PID2 units of measure P267c Custom PID2 units of measure User Level ADVANCED ADVANCED DEFAULT SETTING 0 :[BY MENU] 1: [YES] MODBUS Address 864 865 ADVANCED 0:[STANDARD] 512 ADVANCED 3: [Start Up] 866 ADVANCED 1:[Ref.Activated] 511 ENGINEERING ENGINEERING ENGINEERING ENGINEERING 0:[Disable] [%] 0:[Disable] [%] 867 1867 861 1869 cannot be accessed P268 Measure n.1 on Root page ADVANCED M004 Motor Spd P268y Scaling of Measure n.1 on Root page ADVANCED 100.00% P268a Measure n.2 on Root page ADVANCED M000 Speed Ref. P268z Scaling of Measure n.2 on Root page ADVANCED 100.00% P268b Measure n.1 on Keypad page ADVANCED M006 Mot.Freq. P268c Measure n.2 on Keypad page ADVANCED M026 Motor Current P268d Measure n.3 on Keypad page ADVANCED M004 Motor Spd P268e Measure n.4 on Keypad page ADVANCED M000 Speed Ref. ENGINEERING [NO NO] P269 Disable LOC/REM FWD/REV keys 515 cannot be accessed 516 cannot be accessed cannot be accessed cannot be accessed cannot be accessed 869 P264 Navigation Mode P264 Range Default Level Address Function NOTE 86/482 0÷2 0: By Menu 1: Changed Pars Only 2: Linear 0 0: By Menu ADVANCED 864 Navigation by menu is factory-set and is activated whenever the IDrive drive is powered on. Set P264=1:[Changed Pars Only] to navigate only through the parameters whose default values have been changed. In that case, linear navigation becomes active: only the parameters that have been changed are displayed in sequence. Press the ▲ and ▼ keys to go to a different parameter. Navigation is slower if only few parameters have been changed. Set P264=2:[Linear] to display parameters in sequence using the ▲ and ▼ keys. If Linear navigation is selected, parameters are no longer divided into menus and submenus. This parameter cannot be saved. Navigation by menu is restored whenever the drive is powered on. PROGRAMMING INSTRUCTIONS iDrive 87/482 PROGRAMMING INSTRUCTIONS iDrive P264a Circular Navigation P264a Range Default Level Address Function 0÷1 0: [NO] 1: [YES] 1 1: [YES] ADVANCED 865 Parameter P264a is factory set to 1:[YES]. This means that “wrap” navigation is activated: navigation starts from the first page of the selected menu. Press ▲ to go to the next page. When the last page is displayed, press ▲ again to return to the first page of the selected menu. From the first page of the selected menu, press ▼ to go to the last page of the active menu. If P264a=0: [NO], when the last page of the active menu is displayed, the ▲ key is disabled; you can only view the previous pages—up to the first page of the active menu—by pressing the ▼ key. P264b Navigation Mode with the MENU Key P264b Range Default Level Address Function 0÷1 0: [STANDARD] 1: [OPERATOR] 0 0: [STANDARD] ADVANCED 512 Press the MENU key from any parameter to go to the access page of the menu containing that parameter; press the MENU key again to go to the Root page; press the MENU key again to go to the Keypad page. If factory setting is active (P264b=0: [STANDARD]) press the MENU key from the Keypad page to go to the Root page, then to the starting parameter. If P264b=1: [OPERATOR], navigation is locked once the Keypad Page is displayed. Hold down the ESC key for a few seconds to resume navigation. This prevents inexpert users from navigating through the parameters stored to the keypad. If the Keypad page is preset as the startup page (P265=1: [Measures]) and P264b=1 :[OPERATOR], navigation is always locked. P265 Startup Page P265 Range Default Level Address Function 88/482 0÷3 0: [Root] 1: [Measures] 2: [Keypad] 3: [Start-Up] 3 3: [Start-Up] ADVANCED 866 P265 sets the page to be displayed when the drive is turned on. P265 = 0: the Root page is the startup page. P265 = 1: the Keypad Page displaying 4 measures only is the startup page. P265 = 2: The Keypad page displaying a reference in line 4 is the startup page. P265 = 3: the START-UP MENU is the startup page. PROGRAMMING INSTRUCTIONS iDrive P266 Type of Keypad Page in Local Mode P266 Range Default Level Address Function 0÷2 0: [Measures Only] 1: [Ref.Activated] 2: [Ref.Activated+Speed] 1 1: [Ref.Activated] ADVANCED 511 P266 sets the type of keypad page to be displayed in Local mode. If P266 = 0: [Measures Only] in Local mode, the reference cannot be changed. If P266 = 1: [Ref.Activated] in Local mode, the Keypad page containing the activated reference is displayed; for example, if a torque control is active, the Keypad page displayed in Local mode shows the torque reference in line 4. Use the ▲ and ▼ keys to change the torque reference. If a speed control is active and the drive reference is the PID output (C294 PID Action = 1: [Reference]), when in Local mode, you should disable the PID regulator and send a speed reference from keypad (to do so, set P266 = 2: [Ref.Activated+Speed]). When pressing the LOC/REM key to enter the Local mode, the Keypad page containing the PID reference is displayed. Use the ▲ and ▼ keys to change the PID reference. Press the LOC/REM key once again (when the drive is disabled) to disable the PID control. The Keypad page containing the speed reference is displayed. Use the ▲ and ▼ keys to change the speed reference. P267 Preset PID/PID2 Units of Measure P267 Range Default Level Address Function 0 ÷ 34 See Table 17. 0 0: [Disable] ENGINEERING 867/861 The PID/PID2 reference and PID/PID2 feedback are expressed as a percentage in measures M020, M021, M020a, M021a. Parameters P257/P457 allow setting a gain value to “scale” the PID reference and PID feedback and to obtain the following measures: M023 = P257 * M020; M024 = P257 * M021 which are properly scaled. Parameters P267/P267b (see coding of P267/P267b) sets the unit of measure for the measures above; the unit of measure can also be entered in parameter P267a/P267c (only if P267/P267b = 0: [Disable]). Example: the PID reference is 100%; M020 = 100%; if P257 = 0.04 and P267 = 1: [bars], the scaled measure for the PID reference is → M023 = 4.00 bars. 89/482 PROGRAMMING INSTRUCTIONS iDrive Table 17: Preset PID units of measure. Unit of Measure Customized bar mbar atm Pa kPa PSI m3/s m3/min m3/h l/s l/min l/h ° °C °F Nm kgm P267/P267b 0: Disabled 1: bar 2: mbar 3:atm 4: Pa 5: kPa 6: PSI 7: m3/s 8: m3/m 9: m3/h 10: l/s 11: l/m 12: l/h 13: ° 14: °C 15: °F 16: Nm 17: kgm Item Displayed ----(see P267a) bar mbar atm Pa kPa PSI m3/s m3/m m3/h l/s l/m l/h ° °C °F Nm kgm Unit of measure m ft m/s ft/s rpm gal/s gal/min gal/h ft3/s ft3/min ft3/h A V W kW HP CV P267/P267b 18: m 19: ft 20: m/s 21: ft/s 22: rpm 23: GPS 24: GPM 25: GPH 26: CFS 27: CFM 28: CFH 29: A 30: V 31: W 32: kW 33: HP 34: CV Item Displayed m ft m/s ft/s rpm GPS GPM GPH CFS CFM CFH A V W kW HP CV P267a/P267c Custom PID/PID2 Units of Measure P267a Range Default Level Address Function NOTE 90/482 0x20 ÷ byte) 0x8A 0x015D255B (every ASCII 0x20 = blank ASCII 0x8A = ASCII 0x5D = [ ASCII 0x25 = % ASCII 0x5B = ] ⇒ [%] ENGINEERING (This is a 32-bit data item) Characters are 8-bit ASCII encoded; there are 1867/1869 three 8-bit characters starting from the less significant bit. Bit 24 must always be set to 1. Parameter P267a/P267c is active only if P267/P267b = 0: [Disable] and it relates to the unit of measure actually displayed in M023, M024, M023a, M024a. This parameter allows setting a 3-character string to display the units of measures for the PID Measures: M023, M024, M023a, M024a. Press the SAVE/ENTER key to edit each character: when a flashing cursor appears on the left of each character, press ▲ and ▼ to scroll all the characters displayed. Press the ESC key to go to the next character. Press SAVE/ENTER to store the new parameter value. See also parameter P257/P457 in the PID PARAMETERS MENU. PROGRAMMING INSTRUCTIONS iDrive P268 (P268a) Measure n.1 (n.2) on Root Page P268 / P268a Range Default Level Address Function M000 ÷ M090 (see the MEASURES MENU) P268 → M004 Motor Spd P268a → M000 Speed Ref. ADVANCED Cannot be accessed via serial link. These two parameters allow selecting two measures to be displayed on the Root Page. P268y (P268z) Scaling of Measure n.1 (n.2) on Root page P268y / P268z Range Default Level Address Function 0 ÷ 10000 0 ÷ 100.00% 10000 100.00% ADVANCED 515 / 516 These parameters allow scaling the read-out of the measures on the Root page which have been selected with parameters P268 and P268a. P268b (P268c, P268d, P268e) Measure n.1 (n.2, n.3, n.4) on Keypad Page P268b, P268c, P268d, P268e Range Default Level Address Function NOTE M000 ÷ M090 (see the MEASURES MENU) P268b → M006 Mot.Freq. P268c → M026 Motor Current P268d → M004 Motor Spd P268e → M000 Speed Ref. ADVANCED Cannot be accessed via serial link. These four parameters allow selecting four measures to be displayed on the Keypad Page. Measure n. 4 is available in the measure Keypad page only. The reference to measure n. 4 is available for the remaining Keypad pages. P269 Disable LOC/REM FWD/REV Keys P269 Range Default Level Address Function 0÷3 0:[No No] - 3:[YES YES] 0 0:[No No] ENGINEERING 869 This parameter allows disabling the LOC/REM and/or the FWD/REV key. This is a bit-controlled parameter: bit 0 relates to LOC/REM, while bit 1 relates to FWD/REV. Set 0 to select [NO], set 1 to select [Yes]. P269 = 0 → both keys are enabled. P269 = 1 → the LOC/REM key is disabled. P269 = 2 → the FWD/REV key is disabled. P269 = 3 → both keys are disabled. 91/482 PROGRAMMING INSTRUCTIONS iDrive 12. RAMPS MENU 12.1. Overview An acceleration/deceleration ramp is a function allowing linear variations of the motor speed. The ramp time is the time the motor takes to reach its max. speed when it starts from zero speed (or the time the motor takes to reach 0 speed when decelerating). Four pairs of programmable values are available. Each pair defines the motor acceleration time and deceleration time. The unit of measure of the basic time period is assigned to each pair of values. In the Ramps menu, you can set the acceleration and deceleration times for the four speed ramps available for ordinary operation, for the torque ramp and the speed/torque ramp in JOG mode. Using two special parameters, you can also set the start rounding off and the end rounding off for the acceleration ramps, while two different parameters allow setting the start rounding off and the end rounding off for the deceleration ramps. A fifth parameter allows selecting the ramps for the preset rounding off. 12.1.1. D ESCRIPTION OF THE S PEED R AMPS For the four speed ramps that can be selected through a combination of the digital inputs set in C167 and C168, you can set the following: acceleration time, deceleration time and their units of measure, allowing increasing the programmable time range. P009 Ramp Up Time 1 P010 Ramp Down Time 1 P012 Ramp Up Time 2 P013 Ramp Down Time 2 P014 Unit of Measure for Ramp Times 1 and 2 P015 Ramp Up Time 3 P016 Ramp Down Time 3 P018 Ramp Up Time 4 P019 Ramp Down Time 4 P020 Unit of Measure for Ramp Times 3 and 4 The set ramp time corresponds to the time the speed reference takes to reach the max. speed (from 0 rpm) as an absolute value between min. speed and max. speed of the selected motor (C028 and C029 for motor 1, and so on). The time unit of measure may have the following values: 0 → 0.01 s 1 → 0.1 s 2→1s 3 → 10 s The programmable range may be 0s – 327000s. Example of a speed ramp: Table 18: Example of a Speed Ramp. P014 92/482 Value 0 1 Coding 0.01 s 0.1 s 2 3 1s 10 s Range P009 – P010 Min. Max. 0 327.00 s 0 3270.0 s 0 0 32700 s 327000 s PROGRAMMING INSTRUCTIONS iDrive The factory setting of the unit of measure is 0.1 s; the ramp time is 10 sec. Figure 4: Example of S ramps. You can also select the rounding off and the rounding off percentage for the 4 stages of starting ramp up and the starting ramp down, and for the end ramp up and the end ramp down (S ramps). The ramp rounding off allows reaching the reference end value with a zero tangent, both while accelerating and while decelerating, thus suppressing torque peaks that could damage mechanical couplings. The rounding off is expressed as a percentage of the ramp time it relates to; if used, it allows increasing the preset ramp time by half the sum value of the two rounding off values. Its effect is shown in the figures below. Example: P009 = 10sec ; P021 = 1111 binary (rounding off selected for all four ramps); P022 = 50%; P023 = 50% The resulting ramp up time is as follows: P009 + (( P009* (P022+P023)/2 )/100 ) = 10 + (( 10* (50+50)/2 )/100 ) = 15 sec The effect of this rounding off can be seen in the figures below: 93/482 iDrive PROGRAMMING INSTRUCTIONS The figure shows two patterns for the ramp reference. The first pattern is not rounded off; the second pattern has the same ramp times, but different rounding off values are applied to the start/end ramp up/down time. Figure 5: Speed profile without Rounding Off and with Rounding Off 2 (example). In the figures above, the run command is represented by the high level of the second signal. Note that the time the reference takes to reach constant rpm depends not only on the ramp times, but also on the rounding off values you have defined. 94/482 PROGRAMMING INSTRUCTIONS iDrive Acceleration RESET function. This parameter has effect only if S ramps are used. Parameter P031 enables to reset acceleration when reference trends change. Whenever a speed reference trend changes, the motor acceleration is instantly set to zero and the ramp output reference will be computed considering the preset rounding off (see Figure 6). The figure shows the instant when deceleration begins; the rounding off value assigned to the speed reference when the gradient changes is the value set for the deceleration starting stage. If parameter P031 is set to [No], acceleration is brought to zero before the speed reference starts decreasing, then deceleration begins with the preset pattern. Figure 6: Speed profile with Acceleration Reset - Yes to No (Example). 12.1.2. D ESCRIPTION OF THE T ORQUE R AMPS If the control algorithm is VTC or FOC and if it is controlled by setting “Torque” (C011 for motor 1, C054 for motor 2, and C097 for motor 3 respectively), the reference is “ramped“ based on the values set in parameter P026 (torque increase ramp time), P027 (torque decrease ramp time), and P028 (unit of measure for the ramp times). The ramp up time setting is the time the output torque reference takes to go from 0 to the max. value (as an absolute value) between Torque min. and Torque max. of the selected motor (C047, C048 for motor 1 and so on). 95/482 PROGRAMMING INSTRUCTIONS iDrive 12.2. List of Parameters P009 to P033 Table 19: List of parameters P009 to P033. Parameter FUNCTION Default Values See Table 74 and Table 78 See Table 74 and Table 78 See Table 74 and Table 78 See Table 74 and Table 78 See Table 74 and Table 78 See Table 74 and Table 78 See Table 74 and Table 78 See Table 74 and Table 78 See Table 74 and Table 78 See Table 74 and Table 78 See Table 74 and Table 78 MODBUS Address ADVANCED 50% 622 ADVANCED 50% 623 ADVANCED 50% 624 ADVANCED ADVANCED ADVANCED ADVANCED ADVANCED ADVANCED ADVANCED 50% 5s 5s 0.1 s 1s 1s 1 : [YES] See Table 74 and Table 78 See Table 74 and Table 78 625 626 627 628 629 629 630 User Level P009 Speed ramp 1: acceleration time BASIC P010 Speed ramp 1: deceleration time BASIC P012 Speed ramp 2: acceleration time ADVANCED P013 Speed ramp 2: deceleration time ADVANCED P014 Speed ramps 1and 2: time unit of measure ADVANCED P015 Speed ramp 3: acceleration time ADVANCED P016 Speed ramp 3: deceleration time ADVANCED P018 Speed ramp 4: acceleration time ADVANCED P019 Speed ramp 4: deceleration time ADVANCED P020 Speed ramps 3 and 4: time unit of measure ADVANCED P021 Selection for S ramp rounding off ADVANCED P025 P026 P027 P028 P029 P030 P031 Acceleration S ramp: start rounding off time Acceleration S ramp: end rounding off time Deceleration S ramp: start rounding off time Deceleration S ramp: end rounding off time Torque ramp time: up Torque ramp time: down Unit of measure for torque ramp time Jog ramp acceleration time Jog ramp deceleration time Gradient variation acceleration reset P032 Fire Mode Ramp: acceleration time ENGINEERING P033 Fire Mode Ramp: deceleration time ENGINEERING P022 P023 P024 609 610 612 613 614 615 616 618 619 620 621 632 633 P009 Speed Ramp 1: Acceleration Time P009 Range Default Level Address Function 96/482 0 ÷ 32700 0 ÷327.00 s if P014=0 → 0.01 s 0 ÷3270.0 s if P014=1 → 0.1 s 0 ÷32700 s if P014=2→ 1 s 0 ÷327000 s if P014=3 → 10 s See Table 74 and Table 78 BASIC 609 Determines the time the reference takes to go from 0 rpm to the max. preset speed (considering the max. value between absolute values for max. speed and min. speed set for the selected motor). If S ramps are used, the actual time the reference takes to reach constant rpm exceeds the time set in P009 for a percentage equal to (P022+P023)/2. PROGRAMMING INSTRUCTIONS iDrive 97/482 PROGRAMMING INSTRUCTIONS iDrive P010 Speed Ramp 1: Deceleration Time P010 Range Default Level Address Function 0 ÷ 32700 0 ÷327.00 s if P014=0 → 0.01 s 0 ÷3270.0 s if P014=0 → 0.1 s 0 ÷32700 s if P014=0 → 1 s 0 ÷327000 s if P014=0 → 10 s See Table 74 and Table 78 BASIC 610 Determines the time the reference takes to go from the max. preset speed (considering the max. value between absolute values for max. speed and min. speed set for the selected motor) to zero rpm. If S ramps are used, the actual time the reference takes to reach 0 speed exceeds the time set in P010 for a percentage equal to (P024+P025)/2. P012 Speed Ramp 2: Acceleration Time P012 Range NOTE 0 ÷ 32700 Default Level Address See Table 74 and Table 78 ADVANCED 612 Function Same as ramp 1 (see P009). 0 ÷327.00 s if P014=0 → 0.01 s 0 ÷3270.0 s if P014=0 → 0.1 s 0 ÷32700 s if P014=0 → 1 s 0 ÷327000 s if P014=0 → 10 s Values for ramp 2 can be applied to the reference provided that multiramp digital inputs are set up and that ramp 2 is selected (see the DIGITAL INPUTS MENU). P013 Speed Ramp 2: Deceleration Time P013 Range NOTE 98/482 0 ÷ 32700 Default Level Address See Table 74 and Table 78 ADVANCED 613 Function Same as ramp 1 (see P010). 0 ÷327.00 s if P014=0 → 0.01 s 0 ÷3270.0 s if P014=0 → 0.1 s 0 ÷32700 s if P014=0 → 1 s 0 ÷327000 s if P014=0 → 10 s Values for ramp 2 can be applied to the reference provided that multiramp digital inputs are set up and that ramp 2 is selected (see the DIGITAL INPUTS MENU). PROGRAMMING INSTRUCTIONS iDrive P014 Speed Ramps 1 and 2: Time Unit of Measure P014 Range Default Level Address Function 0÷3 0 → 0.01 s 1→ 0.1 s 2→ 1 s 3→ 10 s See Table 74 and Table 78 ADVANCED 614 Defines the unit of measure for the time periods for speed ramp 1 (P009 and P010), for speed ramp 2 (P012 and P013), and for ramps in Fire Mode (P032 and P033). The allowable programmable range may be extended from 0 s to 327000s. E.g. P014=1 then P009=100; this means P009 = 100 x 0.1 s = 10 s P014=0 then P009=100; this means P009 = 100 x 0.01 s = 1 s P014=3 then P009=100; this means P009 = 100 x 10 s = 1000 s P015 Speed Ramp 3: Acceleration Time P015 Range NOTE 0 ÷327.00 s if P020=0 → 0.01 s 0 ÷3270.0 s if P020=0 → 0.1 s 0 ÷32700 s if P020=0 → 1 s 0 ÷327000 s if P020=0 → 10 s 0 ÷ 32700 Default Level Address See Table 74 and Table 78 ADVANCED 615 Function Same as ramp 1 (see P009). Values for ramp 3 can be applied to the reference provided that multiramp digital inputs are set up and that ramp 3 is selected (see the DIGITAL INPUTS MENU). P016 Speed Ramp 3: Deceleration Time P016 Range NOTE 0 ÷ 32700 0 ÷327.00 s if P020=0 → 0.01 s 0 ÷3270.0 s if P020=0 → 0.1 s 0 ÷32700 s if P020=0 → 1 s 0 ÷327000 s if P020=0 → 10 s Default Level Address See Table 74 and Table 78 ADVANCED 616 Function Same as ramp 1 (see P010). Values for ramp 3 can be applied to the reference provided that multiramp digital inputs are set up and that ramp 3 is selected (see the DIGITAL INPUTS MENU). 99/482 PROGRAMMING INSTRUCTIONS iDrive P018 Speed Ramp 4: Acceleration Time P018 Range NOTE 0 ÷ 32700 Default Level Address See Table 74 and Table 78 ADVANCED 618 Function Same as ramp 1 (see P009). 0 ÷327.00 s if P020=0 → 0.01 s 0 ÷3270.0 s if P020=0 → 0.1 s 0 ÷32700 s if P020=0 → 1 s 0 ÷327000 s if P020=0 → 10 s Values for ramp 4 can be applied to the reference provided that multiramp digital inputs are set up and that ramp 4 is selected (see the DIGITAL INPUTS MENU). P019 Speed Ramp 4: Deceleration Time P019 Range NOTE 0 ÷ 32700 Default Level Address See Table 74 and Table 78 ADVANCED 619 Function Same as ramp 1 (see P010). 0 ÷327.00 s if P020=0 → 0.01 s 0 ÷3270.0 s if P020=0 → 0.1 s 0 ÷32700 s if P020=0 → 1 s 0 ÷327000 s if P020=0 → 10 s Values for ramp 4 can be applied to the reference provided that multiramp digital inputs are set up and that ramp 4 is selected (see the DIGITAL INPUTS MENU). P020 Speed Ramps 3 and 4: Time Unit of Measure P020 Range Default Level Address Function 100/482 0÷3 0 → 0.01 s 1→ 0.1 s 2→ 1 s 3→ 10 s See Table 74 and Table 78 ADVANCED 620 Defines the unit of measure for the times for speed ramp 3, P015 and P016, and speed ramp 4, P020 and P018. The allowable programmable range may be extended from 0 s to 327000s. PROGRAMMING INSTRUCTIONS iDrive P021 Selection for Ramp Rounding Off P021 Range Default Level Address Function 0000b ÷ 1111b binary 0x0000 ÷ 0x000F hexadecimal 0 ÷ 15 0000b (no S ramps) 1111b (all S ramps) See Table 74 and Table 78 ADVANCED 621 In this parameter, you can select the bit corresponding to the ramp to be rounded off. Example: P021 = 0011b = 3 decimal → ramps 1 and 2 are rounded off. The ramp rounding off allows reaching the reference end value with a zero tangent, both while accelerating and while decelerating, thus suppressing torque peaks that could damage mechanical couplings. P022 Acceleration Ramp: Start Rounding Off Time P022 Range Default Level Address Function NOTE 0 ÷ 100 0 ÷ 100 % 50 50% ADVANCED 622 Sets the rounding off time period for the first stage of the acceleration ramp. This parameter is expressed as a percentage of the acceleration ramp time of the active ramp. Example: the second ramp is active with an acceleration ramp time of 5sec, P022 = 50%. Therefore, reference acceleration is limited for the first 2.5 sec of the ramp time. When using parameter P022, the preset acceleration ramp time is increased by: (P022%)/2. P023 Acceleration Ramp: End Rounding Off Time P023 Range Default Level Address Function NOTE 0 ÷ 100 0 ÷ 100 % 50 50% ADVANCED 623 Sets the rounding off time period for the end stage of the acceleration ramp. This parameter is expressed as a percentage of the acceleration ramp time of the active ramp. When using parameter P023, the preset acceleration ramp time is increased by: (P023%)/2. 101/482 PROGRAMMING INSTRUCTIONS iDrive P024 Deceleration Ramp: Start Rounding Off Time P024 0 ÷ 100 0 ÷ 100 % Default Level Address 50 ADVANCED 624 50% Function See the function for P022. The only difference is that this rounding off function is applied to the first stage of a deceleration ramp. Range NOTE When using parameter P024, the preset deceleration ramp time is increased by: (P024%)/2. P025 Deceleration Ramp: End Rounding Off Time P025 0 ÷ 100 0 ÷ 100 % Default Level Address 50 ADVANCED 625 50% Function See the function for P023. The only difference is that this rounding off function is applied to the last stage of a deceleration ramp. Range NOTE When using parameter P025, the preset deceleration ramp time is increased by: (P025%)/2. P026 Torque Ramp Time: Up P026 Range Default Level Address Function 0 ÷ 32700 Function of P028 500 50 sec ADVANCED 626 Defines the time taken by the torque reference of the selected motor to go to zero from max. value (as an absolute value between Torque min. and Torque max.); (C047–C048 for motor 1 and so on). P027 Torque Ramp Time: Down P027 Range Default Level Address Function 102/482 0 ÷ 32700 Function of P028 500 50 sec ADVANCED 627 Defines the time taken by the torque reference of the selected motor to go from max. value to zero (as an absolute value between Torque min. and Torque max.); (C047–C048 for motor 1 and so on). PROGRAMMING INSTRUCTIONS iDrive P028 Unit of Measure for Torque Ramp Time P028 Range 0÷3 0 → 0.01 s 1 → 0.1 s 2→1s 3 → 10 s 1 → 0.1 s Default Level Address 1 ADVANCED 628 Function Defines the unit of measure for the torque ramp times. See the unit of measure for ramp 1 (par. P014). P029 Jog Ramp Acceleration Time P029 0 ÷ 6500 0 ÷ 6500 sec Default Level Address 1 ADVANCED 629 1sec Function The preset time corresponds to the time the “ramped” speed/torque reference takes to go from zero to the JOG speed/torque value (P070). Range P030 Jog Ramp Deceleration Time P030 0 ÷ 6500 0 ÷ 6500 sec Default Level Address 1 ADVANCED 630 1sec Function The preset time corresponds to the time the “ramped” speed/torque reference takes to go from the JOG speed/torque value (P070) to zero. Range P031 Gradient Variation Acceleration Reset P031 Range Default Level Address Function NOTE 0÷1 0: [No] ; 1: [Yes] 1 1: [Yes] ADVANCED 631 Defines whether acceleration is reset or not when switching from acceleration to deceleration and vice versa (reference gradient). For more details, see the description of the speed ramps at the beginning of this section. Parameter P031 is interlocked with parameter C210 (Automatic extension of down ramp) so that P031 = 0:No cannot be programmed in conjunction with C210 ≠ [With resistor]. 103/482 PROGRAMMING INSTRUCTIONS iDrive P032 Fire Mode Acceleration Ramp P032 0 ÷ 327.00 s if P014=0 → 0.01 s 0 ÷ 3270.0 s if P014=1 → 0.1 s 0 ÷ 32700 s if P014=2 → 1 s 0 ÷ 327000 s if P014=3 → 10 s 0 ÷ 32700 Range Default Level Address See Table 74 and Table 78 ENGINEERING 632 Function This ramp is used to accelerate the motor when in Fire Mode. P033 Fire Mode Deceleration Ramp P033 104/482 Range 0 ÷ 32700 0 ÷ 327.00 s if P014=0 → 0.01 s 0 ÷ 3270.0 s if P014=1 → 0.1 s 0 ÷ 32700 s if P014=2 → 1 s 0 ÷ 327000 s if P014=3 → 10 s Default Level Address See Table 74 and Table 78 ENGINEERING 633 Function This ramp is used to decelerate the motor when in Fire Mode. PROGRAMMING INSTRUCTIONS iDrive 13. INPUTS FOR REFERENCES MENU 13.1. Processing Speed/Torque References The “main reference” is the value, at constant rpm, for the controlled physical variable (speed or torque) (M000, M007) “required” for the drive. This reference is acquired by the drive only if the START command is active and the drive is RUNNING, otherwise it is ignored. The main reference is the reference at constant rpm: when the drive is RUNNING, it will increment the speed or torque set–point which will reach the main reference with a timed ramp (see the RAMPS MENU). The drive operating mode is factory-set to MASTER with a speed reference. In SLAVE mode, a torque reference is used; this operating mode may be configured for VTC control (Vector Torque Control) and FOC control (Field Oriented Control) only. The control algorithm and the MASTER/SLAVE mode can be set for each of the 3 programmable motors, depending on which motor is active at that moment (motor 1, motor 2 or motor 3). To enable the SLAVE mode, set the following parameters to 1 or 2: C011 (motor 1) C054 (motor 2) C097 (motor 3) The SLAVE mode may also be selected through a digital input (see the DIGITAL INPUTS MENU). When the main reference is acquired by the drive (RUNNING on), it becomes the reference for the time ramps generating the current speed/torque set–point for the connected motor. The set up of the main reference is based on a number of parameters included in several menus: Table 20: Parameters used for the Inputs for References Menu. Parameters Menu P050 ÷ P074 References P390 ÷ P399 References from option board P080 ÷ P098 Multispeed P105 ÷ P108 P115 ÷ P121 C143 ÷ C146 C011, C028, C029 C054, C071, C072 C097, C114, C115 C047, C048 C090, C091 C133, C134 Contents Scaling parameters for references sent from analog inputs REF, AIN1, AIN2. Scaling parameters for references sent from encoder and frequency input. Parameters for changes made using the UP and DOWN keys. Parameter for JOG reference setting. Parameter for drive disabling in case of reference at min. value. Scaling parameters for references sent from analog inputs XAIN4, XAIN5. Parameters setting preset multispeed values to be selected through digital inputs. Prohibit Speed Parameters setting prohibit speed values. Reference Parameters setting slowing down values percent to be Variation Percent selected through digital inputs. Control Method Parameters setting the reference source. Control of Motor 1 Parameter setting the Master (speed) mode or the Control of Motor 2 Slave (torque) mode. Parameters setting the min. Control of Motor 3 speed or the max. speed. Current Limit for Motor 1 Current Limit for Parameters setting the min. torque and the max. Motor 2 torque. Current Limit for Motor 3 The following pages contain block diagrams illustrating speed reference processing (Figure 6) and torque reference processing (Figure 7). Menus and parameters used are also stated. 105/482 106/482 Figure 7: Speed Reference computing. 3° Motor Motor 1 Control Active motor selection 2° Motor C097, C114, C115 Motor 3 Control C054, C071, C072 Motor 2 Control C011, C028, C029 Motor 1 Control C009 P080 : P098 C143, C144, C145, C146 P050 : P064 P071 : P074 P390 : P399 Scaling Multispeed Control Method Input for Reference Saturation + Saturation Up Down Variation UP DOWN P067 : P069 Saturation P115:P121 Reference Variation Percent Speed Reference computing P105:P108 Prohibit Speed -1 P000662-b REV Inversion Cw/CCW Saturation iDrive PROGRAMMING INSTRUCTIONS C133 , C134 Motor Limits n.3 C090 , C091 Motor Limits n.2 C047 , C048 Motor Limits n.1 3° Motor Motor 1 configuration Active Motor Selection 2° Motor C009 Scaling P050 : P064 P071 : P074 P390 : P399 Input for Reference C143, C144, C145, C146 Control Method UP DOWN P067 : P069 + P000661-b -1 REV Inversion Cw/CCW Saturation Up Down Variation Saturation Torque Reference computing PROGRAMMING INSTRUCTIONS iDrive 107/482 PROGRAMMING INSTRUCTIONS iDrive Figure 8: Torque Reference computing. 108/482 PROGRAMMING INSTRUCTIONS 13.2. iDrive Scaling Analog Inputs REF, AIN1, AIN2 NOTE Please refer to the IDrive’s Installation Instructions Manual for hardware details about analog inputs. Three analog inputs are available: REF, AIN1, AIN2. They can be voltage inputs or current inputs (switching is made possible through hardware Dip–Switch SW1 and software parameters) and are bipolar analog inputs (–10V ÷ +10V or –20mA ÷ +20mA). REF input is single–ended; AIN1 and AIN2 inputs are differential inputs. Factory setting is as follows: the main speed reference is given by REF analog input, 0V ÷ +10V mode; only motor 1 is active. Its max. speed and min. speed parameters are C088=1500 rpm and C029=0 rpm respectively. For the 3 analog inputs, parameters P050 ÷ P064 allow setting the type of signal to be acquired, offset compensation (if any), scaling to obtain a speed reference or a torque reference, the signal filtering time constant. Parameter P053 sets the offset of the input analog signal (if P053=0 offset is zero), while parameter P054 defines the filtering time constant (factory setting: P054 = 5ms). Type of input: for each analog input, Dip–Switch SW1 allows setting the acquisition method of the input signal: voltage signal or current signal. The voltage signal can be bipolar (–10V ÷ +10V) or unipolar (0V ÷ +10V). The current signal can be bipolar (–20mA ÷ +20mA), unipolar (0mA ÷ +20mA) or can have a minimum offset (4mA ÷ 20mA). The user will set each analog input mode in parameters P050, P055, P060. Table 21: Analog Input Hardware Mode. Type / Terminals Name Single-ended input/ 1,2 REF Differential input / 5,6 AIN1 Differential input / 7,8 AIN2 Type ±10V Input 0–20mA Input ±10V Input 0–20mA Input ±10V Input 0–20mA Input PTC Input Dip–Switch SW1–1 off SW1–1 on SW1–2 off SW1–2 on SW1–3 off, SW1–4 5 off SW1–3 on, SW1–4 5 off SW1–3 off, SW1–4 5 on Parameter P050 P055 P060 See note NOTE If AIN2 input is configured as PTC, refer to the MOTOR THERMAL PROTECTION MENU to select the proper parameters. Its measures are no longer valid. NOTE Configurations different from the ones stated in the table above are not allowed. CAUTION For each analog input (REF, AIN1, AIN2), make sure that the “mode” parameter setting (P050, P055, P060) matches with the setting of the relevant SW1 Dip–Switches. Scaling is obtained by setting the parameters relating to the linear function for the conversion from the value read by the analog input to the corresponding speed/torque reference value. The conversion function is a straight line passing through 2 points in Cartesian coordinates having the values read by the analog input in the X-axis, and the speed/torque reference values multiplied by the reference percentage parameters in the Y-axis. Each point is detected through its two coordinates. The ordinates of the two points are the following: the value of Speed_Min (or Trq_Min for the torque reference) multiplied by the percentage set through P051a/P056a/P061a/P071a/P073a for the first point; the value of Speed_Max (or Trq_Max for the torque reference) multiplied by the percentage set through P052a/P057a/P062a/P072a/P074a for the second point. 109/482 PROGRAMMING INSTRUCTIONS iDrive Speed_Min depends on the selected motor: see parameter C028 (motor 1), C071 (motor 2), or C114 (motor 3). Trq_Min depends on the selected motor: see parameter C047 (motor 1), C090 (motor 2) or C133 (motor 3). Speed_Max depends on the selected motor: see parameter C029 (motor 1), C072 (motor 2) or C115 (motor 3). Trq_Max depends on the selected motor: see parameter C048 (motor 1), C091 (motor 2), or C134 (motor 3). The X-axis values of the two points depend on the analog input: REF Input: Parameter P051 is the X-axis value of the first point; parameter P052 is the X-axis value of the second point. AIN1Input: Parameter P056 is the X-axis value of the first point; parameter P057 is the X-axis value of the second point. Input AIN2: Parameter P061 is the X-axis value of the first point; parameter P062 is the X-axis value of the second point. The figure below illustrates how parameters set computing the signals for speed (or torque) analog reference. Figure 9: Computing Speed Analog Reference from terminal board: AIN1. 110/482 PROGRAMMING INSTRUCTIONS iDrive The figures below illustrate programming examples for REF analog input, if motor 1 is selected and in MASTER mode: speed reference. Figure 10: Computing Inputs REF (1) and (2) (examples). The setup in the first part of the figure is as follows: P050 = 3 P051 = 1V; P051a = 100%; P052 = 10V; P052a = 100% Speed_Min = C028 = 100 rpm; Speed_Max = C029 = 1100 rpm The setup in the second part of the figure is as follows: P050 = 3 P051 = 1V; P051a = 100%; P052 = 10V; P052a = 100% Speed_Min = C028 = 1200 rpm; Speed_Max = C029 = 400 rpm - 111/482 PROGRAMMING INSTRUCTIONS iDrive Figure 11: Computing REF Input (Example 3). The Setup in Figure 11 is as follows: P050 = 0 P051 = –5V; P051a = 100%; P052 = +8V; P052a = 100% Speed_Min = C028 = 300 rpm; Speed_Max = C029 =1450 rpm 112/482 PROGRAMMING INSTRUCTIONS 13.3. iDrive List of Parameters P050 to P074a Table 22: List of parameters P050 to P074a. ADVANCED ADVANCED DEFAULT VALUE 3: 0÷10V 0.0V MODBUS Address 650 651 ADVANCED 100.0% 675 ADVANCED 10.0V 652 ADVANCED 100.0% 676 ADVANCED ADVANCED ADVANCED ADVANCED 0V 5 ms 2: 4÷20mA 4.0mA 653 654 655 656 ADVANCED 100.0% 677 ADVANCED 20.0mA 657 ADVANCED 100.0% 678 ADVANCED ADVANCED ADVANCED ADVANCED 0mA 5 ms 2: 4÷20mA 4.0mA 658 659 660 661 ADVANCED 100.0% 679 ADVANCED 20.0mA 662 ADVANCED 100.0% 701 ADVANCED ADVANCED ADVANCED ADVANCED ADVANCED ADVANCED ADVANCED ADVANCED 0mA 5 ms 0 0s Quadratic YES 0:[NO] 0:[NO] 663 664 665 666 667 668 940 941 ADVANCED 0:[NO] 942 ADVANCED ADVANCED ADVANCED ADVANCED 0:[NO] 1: Unipolar 0% 10 kHz 943 669 670 671 ADVANCED 100.0% 713 ADVANCED 100 kHz 672 ADVANCED 100.0% 714 ADVANCED –1500 rpm 673 ADVANCED 100.0% 702 ADVANCED +1500 rpm 674 ADVANCED 100.0% 703 Parameter FUNCTION User Level P050 P051 Type of signal over REF input Value of REF input producing min. reference (X-axis) Percentage of Speed_Min/Trq_Min producing min. reference (Y-axis related to P051) Value of REF input producing max. reference (X-axis) Percentage of Speed_Max/Trq_Max producing max. reference (Y-axis related to P052) Offset over REF input Filtering time over REF input Type of signal over AIN1 input Value of AIN1 input producing min. reference (X-axis) Percentage of Speed_Min/Trq_Min producing min. reference (Y-axis related to P056) Value of AIN1 input producing max. reference (Xaxis) Percentage of Speed_Max/Trq_Max producing max. reference (Y-axis related to P057) Offset over AIN1 input Filtering time over AIN1 input Type of signal over AIN2 input Value of AIN2 input producing min. reference (X-axis) Percentage of Speed_Min/Trq_Min producing min. reference (Y-axis related to P061) Value of AIN2 input producing max. reference (Xaxis) Percentage of Speed_Max/Trq_Max producing max. reference (Y-axis related to P062) Offset over AIN2 input Filtering time over AIN2 input Minimum reference and START disabling threshold START disable delay at P065 threshold Keypad and terminal board UP/DOWN ramp Storage of UP/DOWN values at Power Off Reset UP/DOWN speed/torque at Stop Reset UP/DOWN PID at Stop Reset UP/DOWN speed/torque at Source Changeover Reset UP/DOWN PID at Source Changeover Range of UP/DOWN reference Jog reference (speed/torque) Value of FIN producing min. reference (X-axis) Percentage of Speed_Min/Trq_Min producing min. reference (Y-axis related to P071) Value of FIN producing max. reference (X-axis) Percentage of Speed_Max/Trq_Max producing max. reference (Y-axis related to P072) Value of ECH producing min. reference (X-axis) Percentage of Speed_Min/Trq_Min producing min. reference (Y-axis related to P073) Value of ECH producing max. reference (X-axis) Percentage of Speed_Max/Trq_Max producing max. reference (Y-axis related to P074) P051a P052 P052a P053 P054 P055 P056 P056a P057 P057a P058 P059 P060 P061 P061a P062 P062a P063 P064 P065 P066 P067 P068 P068a P068b P068c P068d P069 P070 P071 P071a P072 P072a P073 P073a P074 P074a 113/482 iDrive 114/482 PROGRAMMING INSTRUCTIONS PROGRAMMING INSTRUCTIONS iDrive P050 Type of Signal over REF Input P050 0÷4 Range Default Level Address Function NOTE 0: ± 10 V 1: ± 20 mA 2: 4 ÷ 20 mA 3: 0 ÷ 10 V 4: 0 ÷ 20 mA 3: 0 ÷ 10 V 3 ADVANCED 650 This parameter selects the type of single–ended, analog signal over the REF terminal in the terminal board. The signal can be a voltage signal, a current signal, a unipolar signal, or a bipolar signal. 0: ± 10 V Bipolar voltage input between –10V and +10V. The detected signal is saturated between these two values. 1: ± 20 mA Bipolar current input between –20mA and +20mA. The detected signal is saturated between these two values. 2: 4 ÷ 20 mA Unipolar current input with min. threshold, between +4 mA and +20mA. The detected signal is saturated between these two values. Before being saturated, if the detected signal is lower than 4 mA or greater than 20 mA, alarms A066 or A102 trip. 3: 0 ÷ 10 V Unipolar voltage input between 0V and +10V. The detected signal is saturated between these two values. 4: 0 ÷ 20 mA Unipolar current input between +0 mA and +20mA. The detected signal is saturated between these two values. The value set in parameter P050 must match with the status of SW1–1 switch allowing selecting the proper electric circuit for the analog signal processing (voltage signal or current signal). P051 Value of REF Input Producing Min. Reference (X-axis) P051 Range Default Level Address Function –100 ÷ 100, if P050 = 0 –200 ÷ 200, if P050 = 1 +40 ÷ 200, if P050 = 2 0 ÷ 100, if P050 = 3 0 ÷ 200, if P050 = 4 –10.0 V ÷ 10.0 V, if P050 = 0: ± 10 V –20.0 mA ÷ 20.0 mA, if P050 = 1: ± 20 mA +4.0mA ÷ 20.0 mA, if P050 = 2: 4 ÷ 20 mA 0.0 V ÷ 10.0V, if P050 = 3: 0 ÷ 10 V 0.0 mA ÷ 20.0 mA, if P050 = 4: 0 ÷ 20 mA 0 0V ADVANCED 651 This parameter selects the value for REF input signal for minimum reference, or better the reference set in C028xP051a (Master mode) or in C047xP051a (Slave mode). If motor 2 is active, C071 and C090 will be used instead of C028 and C047; if motor 3 is active, the values set in C114 and C133 will be used. P051a Percentage of Speed_Min/Trq_Min Producing Min. Reference (Y-axis related to P051) P051a Range Default Level Address Function 0 ÷ 1000 100.0% 1000 100.0% ADVANCED 675 This parameter represents the min. speed percentage (or the min. torque percentage for a torque reference) to be used for the minimum reference set with P051. 115/482 PROGRAMMING INSTRUCTIONS iDrive P052 Value of REF Input Producing Max. Reference (X-axis) P052 Range Default Level Address Function –100 ÷ 100, if P050 = 0 –200 ÷ 200, if P050 = 1 +40 ÷ 200, if P050 = 2 0 ÷ 100, if P050 = 3 0 ÷ 200, if P050 = 4 –10.0 V ÷ 10.0 V, if P050 = 0: ± 10 V –20.0 mA ÷ 20.0 mA, if P050 = 1: ± 20 mA +4.0mA ÷ 20.0 mA, if P050 = 2: 4 ÷ 20 mA 0.0 V ÷ 10.0V, if P050 = 3: 0 ÷ 10 V 0.0 mA ÷ 20.0 mA, if P050 = 4: 0 ÷ 20 mA 100 10.0 V ADVANCED 652 This parameter selects the value for REF input signal for maximum reference, or better the reference set in C029xP052a (Master mode) or in C048xP052a (Slave mode). If motor 2 is active, C072 and C091 will be used instead of C029 and C048; if motor 3 is active, the values set in C115 and C134 will be used. P052a Percentage of Speed_Max/Trq_Max Producing Max. Reference (Y-axis related to P052) P052a Range Default Level Address Function 0 ÷ 1000 100.0% 1000 100.0% ADVANCED 676 This parameter represents the max. speed percentage (or the max. torque percentage for a torque reference) to be used for the maximum reference set with P052. P053 Offset over REF Input P053 Range Default Level Address Function –2000 ÷ 2000 –10.00 V ÷ +10.00 V, if P050 = 0 or 3 – 20.00 mA ÷ +20.00 mA, if P050 = 1,2,4 0 0V ADVANCED 653 This parameter selects the offset correction value of the REF analog signal that has been measured. The value set is added to the signal measured before saturation or conversion; its unit of measure is the same as the one of the signal selected for REF analog input. P054 Filtering Time over REF Input P054 Range Default Level Address Function 116/482 0 ÷ +65000 0 ÷ +65000ms 5 5 ms ADVANCED 654 This parameter selects the value of the filter time constant of the first command applied to the REF input signal when the signal saturation and conversion is over. PROGRAMMING INSTRUCTIONS iDrive P055 Type of Signal over AIN1 Input P055 Range Default Level Address Function NOTE 0÷4 0: ± 10 V 1: ± 20 mA 2: 4 ÷ 20 mA 3: 0 ÷ 10 V 4: 0 ÷ 20 mA 2: 4 ÷ 20 mA 2 ADVANCED 655 This parameter selects the type of differential analog signal over terminals AIN1+ and AIN1– in the terminal board. The signal can be a voltage signal, a current signal, a unipolar signal, or a bipolar signal. 0: ± 10 V Bipolar voltage input between –10V and +10V. The detected signal is saturated between these two values. 1: ± 20 mA Bipolar current input between –20mA and +20mA. The detected signal is saturated between these two values. 2: 4 ÷ 20 mA Unipolar current input with min. threshold, between +4 mA and +20mA. The detected signal is saturated between these two values. Before being saturated, if the detected signal is lower than 4 mA or greater than 20 mA, alarms A067 or A103 trip. 3: 0 ÷ 10 V Unipolar voltage input between 0V and +10V. The detected signal is saturated between these two values. 4: 0 ÷ 20 mA Unipolar current input between +0 mA and +20mA. The detected signal is saturated between these two values. The value set in parameter P055 must match with the status of switch SW1–2 allowing selecting the proper electric circuit for the analog signal processing (voltage signal or current signal). P056 Value of AIN1 Input Producing Min. Reference (X-axis) P056 Range Default Level Address Function –100 ÷ 100, if P055 = 0 –200 ÷ 200, if P055 = 1 +40 ÷ 200, if P055 = 2 0 ÷ 100, if P055 = 3 0 ÷ 200, if P055= 4 –10.0 V ÷ 10.0 V, if P055= 0: ± 10 V –20.0 mA ÷ 20.0 mA, if P055 = 1: ± 20 mA +4.0mA ÷ 20.0 mA, if P055 = 2: 4 ÷ 20 mA 0.0 V ÷ 10.0V, if P055 = 3: 0 ÷ 10 V 0.0 mA ÷ 20.0 mA, if P055 = 4: 0 ÷ 20 mA 40 +4.0mA ADVANCED 656 This parameter selects the value for AIN1 input signal for minimum reference, or better the reference set in C028xP056a (Master mode) or in C047xP056a (Slave mode). If motor 2 is active, C071 and C090 will be used instead of C028 and C047; if motor 3 is active, the values set in C114 and C133 will be used. P056a Percentage of Speed_Min/Trq_Min Producing Min. Reference (Y-axis related to P056) P056a Range Default Level Address Function 0 ÷ 1000 100.0% 1000 100.0% ADVANCED 677 This parameter represents the min. speed percentage (or the min. torque percentage for a torque reference) to be used for the minimum reference set with P056. 117/482 PROGRAMMING INSTRUCTIONS iDrive P057 Value of AIN1 Input Producing Max. Reference (X-axis) P057 Range Default Level Address Function –100 ÷ 100, if P055 = 0 –200 ÷ 200, if P055 = 1 +40 ÷ 200, if P055 = 2 0 ÷ 100, if P055 = 3 0 ÷ 200, if P055 = 4 –10.0 V ÷ 10.0 V, if P055= 0: ± 10 V –20.0 mA ÷ 20.0 mA, ifP055 = 1: ± 20 mA +4.0mA ÷ 20.0 mA, if P055 = 2: 4 ÷ 20 mA 0.0 V ÷ 10.0V, if P055 = 3: 0 ÷ 10 V 0.0 mA ÷ 20.0 mA, if P055 = 4: 0 ÷ 20 mA 200 +20.0mA ADVANCED 657 This parameter selects the value for AIN1 input signal for maximum reference, or better the reference set in C029xP057a (Master mode) or in C048xP057a (Slave mode). If motor 2 is active, C072 and C091 will be used instead of C029 and C048; if motor 3 is active, the values set in C115 and C134 will be used. P057a Percentage of Speed_Max/Trq_Max Producing Max. Reference (Y-axis related to P057) P057a Range Default Level Address Function 0 ÷ 1000 100.0% 1000 100.0% ADVANCED 678 This parameter represents the min. speed percentage (or the min. torque percentage for a torque reference) to be used for the minimum reference set with P057. P058 Offset over AIN1 Input P058 Range Default Level Address Function –2000 ÷ 2000 –10.00 V ÷ +10.00 V, if P055 = 0 or 3 – 20.00 mA ÷ +20.00 mA, if P055 = 1,2,4 0 0V ADVANCED 658 This parameter selects the offset correction value of AIN1 analog signal that has been measured. The value set is added to the signal measured before saturation or conversion; its unit of measure is the same as the one of the signal selected for AIN1 analog input. P059 Filtering Time over AIN1 Input P059 Range Default Level Address Function 118/482 0 ÷ +65000 0 ÷ +65000ms 5 5 ms ADVANCED 659 This parameter selects the value of the filter time constant of the first command applied to AIN1 input signal when the signal saturation and conversion is over. PROGRAMMING INSTRUCTIONS iDrive P060 Type of Signal over AIN2 Input P060 0÷4 Range Default Level Address Function NOTE NOTE 0: ± 10 V 1: ± 20 mA 2: 4 ÷ 20 mA 3: 0 ÷ 10 V 4: 0 ÷ 20 mA 2: 4 ÷ 20 mA 2 ADVANCED 660 This parameter selects the type of differential analog signal over terminals AIN2+ and AIN2– in the terminal board. The signal can be a voltage signal, a current signal, a unipolar signal, or a bipolar signal. 0: ± 10 V Bipolar voltage input between –10V and +10V. The detected signal is saturated between these two values. 1: ± 20 mA Bipolar current input between –20mA and +20mA. The detected signal is saturated between these two values. 2: 4 ÷ 20 mA Unipolar current input with min. threshold, between +4 mA and +20mA. The detected signal is saturated between these two values. Before being saturated, if the detected signal is lower than 4 mA or greater than 20 mA, alarms A068 or A104 trip. 3: 0 ÷ 10 V Unipolar voltage input between 0V and +10V. The detected signal is saturated between these two values. 4: 0 ÷ 20 mA Unipolar current input between +0 mA and +20mA. The detected signal is saturated between these two values. The value set in parameter P060 must match with the status of switches SW1–3, SW1-4 and SW1-5 allowing selecting the proper electric circuit for the analog signal processing (voltage signal or current signal). If the PTC thermal protection (C274) is enabled, the reference from AIN2 is automatically managed as a 0 ÷10V input. The only parameter enabled for the control of AIN2 is P064; P060, P061, P061a, P062, P062a and P063 cannot be viewed and are not considered for calculations. P061 Value of AIN2 Input Producing Min. Reference (X-axis) P061 Range Default Level Address Function –100 ÷ 100, if P060 = 0 –200 ÷ 200, if P060 = 1 +40 ÷ 200, if P060 = 2 0 ÷ 100, if P060 = 3 0 ÷ 200, if P060= 4 –10.0 V ÷ 10.0 V, if P060= 0: ± 10 V –20.0 mA ÷ 20.0 mA, if P060 = 1: ± 20 mA +4.0mA ÷ 20.0 mA, if P060 = 2: 4 ÷ 20 mA 0.0 V ÷ 10.0V, if P060 = 3: 0 ÷ 10 V 0.0 mA ÷ 20.0 mA , if P060 = 4: 0 ÷ 20 mA 40 4.0mA ADVANCED 661 This parameter selects the value for AIN2 input signal for minimum reference, or better the reference set in C028xP061a (Master mode) or in C047xP061a (Slave mode). If motor 2 is active, C071 and C090 will be used instead of C028 and C047; if motor 3 is active, the values set in C114 and C133 will be used. 119/482 PROGRAMMING INSTRUCTIONS iDrive P061a Percentage of Speed_Min/Trq_Min Producing Min. Reference (Y-axis related to P061) P061a Range Default Level Address Function 0 ÷ 1000 100.0% 1000 100.0% ADVANCED 679 This parameter represents the min. speed percentage (or the min. torque percentage for a torque reference) to be used for the minimum reference set with P061. P062 Value of AIN2 Input Producing Max. Reference (X-axis) P062 Range Default Level Address Function –100 ÷ 100, if P060 = 0 –200 ÷ 200, if P060 = 1 +40 ÷ 200, if P060 = 2 0 ÷ 100, if P060 = 3 0 ÷ 200, if P060= 4 –10.0 V ÷ 10.0 V, if P060= 0: ± 10 V –20.0 mA ÷ 20.0 mA, if P060 = 1: ± 20 mA +4.0mA ÷ 20.0 mA, if P060 = 2: 4 ÷ 20 mA 0.0 V ÷ 10.0V, if P060 = 3: 0 ÷ 10 V 0.0 mA ÷ 20.0 mA, if P060 = 4: 0 ÷ 20 mA 200 +20.0 mA ADVANCED 662 This parameter selects the value for AIN2 input signal for maximum reference, or better the reference set in C029xP062a (Master mode) or in C048 xP062a (Slave mode). If motor 2 is active, C072 and C091 will be used instead of C029 and C048; if motor 3 is active, the values set in C115 and C134 will be used. P062a Percentage of Speed_Min/Trq_Min Producing Max. Reference (Y-axis related to P062) P062a Range Default Level Address Function 0 ÷ 1000 100.0% 1000 100.0% ADVANCED 701 This parameter represents the max. speed percentage (or the min. torque percentage for a torque reference) to be used for the maximum reference set with P062. P063 Offset over AIN2 Input P063 Range Default Level Address Function 120/482 –2000 ÷ 2000 –10.00 V ÷ +10.00 V, if P060 = 0 o 3 – 20.00 mA ÷ +20,00 mA , if P060 = 1,2,4 0 0V ADVANCED 663 This parameter selects the offset correction value of AIN2 analog signal that has been measured. The value set is added to the signal measured before saturation or conversion; its unit of measure is the same as the one of the signal selected for AIN2 analog input. PROGRAMMING INSTRUCTIONS iDrive P064 Filtering Time over AIN2 Input P064 Range Default Level Address Function 0 ÷ +65000 0 ÷ +65000ms 5 5 ms ADVANCED 664 This parameter selects the value of the filter time constant of the first command applied to AIN2 input signal when the signal saturation and conversion is over. P065 Minimum Reference and START Disabling Threshold P065 Range Default Level Address Function 0 ÷ +32000 0 ÷ +32000 rpm 0 0rpm ADVANCED 665 If this parameter is other than zero, the current speed reference computed when processing of all active source references is over, it is saturated as an absolute value of this parameter’s value. Saturation implies an absolute value, i.e. this parameter determines a “prohibit range” of the reference approx. zero. Example: P065 = 100 rpm and current speed reference is 500 rpm; if reference drops below 100 rpm, for example down to +50rpm, the value of the active reference is saturated to 100 rpm until reference exceeds 100 rpm again or is lower than–100 rpm; in that case, the preset value will be assigned to the reference. If also parameter P066 is other than zero, the drive disabling function is enabled: if the absolute value of the current speed reference is kept in the “prohibit range” for a time longer than the time set in P066, reference is set to zero and the motor speed decreases following the active ramp up to zero rpm; when the motor speed is equal to zero, the drive will automatically deactivate. The drive will automatically reactivate if the reference exceeds the value set in parameter P065 as an absolute value. NOTE Parameter P065 is active in Master mode only, i.e. when the reference is a speed reference. NOTE Parameter P065 is active only when the Speed searching and Power Down functions are disabled: C245=0 and C225=0. P066 START Disable delay at P065 Threshold P066 Range Default Level Address Function 0 ÷ 250 0 ÷ 250 sec 0 0: Disabled ADVANCED 666 If this parameter is other than zero and if also parameter P065 is other than zero, the drive disabling function is enabled: if the absolute value of the current speed reference is kept in the “prohibit range” for a time longer than the time set in P066, reference is set to zero and the motor speed decreases following the active ramp up to zero rpm; when the motor speed is equal to zero, the drive will automatically deactivate. See also the description of parameter P065. 121/482 PROGRAMMING INSTRUCTIONS iDrive P067 Keypad and Terminal Board UP/DOWN Ramp P067 Range Default Level Address Function 0 ÷ 6501 0 sec ÷ 6500s Quadratic 6501 Quadratic ADVANCED 667 Reference may be increased or decreased with input digital signals UP and DOWN, or using the ▲ and ▼ keys from the keypad (local mode). Reference increment or decrement is obtained by adding to the current reference a quantity which will be increased or decreased with a time ramp. Parameter P067 indicates the ramp time to increase the reference from zero to the preset speed (or torque) maximum absolute value, i.e. the max. value between absolute values Spd_Min and Spd_Max (or Trq_Min and Trq_Max). If motor 1 is active, Spd_Min=C028, Spd_Max=C029, Trq_Min=C047, Trq_Max=C048. P068 Storage of UP/DOWN Values at Power Off P068 Range Default Level Address Function 0÷1 0: Disabled, 1: Enabled 1 1: Enabled ADVANCED 668 If P068=1, the Speed/Torque or PID references added through input digital signals UP and DOWN or with the INC and DEC keys (local mode), are stored at the drive power off and are added to the start reference when the drive is restarted. This function allows storing he reference value obtained with UP and DOWN signals. P068a Reset UP/DOWN Speed/Torque at Stop P068a Range Default Level Address Function 0÷1 0: NO, 1: YES 0 0: NO ADVANCED 940 If P068a =1: [Yes], the Speed/Torque reference sent via the UP/DOWN digital signals or with the ▲ and ▼ keys in the keypad is reset whenever the START command for the drive is disabled and the deceleration ramp is finished. P068b Reset UP/DOWN PID at Stop P068b Range Default Level Address Function 122/482 0÷1 0: NO, 1: YES 0 0: NO ADVANCED 941 If P068b =1: [Yes], the PID reference sent via the UP/DOWN digital signals or via the ▲ and ▼ keys in the keypad) is reset whenever the START command for the drive is disabled and the deceleration ramp is finished. PROGRAMMING INSTRUCTIONS iDrive P068c Reset UP/DOWN Speed/Torque at Source Changeover P068c Range Default Level Address Function 0÷1 0: NO, 1: YES 0 0: NO ADVANCED 942 If P068c =1:[Yes], the Speed/Torque reference sent via the UP/DOWN digital signals or with the ▲ and ▼ keys in the keypad is reset whenever switching from the Remote mode to the Local mode and vice versa (using the LOC/REM key or the LOC/REM digital input, or when a control source switches to the other using the digital input programmed in C179 - MDI for source selection, see the DIGITAL INPUTS MENU). P068d Reset UP/DOWN PID at Source Changeover P068d Range Default Level Address Function 0÷1 0: NO, 1: YES 0 0: NO ADVANCED 943 If P068d =1: [Yes], the PID reference sent via the UP/DOWN digital signals or with the ▲ and ▼ keys in the keypad is reset whenever switching from the Remote mode to the Local mode and vice versa (using the LOC/REM key or the LOC/REM digital input, or when a control source switches to the other using the digital input programmed in C179 - MDI for source selection, see the DIGITAL INPUTS MENU). P069 Range of UP/DOWN Reference P069 Range Default Level Address Function 0÷1 0: Bipolar, 1: Unipolar 1 1: Unipolar ADVANCED 669 If P069=1, the quantity added via the UP/DOWN digital signals or with the ▲ and ▼ keys (Local mode) is unipolar, i.e. it is positive only and has a min. value equal to zero. For bipolar quantities, the added quantity may be negative. P070 JOG reference (Speed/Torque) P070 Range Default Level Address Function ± 100 ± 100 % 0 0% ADVANCED 670 Value of the JOG reference. For speed control, the percentage of the jog reference relates to the maximum speed value of the selected motor (max. value as an absolute value between min. and max. speed parameters); in case of torque control, the percentage of the jog reference relates to the max. torque value of the selected motor (max. value as an absolute value between min. and max. torque limit). 123/482 PROGRAMMING INSTRUCTIONS iDrive P071 Value of FIN Producing Min. Reference (X-axis) P071 Range Default Level Address Function 1000 ÷ 10000 10 kHz ÷ 100 kHz 1000 10 kHz ADVANCED 671 This parameter selects the value of the frequency input signal for minimum reference, or better the reference set in C028xP071a (Master mode) or in C047xP071a (Slave mode). If motor 2 is active, C071 and C090 will be used instead of C028 and C047; if motor 3 is active, the values set in C114 and C133 will be used. P071a Percentage of Speed_Min/Trq_Min Producing Min. Reference (Y-axis related to P071) P071a Range Default Level Address Function 0 ÷ 1000 100.0% 1000 100.0% ADVANCED 713 This parameter represents the min. speed percentage (or the min. torque percentage for a torque reference) to be used for the minimum reference set with P071. P072 Value of FIN Producing Max. Reference (X-axis) P072 Range Default Level Address Function 1000 ÷ 10000 10 kHz ÷ 100 kHz 10000 100 kHz ADVANCED 672 This parameter selects the value of the frequency input signal for maximum reference, or better the reference set in C029xP072a (Master mode) or in C048xP072a (Slave mode). If motor 2 is active, C072 and C091 will be used instead of C029 and C048; if motor 3 is active, the values set in C115 and C134 will be used. P072a Percentage of Speed_Max/Trq_Max Producing Max. Reference (Y-axis related to P072) P072a Range Default Level Address Function 124/482 0 ÷ 1000 100.0% 1000 100.0% ADVANCED 714 This parameter represents the max. speed percentage (or the max. torque percentage for a torque reference) to be used for the maximum reference set with P072. PROGRAMMING INSTRUCTIONS iDrive P073 Value of ECH Producing Min. Reference (X-axis) P073 Range Default Level Address Function –32000 ÷ 32000 ± 32000 rpm –1500 –1500 rpm ADVANCED 673 This parameter selects the value of the Encoder input for minimum reference, or better the reference set in C028xP073a (Master mode) or in C047xP073a (Slave mode). If motor 2 is active, the values set in C071 and C090 will be used instead of C028 and C047; if motor 3 is active, the values set in C114 and C133 will be used. P073a Percentage of Speed_Min/Trq_Min Producing Min. Reference (Y-axis related to P073) P073a Range Default Level Address Function 0 ÷ 1000 100.0% 1000 100.0% ADVANCED 702 This parameter represents the max. speed percentage (or the min. torque percentage for a torque reference) to be used for the maximum reference set with P073. P074 Value of ECH Producing Max. Reference (X-axis) P074 Range Default Level Address Function –32000 ÷ 32000 ± 32000 rpm +1500 +1500 rpm ADVANCED 674 This parameter selects the value of the Encoder input for maximum reference, or better the reference set in C029xP074a (Master mode) or in C048xP074a (Slave mode). If motor 2 is active, C072 and C091 will be used instead of C029 and C048; if motor 3 is active, the values set in C115 and C134 will be used. P074a Percentage of Speed_Max/Trq_Max Producing Max. Reference (Y-axis related to P074) P074a Range Default Level Address Function 0 ÷ 1000 100.0% 1000 100.0% ADVANCED 703 This parameter represents the max. speed percentage (or the max. torque percentage for a torque reference) to be used for the maximum reference set with P074. 125/482 PROGRAMMING INSTRUCTIONS iDrive 14. MULTISPEED MENU 14.1. Overview NOTE See also the INPUTS FOR REFERENCES MENU and the DIGITAL INPUTS MENU. The Multispeed menu allows defining the values for 15 preset speed (or multispeed) references set in parameters P081 to P098. Their application method is set in P080. The desired speed is selected through the digital inputs described in the previous section, relating to the Digital Inputs Menu. The following reference ranges that can be programmed with the parameters above: ± 32000 rpm if multispeed unit of measure is → P100 = 1.00 rpm ± 3200.0 rpm if multispeed unit of measure is → P100 = 0.10 rpm ± 320.00 rpm if multispeed unit of measure is → P100 = 0.01 rpm Use parameters C155, C156, C157 and C158 to set the digital inputs in multispeed mode. Parameter P080 defines the functionality of the references set in the preset speed function: PRESET SPEED, EXCLUSIVE PRESET SPEED, SUM SPEED. If P080 = PRESET SPEED, the speed reference is the value set in the preset speed which is active at that moment. If digital inputs set as multispeed are all open (inactive), the speed reference is the reference coming from the sources selected in the Control Method Menu (C143 to C146). If P080 = EXCLUSIVE PRESET SPEED, the speed reference is the value set in the multispeed which is active at that moment. If digital inputs set as multispeed are all open (inactive), no other reference source is considered; the speed reference is zero. If P080 = SUM SPEED, the speed reference value assigned to the preset speed which is active at that moment is summed up to the total amount of the speed references. The reference obtained is always saturated by the parameters relating to the min. speed and the max. speed of the selected motor. 14.2. List of Parameters P080 to P100 Table 23: List of parameters P080 to P100. Parameter P080 P081 P083 P085 P087 P088 P089 P090 P091 P092 P093 P094 P095 P096 P097 P098 P099 P100 126/482 FUNCTION Multispeed function Output speed Mspd1 Output speed Mspd2 Output speed Mspd3 Output speed Mspd4 Output speed Mspd5 Output speed Mspd6 Output speed Mspd7 Output speed Mspd8 Output speed Mspd9 Output speed Mspd10 Output speed Mspd 11 Output speed Mspd 12 Output speed Mspd 13 Output speed Mspd 14 Output speed Mspd 15 Fire Mode speed Multispeed unit of measure User Level DEFAULT VALUES BASIC BASIC BASIC BASIC ADVANCED ADVANCED ADVANCED ADVANCED ADVANCED ADVANCED ADVANCED ADVANCED ADVANCED ADVANCED ADVANCED ADVANCED ENGINEERING ADVANCED 0:Preset Speed 0.00 rpm 0.00 rpm 0.00 rpm 0.00 rpm 0.00 rpm 0.00 rpm 0.00 rpm 0.00 rpm 0.00 rpm 0.00 rpm 0.00 rpm 0.00 rpm 0.00 rpm 0.00 rpm 0.00 rpm 750 rpm 2: 1.0 rpm MODBUS Address 680 681 683 685 687 688 689 690 691 692 693 694 695 696 697 698 699 700 PROGRAMMING INSTRUCTIONS iDrive P080 Multispeed Function P080 Range Default Level Address Function 0÷2 0: Preset Speed, 1: Sum Speed, 2: Exclusive Preset Speed 0 0: Preset Speed BASIC 680 Defines the functionality of the multispeed values for the global speed reference. Three functions are available: • 0: [ Preset Speed ] → the selected multispeed is the actual rpm value (upon limit due to min. and max. speed parameters for the selected motor) of the motor speed reference. If no multispeed is selected (no digital input programmed for multispeed selection is activated, or all digital inputs programmed for multispeed selection are deactivated), the speed reference is the reference for the sources set in the CONTROL METHOD MENU. • 1: [ Sum Speed ] → the reference relating to the selected multispeed is considered as the sum of the references for the other reference sources selected in the CONTROL METHOD MENU. • 2: [ Exclusive Preset Speed ] → the selected multispeed is the actual rpm value (upon saturation due to min. and max. speed parameters for the selected motor) of the motor speed reference. Unlike function 0 [Preset Speed], if no multispeed is selected (no digital input programmed for multispeed selection is activated, or all digital inputs programmed for multispeed selection are deactivated) the speed reference is zero. P081 to P098 Output Speed Mspd n.1 (/15) P081÷P098 Range –32000 ÷ 32000 Default 0 0.00 rpm From P081 to P085: BASIC From P087 to P098: ADVANCED 681÷698 This parameter sets the multispeed output speed selected through the relevant digital inputs (Table 90). The multispeed value is scaled based on the unit of measure set in P100. The reference resulting from the multispeed selected through the relevant digital inputs will be computed based on the setting of parameter P080. Level Address Function ±32000 rpm 127/482 PROGRAMMING INSTRUCTIONS iDrive P099 Fire Mode Speed P099 –32000 ÷ 32000 Range Default Level Address Function ±32000 rpm 750 750.00 rpm ENGINEERING 699 Determines the value of the output speed in Fire Mode. The Fire Mode speed depends on the unit of measure programmed in P100. P100 Multispeed Unit of Measure P100 0÷2 Range Default Level Address Function CAUTION 128/482 0: [0.01 rpm] ÷ 2: [1.0 rpm] 2 2: [1.0 rpm] ADVANCED 700 Determines the unit of measure considered for the 15 allowable multispeed values and the Fire Mode speed in P099. When changing the unit of measure of the multispeed values in P100, the preset speed values for the multispeed and Fire Mode values will be RECOMPUTED. PROGRAMMING INSTRUCTIONS iDrive 15. PID MULTIREFERENCES MENU 15.1. Overview This menu includes the parameters for the utilisation and allocation of PID Multireferences from digital inputs. The reference sources are based on the setup in parameters C285 to C287 (see the PID CONFIGURATION MENU). The overall reference also depends on the multireferences that are already set (if any) or on the reduction percent of the reference itself (see the REFERENCE VARIATION PERCENT MENU). Configuration example: PID Configuration Menu C285 Source of PID reference 1 = 2: AIN1 C286 Source of PID reference 2 = 0: Disable C287 Source of PID reference 3 = 0: Disable Digital Inputs Menu C188a Input for PID Multireference 1 = 7: MDI7 C188b Input for PID Multireference 2 = 8: MDI8 C188c Input for PID Multireference 3 = 0: Disable PID Multireferences Menu P081a PID Reference 1 (Mref 1) = 1.0 bars P082a PID Reference 2 (Mref 2) = 1.5 bars P083a PID Reference 3 (Mref 3) = 2.5 bars PID Parameters Menu P257 Gain for PID scaling = 0.1 When AIN1 analog input is set to 100%, the pressure reference is 10 bars (100%*P257 =10.0). Supposing that AIN1 is set to 43%, the references below are obtained based on the combination of the digital inputs configured as multireferences, and based on the function allocated to parameter P080a. P80a = 0: Preset Ref. If both digital inputs configured as Multireferences are not activated, the overall reference is given from AIN1 analog input selected as the first PID reference (C285): P080a Multireference Function = Preset Ref. MDI8 MDI7 0 0 0 1 1 0 1 1 Overall reference 4.3 bars 1.0 bars 1.5 bars 2.5 bars P80a = 1: Sum Ref. If both digital inputs configured as Multireference are inactive, the overall reference is given from AIN1 analog input selected as the first PID reference (C285). For the combinations where at least one of the digital inputs configured as multireference is active, the resulting reference is the sum of the value for AIN1 plus the value for the selected multireference. P080a Multireference Function = Exclusive Preset Ref. MDI8 MDI7 Overall reference 0 0 4.3 bars 0 1 5.3 bars 1 0 5.8 bars 1 1 6.8 bars 129/482 iDrive 130/482 PROGRAMMING INSTRUCTIONS PROGRAMMING INSTRUCTIONS iDrive P80a= 2: Exclusive Preset Ref. If no Multireference is activated, the overall reference is null. P080a 15.2. Multireference Function = 2: Exclusive Preset Ref. MDI8 MDI7 Overall Reference 0 0.0 bars 0 0 1 1.0 bars 1 0 1.5 bars 1 1 2.5 bars List of Parameters P080a to P099a Table 24: List of parameters P080a ÷ P099a Parameter P080a P081a P082a P083a P084a P085a P086a P087a P099a FUNCTION PID Multireference function PID Multireference 1 (Mref1) PID Multireference 2 (Mref2) PID Multireference 3 (Mref3) PID Multireference 4 (Mref4) PID Multireference 5 (Mref5) PID Multireference 6 (Mref6) PID Multireference 7 (Mref7) PID Reference in Fire Mode User Level ENGINEERING ENGINEERING ENGINEERING ENGINEERING ENGINEERING ENGINEERING ENGINEERING ENGINEERING ENGINEERING MODBUS Address 944 945 946 947 948 949 986 987 988 P080a Multireference P080a Range Default Level Address Function 0÷2 0: Preset Ref 1: Sum Ref 2: Exclusive Preset Ref. 0 0: [Preset Ref] ENGINEERING 944 This parameter sets if the PID reference resulting from the selection of a digital multireference is to be considered either as the unique active reference or as summed up to the other configured PID reference sources (see example above). P081a÷P087a PID Multireference 1÷7 P081a÷P087a Range Default Level Address Function –1000 ÷ +1000 ±1000 0 0 ENGINEERING 945÷949, 986÷987 This is the value of the PID reference selected with the corresponding combination of the digital inputs programmed as multireferences. The reference is expressed in the unit of measure set with P267 (see the DISPLAY/KEYPAD MENU) and is based on parameter P257 (Gain for PID Scaling). Example: The max. value for the PID feedback is 100%. This value corresponds to a level of 25m in a tank. When P257 = 0.25, 100% of PID feedback corresponds to 25 metres. When setting a reference level of 15 meters, multireference 1 shall be set as P081a = 15.0 m. 131/482 PROGRAMMING INSTRUCTIONS iDrive P099a PID Reference in Fire Mode P099a Range Default Level Address Function 132/482 –1000 ÷ 1000 ±1000 500 50.0 % ENGINEERING 988 This parameter sets the value of the PID reference when in Fire Mode. The value of the PID reference depends on the scale factor set in P257. PROGRAMMING INSTRUCTIONS iDrive 16. PROHIBIT SPEED MENU 16.1. Overview This menu allows setting prohibit speed ranges that the motor cannot maintain at constant rpm due to mechanical resonance. Three prohibit speed ranges are available: 3 intermediate values of the speed range and their semi-amplitude (one for all ranges). In this way, the speed reference value is never included in one of the preset speed ranges; when decreasing, if the speed reference matches with the max. allowable value of a prohibit speed range, the value assigned to the reference is given by the min. allowable value of the speed range, and vice versa when the reference is increasing. The discontinuity of the speed reference has no effect on the actual speed of the connected motor, because this will vary with continuity until it reaches the new rpm value of the speed reference. The intermediate values of the prohibit speed ranges are to be intended as absolute values (independent of the reference sign, +/-). Figure 12: Prohibit Speed ranges. Figure 12 illustrates different trends of the speed reference when it matches with the max. allowable value of a prohibit speed range when decreasing (red) or when it matches with the min. allowable value of a prohibit speed range when increasing (blue). Example: P105 = 500 rpm Prohibit speed 1 P106 = 650 rpm Prohibit speed 2 P107 = 700 rpm Prohibit speed 3 P108 = 50 rpm Semi-amplitude of prohibit speed ranges Range Number Min. Allowable Value Max. Allowable Value 1 2 3 450 rpm 600 rpm 650 rpm 550 rpm 700 rpm 750 rpm In this case, the second and third prohibit ranges partially match, because the max. allowable value of the second range (700 rpm) is higher than the min. allowable value of the third range (650 rpm), thus forming a prohibit speed range ranging from 600 rpm to 750 rpm. 133/482 PROGRAMMING INSTRUCTIONS iDrive 16.2. List of Parameters P105 to P108 Table 25: List of parameters P105 to P108. Parameter P105 P106 P107 P108 FUNCTION Prohibit speed 1 Prohibit speed 2 Prohibit speed 3 Hysteresis (band) ranges of prohibit User Level speed ADVANCED ADVANCED ADVANCED ADVANCED MODBUS Address 705 706 707 708 P105 (P106, P107) Prohibit Speed 1 (2, 3) P105 Range 0 ÷ 32000 Default Level 0 0 rpm ADVANCED 705 706 707 Determines the intermediate value of the first prohibit speed range. This value is to be considered as an absolute value, i.e. independent of the speed reference sign (+/-). Address Function 0 ÷ 32000 rpm P108 Hysteresis (band) of Prohibit Speed Ranges P108 Range Default Level Address Function 134/482 0 ÷ 5000 0 ÷ 5000 rpm 0 0 rpm ADVANCED 708 Sets the semi-amplitude of the prohibit speed ranges. PROGRAMMING INSTRUCTIONS iDrive 17. REFERENCE VARIATION PERCENT MENU 17.1. Overview The Reference Variation Percent Menu allows defining the variation values of the speed/torque or PID instant reference to be entered through digital inputs that have been properly programmed. As per the selection of the variation percentage programmed to the reference and given by the combination of digital inputs configured with parameters C175 ÷ C177, please refer to the DIGITAL INPUTS MENU. The parameters included in this menu represent seven speed/torque or PID variation options to be applied to the speed reference. Variation may range from –100.0% to 100.0% of the instant reference given by the addition of all the selected sources. Example: P115= P116= P117= 0.0% Variation percent of reference 1 50.0% Variation percent of reference 2 –80.0% Variation percent of reference 3 Based on the speed/torque or PID variation selected through digital inputs, the speed reference at constant speed will be as follows: Variation 1: the current reference with no changes (no effect). Variation 2: the current reference increased by 50.0%. Variation 3: the current reference decreased by 80.0%. NOTE Whatever the speed/torque reference value resulting from the application of a speed variation, the value used to control the motor is saturated at max. and min. speed/torque values set in the parameters relating to the selected motor. Speed control (example): 135/482 PROGRAMMING INSTRUCTIONS iDrive Figure 13: Speed Control (example). 136/482 PROGRAMMING INSTRUCTIONS 17.2. iDrive List of Parameters P115 to P121 Table 26: List of parameters P115 to P121. Parameter FUNCTION P115 P116 P117 P118 P119 P120 P121 User Level Reference variation percent n.1 Reference variation percent n.2 Reference variation percent n.3 Reference variation percent n.4 Reference variation percent n.5 Reference variation percent n.6 Reference variation percent n.7 ENGINEERING ENGINEERING ENGINEERING ENGINEERING ENGINEERING ENGINEERING ENGINEERING Default Values 0.0% 0.0% 0.0% 0.0% 0.0% 0.0% 0.0% MODBUS Address 715 716 717 718 719 720 721 P115 (÷ P121) Reference Variation Percent n.1 (÷n.7) P115 (÷ P121) Range Default Level Address Function ±1000 ±100.0% 0 0.0% ENGINEERING 715 (÷721) These parameters define the variation percent of the current reference (M000 for speed control, M007 for torque control, M018 if PID control is activated) to be considered as a ramp reference when selecting variation percent 1 (÷7). 137/482 PROGRAMMING INSTRUCTIONS iDrive 18. SPEED LOOP AND CURRENT BALANCING MENU 18.1. Overview The SPEED LOOP AND CURRENT BALANCING MENU, for VTC and FOC controls, allows setting the parameter values of the speed regulators for the three connected motors and to manually adjust the motor current balancing (see parameter P152). The speed regulator for each motor has two parameterization functions: two integral terms, two proportional terms and two speed error thresholds (expressed as a percentage of the motor rated speed). The response of the speed regulator can be dynamically linked with the speed error; in this way, the speed regulator will be more sensitive to remarkable speed errors and less sensitive to negligible speed errors. Factory setting: because two identical error thresholds are set, only two parameters are used: P126 (maximum integral time) and P128 (minimum proportional constant). The setup of min. integral time and max. proportional constant is enabled provided that two different error thresholds are used. Example: P125 P126 P128 P129 P130 P131 100 500 10.00 25.00 2 20 [ms] [ms] [%] [%] Minimum integral time for maximum error Integral time for minimum error Proportional constant for minimum error Proportional constant for maximum error Minimum error threshold Maximum error threshold Error ≤ P130 For speed errors lower than or equal to 2% of the motor rated speed, the speed regulator adopts parameters P126 and P128. Error ≥ P131 If the speed error exceeds the second error threshold, the speed regulator adopts parameters P125 and P129. P130<Error<P131 When the speed error is included between the two error thresholds, the speed regulator will use coefficients that are dynamically linked with the speed error (see figure below). Integral coefficient Proportional coefficient = (1/P126) + [(err%–P130)* (1/P125 – 1/P126 ) / ( P131 – P130 )] = P128 + [(err%–P130)* ( P129 – P128 ) / ( P131 – P130 )] Figure 14: Dual Parameterization function (example). 138/482 PROGRAMMING INSTRUCTIONS 18.2. iDrive List of Parameters P125 to P152 Table 27: List of parameters P125 to P152. Parameter FUNCTION User Level P125 P126 Mot1 Integral time for maximum error Mot1 Integral time for minimum error Mot1 Prop. coefficient for minimum error Mot1 Prop. coefficient for maximum error Mot1 Minimum error threshold Mot1 Maximum error threshold Mot2 Integral time for maximum error Mot2 Integral time for minimum error Mot2 Prop. coefficient for minimum error Mot2 Prop. coefficient for maximum error Mot2 Min. error threshold Mot2 Max. error threshold Mot3 Integral time for maximum error Mot3 Integral time for minimum error Mot3 Prop. coefficient for minimum error Mot3 Prop. coefficient for maximum error Mot3 Min. error threshold Mot3 Max. error threshold Symmetry regulation of three-phase current BASIC BASIC Default Values 500 ms 500 ms BASIC 10.00 728 BASIC 10.00 729 BASIC BASIC BASIC BASIC 1.00% 1.00% 500 ms 500 ms 730 731 735 736 BASIC 10.00 738 BASIC 10.00 739 BASIC BASIC BASIC BASIC 1.00% 1.00% 500 ms 500 ms 740 741 745 746 BASIC 10.00 748 BASIC 10.00 749 BASIC BASIC 1.00% 1.00% 750 751 ENGINEERING 0% 752 P128 P129 P130 P131 P135 P136 P138 P139 P140 P141 P145 P146 P148 P149 P150 P151 P152 MODBUS Address 725 726 P125 (P135, P145) Integral Time for Maximum Error P125 (Motor n.1) P135 (Motor n.2) P145 (Motor n.3) Range 1÷ 32000 Default Level 500 500 ms BASIC 725 735 745 VTC and FOC This parameter sets the min. integral time for the speed regulator. It may be accessed only if the min. and max. error thresholds are different (P130≠P131 for Motor1, P140≠P141 for Motor2, P150≠P151 for Motor3). Address Control Function 0.001÷ 32.000 [Disable] ms P126 (P136, P146) Integral Time for Minimum Error P126 (Motor n.1) P136 (Motor n.2) P146 (Motor n.3) Range 1÷ 32000 0.001÷ 32.000 [Disable] ms Default Level 500 BASIC 726 736 746 500 ms Address 139/482 PROGRAMMING INSTRUCTIONS iDrive Control Function 140/482 VTC and FOC This parameter sets the max. integral time for the speed regulator. PROGRAMMING INSTRUCTIONS iDrive P128 (P138, P148) Proportional Coefficient for Minimum Error P128 (Motor n.1) P138 (Motor n.2) P148 (Motor n.3) Range Default Level Address Control Function 0 ÷ 65000 0.00 ÷ 650.00 1000 10.00 BASIC 728,738,748 VTC and FOC This parameter sets the min. proportional coefficient for the speed regulator. Default value (10): if a speed error of 1% occurs, the regulator will require 10% of the motor rated torque. P129 (P139, P149) Proportional Coefficient for Maximum Error P129 (Motor n.1) P139 (Motor n.2) P149 (Motor n.3) Range Default Level Address Control Function 0 ÷ 65000 0.00 ÷ 650.00 1000 10.00 BASIC 729,739,749 VTC and FOC This parameter sets the max. proportional coefficient for the speed regulator. Default value (10): if a speed error of 1% occurs, the regulator will require 10% of the motor rated torque. This parameter may be accessed only if the min. and max. error thresholds are different (P130 ≠ P131 for Motor1, P140 ≠ P141 for Motor2, P150 ≠ P151 for Motor3). P130 (P140, P150) Min. Error Threshold P130 (Motor n.1) P140 (Motor n.2) P150 (Motor n.3) Range Default Level Address Control Function 0 ÷ 32000 0.00 ÷ 320.00 100 1.00% BASIC 730,740,750 VTC and FOC This parameter determines the min. error threshold. In case of speed errors lower than or equal to the min. threshold, parameters P126 and P128 will be used. P131 (P141, P151) Max. Error Threshold P131 (Motor n.1) P141 (Motor n.2) P151 (Motor n.3) Range Default Level Address Control Function 0 ÷ 32000 0.00 ÷ 320.00 100 1.00% BASIC 731,741,751 VTC and FOC This parameter sets the max. error threshold. If P130 = P131 or in case of speed errors greater than or equal to the max. threshold, parameters P125 and P129 will be used. 141/482 PROGRAMMING INSTRUCTIONS iDrive P152 Symmetry Regulation of Three-phase Current P152 Range Default Level Address Function 142/482 ± 100 ± 100% 0 0% ENGINEERING 752 This parameter affects three-phase current balancing. It must be used when dissymmetry of the motor currents occurs, especially when no-load currents are delivered and the motor rotates at low rpm. PROGRAMMING INSTRUCTIONS iDrive 19. FOC REGULATORS MENU 19.1. Overview NOTE Please refer to the MOTOR CONTROL MENU as well. NOTE This menu may be accessed only if the FOC control is programmed for one of the connected motors (C010=2 for motor n.1, C053=2 for motor n.2, C096=2 for motor n.3). The FOC control has the same basic structure as that of any classic field oriented control. The inner loops of FOC control are two PI current regulators having the same parameterization. The first regulator controls Iq torque current; the second regulator controls Id flux current. Iq Torque current is computed based on the required torque set-point. In Slave mode (torque reference), the required set–point comes from the external reference; in Master mode, the torque set–point is given by the output of the speed regulator (see the SPEED LOOP AND CURRENT BALANCING MENU) for the regulation of the motor speed of rotation. Id Flux current results from the output of the flux regulator, ensuring that the connected motor is always properly fluxed. This menu allows accessing the current PI regulators and flux regulators for the FOC control. 19.2. List of Parameters P155 to P173 Table 28: List of parameters P155 to P173. ENGINEERING Default Values 3.00 MODBUS Address 755 ENGINEERING ENGINEERING 20.0 ms 0.00 756 758 ENGINEERING ENGINEERING 33 ms 3.00 759 762 ENGINEERING ENGINEERING ENGINEERING ENGINEERING 20.0 ms 0.00 33 ms 3.00 763 765 766 769 ENGINEERING ENGINEERING ENGINEERING 20.0 ms 0.00 33 ms 770 772 773 Parameter FUNCTION User Level P155 Current regulator proportional constant, Mot n.1 Current regulator integral time, Mot n.1 Flux regulator proportional constant, Mot n.1 Flux regulator integral time, Mot n.1 Current regulator proportional constant, Mot n.2 Current regulator integral time, Mot n.2 Flux regulator proportional constant, Mot n.2 Flux regulator integral time, Mot n.2 Current regulator proportional constant, Mot n.3 Current regulator integral time, Mot n.3 Flux regulator proportional constant, Mot n.3 Flux regulator integral time, Mot n.3 P156 P158 P159 P162 P163 P165 P166 P169 P170 P172 P173 143/482 PROGRAMMING INSTRUCTIONS iDrive P155 (P162, P169) Current Regulator Proportional Constant P155 (Motor n.1) P162 (Motor n.2) P169 (Motor n.3) Range 0 ÷ 65000 Default Level 300 3.00 ENGINEERING 755 762 769 FOC Kp Proportional coefficient of PI current regulator Id and Iq in field rotary reference for motor n.1 (P162 and P169 relate to motors 2 and 3). The regulator’s structure is as follows: error = Set_Point – Measure; integral_status = integral_status + error *Ki*Ts; Output = Kp*error + integral_status; where Kp is the proportional coefficient Ki is the integral coefficient = 1/Ti , where Ti is the integral time Ts is the regulator operating time (ranging from 200 to 400 microseconds based on carrier frequency). Address Control Function NOTE 0.00 ÷ 650.00 This parameter is automatically computed and saved when the Autotuning procedure is performed (see the AUTOTUNE MENU). P156 (P163, P170) Current Regulator Integral Time P156 (Motor n.1) P163 (Motor n.2) P170 (Motor n.3) Range 1 ÷ 32000 Default Level 200 20.0 ms ENGINEERING 756 763 (motor n.2) 770 (motor n.3) FOC Ti Integral time of PI current regulator Id and Iq in the field rotary reference for motor n.1 (P166 and P170 relate to motors 2 and 3). The regulator’s structure is as follows: error = Set_Point – Measure; integral_status = integral_status + error *Ki*Ts; Output = Kp*error + integral_status; where Kp is the proportional coefficient Ki is the integral coefficient = 1/Ti , where Ti is the integral time Ts is the regulator operating time (ranging from 200 to 400 microseconds based on carrier frequency). Address Control Function NOTE 144/482 1.0 ÷ 32000. (Disabled) This parameter is automatically computed and saved when the Autotuning procedure is performed (see the AUTOTUNE MENU). PROGRAMMING INSTRUCTIONS iDrive P158 (P165, P172) Flux Regulator Proportional Constant P158 (Motor n.1) P165 (Motor n.2) P172 (Motor n.3) Range 0 ÷ 65000 Default Level 0 0.00 ENGINEERING 758 765 772 FOC Kp Proportional coefficient of PI flux regulator for motor n.1 (P165 and P172 relate to motors 2 and 3). The regulator’s structure is as follows: error = Set_Point – Measure; integral_status = integral_status + error *Ki*Ts; Output = Kp*error + integral_status; where Kp is the proportional coefficient Ki is the integral coefficient = 1/Ti , where Ti is the integral time Ts is the regulator operating time (ranging from 200 to 400 microseconds based on carrier frequency). Address Control Function 0.00 ÷ 650.00 P159 (P166, P173) Flux Regulator Integral Time P159 (Motor n.1) P166 (Motor n.2) P173 (Motor n.3) Range 1 ÷ 32000 Default Level 33 33 ms ENGINEERING 759 766 773 FOC Ti Integral time of flux regulator PI for motor n.1 (P166 and P173 relate to parameters 2 and 3). The regulator’s structure is as follows: error = Set_Point – Measure; integral_status = integral_status + error *Ki*Ts; Output = Kp*error + integral_status; where Kp is the proportional coefficient Ki is the integral coefficient = 1/Ti , where Ti is the integral time Ts is the regulator operating time (ranging from 200 to 400 microseconds based on carrier frequency). Address Control Function NOTE 1.0 ÷ 32000. (Disabled) Parameters P159-P166-P173 are automatically recomputed and saved whenever the Rotor Time Constant parameter (C025) is changed. 145/482 PROGRAMMING INSTRUCTIONS iDrive 20. ANALOG AND FREQUENCY OUTPUTS MENU 20.1. Overview NOTE Please refer to the IDrive’s Installation Instructions Manual for the hardware description of the analog output and the frequency output or for the configuration of the dip-switches for voltage/current outputs. NOTE MDO1 digital output is used when the frequency output is enabled (P200 other than Disabled). Any configuration set in the DIGITAL OUTPUTS MENU will have no effect. The IDrive drive allows configuring three programmable analog outputs as voltage outputs or current outputs, as well as one frequency output. 20.1.1. F ACTORY - SETTING OF THE A NALOG O UTPUTS Analog outputs are factory set to voltage values ranging from ± 10V and the following variables are selected: TERMINALS OUTPUTS SELECTED VARIABLE 10 AO1 11 AO2 12 AO3 Speed (speed of the connected motor) Speed Ref. (speed reference at constant rpm) Current of the connected motor OUTPUT RANGE ±10V ±10V MIN. VALUE -1500 MAX. VALUE 1500 -1500 1500 ±10V 0 Imax * * Depending on the inverter size. 20.1.2. A NALOG O UTPUTS As per the analog outputs, the ANALOG AND FREQUENCY OUTPUTS MENU allows selecting the variable to be represented, its range, its acquisition mode (± or as an absolute value), the type of analog output (voltage/current) and the output values corresponding to the min. value and the max. value of the selected variable. An offset value and a filtering function may also be applied to the analog outputs. For the frequency output, this menu contains the parameters for the selection of the represented variable, its acquisition mode (± or as an absolute value), its min. value and max. value and the corresponding output frequency value, and a filtering function. The figure below shows the typical structure of the analog outputs; in particular, AO1analog output and its parameter set are illustrated. 146/482 PROGRAMMING INSTRUCTIONS iDrive Figure 15: Typical structure of the Analog Outputs. • Vector Selection Selects the variable to be represented through the digital analog converter (DAC). P177 is the selection parameter for AO1analog output and P185 and P193 for AO2 and AO3 respectively. Mode Sets the acquisition mode of the selected variable (± or as an absolute value) and the type (voltage/current) for the analog output. If Mode = Disable, a different operating mode is activated for the analog output for which the represented variable is determined by the MODBUS address set in Address and the gain value set in Gain is applied: P176 (Mode), P207 (Gain), P210 (Address) for AO1; P184 (Mode), P208 (Gain), P211 (Address) for AO2; P192 (Mode), P209 (Gain), P212 (Address) for AO3. • • (Val Min; Out Min) Defines the minimum saturation value of the variable to be represented and the corresponding value to be assigned to the analog output. For values equal to or lower than Val Min, Out Min will be assigned to the selected analog output. For analog outputs AO1, AO2, and AO3, the following parameters will be used: (P178; P182), (P186; P194) and (P190; P198) for values (Val Min; Out Min). • (Val Max; Out Max) Defines the maximum saturation value of the variable to be represented and the corresponding value to be assigned to the analog output. For values equal to or higher than Val Max, Out Max will be assigned to the selected analog output. For analog outputs AO1, AO2, and AO3, the following parameters will be used: (P179; P183), (P187; P195) and (P191; P199) for values (Val Max; Out Max). • Offset Defines the offset value applied to the analog output. Offset is set in parameter P180 for AO1 analog output, in parameters P188, P196 for AO2 and AO3 respectively. • Filter Defines the filter time constant applied to the analog output. The filter time constant is set in parameter P181 for AO1 analog output, in parameters P189, P197 for AO2 and AO3 respectively. 147/482 PROGRAMMING INSTRUCTIONS iDrive 20.1.3. F REQUENCY O UTPUT When programming the frequency output, the setting of MDO1 in the DIGITAL OUTPUTS MENU is disabled. The figure below illustrates the structure of the frequency output. Parameterization is similar to the one used for the analog outputs. Figure 16: Structure of the Frequency Output. 148/482 PROGRAMMING INSTRUCTIONS 20.2. iDrive Variables This section covers the variables that can be represented for the analog and frequency outputs. Table 29: Variables to be selected for the Analog and Frequency Outputs. SELECTION CODE Selection Value 0: Disable 1: Speed 2: Speed Ref. 3: Ramp Out 4: Mot. Freq. 5: Mot. Curr. 6: Out Volt 7: OutPower 8: DC Vbus 9: Torq.Ref 10: Torq.Dem 11: Torq.Out 12: Torq.Lim 13: PID Ref% 14: PID RMP% 15: PID Err% 16: PID Fbk% 17: PID Out% 18: REF 19: AIN1 20: AIN2/PTC 21: Enc. In 22: PulseIn 23: Flux Ref 24: Flux 25: iq ref. 26: id ref. 27: iq 28: id 29: Volt.Vq 30: Volt Vd 31: Cosine 32: Sine 33: Angle 34: +10V 35: –10V 36: Flux Current 37: Sqr Wave 38: Saw Wave 39: Hts Temp. 40: Amb Temp. 41÷49: RESERVED 50: PT100_1 51: PT100_2 52: PT100_3 53: PT100_4 54: I2t% 55: XAIN4 56: XAIN5 57: OT Count 58: ST Count Full-scale Value 100.00% 10000 rpm 10000 rpm 10000 rpm 1000.0 Hz 5000.0 A 2000.0 V 5000.0 kW 2000.0 V 10000% 10000 Nm 10000% 10000% 100.00% 100.00% 100.00% 100.00% 100.00% 100.00% 100.00% 100.00% 10000 rpm 100.00 kHz 1.0000 Wb 1.0000 Wb 5000.0 A 5000.0 A 5000.0 A 5000.0 A 2000.0 V 2000.0 V 100.00% 100.00% 1.0000 rad 10.000 V 10.000 V 5000.0 A 100.00% 100.00% 100.00 °C 100.00 °C 100.00% 100.00% 100.00% 100.00% 100.00% 100.00% 100.00% 100000h 100000h Description Disabled output Speed of the connected motor Speed reference at constant speed “Ramped” speed reference Frequency produced by the drive Current RMS Output voltage RMS Output power DC-link voltage Torque reference at constant speed Demanded torque (Nm) Evaluation of the torque output Setpoint of the torque limit PID reference at constant speed “Ramped” PID reference Error between PID reference and feedba Feedback to the PID Output of the PID Analog input REF Analog input AIN1 Analog input AIN2 Speed read by the encoder used as a re Frequency input Flux reference at constant speed Current flux reference Current reference in axis q Current reference in axis d Current measure in axis q Current measure in axis d Voltage in axis q Voltage in axis d Cosine waveform Sine waveform Electric angle of delivered Vu Voltage level +10V Voltage level –10V Flux Current Square wave Saw wave Temperature of the heatsink Ambient temperature RESERVED PT100 Channel 1 PT100 Channel 2 PT100 Channel 3 PT100 Channel 4 Motor thermal capacity XAIN4 Analog input XAIN5 Analog input Maintenance Operation Time Counter Maintenance Supply Time Counter 149/482 PROGRAMMING INSTRUCTIONS iDrive 59: PID2 Reference 60: PID2 Set Point 61: PID2 Error 62: PID2 Feedback 63: PID2 Out 64: Torque Demand 65: RESERVED 66: RESERVED 67: RESERVED 68: RESERVED 69: RESERVED 100.00% 100.00% 100.00% 100.00% 100.00% 100.00% Reference at constant speed of PID2 “Ramped” reference of PID2 Error between reference and feedback of PID2 Feedback of PID2 Output of PID2 Torque demand (value percent) RESERVED RESERVED RESERVED RESERVED RESERVED Table 29 provides a brief description of each variable and its full-scale value used to set the minimum and maximum value. 20.2.1. O PERATING M ODE O UTPUTS OF A NALOG AND F REQUENCY This section covers the different representation modes to be selected for the analog and frequency outputs. The following modes can be used for analog outputs: 0: Disabled 1: ± 10V Disabled analog output (enables a RESERVED operating mode). The analog output is set as a voltage output and the possible min. and max. output range from +/ – 10V. The selected variable has a positive or negative sign. 2: 0÷10V The analog output is set as a voltage output and the possible min. and max. output range from 0 to 10V. The selected variable has a positive or negative sign. 3: 0÷20mA The analog output is set as a current output and the possible min. and max. output range from 0 to 20mA. The selected variable has a positive or negative sign. 4: 4÷20mA The analog output is set as a current output and the possible min. and max. output range from 4 to 20mA. The selected variable has a positive or negative sign. 5: ABS 0÷10V As 0÷10V output mode, but the selected variable is considered as an absolute value. 6: ABS 0÷20mA As 0÷20mA output mode, but the selected variable is considered as an absolute value. 7: ABS 4÷20mA As 4÷20mA output mode, but the selected variable is considered as an absolute value. NOTE values values values values Always check the min. and max. values of the outputs programmed in the relevant parameters. Three operating modes can be selected for the Frequency Output: 0: Disabled The output frequency is disabled. 1: Pulse Out MDO1 Digital Output is programmed as a frequency output. The selected variable has a positive or negative sign. 2: ABS Pulse Out As Pulse Out, but the selected variable is considered as an absolute value. NOTE 150/482 When P200 is not set to DISABLE, MDO1digital output is used as a frequency output and any MDO1 settings in the DIGITAL OUTPUTS MENU are ignored. PROGRAMMING INSTRUCTIONS iDrive 20.2.2. A NALOG O UTPUT P ROGRAMMING E XAMPLES This section contains a description of operating examples of the analog outputs obtained with different programming modes. Example 1: Table 30: Programming AO1 (0÷ 10V). Parameter P176 P177 P178 P179 P180 P181 P182 P183 Parameterization of AO1 Analog Output Value Description 0÷10V AO1 Analog output 1: Speed Selected variable for AO1 analog output –500 rpm Min. value of AO1 selected variable +500 rpm Max. value of AO1 selected variable 0.000 V AO1 Analog output offset 0 ms Filter for AO1 analog output 0.0 V Min. AO1 output value with reference to P178 10.0 V Max. AO1 output value with reference to P179 Figure 17: Curve (voltage; speed) implemented by AO1 (Example 1). 10 (V) 9 8 7 6 5 4 3 2 1 0 -500 -400 -300 -200 -100 0 100 200 300 400 500 ( rpm ) Example 2: Table 31: Programming AO1 (ABS 0 ÷ 10V). Parameter P176 P177 P178 P179 P180 P181 P182 P183 Parameterization of Analog Output AO1 Value Description ABS 0÷10V AO1 Analog output 1: Speed Selected variable for AO1 analog output 0 rpm Min. value of AO1 selected variable +500 rpm Max. value of AO1 selected variable 0.000 V AO1 Analog output offset 0 ms Filter for AO1 analog output 0.0 V Min. AO1 output value with reference to P178 Max. AO1 output value with reference to 10.0 V P179 151/482 PROGRAMMING INSTRUCTIONS iDrive Figure 18: Curve (voltage; speed) implemented by AO1 (Example 2). 10 (V) 9 8 7 6 5 4 3 2 1 0 -500 -400 -300 -200 -100 0 100 200 300 400 500 ( rpm ) Example 3: Table 32: Programming AO1 (ABS 0 ÷ 10V). Parameterization of Analog Output AO1 Value Description ABS 0÷10V AO1 Analog output 1: Speed Selected variable for AO1 analog output –500 rpm Min. value of AO1 selected variable +500 rpm Max. value of AO1 selected variable 0.000 V AO1 Analog output offset 0 ms Filter for AO1 analog output Min. AO1 output value with reference to 0.0 V P178 Max. AO1 output value with reference to 10.0 V P179 Parameter P176 P177 P178 P179 P180 P181 P182 P183 Figure 19: Curve (voltage; speed) implemented by AO1 (Example 3). 10 (V) 9 8 7 6 5 4 3 2 1 0 -500 -400 -300 -200 -100 0 100 200 300 400 500 ( rpm ) NOTE 152/482 The programming mode above would imply a straight line passing through (– 500rpm; 0V) and (+500rpm; 10V), but based on the selected mode and considering the variable as an absolute value, the min. point for output AO1 will be (0 rpm; 5 V). PROGRAMMING INSTRUCTIONS iDrive Example 4: Table 33: Programming AO1 (ABS 0 ÷ 10V). Parameterization of Analog Output AO1 Value Description ABS 0÷10V AO1 Analog output 1: Speed Selected variable for AO1 analog output +100 rpm Min. value of AO1 selected variable +500 rpm Max. value of AO1 selected variable 0.000 V AO1 Analog output offset 0 ms Filter for AO1 analog output Min. AO1 output value with reference to 0.0 V P178 Max. AO1 output value with reference to 10.0 V P179 Parameter P176 P177 P178 P179 P180 P181 P182 P183 Figure 20: Curve (voltage; speed) implemented by AO1 (Example 4). 10 (V) 9 8 7 6 5 4 3 2 1 0 -500 -400 -300 -200 -100 0 100 200 300 400 500 ( rpm ) Example 5: Table 34: Programming AO1 (± 10V). Parameter P176 P177 P178 P179 P180 P181 P182 P183 Parameterization of Analog Output AO1 Value Description ±10V AO1 Analog output 1: Speed Selected variable for AO1 analog output +500 rpm Min. value of AO1 selected variable –500 rpm Max. value of AO1 selected variable 0.000 V AO1 Analog output offset 0 ms Filter for AO1 analog output Min. AO1 output value with reference to –10.0 V P178 Max. AO1 output value with reference to +10.0 V P179 153/482 PROGRAMMING INSTRUCTIONS iDrive 10 (V) 8 6 4 2 0 -500 -400 -300 -200 -100 -2 0 100 200 300 400 500 -4 -6 -8 -10 ( rpm ) Figure 21: Curve (voltage; speed) implemented by AO1 (Example 5). 154/482 PROGRAMMING INSTRUCTIONS 20.3. iDrive List of Parameters P176 to P215 Table 35: List of parameters P176 to P215. ADVANCED ADVANCED ADVANCED ADVANCED ADVANCED ADVANCED ADVANCED –10.0 V 782 ADVANCED +10.0V 783 P184 AO1 analog output Selected variable for AO1 analog output Min. value of AO1 selected variable Max. value of AO1 selected variable AO1 Analog output offset Filter for AO1 analog output Min. AO1 output value with reference to P178 Max. AO1 output value with reference to P179 AO2 analog output DEFAULT VALUES 1: ± 10V 1: Motor speed –1500 rpm +1500 rpm 0.000 V 0 ms ADVANCED 784 P185 Selected variable for AO2 analog output ADVANCED P186 P187 P188 P189 Min. value of AO2 selected variable Max. value of AO2 selected variable AO2 Analog output offset Filter for AO2 analog output Min. AO2 output value with reference to P186 Max. AO2 output value with reference to P187 AO3 analog output Selected variable for AO3 analog output Min. value of AO3 selected variable Max. value of AO3 selected variable AO3 Analog output offset Filter for AO3 analog output Min. AO3 output value with reference to P194 Max. AO3 output value with reference to P195 FOUT output in [MDO1] frequency Selected variable for FOUT frequency output Min. FOUT value of selected variable Max. FOUT value of selected variable Min. FOUT output value with reference to P202 Max. FOUT output value with reference to P203 Filter for FOUT frequency output AO1: Gain AO2: Gain AO3: Gain AO1: Variable MODBUS address AO2: Variable MODBUS address AO3: Variable MODBUS address Amplitude of sinusoidal analog output signal Frequency of sinusoidal analog output signal Frequency of saw wave analog output signal ADVANCED ADVANCED ADVANCED ADVANCED 1: ± 10V 2: Speed reference at constant rpm –1500 rpm +1500 rpm 0.000 V 0 ms 786 787 788 789 ADVANCED –10.0 V 790 ADVANCED +10.0V 791 ADVANCED ADVANCED ADVANCED ADVANCED ADVANCED ADVANCED 2: 0÷10V 5: Output current 0A Inverter Imax 0.000 V 0 ms 792 793 794 795 796 797 ADVANCED 0.0 V 798 ADVANCED +10.0V 799 ADVANCED 0: Disabled 800 ADVANCED 1: Motor speed 801 ADVANCED ADVANCED 0 0 802 803 ADVANCED 10.00 kHz 804 ADVANCED 100.00 kHz 805 ADVANCED ADVANCED ADVANCED ADVANCED ADVANCED ADVANCED ADVANCED 0 ms 806 807 808 809 810 811 812 Param. P176 P177 P178 P179 P180 P181 P182 P183 P190 P191 P192 P193 P194 P195 P196 P197 P198 P199 P200 P201 P202 P203 P204 P205 P206 P207 P208 P209 P210 P211 P212 P213 P214 P215 Function User Level RESERVED ENGINEERING 100.0% ENGINEERING 1.00 Hz ENGINEERING 1.00 Hz ModBus Address 776 777 778 779 780 781 785 813 814 815 155/482 iDrive 156/482 PROGRAMMING INSTRUCTIONS PROGRAMMING INSTRUCTIONS iDrive P176 AO1Analog Output P176 Range Default Level Address Function 0: Disabled, 1: ± 10V, 2: 0 ÷ 10V, 3: 0 ÷ 20mA, 4: 4 ÷ 20mA, 5: ABS 0 ÷ 10V, 6: ABS 0 ÷ 20mA, 7: ABS 4 ÷ 20mA. 0÷7 1 1: ± 10V ADVANCED 776 Selects the operating mode of AO1analog output. P 1 7 6 T y p e O u t p u t S i g A O 1 S W → 0 - 2 0 m o f n a l 2 - 1 A - 2 In the example above, A01 is set as a current input. Contact 1 of SW2 dip-switch is open, contact 2 is closed. NOTE Analog outputs are set as voltage outputs by default. To set them as current outputs, see the DIP-switch configuration and follow the instructions displayed on the keypad, or refer to the IDrive’s Installation Instructions Manual. P177 Selected Variable for AO1 Analog Output P177 Range Default Level Address Function 0 ÷ 69 See Table 29 1 Motor speed ADVANCED 777 Selects the variable to be allocated to AO1 digital output. P178 Min. value of AO1 Selected Variable P178 Range Default Level Address Function -32000 ÷ +32000 Depending on the value selected in P177 - 320.00% ÷ + 320.00 % of the full-scale value See Table 29 –1500 –15.00% of 10000 rpm = –1500 rpm ADVANCED 778 Minimum value of the variable selected via P177, corresponding to the min. output value of AO1 set in P182. 157/482 PROGRAMMING INSTRUCTIONS iDrive P179 Max. value of AO1 Selected Variable P179 Range Default Level Address Function -32000 ÷ +32000 Depending on the value selected in P177 - 320.00% ÷ + 320.00 % of the full-scale value See Table 29 +1500 +15.00% of 10000 rpm = +1500 rpm ADVANCED 779 Maximum value of the variable selected via P177, corresponding to the max. output value of AO1 set in P183. P180 AO1 Analog Output Offset P180 Range Default Level Address Function –9999 ÷ +9999 Depending on the value –9.999 ÷ +9.999 selected in P176 0 0.000 V ADVANCED 780 Offset value applied to AO1 analog output. P181 Filter for AO1 Analog Output P181 Range Default Level Address Function 0 ÷ 65000 0.000 ÷ 65.000 sec. 0 0.000 sec. ADVANCED 781 Value of the filter time constant applied to AO1 analog output. P182 Min. AO1 Output Value with Reference to P178 P182 Range Default Level Address Function –100 ÷ +100 –200 ÷ +200 –10.0 ÷ +10.0 V Depending on the value –20.0 ÷ +20.0 mA selected in P176 –100 –10.0 V ADVANCED 782 Minimum output value obtained when the minimum value of the variable set in P178 is implemented. P183 Max. AO2 Output Value with Reference to P179 P183 Range Default Level Address Function 158/482 –100 ÷ +100 –200 ÷ +200 –10.0 ÷ +10.0 V Depending on the value –20.0 ÷ +20.0 mA selected in P176 +100 +10.0 V ADVANCED 783 Maximum output value obtained when the maximum value of the variable set in P179 is implemented. PROGRAMMING INSTRUCTIONS iDrive P184 AO2 Analog Output P184 Range Default Level Address Function NOTE 0÷7 0: Disabled, 1: ± 10V, 2: 0 ÷ 10V, 3: 0 ÷ 20mA, 4: 4 ÷ 20mA, 5: ABS 0 ÷ 10V, 6: ABS 0 ÷ 20mA, 7: ABS 4 ÷ 20mA. 1 1: ± 10V ADVANCED 784 Selects the operating mode of AO2 analog output. Analog outputs are set as voltage outputs by default. To set them as current outputs, see the DIP-switch configuration and follow the instructions displayed on the keypad, or refer to the IDrive’s Installation Instructions Manual. P185 Selected Variable for AO2 Analog Output P185 Range Default Level Address Function 0 ÷ 69 See Table 29 2 Reference at constant speed ADVANCED 785 Selects the variable to be allocated to AO2 digital output. P186 Min. Value of AO2 Selected Variable P186 Range Default Level Address Function –32000 ÷ +32000 –320.00 % ÷ +320.00 % of the full-scale value Depends on the value See Table 29 selected in P185 –1500 –1500 rpm ADVANCED 786 Minimum value of the variable selected via P185, corresponding to the min. output value of AO2 set in P190. P187 Max. value of AO2 Selected Variable P187 Range Default Level Address Function –32000 ÷ +32000 –320.00 % ÷ +320.00 % of the full-scale value Depends on the value See Table 29 selected in P185 +1500 +1500 rpm ADVANCED 787 Maximum value of the variable selected via P185, corresponding to the max. output value of AO2 set in P191. 159/482 PROGRAMMING INSTRUCTIONS iDrive P188 AO2 Analog Output Offset P188 Range Default Level Address Function –9999 ÷ +9999 Depends on the value -9.999 ÷ 9.999 selected in P184 0 0.000 V ADVANCED 788 Offset value applied to AO2 analog output. P189 Filter for AO2 Analog Output P189 Range Default Level Address Function 0 ÷ 65000 0.000÷65.000 sec. 0 0.000 sec. ADVANCED 789 Value of the filter time constant applied to AO2 analog output. P190 Min. AO2 Output Value with Reference to P186 P190 Range Default Level Address Function –100 ÷ +100 –200 ÷ +200 –10.0 ÷ +10.0 V Depends on the value –20.0 ÷ +20.0 mA selected in P184 –100 –10.0 V ADVANCED 790 Minimum output value obtained when the minimum value of the variable set in P186 is implemented. P191 Max. AO2 Output Value with Reference to P187 P191 Range Default Level Address Function -100 ÷ +100 –200 ÷ +200 –10.0 ÷ +10.0 V Depends on the value –20.0 ÷ +20.0 mA selected in P184 +100 +10,0 V ADVANCED 791 Maximum output value obtained when the maximum value of the variable set in P187 is implemented. P192 AO3 Analog Output P192 Range Default Level Address Function 160/482 0÷7 0: Disabled, 1: ± 10V, 2: 0 ÷ 10V, 3: 0 ÷ 20mA, 4: 4 ÷ 20mA, 5: ABS 0 ÷ 10V, 6: ABS 0 ÷ 20mA, 7: ABS 4 ÷ 20mA. 2 2: 0 ÷ 10V ADVANCED 792 Selects the operating mode of AO3 analog output. PROGRAMMING INSTRUCTIONS NOTE iDrive Analog outputs are set as voltage outputs by default. To set them as current outputs, see the DIP-switch configuration and follow the instructions displayed on the keypad, or refer to the IDrive’s Installation Instructions Manual. P193 Selected Variable for AO3 Analog Output P193 Range Default Level Address Function 0 ÷ 69 See Table 29 5 5: Motor current ADVANCED 793 Selects the variable to be allocated to AO3 analog output. P194 Min. Value of AO3 Selected Variable P194 Range Default Level Address Function –320.00 % ÷ +320.00 % of –320.00 % ÷ +320.00 % of the full-scale value the full-scale value Depends on the value See Table 29 selected through P193 0 0A ADVANCED 794 Minimum value of the variable selected via P193, corresponding to the min. output value of AO3 set in P198. P195 Max. Value of AO3 Selected Variable P195 Range –320.00 % ÷ +320.00 % –320.00 % ÷ +320.00 % of the full-scale value Depends on the value See Table 29 selected through P193 Default Inverter Imax Level Address ADVANCED 795 Maximum value of the variable selected via P193, corresponding to the max. output value of AO3 set in P199. Function Max. drive current depending on the drive size – see Table 73 and Table 77 P196 AO3 Analog Output Offset P196 Range Default Level Address Function –9999 ÷ +9999 Depends on the value –9.999 ÷ +9.999 selected through P192 0 0.000 V ADVANCED 796 Offset value applied to AO3 analog output. P197 Filter for AO3 Analog Output P197 Range Default Level Address Function 0 ÷ 65000 sec. 0.000 ÷ 65.000 sec. 0 0.000 sec. ADVANCED 797 Value of the filter time constant applied to AO3 analog output. 161/482 PROGRAMMING INSTRUCTIONS iDrive P198 Min. AO3 Output Value with Reference to P194 P198 Range Default Level Address Function –100 ÷ +100 –200 ÷ +200 –10.0 ÷ +10.0 V Function according to –20.0 ÷ +20.0 mA the selection of P192 0 00.0 V ADVANCED 798 Minimum output value obtained when the minimum value of the variable set in P194 is implemented. P199 Max. AO3 Output Value with Reference to P195 P199 Range Default Level Address Function –100 ÷ +100 –200 ÷ +200 –10.0 ÷ +10.0 V Function according to –20.0 ÷ +20.0 mA selection of P192 +100 +10.0 V ADVANCED 799 Maximum output value obtained when the maximum value of the variable set in P195 is implemented. P200 FOUT Output in [MDO1] Frequency P200 Range Default Level Address Function NOTE 0÷2 0: Disabled, 1: Pulse, 2: ABS Pulse 0 0: Disabled ADVANCED 800 Selects the operating mode of FOUT frequency output. When P200 is not set to DISABLE, MDO1digital output is used as a frequency output and any settings for MDO1 in the DIGITAL OUTPUTS MENU are ignored. P201 Selected Variable for FOUT Frequency Output P201 Range Default Level Address Function 0 ÷ 69 See Table 29 1 Motor speed ADVANCED 801 Selects the variable to be allocated to FOUT frequency output. P202 Min. FOUT Value of Selected Variable P202 Range Default Level Address Function 162/482 –32000 ÷ +32000 –320.00 % ÷ +320.00 % of the full-scale value Depends on the value See Table 29 selected through P201 0 0 ADVANCED 802 Minimum value of the selected variable. PROGRAMMING INSTRUCTIONS iDrive P203 Max. FOUT Value of Selected Variable P203 Range Default Level Address Function –32000 ÷ +32000 –320.00 % ÷ +320.00 % of the full-scale value Depends on the value See Table 29 selected through P201 0 0 ADVANCED 803 Maximum value of the selected variable. P204 Min. FOUT Output Value with Reference to P202 P204 Range Default Level Address Function 1000÷10000 10.00÷100.00 kHz 1000 10.00 kHz ADVANCED 804 Minimum output value obtained when the minimum value of the variable set in P202 is implemented. P205 Min. FOUT Output Value with Reference to P203 P205 Range Default Level Address Function 1000÷10000 10.00÷100.00 kHz 10000 100.00 kHz ADVANCED 805 Maximum output value obtained when the maximum value of the variable set in P203 is implemented. P206 Filter for FOUT Frequency Output P206 Range Default Level Address Function 0 ÷ 65000 0.000 ÷ 65.000 sec 0 0.000 sec. ADVANCED 806 Value of the filter time constant applied to FOUT frequency output. P207 AO1: Gain P208 AO2: Gain P209 AO3: Gain P210 AO1: Variable MODBUS Address P211 AO2: Variable MODBUS Address P212 AO3: Variable MODBUS Address RESERVED P213 Amplitude of Sinusoidal Analog Output Signal P213 Range Default Level Address Function 0 ÷ 1000 0 ÷ 100.0% 1000 100.0% ENGINEERING 813 Amplitude of the sinusoidal analog output signal when Sine or Cosine variables are selected. 163/482 PROGRAMMING INSTRUCTIONS iDrive P214 Frequency of Sinusoidal Analog Output Signal P214 Range Default Level Address Function 0 ÷ 20000 0 ÷ 200.00Hz 100 1.00Hz ENGINEERING 814 Frequency of the sinusoidal analog output signal when Sine or Cosine variables are selected. P215 Frequency of Saw Wave Analog Output Signal P215 Range Default Level Address Function 164/482 0 ÷ 20000 0 ÷ 200.00Hz 100 1.00Hz ENGINEERING 815 Frequency of saw wave analog output signal when Sine or Cosine variables are selected. This can be used as the carrier frequency when setting MDO1 or MDO2 in PWM mode (see the example given in the DIGITAL OUTPUTS MENU). PROGRAMMING INSTRUCTIONS iDrive 21. TIMERS MENU 21.1. Overview The Timers menu allows setting enable and disable delay times for digital inputs/outputs. NOTE For the ENABLE digital input, no disable delay is allowed, because the logic status of the ENABLE command is used directly by the hardware activating IGBT switching; when no ENABLE command is sent, the output power stage is instantly deactivated. NOTE The reset function for the alarms on the leading edges of MDI3 is not delayed. NOTE Any auxiliary alarm set to the digital inputs is not delayed. NOTE Five timers are available; the use can set an enabling/disable delay for each of them. The same timer may also be assigned to multiple digital inputs/outputs. NOTE The ENABLE –S function cannot be delayed. Example 1: The drive enable (MDI1 START) depends on a signal coming from a different source. An activation delay of 2 seconds and a deactivation delay of 5 seconds are needed. To do so, set two delay times for activation and deactivation for the same timer and assign it to MDI1 (START) digital input. In the example below, timer 1 is used. P216 P217 P226 165/482 2.0 sec 5.0 sec 0x0001 Activation delay T1 Deactivation delay T1 Timer assigned to MDI1 (START) PROGRAMMING INSTRUCTIONS iDrive Figure 22: Using Timers (example). The figure shows two possible operating modes: on the left: application of the delay times set for the drive enabling/disabling; on the right: the start signal persists for a shorter time than the delay set for enabling; in this case, the Start function is not enabled. The Start function will be enabled only when MDI1 digital input is ON for a time longer than the time set in P216. 166/482 PROGRAMMING INSTRUCTIONS 21.2. iDrive List of Parameters P216 to P229 Table 36: List of parameters P216 to P229. Paramete r P216 P217 P218 P219 P220 P221 P222 P223 P224 P225 P226 P227 P228 P229 FUNCTION User Level Default Values T1 Enable delay T1 Disable delay T2 Enable delay T2 Disable delay T3 Enable delay T3 Disable delay T4 Enable delay T4 Disable delay T5 Enable delay T5 Disable delay Timer assigned to inputs MDI1÷4 Timer assigned to inputs MDI5÷8 Timer assigned to outputs MDO1÷4 Timer assigned to virtual outputs MPL1÷4 ENGINEERING ENGINEERING ENGINEERING ENGINEERING ENGINEERING ENGINEERING ENGINEERING ENGINEERING ENGINEERING ENGINEERING 0.0 0.0 0.0 0.0 0.0 0.0 0.0 0.0 0.0 0.0 MODBUS Address 816 817 818 819 820 821 822 823 824 825 ENGINEERING 0: No timer assigned 826 ENGINEERING 0: No timer assigned 827 ENGINEERING 0: No timer assigned 828 ENGINEERING 0: No timer assigned 829 P216 T1 Enable delay P216 Range Default Level Address Function 0 ÷ 60000 0.0 ÷ 6000.0 sec 0 0.0 ENGINEERING 816 This parameter sets T1 enable time. Using P226 or P227, if timer T1 is assigned to a digital input having a particular function, P216 represents the delay occurring between the input closure and the function activation. Use P228 to assign timer 1 to a digital output; in that case, the digital output energizing will be delayed according to the time set in P216. P217 T1 Disable delay P217 Range Default Level Address Function 0 ÷ 60000 0.0 ÷ 6000.0 sec 0 0.0 ENGINEERING 817 This parameter sets T1 disabling time. Using P226 or P227, if timer T1 is assigned to a digital input having a particular function, this parameter represents the delay occurring between the input opening and the function deactivation. Use P228 to assign timer 1 to a digital output; in that case, the digital output de-energizing will be delayed according to the time set in P217. 167/482 PROGRAMMING INSTRUCTIONS iDrive P218 T2 Enable delay P218 Range Default Level Address Function 0 ÷ 60000 0.0 ÷ 6000.0 sec 0 0.0 ENGINEERING 818 This parameter sets T2 enable time. (Operation as per P216.) P219 T2 Disable delay P219 Range Default Level Address Function 0 ÷ 60000 0.0 ÷ 6000.0 sec 0 0.0 ENGINEERING 819 This parameter sets T2 disable time. (Operation as per P217.) P220 T3 Enable delay P220 Range Default Level Address Function 0 ÷ 60000 0.0 ÷ 6000.0 sec 0 0.0 ENGINEERING 820 This parameter sets T3 enable time. (Operation as per P216.) P221 T3 Disable delay 0 ÷ 60000 0.0 ÷ 6000.0 sec Default Level Address 0 ENGINEERING 821 0.0 Function This parameter sets T3 disable time. (Operation as per P217.) P221 Range P222 T4 Enable delay P222 Range Default Level Address Function 0 ÷ 60000 0.0 ÷ 6000.0 sec 0 0.0 ENGINEERING 822 This parameter sets T4 enable time. (Operation as per P216.) P223 T4 Disable delay P223 Range Default Level Address Function 168/482 0 ÷ 60000 0.0 ÷ 6000.0 sec 0 0.0 ENGINEERING 823 This parameter sets T4 disable time. (Operation as per P217.) PROGRAMMING INSTRUCTIONS iDrive P224 T5 Enable delay P224 0 ÷ 60000 Range Default Level Address Function 0.0 ÷ 6000.0 sec 0 0.0 ENGINEERING 824 This parameter sets T5 enable time. (Operation as per P216.) P225 T5 Disable delay P225 0 ÷ 60000 Range Default Level Address Function 0.0 ÷ 6000.0 sec 0 0.0 ENGINEERING 825 This parameter sets T5 disable time. (Operation as per P217.) P226 Timers Assigned to Inputs MDI1÷4 P226 [ 0; 0; 0; 0 ] ÷ [ 5; 5; 5; 5 ] Range Default Level Address Function 0: No timer assigned 1 ÷ 5: T1 ÷ T5 [ 0; 0; 0; 0 ] 0: No timer assigned ENGINEERING 826 The first group of four digital inputs may be assigned to any of the five timers and the same timer may be assigned to multiple inputs. Select “zero” to avoid delaying the digital inputs. Setting via serial link: see coding table below. Table 37: Coding of P226: Timers assigned to digital inputs MDI 1÷4. bits [15..12] bits [11..9] bits [8..6] bits [5..3] bits [2..0] not used MDI4 MDI3 MDI2 MDI1 Coding example for P226: MDI1=Timer T2 MDI2=No timer assigned MDI3=Timer T2 MDI4=Timer T5 ⇒ value in P226 101 010 000 010 bin = 2690 dec P227 Timers Assigned to Inputs MDI5÷8 P227 Range Default Level Address Function [ 0; 0; 0; 0 ] ÷ [ 5; 5; 5; 5 ] 0: No timer assigned 1 ÷ 5: T1 ÷ T5 [ 0; 0; 0; 0 ] 0: No timer assigned ENGINEERING 827 The second group of four digital inputs may be assigned to any of the five timers and the same timer may be assigned to multiple inputs. Select “zero” to avoid delaying the digital inputs. Setting via serial link: see coding in P226. 169/482 PROGRAMMING INSTRUCTIONS iDrive P228 Timers Assigned to Outputs MDO1÷4 P228 Range Default Level Address Function [ 0; 0; 0; 0 ] ÷ [ 5; 5; 5; 5 ] 0: No timer assigned 1 ÷ 5: T1 ÷ T5 [ 0; 0; 0; 0 ] 0: No timer assigned ENGINEERING 828 The digital outputs may be assigned to any of the five timers and the same timer may be assigned to multiple outputs. Select “zero” to avoid delaying the digital outputs. Setting via serial link: see coding in P226. P229 Timers Assigned to Virtual Outputs MPL 1÷4 P229 Range Default Level Address Function 170/482 [ 0; 0; 0; 0 ] ÷ [ 5; 5; 5; 5 ] 0: No timer assigned 1 ÷ 5: T1 ÷ T5 [ 0; 0; 0; 0 ] 0: No timer assigned ENGINEERING 829 The virtual digital outputs may be assigned to any of the five timers and the same timer may be assigned to multiple outputs. Select “zero” to avoid delaying the virtual digital outputs. Setting via serial link: see coding in P226. PROGRAMMING INSTRUCTIONS iDrive 22. PID PARAMETERS MENU 22.1. Overview This menu defines the parameters for the digital PID regulator integrated in the drive. The PID regulator may be used to control a physical variable which is external to the drive; the variable measure shall be available in the system and must be connected to the “feedback” input. The PID regulator is used to keep the reference and the control variable constant (feedback); to do so, the PID regulator controls three internal variables, which are described below: 9 Proportional term: this the variable detecting the instant difference between the reference and the measured value of the physical variable to be controlled ( “error “); 9 Integral term: this is the variable keeping track of the “history” of the detected errors (summation of all errors); Derivative term: this is the variable keeping track of the evolution of the error or the controlled variable (difference between two consecutive errors or between two consecutive values of the feedbacked variable); The weighted summation of these terms represents the output signal of the PID regulator. The weight of these three terms may be defined by the user with the parameters below. 9 Figure 23: PID Block Diagram. NOTE In LOCAL mode, the PID regulator is disabled if it is used to correct the reference or the voltage values (C294 = 2: Sum Reference or C294 =3: Sum Voltage). NOTE In LOCAL mode, if the drive reference is the PID output C294=Reference and the Type parameter on the Keypad page in Local mode is P266=Ref.Active+Spd, the PID reference can be changed by activating the Local mode from the Keypad page. Press the LOC/REM key again when the drive is disabled (or the MDI LOC/REM key if it is programmed as a pushbutton: C180a=Pushbutton) to disable the PID and to set the speed reference directly from the Keypad page. 171/482 PROGRAMMING INSTRUCTIONS iDrive 22.2. PID Regulator Tuning – Method of Ziegler and Nichols Tuning a PID regulator consists in selecting and allocating values to PID parameters in order to adjust the operation of the system to the technical requirements of the process and to the equipment restrictions. One of the possible PID tuning procedures is the Method of Ziegler and Nichols. This method implies the following steps: 1. Set the integral action and the derivative action to zero: Ti (P242) = 0, Td (P243) = 0. 2. Assign very low values to Kp (P240), then apply a little step to the reference signal (setpoint) selected with C285/286/287. 3. Gradually increase the value of Kp until permanent oscillation is attained in the PID loop. 4. Tune the parameters for a P, PI or PID regulator based on the table below—where Kpc is the value of the proportional gain corresponding to the permanent oscillation (critical gain) and Tc is the period of the permanent oscillation: Kp (P240) Ti (P242) P 0.5 Kpc PI 0.45 Kpc Tc/1.2 PID 0.6 Kpc Tc/2 Td (P243) Tc/8 Figure 24: Permanent oscillation with Kpc critical gain. 172/482 PROGRAMMING INSTRUCTIONS iDrive Figure 25: Response to a system tuned with the method of Ziegler and Nichols. NOTE 22.3. The method of Ziegler and Nichols is not always applicable, because some systems do not produce any oscillations, even in presence of large proportional gains. However, leading a system close to instability can be very dangerous. Manual Tuning of the PI Regulator The PI regulator con be manually tuned when the tuning method of Ziegler and Nichols is not applicable. The sections below cover the following: • how the transient is affected from the proportional action when the integral action is kept constant in a PI regulator; • how the transient is affected from the integral action when the proportional action is kept constant in a PI regulator; • how the transient is affected from the derivative action in a PID regulator. 22.3.1. Symbol Kp P ROPORTIONAL A CTION (P) Tuning function An input variance (error) produces an output variance proportional to the variance amplitude PI Regulator Ti=Constant Small Kp Optimum Kp Large Kp Main goal Changes the tuning variable based on the variable being tuned Response to the step Response time Overshoot Optimum Undershoot Longer Optimum Shorter 173/482 iDrive PROGRAMMING INSTRUCTIONS Figure 26: Response to the step based on the value of Kp when Ti is kept constant. 174/482 PROGRAMMING INSTRUCTIONS iDrive When Kp is increased, the error is reduced at constant rate, but the transient can also be adversely affected. Adverse effects can be a longer transient with stronger oscillations due to the damping reduction, or even instability. This is shown in the figure below: Figure 27: Response to the step when Kp is too large. 22.3.2. Symbol Ti I NTEGRAL A CTION (I) Tuning function As soon as an input variance occurs (Error), an output variance occurs. The variation rate is proportional to the error magnitude. PI Regulator Small Kp Optimum Kp Large Kp Response to the step Overshoot Optimum Undershoot Main goal Sets the tuning point (eliminates the offset from the proportional action). Response time Shorter Optimum Longer 175/482 PROGRAMMING INSTRUCTIONS iDrive Figure 28: Response to the step based on the value of Ti when Kp is kept constant. The figure below represents the response of the PI regulator when the values for Kp and Ti are lower than the optimum value computed with the method of Ziegler and Nichols. Figure 29: Response to the step when the values of Kp and Ti are too small. 176/482 PROGRAMMING INSTRUCTIONS 22.3.3. Symbol iDrive D ERIVATIVE A CTION (D) Tuning function An input variance (error) generates an output variance proportional to the variance rate Td Main goal Decreases the response time for the return to the tuning point The derivative action set with Td increases the stability of the system, thus increasing the transient response. The derivative action tends to get an earlier response, but it increases the system sensitivity to the disturbance overriding the error signal. 22.3.4. T UNING A CTIONS AT C ONSTANT S PEED When the system is operating at constant speed, the system response shall be the most accurate as possible (minimum error) and shall adjust any little reference variations. When at constant speed, if the system does not promptly respond to little reference variations, a shorter integral time may solve this problem. Otherwise, when little and long-lasting oscillations affect the reference value, setting a longer integral time could be the right solution. 22.4. Anti-windup The major benefit of the integral action is to ensure null errors at steady speed. However, just like the derivative action, the integral action shall be applied with caution to avoid worse performance. A case in point is the output saturation occurring at the same time as an excessive integral action. When the output saturates, the control action is limited, so the error is still remarkable. If the error persists, the actuator will saturate, because the longer the time the error persists, the stronger the integral action is; this phenomenon is called “windup”. In case of output saturation, the integral term can reach very high values; as a result, the error shall have opposite sign for a long period before exiting from saturation. The PID regulator of the IDrive drive is provided with an Anti-windup function which compensates the effect described above. This Anti-windup action is described below (P=proportional term; I=integral term; D=derivative term). The output is always calculated as follows: OUT ← P + I + D When output saturation occurs: OUT ← OUTsat The integral term is forced based on the following: I ← OUTsat – P – D (which is the Anti-windup function). This prevents the integral term from reaching very high values; the integral term is then kept constantly in line with the saturated output value OUTsat that is present at each moment; any variations of the error (i.e. the P) that allows exiting from saturation have immediate effect to the output, without having to wait for a long time before discharging the integral term itself. The effect of the Anti-windup can be adjusted with parameter P260; if P260<1, the effect is reduced and the system is less sensitive to error variations; if P260=0, the effect is cancelled. The value of P260=1 is correct for the applications requiring to quickly exit from saturation. On the other hand, reducing P260 can be useful when output variations are to be avoided for negligible error variations. 177/482 PROGRAMMING INSTRUCTIONS iDrive 22.5. List of Parameters P236 to P260 Table 38: List of parameters P236 to P260. Parameter P236 P237 P237a P237b P238 P239 P240 P241 P242 P243 P244 P245 P246 P247 P248 P249 P250 P251 P252 P253 P254 P255 P256 P257 P260 178/482 FUNCTION Max. value of PID output Min. value of PID output Wake-up Mode Wake-up Level Max. value of PID integral term Max. value of PID derivative term PID proportional constant Multiplicative factor of P240 PID Integral time (multiples of P244) PID Derivative time (multiples of P244) Cycle time of PID regulator: Tc Min. value of PID reference Max. value of PID reference Min. value of PID feedback Max. value of PID feedback PID reference ramp up time PID reference ramp down time Unit of measure of PID ramp PID ramp start rounding off PID ramp end rounding off Integral term activation threshold START Disable delay with PID Out=P237 PID output gradient limit Gain for PID measure scaling Gain for Anti-windup User Level Default Values ENGINEERING ENGINEERING ENGINEERING ENGINEERING ENGINEERING ENGINEERING ENGINEERING ENGINEERING ENGINEERING ENGINEERING ENGINEERING ENGINEERING ENGINEERING ENGINEERING ENGINEERING ENGINEERING ENGINEERING ENGINEERING ENGINEERING ENGINEERING ENGINEERING ENGINEERING ENGINEERING ENGINEERING ENGINEERING +100.00% –100.00% 0: [Disabled] 0.00% +100.00% +100.00% 1.000 0:1.0 500*Tc (ms) 0*Tc (ms) 5 ms 0.00% +100.00% 0.00% +100.00% 0s 0s 1: [0.1s] 50% 50% 0.00% 0: [Disabled] 1 ms 1.000 1.00 MODBUS Address 836 837 858 859 838 839 840 841 842 843 844 845 846 847 848 849 850 851 852 853 854 855 856 857 860 PROGRAMMING INSTRUCTIONS iDrive P236 Max. Value of PID Output P236 Range Default Level Address Function –10000 +10000 ÷ –100.00 ÷ +100.00 % +10000 +100.00 % ENGINEERING 836 This is the max. allowable value of PID regulator output. This value is expressed as a percentage; its allocation depends on parameter C294, defining PID action. Example: if C294 = External Out, the PID regulator delivers a reference obtained based on the controlled variable and its setpoint. In this case, the PID output can be brought outside through an analog output. The matching between P236 and the output value (see the ANALOG AND FREQUENCY OUTPUTS MENU) is user-defined. If C294 = Reference, the PID regulator output is the motor speed/torque reference (the system will ignore any other reference source), parameter P236 is a percentage referring to the max. value, considered as an absolute value, between the max. and the min. speed/torque reference of the active motor. If C294 = Add Reference, the percentage in P236 relates to the instant value of the speed/torque reference to be adjusted. If a Frequency control is used, the PID regulator can be used to adjust the drive output voltage; in this case, P236 relates to the instant voltage value (E.g. If a drive delivers 50V and an adjustment of 10% is implemented, the drive will deliver 55V). P237 Min. Value of PID Output P237 Range Default Level Address Function –10000 ÷ +10000 –100.00 ÷ +100.00 % –10000 –100.00 % ENGINEERING 837 This is the min. allowable value of PID regulator output. For the value percent of P237, see the description of parameter P236. P237a Wake-up Mode P237a Range Default Level Address Function 0÷4 0: Disabled 1: Feedback < P237b 2: Feedback > P237b 3: Error < P237b 4: Error > P237b 0 0: Disabled ENGINEERING 858 If this parameter is disabled, the PID control re-activates only when the PID output exceeds the value set in parameter P237. If this parameter is enabled, the PID control re-activates when: P237a=1: the Feedback value drops below the level set with P237b; P237a=2: the Feedback value exceeds the level set with P237b; P237a=3: the Error value drops below the level set with P237b; P237a=4: the Error value exceeds the level set with P237b. 179/482 PROG GRAMMING G INS STRUCTIONSS iDrive P237b Wake e-up Level P237 7b Range Default Level Address Function –10000 ÷ +10000 –100.00 ÷ +100.00 % 0 0.00 % ENGINEER RING 859 Level of tthe Feedbac ck or Error sign nal allowing rre-activating g the PID control (ssee P237a). PID Feedb back P2377a = 1 [Feed dback < P237b] P237b Wake-U Up Level TIME PID Output T > P255 P237 Sleep Level TIME RUNNIN NG P000666-b STOP F Figure 30: PID D Sleep and W Wake-up Mo ode when P23 37a is set to 11. Value of Integ gral Term P238 Max. V P238 8 Range Default Level Address Function 180/482 0 ÷ 10000 0 –100.00 ÷ +100.00 % 10000 +100.00 % ENGINEER RING 838 This is th he max. allo owable value of the inttegral term. It is to be considere ed as an ab bsolute value; the output value resultiing from the integral t erm ranges from f + P238 to – P238. PROGRAMMING INSTRUCTIONS iDrive P239 Max. Value of Derivative Term P239 Range Default Level Address Function 0 ÷ 10000 –100.00 ÷ +100.00 % 10000 +100.00 % ENGINEERING 839 This is the max. allowable value of the derivative term; it is to be considered as an absolute value; the output value resulting from the derivative term ranges from + P239 to – P239. P240 PID Proportional Constant P240 Range Default Level Address Function 0 ÷ 65000 0 ÷ 65.000 1000 1.000 ENGINEERING 840 This is the value of the proportional coefficient. The PID regulator will use Kp resulting from the product of P240 multiplied by P241 (multiplicative factor). P241 Multiplicative Factor of P240 P241 Range Default Level Address Function 0÷2 0: 1.0 1: 10.0 2: 100.0 0 0: 1.0 ENGINEERING 841 Multiplicative factor of the proportional coefficient. This is used to obtain a wider range for the proportional coefficient used in PID regulator and ranging from 0.000 to 6500.0. Supposing that the default values are used for P240 and P241, the proportional coefficient used in the PID regulator is unitary: in case an error of 1% occurs between the reference and the controlled variable, the proportional term, representing one of the three values of the regulator output, will be 1%. P242 PID Integral Time (Multiples of P244) P242 Range Default Level Address Function 0 ÷ 65000 0: Disabled ÷ 65000 * Tc (ms) 500 500* Tc (ms) ENGINEERING 842 Ti constant dividing the integral term of PID regulator: Ki = 1/Ti = 1/(P242*Ts) It is expressed in sampling time units Ts (see P244). If this parameter is set to zero, the integral action is cancelled. P243 PID Derivative Time (Multiples of P244) P243 Range Default Level Address Function 0 ÷ 65000 0 ÷ 65.000 * Tc (ms) 0 0*Tc (ms) ENGINEERING 843 Constant multiplying the derivative term of PID regulator. If this parameter is set to zero, the derivative action is disabled. 181/482 PROGRAMMING INSTRUCTIONS iDrive P244 Cycle Time of PID Regulator: Tc P244 Range Default Level Address Function 5 ÷ 65000 0 ÷ 65000 ms 5 5 ms ENGINEERING 844 This parameter sets the cycle time of PID regulator. It is expressed in ms (multiples of 5 only). Example: if P244 = 1000 ms, the PID regulator cycle will be executed every second, and the output will be refreshed every second as well. P245 Min. Value of PID Reference P245 Range Default Level Address Function –10000 ÷ +10000 ±100.00% 0 0.00% ENGINEERING 845 This parameter defines the min. allowable value of the PID reference. The PID references are to be considered as percentage values. If analog references are selected, P245 relates to the minimum value of the selected analog input. Example: Select AIN1 analog input as the PID reference and suppose that its max. and min. values are +10V and –10V respectively. If P245 is –50%, this means that the PID reference will be saturated at –50% for voltage values lower than –5V. P246 Max. Value of PID Reference P246 Range Default Level Address Function –10000 ÷ +10000 ±100.00% +10000 +100.00% ENGINEERING 846 This parameter defines the max. allowable value of the PID reference. See the description of P245. P247 Min. Value of PID Feedback P247 Range Default Level Address Function –10000 ÷ +10000 ±100.00% 0 0.00% ENGINEERING 847 This parameter defines the min. allowable value of the PID feedback. See the description of P245. P248 Max. Value of PID Feedback P248 Range Default Level Address Function 182/482 –10000 ÷ +10000 ±100.00% +10000 +100.00% ENGINEERING 848 This parameter defines the max. allowable value of the PID feedback. See the description of P245. PROGRAMMING INSTRUCTIONS iDrive P249 PID Reference Ramp Up Time P249 Range Default Level Address Function 0 ÷ 32700 Function of P251 0 0s ENGINEERING 849 This parameter defines the ramp up time of the PID regulator reference from 0% to the max. allowable absolute value (max. {|P245|,|P246|}). P250 PID Reference Ramp Down Time P250 Range Default Level Address Function 0 ÷ 32700 Function of P251 0 0s ENGINEERING 850 This parameter defines the ramp down time of the PID regulator reference, from max. allowable value (max. {|P245|,|P246|}) to 0%. P251 Unit of measure of PID Ramp P251 0: 0.01 s 1: 0.1 s 2: 1.0 s 3: 10.0 s Range 0÷3 Default Level Address 1 1: 0.10 s ENGINEERING 851 This parameter defines the unit of measure for the PID reference ramp times. It defines the unit of measure for the time of the third ramp of the PID reference P249 and P250, so that the allowable range becomes 0s – 327000s. Function Example: P251 Value 0 1 2 3 NOTE Coding 0.01 s 0.1s 1.0 s 10.0 s Range P249 – P250 Min. Max. 0 327.00 s 0 3270.0 s 0 32700 s 0 327000 s Factory-setting: the PID reference ramp is zero; if a given ramp time is set up, the ramp will be rounded off (50% at the beginning and at the end of the ramp). See parameters P252 and P253. 183/482 PROGRAMMING INSTRUCTIONS iDrive P252 PID Ramp Start Rounding Off P252 Range Default Level Address Function NOTE 0 ÷ 100 0 % ÷ 100% 50 50% ENGINEERING 852 This parameter sets the time period of the rounding off applied to the first stage of the ramps. It is expressed as a percentage of the ramp up/down time. Example: ramp up of 5sec.: P252 = 50% means that the speed reference is limited in acceleration for the first 2.5 sec of the ramp up. When P252 is used, the preset ramp time is increased by (P252%)/2. P253 PID Ramp End Rounding Off P253 Range Default Level Address Function NOTE 0 ÷ 100 0 % ÷ 100% 50 50% ENGINEERING 853 As P252, but P253 sets the rounding off applied at the end of the ramps. When P253 is used, the preset ramp time is increased by (P253%)/2. P254 Integral Term Activation Threshold P254 Range Default Level Address Function 184/482 0.0 ÷ 5000 0.0 % ÷ 500.0% 0 0.0 % ENGINEERING 854 This parameter sets a threshold value below which the integrator is kept to zero. It has effect only when the PID regulator is used as a reference corrector or generator. In this case, the threshold percentage value refers to the max. speed (or torque) absolute value set for the active motor. The integral term is not calculated when the speed (or torque) percentage value expressed as an absolute value is lower than the value set in P254. If P254 is set to zero, the integrator is always activated. PROGRAMMING INSTRUCTIONS iDrive P255 START Disable Delay with PID Out=P237 P255 Range Default Level Address Function 0 ÷ 60000 0: Disabled 1 ÷ 60000 s 0 0: Disabled ENGINEERING 855 This parameter sets the max. time for the drive operation when the PID regulator output continuously operates at its min. value (P237). If this is true for a time equal to the time set in P255, the drive is automatically put on stand-by until 1) the PID output value exceeds the min. value (if P237a=Disabled); 2) the Feedback or the Error drops below the Wake-up level in P237b (if P237a=1 or =3 respectively); 3) when the Feedback or the Error exceeds the Wake-up level in P237b (if P237a=2 or =4 respectively). If C294 is set as External Out or P255 is set to zero, this function is disabled. P256 PID Output Gradient Limit P256 Range Default Level Address Function 1 ÷ 65000 1 ÷ 65000 msec 1 1msec ENGINEERING 856 This parameter limits the max. acceleration for the PID regulator output. The max. acceleration for the PID regulator output is equal to 100% / P256 [%/msec]. P257 Gain for PID Measure Scaling P257 Range Default Level Address Function 0 ÷ 32000 0.000 ÷ 32.000 1 1.000 ENGINEERING 857 Gain for the scaling of PID measures M023 ÷ M025. This gain has effect only on the measures above. It does not affect the PID operation. This parameter allows scaling if you want to display PID measures with a different unit of measure: M023 = M020 * P257 M024 = M021 * P257 P260 Anti Wind-Up Gain P260 Range Default Level Address Function 0 ÷ 100 0.00 ÷ 1.00 100 1.00 ENGINEERING 860 Value of the Anti Wind-Up coefficient that freezes the integral term of the PID when its output is being saturated (see Anti-windup). When leaving P260=1.00, Anti Wind-Up is complete (I ← OUTsat – P – D). If P260=0.00, Anti Wind-Up is inhibited (the integral term reaches the value of ±P238 based on the error sign). Intermediate values for P260 give intermediate effects. 185/482 PROGRAMMING INSTRUCTIONS iDrive 23. PID2 PARAMETERS MENU 23.1. Overview This menu defines the parameters of the digital regulator PID2 as well as the parameters used in 2-zone mode. To activate the PID2 regulator, set C291a = 7: 2 PID (PID CONFIGURATION MENU). Once activated, the PID2 regulator has the same functionality and operates in line with the standard PID (PID PARAMETERS MENU). The output of the standard PID regulator is algebraically summed with the output of the PID2 regulator. Add “200” to the parameter codes pertaining to the standard PID to obtain the relevant parameter codes for PID2. Example: P236 for standard PID corresponds to P436 for PID2. To enable the 2-zone mode, set C291a = 5: 2-Zone MIN or 6: 2-Zone MAX (PID CONFIGURATION MENU). Once the 2-zone mode is enabled, the standard PID regulator operates on the system with the larger error (minimum feedback in respect to its reference, 2-Zone MIN) or with the smaller error (maximum feedback in respect to its reference, 2-Zone MAX). In 2-zone mode, parameters P236..P260 pertain to the system where the error results from the reference selected with C285 and from the feedback selected with C288, whilst parameters P436..P460 pertain to the system where the error results from the reference selected with C286 and from the feedback selected with C289. NOTE The PID2 regulator is disabled when operating in 2-zone mode. Please refer to the block-diagram in Figure 63. 186/482 PROGRAMMING INSTRUCTIONS 23.2. iDrive List of Parameters P436 to P460 Table 39: List of parameters P436 to P460. Parameter P436 P437 P437a P437b P438 P439 P440 P441 P442 P443 P444 P445 P446 P447 P448 P449 P450 P451 P452 P453 P454 P455 P456 P457 P460 FUNCTION Max. value of PID2 output Min. value of PID2 output Wake-up Mode Wake-up Level Max. value of PID2 integral term Max. value of PID2 derivative term PID2 proportional constant Multiplicative factor of P440 PID2 Integral time (multiples of P444) PID2 Derivative time (multiples of P444) Cycle time of PID2 regulator: Tc Min. allowable value of PID2 reference Max. allowable value of PID2 reference Min. allowable value of PID2 feedback Max. allowable value of PID2 feedback PID2 reference ramp up time PID2 reference ramp down time Unit of measure of PID2 ramp PID2 ramp start rounding off PID2 ramp end rounding off Integral term activation threshold START Disable delay with PID Out=P437 PID2 output gradient limit Gain for PID2 measure scaling Gain for Anti Wind-Up NOTE User Level DEFAULT VALUES ENGINEERING ENGINEERING ENGINEERING ENGINEERING ENGINEERING ENGINEERING ENGINEERING ENGINEERING ENGINEERING ENGINEERING ENGINEERING ENGINEERING ENGINEERING ENGINEERING ENGINEERING ENGINEERING ENGINEERING ENGINEERING ENGINEERING ENGINEERING ENGINEERING ENGINEERING ENGINEERING ENGINEERING ENGINEERING +100.00% –100.00% 0: [Disabled] 0.00% +100.00% +100.00% 1.000 0:1.0 500*Tc (ms) 0*Tc (ms) 5 ms 0.00% +100.00% 0.00% +100.00% 0s 0s 1: [0.1s] 50% 50% 0.00% 0: [Disabled] 1 ms 1.000 1.00 MODBUS Address 1346 1347 1282 1283 1348 1349 1350 1351 1352 1353 1354 1355 1356 1357 1358 1359 1360 1361 1362 1363 1364 1284 1368 1369 1370 Parameters P437a, P437b and P455 are overridden if the Two PIDs mode is selected with “summed outputs” (C291a = 7: 2 PID and C171a = 0: Disabled). 187/482 PROGRAMMING INSTRUCTIONS iDrive 24. DIGITAL OUTPUTS MENU 24.1. Overview The Digital Outputs menu includes the parameters allowing configuring the drive digital outputs (MDO1, MDO2, MDO3 and MDO4). NOTE The Digital Outputs menu may be accessed only if the user level is ADVANCED or ENGINEERING. NOTE For a detailed hardware description of the digital outputs, please refer to the IDrive’s Installation Instructions manual. NOTE MDO1 digital output can be programmed only if the frequency output is not set up (P200 = Disable; see the ANALOG AND FREQUENCY OUTPUTS MENU). NOTE XMDI digital outputs (values from 13 to 20 in the parameters relating to the control functions) can be set up only after setting XMDI/O in parameter R023. 24.1.1. F ACTORY S ETTINGS The factory settings are as follows: MDO1 is a zero speed relay (it energizes when a preset threshold is exceeded). MDO2 controls an electromechanical brake used for crane applications (it energizes to release the brake). MDO3 de-energizes (fail-safe logic) in case of “Inverter Alarm”. MDO4 energizes in case of “Inverter Run Ok” (Drive running – no standby). 24.1.2. S TRUCTURE OF THE D IGITAL O UTPUTS A digital output is composed of two logic blocks allowing data processing before actuating the actual digital output. Block 2 depends on the settings in parameters P277a (P286a, P295a, P304a). INPUTA INPUTB P277a = 0 Logic Bloc k set by parameters P271-P277 f(A,B) yes Output= f(A,B) NO Logic bloc k set by P277b that tests f(A,B) and signal C P000659-b Figure 31: MDO block-diagram. 188/482 Output= g[f(A,B),C] PROGRAMMING INSTRUCTIONS iDrive Operating modes set in MDO1 (2,3,4) Digital Output: P270, (P279, P288, P297) The user can select one of the following operating modes: Table 40: Digital Output Mode. DISABLE DIGITAL DOUBLE DIGITAL ANALOG DOUBLE ANALOG DOUBLE FULL BRAKE ABS BRAKE ABS LIFT PWM MODE The selected digital output is disabled. The digital output depends on a selected digital signal and on the logic output function (True/False). See Examples 1 and 2. The digital output depends on 2 selected digital signals, on the logic function calculating the output value and on the logic output function (True/False). The digital output depends on a selected analog variable, which is tested through Test A and Test B, thus obtaining 2 digital signals; starting from their value, the selected logic function calculates the output value, whereas the True/False logic output function calculates the end value. See Example 3. The digital outputs depends on 2 selected analog variables: Test A is performed for variable A, whilst Test B is performed for variable B, thus obtaining 2 digital signals; starting from their value, the selected logic function calculates the output value, whereas the logic output function True/False calculates the end value. As DOUBLE ANALOG or DOUBLE DIGITAL mode, but both digital signals and analog variables can be selected. If you select a digital signal, its value (TRUE or FALSE) is used to calculate the selected logic function. If you select an analog variable, the test selected for this variable is performed, and its result (TRUE or FALSE) is used to calculate the selected logic function. As ABS BRAKE below, although the selected variables are not expressed as absolute values, but depend on the selected tests. The ABS BRAKE mode allows controlling the electromechanical brake of a motor used for lifting applications. To enable the relevant output, make sure that all the conditions depending on the drive status are true (see the description at the end of this section). The ABS BRAKE mode is applied by selecting the measured (or estimated) speed value [A71] as the first variable, and the output torque [A80] as the second variable. Variables are considered as absolute values. See Example 4. As ABS BRAKE, but the brake unlocks (digital output open) when a given torque value is attained, which is automatically determined based on the last torque value required in the previous stroke. The PWM mode may be selected for digital outputs MDO1 and MDO2 only (it cannot be selected for relay digital outputs MDO3 and MDO4). The digital output becomes a low-frequency PWM output with a duty–cycle proportional to the value of the selected analog output. See Example 5. 189/482 PROGRAMMING INSTRUCTIONS iDrive Variable A Selected for MDO1 (2,3,4): P271, (P280, P289, P298) This selects the digital signal or the analog variable used for Test A (set with P273/P282/P291/P300). The whole list of the selectable items and their description appears at the end of this section (see Table 41). If a digital signal is selected, Test A is not performed: therefore, the comparison value for Test A (set with P275/P284/P293/P302) has no meaning. NOTE This parameter can be accessed only if the operating mode of the digital output concerned is other than zero. Example: MDO1 P270≠0. Variable B selected for MDO1 (2,3,4): P272, (P281, P290, P299) This selects a different digital signal or the analog variable used for Test B (set with P274/P283/P292/P301). The whole list of the selectable items and their description appears at the end of this section (see Table 41). If a digital signal is selected, Test B is not performed: therefore, the comparison value for Test B (set with P276 / P285 / P294 / P303) has no meaning. NOTE Parameter P272 cannot be accessed when the digital output operating mode is 1: DIGITAL or 3: ANALOG. Example: MDO1 P270=1 OR P270=3. Table 41: List of the selectable digital inputs and analog outputs. Selectable digital signals (BOOLEAN): Selectable Value D0: Disable D1: Run Ok D2: Ok On D3: Alarm D4: Run ALR D5: Fwd Run D6: Rev Run D7: Lim. MOT D8: Lim.GEN D9: Limiting D10: Prec. Ok D11: PID MAX D12: PID MIN D13: MDI 1 D14: MDI 2 D15: MDI 3 D16: MDI 4 D17: MDI 5 D18: MDI 6 D19: MDI 7 D20: MDI 8 D21: MDI ENABLE D22: MDI ENABLE S D23: MDI 1 Delayed D24: MDI 2 Delayed D25: MDI 3 Delayed D26: MDI 4 Delayed D27: MDI 5 Delayed D28: MDI 6 Delayed D29: MDI 7 Delayed D30: MDI 8 Delayed D31: ENABLE DL 190/482 Description Always FALSE: 0 Drive running (no standby) Inverter ok: no alarms tripped Drive alarm tripped Drive KO: alarm tripped when the drive is running Speed (measured or estimated) higher than +0.5 rpm Speed (measured or estimated) lower than –0.5 rpm Drive in limiting mode operating as a motor Drive in limiting mode operating as a generator Drive in limiting mode (generator or motor) Capacitor Precharge relay closure and command return test PID output max. saturation PID output min. saturation Selected MDI1digital input (remote OR physical) Selected MDI2 digital input (remote OR physical) Selected MDI3 digital input (remote OR physical) Selected MDI4 digital input (remote OR physical) Selected MDI5 digital input (remote OR physical) Selected MDI6 digital input (remote OR physical) Selected MDI7 digital input (remote OR physical) Selected MDI8 digital input (remote OR physical) Selected ENABLE digital input (remote AND physical) Selected ENABLE S digital input (remote AND physical) MDI1 Digital input (remote OR physical) DELAYED by MDI timers MDI1 Digital input (remote OR physical) DELAYED by MDI timers MDI1 Digital input (remote OR physical) DELAYED by MDI timers MDI1 Digital input (remote OR physical) DELAYED by MDI timers MDI5 Digital input (remote OR physical) DELAYED by MDI timers MDI6 Digital input (remote OR physical) DELAYED by MDI timers MDI7 Digital input (remote OR physical) DELAYED by MDI timers MDI8 Digital input (remote OR physical) DELAYED by MDI timers ENABLE Digital input (remote AND physical) DELAYED by MDI timers PROGRAMMING INSTRUCTIONS iDrive 191/482 iDrive D32: Trk.Err D33: Fan Flt D34: Fbus C1 D35: Fbus C2 D36: Fbus C3 D37: Fbus C4 D38: FireMod D39: Local D40: Speed OK D41: Fan ON D42: XMDI1 D43: XMDI2 D44: XMDI3 D45: XMDI4 D46: XMDI5 D47: XMDI6 D48: XMDI7 D49: XMDI8 D50: MPL 1 Delayed D51: MPL 2 Delayed D52: MPL 3 Delayed D53: MPL 4 Delayed D54: OTM Elapsed D55: STM Elapsed D56: MDO 1 Delayed D57: MDO 2 Delayed D58: MDO 3 Delayed D59: MDO 4 Delayed D60: TFL1 D61: TFL2 D62: TFL3 D63: TFL4 D64: Reserved D65: Reserved D66: Reserved D67: Reserved D68: Reserved D69: Reserved 192/482 PROGRAMMING INSTRUCTIONS Speed tracking error: |SetPoint – Measure| > Error_Par Fault of the cooling fan Command 1 from fieldbus Command 2 from fieldbus Command 3 from fieldbus Command 4 from fieldbus Fire Mode function LOCAL Mode Constant speed reference reached Fan activation command XMDI1 Auxiliary digital input XMDI2 Auxiliary digital input XMDI3 Auxiliary digital input XMDI4 Auxiliary digital input XMDI5 Auxiliary digital input XMDI6 Auxiliary digital input XMDI7 Auxiliary digital input XMDI8 Auxiliary digital input Virtual digital input resulting from MPL1 output DELAYED from MPL Timers Virtual digital input resulting from MPL2 output DELAYED from MPL Timers Virtual digital input resulting from MPL3 output DELAYED from MPL Timers Virtual digital input resulting from MPL4 output DELAYED from MPL Timers Maintenance Operation Time elapsed Maintenance Supply Time elapsed Virtual digital input resulting from MDO1 output DELAYED from MDO Timers Virtual digital input resulting from MDO2 output DELAYED from MDO Timers Virtual digital input resulting from MDO3 output DELAYED from MDO Timers Virtual digital input resulting from MDO4 output DELAYED from MDO Timers Timed flag TFL1 Timed flag TFL2 Timed flag TFL3 Timed flag TFL4 PROGRAMMING INSTRUCTIONS iDrive Selectable analog variables: Selectable Value A70: GROUND A71: Speed A72: Spd REF. A73: RampOut A74: MotFreq A75: MotCurr A76: OutVolt A77: Out Pow A78: DC Vbus A79: Torq.REF A80: Torq.DEM A81: Torq.OUT A82: Torq.LIM A83: PID REF A84: PID RMP A85: PID Err A86: PID Fbk A87: PID Out A88: REF A89: AIN1 A80: AIN2/Pt Full-scale Value Kri Description Analog 0 Volt Motor speed Speed reference at constant speed Speed reference when ramps are over Frequency produced by the drive Current RMS Output voltage RMS Output power DC-link voltage Torque reference at constant speed Torque demand Estimation of the torque output Torque limit setpoint PID reference at constant speed PID reference when ramps are over Error between PID reference and PID feedback PID feedback PID output Analog input REF Analog input AIN1 Analog input AIN2/PTC Speed read from encoder and used as a reference Frequency input Flux reference at constant speed Active flux reference Current reference over axis q Current reference over axis d Current measure over axis q Current measure over axis d Voltage over axis q Voltage over axis d Waveform: Cosine Waveform: Sine Electric angle of delivered Vu Analog +10 Volt Analog –10 Volt 10000 rpm 10000 rpm 10000 rpm 1000.0 Hz 1000.0 A 1000.0 V 1000.0 kW 1000.0 V 100.00 % 100.00 % 100.00 % 100.00 % 100.00 % 100.00 % 100.00 % 100.00 % 100.00 % 100.00 % 100.00 % 100.00 % 1 1 1 10 10 10 10 10 100 100 100 100 100 100 100 100 100 100 100 100 A91: EncIn 10000 rpm 1 A92: PulseIn A93: Flux REF A94: Flux A95: Iq REF A96: Id REF A97: Iq A98: Id A99: Volt Vq A100: Volt Vd A101: Cosine A102: Sine A103: Angle A104: +10V A105: –10V A106: Reserved A107: SqrWave A108: Saw Wave A109: HtsTemp. A110: AmbTemp. A111 ÷ A109: Reserved A120: PT100_1 A121: PT100_2 A122: PT100_3 A123: PT100_4 A124: I2t% A125: XAIN4 A126: XAIN5 A127: OT Counter A128: ST Counter A129: Reserved 100.00 kHz 1.0000 Wb 1.0000 Wb 1000.0 A 1000.0 A 1000.0 A 1000.0 A 1000.0 V 1000.0 V 100.00 % 100.00 % 100.00 % 100 10000 10000 10 10 10 10 10 10 100 100 100 100.00 % 100.00 % 100.00 °C 100.00 °C 100 100 100 100 Square wave Saw wave Heatsink temperature Ambient temperature 320.00 °C 320.00 °C 320.00 °C 320.00 °C 100.00 % 100.00 % 100.00 % 320000h 320000h 100 100 100 100 100 100 100 1 1 PT100 channel 1 PT100 channel 2 PT100 channel 3 PT100 channel 4 Motor thermal capacity XAIN4 analog input XAIN5 analog input Maintenance Operation Time counter Maintenance Supply Time counter Minimum value = –3.2*Full-scale value Maximum value = 3.2*Full-scale value MODBUS value = Parameter value*Kri 193/482 iDrive 194/482 PROGRAMMING INSTRUCTIONS PROGRAMMING INSTRUCTIONS iDrive Testing Variable A for MDO1 (2,3,4): P273, (P282, P291, P300) If an analog variable is selected, a logic TEST is performed to obtain a TRUE/FALSE Boolean signal. Seven different tests are available, that can be performed for selected variable A and its comparing value A: Table 42: Test functions. GREATER THAN GREATER THAN/EQUAL TO LOWER LOWER THAN/EQUAL TO ABS, GREATER THAN ABS, GREATER THAN/EQUAL TO ABS, LOWER ABS, LOWER THAN/EQUAL TO NOTE Selected variable > comparing value Selected variable ≥ comparing value Selected variable < comparing value Selected variable ≤ comparing value Absolute value (selected variable) > comparing value Absolute value (selected variable) ≥ comparing value Absolute value (selected variable) < comparing value Absolute value (selected variable) ≤ comparing value This parameter can be accessed only if the operating mode of the selected digital output is > 2. Example: MDO1 P270>2. Testing Variable B for MDO1 (2,3,4): P274, (P283, P292, P301) If an analog variable is selected, a logic TEST is performed to obtain a TRUE/FALSE Boolean signal. Seven different tests are available, that can be performed for selected variable B and its comparing value B (see Table 42). NOTE This parameter can be accessed only if the operating mode of the selected digital output is > 2 and < 9. Example: MDO1 2<P270<9. Reference threshold for P271 (P280, P289, P298) in MDO1: P275, (P284, P293, P302) This defines the comparing value of Test A with the first selected variable. NOTE This parameter can be accessed only if the operating mode of the selected digital output is > 2. Example: MDO1 P270>2. Reference threshold for P272 (P281, P290, P299) in MDO2 (3,4): P276, (P285, P294, P303) This defines the comparing value of Test B with the first selected variable. NOTE This parameter can be accessed only if the operating mode of the selected digital output is > 2. Example: MDO1 P270>2. 195/482 PROGRAMMING INSTRUCTIONS iDrive MDO1: Function Applied to the Result of Tests A and B: P277, (P286, P295, P304) A logic function is applied to the two Boolean signals obtained in order to obtain the output TRUE/FALSE Boolean signal. Six different tests may be performed for variable (A) using the comparing value and variable (B). (A) OR (B): The selected digital output is enabled when at least one of the two conditions below is true (this function also allows enabling the selected digital input based on one test only). Test A 0 1 0 1 (A) OR (B) Test B Output 0 0 0 1 1 1 1 1 (A) SET (B) RESET Rising Edge (A) RESET (B) SET Rising Edge (A) SET (B) RESET Falling Edge (A) RESET (B) SET Falling Edge The selected digital output is activated as the output of a Flip Flop Set Reset whose inputs are signal A and signal B. This function can be used in case of hysteresis. The status of the input (Qn) depends on the previous value (Qn-1) and on the result of the two tests. Signals A and B are considered only when passing from 0→1 (Rising Edge) or 1→0 (Falling Edge). Signal A and signal B may be used both as Set and Reset command. Example: Suppose that the output enables only when the motor speed exceeds 50rpm and disables when the motor speed drops below 5 rpm. To do so, assign the first condition to Test A, representing the Set command for Flip Flop (P271 = Motor Speed, P273 >, P275 = 50rpm), and assign the second condition to Test B, representing the Reset command (P272 = Motor Speed, P274 <=, P276 = 5rpm). A more detailed example is given at the end of this section. (A) SET (B) RESET Rising Edge Test A (Set) Test B (Reset) Qn 0→1 X 1 0→1 X 0 In any other case Qn-1 (A) RESET (B) SET Rising Edge Test A Test B (Set) Qn (Reset) 0→1 X 0 0→1 X 1 In any other case Qn-1 (A) SET (B) RESET Falling Edge Test A (Set) Test B (Reset) Qn 1→0 X 1 1→0 X 0 In any other case Qn-1 (A) RESET (B) SET Falling Edge Test A Test B (Set) Qn (Reset) 1→0 X 0 1→0 X 1 In any other case Qn-1 196/482 PROGRAMMING INSTRUCTIONS iDrive (A) AND (B): The selected digital output enables when both conditions are true. Test A 0 1 0 1 (A) AND (B) Test B Output 0 0 0 0 1 0 1 1 (A) XOR (B): The selected digital output enables when either one condition or the other is true (but not when both conditions are true at a time). Test A 0 1 0 1 (A) XOR (B) Test B Output 0 0 0 1 1 1 1 0 (A) NOR (B): The selected digital output enables when no condition is true. The NOR function between two variables corresponds to the AND of the same false variables, i.e. (A)NOR (B) = (/A) AND (/B). (A) NOR (B) Test A Test B Output 0 0 1 1 0 0 0 1 0 1 1 0 (A) NAND (B): The selected digital output enables when no condition is true or when only one of the two conditions is true. The NAND function between two variables corresponds to the OR of the same false variables, i.e. (A)NAND (B) = (/A) OR (/B). (A) NAND (B) Test 1 Test 2 Output 0 0 1 1 0 1 0 1 1 1 1 0 NOTE This parameter can be accessed only if the operating mode of the selected digital output is > 2 and <9. Example: MDO1 2<P270<9. 197/482 PROGRAMMING INSTRUCTIONS iDrive Function applied to the result of f(A,B) C for MDO1 P277b, (P286b, P295b, P304b) Once the Boolean signal resulting from f(A,B) is obtained, an additional logic function can be applied to obtain the output TRUE//FALSE Boolean signal. If parameter P277a is disabled, the output of f(A,B) goes directly to the corresponding digital output; if parameter P277a is enabled, the output of the output of f(A,B) becomes one of the two inputs of the second programmed block. The user can choose one of the six Boolean tests above for the first variable - f(A,B) – and for the second variable (C). See Example 6. MDO1 (2,3,4): Logic applied to MDO1 (2,3,4): P278, (P287, P296, P305) The logic of the Boolean signal can be reversed at the end of the processing chain. The user can choose whether the logic level of the digital output is POSITIVE or NEGATIVE. (0) FALSE = a logic negation is applied (NEGATIVE logic) (1) TRUE = no negation is applied (POSITIVE logic) NOTE 24.2. This parameter can be accessed only if the operating mode of the selected digital output is other than zero. Example: MDO1 P270≠0. Programmable Operating Modes (Diagrams) The diagrams shown in the figures illustrate the operating structure of MDO1 digital output; the remaining digital outputs (MDO2, MDO3, and MDO4) will follow the same logics, as implemented in the relevant parameters. Figure 32: DIGITAL Mode. 198/482 PROGRAMMING INSTRUCTIONS iDrive Figure 33: ANALOG Mode. Figure 34: DOUBLE DIGITAL Mode. 199/482 PROGRAMMING INSTRUCTIONS iDrive Figure 35: General structure of the parameterization of a digital output. 200/482 PROGRAMMING INSTRUCTIONS 24.3. iDrive Examples This section illustrates some examples. A table stating the set up of the parameters used is given for each example. Parameters highlighted in grey have no effect due to their preset selection. Example 1: Digital output for Inverter Alarm digital command (MDO3 digital output default setting). Table 43: MDO parameterization for PD Status OK. P288 P289 P290 P291 P292 P293 P294 P295 P295a P295b P296 MDO3: Digital output mode MDO3: Variable A selection MDO3: Variable B selection MDO3: Testing variable A MDO3: Testing variable B MDO3: Comparing value for Test A MDO3: Comparing value for Test B MDO3: Function applied to the result of the two tests MDO3: Variable C selection MDO3: Function applied to the result of f(A,B) and C test MDO3: Output logic level DIGITAL D3: Inverter Alarm D0: Disabled FALSE The digital output status depends on the Boolean variable “Inverter Alarm”, which is TRUE only when an alarm trips. This output is a fail-safe contact: the relay energizes if the drive is on and no alarms tripped. Example 2: Digital output for Drive Run OK digital command (MDO4 digital output default setting). Table 44: MDO parameterization for drive Run OK. P297 P298 P299 P300 P301 P302 P303 P304 P295a P295b P305 MDO4: Digital output mode MDO4: Variable A selection MDO4: Variable B selection MDO4: Testing variable A MDO4: Testing variable B MDO4: Comparing value for Test A MDO4: Comparing value for Test B MDO4: Function applied to the result of the two tests MDO3: Variable C selection MDO3: Function applied to the result of f(A,B) and C test MDO4: Output logic level DIGITAL D1: Drive Run Ok D0: Disabled TRUE The digital output status depends on the Boolean variable “Drive Run Ok”, which is TRUE only when the drive is modulating (IGBTs on). 201/482 PROGRAMMING INSTRUCTIONS iDrive Example 3: Digital output for speed thresholds Suppose that a digital output energizes if the motor speed exceeds 100rpm as an absolute value, and deenergizes when the motor speed is lower than or equal to 20rpm (as an absolute value). Parameter P270 sets ABS mode, so that the selected variables are considered as absolute values. The condition “greater than” is selected for test A, and “lower than/equal to” is selected for test B. Table 45: MDO parameterization for speed thresholds. P270 P271 P272 P273 P274 P275 P276 P277 P277a P277b P278 MDO1: Digital output mode MDO1: Variable A selection MDO1: Variable B selection MDO1: Testing variable A MDO1: Testing variable B MDO1: Comparing value for Test A MDO1: Comparing value for Test B MDO1: Function applied to the result of the two tests MDO1: Variable C selection MDO1: Function applied to the result of f(A,B) and C test MDO1: Output logic level DOUBLE ANALOG A71: Speed MEA A71: Speed MEA ABS(x) > ABS (x) ≤ 100.00 rpm 20.00 rpm (A) Set (B) Reset Rising Edge D0: Disabled TRUE Both tests are performed over the motor speed; P271, P272 are set to “motor speed”. The values of reference for the two tests are 100rpm and 20rpm; the function applied is Flip Flop Set Reset and the output is considered as a true logic. Test A is the Set signal of the Flip Flop and Test B is the Reset signal. Figure 36: Digital output for speed thresholds (example). 202/482 PROGRAMMING INSTRUCTIONS iDrive Example 4: Digital output for electromechanical brake for lifting applications (programming example related to MDO4 digital output). Table 46: MDO parameterization for electromechanical brake command. P297 P298 P299 P300 P301 P302 P303 P304 P304a P304b P305 MDO4: Digital output mode MDO4: Variable A selection MDO4: Variable B selection MDO4: Testing variable A MDO4: Testing variable B MDO4: Comparing value for Test A MDO4: Comparing value for Test B MDO4: Function applied to the result of the two tests MDO4: Variable C selection MDO4: Function applied to the result of f(A,B) and C test MDO4: Output logic level ABS BRAKE A81: Torque Output A71: Speed MEA > ≤ 20.00% 50.00 rpm (A) Set (B) Reset Rising Edge D0: Disabled TRUE The digital output energizes only if no alarm trips. The torque demand is greater than P302 = 20.00% (Set). The digital output de-energizes if an alarm trips or if the decelerating speed is lower than the speed value set in P303 = 50rpm (Reset). Figure 37: Electromechanical brake command (example). CAUTION NOTE Always use the NO contact of the digital output for the electromechanical brake command. For details about the electromechanical brake used for lifting applications, see also the BRIDGE CRANE MENU. 203/482 PROGRAMMING INSTRUCTIONS iDrive Example 5: Using the PWM Function. Suppose that the motor of a machine tool is controlled by a drive. The tool must be lubricated based on the cutting speed. At max. cutting speed, the electrovalve controlling lubrication must work for 0.5 sec with a frequency of 1Hz (time period of 1 sec.): at max. speed, a duty cycle of 50% (Ton/T) is required, with a time period of 1 second; the time when the electrovalve opens is directly proportional to the cutting speed. Spd1 is the max. cutting speed and dtc1 is the duty cycle required; the saw carrier frequency required for PWM must be 1 Hz (P213), the min. value must be 0rpm (when speed = 0rpm, the electrovalve is disabled) and max. value = Spd1*100/ dtc1 = 2*Spd1. Supposing that the tool can rotate in both directions, that Spd1 = 1500rpm and that the first digital output is used, parameters are set as follows: Table 47: MDO parameterization for the PWM function. P270 P271 P272 P273 P274 P275 P276 P277 P277a P277b P278 P215 MDO1: Digital output mode MDO1: Variable A selection MDO1: Variable B selection MDO1: Testing variable A MDO1: Testing variable B MDO1: Comparing value for Test A MDO1: Comparing value for Test B MDO1: Function applied to the result of the two tests MDO1: Variable C selection MDO1: Function applied to the result of f(A,B) and C test MDO1: Output logic level Saw signal frequency PWM MODE A72: Speed Ref. > 3000.00 rpm 0.0 rpm D0: Disabled TRUE 1Hz Parameter P215 in the ANALOG AND FREQUENCY OUTPUTS MENU sets the frequency of the saw wave, i.e. the PWM frequency of the digital output. In PWM mode, parameter P275 sets the max. value (peak value) of the saw wave, while parameter P276 sets the min. value of the saw wave. The test selected with P273 is performed between the analog variable selected in P271 and the saw wave. 204/482 PROGRAMMING INSTRUCTIONS iDrive Example 6: Digital output indicating the READY state to a PLC supervisor – using Inputs A, B, C This example shows how to activate a digital output based on the logic AND of 3 inputs A,B,C—particularly the ENABLE input, the ENABLE S (Safety) input for redundancy and the condition of “Inverter Ok On”. An additional block applied to f(A,B) and C is used: Table 48: MDO parameterization for the Ready state of a PLC supervisor. P270 P271 P272 P273 P274 P275 P276 P277 P277a P277b P278 MDO1: Digital output mode MDO1: Variable A selection MDO1: Variable B selection MDO1: Testing variable A MDO1: Testing variable B MDO1: Comparing value for Test A MDO1: Comparing value for Test B MDO1: Function applied to the result of the two tests MDO1: Variable C selection MDO1: Function applied to the result of f(A,B) and C test MDO1: Output logic level DOUBLE DIGITAL D21: MDI Enable D22: MDI Enable S (A) AND (B) D2: Inverter Ok On f(A,B) AND (C) VERA 205/482 PROGRAMMING INSTRUCTIONS iDrive 24.4. List of Parameters P270 to P305 Table 49: List of parameters P270 to P305. Parameter P270 P271 P272 P273 P274 P275 P276 P277 FUNCTION MDO1: Digital output mode MDO1: Selecting variable A MDO1: Selecting variable B MDO1: Testing variable A MDO1: Testing variable B MDO1: Comparing value for Test A MDO1: Comparing value for Test B P277a MDO1: Function applied to the result of the 2 tests MDO1: Selecting variable C P277b MDO1: Function applied to the result of f(A,B) C P278 P279 P280 P281 P282 P283 P284 P285 P286 MDO1: Output logic level MDO2: Digital output mode MDO2: Selecting variable A MDO2: Selecting variable B MDO2: Testing variable A MDO2: Testing variable B MDO2: Comparing value for Test A MDO2: Comparing value for Test B P286a MDO2: Function applied to the result of the 2 tests MDO2: Selecting variable C P286b MDO2: Function applied to the result of f(A,B) C P287 P288 P289 P290 P291 P292 P293 206/482 MDO2: Output logic level MDO3: Digital output mode MDO3: Selecting variable A MDO3: Selecting variable B MDO3: Testing variable A MDO3: Testing variable B MDO3: Comparing value for Test A User Level DEFAULT VALUES ADVANCE D ADVANCE D ADVANCE D ADVANCE D ADVANCE D ADVANCE D ADVANCE D ADVANCE D ADVANCE D ADVANCE D ADVANCE D ADVANCE D ADVANCE D ADVANCE D ADVANCE D ADVANCE D ADVANCE D ADVANCE D ADVANCE D ADVANCE D ADVANCE D ADVANCE D ADVANCE D ADVANCE D ADVANCE D ADVANCE D ADVANCE D ADVANCE 3:ANALOG MODBUS Address 870 A71: Speed 871 A71: Speed 872 0: > 873 3: ≤ 874 50 rpm 875 10 rpm 876 1: (A) SET (B) RESET 877 0: Disable 642 0: f(A,B) OR C 643 1: TRUE 878 6: BRAKE 879 A81: Trq Output 880 A71: Speed 881 0: > 882 3: ≤ 883 20% 884 50 rpm 885 1: (A) SET (B) RESET 886 0: Disable 644 0: f(A,B) OR C 645 1: TRUE 887 1: DIGITAL 888 D3: Inverter Alarm 889 D3: Inverter Alarm 890 0: > 891 0: > 892 0 893 PROGRAMMING INSTRUCTIONS P294 P295 MDO3: Comparing value for Test B P295a MDO3: Function applied to the result of the 2 tests MDO3: Selecting variable C P295b MDO3: Function applied to the result of f(A,B) C P296 P297 P298 P299 P300 P301 P302 P303 P304 MDO3: Output logic level MDO4: Digital output mode MDO4: Selecting variable A MDO4: Selecting variable B MDO4: Testing variable A MDO4: Testing variable B MDO4: Comparing value for Test A MDO4: Comparing value for Test B P304a MDO4: Function applied to the result of the 2 tests MDO4: Selecting variable C P304b MDO4: Function applied to the result of f(A,B) C P305 MDO4: Output logic level iDrive D ADVANCE D ADVANCE D ADVANCE D ADVANCE D ADVANCE D ADVANCE D ADVANCE D ADVANCE D ADVANCE D ADVANCE D ADVANCE D ADVANCE D ADVANCE D ADVANCE D ADVANCE D ADVANCE D 0 894 0: (A) OR (B) 895 0: Disable 646 0: f(A,B) OR C 647 0: FALSE 896 1: DIGITAL 897 D1: Inverter Run Ok 898 D1: Inverter Run Ok 899 0: > 900 0: > 901 0 902 0 903 0: (A) OR (B) 904 0: Disable 648 0: f(A,B) OR C 649 1: TRUE 905 207/482 PROGRAMMING INSTRUCTIONS iDrive P270 MDO1: Digital Output Mode P270 Range Default Level Address Function NOTE 0÷9 0: DISABLE 1: DIGITAL 2: DOUBLE DIGITAL 3: ANALOG 4: DOUBLE ANALOG 5: DOUBLE FULL 6: BRAKE 7: ABS BRAKE 8: ABS LIFT 9: PWM MODE 3 3: ANALOG ADVANCED 870 This parameter defines the operating mode of digital output 1. The different operating modes are described at the beginning of this chapter. MDO1 Digital output can be programmed only if the frequency output is not set up: P200 = Disable (see ANALOG AND FREQUENCY OUTPUTS MENU). P271 MDO1: Selecting Variable A P271 Range Default Level Address Function 0 ÷ 119 See Table 41 61 A71: Speed MEA ADVANCED 871 This parameter selects the digital signal used to calculate the value of MDO1 digital output. It selects an analog variable used to calculate the value of MDO1digital output if one of the “analog” operating modes is selected. Digital signals and analog variables are detailed in Table 41. P272 MDO1: Selecting Variable B P272 Range Default Level Address Function 208/482 0 ÷ 119 See Table 41 61 A71: Speed MEA ADVANCED 872 This parameter selects the second digital signal used to calculate the value of MDO1 digital output. It selects an analog variable used to calculate the value of MDO1 digital input if one of the “analog” operating modes is selected. Digital signals and analog variables are detailed in Table 41. PROGRAMMING INSTRUCTIONS iDrive P273 MDO1: Testing Variable A P273 Range Default Level Address Function 0÷7 0: > 1: ≥ 2: < 3: ≤ 4: ABS(x) > 5: ABS(x) ≥ 6: ABS(x) < 7: ABS(x) ≤ 0 0: > ADVANCED 873 This parameter defines the test to be performed for the variable detected by P271 using P275 as a comparing value. P274 MDO1: Testing Variable B P274 Range Default Level Address Function 0÷7 0: > 1: ≥ 2: < 3: ≤ 4: ABS(x) > 5: ABS(x) ≥ 6: ABS(x) < 7: ABS(x) ≤ 3: ≤ 3 ADVANCED 874 This parameter defines the test to be performed for the variable detected by P272 using P276 as a comparing value. P275 MDO1: Comparing Value for Test A P275 Range Default Level Address Function –32000 ÷ 32000 –320.00 % ÷ 320.00 % % of the full-scale value of selected variable A, see Table 41. 50 50 rpm ADVANCED 875 This parameter defines the comparing value with the selected variable for test A. P276 MDO1: Comparing Value for Test B P276 Range Default Level Address Function –32000 ÷ 32000 –320.00 % ÷ 320.00 % % of the full-scale value of selected variable B, see Table 41. 10 10 rpm ADVANCED 876 This parameter defines the comparing value with the selected variable for test B. 209/482 PROGRAMMING INSTRUCTIONS iDrive P277 MDO1: Function Applied to the Result of the 2 Tests P277 Range Default Level Address Function 0 ÷ 12 0: (A) OR (B) 1: (A) SET (B) RESET 2: (A) AND (B) 3: (A) XOR (B) 4: (A) NOR (B) 5: (A) NAND (B) 6: (A\) OR (B) 7: (A) OR (B\) 8: (A\) AND (B) 9: (A) AND (B\) 10: (A) RESET (B) SET RISING EDGE 11: (A) SET (B) RESET FALLING EDGE 12: (A) RESET (B) SET FALLING EDGE 1 1: (A) SET (B) RESET ADVANCED 877 This parameter determines the logic function applied to the result of the two tests allowing calculating the output value. P277a MDO1: Selecting Variable C 277a 0 ÷ 59 See Table 41 Default Level Address 0 ADVANCED 642 D0: Disable Function This parameter selects the digital signal used to calculate the value of MDO1 digital output. The digital signals that can be selected are given in Table 41. Range P277b MDO1: Function Applied to the Result of f(A,B) C P277b Range Default Level Address Function 210/482 0 ÷ 12 0: f(A,B) OR (C) 1: f(A,B) SET (C) RESET RISING EDGE 2: f(A,B) AND (C) 3: f(A,B) XOR (C) 4: f(A,B) NOR (C) 5: f(A,B) NAND (C) 6: f(A,B)\ OR (C) 7: f(A,B) OR (C\) 8: f(A,B)\ AND (C) 9: f(A,B) AND (C\) 10: f(A,B) RESET (C) SET RISING EDGE 11: f(A,B) SET (C) RESET FALLING EDGE 12: f(A,B) RESET (C) SET FALLING EDGE 0 0: f(A,B) OR (C) ADVANCED 643 This parameter determines the logic function applied to the result of the two tests allowing calculating the output value. PROGRAMMING INSTRUCTIONS iDrive P278 MDO1: Output Logic Level P278 Range Default Level Address Function 0–1 0: FALSE 1: TRUE 1 1: TRUE ADVANCED 878 MDO1 digital output logic function to apply a logic reversal (negation) to the calculated output signal: (0) FALSE = a logic negation is applied; (1) TRUE = no negation is applied. P279 MDO2: Digital Output Mode P279 Range Default Level Address Function 0÷9 0: DISABLE 1: DIGITAL 2: DOUBLE DIGITAL 3: ANALOG 4: DOUBLE ANALOG 5: DOUBLE FULL 6: BRAKE 7: ABS BRAKE 8: ABS LIFT 9: PWM MODE 6 1: BRAKE ADVANCED 879 This parameter defines the operating mode of digital output 2. The different operating modes are described at the beginning of this chapter. P280 MDO2: Selecting Variable A P280 Range Default Level Address Function 0 ÷ 119 See Table 41 71 A81: Torque Output ADVANCED 880 This parameter selects the digital signal used to calculate the value of MDO2 digital output. It selects an analog variable used to calculate the value of MDO2 digital input if one of the “analog” operating modes is selected. Digital signals and analog variables are detailed in Table 41. P281 MDO2: Selecting Variable B P281 Range Default Level Address Function 0 ÷ 119 See Table 41 61 A71: Speed MEA ADVANCED 881 This parameter selects the second digital signal used to calculate the value of MDO2 digital output. It selects an analog variable used to calculate the value of MDO2 digital input if one of the “analog” operating modes is selected. Digital signals and analog variables are detailed in Table 41. 211/482 PROGRAMMING INSTRUCTIONS iDrive P282 MDO2: Testing Variable A P282 Range Default Level Address Function 0÷7 0: > 1: ≥ 2: < 3: ≤ 4: ABS(x) > 5: ABS(x) ≥ 6: ABS(x) < 7: ABS(x) ≤ 0 0: > ADVANCED 882 This parameter defines the test to be performed for the variable detected by P280 using P284 as a comparing value. P283 MDO2: Testing Variable B P283 Range Default Level Address Function 0÷7 0: > 1: ≥ 2: < 3: ≤ 4: ABS(x) > 5: ABS(x) ≥ 6: ABS(x) < 7: ABS(x) ≤ 3: ≤ 0 ADVANCED 883 This parameter defines the test to be performed for the variable detected by P281 using P285 as a comparing value. P284 MDO2: Comparing Value for Test A P284 Range Default Level Address Function –32000 ÷ 32000 –320.00 % ÷ 320.00 % % of the full-scale value of selected variable A, see Table 41. 2000 20% ADVANCED 884 This parameter defines the comparing value with the selected variable for test A. P285 MDO2: Comparing Value for Test B P285 Range Default Level Address Function 212/482 –32000 ÷ 32000 –320.00 % ÷ 320.00 % % of the full-scale value of selected variable B, see Table 41. 50 50 rpm ADVANCED 885 This parameter defines the comparing value with the selected variable for test B. PROGRAMMING INSTRUCTIONS iDrive P286 MDO2: Function Applied to the Result of the 2 Tests P286 Range Default Level Address Function 0 ÷ 12 0: (A) OR (B) 1: (A) SET (B) RESET 2: (A) AND (B) 3: (A) XOR (B) 4: (A) NOR (B) 5: (A) NAND (B) 6: (A\) OR (B) 7: (A) OR (B\) 8: (A\) AND (B) 9: (A) AND (B\) 10: (A) RESET (B) SET RISING EDGE 11: (A) SET (B) RESET FALLING EDGE 12: (A) RESET (B) SET FALLING EDGE 1 1: (A) SET (B) RESET ADVANCED 886 This parameter determines the logic function applied to the result of the two tests allowing calculating the output value. P286a MDO2: Selecting Variable C P286a 0 ÷ 59 See Table 41 Default Level Address 0 ADVANCED 644 D0: Disable Function This parameter selects the digital signal used to calculate the value of MDO2 digital output. The digital signals that can be selected are given in Table 41. Range P286b MDO2: Function Applied to the Result of f(A,B) C P286b Range Default Level Address Function 0 ÷ 12 0: f(A,B) OR (C) 1: f(A,B) SET (C) RESET RISING EDGE 2: f(A,B) AND (C) 3: f(A,B) XOR (C) 4: f(A,B) NOR (C) 5: f(A,B) NAND (C) 6: f(A,B)\ OR (C) 7: f(A,B) OR (C\) 8: f(A,B)\ AND (C) 9: f(A,B) AND (C\) 10: f(A,B) RESET (C) SET RISING EDGE 11: f(A,B) SET (C) RESET FALLING EDGE 12: f(A,B) RESET (C) SET FALLING EDGE 1 1: (A) SET (B) RESET ADVANCED 645 This parameter determines the logic function applied to the result of the two tests allowing calculating the output value. 213/482 PROGRAMMING INSTRUCTIONS iDrive P287 MDO2: Output Logic Level P287 Range Default Level Address Function 0–1 0: FALSE 1: TRUE 1 1: TRUE ADVANCED 887 MDO2 digital output logic function to apply a logic reversal (negation) to the calculated output signal: (0) FALSE = a logic negation is applied; (1) TRUE = no negation is applied. P288 MDO3: Digital Output Mode P288 Range Default Level Address Function 0÷8 0: DISABLE 1: DIGITAL 2: DOUBLE DIGITAL 3: ANALOG 4: DOUBLE ANALOG 5: DOUBLE FULL 6: BRAKE 7: ABS BRAKE 8: ABS LIFT 1 1: DIGITAL ADVANCED 888 This parameter defines the operating mode of digital output 3. The different operating modes are described at the beginning of this chapter. P289 MDO3: Selecting Variable A P289 Range Default Level Address Function 0 ÷ 119 See Table 41 3 D3: Inverter Alarm ADVANCED 889 This parameter selects the digital signal used to calculate the value of MDO3 digital output. It selects an analog variable used to calculate the value of MDO3 digital input if one of the “analog” operating modes is selected. Digital signals and analog variables are detailed in Table 41. P290 MDO3: Selecting Variable B P290 Range Default Level Address Function 214/482 0 ÷ 119 See Table 41 3 D3: Inverter Alarm ADVANCED 890 This parameter selects the second digital signal used to calculate the value of MDO3 digital output. It selects an analog variable used to calculate the value of digital input MDO3 if one of the “analog” operating modes is selected. Digital signals and analog variables detailed in Table 41. PROGRAMMING INSTRUCTIONS iDrive P291 MDO3: Testing Variable A P291 Range Default Level Address Function 0÷7 0: > 1: ≥ 2: < 3: ≤ 4: ABS(x) > 5: ABS(x) ≥ 6: ABS(x) < 7: ABS(x) ≤ 0 0: > ADVANCED 891 This parameter defines the test to be performed for the variable detected by P289 using P293 as a comparing value. P292 MDO3: Testing Variable B P292 Range Default Level Address Function 0÷7 0: > 1: ≥ 2: < 3: ≤ 4: ABS(x) > 5: ABS(x) ≥ 6: ABS(x) < 7: ABS(x) ≤ 0 0: > ADVANCED 892 This parameter defines the test to be performed for the variable detected by P290 using P294 as a comparing value. P293 MDO3: Comparing Value for Test A P293 Range –32000 ÷ 32000 –320.00 % ÷ 320.00 % % of the full-scale value of selected variable A, see Table 41. Default 0 0 Level Address Function ADVANCED 893 This parameter defines the comparing value with the variable selected for test A. P294 MDO3: Comparing Value for Test B P294 Range Default Level Address Function –32000 ÷ 32000 –320.00 % ÷ 320.00 % % of the full-scale value of selected variable B, See Table 41. 0 0 ADVANCED 894 This parameter defines the comparing value with the variable selected for test B. 215/482 PROGRAMMING INSTRUCTIONS iDrive P295 MDO3: Function Applied to the Result of the 2 Tests P295 Range Default Level Address Function 0 ÷ 12 0: (A) OR (B) 1: (A) SET (B) RESET 2: (A) AND (B) 3: (A) XOR (B) 4: (A) NOR (B) 5: (A) NAND (B) 6: (A\) OR (B) 7: (A) OR (B\) 8: (A\) AND (B) 9: (A) AND (B\) 10: (A) RESET (B) SET RISING EDGE 11: (A) SET (B) RESET FALLING EDGE 12: (A) RESET (B) SET FALLING EDGE 0 0: (A) OR (B) ADVANCED 895 This parameter determines the logic function applied to the result of the two tests allowing calculating the output value. P295a MDO3: Selecting Variable C P295a 0 ÷ 59 See Table 41 Default Level Address 0 ADVANCED 646 D0: Disable Function This parameter selects the digital signal used to calculate the value of MDO3 digital output. The digital signals that can be selected are given in Table 41. Range P295b MDO3: Function Applied to the Result of f(A,B) C P295b Range Default Level Address Function 216/482 0 ÷ 12 0: f(A,B) OR (C) 1: f(A,B) SET (C) RESET RISING EDGE 2: f(A,B) AND (C) 3: f(A,B) XOR (C) 4: f(A,B) NOR (C) 5: f(A,B) NAND (C) 6: f(A,B)\ OR (C) 7: f(A,B) OR (C\) 8: f(A,B)\ AND (C) 9: f(A,B) AND (C\) 10: f(A,B) RESET (C) SET RISING EDGE 11: f(A,B) SET (C) RESET FALLING EDGE 12: f(A,B) RESET (C) SET FALLING EDGE 1 1: (A) SET (B) RESET ADVANCED 647 This parameter determines the logic function applied to the result of the two tests allowing calculating the output value. PROGRAMMING INSTRUCTIONS iDrive P296 MDO3: Output Logic Level P296 Range 0–1 0: FALSE 1: TRUE Default 0 0: FALSE Level Address ADVANCED 896 MDO3 digital output logic function to apply a logic reversal (negation) to the calculated output signal: (0) FALSE = a logic negation is applied; (1) TRUE = no negation is applied. Function P297 MDO4: Digital Output Mode P297 0: DISABLE 1: DIGITAL 2: DOUBLE DIGITAL 3: ANALOG 4: DOUBLE ANALOG 5: DOUBLE FULL 6: BRAKE 7: ABS BRAKE 8: ABS LIFT Range 0÷8 Default Level Address 1 1: DIGITAL ADVANCED 897 This parameter defines the operating mode of digital output 4. The different operating modes are described at the beginning of this chapter. Function P298 MDO4: Selecting Variable A P298 Range Default Level Address Function 0 ÷ 119 See Table 41. 1 D1: Inverter Run Ok ADVANCED 898 This parameter selects the digital signal used to calculate the value of MDO4 digital output. It selects an analog variable used to calculate the value of MDO4 digital input if one of the “analog” operating modes is selected. Digital signals and analog variables are detailed in Table 41. P299 MDO4: Selecting Variable B P299 Range Default Level Address Function 0 ÷ 119 See Table 41 1 D1: Inverter Run Ok ADVANCED 899 This parameter selects the second digital signal used to calculate the value of MDO4 digital output. It selects an analog variable used to calculate the value of MDO4 digital input if one of the “analog” operating modes is selected. Digital signals and analog variables are detailed in Table 41. 217/482 PROGRAMMING INSTRUCTIONS iDrive P300 MDO4: Testing Variable A P300 Range Default Level Address Function 0÷7 0: > 1: ≥ 2: < 3: ≤ 4: ABS(x) > 5: ABS(x) ≥ 6: ABS(x) < 7: ABS(x) ≤ 0 0: > ADVANCED 900 This parameter defines the test to be performed for the variable detected by P298 using P302 as a comparing value. P301 MDO4: Testing Variable B P301 Range Default Level Address Function 0÷7 0: > 1: ≥ 2: < 3: ≤ 4: ABS(x) > 5: ABS(x) ≥ 6: ABS(x) < 7: ABS(x) ≤ 0 0: > ADVANCED 901 This parameter defines the test to be performed for the variable detected by P299 using P303 as a comparing value. P302 MDO4: Comparing Value for Test A P302 Range Default Level Address Function –32000 ÷ 32000 –320.00 % ÷ 320.00 % % of the full-scale value of selected variable A, see Table 41 0 0 ADVANCED 902 This parameter defines the comparing value with the selected variable for test A. P303 MDO4: Comparing Value for Test B P303 Range Default Level Address Function 218/482 –32000 ÷ 32000 –320.00 % ÷ 320.00 % % of the full-scale value of selected variable B, see Table 41. 0 0 ADVANCED 903 This parameter defines the comparing value with the selected variable for test B. PROGRAMMING INSTRUCTIONS iDrive P304 MDO4: Function Applied to the Result of the 2 Tests P304 Range Default Level Address Function 0 ÷ 12 0: (A) OR (B) 1: (A) SET (B) RESET 2: (A) AND (B) 3: (A) XOR (B) 4: (A) NOR (B) 5: (A) NAND (B) 6: (A\) OR (B) 7: (A) OR (B\) 8: (A\) AND (B) 9: (A) AND (B\) 10: (A) RESET (B) SET RISING EDGE 11: (A) SET (B) RESET FALLING EDGE 12: (A) RESET (B) SET FALLING EDGE 0 0: (A) OR (B) ADVANCED 904 This parameter determines the logic function applied to the result of the two tests allowing calculating the output value. P304a MDO4: Selecting Variable C P304a 0 ÷ 59 See Table 41. Default Level Address 0 ADVANCED 648 D0: Disable Function This parameter selects the digital signal used to calculate the value of MDO4 digital output. The digital signals that can be selected are given in Table 41. Range P304b MDO4: Function Applied to the Result of f(A,B) C P304b Range Default Level Address Function 0 ÷ 12 0: f(A,B) OR (C) 1: f(A,B) SET (C) RESET RISING EDGE 2: f(A,B) AND (C) 3: f(A,B) XOR (C) 4: f(A,B) NOR (C) 5: f(A,B) NAND (C) 6: f(A,B)\ OR (C) 7: f(A,B) OR (C\) 8: f(A,B)\ AND (C) 9: f(A,B) AND (C\) 10: f(A,B) RESET (C) SET RISING EDGE 11: f(A,B) SET (C) RESET FALLING EDGE 12: f(A,B) RESET (C) SET FALLING EDGE 1 1: (A) SET (B) RESET ADVANCED 649 This parameter determines the logic function applied to the result of the two tests allowing calculating the output value. 219/482 PROGRAMMING INSTRUCTIONS iDrive P305 MDO4: Output Logic Level P305 Range Default Level Address Function 220/482 0–1 0: FALSE 1: TRUE 1 1: TRUE ADVANCED 905 MDO4 digital output logic function to apply a logic reversal (negation) to the calculated output signal: (0) FALSE = a logic negation is applied; (1) TRUE = no negation is applied. PROGRAMMING INSTRUCTIONS iDrive 25. AUXILIARY DIGITAL OUTPUTS MENU 25.1. Overview This menu includes the parameters allowing allocating the control functions implemented via the digital inputs located on I/O expansion boards. This menu can be viewed only after enabling data acquisition from the expansion boards. 25.2. List of Parameters P306 to P317 Table 50: List of parameters P306 to P317. Parameter P306 P307 P308 P309 P310 P311 P312 P313 P314 P315 P316 P317 FUNCTION XMDO1: Signal selection XMDO1: Output logic level XMDO2: Signal selection XMDO2: Output logic level XMDO3: Signal selection XMDO3: Output logic level XMDO4: Signal selection XMDO4: Output logic level XMDO5: Signal selection XMDO5: Output logic level XMDO6: Signal selection XMDO6: Output logic level User Level DEFAULT VALUES ENGINEERING ENGINEERING ENGINEERING ENGINEERING ENGINEERING ENGINEERING ENGINEERING ENGINEERING ENGINEERING ENGINEERING ENGINEERING ENGINEERING D0: Disable 1: True D0: Disable 1: True D0: Disable 1: True D0: Disable 1: True D0: Disable 1: True D0: Disable 1: True MODBUS Address 906 907 908 909 910 911 912 913 914 915 916 917 P306 XMDO1: Signal Selection P306 Range Default Level Address Function 0 ÷ 59 See Table 41 0 D0: Disable ENGINEERING 906 Selects the digital signal used to calculate the value of XMDO1 digital output. It selects an analog variable used to calculate the value of XMDO1 digital input if one of the “analog” operating modes is selected. Digital signals and analog variables are detailed in Table 41. P307 XMDO1: Output Logic Level P307 Range Default Level Address Function 0–1 0: FALSE 1: TRUE 1 1: TRUE ENGINEERING 907 XMDO1 digital output logic function to apply a logic reversal (negation) to the calculated output signal: (0) FALSE = a logic negation is applied; (1) TRUE = no negation is applied. 221/482 PROGRAMMING INSTRUCTIONS iDrive P308 XMDO2: Signal Selection P308 Range Default Level Address Function 0 ÷ 59 See Table 41 0 D0: Disable ENGINEERING 908 Selects the digital signal used to calculate the value of XMDO2 digital output. It selects an analog variable used to calculate the value of XMDO2 digital input if one of the “analog” operating modes is selected. Digital signals and analog variables are detailed in Table 41. P309 XMDO2: Output Logic Level P309 Range Default Level Address Function 0–1 0: FALSE 1: TRUE 1 1: TRUE ENGINEERING 909 XMDO2 digital output logic function to apply a logic reversal (negation) to the calculated output signal: (0) FALSE = a logic negation is applied; (1) TRUE = no negation is applied. P310 XMDO3: Signal Selection P310 Range Default Level Address Function 0 ÷ 59 See Table 41 0 D0: Disable ENGINEERING 910 Selects the digital signal used to calculate the value of XMDO3 digital output. It selects an analog variable used to calculate the value of XMDO3 digital input if one of the “analog” operating modes is selected. Digital signals and analog variables are detailed in Table 41. P311 XMDO3: Output Logic Level P311 Range Default Level Address Function 222/482 0–1 0: FALSE 1: TRUE 1 1: TRUE ENGINEERING 911 XMDO3 digital output logic function to apply a logic reversal (negation) to the calculated output signal: (0) FALSE = a logic negation is applied; (1) TRUE = no negation is applied. PROGRAMMING INSTRUCTIONS iDrive P312 XMDO4: Signal Selection P312 Range Default Level Address Function 0 ÷ 59 See Table 41 0 D0: Disable ENGINEERING 912 Selects the digital signal used to calculate the value of XMDO4 digital output. It selects an analog variable used to calculate the value of XMDO4 digital input if one of the “analog” operating modes is selected. Digital signals and analog variables are detailed in Table 41. P313 XMDO4: Output Logic Level P313 Range Default Level Address Function 0–1 0: TRUE 1: FALSE 1 1: FALSE ENGINEERING 913 XMDO4 digital output logic function to apply a logic reversal (negation) to the calculated output signal: (0) FALSE = a logic negation is applied; (1) TRUE = no negation is applied. P314 XMDO5: Signal Selection P314 Range Default Level Address Function 0 ÷ 59 See Table 41 0 D0: Disable ENGINEERING 914 Selects the digital signal used to calculate the value of XMDO5 digital output. It selects an analog variable used to calculate the value of XMDO5 digital input if one of the “analog” operating modes is selected. Digital signals and analog variables are detailed in Table 41. P315 XMDO5: Output Logic Level P315 0: FALSE 1: TRUE Range 0–1 Default Level 1 ENGINEERING Address 915 Function XMDO5 digital output logic function to apply a logic reversal (negation) to the calculated output signal: (0) FALSE = a logic negation is applied; (1) TRUE = no negation is applied. 1: TRUE 223/482 PROGRAMMING INSTRUCTIONS iDrive P316 XMDO6: Signal Selection P316 Range Default Level Address Function 0 ÷ 59 See Table 41 0 D0: Disable ENGINEERING 916 Selects the digital signal used to calculate the value of XMDO6 digital output. It selects an analog variable used to calculate the value of XMDO6 digital input if one of the “analog” operating modes is selected. Digital signals and analog variables are detailed in Table 41. P317 XMDO6: Output Logic Level P317 Range Default Level Address Function 224/482 0–1 0: FALSE 1: TRUE 1 1: TRUE ENGINEERING 917 XMDO6 digital output logic function to apply a logic reversal (negation) to the calculated output signal: (0) FALSE = a logic negation is applied; (1) TRUE = no negation is applied. PROGRAMMING INSTRUCTIONS iDrive 26. MEASURE CONTROL FROM PT100 26.1. Overview This menu relates to ES847 control board. It can be viewed only if R023 (I/O board setting) = PT100 (see the EXPANSION BOARD CONFIGURATION MENU). The analog inputs can be linked to measure sensors. NOTE Set DIP-Switches 1 and 2 as follows for proper data acquisition from PT100: SW1 SW2 ON ON 1 2 3 4 1 5 6 7 ON ON 8 1 1 ON 2 3 1 4 ON 5 6 7 8 1 26.2. List of Parameters P318 to P325 Table 51: List of parameters P318 to P325. Parameter FUNCTION P320 Channel 1: measure mode P321 Channel 1: measure offset P322 Channel 2: measure mode P323 Channel 2: measure offset P324 Channel 3: measure mode P325 Channel 3: mesaure offset P326 Channel 4: measure mode P327 Channel 4: mesaure offset User Level ADVANCE D ADVANCE D ADVANCE D ADVANCE D ADVANCE D ADVANCE D ADVANCE D ADVANCE D DEFAULT VALUES 0: no input 0.0 °C 0: no input 0.0 °C 0: no input 0.0 °C 0: no input 0.0 °C MODBUS Address 920 921 922 923 924 925 926 927 225/482 PROGRAMMING INSTRUCTIONS iDrive P320 Channel 1: Measure Mode P320 Range Default Level Address Function 0÷1 0: no input 1: val PT100 0 0: no input ADVANCED 920 This parameter selects the type of analog signal available in terminals 27– 28 in ES847 expansion board. 0: no signal is used. The P parameter relating to the analog input disappears. 1: val PT100. The acquired signal is transformed into degrees centigrade. See Measure M069. P321 Channel 1: Measure Offset P321 Range Default Level Address Function –30000 ÷ 30000 –300.00 ÷ 300.00 0 0.0 °C ADVANCED 921 Value of the measure offset for channel 1: an offset can be applied to the measure to correct possible errors. P322 Channel 2: Measure Mode P322 Range Default Level Address Function 0÷1 0: no input 1: val PT100 0 0: no input ADVANCED 922 This parameter selects the type of analog signal available in terminals 29– 30 in ES847 expansion board. 0: no signal is used. The P parameter relating to the analog input disappears. 1: val PT100. The acquired signal is transformed into degrees centigrade. See Measure M070. P323 Channel 2: Measure Offset P323 Range Default Level Address Function 226/482 –30000 ÷ 30000 –300.00 ÷ 300.00 0 0.0 °C ADVANCED 923 Value of the measure offset for channel 2: an offset can be applied to the measure to correct possible errors. PROGRAMMING INSTRUCTIONS iDrive P324 Channel 3: Measure Mode P324 Range Default Level Address Function 0÷1 0: no input 1: val PT100 0 0: no input ADVANCED 924 This parameter selects the type of analog signal available in terminals 31– 32 in ES847 expansion board. 0: no signal is used. The P parameter relating to the analog input disappears. 1: val PT100. The acquired signal is transformed into degrees centigrade. See Measure M071. P325 Channel 3: Measure Offset P325 Range Default Level Address Function –30000 ÷ 30000 –300.00 ÷ 300.00 0 0.0 °C ADVANCED 925 Value of the measure offset for channel 3: an offset can be applied to the measure to correct possible errors. P326 Channel 4: Measure Mode P326 Range Default Level Address Function 0÷1 0: no input 1: val PT100 0 0: no input ADVANCED 926 This parameter selects the type of analog signal available in terminals 33– 34 in ES847 expansion board. 0: no signal is used. The P parameter relating to the analog input disappears. 1: val PT100. The acquired signal is transformed into degrees centigrade. See Measure M072. P327 Channel 4: Measure Offset P327 Range Default Level Address Function –30000 ÷ 30000 –300.00 ÷ 300.00 0 0.0 °C ADVANCED 927 Value of the measure offset for channel 4: an offset can be applied to the measure to correct possible errors. 227/482 PROGRAMMING INSTRUCTIONS iDrive 27. FIELDBUS PARAMETERS MENU 27.1. Overview This menu allows selecting the Third measure and the Fourth measure from the Fieldbus. The list of the selectable measures is the same as the list in the MEASURES MENU. The First measure and the Second measure are fixed (Output Current and Motor Speed) (see Exchanged P). 27.2. List of Parameters P330 to P331 Table 52: List of parameters P330 to P331. Parameter FUNCTION User Level P330 Third measure from the Fieldbus ENGINEERING P331 Fourth measure from the Fieldbus ENGINEERING Default Values 13:Torque Out % 23: PID Out% P330 Third Measure from the Fieldbus P330 Range Default Level Address Function 0-91 See Table 53 13 M012 :[Torque Out %] ENGINEERING 930 Third measure exchanged via Fieldbus. P331 Fourth Measure from the Fieldbus P331 Range Default Level Address Function 228/482 0-91 See Table 53 23 M022 :[PID Out %] ENGINEERING 931 Fourth measure exchanged via Fieldbus. MODBUS Address 930 931 PROGRAMMING INSTRUCTIONS iDrive Table 53: List of Programmable Measures for P330 ÷ P331. 0 1 2 3 4 5 6 7 8 9 10 11 12 13 14 15 16 17 18 19 20 21 22 23 24 25 26 27 28 29 30 31 32 33 34 35 36 37 38 39 40 41 42 43 44 45 NONE M000 Speed Ref M001 dcm.Spd.Ref M002 Ramp Out M003 dcm.Rmp.Out M004 Motor Speed M005 dcm.Mot.Spd M006 Mot.Freq. M007 Torq.Ref M008 Torq.Demand M009 Torq.Out M010 Torq.Ref % M011 Torq.Dem.% M012 Torq.Out % M013 T.Lim.Ref M014 T.Lim.RmpOut M015 T.Lim.Ref % M016 T.Lim.RmpOut % M017 Flux Ref M018 PID Ref % M019 PID RmpOut % M020 PID Fbk % M021 PID Err % M022 PID Out % M023 PID Ref M024 PID Fbk M056a Virtual Dig.Out M026 Mot.Current M027 Out Volt M028 Power Out M029 Vbus-DC M030 V Mains M031 Delay.Dig.IN M032 Instant.Dig.IN M033 Term. Dig.IN M034 Ser. Dig.IN M035 Fbus. Dig.IN M036 Aux. Dig.IN M037 Analog In REF M038 Analog In AIN1 M039 Analog In AIN2 M040 Ser.SpdRef M041 dcm.Ser.SpdRef M042 Fbus.SpdRef M043 dcm.Fbus.SpdRef M044 Ser.TrqLimRef 46 47 48 49 50 51 52 53 54 55 56 57 58 59 60 61 62 63 64 65 66 67 68 69 70 71 72 73 74 75 76 77 78 79 80 81 82 83 84 85 86 87 88 89 90 91 M045 Fbus.TrqLimRef M046 SerPID Ref M047 FbusPID Ref M048 SerPID Fbk M049 FbusPID Fbk M050 Encoder Ref M051 Freq.In Ref M052 Op.Time Lo M053 Op.Time Hi M054 Sply.Time Lo M055 Sply.Time Hi M056 Digital Out M057 Freq.Out M058 Analog Out AO1 M059 Analog Out AO2 M060 Analog Out AO3 M061 Aux. Dig.OUT M062 Amb.Temp. M036a Aux.Ser. Dig.IN M064 Hts.Temp. M065 OP Counter M066 SP Counter M036b Aux.FBus. Dig.IN M022a PID2 Out % M069 PT100 Temp.1 M070 PT100 Temp.2 M071 PT100 Temp.3 M072 PT100 Temp.4 M073 -----------------M074 -----------------M075 -----------------M076 -----------------M077 -----------------M026a I2t M039a Analog In XAIN4 M039b Analog In XAIN5 M018a PID2 Ref % M019a PID2 RmpOut % M020a PID2 Fbk % M084 -----------------M021a PID2 Err % M023a PID2 Ref M024a PID2 Fbk M088 -----------------M089 Status M090 Alarm 229/482 PROGRAMMING INSTRUCTIONS iDrive 28. VIRTUAL DIGITAL OUTPUTS (MPL) MENU 28.1. Overview The Virtual Digital Outputs menu includes the parameters allowing configuring the virtual digital outputs (MPL1..4) of the IDrive drive. Virtual digital outputs are logic blocks (no hardware output is provided) allocating more complex logic functions to outputs MDO1..4: MPL virtual outputs can be feedbacked at the input of a new block (hardware or virtual block), thus allowing implementing more complex functionality. NOTE The Virtual Digital Outputs menu may be accessed only if the user level is ADVANCED or ENGINEERING. NOTE XMDI auxiliary digital outputs (values from 13 to 20 in the parameters relating to the control functions) can be set up only after setting XMDI/O in parameter R023. 28.1.1. F ACTORY S ETTING MPL1 energizes when the ENABLE input is present; MPL2 energizes when a fan fault trips; MPL3 energizes when the Fire Mode is activated; MPL4 is factory set as disabled. 28.1.2. S TRUCTURE OF THE V IRTUAL D IGITAL O UTPUTS A virtual digital output is composed of two logic blocks allowing data processing before actuating the actual digital output. Block 2 depends on the settings in parameters P357a (P366a, P375a, P384a). INPUTA INPUTB P357a = 0 Logic Bloc k set by parameters P351-P357 f(A,B) yes Output= f(A,B) NO Logic bloc k set by P357b that tests f(A,B) and signal C P000658-b Figure 38: Block diagram of the virtual digital outputs (MPL). Operating modes set in MPL1 (2, 3, 4): P350, (P359, P368, P377) The user can select one of the following operating modes: 230/482 Output= g[f(A,B),C] PROGRAMMING INSTRUCTIONS iDrive Table 54: Digital Output Modes. DISABLING DIGITAL DOUBLE DIGITAL ANALOG DOUBLE ANALOG DOUBLE FULL BRAKE ABS BRAKE ABS LIFT The selected digital output is disabled. The digital output depends on a selected digital signal and on the logic output function (True/False). The digital output depends on 2 selected digital signals, on the logic function calculating the output value and on the logic output function (True/False). The digital output depends on a selected analog variable, which is tested through Test A and Test B, thus obtaining 2 digital signals; starting from their value, the selected logic function calculates the output value, whereas the True/False logic output function calculates the end value. The digital outputs depends on 2 selected analog variables: Test A is performed for variable A, whilst Test B is performed for variable B, thus obtaining 2 digital signals; starting from their value, the selected logic function calculates the output value, whereas the logic output function True/False calculates the end value. As DOUBLE ANALOG or DOUBLE DIGITAL mode, but both digital signals and analog variables can be selected. If you select a digital signal, its value (TRUE or FALSE) is used to calculate the selected logic function. If you select an analog variable, the test selected for this variable is performed, and its result (TRUE or FALSE) is used to calculate the selected logic function. As ABS BRAKE below, although the selected variables are not expressed as absolute values, but depend on the selected tests. The ABS BRAKE mode allows controlling the electromechanical brake of a motor used for lifting applications. To enable the relevant output, make sure that all the conditions depending on the drive status are true (see the description at the end of this section). The ABS BRAKE mode is applied by selecting the measured (or estimated) speed value [A71] as the first variable and the output torque [A80] as the second variable. Variables are considered as absolute values. As ABS BRAKE, but the brake unlocks (digital output open) when a given torque value is attained, which is automatically determined based on the last torque value required in the previous stroke. Variable A Selected for MPL1 (2, 3, 4): P351, (P360, P369, P378) Selects the digital signal or the analog variable used for Test A (set with P353 / P362 / P371 / P380). The whole list of the selectable items and their description are stated in Table 41. If a digital signal is selected, Test A is not performed: therefore, the comparison value for Test A (set with P355 / P364 / P373 / P382) has no meaning. NOTE This parameter can be accessed only if the operating mode of the digital output concerned is other than zero. Example: MPL1 P350≠0. Variable B selected for MPL1 (2, 3, 4): P352, (P361, P370, P379) This selects a different digital signal or the analog variable used for Test B (set with P354 / P363 / P372 / P381). The whole list of the selectable items and their description are stated in Table 41. If a digital signal is selected, Test B is not performed: therefore, the comparison value for Test B (set with P356 / P365 / P374 / P383) has no meaning. NOTE Parameter P352 cannot be accessed when the digital output operating mode is 1: DIGITAL or 3: ANALOG. Example: MPL1 P350=1 OR P350=3. 231/482 PROGRAMMING INSTRUCTIONS iDrive Testing Variable A for MPL1 (2, 3, 4): P353, (P362, P371, P380) If an analog variable is selected, a logic TEST is performed to obtain a TRUE/FALSE Boolean signal. Eight different tests are available, that can be performed for selected variable A and its comparing value A: Table 55: Test functions. GREATER THAN GREATER THAN/EQUAL TO LOWER LOWER THAN/EQUAL TO ABS, GREATER THAN ABS, GREATER THAN/EQUAL TO ABS, LOWER ABS, LOWER THAN/EQUAL TO NOTE Selected variable > comparing value Selected variable ≥ comparing value Selected variable < comparing value Selected variable ≤ comparing value Absolute value (selected variable) > comparing value Absolute value (selected variable) ≥ comparing value Absolute value (selected variable) < comparing value Absolute value (selected variable) ≤ comparing value This parameter can be accessed only if the operating mode of the selected digital output is > 2. Example: MPL1 P350>2. Operation on variable B, digital output MPL1 (2, 3, 4): P354, (P363, P372, P381) If an analog variable is selected, a logic TEST is performed to obtain a TRUE/FALSE Boolean signal. Eight different tests are available, that can be performed for selected variable B and its comparing value B (see Table 57). NOTE This parameter can be accessed only if the operating mode of the selected digital output is > 2 and < 9. Example: MPL1 2<P350<9. Reference threshold for P351 ( P360, P369, P378) in MPL1: P355, (P364, P373, P382) Defines the comparing value of Test A with the first selected variable. NOTE This parameter can be accessed only if the operating mode of the selected digital output is > 2. Example: MPL1 P350>2. Reference threshold for P352 ( P361, P370, P379) in MPLx: P356, (P365, P374, P383) Defines the comparing value of Test B with the first selected variable. NOTE 232/482 This parameter can be accessed only if the operating mode of the selected digital output is > 2. Example: MPL1 P350>2. PROGRAMMING INSTRUCTIONS iDrive MPL1: Function applied to the result of Tests A and B: P357, (P366, P375, P384) A logic function is applied to the two Boolean signals obtained in order to obtain the output TRUE/FALSE Boolean signal. Six different tests may be performed for variable (A) using the comparing value and variable (B). (A) OR (B): The selected digital output is enabled when at least one of the two conditions below is true (this function also allows enabling the selected digital input based on one test only). (A) OR (B) Test A Test B Output 0 0 0 1 0 1 0 1 1 1 1 1 (A) SET (B) RESET Rising Edge (A) RESET (B) SET Rising Edge (A) SET (B) RESET Falling Edge (A) RESET (B) SET Falling Edge The selected digital output is activated as the output of a Flip Flop Set Reset whose inputs are signal A and signal B. This function can be used in case of hysteresis. The status of the input (Qn) depends on the previous value (Qn-1) and on the result of the two tests. Signals A and B are considered only when passing from 0→1 (Rising Edge) or 1→0 (Falling Edge) and may be used both as Set and Reset command. Example: Suppose that the output enables only when the motor speed exceeds 50rpm and disables when the motor speed drops below 5 rpm. To do so, assign the first condition to Test A, representing the Set command for Flip Flop (P351 = Motor Speed, P353 >, P355 = 50rpm), and assign the second condition to Test B, representing the Reset command (P352 = Motor Speed, P354 ≤, P356 = 5rpm). A more detailed example is given at the end of this section. (A) SET (B) RESET Rising Edge Test A (Set) Test B (Reset) Qn 0→1 X 1 0→1 X 0 In any other case Qn-1 (A) RESET (B) SET Rising Edge Test A Test B (Set) Qn (Reset) 0→1 X 0 0→1 X 1 In any other case Qn-1 (A) SET (B) RESET Falling Edge Test A (Set) Test B (Reset) Qn 1→0 X 1 1→0 X 0 In any other case Qn-1 (A) RESET (B) SET Falling Edge Test A Test B (Set) Qn (Reset) 1→0 X 0 1→0 X 1 In any other case Qn-1 233/482 PROGRAMMING INSTRUCTIONS iDrive (A) AND (B): The selected digital output enables when both conditions are true. (A) AND (B) Test A Test B Output 0 0 0 1 0 0 0 1 0 1 1 1 (A) XOR (B): The selected digital output enables when either one condition or the other is true (but not when both conditions are true at a time). (A) XOR (B) Test A Test B Output 0 0 0 1 0 1 0 1 1 1 1 0 (A) NOR (B): The selected digital output enables when no condition is true. The NOR function between two variables corresponds to the AND of the same false variables, i.e. (A) NOR (B) = (/A) AND (/B). (A) NOR (B) Test A Test B Output 0 0 1 1 0 0 0 1 0 1 1 0 (A) NAND (B): The selected digital output enables when no condition is true or when only one of the two conditions is true. The NAND function between two variables corresponds to the OR of the same false variables, i.e. (A) NAND (B) = (/A) OR (/B). (A) NAND (B) Test 1 Test 2 Output 0 0 1 1 0 1 0 1 1 1 1 0 NOTE 234/482 This parameter can be accessed only if the operating mode of the selected digital output is > 2 and <9. Example: MPL1 2<P350<9. PROGRAMMING INSTRUCTIONS iDrive Function applied to the result of f(A,B) C for MPL1: P357b, (P366b, P375b, P384b) Once the Boolean signal resulting from f(A,B) is obtained, an additional logic function can be applied to obtain the output TRUE//FALSE Boolean signal. If parameter P357a is disabled, the output of f(A,B) goes directly to the corresponding digital output; if parameter P357a is enabled, the output of the output of f(A,B) becomes one of the two inputs of the second programmed block. The user can choose one of the six Boolean tests above for the first variable—f(A,B)—and for the second variable (C). Logic applied to MPL1 (2, 3,4): P358, (P367, P376, P385) The logic of the Boolean signal can be reversed at the end of the processing chain. The user can choose whether the logic level of the digital output is POSITIVE or NEGATIVE. (0) FALSE = a logic negation is applied (NEGATIVE logic). (1) TRUE = no negation is applied (POSITIVE logic). NOTE This parameter can be accessed only if the operating mode of the selected digital output is other than zero. Example: MPL1 P350≠0 NOTE Please refer to Programmable Operating Modes (Diagrams) relating to the digital outputs. 235/482 PROGRAMMING INSTRUCTIONS iDrive 28.2. Operating Diagram of the Virtual Digital Outputs Virtual digital outputs are software outputs that can be used as digital inputs from the following items: • digital inputs • digital outputs • auxiliary digital outputs • virtual digital outputs themselves. They can be used for special functionality of the system, thus avoiding loop wiring on the same control board. Example: It can be necessary to control the status of the hardware ENABLE contact of the system to cause an external alarm to trip when MPL1 is selected in parameter C164 (DIGITAL INPUTS MENU). Enable P350 = 1: Digital P351 = D21:Enable P358 = TRUE MPL1 out C164 = 9: MPL1 P000660-b . Figure 39: Example of MPL functionality. For more details about possible configurations of the virtual digital outputs, see Programmable Operating Modes (Diagrams). 236/482 PROGRAMMING INSTRUCTIONS iDrive Examples This section covers some examples for the supervision of pumping systems with the PID control algorithm. The settings of the parameters being used are given in the tables below: the parameters highlighted in grey have no effect. Example 1: Dry Run Detection For most pumps, especially submersible bore-hole pumps, it must be assured that the pump is stopped in case of dry run. This is assured by the Dry Run Detection feature. How Does It Work? Dry run detection is based on power/frequency monitoring. Stop (trip) due to dry run is initiated under the following conditions: Table 56: MPL parameterization for Dry Run Detection. P359 P360 P361 P362 P363 P364 P365 P366 P366a P366b P367 MPL2: Digital output mode MPL2: Selecting variable A MPL2: Selecting variable B MPL2: Testing variable A MPL2: Testing variable B MPL2: Comparing value for Test A MPL2: Comparing value for Test B MPL2: Function applied to the result of the 2 tests MPL2: Selecting variable C MPL2: Function applied to the result of f(A,B) C MPL2: Output logic level NOTE P368 P369 P370 P371 P372 P373 P374 P375 P375a P375b P376 It is recommended that a TIMEOUT be entered for Dry Run Detection. Enter a timeout for MPL2 output (see TIMERS MENU). MPL3: Digital output mode MPL3: Selecting variable A MPL3: Selecting variable B MPL3: Testing variable A MPL3: Testing variable B MPL3: Comparing value for Test A MPL3: Comparing value for Test B MPL3: Function applied to the result of the 2 tests MPL3: Selecting variable C MPL3: Function applied to the result of f(A,B) C MPL3: Output logic level NOTE DOUBLE ANALOG A77: Output Power A86: PID Feedback < < Min. operating PWR [*] Min. FBK value [*] (A) AND (B) D11: PID Out Max f(A,B) AND (C) TRUE DOUBLE ANALOG A77: Output Power A86: PID Feedback ≥ < Min. operating PWR [*] Min. FBK value [*] (A) AND (B) D51: MPL2 f(A,B) OR (C) TRUE MPL3 detects when piping is clogged or faulty or when the delivery/pressure sensor is malfunctioning (e.g. the pump membrane is locked) when the sensor is located downstream of the mains. 237/482 PROGRAMMING INSTRUCTIONS iDrive P377 P378 P379 P380 P381 P382 P383 P384 P384a P384b P385 MPL4: Digital output mode MPL4: Selecting variable A MPL4: Selecting variable B MPL4: Testing variable A MPL4: Testing variable B MPL4: Comparing value for Test A MPL4: Comparing value for Test B MPL4: Function applied to the result of the 2 tests MPL4: Selecting variable C MPL4: Function applied to the result of f(A,B) C MPL4: Output logic level DOUBLE FULL D51: MPL3 A86: PID Feedback ≥ Min. FBK value [*] (A) Set (B) Reset D0: Disabled See steps 1. and 2. below Virtual digital output MPL4 locks the system operation in two modes: 1. Virtually connecting the output to an external alarm input (P385=FALSE; C164=12: MPL4) 2. Disabling the PID (P385=TRUE; C171=12: MPL4) On the other hand, when the malfunctioning signal is sent to the PLC supervisor, the same parameterization in MPL4 shall be entered in the digital output concerned. NOTE NOTE 238/482 [*] Min. Operating PWR = Min. power required for the pump delivery. Min. FBK value = the min. feedback value shall be ≥ P237 (minimum PID). When the Sleep Mode (see PID PARAMETERS MENU) and the Dry Run Detection mode are activated simultaneously, the delay time for the Dry Run Detection mode shall be shorter than the Sleep Mode time. PROGRAMMING INSTRUCTIONS iDrive Example 2: Pipe Fill Function. The PIPE FILL function avoids water hammer in irrigation pipes. To avoid water hammer, pipes must be filled very slowly for air drainage. To do so, force a minimum rate reference, thus obtaining the minimum delivery of the pumping system. Once the min. rate is attained, the feedback starts increasing; when the filling pressure is attained, the system can start operating under normal conditions. Suppose that the feedback value of the pipe pressure is present at analog input AIN1. Table 57: MPL parameterization for Pipe Fill function. P368 P369 P370 P371 P372 P373 P374 MPL3: Digital output mode MPL3: Selecting variable A MPL3: Selecting variable B MPL3: Testing variable A MPL3: Testing variable B MPL3: Comparing value for Test A MPL3: Comparing value for Test B P375 P375a P375b P376 MPL3: Function applied to the result of the 2 tests MPL3: Selecting variable C MPL3: Function applied to the result of f(A,B) C MPL3: Output logic level P377 P378 P379 P380 P381 P382 P383 P384 P384a P384b P385 MPL4: Digital output mode MPL4: Selecting variable A MPL4: Selecting variable B MPL4: Testing variable A MPL4: Testing variable B MPL4: Comparing value for Test A MPL4: Comparing value for Test B MPL4: Function applied to the result of the 2 tests MPL4: Selecting variable C MPL4: Function applied to the result of f(A,B) C MPL4: Output logic level P009 P010 P011 P012 P080 P081 C182 C155 C167 C171 Acceleration time 1 Deceleration time 1 Acceleration time 2 Deceleration time 2 Multispeed function Output speed 1 (Mspd1) MDI Multiprogramming enable MDI for multispeed 0 selection MDI for multiramp 0 selection MDI for PID disable DOUBLE ANALOG A79: AIN1 A79: AIN1 < ≥ Pressure value when the system is empty Pressure value when the system is full (A) Set (B) Reset D0: Disabled TRUE DIGITAL D52: MPL3 D0: Disabled TRUE Ramp for normal operation [*] Ramp for normal operation [*] Ramp for PIPE FILL [*] Ramp for PIPE FILL [*] 0: Preset Speed Min. operating speed [*] Enabled 12: MPL4 11: MPL3 11: MPL3 It is required to feed back MPL3 output to MPL4 output, because every MPL may be allocated to maximum 2 functions (C182 = Enabled – see DIGITAL INPUTS MENU). In that case, 3 functions are required, so an additional output is needed. NOTE [*] Ramp for normal function = Ramp desired during normal operation. Ramp for PIPE FILL = Ramp desired when filling the pipes. Minimum operating speed = Min. speed required for the correct delivery of the pump. 239/482 PROGRAMMING INSTRUCTIONS iDrive 28.3. List of Parameters P350 to P385 Table 58: List of parameters P350 to P385. Paramete r P350 P351 P352 P353 P354 P355 P356 P357 FUNCTION MPL1: Digital output mode MPL1: Selecting variable A MPL1: Selecting variable B MPL1: Testing variable A MPL1: Testing variable B MPL1: Comparing value for Test A MPL1: Comparing value for Test B MPL1: Function applied to the result of the 2 tests P357a MPL1: Selecting variable C P357b MPL1: Function applied to the result of f(A,B) C P358 P359 P360 P361 P362 P363 P364 P365 P366 MPL1: Output logic level MPL2: Digital output mode MPL2: Selecting variable A MPL2: Selecting variable B MPL2: Testing variable A MPL2: Testing variable B MPL2: Comparing value for Test A MPL2: Comparing value for Test B MPL2: Function applied to the result of the 2 tests P366a MPL2: Selecting variable C P366b MPL2: Function applied to the result of f(A,B) C P367 P368 P369 P370 P371 P372 P373 240/482 MPL2: Output logic level MPL3: Digital output mode MPL3: Selecting variable A MPL3: Selecting variable B MPL3: Testing variable A MPL3: Testing variable B MPL3: Comparing value for Test A User Level DEFAULT VALUES ADVANCE D ADVANCE D ADVANCE D ADVANCE D ADVANCE D ADVANCE D ADVANCE D ADVANCE D ADVANCE D ADVANCE D ADVANCE D ADVANCE D ADVANCE D ADVANCE D ADVANCE D ADVANCE D ADVANCE D ADVANCE D ADVANCE D ADVANCE D ADVANCE D ADVANCE D ADVANCE D ADVANCE D ADVANCE D ADVANCE D ADVANCE D ADVANCE 0: DISABLE MODBUS Address 950 D0: DISABLE 951 D0: DISABLE 952 0: > 953 0: > 954 0 955 0 956 0: (A) OR (B) 957 0: Disable 932 0: f(A,B) OR C 933 1: TRUE 958 0: DISABLE 959 D0: DISABLE 960 D0: DISABLE 961 0: > 962 0: > 963 0 964 0 965 0: (A) OR (B) 966 0: Disable 934 0: f(A,B) OR C 935 1: TRUE 967 0: DISABLE 968 D0: DISABLE 969 D0: DISABLE 970 0: > 971 0: > 972 0 973 PROGRAMMING INSTRUCTIONS P374 P375 MPL3: Comparing value for Test B MPL3: Function applied to the result of the 2 tests P375a MPL3: Selecting variable C P375b MPL3: Function applied to the result of f(A,B) C P376 P377 P378 P379 P380 P381 P382 P383 P384 MPL3: Output logic level MPL4: Digital output mode MPL4: Selecting variable A MPL4: Selecting variable B MPL4: Testing variable A MPL4: Testing variable B MPL4: Comparing value for Test A MPL4: Comparing value for Test B MPL4: Function applied to the result of the 2 tests P384a MPL4: Selecting variable C P384b MPL4: Function applied to the result of f(A,B) C P385 MPL4: Output logic level iDrive D ADVANCE D ADVANCE D ADVANCE D ADVANCE D ADVANCE D ADVANCE D ADVANCE D ADVANCE D ADVANCE D ADVANCE D ADVANCE D ADVANCE D ADVANCE D ADVANCE D ADVANCE D ADVANCE D 0 974 0: (A) OR (B) 975 0: Disable 936 0: f(A,B) OR C 937 1: TRUE 976 0: DISABLE 977 D0: DISABLE 978 D0: DISABLE 979 0: > 980 0: > 981 0 982 0 983 0: (A) OR (B) 984 0: Disable 938 0: f(A,B) OR C 939 1: TRUE 985 241/482 PROGRAMMING INSTRUCTIONS iDrive P350 MPL1: Digital Output Mode P350 Range Default Level Address Function NOTE 0÷8 0: DISABLE 1: DIGITAL 2: DOUBLE DIGITAL 3: ANALOG 4: DOUBLE ANALOG 5: DOUBLE FULL 6: BRAKE 7: ABS BRAKE 8: ABS LIFT 1 1: DIGITAL ADVANCED 950 This parameter defines the operating mode of virtual digital output 1. The different operating modes are described at the beginning of this chapter. MPL1 Digital output can be programmed only if the frequency output is not set up: P200 = Disable (see ANALOG AND FREQUENCY OUTPUTS MENU). P351 MPL1: Selecting Variable A P351 Range Default Level Address Function 0 ÷ 119 See Table 41 21 D21: MDI Enable ADVANCED 951 This parameter selects the digital signal used to calculate the value of MPL1 digital output. It selects an analog variable used to calculate the value of MPL1 digital output if one of the “analog” operating modes is selected. Digital signals and analog variables are detailed in Table 41. P352 MPL1: Selecting Variable B P352 Range Default Level Address Function 242/482 0 ÷ 119 See Table 41 0 D0: Disable ADVANCED 952 This parameter selects the second digital signal used to calculate the value of MPL1 digital output. It selects an analog variable used to calculate the value of MPL1 digital input if one of the “analog” operating modes is selected. Digital signals and analog variables are detailed in Table 41. PROGRAMMING INSTRUCTIONS iDrive P353 MPL1: Testing Variable A P353 Range Default Level Address Function 0÷7 0: > 1: ≥ 2: < 3: ≤ 4: ABS(x) > 5: ABS(x) ≥ 6: ABS(x) < 7: ABS(x) ≤ 0 0: > ADVANCED 953 This parameter defines the test to be performed for the variable detected by P351 using P355 as a comparing value. P354 MPL1: Testing Variable B P354 Range Default Level Address Function 0÷7 0: > 1: ≥ 2: < 3: ≤ 4: ABS(x) > 5: ABS(x) ≥ 6: ABS(x) < 7: ABS(x) ≤ 0 0: > ADVANCED 954 This parameter defines the test to be performed for the variable detected by P352 using P356 as a comparing value. P355 MPL1: Comparing Value for Test A P355 Range Default Level Address Function –32000 ÷ 32000 –320.00 % ÷ 320.00 % % of the full-scale value of selected variable A, see Table 41 0 0 ADVANCED 955 This parameter defines the comparing value with the selected variable for test A. P356 MPL1: Comparing Value for Test B P356 Range Default Level Address Function –32000 ÷ 32000 –320.00 % ÷ 320.00 % % of the full-scale value of selected variable B, see Table 41 0 0 ADVANCED 956 This parameter defines the comparing value with the selected variable for test B. 243/482 PROGRAMMING INSTRUCTIONS iDrive P357 MPL1: Function Applied to the Result of the 2 Tests P357 Range Default Level Address Function 0 ÷ 12 0: (A) OR (B) 1: (A) SET (B) RESET 2: (A) AND (B) 3: (A) XOR (B) 4: (A) NOR (B) 5: (A) NAND (B) 6: (A\) OR (B) 7: (A) OR (B\) 8: (A\) AND (B) 9: (A) AND (B\) 10: (A) RESET (B) SET RISING EDGE 11: (A) SET (B) RESET FALLING EDGE 12: (A) RESET (B) SET FALLING EDGE 0 0: (A) OR (B) ADVANCED 957 This parameter determines the logic function applied to the result of the tests allowing calculating the output value. P357a MPL1: Selecting Variable C P357a Range Default Level Address Function 0 ÷ 59 See Table 41 0 D0: Disable ADVANCED 932 This parameter selects the digital signal used to calculate the value of MPL1 digital output. The digital signals that can be selected are given in Table 41. P357b MPL1: Function Applied to the Result of f(A,B) C P357b Range Default Level Address Function 244/482 0 ÷ 12 0: f(A,B) OR (C) 1: f(A,B) SET (C) RESET RISING EDGE 2: f(A,B) AND (C) 3: f(A,B) XOR (C) 4: f(A,B) NOR (C) 5: f(A,B) NAND (C) 6: f(A,B)\ OR (C) 7: f(A,B) OR (C\) 8: f(A,B)\ AND (C) 9: f(A,B) AND (C\) 10: f(A,B) RESET (C) SET RISING EDGE 11: f(A,B) SET (C) RESET FALLING EDGE 12: f(A,B) RESET (C) SET FALLING EDGE 0 0: f(A,B) OR (C) ADVANCED 933 This parameter determines the logic function applied to the result of the two tests allowing calculating the output value. PROGRAMMING INSTRUCTIONS iDrive P358 MPL1: Output Logic Level P358 Range Default Level Address Function 0–1 0: FALSE 1: TRUE 1 1: TRUE ADVANCED 958 MPL1 digital output logic function to apply a logic reversal (negation) to the calculated output signal: (0) FALSE = a logic negation is applied; (1) TRUE = no negation is applied. P359 MPL2: Digital Output Mode P359 Range Default Level Address Function 0÷8 0: DISABLE 1: DIGITAL 2: DOUBLE DIGITAL 3: ANALOG 4: DOUBLE ANALOG 5: DOUBLE FULL 6: BRAKE 7: ABS BRAKE 8: ABS LIFT 1 1: DIGITAL ADVANCED 959 This parameter defines the operating mode of virtual digital output 2. The different operating modes are described at the beginning of this chapter. P360 MPL2: Selecting Variable A P360 Range Default Level Address Function 0 ÷ 119 See Table 41 33 D33: Fan Fault ADVANCED 960 This parameter selects the digital signal used to calculate the value of MPL2 digital output. It selects an analog variable used to calculate the value of MPL2 digital input if one of the “analog” operating modes is selected. Digital signals and analog variables are detailed in Table 41. P361 MPL2: Selecting Variable B P361 Range Default Level Address Function 0 ÷ 119 See Table 41 0 D0: Disable ADVANCED 961 This parameter selects the second digital signal used to calculate the value of MPL2 digital output. It selects an analog variable used to calculate the value of MPL2 digital input if one of the “analog” operating modes is selected. Digital signals and analog variables are detailed in Table 41. 245/482 PROGRAMMING INSTRUCTIONS iDrive P362 MPL2: Testing Variable A P362 Range Default Level Address Function 0÷7 0: > 1: ≥ 2: < 3: ≤ 4: ABS(x) > 5: ABS(x) ≥ 6: ABS(x) < 7: ABS(x) ≤ 0 0: > ADVANCED 362 This parameter defines the test to be performed for the variable detected by P360 using P364 as a comparing value. P363 MPL2: Testing Variable B P363 Range Default Level Address Function 0÷7 0: > 1: ≥ 2: < 3: ≤ 4: ABS(x) > 5: ABS(x) ≥ 6: ABS(x) < 7: ABS(x) ≤ 0 0: > ADVANCED 963 This parameter defines the test to be performed for the variable detected by P361 using P365 as a comparing value. P364 MPL2: Comparing Value for Test A P364 Range Default Level Address Function –32000 ÷ 32000 –320.00 % ÷ 320.00 % % of the full-scale value of selected variable A, see Table 41 0 0 ADVANCED 964 This parameter defines the comparing value with the selected variable for test A. P365 MPL2: Comparing Value for Test B P365 Range Default Level Address Function 246/482 –32000 ÷ 32000 –320.00 % ÷ 320.00 % % of the full-scale value of selected variable B, see Table 41 0 0 ADVANCED 965 This parameter defines the comparing value with the selected variable for test B. PROGRAMMING INSTRUCTIONS iDrive P366 MPL2: Function Applied to the Result of the 2 Tests P366 Range Default Level Address Function 0 ÷ 12 0: (A) OR (B) 1: (A) SET (B) RESET 2: (A) AND (B) 3: (A) XOR (B) 4: (A) NOR (B) 5: (A) NAND (B) 6: (A\) OR (B) 7: (A) OR (B\) 8: (A\) AND (B) 9: (A) AND (B\) 10: (A) RESET (B) SET RISING EDGE 11: (A) SET (B) RESET FALLING EDGE 12: (A) RESET (B) SET FALLING EDGE 1 1: (A) SET (B) RESET ADVANCED 966 This parameter determines the logic function applied to the result of the two tests allowing calculating the output value. P366a MPL2: Selecting Variable C P366a Range Default Level Address Function 0 ÷ 59 See Table 41 0 D0: Disable ADVANCED 934 This parameter selects the digital signal used to calculate the value of MPL2 digital output. The digital signals that can be selected are given in Table 41. P366b MPL2: Function Applied to the Result of f(A,B) C P366b Range Default Level Address Function 0 ÷ 12 0: f(A,B) OR (C) 1: f(A,B) SET (C) RESET RISING EDGE 2: f(A,B) AND (C) 3: f(A,B) XOR (C) 4: f(A,B) NOR (C) 5: f(A,B) NAND (C) 6: (A\) OR (B) 7: (A) OR (B\) 8: (A\) AND (B) 9: (A) AND (B\) 10: (A) RESET (B) SET RISING EDGE 11: (A) SET (B) RESET FALLING EDGE 12: (A) RESET (B) SET FALLING EDGE 0 0: f(A,B) OR (C) ADVANCED 935 This parameter determines the logic function applied to the result of the two tests allowing calculating the output value. 247/482 PROGRAMMING INSTRUCTIONS iDrive P367 MPL2: Output Logic Level P367 Range Default Level Address Function 0–1 0: FALSE 1: TRUE 1 1: TRUE ADVANCED 967 MPL2 digital output logic function to apply a logic reversal (negation) to the calculated output signal: (0) FALSE = a logic negation is applied; (1) TRUE = no negation is applied. P368 MPL3: Digital Output Mode P368 Range Default Level Address Function 0÷8 0: DISABLE 1: DIGITAL 2: DOUBLE DIGITAL 3: ANALOG 4: DOUBLE ANALOG 5: DOUBLE FULL 6: BRAKE 7: ABS BRAKE 8: ABS LIFT 1 1: DIGITAL ADVANCED 968 This parameter defines the operating mode of virtual digital output 3. The different operating modes are described at the beginning of this chapter. P369 MPL3: Selecting Variable A P369 Range Default Level Address Function 0 ÷ 119 See Table 41 38 D38: Fire Mode ADVANCED 969 This parameter selects the digital signal used to calculate the value of MPL3 digital output. It selects an analog variable used to calculate the value of MPL3 digital input if one of the “analog” operating modes is selected. Digital signals and analog variables are detailed in Table 41. P370 MPL3: Selecting Variable B P370 Range Default Level Address Function 248/482 0 ÷ 119 See Table 41 0 D0: Disable ADVANCED 970 This parameter selects the second digital signal used to calculate the value of MPL3 digital output. It selects an analog variable used to calculate the value of digital input MPL3 if one of the “analog” operating modes is selected. Digital signals and analog variables are detailed in Table 41. PROGRAMMING INSTRUCTIONS iDrive P371 MPL3: Testing Variable A P371 Range Default Level Address Function 0÷7 0: > 1: ≥ 2: < 3: ≤ 4: ABS(x) > 5: ABS(x) ≥ 6: ABS(x) < 7: ABS(x) ≤ 0 0: > ADVANCED 971 This parameter defines the test to be performed for the variable detected by P369 using P373 as a comparing value. P372 MPL3: Testing Variable B P372 Range Default Level Address Function 0÷7 0: > 1: ≥ 2: < 3: ≤ 4: ABS(x) > 5: ABS(x) ≥ 6: ABS(x) < 7: ABS(x) ≤ 0 0: > ADVANCED 972 This parameter defines the test to be performed for the variable detected by P370 using P374 as a comparing value. P373 MPL3: Comparing Value for Test A P293 Range Default Level Address Function –32000 ÷ 32000 –320.00 % ÷ 320.00 % % of the full-scale value of selected variable A, see Table 41 0 0 ADVANCED 973 This parameter defines the comparing value with the variable selected for test A. P374 MPL3: Comparing Value for Test B P374 Range Default Level Address Function –32000 ÷ 32000 –320.00 % ÷ 320.00 % % of the full-scale value of selected variable B, see Table 41 0 0 ADVANCED 974 This parameter defines the comparing value with the variable selected for test B. 249/482 PROGRAMMING INSTRUCTIONS iDrive P375 MPL3: Function Applied to the Result of the 2 Tests P375 Range Default Level Address Function 0 ÷ 12 0: (A) OR (B) 1: (A) SET (B) RESET 2: (A) AND (B) 3: (A) XOR (B) 4: (A) NOR (B) 5: (A) NAND (B) 6: (A\) OR (B) 7: (A) OR (B\) 8: (A\) AND (B) 9: (A) AND (B\) 10: (A) RESET (B) SET RISING EDGE 11: (A) SET (B) RESET FALLING EDGE 12: (A) RESET (B) SET FALLING EDGE 0 0: (A) OR (B) ADVANCED 975 This parameter determines the logic function applied to the result of the two tests allowing calculating the output value. P375a MPL3: Selecting Variable C P375a Range Default Level Address Function 0 ÷ 59 See Table 41 0 D0: Disable ADVANCED 936 This parameter selects the digital signal used to calculate the value of MPL3 digital output. The digital signals that can be selected are given in see Table 41. P375b MPL3: Function Applied to the Result of f(A,B) C P375b Range Default Level Address Function 250/482 0 ÷ 12 0: f(A,B) OR (C) 1: f(A,B) SET (C) RESET RISING EDGE 2: f(A,B) AND (C) 3: f(A,B) XOR (C) 4: f(A,B) NOR (C) 5: f(A,B) NAND (C) 6: f(A,B)\ OR (C) 7: f(A,B) OR (C\) 8: f(A,B)\ AND (C) 9: f(A,B) AND (C\) 10: f(A,B) RESET (C) SET RISING EDGE 11: f(A,B) SET (C) RESET FALLING EDGE 12: f(A,B) RESET (C) SET FALLING EDGE 0 0: f(A,B) OR (C) ADVANCED 937 This parameter determines the logic function applied to the result of the two tests allowing calculating the output value. PROGRAMMING INSTRUCTIONS iDrive P376 MPL3: Output Logic Level P376 Range Default Level Address Function 0–1 0: TRUE 1: FALSE 1 1: TRUE ADVANCED 976 MPL3 digital output logic function to apply a logic reversal (negation) to the calculated output signal: (0) FALSE = a logic negation is applied; (1) TRUE = no negation is applied. P377 MPL4: Digital Output Mode P377 Range Default Level Address Function 0÷8 0: DISABLE 1: DIGITAL 2: DOUBLE DIGITAL 3: ANALOG 4: DOUBLE ANALOG 5: DOUBLE FULL 6: BRAKE 7: ABS BRAKE 8: ABS LIFT 1 1: DIGITAL ADVANCED 977 This parameter defines the operating mode of virtual digital output 4. The different operating modes are described at the beginning of this chapter. P378 MPL4: Selecting Variable A P378 Range Default Level Address Function 0 ÷ 119 See Table 41 0 D0: Disable ADVANCED 978 This parameter selects the digital signal used to calculate the value of MPL4 digital output. It selects an analog variable used to calculate the value of MPL4 digital input if one of the “analog” operating modes is selected. Digital signals and analog variables are detailed in Table 41. P379 MPL4: Selecting Variable B P379 Range Default Level Address Function 0 ÷ 119 See Table 41 0 D0: Disable ADVANCED 979 This parameter selects the second digital signal used to calculate the value of MPL4 digital output. It selects an analog variable used to calculate the value of MPL4 digital input if one of the “analog” operating modes is selected. Digital signals and analog variables are detailed in Table 41. 251/482 PROGRAMMING INSTRUCTIONS iDrive P380 MPL4: Testing Variable A P380 Range Default Level Address Function 0÷7 0: > 1: ≥ 2: < 3: ≤ 4: ABS(x) > 5: ABS(x) ≥ 6: ABS(x) < 7: ABS(x) ≤ 0 0: > ADVANCED 980 This parameter defines the test to be performed for the variable detected by P378 using P382 as a comparing value. P381 MPL4: Testing Variable B P381 Range Default Level Address Function 0÷7 0: > 1: ≥ 2: < 3: ≤ 4: ABS(x) > 5: ABS(x) ≥ 6: ABS(x) < 7: ABS(x) ≤ 0 0: > ADVANCED 981 This parameter defines the test to be performed for the variable detected by P379 using P383 as a comparing value. P382 MPL4: Comparing Value for Test A P382 Range Default Level Address Function –32000 ÷ 32000 –320.00 % ÷ 320.00 % % of the full-scale value of selected variable A, see Table 41 0 0 ADVANCED 982 This parameter defines the comparing value with the selected variable for test A. P383 MPL4: Comparing Value for Test B P383 Range Default Level Address Function 252/482 –32000 ÷ 32000 –320.00 % ÷ 320.00 % % of the full-scale value of selected variable B, see Table 41 0 0 ADVANCED 983 This parameter defines the comparing value with the selected variable for test B. PROGRAMMING INSTRUCTIONS iDrive P384 MPL4: Function Applied to the Result of the 2 Tests P384 Range Default Level Address Function 0 ÷ 12 0: (A) OR (B) 1: (A) SET (B) RESET 2: (A) AND (B) 3: (A) XOR (B) 4: (A) NOR (B) 5: (A) NAND (B) 6: (A\) OR (B) 7: (A) OR (B\) 8: (A\) AND (B) 9: (A) AND (B\) 10: (A) RESET (B) SET RISING EDGE 11: (A) SET (B) RESET FALLING EDGE 12: (A) RESET (B) SET FALLING EDGE 0 0: (A) OR (B) ADVANCED 984 This parameter determines the logic function applied to the result of the two tests allowing calculating the output value. P384a MPL4: Selecting Variable C P384a Range Default Level Address Function 0 ÷ 59 See Table 41 0 D0: Disable ADVANCED 938 This parameter selects the digital signal used to calculate the value of MPL4 digital output. The digital signals that can be selected are given in Table 41. P384b MPL4: Function Applied to the Result of f(A,B) C P384b Range Default Level Address Function 0 ÷ 12 0: f(A,B) OR (C) 1: f(A,B) SET (C) RESET RISING EDGE 2: f(A,B) AND (C) 3: f(A,B) XOR (C) 4: f(A,B) NOR (C) 5: f(A,B) NAND (C) 6: f(A,B)\ OR (C) 7: f(A,B) OR (C\) 8: f(A,B)\ AND (C) 9: f(A,B) AND (C\) 10: f(A,B) RESET (C) SET RISING EDGE 11: f(A,B) SET (C) RESET FALLING EDGE 12: f(A,B) RESET (C) SET FALLING EDGE 0 0: f(A,B) OR (C) ADVANCED 939 This parameter determines the logic function applied to the result of the two tests allowing calculating the output value. 253/482 PROGRAMMING INSTRUCTIONS iDrive P385 MPL4: Output Logic Level P385 Range Default Level Address Function 254/482 0–1 0: TRUE 1: FALSE 1 1: TRUE ADVANCED 985 MPL4 digital output logic function to apply a logic reversal (negation) to the calculated output signal: (0) FALSE = a logic negation is applied; (1) TRUE = no negation is applied. PROGRAMMING INSTRUCTIONS iDrive 29. INPUTS FOR REFERENCES FROM OPTIONAL BOARD This menu relates to ES847 I/O expansion board. It can be viewed only if R023 (I/O board setting) = XAIN (see the EXPANSION BOARD CONFIGURATION MENU). In addition to the analog inputs located on the control board, a current analog input and a voltage analog input can be acquired if ES847 is fitted. 29.1. Scaling Analog Inputs XAIN4, XAIN5 NOTE Please refer to the IDrive’s Installation Instructions Manual for hardware details about analog inputs. Two analog inputs (XAIN4, XAIN5) are located on ES847 control board. XAIN4 is a current input and XAIN5 is a voltage input. They are both bipolar analog inputs (–10V ÷ +10V or – 20mA ÷ +20mA). For both analog inputs, parameters P390 to P399 allow setting the type of signal to be acquired, offset compensation (if any), scaling to obtain a speed reference or a torque reference, the signal filtering time constant. Parameter P393 sets the offset of the input analog signal (if P393=0 offset is zero), while parameter P394 defines the filtering time constant (factory setting: P394 = 100ms). The voltage signal can be bipolar (–10V ÷ +10V) or unipolar (0V ÷ +10V). The current signal can be bipolar (–20mA ÷ +20mA), unipolar (0mA ÷ +20mA) or can have a minimum offset (4mA ÷ 20mA). The user will set each analog input mode in parameters P390, P395. Table 59: Analog input hardware mode. Type / Terminals Differential input / Pin 11,12 Differential input / Pin 13,14 NOTE Name XAIN4 XAIN5 Type ±10V Input ±20mA Input Parameter P390 P395 Configurations different from the ones stated in the table above are not allowed. Scaling is obtained by setting the parameters relating to the linear function for the conversion from the value read by the analog input to the corresponding speed/torque reference value. The conversion function is a straight line passing through 2 points in Cartesian coordinates having the values read by the analog input in the X-axis, and the speed/torque reference values in the Y-axis. The speed/torque reference values are multiplied by the reference percent parameters. Each point is detected through its two coordinates. The ordinates of the two points are the following: the value of Speed_Min (or Trq_Min for the torque reference) multiplied by the percentage set with P391a/P396a for the first point; the value of Speed_Max (or Trq_Max for the torque reference) multiplied by the percentage set with P392a/P397a for the second point. Speed_Min depends on the selected motor: see parameter C028 (motor 1), C071 (motor 2), or C114 (motor 3). Trq_Min depends on the selected motor: see parameter C047 (motor 1), C090 (motor 2) or C133 (motor 3). Speed_Max depends on the selected motor: see parameter C029 (motor 1), C072 (motor 2) or C115 (motor 3). Trq_Max depends on the selected motor: see parameter C048 (motor 1), C091 (motor 2), or C134 (motor 3). The X-axis values of the two points depend on the analog input: XAIN4 Input: 255/482 PROGRAMMING INSTRUCTIONS iDrive Parameter P391 is the X-axis of the first point; parameter P392 is the X-axis of the second point. XAIN5 Input: Parameter P396 is the X-axis of the first point; parameter P397 is the X-axis of the second point. (see also Scaling Analog Inputs REF, AIN1, AIN2). 29.2. List of parameters P390 to P399 Table 60: List of parameters P390 to P399. ADVANCED DEFAULT VALUE 1:0÷10V MODBUS Address 990 ADVANCED 0.0V 991 ADVANCED 100.0% 704 ADVANCED 10.0V 992 ADVANCED 100.0% 710 ADVANCED ADVANCED ADVANCED 0V 100ms 3: 4÷20mA 993 994 995 ADVANCED 4.0mA 996 ADVANCED 100.0% 711 ADVANCED 20.0mA 997 ADVANCED 100.0% 712 ADVANCED ADVANCED 0mA 100 ms 998 999 Parameter FUNCTION User Level P390 Type of signal over XAIN4 input Value of XAIN4 input producing min. reference (X-axis) Percentage of Speed_Min/Trq_Min producing min. reference (Y-axis related to P391) Value of XAIN4 input producing max. reference (X-axis) Percentage of Speed_Max/Trq_Max producing max. reference (Y-axis related to P392) Offset over XAIN4 input Filtering time over XAIN4 input Type of signal over XAIN5 input Value of XAIN5 input producing min. reference (X-axis) Percentage of Speed_Min/Trq_Min producing min. reference (Y-axis related to P396) Value of XAIN5 input producing max. reference (X-axis) Percentage of Speed_Min/Trq_Min producing min. reference (Y-axis related to P397) Offset over XAIN5 input Filtering time over XAIN5 input P391 P391a P392 P392a P393 P394 P395 P396 P396a P397 P397a P398 P399 P390 Type of Signal over XAIN4 Input P390 Range Default Level Address Function 256/482 0÷1 0: ± 10 V 1: 0 ÷ 10 V 1:0÷10V 1 ADVANCED 990 This parameter selects the type of single–ended, analog signal over XAIN4 terminal in the terminal board. The signal can be a voltage signal, a unipolar signal, or a bipolar signal. 0: ± 10 V Bipolar voltage input between –10V and +10V. The detected signal is saturated between these two values. 1: 0 ÷ 10 V Unipolar voltage input between 0V and +10V. The detected signal is saturated between these two values. PROGRAMMING INSTRUCTIONS iDrive P391 Value of XAIN4 Input Producing Min. Reference P391 Range Default Level Address Function –100 ÷ 100, if P390 = 0 0 ÷ 100, if P390 = 1 –10.0 V 0.0 V ÷ 10.0 V, if P390 = 0: ± 10 V ÷ 10.0V, if P390 = 1: 0 ÷ 10 V 0 0.0V ADVANCED 991 This parameter selects the value for XAIN4 input signal for minimum reference, or better the reference set in C028 xP391a (Master mode) or in C047xP391a (Slave mode). If motor 2 is active, C071 and C090 will be used instead of C028 and C047; if motor 3 is active, the values set in C114 and C133 will be used. P391a Percentage of Speed_Min/Trq_Min. Producing Min. Reference (Y-axis related to P391) P391a Range Default Level Address Function 0 ÷ 1000 100.0% 1000 100.0% ADVANCED 704 This parameter represents the min. speed percentage (or the min. torque percentage for a torque reference) to be used for the minimum reference set with P391. P392 Value of XAIN4 Input Producing Max. Reference (X-axis) P392 Range Default Level Address Function –100 ÷ 100, if P390 = 0 0 ÷ 100, if P390 = 3 –10.0 V 0.0 V ÷ 10.0 V, if P390 = 0: ± 10 V ÷ 10.0V, if P390 = 1: 0 ÷ 10 V 100 +10.0V ADVANCED 992 This parameter selects the value for XAIN4 input signal for maximum reference, or better the reference set in C029xP392a (Master mode) or in C048xP392a (Slave mode). If motor 2 is active, C072 and C091 will be used instead of C029 and C048; if motor 3 is active, the values set in C115 and C134 will be used. P392a Percentage of Speed_Max/Trq_Max Producing Max. Reference (Y-axis related to P392) P392a Range Default Level Address Function 0 ÷ 1000 100.0% 1000 100.0% ADVANCED 710 This parameter represents the max. speed percentage (or the max. torque percentage for a torque reference) to be used for the maximum reference set with P392. P393 Offset over XAIN4 Input P393 Range Default Level Address Function –1000 ÷ 1000 –10.00 V ÷ +10.00 V 0 0.00 V ADVANCED 993 This parameter selects the offset correction value of the XAIN4 analog signal that has been measured. The value set is added to the signal measured before saturation or conversion; its unit of measure is the same as the one of the signal selected for XAIN4 analog input. 257/482 iDrive 258/482 PROGRAMMING INSTRUCTIONS PROGRAMMING INSTRUCTIONS iDrive P394 Filtering Time over XAIN4 Input P394 Range Default Level Address Function 0 ÷ +65000 0 ÷ +65000ms 100 100 ms ADVANCED 994 This parameter selects the value of the filter time constant of the first command applied to the XAIN4 input signal when the signal saturation and conversion is over. P395 Type of Signal over XAIN5 Input P395 Range Default Level Address Function 2÷4 2: ± 20 mA 3: 4 ÷ 20 mA 4: 0 ÷ 20 mA 3: 4 ÷ 20 mA 3 ADVANCED 995 This parameter selects the type of differential analog signal over terminals XAIN5+ and XAIN5– in the terminal board. The signal can be a current signal, a unipolar signal, or a bipolar signal. 2: ±20 mA Bipolar current input between –20mA and +20mA. The detected signal is saturated between these two values. 3: 4 ÷ 20 mA Unipolar current input with min. threshold, between +4 mA and +20mA. The detected signal is saturated between these two values. Before being saturated, if the detected signal is lower than 4 mA or greater than 20 mA, alarms A069 or A086 trip. 4: 0 ÷ 20 mA Unipolar current input between +0 mA and +20mA. The detected signal is saturated between these two values. P396 Value of XAIN5 Producing Min. Reference (X-axis P396 Range Default Level Address Function –200 ÷ 200, if P395 = 2 +40 ÷ 200, if P395 = 3 0 ÷ 200, if P395= 4 –20.0 mA ÷ 20.0 mA, if P395 = 2: ± 20 mA +4.0mA ÷ 20.0 mA, if P395 = 3: 4 ÷ 20 mA 0.0 mA ÷ 20.0 mA, if P395 = 4: 0 ÷ 20 mA 40 +4.0mA ADVANCED 996 This parameter selects the value for XAIN5 input signal for minimum reference, or better the reference set in C028xP396a (Master mode) or in C047xP396a (Slave mode). If motor 2 is active, C071 and C090 will be used instead of C028 and C047; if motor 3 is active, the values set in C114 and C133 will be used. P396a Percentage of Speed_Min/Trq_Min Producing Min. Reference (Y-axis related to P396) P396a Range Default Level Address Function 0 ÷ 1000 100.0% 1000 100.0% ADVANCED 711 This parameter represents the min. speed percentage (or the min. torque percentage for a torque reference) to be used for the minimum reference set with P396. 259/482 PROGRAMMING INSTRUCTIONS iDrive P397 Value of XAIN5 Input Producing Max. Reference (X-axis) Range P397 Default Level Address Function –200 ÷ 200, if P395 = 2 +40 ÷ 200, if P395 = 3 0 ÷ 200, if P395 = 4 –20.0 mA ÷ 20.0 mA, if P395= 2: ± 20 mA +4.0mA ÷ 20.0 mA, if P395= 3: 4 ÷ 20 mA 0.0 mA ÷ 20.0 mA, if P395= 4: 0 ÷ 20 mA 200 +20.0mA ADVANCED 997 This parameter selects the value for XAIN5 input signal for maximum reference, or better the reference set in C029xP397a (Master mode) or in C048xP397a (Slave mode). If motor 2 is active, C072 and C091 will be used instead of C029 and C048; if motor 3 is active, the values set in C115 and C134 will be used. P397a Percentage of Speed_Max/Trq_Max Producing Max. Reference (Y-axis related to P397) P397a Range Default Level Address Function 0 ÷ 1000 100.0% 1000 100.0% ADVANCED 712 This parameter represents the max. speed percentage (or the max. torque percentage for a torque reference) to be used for the maximum reference set with P397. P398 Offset over XAIN5 Input P398 Range Default Level Address Function –2000 ÷ 2000 – 20.00 mA ÷ +20.00 mA 0 0 mA ADVANCED 998 This parameter selects the offset correction value of XAIN5 analog signal that has been measured. The value set is added to the signal measured before saturation or conversion; its unit of measure is the same as the one of the signal selected for XAIN5 analog input. P399 Filtering Time over XAIN5 Input P399 Range Default Level Address Function 260/482 0 ÷ +65000 0 ÷ +65000ms 100 100 ms ADVANCED 999 This parameter selects the value of the filter time constant of the first command applied to XAIN5 input signal when the signal saturation and conversion is over. PROGRAMMING INSTRUCTIONS iDrive 30. AUTOTUNE MENU 30.1. Overview NOTE See the FIRST STARTUP section for tuning based on the control algorithm to be used. NOTE At the end of the Autotune procedure, the system automatically saves the whole parameter set of the drive. NOTE Autotune must be performed only after entering the motor ratings or the ratings of the encoder used as a speed feedback. Please refer to the MOTOR CONTROL MENU and the ENCODER/FREQUENCY INPUTS MENU. The selected motor may be tuned in order to obtain the machine ratings or the parameterization required for the correct functioning of the control algorithms. The user can also check the proper operation/wiring of the encoder used as a speed feedback. The Autotune menu includes two programming inputs, I073 and I074. Input I073 allows enabling and selecting the type of autotune. Input I074—which can be programmed only if I073 = Motor Tune— describes the type of autotune which is performed. Because the values set in I073 or I074 cannot be changed once for all and are automatically reset after autotuning, the ENABLE signal must be disabled and the ESC key must be used to accept the new value. 30.1.1. M OTOR A UTOTUNE AND A DJUSTING L OOPS Set I073 as Motor Tune to enable autotune functions that can be selected with I074. NOTE For the correct operation of the tuning algorithms, enter the motor ratings and the ratings of the encoder used as a speed feedback. Please refer to the MOTOR CONTROL MENU and the ENCODER/FREQUENCY INPUTS MENU. 261/482 PROGRAMMING INSTRUCTIONS iDrive Table 61: Programmable “Motor Tune” functions. I074 Setting Motor Rotation 0: all Ctrl no rotation No 1: FOC Auto no rotation No 2: FOC. Auto + rotation Yes 3: VTC/FOC Man rotation (speed) Yes 4: FOC Man no rotation (current) No 5: FOC Man no rotation (flux) No 262/482 Type of Tune Automatic estimation of the stator resistance and the leakage inductance. If no-load current (C018) is zero, no-load current values are computed based on the rated power of the connected motor. Tuning mode required for the correct operation of the control algorithms. Automatic autotune of the current loop. Tuning mode required for the correct operation of FOC algorithm. If autotune of the current loop fails (Alarm A065 Autotune KO trips), the current loop may be manually tuned - see 4: FOC Man no rotation (current). While autotuning, the system can monitor the reference current and the current obtained in analog outputs AO2 and AO1 respectively. Automatic estimation of the rotor time constant. Tuning mode required for the correct operation of FOC algorithm. After entering the correct no-load current value (parameters C021, C064, C107 for motors M1, M2 and M3 respectively) and tuning the current loop, the system can measure the rotor time constant for no-load rotation of the connected motor up to 90% of its constant speed. Manual tune of the speed loop. Analog outputs AO1 and AO2 are displayed, showing the speed reference and the speed value obtained with the preset parameters of the speed regulator (see the SPEED LOOP AND CURRENT BALANCING MENU). Set the current regulator’s parameters in order to reduce to a minimum the difference between the two waveforms. Manual tune of the current loop. If automatic tuning 1: FOC Auto no rotation fails, the current loop may be manually tuned. Display analog outputs AO1 and AO2, showing the current reference value and the current value measured. Set the current regulator’s parameters (see the FOC REGULATORS MENU) in order to reduce to a minimum the difference between the two waveforms. Manual tune of the flux loop. The correct parameters of the flux regulator are calculated whenever the rotor time constant value changes (see 2: FOC Auto rotation). However, you can manually tune the flux loop. Display analog outputs AO1 and AO2, showing the flux reference value and the flux value obtained. Set the current regulator’s parameters in order to reduce to a minimum the difference between the two waveforms. See the FOC REGULATORS MENU. NOTE If Manual tune is selected, do the following to quit the function: disable the ENABLE command and set I073 = [0: Disable]. NOTE After tuning the rotor time constant, whenever the time constant value is manually changed, parameters P158 and P159 are adjusted based on the time constant value that has been set up. PROGRAMMING INSTRUCTIONS 30.1.2. iDrive C HECKING THE E NCODER O PERATION Set I073 as Encoder Tune to check the correct operation of the encoder selected as a speed feedback (see the ENCODER/FREQUENCY INPUTS MENU) and to automatically set the correct direction of rotation. NOTE Before checking the correct operation of the encoder used as a speed feedback, enter the motor ratings and the encoder ratings. Please refer to the MOTOR CONTROL MENU and the ENCODER/FREQUENCY INPUTS MENU. Once I073 is set as Encoder Tune and the ENABLE and START commands are enabled, the connected motor attains a speed of rotation of approx. 150 rpm; its speed of rotation is detected by the encoder, then the drive is disabled. The following messages can be displayed on the display/keypad: A059 Encoder Fault W31 Encoder OK Then the following message is always displayed: W32 OPEN ENABLE If alarm A059 Encoder Fault trips: in the encoder input, the value measured by the drive does not match with the real speed of rotation of the motor. Check that the encoder is properly set up (see the ENCODER/FREQUENCY INPUTS MENU) and wired; if the Encoder B input is used, check the Configuration of the dip–switches located on ES836 or ES913 option board (see the IDrive’s Installation Instructions manual). If W31 Encoder OK appears: the speed feedback from encoder is correct. In addition, the autotune sets the encoder signal as feedback with parameter C199. 263/482 PROGRAMMING INSTRUCTIONS iDrive 30.2. List of Inputs I073 - I074 Table 62: List of inputs I073 - I074. Input I073 I074 FUNCTION Type of autotune Type of motor tune User Level BASIC BASIC MODBUS Address 1460 1461 I073 Type of Autotune I073 Range Default Level Address Function 0÷2 0: Disable 1: Motor Tune 2: Encoder Tune This is not a programming parameter: the input is set to zero whenever the drive is powered on and whenever the command is executed. BASIC 1460 I073 selects the type of tune to perform. If you select [1: Motor Tune]: I074 sets different types of tune for current loops, flux loops and speed loops and for the estimation of the motor ratings (see Motor Autotune and Adjusting Loops). If you select [2: Encoder Tune]: you can check the correct operation of the encoder used as a speed feedback (see Checking the Encoder Operation). I074 Type of Motor Tune I074 Range Default Level Address Function 264/482 0÷5 0: All Auto no rotation 1: FOC Auto no rotation 2: FOC Auto + rotation 3: VTC/FOC Man rotation (speed) 4: FOC Man no rotation (current) 5: FOC Man no rotation (flux) This is not a programming parameter: the input is set to zero whenever the drive is powered on and whenever the command is executed. BASIC 1461 I074 selects the type of autotune to perform if I073 = [1: Motor Tune] (see section Motor Autotune and Adjusting Loops). NOTE No changes can be made to I073 and I074 when the ENABLE signal is present. If you attempt to change these values when ENABLE is active, “W34 ILLEGAL DATA” warning appears. Remove the ENABLE signal to set these values and activate the ENABLE signal to begin the selected autotune process. NOTE If SAVE/ENTER is pressed to store the changes made to I073 and I074, “W17 SAVE IMPOSSIBLE” warning appears. Use the ESC key instead. PROGRAMMING INSTRUCTIONS iDrive 31. CARRIER FREQUENCY MENU 31.1. Overview The Carrier Frequency Menu sets some of the PWM modulation characteristics based on the preset type of control. 31.1.1. IFD C ONTROL VTC C ONTROL AND The IFD and VTC control algorithms allow gaining access to all the parameters included in the Carrier Frequency menu. The user can set the minimum value and the maximum value of the switching carrier frequency and the number of pulses per period used to produce the output frequency when switching from min. carrier frequency to max. carrier frequency (synchronous modulation). The silent modulation function can also be enabled (C004). 31.1.2. E XAMPLE (IFD AND VTC) Setting two levels of carrier frequency and the number of pulses used for synchronous modulation. A lower value for carrier frequency ensures a better performance of the motor but implies higher noise levels. Suppose that the connected motor has a rated speed equal to 1500rpm at 50Hz and that you need the best performance up to 200rpm and a “noiseless” carrier frequency at max. speed (3000rpm). In this case, the max. speed of the drive will produce an output voltage with a frequency value equal to 100Hz; in proximity to this speed the carrier frequency should be at its maximum level. Suppose that a model implementing max. 16kHz carrier frequency is used. Assign the following: C001 = 1600Hz C002 = 16000Hz C003 ≥ (C002/100Hz) = (160 pulses per period) fcarrier ( Hz ) 18000 C002 16000 14000 12000 10000 8000 6000 4000 C001 2000 0 0 10 20 (C001 / C003) 30 40 50 60 fout ( Hz ) 70 80 90 100 (C002 / C003) Figure 40: Carrier frequency (example). Suppose that C003 = 192np, so that C002/C003 = 16000/192 = 83.33Hz. The max. carrier frequency is obtained with this output frequency. The min. frequency is kept constant until frequency C001/C003 = 8.33 Hz is attained, corresponding to 250 rpm of the motor speed. In the output frequency range, ranging from 8.33 to 83.33Hz, synchronous modulation is obtained and the carrier frequency applied results from: f carrier = fout * C003 [Hz]. 265/482 iDrive 266/482 PROGRAMMING INSTRUCTIONS PROGRAMMING INSTRUCTIONS 31.1.3. iDrive FOC C ONTROL The FOC control algorithm selects the silent modulation mode (C004) and allows increasing the carrier frequency with parameter C002. The FOC algorithm uses a carrier frequency corresponding to: • max. carrier freq. allowed for the IDrive size concerned if freq. is < 8kHz (see Table 73 and Table 77); • the greatest between C002 and 8 kHz if the max. carrier freq. allowed is > 8kHz; this means that the value set in C002 is applied only when exceeding 8kHz. The carrier frequency is not affected by the value set in C001. 31.1.4. A NY C ONTROL A LGORITHM The maximum preset carrier frequency value also limits the maximum speed value to be programmed: Max. programmable speed → rated speed * (maximum output frequency/rated frequency) where the maximum output frequency results from the following: C002 > 5000Hz C002 ≤ 5000Hz fout_max = C002 / 16 fout_max = C002 / 10 C002 is the maximum carrier frequency and the divisor is the min. allowable number of pulses per period. Table 63: Maximum value of the output frequency depending on the IDrive size. Size Smaller than 0015 0015 to 0129 (**) 0150 to 0162 Greater than 0162 Max. output frequency (Hz) (*) 2T/4T 1000 625 500 400 (**) From 0023 to 0030 (437.5Hz), 0040 (1000Hz) and 0049 (800Hz) Size Any PD size (*) NOTE Max. Output Frequency (Hz) (*) 5T/6T 400 The maximum output frequency is limited to the speed level programmed in parameters C028, C029 [–32000 ÷ 32000]rpm. This results in Foutmax= (RPMmax*NPole)/120; EXAMPLE: When using a 4-pole motor and 30,000rpm are required, Fout will be 1000Hz, so the performance requirements are fulfilled. On the other hand, if the same performance requirements are needed with an 8-pole system, 30,000rpm cannot be obtained, as Fout is 2000Hz. As a result, when using an 8-pole motor, the maximum allowable programmable speed is 15,000rpm[RPMoutmax=(Foutmax*120)/(number of motor poles)]. 267/482 PROGRAMMING INSTRUCTIONS iDrive 31.2. List of Parameters C001 to C004 Table 64: List of parameters C001 to C004. Parameter C001 C002 C003 C004 FUNCTION Minimum carrier frequency Maximum carrier frequency Number of pulses Silent modulation User Level ENGINEERING MODBUS Address 1001 ENGINEERING 1002 ENGINEERING ENGINEERING 1003 1004 Default Values See Table 73 and Table 77 See Table 73 and Table 77 1:[24] See Table 73 and Table 77 The default value and the max. value of carrier frequency (C001 and C002) depend on the drive size. To check those values, see Table 73 and Table 77. C001 Minimum Carrier Frequency C001 Range Default Level Address Control Function NOTE 1600 ÷ 16000 1600 ÷ 16000 Hz Depending on the drive Depending on the drive model – see Table model 73 and Table 77. See Table 73 and Table 77 ENGINEERING 1001 IFD and VTC It represents the min. value of the modulation frequency being used. The min. value set in C001 cannot exceed the max. value set in C002. Increase the max. value in C002 if you need to increase the min. value and if C001 equals C002. C002 Maximum Carrier Frequency C002 Range Default Level Address Function NOTE NOTE 268/482 1600 ÷ 16000 Hz 1600 ÷ 16000 Depending on the drive model – see Table Depending on the drive size 73 and Table 77 See Table 73 and Table 77 ENGINEERING 1002 It represents the max. value of the modulation frequency being used. As per FOC control, the modulation frequency set in C002 is used only if exceeding 8 kHz (when the max. allowable carrier frequency is > 8kHz). Otherwise, the max. carrier frequency allowed is used for the models implementing a carrier frequency <8 kHz, independently of C002. The max. value set in C002 cannot be lower than the min. value set in C001. Decrease the min. value in C001 if you need to decrease the max. value and if C001 equals C002. The max. value in C002 also determines the max. allowable speed value for the selected motor, in order to ensure a minimum number of pulses per period of frequency produced. This value is 16 for maximum carrier frequency (max. C002 value) greater than 5kHz and 10 for lower maximum carrier frequency (see Table 73 and Table 77). PROGRAMMING INSTRUCTIONS iDrive C003 Pulse Number C003 Range Default Level Address Control Function 0-5 0: [12] 1: [24] 2: [48] 3: [96] 4: [192] 5: [384] 1 1: [24] ENGINEERING 1003 IFD and VTC This parameter has effect only if C001≠C002. It represents the min. value of pulses per period obtained when modulation frequency changes (synchronous modulation). C004 Silent Modulation C004 Range Default Level Address Function 0-1 0: [No]; 1: [Yes] See Table 73 and Table 77 ENGINEERING 1004 This parameter enables silent modulation. The electric noise due to the switching frequency is dampened. 269/482 PROGRAMMING INSTRUCTIONS iDrive 32. MOTOR CONTROL MENU 32.1. Overview The IDrive allows configuring three different types of motors and three different types of control algorithms at the same time. The three types of control algorithms are identified with the acronyms 9 IFD (Voltage/Frequency Control); 9 VTC (Vector Torque Control); 9 FOC (Field Oriented Control). The Voltage/Frequency control allows controlling the motor by producing voltage depending on frequency. The Vector Torque Control (sensorless) processes the machine equations depending on the equivalent parameters of the asynchronous machine. It also allows separating torque control from flux control with no need to use a transducer. The Field Oriented Control is a closed-chain control requiring a speed transducer to detect the position of the motor shaft instant by instant. The parameter set for the selected motor is included in the Motor Control menu: 9 Motor Control 1 Menu concerns motor 1; 9 Motor Control 2 Menu concerns motor 2; 9 Motor Control 3 Menu concerns motor 3. Factory setting allows configuring only one motor. To access the Configuration menus of the other connected motors, simply enter the number of the selected motor in C009 (Number of Configured Motors) in the Motor Control 1 Menu. To select the connected motor, use digital inputs programmed with parameters C173 and C174, Digital Input for Motor 2 Activation and Digital Input for Motor 3 Activation respectively (see also the DIGITAL INPUTS MENU). The parameters included in the Motor Control Menus are detailed in the table below. 270/482 PROGRAMMING INSTRUCTIONS iDrive Table 65: Description of the parameters classified by motor. Parameter Contents Mains rated voltage Control algorithm being used Type of reference being used (speed/torque) Availability of the speed feedback from encoder Electric ratings of the motor Max. speed and min. speed required, speed at the beginning of flux weakening, max. speed alarm threshold and enabling V/f pattern parameters Slip compensation activation Drop in rated current voltage Fluxing ramp time Motor Control 1 C008 C010 Motor Control 2 ⎯⎯⎯⎯⎯⎯⎯ C053 Motor Control 3 ⎯⎯⎯⎯⎯⎯⎯ C096 C011 C054 C097 C012 C055 C098 C015 ÷ C025 C058 ÷ C068 C101 ÷ C111 C028 ÷ C031 C071 ÷ C074 C114 ÷ C117 C013/C032 ÷ C038 C039 C040 C041 C056/C075 ÷ C081 C082 C083 C084 C099/C118 ÷ C124 C125 C126 C127 The parameters that can be modified depend on the type of control that has been selected. 32.1.1. E LECTRICAL S PECIFICATIONS M OTOR OF THE C ONNECTED This group of parameters can be divided into two subunits: the first subunit includes the motor ratings, the second subunit includes the parameters of the equivalent circuit of the asynchronous machine being used. 32.1.2. M OTOR R ATINGS Table 66: Motor ratings. Motor Ratings Rated frequency Rated rpm Rated power Rated current Rated voltage No-load power No-load current Motor 1 Motor 2 Motor 3 C015 C058 C101 C016 C017 C018 C019 C020 C059 C060 C061 C062 C063 C102 C103 C104 C105 C106 C021 C064 C107 271/482 PROGRAMMING INSTRUCTIONS iDrive 32.1.3. P ARAMETERS OF THE E QUIVALENT C IRCUIT A SYNCHRONOUS M ACHINE OF THE Table 67: Parameters of the equivalent circuit of the asynchronous machine. Description Stator resistance Leakage inductance Mutual inductance Rotor time constant Motor 1 C022 C023 C024 C025 Motor 2 C065 C066 C067 C068 Motor 3 C108 C109 C110 C111 Figure 41: Equivalent circuit of the asynchronous machine. is Rs l2 l1 Vs RR M S Where: Rs: Stator resistance (wires included) Rr: Rotor resistance Full leakage inductance l1+l2: M: Mutual inductance (not required for control implementation) S: Slip τ rot. ≅ M / Rr rotor time constant. Because the motor characteristics are generally unknown, the IDrive is capable of automatically determining the motor characteristics (see the FIRST STARTUP section and the AUTOTUNE MENU). However, some parameters may be manually adjusted to meet the requirements needed for special applications. The parameters used for the different control algorithms are stated in the table below. Table 68: Motor parameters used by control algorithms. NOTE 272/482 Parameter IFD VTC FOC Stator resistance ν ν ν Leakage inductance ⎯ ν ⎯ Mutual inductance ⎯ ⎯ ν ⎯ ⎯ Rotor time constant ν Used ; ⎯ Not used ν Because the value of the stator resistance is used for any type of control, always perform the autotune procedure with I073= Motor Tune and I074= 0: All no rotation. PROGRAMMING INSTRUCTIONS 32.1.4. iDrive V/ F P ATTERN (IFD O NLY ) This group of parameters which is included in the Motor Control Menu defines the V/f pattern trend of the drive when it is used as an IFD control algorithm. When setting the type of V/f pattern (e.g. C013 for motor 1), the following curves can be used: • Constant torque • Quadratic • Free setting The diagram below illustrates three types of programmable curves compared to the theoretical V/f curve. If C013 = Constant Torque, Preboost parameter C034 allows changing the starting voltage value if compared to the theoretical V/f curve (this allows torque compensation for losses caused by the stator impedance and a greater torque at lower revs). If C013 = Quadratic, the drive will follow a V/f pattern with a parabolic trend. You can set the starting voltage value (C034), the desired voltage drop if compared to the relevant constant torque (use C032) and the frequency allowing implementing this torque reduction (use C033). If C013 = Free Setting, you can program the starting voltage (C034 Preboost), the increase in voltage to 1/20 of the rated frequency (C035 Boost0), and the increase in voltage (C036 Boost1) to the programmable frequency (C037 Frequency for Boost1). Figure 42: Types of programmable V/f curves. The voltage produced by the drive may be changed also by setting the Automatic increase in torque curve parameter (C038 for motor 1). For the description of the parameters used in the figure above, see the table below. 273/482 PROGRAMMING INSTRUCTIONS iDrive Table 69: IFD control parameters for the connected motors. Parameter Rated frequency: Rated frequency of the connected motor (current rating). Rated voltage: rated voltage of the connected motor (voltage rating). V/f curve type: Type of V/f curve applied. Torque reduction with quadratic curve: Torque reduction using V/f quadratic curve. Rated speed referring to torque reduction with quadratic curve: Speed actuating the torque reduction using a quadratic curve. Voltage preboost: Determines the voltage produced by the drive at min. output frequency fomin. Voltage boost 0 of torque curve: Determines the variation of the output rated voltage at fmot/20; Boost >0 increases the starting torque. Voltage boost 1 of torque curve: Determines the voltage variation with respect to rated voltage at preset frequency. Frequency for the application of Boost 1: Determines the frequency for the application of the boost at preset frequency. Torque curve automatic increase: Variable torque compensation expressed as a percentage of the rated motor voltage. The preset value expresses the voltage increase when the motor is running at rated torque. 32.1.5. Motor 1 Motor 2 Motor 3 C015 C058 C101 C019 C062 C105 C013 C056 C099 C032 C075 C118 C033 C076 C119 C034 C077 C120 C035 C078 C121 C036 C079 C122 C037 C080 C123 C038 C081 C124 E XAMPLE 1 - V/ F P ATTERN P ARAMETERIZATION Motor 1: the voltage/frequency pattern is to be programmed for an asynchronous motor (400V/50Hz) with a rated speed of 1500rpm up to 2000rpm. Type of V/f curve Rated frequency Rated voltage Preboost C013 C015 C019 C034 = = = = Max. speed C115 = 274/482 Constant Torque 50 Hz 400 V depending on the starting torque 2000rpm PROGRAMMING INSTRUCTIONS 32.1.6. iDrive E XAMPLE 2 - V/ F P ATTERN P ARAMETERIZATION The voltage/frequency pattern is to be programmed for an asynchronous motor (400V/50Hz) having a rated power of 7.5 kW and a rated speed of 1420 rpm with a voltage compensation depending on the motor torque. Voltage compensation (AutoBoost) is calculated as follows: Type of V/f curve Rated frequency Motor rpm Rated power Rated voltage Preboost C013 C015 C016 C017 C019 C034 = = = = = = Autoboost C038 = Constant Torque 50 Hz 1420rpm 7.5kW 400 V depending on the starting torque 4% Voltage compensation (AutoBoost) results from the formula below: ΔV = C019 x (C038/100) x (T/Tn) Where T is the estimated motor torque and Tn is the rated motor torque. Tn is calculated as follows: Tn = (Pn x pole pairs/2πf = (C017 x pole pairs)/(2π x C015) “Pole pairs” is the integer number obtained by rounding down (60* C015/C016). The programmable parameters relating to the AutoBoost functions are the following: C038 (AutoBoost): variable torque compensation expressed as a percentage of the motor rated voltage (C019). The value set in C038 is the voltage increase when the motor is running at its rated torque. C017 (Pn): rated power of the connected motor. 32.1.7. S LIP C OMPENSATION (IFD O NLY ) This function allows compensating the speed decrease of the asynchronous motor when the mechanical load increases (slip compensation). This is available for IFD control only. The parameters relating to this function are included in the Motor Control Menu (Configuration Menu). Table 70: Parameters setting Slip Compensation (IFD Control). Parameter Rated voltage: Rated voltage of the connected motor (voltage rating). No-load power: Power absorbed by the motor when no load is connected to the motor; it is expressed as a percentage of the motor rated power. Stator resistance: Determines the resistance of the stator phases used to compute the power consumption due to Joule effect. Activation of slip compensation: If other than zero, this parameter enables slip compensation and defines its relevant value. Motor 1 Motor 2 Motor 3 C019 C062 C105 C020 C063 C106 C022 C065 C108 C039 C082 C125 Once the drive output power has been estimated and the power losses due to the Joule effect and to the mechanical parts (depending on output voltage and no-load power) have been subtracted, mechanical power is obtained. Starting from mechanical power and the value set for slip compensation (C039 for motor 1), you can obtain the increase of the output frequency limiting the error between the desired speed value and the actual speed value of the connected motor. 275/482 PROGRAMMING INSTRUCTIONS iDrive 32.1.8. T ORQUE C ONTROL (VTC AND FOC O NLY ) VTC and FOC controls allow controlling the drive with a torque reference instead of a speed reference. To do so, set [1: Torque or 2: Torque with Speed Limit [FOC only] in the relevant parameter (C011 for motor 1, C054 for motor 2, C097 for motor 3). In this way, the main reference corresponds to the motor torque demand and may range from C047 to C048 (Limits Menu) for motor 1 (minimum and maximum torque expressed as a percentage of the motor rated torque). For motors 2 and 3, the parameters relating to min. and max. torque (C090, C091 and C133, C134) are included in the Limits Menu 2 and Limits Menu 3. Using a 0020 drive connected to a 15kW motor, C048 is factory-set to 120% of the motor rated torque. If the max. reference is applied (C143 = REF), the torque reference will be 120%. If a 7.5kW motor is connected, C048 may exceed 200%; torque values exceeding 200% may be obtained based on the value set in C048. The motor rated torque results from the following formula: C=P/ω where P is the rated power expressed in W and ω is the rated speed of rotation expressed in radiants/sec. Example: the rated torque of a 15kW motor at 1420rpm is equal to: 15000 C = –––––––––––– = 100.9 Nm 1420⋅2π/60 The starting torque is: rated torque * 120% = 121.1 Nm 276/482 PROGRAMMING INSTRUCTIONS 32.2. iDrive List of Parameters C008 to C128 Table 71: List of parameters C008 to C128. Parameter C008 C009 Parameter C010 C053 C096 C011 C054 C097 C012 C055 C098 C013 C056 C099 C014 C057 C100 C015 C058 C101 C016 C059 C102 C017 C060 C103 C018 C061 C104 C019 C062 C105 C020 C063 C106 C021 C064 C107 C022 C065 C108 C023 C066 C109 M1 M2 M3 M1 M2 M3 M1 M2 M3 M1 M2 M3 M1 M2 M3 M1 M2 M3 M1 M2 M3 M1 M2 M3 M1 M2 M3 M1 M2 M3 M1 M2 M3 M1 M2 M3 M1 M2 M3 M1 M2 M3 FUNCTION Rated mains voltage N. of configured motors FUNCTION Type of control algorithm Type of reference User Level BASIC ENGINEERING User Level BASIC ADVANCED Speed feedback from encoder BASIC Type of V/f curve BASIC Phase rotation ENGINEERING Rated motor frequency BASIC Rated motor rpm BASIC Rated motor power BASIC Rated motor current BASIC Rated motor voltage BASIC Motor no-load power ADVANCED Motor no-load current ADVANCED Motor stator resistance ENGINEERING Leakage inductance ENGINEERING MODBUS Address 1008 1009 DEFAULT VALUES 2:[380÷480V] 1 MODBUS Address 1010 1053 1096 1011 1054 1097 1012 1055 1098 1013 1056 1099 1014 1057 1100 1015 1058 1101 1016 1059 1102 1017 1060 1103 1018 1061 1104 1019 1062 1105 1020 1063 1106 1021 1064 1107 1022 1065 1108 1023 1066 1109 DEFAULT VALUES 0: IFD 0: Speed (MASTER mode) 0: No See Table 75 and Table 79 0: No 50.0 Hz 1420 rpm See Table 76 and Table 80 See Table 76 and Table 80 Depending on the drive voltage class 0.0% 0% See Table 76 and Table 80 See Table 76 and Table 80 277/482 PROGRAMMING INSTRUCTIONS iDrive C024 C067 C110 C025 C068 C111 C026 C069 C112 C028 C071 C114 C029 C072 C115 C030 C073 C116 C031 C074 C117 C032 C075 C118 C033 C076 C119 C034 C077 C120 C034a C077a C120a C034b C077b C120b C035 C078 C121 C036 C079 C122 C037 C080 C123 C038 C081 C124 C039 C082 C125 C040 C083 C126 M1 M2 M3 M1 M2 M3 M1 M2 M3 M1 M2 M3 M1 M2 M3 M1 M2 M3 M1 M2 M3 M1 M2 M3 M1 M2 M3 M1 M2 M3 M1 M2 M3 M1 M2 M3 M1 M2 M3 M1 M2 M3 M1 M2 M3 M1 M2 M3 M1 M2 M3 M1 M2 M3 278/482 Mutual inductance ADVANCED Rotor time constant ADVANCED Time constant of bus voltage low-pass filter ENGINEERING Min. motor speed BASIC Max. motor speed BASIC Flux weakening speed ENGINEERING Max. speed alarm ADVANCED Reduction in quadratic torque curve ADVANCED Rated revs referring to reduction in quadratic torque curve ADVANCED Voltage Preboost for IFD BASIC VTC Boost for positive reference ENGINEERING VTC Boost for negative reference ENGINEERING Voltage Boost at 5% of the motor rated frequency ADVANCED Voltage Boost at programmable frequency ADVANCED Frequency for application of voltage Boost at programmable frequency ADVANCED Autoboost ADVANCED Slip compensation ADVANCED Voltage drop at rated current ADVANCED 1024 1067 1110 1025 1068 1111 1026 1069 1112 1028 1071 1114 1029 1072 1115 1030 1073 1116 1031 1074 1117 1032 1075 1118 1033 1076 1119 1034 1077 1120 1204 1206 1208 1205 1207 1209 1035 1078 1121 1036 1079 1122 1037 1080 1123 1038 1081 1124 1039 1082 1125 1040 1083 1126 250.00mH 0 ms 0 ms 0 rpm 1500 rpm 90% 0: Disabled 30% 20% See Table 75 and Table 79 0% 0% See Table 75 and Table 79 See Table 75 and Table 79 See Table 75 and Table 79 See Table 75 and Table 79 0: Disabled 0: Disabled PROGRAMMING INSTRUCTIONS C041 C084 C127 C042 C085 C128 iDrive M1 M2 Fluxing ramp time M3 M1 M2 Vout saturation percentage M3 1041 1084 1127 1042 1085 1128 ENGINEERING ENGINEERING See Table 74 and Table 78 100% C008 Rated Mains Voltage C008 Range Default Level Address Function 0: [ 200 ÷ 240 ] V 1: 2T Regen. 2: [ 380 ÷ 480 ] V 3: [ 481 ÷ 500 ] V 4: 4T Regen. 5: [ 500 ÷ 600 ] V 6: 5T Regen. 7: [ 600 ÷ 690 ] V 8: 6T Regen. 0÷8 2: [ 380 ÷ 480 ] V 2 BASIC 1008 This parameter defines the rated voltage of the mains powering the drive, thus allowing obtaining voltage ranges to be used for the drive operation. The value set in this parameter depends on the Drive voltage class. To supply the drive via a non-stabilized DC source, the corresponding AC voltage range must be used (see Table 72). DO NOT USE xT Regen settings in this case. Table 72: Equivalence between AC mains range and DC range. AC Mains 200÷240 Vac 380÷480 Vac 481÷500 Vac 500÷600 Vac 600÷690 Vac NOTE DC range 280÷338 Vdc 530÷678 Vdc 680÷705 Vdc 705÷810 Vdc 810÷970 Vdc Select xT Regen (where x relates to the voltage class of the drive) if the drive is DCsupplied through a regenerative IDrive or a different drive used to stabilize the DC bus to a higher level than the stabilization level obtained when rectifying the 3phase mains. C009 N. of Configured Motors C009 Range Default Level Address Function 1÷3 1÷3 1 1 ENGINEERING 1009 This parameter determines the number of motors to be configured. The active motor is selected through digital inputs programmed with C173 and C174 (see the DIGITAL INPUTS MENU). The programming parameters of the Motor Control 2 Menu can be accessed only if C009 = 2 or 3; the programming parameters of the Motor Control 3 Menu can be accessed only if C009 =3. 279/482 PROGRAMMING INSTRUCTIONS iDrive C010 (C053,C096) Type of Control Algorithm C010 (Motor 1) C053 (Motor 2) C096 (Motor 3) 0÷2 Default Level 0 0: IFD BASIC 1010 1053 1096 This parameter sets the type of control algorithm to be used. Type of controls: 0: IFD V/f control 1: VTC Sensorless Vector Torque control 2: FOC Field Oriented Control V/f control allows controlling the motor by producing voltage depending on frequency. It is possible to configure several types of V/f patterns (see V/f Pattern (IFD Only)). Sensorless vector control processes the machine equations depending on the equivalent parameters of the asynchronous machine, such as stator resistance and leakage inductance (C022, C023 for motor 1; C065, C066 for motor 2; C108, C109 for motor 3 respectively) and allows separating torque control from flux control with no need to use a transducer. The drive can be then controlled with a torque reference instead of a speed reference. Field oriented control is a closed-loop control requiring a speed transducer to detect the position of the motor shaft instant by instant. The machine equations depend on the following: magnetizing current, obtained from no-load current C021 (C064 for motor 2 and C107 for motor 3); mutual inductance C024 (C067 for motor 2 and C110 for motor 3); rotor time constant C025 (C068 for motor 2 and C111 for motor 3). The machine equations allow separating torque control from flux; the drive can be controlled with a torque reference instead of a speed reference. Address Function NOTE 280/482 0: IFD 1: VTC 2: FOC Range FOC control requires a speed transducer, such as an encoder feedback. PROGRAMMING INSTRUCTIONS iDrive C011 (C054,C097) Type of Reference (Master/Slave) C011 (Motor 1) C054 (Motor 2) C097 (Motor 3) Range Default Level Address Control Function 0: Speed (MASTER mode) 1: Torque (SLAVE mode) 2: Torque with speed limit (SLAVE mode) (FOC only) 0÷2 0 0: Speed (MASTER mode) ADVANCED 1011, 1054, 1097 VTC and FOC This parameter defines the type of reference to be used. The torque control may be set up (see section Torque Control (VTC and FOC Only) as well). When the Torque control with speed limit mode is used, the drive will limit the motor rotation to the rpm set in parameter C029 (C072, C115). This function can be used to automatically toggle from the torque control mode to the speed control mode: when the torque control mode is implemented, the motor speed can reach any value included in the “AB” area (see figure below). If the limit speed is attained due to particular load conditions, the drive will automatically switch to the speed control (“BC” zone). The controlled torque is no longer maintained. If the torque returns to its setpoint value, the drive will automatically switch to the torque control again (“AB” zone). TORQUE TORQUE CONTROL ZONE A B SPEED CONTROL ZONE AB = Torque Set Point BC = Speed Limit C P000665-b SPEED Figure 43: Torque control with speed limit. NOTE Mode 2 can be selected only if a FOC control is implemented. 281/482 PROGRAMMING INSTRUCTIONS iDrive C012 (C055,C098) Speed Feedback from Encoder C012 (Motor 1) C055 (Motor 2) C098 (Motor 3) Range Default Level Address Control Function 0÷1 0: No 1: Yes 0÷1 0 BASIC 1012, 1055, 1098 VTC and FOC This parameter enables the encoder as a speed feedback. It defines the encoder characteristics and whether Encoder A (MDI6 and MDI7 in the terminal board) or Encoder B (with option board) is used as a speed feedback (see the ENCODER/FREQUENCY INPUTS MENU). C013 (C056, C099) Type of V/F Pattern C013 (Motor 1) C056 (Motor 2) C099 (Motor 3) Range Default Level Address Control 0÷2 0: Constant Torque 1: Quadratic 2: Free Setting See Table 75 and Table 79 BASIC 1013, 1056, 1099 IFD Allows selecting different types of V/f pattern. If C013 (C056,C099) = Constant torque, voltage at zero frequency can be selected (Preboost C034 (C077,C120)). Function If C013 (C056,C099) = Quadratic, you can select voltage at zero frequency (preboost, C034 (C077,C120)), max. voltage drop with respect to the theoretical V/f pattern, C032 (C075 C118), and the frequency allowing implementing max. voltage drop, C033 (C076 C119). If C013 (C056,C099) = Free Setting, you can set voltage at zero frequency (preboost, C034(C077,C120)); voltage increase to 20% of the rated frequency (Boost0, C035 (C078,C121)); and voltage increase to a programmed frequency (Boost1, C036 (C079,C122); frequency for Boost1, C037 (C080,C123)). C014 (C057, C100) Phase Rotation C014 (Motor 1) C057 (Motor 2) C100 (Motor 3) Range Default Level Address Function DANGER!!! 282/482 0÷1 0: [No]; 1: [Yes] 0 0: [No] ENGINEERING 1014, 1057,1100 Allows reversing the mechanical rotation of the connected motor. When activating C014 (C057, C100), the mechanical rotation of the connected motor and its load is reversed accordingly. PROGRAMMING INSTRUCTIONS iDrive C015 (C058, C101) Rated Motor Frequency C015 (Motor 1) C058 (Motor 2) C101 (Motor 3) Range Default Level Address Control Function 10 ÷ 10000 1.0 Hz ÷ 1000.0 Hz See upper limits in Table 64 500 50.0 Hz BASIC 1015, 1058, 1101 All This parameter defines the rated motor frequency (nameplate rating). C016 (C059,C102) Rated Motor Rpm C016 (Motor 1) C059 (Motor 2) C102 (Motor 3) Range Default Level Address Function 1 ÷ 32000 1 ÷ 32000 rpm 1420 1420 rpm BASIC 1016 , 1059, 1102 This parameter defines the rated motor rpm (nameplate rating). C017 (C060,C103) Rated Motor Power C017 (Motor 1) C060 (Motor 2) C103 (Motor 3) Range 1 ÷ 32000 0.1 ÷ 3200.0 kW Upper limited to twice the default value Default Level Address Function See Table 76 and Table 80 BASIC 1017, 1060, 1103 This parameter defines the rated motor power (nameplate rating). C018 (C061,C104) Rated Motor Current C018 (Motor 1) C061 (Motor 2) C104 (Motor 3) Range 1 ÷ 32000 0.1 ÷ 3200.0 A See twice the upper values in Inom column in Table 73 and Table 77 Default Level Address Function See Table 76 and Table 80 BASIC 1018 , 1061, 1104 This parameter defines the rated motor current (nameplate rating). C019 (C062,C105) Rated Motor Voltage C019 (Motor 1) C062 (Motor 2) C105 (Motor 3) Range Default Level Address Function 50 ÷ 12000 5.0 ÷ 1200.0 V 2300 for class 2T drives 230.0V for class 2T drives 4000 for class 4T drives 400.0V for class 4T drives 5750 for class 5T drives 575.0V for class 5T drives 6900 for class 6T drives 690.0V for class 6T drives BASIC 1019 , 1062, 1105 This parameter defines the rated motor voltage (nameplate rating). 283/482 PROGRAMMING INSTRUCTIONS iDrive C020 (C063,C106) Motor No-Load Power C020 (Motor 1) C063 (Motor 2) C106 (Motor 3) Range Default Level Address Function 0 ÷ 1000 0.0 ÷ 100.0% 0 0.0% ADVANCED 1020 , 1063, 1106 This parameter defines the power absorbed by the motor at rated voltage and rated rpm when no load is connected to the motor. C021 (C064,C107) Motor No-Load Current C021 (Motor 1) C064 (Motor 2) C107 (Motor 3) Range Default Level Address Function 1 ÷ 100 1 ÷ 100% 0 0% BASIC 1021, 1064, 1107 This parameter defines the current absorbed by the motor at rated voltage and rated rpm when no load is connected to the motor. It is expressed as a percentage of the motor rated current C018 (C061, C104). For a proper tuning of the current loops required for FOC control, enter a value other than zero. If the stator resistance is tuned (I073 = [1: Motor Tune]); 1074 = (0: All no rotation)) and the no load current parameter is zero, a value for a first attempt is assigned to this parameter, depending on power and pole pairs of the connected motor. C022 (C065,C108) Motor Stator Resistance C022 (Motor 1) C065 (Motor 2) C108 (Motor 3) Range Default Level Address Function 0 ÷ 32000 0.000 ÷ 32.000Ω See Table 76 and Table 80 ADVANCED 1022, 1065, 1108 This parameter defines stator resistance Rs. If a star connection is used, it matches with the value of the resistance of one phase (half the resistance measured between two terminals); if a delta connection is used, it matches with 1/3 of the resistance of one phase. Autotune is always recommended. C023 (C066,C109) Motor Leakage Inductance C023 (Motor 1) C066 (Motor 2) C109 (Motor 3) Range Default Level Address Function 284/482 0 ÷ 32000 0.00 ÷ 320.00mH See Table 76 and Table 80 ADVANCED 1023, 1066, 1109 This parameter defines the global leakage inductance of the connected motor. If a star connection is used, it matches with the value of the inductance of one phase; if a delta connection is used, it matches with 1/3 of the inductance of one phase. Autotune is always recommended. PROGRAMMING INSTRUCTIONS NOTE iDrive With the Autotuning function, calculate the value of the leakage inductance (C023). From the resulting value, manually subtract the value in mH of the output inductance (if any). 285/482 PROGRAMMING INSTRUCTIONS iDrive C024 (C067,C110) Mutual Inductance C024 (Motor 1) C067 (Motor 2) C110 (Motor 3) Range Default Level Address Function NOTE 0 ÷ 65000 0.00 ÷ 650.00mH 25000 250.00mH ADVANCED 1024, 1067, 1110 This parameter defines the mutual inductance of the connected motor. The approximate value of the mutual inductance results from no-load current according to the formula below: M ≅ (Vmot – Rstat*Io) / (2πfmot* Io) Parameter C024 (mutual inductance) is automatically calculated based on the preset no-load current value (C021) whenever parameters I073 and I074 are set as follows: I073 = [1: Motor Tune] I074 = [0: All no rotation] whether current loop tuning is performed or not. C025 (C068,C111) Rotor Time Constant C025 (Motor 1) C068 (Motor 2) C111 (Motor 3) Range Default Level Address Control Function NOTE 0 ÷ 5000 0 ÷ 5000msec 0 ADVANCED 1025, 1068, 1111 FOC This parameter defines the rotor time constant of the connected motor. If the rotor time constant is not stated by the motor manufacturer, it can be obtained through the autotune function (see the FIRST STARTUP section and the AUTOTUNE MENU). Whenever one of these parameters is written, the drive automatically computes and saves the parameters of PI flux regulator and FOC control: proportional constant for motor 1 P158 (P165 for motor 2, P172 for motor 3) and integral time P159 (P166 for motor 2, P173 for motor 3). C026 (C069, C112) Time Constant of Bus Voltage Low-pass Filter C026 (Motor 1) C069 (Motor 2) C112 (Motor 3) Range Default Level Address Function 286/482 0 ÷ 32000 0.0 ÷ 3200.0 ms 0 0.0 ms ENGINEERING 1026, 1069, 1112 This parameter defines the time constant of the low-pass filter of the bus voltage readout. Changing this value can avoid motor oscillations, especially when no load is connected to the motor. PROGRAMMING INSTRUCTIONS iDrive C028 (C071,C114) Min. Motor Speed C028 (Motor 1) C071 (Motor 2) C114 (Motor 3) Range Default Level Address -32000 ÷ 32000 (*) -32000 ÷ 32000 rpm (*) 0 0 rpm BASIC 1028, 1071, 1114 This parameter defines the minimum speed of the connected motor. When references forming the global reference are at their min. relative value, the global reference equals the min. speed of the connected motor. Example: CONTROL METHOD MENU C143 →[1: REF] Selection of reference 1 source C144 →[2: AIN1] Selection of reference 2 source C145 →[0: Disable] Selection of reference 3 source C146 →[0: Disable] Selection of reference 4 source Function INPUTS FOR REFERENCES MENU P050 →[0: ± 10V] Type of reference for REF input P051 →[ – 10V] Value of the min. reference for REF input P052 →[ +10V] Value of the max. reference for REF input P055 →[0: ± 10V] Type of reference for AIN1 input P056 →[ – 5 V] Value of min. reference for AIN1 input P057 →[ +5 V] Value of max. reference for AIN1 input The speed reference is the min. speed set in C028 (motor 1) when both REF input and AIN1 input values are lower than or equal to the minimum values set in P051 and P056 respectively. (*) NOTE The maximum allowable value (as an absolute value) for C028 and C029 (min. and max. motor speed) also depends on the preset max. carrier frequency (see Table 63). It can be max. 4 times the rated speed of the connected motor. NOTE The value set as the min. speed is used as the saturation of the global reference; the speed reference will never be lower than the value set as min. speed. NOTE The min. speed is not respected only when the REV command or the CW/CCW command are sent after setting a value for max. speed exceeding the min. value (C029>C028 for motor 1) and with the max. reference to the drive. The motor rpm will be –C029 <C028. 287/482 PROGRAMMING INSTRUCTIONS iDrive C029 (C072,C115) Max. Motor Speed C029 (Motor 1) C072 (Motor 2) C115 (Motor 3) Range Default Level Address Function NOTE 0 ÷ 32000 (*see parameter C028) note in 0 ÷ 32000 rpm (*see note in parameter C028) 1500 1500 rpm BASIC 1029, 1072, 1115 This parameter defines the maximum speed of the connected motor. When references forming the global reference are at their max. relative value, the global reference equals the max. speed of the connected motor. If C011 (C054, C097) = 2: Torque with speed limit, this parameter is used to limit the motor rotation. In the CONTROL METHOD MENU, if an external speed/torque limit source (C147) is selected, the speed limit value set with this parameter is the upper limit, that can be reduced by adjusting the external source. Also, the ramp times set in the RAMPS MENU (P009–P025) are applied to this limit. C030 (C073,C116) Flux Weakening Speed C030 (Motor 1) C073 (Motor 2) C116 (Motor 3) Range Default Level Address Control Function 0 ÷ 200 0% ÷ 200% 90 90% ENGINEERING 1030, 1073, 1116 FOC This parameter defines the speed value determining the motor flux weakening. It is expressed as a percentage of the motor rated speed: C016 (C059,C102) C031 (C074,C117) Max. Speed Alarm C031 (Motor 1) C074 (Motor 2) C117 (Motor 3) Range Default Level Address Function 288/482 0 ÷ 32000 0: (Disabled) ÷ 32000 rpm 0 0: Disabled ADVANCED 1031, 1074, 1117 If it is not set to zero, this parameter determines the speed value to be entered for the maximum speed alarm (A076). PROGRAMMING INSTRUCTIONS iDrive C032 (C075, C118) Reduction in Quadratic Torque Curve C032 (Motor 1) C075 (Motor 2) C118 (Motor 3) Range Default Level Address Control Function 0 ÷ 1000 0 ÷ 100.0% 300 30.0% ADVANCED 1032, 1075, 1118 IFD If the V/f curve pattern C013 (C056, C099) = Quadratic, this parameter defines the maximum voltage reduction in terms of theoretical V/f pattern, which is implemented at the frequency programmed in C033 (C076, C119). C033 (C076, C119) Rated Revs Referring to Reduction in Quadratic Torque Curve C033 (Motor 1) C076 (Motor 2) C119 (Motor 3) Range Default Level Address Control Function 1 ÷ 100 1 ÷ 100% 20 20% ADVANCED 1033, 1076, 1119 IFD If the V/f curve pattern C013 (C056, C099) = Quadratic, this parameter defines the frequency implementing the max. torque reduction in terms of theoretical V/f pattern set in C032 (C075, C120). C034 (C077,C120) Voltage Preboost C034 (Motor 1) C077 (Motor 2) C120 (Motor 3) Range Default Level Address Control Function 0 ÷ 50 0.0 ÷ 5.0 % See Table 75 and Table 79 BASIC 1034, 1077, 1120 IFD Torque compensation at minimum frequency produced by the drive. IFD control: determines the increase of the output voltage at 0Hz. C034a (C077a, C120a) VTC Torque Reference for Positive Reference C034a (mot. n.1) C077a (mot. n.2) C120a (mot. n.3) Range Default Level Address Control Function –500 ÷ 500 –50.0 ÷ 50.0 % 0% ENGINEERING 1204, 1206, 1208 VTC VTC control: determines the increase of the torque at low rpm with a positive speed/torque reference. 289/482 PROGRAMMING INSTRUCTIONS iDrive C034b (C077b, C120b) VTC Torque Boost for Negative Reference C034b (mot. n.1) C077b (mot. n.2) C120b (mot. n.3) Range Default Level Address Control Function –500 ÷ 500 –50.0 ÷ 50.0 % 0% ENGINEERING 1205, 1207, 1209 VTC VTC control: determines the increase of the torque at low rpm with a negative speed/torque reference. C035 (C078,C121) Torque Curve Increment Boost 0 C035 (Motor 1) C078 (Motor 2) C121 (Motor 3) Range Default Level Address Control Function –100 ÷ +100 –100 ÷ +100 % See Table 75 and Table 79 ADVANCED 1035, 1078, 1121 IFD Torque compensation at low rpm. Determines how output voltage varies at 5% of the motor rated frequency with respect to the voltage obtained with a constant V/f pattern (constant voltage frequency). C036 (C079,C122) Torque Curve Increment Boost 1 C036 (Motor 1) C079 (Motor 2) C122 (Motor 3) Range Default Level Address Control Function –100 ÷ +400 –100 ÷ +400 % See Table 75 and Table 79 ADVANCED 1036, 1079, 1122 IFD Torque compensation at preset frequency (parameter C037 for motor 1, C080 for motor 2 and C123 for motor 3). Determines how output voltage varies at preset frequency with respect to voltage obtained with a constant V/f pattern (constant voltage frequency). C037 (C080,C123) RPM Relating to C36 (C079,C122) (Frequency for Application of Boost 1) C037 (Motor 1) C080 (Motor 2) C123 (Motor 3) Range Default Level Address Control Function 290/482 6 ÷ 99 6 ÷ 99 % See Table 75 and Table 79 ADVANCED 1037,1080,1123 IFD Frequency for application of voltage Boost with parameter C036 for motor 1, parameter C079 for motor 2 and parameter C122 for motor 3. This is expressed as a percentage of the motor rated frequency. PROGRAMMING INSTRUCTIONS iDrive C038 (C081,C124) Torque Curve Automatic Increment C038 (Motor 1) C081 (Motor 2) C124 (Motor 3) Range Default Level Address Control Function 0 ÷ 10 0 ÷ 10 % See Table 75 and Table 79 ADVANCED 1038, 1081, 1124 IFD Variable torque compensation expressed as a percentage of the motor rated voltage. The preset value expresses the voltage increase when the motor is running at its rated torque. C039 (C082,C125) Slip Compensation C039 (Motor 1) C082 (Motor 2) C125 (Motor 3) Range Default Level Address Control Function 0 ÷ 200 [0: Disabled] ÷ 200 % 0 [0: Disabled] ADVANCED 1039, 1082, 1125 IFD This parameter represents the motor rated slip expressed as a value percent. If set to 0, this function is disabled. C040 (C083, C126) Voltage Drop at Rated Current C040 (Motor 1) C083 (Motor 2) C126 (Motor 3) Range Default Level Address Control Function 0÷500 0÷50.0% 0 0:Disabled ADVANCED 1040, 1083, 1126 IFD Defines the increase in voltage (in terms of the corresponding produced frequency) when the current produced by the motor is greater than or equal to the rated current. For example: C040 = 10% Voltage drop at rated current C013 = Constant Torque Type of V/f pattern C015 = 50 Hz Rated frequency C019= 380 V Rated voltage If the drive output frequency is 25 Hz, it must deliver 190V. When the output current is equal to the rated current of the motor (C018), the voltage actually produced is Vout = 190 * (1+ C040/100) = 209V. C041 (C084,C127) Fluxing Ramp Time C041 (Motor 1) C084 (Motor 2) C127 (Motor 3) Range Default Level Address Control Function 40 ÷ 4000 40 ÷ 4000 msec See Table 74 and Table 78 ENGINEERING 1041, 1084, 1127 VTC and FOC This parameter indicates the time spent for motor fluxing. 291/482 PROGRAMMING INSTRUCTIONS iDrive C042 (C085, C0128) Vout Saturation Percentage C042 (Motor 1) C085 (Motor 2) C128 (Motor 3) Range Default Level Address Function 292/482 10 ÷ 120 10 ÷ 120 % 100 100% ENGINEERING 1042, 1085, 1128 This parameter sets the bus voltage value percent used to generate the output voltage of the drive. Changes made to this parameter affect the motor performance in terms of flux weakening. PROGRAMMING INSTRUCTIONS iDrive 32.3. Tables Including the Parameters Depending on the Drive Size 32.3.1. V OLTAGE C LASS 2T/4T Table 73: Parameters depending on the Drive Size and Model / Class 2T/4T / 1. SIZE S05 S05/S12 S12 S15 S20 S30 S41 MODEL 0005 0007 0008 0009 0010 0011 0013 0014 0015 0016 0020 0017 0023 0025 0030 0033 0034 0036 0037 0040 0049 0060 0067 0074 0086 0113 0129 0150 0162 0180 0202 0217 0260 DRIVE INOM [A] 10.5 12.5 15 16.5 17 16.5 19 16.5 23 27 30 30 38 41 41 51 57 60 65 72 80 88 103 120 135 180 195 215 240 300 345 375 425 DRIVE IMAX [A] 11.5 13.5 16 17.5 19 21 21 25 25 30 36 32 42 48 56 56 63 72 72 80 96 112 118 144 155 200 215 270 290 340 420 460 560 DRIVE IPEAK [A] 14 16 19 19 23 25 25 30 30 36 43 37 51 58 67 68 76 86 83 88 115 134 142 173 186 240 258 324 324 408 504 552 672 DEF CARRIER [kHz] C001 C002 5 5 5 5 5 5 5 5 5 3/5 3/5 3 3 3 3 3 3 3 3 3 3 3 3 3 3 2 2 2 2 2 2 2 2 MAX CARRIER [kHz] C001 C002 16 16 10 16 10 16 10 16 10 10 10 10 10 7 7 10 10 10 10 16 12.8 10 10 10 10 10 10 5 5 5 5 5 5 DEF Silent Modulation C004 YES YES YES YES YES YES YES YES YES YES YES YES YES YES YES YES YES YES YES YES YES YES YES YES YES YES YES YES YES NO NO NO NO 293/482 PROGRAMMING INSTRUCTIONS iDrive SIZE S51 S60 S65 S75 S90 2xS41 2xS51 3xS51 294/482 MODEL 0313 0367 0402 0457 0524 0598 0748 0831 0964 1130 1296 1800 2076 0523 0599 0749 0800 0832 0850 0965 1129 DRIVE INOM [A] 480 550 680 720 800 900 1000 1200 1480 1700 2100 2600 3000 765 900 1000 1100 1200 1340 1480 1650 DRIVE IMAX [A] 600 680 850 880 960 1100 1300 1440 1780 2040 2520 3100 3600 1000 1100 1300 1350 1440 1600 1780 2000 DRIVE IPEAK [A] 720 792 1020 1056 1152 1320 1560 1728 2136 2448 3024 3720 4000 1200 1320 1560 1620 1728 1920 2136 2400 DEF CARRIER [kHz] C001 C002 2 2 2 2 2 2 2 2 2 2 2 2 2 2 2 2 2 2 2 2 2 MAX CARRIER [kHz] C001 C002 5 5 5 4 4 4 4 4 4 4 4 4 4 5 5 5 5 5 5 5 5 DEF Silent Modulation C004 NO NO NO NO NO NO NO NO NO NO NO NO NO NO NO NO NO NO NO NO NO PROGRAMMING INSTRUCTIONS iDrive Table 74: Parameters depending on the Drive Size and Model - Class 2T/4T / 2. SIZE S05 S05/S12 S12 S15 S20 S30 S41 MODEL DEF TFLUX [ms] DEF ILIM DEC [%Inom] DEF DCB RAMP [ms] DEF Acc. Time [sec] DEF Dec. Time [sec] M1 M2 C041 C084 C045 C088 C222 C223 M3 C127 C131 C224 0005 0007 0008 0009 0010 0011 0013 0014 0015 0016 0020 0017 0023 0025 0030 0033 0034 0036 0037 0040 0049 0060 0067 0074 0086 0113 0129 0150 0162 0180 0202 0217 0260 300 300 300 300 300 300 300 300 300 300 300 300 300 300 300 300 300 300 300 300 300 300 300 300 300 300 300 300 300 450 450 450 450 150 150 150 150 150 150 150 150 150 150 150 150 150 150 150 150 150 150 150 150 150 150 150 150 150 150 150 150 150 100 100 100 100 50 50 50 50 50 50 50 50 50 50 50 50 50 50 50 50 70 70 70 70 80 80 100 100 150 150 150 200 200 250 250 250 250 P009 P012 P015 P018 10 10 10 10 10 10 10 10 10 10 10 10 10 10 10 10 10 10 10 10 10 10 10 10 10 10 10 10 10 100 100 100 100 P010 P013 P016 P019 10 10 10 10 10 10 10 10 10 10 10 10 10 10 10 10 10 10 10 10 10 10 10 10 10 10 10 10 10 100 100 100 100 S– Ramps Fire Mode Ramps DEF [sec] UNIT Acc. / Dec. DEF [sec] Dec. Ramp Ext. DEF P021 P032 P033 P014 P020 C210 On On On On On On On On On On On On On On On On On On On On On On On On On On On On On Off Off Off Off 10 10 10 10 10 10 10 10 10 10 10 10 10 10 10 10 10 10 10 10 10 10 10 10 10 10 10 10 10 100 100 100 100 0.1 0.1 0.1 0.1 0.1 0.1 0.1 0.1 0.1 0.1 0.1 0.1 0.1 0.1 0.1 0.1 0.1 0.1 0.1 0.1 0.1 0.1 0.1 0.1 0.1 0.1 0.1 0.1 0.1 1 1 1 1 0.2 0.2 0.2 0.2 0.2 0.2 0.2 0.2 0.2 0.2 0.2 0.2 0.2 0.2 0.2 0.2 0.2 0.2 0.2 0.2 0.2 0.2 0.2 0.2 0.2 0.2 0.2 0.2 0.2 2 2 2 2 295/482 PROGRAMMING INSTRUCTIONS iDrive SIZE S51 S60 S65 S75 S90 2xS41 2xS51 3xS51 296/482 MODEL DEF TFLUX [ms] DEF ILIM DEC [%Inom] DEF DCB RAMP [ms] M1 M2 C041 C084 C045 C088 C222 C223 M3 C127 C131 C224 0313 0367 0402 0457 0524 0598 0748 0831 0964 1130 1296 1800 2076 0523 0599 0749 0800 0832 0850 0965 1129 450 450 450 450 450 450 450 450 450 450 450 450 450 450 450 450 450 450 450 450 450 100 100 100 100 100 100 100 100 100 100 100 100 100 100 100 100 100 100 100 100 100 250 250 250 250 250 250 250 250 250 250 250 250 250 250 250 250 250 250 250 250 250 DEF Acc. Time DEF Dec. Time [sec] P009 P012 P015 P018 100 100 100 100 100 100 100 100 100 100 100 100 100 100 100 100 100 100 100 100 100 [sec] P010 P013 P016 P019 100 100 100 100 100 100 100 100 100 100 100 100 100 100 100 100 100 100 100 100 100 S– Ramps Fire Mode Ramps DEF [sec] UNIT Acc. / Dec. DEF [sec] Dec. Ramp Ext. DEF P021 P032 P033 P014 P020 C210 Off Off Off Off Off Off Off Off Off Off Off Off Off Off Off Off Off Off Off Off Off 100 100 100 100 100 100 100 100 100 100 100 100 100 100 100 100 100 100 100 100 100 1 1 1 1 1 1 1 1 1 1 1 1 1 1 1 1 1 1 1 1 1 2 2 2 2 2 2 2 2 2 2 2 2 2 2 2 2 2 2 2 2 2 PROGRAMMING INSTRUCTIONS iDrive Table 75: Parameters depending on the Drive Size and Model - Class 2T/4T / 3. SIZE S05 S05/S12 S12 S15 S20 S30 S41 MODEL DEF V/f Pattern DEF PREBOOST [%Vmot] M1 M2 M3 0005 0007 0008 0009 0010 0011 0013 0014 0015 0016 0020 0017 0023 0025 0030 0033 0034 0036 0037 0040 0049 0060 0067 0074 0086 0113 0129 0150 0162 0180 0202 0217 0260 C013 C056 C099 0:CONST 0:CONST 0:CONST 0:CONST 0:CONST 0:CONST 0:CONST 0:CONST 0:CONST 0:CONST 0:CONST 0:CONST 0:CONST 0:CONST 0:CONST 0:CONST 0:CONST 0:CONST 0:CONST 0:CONST 0:CONST 0:CONST 0:CONST 0:CONST 0:CONST 0:CONST 0:CONST 0:CONST 0:CONST 2:FREE 2:FREE 2:FREE 2:FREE C034 C077 C120 1.0 1.0 1.0 1.0 1.0 1.0 1.0 1.0 1.0 1.0 1.0 1.0 1.0 1.0 1.0 1.0 1.0 1.0 1.0 1.0 1.0 1.0 1.0 1.0 1.0 0.5 0.5 0.5 0.5 0.2 0.2 0.2 0.2 BOOST @ 5% fmot and BOOST DEF [%Vmot] C035/C036 C078/C079 C121/C122 0 0 0 0 0 0 0 0 0 0 0 0 0 0 0 0 0 0 0 0 0 0 0 0 0 0 0 0 0 –20 –20 –20 –20 Frequency for BOOST DEF [%fmot] DEF Auto BOOST [%Vmot] C037 C080 C123 50 50 50 50 50 50 50 50 50 50 50 50 50 50 50 50 50 50 50 50 50 50 50 50 50 50 50 50 50 20 20 20 20 C038 C081 C124 1 1 1 1 1 1 1 1 1 1 1 1 1 1 1 1 1 1 1 1 1 1 1 1 1 1 1 1 1 0 0 0 0 297/482 PROGRAMMING INSTRUCTIONS iDrive SIZE S51 S60 S65 S75 S90 2xS41 2xS51 3xS51 298/482 MODEL DEF V/f Pattern DEF PREBOOST [%Vmot] M1 M2 M3 0313 0367 0402 0457 0524 0598 0748 0831 0964 1130 1296 1800 2076 0523 0599 0749 0800 0832 0850 0965 1129 C013 C056 C099 2:FREE 2:FREE 2:FREE 2:FREE 2:FREE 2:FREE 2:FREE 2:FREE 2:FREE 2:FREE 2:FREE 2:FREE 2:FREE 2:FREE 2:FREE 2:FREE 2:FREE 2:FREE 2:FREE 2:FREE 2:FREE C034 C077 C120 0.2 0.2 0.2 0.2 0.2 0.2 0.2 0.2 0.2 0.2 0.2 0.2 0.2 0.2 0.2 0.2 0.2 0.2 0.2 0.2 0.2 BOOST @ 5% fmot and BOOST DEF [%Vmot] C035/C036 C078/C079 C121/C122 –20 –20 –20 –20 –20 –20 –20 –20 –20 –20 –20 –20 –20 –20 –20 –20 –20 –20 –20 –20 –20 Frequency for BOOST DEF [%fmot] DEF Auto BOOST [%Vmot] C037 C080 C123 20 20 20 20 20 20 20 20 20 20 20 20 20 20 20 20 20 20 20 20 20 C038 C081 C124 0 0 0 0 0 0 0 0 0 0 0 0 0 0 0 0 0 0 0 0 0 PROGRAMMING INSTRUCTIONS iDrive Table 76: Parameters depending on the Drive Size and Model - Class 2T/4T /4. 2T SIZE S05 S05/S12 S12 S15 S20 S30 S41 MODEL M1 M2 M3 0005 0007 0008 0009 0010 0011 0013 0014 0015 0016 0020 0017 0023 0025 0030 0033 0034 0036 0037 0040 0049 0060 0067 0074 0086 0113 0129 0150 0162 0180 0202 0217 0260 DEF Pmot [kW] C017 C060 C103 --1.8 2.2 --3 --3.7 --4 4.5 5.5 --7.5 ----11 ----15 15 18.5 22 25 30 32 45 50 55 65 75 80 110 110 DEF Imot [A] C018 C061 C104 --7.3 8.5 --11.2 --13.2 --16.6 15.7 19.5 --25.7 ----36 ----50 50 61 71 80 96 103 135 150 170 195 231 250 332 332 4T DEF Rstat [Ω] C022 C065 C108 --1.155 1.000 --0.800 --0.650 --0.600 0.462 0.346 --0.300 ----0.200 ----0.100 0.115 0.087 0.069 0.058 0.046 0.035 0.023 0.023 0.017 0.012 0.010 0.010 0.009 0.007 DEF Ldisp [mH] C023 C066 C109 --14.43 12.00 --7.50 --6.00 --5.00 3.46 2.89 --2.50 ----1.50 ----1.15 1.15 1.15 1.15 0.69 0.69 0.58 0.58 0.58 0.58 0.58 0.52 0.52 0.46 0.35 DEF Pmot [kW] C017 C060 C103 3 4 --4.5 --5.5 --7.5 --9.2 11 9.2 --15 18.5 --22 25 --25 30 37 45 50 55 75 80 90 110 132 160 185 220 DEF Imot [A] C018 C061 C104 6.4 8.4 --9 --11.2 --14.8 --17.9 21.0 21 --29 35 --41 46 --46 55 67 80 87 98 133 144 159 191 228 273 321 375 DEF Rstat [Ω] C022 C065 C108 2.500 2.000 --1.600 --1.300 --1.000 --0.800 0.600 0.800 --0.400 0.300 --0.250 0.250 --0.200 0.150 0.120 0.100 0.080 0.060 0.040 0.040 0.030 0.020 0.018 0.018 0.015 0.012 DEF Ldisp [mH] C023 C066 C109 30.00 25.00 --16.00 --12.00 --8.00 --6.00 5.00 6.00 --3.00 2.50 --2.00 2.00 --2.00 2.00 2.00 1.20 1.20 1.00 1.00 1.00 1.00 1.00 0.9 0.9 0.8 0.6 299/482 PROGRAMMING INSTRUCTIONS iDrive 2T SIZE S51 S60 S65 S75 S90 2xS41 2xS51 3xS51 300/482 MODEL M1 M2 M3 0313 0367 0402 0457 0524 0598 0748 0831 0964 1130 1296 1800 2076 0523 0599 0749 0800 0832 0850 0965 1129 DEF Pmot [kW] C017 C060 C103 132 150 160 200 220 250 280 330 400 450 560 ----220 --------------- DEF Imot [A] C018 C061 C104 390 458 475 593 661 732 840 985 1183 1330 1633 ----589 --------------- 4T DEF Rstat [Ω] C022 C065 C108 0.006 0.005 0.005 0.005 0.004 0.003 0.002 0.001 0.001 0.001 0.001 ----0.004 --------------- DEF Ldisp [mH] C023 C066 C109 0.28 0.23 0.17 0.14 0.12 0.12 0.09 0.06 0.05 0.05 0.05 ----0.12 --------------- DEF Pmot [kW] C017 C060 C103 250 280 355 315 355 400 500 560 710 800 1000 1200 1400 355 400 500 500 560 630 710 800 DEF Imot [A] C018 C061 C104 375 480 589 528 589 680 841 939 1200 1334 1650 2050 2400 589 680 841 841 939 1080 1200 1334 DEF Rstat [Ω] C022 C065 C108 0.012 0.010 0.010 0.008 0.007 0.006 0.003 0.002 0.002 0.001 0.001 0.001 0.001 0.007 0.006 0.003 0.003 0.002 0.002 0.002 0.001 DEF Ldisp [mH] C023 C066 C109 0.50 0.40 0.30 0.25 0.20 0.20 0.15 0.10 0.09 0.09 0.09 0.06 0.05 0.20 0.20 0.15 0.15 0.10 0.09 0.09 0.09 PROGRAMMING INSTRUCTIONS 32.3.2. iDrive V OLTAGE C LASS 5T/6T Table 77: Parameters depending on the Drive Size and Model - Class 5T/6T / 1. SIZE S12/S14 S14 S22 S32 S42 S52 S65 S70 S75 S80 S90 2xS42 2xS52 3xS52 MODEL 0003 0004 0006 0012 0018 0019 0021 0022 0024 0032 0042 0051 0062 0069 0076 0088 0131 0164 0172 0181 0201 0218 0259 0290 0314 0368 0401 0457 0524 0598 0748 0831 0964 1130 1296 1800 2076 0459 0526 0600 0750 0828 0960 1128 DRIVE INOM [A] 7.0 9.0 11.0 13.0 17.0 21 25 33 40 52 60 80 85 105 125 150 190 230 265 305 330 360 400 450 500 560 640 720 800 900 1000 1200 1480 1700 2100 2600 3000 720 800 900 1000 1150 1400 1600 DRIVE IMAX [A] 8.5 11.0 13.5 16.0 21.0 25 30 40 48 63 72 96 110 135 165 200 250 300 345 380 420 465 560 600 665 720 850 880 960 1100 1300 1440 1780 2040 2520 3100 3600 1000 1050 1160 1300 1440 1800 2040 DRIVE IPEAK [A] 10.2 13.2 16.2 19.2 25.2 30 36 48 57.6 75.6 86.4 115.2 132 162 198 240 300 360 414 455 504 558 672 720 798 864 1020 1056 1152 1320 1440 1440 2136 2448 2520 3720 3600 1200 1260 1392 1560 1728 2160 2448 DEF CARRIER [kHz] MAX CARRIER [kHz] DEF Silent Modulation C001 C002 C001 C002 C004 3 3 3 3 3 3 3 3 3 3 3 3 3 3 2 2 2 2 2 2 2 2 2 2 2 2 2 2 2 2 2 2 2 2 2 2 2 2 2 2 2 2 2 2 5 5 5 5 5 5 5 5 5 5 5 5 5 5 4 4 4 4 4 4 4 4 4 4 4 4 4 2 2 2 2 2 2 2 2 2 2 4 4 4 4 4 4 4 YES YES YES YES YES YES YES YES YES YES YES YES YES YES YES YES YES YES YES NO NO NO NO NO NO NO NO NO NO NO NO NO NO NO NO NO NO NO NO NO NO NO NO NO 301/482 PROGRAMMING INSTRUCTIONS iDrive Table 78: Parameters depending on the Drive Size and Model - Class 5T/6T / 2. SIZE MODEL DEF TFLUX [ms] DEF ILIM DEC [%Inom] S12/S14 S14 S22 S32 S42 S52 S65 S70 S75 S80 S90 2xS42 2xS52 3xS52 302/482 DEF DCB RAMP [ms] DEF Acc. Time [sec] DEF Dec. Time [sec] P009 P012 P015 P018 10 10 10 10 10 10 10 10 10 10 10 10 10 10 10 10 10 10 10 100 100 100 100 100 100 100 100 100 100 100 100 100 100 100 100 100 100 100 100 100 100 100 100 100 P010 P013 P016 P019 10 10 10 10 10 10 10 10 10 10 10 10 10 10 10 10 10 10 10 100 100 100 100 100 100 100 100 100 100 100 100 100 100 100 100 100 100 100 100 100 100 100 100 100 M1 M2 C041 C084 C045 C088 C222 C223 M3 C127 C131 C224 0003 0004 0006 0012 0018 0019 0021 0022 0024 0032 0042 0051 0062 0069 0076 0088 0131 0164 0172 0181 0201 0218 0259 0290 0314 0368 0401 0457 0524 0598 0748 0831 0964 1130 1296 1800 2076 0459 0526 0600 0750 0828 0960 1128 300 300 300 300 300 300 300 300 300 300 300 300 300 300 300 300 300 300 300 450 450 450 450 450 450 450 450 450 450 450 450 450 450 450 450 450 450 450 450 450 450 450 450 450 150 150 150 150 150 150 150 150 150 150 150 150 150 150 150 150 150 150 150 100 100 100 100 100 100 100 100 100 100 100 100 100 100 100 100 100 100 100 100 100 100 100 100 100 50 50 50 50 50 50 50 50 50 50 80 80 80 100 100 150 150 200 200 200 220 250 250 250 250 250 250 250 250 250 250 250 250 250 250 250 250 250 250 250 250 250 250 250 S– Ramps Fire Mode Ramps DEF [sec] Unit Of Meas. Acc. / Dec. DEF [sec] Dec. Ramp Ext. DEF P021 P032 P033 P014 P020 C210 On On On On On On On On On On On On On On On On On On On Off Off Off Off Off Off Off Off Off Off Off Off Off Off Off Off Off Off Off Off Off Off Off Off Off 10 10 10 10 10 10 10 10 10 10 10 10 10 10 10 10 10 10 10 100 100 100 100 100 100 100 100 100 100 100 100 100 100 100 100 100 100 100 100 100 100 100 100 100 0.1 0.1 0.1 0.1 0.1 0.1 0.1 0.1 0.1 0.1 0.1 0.1 0.1 0.1 0.1 0.1 0.1 0.1 0.1 1 1 1 1 1 1 1 1 1 1 1 1 1 1 1 1 1 1 1 1 1 1 1 1 1 0.2 0.2 0.2 0.2 0.2 0.2 0.2 0.2 0.2 0.2 0.2 0.2 0.2 0.2 0.2 0.2 0.2 0.2 0.2 2 2 2 2 2 2 2 2 2 2 2 2 2 2 2 2 2 2 2 2 2 2 2 2 2 PROGRAMMING INSTRUCTIONS iDrive 303/482 PROGRAMMING INSTRUCTIONS iDrive Table 79: Parameters depending on the Drive Size and Model - Class 5T/6T / 3. SIZE S12/S14 S14 S22 S32 S42 S52 S65 S70 S75 S80 S90 2xS42 2xS52 3xS52 304/482 MODEL DEF V/f Pattern DEF PREBOOST [%Vmot] M1 M2 M3 0003 0004 0006 0012 0018 0019 0021 0022 0024 0032 0042 0051 0062 0069 0076 0088 0131 0164 0172 0181 0201 0218 0259 0290 0314 0368 0401 0457 0524 0598 0748 0831 0964 1130 1296 1800 2076 0459 0526 0600 0750 0828 0960 1128 C013 C056 C099 0:CONST 0:CONST 0:CONST 0:CONST 0:CONST 0:CONST 0:CONST 0:CONST 0:CONST 0:CONST 0:CONST 0:CONST 0:CONST 0:CONST 0:CONST 0:CONST 0:CONST 0:CONST 0:CONST 2:FREE 2:FREE 2:FREE 2:FREE 2:FREE 2:FREE 2:FREE 2:FREE 2:FREE 2:FREE 2:FREE 2:FREE 2:FREE 2:FREE 2:FREE 2:FREE 2:FREE 2:FREE 2:FREE 2:FREE 2:FREE 2:FREE 2:FREE 2:FREE 2:FREE C034 C077 C120 1.0 1.0 1.0 1.0 1.0 1.0 1.0 1.0 1.0 1.0 1.0 1.0 1.0 1.0 1.0 1.0 0.5 0.5 0.5 0.2 0.2 0.2 0.2 0.2 0.2 0.2 0.2 0.2 0.2 0.2 0.2 0.2 0.2 0.2 0.2 0.2 0.2 0.2 0.2 0.2 0.2 0.2 0.2 0.2 BOOST @ 5% fmot and BOOST DEF [%Vmot] C035/C036 C078/C079 C121/C122 0 0 0 0 0 0 0 0 0 0 0 0 0 0 0 0 0 0 0 –20 –20 –20 –20 –20 –20 –20 –20 –20 –20 –20 –20 –20 –20 –20 –20 –20 –20 –20 –20 –20 –20 –20 –20 –20 Frequency for BOOST DEF [%fmot] DEF Auto BOOST [%Vmot] C037 C080 C123 50 50 50 50 50 50 50 50 50 50 50 50 50 50 50 50 50 50 50 20 20 20 20 20 20 20 20 20 20 20 20 20 20 20 20 20 20 20 20 20 20 20 20 20 C038 C081 C124 1 1 1 1 1 1 1 1 1 1 1 1 1 1 1 1 1 1 1 0 0 0 0 0 0 0 0 0 0 0 0 0 0 0 0 0 0 0 0 0 0 0 0 0 PROGRAMMING INSTRUCTIONS iDrive Table 80: Parameters depending on the Drive Size and Model - Class 5T/6T / 4. 5T SIZE S12/S14 S14 S22 S32 S42 S52 S65 S70 S75 S80 S90 2xS42 2xS52 3xS52 MODEL M1 M2 M3 0003 0004 0006 0012 0018 0019 0021 0022 0024 0032 0042 0051 0062 0069 0076 0088 0131 0164 0172 0181 0201 0218 0259 0290 0314 0368 0401 0457 0524 0598 0748 0831 0964 1130 1296 1800 2076 0459 0526 0600 0750 0828 0960 1128 DEF Pmot [kW] C017 C060 C103 3.0 4.0 5.5 7.5 9.2 11.0 15.0 18.5 22.0 30.0 37 45 55 55 75 110 110 132 160 185 200 220 280 300 330 355 400 500 560 630 710 800 1000 1170 1340 1750 2000 500 500 630 710 710 1000 1000 DEF Imot [A] C018 C061 C104 4.4 5.7 7.6 10.0 12.5 14.0 20.0 25.0 28.0 39.0 47 55 70 70 95 135 135 168 198 225 240 275 336 358 395 420 473 585 630 720 800 900 1450 1360 1560 2050 2400 626 696 773 800 800 1145 1360 6T DEF Rstat [Ω] C022 C065 C108 3.608 3.608 2.887 1.732 1.155 1.155 0.866 0.866 0.577 0.433 0.217 0.173 0.173 0.144 0.115 0.087 0.058 0.029 0.029 0.026 0.026 0.022 0.017 0.017 0.017 0.014 0.014 0.012 0.010 0.009 0.004 0.003 0.003 0.001 0.001 0.001 0.001 0.012 0.010 0.009 0.004 0.003 0.003 0.001 DEF Ldisp [mH] C023 C066 C109 43.30 43.30 36.08 15.88 8.66 8.66 7.22 7.22 4.33 3.61 2.89 2.89 2.89 1.73 1.73 1.44 1.44 1.44 1.44 1.44 1.30 1.15 0.87 0.72 0.72 0.57 0.43 0.36 0.29 0.29 0.22 0.14 0.13 0.13 0.13 0.08 0.07 0.36 0.29 0.29 0.22 0.14 0.13 0.13 DEF Pmot [kW] C017 C060 C103 4.0 4.0 7.5 7.5 11.0 11.0 15.0 22.0 22.0 37.0 37 55 55 75 90 110 160 185 200 220 250 315 355 400 450 500 560 560 630 710 900 1000 1220 1400 1610 2100 2400 630 710 800 900 1000 1200 1400 DEF Imot [A] C018 C061 C104 4.8 4.8 8.4 8.4 12.1 12.1 16.8 23.0 23.0 39.0 39 56 55.8 78.1 94.4 112.6 158 185 198 220 250 310 341 390 440 480 544 544 626 696 858 954 1187 1360 1560 2100 2400 626 696 773 858 954 1187 1360 DEF Rstat [Ω] C022 C065 C108 4.330 4.330 3.464 2.078 1.386 1.386 1.039 1.039 0.693 0.520 0.260 0.208 0.208 0.173 0.139 0.104 0.069 0.035 0.035 0.031 0.031 0.026 0.021 0.020 0.020 0.017 0.017 0.014 0.012 0.010 0.005 0.003 0.003 0.001 0.001 0.001 0.001 0.014 0.012 0.010 0.005 0.003 0.003 0.002 DEF Ldisp [mH] C023 C066 C109 51.96 51.96 43.30 19.05 10.39 10.39 8.66 8.66 5.20 4.33 3.46 3.46 3.46 2.08 2.08 1.73 1.73 1.73 1.73 1.73 1.56 1.39 1.04 0.86 0.86 0.69 0.51 0.43 0.35 0.35 0.26 0.17 0.16 0.16 0.16 0.10 0.08 0.43 0.35 0.35 0.26 0.17 0.16 0.16 305/482 PROGRAMMING INSTRUCTIONS iDrive 33. LIMITS MENU 33.1. Overview The Limits Menu defines the current/torque limits applied to the control functions (IFD, VTC or FOC controls) selected for the three connected motors. For IFD control, current limits are used. Three limit current levels are available, which are expressed as a percentage of the motor rated current: 1) Current limit while accelerating; 2) Current limit at constant rpm; 3) Current limit while decelerating. Two special parameters are also available; one sets the decrease of the limit current value when the motor runs at constant power (flux weakening), while the other parameter disables the frequency decrease in case of acceleration current limit (this is useful for inertial loads). If a VTC control or a FOC control is used, limits are expressed as a percentage of the rated motor torque. Values set in the two parameters relating to min. torque and max. torque represent the limits for saturation of the control torque demand. If an external torque limit is set (C147 in the CONTROL METHOD MENU), the values set in the parameters above represent the range of the source used for limitation; the torque ramp times set in the RAMPS MENU will be applied to the preset limit torque reference. The ramp time for torque limit can be selected (C049 for motor 1, C092 for motor 2 and C135 for motor 3) for the VTC control only. The Ipeak current load is available (see Table 73 and Table 77) for a maximum time of 3 seconds and only if the preset carrier frequency is lower than/equal to the default frequency value (see Table 73 and Table 77). When operating with synchronous modulation, the current peak value dynamically decreases when the output frequency increases. Manually enabling/disabling that function can be done only when using the IFD control with current limit parameters C043/C044/C045. When using the VTC or FOC control, the system will automatically handle the maximum current value that can be used also based on the torque limit configured with C047/C048. Ilim [C043/C044/C045] Ipeak Imax Inom fcarrier [C001/C002] fdef f* fmax Figure 44: Current limit decreased based on the carrier frequency. f*: Max. frequency for which Imax can be obtained. 306/482 PROGRAMMING INSTRUCTIONS 33.2. iDrive List of Parameters C043 to C135 Table 81: List of parameters C043 to C135. Parameter C043 C086 C129 C044 C087 C130 C045 C088 C131 C046 C089 C132 C047 C090 C133 C048 C091 C134 C049 C092 C135 C050 C093 C136 M1 M2 M3 M1 M2 M3 M1 M2 M3 M1 M2 M3 M1 M2 M3 M1 M2 M3 M1 M2 M3 M1 M2 M3 FUNCTION User Level BASIC Current limit while accelerating ADVANCED BASIC Current limit at constant rpm ADVANCED BASIC Current limit while decelerating ADVANCED Current limit decrease in flux weakening ADVANCED Minimum torque ADVANCED BASIC Maximum torque ADVANCED Ramp time for torque limit ADVANCED Frequency decrease during acceleration limit ADVANCED MODBUS Address 1043 1086 1129 1044 1087 1130 1045 1088 1131 1046 1089 1132 1047 1090 1133 1048 1091 1134 1049 1092 1135 1050 1093 1136 DEFAULT VALUES 150% 150% See Table 74 and Table 78 0: Disabled 0.0% 120.0% 50ms 0: Enabled 307/482 PROGRAMMING INSTRUCTIONS iDrive C043 (C086, C129) Current Limit While accelerating C043 (Motor 1) C086 (Motor 2) C129 (Motor 3) Range Default Level Address Control Function 0 ÷ 400 (*) 0: Disabled 1.0% ÷ Min[Ipeak inverter/Imot, 400.0%] 150% BASIC (C043); ADVANCED (C086, C129) 1043, 1086, 1129 IFD This parameter defines the current limit while accelerating; it is expressed as a percentage of the rated current of the selected motor. (*) The maximum allowable value depends on the drive size. C044 (C087, C130) Current Limit at Constant Rpm C044 (Motor 1) C087 (Motor 2) C130 (Motor 3) Range Default Level Address Control Function 0 ÷ 400 (*) 0: Disabled 1.0% ÷ Min[[Ipeak inverter/Imot, 400.0%] 150% BASIC (C044); ADVANCED (C087, C130) 1044, 1087, 1130 IFD This parameter defines the current limit at constant rpm; it is expressed as a percentage of the rated current of the selected motor. (*) The maximum allowable value depends on the drive size. C045 (C088, C131) Current Limit while Decelerating C045 (Motor 1) C088 (Motor 2) C131 (Motor 3) Range Default Level Address Control Function 0 ÷ 400 (*) 0: Disabled 1.0% ÷ Min[Ipeak inverter/Imot, 400.0%] See Table 74 and Table 78 BASIC (C045); ADVANCED (C088, C131) 1045, 1088, 1131 IFD This parameter defines the current limit while decelerating; it is expressed as a percentage of the rated current of the selected motor. (*) The maximum allowable value depends on the drive size. C046 (C089, C132) Current Limit Decrease in Flux Weakening C046 (Motor 1) C089 (Motor 2) C132 (Motor 3) Range Default Level Address Control Function 308/482 0÷1 0: Disabled 1: Enabled 0 0: Disabled ADVANCED 1046, 1089, 1132 IFD This parameter enables the current limit decrease function in flux weakening. The current limit is multiplied by the ratio between the motor rated torque and the frequency forced to the drive: limit = current limit being used * (Fmot/ Fout). PROGRAMMING INSTRUCTIONS iDrive C047 (C090, C133) Minimum Torque C047 (Motor 1) C090 (Motor 2) C133 (Motor 3) Range Default Level Address Control Function NOTE –5000 ÷ 5000 (*) –500.0% ÷ +500.0% 0 0.0% ADVANCED 1047, 1090, 1133 VTC and FOC This parameter sets the min. limit of the torque demanded by the control being used. Torque is expressed as a percentage of the rated torque of the selected motor. If an external torque limit is set (C147 in the CONTROL METHOD MENU), the values set in the parameters above represent the range of the source used for limitation; they can be reduced by adjusting the external source; the torque ramp times set in the RAMPS MENU will be applied to the preset limit torque reference (P026– P027). C048 (C091, C134) Maximum Torque C048 (Motor 1) C091 (Motor 2) C134 (Motor 3) Range Default Level Address Control Function NOTE –5000(*) ÷ 5000 (*) –500.0% ÷ +500.0% 1200 120.0% BASIC (C048); ADVANCED (C091;C134) 1048, 1091, 1134 VTC and FOC This parameter sets the max. limit of the torque demanded by the control being used. Torque is expressed as a percentage of the rated torque of the selected motor. If an external torque limit is set (C147 in the CONTROL METHOD MENU), the values set in the parameters above represent the range of the source used for limitation; the torque ramp times set in the RAMPS MENU will be applied to the preset limit torque reference (P026–P027). C049 (C092, C135) Ramp Time for Torque Limit C049 (Motor 1) C092 (Motor 2) C135 (Motor 3) Range Default Level Address Control Function 10 ÷ 30000 10 ÷ 30000ms 50 50ms ADVANCED 1049, 1092, 1135 VTC and FOC This parameter sets the time taken by the torque limit of the selected motor to go to zero from max. value. 309/482 PROGRAMMING INSTRUCTIONS iDrive C050 (C093, C136) Frequency Decrease during Acceleration Limit C050 (Motor 1) C093 (Motor 2) C136 (Motor 3) Range Default Level Address Control Function NOTE 310/482 0÷1 0: Enabled 1: Disabled 0 0: Enabled ADVANCED 1050, 1093, 1136 IFD This parameter enables output frequency decrease during acceleration limit. Setting “1:Disabled” is recommended for high inertia loads. When high inertia loads are connected to the drive, the frequency decrease can lead to strong regeneration and DC-bus voltage oscillations. PROGRAMMING INSTRUCTIONS iDrive 34. CONTROL METHOD MENU 34.1. Overview NOTE Please refer to the IDrive’s Installation Instructions Manual for the hardware description of digital inputs (COMMANDS) and analog inputs (REFERENCES). See also the INPUTS FOR REFERENCES MENU and the DIGITAL INPUTS MENU. The drive is factory set to receive digital commands via the terminal board; the main speed reference is sent from the REF analog input, and no external limit for torque limitation is enabled. The parameters in this menu allow selecting the following: • The source of the drive commands (digital inputs) from three signal sources (through parameters C140, C141, C142) which are logically matched so as to obtain an active M031 command set. For each of these 3 parameters you can select the source of the command signals from 4 different sources; • The source of the speed reference (or torque reference) from 4 different sources (that can be selected with parameters C143, C144, C145, C146) that can be summed up together. For each of these 4 parameters, you can select the source of the reference signals from 9 different sources; • The source of the torque limit reference (through parameter C147, allowing selecting the reference source from 9 different sources). Therefore, you can select and enable different command sources (hardware or virtual sources), different speed (or torque) references (hardware or virtual sources) and enable an external torque limit. The drive commands may be sent from: • The hardware terminal board (terminal board on the control board), which is logically separated into terminal board A and terminal board B; • The keypad; • The virtual remote terminal board: through serial link with MODBUS communications protocol; • The virtual remote terminal board: through Fieldbus (option board). Multiple terminal boards may also be enabled (up to 3 terminal boards with parameters C140, C141, C142); in this case, the drive will apply logic functions OR or AND to the different terminals to obtain the activated terminal board (see Command Sources). The following references and torque limit signals may be sent: • Three analog inputs acquired to the hardware terminal board (REF, AIN1, AIN2), plus two analog inputs (XAIN4, XAIN5) acquired to the hardware terminal board located on ES847 option board ; • FIN frequency input; • Encoder input; • Keypad; • Serial link with MODBUS communications protocol; • Fieldbus (option board); • Up/Down from MDI (Up and Down digital inputs). Multiple reference sources may be enabled at the same time (up to 4 reference sources with parameters C143, C144, C145, C146); in this case, the drive will consider the sum of all active reference as the main reference. Finally, a dynamic selection between two command sources and two reference sources is allowed when using the digital input configured as Source Selection (see C179). 311/482 PROGRAMMING INSTRUCTIONS iDrive 34.1.1. C OMMAND S OURCES The drive commands may be sent from the following sources: 0: Disabled 1: Terminal board A 2: Serial link (with MODBUS protocol) 3: Fieldbus (fieldbus on option board) 4: Terminal board B 5: Keypad (remotable display/keypad) The factory-setting enables only Terminal Board A (C140=1 and C141=1) as a command source (see also the DIGITAL INPUTS MENU). Both Terminal board A and B refer to the same terminal board located on the control board, but allow switching between one set of START, STOP, REVERSE commands sent to three terminals to a different set of commands sent to three different terminals. Most commands may be delayed (when enabled or disabled): refer to the TIMERS MENU. Figure 45: Selecting the command sources. If the keypad is not selected as a command source or if the STOP input function is enabled (C150≠0), more than one command source may be enabled at a time. In this case, the logic function implemented by the drive for the terminals of all active command sources is the following: • • AND for the terminals allocated to the ENABLE, ENABLE–S, External Alarms n.1, n.2, n.3 functions; OR for all other terminals. 312/482 PROGRAMMING INSTRUCTIONS iDrive NOTE If the keypad is enabled as a command source, the START, STOP, RESET, LOC/REM, FWD/REV functions are enabled (to disable LOC/REM and FWD/REV see parameter P269). The keypad is ignored for the processing of logic functions (AND/OR) of the other command sources that are enabled at that moment. NOTE As the ENABLE command of the hardware terminal board is a hardware safety device (it enables the drive) it is always active, even when none of parameters C140, C141 or C142 selects the terminal board (=1). NOTE The commands for the External Alarm n.1, n.2, n.3 functions are always considered for the drive terminal board only. NOTE The LOCAL mode, that can be enabled with the LOC/REM key from the keypad or with the LOCAL command function from the terminal board (see C180), forces the keypad as the only command source, thus ignoring the values set in parameters C140, C141, C142. The following functions are therefore enabled for the hardware terminal board: External Alarm n.,1 n.2, n.3, Motor Sel. n.2, Motor Sel. n.3, SLAVE, Source Selection, LOCAL and the ENABLE and RESET functions are always enabled for terminals MDI2 and MDI3. Table 82: Remote command inputs from serial link. MODBUS Address Input Code User Level Description 1406 I019 BASIC Remote, virtual terminal board from serial link 1407 I020 BASIC Auxiliary, virtual terminal board from serial link NOTE Range Bit input: 0÷1 for 8 bits corresponding to MDI1÷ MDI8 Bit input: 0÷1 for 8 bits corresponding to XMDI1÷ XMDI8 I020 is enabled only if R023 is set other than 0. Example: If C140 = 3 (Fieldbus) and C141 = 2 (Serial link), the ENABLE command is sent by closing terminal MDI2 on the terminal board and (AND) by forcing bit MDI2 from the serial link on input I019 (MODBUS address: 1406) and bit MDI2 from Fieldbus (see the FIELDBUS CONFIGURATION MENU). The START command may also be sent (OR) by forcing bit MDI1 from serial link on input I019 or by forcing bit MDI1 from Fieldbus for the relevant variable. 313/482 PROGRAMMING INSTRUCTIONS iDrive 34.1.2. S PEED /T ORQUE REFERENCE S OURCES The “main reference” is the value at constant speed to be attained by the controlled variable (speed or torque) (M000, M007) “required” from the drive. This reference is acquired by the drive only if the START command and the ENABLE commands are active; otherwise, it is ignored. When the main reference is acquired by the drive (START and ENABLE are active), it becomes the input signal controlled by the “time ramp” functions that generate the speed/torque reference setpoint for the connected motor. The speed or torque references may come from the following command sources: 0. Source disabled; 1. REF (single–ended analog input from terminal board); 2. AIN1 (differential analog input from terminal board); 3. AIN2 (differential analog input from terminal board); 4. FIN (frequency input from terminal board; see also the ENCODER/FREQUENCY INPUTS MENU); 5. Serial link (with MODBUS protocol); 6. Fieldbus (fieldbus in option board); 7. Keypad (remotable display/keypad); 8. Encoder (in terminal board MDI6–ECHA, MDI7–ECHB or option board); 9. Up Down from MDI (Up/down from digital inputs, see C161 and C162) 10. XAIN4 (auxiliary, differential voltage analog input from ES847 terminal board) 11. XAIN5 (auxiliary, differential current analog input from ES847 terminal board) With factory-setting, only one source is enabled (C143=1, C144=2, C145=0 and C146=0). Because the digital input for source selection is programmed (C179=6: MDI6, see Digital Inputs Menu), if this input is inactive, only the REF item is selected (please refer to the INPUTS FOR REFERENCES MENU). If multiple reference sources are enabled, by programming also C144, C145, or C146, the actual calculated reference is the algebraic sum of all the references that are enabled (see How to Manage the Reference Sources). REF, AIN1 and AIN2 The sources called REF, AIN1 and AIN2 come from the analog inputs in the terminal board and generate a reference resulting from the setting of the relevant parameters (from P050 to P064). See the INPUTS FOR REFERENCES MENU for the scaling, offset compensation and filtering of the reference obtained. The inputs may be used as voltage or current inputs depending on the setting and the position of the relevant dip-switches (see the IDrive’s Installation Instructions manual). FIN The FIN source is a frequency input on terminal MDI6 (FINA) or MD18 (FINB) and it generates a reference determined by the setting of the relevant parameters (from P071 to P072), allowing proper scaling (see the INPUTS FOR REFERENCES MENU and the ENCODER/FREQUENCY INPUTS MENU). SERIAL LINK The Serial Link source is an input located on the MODBUS link: the reference value must be written by the user to the addresses below: 314/482 PROGRAMMING INSTRUCTIONS iDrive Table 83: Reference inputs from serial link. MODBUS Address Input Code User Level Referenc e 1412 I025 BASIC Speed 1413 I026 BASIC Speed 1416 I029 BASIC Torque Description Speed reference/limit (integer portion) Speed reference/limit (decimal portion) Torque reference/limit Range Unit of measure Min. speed ÷ Max. speed RPM –99 ÷ 99 RPM/100 Min. torque ÷ Max. torque Tenths % NOTE I025 is the speed reference if at least one among parameters C143..146 is set to 5:Serial Link and the type of reference of the active motor (parameters C011 / C054 / C097) is set to 0:Speed; I025 is the speed limit if C147=5:Serial Link and the type of reference of the active motor is set to 2:Torque with Speed Limit. The range of this reference depends on the active Minimum Speed value and Maximum Speed value as set in parameters C028 and C029 (for motor 1, and relevant parameters for motor 2 and motor 3). If C029 ≤ C028, then Min. speed = C029, Max. speed = C028. If C029 ≥ C028, then Min. speed = C028, Max. speed = C029. NOTE I026 is the decimal portion of the speed reference in RPM and has effect in FOC motor control mode only. NOTE I029 is used as a torque reference if at least one among parameters C143..146 is set to 5:Serial Link and the type of reference of the active motor (parameters C011 / C054 / C097) is set to 1:Torque or 2:Torque with Speed Limit. I029 is used as a torque limit if C147=5:Serial Link. I029 is expressed as a percentage of the max. absolute torque set with the parameters C047 and C048 (motor 1, and relevant parameters for motor 2 and motor 3). The max. absolute torque is the max. value between absolute values of parameters C047 and C048. Max. absolute torque = Max( | C047 | , | C048 |) The unit of measure is tenths of %: Torque reference % = (I029*0.1) % Reference range: If C047 ≤ C048, then Min. torque = C047, Max. torque = C048. If C047 ≥ C048, then Min. torque = C048, Max. torque = C029. Example: 1200 = 120.0% FIELDBUS For a description of the Fieldbus source, see the FIELDBUS CONFIGURATION MENU. KEYPAD NOTE The keypad is a special reference source. The keypad reference may be changed with the ▲ and ▼ keys only if this reference is on a Keypad page displaying a reference in line 4. If the keypad is enabled, a variation to the active reference may be added through an algebraic sum (calculated by processing the other reference sources that are activated at that moment). The reference variation method can be selected with parameters P067, P068, P069, and C163. This function is the same as the UP and DOWN functions from the terminal board (see the DIGITAL INPUTS MENU: C161 and C162 and P068÷P069 in the INPUTS FOR REFERENCES MENU). 315/482 PROGRAMMING INSTRUCTIONS iDrive NOTE 316/482 The LOCAL mode, that can be enabled with the LOC/REM key on the keypad or with the LOCAL command function from terminal board (see C180), forces the keypad to become the only command and reference source, thus ignoring the values set in parameters C143, C144, C145, C146. PROGRAMMING INSTRUCTIONS iDrive ENCODER The Encoder source is an encoder input: it can come from the terminal board (terminals MDI6, MDI7) in Encoder A, or from the optional Encoder B board (see the ENCODER/FREQUENCY INPUTS MENU). It generates a reference resulting from the correct setting of the relevant parameters (P073, P074), allowing the relevant scaling (see the INPUTS FOR REFERENCES MENU). UP/DOWN from digital inputs To enable the UP/DOWN from digital inputs also set the relevant Up and Down inputs (see the DIGITAL INPUTS MENU). XAIN4 and XAIN5 XAIN4 and XAIN5 come from the analog inputs in the terminal board of ES847 and generate a reference determined by the settings of the relevant parameters (P390 to P399), allowing proper scaling, offset compensation and filtering (see the INPUTS FOR REFERENCES FROM OPTIONAL BOARD ). Figure 46: Selecting the source references. 34.1.3. A LTERNATIVE C OMMAND AND R EFERENCE S OURCES A digital input can be set as a selector between 2 alternative command and reference sources. Example: C179 MDI To select sources = MDI6 C140 To select command source number 1 = Keypad C141 To select command source number 2 = Fieldbus C143 To select reference source number 1 = AIN1 C144 To select reference source number 2 = Fieldbus If MD16 (in the drive terminal board) set as a selector is open, the drive will consider number 1 as reference and command sources (that is C140 = Keypad and C143 = AIN1); if it is closed, number 2 will be considered (C141 = Fieldbus and C144 = Fieldbus). See also How to Manage the Reference Sources. If references sources 3 and 4 (C145 and C146) are not set to Disable, the reference sent for these sources shall be a sum of the source selected by MD16 vector. Please refer to C179 in the DIGITAL INPUTS MENU. 317/482 PROGRAMMING INSTRUCTIONS iDrive 34.1.4. T ORQUE L IMIT S OURCE The source of the Torque Limit can be selected with parameter C147. The Torque limit function is a limit of the absolute value of the torque required from the drive. (– Torque limit) <= torque <= (+ Torque limit) The torque limit references may be selected from the following: 0. Source disabled 1. REF (single–ended analog input from terminal board); 2. AIN1 (differential analog input from terminal board); 3. AIN2 (differential analog input from terminal board; see also the ENCODER/FREQUENCY INPUTS MENU); 4. FIN (frequency input from terminal board); 5. Serial link (with MODBUS protocol); 6. Fieldbus (fieldbus on option board); 7. Keypad (remotable display/keypad); 8. Encoder (in terminal board MDI6–ECHA , MDI7–ECHB or option board); 9. Up Down from MDI (Up/down from digital inputs, see C161 and C162) 10. XAIN4 (auxiliary, differential voltage analog input from ES847 terminal board) 11. XAIN5 (auxiliary, differential current analog input from ES847 terminal board) NOTE If the reference source is disabled, the torque limit results from the max. absolute torque determined by the drive size and the motor size. The max. absolute torque is the max. value ranging between the absolute values of C047 and C048 (motor 1, and relevant parameters for motor 2 and motor 3). Max. absolute torque = Max( | C047 | , | C048 |) Factory setting is C147=0: the reference source is disabled and the torque limit is given by the max. absolute torque. 34.1.5. R EMOTE /L OCAL M ODE According to factory-setting, switching over from the Remote mode to the Local mode can only be made when the drive is disabled. The reference and command sources for the Remote mode depend on the settings of parameters C140 to C147 in the CONTROL METHOD MENU and on the settings of parameters C285 to C287 in the PID CONFIGURATION MENU. When switching over from the Remote mode to the Local mode, the command and reference can be sent via keypad only. This is true for the switch over from the Local to the Remote mode as well. Parameter C148 allows customizing the Loc/Rem function so that it can be performed even when the drive is running. Parameter C148 also allows setting whether the same running condition and the same reference must be maintained when switching over from the Remote to the Local mode. NOTE 318/482 For more details on the Loc/Rem function, see LOC/REM Key (Keypad Pages) and DIGITAL INPUTS MENU. PROGRAMMING INSTRUCTIONS 34.2. iDrive How to Manage the Reference Sources This section covers how to manage the reference sources. Two examples are given along with the table including the configuration of the parameters to be used. Example 1: The Speed Reference is the algebraic sum of two references Analog inputs REF and AIN1 (that are supposed to be 0-10V voltage inputs) are to be used as speed references. The main reference will be the sum of the two references being used. The end result may vary based on the parameters concerned. P050 P051 P051a P052 P052a P055 P056 P056a P057 P057a C028 C029 C143 C144 C179 Type of Reference for REF Input Value of REF Input producing Min. Reference Percentage of Ref_Min producing Min. Reference Value of REF Input producing Max. Reference Percentage of Ref_Max producing Max. Reference Type of Signal over AIN1 input Value of AIN1 Input producing Min. Reference Percentage of Ref_Min producing Min. Reference Value of AIN1 input producing Max. Reference Percentage of Ref_Max producing Max. Reference Min. Motor Speed Max. Motor Speed Selection of Reference 1 Selection of Reference 2 MDI for Source Selection 3: 0-10V 0.0V 100.0% 10.0V 100.0% 3: 0-10V 0.0V 100.0% 10.0V 100.0% 0rpm 1500rpm 1: REF 2: AIN1 0: Disable C179=0: Disable ensures that the main reference is the sum of the references being used. If a digital input for Source selection were used, either one reference would be selected as the main reference based on the input status. Both REF and AIN1 references are programmed in order to meet the following requirements: • at 0V, they are expected to generate 100% of the minimum motor speed reference (C028), i.e. 0rpm • at 10V, they are expected to generate 100% of the maximum motor speed reference (C029), i.e. 1500rpm The main reference will be their sum and will start from 0rpm (when both references are at 0V) and its maximum value would be 3000rpm (when both references are at 10V), but it will be limited to 1500, as set by C029, as soon as the sum of the two references exceeds 1500rpm. Suppose that the parameters below are to be programmed (only the parameters changing with respect to the example above are given): C028 Min. Motor Speed 50rpm As the minimum motor speed is set to 50rpm, each of the two references, at 0V, will generate a reference equating 100% of 50rpm, i.e. 50rpm. The minimum value of the main reference, that is the sum of the two references, will then equating 100rpm if the two references are at 0V. If the main reference shall start from 50rpm, that is it can generate the minimum motor speed, the following parameters shall be set accordingly: P051a P056a Percentage of Ref_Min producing Min. Reference Percentage of Ref_Min producing Min. Reference 50.0% 50.0% In that way, either references at 0V will generate 50% of 50rpm, i.e. 25rpm. Their sum will be worth 50rpm at a minimum, as required. If the whole resolution of the references is to be exploited, so that: • at 0V, for both references, the minimum speed is 50rpm • at 10V, for both references, the maximum speed is 1500rpm then the following shall be programmed: P052a P057a Percentage of Ref_Max producing Max. Reference Percentage of Ref_Max producing Max. Reference 50.0% 50.0% 319/482 PROGRAMMING INSTRUCTIONS iDrive In that way, each reference will range from 25 to 750rpm and their sum will range from 50 and 1500rpm, as required. Example 2: Speed references alternatively selected The two REF analog inputs are to be used as alternative speed references. The following parameters shall be programmed accordingly: P050 P051 P051a P052 P052a P055 P056 P056a P057 P057a C143 C144 C179 Type of Reference for REF Input Value of REF Input producing Min. Reference Percentage of Ref_Min producing Min. Reference Value of REF Input producing Max. Reference Percentage of Ref_Max producing Max. Reference Type of Signal over AIN1 input Value of AIN1 Input producing Min. Reference Percentage of Ref_Min producing Min. Reference Value of AIN1 input producing Max. Reference Percentage of Ref_Max producing Max. Reference Selection of Reference 1 Selection of Reference 2 MDI for Source Selection 3: 0-10V 0.0V 100.0% 10.0V 100.0% 3: 0-10V 0.0V 100.0% 10.0V 100.0% 1: REF 2: AIN1 6: MDI6 As MDI6 input is selected as reference source selection (C179), the references selected via C143 and C144 are selected as the main reference depending on the input status. When the input is inactive, REF will be the main reference; when the input is active, AIN1 will be the actual reference. 320/482 PROGRAMMING INSTRUCTIONS 34.3. iDrive List of Parameters C140 to C148 Table 84: List of parameters C140 to C148. Parameter C140 C141 C142 C143 C144 C145 C146 C147 C148 FUNCTION Command digital input 1 Command digital input 2 Command digital input 3 Input reference 1 Input reference 2 Input reference 3 Input reference 4 Torque Limit input Switch over from Remote to Local command NOTE ADVANCED ADVANCED ENGINEERING ADVANCED ADVANCED ENGINEERING ENGINEERING ENGINEERING MODBUS Address 1140 1141 1142 1143 1144 1145 1146 1147 Default Values 1:Terminal Board 1:Terminal Board 0 1: REF 2: AIN1 0 0 0 ENGINEERING 1148 0: StandBy or Fluxing User Level The programming range of parameters C140, C141, C142 depends on the setting of parameter C150 and vice versa (see the detailed description of the parameters above). C140 (C141, C142) Command Source Selection 1 (2, 3) C140 (C141, C142) Range Default Level Address Function NOTE NOTE 0÷5 0: Disabled, 1: Terminal Board, 2: Serial Link, 3: Fieldbus, 4: Terminal Board B, 5: Keypad C140 ÷ C141= 1 C140 ÷ C141= 1: Terminal Board C142 = 0 C142 = 0: Disabled C140 ÷ C141 ADVANCED; C142 ENGINEERING 1140 (1141,1142) Selection of the drive command source. If the command source is set as Keypad, different command sources can be set up only if the STOP or STOP B digital inputs are programmed (see C150 and C150a) to enable pushbutton operation or to make sure that the Source Selection function is activated (see C179). If the first command source is already set and it is not a Keypad source, you can set the Keypad as a second or third source, only if the STOP or STOP B inputs are programmed (C150 ≠ 0 or C150a ≠ 0) to enable pushbutton operation or to make sure that the Source Selection function is activated (see C179). 321/482 PROGRAMMING INSTRUCTIONS iDrive C143 (C144, C145, C146) Reference 1 (2, 3, 4) Selection C143 (C144, C145, C146) Range Default Level Address Function 0÷9 0 ÷ 11 if ES847 is in 0: Disabled 1: REF 2: AIN1 3: AIN2 4: Frequency input 5: Serial Link 6: Fieldbus 7: Keypad 8: Encoder 9: UpDown from MDI 10: XAIN4 11: XAIN5 C143 = 1, C144 = 2 C143 = 1: REF, C144 = 2: AIN1 C145 ÷ C146 = 0 C145 ÷ C146 = 0 : Disabled C143 ÷ C144 ADVANCED; C145 ÷ C146 ENGINEERING 1143 (1144, 1145, 1146) This parameter selects the sources for the speed (or torque) reference. The reference resulting from the sum of the selected sources represents the drive speed or torque reference. If the PID action has been set as reference C294 = Reference, the drive speed or torque references shall only be given by the PID output and not by the sources set in C143 ÷ C146. Reference sources 10 and 11 can be selected only after setting XAIN in parameter R023. C147 Torque Limit Input C147 Range Default Level Address Control Function 322/482 0÷9 0: Disabled 1: REF 2: AIN1 3: AIN2 4: Frequency input 5: Serial Link 6: Fieldbus 7: Keypad 8: Encoder 9: UpDown from MDI 10: XAIN4 11: XAIN5 0 0: Disabled ENGINEERING 1147 VTC and FOC If a speed control with FOC or VTC control algorithms is used, an external torque limit can be used. Parameter C147 selects the Torque Limit source. The torque ramp times set in P026–P027 will be applied to the torque limit reference source that has been selected. The external torque limit may be disabled by closing the digital input set with C187. Limiting sources 10 and 11 can be selected only after setting XAIN in parameter R023. PROGRAMMING INSTRUCTIONS iDrive NOTE If the reference source is disabled, the torque limit results from the max. absolute torque determined by the drive size and the motor size. The max. absolute torque is the max. value ranging between the absolute values of C047 and C048 (motor 1, and relevant parameters for motor 2 and motor 3). Max. absolute torque = Max( | C047 | , | C048 |) Factory-setting : the reference source is disabled (C147=0), so the torque limit depends on the max. absolute torque (see also the INPUTS FOR REFERENCES MENU). C148 Switch over from Remote to Local Command C148 Range Default Level Address Function NOTE 0÷3 0: StandBy + Fluxing 1: Drive Running / No Bumpless 2: Drive Running / Commands Bumpless 3: Drive Running / All Bumpless 0 0: StandBy or Fluxing ENGINEERING 1148 The drive factory-setting (0: StandBy or Fluxing) allows switching over from Remote to Local mode (and vice versa) only when the drive is not running. Different settings allowed by parameter C148 are detailed below; switching from Remote to Local mode (and vice versa) can be performed even when the drive is running: • No Bumpless → When switching from Remote to Local mode, a “zero” speed or torque reference is sent to the drive; the START button must be pressed to start the drive. • Commands Bumpless → When switching from Remote to Local mode, a “zero” speed or torque reference is sent to the drive, but the running conditions are the same as in Remote mode. For example, if the motor is running in Remote mode, the drive still runs even in Local mode and the reference can be changed with the INC/DEC key, starting from “zero”. • All Bumpless → When switching from Remote to Local mode, the drive maintains the same speed/torque reference and the same running condition as in Remote mode. For example, if the motor is running at 1000 rpm in Remote mode, the drive still runs even in Local mode with a reference of 1000 rpm that can be changed with the INC/DEC key, starting from “zero”. Parameter C148 affects parameters C140 to C147 and C285 to C287 (see PID CONFIGURATION MENU) when the PID controller is enabled. 323/482 PROGRAMMING INSTRUCTIONS iDrive 35. DIGITAL INPUTS MENU 35.1. Overview NOTE Please refer to the IDrive’s Installation Instructions manual for the hardware description of the digital inputs. The parameters contained in this menu assign particular digital control functions to each digital input in the terminal board. Each parameter has a particular function, which is assigned to a given terminal on the terminal board. Figure 47: Inputs that can be selected to implement control functions. The full processing of the digital inputs also includes the selection of other remote/virtual terminal boards (see the CONTROL METHOD MENU) and the possibility of delaying input digital signal enable/disable by means of software timers (see the TIMERS MENU). 324/482 PROGRAMMING INSTRUCTIONS iDrive As shown in the figure above, the digital input status is displayed in measures M031, M032, M033. Measure M033 shows the current status of the 8 inputs in the local hardware terminals in the drive board. The symbol displays the logic levels for terminals M033 for inactive inputs; the active inputs are marked with . Measure M032 shows the current status of the virtual terminal board obtained by processing all active terminal boards. It includes 10 signals, with two additional signals with respect to the local hardware terminal board: • Inputs MDI1 ~ MDI8 are obtained with the logic OR of the input signals for all active terminals; • The ENABLE input is obtained with the logic AND of the input signals for terminal MDI2 in all active terminal boards; • The ENABLE–S input is obtained with the logic AND of the terminals selected for this function in all active terminal boards. Measure M031 is similar to M032, but it displays the status of the terminal board obtained after delaying the input signals of M032 using special timers. The drive uses this terminal board to acquire digital commands. Some functions cannot be programmed, but they are assigned to special terminals: Table 85: Unprogrammable functions. Function ENABLE RESET Terminal MDI2 MDI3 (can be disabled if C154=Yes) Some terminals in the local hardware terminal board can also be used for different functions: Table 86: Terminals used for other inputs. Terminal MDI6 MDI7 MDI8 Description ECHA: channel A of encoder A in the terminal board ECHB: channel B of encoder A in the terminal board FIN: frequency input 325/482 PROGRAMMING INSTRUCTIONS iDrive 35.1.1. START The START function may be assigned to a digital input (MDI1..8); to an auxiliary digital input (XMDI1..8); to an auxiliary digital output (MPL1..4) or to a timed flag (TFL1..4). The input programming is set via parameter C149. To enable the Start input, set the control modes via terminal board (factory setting). The START command can also be sent from the display/keypad. The programmed input Enable/Disable can be delayed via special timers. The START input function is assigned to MDI1 terminal by default, but it can be assigned to other terminals as well. The same terminal programmed as START may be allocated to different functions as well. The motor stop mode (C185) can be programmed. When removing the START command, the following motor stop modes can activate: the motor stops following a deceleration ramp or starts idling; the motor is fluxed (VTC, FOC) only when the START command is shut down and the ENABLE is not closed (C184). When START is active (and when ENABLE is active as well), the RUN command is enabled: the speed (or torque) setpoint increases proportionally to the preset ramp until it reaches the active reference. (IFD control: in order to enable the RUN command, the main speed reference must be other than zero). When START is inactive (but ENABLE is active), the RUN command is disabled: the reference is set to zero and the speed (or torque) setpoint decreases down to zero depending on the preset deceleration ramp. 326/482 NOTE The way the START enables or disables the RUN command also depends on the setup of other functions, in particular the STOP, REVERSE and JOG functions (see parameters C150, C151, C169). If the REVERSE (C151≠0) function is enabled, it can enable/disable the RUN command. However, if the START and REVERSE commands are both active, the RUN command is disabled. In this case, START is interpreted as FORWARD and REVERSE as REVERSE. When both Start and Reverse are active, the system cannot interpret the query to be FORWARD or REVERSE. If the JOG function is enabled (C169≠0), it can enable/disable the RUN command, but only if the RUN command has not been previously enabled by other functions. If the STOP function is enabled (C150≠0), the RUN command may be enabled/disabled only by pressing the relevant “key”: see the description of the STOP function (C150). NOTE If only the keypad is enabled as the command source, press the START key located on the keypad to enable the drive RUN and press the STOP key to disable the drive RUN. NOTE If C185 = Free Wheel when removing the START command, the drive will not carry out the deceleration ramp and will be put on stand-by. PROGRAMMING INSTRUCTIONS 35.1.2. iDrive ENABLE (T ERMINAL 15:MDI2) The ENABLE input function is assigned to terminal MDI2 and enables the drive operation. It cannot be set to other terminals, whereas the same terminal may be assigned to different functions. The ENABLE input is always to be activated to enable the inverter operation irrespective of the control mode. If the ENABLE input is disabled, the drive output voltage is always set to zero, so the connected motor starts idling (the motor idles and stops due to friction or the mechanical load). In case of pulled loads (e.g. lifting applications), when the motor is idling, the mechanical load could cause the motor to run at uncontrolled speed! If the ENABLE input is disabled when the drive is controlling the motor, it is closed with a delay time depending on the drive size. This ENABLE delay starts from the instant when the input is disabled irrespective of the enable delay (if any) set through a software timer in MDI2. The operating mode and the logic used by the ENABLE input to enable/disable the drive also depends on the programming of the ENABLE–S and DISABLE functions. If the IFD control is used, the drive enabling also depends on the START input and the current value of the active reference. If the START command is active but the reference is lower than the preset threshold, the drive operation is disabled. To enable this operating mode with other types of control, parameters P065 and P066 must be set accordingly. The drive may also be disabled by the PID regulator (see parameter P255). CAUTION If the ENABLE input signal is disabled for one of the active terminals, the drive is instantly disabled and the motor starts idling! The motor could run at uncontrolled speed due to the activation of the mechanical load. If so, the mechanical load could cause uncontrolled acceleration/slowing down of the connected motor! CAUTION If a protection/alarm trips, the drive disables and the motor starts idling! NOTE If software timers are enabled for digital inputs, the timer for the ENABLE signal (timer active for MDI2) delays the signal enabling. The ENABLE signal is always instantly disabled (for the ENABLE function, Toff in MDI2 is ignored). NOTE The activation of the ENABLE command enables the alarms controlling the configuration consistency of certain parameters. NOTE When the ENABLE signal is shutdown, C parameters cannot be changed (factorysetting). If P003 Condition required for changing C parameters = Standby+Fluxing, the parameters may be changed even if the drive is enabled but the motor is not running. NOTE When the ENABLE signal is shutdown for VTC and FOC controls, the motor is fluxed by the drive. Motor fluxing is allowed only if the START contact is shutdown and C184 = Yes. NOTE If set accordingly, safety parameter C181 prevents the drive from starting if the ENABLE signal is already active when the drive is powered on. 327/482 PROGRAMMING INSTRUCTIONS iDrive 35.1.3. RESET (T ERMINAL 16:MDI3) The RESET function is assigned to input terminal MDI3. It resets the alarms to unlock the drive operation. It cannot be set to other terminals, whereas the same terminal may be assigned to different functions. To disable the reset function from terminal MDI3, set C154 = Yes. If a protection trips, the drive locks, the motor starts idling (the motor idles and stops due to friction or the mechanical load) and an alarm message is displayed (see also the AUTORESET MENU and the ALARMS AND WARNINGS section). Reset procedure To unlock the drive, activate the RESET input for an instant, or press the RESET key from the keypad. When the drive unlocks and the cause responsible for the alarm has disappeared, “Inverter ok” comes up on the screen, otherwise, the alarm persists and cannot be reset. If set up accordingly, safety parameter C181 permits to deactivate and reactivate the ENABLE signal to restart the drive once the cause responsible for the alarm has disappeared. 35.2. NOTE Factory setting does not reset alarms at power off. Alarms are stored and displayed at next power on and the drive is locked. A manual reset is then required to unlock the drive (see the AUTORESET MENU). CAUTION If an alarm trips, see the ALARMS AND WARNINGS section and reset the equipment after detecting the cause responsible for the alarm. DANGER!!! Electrical shock hazard exists on output terminals (U, V, W) and resistive braking module terminals (+, –, B) even when the drive is disabled. NOTE Set C154 = Yes to remove the reset function from MDI3. After that, only one different function can be allocated to MDI3 even when multiprogramming is active (see parameter C182). Factory-setting of the Digital Inputs Table 87: Terminal board: Factory-setting. Function START ENABLE RESET MULTISPEED 0 MULTISPEED 1 Source Sel Loc/Rem CwCCW 328/482 Terminal 14: MDI1 15: MDI2 16: MDI3 17: MDI4 18: MDI5 19: MDI6 20: MDI7 21: MDI8 Description Enables the drive RUN Enables the drive Resets the alarms tripped Bit 0 for Multispeed selection Bit 1 for Multispeed selection Source Selection Local / Remote Control Selection Reference reversal PROGRAMMING INSTRUCTIONS 35.3. iDrive List of Parameters C149 to C188c and I006 The parameters ranging from C149 to C180 and from C186 to C188c (one for each command function) activate single functions and set the terminal for each enabling/disabling function. Parameter C181 enables a safe START mode. Parameter C182 enables multiple programming (if compatible) to the same terminal. Max. two functions can be programmed to the same input. Table 88: List of parameters C149 to C188c and I006 Parameter I006 C149 C149a C150 C150a C151 C151a C152 C153 C154 C155 C156 C157 C158 C159 C160 C161 C162 C163 C164 C164a C165 C165a C166 C166a C167 C168 C169 C170 C171 C171a C172 C173 C174 C175 C176 C177 C178 C179 C180 C180a C181 C182 C183 C184 C185 C186 C187 FUNCTION Function selection for MDI control START Input START Input B STOP Input STOP B Input REVERSE Input REVERSE B Input ENABLE–S Input DISABLE Input Disable RESET alarms on MDI3 MULTISPEED 0 Input MULTISPEED 1 Input MULTISPEED 2 Input MULTISPEED 3 Input CW/CCW Input DCB Input UP Input DOWN Input RESET UP/DOWN Input External alarm 1 Input External alarm 1 trip delay External alarm 2 Input External alarm 2 trip delay External alarm 3 Input External alarm 3 trip delay MultiRamp 0 Input MultiRamp 1 Input JOG Input SLAVE Input PID DISABLE Input Input for PID control selection KEYPAD LOCK Input MOTOR 2 SEL. Input MOTOR 3 SEL. Input SPEED VAR. 0 Input SPEED VAR. 1 Input SPEED VAR. 2 Input PID RESET UP/DOWN input SOURCE SELECTION Input LOC/REM Input Type of LOC/REM contact Safety Start enable Multiprogramming enable Max. fluxing time before drive Disable Fluxing at activation only with START closed Stop Mode Fire Mode enabling Input Torque Limit Source Ref. Disabling Input User Level ADVANCED ADVANCED ADVANCED ADVANCED ADVANCED ADVANCED ADVANCED ADVANCED ADVANCED ADVANCED ADVANCED ADVANCED ADVANCED ADVANCED ADVANCED ADVANCED ADVANCED ADVANCED ADVANCED ADVANCED ADVANCED ADVANCED ADVANCED ADVANCED ADVANCED ENGINEERING ENGINEERING ADVANCED ADVANCED ADVANCED ENGINEERING ADVANCED ENGINEERING ENGINEERING ENGINEERING ENGINEERING ENGINEERING ADVANCED ADVANCED ADVANCED ADVANCED ADVANCED ENGINEERING ADVANCED ADVANCED ADVANCED ENGINEERING ADVANCED MODBUS Address 1393 1149 1297 1150 1298 1151 1299 1152 1153 1154 1155 1156 1157 1158 1159 1160 1161 1162 1163 1164 1305 1165 1306 1166 1307 1167 1168 1169 1170 1171 1188 1172 1173 1174 1175 1176 1177 1178 1179 1180 1303 1181 1182 1183 1184 1185 1186 1187 Default Values inactive MDI1 none none none none none none none NO MDI4 MDI5 none none MDI8 none none none none none immediate none immediate none immediate none none none none none none none none none none none none none MDI6 MDI7 pushbutton+storage inactive inactive disabled no deceleration ramp none none 329/482 PROGRAMMING INSTRUCTIONS iDrive C188a C188b C188c PID Multireference 1 Input PID Multireference 2 Input PID Multireference 3 Input ENGINEERING ENGINEERING ENGINEERING 1365 1366 1367 none none none NOTE If a parameter is set to zero, its function is disabled, otherwise the parameter value stands for the MDIx input assigned to the function. NOTE Auxiliary digital inputs XMDI (values from 17 to 24 in control function parameters) can be set up only after setting XMDI/O in parameter R023. CAUTION Set C182=1 to allocate 2 functions to the same terminal. I006 Function Selection for MDI Control I006 Range Default Level Address Function 0÷2 0 → Inactive 1 → Clear all 2 → Set factory default This is not a programming parameter: the input is set to zero whenever the drive is powered on and whenever the command is executed. ADVANCED 1393 0 → Inactive. 1 → Forces to “0 → Inactive” the settings of all the digital inputs. 2 → Forces to the default values the settings of all the digital inputs. C149 START Input Range C149 Default Level Address Function NOTE 330/482 0 ÷ 16 0 ÷ 24 if ES847 or ES870 is fitted 0 → Inactive 1 ÷ 8 → MDI1 ÷ MDI8 9 ÷ 12 → MPL1 ÷ MPL4 13 ÷ 16 → TFL1 ÷TFL4 17 ÷ 24 → XMDI1 ÷ XMDI8 1 MDI1 ADVANCED 1149 When the START input is activated (the ENABLE input is activated as well), RUN is enabled: the speed (torque) setpoint increases following the programmed ramp until it reaches the active reference. In IFD control mode, the main speed reference shall be other than zero for RUN enable. When the START input is inactive (even if the ENABLE input is activated) RUN is disabled: the reference is set to zero and the speed (torque) setpoint drops to zero based on the programmed deceleration ramp. If the PROFIdrive option is present, parameter C149 START Input must be assigned to value 1: MDI1. PROGRAMMING INSTRUCTIONS iDrive C149a START B Input Range C149a Default Level Address Function 0 ÷ 16 0 ÷ 24 if ES847 or ES870 is fitted 0 → Inactive 1 ÷ 8 → MDI1 ÷ MDI8 9 ÷ 12 → MPL1 ÷ MPL4 13 ÷ 16 → TFL1 ÷ TFL4 17 ÷ 24 → XMDI1 ÷ XMDI8 0 Inactive ADVANCED 1297 The START B input behaves as the START input (see the START section) when terminal board B is active. C150 STOP Input C150 Range Default Level Address 0 ÷ 16 0 ÷ 24 if ES847 or ES870 is fitted 0 → Inactive 1 ÷ 8 → MDI1 ÷ MDI8 9 ÷ 12 → MPL1 ÷ MPL4 13 ÷ 16 → TFL1 ÷ TFL4 17 ÷ 24 → XMDI1 ÷ XMDI8 0 Inactive ADVANCED 1150 This parameter disables the RUN function enabled by the START command. The setting of this function affects the enabling/disabling mode of the RUN command: it can be enabled/disabled using the START and STOP keys or the START, STOP and REVERSE keys instead of the START key as an ON/OFF switch (factory-setting). Function If the drive is enabled: Press START to enable the drive RUN; Press STOP to disable the drive RUN: reference is set to zero, so the speed (or torque) setpoint decreases to zero based on the preset deceleration ramp. In case of preset STOP, the keypad and one or more terminal boards may be enabled at a time. In this case, the START key and the STOP key in the display/keypad are active and can enable or disable the drive RUN. The STOP input is a normally closed input signal. NOTE According to factory setting, only the hardware terminal board selected with command source 1 (C140=1) is active as a switch-operated mode (C150=0). To switch to the key-operated mode, set the STOP input (C150 ≠0). The keypad and other terminal boards may be selected in key-operated mode only. If the STOP input is not programmed, and the switch-operated mode is active, the keypad may be selected as the only command source (C140=5, C141=0, C142 =0). NOTE The STOP function has priority over the START function; if both inputs are active, the STOP input prevails. Therefore, the STOP input acts as a key and as a switch. NOTE The START/STOP commands are ignored when the drive is disabled. 331/482 PROGRAMMING INSTRUCTIONS iDrive C150a STOP B Input C150a Range Default Level Address Function 0 ÷ 16 0 ÷ 24 if ES847 or ES870 is fitted 0 → Inactive, 1 ÷ 8 → MDI1 ÷ MDI8 9 ÷ 12 → MPL1 ÷ MPL4 13 ÷ 16 → TFL1 ÷ TFL4 17 ÷ 24 → XMDI1 ÷ XMDI8 0 Inactive ADVANCED 1298 The STOP B Input acts as the STOP Input (see C150) when Terminal Board B is active. The STOP B is a normally closed input signal. C151 REVERSE Input C151 Range Default Level Address Function NOTE NOTE CAUTION 332/482 0 ÷ 16 0 ÷ 24 if ES847 or ES870 is fitted 0 → Inactive 1 ÷ 8 → MDI1 ÷ MDI8 9 ÷ 12 → MPL1 ÷ MPL4 13 ÷ 16 → TFL1 ÷ TFL4 17 ÷ 24 → XMDI1 ÷ XMDI8 0 Inactive ADVANCED 1151 The REVERSE function carries out a START command, but it reverses the motor direction of rotation. If both the START and REVERSE inputs are active at the same time, the drive is sent a STOP command. If the STOP input function is not programmed (C150=0), the REVERSE signal and the START input act as switches, otherwise they act as keys. If the keypad is active, pressing the FWD/REV key on the display/keypad will also reverse the direction of rotation of the connected motor. The reference direction of rotation can be reversed with Cw/CCw if this is set up (C159 ≠ 0). Both functions cause a signal reversal; if they are both active, they will cancel each other. The keypad and the terminal board can be simultaneously activated only if the STOP (C150 ≠ 0) function is activated. Three sources for the signal reversal are then active: REVERSE, Cw/CCw, REV key; if two of them are active, they will cancel each other, while if all three sources are active, the reference sign will be reversed. When the reference sign is reversed, the direction of rotation of the connected motor is not immediately reversed: the setpoint decreases to zero following the preset deceleration ramp, and it increases up to the reference value having the opposite sign following the preset acceleration ramp. PROGRAMMING INSTRUCTIONS iDrive C151a REVERSE B Input C151a Range Default Level Address Function 0 ÷ 16 0 ÷ 24 if ES847 or ES870 is fitted 0 → Inactive 1 ÷ 8 → MDI1 ÷ MDI8 9 ÷ 12 → MPL1 ÷ MPL4 13 ÷ 16 → TFL1 ÷ TFL4 17 ÷ 24 → XMDI1 ÷ XMDI8 0 Inactive ADVANCED 1299 The REVERSE B Input acts as the REVERSE Input (see C151) when Terminal Board B is active. The figure below illustrates the processing logic diagram for the START, REV, Cw/CCw functions and the START, STOP, REV keys on the display/keypad if the STOP function is not programmed. Figure 48: Controlling Run and Direction when the STOP Input is not programmed. 333/482 PROGRAMMING INSTRUCTIONS iDrive The figure below illustrates the processing logic diagram for the START, REV, Cw/CCw functions and the START, STOP, REV keys on the display/keypad, if the STOP function is programmed. Figure 49: Controlling Run and Direction when the STOP Input is programmed. C152 ENABLE–S Input C152 0 ÷ 16 0 ÷ 24 if ES847 or ES870 is fitted Range Default Level Address Function NOTE 334/482 0 → Inactive 1 ÷ 8 → MDI1 ÷ MDI8 9 ÷ 12 → MPL1 ÷ MPL4 13 ÷ 16 → TFL1 ÷ TFL4 17 ÷ 24 → XMDI1 ÷ XMDI8 0 Inactive ADVANCED 1152 This is a safety ENABLE: if this function is enabled, the drive activates only if both ENABLE and ENABLE–S inputs are active. The ENABLE–S signal cannot be delayed by software timers: if a timer is programmed for the terminal relating to ENABLE–S, it will have no effect on the ENABLE–S function, whereas it will normally delay other functions programmed for the same terminal. PROGRAMMING INSTRUCTIONS iDrive C153 DISABLE Input C153 Range Default Level Address Function 0 ÷ 16 0 ÷ 24 if ES847 or ES870 is fitted 0 → Inactive 1 ÷ 8 → MDI1 ÷ MDI8 9 ÷ 12 → MPL1 ÷ MPL4 13 ÷ 16 → TFL1 ÷ TFL4 17 ÷ 24 → XMDI1 ÷ XMDI8 0 Inactive ADVANCED 1153 The DISABLE function disables the drive and overrides any ENABLE signals. The DISABLE command sets the drive output voltage to zero, so the motor starts idling (the motor idles and stops due to friction or the mechanical load). If the DISABLE function is set (C153≠0) to activate the drive, deactivate the input signal on the terminal selected with C153 to enable the drive; then activate the ENABLE function (and the ENABLE–S function, if programmed). C154 Disable RESET Alarms on MDI3 C154 Range Default Level Address Function 0÷1 0: NO ; 1: Yes 0 0: NO ADVANCED 1154 If C154 =1 : Yes, the alarm reset function can be disabled from MDI3, that can be assigned to other functions. C155, C156, C157, C158 MULTISPEED Inputs C155 C156 C157 C158 Range Default Level Address Function 0 → Inactive 0 ÷ 16 1 ÷ 8 → MDI1 ÷ MDI8 0 ÷ 24 if ES847 or ES870 is 9 ÷ 12 → MPL1 ÷ MPL4 13 ÷ 16 → TFL1 ÷ TFL4 fitted 17 ÷ 24 → XMDI1 ÷ XMDI8 C155 = 4, C156 = 5, C155 = MDI4, C156 = MDI5, C157 = 0, C158 = 0. C157 = C158 = Inactive. ADVANCED 1155, 1156, 1157, 1158 This function generates up to 15 speed references that can be programmed with parameters P081÷P098 according to the programming mode set in P080. The 4 Multispeed functions determine which of the 15 active speed references are active: active value (1) or inactive value (0) of each preset input signal determines a bit-logic binary number: MULTISPEED 0 is the less significant bit (bit 0) and MULTISPEED 3 is the most significant bit (bit 3). If one of these functions is not set up, its relevant bit is “zero”. Table 89: Multispeed selection. Multispeed selected = Bit 3 Bit 2 Bit 1 Bit 0 MULTISPEED 3 MULTISPEED 2 MULTISPEED 1 MULTISPEED 0 335/482 PROGRAMMING INSTRUCTIONS iDrive 1 0 1 0 1 10 1 1 1 0 1 11 1 0 0 1 1 12 1 1 0 1 1 13 1 0 1 1 1 14 1 1 1 1 1 15 P093 P094 P095 P096 P097 P098 P092 Status of the relevant input 1 1 1 1 1 1 0 1 0 1 0 1 1 0 0 1 1 1 0 0 0 0 0 1 1 5 6 7 8 9 P091 1 0 0 1 0 4 P090 (*) 1 1 1 0 0 3 P089 0 1 0 1 0 0 2 P088 1 1 0 0 0 1 P087 1 0 0 0 0 0 P085 0 X X X X X P083 Function: START MULTISPEED 0 MULTISPEED 1 MULTISPEED 2 MULTISPEED 3 Multispeed selected Resulting reference P081 Table 90: Selected Speed reference. If one of these functions is not set up, its relevant bit is “zero”. For example, if C156 and C157 are Inactive (0), while C155 and C158 are programmed to two different terminals, only Multispeed 0, 1, 8, 9 can be selected, relating to the following references: (*) P081 P091 P092 (*) Factory-setting: (P080 = Preset Speed) if no Multispeed function is selected, the active reference is the reference set according to the parameters in the INPUTS FOR REFERENCES MENU. If P080 = Speed Sum, the selected Multispeed function adds up to the active reference: the reference set according to the parameters in the INPUTS FOR REFERENCES MENU. If P080 = Preset Speed Esc, the selected Multispeed replaces the active reference, which will be ignored. If no Multispeed function is selected, the resulting reference is equal to zero. See also the INPUTS FOR REFERENCES MENU for the reference processing sequence: the Speed Decrease function and the Reference Reversal function become active downstream of the Multispeed function. NOTE In Table 90: 0 ⇒ Inactive input; 1 ⇒ Active input; X ⇒ Input having no effect. C159 CW/CCW Input C159 Range Default Level Address Function 336/482 0 ÷ 16 0 ÷ 24 if ES847 or ES870 is fitted 0 → Inactive 1 ÷ 8 → MDI1 ÷ MDI8 9 ÷ 12 → MPL1 ÷ MPL4 13 ÷ 16 → TFL1 ÷ TFL4 17 ÷ 24 → XMDI1 ÷ XMDI8 8 MDI8 ADVANCED 1159 The Cw/CCw function reverses the active reference signal: the connected motor decelerates to zero following the preset deceleration ramp, then it accelerates following the preset acceleration ramp until it reaches the new reference value. PROGRAMMING INSTRUCTIONS iDrive C160 DCB Input C160 Range Default Level Address Control Function 0 ÷ 16 0 ÷ 24 if ES847 or ES870 is fitted 0 → Inactive 1 ÷ 8 → MDI1 ÷ MDI8 9 ÷ 12 → MPL1 ÷ MPL4 13 ÷ 16 → TFL1 ÷ TFL4 17 ÷ 24 → XMDI1 ÷ XMDI8 0 Inactive ADVANCED 1160 IFD and VTC For other types of control, this function has no effect even if C160≠0. The DCB command enables DC braking for a time period depending on the speed value determining the input activation. See the DC BRAKING MENU for more details. C161, C162 UP and DOWN Inputs C161 C162 Range Default Level Address Function 0 ÷ 16 0 ÷ 24 if ES847 or ES870 is fitted 0 → Inactive 1 ÷ 8 → MDI1 ÷ MDI8 9 ÷ 12 → MPL1 ÷ MPL4 13 ÷ 16 → TFL1 ÷ TFL4 17 ÷ 24 → XMDI1 ÷ XMDI8 0 Inactive ADVANCED 1161, 1162 This function increases (UP) or decreases (DOWN) the reference for which the UpDown source from MDI has been selected by adding a quantity to the reference itself. This also depends upon the following parameters: C163 Up/Down Reset P067 Up/Down Ramp Time P068 Store Up/Down value at power off P068a Speed/Torque Up/Down Reset at stop P068b PID Up/Down Reset at stop P068c Speed/Torque Up/Down Reset at sources changeover P068d PID Up/Down Reset at sources changeover P069 Up/Down Reference range C163 Reset Up/Down Input for Speed/Torque Reference C163 Range Default Level Address Function 0 ÷ 16 0 ÷ 24 if ES847 or ES870 is fitted 0 → Inactive 1 ÷ 8 → MDI1 ÷ MDI8 9 ÷ 12 → MPL1 ÷ MPL4 13 ÷ 16 → TFL1 ÷ TFL4 17 ÷ 24 → XMDI1 ÷ XMDI8 0 Inactive ADVANCED 1163 This function sets to zero the reference variation obtained via the UP or DOWN inputs or the ▲ and ▼ keys located on the display/keypad. The Up/Down reference (Speed/Torque only) may also be reset using different functions (see P068a – P068c). 337/482 PROGRAMMING INSTRUCTIONS iDrive C164 , C165, C166 External Alarm Inputs C164 C165 C166 0 ÷ 16 0 ÷ 24 if ES847 or ES870 is fitted Range Default Level Address Function CAUTION 0 → Inactive 1 ÷ 8 → MDI1 ÷ MDI8 9 ÷ 12 → MPL1 ÷ MPL4 13 ÷ 16 → TFL1 ÷ TFL4 17 ÷ 24 → XMDI1 ÷ XMDI8 0 Inactive ADVANCED 1164, 1165, 1166 When allocating one of these 3 functions to a digital input, the status of this input will ALWAYS BE CHECKED ON THE DRIVE’S TERMINAL BOARD. When the command contact opens, the drive is locked due to an alarm tripped. Parameters C164a, C165a, C166a allow delaying external alarms. To restart the drive, the digital input set as an external alarm must be closed and a Reset procedure is required. Alarms tripped due to these 3 functions are A083, A084, A085 respectively. This function is factory set as disabled. The terminal board for these 3 functions is the hardware terminal board of the drive. If different command sources are enabled (see the CONTROL METHOD MENU), the “External Alarm” signal command is obtained only for the hardware terminal board of the drive. Therefore, in order to avoid any external alarm, the input signal for the active terminal must be active in the terminal board. Alarms trip when only one input signal for the terminal selected on one of the active command sources is disabled. A trip delay can be programmed with parameters C164a, C165a, C166a. C164a (C165a, C166a) External Alarm Trip Delay C164a C165a C166a Range Default Level Address Function 338/482 0 ÷ 32000 0 ÷ 32000 msec 0 Instantaneous ADVANCED 1305, 1306, 1307 External alarm trip delay. To avoid untimely alarm trip, it may be necessary to set a check time for the opening of the input set as an external alarm before the alarm trips. PROGRAMMING INSTRUCTIONS iDrive C167, C168 MULTIRAMP Inputs C167 C168 Range Default Level Address Function 0 ÷ 16 0 ÷ 24 if ES847 or ES870 is fitted 0 → Inactive 1 ÷ 8 → MDI1 ÷ MDI8 9 ÷ 12 → MPL1 ÷ MPL4 13 ÷ 16 → TFL1 ÷ TFL4 17 ÷ 24 → XMDI1 ÷ XMDI8 0 Inactive ENGINEERING 1167, 1168 This function allows selecting up to 4 acceleration/deceleration ramps. Each ramp has its own programming parameters; see P009 ÷ P025 (RAMPS MENU). These 2 functions determine which of the 4 ramps is to be selected: the active value (1) or inactive value (0) of each preset input signal determines a binary number with a bit-logic, where Multiramp 0 is the less significant bit (bit 0 ) and Multiramp 1 is the most significant bit (bit 1). The ramps range from 1 to 4; for the selected ramp, add 1 to the binary figure obtained. If one of these functions is not programmed, the relevant bit is “zero”. Table 91: Multiramp selection. Selected Ramp = ( Bit 1 Bit 0 Multiramp 1 Multiramp 0 )+ 1 Table 92: Selected ramp. Function: Multiramp 0 Multiramp 1 Selected Ramp Active ramp times (parameters determining the ramp model) 0 0 1 P009 P010 P014 (*) Input Status 1 0 0 1 2 3 P012 P013 P014 (*) P015 P016 P020 (*) 1 1 4 P018 P019 P020 (*) If one of these functions is not programmed, its bit is “zero”. For example, if C167 is Inactive (0) and C168 is programmed for one terminal, only ramp 1 or ramp 3 can be selected. NOTE (*) If the ramp rounding off function is enabled (P021≠0), the real ramp times also depend on the values set in parameters P022, P023, P024, P025, P031. 339/482 PROGRAMMING INSTRUCTIONS iDrive C169 JOG Input C169 Range Default Level Address Function CAUTION 0 ÷ 16 0 ÷ 24 if ES847 or ES870 is fitted 0 → Inactive 1 ÷ 8 → MDI1 ÷ MDI8 9 ÷ 12 → MPL1 ÷ MPL4 13 ÷ 16 → TFL1 ÷ TFL4 17 ÷ 24 → XMDI1 ÷ XMDI8 0 Inactive ADVANCED 1169 When the JOG function is enabled, the motor rotates at low speed following slow ramps which are manually controlled by the user only by means of the keys in keypad. If the drive is enabled (ENABLE activated) but is not running, and if the JOG terminal is enabled, the drive will run: the connected motor will accelerate following a JOG ramp (P029) up to the JOG speed reference (P070). On the other hand, if the terminal is disabled, the drive will stop: the connected motor will decelerate to zero speed following the JOG ramp (P029). Reverse the direction of rotation of the active reference to reverse the JOG reference. The motor starts running as soon as this terminal is activated (only if the drive is enabled). NOTE The RUN function will override the JOG function. Therefore, if the RUN function is active, the JOG function is ignored. NOTE If the motor is not running in SLAVE mode (torque reference instead of speed reference), it can rotate at JOG speed when the user activates the JOG function. In SLAVE mode, the JOG function is ignored if the motor is still rotating due to an active reference torque. C170 SLAVE Input C170 Range Default Level Address Control Function 340/482 0 ÷ 16 0 ÷ 24 if ES847 or ES870 is fitted 0 → Inactive 1 ÷ 8 → MDI1 ÷ MDI8 9 ÷ 12 → MPL1 ÷ MPL4 13 ÷ 16 → TFL1 ÷ TFL4 17 ÷ 24 → XMDI1 ÷ XMDI8 0 Inactive ADVANCED 1170 VTC and FOC When activating the terminal allocated to the Slave Input, the main reference becomes a torque reference and the speed loop is by-passed. This function enables the SLAVE operating mode (torque reference), instead of the MASTER operating mode (speed reference); the Torque References and the Ramp Torques are used (see the INPUTS FOR REFERENCES MENU and the RAMPS MENU). PROGRAMMING INSTRUCTIONS iDrive NOTE This function is ignored if the operating mode selected for the active motor is the SLAVE mode, i.e. C011=1 or 2 (motor 1), C054=1 or 2 (motor 2), C097=1 or 2 (motor 3). Commands are factory-set to MASTER mode and the speed reference is selected as factory setting (C011= 0 ; C054 =0 ; C097 = 0). CAUTION Switching from MASTER to SLAVE mode (or vice versa) is allowed only when the drive is disabled. C171 PID DISABLE Input C171 Range Default Level Address Function 0 ÷ 16 0 ÷ 24 if ES847 or ES870 is fitted 0 → Inactive 1 ÷ 8 → MDI1 ÷ MDI8 9 ÷ 12 → MPL1 ÷ MPL4 13 ÷ 16 → TFL1 ÷ TFL4 17 ÷ 24 → XMDI1 ÷ XMDI8 0 Inactive ADVANCED 1171 This function is used for managing the PID regulator (see the PID CONFIGURATION MENU). When the terminal allocated to this function is activated, the PID regulator can be disabled: its output and its external variable are set to zero. More precisely, if the PID regulator is in External Out mode (C294=0), when the PID DISABLE function is enabled, the PID output is set to zero and the external variable regulated by the PID regulator (feedback) is no longer regulated by the PID regulator itself. In Reference mode, the PID DISABLE function disables the PID regulator as described above and switches the reference, thus becoming the main active reference again. C171a Input for PID Control Selection C171a Range Default Level Address Function 0 ÷ 16 0 ÷ 24 if ES847 or ES870 is fitted 0 → Inactive 1 ÷ 8 → MDI1 ÷ MDI8 9 ÷ 12 → MPL1 ÷ MPL4 13 ÷ 16 → TFL1 ÷ TFL4 17 ÷ 24 → XMDI1 ÷ XMDI8 0 Inactive ENGINEERING 1188 This parameter pertains to the activation of the two PIDs or the 2-zone mode (see the PID CONFIGURATION MENU). It allows using the PID regulator outputs in different ways and allows disabling the 2-zone mode. 341/482 PROGRAMMING INSTRUCTIONS iDrive C172 KEYPAD LOCK Input C172 Range Default Level Address Function NOTE 0 ÷ 16 0 ÷ 24 if ES847 or ES870 is fitted 0 → Inactive 1 ÷ 8 → MDI1 ÷ MDI8 9 ÷ 12 → MPL1 ÷ MPL4 13 ÷ 16 → TFL1 ÷ TFL4 17 ÷ 24 → XMDI1 ÷ XMDI8 0 Inactive ADVANCED 1172 This function avoids accessing parameter modification through the removable display/keypad and avoids accessing the LOCAL mode by pressing the LOC/REM key or by enabling the LOCAL input function (C181). If the LOCAL mode is already active, the LOCK command will have no effect on the LOCAL function: it only avoids changing the programming parameters, while it is still possible to send references and the START/STOP/REV/JOG/RESET commands via keypad. If the LOCK command is active and the LOCAL mode is disabled, the LOCK function prevents the LOCAL mode from activating. C173, C174 MOTOR SEL Input C173 C174 Range Default Level Address Function 0 ÷ 16 0 ÷ 24 if ES847 or ES870 is fitted 0 → Inactive 1 ÷ 8 → MDI1 ÷ MDI8 9 ÷ 12 → MPL1 ÷ MPL4 13 ÷ 16 → TFL1 ÷ TFL4 17 ÷ 24 → XMDI1 ÷ XMDI8 0 Inactive ENGINEERING 1173, 1174 This function activates motor 2 and 3 and sets the relevant programming parameters (see Table 93). A different active motor can be selected only when the drive is disabled. Table 93: Motor selection. Value of the terminal allocated to the Sel. Motor n.2 (C173) function 0 1 0 1 NOTE 342/482 Value of the terminal allocated to the Sel. Motor n.3 (C174) function 0 0 1 1 When both inputs are enabled, Motor 1 is selected again. Active motor Motor n.1 Motor n.2 Motor n.3 Motor n.1 PROGRAMMING INSTRUCTIONS iDrive C175, C176, C177 SPEED VAR. Inputs C175 C176 C177 0 → Inactive 0 ÷ 16 1 ÷ 8 → MDI1 ÷ MDI8 0 ÷ 24 if ES847 or ES870 is 9 ÷ 12 → MPL1 ÷ MPL4 13 ÷ 16 → TFL1 ÷ TFL4 fitted 17 ÷ 24 → XMDI1 ÷ XMDI8 Range Default Level Address Function 0 Inactive ENGINEERING 1175, 1176, 1177 This function generates up to 7 values of variation % for the active reference ranging from –100% to 100% with parameters P115÷P121. The 3 functions determine which of the 7 values of the speed reference variation is active: the active value (1) or inactive value (0) of each preset input signal determines a bit-logic binary number where SPEED VAR. 0 is the less significant bit (bit 0), while SPEED VAR. 2 is the most significant bit (bit 3) as shown in Table 94 and Table 95. If one of these functions is not set up, its bit is “zero”. Table 94: Selection of the speed reference variation. Variation of the Selected Speed Reference = Bit 2 SPEED VARIATION 2 Bit 1 SPEED VARIATION 1 Bit 0 SPEED VARIATION 0 Table 95: Variation of the selected speed reference. Function: MULTISPEED 0 MULTISPEED 1 MULTISPEED 2 Variation of the selected speed reference Variation % selected 0 0 0 1 0 0 0 1 0 Input Status 1 0 1 0 0 1 1 0 1 0 1 1 1 1 1 None 1 2 3 4 5 6 7 0 P115 P116 P117 P118 P119 P120 P121 If one of the functions above is not set up, its bit is “zero”. For example, if C175 and C177 are INACTIVE (0) and C176 is programmed for one terminal, only variation 2 corresponding to parameter P116 can be selected. In any case, the output speed must never exceed the max. allowable speed, even when a higher speed is required. NOTE In Table 95 above: 0 ⇒ Inactive Input; 1 ⇒ Active Input. 343/482 PROGRAMMING INSTRUCTIONS iDrive C178 PID Up/Down Reset Input C178 Range Default Level Address Function 0 ÷ 16 0 ÷ 24 if ES847 or ES870 is fitted 0 → Inactive 1 ÷ 8 → MDI1 ÷ MDI8 9 ÷ 12 → MPL1 ÷ MPL4 13 ÷ 16 → TFL1 ÷ TFL4 17 ÷ 24 → XMDI1 ÷ XMDI8 0 Inactive ADVANCED 1178 This function resets the variation of the PID reference obtained with the ▲ and ▼ keys on the KEYPAD page of the user interface on the display/keypad in PID mode. C179 Source Selection Input C179 Range Default Level Address Function 0 ÷ 16 0 ÷ 24 if ES847 or ES870 is fitted 0 → Inactive 1 ÷ 8 → MDI1 ÷ MDI8 9 ÷ 12 → MPL1 ÷ MPL4 13 ÷ 16 → TFL1 ÷ TFL4 17 ÷ 24 → XMDI1 ÷ XMDI8 6 MDI6 ADVANCED 1179 The digital input set as a source selector is considered in the drive terminal board only, not in the virtual terminal boards, as Fieldbus or Serial Link (see Command Sources). When the digital input set as a source selector is open, only the first command sources and references programmed in the CONTROL METHOD MENU are considered (C140 command source n.1 and C143 reference source n.1 respectively) as well as the first reference and feedback sources programmed in the PID CONFIGURATION MENU (parameter C285 for reference source n. 1 and C288 for feedback source n.1). When the digital input set as a source selector is closed, only the second command source and the second reference source programmed in the CONTROL METHOD MENU are considered (C141 for command source n. 2 and C144 for reference source n.2), as well as the second reference sources and feedback sources set in the PID CONFIGURATION MENU (parameter C286 for reference source n.2 and parameter C289 for feedback source n.2). CAUTION 344/482 If set different from 0:Disabled, reference sources n.3 (C145 in the CONTROL METHOD MENU and C287 and C290 in the PID CONFIGURATION MENU) and reference sources n.4 (C146 in the CONTROL METHOD MENU) are always considered as summed up to the reference source selected by the source selector. PROGRAMMING INSTRUCTIONS iDrive C180 LOC/REM Input C180 Range Default Level Address Function 0 ÷ 16 0 ÷ 24 if ES847 or ES870 is fitted 0 → Inactive 1 ÷ 8 → MDI1 ÷ MDI8 9 ÷ 12 → MPL1 ÷ MPL4 13 ÷ 16 → TFL1 ÷ TFL4 17 ÷ 24 → XMDI1 ÷ XMDI8 7 MDI7 ADVANCED 1180 The digital input set as a source selector is considered in the drive terminal board only, not in the virtual terminal boards, as Fieldbus or Serial Link (see Command Sources). The LOCAL mode can be enabled via the relevant digital input (it ignores any enabling/disable delay times set via software timers) or by pressing the LOC/REM key located on the display/keypad. Factory setting allows enabling the Local mode only when the drive is not running. Settings may be changed through C148 Changeover from Remote to Local Command (see the CONTROL METHOD MENU); switching from Remote to Local command is allowed even when the drive is operating and when the running condition or reference must be maintained in Local mode. This function allows switching over to LOCAL mode and allows ignoring parameters C140 to C147 and C285 to C287 (see the PID CONFIGURATION MENU) when the PID controller is enabled, thus allowing setting them via KEYPAD only. The following functions are still active in the hardware terminal board of the control board being used: ENABLE, External Alarm 1,2,3, Sel.Motor n.2, Sel.Motor n.3, SLAVE, PID Disable, and the LOCAL function itself, that can be disabled at any time. If the input is deactivated when the drive is disabled, signals coming from different sources will activate again. If the main reference of the drive is the PID output, you can set C180a Type of LOC/REM Contact = Pushbutton and P266 Type of Keypad page in Local Mode = Ref.Activated + Spd. As a result, when the Loc key is pressed and released once, the drive enters the Local mode and the PID reference can be changed, whereas when the Loc command is pressed and released again (provided that the drive is not enabled) the PID is disabled and the RPM reference can be sent to the connected motor. See also the CONTROL METHOD MENU and the Keypad page and Local mode in the DISPLAY/KEYPAD menu. C180a Type of LOC/REM Contact C180a Range Default Level Address Function 0÷2 0:[Switch] 1:[Pushbutton] 2:[ [Pushbutton+Storage] 2 2:[Pushbutton+Storage] ADVANCED 1303 Factory-setting: the digital contact set as LOC/REM (C180) is Pushbutton based. If the PID output is the main reference and P266 Type of Keypad Page in Local Mode = Ref.Activated + Spd, allowing entering the LOCAL mode when the LOC/REM command is first sent, thus controlling the PID reference, and allowing the LOCAL mode to be maintained when the LOC/REM command is sent for the second time, thus disabling the PID and allowing setting a speed reference, the LOC/REM digital input must be set as C180a=Pushbutton. If C180a=2, the logic status of LOC/REM will be saved at power off and will be used when the drive is next powered on. 345/482 PROGRAMMING INSTRUCTIONS iDrive C181 Safety Start C181 Range Default Level Address Function NOTE 0÷1 Inactive, Active 0 Inactive ADVANCED 1181 This function enables the Safety START mode. When this function is enabled and the drive is to be restarted after resetting an alarm, open and close the ENABLE terminal. This prevents the drive from RUNNING when it is turned off and on again (for example after a mains loss) and the START and ENABLE inputs are on. If multiple terminal boards are selected with parameters C140, C141, C142, open and close the ENABLE terminal (MDI2) in one of the active terminal boards to restart the drive. C182 Multiprogramming Enable C182 Range Default Level Address Function NOTE 0÷1 Inactive, Active 1 Inactive ENGINEERING 1182 This function allows allocating two different functions to the same terminal. Only few preset combinations are allowed. When invalid configurations are set up, “ILLEGAL DATA” appears on the display/keypad of the IDrive drive. C183 Max. Fluxing Time Before Drive disabling C183 Range Default Level Address Control Function NOTE 0 ÷ 65000 0 ÷ 65000 ms 0 Disabled ADVANCED 1183 VTC and FOC This function disables the drive if the fluxing time period is longer than the preset time (if the ENABLE command, not a RUN command, is sent). To restore motor fluxing, disable and enable the ENABLE command, or send a START command when ENABLE is closed. The time set in C183 is added to the Fluxing Ramp Time set in C041 / C084 / C127. C184 Fluxing at Activation only with START Closed C184 Range Default Level Address Control Function 346/482 0 ÷1 0:No - 1:Yes 0 0:No ADVANCED 1184 VTC and FOC Fluxing may be carried out only when the START command is closed. PROGRAMMING INSTRUCTIONS iDrive C185 STOP Mode C185 Range Default Level Address Function 0 ÷1 0: [Deceleration Ramp] – 1:[Idling] 0 0: [Deceleration Ramp] ADVANCED 1185 This function allows selecting whether the drive is to be deactivated with a controlled deceleration ramp or is left idling when the START command is open. C186 Fire Mode Enable Input C186 Range Default Level Address Function 0 → Inactive 0 ÷ 16 1 ÷ 8 → MDI1 ÷ MDI8 0 ÷ 24 if ES847 or ES870 is 9 ÷ 12 → MPL1 ÷ MPL4 13 ÷ 16 → TFL1 ÷ TFL4 fitted 17 ÷ 24 → XMDI1 ÷ XMDI8 0 Inactive ENGINEERING 1186 This parameter allows programming a digital input to activate the Fire Mode (see the Fire Mode section). C187 Torque Limit Source Ref. Disable Input C187 Range Default Level Address Function 0 → Inactive 1 ÷ 8 → MDI1 ÷ MDI8 0 ÷ 16 9 ÷ 12 → MPL1 ÷ MPL4 0 ÷ 24 if ES847 or ES870 is fitted 13 ÷ 16 → TFL1 ÷ TFL4 17 ÷ 24 → XMDI1 ÷ XMDI8 0 Inactive ADVANCED 1187 This function sets a digital input allowing disabling the external torque limit. When the digital input set for C187 is active, the torque limit will depend on the parameters contained in the LIMITS MENU of the active motor. C188a, C188b, C188c Inputs for PID MULTIREFERENCES C188a C188b C188c Range Default Level Address Function 0 → Inactive 1 ÷ 8 → MDI1 ÷ MDI8 0 ÷ 16 9 ÷ 12 → MPL1 ÷ MPL4 0 ÷ 24 if ES847 or ES870 is fitted 13 ÷ 16 → TFL1 ÷ TFL4 17 ÷ 24 → XMDI1 ÷ XMDI8 0 Inactive ADVANCED 1365, 1366, 1367 This function allows generating up to 7 PID references that can be programmed with parameters P081a to P087a according to the operating mode selected with P080a. The 3 functions determine which is the active reference among the 7 available PID references: the active value (1) or the inactive value (0) of each programmed input signal determines a bit-logic value, where MULTIREF 0 is the least significant bit (bit 0) and MULTIREF 2 is the most significant bit (bit 2). If one of the available functions is not programmed, the value of the relevant bit is “zero”. 347/482 PROGRAMMING INSTRUCTIONS iDrive Table 96: Selection of PID Multireferences. Multireference selected = 348/482 Bit 2 Bit 1 Bit 0 MULTIRFERENCE 2 MULTIRFERENCE 1 MULTIRFERENCE 0 PROGRAMMING INSTRUCTIONS iDrive 36. ENCODER/FREQUENCY INPUTS MENU 36.1. Overview Three quick acquisition digital inputs are available in the IDrive control board: • MDI6/ECHA/FINA; • MDI7/ECHB; • MDI8/FINB. These inputs can be used as encoder reading (encoder A) or as frequency inputs. In addition, if ES836 or ES913 option board is used (see the IDrive’s Installation Instructions manual), an additional encoder reading (encoder B) is allowed. NOTE If MDI6 and MDI7 are used for encoder reading, only Push–Pull encoders can be used. NOTE For the reversal of the encoder speed measure, properly set up parameter C199. 36.1.1. W HEN ES836 IS NOT U SED • Encoder reading: Digital inputs MDI6 and MDI7 are used for reading the two channels of a 24V push–pull encoder powered directly by the IDrive control board (see the IDrive’s Installation Instructions Manual). No function can be programmed for MDI6 and MDI7; if you attempt to program MDI6 and MDI7, alarm A082 Illegal Encoder Configuration will trip when ENABLE closes. • Reading a Frequency Input: Digital inputs MDI6 or MDI8 can be used. If MDI6 is programmed as a frequency input (FINA) with C189, no other function can be programmed; otherwise, alarm A100 MDI6 Illegal Configuration trips when ENABLE closes. If MDI8 is programmed as a frequency input (FINB) with C189, no other function can be allocated to MDI8, and ES836 or ES913 option board must not be applied to the power drive, otherwise, alarm A101 MDI8 Illegal Configuration trips when ENABLE closes. • Reading a Frequency Input and an Encoder: MDI6 and MDI7 are used to read the push–pull encoder, and MDI8 is used to read the frequency input. The following alarms may trip: • A082 Illegal Encoder Configuration, if additional functions are allocated to MDI6 or MDI7; • A101 MDI8 Illegal Configuration, if additional functions are allocated to MDI8 or if the power drive detects the presence of ES836 or or ES913 option board. 349/482 PROGRAMMING INSTRUCTIONS iDrive 36.1.2. W HEN U SING ES836 OR ES913 • Reading 1 or 2 Encoders: To read one Encoder, use ES836 option board or digital inputs MDI6 and MDI7 (if a push–pull encoder is used). Both the option board and digital inputs MDI6 and MDI7 can be used to read two encoders at a time. Use parameter C189 to set the readout of the speed measure of the controlled motor or to read reference values. You can use encoder A or encoder B as a speed feedback or a reference source (speed reference, torque reference or PID reference). Example: If you want to use encoder A as a speed reference source and encoder B as a speed feedback, set C189 as 6:[A Ref ; B Fbk]; use P073 and P074 (INPUTS FOR REFERENCES MENU) to define the min. speed and the max. speed read for scaling and saturation of encoder A selected as a reference source (in one of parameters C144 ÷ C147, CONTROL METHOD MENU); set parameter C012 (motor 1) to [Yes] to enable the Speed Feedback from Encoder function. If encoder A is selected, no function can be programmed for MDI6 and MDI7; otherwise, alarm A082 Illegal Encoder Configuration will trip when ENABLE closes. If encoder B is selected and ES836 or ES913 option board is not detected by the drive, alarm A082 Illegal Encoder Configuration will trip when ENABLE closes. • Reading a Frequency Input: Only MDI6 digital input (FINA) can be used as a frequency input; if MDI8 is programmed as a frequency input (FINB) with C189, if the option board is installed, alarm A101 MDI8 Illegal Configuration trips. No additional function must be assigned to MDI6; otherwise, alarm A100 MDI6 Illegal Configuration will trip when ENABLE closes. • Reading a Frequency Input and an Encoder: MDI6 Digital input (FINA) is used as a frequency input and Encoder B is used (because ES836 or ES913 board avoids reading frequency input FINB through MDI8). If additional functions are programmed for digital input MDI6, alarm A100 MDI6 Illegal Configuration will trip when ENABLE closes. If alarm A082 Illegal Encoder Configuration trips, this means that the drive has not detected ES836 or ES913 board (check the board wiring). Parameter C189 defines whether quick acquisition digital inputs are used to read a frequency input or an encoder, and if the encoder is a reference source or a feedback source. In the Encoder Menu, you can also do the following: • define the number of pls/rev for the encoder being used; • enable or disable the speed alarm; • define a time constant applied to read filtering; • define whether encoders are read by means of squaring channels or by channel A only (while the direction of rotation will be defined by channel B: ChB low level → negative rotation; ChB high level → positive rotation). 350/482 PROGRAMMING INSTRUCTIONS 36.1.3. iDrive W HEN U SING T WO E NCODERS Figure 50: Using two encoders (example). Suppose that motor 2 is to be controlled in closed chain and that its speed value is twice the speed value of motor 1. To do so, use speed of motor 1, provided with an encoder, as the reference for the IDrive Drive, and use the speed measure of encoder B, which is coaxial to the motor controlled by the drive, as a speed feedback. Suppose that motor 1 speed ranges from 0 to 750rpm and that motor 1 is provided with a Push–Pull encoder with Single–Ended outputs and that its resolution is 2048 pls/rev. Motor 2 is provided with an NPN encoder with Single–Ended outputs; its resolution is 1024 pls/rev. Only one Push-Pull encoder can be connected to digital inputs MDI6-MDI7, so encoder NPN of motor 2, representing the speed feedback of the drive, must be connected to ES836 board (drive Encoder B), whereas the encoder of motor 1 (Push–Pull), used as a reference, shall be connected to terminals MDI6 and MDI7 (drive Encoder A). Encoder Configuration is as follows: Encoder/Frequency Inputs Menu (operating modes and encoder feature setting) C189 = [6: A–Reference B–Feedback] (Encoder/Frequency input operating mode) C190 = 2048 pls/rev (Number of pls/rev for Encoder A) C191 = 1024 pls/rev (Number of pls/rev for Encoder B) C197 = [0: 2Ch.Quad.] (Number of channels of Encoder A) C198 = [0: 2Ch.Quad.] (Number of channels of Encoder B) C199 = [0: Fdbk.No Ref.No] (Encoder reading sign reversal) 351/482 iDrive PROGRAMMING INSTRUCTIONS Motor Control 1 Menu (Setup of control mode with speed feedback from encoder and min. speed and max. speed of the controlled motor) C012 = [Yes] (Speed feedback from M1 encoder) C028 = 0 rpm (Min. speed of motor M1) C029 = 1500 rpm (Max. speed of motor M1) Control Method Menu (Setup of the source of the speed feedback from encoder) C143 = [8: Encoder] (Selection of reference 1 source) C144 = [0: Disable ] (Selection of reference 2 source) C145 = [0: Disable ] (Selection of reference 3 source) C146 = [0: Disable ] (Selection of reference 4 source) References Menu (Setup of the reading range for the encoder used as a speed reference) P073 = 0 rpm (Encoder input min. rpm) P074 = 750 rpm (Encoder input max. rpm) Ramps Menu (Ramps time applied to the reference are reset to maintain the desired speed variation without entering any delay value) P009 = 0 (Acceleration time 1) P010 = 0 (Deceleration time 1) When motor 1 reaches its max. speed (750rpm), the speed reference is 100% (because the speed value read by the encoder used as a reference source is saturated and scaled with respect to the min. rpm and max. rpm set in P073, P074). Because the max. speed of the motor controlled by the drive is 1500 rpm (C029), the speed reference is 1500 rpm. 352/482 PROGRAMMING INSTRUCTIONS 36.2. iDrive List of Parameters C189 to C199 Table 97: List of parameters C189 to C199. Paramete r C189 C190 C191 C192 C193 C194 C195 C196 C197 C198 C199 User Level MODBUS Address BASIC 1189 BASIC BASIC ENGINEERING 1190 1191 1192 0 [Not used, Not used] 1024 1024 5.00 sec ENGINEERING 1193 300 rpm ENGINEERING 1194 1: Active ENGINEERING 1195 5.0 ms ENGINEERING 1196 5.0 ms ENGINEERING 1197 0:2 Squaring channels ENGINEERING 1198 0:2 Squaring channels ENGINEERING 1199 0[Fdbk.NO;Ref.NO] FUNCTION Encoder/Frequency input operating mode Number of pls/rev for encoder A Number of pls/rev for encoder B Speed searching error timeout Error between reference and speed Tracking error alarm enable Filter time constant over value of feedback from encoder Filter time constant over value of reference from encoder Number of channels of Encoder A Number of channels of Encoder B Encoder sign reversal DEFAULT VALUES C189 Encoder/Frequency Input Operating Mode C189 Range Default Level Address Function 0 ÷ 14 See Table 98 0 0 [Not used; Not used] BASIC 1189 This parameter determines the operating mode of quick acquisition digital inputs. If MDI8 is used as a frequency input, the option board for encoder B is not required. MDI6 digital input may be used as a frequency input; if used along with MDI7, it can be used for encoder A reading. Reading both encoders A and B can be programmed; parameter C189 defines the encoder to be used as a reference source (if set as a speed/torque reference source in the MOTOR CONTROL MENU or as a PID reference source in the PID CONFIGURATION MENU) and the encoder to be used as a speed feedback. Configuration allowed for quick acquisition digital inputs is shown in Table 98. If the encoder is used as a reference source, the detected speed value will be saturated and scaled based on values set in P073 and P074 respectively (minimum and maximum value for the encoder). Example: C189 [A Reference; B Unused], P073 [–1500rpm], P074 [1500rpm] if the encoder is used as a PID reference, the reference measure is expressed as a percentage of the max. value [|P073|; |P074|]. If a frequency input is selected, its readout is saturated and scaled based on parameters P071 and P072 respectively (minimum and maximum value for the frequency input). 353/482 PROGRAMMING INSTRUCTIONS iDrive Table 98: Coding of C189. Value 0 1 2 3 4 5 6 7 8 9 10 11 12 13 14 When using Encoder A/FINA Not used EncA Feedback EncA Reference Not used Not used EncA Feedback EncA Reference EncA Reference and Feedback Not used MDI6 Frequency Input Not used MDI6 Frequency Input EncA Reference MDI6 Frequency Input EncA Feedback When using Encoder B/FINB Not used Not used Not used EncB Feedback EncB Reference EncB Reference EncB Feedback Not used EncB Reference and Feedback Not used MDI8 Frequency Input EncB Reference MDI8 Frequency Input EncB Feedback MDI8 Frequency Input Values 7-8: the same encoder can be used both as a reference source and as a reference feedback. Value 7: encoder A can be used both as a speed feedback for the motor control and as a PID regulator reference. C190 Number of Pls/Rev for Encoder A C190 Range Default Level Address Function 256 ÷ 10000 256 ÷ 10000 pls/rev 1024 1024 BASIC 1190 Defines the number of pls/rev for encoder A (encoder in the terminal board). C191 Number of Pls/Rev for Encoder B C191 Range Default Level Address Function 256 ÷ 10000 256 ÷ 10000 pls/rev 1024 1024 BASIC 1191 Defines the number of pls/rev for encoder B (encoder that can be connected to ES836 option board). C192 Timeout for Speed Alarm C192 Range Default Level Address Function 354/482 0 ÷ 65000 0.00 ÷ 650.00 sec 500 5.00 sec ENGINEERING 1192 If the speed alarm (C194) is enabled and the speed error exceeds the speed threshold (C193), this parameter determines the speed error timeout. Even if the alarm speed is disabled, time set in C192 and error threshold set in C193 are used to signal a speed searching error to digital outputs set with BRAKE or LIFT mode. Digital outputs are then disabled. PROGRAMMING INSTRUCTIONS iDrive C193 Speed Error Threshold C193 Range Default Level Address Function 0 ÷ 32000 0 ÷ 32000 rpm 300 300 rpm ENGINEERING 1193 If the speed alarm (C194) is enabled and the speed error exceeds the speed threshold (C193), this parameter determines the error threshold for the speed error timeout. Even if the alarm speed is disabled, time set in C192 and error threshold set in C193 are used to signal a speed searching error to digital outputs set with BRAKE or LIFT mode. Digital outputs are then disabled. C194 Speed Error Enable C194 Range Default Level Address Function 0÷1 0: Disabled 1: Enabled 1 1: Enabled ENGINEERING 1194 This parameter enables the speed error alarm. C195 Filter Time Constant over Value of Feedback from Encoder C195 Range Default Level Address Function 0 ÷ 30000 5 ÷ 3000.0 ms 50 5.0 ms ENGINEERING 1195 This parameter defines the time constant used for filtering the reading of the encoder used as a speed feedback. C196 Filter Time Constant over Value of Reference from Encoder C196 Range Default Level Address Function 0 ÷ 30000 5 ÷ 3000.0 ms 50 5.0 ms ENGINEERING 1196 This parameter defines the time constant used for filtering the reading of the encoder used as a reference. C197 Number of Channels of Encoder A C197 Range Default Level Address Function 0÷1 0: 2 Squaring Channels 1: Channel only 0 0: 2 Squaring Channels ENGINEERING 1197 This parameter defines the number of channels used for encoder A reading. Factory-setting is 2 Squaring channels. Speed can be read through one channel only (as for phonic wheel); channel 2 can define the direction of rotation (low level → negative rotation; high level → positive rotation). 355/482 PROGRAMMING INSTRUCTIONS iDrive C198 Number of Channels of Encoder B C198 Range Default Level Address Function 0: 2 Squaring channels 1: Channel only 0÷1 0 0: 2 Squaring channels ENGINEERING 1198 This parameter defines the number of channels used for encoder B reading (see parameter C197). C199 Encoder Sign Reversal C198 Range Default Level Address Function NOTE 0÷3 See Table 99 0 0 [Fdbk. NO; Ref. NO] ENGINEERING 1199 This parameter permits to reverse the speed sign measured by encoder inputs. When tuning the encoder, the encoder sign used as feedback is automatically adjusted to the direction of rotation of the connected motor. Table 99: Coding of C199. Value 0 1 2 3 356/482 Feedback Encoder Sign Reversal Fdbk. NO Fdbk. YES Fdbk. NO Fdbk. YES Reference Encoder Sign Reversal Ref. NO Ref. NO Ref. YES Ref. YES PROGRAMMING INSTRUCTIONS iDrive 37. BRAKING RESISTANCE MENU 37.1. Overview The Braking Resistance Menu enables the clamp transistor command and sets its max. duty cycle in the drive braking resistance. If no braking resistance is installed, promptness of the DC bus voltage control can be adjusted in order to avoid OVERVOLTAGE alarm, causing abrupt deceleration. To enable the clamp transistor command for the braking resistance, set C210=[With resistor]. In this operating mode, when DC bus voltage exceeds a preset threshold value depending on the drive voltage class, the clamp transistor closes in the braking resistor, so energy in excess is dissipated to the resistor and DC bus voltage does not exceed voltage ratings. The max. duty cycle of the braking resistor is parameterized with C212 and C211: maximum duty cycle (100 * Ton / (Ton+Toff) [%] ) and maximum time of continuous supply (Ton) respectively. If the braking resistor activation is Ton = C212 , when this interval is over, the relevant command will be disabled for a time equal to Toff = (100 – C212) * C211 / C212 [sec]. Example: A lifting application featuring a IDrive 0086 at 400V requires a braking resistor with a 50% duty cycle. The braking period is 30s. According to the tables in the “Braking Resistors” section (Installation Instructions manual) the applicable braking resistor is 10Ω – 24 kW. The max. continuous duty for said resistor is 62s: the braking period is then compatible with that rating. Otherwise, a higher rated resistor should be applied. Parameter setting: C210=[With resistor]. C211=30s C212=50% Factory-setting assumes that no braking resistor is provided. In this case, C210 sets promptness, with respect to variations of DC bus, for the deceleration ramp slowing-down, in order not to overload the bus capacitor bank. If C210 is set to zero in FOC control, deceleration slows down when given values of the voltage bar are reached (depending on the drive voltage class). If C210 is > 0, DC bus voltage is controlled by considering the derivative of the bus voltage. The higher the value in C210, the lower the values for voltage variation affecting deceleration ramp times. NOTE The clamp transistor is not commanded if the drive is supplied from a Regenerative source (see C008 = xT Regen, where x can be 2, 4, 5, or 6 ). 357/482 PROGRAMMING INSTRUCTIONS iDrive 37.2. List of Parameters C210 to C212 Table 100: List of parameters C210 to C212. C210 Automatic extension of down ramp ENGINEERING 1210 C211 Max. time of continuous supply ENGINEERING 1211 DEFAULT VALUES See Table 74 and Table 78 2.00sec C212 Duty Cycle Braking (Ton/(Toff+Ton)) ENGINEERING 1212 10% Parameter FUNCTION User Level MODBUS Address C210 Automatic Extension of Down Ramp C210 Range Default Level Address Function -1 ÷ 32000 –0.01: (With Resistance); 320.00% See Table 74 and Table 78 ENGINEERING 1210 If C210 = [With Resistor], this parameter commands enabling resistor and DC bus relating to this operating condition, allowing dissipating energy regenerated from the motor. If no braking resistor is used, energy regenerated from the motor cannot be dissipated. In this condition, the down ramp is extended if the variation in DC bus voltage is too rapid or exceeds certain threshold values. Set a higher value in parameter C210 for a more sensitive ramp extension (a lower rating of regenerated power allows obtaining longer ramps), thus avoiding overvoltage. Parameter C210 decreases the DC bus voltage threshold setting the ramp extension. The k factor is as follows: k = Pout/(Pmax*100*C210), k ranges from 1.0 to 1.3 NOTE The greater the k factor, the lower the DC bus level setting the ramp extension. For example, when C210=0.2, power Pout shall exceed 5% of Pmax in order to obtain k>1. When C210=2, 0.5% of Pmax is required to obtain k>1. NOTE Parameter C210 is interlocked with parameter P031 (Gradient variation acceleration reset) so that C210 ≠ –0.01:With resistance cannot be programmed in conjunction with P031 = 0:No. C211 Max. Time of Continuous Supply for Braking Resistance C211 Range Default Level Address Function 358/482 0 ÷ 32000 0 ; 320.00 sec 200 2.00 sec ENGINEERING 1211 This parameter determines the max. continuous operating time required for the braking resistance. If the braking resistance is used for a time C211 without being activated, the braking resistance command is automatically disabled for a time of inactivity set in C212. PROGRAMMING INSTRUCTIONS iDrive C212 Duty Cycle Braking (Ton/(Toff+Ton)) C212 Range Default Level Address Function 0 ÷ 100 0 ÷ 100% 10 10% ENGINEERING 1212 C212 = (Ton/(Ton+Toff))*100 This parameter determines the operating duty cycle allowed for the braking resistance. It is expressed as a percentage and defines the time of inactivity of the braking resistance when it is continuously operating for the max. time set in C211. 359/482 PROGRAMMING INSTRUCTIONS iDrive 38. DC BRAKING MENU 38.1. Overview When the IFD or VTC control algorithm are used, DC current can be injected into the motor to stop it. DC current may be automatically injected at stop and/or at start; DC current injection may also be controlled by the terminal board. All relevant parameters are included in the DC BRAKING MENU. The intensity of the DC current injected is expressed as a percentage of the rated current of the active motor. 38.1.1. DC B RAKING F UNCTION AT S TART AND N ON - CONDENSING To activate DC braking at start, set C216 to [YES]. Braking occurs after sending a START command, with a speed reference other than zero, before the acceleration ramp. A START command may be one of the following: RUN command or REV command sent via terminal board; START command from keypad, etc., depending on the preset control mode. DC braking level and duration are set in the following parameters: C220 Expressed as a percentage of the rated current of the controlled motor. C218 Expressed in seconds. Figure 51: DCB Hold and DCB at Start. Output speed, holding and DC braking current when the DCB Hold and DCB at Start functions are active. 360/482 PROGRAMMING INSTRUCTIONS iDrive The non-condensing function consists in injecting DC into the motor. DC current brakes the motor and heats the motor windings, thus avoiding condensation. This function is active only for the IFD control if C221 is other than zero and ENABLE = ON. For the other control algorithms, the non-condensing function is performed by injecting current during motor fluxing. Parameter C221, expressed as a percentage of the rated current of the controlled motor, determines the level of direct current injected into the motor. Parameters used to program this function are the following: C216 enabling DCB at Start; C218 setting the duration of DCB at Start; C220 setting the intensity of the DC braking; C221 setting the intensity of the holding current (this function is active for the IFD control only). Figure 52: DCB at Start with VTC Control. Output Speed and DC Braking when the DCB At Start Function is active for the Vector Torque control. 361/482 PROGRAMMING INSTRUCTIONS iDrive 38.1.2. DC B RAKING AT S TOP To activate this function, set C215 to [YES] or, in Power Down mode, set C234 (Power Down Stop Mode) as DCB. DC Braking occurs after sending a “stop with ramp” command. The speed level for DC Braking is set in C219. If the drive is in Power Down mode and C234 is set as DCB, the speed level is set in C235 (Power Down Stop Level). The figure below illustrates the output speed and DC Braking trends when the DC Braking at Stop function is active. Parameters used to program this function are the following: C215 function enabling; C217 braking duration; C219 motor speed at the beginning of DC Braking; C220 intensity of DC braking. In Power Down mode, if C234 (Power Down Stop Mode) is set as DCB: C235 motor speed at the beginning of DC Braking. Figure 53: DCB at Stop. Motor speed and DC Braking patterns when the DC BRAKING AT STOP function is active. 362/482 PROGRAMMING INSTRUCTIONS 38.1.3. iDrive DC B RAKING C OMMAND S ENT FROM T ERMINAL B OARD Activate the digital input set as DCB (C160) to send a DC Braking command. DC Braking duration is determined by the following formula: t* = C217 * ( nOUT / C219 ) with nOUT / C219 equal to max. 10. Possible cases: a) t1 > t* time t1 for braking command is longer than t*. To restart the motor following the preset acceleration ramp when DC Braking is over, just disable the DCB command and disable and enable again the START command (see figure below). Figure 54: Manual DCB (Example 1). Motor Speed, DC Braking, Manual DCB Command and START Command if t1>t*. b) t1 < t* time t1 for braking command is shorter than t*. Two different cases may occur, depending on the control algorithm and the setup of the motor speed searching function. 363/482 PROGRAMMING INSTRUCTIONS iDrive IFD or VTC Control when the Speed Searching function is disabled (C245 [NO]): Prematurely disable the manual braking command to stop DC braking. If the motor is still rotating, it will start idling. To restart the motor following the preset acceleration ramp, simply disable and enable the START command (see Figure 55). Figure 55: Manual DCB (Example 2). Motor Speed, DC Braking, Manual DCB Command and START Command if t1<t* and the control algorithm is either IFD Voltage/Frequency or VTC VectorTorque when the Speed Searching Function is disabled. 364/482 PROGRAMMING INSTRUCTIONS iDrive IFD Control when the Speed Searching function is enabled (C245 [YES]): Prematurely disable the manual braking command to activate the Speed Searching function. When the motor speed searching occurs, the motor speed is increased depending on the preset acceleration ramp (see Figure 56). Figure 56: Manual DCB (Example 3). Motor Speed, DC Braking and Manual DCB Command and START Command if t1<t*, the control algorithm is IFD and the Speed Searching Function is enabled. 365/482 PROGRAMMING INSTRUCTIONS iDrive 38.2. List of Parameters C215 to C224 Table 101: List of parameters C215 to C224. Parameter FUNCTION User Level C215 C216 C217 C218 C219 C220 C221 C222 C223 C224 Enabling DCB at Stop function Enabling DCB at Start function DCB at Stop duration DCB at Start duration Speed at the beginning of DCB at Stop DCB current level DCB Hold Ramp braking time for Motor 1 DCB Ramp braking time for Motor 2 DCB Ramp braking time for Motor 3 DCB ADVANCED ADVANCED ADVANCED ADVANCED ADVANCED ADVANCED ADVANCED ENGINEERING ENGINEERING ENGINEERING MODBUS Address 1215 1216 1217 1218 1219 1220 1221 1222 1223 1224 Default Values 0:NO 0:NO 0.5 0.5 50rpm 100% 0% See Table 74 and Table 78 C215 Enabling DCB at Stop Function C215 Range Default Level Address Control Function 0÷1 0: No; 1: Yes 0 0: No ADVANCED 1215 IFD and VTC Enables DC Braking during deceleration when the speed set in C219 is reached (or the speed set in C235 if in Power Down mode and C234 [DCB] is reached). C216 Enabling DCB at Start Function C216 Range Default Level Address Control Function 0÷1 0: No; : Yes 0 0: No ADVANCED 1216 IFD and VTC Enables the DC Braking at Start function. C217 DCB at Stop Duration C217 Range Default Level Address Control Function 366/482 1 ÷ 600 0.1; 60.0 sec. 5 0.5 sec ADVANCED 1217 IFD and VTC Determines the duration of the DCB at Stop function. PROGRAMMING INSTRUCTIONS iDrive C218 DCB at Start Duration C218 Range Default Level Address Control Function 1 ÷ 600 0.1; 60.0 sec. 5 0.5 sec ADVANCED 1218 IFD and VTC Determines the duration of the DCB at Start function. C219 Speed at the Beginning of DCB at Stop C219 Range Default Level Address Control Function 0; 1000 0; 1000 rpm 50 50rpm ADVANCED 1219 IFD and VTC Determines the speed at the beginning of DCB at stop while decelerating. C220 DCB Current Level C220 Range Default Level Address Control Function 0 ÷ MIN [ (Ipeak inverter/Imot)*100) ; 0% ÷ Min[Ipeak inverter/Imot, 120] 120%] 100 100% ADVANCED 1220 IFD and VTC Determines the level of direct current injected to brake the motor. It is expressed as a percentage of the rated current of the controlled motor. C221 DCB Hold C221 Range Default Level Address Control Function 0 ÷ 100 0; 100% 0 0% ADVANCED 1221 IFD Determines the level of direct current injected during the Hold function. To activate this function, set a value other than zero in parameter C221. DC level is expressed as a percentage of the rated current of the controlled motor. C222 (C223, C224) Ramp Braking Time for DCB C222 (Motor 1) C223 (Motor 2) C224 (Motor 3) Range Default Level Address Control Function 2 ÷ 32000 2 ÷ 32000 msec See Table 74 and Table 78 ENGINEERING 1222, 1223, 1224 IFD and VTC This parameter represents the time required for flux weakening before DCB. 367/482 PROGRAMMING INSTRUCTIONS iDrive 39. POWER DOWN MENU 39.1. Overview In the case of power failure, the drive can be kept powered on by exploiting the kinetic energy of the motor and the load: energy recovered due to motor slowing down is used to power the drive, thus avoiding loosing the drive control when a black–out occurs. All parameters relating to the Power Down function are included in the Power Down submenu in the Configuration menu. The following options are available (parameter C225): – [NO]: The function is disabled. – [YES]: After the time set in C226 (Power Down start delay), starting from the instant when power down occurs, a deceleration ramp takes place (deceleration ramp in Power Down C227). The time period of the deceleration ramp can be user-defined. – [YES V]: In case of power down for a time longer than C226, the motor coasts to stop, so that DC bus voltage value is kept constant at C230. To do so, a PI (proportional–integral) regulator is used, which is adjusted through parameter C231 (proportional term) and C232 (integral term). – [Alarm]: In case of power down, when the time set in C226 is over, alarm A064 trips (factory setting). 368/482 NOTE If the mains loss deactivates the ENABLE command, the motor cannot coast to stop, because the ENABLE command is required for the hardware enabling of IGBTs. NOTE If a drive is DC-powered by a Regenerative IDrive (or an equivalent drive stabilizing DC bus voltage), Power Down cannot occur (C008 = xT Regen, where x can be 2, 4, 5, or 6 ). PROGRAMMING INSTRUCTIONS iDrive Figure 57: Power Down (Example). 369/482 iDrive PROGRAMMING INSTRUCTIONS The figure above illustrates the patterns of the motor speed and the DC bus voltage in case of mains loss. In the example above, power supply is restored before the drive turns off and before the deceleration ramp is over, so the motor accelerates with the preset acceleration ramp. If power supply is restored during the deceleration ramp in Power Down, the connected motor accelerates following the selected acceleration ramp. A speed value for the end of Power Down can be set in C235; the desired operating mode at stop can be set in C234. When the motor speed attains the end level of Power Down, the following functions can be selected in parameter C234: – [Stop]: The drive will control the motor until it stops down, independently of the value set in C235; when the motor stops and power supply is restored, the RUN command must be disabled and enabled again to accelerate the motor. – [DCB]: When the speed of the Power Down end set in C235 is attained, DC braking occurs. If power supply is restored during DC braking, the RUN command must be disabled and enabled again to accelerate the motor. – [Stand–By]: When the speed of the Power Down end set in C235 is attained, the drive is in stand–by; if power supply is restored when the drive is in stand-by, the RUN command must be disabled and enabled again to accelerate the motor. 370/482 PROGRAMMING INSTRUCTIONS 39.2. iDrive List of Parameters C225 to C235 Table 102: List of parameters C225 to C235. Paramet er C225 C226 C227 C228 C229 C230 C231 C232 C234 C235 FUNCTION Procedure in case of Power Down Power Down enable delay Stop ramp time in Power Down Start increment of ramp gradient in P.D. Improved sensitivity of DC bus control Voltage level of DC bus in Power Down PI Proportional constant for automatic deceleration PI Integral time for automatic deceleration Ramp action at the end of Power Down Motor speed at the end of Power Down Access Level ENGINEERING ENGINEERING ENGINEERING MODBUS Address 1225 1226 1227 Default Values 3:Alarm 10 ms 20 sec ENGINEERING 1228 0.10% ENGINEERING 1229 1 ENGINEERING 1230 339V for class 2T 679V for class 4T(380;480V) 707V for class 4T(481;500V) 813V for class 5T 976V for class 6T ENGINEERING 1231 0.050 ENGINEERING 1232 0.5 sec ENGINEERING 1234 0: Stop ENGINEERING 1235 0 rpm C225 Procedure in Case of Power Down C225 Range Default Level Address Function NOTE 0÷3 0: Disabled 1: Yes 2: YesV 3: Alarm 3 3: Alarm ENGINEERING 1225 Type of power down: 0: Disabled The Power Down function is disabled. 1: Yes In case of mains loss after a time longer than the time set in C226 starting from the mains loss detection, the deceleration ramp set in C227 is performed. 2: YesV In case of mains loss, deceleration is automatically regulated by a PI regulator (see C231 and C232), so that voltage level in DC link is kept constant at the reference value set in C230. IFD control: because no torque demand regulation is available, the deceleration ramp gradient is adjusted depending on the gradient value set in C227. 3: Alarm In case of power failure, the A064 Mains Loss alarm trips after the time set in C226. If a drive is DC-powered by a Regenerative IDrive (or an equivalent drive stabilizing DC bus voltage), Power Down cannot occur (C008 = xT Regen, where x can be 2, 4, 5, or 6 ). 371/482 PROGRAMMING INSTRUCTIONS iDrive C226 Power Down Enable Delay C226 Range Default Level Address Function NOTE 1 ÷ 250 1 ÷ 250 ms 10 10 ms ENGINEERING 1226 This parameter determines the Power Down delay after a mains loss is detected by the drive. If C225 = Alarm, this delay is applied to the alarm tripped. Setting a too long Power Down delay in case of mains loss can cause the drive to switch off. C227 Stop Ramp Time in Power Down C227 Range Default Level Address Function 1 ÷ 32000 1 ÷ 32000 sec 20 20 sec ENGINEERING 1227 Determines the gradient of the deceleration ramp occurring at Power Down (after the first extra deceleration stage) if C225 = Yes. IFD Control algorithm: C227 is the basic gradient for deceleration adjustment when C225= Yes V. C228 Start Increment of Ramp Gradient in Power Down C228 Range Default Level Address Function -100 10000 ÷ -1.00 ÷ + 100.00 % 10 0.10% ENGINEERING 1228 Determines an increase in deceleration ramp gradient at the beginning of the Power Down function. This is required to increase DC bus voltage. C228 = 0% start deceleration is due to C227 (C228 has no effect) C228 = 100% start deceleration is 100 times faster than deceleration set in C227 (start ramp = C227/100 sec) C228 = -1.00% start deceleration is zero (deceleration ramp of infinite time) C229 Improved Sensitivity of DC Bus Control C229 Range Default Level Address Function 372/482 1 ÷ 250 1 ÷ 250 1 1 ENGINEERING 1229 Based on the DC bus voltage trend, this function allows detecting mains loss in advance. If the value for this coefficient is too high, erroneous mains loss conditions can be detected, due to a sudden drop in DC bus voltage. PROGRAMMING INSTRUCTIONS iDrive C230 Voltage Level of DC Bus in Power Down C230 Range Default Level Address Function 250 ÷ 450 for Class 2T 400 ÷ 800 for Class 4T 500 ÷ 960 for Class 5T 600 ÷ 1150 for Class 6T 250 ÷ 450 V for Class 2T 400 ÷ 800 V for Class 4T 500 ÷ 960 V for Class 5T 600 ÷ 1150 V for Class 6T 339 for Class 2T 339 V for Class 2T 679 for Class 4T (380÷ 480V) 679 V for Class 4T (380÷ 480V) 707 for Class 4T (481÷ 500V) 707 V for Class 4T (481÷ 500V) 813 for Class 5T 813 V for Class 5T 976 for Class 6T 976 V for Class 6T ENGINEERING 1230 Determines the reference value for DC bus voltage in case of automatic deceleration in Power Down; C225 = Yes V. C231 PI Proportional Constant for Automatic Deceleration C231 Range Default Level Address Function 0 ÷ 32000 0.000 ÷ 32.000 50 0.050 ENGINEERING 1231 Proportional coefficient used in PI regulator controlling automatic deceleration in case of Power Down; C225 =Yes V. C232 PI Integral Time for Automatic Deceleration C232 Range Default Level Address Function 1 ÷ 32000 0.001 ÷ 31.999 sec 32000 = Disabled 500 0.5 sec ENGINEERING 1232 Integral time used in PI regulator controlling automatic deceleration in case of Power Down; C225 =Yes V. 373/482 PROGRAMMING INSTRUCTIONS iDrive C234 Ramp Action at the End of Power Down C234 Range Default Level Address 0÷2 0: Stop 1: Stand–by 2: Dcb 0 0: Stop ENGINEERING 1234 When the motor speed during Power Down attains the Power Down end value set in C235, three operating modes are possible depending on C234 programming: [Stop] If the drive is capable of bearing DC bus voltage, it will control the motor until it stops irrespective of the speed value set in C235. If power supply is restored when the deceleration ramp is over, the RUN command must be disabled and enabled again to accelerate the motor. If power supply is restored when the motor is still decelerating, the speed of reference is forced to the motor with the preset acceleration ramp. Function [Stand–by] When decelerating, once the speed value set in C235 is attained, the drive is put on stand–by and the motor keeps decelerating (motor idling). If power supply is restored, the same conditions as described in the step above (see [Stop]); instead of stopping the motor, the drive is put on stand–by. [DCB] When decelerating, once the speed value set in C235 is attained, DC braking occurs. Its duration depends on the speed value set in C235 and on DC braking parameters (see the DC BRAKING MENU): t* = C217 * ( C235 /C219 ) with C235/C219 equal to max. 10. If power supply is restored, the same conditions as described in the step above occur (see [Stop]); instead of stopping the motor, the drive performs DC braking. C235 Motor Speed at the End of Power Down C235 Range Default Level Address Function 374/482 0 ÷ 5000 0 ÷ 5000 rpm 0 0 rpm ENGINEERING 1235 Motor speed at the end of Power Down. If C234 is set as [Stand–by], the drive is put on stand-by; if C234 is set as [DCB], it determines DC braking. Both conditions occur during the deceleration ramp due to Power Down and when the speed value set in C235 is attained. PROGRAMMING INSTRUCTIONS iDrive 40. SPEED SEARCHING MENU 40.1. Overview When a command is sent to disable the drive, the motor idles. When the drive activates again, the Speed Searching function allows the drive to reach the motor speed. All parameters relating to this function are included in the Speed Searching submenu in the Configuration menu. For FOC control, the motor speed of rotation is always known, so this function is always active and independent of the parameters of the relevant menu. NOTE The Speed Searching parameters are used for IFD control only. When C245 is set to [YES], do the following to activate the Speed Searching function: – open and close the ENABLE command before tSSdis is over (C246); – disable the DC Braking command before the DC braking preset time is over (see the DC BRAKING MENU); – reset any alarm tripped (with reference other than 0) before tSSdis is over. Speed searching does not take place when the drive turns off due to mains loss. If the drive restarts after a time longer than tSSdis (C246), frequency output is generated following the acceleration ramp, and no speed searching takes place. If C246 0: (Always On), speed searching (if enabled with C245) occurs when the drive restarts (RUN), irrespective of the time elapsed from disabling. The figures below show output frequency and motor rpm during speed searching. After time t0 for rotor demagnetization, speed searching occurs as follows (see 3 steps below): Speed at the beginning of the speed searching function depends on the settings in C249. 375/482 PROGRAMMING INSTRUCTIONS iDrive Figure 58: Speed Searching (Example 1). – Output Frequency and motor RPM for the Speed Searching Function (C245 = [YES]) activated by the ENABLE command. tO < tSSdis (C246) or C246 = 0. Three stages: Time t1 Time t2 Time t3 The drive output frequency corresponds to the last value which was active before disabling the drive; output current matches with the value set in C248; Output frequency is decremented following the ramp set in C247 for rotation speed searching; The connected motor accelerates following the acceleration ramp. 376/482 PROGRAMMING INSTRUCTIONS iDrive Figure 59: Speed Searching (Example 2). Frequency, Motor Rpm, Drive Lock, RESET and ENABLE during Speed Searching (C245 =[YES]) due to an Alarm Trip tOFF < tSSdis (C246) or C246 = 0. NOTE If the Safety at Start function is disabled (C181 = [Inactive]), it is not necessary to open and close the ENABLE contact; Speed searching matches with the RESET command. 377/482 PROGRAMMING INSTRUCTIONS iDrive 40.2. List of Parameters C245 to C249 Table 103: List of parameters C245 to C249. Parameter FUNCTION User Level C245 C246 Speed Searching enable Speed Searching disable if ENABLE is open Speed Searching time as % deceleration ramp Current used for Speed Searching Speed searching starting level ENGINEERING C247 C248 C249 ENGINEERING ENGINEERING ENGINEERING ENGINEERING MODBUS Address 1245 1246 Default Values 1: YES 1sec 1247 10% 1248 1249 75% Last speed C245 Speed Searching Enable C245 Range Default Level Address Control Function 0÷1 0: No ÷ 1: Yes 0 0: No ENGINEERING 1245 IFD This parameter enables the speed searching function. The Speed Searching function is enabled in the following cases: – when the ENABLE contact is open and closed before time tSSdis (C246); – when the DC Braking command is disabled before the preset time is over (see the DC BRAKING MENU); – when an alarm is reset (with a reference other than 0) before time tSSdis. C246 Speed Searching Disable if ENABLE is Open C246 Range Default Level Address Control Function 378/482 0; 3000 0 : (Always ON) ÷ 3000 sec 1 1 sec ENGINEERING 1246 IFD Determines the maximum allowable time passing between the drive disable and enable command when the Speed Searching function is activated. When the drive is restarted, output frequency will depend on the preset acceleration ramp. When C246 = 0: (Always ON) , speed searching will always occur, independently of the time passing between the drive disable and enable. PROGRAMMING INSTRUCTIONS iDrive C247 Frequency Decrease Rate C247 Range Default Level Address Control Function 1 ÷ 1000 1 ÷ 1000% 10 10% ENGINEERING 1247 IFD This parameter sets the frequency decrease rate during the speed search stage. The frequency decrease rate (expressed in Hz/s) is given from the following formula: (fmax x C247) / 10 This means that when C247=100%=1, the IDrive drive takes 10s to go from the max. frequency to 0Hz. When C247=10%=0.1 (default value), the system takes 100s to go from the max. frequency to 0Hz. The maximum frequency of the connected motor is given from the following formula: fmax = (npoles x C029) / (2 x 60). NOTE The frequency decrease rate is not dependent on the preset ramp times. NOTE When the IDrive drive enters the current limitation mode, the time the system takes for speed searching can be longer than the preset time. C248 Current Used for Speed Searching C248 Range Default Level Address Control Function 20 ÷ Min[Ipeak inverter/Imot, 20% ÷ Min[Ipeak inverter/Imot, 100%] 100] 75 75% ENGINEERING 1248 IFD Determines the max. current level for speed searching; it is expressed as a percentage of the rated motor current. C249 Speed Searching Starting Level C249 Range Default Level Address Control 0÷3 0 ENGINEERING 1249 IFD 0: Last speed 1: MaxSpd/Last dir. 2: MaxSpd/Pos. Dir. 3: MaxSpd/Neg.Dir. 0: Last speed 379/482 PROGRAMMING INSTRUCTIONS iDrive Function 380/482 Speed Searching starts according to the value set in C249: C249 = 0:[Last Speed Value] – the last speed search value generated before disabling the system is used for speed searching. C249 = 1:[MaxSpd/LastDir.] – the max. speed programmed for the motor in the last direction of rotation of the connected motor is produced. C249 = 2:[MaxSpd/Pos.Dir] – the speed searching function will begin with the max. speed programmed for the motor in the positive direction of rotation independently of the last frequency value produced before disabling the drive. C249 = 3:[MaxSpd/Neg.Dir] – as “2”, but the direction of rotation of the connected motor will always be negative. PROGRAMMING INSTRUCTIONS iDrive 41. AUTORESET MENU 41.1. Overview The Autoreset function can be enabled in case an alarm trips. You can enter the maximum number of autoreset attempts and the time required for resetting the attempt number. If the Autoreset function is disabled, you can program an autoreset procedure at power on, which resets an active alarm when the drive is shut off. Undervoltage alarms or mains loss alarms can be saved in the fault list in the Autoreset menu. To activate the Autoreset function, set a number of attempts other than zero in parameter C255. When the number of reset attempts is the same as the value set in C255, the autoreset function is disabled. It will be enabled again only when a time equal to or longer than the time set in C256 has passed. If the drive is turned off when an alarm is active, the alarm tripped is stored to memory and will be active at next power on. Regardless of the Autoreset function setup, an automatic reset of the last alarm stored can be obtained when the drive is next turned on (C257 [Yes]). Undervoltage alarm A047 (DC bus voltage below allowable threshold with motor running) or Mains Loss alarm A064 (mains loss when the motor is running and the Power Down function is disabled) are not stored in the fault list when the drive is powered off (factorysetting). To enable parameter storage, set C258 to [Yes]. 41.2. List of Parameters C255 to C258 Table 104: List of parameters C255 to C258. Parameter C255 C256 C257 C258 ENGINEERING ENGINEERING ENGINEERING MODBUS Address 1255 1256 1257 ENGINEERING 1258 FUNCTION User Level Autoreset attempt number Attempt counting reset time Alarm reset at Power On Enable Undervoltage and Mains Loss alarms Default Values 0 300 sec 0: [Disabled] 0: [Disabled] C255 Autoreset Attempt Number C255 Range 0 ÷ 100 0: ÷ 100 Default Level Address 0 0 ENGINEERING 1255 If set other than 0, this parameter enables the Autoreset function and sets the max. allowable number of reset attempts. The autoreset attempt count is Function reset when a time equal to the time set in C256 passes starting from the last alarm tripped. C256 Attempt Counting Reset Time C256 Range 0; 1000 0; 1000 sec. Default Level Address 300 300 sec. ENGINEERING 1256 Determines the time that passes from the last alarm tripped to reset the Function autoreset attempt number. 381/482 PROGRAMMING INSTRUCTIONS iDrive C257 Alarm Reset at Power On C257 Range Default Level Address Functio n 0; 1 0: [Disabled]; 1: [Yes] 0 0: [Disabled] ENGINEERING 1257 At power on, this parameter enables the automatic reset of the alarms tripped when the drive is powered off. C258 Enable Saving Undervoltage and Mains Loss Alarms C258 Range Default Level Address Functio n 382/482 0; 1 0: [Disabled]; 1: [Yes] 0 0: [Disabled] ENGINEERING 1258 This parameter saves Undervoltage and Mains Loss alarms to the fault list. PROGRAM MMING INSTRUCTIO ONS iDrive e 42. MO OTOR TH HERMAL L PROTE ECTION N MENU 42.1. Overrview hermal Prote ection functio on protects th he motor aga ainst overloads. The Motor Th Some IDrive e models offe er the possibiliity to set the heatsink tem mperature forr the activatio on of cooling g fans. d in the Moto r Thermal Pro otection men nu. All relevant parameters are included NOTE Each conne ected motor has its own thermal t model. If the drive is i used to co ntrol only one motor and its control m mode is selected through the selectio on of the diffferent moto ors, the moto or thermal p protection is ensured by setting PTC protection fo or all motors. ermal protec ction can be configured in 4 modes, which can be selected d For each prrogrammable motor, the with parame eter C265 (orr C268 or C27 71 for motor 2 and 3 respe ectively), depending on tthe cooling system s being g used (config guration mod des 1, 2 and 3): 3 0:NO 1:YES 2:YES A 3: YES B NO] [N The Motor Thermal T Prote ection function is disabled d; The Motor Thermal T Prote ection function is active with w trip curre ent It indepen ndent of [N No Derated] operating speed s (No de erated); The Motor Thermal T Prote ection function is active with w trip curre ent It depend ding on [FForced C Cooled] operating speed, s with fa m de-ratin ng; an-cooled motor The Motor Thermal T Prote ection function is active; trip current Itt depends on n operating [S Self Cooled] speed and de-rating is ssuitable for motors m having g a fan keyed d to the shafft (factory setting). hermal mode el is considerred. The heating of a mo otor is proporrtional to the e When C265=1, 2 and 3, the motor th he current flo owing (Io2). The T Motor ov verheated alarm (A075) will trip afterr the time “t” computed d square of th based on th he motor therrmal model iss over. The alarm c can be reset only after a given time d depending on o the thermal constant ((C267) of the e motor, thuss allowing for the correct cooling c of the motor. Figure 60: Trip current drop depending on spee ed values. above showss how trip current It dropss depending on the gene erated speed d based on the t value sett The graph a in paramete er C265. 383/482 PROGRAMMING INSTRUCTIONS iDrive NOTE The motor heating can be monitored with measure M026a. This value is expressed as a percentage of the asymptotic value that can be attained. When C274=Enabled, the thermal protection function is implemented from a PTC sensor: the PTC alarm (A055) trips when voltage acquired by AIN2 used as a PTC signal input exceeds a preset threshold value when the characteristic temperature is attained. Alarm A055 can be reset only if temperature decreases by 5% with respect to the trip temperature. 42.2. Choosing the Characteristic Parameters Parameter C266 relates to the instantaneous trip current that the internal thermal protection function will begin to monitor the current. The default value of 105% is a typical value and it is usually unnecessary to change it. The motor thermal time is specific to the motor design and it varies between different motor manufacturers. If the motor thermal time is unknown, the thermal time constant (C267) can be set up as described in the sections below (IEC Class, Maximum Locked Rotor Time – Basic and Maximum Locked Rotor Time – Enhanced). The first method is the most simple and gives an approximate result. The other two methods are more complex, but give more accurate results. 42.2.1. IEC C LASS The motor can be protected as defined in the IEC 60947-4-1 standard for the thermal overload relays. If the protection class is known, in order to set-up the thermal protection for a certain IEC trip class, the value of C267 can be entered as: IEC Class C267 [s] 10 360 20 720 30 1080 Table 105: Suggested values for the motor thermal time constant. The standard above defines a 7.2 ratio between LRC and FLC. The value to be entered in C267 is then defined from the formula below: C267 = IEC Class x 36. If the ratio between LRC and FLC is not 7.2, please refer to the graph in Figure 61. 42.2.2. M AXIMUM L OCKED R OTOR T IME – B ASIC If the IEC class is not known, then the IEC class can be approximated by the procedure described below. The following values must be known: • Full Load Current (FLC) of the motor • Locked Rotor Current (LRC) • Maximum Locked Rotor Time (LRT) or Direct On Line (DOL) Start Time The FLC of the motor can be obtained directly from the nameplate on the motor. The LRC and LRT must be obtained from the manufacturer or the motor datasheets. The LRC, also referred to as starting current or motor start-up current, is the current that a motor draws at startup when full voltage is applied to the terminals. LRT is the time a motor can safely maintain LRC from a cold start. This information might also be available as a thermal withstand curve or a thermal damage curve. If this is the case, then the LRC and LRT must be deduced from the curves. 384/482 PROGRAMMING INSTRUCTIONS iDrive The following formula can be applied: LRC x LRT IEC Class = ------------FLC x 6 Once the approximated IEC class has been calculated, use the motor thermal time constant (C267) that corresponds to the closest IEC class from Table 105 above. Example 1a: the 7.5kW motor in the table below can be approximated to have a trip class of: 820 x 20 IEC Class = ------------- = 27.3 100 x 6 The motor thermal time constant that you would select is IEC class 30, C267 = 1080s. NOTE As an even quicker guide, the IEC trip class can generally be approximated as the locked rotor time. Table 106: Typical datasheet for 4-pole, 50Hz-400V motors. Output [kW] IEC Frame 0.12 0.18 0.25 0.37 0.55 0.75 1.1 1.5 2.2 4 5.5 7.5 9.2 11 15 18.5 22 30 37 45 55 75 90 110 132 150 160 185 200 220 250 260 280 300 315 330 63 63 71 71 80 80 90S 90L 112M 112M 132S/M 132S/M 160M 160M 160L 180M/L 180L 200L 225S/M 225S/M 250S/M 250S/M 280S/M 315S/M 315S/M 315S/M 315S/M 355M/L 355M/L 355M/L 355M/L 355M/L 355M/L 355M/L 355M/L 355M/L Locked Rotor Full Load Locked Rotor Rated speed Current - LRC Current - FLC Time (cold) [rpm] [% FLC] [A] LRT [s] 450 460 500 500 600 570 700 750 720 660 850 820 560 600 650 800 790 700 720 740 720 750 780 760 780 750 760 720 660 700 690 650 710 670 670 650 0.41 0.58 0.7 1.03 1.3 1.61 2.37 3.28 4.42 7.85 10.34 14 17.4 20.84 28.4 34.83 39.4 55.6 65.2 78.11 95.2 131.25 154.41 189 225.53 260 277 320 342 375 425 445 471 504 529 554 44 59 106 81 37 35 31 22 55 26 26 20 59 42 37 26 35 40 35 33 37 35 55 64 55 44 44 117 108 84 79 90 86 103 92 70 1415 1400 1400 1395 1430 1420 1445 1450 1455 1445 1465 1465 1460 1465 1465 1470 1475 1475 1480 1480 1480 1480 1485 1485 1485 1485 1485 1490 1490 1490 1490 1490 1490 1490 1490 1490 Example 1a/1b Example 2 385/482 PROG GRAMMING G INS STRUCTIONSS iDrive 42 2.2.3. M AXIMU M L OCKEED R OTO OR T IME – E NHAN NCED uired, when tthe ratio bettween LRC and FLC is diffferent from 7.2, you can n If a more prrecise calculation is requ refer to the graph below w, where the e x axis show ws the LRC/FFLC ratio, and the y axis shows the multiplicative m e constant to be applied to t the LRT to calculate th e value of pa arameter C267: Figure 61: Set up p of parametter C267 dep pending on th he LRC/FLC ra atio. b: When usin ng a 7.5kW motor, the multiplicative e constant correspondin c ng to an LRC/FLC=8.2 iss Example 1b approx. 46 if referring to the graph above. hermal time constant c tha t you would select is 27.3 3 x 46, C267 = 1257s, which is a more e As a result, the motor th alue than 108 80s compute ed in Example e 1a. accurate va m in Table e 106 can be e approximatted to have a trip class off: Example 2: TThe 250kW motor 6 690 x 79 IEC Class = -------------- = 90 0.85 100 x 6 mal time consstant that yo ou would sele ect is directly y Because this value is not given in Table 105, the motor therm 85 x 36 = 3260 0s, or 90.85 x 33 = 2998s i f the value “33” “ is consid dered, resultin ng from Tablle 106 with a C267 = 90.8 en LRC/FLC= =6.9. ratio betwee 386/482 PROGRAM MMING INSTRUCTIO ONS 42.3. iDrive e Ther mal Pro otection n Trip Delay D The graph b below shows the thermal protection trrip delay dep pending on the t IEC Classs and the cu urrent flowing g (which is sup pposed to be e constant). Parameter C C266 (trip current) is facto ory set to 105 5%. Figure 62: Trip T delay of alarm A075 based on the e IEC Class. he protection n level is com mpliant with IEC Class 30 0. If the curre ent flowing iss 200% of the e FLC, alarm m Example: Th A075 will trip p after appro ox. 480s (8 min nutes). 387/482 PROGRAMMING INSTRUCTIONS iDrive 42.4. List of Parameters C264 to C274 Table 107: List of parameters C264 to C274. Parameter C264 C265 C266 C267 C268 C269 C270 C271 C272 C273 C274 FUNCTION Heatsink temperature for fan activation Thermal Protection activation for motor 1 Trip current for motor 1[Imot%] Thermal time constant for motor 1 Thermal Protection activation for motor 2 Trip current for motor 2 [Imot%] Thermal time constant for motor 2 Thermal Protection activation for motor 3 Trip current for motor 3 [Imot%] Thermal time constant for motor 3 PTC Thermal Protection Enable User Level ADVANCED BASIC ADVANCED BASIC ADVANCED ADVANCED ADVANCED ADVANCED ADVANCED ADVANCED BASIC MODBUS Address 1264 1265 1266 1267 1268 1269 1270 1272 1271 1273 1274 Default Values 50°C 3: [Fan Shaft] 105% 720s 3: [Fan Shaft] 105% 720s 3: [Fan Shaft] 105% 720s 0:[Disabled] C264 Heatsink Temperature for Fan Activation C264 Range -1 ÷ 100 Default Level Address Function NOTE -1: [Always ON] ÷ 50°C 50 50°C ADVANCED 1264 The heatsink cooling fans are switched on each time the drive is enabled (and the IGBTs are switching). When disabled, the fans are switched off only if the heatsink temperature drops below the value set in C264. Set “Always ON” for cooling fan continuous operation. The real temperature of the heatsink can be displayed in measure parameter M064. This parameter has effect only for the IDrive models where fans are controlled directly by the drive control board (F), as displayed on the Product screen in the PRODUCT MENU . See Table 13 and Table 14. P R O D U C T N A M E P E N T A T y p e 0 0 2 0 4 T 388/482 F - - PROGRAMMING INSTRUCTIONS iDrive C265 (C268, C271) Thermal Protection Activation C265 (Motor 1) C268 (Motor 2) C271 (Motor 3) Range Default Level Address Function 0÷3 0 : [Disabled] 1 : [No Derating] 2 : [ForcedCool.] 3 : [Self-cool.] 3 3: [Fan Shaft] BASIC (C265); ADVANCED (C268, C271) 1265; 1268; 1271 This parameter enables the Motor Thermal Protection function. It also selects the type of thermal protection among different trip patterns. C266 (C269, C272) Trip Current C266 (Motor 1) C269 (Motor 2) C272 (Motor 3) Range Default Level Address Function 1 ÷ min [120%; [((Imax/Imot)*100) %] 1 ÷ min [120%; [((Imax/Imot)*100) %] 105 105% ADVANCED 1266, 1269, 1272 This parameter sets the thermal protection trip current expressed as a percentage of the rated current of motor 1 (2, 3). C267 (C270, C273) Thermal Time Constant C267 (Motor 1) C270 (Motor 2) C273 (Motor 3) Range Default Level Address Function 1 ÷ 10800 1 ÷ 10.800 s 720 720s (corresponding to IEC Class 20) BASIC (C267); ADVANCED (C270, C273) 1267; 1270; 1273 This parameter sets the thermal time constant of the connected motor. The time constant is the time within which the calculated thermal stage has reached 63% of its final value. The motor attains its thermal time constant when it operates in constant load conditions for a time equal to approx. 5 times the constant set in this parameter. C274 PTC Thermal Protection Enable C274 Range Default Level Address Function NOTE 0÷1 0: Disabled ÷ 1: Enabled 0 Disabled ADVANCED 1274 This parameter enables the PTC probe (AIN2 analog input) If the PTC thermal protection (C274) is enabled, the reference from AIN2 is automatically managed as a 0 ÷10V input. The only parameter enabled for the control of AIN2 is P064; P060, P061, P062 and P063 cannot be viewed and are not considered for calculations. 389/482 PROGRAMMING INSTRUCTIONS iDrive 43. MAINTENANCE MENU 43.1. Overview The Maintenance menu allows setting partial counters for the drive Operation Time (OT) and Supply Time (ST). When the preset time is reached, a warning message appears (W48 OT Time over and W49 ST Time over respectively). 43.2. List of Parameters C275 to C278 Table 108: List of parameters C275 to C278. Parameter C275 C276 C277 C278 FUNCTION Operation time counter reset Operation time threshold Supply time counter reset Supply time threshold User Level ENGINEERING ENGINEERING ENGINEERING ENGINEERING MODBUS Address 1275 1276 1277 1278 DEFAULT VALUES NO 0h NO 0h C275 Operation time counter reset C275 Range Default Level Address Function 0÷1 0: [NO] ÷ 1 [YES] 0 NO ENGINEERING 1275 This parameter resets the partial counter for the drive operation time. C276 Operation Time Threshold C276 Range Default Level Address Function 0 ÷ 65000 0 ÷ 650000h 0 0h ENGINEERING 1276 This parameter sets the threshold for the operation time of the drive. When this time is exceeded, Warning “W48 OT Over” appears. To reset the warning message, reset the partial counter or set the counter threshold to zero. C277 Supply Time Counter Reset C277 Range Default Level Address Function 0÷1 0: [NO] ÷ 1 [YES] 0 NO ENGINEERING 1277 This parameter resets the partial counter for the drive supply time. C278 Supply Time Threshold C278 Range Default Level Address Function 390/482 0 ÷ 65000 0 ÷ 650000h 0 0h ENGINEERING 1278 This parameter sets the threshold for the supply time of the drive. When this time is exceeded, Warning “W49 ST Over” appears. To reset the warning message, reset the partial counter or set the counter threshold to zero. PROGRAMMING INSTRUCTIONS iDrive 44. PID CONFIGURATION MENU 44.1. Overview The IDrive is provided with two separate PID (Proportional, Integral, Derivative) regulators allowing performing regulation loops such as pressure control, delivery control, etc., with no need to connect external auxiliary devices. The PID Configuration Menu defines configuration parameters for the two PID regulators. The configuration parameters for the PID regulator can be modified only when the drive is in stand-by and they set the following variables: reference sources, feedback sources and type of PID output action. The programming parameters for the two PID regulators, including coefficients of proportional, integral and derivative terms, output saturation, etc., are covered in the PID PARAMETERS MENU and the PID2 PARAMETERS MENU. 44.2. Operation and Structure of the PID Regulator Figure 63: Structure of the PID Regulator. The figure above illustrates the block diagram of the PID regulator. Each block is described below: Block 1: PID reference sources. Multiple reference sources can be selected at a time (up to 3 reference sources can be selected with parameters C285, C286, C287). The resulting reference value depends on the setup in C291a (see block 3). Dynamic selection is possible between two reference sources using the digital input configured as the source selector (see C179); this parameter has effect only if the Two PIDs mode is activated. Block 2: PID feedback sources. Multiple feedback sources can be selected at a time (up to 3 feedback sources can be selected with parameters C288, C289, C290). The resulting reference value depends on the setup in C291a (see block 3). Dynamic selection is possible between two feedback sources using the digital input configured as the source selector (see C179); this parameter has effect only if the Two PIDs mode is activated. 391/482 PROGRAMMING INSTRUCTIONS iDrive Figure 64: Reference source and feedback source selection. NOTE The signals selected in the Sources Vector are to be considered as percentage values; therefore, analog signals are expressed as a percentage of the preset maximum values and minimum values. For example, when selecting a reference source, if P052 Ref. max. = 8V and P051 Ref. min. = –3V, 100% will be considered when Ref. = 8V and –100% will be considered when Ref. = –3V. NOTE Among the allowable variables for the PID feedback, electrical variables Iout (output current), Vout (output voltage), Vdc (DC bus voltage), Pout (output power) and Torque out (output torque – only with VTC and FOC control). Their percentage values relate to rated current values and rated voltage values of the selected motor and to 1500VDC respectively. NOTE In Local mode, the PID regulator is disabled if set as C294 = Reference Sum or Voltage Sum. Block 3: PID Control Mode This block allows applying different processing types to the feedback signals and allows enabling/disabling the PID2 integrated into the system (see C291a). Block 4: Ramp over PID Reference A ramp may be applied to the PID references sent from block 3. The same ramp is applicable for both blocks: the processed references are the ones actually used in the PID regulator. The parameters of the PID reference ramp are illustrated in the figure below. The initial rounding-off is applied to the reference whenever a new acceleration/deceleration ramp is started, while the end reference is applied at the end of each ramp. 392/482 PROGRAMMING INSTRUCTIONS iDrive Figure 65: PID ramp reference. NOTE The PID2 ramp reference control is the same, but parameters P2xx are replaced with parameters P4xx. Block 5: PID regulators This is the real PID regulator. Its output may be disabled by an external digital command (if programmed with C171). If the PID regulator is used as a reference source and P255 (P455 for PID2) is not set to zero, the PID output value control is enabled. If the PID output equals the preset minimum value for a time longer than P255 (P455 for PID2), the drive is automatically put on stand-by. In the last block, the PID output is applied to the function defined by the “PID Action” parameter (C294). The PID regulator structure is detailed in the diagram below (block 5). Figure 66: Details of the PID regulator structure. NOTE The PID2 structure is the same as the PID structure, but parameters P2xx are replaced with P4xx and parameter C291 is replaced with parameter C291b. Parameters C292 and C293 are in common for PID and PID2. Block 6: Digital input for PID control selection. Block 6 activates only when both PIDs are enabled (C291a = 2 PID) or when in 2-Zone mode (C291a = 2-Zone MIN or 2-Zone MAX). 393/482 PROGRAMMING INSTRUCTIONS iDrive In Two PIDs mode: if C171a = 0: Disabled, the PID output is summed with the PID2 output; if C171a is enabled, the logic state of the configured input determines which is the output of the PID regulator to be used: 0 → PID, 1→ PID2. In 2-zone mode: if C171a is enabled, when the selected input is activated, the 2-zone mode (MIN or MAX) is disabled. In that case, the PID regulator always operates on the error resulting from C285–C288 and with parameters P2xx. The PID regulator output may be used as: • an external output; • a speed/torque reference of the drive; • a speed/torque reference increase or, if the IFD control is used, the PID regulator input may be used for correcting the output voltage. If the PID regulator output is the speed reference of the drive, the selected speed/torque ramp is applied. SERIAL LINK The Serial Link source is an input from the MODBUS link: the reference value shall be written by the user to the following addresses: Table 109: Reference sources from serial link. MODBUS Address 1418 1420 44.3. Input User Level I031 I033 BASIC BASIC Type of Reference PID Reference PID Feedback Description Unit of Measure PID reference value PID feedback value Set in P267 Set in P267 List of Parameters C285 to C294 Table 110: List of parameters C285 to C294. Paramete r C285 C286 C287 C288 C289 C290 C291 FUNCTION Selection of PID reference n. 1 Selection of PID reference n. 2 Selection of PID reference n. 3 Selection of PID feedback n. 1 Selection of PID feedback n. 2 Selection of PID feedback n. 3 PID operating mode C291a PID control mode C291b PID2 operating mode Selection of the variable for calculating the derivative term Proportional Multiplier of derivative and integral terms PID action C292 C293 C294 394/482 ENGINEERING ENGINEERING ENGINEERING ENGINEERING ENGINEERING ENGINEERING ENGINEERING ENGINEERING MODBUS Address 1285 1286 1287 1288 1289 1290 1291 1295 ENGINEERING 1296 Default Values 2:AIN1 0:Disable 0:Disable 3:AIN2/PTC 0:Disable 0:Disable 0:Disable 0:Standard SUM 1: Normal ENGINEERING 1292 0:Measure ENGINEERING 1293 0:NO ENGINEERING 1294 1:Reference User Level PROGRAMMING INSTRUCTIONS iDrive C285 (C286,C287) Selection of PID Reference n. 1 ( 2, 3) C285 (C286, C287) Range Default Level Address Function 0÷9 0 ÷ 11 when ES847 is fitted 0: Disable 1: REF 2: AIN1 3: AIN2/PTC 4: Pulse Input 5: Serial Link 6: Fieldbus 7: Keypad 8: Encoder 9: Up Down from MDI 10: XAIN4 11: XAIN5 C285 = 2 C285 = 2: AIN1 C286 = 0 C286 = 0 C287 = 0 C287 = 0 ENGINEERING 1285 (1286, 1287) C285 selects the first PID reference source from the PID regulator. Up to three reference sources may be configured (285 – C287) considered as a sum. The sources are used by the PID and are expressed in percentage values (with reference to their max. value and min. value set in the References menu). If multiple reference sources are selected, their sum is considered. They are saturated between P246 and P245 (PID reference maximum and minimum value respectively). Reference sources 10 and 11 can be selected only after setting XAIN in parameter R023. C288 (C289,C290) Selection of PID Feedback n.1 (2, 3) C288 (C289, C290) Range Default Level Address 0 ÷ 13 0 ÷ 15 when ES847 is fitted C288= 3 C289= 0 C290= 0 ENGINEERING 1288 (1289, 1290) 0: Disable 1: REF 2: AIN1 3: AIN2/PTC 4: Pulse Input 5: Serial Link 6: Fieldbus 7: Keypad 8: Encoder 9: Iout 10: Vout 11: Vdc 12: Pout 13: Tout 14: XAIN4 15: XAIN5 C288= 3: AIN2/PTC C289= 0: Disable C290= 0: Disable 395/482 PROGRAMMING INSTRUCTIONS iDrive Function 396/482 C288 selects the first PID feedback source. Up to three feedback sources can be configured among the available reference sources. If multiple sources are selected, their sum is considered. They are saturated based on parameters P247 and P248 (PID feedback maximum and minimum value respectively). See also parameter C285. Feedback sources 14 and 15 can be selected only after setting XAIN in parameter R023. PROGRAMMING INSTRUCTIONS iDrive C291 PID Operating Mode C291 Range Default Level Address Function 0÷2 0: Disable 1: Normal 2: Reverse 0 0: Disable ENGINEERING 1291 This parameter defines how to compute the PID output. Three computing modes are available: 0: Disable, 1: Normal, 2: Reverse. If 0: Disable is selected, the PID regulator is inactive and its output is always set to zero. In Normal mode, the real PID output is considered. If 2: Reverse is selected, the output actuated by the PID regulator results from the subtraction of the max. output value set in P236 from the output obtained by the PID regulator. This operating mode can be used for special applications (see the Keeping Fluid Level Constant (Example) at the end of this chapter). C291a PID Control Mode C291a Range Default Level Address Function 0÷7 0: Standard SUM 1: Standard DIFF 2: Average 3: Minimum 4: Maximum 5: 2-Zone MIN 6: 2-Zone MAX 7: 2 PIDs 0 0: Standard SUM ENGINEERING 1295 This parameter sets the PID control mode. Functions 0 to 4 set the processing mode of the feedback signal as detailed below. 1) If C179 Input for Source Selection = 0: Disabled: STANDARD SUM: All the selected feedback signals are summed up. STANDARD DIFF: The sum of the selected feedback signals is subtracted from the feedback signal programmed in C288. AVERAGE: The resultant of the feedback is given from the arithmetical average of the selected signals. MINIMUM: The signal having the smallest value among the selected signals is considered as the feedback. MAXIMUM: The signal having the largest value among the selected signals is considered as the feedback. 2) If C179 is enabled: STANDARD SUM: C288+C290 or C289+C290. STANDARD DIFF: C288–C290 or C289–C290. AVERAGE: AVG(C288,C290) or AVG(C289,C290). MINIMUM: MIN(C288,C290) or MIN(C289,C290). MAXIMUM: MAX(C288,C290) or MAX(C289,C290). The references are always summed with each other, unless they are managed with the Source Selection (see C179). 397/482 PROGRAMMING INSTRUCTIONS iDrive Functions 5 and 6 (2-Zone Mode) automatically disable the Source Selection function that can be programmed with C179. In functions 5 and 6 only the references selected with C285-C286 and the feedback values selected with C288-C289 are used. 2-Zone MIN: The PID operates on the system with the larger algebraic error MAX(C285–C288,C286–C289). This means that the system takes control of the PID having the minimum feedback in respect to its setpoint. 2-Zone MAX: The PID operates on the system with the smaller algebraic error MIN(C285–C288,C286–C289). This means that the system takes control of the PID having the maximum feedback in respect to its reference. Function NOTE: When C171a Input for PID Control Selection is activated and the selected input is activated, the 2-zone (MIN or MAX) mode is disabled and the PID always operates on the error resulting from C285–C288. Function 7 (Two PIDs programming) automatically disables the Source Selection function that can be programmed with C179. The two PIDs use only the signals selected with C285/C288 for PID and with C286/C289 for PID2. 2 PID: PID and PID2 operate in parallel; the outputs of the two PIDs are matched based on the configuration of C171a: If C171a = 0: Disabled, the outputs of the two PIDs are summed to each other; If C171a is enabled, the output of the PID regulator depends on the logic state of the configured input: 0 → PID, 1→ PID2. C291b PID2 Operating Mode C291b Range Default Level Address Function 1÷2 1: Normal 2: Inverse 1 1: Normal ENGINEERING 1296 This parameter sets how to calculate the PID2 output. Two modes are available: 1: Normal, 2: Inverse. In Normal mode, the output of the PID regulator is the actual PID2 output. If 2: Inverse is selected, the error sign is reversed. The Inverse operating mode can be used for special applications only (see Keeping Fluid Level Constant (Example)). C292 Selection of the Variable for Calculating the Derivative Term C292 Range Default Level Address Function 398/482 0÷1 0: Measure 1: Error 0 0: Measure ENGINEERING 1292 This parameter sets the variable used for calculating the derivative term. By default, the derivative term is computed according to the feedback measure, but it can also be computed according to the PID error: Error = Reference – Feedback. PROGRAMMING INSTRUCTIONS iDrive C293 Proportional Multiplier of Derivative and Integral Terms C293 Range Default Level Address Function 0÷1 0: No 1: Yes 0 0: No ENGINEERING 1293 This parameter defines if the proportional term is used for the multiplication of the derivative and integral terms as well. 0: No means that the proportional term DOES NOT multiply the integral term. 399/482 PROGRAMMING INSTRUCTIONS iDrive C294 PID Action C294 Range Default Level Address 400/482 0÷4 1 ENGINEERING 1294 0: External output 1: Reference 2: Reference sum 3: Voltage sum 4: Full Ref. Sum 1: Reference PROGRAMMING INSTRUCTIONS iDrive This parameter sets the type of implementation carried out by the PID regulator. C294 = External Output: The PID regulator is independent of the drive operation, unless a digital input is configured for PID disabling; if the digital input closes, the PID regulator is disabled and the output is set to zero. In order to use the PID regulator output externally to the drive, configure one of the analog outputs as PID Out. C294 = Reference: The PID regulator output is the speed/torque reference of the connected motor (depending on the type of reference configured when the motor is running); any other reference source which will be selected will be ignored. If the output is a speed reference, 100% corresponds to the max. absolute value between min. speed and max. speed set for the motor being used. Mot1 <– Max { | C028 |; | C029 | } Mot2 <– Max { | C071 |; | C072 | } Mot3 <– Max { | C114 |; | C115 | } If the output is a torque reference, 100% is the max. absolute value between the min. limit and the max. limit of the torque of the active motor. Mot1 <– max { | C047 |; | C048 | } Mot2 <– max { | C090 |; | C091 | } Mot3 <– max { | C133 |; | C134 | } Function C294 = Reference Sum: The PID regulator output is a correction of the speed/torque reference of the active motor (depending on the type of reference configured when the motor is running). The percentage value of the PID output relates to the instant value of the speed/torque reference. For example, if the speed reference of the active motor is 800rpm and the PID output is ignored, if this drops to 50%, the overall speed setpoint will be 800 + 800*(50/100) = 1200rpm. Therefore, the PID regulator can never reversed the reference sign. C294 = Voltage Output Sum: This configuration is active only when the control algorithm of the active motor is IFD. In this case, the PID regulator output is a correction of the output voltage. The percentage value of the PID output relates to the instant voltage value. For example, if a motor is operating in IFD mode and the drive output voltage is 200V rms at 25 Hz with PID Output = 0, if PID Output drops to 10%, the actual voltage will be 200 + 200*(–10/100) = 180V. C294 = Reference Sum Full: The regulator output is a correction of the speed/torque reference of the connected motor (depending on the type of reference configured for the active motor). The value percent of the PID output is managed in the same way as C294 = Reference and is summed to the main reference. For example, if a motor is speed-controlled with C029=1500rpm, considering the PID regulator output as null, the reference is 400rpm; if the PID output becomes 50%, the total speed setpoint is 400 + 1500*(50/100) = 1150rpm. In that way, if the PID output is other than zero, the reference generated will be other than zero as well, even if the main reference is null, unlike what would happen if C294 = Reference Sum. 401/482 PROGRAMMING INSTRUCTIONS iDrive 44.4. Keeping Fluid Level Constant (Example) Mains Fuse Counts time Sensor Level 4-20mA Tank Figure 67: Keeping fluid level constant (Example). Suppose that the maximum level in the tank is to be kept at 50% and that a 4–20mA level probe is used, with an output of 4mA for the min. level and 20mA for the max. level. The PID reference is sent from keypad, while the probe feedback is sent to AIN2/PTC analog input, which is configured as follows: The reference shall be saved from keypad, thus avoiding setting it up again when the drive is shut off. 402/482 PROGRAMMING INSTRUCTIONS iDrive The PID regulator action and the PID output computing mode must also be set. The PID regulator parameters are defined in the PID PARAMETERS MENU. This configuration limits the PID output between 0 and 100% for a proper rotation of the connected pump. Set P255 = 1000 ts: if the PID output is equal to the min. value for 5 seconds, the drive is put on stand by. 403/482 iDrive PROGRAMMING INSTRUCTIONS When the level of liquid in the tank exceeds the reference value set from keypad, a negative error is produced (Error = Reference – Feedback). Because the complemented output computing mode is selected and because the complemented output is the speed reference, the higher the error absolute value, the higher the PID output value. This means that the quicker the level increases, the quicker the pump suction. On the other hand, if the level is lower than the reference, a positive error is produced, because the PID output is limited to 0%, the pump will not activate; if the PID output is equal to the min. value for a timer longer than P255 = 1000*P244 = 5sec , the drive is put on stand by. 404/482 PROGRAMMING INSTRUCTIONS 45. iDrive BRIDGE CRANE MENU 45.1. Overview For lifting applications, it may be necessary to consider the opening/closing of a mechanical brake in order to obtain a proper control of the connected motor. For example, if a mechanical brake takes 500ms to open after the start command – the delay is due to the type of brake – the motor will not be running for 500ms, while the speed reference increases the preset ramp. The motor then pushes against the brake, and when it can rotate freely, the motor torque will not match with the torque required to move the connected load. If the speed setpoint is kept to zero for a given time after sending the start command (considering the time required for the mechanical brake to open), the motor control will implement the proper torque for the motor speed as soon as the motor can start rotating. The brake closure can be controlled via a digital input that is properly set up; when the drive detects the brake closure, it automatically adjusts the value of the current injected into the motor to the fluxing value. This is required when, during the lifting stage, the mechanical brake closes when the load is suspended after reaching negligible speed. In that case, the torque produced by the motor is capable of keeping the load hanging; when the brake closes, this has no effect on the speed regulator, because the motor is already standstill. When the brake closes, no torque must be generated to keep the load hanging, so the current injected into the motor drops to the value required for the motor fluxing. 45.2. NOTE The Bridge CRANE menu is used for VTC and FOC Control only. NOTE For safety reasons, the brake closure contact must be an NO contact (closed contact only when the brake is engaged). NOTE In addition to parameters C300 to C302, a dedicated MDO must be set as 6:BRAKE (see the DIGITAL OUTPUTS MENU). List of Parameters C300 to C302 Table 111: List of parameters C300 to C302. ENGINEERING ENGINEERING ENGINEERING MODBUS Address 1300 1301 1308 DEFAULT VALUES 0.0% 0 0.0% ENGINEERING 1309 0 ENGINEERING 1302 0: None Parameter FUNCTION User Level C300 C301 C300a Positive pretensioning torque [%Cmot] Positive pretensioning torque time Negative pretensioning torque [%Cmot] Time period of negative pretensioning torque Closed brake input (NO contact) C301a C302 405/482 PROGRAMMING INSTRUCTIONS iDrive C300/C300a Pretensioning Torque [%Cmot] C300/C300a Range Default Level Address Control Function -5000 ÷ +5000 -500.0% ÷ +500.0% 0 0.0 % ENGINEERING 1300/1308 VTC and FOC If not set to zero, this parameter defines the torque value (expressed as a percentage of the rated torque of the selected motor) reached before the speed ramp starts after sending a START command. After sending a START command, the drive brings the motor torque to the level set in C300/C300a and torque is adjusted by the speed loop for the time set in C301/C301a in order to keep the motor standstill. Once this time has elapsed, the speed ramp can start and the motor follows the required speed profile. The torque sign defines the running direction. The sign of the speed reference determines which value percent is to be used; C300 is for the positive sign, C300a is for the negative sign. C301/C301a Pretensioning Torque Time C301/C301a Range Default Level Address Control Function 0 ÷ 32000 0 ÷ 32000 ms 0 0 ENGINEERING 1301/1309 VTC and FOC Delay time passing between the start command and the speed ramp start. During this time, the motor torque output is set in C300/C300a to keep the load suspended. C302 Closed Brake Input (NO contact) C302 Range Default Level Address Control Function 406/482 0 → Inactive 0 ÷ 12 1 ÷ 8 → MDI1 ÷ MDI8 0 ÷ 20 if ES847 or ES870 is 9 ÷ 12 → MPL1 ÷ MPL4 13 ÷ 16 → TFL1 ÷ TFL4 installed 17 ÷ 24 → XMDI1 ÷ XMDI8 0 → Inactive 0 ENGINEERING 1302 VTC and FOC This parameter determines the digital input assigned to the mechanical brake closure feedback (NO contact, which closes only when the brake is engaged). When the brake closure is detected after a deceleration ramp, the current required for motor fluxing is injected into the motor. If no digital input is available for the detection of the brake closure, set max. time in C183, in order to avoid injecting current into the motor after the deceleration ramp. When the motor is not running, the START command is disabled and the speed setpoint is at zero for a time longer than the one set in C183, the drive will be put on standby. PROGRAMMING INSTRUCTIONS iDrive 46. DATE AND TIME MENU 46.1. Overview The Clock/Calendar of the control board (RTC – Real Time Clock) is based on the Clock/Calendar of the Data Logger ES851 (please refer to the Installation Instructions manual). NOTE The Data and Time Menu may be accessed only if the Data Logger board is installed (even the ES851 RTC version only) and if parameter R021 Data Logger setting is set to 2: ENABLE. The clock/calendar can be updated via special parameters. The display/keypad permits to immediately update the clock/calendar: just select the Set Time page or the Set Date page and press ENTER. Press ESC to go to the next field; press ENTER to confirm. If you use the serial link of the inverter where the Data Logger is installed, the Clock/Calendar is viewed in the measure parameters below. To update the Clock/Calendar via serial link, set the new values in C310 to C315 and send the edit command (C316). Parameters R050 to R053 set the rules for daylight saving time. C 3 1 4 D S T : Press Save/Enter for TIME setting S e t O F F T I M E : 2 9 : 5 5 J A N / 0 1 : S A T > 1 6 2 0 1 1 / First page of the Date and Time menu on the display/keypad C 3 1 0 Press Save/Enter for DATE setting > 2 0 1 1 S e / t D A T E 1 6 : 2 9 : 5 5 J A N / 0 1 : S A B Second page of the Date and Time menu on the display/keypad The date and time on the display/keypad are represented by the measures below: Time (Hours) Time (Hours) Range 0 ÷ 23 0 ÷ 23 hours Address Level This measure is available only if the Data Logger ES851 is installed and activated (R021 = ENABLE). 3342 BASIC Function Time - hours (current value). Active 407/482 PROGRAMMING INSTRUCTIONS iDrive Minutes Minutes Range Active Address Level Function 0 ÷ 59 0 ÷ 59 min This measure is available only if the Data Logger ES851 is installed and activated (R021 = ENABLE). 3343 BASIC Minutes (current value). Seconds Seconds Range Active Address Level Function 0 ÷ 59 0 ÷ 59 sec This measure is available only if the Data Logger ES851 is installed and activated (R021 = ENABLE). 3344 BASIC Seconds (current value). Day of the Week Day of the Week Range Active Address Level Function 1÷7 1: Mon. 2: Tues. 3: Wed. 4: Th. 5: Fri. 6: Sat. 7: Sun. This measure is available only if the Data Logger ES851 is installed and activated (R021 = ENABLE). 3345 BASIC Day of the week (current value). Day of the Month Day of the Month Range Active Address Level Function 1 ÷ 31 1 ÷ 31 days This measure is available only if the Data Logger ES851 is installed and activated (R021 = ENABLE). 3346 BASIC Day of the month (current value). Daylight Saving Time Daylight Saving Time Range Active Address Level Function 408/482 0÷2 0÷2 This measure is available only if the Data Logger ES851 is installed and activated (R021 = ENABLE). 528 BASIC Status of the DST: 0: Inactive 1: Inactive from less than 1 hour 2: Active PROGRAMMING INSTRUCTIONS iDrive Month Month Range Active Address Level Function 1 ÷ 12 1: January 2. February 3: March 4: April 5: May 6: June 7: July 8: August 9: September 10: October 11: November 12: December This measure is available only if the Data Logger ES851 is installed and activated (R021 = ENABLE). 3347 BASIC Month (current value). Year Year Range Active Address Level Function 2000 ÷ 2099 2000 ÷ 2099 years This measure is available only if the Data Logger ES851 is installed and activated (R021 = ENABLE). 3348 BASIC Year (current value). 409/482 PROGRAMMING INSTRUCTIONS iDrive 46.2. List of Parameters C310 to C316 Table 112: List of Parameters C310 to C316 Parameter C310 C311 C312 C313 C314 C315 C316 FUNCTION Day of the week to be changed Day of the month to be changed Month to be changed Year to be changed Time (Hours) to be changed Time (Minutes) to be changed Clock/Calendar editing command User Level ADVANCED ADVANCED ADVANCED ADVANCED ADVANCED ADVANCED ADVANCED MODBUS Address Drive Software Multipump (PD) Software (PM) 1237 1053 1238 1054 1239 1055 1240 1056 1241 1057 1242 1058 1244 1060 C310 Day of the Week to be changed C310 1: Mon. 2: Tues. 3: Wed. 4: Th. 5: Fri. 6: Sat. 7: Sun. Range 1÷7 Default 1 1: Mon. This parameter can be viewed and changed only if the Data Logger ES851 is installed and activated (R021 = ENABLE). 1237 (PM 1053) ADVANCED This parameter sets the value of the day of the week to be changed. Active Address Level Function C311 Day of the Month to be changed C311 Range 1 ÷ 31 Default Level 1 Day 1 ADVANCED This parameter can be viewed and changed only if the Data Logger ES851 is installed and activated (R021 = ENABLE). 1238 (PM 1054) This parameter sets the value of the day of the month to be changed. Active Address Function 410/482 1 ÷ 31 days PROGRAMMING INSTRUCTIONS iDrive C312 Month to be changed C312 1: January 2. February 3: March 4: April 5: May 6: June 7: July 8: August 9: September 10: October 11: November 12: December Range 1 ÷ 12 Default Level 1 1: January ADVANCED This parameter can be viewed and changed only if the Data Logger ES851 is installed and activated (R021 = ENABLE). 1239 (PM 1055) This parameter sets the value of the month to be changed. Active Address Function C313 Year to be changed C313 Range 2000 ÷ 2099 Default Level 0 Year 2000 ADVANCED This parameter can be viewed and changed only if the Data Logger ES851 is installed and activated (R021 = ENABLE). 1240 (PM 1056) This parameter sets the value of the year to be changed. Active Address Function 2000 ÷ 2099 years C314 Time (hours) to be changed C314 Range 0 ÷ 23 Default Level 0 0 hours ADVANCED This parameter can be viewed and changed only if the Data Logger ES851 is installed and activated (R021 = ENABLE). 1241 (PM 1057) This parameter sets the time (hour) to be changed. Active Address Function 0 ÷ 23 hours C315 Minutes to be changed C315 Range 0 ÷ 59 Default Level 0 0 minutes ADVANCED This parameter can be viewed and changed only if the Data Logger ES851 is installed and activated (R021 = ENABLE). 1242 (PM 1058) This parameter sets the time (minutes) to be changed. Active Address Function 0 ÷ 59 min. 411/482 PROGRAMMING INSTRUCTIONS iDrive C316 Clock/Calendar Editing Command C316 Range 0÷1 Default Level 0 0 ADVANCED This parameter can be viewed and changed only if the Data Logger ES851 is installed and activated (R021 = ENABLE). 1244 (PM 1060) If this parameter is set to 1, all the values set in parameters C310 to C315 are written and stored to the clock/calendar of the board and the measures described above are instantly changed. Active Address 0÷1 Function CAUTION 412/482 Also unchanged parameters are written to the clock/calendar. Make sure that unchanged parameters are correct. PROGRAMMING INSTRUCTIONS iDrive 47. TIMED FLAGS MENU 47.1. Overview The Timed Flag Menu includes the parameters setting the four timed flags for the inverter, TFL1..4. The following data items are set for each timed flag: activation time (Time ON), deactivation time (Time OFF), days of the week when activation shall occur. The timed flags may be used as they were digital inputs, both when managing digital outputs (MDO) and when managing virtual digital outputs (MPL). It is also possible to assign the same control functions that can be associated to the other digital inputs (see DIGITAL INPUTS MENU). NOTE 47.2. The Timed Flags Menu may be accessed only if the Data Logger board is installed (even the ES851 RTC version only) and if parameter R021 Data Logger setting is set to 2: ENABLE. Examples Every time flag features 3 parameters (Hour, Minute, Second) setting the activation time of the flag itself; 3 parameters (Hour, Minute, Second) setting the deactivation time of the flag itself; 1 parameter setting the days of the week when the flag shall activate. If the activation time precedes the deactivation time, the flag will have the TRUE logic value at the activation time, whilst it will have the FALSE logic value at the deactivation time in the days of the week concerned. If the activation time is subsequent to the deactivation time, the flag will have the TRUE logic value at the activation time, whilst it will have the FALSE logic value at the deactivation time of the following day. Example 1: C330 C331 C332 C333 C334 C335 C336 TFL1: Time ON – Hour TFL1: Time ON – Minutes TFL1: Time ON – Seconds TFL1: Time OFF – Hour TFL1: Time OFF – Minutes TFL1: Time OFF – Seconds TFL1: Days of the week 08 00 00 20 00 00 1000000 The timed flag TFL1 is TRUE from 8:00:00AM to 08:00:00PM every Monday. Example 2: C330 C331 C332 C333 C334 C335 C336 TFL1: Time ON – Hour TFL1: Time ON – Minutes TFL1: Time ON – Seconds TFL1: Time OFF – Hour TFL1: Time OFF – Minutes TFL1: Time OFF – Seconds TFL1: Days of the week 20 00 00 08 00 00 1000000 The timed flag TFL1 is TRUE from 08:00:00PM on every Monday to 8:00:00AM on every Tuesday. 413/482 PROGRAMMING INSTRUCTIONS iDrive 47.3. List of Parameters from C330 to C357 Table 113: List of Parameters C330 ÷ C357 Parameter C330 C331 C332 C333 C334 C335 C336 C337 C338 C339 C340 C341 C342 C343 C344 C345 C346 C347 C348 C349 C350 C351 C352 C353 C354 C355 C356 C357 FUNCTION TFL1: Time ON – Hour TFL1: Time ON – Minutes TFL1: Time ON – Seconds TFL1: Time OFF – Hour TFL1: Time OFF – Minutes TFL1: Time OFF – Seconds TFL1: Days of the week TFL2: Time ON – Hour TFL2: Time ON – Minutes TFL2: Time ON – Seconds TFL2: Time OFF – Hour TFL2: Time OFF – Minutes TFL2: Time OFF – Seconds TFL2: Days of the week TFL3: Time ON – Hour TFL3: Time ON – Minutes TFL3: Time ON – Seconds TFL3: Time OFF – Hour TFL3: Time OFF – Minutes TFL3: Time OFF – Seconds TFL3: Days of the week TFL4: Time ON – Hour TFL4: Time ON – Minutes TFL4: Time ON – Seconds TFL4: Time OFF – Hour TFL4: Time OFF – Minutes TFL4: Time OFF – Seconds TFL4: Days of the week User Level DEFAULT VALUES ADVANCED ADVANCED ADVANCED ADVANCED ADVANCED ADVANCED ADVANCED ADVANCED ADVANCED ADVANCED ADVANCED ADVANCED ADVANCED ADVANCED ADVANCED ADVANCED ADVANCED ADVANCED ADVANCED ADVANCED ADVANCED ADVANCED ADVANCED ADVANCED ADVANCED ADVANCED ADVANCED ADVANCED 0 0 0 0 0 0 0 0 0 0 0 0 0 0 0 0 0 0 0 0 0 0 0 0 0 0 0 0 MODBUS Address 271 272 273 274 275 276 277 278 279 280 281 282 283 284 285 286 287 288 289 290 291 292 293 294 295 296 297 298 C330 (C337, C344, C351) Hour of Activation of the Timed Flag TFL1 (TFL2, TFL3, TFL4) C330 C337 C344 C351 Range Default Level Address Function 0 ÷ 23 0 ÷ 23 0 0 ADVANCED 271 (278, 285, 292) Sets the hour of activation of the timed flag TFL1 (TFL2, TFL3, TFL4). C331 (C338, C345, C352) Minute of Activation of the Timed Flag TFL1 (TFL2, TFL3, TFL4) C331 C338 C345 C352 Range Default Level Address Function 414/482 0 ÷ 59 0 ÷ 59 0 0 ADVANCED 272 (279, 286, 293) Sets the hour of activation of the timed flag TFL1 (TFL2, TFL3, TFL4). PROGRAMMING INSTRUCTIONS iDrive C332 (C339, C346, C353) Second of Activation of the Timed Flag TFL1 (TFL2, TFL3, TFL4) C332 C339 C346 C353 Range Default Level Address Function 0 ÷ 59 0 ÷ 59 0 0 ADVANCED 273 (280, 287, 294) Sets the second of activation of the timed flag TFL1 (TFL2, TFL3, TFL4). C333 (C340, C347, C354) Hour of Deactivation of the Timed Flag TFL1 (TFL2, TFL3, TFL4) C333 C340 C347 C354 Range Default Level Address Function 0 ÷ 23 0 ÷ 23 0 0 ADVANCED 274 (281, 288, 295) Sets the hour of deactivation of the timed flag TFL1 (TFL2, TFL3, TFL4). C334 (C341, C348, C355) Minute of Deactivation of the Timed Flag TFL1 (TFL2, TFL3, TFL4) C334 C341 C348 C355 Range Default Level Address Function 0 ÷ 59 0 ÷ 59 0 0 ADVANCED 275 (282, 289, 296) Sets the minute of deactivation of the timed flag TFL1 (TFL2, TFL3, TFL4). C335 (C342, C349, C356) Second of Deactivation of the Timed Flag TFL1 (TFL2, TFL3, TFL4) C335 C342 C349 C356 Range Default Level Address Function 0 ÷ 59 0 ÷ 59 0 0 ADVANCED 276 (283, 290, 297) Sets the second of deactivation of the timed flag TFL1 (TFL2, TFL3, TFL4). 415/482 PROGRAMMING INSTRUCTIONS iDrive C336 (C343, C350, C357) Days of the Week of the Activation of the Timed Flag TFL1 (TFL2, TFL3, TFL4) C336 C343 C350 C357 Range Default Level Address Function 416/482 0000000b ÷1111111b binary 0 ÷ 127 0 0 ADVANCED 277(284, 291, 298) Sets the second of deactivation of the timed flag TFL1 (TFL2, TFL3, TFL4). Every bit corresponds to a day of the week: bit 1 corresponds to Monday, bit 7 corresponds to Sunday. Example: 1111100: flag TLF1 will activate every day of the week but Saturday and Sunday. 0000000: the flag will never activate. 1111111: the flag will activate every day. PROGRAM MMING INSTRUCTIO ONS 48. iDrive e SER RIAL CO OMMUNIICATION NS 48.1 1. Overrview onnected to o other devic ces through a serial link.. This allows reading and d writing the e IDrive drivess may be co parameters accessed th hrough the re emotable disp play/keypad d.. S also sup pplies the RemoteDrive R e Lönne Scandinavia AS ackage allow wing controllling the drive through a software pa computer co onnected via a serial link. The RemoteD Drive offers th he following functionality y: image copy, keypa ad emulation, oscilloscope e functions and a multifunction n tester, data a logger, histo ory data table compiler, parameter setting and data receptio on–transmissio on–storage on for the au utomatic from and to a computer,, scan functio detection off the connected inverterss (up to 247 connected c inverters). Lönne Scan ndinavia AS also suppliess the RemotteDrive softw ware packag ge for the invverter contro ol through a computer c connected via serial link. 48.2. MOD DBUS–R TU PRO OTOCOL L and data are e sent by me eans of stan dard protoc col MODBUS in RTU mode e. This standa ard protocoll Messages a performs co ontrol proced dures using an n 8–bit binaryy representattion. In RTU mode e, a message e begins with a silence intterval equal to t 3.5 times the transmissio on time of a character. If the character transmisssion stops forr a time equa al to 3.5 time es the transmission time off a characterr, the controller w will consider th his time interv val as the end d of the message. Similarly, a message e starting witth a shorter silence time e is considere ed as part of the t previous message. age Messa begin nning T1–T2–TT3–T4 Address Functio on Data Error contrrol End of message 8 bits 8 bitss n x 8 bits 16 bits T1–T2 2–T3–T4 eter R004 (Tim meOut) to inc crease the sile ence time in nterval up to max. 10000m ms for the systtems that do o Use parame not recognizze standard timeouts. Address wledges any y value rangin ng from 1 to 247 as the ad ddress of the e slave periph heral device.. The addresss field acknow The master device que eries the peripheral devic ce specified d in the address field; th he periphera al device willl respond witth a message e containing g its address to let the ma aster device know which h the slave source of the e response is. A master de evice query with w a 0 addrress is addresssed to all slave devices, w which will no ot respond att all (broadca ast mode). Function n related to the t message may be cho osen within th he legal field d ranging from m 0 to 255. A response off The function the slave de evice to a me essage of the e master dev vice will simply return the function f cod de to the master device iff no error took place; othe erwise, the most m significan nt bit in this fiield is set to 1. nctions allowe ed are 03h: Read R Holding g Register and 10h: Presett Multiple Reg gister (see below). The only fun 417/482 PROGRAMMING INSTRUCTIONS iDrive Data The data field contains any additional information for the function being used. Error Control The error control is performed through the CRC (Cyclical Redundancy Check) method. The16–bit value of the relevant field is computed when the message is sent by the transmitter and is then re–computed and checked by the receiver. CRC Register is computed as follows: 1. CRC Register is set to FFFFh 2. Exclusive OR is executed between CRC register and the first 8 bits of the message; the result is saved to a 16– bit register. 3. This register is right–shifted of one place. 4. If the right bit is 1, exclusive OR is executed between the 16–bit register and value 1010000000000001b. 5. Steps 3 and 4 are repeated until 8 shifts are performed. 6. Exclusive OR is performed between the 16–bit register and the next 8 bits of the message. 7. Steps 3 to 6 are repeated until all message bytes are processed. 8. The result is a CRC, that is attached to the message by sending the less significant byte as the first byte. Supported Functions 03h: Read Holding Register Allows reading the register state of the slave device. This function does not allow the broadcast mode (address 0). Additional parameters are the address of the basic digital register to be read and the output number to be read. QUERY Slave address 03h Function Register address (high) Register address (low) Register N. (high) Register N. (low) Error correction RESPONSE Slave address 03h Function Byte number Data … Data Error correction 10h: Preset Multiple Register Sets the state of multiple registers for the slave device. In broadcast mode (address 0), the state of those registers is set in all the connected slave devices. Additional parameters are the basic register address, the number of registers to be set, the relevant value and the number of bytes used for the data items. QUERY Slave address 10h Function Register 1 addr. (Hi) Register 1 addr. (Lo) Register N. (Hi) Register N. (Lo) Byte number Data (Hi) Data (Lo) … Data (Hi) Data (Lo) Error correction 418/482 RESPONSE Slave address 10h Function Register 1 addr. (Hi) Register 1 addr. (Lo) Register N. (Hi) Register N. (Lo) Error correction PROGRAMMING INSTRUCTIONS iDrive Error Messages If a message error is detected, the inverter will send a message to the master: Slave address Function (MSB = 1) Error code Error correction The error code meaning is the following: Code 0x01 ILLEGAL FUNCTION 0x02 ILLEGAL ADDRESS 0x03 ILLEGAL DATA VALUE 0x06 DEVICE BUSY 0x07 ANOTHER USER WRITING 0x09 BAD ACCESS LEVEL DESCRIPTION The function sent by the Master is different from 0x03 (Read Holding Registers) and 0x10 (Preset Multiple Registers). The Master wrote to or read from an illegal address. The numerical value the Master tried to write is not included in the correct range. The drive refused the Master writing attempt (e.g. because it is running and a Cxxx parameter is activated). Other users are writing to the selected parameter when the Master is trying to write to this parameter (e.g. display/keypad in editing mode or Upload/Download to/from keypad). The parameter the Master is trying to write to is not included in the selected User Level (e.g. it is trying to write an ADVANCED parameter when the BASIC user level is selected). 419/482 PROGRAMMING INSTRUCTIONS iDrive 49. SERIAL LINKS MENU 49.1. Overview NOTE NOTE NOTE Please refer to the IDrive’s Installation Instructions Manual for the description of the serial links and connections. For a greater immunity against communication interference, an optional optoisolated serial board (ES822) may be used instead of RS485 serial link. Serial links RS232 and RS485 can interface with ES822 board. Please refer to the IDrive’s Installation Instructions Manual for the description of the optional optoisolated board. The parameters described in this menu are Rxxx parameters. Once changed and saved, they become active only when the drive is next switched on or when the control board is reset (by holding down the RESET key for more than 5 secs). Drives of the iDrive series may be connected to peripheral devices through a serial link. This enables both reading and writing of all parameters normally accessed through the display/keypad. Two-wire RS485 is used, which ensures better immunity against disturbance even on long cable paths, thus reducing the communication errors. Two serial links are available. Serial Link 0 is provided with a 9-pole, male D connector; Serial Link 1 is provided with an RJ45 connector (or a three-phone connector) connected to the display/keypad. NOTE The display/keypad connected through RJ45 connector dialogues correctly with the drive using the default values preset in the parameter set for serial link 1. The drive will typically behave as a slave device (i.e. it only answers to queries sent by another device). A master device (typically a computer) is then needed to start serial communications. The following items may be configured for both serial links: 1. 2. 3. 4. 5. 6. The drive MODBUS address. The drive response delay to a Master query. The baud rate of the serial link (expressed in bits per second); The time added to the 4 byte–time; The serial link watchdog (which is active if the relevant parameter is not set at 0); The type of parity used for serial communications. 49.1.1. W ATCHDOG A LARMS The Watchdog alarms determined by the serial link may be the following: • • • A061 Serial alarm n.0 WDG A062 Serial alarm n.1 WDG A081 Keypad Watchdog The first two alarms trip when no legal message is sent from the serial link to the drive for a time longer than the time set in the relevant watchdog parameters; these alarms are active only if parameters R005 or R012 are set other than zero. The third alarm trips only if the display/keypad used as a reference/command source detects a communication loss for a time longer than 2 seconds. 420/482 PROGRAMMING INSTRUCTIONS 49.2. iDrive List of Parameters R001 to R013 Table 114: List of parameters R001 to R013. User Level ENGINEERING ENGINEERING ENGINEERING MODBUS Address 588 589 590 Default Values 1 5msec 6:38400 bps ENGINEERING 591 2msec ENGINEERING 592 Parity Bit for Serial Link 0 (D9-pole) ENGINEERING 593 R008 R009 R010 R011 R012 Drive MODBUS address for Serial Link 1 (RJ45) Response Delay for Serial Link 1 (RJ45) Baud Rate for Serial Link 1 (RJ45) Time Added to 4byte–time for Serial link 1 (RJ45) Watchdog Time for Serial Link 1 (RJ45) ENGINEERING ENGINEERING ENGINEERING ENGINEERING ENGINEERING 595 596 597 598 599 R013 Parity Bit for Serial Link 1 (RJ45) ENGINEERING 600 0.0sec 1:Disabled 2 Stopbit 1 5 msec 6:38400 bps 2msec 0.0sec 1:Disabled 2 Stopbit Parameter FUNCTION R001 R002 R003 R005 Drive MODBUS Address for Serial Link 0 (D9-pole) Response Delay for Serial Link 0 (D9-pole) Baud Rate for Serial Link 0 (D9-pole) Time added to 4byte–time for Serial Link 0 (D9pole) Watchdog time for Serial Link 0 (D9-pole) R006 R004 R001 Drive MODBUS Address for Serial Link 0 (D9-pole) R001 Range Default Level Address Function 1 ÷ 247 1 ÷ 247 1 1 ENGINEERING 588 This parameter determines the address assigned to the drive connected through RS485 of serial link 0 (9-pole, male D connector). R002 Response Delay for Serial Link 0 (D9-pole) .R002 Range Default Level Address Function 1 ÷ 1000 1 ÷ 1000 msec 5 5 msec ENGINEERING 589 This parameter determines the drive response delay after a master query sent through serial link 0 (9-pole, male D connector). R003 Baud Rate for Serial Link 0 (D9-pole) R003 Range Default Level Address Function 1÷7 1: 1200 bps 2: 2400 bps 3: 4800 bps 4: 9600 bps 5: 19200 bps 6: 38400 bps 7: 57600 bps 6 6: 38400bps ENGINEERING 590 This parameter determines the baud rate, expressed in bits per second, for serial link 0 (9-pole, male D connector). 421/482 PROGRAMMING INSTRUCTIONS iDrive R004 Time added to 4–Byte–Time for Serial Link 0 (D9-pole) R004 1 ÷ 10000 Range Default Level Address Function 1 ÷ 10000 msec 2 2 msec ENGINEERING 591 This parameter determines the limit time when no character is received from serial link 0 (9-pole, male D connector) and the message sent from the master to the drive is considered as complete. R005 Watchdog Time for Serial Link 0 (D9-pole) R005 0 ÷ 60000 Range Default Level Address Function 0 ÷ 6000.0 sec 0 0.0 sec ENGINEERING 592 If not set at zero, this parameter determines the time limit after which alarm A061 WDG Serial 0 Alarm trips if the drive does not receive any legal message through serial link 0 (9-pole, male D connector). R006 Parity Bit for Serial Link 0 (D9-pole) R006 0÷3 Range Default Level Address Function 0: Disabled 1 Stop–bit 1: Disabled 2 Stop–bit 2: Even (1 Stop bit) 3: Odd (1 Stop bit) 1 1: Disabled 2 Stop–bit ENGINEERING 593 This parameter determines whether the parity bit is used or not when creating the MODBUS message through serial link 0 (9-pole, male D connector). R008 Drive MODBUS Address for Serial Link 1 (RJ45) R008 1 ÷ 247 Range Default Level Address Function NOTE 1 ÷ 247 1 1 ENGINEERING 595 This parameter determines the address assigned to the drive connected to the network through RS485 of serial link 1 (RJ45 connector). The display/keypad connected through RJ45 connector dialogues correctly with the drive using the default values preset in the parameter set for serial link 1 (RJ45). R009 Response Delay for Serial Link 1 (RJ45) R009 Range Default Level Address Function 422/482 1 ÷ 1000 1 ÷ 1000 msec 5 5 msec ENGINEERING 596 This parameter determines the drive response delay after a master query sent through serial link 1 (RJ45 connector). PROGRAMMING INSTRUCTIONS iDrive R010 Baud Rate for Serial Link 1 (RJ45) R010 Range Default Level Address Function 1÷7 1: 1200 bps 2: 2400 bps 3: 4800 bps 4: 9600 bps 5: 19200 bps 6: 38400 bps 7: 57600 bps 6 6: 38400bps ENGINEERING 597 This parameter determines the baud rate, expressed in bits per second, for serial link 1 (RJ45 connector). R011 Time Added to 4–Byte–Time for Serial Link 1 (RJ45) R011 Range Default Level Address Function 1÷10000 1 ÷ 10000 msec 2 2 msec ENGINEERING 598 This parameter determines the time limit when no character is received from serial link 1 (RJ45 connector) and the message sent from the master to the drive is considered as complete. R012 Watchdog Time for Serial Link 1 (RJ45) R012 Range Default Level Address Function 0 ÷ 60000 0 ÷ 6000.0 sec 0 0.0 sec ENGINEERING 599 If this parameter is not set at zero, it determines the time limit after which alarm A062 WDG Serial Link 1 Alarm trips if the drive does not receive any legal message through serial link 1 (RJ45 connector). R013 Parity Bit for Serial Link 1 (RJ45) R013 Range Default Level Address Function 0÷3 0: Disabled 1 Stop–bit 1: Disabled 2 Stop–bit 2: Even (1 Stop bit) 3: Odd (1 Stop bit) 1 1: Disabled 2 Stop–bit ENGINEERING 600 This parameter determines whether the parity bit is used or not when creating the MODBUS message through serial link 1 (RJ45 connector). 423/482 PROGRAMMING INSTRUCTIONS iDrive 50. FIELDBUS CONFIGURATION MENU 50.1. Overview NOTE See the OPTIONAL BOARDS FOR FIELDBUS section in the IDrive’s Installation Instructions Manual for the description of the optional board required. NOTE The parameters included in this menu are Rxxx parameters. Once saved, they are active only when the drive is next switched on or when the control board is reset (by holding down the RESET key for more than 5 secs). CAUTION 50.1.1. This menu is not applicable to ES919 communications boards (see relevant section in the IDrive’s Installation Instructions Manual). ES919 boards act as gateways and change the MODBUS RS485 packets into the packets of each protocol being used. The exchanged parameters are all the Mxxx measures from the IDrive to the Master and all the Ixxx inputs from the Master to the IDrive (as detailed in the MEASURES MENU, Table 82: Remote command inputs from serial link. and Table 83: Reference inputs from serial link.) A LARM A070 (C OMMUNICATION S USPENDED ) Alarm A070 trips if the IDrive is not sent any legal message via FIELDBUS within the timeout set in parameter R016. Set parameter R016 to 0 to disable alarm A070. A legal message is the word of the digital inputs (M035) with bit 15=1 written by the master. Important: this is enabled only when the drive receives the first message with bit 15=1. To reset alarm A070, force communication between the Master and the IDrive drive with bit 15 of the digital input word always set to 1 and reset the drive control board. If communications between the Master and the Slave (IDrive) cannot be restored, alarm A070 is reset after setting parameter R016 to zero and after resetting the IDrive drive. When the drive is next powered on, resetting the alarm reset will affect the drive control board. 50.2. List of Parameters R016 to R017 Table 115: List of parameters R016 to R017. Parameter R016 R017 FUNCTION Fieldbus Watchdog Time Analog Outputs controlled by the Fieldbus User Level ENGINEERING ENGINEERING MODBUS Address 603 604 Default Values 0 ms 000b R016 Fieldbus Watchdog Time R016 Range Default Level Address Function 424/482 0 ÷ 60000 0 ÷ 60000 ms 0 0 ms ENGINEERING 603 If not set at zero, this parameter determines the time limit after which A070 Fieldbus WDG trips (no legal writing is received from the fieldbus in a given time interval). PROGRAMMING INSTRUCTIONS NOTE iDrive The Watchdog activates only once the drive has received the first legal message from the master, as described in Alarm A070 (Communication Suspended). This avoids untimely activation due to different start times between the master and the drive. 425/482 PROGRAMMING INSTRUCTIONS iDrive R017 Analog Outputs Controlled by the Fieldbus R017 Range Default Level Address Function 426/482 000b ÷ 111b binary 0000h ÷ 0007h hex 0 ÷ 7 decimal 000b → None 001b → AO1 010b → AO2 100b → AO3 000b → None 000b ENGINEERING 604 To select analog outputs controlled by the fieldbus, select the bit corresponding to the analog output to be controlled. Example: R017 = 0011b = 3 decimal → analog outputs AO1 and AO2 are controlled directly by the fieldbus, irrespective of their configuration in the ANALOG AND FREQUENCY OUTPUTS MENU. PROGRAMMING INSTRUCTIONS 50.3. iDrive Exchanged Parameters The tables below state the IDrive parameters exchanged via Fieldbus. Each table contains: 1) the parameter code; 2) its description; 3) its range; 4) its unit of measure (also indicated on the display); 5) the ratio between the IDrive value (exchanged via Fieldbus) and the represented hardware value (as displayed). N.B.: Each parameter is exchanged as an integer number with a 16-bit sign (from –32768 to +32767). Bytes are exchanged in big-endian mode (the most significant value is stored to the smallest memory address). When using an Intel based master/PLC chipset, then the data below will be byteswapped. NOTE 50.3.1. F ROM Word 1) Code 1 M042 2 M043 3 M045 4 M047 5 M035 6 7 AO1 8 AO2 9 AO3 10 M049 THE M ASTER 2) Description Speed reference/limit from FIELDBUS (integer portion) Speed reference/limit from FIELDBUS (decimal portion) Torque reference/limit from FIELDBUS PID reference from FIELDBUS Digital Inputs from FIELDBUS Command for Digital Outputs from FIELDBUS Analog Output 1 controlled by FIELDBUS Analog Output 2 controlled by FIELDBUS Analog Output 3 controlled by FIELDBUS PID Feedback from FIELDBUS TO THE ID RIVE 3) Range 4) Unit of Measure 5) Scaling – 32000 ÷ + 32000 rpm 1 – 99 ÷ + 99 rpm x 100 % x 10 % x 100 – – – – – – + 111 ÷ + 1889 – – + 111 ÷ + 1889 – – + 111 ÷ + 1889 – – – 10000 ÷ + 10000 – x 100 – 5000 ÷ + 5000 – 10000 ÷ + 10000 Word 1: Speed reference/limit from FIELDBUS (integer portion) Word 1 of the memory map details the integer portion of the speed reference (M042) in either IFD, VTC or FOC mode. bit [15..8] bit [7..0] Speed reference integer portion The speed reference from the FIELDBUS is obtained by adding the decimal portion to the integer portion (see Word 2). This value is included in the global speed reference of the drive (measure M000) along with the other reference sources if at least one of parameters C143 to C146 is set as 6:FieldBus. 427/482 PROGRAMMING INSTRUCTIONS iDrive The speed limit from FIELDBUS is significant if parameter C147 is set as 6:FieldBus and the type of reference of the active motor (parameters C011 / C054 / C097) is set as 2:Torque with Speed Limit. Word 2: Speed reference/limit from FIELDBUS (decimal portion) Word 2 details the decimal portion of the speed reference (M043) ONLY IN FOC MODE. The value sent by the Master to the IDrive as the decimal portion of the speed reference must be multiplied by 100. In order to send a speed reference of XXX.50rpm, the low byte of the word must contain the value 5010 or 001100102 (0.5010 x 100 = 5010). Example: M042=210; M043=50 ⇒ speed ref. = 210.50 rpm bit [15..8] bit [7..0] Speed reference decimal portion Word 3: Torque reference/limit from FIELDBUS The torque reference from the FIELDBUS (M045) is significant if at least one of parameters C143 to C146 is set as 6:FieldBus and if the type of reference of the active motor (parameters C011/C054/C097) is set as 1:Torque or as 2:Torque with Speed Limit, or if the drive is in slave mode from digital input. The torque limit from the FIELDBUS is significant if parameter C147 is set as 6:FieldBus. The value sent by the Master to the IDrive as the torque reference/torque limit must be multiplied by 10. In order to send a torque reference/torque limit of 50%, the word must contain the value 50010 or 1111101002 (50%10 x 10 = 50010). bit [15..8] bit [7..0] Torque reference/limit Word 4: PID reference from FIELDBUS The PID reference (M047) can be sent from the fieldbus if at least one of the parameters C285 to C287 is set as 6:Fieldbus. The value sent by the Master to the IDrive as the PID reference must be multiplied by 100. E.g. In order to send a PID reference of 50%, the word must contain the value 500010 or 1111101002 (50%10 x 100 = 500010). bit [15..8] bit [7..0] PID reference from FIELDBUS Word 5: Digital Inputs from FIELDBUS The virtual digital inputs via the Fieldbus are the low byte of the word: bit 15 bit [14..8] 1 bit [7..0] MDI8 MDI7 MDI6 MDI5 MDI4 MDI3 (RESET) MDI2 (ENABLE ) MDI1 (START) The logic status of these bits is included in the overall status of the drive digital inputs (measure M031) along with the other command sources if at least one of the parameters C140 ÷ C142 is set as 6:FieldBus. NOTE 428/482 Auxiliary virtual terminal board XMDI1.. 8 cannot be simulated via fieldbus. PROGRAMMING INSTRUCTIONS CAUTION iDrive Bit 15 must always be written =1; this means that data exchanged between the master and the drive is consistent, thus keeping the watchdog counter reset (see Alarm A070 (Communication Suspended)). 429/482 PROGRAMMING INSTRUCTIONS iDrive Word 6: Command for Digital Outputs from FIELDBUS Digital commands from FIELDBUS are the 4 lower bytes of the word: bit [15...4] bit [3..0] CMD 4 CMD 3 CMD 2 CMD 1 Byte format: Bit Command 0 1 2 3 Fbus CMD 1 Fbus CMD 2 Fbus CMD 3 Fbus CMD 4 Position in the selection vector D34 D35 D36 D37 Columns 2 and 3 state the name and position of the commands sent via fieldbus. Example: to control digital output 1 via fieldbus through command 4, set the parameters below in the DIGITAL OUTPUTS MENU: P270 = 1: Digital Digital Output Mode P271 = D37: Fbus CMD4 Variable A Selection P278 = 1: True Output Logic Level Words 7, 8, 9: Analog Outputs controlled by FIELDBUS Parameter R017 needs to be properly set up to distinguish which Analog Outputs are to be controlled by the Fieldbus. Byte format: Bit 0 1 2 Analog Output controlled by the fieldbus AO1 AO2 AO3 Example: R017 = 0112 = 310 → analog outputs AO1 and AO2 are controlled directly by the fieldbus, independently of their configuration in the ANALOG AND FREQUENCY OUTPUTS MENU. The correspondence between the exchanged value and the real value (in volts) of the analog outputs is as follows: Exchanged value + 1889 + 1000 + 111 Voltage (V) + 10 0 – 10 Current (mA) + 20 mA 0 – 20 mA Word 10: PID feedback from FIELDBUS The PID feedback (M049) can be sent from the fieldbus if at least one of the parameters C288 to C290 is set as 6:Fieldbus. The value sent by the Master to the IDrive as the PID feedback must be multiplied by 100. E.g. In order to send a PID feedback of 50%, the word must contain the value 500010 or 1111101002 (50%10 x 100 = 500010). bit [15..8] bit [7..0] PID feedback from FIELDBUS 430/482 PROGRAMMING INSTRUCTIONS iDrive 50.3.2. Word 1) Code 1 2 3 M026 M004 4 5 6 7 8 9 10 DIN DOU REF AIN1 AIN2 F ROM THE ID RIVE TO THE M ASTER 4) Unit of Measure 5) Scaling – A rpm See selected measure – x 10 x1 See selected measure All the measures See selected measure See selected measure – – – 16380 ÷ + 16380 – 16380 ÷ + 16380 – 16380 ÷ + 16380 – – – – – – – – – – 2) Description 3) Range Status + Alarms Output Current Motor Speed Third measure that may be configured with P330 Fourth measure that may be configured with P331 Digital Inputs Digital Outputs REF Analog Input AIN1Analog Input AIN2 Analog Input – 0 ÷ 65000 – 32000 ÷ + 32000 All the measures Word 1: Status + Alarms The Status and Alarms are displayed over the fieldbus in the following format: bit [15..8] Status bit [7..0] Alarms The Status codes may be found in Table 125. The Alarm codes may be found in Table 122. Word 2: Output Current The output current measure (M026) is displayed as a value that must be divided by 10 to obtain the actual motor current. As a result, if the returned value from the IDrive to the Master is 100, then the actual output motor current is 10A. bit [15..8] bit [7..0] Output Current Word 3: Motor Speed The output motor speed (M004) is displayed as follows: bit [15..8] bit [7..0] Motor Speed Words 4 & 5: Third & Fourth measure that may be configured with P330 & P331 Words 4 & 5 may be configured with P330 and P331 – more details are given in the FIELDBUS PARAMETERS MENU. Both words 4 & 5 are represented as follows: bit [15..8] bit [7..0] Mxxx represented by P330 and P331 431/482 PROGRAMMING INSTRUCTIONS iDrive Word 6: Digital Inputs Digital input status in the word: bit [15..8] bit [7..0] XMDI8 XMDI7 XMDI6 XMDI5 XMDI4 XMDI3 XMDI2 XMDI1 MDI8 MDI7 MDI6 MDI5 MDI4 MDI2 MDI3 MDI1 (ENABLE (RESET) (START) ) Word 7: Digital Outputs Digital output status in the word: bit [15..14] bit [13..8] bit 7 bit 6 XMDO6 XMDO5 XMDO4 XMDO3 XMDO2 XMDO1 bit [5..4] [*] bit [3.0] MDO4 MDO3 MDO2 MDO1 /FOUT [*] Status of the Pre-charge contactor Words 8, 9, 10: REF, AIN1, AIN2 Analogue Signal Full scale value ± 16380 is a rated value corresponding to an input range of ± 10V. This value can be changed due to automatic compensation of the tolerance of the input stage. bit [15..8] bit [7..0] REF / AIN1 / AIN2 NOTE 432/482 The measures of the analog inputs sent from the IDrive to the Master are the unfiltered measure values detected in the A/D converter output. For filtered measures, use M037, M038 and M039 respectively. iDrive PROGRAMM MING NSTRUCTIONSS IN 51. EXP PANSIO ON BOAR RD CON NFIGURA ATION MENU M 51.1 1. Overrview NOTE Parameters in this me enu are Rxxx x parameterss. aved, they arre active onlly when the drive d is next sswitched on or when the Once sa control board b is rese et (by holding g down the RESET key for m more than 5 secs). 51.2 2. List of Para meters R021 to o R023 Ta able 116: List o of parameters R021 to R02 23. Parameter FUNCTION R021 Data Logge er setting R023 I/O board se etting User Level EENGINEERING G EENGINEERING G MOD DBUS Addresss 551 553 DEFAULT VALUES Disab ble Non ne ogger Setting g R021 Data Lo R021 Range Default Level Address Function 1÷2 1: Disable 2: Enable 1 1: Disable ENGINEERI NG 551 This param meter enabless or disables Data Logge er initialization n (if the Data a Logger boa ard is fitted). R023 I/O Board Setting R023 3 Range Default Level Address Function NOTE 0÷4 0: None 1: XMDI/O 2: XMDI/O + XAIN 3: XMDI/O + PT100 4: XMDI/O + XAIN + PT100 0 0: None ENGINEERI NG 553 Based on tthe settings in n the relevan nt parameterr, this parameter enabless controlling digital I/O (XMDI/O), an nalog inputs (XAIN) and PT100 P probess located on n optional co ontrol boards. ES847 is required to c control analo og inputs (XAIN) and PT1000 probes. S847 or ES870 0 can be used d to control digital d I/O (XM MDI/O). Either ES 433/482 PROGRAMMING INSTRUCTIONS iDrive 52. PROF I D RIVE BOARD CONFIGURATION MENU 52.1. Overview This menu allows programming the PROFIdrive expansion board. It can be viewed only if the PROFIdrive board is connected to the control board. 52.2. NOTE Parameters in this menu are Rxxx parameters. Once changed and saved, they become active only when the drive is next switched on or when its control board is reset by holding down the RESET key for more than 5 secs. NOTE For the correct operation of the PROFIdrive board, please refer to the IDrive’s Installation Instructions manual and to the PROFIdrive COMMUNICATIONS BOARD USER MANUAL. NOTE If the PROFIdrive option is present, parameter C149 START Input must be assigned to value 1: MDI1. List of Parameters R025 to R045 Table 117: List of parameters R025 to R045. Parameter R025 R026 R027 R028 R029 R030 R031 R032 R033 R034 R035 R036 R037 R038 R039 R040 R041 R044 R045 434/482 FUNCTION Slave address PZD3 OUT PZD4 OUT PZD5 OUT PZD6 OUT PZD7 OUT PZD8 OUT PZD9 OUT PZD10 OUT PZD3 IN PZD4 IN PZD5 IN PZD6 IN PZD7 IN PZD8 IN PZD9 IN PZD10 IN Drive Profile Communication Mode Drive Profile Selection ENGINEERING ENGINEERING ENGINEERING ENGINEERING ENGINEERING ENGINEERING ENGINEERING ENGINEERING ENGINEERING ENGINEERING ENGINEERING ENGINEERING ENGINEERING ENGINEERING ENGINEERING ENGINEERING ENGINEERING MODBUS Address 547 548 549 550 554 555 556 557 558 559 581 582 583 584 585 586 587 1 1: DIGITAL INPUTS 0: NOT USED 0: NOT USED 0: NOT USED 0: NOT USED 0: NOT USED 0: NOT USED 0: NOT USED 0: NOT USED 0: NOT USED 0: NOT USED 0: NOT USED 0: NOT USED 0: NOT USED 0: NOT USED 0: NOT USED ENGINEERING 520 0: DP V0 ENGINEERING 521 1: VENDOR SPECIFIC 1 User Level DEFAULT VALUES PROGRAMMING INSTRUCTIONS iDrive R025 SLAVE ADDRESS R025 Range Default Level Address Function 0 ÷ 126 0 ÷ 126 1 1 ENGINEERING 547 This parameter sets the address for the PROFIdrive board. The programmed value has effect only if the board address selectors are set to zero (see the IDrive’s Installation Instructions manual and the PROFIdrive comms board User Manual). NOTE R026 to R033 PZD3(/10) OUT R026 Range 0÷6 0: NOT USED 1: DIGITAL INPUTS 2: AUXILIARY DIGITAL INPUTS (I/O expansion board) 3: DIGITAL OUTPUT COMMANDS 4: TORQUE REFERENCE 5: PID REFERENCE 6: PID FEEDBACK Default Level Address 1 1: DIGITAL INPUTS ENGINEERING 548 ÷ 550 // 554 ÷ 558 These parameters allow selecting the inputs to be downloaded from the Master PLC to the drive through the eight process data items that can be Function mapped in the fast communication area between the Master and the Slave station. R034 ÷ R041 PZD3(/10) IN R034 Range 0 ÷ 91 0 ÷ 91 Default Level Address 0 0: NOT USED ENGINEERING 559 // 581 ÷ 587 These parameters allow selecting the measures to be passed to the drive from the Master PLC through the eight process data items that can be Function mapped in the fast communication area between the Master and the Slave station. You can select any measure from the MEASURES MENU. R044 DRIVE PROFILE COMMUNICATION MODE R044 Range Default Level Address Function 0÷1 0: DP V0 1: DP V1 0 0: DP V0 ENGINEERING 520 This parameter sets the version of the PROFIdrive protocol. 435/482 PROGRAMMING INSTRUCTIONS iDrive R045 DRIVE PROFILE SELECTION R045 Range 0÷2 0: PROFiDrive 1: VENDOR SPECIFIC 1 2: VENDOR SPECIFIC 2 Default Level Address 1 1: VENDOR SPECIFIC 1 ENGINEERING 507 This parameter sets the control mode (Command and Reference) for the Slave station. 0: PROFiDrive 1: VENDOR SPECIFIC 1 2: VENDOR SPECIFIC 2 Command Reference According to the Function PROFiDrive According to the PROFIdrive protocol. PROFIdrive protocol. VENDOR According to the PROFIdrive One-to-one scale of the SPECIFIC 1 protocol. programmed reference. VENDOR The eight low bits in the CONTROL One-to-one scale of the SPECIFIC 2 WORD represent the eight digital programmed reference. inputs in the control board. 436/482 NOTE Bit 11 in the control board enables or not the Fieldbus line watchdog in any of the three control modes above, provided that parameter R016 is set higher than zero. NOTE The watchdog activates only after the drive has received the first legal message sent from the master (see Alarm A070 (Communication Suspended), thus preventing alarm A070 from tripping due to different power-on times between the master station and the IDrive drive. PROGRAMMING INSTRUCTIONS iDrive 53. DAYLIGHT SAVING TIME 53.1. Overview NOTE The Daylight Saving Time menu may be accessed only if the Data Logger board is installed (even the ES851 RTC version only) and if parameter R021 Data Logger setting is set to 2: ENABLE. Parameters R050 to R053 set the DST rules for the Clock/Calendar of the Data Logger or the ES851 RTC. See DATE AND TIME MENU. NOTE 53.2. By setting parameters R050 and R052 to 0, the DST is not managed. List of Parametres R050 to R053 Table 118: List of Parameters R050 to R053. Parameter R050 R051 R052 R053 FUNCTION DST Start WDMM DST Start HHMM DST End WDMM DST End HHMM User Level DEFAULT VALUES ENGINEERING ENGINEERING ENGINEERING ENGINEERING 5703 200 5710 200 MODBUS Address 524 525 526 527 R050 DST Start WDMM – Week/Day/Month R050 Range 0 ÷ 9112 Default Level 5703 5703 ENGINEERING This parameter can be viewed and changed only if the Data Logger ES851 is installed and activated (R021 = ENABLE). Active Address Function 0 ÷ 9112 524 If the first digit of the parameter is lower than 6: The first digit (W) indicates the week of the month when the DST starts (1 = first week, 2 = second week, 3 = third week, 4 = fourth week, 5 = last week). The second digit (D) indicates the day of the week (1 = Monday, 7 = Sunday). The third and fourth digits (MM) indicate the start month (01 = January, 12 = December). Example: European Union: 5703 (last Sunday in March) USA: 2703 (second Sunday in March) Brazil: 3710 (third Sunday in October) If the first digit of the parameter is higher than or equal to 6: The first two digits (WD) correspond to the month when the DST starts, added to 60 (61 corresponds to 1, 91 corresponds to 31). The third and fourth digit (MM) indicate the start month (01 corresponds to January, 12 corresponds to December). Example: 7504 = 15 April. 437/482 PROGRAMMING INSTRUCTIONS iDrive R051 DST Start HHMM – Hour/Minutes R051 Range 100 ÷ 2400 Default Level 200 200 ENGINEERING This parameter can be viewed and changed only if the Data Logger ES851 is installed and activated (R021 = ENABLE). Active 100 ÷ 2400 Address 525 Function The first digit or the first two digits (if the total digits are 3 or 4 respectively) correspond to the start date. The last two digits correspond to the minutes. Example: 200 = 2h 00m 2400 = 0h 0m (midnight between the day set in R050 and the previous day.) R052 DST End WDMM – Week/Day/Month R052 Range 0 ÷ 9112 Default Level 5710 5710 ENGINEERING This parameter can be viewed and changed only if the Data Logger ES851 is installed and activated (R021 = ENABLE). Active Address Function 0 ÷ 9112 526 If the first digit of the parameter is lower than 6: The first digit (W) indicates the week of the month when the DST ends (1 = first week, 2 = second week, 3 = third week, 4 = fourth week, 5 = last week). The second digit (D) indicates the day of the week (1 = Monday, 7 = Sunday). The third and fourth digits (MM) indicate the start month (01 = January, 12 = December). Example: European Union: 5710 (last Sunday in October) USA: 1711 (first Sunday in November) Brazil: 3702 (third Sunday in February) If the first digit of the parameter is higher than or equal to 6: The first two digits (WD) correspond to the month when the DST starts, added to 60 (61 corresponds to 1, 91 corresponds to 31). The third and fourth digit (MM) indicate the start month (01 corresponds to January, 12 corresponds to December). Example: 6110 = 1 October. R053 DST End HHMM – Hour/Minutes R053 Range 100 ÷ 2400 Default Level 200 200 ENGINEERING This parameter can be viewed and changed only if the Data Logger ES851 is installed and activated (R021 = ENABLE). Active Address 438/482 527 100 ÷ 2400 PROGRAMMING INSTRUCTIONS iDrive Function The first digit or the first two digits (if the total digits are 3 or 4 respectively) correspond to the end date. The last two digits correspond to the minutes. Example: 200 = 2h 00m 2400 = 0h 0m (midnight between the day set in R052 and the previous day.) 439/482 PROGRAMMING INSTRUCTIONS iDrive 54. DATA LOGGER MENU 54.1. Overview The Data Logger menu is to be used if the IDrive drive cannot dialog with the Data Logger ES851 board through the RemoteDrive software. Parameter R116 imposes to ES851 the type of connection required for the communication mode being used. NOTE NOTE CAUTION 54.2. The Data Logger menu may be accessed only if the Data Logger board is installed and if parameter R021 Data Logger setting is set to 2: ENABLE. Important: The complete version of the Data Logger ES851 shall be installed (the RTC version only is not suitable for this functionality). Please refer to the Installation Instructions manual. The parameters described in this menu are Rxxx parameters. Once changed and saved, they become active only when the drive is next switched on or when the control board is reset (by holding down the RESET key for more than 5 secs). The parameters set from this menu are not saved to non-volatile memory of the Data Logger board. They must be confirmed and saved using the RemoteDrive software. List of Parameters R115 and R116 Table 119: List of parameters R115 and R116. Parameter FUNCTION R115 SIM Card PIN R116 Preset connection status User Level BASIC ENGINEERING MODBUS Address 563 134 DEFAULT VALUES “0000” 0: no active preset R115 SIM Card PIN R115 Range Default Level Address Function NOTE 0x0000 ÷ 0xAAAA “0” ÷ “9999” 0x0000 “0000” BASIC 563 This parameter indicates the digits of the PIN of the SIM card fitted in the GSM/GPRS modem. The digits must be aligned left; the # symbol, which is codified as 0xA (hex) is intended as the number terminator. Max. 4 digits are allowed for the SIM card PIN. The PIN can be composed of less than 4 digits and the # symbol can be used as the PIN terminator. R116 Preset Connection Status (Line 2) R116 Line 2 Range Address Function 440/482 0 ÷ 20 See Table 120 1337 This parameter indicates if preset configurations are actually set up for the types of connections supported by ES851. PROGRAMMING INSTRUCTIONS iDrive R116 Preset Connections (Line 4) R116 Line 4 Range Default Level Address Function NOTE 0 ÷ 20 See Table 120 0 0: no active preset ENGINEERING 134 This parameter allows forcing one of the available connecting modes to the Data Logger ES851 board. The parameters used for Ethernet connections and modem connections are the ones stored in the IDrive drive. Configurations 19 and 20 support both dial in and dial out. After imposing any of the preset values given in Table 120, the Data Logger is forced to Interlocked mode (see the Data Logger Measures Menu). Table 120: Preset connections. Value 0 1 2 3 4 5 6 7 8 9 10 11 12 13 14 15 16 17 18 19 20 COM 1(RS232) 1(RS232) 1(RS232) 1(RS232) 1(RS232) 1(RS232) 1(RS232) 1(RS232) 2(RS485) 2(RS485) 2(RS485) 2(RS485) 2(RS485) 2(RS485) 2(RS485) 2(RS485) Baudrat Stop bit Parity e[bps] No active presetting Ethernet enabled PPP null modem 38400 2 no 38400 1 no 38400 2 no 38400 1 no 9600 2 no 9600 1 no 9600 2 no 9600 1 no 38400 2 no 38400 1 no 38400 2 no 38400 1 no 9600 2 no 9600 1 no 9600 2 no 9600 1 no Dial Out analog modem Dial Out GSM modem Delay [ms] 2 2 20 20 2 2 20 20 2 2 20 20 2 2 20 20 441/482 PROGRAMMING INSTRUCTIONS iDrive 55. EEPROM MENU 55.1. Overview The drive has four different memory zones: • RAM → Volatile memory containing the drive’s current parameterization; • Default Zone → Non-volatile memory that cannot be accessed by the user, containing the factorysetting of the drive parameters. • Work Zone → Non-volatile memory where customized parameters are saved. Whenever the drive is reset, this parameterization is loaded to the RAM. • Back–up Zone → Non-volatile memory storing a new drive parameterization. Back-up parameters are modified only when the user explicitly saves the back–up zone. Any parameter can be changed by the user. The drive will immediately use the new parameter value. The user may save the parameter value in the Work zone. If no new value is saved for a given parameter, the drive will use the parameter value stored in the Work zone when next turned on. • “P” parameters can be written at any moment. • According to factory-setting, “C” parameters (see P003 to modify them even when fluxing and the motor is not running) can be written only if the drive is not running and the ENABLE command is disabled (terminal MDI2 open). • “R” parameters have the same features as “C” parameters, but the new parameter value, once written and saved, will be used only at next power on. To use the new parameter value immediately, turn the drive off and on or press the RESET key for at least 5 seconds. The Work zone may be copied to the BACKUP zone through I012 included in the Eeprom menu and described in the section below. I012 input also allows copying the Backup zone to the WORK zone in order to restore the parameter values stored in the WORK zone. I012 input also allows restoring the factory-setting values for all parameters in the WORK zone. 1. Restore back up 2. Save back up DEFAULT BACK UP WORK RAM Memory locations 3. Save work 4. Restore default 442/482 PROGRAMMING INSTRUCTIONS 55.2. iDrive List of Inputs I009 to I012 Table 121: List of programmable inputs I009 to I012. Input I009 I012 FUNCTION Parameter save EEPROM control User Level BASIC BASIC MODBUS Address 1396 1399 I009 Parameter save I009 Range Default Level Address Function 131 ÷ 2466 131 ÷ 2466 This is not a parameter: at power on and whenever the EEPROM command is executed, I009 is set to zero. BASIC 1396 Allows only one parameter to be saved to EEPROM. The value to be saved must be the same as the value set in the Address field of the parameter concerned. I012 EEPROM Control I012 Range Default Level Address 0, 2, 4, 5, 11 0: No Command 2: Restore Backup 4: Save Backup 5: Save Work 11: Restore Default This is not a parameter: at power on and whenever the EEPROM command is executed, I012 is set to zero. BASIC 1399 This parameter saves and restores the entire set of parameters that can be accessed by the user: 2: Restore Backup: the parameters stored in the Backup zone are copied and stored in the WORK zone. They represent the new RAM parameterization; the previous RAM parameters are cleared. Backup → RAM → Work; Function 4: Save Backup: the parameters in the WORK zone are saved to a copy of the Backup zone. Work → Backup; 5: Save Work: the current values of the parameters stored in the RAM zone are saved to non-volatile memory in the Work zone. All the parameters are saved with this command. RAM → Work; 11: Restore Default: factory-setting values are restored for all parameters; each factory-setting value is stored to non-volatile memory in the Work zone. Default → RAM → Work. 443/482 PROGRAMMING INSTRUCTIONS iDrive 56. ALARMS AND WARNINGS CAUTION 56.1. If a protection trips or the drive enters the emergency mode, the drive is locked and the motor starts idling! What Happens When a Protection Trips NOTE Before operating the drive in emergency conditions, carefully read this section and the following section, What To Do When an Alarm Trips. The drive alarms are detailed below. When a protection / alarm trips: 1) the ALARM LED on the keypad comes on; 2) the page displayed on the keypad is the root page of the FAULT LIST; 3) the FAULT LIST is refreshed; 4) when using the Drive Profile board, the drive reports faults as hexadecimal values, which are assigned and coded according to the DRIVECOM specification. See Table 125. In factory-setting, when the drive is switched on after an alarm has tripped—which has not been reset—it is kept in emergency condition. If the drive is in emergency mode when switched on, this could be due to an alarm tripped before the drive was reset. To avoid storing the alarms tripped before the drive is switched off, set parameter C257 in the Autoreset Menu. The drive stores the moment when an alarm trips to the FAULT LIST (supply–time and operation–time). The drive status when the alarm tripped and some measures sampled when the alarm tripped are also stored to the Fault List. The readout and storage of the fault list can be very useful to detect the cause responsible for the alarm and its possible solution (see also the Fault List Menu). NOTE CAUTION 444/482 Alarms A001 to A039 relate to the main microcontroller (DSP Motorola) of the control board, which detected a fault on the control board itself. No fault list is available for Alarms A001 to A039 and no Reset command can be sent via serial link; alarms can be reset through the RESET terminal on the terminal board or the RESET key on the keypad. No software for the keypad interface is available; the drive parameters and measures cannot be accessed via serial link. Avoid resetting alarms A033 and A039, as they trip when the flash memory is not provided with its correct software. Alarms A033 and A039 can be reset only when proper software is downloaded for the the inverter flash memory. Before resetting an alarm, deactivate the ENABLE signal on terminal MDI2 to disable the inverter and prevent the connected motor from running at uncontrolled speed, unless parameter C181=1 (the Safety Start function is active): after resetting an alarm or after supplying the inverter, this will start only if the ENABLE contact is opened and closed again. PROGRAMMING INSTRUCTIONS 56.2. iDrive What To Do When an Alarm Trips CAUTION If a protection trips or the drive is in emergency condition, the drive is locked and the motor starts idling! CAUTION Before resetting an alarm, disable the ENABLE signal on terminal MDI2 to disable the drive and to prevent the connected motor from running at uncontrolled speed. Proceed as follows: 1. 2. Disable the ENABLE signal on terminal MDI2 to disable the drive and to lock the motor, unless parameter C181=1 (the Safety Start function is active): after resetting an alarm or after supplying the drive, this will start only if the ENABLE contact is open and closed. If the motor is idling, wait until it stops. Check the FAULT LIST carefully for any information about the alarm tripped, in order to determine the cause responsible for the alarm and its possible solutions. Any information stored to the FAULT LIST is also required when contacting Lönne Scandinavia AS’s Customer Service. 3. In the following sections, find the relative alarm code and follow the instructions. 4. Solve any external problems that may have been responsible for the protection trip. 5. If the alarm tripped due to the entry of wrong parameter values, set new correct values and save them. 6. Reset the alarm. 7. If the alarm condition persists, please contact Lönne Scandinavia AS Customer Service. A RESET command must be sent to reset the alarms tripped. Do one of the following: • Enable the RESET signal in MDI3 terminal in the hardware terminal board; • Press the RESET key on the keypad; • Enable the RESET MDI3 signal in one of the virtual terminal boards enabled as remote control sources (see the CONTROL METHOD MENU). To activate the Autoreset function, enable parameter C255 (see the AUTORESET MENU); the drive will automatically try to reset the alarms tripped. 445/482 PROGRAMMING INSTRUCTIONS iDrive 56.3. Alarm List Table 122: List of the possible alarms. Alarm Alarm Message Description A001 ÷ A032 A033 A039 A040 A041 A042 A043 A044 A045 A046 A047 A048 A049 A050 A051 A052 A053 A054 A055 A056 … TEXAS VER KO FLASH KO User Fault PWMA Fault Illegal XMDI in DGI False Interrupt SW OverCurrent Bypass Circuit Fault Bypass Connector Fault UnderVoltage OverVoltage RAM Fault PWMA0 Fault PWMA1 Fault Illegal XMDI in DGO PWMA Not ON Option Board not in PTC Alarm PTC Short Circuit A057 Illegal XMDI in MPL A059 A060 A061 A062 A063 A064 A065 A066 A067 A068 A069 A070 A071 A072 A073 A074 A075 A076 A078 A079 A080 A081 Encoder Fault NoCurrent Fault Ser WatchDog SR1 WatchDog Generic Motorola Mains Loss AutoTune Fault REF < 4mA AIN1 < 4mA AIN2 < 4mA XAIN5 < 4mA Fbs WatchDog 1ms Interrupt OverTime Parm Lost Chk Parm Lost COM1 Drive OverHeated Motor OverHeated Speed Alarm MMI Trouble FOC No Encoder Tracking Error KeyPad WatchDog A082 Illegal Encoder Cfg A083 A084 A085 A086 A087 A088 A089 A090 External Alarm 1 External Alarm 2 External Alarm 3 XAIN5 > 20mA ±15V LOSS ADC Not Tuned Parm Lost COM2 Parm Lost COM3 A091 Braking Resistor Overload Control board failure Incompatible Texas Software Version Texas Flash not programmed Alarm caused by the user General hardware fault from IGBT, side A Illegal configuration of XMDI in the Digital Inputs menu Control board failure Software overcurrent Fault of the precharge By–Pass Precharge By–Pass connector fault Dc bus voltage lower than Vdc_min Dc bus voltage exceeding Vdc_max Control board failure Hardware Fault from IGBT converter, side A Hardware overcurrent, side A Illegal configuration of XMDI in the Digital Outputs menu Hardware failure, IGBT A power on impossible Failure in detecting preset option I/O board External PTC tripped External PTC in short circuit Illegal configuration of XMDI in the Virtual Digital Outputs (MPL) menu Error of motor speed measure Current is zero in FOC control Watchdog tripped in serial link 0 (9-pole D connector) Watchdog tripped in serial link 1 (RJ45) Control board failure No power is supplied from the mains Autotune failed REF Current input (4÷20mA) lower than 4mA AIN1 Current input (4÷20mA) lower than 4mA AIN2 Current input (4÷20mA) lower than 4mA XAIN5 Current input (4÷20mA) lower than 4mA Fieldbus Watchdog tripped Control board failure Parameter download/upload error Parameter download/upload error Drive thermal protection tripped Motor thermal protection tripped Motor speed too high Control board failure FOC control but Encoder not enabled Encoder speed tracking error Communication watchdog via keypad Functions programmed for MDI6 and MDI7 or encoder B selected and encoder board not detected. External alarm 1 External alarm 2 External alarm 3 XAIN5 Current input (4÷20mA or 0÷20mA) greater than 20mA ± 15V Loss Control board failure Parameter download/upload error Parameter download/upload error Overvoltage tripped with braking resistor activated due to continuous operation time exceeding the max. programmed time 446/482 PROGRAMMING INSTRUCTIONS iDrive 447/482 PROGRAMMING INSTRUCTIONS iDrive A092 A093 A094 A095 A096 A097 A098 A099 A100 A101 A102 A103 A104 A105 A106 A107 A108 A109 A110 ÷ A120 SW Version KO Bypass Circuit Open HeatSink Overheated Illegal Drive Profile Board Fan Fault Motor Not Connected Illegal Motor Selected 2nd Sensor Fault MDI6 Illegal Configuration MDI8 Illegal Configuration REF > 20mA AIN1 > 20mA AIN2 > 20mA PT100 Channel 1 Fault PT100 Channel 2 Fault PT100 Channel 3 Fault PT100 Channel 4 Fault Amb.Overtemp. … Control board failure By-Pass relay open IGBT heatsink temperature too high Drive Profile board not correctly configured Fault of the cooling fans Motor not connected Illegal motor selected via MDI Fault of fan sensor 2 Function programmed for MDI6 along with frequency input A Function programmed for MDI8 along with frequency input B REF Current input (4÷20mA or 0÷20mA) greater than 20mA AIN1 Current input (4÷20mA or 0÷20mA) greater than 20mA AIN2 Current input (4÷20mA or 0÷20mA) greater than 20mA Hardware address out of measure range of the drive Hardware address out of measure range of the drive Hardware address out of measure range of the drive Hardware address out of measure range of the drive Ambient overtemperature Control board failure A001 ÷ A032, A043, A049, A063, A071, A078, A088, A092, A110÷A120 Control Board Failure A001 ÷ A032 A043 A049 A063 A071 A078 A088 A092 A110 ÷ A120 Description Event Control board failure There may be several causes: the board autodiagnostics file constantly checks its operating conditions. Possible cause • Strong electromagnetic disturbance or radiated interference. • Possible failure of the microcontroller or other circuits on the control board. Solution 1. Reset the alarm: send a RESET command. 2. If the alarm persists, please contact LÖNNE SCANDINAVIA AS’s Customer Service. A033 Texas Software KO A033 Description Event Incompatible Software Texas version When switched on, DSP Motorola detected an incompatible version of the software downloaded to Flash Texas (software version incompatible with Motorola). Possible cause The wrong software was downloaded. Solution 1. Download the correct DSP Texas software version. 2. If the alarm persists, please contact LÖNNE SCANDINAVIA AS’s Customer Service. A039 Texas Flash not Programmed A039 Description Event 448/482 Texas Flash not programmed When switched on, DSP Motorola detected that Flash Texas is not correctly programmed. PROGRAMMING INSTRUCTIONS iDrive Possible cause A prior attempt to download DSP Texas software failed. Solution 1. Download the correct DSP Texas software version. 2. If the alarm persists, please contact LÖNNE SCANDINAVIA AS’s Customer Service. 449/482 PROGRAMMING INSTRUCTIONS iDrive A040 User Alarm A040 Description Event Possible cause Solution Alarm trip caused by the user (as a testing procedure) The user has forced the alarm to trip. Value 1 was entered to address MODBUS 1400 via serial link. Reset the alarm: send a RESET command. A041 IGBT Fault Side A A041 Description Event Possible cause Solution General hardware fault from IGBT, side A Power converter A generated a general alarm. • Electromagnetic disturbance or radiated interference. • Overcurrent, IGBT overtemperature, IGBT fault. 1. Reset the alarm: send a RESET command. 2. If the alarm persists, please contact LÖNNE SCANDINAVIA AS’s Customer Service. A042 Illegal XMDI in DGI A042 Description Event 450/482 Illegal configuration of XMDI in the Digital Inputs menu. • The drive checked if at least one XMDI input from ES847 or ES870 I/O option board is available in the DIGITAL INPUTS MENU; • The drive checked if R023 (I/O Board setting) is set to 0 in the EXPANSION BOARD CONFIGURATION MENU Possible cause Wrong settings. Solution Check settings and enter correct settings. PROGRAMMING INSTRUCTIONS iDrive A044 SW Overcurrent A044 Description Event SW Overcurrent Immediate current limit tripped. • Abrupt variations of the connected load • Output short-circuit or ground short-circuit • Strong electromagnetic disturbance or radiated interference. If alarm A044 tripped while accelerating: • Possible cause Too short acceleration ramp; If alarm A044 tripped while decelerating: • Too short deceleration ramp. • Excessive gain of the current regulator (P155) or too short integral time (P156) when using the FOC control algorithm. • Excessive gain of the speed regulator (P128) or too short integral time (P126) when using the VTC control algorithm. 1. Check if the drive and the motor are properly dimensioned with respect to the connected load. 2. Make sure that no short-circuit is to be found between two phases or between one phase and the grounding outgoing from the drive (terminals U, V, W). (Remove voltage from the motor, set IFD control and operate the drive in no-load conditions.) Solution 3. Check if the command signals are sent to the drive using screened cables where required (see IDrive’s Installation Instructions manual). Detect external sources for electromagnetic disturbance, check wiring and make sure that antidisturbance filters are installed on the coils of contactors and electrovalves (if fitted inside the cabinet). 4 If necessary, set longer acceleration times (see the RAMPS MENU). 5 If necessary, set longer deceleration times (see the RAMPS MENU). 6. If necessary, decrease the values set in the LIMITS MENU. A045 Bypass Circuit Fault A045 Description Event Possible cause Bypass precharge Fault The drive forced to close its relay or contactor for the short-circuit of the precharge resistors in DC-link capacitors (DC bus), but it did not detect the relevant closing signal while precharging. See also A046. • Disconnection of auxiliary signal. • Precharge relay/contactor failure. 1. Reset the alarm: send a RESET command. Solution 2. If the alarm persists, please contact LÖNNE SCANDINAVIA AS’s Customer Service. 451/482 PROGRAMMING INSTRUCTIONS iDrive A046 Bypass Connector Fault A046 Description Event Precharge bypass connector fault. Auxiliary signal for the closing of the bypass connector of the short-circuit precharge resistor is considered as closed before the relevant closing command is sent. See also A045. Possible cause • Precharge bypass connector reversed. • Precharge relay/contactor failure. Solution 1. Reset the alarm: send a RESET command. 2. If the alarm persists, please contact LÖNNE SCANDINAVIA AS’s Customer Service. A047 Undervoltage A047 Description Event Possible cause Solution 452/482 DC bus Voltage lower than minimum voltage. Voltage measured in DC bus capacitors has dropped below the min. value allowed for a proper operation of the drive class being used. • Supply voltage has dropped below 200Vac–15% (class 2T), 380V–15% (class 4T), 500V –15% (class 5T), 600Vac –5% (class 6T). • Alarm A047 can trip even when voltage temporarily drops below the allowable min. value (which is caused for example by the direct starting of the connected load). • If the drive is powered directly by the bus bar, the bus feeder is responsible for the alarm. • Failure in DC bus voltage measure circuit. 1. Check voltage in terminals R, S, T. Check mains voltage value M030 and DC bus voltage value M029. Also check the values of M030 and M029 sampled in the FAULT LIST when the alarm tripped. 2. If the alarm persists, please contact LÖNNE SCANDINAVIA AS’s Customer Service. PROGRAMMING INSTRUCTIONS iDrive A048 Overvoltage A048 Description Event Possible cause Solution Overvoltage in DC bus (voltage in DC-link). Voltage measured in DC bus (DC-link) capacitors has exceeded the max. value allowed for a proper operation of the drive class being used. • Check that voltage does not exceed 240Vac +10% (class 2T), 500Vac +10% (class 4T), 600Vac +10% (class 5T), 690Vac +10% (class 6T). • Very inertial loads and a too short deceleration ramp (see the RAMPS MENU). • Alarm A048 can trip even when the motor is pulled by the load (eccentric load). • If the drive is powered directly by the bus bar, the bus feeder is responsible for the alarm trip. • Failure in DC bus voltage measure circuit. 1. Check voltage in terminals R, S, T. Check mains voltage value M030 and DC bus voltage value M029. Also check the values of M030 and M029 sampled in the FAULT LIST when the alarm tripped. 2. In case of very inertial loads and if the alarm tripped when decelerating, try to set a longer deceleration ramp. If short stop times are needed or if the motor is pulled by the load, activate the resistive braking unit. 3. If the alarm persists, please contact LÖNNE SCANDINAVIA AS’s Customer Service. A050 IGBT Fault A A050 Description Event Possible cause Solution Hardware fault from IGBT converter, side A, or brake overcurrent The IGBT drivers of power converter A have detected IGBT failure or overcurrent conditions in the brake circuit (models S14, S22, S32 5T/6T only) • Strong electromagnetic disturbance or radiated interference. • Overcurrent, Overtemperature, IGBTs, IGBT fault. • Unsuitable braking resistor (models S14, S22, S32 5T/6T only). 1. Reset the alarm: send a RESET command. 2. If the alarm persists, please contact LÖNNE SCANDINAVIA AS’s Customer Service. A051 Overcurrent HW A A051 Description Event Hardware overcurrent, side A. Hardware overcurrent detected by the drive output current circuit. Possible cause See A044 SW Overcurrent. Solution See A044 SW Overcurrent. 453/482 PROGRAMMING INSTRUCTIONS iDrive A052 Illegal XMDI in DGO A052 Description Illegal configuration of XMDI in the Digital Outputs menu. • Event Possible cause Solution The drive checked if at least one XMDI input from ES847 or ES870 I/O option board is available in the DIGITAL INPUTS MENU; • The drive checked if R023 (I/O Board setting) is set to 0 in the EXPANSION BOARD CONFIGURATION MENU Wrong settings. Check settings and enter correct settings. A053 Not PWONA A053 Description Event Possible cause Solution Hardware failure; IGBT A power on failure. IGBT A power on controlled by Motorola microcontroller has failed. Control board failure. 1. Reset the alarm: send a RESET command. 2. If the alarm persists, please contact LÖNNE SCANDINAVIA AS’s Customer Service. A054 Option Board not in A054 Description Event Possible cause ES847 or ES870 not in. The control board detects no ES847 or ES870 I/O expansion boards after parameter R023 (I/O Board Setting) is set as ≠ 0. Option board not in or faulty. 1. Check consistency of parameter R023 (see the EXPANSION BOARD CONFIGURATION MENU). Solution 2. Reset the alarm: send a RESET command. 3. If the alarm persists, please contact LÖNNE SCANDINAVIA AS’s Customer Service. A055 PTC Alarm A055 Description Event Possible cause Solution External PTC resistor tripped. The drive detected the opening of the PTC connected to AIN2 input (R > 3600 ohm) • Opening of the PTC due to motor overheating. • Incorrect wiring of PTC. • Incorrect setting of SW1 hardware switch on the control board (see Installation Instructions Manual). 1. Allow the motor to cool, then reset the alarm. 2. Make sure that the PTC is correctly connected to AIN2 analog input (see Installation Instructions Manual). 3. Make sure that SW1 hardware switch is correctly set. 454/482 PROGRAMMING INSTRUCTIONS iDrive A056 PTC Short Circuit A056 Description Event Possible cause Solution External PTC resistor short circuit. Detected the short circuit of the PTC connected to AIN2 input (R < 10 ohm). • Short circuit in the PTC. • Incorrect wiring of PTC. • Incorrect setting of SW1 hardware switch on the control board (see Installation Instructions Manual). 1. Make sure that the PTC is correctly connected to AIN2 analog input (see Installation Instructions Manual). 2. Make sure that SW1 hardware switch is correctly set. A057 Illegal XMDI in MPL A057 Description Event Illegal configuration of XMDI in the Virtual Digital Outputs (MPL) Menu. • The drive checked if at least one XMDI input from ES847 or ES870 I/O option board is available in the VIRTUAL DIGITAL OUTPUTS (MPL) MENU; • The drive checked if R023 (I/O Board setting) is set to 0 in the EXPANSION BOARD CONFIGURATION MENU Possible cause Wrong settings. Solution Check settings and enter correct settings. A059 Encoder Fault A059 Description Event Possible cause Solution Motor speed measure error. During the encoder tune, a speed error measure occurred with respect to the estimated speed, although the sign of the measured speed is consistent with the estimated speed. • Incorrect parameterization of the encoder concerning the type and number of pulses/rev. • Voltage removed from one of the two encoders. • Incorrect mounting of the encoders. • Encoder failure. 1. Check that the encoder parameters are correct (see the ENCODER/FREQUENCY INPUTS MENU). 2. Check that both encoders are properly connected. 3. Check mounting of the encoders. 4. Using an oscilloscope, check that the encoder signals are correct. 455/482 PROGRAMMING INSTRUCTIONS iDrive A060 No Current Fault (FOC) A060 Description The error detected in FOC control by the current loop exceeds the max. allowable value. Event The FOC control detected a current regulation error. • One motor cable is disconnected. Possible cause • Failure in the current measure circuit. • Wrong setting of current regulator parameters for FOC control. 1. Check motor connections (terminals U, V, W). 2. Check parameterization of current regulators for FOC control (see the FOC REGULATORS MENU). Perform a new current regulator autotune (see Solution AUTOTUNE MENU). 3. If the alarm persists, please contact LÖNNE SCANDINAVIA AS’s Customer Service. A061, A062 Serial Link Watchdog A061 (Serial Link 0) A062 (Serial Link 1) Description Event Possible cause Solution A061: Serial Link Watchdog 0 tripped A062: Serial Link Watchdog 1 tripped The serial link watchdog has tripped. Communication failure: no read/write query sent to serial link for a time longer than the time set in the parameters relating to serial link watchdog (see the SERIAL LINKS MENU). • Serial link is disconnected. • Communication failure on remote master side. • Watchdog operating times too short. 1. Check serial link. 2. Make sure that the remote master constantly sends read/write queries with max. intervals between two queries lower than the preset watchdog operating time. 3. Set longer watchdog operating times (see R005 for serial link 0 and R012 for serial link 1). A064 Mains Loss A064 Description Event Mains loss Mains loss. • One supply cable is disconnected. Possible cause • Mains supply too weak. • Mains gap. 1. Check voltage in terminals R, S, T. Check mains voltage value M030. Also check the value of M030 sampled in the FAULT LIST when the alarm tripped. Solution 2. This protection may be disabled or delayed (see the POWER DOWN MENU). 456/482 PROGRAMMING INSTRUCTIONS iDrive A065 Autotune KO A065 Description Event Possible cause Autotune failed. Autotune aborted or failed. • The ENABLE contact was opened before autotune was over. • Autotune aborted, maybe because the parameter values inconsistent with the motor ratings. 1. Reset the alarm: send a RESET command. were 2. Check the motor parameters and make sure that they are consistent with the motor ratings (see the MOTOR CONTROL MENU) and perform a new autotune procedure. Solution 3. If the alarm persists, please contact LÖNNE SCANDINAVIA AS’s Customer Service. A066, A067, A068, A069 Current input < 4mA A066 (REF) A067 (AIN1) A068 (AIN2) A069 (XAIN5) Description Event Possible cause Solution NOTE A066: REF Current input (4÷20mA) lower than 4mA A067: AIN1 Current input (4÷20mA) lower than 4mA A068: AIN2 Current input (4÷20mA) lower than 4mA A069: XAIN5 current input (4÷20mA) lower than 4mA A current value lower than 4 mA has been detected over one input (REF, AIN1, AIN2, XAIN5) set with the following range: 4÷20mA. • Wrong setting of SW1 on the control board (except for A069). • Signal cable disconnected. • Failure in the current signal source. 1. Check setting of SW1 (except for A069). 2. Check that the signal cable is properly connected to its terminal. 3. Check the current signal source. The alarms above trip only if the relevant inputs have been selected (see CONTROL METHOD MENU and PID CONFIGURATION MENU). 457/482 PROGRAMMING INSTRUCTIONS iDrive A070 Fieldbus WatchDog A070 Description Event Possible cause Solution Watchdog Fieldbus tripped. The watchdog fieldbus tripped and communication is suspended. Communication is interrupted: the Master did not send any valid message for a time longer than the time set in the parameter relating to the value set with parameter R016 of the fieldbus watchdog time (see the FIELDBUS CONFIGURATION MENU). • Voltage removed from Fieldbus. • No communication from Master. • Watchdog times too short. 1. Check fieldbus connections. 2. Check that the master ensures a constant sequence of legal messages (FIELDBUS CONFIGURATION MENU) with max. time intervals lower than the preset watchdog time. 3. Set longer watchdog times (see R016). 4. To reset alarm A070, force communication between the Master and the IDrive drive with bit 15 of the digital input word always set to 1 and reset the drive control board. If communication between the Master and the Slave (IDrive) cannot be restored, alarm A070 is restored after setting parameter R016 to zero and after resetting the IDrive drive. When the drive is next powered on, the alarm reset will affect the drive control board. A072-3, A089-90 Parameter Upload/Download Error from Keypad to Drive A072 A073 A089 A090 Description Event Upload/download failed, one of the controls of the parameter consistency detected a fault. A communication error occurred while uploading/downloading programming parameters from the keypad to the drive. the Possible cause Temporary interruption to the serial link between keypad and control board. Solution Check the connection between the keypad and the control board, reset the alarm and perform a new upload/download procedure. A074 Overload A074 Description Event Possible cause Solution 458/482 Drive thermal protection tripped. The output current has been exceeding the drive rated current for long periods. • Current equal to Ipeak + 20% for 3 seconds, or • Current equal to Imax for 120 seconds (S05÷S30 2T/4T), • Current equal to Imax for 60 seconds (S41÷S90 2T/4T and all the 5T/6T models) Check the drive current output during ordinary operation (M026 in the Measure Menu); check the mechanical conditions of the connected load (load locked / overload). PROGRAMMING INSTRUCTIONS iDrive A075 Motor Overheated A075 Description Event Possible cause Solution Motor thermal protection tripped. The software motor thermal protection tripped. Output current has been exceeding the motor rated current for long periods. • Poor mechanical conditions of the connected load. • Wrong setting of parameters in the Thermal Protection Menu. 1. Check mechanical conditions of the connected load. 2. Check parameters C265, C266, C267 (and equivalent parameters for motors 2 and 3) in the MOTOR THERMAL PROTECTION MENU. A076 Limit Speed A076 Description The motor speed is too high. The motor speed is higher than the current value set in parameter C031 (for motor 1, or equivalent parameters for motors 2 and 3). Event Possible cause Solution If C031 = 0, the limit speed protection is disabled. If the encoder is disabled, the variable used for this software protection is: • The current speed setpoint for IFD. • The estimated motor speed for VTC control. • Value of parameter C031 too low. • Torque reference too high for SLAVE mode. 1. Check the compatibility of the parameter with respect to the maximum speed parameter. 2. In SLAVE mode, check the torque reference value. A079 Encoder Not Enabled A079 Description Event Possible cause Solution FOC control, but encoder not enabled. The FOC control is active, but no encoder has been enabled with parameter C012 (for motor 1, or equivalent parameters for motors 2 and 3). Otherwise, no encoder enabled for speed measure with parameter C189 (see the ENCODER/FREQUENCY INPUTS MENU). • C012 = 0 (for motor 1, or equivalent parameters for motors 2 and 3). See the MOTOR CONTROL MENU. • The value set in C189 does not enable any encoder for speed measure. • The FOC control has been improperly enabled. Set parameters correctly. 459/482 PROGRAMMING INSTRUCTIONS iDrive A080 Speed Tracking A080 Description Event Possible cause Solution Encoder speed measure error. The system detected an error between the measured speed and the measure setpoint. Speed has been exceeding the value set in parameter C193 for a time longer than the value set in parameter C192. This protection is enabled only if parameter C194 is not set at zero. • Wrong setting in parameters C192, C193, C194 (see the ENCODER/FREQUENCY INPUTS MENU). • Torque limit too low. • Connected load too heavy. • Encoder failure, encoder mechanical joint broken down, disconnection of one of the signal cables of the encoder. 1. Set parameters C192, C193 correctly. 2. Check torque limit value (see the INPUTS FOR REFERENCES MENU and the CONTROL METHOD MENU). 3. Check the mechanical load. 4. Make sure that the encoder works properly, check its mechanical connection to the motor and check that the encoder signal cables are properly connected to the terminals. A081 Keypad Watchdog A081 Description Event Possible cause Solution 460/482 Watchdog for the communication to the keypad. Communication failed when the keypad was enabled as a reference source or a command source or when it was in Local mode (Watchdog time is equal to approx. 1.6 seconds) • Keypad cable disconnected. • Failure of one of the two connectors of the keypad. • Strong electromagnetic disturbance or radiated interference. • Keypad failure. • Incorrect setting in parameters relating to serial link 1 (see the SERIAL LINKS MENU). 1. Check the connection of the keypad cable. 2. Make sure that the keypad cable connectors are intact (on both drive side and keypad side). 3. Check communication parameters of serial link 1. PROGRAMMING INSTRUCTIONS iDrive A082 Encoder Configuration A082 Description Event Possible cause Solution Functions programmed for MDI6 and MDI7, or Encoder B selected and encoder board not detected. • Encoder A has been selected for speed measure or as a reference source, but different digital command functions are programmed for terminals MDI6 and MDI7. • Encoder B has been selected for the speed measure or as a reference source, but the control board did not detect any optional encoder board. • Incorrect setting of the use of the encoders in parameter C189. • Incorrect programming of digital input functions. • Option board for Encoder B is not fitted, has been improperly mounted or is faulty. Possible connector failure. 1. Check and adjust the value set in C189 (see the ENCODER/FREQUENCY INPUTS MENU). 2. Check and adjust the control function programming for digital inputs MDI6 and MDI7 (see the DIGITAL INPUTS MENU). 3. Check if optional encoder board is fitted and properly mounted. A083, A084, A085 External Alarm A083 (EXT1) A084 (EXT2) A085 (EXT3) Description Event Possible cause Solution A083: External alarm 1 A084: External alarm 2 A085: External alarm 3 The External Alarm (1, 2, 3) functionality has been programmed, but the relevant digital input is disabled (see the DIGITAL INPUTS MENU). If multiple digital command sources are programmed, alarms A083-A085 trip if one of the terminals in the active sources is disabled (see the CONTROL METHOD MENU). The cause for the alarm trip does not depend on the drive; check for the reason why the contact connected to terminal MDIx where the External Alarm function is programmed opens. Check external signal. A087 ±15V Loss A087 Description Event Possible cause Solution Loss of ±15V. • The voltage level of ±15V is inadequate. • Possible failure of the control board or other circuits in the IDrive Drive. 1. Reset the alarm: send a RESET command. 2. If the alarm persists, please contact LÖNNE SCANDINAVIA AS’s Customer Service. 461/482 PROGRAMMING INSTRUCTIONS iDrive A091 Braking Resistor Overload A091 Description Event Possible cause Solution Overvoltage due to the overload of the braking resistor that has been operating for a time equal to the maximum time due to settings in C211 and C212. The braking resistance command was inhibited because the maximum ON time was expired and the energy caused by regeneration (that can no longer be dissipated) has led to overvoltage. This application requires an intense use of the Braking Resistor, for example in lifting applications, where a long downstroke is required when the load is connected to the motor. 1. Reset the alarm: send a RESET command. 2. If the power dissipated by the braking resistance allows for a heavier use, set C211 with a greater ON time. A093 Precharge: Bypass open A093 Description Event Possible cause Solution Bypass relay open. The control board requested the closure of the bypass relay (or contactor) for the short-circuit of the DC-link capacitor precharge resistors, but no closing signal is sent (auxiliary of the relay) during functioning (precharge already closed). Failure in the relay control circuit or in the auxiliary signal circuit detecting relay closing. 1. Reset the alarm: send a RESET command. 2. If the alarm persists, please contact LÖNNE SCANDINAVIA AS’s Customer Service. A094 Heatsink Overheated A094 Description Event Possible cause Solution IGBT heatsink temperature too high. IGBT power heatsink overheated even if the cooling fan is on (see also A096 and A099). • Ambient temperature exceeding 40 °C. • Too high motor current. • Excessive carrier frequency for the application required. 1. Check ambient temperature. 2. Check motor current. 3. Decrease IGBT carrier frequency (see the CARRIER FREQUENCY MENU). A095 Illegal Drive Profile Board A095 Description Event Possible cause An illegal Drive Profile board is implemented. Incorrect configuration of the optional Drive Profile board. • • • 1. Solution 462/482 The Drive Profile board is configured for a different drive. The Drive Profile board is not configured. Faulty Drive Profile board. Make sure that the Drive Profile board is correctly configured for the IDrive drive. 2. Replace the Drive Profile board. PROGRAMMING INSTRUCTIONS iDrive A096 Fan Fault A096 Description Event Fan alarm. Power heatsink overheated with fan locked or disconnected or faulty (see also A094 and A099). Possible cause Fan locked or disconnected or faulty. Solution Replace fan. A097 Motor Cables KO A097 Description Event Possible cause Solution Motor not connected. This protection trips during autotune or DC Brake if the motor is not connected to the drive or if its current value is not compatible with the drive size. • One cable of the motor is disconnected. • The motor size is too small if compared to the drive size. 1. Check that motor cables are properly connected to terminals U, V, W. 2. Check the motor parameters; perform autotune procedure again (VTC and FOC controls). A098 Illegal Motor A098 Description Event Possible cause Solution A disabled motor has been selected. • Motor 2 is enabled, but only one motor can be enabled: C009=1 (see the MOTOR CONTROL MENU). • Motor 3 is enabled, but only 1 or 2 motors can be enabled: C009=1 or 2 (see the MOTOR CONTROL MENU). • Incorrect setting in parameter C009. • Incorrect setting of the digital input parameters enabling the selection functions for motor 2 (C173) and/or motor 3 (C174). 1. Check and enter the correct value for C009. 2. Check and enter the correct value for C173, C174. 3. Check the status of the digital commands for terminals C173 and C174. If remote command sources are selected, check the status of the commands that have been sent. A099 Sensor 2 Fault A099 Description Sensor 2 fault. Event Possible cause Power heatsink overheated with cooling fan off (see also A094 and A096). Solution Please contact LÖNNE SCANDINAVIA AS’s Customer Service. Failure in temperature control device and/or cooling system. A100 MDI6 Illegal Configuration A100 Description Event Possible cause Function programmed to MDI6 and frequency input A as well. MDI6 terminal is programmed with a digital function command and as frequency input A. Incorrect programming of a command function for MDI6, because frequency input A is already set in parameter C189 (FinA) (see the DIGITAL INPUTS MENU and the ENCODER/FREQUENCY INPUTS MENU). 463/482 PROGRAMMING INSTRUCTIONS iDrive Solution 464/482 Check and adjust programming of the digital input functions and of parameter C189. PROGRAMMING INSTRUCTIONS iDrive A101 MDI8 Illegal Configuration A101 Description Event Possible cause Solution Function programmed to MDI8 and frequency input B as well. MDI8 terminal is programmed with a digital function command and as frequency input B. Incorrect programming of a command function for MDI8, because frequency input B is already set in parameter C189 (FinB) (see the DIGITAL INPUTS MENU and the ENCODER/FREQUENCY INPUTS MENU). Check and adjust programming of the digital input functions and of parameter C189. A102, A103, A104, A086 Current input > 20 mA A102 (REF) A103 (AIN1) A104 (AIN2) A086 (XAIN5) Description Event Possible cause Solution A102: REF Current input (4÷20mA or 0÷20mA) greater than 20mA A103: AIN1 Current input (4÷20mA or 0÷20mA) greater than 20mA A104: AIN2 Current input (4÷20mA or 0÷20mA) greater than 20mA A086: XAIN5 Current input (4÷20mA or 0÷20mA) greater than 20mA A current value greater than 20mA has been detected over one input (REF, AIN1, AIN2, XAIN5) set with the following ranges: 4÷20mA or 0÷20mA. • Wrong setting of SW1 on the control board (except for A086). • Failure in the current signal source. 1. Check setting of SW1(except for A086). 2. Check the current signal source. A105, A106, A107, A108 PT100 Channel 1,2,3,4 Fault A105 (Channel 1) A106 (Channel 2) A107 (Channel 3) A108 (Channel 4) Description Event Possible cause A105: PT100 Channel 1 fault A106: PT100 Channel 2 fault A107: PT100 Channel 3 fault A108: PT100 Channel 4 fault Hardware input out of the measure range of the drive. • Wrong setting of SW1 or SW2 on optional control board ES847 • Failure in the current signal source. 1. Check setting of SW1 and SW2. Solution 2. Check the current signal source. A109 Ambient Overtemperature A109 Description Event Possible cause Solution The ambient temperature is too high. The control board has detected a too high ambient temperature. Inverter or cabinet overheated; failure of control board NTC. 1. Open the cabinet and check its conditions. Also check measure M062. 2. Reset the alarm: send a RESET command. 3. If the alarm persists, please contact LÖNNE SCANDINAVIA AS’s Customer Service. 465/482 PROGRAMMING INSTRUCTIONS iDrive 56.4. List of the DRIVECOM Alarm Codes If a PROFIdrive expansion board is used (see PROFiDrive BOARD CONFIGURATION MENU), the IDrive fault codes are also coded according to the DRIVECOM communication profile. The specific code is readable @ address 947 of the specific PROFiDrive PARAMETERS (see PROFIdrive COMMUNICATIONS BOARD USER MANUAL). The DRIVECOM User Group e.V. is an association of international drive manufacturers, universities, and institutes. It has set itself a goal to develop a simple integration of drives in open automation systems. The DRIVECOM User Group therefore decided to standardise the communication interface for accessing drives. Also visit www.drivecom.org. Table 123: List of the DRIVECOM alarm codes Code 0000 1000 Meaning No malfunction General malfunction 2000 2300 2310 2311 2312 2320 Current 3000 3100 3130 3200 3210 3220 4000 Voltage Current on device output side Continuous overcurrent Continuous overcurrent No. 1 Continuous overcurrent No. 2 Short circuit / earth leakage Mains voltage Phase failure Internal voltage Internal overvoltage Internal undervoltage Temperature 4100 4110 4300 4310 Ambient 5000 5111 5200 5210 5220 5300 Device hardware Excess ambient temperature Drive temperature Excess drive temperature U1 = supply +/- 15 V # A000 A060 A065 SW OverCurrent PWMA1 Fault PWMA Fault PWMA0 Fault PWMA Not ON A044 A051 A041 A050 A053 Mains Loss A064 OverVoltage UnderVoltage PT100 Channel 1 Fault PT100 Channel 2 Fault PT100 Channel 3 Fault PT100 Channel 4 Fault A048 A047 A105 A106 A107 A108 Amb.Overtemp. A109 Drive OverHeated HeatSink Overheated A074 A094 ±15V Loss A087 ADC Not Tuned A088 Parm Lost Chk Parm Lost COM1 MMI Trouble KeyPad WatchDog Parm Lost COM2 Parm Lost COM3 Fan Fault 2nd Sensor Fault A072 A073 A078 A081 A089 A090 A096 A099 Bypass Circuit Fault Bypass Connector Fault Bypass Circuit Open A045 A046 A093 RAM Fault A049 Control Measurement control Computing circuit Operating unit 5400 Power section 5440 5441 5442 5443 5500 5510 Contactors Contactor 1 = manufacturer specific Contactor 2 = manufacturer specific Contactor 3 = manufacturer specific Data storage RAM 466/482 IDrive Fault – NoCurrent Fault AutoTune Fault PROGRAMMING INSTRUCTIONS 6000 6010 6100 6200 6300 6301 6302 6303 6304 6305 6306 6307 6308 6309 630A 7000 7100 7110 7120 7300 iDrive Device software Software reset (Watchdog) Internal software User software Data record Data record No. 1 Data record No. 2 Data record No. 3 Data record No. 4 Data record No. 5 Data record No. 6 Data record No. 7 Data record No. 8 Data record No. 9 Data record No. 10 Supplementary modules Power Brake chopper Motor Sensor 7301 7310 7500 8000 8300 8311 9000 False Interrupt Generic Motorola 1ms Interrupt OverTime User Fault A043 A063 A071 A040 SW Version KO Option Board not in Illegal XMDI in DGI Illegal XMDI in DGO Illegal XMDI in MPL FOC No Encoder Illegal Encoder Cfg Illegal Motor Selected MDI6 Illegal Configuration MDI8 Illegal Configuration A092 A054 A042 A052 A057 A079 A082 A098 A100 A101 Braking Resistor Overload Motor Not Connected PTC Alarm PTC Short Circuit REF < 4mA AIN1 < 4mA AIN2 < 4mA XAIN5 < 4mA REF > 20mA AIN1 > 20mA AIN2 > 20mA XAIN5 > 20mA A091 A097 A055 A056 A066 A067 A068 A069 A102 A103 A104 A086 Tracking Error Encoder Fault Speed Alarm Ser WatchDog SR1 WatchDog Fbs WatchDog Illegal Drive Profile Board A080 A059 A076 A061 A062 A070 A095 Motor OverHeated External Alarm 1 External Alarm 2 External Alarm 3 A075 A083 A084 A085 Tacho fault Speed Communication Monitoring Torque control Excess torque External malfunction 467/482 PROGRAMMING INSTRUCTIONS iDrive 56.5. Warnings Warning messages are displayed on the display/keypad. They are flashing messages that usually appear in line 1 or 2 of the first three lines of the display. NOTE Warnings are neither protections nor alarms, and are not stored to the fault list. Some warnings simply state what’s happening or suggest what to do when using the keypad. However, most of the warning messages are Coded warnings: they are displayed with letter “W” followed by two digits stating which warning is active at that moment. Example: W 3 2 O P E N E Warning messages are detailed in the following section. 468/482 N A B L E PROGRAMMING INSTRUCTIONS 56.6. iDrive Warning List Table 124: Warning list. Warning W03 W04 Alarm Message SEARCHING… DATA READ KO W06 HOME SAVED W07 DOWNLOADING W08 UPLOADING W09 DOWNLOAD OK W11 UPLOAD OK W12 UPLOAD KO W13 NO DOWNLOAD W16 W17 PLEASE WAIT… SAVE IMPOSSIBLE W18 PARAMETERS LOST W20 W21 NO PARAMETERS LOAD NOT NOW CONTROL ON W23 DOWNLOAD VER. KO W24 VERIFY DATA W28 W31 W32 W33 W34 OPEN START ENCODER OK OPEN ENABLE WRITE IMPOSSIBLE ILLEGAL DATA W35 NO WRITE CONTROL W36 ILLEGAL ADDRESS W37 ENABLE LOCKED W19 W38 LOCKED W39 W4 0 W41 W42 KEYPAD DISABLED FAN FAULT SW VERSION KO IDP KO W43 PIN KO W44 W45 W46 W48 CURRENT CLASS KO VOLTAGE CLASS KO DOWNLOAD KO OT Time over Description The user interface is searching the data of the next page to display. Software warnings concerning data reading. The page displayed has been saved as the home page displayed at power on. The keypad is writing to the drive the WORK zone parameters saved on its own flash memory. The keypad is reading from the drive the WORK zone parameters that will be saved on its own flash memory. Parameters were successfully downloaded (written) from the keypad to the drive. Parameters were successfully uploaded (read) from the drive to the keypad. The keypad interrupted parameter upload to the drive. Parameter reading has failed. A Download procedure was queried, but no parameter is saved to the flash memory. Wait until the system completes the operation required. Parameter save is not allowed. The keypad interrupted parameter download to the drive. Parameter writing has failed. As a result, not all parameters have been updated (parameter inconsistency). UPLOAD impossible. The required function is not available at the moment. The required function is inhibited because the drive is running. Download failed because parameters saved to keypad memory relate to a SW version or product ID incompatible with the drive SW version or product ID. Download preliminary operation underway, the system is checking the integrity and compatibility of the parameters saved in the keypad memory. Open and close the START (MDI1) signal to start the drive. Encoder tuning procedure finished: the encoder is correctly connected. Open and close the ENABLE (MDI2) signal to enable the drive. Writing procedure impossible. Illegal value entered, operation failed. Writing procedure impossible because Control is active and the drive is running. Illegal address entered, operation failed. The drive is disabled and does not acknowledge the ENABLE command because it is writing a “C” parameter. CAUTION: The drive will start up as soon as writing is over!!! Editing mode cannot be accessed because parameter modification is disabled: P000 is different from P002. Editing mode cannot be accessed because the keypad is disabled. Fan locked or disconnected or faulty. Download impossible because of different SW Versions. Download impossible because of different IDPs (Identification Products). Download impossible because of different PINs (Part Identification Numbers). Download impossible because of different current classes. Download impossible because of different voltage classes. Download impossible (generic cause). The preset threshold for the drive Operation Time has been exceeded. 469/482 PROGRAMMING INSTRUCTIONS iDrive W49 W50 470/482 ST Time over NTC Fault The preset threshold for the drive Supply Time has been exceeded. NTC sensor for heatsink temperature disconnected or faulty. PROGRAMMING INSTRUCTIONS 56.7. iDrive State List Table 125: State list. Number 0 1 2 3 4 5 6 7 8 9 10 11 12 13 14 15 16 17 18 19 20 21 State ALARM!!! STARTING UP MAINS LOSS TUNING SPEED SEARCHING DCB at START DCB at STOP DCB HOLD MANUAL DCB LIMIT WHILE ACCEL. LIMIT WHILE DECEL. LIMIT AT ST. SPD BRAKING RUN AT ST. SPEED ACCELERATING DECELERATING INVERTER OK FLUXING FLUXED MOTOR FIRE MODE RUN FIRE MODE ACC. FIRE MODE DEC. 22 INVERTER OK* 25 27 28 29 30 SPARE WAIT NO ENABLE WAIT NO START PIDOUT min DISAB REF min DISABLED 31 IFD WAIT REF. 32 IFD WAIT START 33 DISABLE NO START Description Alarm tripped The drive is starting up Mains loss The drive is tuning Searching for motor speed DC Braking at start DC Braking at stop DC current for Hold function Manual DC Braking Current/torque limit while accelerating Current/torque limit while decelerating Current/torque limit at constant rpm Braking module startup or deceleration ramp extension Drive running at speed set point Drive running with motor in acceleration stage Drive running with motor in deceleration stage Drive on Stand-by with no alarms tripped Motor fluxing stage Motor fluxed Constant rpm in Fire Mode Acceleration in Fire Mode Deceleration in Fire Mode Drive on Stand-by with no alarms tripped; void warranty due to alarm trip in Fire Mode Board in Spare mode Waiting for opening ENABLE command Waiting for opening START command Drive disabled due to PID output < Min. Drive disabled due to REF < Min. Drive enabled with IFD control waiting for reference in order to start Drive enabled with IFD control waiting for START in order to start When fluxing, the RUN command was not given within the max. time set in C183. The drive is kept disabled until the RUN command is given. 471/482 PROGRAMMING INSTRUCTIONS iDrive 57. CUSTOM PARAMETERS In the table below, you can write down settings that are different from the default values. PARAMETERS P00x User Level P001-AcsLev Product P263-Lang P26x Display P264-ModNav P264b-ModMenu P266-kpd_type P267a-Custom PID units of measure Default Values 0: Basic PARAMETERS P003-ModCmode 0: Menu 0: Standard 1: Ref.Activated 1:[StandBy+Fluxing] P264a-ModNavMenu P265-FirstPage P267-umis1_PID 1: Yes 3: [Start Up] 0: Disable [%] M004 P268a- Measure n.2 on Root page M000 M006 M004 0: No P268y- Scaling of Measure n.1 on Root page P268z- Scaling of Measure n.2 on Root page P268c- Measure n.2 on Keypad page P268e- Measure n.4 on Keypad page P269a-DisabKey2 P00x-P03x Ramps P009-Tup1 P012-Tup2 P014-Un.Meas1-2 P016-Tdn3 P019-Tdn4 P021a-Rnd.Sel1 P021c-Rnd.Sel3 P022-RndStartAcc P024-RndStartDec P026-T Tup P028-T Un.Mea P030-J Tdn P032-TupFireM [*] [*] [*] [*] [*] [*] [*] 50 % 50 % 5.00 s 1: 0.1 s 1s [*] P010-Tdn1 P013-Tdn2 P015-Tup3 P018-Tup4 P020-Un.Meas3-4 P021b-Rnd.Sel2 P021d-Rnd.Sel4 P023-RndStopAcc. P025-RndStopDec P027-T Tdn P029-J Tup P031-SpdAccReset P033-TdnFireM P05x-P07x Reference P050-REF P051a-REFMIN_% P052a-REFMAX_% P054-TauFilt REF P056-AIN1MIN P057-AIN1MAX P058-AIN1OFFS P060-AIN2 P061a-AIN2MIN_% P062a-AIN2MAX_% P064-TauFilt AIN2 P066-SpdDisabTime P068-U/D Mem P068b-U/D2-StopRes P068d-U/D2SwSRes P070-Jog Ref P071a-PulseMin_% P072a-PulseMax_% P073a-EncMin_% P074a-EncMax_% 3: 0-10V 100% 100% 5 ms 4.0 mA 20.0 mA 0.000 mA 2: 4-20mA 100% 100% 5 ms 0s 1: Yes 0: No 0: No 0% 100% 100% 100% 100% P051-REFMIN P052-REFMAX P053-REFOFFS P055-AIN1 P056a-AIN1MIN_% P057a-AIN1MAX_% P059-TauFilt AIN1 P061-AIN2MIN P062-AIN2MAX P063-AIN2OFFS P065-SpdDisab P067-U/D Ramp P068a-U/D1-StopRes P068c-U/D1SwSRes P069-U/D Range P071-PulseMin P072-PulseMax P073-EncMin P074-EncMax 472/482 Default Values 1: ENGLISH P268-Measure n.1 on Root page P268b-Measure n.1 on Keypad page P268d-Measure n.3 on Keypad page P269-DisabKey1 Custom Values 100.00% 100.00% M026 M000 0: No [*] [*] [*] [*] [*] [*] [*] 50 % 50 % 5.00 s 1s 1: Yes [*] 0.0 V 10.0 V 0.000 V 2: 4-20mA 100% 100% 5 ms 4.0 mA 20.0 mA 0.000 mA 0 rpm Square 0: No 0: No 1: Unipolar 10000 Hz 100000 Hz -1500 rpm 1500 rpm Custom Values PROGRAMMING INSTRUCTIONS PARAMETERS P08x-P10x Multispeed P080-Mspd.use P083-Spd2 P087-Spd4 P089-Spd6 P091-Spd8 P093-Spd10 P095-Spd12 P097-Spd14 P099-FireM_Spd iDrive Default Values 0:Preset Speed 0.00 rpm 0.00 rpm 0.00 rpm 0.00 rpm 0.00 rpm 0.00 rpm 0.00 rpm 750.00 rpm P08x-P09x PID Multireference P080a-Mref.use PID 0:Preset Ref P082a-Ref 2 PID 0.00 P084a-Ref 4 PID 0.00 P086a-Ref 6 PID 0.00 P099a-FireM_Ref PID 0.00 Custom Values PARAMETERS P081-Spd1 P085-Spd3 P088-Spd5 P090-Spd7 P092-Spd9 P094-Spd11 P096-Spd13 P098-Spd15 P100-Un.Meas P081a-Ref 1 PID P083a-Ref 3 PID P085a-Ref 5 PID P087a-Ref 7 PID Default Values 0.00 rpm 0.00 rpm 0.00 rpm 0.00 rpm 0.00 rpm 0.00 rpm 0.00 rpm 0.00 rpm 0: 0.01 rpm 0.00 0.00 0.00 0.00 P10x Prohibit Speeds P105-Velbp1 P107-Velbp3 0 rpm 0 rpm P106-Velbp2 P108-Bwbps 0 rpm 0 rpm P11x-P12x % Var. Ref. P115-VarPerc1 P117-VarPerc3 P119-VarPerc5 P121-VarPerc7 0.0 % 0.0 % 0.0 % 0.0 % P116-VarPerc2 P118-VarPerc4 P120-VarPerc6 0.0 % 0.0 % 0.0 % P12x-P15x Speed Loop P125-Ti min M1 P128-Kp min M1 P130-Err.min M1 P135-Ti min M2 P138-Kp min M2 P140-Err.min M2 P145-Ti min M3 P148-Kp min M3 P150-Err.min M3 P152-curr_symm. P15x-P17x FOC Regulator P155-Curr_Kp M1 P158-Flux_Kp M1 P162-Curr_Kp M2 P165-Flux_Kp M2 P169-Curr_Kp M3 P172-Flux_Kp M3 P17x-P21x Analog Outputs P176-AO1 Mode P178-AO1 Min P180-AO1 Offset P182-AO1 Out_min P184-AO2 Mode P186-AO2 Min P188-AO2 Offset P190-AO2 Out_min P192-AO3 Mode P194-AO3 Min P196-AO3 Offset P198-AO3 Out_min P200-PulsOut Mode P202-Pls Out Min P204-Pls Out Fmax P206-Pls Out Filt P208-AO2Gain P210-AO1Address P212-AO3Address 0.500 s 10.00 1.00 % 0.500 s 10.00 1.00 % 0.500 s 10.00 1.00 % 0% P126-Ti max M1 P129-Kp max M1 P131-Err.max M1 P136-Ti max M2 P139-Kp max M2 P141-Err.max M2 P146-Ti max M3 P149-Kp max M3 P151-Err.max M3 0.500 s 10.00 1.00 % 0.500 s 10.00 1.00 % 0.500 s 10.00 1.00 % 3.00 0.00 3.00 0.00 3.00 0.00 P156-Curr_Ti M1 P159-Flux_Ti M1 P163-Curr_Ti M2 P166-Flux_Ti M2 P170-Curr_Ti M3 P173-Flux_Ti M3 20.0 ms 33 ms 20.0 ms 33 ms 20.0 ms 33 ms 1: +/-10V -1500.000 rpm 0.000 V -10.0 V 1: +/-10V -1500.000 rpm 0.000 V -10.0 V 1: +/-10V 0.000 A 0.000 V -10.0 V 0: Disabled 0 rpm 10.00 kHz 0.000 s RESERVED P177-AO1 Sel P179-AO1 Max P181-AO1 Filt P183-AO1 Out_max P185-AO2 Sel P187-AO2 Max P189-AO2 Filt P191-AO2 Out_max P193-AO3 Sel P195-AO3 Max P197-AO3 Filt P199-AO3 Out_max P201-PlsOut Sel P203-Pls Out Max P205-Pls Out Fmin P207-AO1Gain P209-AO3Gain P211-AO2Address P213-Sin Amp Custom Values 1: Motor Speed 1500.000 rpm 0.000 s 10.0 V 2: Speed Ref. 1500.000 rpm 0.000 s 10.0 V 5:Motor Current 36.000 A 0.000 s 10.0 V 1: Motor Speed 0 rpm 100.00 kHz RESERVED 100.0 % 473/482 PROGRAMMING INSTRUCTIONS iDrive P214-Sin Freq PARAMETERS P21x-P22x Timers P216-T1 delay On P218-T2 delay On P220-T3 delay On P222-T4 delay On P224-T5 delay On P226a-Timer MDI1 P226c-Timer MDI3 P227a-Timer MDI5 P227c-Timer MDI7 P228a-Timer MDO1 P228c-Timer MDO3 P229a-Timer MPL1 P229c-Timer MPL3 1.00 Hz Default Values 0.0 s 0.0 s 0.0 s 0.0 s 0.0 s 0 0 0 0 0 0 0 0 P23x-P26x PID Parameters P236-PID Out Max 100.00 % P237a-Wake Up 0: Disabled Mode P238-Integ Max 100.00 % P240-PID Kp 1.000 P242-PID Ti(Tc) 500 Tc P244-PID Tc 5 ms P246-PID Ref Max 100.00 % P248-PID Fdbk Max 100.00 % P250-PID Tdn 0.00 s P252-Rnd start 50 % P254-Thresh Int 0.0 %|Refmax| P256-Trate Lim 1 ms P260-GainAWUP 1.00 P27x-P30x Digital Outputs P270-Out1Mode 3: Analog P272-Out1Sel2 A71: Speed 3: ≤ P274-Out1 Test2 P276-D01 ValTst2 10.000 rpm P277a-Out1Sel1 D0: Disable P278-Out1Logic 1: True P280-Out2Sel1 A81: Torque output P282-Out2 Test1 0: > P284-D02 ValTst1 20.000 % P286-Out2Func 1: (A) Set (B) Reset P286b-Out2Func 0: f(A,B) OR (C) P288-Out3Mode 1: Digital P290-Out3Sel2 D3: Inverter Alarm P292-Out3 Test2 0: > P294-D03 ValTst2 0.000 P295a-Out3Sel1 D0: Disable P296-Out3Logic 0: False P298-Out4Sel1 D1: Inverter Run Ok P300-Out4 Test1 0: > P302-D04 ValTst1 0.000 P304-Out4Func 0: (A) OR (B) P304b-Out4Func 0: f(A,B) OR (C) 474/482 P215-Saw Freq Custom Values PARAMETERS 1.000 Hz Default Values P217-T1 delay Off P219-T2 delay Off P221-T3 delay Off P223-T4 delay Off P225-T5 delay Off P226b-Timer MDI2 P226d-Timer MDI4 P227b-Timer MDI6 P227d-Timer MDI8 P228b-Timer MDO2 P228d-Timer MDO4 P229b-Timer MPL2 P229d-Timer MPL4 0.0 s 0.0 s 0.0 s 0.0 s 0.0 s 0 0 0 0 0 0 0 0 P237-PID Out Min P237b-Wake Up Level P239-Der Max P241-PID KpMult P243-PID Td(Tc) P245-PID Ref Min P247-PID Fdbk Min P249-PID Tup P251-PID U.Mea. P253-Rnd stop P255-Disab Time P257-GainScale 100.00 % P271-Out1Sel1 P273-Out1 Test1 P275-D01 ValTst1 P277-Out1Func P277b-Out1Func P279-Out2Mode P281-Out2Sel2 P283-Out2 Test2 P285-D02 ValTst2 P286a-Out2Sel1 P287-Out2Logic P289-Out3Sel1 P291-Out3 Test1 P293-D03 ValTst1 P295-Out3Func P295b-Out3Func P297-Out4Mode P299-Out4Sel2 P301-Out4 Test2 P303-D04 ValTst2 P304a-Out4Sel1 P305-Out4Logic 0.00 % 100.00 % 0: 1 0 mTc 0.00 % 0.00 % 0.00 s 1: 0.1 s 50 % Disabled 1.000 A71: Speed 0: > 50.000 rpm 1: (A) Set (B) Reset 0: f(A,B) OR (C) 6: Brake A71: Speed 3: ≤ 50.000 rpm D0: Disable 1: True D3: Inverter Alarm 0: > 0.000 0: (A) OR (B) 0: f(A,B) OR (C) 1: Digital D1: Inverter Run Ok 0: > 0.000 D0: Disable 1: True Custom Values PROGRAMMING INSTRUCTIONS PARAMETERS iDrive Default Values Custom Values PARAMETERS P306-P317 Aux Digital Outputs P306-Out1Sel D0: Disable P308-Out2Sel D0: Disable P310-Out3Sel D0: Disable P312-Out4Sel D0: Disable P314-Out5Sel D0: Disable P316-Out6Sel D0: Disable P307-Out1Logic P309-Out2Logic P311-Out3Logic P313-Out4Logic P315-Out5Logic P317-Out6Logic P32x PT100 Settings P320-Mea1 Type P322-Mea2 Type P324-Mea3 Type P326-Mea4 Type P321-Offset Mea1 P323-Offset Mea2 P325-Offset Mea3 P327-Offset Mea4 0:Disable 0:Disable 0:Disable 0:Disable Default Values Custom Values 1: True 1: True 1: True 1: True 1: True 1: True 0 0 0 0 P33x Fieldbus Parameters P330-fbs_meas3 M012 Torq.Out.% P331-fbs_meas4 M022 PID Out% P35x-P38x MPL P350-Out1Mode P352-Out1Sel2 P354-Out1 Test2 P356-D01 ValTst2 P357a-Out1Sel1 P358-Out1Logic P360-Out2Sel1 P362-Out2 Test1 P364-D02 ValTst1 P366-Out2Func P366b-Out2Func P368-Out3Mode P370-Out3Sel2 P372-Out3 Test2 P374-D03 ValTst2 P375a-Out3Sel1 P376-Out3Logic P378-Out4Sel1 P380-Out4 Test1 P382-D04 ValTst1 P384-Out4Func P384b-Out4Func 0: Disable D0: Disable 0: > 0 D0: Disable 1: True D0: Disable 0: > 0 0: (A) OR (B) 0: f(A,B) OR (C) 0: Disable D0: Disable 0: > 0 D0: Disable 1: True D0: Disable 0: > 0 0: (A) OR (B) 0: f(A,B) OR (C) P351-Out1Sel1 P353-Out1 Test1 P355-D01 ValTst1 P357-Out1Func P357b-Out1Func P359-Out2Mode P361-Out2Sel2 P363-Out2 Test2 P365-D02 ValTst2 P366a-Out2Sel1 P367-Out2Logic P369-Out3Sel1 P371-Out3 Test1 P373-D03 ValTst1 P375-Out3Func P375b-Out3Func P377-Out4Mode P379-Out4Sel2 P381-Out4 Test2 P383-D04 ValTst2 P384a-Out4Sel1 P385-Out4Logic D0: Disable 0: > 0 0: (A) OR (B) 0: f(A,B) OR (C) 0: Disable D0: Disable 0: > 0 D0: Disable 1: True D0: Disable 0: > 0 0: (A) OR (B) 0: f(A,B) OR (C) 0: Disable D0: Disable 0: > 0 D0: Disable 1: True P39x Auxiliary Reference P390-XAIN4 P391a-XAIN4MIN_% P392a-XAIN4MAX_% P394-TauFilt XAIN4 P396-XAIN5MIN P397-XAIN5MAX P398-XAIN5OFFS 3: 0-10V 100% 100% 100 ms 4.0 mA 20.0 mA 0.000 mA P43x-P46x PID2 Parameters P436-PID2 Out Max 100.00 % P437a-Wake Up 0: Disabled Mode P438-Integ Max 100.00 % P440-PID2 Kp 1.000 P442-PID2 Ti(Tc) 500 Tc P444-PID2 Tc 5 ms P446-PID2 Ref Max 100.00 % P448-PID2 Fdbk Max 100.00 % P450-PID2 Tdn 0.00 s P452-Rnd start 50 % P454-Thresh Int 0.0 %|Refmax| P456-Trate Lim 1 ms P460-GainAWUP 1.00 P391-XAIN4MIN P392-XAIN4MAX P393-XAIN4OFFS P395-XAIN5 P396a-XAIN5MIN_% P397a-XAIN5MAX_% P399-TauFilt XAIN5 0.0 V 10.0 V 0.000 V 2: 4-20mA 100% 100% 100 ms P437-PID2 Out Min P437b-Wake Up Level P439-Der Max P441-PID2 KpMult P443-PID2 Td(Tc) P445-PID2 Ref Min P447-PID2 Fdbk Min P449-PID2 Tup P451-PID2 U.Mea. P453-Rnd stop P455-Disab Time P457-GainScale 100.00 % 0.00 % 100.00 % 0: 1 0 mTc 0.00 % 0.00 % 0.00 s 1: 0.1 s 50 % Disabled 1.000 475/482 PROGRAMMING INSTRUCTIONS iDrive PARAMETERS Default Values C00x-C00x Carrier Freq C001-Minimun Carrier C003- Pulse Number C00x-C04x Motor Control M1 C008-VmainsNom C010-Ctrl.Type M1 C012-EncEnab M1 C014-Phase Rot. Mot1 C016-n mot M1 C018-Imot M1 C020-P0 M1 C022-Rstat M1 C024-Lm M1 C026-vdcFiltM1 C029-nmax M1 C031-nsa M1 C033-spd_redTrq1 [*] 1: 24 PARAMETERS C002-Maximum Carrier C004-Silent Modulation Default Values [*] [*] C035-Boost0 M1 C037-FrqBst C039-SlipComp. M1 C041-Tfl M1 [*] [*] Disabled [*] C009-Mot.Numb. C011-RefMode M1 C013-v_f_mode1 C015-Fmot M1 C017-Pmot M1 C019-Vmot M1 C021-i0 M1 C023-Ld M1 C025-TauRot M1 C028-nmin M1 C030-spddeflux M1 C032-red_Trq1 C034-Preboost M1 C034b-Boost ref.neg. M1 C036-Boost M1 C038-AutoBst C040-DV_M1 C042-Vout Sat M1 C04x-C05x Limits M1 C043-Iacclim M1 C045-Ideclim M1 C047-Tmin M1 C049-Tlim Ramp M1 150% [*] 0.0 % 50ms C044-Irunlim M1 C046-defilimRed M1 C048-Tmax M1 C050-fRedLimAcc M1 150% 0: Disabled 120% 0: Enabled 0: IFD 0: No 0: No 1420 rpm [*] 0.0 % [*] 250.00 mH 0ms 1500 rpm Disabled 20 % 0: Speed [*] 50.0 Hz [*] [**] 0% [*] 0 ms 0 rpm 90 % 30.0 % [*] C078-Boost0 M2 C080-FrqBst C082-SlipComp. M2 C084-Tfl M2 [*] [*] Disabled [*] C054-RefMode M2 C056-v_f_mode2 C058-Fmot M2 C060-Pmot M2 C062-Vmot M2 C064-i0 M2 C066-Ld M2 C068-TauRot M2 C071-nmin M2 C073-spddeflux M2 C075-red_Trq2 C077-Preboost M2 C077b-Boost ref.neg. M2 C079-Boost M2 C081-AutoBst C083-DV_M2 C085-Vout Sat M2 C08x-C09x Limits M2 C086-Iacclim M2 C088-Ideclim M2 C090-Tmin M2 C092-Tlim Ramp M2 150% [*] 0.0 % 50ms C087-Irunlim M2 C089-defilimRed M2 C091-Tmax M2 C093- fRedLimAcc M2 150% 0: Disabled 120% 0: Enabled C034a-Boost ref.pos. M1 C05x-C08x Motor Control M2 C053-Ctrl.Type M2 C055-EncEnab M2 C057-Phase Rot. Mot2 C059-n mot M2 C061-Imot M2 C063-P0 M2 C065-Rstat M2 C067-Lm M2 C069-vdcFiltM2 C072-nmax M2 C074-nsa M2 C076-spd_redTrq2 C077a-Boost ref.pos. M2 476/482 [**] 0: IFD 0: No 0: No 1420 rpm [*] 0.0 % [*] 250.00 mH 0ms 1500 rpm Disabled 20 % Custom Values 0.0 % 0.0 % 1 0: Speed [*] 50.0 Hz [*] [**] 0% [*] 0 ms 0 rpm 90 % 30.0 % [*] 0.0 % [*] [*] Disabled 85% 0.0 % [*] [*] Disabled 85% Custom Values PROGRAMMING INSTRUCTIONS iDrive Default Values PARAMETERS C09x-C12x Motor Control M3 C096-Ctrl.Type M3 C098-EncEnab M3 C100-Phase Rot. Mot3 C102-n mot M3 C104-Imot M3 C106-P0 M3 C108-Rstat M3 C110-Lm M3 C112-vdcFiltM3 C115-nmax M3 C117-nsa M3 C119-spd_redTrq3 C120a-Boost ref.pos. M3 C121-Boost0 M3 C123-FrqBst C125-SlipComp. M3 C127-Tfl M3 0: IFD 0: No 0: No 1420 rpm [*] 0.0 % [*] 250.00 mH 0ms 1500 rpm Disabled 20 % 0.0 % [*] [*] Disabled [*] C12x-C13x Limits M3 C129-Iacclim M3 C131-Ideclim M3 C133-Tmin M3 C135-Tlim Ramp M3 150% [*] 0.0 % 50ms C14x Control Method C140-Sel Comm 1 C142-Sel Comm 3 C144-Sel InRef 2 C146-Sel InRef 4 C148-RemLoc_mode 1: Terminals 0: Disabled 2: AIN1 0: Disabled 0: StandBy + Fluxing Custom Values C097-RefMode M3 C099-v_f_mode3 C101-Fmot M3 C103-Pmot M3 C105-Vmot M3 C107-i0 M3 C109-Ld M3 C111-TauRot M3 C114-nmin M3 C116-spddeflux M3 C118-red_Trq3 C120-Preboost M3 C120b-Boost ref.neg. M3 C122-Boost M3 C124-AutoBst C126-DV_M3 C128-Vout Sat M3 PARAMETERS 0: Speed [*] 50.0 Hz [*] [**] 0% [*] 0 ms 0 rpm 90 % 30.0 % [*] 0.0 % [*] [*] Disabled 85% C130-Irunlim M3 C132-defilimRed M3 C134-Tmax M3 C136-fRedLimAcc M3 150% 0: Disabled 120% 0: Enabled C141-Sel Comm 2 C143-Sel InRef 1 C145-Sel InRef 3 C147-Sel T lim 1: Terminals 1: REF 0: Disabled 0: Disabled C15x-C18x Digital Inputs C149-Start C150-Stop C151-Rev C152-Enable S C154-DisabReset C156-Mltsp 1 C158-Mltsp 3 C160-DCB C162-Down C164-ExtAlrm 1 C165-ExtAlrm 2 C166-ExtAlrm 3 C167-MltRmp 0 C169-Jog C171-PID disab. C172-Keypad lock C174-3rd Mot. C176-PercSpd 1 C178-PIDud_res 1: MDI1 0: None 0: None 0: None 0: No 5: MDI5 0: None 0: None 0: None 0: None 0: None 0: None 0: None 0: None 0: None 0: None 0: None 0: None 0: None C149a-StartB C150a-StopB C151a-RevB C153-Disable C155-Mltsp 0 C157-Mltsp 2 C159-Cw-CCw C161-Up C163-U/D Reset C164a-ExtAlr1Delay C165a-ExtAlr2Delay C166a-ExtAlr3Delay C168-MltRmp 1 C170-Master/Slave C171a-PID sel. control C173-2nd Mot. C175-PercSpd 0 C177-PercSpd 2 C179-SourceSel C180-Loc/Rem 0: MDI7 C180a-Loc/RemType 0: Disabled AlwaysON 0: Dec. Ramp 0: None 0: None C182-MultiProg C184-StartFlux C186-FireMode C188a-MrefPID 1 C188c-MrefPID 3 0: None 0: None 0: None 0: None 4: MDI4 0: None 8: MDI8 0: None 0: None 0 ms 0 ms 0 ms 0: None 0: None 0: Disabled 0: None 0: None 0: None 0: MDI6 2: Pushbutton+Storage 0: Disabled 0: No 0: None 0: None 0: None C18x-C19x Encoder/Frequency Input C189-UseEnc 0: A / B Unused C191-pulsEncB 1024 C193-SpdErr 300 rpm C195-tauFiltFdbk 5.0 ms C190-pulsEncA C192-SpdAlrTime C194-TrackAlrEn C196-tauFiltRef 1024 5.00 s 1: Enable 5.0 ms C181-Safe Start C183-Tflux_dis C185-StartFrWheel C187-DisabExtTlim C188b-MrefPID 2 Default Values 477/482 PROGRAMMING INSTRUCTIONS iDrive C197-nCH ENCA C199-EncSign PARAMETERS C21x Braking Unit C210-Enab/Vel BrakeO C212-BrkDutyCycle 0:.2Ch. Quad 0: Fdbk.NO Ref.NO Default Values [*] 0: No 0.5 s 50 rpm 0% [*] C22x-C23x Power Down C225-pwd type C227-Tpddec C229-Pddcder C231-Kpvdclc C234-stopmode 3: Alarm 20 s 1 0.050 0: Stop C24x Speed Searching C245-Enab SpdSch C247-SpsRate C249-SpsSpd 0: No 10 % 0: Last Speed Disable 0: No C26x-C27x Thermal Protection C264-FanTemp 50 °C C266-ThermCurr M1 105 % C268-ThermProt M2 3: Yes B C270-ThermConstM2 720s C272-ThermCurr M3 105 % C274-PTC ThermProt 0:Disable C27x Maintenance C276-Set OP Time 0h C28x-C29x PID Configuration C285-Sel InPID 1 2: AIN1 C287-Sel InPID 3 0: Disabled C289-Sel Fdbk 2 PID 0: Disable C291-PID Mode 0: Disable C291b-PID Mode C293-PID Struct 0: Disable 0: No C30x Crane C300-StartTrq ref.pos. C300a-StartTrq ref.neg. C302-Brk_On 478/482 PARAMETERS 0: 2Ch. Quad Default Values C211-BrakeTon 2.00 s C216-Enab dcb start C218-Tdcb start C220-I dcb C222-Tdefl M1 C224-Tdefl M3 0: No 0.5 s 100 % [*] [*] C226-Tpdd C228-Pddecboost C230-Vpddel C232-Kivdclc C235-stoplev 10 ms 0.10 % [**] 0.500s 0 rpm 10 % C21x-C22x DC Braking C215-Enab dcb stop C217-Tdcb stop C219-dcb speed C221-I dcb hold C223-Tdefl M2 C25x AutoReset C255-nPulsRes C257-PowOnRes Custom Values C198-nCH ENCB. 0.0 % 0.0 % 0: None C246-tssd C248-Is 1s 75 % C256-T ResCyc C258-UvMlStore 300 s 0: No C265-ThermProt M1 C267-ThermConstM1 C269-ThermCurr M2 C271-ThermProt M3 C273-ThermConstM3 C276-Set SP Time C286-Sel InPID 2 C288-Sel Fdbk 1 PID C290-Sel Fdbk 3 PID C291a-PID Control mode C292-Der Mode C294-PID Act C301-t_StartTrq ref.pos. C301a-t_StartTrq ref.neg. 3: Yes B 720s 105 % 3: Yes B 720s 0h 0: Disabled 3: AIN2/PTC 0: Disable 0: Standard SUM 0: Measure 1: Reference 0 ms 0 ms PARAMETERS PROGRAMMING INSTRUCTIONS PARAMETERS C31x Date and Time C310-ModWeekday C312-ModMonth C314-ModHour C316-Modify Date C33x-C35x Timed Flags C330-TFL1: T on h C332-TFL1: T on s C334-TFL1: T off m C336-TFL1: WeekDays C338-TFL2: T on m C340-TFL2: T off h C342-TFL2: T off s C344-TFL3: T on h C346-TFL3: T on s C348-TFL3: T off m C350-TFL3: WeekDays C352-TFL4: T on m C354-TFL4: T off h C356-TFL4: T off s iDrive Default Values 1: Monday 1: January 0 0 0 0 0 0 0 0 0 0 0 0 0 0 0 Custom Values PARAMETERS Default Values C311-ModDay C313-ModYear C315-ModMin 1 0 0 C331-TFL1: T on m C333-TFL1: T off h C335-TFL1: T off s C337-TFL2: T on h C339-TFL2: T on s C341-TFL2: T off m C343-TFL2: WeekDays C345-TFL3: T on m C347-TFL3: T off h C349-TFL3: T off s C351-TFL4: T on h C353-TFL4: T on s C355-TFL4: T off m C357-TFL4: WeekDays 0 0 0 0 0 0 0 0 0 0 0 0 0 0 PARAMETERS 479/482 PROGRAMMING INSTRUCTIONS iDrive PARAMETERS Default Values R00x-R01x Serial Link R001-com_slaveaddr Custom Values Default Values 5 ms R010-sc1_baudrate 38400 bps R012-sr1_wdg_time 0.0 s R002-com_answdelay R004com_4time_delay R006-parity sc0 R009-cm1_answdelay R011cm1_4time_delay R013-parity sc1 R01x Fieldbus Configuration R016-fbs_wdg_time R017b-AO2_fb_sel 0 ms 0: No R017a-AO1_fb_sel R017c-AO3_fb_sel 1: NO R023- I/O Board setting R003-sc0_baudrate R005-ser_wdg_time R008-cm1_slaveaddr R02x Expansion Board Settings R021-Data Logger Setting 1 PARAMETERS 38400 bps 0.0 s 1 R02x-R04x PROFIdrive Settings R025-SlaveAddr 1 R027-PZD4_O_Addr 0: not used R029-PZD6_O_Addr 0: not used R031-PZD8_O_Addr 0: not used R033-PZD10_O_Addr 0: not used R035-PZD4_I_Addr 0: not used R037-PZD6_I_Addr 0: not used R039-PZD8_I_Addr 0: not used R041-PZD3_I_Addr 0: not used R045-DP sel. 1: VENDOR SPECIFIC 1 R05x Daylight Saving Time R050-DSTOn WDMM R052-DSTOff WDMM 5703 5710 2 ms 1: No, 2 Stop Bit 5 ms 2 ms 1: No, 2 Stop Bit 0: No 0: No 0:None R026-PZD3_O_Addr R028-PZD5_O_Addr R030-PZD7_O_Addr R032-PZD9_O_Addr R034-PZD3_I_Addr R036-PZD5_I_Addr R038-PZD7_I_Addr R040-PZD9_I_Addr R044-DP com.mode 1: Digital Inputs 0: not used 0: not used 0: not used 0: not used 0: not used 0: not used 0: not used 0: DP V0 R051-DSTOn HHMM R053-DSTOff HHMM 200 200 R11x Data Logger R115-SIM card PIN “0000” Key: [*] Parameter depending on the current size. [**] Parameter depending on the voltage class. 480/482 R116-Preset Connections 0: Disable PARAMETERS PROGRAMMING INSTRUCTIONS iDrive 58. INDEX 2 2-ZONE ...................................................................................173 A ALARM CODES LIST...................................................... 416; 433 ALARMS AND WARNINGS ...................................................414 ALTERNATIVE COMMAND AND REFERENCE SOURCES ....... 28; 295 ANALOG AND FREQUENCY OUTPUTS ................................135 ANTI-WINDUP .........................................................................164 APPLICATION ..........................................................................76 AUTORESET .............................................................................356 AUTOTUNE..............................................................................243 AUX REFERENCES ..................................................................238 AUXILIARY DIGITAL OUTPUTS ...............................................205 ES847 ..................................................................... 238; 295; 404 ES851 ............................................................................... 69; 410 ES870 ..................................................................................... 404 ES913 ..................................................................................... 326 EXPANSION BOARDS ........................................................... 404 EXTERNAL ALARM INPUTS .................................................... 316 EXTERNAL TORQUE LIMIT ........................................................34 F BRAKING RESISTANCE ..........................................................334 BRIDGE CRANE .....................................................................378 FAULT LIST .................................................................................72 FEEDBACK FROM ENCODER ........................................ 35; 330 FIELDBUS ................................................................................ 397 FIRE MODE ........................................................................ 29; 74 FIRE MODE ENABLE INPUT ................................................... 325 FIRST STARTUP ..........................................................................39 FLUXING AT ACTIVATION .................................................... 324 FLUXING MAX. TIME ............................................................. 324 FOC ................................................................................. 43; 251 FOC CURRENT REGULATOR ................................................ 133 FOC FLUX REGULATOR ........................................................ 134 FREQUENCY OUTPUT ........................................................... 137 FUNCTIONING TIMES...............................................................67 C I CARRIER FREQUENCY ..........................................................247 CHANGEOVER FROM REMOTE TO LOCAL COMMAND .301 COMMAND SOURCES .........................................................291 CONTROL METHOD ..............................................................290 CONTROLLED STOP IN CASE OF POWER FAILURE ..............27 CURRENT BALANCING .........................................................128 CW/CCW INPUT ....................................................................314 I/O OPTIONAL BOARD ................................................ 238; 295 IFD .................................................................................... 39; 251 INPUTS FOR REFERENCES ........................................................99 IPEAK ..................................................................................... 285 B D DATA LOGGER ............................................................... 69; 410 DAYLIGHT SAVING TIME .......................................................408 DC BRAKING .................................................................. 27; 337 DC BRAKING AT START AND NON-CONDENSING FUNCTION ..........................................................................337 DC BRAKING AT STOP ..........................................................339 DC BRAKING COMMAND SENT FROM TERMINAL BOARD ............................................................................................340 DCB INPUT..............................................................................315 DIGITAL INPUTS ......................................................................302 DIGITAL OUTPUT MODE ........................................................176 DIGITAL OUTPUTS ..................................................................175 DIGITAL PID REGULATOR .......................................................28 DISABLE INPUT .......................................................................313 DISABLE LOC/REM FWD/REV KEYS .......................................86 DISABLE RESET ALARMS ON MDI3 .......................................313 DISPLAY/KEYPAD ....................................................................15 DOWNLOAD/UPLOAD FROM THE KEYPAD .........................22 DRIVECOM ............................................................................433 DRY RUN ................................................................................ 221 E EEPROM .................................................................................412 ELECTRICAL SPECIFICATIONS OF THE CONNECTED MOTOR .... 252 ENABLE ...................................................................................305 ENABLE S ................................................................................324 ENABLE–S INPUT ....................................................................312 ENCODER/FREQUENCY INPUTS ..........................................326 EQUIVALENT CIRCUIT OF THE ASYNCHRONOUS MACHINE ... 253 ES836 ......................................................................................326 J JOG ....................................................................................... 115 JOG INPUT ............................................................................ 318 K KEYPAD ....................................................................................80 KEYPAD LOCK INPUT ........................................................... 320 L LANGUAGE..............................................................................74 LEDS ..........................................................................................24 LIMITS ..................................................................................... 285 LOC/REM ........................................................................ 23; 296 LOC/REM INPUT ................................................................... 323 LOCAL MODE..........................................................................81 M MAIN SPEED/TORQUE REFERENCE........................................26 MAINTENANCE ..................................................................... 365 MDI MULITPROGRAMMING ENABLE.................................. 324 MENU TREE ...............................................................................16 METHOD OF ZIEGLER AND NICHOLS ................................. 159 MOTOR CONTROL ............................................................... 251 MOTOR SEL INPUT ................................................................ 320 MOTOR THERMAL PROTECTION ................................... 27; 358 MPL ........................................................................................ 214 MULTIMOTOR ...........................................................................27 MULTIRAMP INPUTS .............................................................. 317 MULTISPEED ........................................................................... 118 MULTISPEED INPUTS ...................................................... 313; 325 481/482 PROGRAMMING INSTRUCTIONS iDrive N NAVIGATION ...........................................................................18 O OPERATION TIME COUNTER ..................................................68 P PARAMETER MODIFICATION .................................................19 PASSWORD ....................................................................... 13; 78 PID CONFIGURATION ...........................................................366 PID DISABLE INPUT .................................................................319 PID FEEDBACK REFERENCE ....................................................26 PID PARAMETERS...................................................................158 PID REFERENCE .......................................................................26 PID UP/DOWN RESET INPUT .................................................322 PID/PID2 UNITS OF MEASURE .................................................84 PID2 PARAMETERS ................................................................173 PIPE FILL ................................................................................. 223 POWER DOWN ............................................................... 27; 345 POWER OFF LIST ......................................................................73 PROFiDrive .............................................................................405 PROHIBIT SPEEDS .................................................... 28; 121; 124 PT100 ............................................................................... 66; 209 PTC .........................................................................................359 R REAL TIME CLOCK (RTC).......................................................380 REFERENCE FROM ENCODER ....................................... 36; 330 REFERENCE VARIATION PERCENT .............................. 121; 126 REMOTE/LOCAL ....................................................................296 RESET .......................................................................................306 RESET UP/DOWN INPUT ........................................................315 REVERSE B INPUT ...................................................................311 REVERSE INPUT.......................................................................310 ROOT PAGE .............................................................................80 ROUNDING OFF ......................................................................89 S S RAMPS ...................................................................................88 SERIAL LINKS...........................................................................393 SERIAL NUMBER .......................................................................76 SLAVE INPUT...........................................................................318 SLIP COMPENSATION .............................................................27 482/482 SOURCE SELECTION INPUT .................................................. 322 SPEED LOOP ......................................................................... 128 SPEED RAMPS ..........................................................................87 SPEED SEARCHING ........................................................ 27; 351 SPEED VAR. INPUTS .............................................................. 321 SPEED/TORQUE LIMIT REFERENCE .........................................26 SPEED/TORQUE REFERENCE SOURCES .............................. 293 START ..................................................................................... 304 START B INPUT ....................................................................... 309 START INPUT........................................................................... 308 START-UP...................................................................................37 STATE LIST ............................................................................... 437 STOP B INPUT......................................................................... 310 STOP INPUT ............................................................................ 309 STOP MODE .......................................................................... 325 SUPPLY TIME COUNTER ...........................................................68 SW VERSIONS...........................................................................76 T TIMERS ................................................................................... 152 TORQUE CONTROL ...................................................... 257; 262 TORQUE LIMIT SOURCE........................................................ 296 TORQUE LIMIT SOURCE REF. DISABLE INPUT ...................... 325 TORQUE RAMPS ......................................................................90 TYPE OF LOC/REM CONTACT ............................................ 323 U UP AND DOWN INPUTS........................................................ 315 UP/DOWN ............................................................................. 115 USER LEVEL ...............................................................................78 V VIRTUAL DIGITAL OUTPUTS .................................................. 214 VOLTAGE/FREQUENCY PATTERN ................................. 27; 254 VTC .................................................................................. 41; 251 W WARNING LIST ...................................................................... 436 WATCHDOG ......................................................................... 393 X XAIN4 ..................................................................................... 238 XAIN5 ..................................................................................... 238