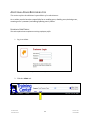
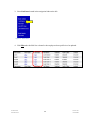
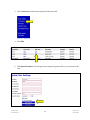
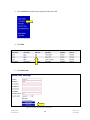
1
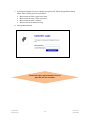
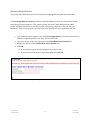
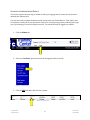
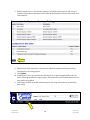
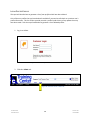
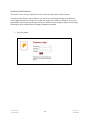
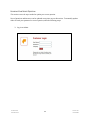
Remote Deposit Capture Administrator User Manual TABLE OF CONTENTS Purpose of this Manual ......................................................................................................................1 Session Timeouts ...............................................................................................................................1 Overview ...........................................................................................................................................2 First Time Logging In ..........................................................................................................................3 Changing a Temporary Password ............................................................................................3 Creating a Secret Question .....................................................................................................5 Updating the Administrator Profile.........................................................................................6 Adding a User ........................................................................................................................8 Additional Admin Responsibilities .................................................................................................... 11 Updating a User Profile ........................................................................................................ 11 Unlocking a User .................................................................................................................. 14 Resetting a Password ........................................................................................................... 16 Deleting a User’s Profile ....................................................................................................... 18 Listing Deleted Profiles......................................................................................................... 20 Updating Your Password ...................................................................................................... 22 Updating Your Secret Question ............................................................................................ 25 Glossary of Terms ............................................................................................................................ 28 Administrator Field Definitions............................................................................................. 28 User Privilege and Roles ....................................................................................................... 30 User Administrator HVFCU User Manual i Version No.: 002 Revised. 200908 PURPOSE OF THIS MANUAL The Administrator User Manual is a guide for all persons who are responsible for adding and maintaining their site’s users. Use the <Tab> key to navigate between fields within the screens. SESSION TIMEOUTS The system will automatically log off a user who has been inactive for at least 30 minutes. A Session Timeout Warning appears two minutes before the user is set to be logged out to give them an opportunity to remain logged in. Figure 1 – Session Timeout Warning If the user clicks OK on the warning screen within the two-minute grace period, the session period will restart. If the warning appears and no action is taken: a) The warning closes automatically at the end of the two-minute grace period. b) The session times out. c) The user's browser session is automatically redirected to the Logout screen. This indicates the session timed out due to inactivity. User Administrator HVFCU User Manual 1 Version No.: 002 Revised 200908 OVERVIEW This topic gives an overview of the roles and responsibilities of the Admin. There are two distinct privileges for system users: Administrator (Admin) and Customer Services. This manual will concentrate on the role of the Admin. The Admin of a site is the person responsible for: Setting up employee user profiles. Enabling or disabling a user. Editing a user profile. Unlocking a user’s profile. Deleting a user’s profile. Resetting a password to provide a temporary one. Assigning specific roles or functions to an employee. Enabling access to any and all accounts (locations) for which an employee will be processing. Based on their assigned role(s) employees will have the ability to: Process transactions. Generate reports. Research historical transactions. Edit transactions. Contact support. Your tabs, privileges and roles may differ slightly from those pictured. User Administrator HVFCU User Manual 2 Version No.: 002 Revised 200908 FIRST TIME LOGGING IN CHANGING A TEMPORARY PASSWORD This task explains how to change a temporary password after logging in to the system for the first time. You will be provided with your site’s URL address, the user name (Admin), temporary password, and company name that must be entered the first time logging on to the system. 1. Open Internet Explorer. 2. Type the URL address. Save this URL in Favorites 3. Enter Admin in the User Name: box. 4. Enter your temporary Password. 5. Enter the Company name. 6. Click Login. Figure 2 – Customer Login Screen User Administrator HVFCU User Manual 3 Version No.: 002 Revised 200908 7. A prompt will appear for you to change your password. Follow the guidelines listed below when creating your new password: Must contain at least 1 upper case letter. Must contain at least 1 lower case letter. Must contain at least 1 number. Must be at least 8 characters long. 8. Click Update Password. Figure 3 – Create New Password screen Passwords expire approximately every 90 days and are case sensitive. User Administrator HVFCU User Manual 4 Version No.: 002 Revised 200908 CREATING A SECRET QUESTION This section will outline the steps a user must take after logging into the system for the first time. The Secret Question and Answer provide you with the ability to reset your own password in the event that you have forgotten it. This question, along with your E-mail address in the Admin profile, will allow the system to provide you with a temporary password so that you don’t get locked out. They are set up upon your first log in to the system and can be updated at any time. 1. Type a question that is unique to you in the Secret Question: box. It does not need to be a formal or complete question. It is not a case sensitive field. 2. Type your answer to the secret question in the Enter New Secret Answer: box. 3. Retype your answer in the Confirm New Secret Answer: box. 4. Click OK. a. If your answers agree, they will disappear from the screen. b. If your answers don’t agree, retype them again then click OK. Figure 4 - My Settings screen User Administrator HVFCU User Manual 5 Version No.: 002 Revised 200908 UPDATING THE ADMINISTRATOR PROFILE This section explains the next step for Admins to take upon logging into the system for the first time – updating the Admin profile. You will now need to update the Admin profile and provide your Email address. This will be used in conjunction with your Secret Question to send you a new temporary password should you forget yours, preventing you from becoming locked out. You should already be logged in as Admin. 1. Click the Admin tab. Figure 5 – Welcome screen – Admin tab 2. Select the List Users option located in the navigation links on the left. Figure 6 – Admin menu 3. Click the Edit link under the Edit User column. Figure 7 – List of users User Administrator HVFCU User Manual 6 Version No.: 002 Revised 200908 4. Type your Email Address in the box provided where you would want a temporary password sent, if necessary. 5. Click Update located at the bottom left corner of the screen. Figure 8 – Update User Settings screen User Administrator HVFCU User Manual 7 Version No.: 002 Revised 200908 ADDING A USER This task explains how to create a user profile. As the administrator of the site you are responsible for setting up the user profile for each of your employees (including yourself, if applicable) that will be accessing the system. Whether that employee will be processing transactions or just generating reports and doing research, each user should have their own login for security purposes. . You should still be logged in as Admin under the Admin tab. 1. Click Add User located in the navigation links on the left. Figure 9 – Admin menu 2. Fill in the required fields as follows: (see the Terms for complete field definitions) Full Name – First and last name of the user User Name – User’s Login. This is a required field, and is not case sensitive. Cash Mgmt ID – Required for single sign-on internet banking users only. Email Address – Email address of user. Enabled – This box must be checked for a user to access the system. Unchecked disables the user’s access. Temporary Password – This is the system assigned temporary password that the user will use the first time they log in to the system. You will need to print or record this password to present to the employee whose profile is being set up. Optional fields that may need to be filled in or enabled: Dual Auth Amount - The single transaction dollar limit for this user. Dual Auth Status – The action to take when the Dual Auth Amount is exceeded. Authorized Caller – Designates a person is authorized to contact Customer Support. User Administrator HVFCU User Manual 8 Version No.: 002 Revised 200908 Figure 10 – Update User Settings screen 3. Click the Customer Services privilege box for all employees in order for them to access the application. 4. Click Update This will bring up the Roles within the Customer Services Privilege and Locations for this User sections. Only the roles for which your site is set up will be listed. User Administrator HVFCU User Manual 9 Version No.: 002 Revised 200908 5. Enable only the role or roles that the employee will need to perform their job. A list of common roles and their functions can be found in the Glossary of Terms section at the end of this manual. Figure 11 – User profile – Roles and Locations 6. Enable any location (account) or locations for which the employee will be processing transactions or accessing reports. 7. Click Update. 8. If adding more users, you will need to click List Users on the Navigation links to the left before selecting the Add Users option again. This step will need to be taken between each new profile being added. 9. Click Logout located on the bar underneath your site’s logo when all user profiles have been set up. Figure 12 - Logout User Administrator HVFCU User Manual 10 Version No.: 002 Revised 200908 ADDITIONAL ADMIN RESPONSIBILITIES This section explains the additional responsibilities of an administrator. As an admin you also have the responsibility for re-enabling users, disabling users, deleting users, resetting a user’s password, and editing/updating users’ profiles. UPDATING A USER PROFILE This task explains how to update an existing employee profile. 1. Log in as Admin. Figure 13 – Customer Login screen 2. Click the Admin tab. Figure 14 – Welcome screen – Admin tab User Administrator HVFCU User Manual 11 Version No.: 002 Revised 200908 3. Select List Users located in the navigation links on the left. Figure 15 – Admin menu 4. Click Edit under the Edit User column for the employee whose profile is to be updated. Figure 16 – List of users User Administrator HVFCU User Manual 12 Version No.: 002 Revised 200908 5. Type the information to be added or updated in the appropriate box, check any fields to be enabled or uncheck any enabled fields that are no longer applicable. 6. Click Update Figure 17 – Update User Settings screen User Administrator HVFCU User Manual 13 Version No.: 002 Revised 200908 UNLOCKING A USER This task explains how to unlock an employee’s profile. Users, including Admins, can get locked out of the system for a couple of reasons: a) they keyed their password incorrectly at least five times or, b) when requesting a new temporary password they keyed the answer to their secret question incorrectly. As the admin, you are responsible for unlocking an employee’s profile so that they can access the system again. Follow the steps below, to unlock a locked profile. If you are locked out, you will need to contact your financial institution for assistnace. 1. Log in as Admin. Figure 18 – Customer Login screen 2. Click the Admin tab. Figure 19 – Welcome screen – Admin tab User Administrator HVFCU User Manual 14 Version No.: 002 Revised 200908 3. Select List Users located in the navigation links on the left. Figure 20 – Admin menu 4. Click unlock located to the right of the word Locked under the Locked column. This link will unlock the profile to allow the user to try logging in again. Figure 21 – Locked user If a new password is needed, then proceed to Step 4 under Resetting a Password to edit the employee’s profile. User Administrator HVFCU User Manual 15 Version No.: 002 Revised 200908 RESETTING A PASSWORD This task explains how to reset a user’s password. Users may forget their password and ask you to provide them with a new temporary one. The steps below explain how to reset a user’s password in the event they have forgotten theirs. 1. Log in as Admin. Figure 22 - Customer Login screen 2. Click the Admin tab. Figure 23 - Welcome screen – Admin tab User Administrator HVFCU User Manual 16 Version No.: 002 Revised 200908 3. Select List Users located in the navigation links on the left. Figure 24 – Admin menu 4. Click Edit. Figure 25 - List of Users 5. Click Reset Password. This will generate a temporary password for you to present to the user. Figure 26 - Update User Settings screen User Administrator HVFCU User Manual 17 Version No.: 002 Revised 200908 DELETING A USER’S PROFILE This task explains how to delete a user’s profile. There are 2 different ways to deactivate a user profile – disable it by clearing (unchecking) the Enabled box or delete it. Disabling a profile allows you the ability to re-enable it should the user need access to the system again in the future. Deleting a profile removes it from view and will no longer be able to be reactivated. You will also not be able to set up a new profile with that person’s User Name. To permanently delete a user’s profile follow the steps below. 1. Log in as Admin. Figure 27 - Customer Login screen 2. Click the Admin tab. Figure 28 - Welcome screen – Admin tab User Administrator HVFCU User Manual 18 Version No.: 002 Revised 200908 3. Select List Users located in the navigation links on the left. Figure 29– Admin menu 4. Click Edit. Figure 30- List of Users 5. Click Delete User. Figure 31– Update User Settings – Delete User User Administrator HVFCU User Manual 19 Version No.: 002 Revised 200908 LISTING DELETED PROFILES This topic will describe how to generate a list of user profiles which have been deleted. A list of the user profiles that you have deleted is available if you need to refer back to a previous user’s profile information. This list will also provide you with a profile’s audit history of any updates that may have been made. Take the steps listed below to generate a list of deleted profiles. 1. Log in as Admin. Figure 32– Customer Login screen 2. Click the Admin tab. Figure 33– Welcome screen – Admin tab User Administrator HVFCU User Manual 20 Version No.: 002 Revised 200908 3. Select List Deleted Users located in the navigation links on the left. Figure 34– Admin menu 4. To look at a profile’s audit history click View. Figure 35– List of deleted user profiles Figure 36– User profile audit history User Administrator HVFCU User Manual 21 Version No.: 002 Revised 200908 UPDATING YOUR PASSWORD This section covers the steps required of all users when their password is about to expire. Your password will expire every 90 days. You will receive a warning message on the Welcome screen approximately 4 or 5 days prior to that date to give you a chance to change it. If you miss that deadline and your password expires then you will be forced to change it upon your next login following the steps outlined under Changing a Temporary Password. 1. Log in as Admin. Figure 37– Customer Login screen User Administrator HVFCU User Manual 22 Version No.: 002 Revised 200908 2. Click My Settings. Figure 38 – Welcome screen – My Settings option User Administrator HVFCU User Manual 23 Version No.: 002 Revised 200908 1. Enter a password in the Enter New Password: box. 2. Retype the password in the Confirm New Password: box. 3. If you do not want or need to update your Secret Question, click Update. Figure 39 – My Settings screen User Administrator HVFCU User Manual 24 Version No.: 002 Revised 200908 UPDATING YOUR SECRET QUESTION This section covers the steps needed to update your secret question. Secret Questions and Answers can be updated at any time at your discretion. To manually update either or both your password or secret question, take the following steps. 3. Log in as Admin. Figure 40– Customer Login screen User Administrator HVFCU User Manual 25 Version No.: 002 Revised 200908 4. Click My Settings. Figure 41 - Welcome screen – My Settings option User Administrator HVFCU User Manual 26 Version No.: 002 Revised 200908 1. Place your cursor in the Secret Question: box. 2. Type a question that is unique to you in the Secret Question: box. It does not need to be a formal or complete question. It is not a case sensitive field. 3. Type your answer to the secret question in the Enter New Secret Answer: box. 4. Retype your answer in the Confirm New Secret Answer: box. 5. Click Update. If your answers don’t agree, retype them again then click Update. Figure 42 - My Settings screen User Administrator HVFCU User Manual 27 Version No.: 002 Revised 200908 GLOSSARY OF TERMS ADMINISTRATOR FIELD DEFINITIONS This section provides Admin field definitions for the fields available for Administrators. They are listed in alphabetical order for quick reference. Administrator This is the value defaulted in the Full Name field for an Administrator of a site. Admin This is the User Name assigned to the person who will have the authority to add, edit and delete users along with assigning them their roles (responsibilities) when working with the system. This user name should not be changed. Auto Disable This field is not used at the present time. Customer Services This privilege allows a user to access the customer site to perform their assigned duties. Delete User This button will remove a user’s profile and deactivate them from accessing the system. Dual Auth Amount This field contains the single transaction dollar limit for this user. (Optional) Dual Auth Status This field contains the action to be taken when a transaction exceeds the set Dual Auth Amount. Declined – All transactions above the amount will be rejected. Approved – All transactions will be approved. Awaiting Approval – Someone with more authority will need to approve the transaction to be processed. Email Address This field contains the user’s email address. It is used for sending a temporary password if the original is forgotten and for receiving Remote Deposit Capture deposit notifications. User Administrator HVFCU User Manual 28 Version No.: 002 Revised 200908 Enabled This field contains a check mark if the user is to have access to the system. Unchecked a user is disabled and cannot access the system. Full Name This field contains the first and last name of the user. This filed will be displayed in the upper right corner of the screen just below the company name. It is also included in any audit trail records of transactions the user may have created or edited. Location Name This column lists the account or location name(s) for which the customer wants deposits created. Reset Password This button is used to provide a temporary password to a user who has either forgotten theirs or locked themselves out of the system. Temporary Password This field contains the system provided temporary password for a user to log into the system with either for the first time or any time it has been reset. User Location This is an optional, informational only field that can remain blank. User Name This field contains the user's login information. This is a required field and is not case sensitive. User Administrator HVFCU User Manual 29 Version No.: 002 Revised 200908 USER PRIVILEGE AND ROLES This section is a list of the most common Customer Services Privilege roles available to be assigned to a user and their purposes. They are listed in alphabetical order for quick reference. Accounting The (full) Accounting role allows a user to run reports, balance all checking and credit card transactions, look at transaction details, edit transitions, look at check images, and monitor and research transactions. Accounting – Approve Check Only This role is used in conjunction with the Dual Authorization feature. If utilizing this feature, a user will need to be assigned this role if they will be the secondary person that can approve the original processor’s transactions (those in the Awaiting Approval status). Accounting – Limited Functionality A user with the Limited Functionality Accounting role will not have access to the Transaction Status Summary. Customer Services The Admin enables this privilege to make approved roles available. QB Admin This role, when enabled, allows the user to set up the link to their QuickBooks account and export their transaction files to QuickBooks. Remote Deposit / EPSON This role, when enabled, allows the user to process batches of checks using the Epson CaptureOne scanner. Remote Deposit Capture or Remote Deposit Capture / MVX This role, when enabled, allows the user to process batches of checks using the high-speed MyVision X or VX scanner (Unisys or Panini). Remote Deposit Capture / RDM This role, when enabled, allows the user to process checks using the single feed check scanner. User Administrator HVFCU User Manual 30 Version No.: 002 Revised 200908 Remote Deposit / TS230 This role, when enabled, allows the user to process batches of checks using the TS230 scanner. RTG User If enabled, third party vendor files will be sent through the Real Time gateway. Scan Check (Merchant Capture) When enabled, this role allows the user to process checks through the single feed check scanner (RDM) and edit transaction detail. View Batch Images (aka View Debits & Credit Report) When enabled, the user will have access to the batch image file to print, save or view. User Administrator HVFCU User Manual 31 Version No.: 002 Revised 200908