1
INTRODUCTION / DESCRIPTION
This manual describes the installation of Durant models 5770X-48X. It is the duty of
any good instruction manual to describe the product itself, and this is especially true
for the Eclipse. This unit is extremely versatile, and a good understanding of what it
can do will be immensely helpful to the installer in figuring out how to use it. Following the description, the installation section gives information about mounting, wiring
and programming. An operator section of the manual follows installation. This manual
ends with a lively discussion of diagnostics, and specifications.
The installer’s intuition and counter experience will be definite advantages when dealing
with the Eclipse; however, even experienced control electricians will find that this unit
offers some interesting variations from “normal” counter functionality. For application specific assistance with any Durant counter, contact the Durant Applications
Engineering Department at 800-540-9242 (U.S. and Canada) or 920-261-4070, or
by FAX at 920-261-9079.
Description
Base Unit
The Eclipse base unit comes in two flavors: totalizer and count control. The totalizer
has a six digit display. The display can be scaled to divide totalizer counts by 1, by
10, or by 100, which effectively converts the total to 6, 7, or 8 digits respectively.
Depending upon the count input device(s) and programming, the totalizer can count
up, or down, or both directions. If the display counts up to 999,999, the next count
will cause it to roll over to zero, like the odometer in a car. If the display counts down
to zero, the next count in will cause a rollunder to either 999,999, or to -1, depending
upon how it is programmed. If the display continues to count down to -99,999, any
further “negative” counts will be lost.
Another function of the totalizer base unit is to display rate. The ratemeter looks at
how fast the pulses are coming in to the A count input (frequency), and calculates a
rate to be displayed to the operator. For instance, if the totalizer is counting in inches,
the ratemeter could display material speed in inches per second or feet per minute.
If the totalizer is counting in gallons, the ratemeter could display flow rate in gallons
per minute, etc. The ratemeter updates every one second plus the time it takes until
the next pulse comes into the A input. If the pulse frequency slows to one or less
every nine (9) seconds, the rate display goes to zero. Up to five digits may be displayed on the rate screen. If the Eclipse is set up in a quadrature count mode, a
negative sign will appear on the rate display when the totalizer is counting down. The
ratemeter can be programmed to not appear on the display for the operator.
The base unit also has three (3) control inputs that are programmable to either reset
or program lockout. It is highly recommended to program one of them as a lockout
and then activate it via a jumper to ground. Finally, the front panel keypad can be
programmed to reset the total count.
1
DESCRIPTION cont.
The count control base unit has all the features of the totalizer plus some additional
goodies. There are three count registers in the control: the main counter, the totalizer, and the batch counter. The main counter is six digits, bi-directional, and has two
presets. It can be programmed to roll under either to 999,999, or to -1. The presets
cannot be set to a negative number, and should not be set to the same number. The
control houses two relays that are programmable by the installer to respond to any
combination of presets and two control signals. The totalizer operates the same way
as the stand alone totalizer version of the Eclipse, except that it can be hidden from
the operator. The batch counter counts the number of batches (count cycles) of the
main counter. The batch counter is six digits, has one preset, and counts up only.
The batch counter and the ratemeter can also be hidden from the operator.
The base unit has three control inputs imaginatively named Input 1, Input 2, and
Input 3. Each input is programmable to perform a specific function when electrically
activated. There are ten possible functions to choose from, including reset, unlatch
outputs, and program lockout. The front panel keypad also has a programmable
reset capability. It is highly recommended that one of the control inputs be programmed to one of the lockout functions and then activated via a jumper wire to
ground. Inadvertent operator entry into the program mode is the ultimate in operator
confusion and installer frustration.
Much of the previously mentioned versatility of the Eclipse count control is due to the
flexibility of the output relays. The unit contains two relays, each with one set of form
C (normally open and normally closed) contacts. Each relay may be individually
programmed, and because of the number of possibilities, the installer must think
through relay behavior very carefully. First of all, relays can be programmed to either
normal or reverse operation. Reverse operation is common in fluid batching applications, and as a typical feature of microprocessor-based counters, is usually well
understood. However, the Eclipse allows the installer to select at which event(s) the
relay will pick up and at which event(s) the relay will drop out. This means that the
Eclipse relays will almost always be used in normal operation, even to do applications that previously required reversed relays. The installer will appreciate not having
to deal with reverse (ON really means OFF) logic when programming the relays. The
remainder of this description of relay operation will assume the relays are programmed
for normal operation.
There are five events that can cause each relay to pick up (turn ON), or drop out (turn
OFF). They are the two main counter presets (P1 and P2), the batch counter preset
(Pb), a main counter reset either from the front panel or the control inputs, and the
unlatch control input. A relay can pick up or drop out at any combination of these
events. There are three modes of operation for the relays: pulsed, latched and follows. In pulsed mode, the installer programs one or more pick up events and a
timeout. The relay turns ON at a pick up event, remains ON for the timeout period,
and then turns OFF. In latched mode, the installer programs one or more pick up
events and one or more drop out events. The relay turns ON at a pick up event and
turns OFF at a drop out event. In follows mode, the installer selects either follows low
or follows high and then assigns the relay to follow either P1 or P2. A follows low
2
DESCRIPTION cont.
relay turns ON when the main count is less than or equal to the assigned preset and
turns OFF when the count is greater than the preset. A follows high relay turns ON
when the main count is greater than or equal to the assigned preset and turns OFF
when the count is less than the preset. The comparison is made each time a count
pulse is entered, and when the main counter is reset. A comparison and output
update can also be made at power up if the unit is programmed to do so. Reverse
mode of operation is not available if the output is programmed to follows mode.
Analog Output Option Board
If the optional analog output board is installed in the Eclipse, the base unit will detect
it and allow programming for the output assignment and range. In either base unit,
the output can be programmed to follow the total count or the rate.
If the analog output is installed in a count control base unit, it may also be programmed to follow the main count or batch count. The output board has a 0-10V and
a 4-20 mA output; however it is expected that the installer will use one or the other.
Both outputs follow the assigned count or rate and both go from minimum value (0V
and 4 mA) to maximum value (10V and 20 mA) over the same count or rate range.
RS 485 Serial Communications Option Board
The optional RS 485 serial communication board allows a host device to download
and read function code programming selections and to read status information such
as count, rate, and preset values.
This manual does not contain information on the serial communication protocol or
the serial command list. That information is contained in the 57700 serial specification and is obtainable by contacting the Durant Literature Department at 800-5409242 (U.S. and Canada), or 920-261-4070, or by FAX at 920-261-9097.
3
MOUNTING
Mounting
Durant
PGM
View
Enter
Reset
Edit
Mounting clips and screws shown in installed positions.
Mounting Instructions
1.
Slide mounting gasket (not shown) over unit body until adhesive surface makes
contact with the front bezel.
2.
Slide unit into cutout in panel.
3.
Attach mounting clips and screws.
4.
Tighten screws until unit is firmly in place. DO NOT OVERTIGHTEN screws
to the point of squeezing the gasket out from behind the bezel.
4
WIRING
WIRING AND DIP SWITCHES
All wiring to the counter is done to rear terminal, de-pluggable connectors. Up to six
headers accept the wired connectors on the counter. All units have at least three
headers, power input, count input and control input. The relay output header is installed in the count control base unit. Any combination of two additional circuit boards
with headers may be installed. These option boards are RS 485 serial communications and analog output. The option boards occupy specific locations in the counter
and are not interchangeable. All boards are keyed to prevent installation in the wrong
location.
Disconnect all power before wiring terminals. A safety hazard exists if this
precaution is not observed. Treat all control and count inputs as hazardous since they may carry line voltage.
Rear Terminal Layout
Relay
Output
RS485
Communications
Analog
Output
DIP Switch
Durant®
1
1
Power Input
2 Terminals for DC
Powered Units
3 Terminals for
AC Powered Units
1
Count Input
Control Input
Terminal Connector Ratings
AC or DC Power Input / Relay Output: 10A, 250VAC;
Wire size: 12-24AWG (3.1mm2 - 0.24mm2), 600V.
RS485 / Analog Output / Count Input / Control Input: 8A, 125VAC;
Wire size: 16-28AWG (1.3mm2 - 0.1mm2), 300V.
5
WIRING cont.
Wiring and DIP Switches
DC Power Input (for DC powered models 57700-48X)
Durant
®
1
Power In
{
9-30 VDC
12 VA
1
+
-
No Internal Fuse
External Fuse Size
U.S.
European
2 AMP, 50 V
T2A, 50 V
Time Delay
Time Delay
1
AC Power Input (for AC powered models 57701-48X)
Durant
®
1
1
Power In
85-265 VAC
47-63 Hz
20 VA
L1
{ L2
No Internal Fuse
External Fuse Size
European
U.S.
0.2 AMP, 250 V
T200mA, 250 V
Time Delay
Time Delay
1
Not
Used
6
WIRING cont.
Count Input
Durant
®
DIP Switch Position 6
DIP Switch Position 1
4
3
2
1
Sensor Power Out
12 VDC +/- 12%, 75 mA max, short circuit protected
Dip Switch Settings
7
+12 VDC Out
Count Input A
Count Input B
X Ground
WIRING cont.
Control Inputs
Durant
Control inputs require
current sinking (NPN)
sensors or contact
closures to ground.
Internal pullup
resistance:
4.75k W to +5 VDC.
®
1 2 3 4
Max. Voltage:
28 VDC
Input 1
Input 2
Input 3
Ground
Relay Output Option Board
Typical Wiring
Terminal Designation
Durant
®
6
6
5
5
Load
4
3
4
External 3
Power
2
2
1
1
1
1
Contact Ratings
5 A @250 VAC or 30 VDC maximum
1 An RC surge suppressor is recommended across all inductive loads.
8
Relay
2
Relay
1
WIRING cont.
RS 485 Communication Option Board
To Host Serial Port
Durant
485 +
485 Common
®
1
Analog Output Option Board
Durant
4-20mA +
0-10 V +
Common
4-20mA 0-10 V -
®
1
(
Output Ratings
4-20 mA into 750 W (Ohms) maximum
0-10 V into 2500 W (Ohms) minimum
A switch shall be included in the building installation:
• It shall be in close proximity to the equipment and within easy reach of the
operator.
• It shall be marked as the disconnecting device for the equipment.
• Switches and circuit breakers in Europe must comply with IEC 947.
9
)
PROGRAMMING
Programming defines the Eclipse’s personality. It will be necessary for the installer to
program the unit to fit the requirements of the application. Programming in the Eclipse
is done with function codes. Each function code has a number and a field of values.
The installer selects a particular value for a function code to enable a specific type of
behavior in the unit. For instance, if function code 10 is set to a value of 1, the main
counter autorecycles when the count is equal to preset 1. If function code 10 is set to
a value of 2, the main counter autorecycles when the count is equal to preset 2.
There are 33 function codes; however, some function codes are mutually exclusive
and the setting for one function code may enable or disable other function codes.
Function codes that have been disabled will not show in the function code list when
the installer programs the unit. Furthermore, function codes that are specific to the
count control base unit and the optional RS 485 serial communications and analog
output boards will only show in the function code list if they are appropriate to the
hardware set.
Count and Rate Scaling
Several of the function codes determine the arithmetic that the unit applies to raw
count input pulses in order to display counts and rates in engineering units that are
meaningful to the operator. This arithmetic is called scaling. The Eclipse allows scaling by two methods: the traditional absolute scale factor mode and the calculate
mode.
Using the absolute scale factor mode, the installer must calculate the count and rate
scalers by using the following formulae:
Count Scale Factor =
CDPF
PPI
,
where C D P F = Count Decimal Point Factor, and is taken from the table below:
Displayed Count Decimal Point
CDPF
XXXXXX
1
XXXXX.X
10
XXXX.XX
100
XXX.XXX
1000
XX.XXXX
10000
PPI = Pulses Per Item; the number of count input pulses per unit (inch, foot, gallon,
etc.) of displayed count. Double, or quadruple this number if the count mode is
quadrature X2, or X4, respectively.
10
PROGRAMMING cont.
Example: A flowmeter delivers 25 pulses per gallon and the operator must read the
count in gallons and tenths (XXXXX.X)
10
Count Scale Factor =
= 0.40000
25
Rate Scale Factor =
NOS X RDPF
,
PPI
where NOS = Number of Seconds in the displayed rate time unit (per second = 1, per
minute = 60, etc.).
R D P F = Rate Decimal Point Factor, and is taken from the table below:
Displayed Rate Decimal Point
RDPF
XXXXX
1
XXXX.X
10
XXX.XX
100
XX.XXX
1000
X.XXXX
10000
PPI - Pulses Per Item; the number of count input pulses per unit of displayed rate.
Double, or quadruple this number if the count mode is quadrature X2, or X4 respectively.
Example: An encoder puts out 600 pulses per foot and the operator must read
material speed in feet and tenths per minute (XXXX.X).
Rate Scale Factor =
60 X 10
600
= 1.000
To program the Eclipse for traditional scaling, the installer would set function code
(FC) 0 to a value of 2. Then set FCs 2 and 4 to the absolute count and rate scale
factors and set FCs 3 and 5 to set the count decimal point and rate decimal point
respectively.
If the installer sets function code 0 to a value of 0 or 1, the Eclipse will be in the
calculate mode for scaling. This means that the installer must enter values for PPI
(FC 1), CDPF (FC 3), RDPF (FC 5), and NOS (FC 6). The unit will use the count and
rate scale factor formulae to calculate the scalers. This is especially useful when the
operator must change scale factors and is likely to know the PPI value. With FC 0 set
to 1, the operator can change the PPI value without going into the program mode,
and the count and rate scale factors will be calculated by the Eclipse. The traditional
absolute method of scaling is only likely to be used when there is potential for unacceptable round off in the calculation or when the count and rate displays must be
scaled to different engineering units, such as counting in inches and displaying rate
in feet per minute.
11
PROGRAMMING cont.
The topic of scaling also is an example of mutually exclusive function codes in the
function code list. By selecting calculate mode, FCs 2 and 4 do not appear on the
display to the installer, but FC 6 does appear. By selecting absolute mode, FCs 2
and 4 appear on the display, but FC 6 does not.
Entering the Program Mode
Note: It is recommended that upon installation, one of the control inputs be
programmed to one of the Lock Functions, and then activated via a jumper
to ground to prevent inadvertent operator entry into the program mode. If
the program mode must be accessed after installation, remove the jumper
wire and follow the procedure below.
!
Caution: Entry into the program mode will cause both relays, if installed, to turn OFF,
and will cause the analog output, if installed, to go to its minimum values (4 mA and
0V).
To enter the program mode,
1.
Press the
View
Enter
and
keys simultaneously.
Durant
View
Enter
Edit
The program LED will turn ON, and the display will show FC 0 (function code
0) for one second. The display will then show the value selected for FC 0.
12
PROGRAMMING cont.
To scroll through the active function code list,
1.
Press and hold the
View
Enter
key;
Durant
View
Enter
the display will show a function code number as long as
2.
While holding
View
Enter
, press either
or
View
Enter
is held,
,
Durant
View
Enter
the display ascends numerically to the next FC in the list each time
pressed, and descends each time the
3.
Release the
View
Enter
key is pressed,
key to display the value for the FC.
Durant
13
is
PROGRAMMING cont. / FUNCTION CODES
To change the value of a function code,
1.
Press the
key,
Durant
12345
12345
12345
12345
12345
12345
12345
12345
12345
12345 Indicates flashing portion of
12345
12345 display.
Edit
the most significant digit of the value will flash,
2.
Use the
or
key to change the value of the flashing digit,
Durant
3.
Press the
View
Enter
key to enter the new value and display the FC number.
Durant
View
Enter
To exit the program mode, press the
View
Enter
and
keys simultaneously.
The Function Code List
The following list contains all possible function codes (FCs) for the Eclipse in numeric order. Not all FCs will be viewable in the program mode since some are mutually exclusive dependent upon program selections already made, and many are dependent upon the type of base unit and the presence of an option board installed in
the unit. The Eclipse will only show those FCs appropriate for its present configuration. Those values indicated with an asterisk (*) are the default values.
14
FUNCTION CODES cont.
FC#
0
Function
Scaling Mode
Value Range
Value Description
0*
Calculate mode; PPI entry in program
mode only.
Calculate mode; PPI entry in run or
program mode only.
Absolute scale factor mode.
1
2
1
PPI
0.10 to 9999.99
1.00*
2
Count Scaler
3
CDP
4
Rate Scaler
5
RDP
0*
1
2
3
4
6
NOS
1 to 99,999
60*
7
Count Mode
0*
1
2
3
4
5
A - Add / B - Subtract
A - Add / B - Add
A - Add / B - Count Inhibit
Quadrature X1
Quadrature X2
Quadrature X4
8
Batch Counter
0*
1
2
No batch counter or batch preset
Non-presettable batch counter
Presettable batch counter
0.00001 to 9.99999
1.00000*
0*
1
2
3
4
Pulses Per Item. Any value of PPI that
causes the count scale factor to be
outside the range of 0.00010 to
10.00000 or the rate scale factor to
be outside the range of 0.001 to 9999
will not be accepted.
Absolute count scale factor
Count decimal point XXXXXX
XXXXX.X
XXXX.XX
XXX.XXX
XX.XXXX
0.001 to 9999
60.00*
Absolute rate scale factor.
Rate decimal point
XXXXXX
XXXX.X
XXX.XX
XX.XXX
X.XXXX
Number of seconds in rate time
unit (per second = 1, per minute =
60, etc.)
15
FUNCTION CODES cont.
9
Reset Mode
0*
1
Main counter resets to zero
Main counter resets to preset 2; preset 2 count coincidence value is zero
10
Autorecycle
Main Counter
0*
1
2
3
No autorecycle
Autorecycle at preset 1 coincidence
Autorecycle at preset 2 coincidence
Autorecycle at preset 1 and preset 2
coincidence
11
Rollunder
0*
1
Count rollunder to 999,999
Count rollunder to -1
14
Rate Display
0*
1
Rate is not displayed
Rate is displayed
16
Totalizer Display
0*
1
2
3
Total is not displayed
1 is displayed
Total
Total
10 is displayed
100 is displayed
Total
For totalizer base unit, option 0 is not
available and option 1 is the
default value.
20
Control Inputs
ABC
000*
Control input functions. ABC values
from table below:
Input 1 Input 2 Input 3
A
B
C
0
0
0
1
1
1
2
2
2
3
3
3
4
4
4
5
5
5
6
6
6
7
7
7
8
8
8
9
9
9
Disabled
Reset Totalizer
Lock All
Lock Program
Lock Program and P1
Reset Main Counter
Reset Batch Counter
Reset All Counters
Unlatch
Bypass P1
For totalizer base unit, options 3 to 9
are not available. All reset inputs, and
the unlatch input are momentary
(edge triggered). All lock inputs, and
the bypass P1 input are maintained
(level sensitive).
16
FUNCTION CODES cont.
23
Keypad Reset
0*
1
2
3
4
5
Disabled
Reset Totalizer
Reset Main Counter
Reset Batch Counter
Reset Displayed Counter
Reset all Counters
For totalizer base unit, options 2 to 5
are not available.
All reset selections are momentary
(edge triggered).
30
Relay 1 Mode
0*
1
2
3
4
5
6
Disabled
Normal, latched mode
Reverse, latched mode
Normal, pulsed mode
Reverse, pulsed mode
Follows, low mode
Follows, high mode
31
Relay 1 Timeout
0.01 to 99.99
1.00*
32
Relay 1 Events
ABCDE
00000*
P1
A
0
1
2
P2
B
0
1
2
Pb
C
0
1
2
Pulsed mode timeout (seconds)
for relay 1
Relay 1 pick up and drop out events.
ABCDE values from table below:
Unlatch
D
0
1
2
Reset Count
E
0
1
2
No Action
Pick Up
Drop Out
34
Relay 1 Follows
0*
1
Relay 1 follows P1
Relay 1 follows P2
35
Relay 1 Follows Test
0*
1
Relay 1 not tested at power up
Relay 1 tested at power up
40
Relay 2 Mode
0*
1
2
3
4
5
6
Disabled
Normal, latched mode
Reverse, latched mode
Normal, pulsed mode
Reverse, pulsed mode
Follows, low mode
Follows, high mode
41
Relay 2 Timeout
0.01 to 99.99
1.00*
Pulsed mode timeout (seconds)
for relay 2
17
FUNCTION CODES cont.
42
Relay 2 Events
P1
A
0
1
2
ABCDE
00000*
P2
B
0
1
2
Pb
C
0
1
2
Relay 2 pickup and drop out events.
ABCDE values from table below:
Unlatch
D
0
1
2
Reset Count
E
0
1
2
No Action
Pick Up
Drop Out
44
Relay 2 Follows
0*
1
Relay 2 follows P1
Relay 2 follows P2
45
Relay 2 Follows Test
0*
1
Relay 2 not tested at power up
Relay 2 tested at power up
50
Load Defaults
0*
1
2
Default value for FC 50
Load default values for all FCs
Load default run mode values
60
Serial Address
00 to 99
00*
Unit serial address for RS 485
communications.
61
RS 485 Baud Rate
0
1
2
3
4*
1200 Baud
2400 Baud
4800 Baud
9600 Baud
19.2 k Baud
62
RS 485 Parity
0*
1
2
No parity
Odd parity
Even parity
70
Analog Assignment
0*
1
Analog output follows rate.
Analog output follows displayed
total.
For a totalizer base unit, options 2
and 3 are not available.
Analog output follows main count.
Analog output follows batch count.
2
3
71
Analog Offset
000000*
-99,999 to 99,999
0 to 999,999
-99,999 to 999,999
18
Displayed value for minimum analog
output.
Range for offset when FC 70 = 0
Range for offset when
FC 70 = 1, 2, FC 11 = 0, FC 70 = 3
Range for offset when
FC 70 = 1, 2 and FC 11 = 1
FUNCTION CODES cont. / RUN MODE
72
Analog Full Scale
999,999*
-99,999 to 99,999
0 to 999,999
-99,999 to 999,999
Displayed value for maximum
analog output
Range for full scale when FC 70 = 0
Range for full scale when
FC 70 = 1, 2; FC 11 = 0, FC 70 = 3
Range for full scale
when FC 70 = 1, 2 and FC 11 = 1
RUN MODE
This is the operator’s section of this instruction manual. Once the installer has wiring
and programmed the counter to do a specific job, it is up to the operator to deal with
the counter on a day-by-day basis. There are three things that the operator might be
expected to do with this counter:
1.
2.
3.
View count and rate values.
Change preset values.
Reset the count.
Typically all operator functions are performed on the front panel of the counter. The
front panel features of interest to the operator are a six digit LED display, a keypad
containing four keys, and an indicating LED.
Durant
The six digit LED display, which will be referred to simply as “the display”, is where
the operator views count, rate, and presets. The keypad consists of the four keys
that the operator pokes to change the display and to enter presets. The indicating
LED turns ON only when the counter has been put in the program mode. This mode
is normally NOT an operator function and the installer usually has taken steps to
insure that the operator cannot enter the program mode. Therefore, this LED is normally OFF.
19
RUN MODE cont.
With no keys pressed, the display will always show a number. Depending upon the
type of counter and how it is programmed, the displayed number is a value for one of
up to eight viewable items. To find out what the number represents, press and hold
the
View
Enter
key. A title screen will appear on the display showing the name of the item.
Durant
View
Enter
Press and hold this key
to display title screen.
When the
View
Enter
key is released, the display goes back to the value for that item. The
title screens are described below. All counters will have at least one viewable item,
but up to eight viewable items are possible.
Title Screen
Viewable Item
The main counter
Preset 1 of the main counter
Preset 2 of the main counter
The batch counter
The batch preset
The totalizer counter
The ratemeter
Count pulses per item for scaling
The operator can change which item is being displayed by using the keypad to scroll
up or down through the list of viewable items. Those items in the list that are not
appropriate for the counter’s type or programming will not appear on the display.
20
RUN MODE cont.
To change which item is displayed,
1.
Press and hold the
View
Enter
key,
Durant
View
Enter
the title screen will appear on the display.
2.
While holding
View
Enter
, press either the
or
key,
Durant
View
Enter
a new title screen will appear on the display each time
3.
or
is pressed.
When the title screen for the desired item is reached, release all keys to display the value for that item.
Durant
The values for main count, total count, batch count, and rate cannot be edited by the
operator. The values for the other four viewable items typically can be changed by
the operator. Those items are preset 1, preset 2, batch preset, and count pulses per
item. The installer normally determines which of these items can be viewed by the
operator and also which of these items can be edited by the operator and programs
the unit appropriately. If an item is programmed to view only, it will not respond to the
editing key sequence below.
21
RUN MODE cont.
To change the value of a preset or pulses per item (example - change preset 1 from
950 to 870):
1.
Press the
Edit
key,
12345
12345 Indicates flashing digit.
12345
12345
12345
12345
Durant
12345
12345
12345
12345
12345
12345
12345
Edit
the left-most digit (MSD) begins to flash. The preset is edited one digit at a
time by selecting a digit (flash) and changing the value of that digit.
2.
Press the
Edit
key until a digit that must be changed is flashing. The flash
moves one digit to the right each time the
Durant
Edit
key is poked.
12345
12345
12345
12345
12345
12345
Edit
3.
Press the
Durant
or
key to change the value of the flashing digit.
12345
12345
12345
12345
12345
12345
12345
22
RUN MODE cont.
4.
Repeat steps 2 and 3 until all digits are changed to the new preset value.
Durant
5.
12345
12345
12345
12345
12345
12345
View
Enter
Press the
key to enter the new value for the preset and display the title
screen.
Durant
View
Enter
The operator may have to reset the counter from time to time. The installer probably
considered this and programmed the unit to allow the operator one of the following
options for the front panel keypad reset.
1.
2.
3.
4.
5.
6.
No counter reset
Totalizer count reset
Main counter reset
Batch counter reset
Displayed counter reset
Reset all counters
The reset function only works when a value is on the display (in other words, don’t be
pushing on the
View
Enter
key), and only when preset editing is NOT underway (no flash-
ing digits).
23
RUN MODE cont. / DIAGNOSTICS
To reset the counter, press the
and
keys at the same time.
Durant
Reset
The display may or may not go to zero (or possibly the preset 2 value). That depends
upon which value is being displayed, and which counter is programmed to reset via
the keypad.
DIAGNOSTICS
Self Diagnostics and Error Messages
Each time power is applied to the Eclipse, it performs a series of internal diagnostic
tests. A lamp test (all display segments on) is conducted while these tests are in
progress. If a failure occurs, an error message will appear on the display. Additionally, once the unit is up and running, an out of range message (flashing
or
)
may appear on the rate display indicating that the calculated rate is greater than
99,999, or less than -99,999 respectively.
The diagnostic tests are checksum calculations of internal memory, to verify that
data stored in memory during manufacture or at power down is still there at power
up. Programming, calibration, and run mode data is stored in non-volatile memory
(NOVRAM and EEPROM). A failure in the programming section of memory results
. An error in the calibration section of memory
in the displayed error message
results in a
error message, and a bad checksum in run data is indicated by
. For each of these errors, the associated data is set to default values. The
error message remains on the display until a key is pressed. At that time, the unit will
continue to perform the remaining tests and then go into run mode. However, the
defaulted program, calibration, and run data must be restored to the user’s settings
before the unit is put back into operation. NOTE: the calibration diagnostic test determines the validity of data stored in memory only. THERE IS NO DIAGNOSTIC TEST
TO DETERMINE THAT THIS UNIT REQUIRES CALIBRATION! The final checksum
. This type of
test is performed on ROM. If a failure occurs, the display will read
failure is non-recoverable and the unit should be returned to the factory for repair.
24
DIAGNOSTICS cont.
Keyboard Diagnostic Mode
The keyboard diagnostics allows the user to test each of the front panel keys, the
display, and the analog and relay outputs if present in the unit.
Caution: performing the keyboard diagnostic tests will turn ON the analog
and relay outputs if they are installed in the unit. Remove power from the
counter and disconnect any output that should not activate its load during
the diagnostic tests.
!
To enter the keyboard diagnostic mode,
1.
Turn power to the unit OFF.
Durant
1
®
2
Power
In
2.
If any control input is programmed to a lock function, remove the jumper wire
from that input to ground.
3.
While holding down both the
Edit
and
keys, turn unit power ON. After
1.5 seconds, the unit will be in the diagnostic mode with all LED segments
and the program LED ON. Release the
Edit
and
keys at this time. If
present, both relays will be OFF, and the analog output will be at minimum
values (4 mA and 0V).
Durant
Edit
Power
In
25
DIAGNOSTICS cont.
There are four keyboard diagnostic tests, one for each key. The tests are performed
by pressing each key. The unit’s response is maintained as long as the key is held.
Test Key
View/Enter
Edit/Right Arrow
Unit Response
View
E nter
E dit
Display shows software revision number
All display segments and the program LED
will turn OFF, and the analog output will go
to maximum values (20 mA and 10V).
Up Arrow
Each display digit will turn ON, one at
a time, and relay 2 will turn ON.
Down Arrow
Each display segment of all digits will turn ON,
one segment at a time, and relay 1 will turn ON.
To exit the keyboard diagnostic mode, turn unit power off.
26
SPECIFICATIONS
MECHANICAL
Cutout Dimensions: 3.62” W x 1.77” H (92mm x 45mm) DIN standard
Outline Dimensions: 4.04” W x 2.19” H x 3.87” D (103mm x 56mm x 98mm)
3.60” (92mm) maximum depth in panel
Enclosure:
Plastic with polyester front label
Connectors:
Up to six de-pluggable terminal blocks
INPUT POWER
AC Powered Models (57701-4XX)
Input Power: 85-265 VAC, 47-63 Hz, 20 VA
External Fuse: 0.2A, 250 VAC, Time Delay (T200mA, 250V)
Isolation Dielectric Strength: 2300 VAC
DC Powered Models (57700-4XX)
Input Power: 9-30 VDC, 12 VA
External Fuse: 2.0A, 50 VDC, Time Delay (T2A, 50V)
Reverse Voltage Protection: Yes
Isolation Dielectric Strength: 2300 VAC to signal inputs and relays, 500 VAC to
RS 485 and analog outputs
HUMAN INTERFACE
Display:
+6, -5 digits
Type:
.56” high, seven segment, red LED
DATA RETENTION
Memory Type: EEPROM, no batteries required
Duration:
100 years
COUNT SIGNAL INPUT
Sensor Type:
Sink or source, DIP switch selectable
Input Impedance: 4.75 k ohms to +5 VDC or 34.9 k Ohms to ground
Threshholds:
High 3.5 to 28 VDC, low 0 to 1.9 VDC, for single ended signals
Magnetic Pickup Range: 200 mV p-p to 65 VRMS into 34.9 k Ohms
Slow Response: 200 Hz max. (DIP switch 2 and/or 5 ON)
Fast Response: Count Mode
A or B
A and B
Add/Add, Add/Subtract, Add w/Inh 8250/8250
3000/3000
Quad X1, Quad X2
3250
Quad X4
2000
CONTROL INPUTS
Sensor Type:
Sink only
Input Impedance: 4.75 k ohms to +5 VDC
Threshholds:
High 3.5 to 28 VDC, low 0 to 1.9 VDC
Response:
25 msec maximum (5V signal)
27
SPECIFICATIONS cont.
ACCESSORY POWER OUTPUT
Voltage:
Current:
Protection:
12 VDC +/- 12%
75 mA max.
Short circuit protected
RELAY OUTPUTS (count control base unit only)
Number of relays:
Contact type:
Contact rating:
Isolation dielectric strength:
OPTIONAL OUTPUTS
Analog Retransmission
Output signals:
Accuracy:
Isolation dielectric strength:
RS 485 Serial Communications
Baud Rate:
Parity:
Address Range:
Protocol:
Isolation Dielectric Strength:
2
1 set form C per relay
5A, 250 VAC or 30 VDC
2300 VAC
4-20 mA (<750 W) and 0-10 V (>2500 W)
0.13% full scale and 100 PPM /°C (and 0.07%
full scale change over 4-20 mA load ranges
2300 VAC to signal inputs, relays, and AC power
inputs, 500 VAC to analog outputs and DC power
inputs
1200, 2400, 4800, 9600, or 19,200, programmable
Even, odd, or no parity
00 to 99 decimal
Opto 22® compatible
2300 VAC to signal inputs, relays, and AC power
inputs, 500 VAC to analog outputs and DC power
inputs
ENVIRONMENTAL
Operating Environment:
Indoor use to 2000 meters
Temperature:
Operating:
0 to 50°C
Storage:
-20 to 70°C
Humidity:
0 to 85% RH, non-condensing
Vibration:
2.5 g’s, 30 to 200 Hz
Shock:
30 g’s, 11 msec half sinewave
EMC:
Immunity to EN 50082-2 (Heavy Industrial)
Emissions to EN 50081-2 (Heavy Industrial)
Front Panel:
NEMA 4X when mounted with gasket provided
Agency Approval: UL, cUL listed, CE compliant
CE EMC immunity and emissions requirements were met using
shielded wiring on the RS-485, analog output, and pulse input/
power lines. The shields were connected to earth ground at the
Eclipse end of the shields.
Polution Degree 2
Overvoltage category II
28
WARRANTY
Eaton warrants all products against defects in material and workmanship for a period of one (1) year
from the date of shipment to Buyer. This is a limited warranty limited to its terms. This warranty is
void if the product has been altered, misused, taken apart or otherwise abused. ALL OTHER WARRANTIES, EXPRESS OR IMPLIED, ARE EXCLUDED, INCLUDING BUT NOT LIMITED TO THE
IMPLIED WARRANTIES OF MERCHANTABILITY AND FITNESS FOR PURPOSE.
BUYERS REMEDIES: Eaton’s obligations and liabilities under the foregoing warranty are limited to
repair or replacement of the product without charge. To receive the required Return Goods Authorization number (RGA), contact your local Durant distributor or call 800-410-2910. A charge is made
for repairing after the expiration of the warranty. IN NO EVENT SHALL EATON BE LIABLE FOR
CLAIMS BASED UPON BREACH OF EXPRESS OR IMPLIED WARRANTY OR NEGLIGENCE
OR ANY OTHER DAMAGES WHETHER DIRECT, IMMEDIATE, FORESEEABLE, CONSEQUENTIAL OR SPECIAL OR FOR ANY EXPENSES INCURRED BY REASON OF THE USE OR MISUSE, SALE OR FABRICATION OF PRODUCTS WHICH DO OR DO NOT CONFORM TO THE
TERMS AND CONDITIONS OF THIS CONTRACT.
INDEMNIFICATION: Buyer agrees to hold Eaton harmless from, defend, and indemnify Eaton
against damages, claims and expenses arising out of subsequent sales of Durant products or products containing components manufactured by Eaton and based upon personal injuries, deaths, property damage, lost profits, and other matters for which Buyer, its employees or sub-contractors are or
may be to any extent liable, including without limitation penalties imposed by the Consumer Product
Safety Act (P.L.92-573) and liability imposed upon any person pursuant to the Magnuson-Moss
Warranty Act (P.L.93.637), as now in effect or as amended hereafter. The warranties and remedies
provided for herein are available to Buyer and shall not extend to any other person.
COMPLIANCE WITH OSHA: Eaton offers no warranty and makes no representation that its products comply with the provisions or standards of the Occupational Safety and Health Act of 1970, or
any regulations issued thereunder. In no event shall Eaton be liable for any loss, damages, fines,
penalty or expense arising under said ACT.
This manual constitutes proprietary information of Eaton Corp., and is furnished for the customers’
use in operating the Durant counter. Reproduction of this material for purposes other than the support of Durant counters or related products is prohibited without the prior written consent of Eaton
Corp., Watertown, WI.
In the construction of the Control described herein, the full intent of the specifications will be met.
Eaton Corp., however reserves the right to make, from time to time and without proper written notice,
such departures from the detail specifications as may be required to permit improvements in the
design of the product.
The information included herein is believed to be accurate and reliable; however no responsibility is
assumed by Eaton Corp., for its use; nor for any infringements of patents or other rights of third
parties which may result from its use.
This equipment is capable of generating radio frequency energy. If not installed and used in accordance with the instructions, this unit may interfere with radio communications.
29
Durant
901 S. 12th Street
Watertown, WI 53094
800-540-9242 • 920-261-4070
Fax: 920-261-9097
www.durant.com
Durant
Installation and Operation
Manual Number 57700-980-04
Eclipse Series Totalizers and Counters
Models:
5770X-48X - Totalizers/Counters
Durant
PGM
View
Enter
Reset
Edit
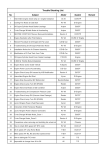
Table of Contents
1
1
4
5
10
Introduction
Description
Mounting
Wiring
Programming
Durant
®
Visit our Web Site at
www.durant.com
14
19
24
27
Function Codes
Run Mode
Diagnostics
Specifications