1
© 2014 Elsevier B.V. All rights reserved.
Table of Contents
i
Table of Contents
1 New in Pure ...................................................................................................................................... 1
2 HTML version .................................................................................................................................... 2
3 Browser support ................................................................................................................................ 3
4 Introduction and concept definitions ............................................................................................... 4
4.1 Being a Personal user in Pure ............................................................................................................... 4
4.2 Person-, User- and Personal user .......................................................................................................... 4
5 Layout and overview .......................................................................................................................... 6
5.1 Personal overview ................................................................................................................................... 6
5.2 Content view and functionalities ........................................................................................................... 7
6 Content lists ...................................................................................................................................... 9
6.1 Filtering ................................................................................................................................................. 10
6.2 Searching ............................................................................................................................................... 11
6.3 Sorting ................................................................................................................................................... 13
6.4 My favourites ........................................................................................................................................ 14
6.5 Content-export options ........................................................................................................................ 14
7 First time login ................................................................................................................................ 16
7.1 Recommended first steps ..................................................................................................................... 16
7.2 Language settings ................................................................................................................................. 17
7.3 Tasks ...................................................................................................................................................... 18
7.3.1 Task: Pending Research output ................................................................................................. 19
7.3.2 Task: Open access Research output without full text ................................................................ 19
7.3.3 Task: Candidates in [Online source] .......................................................................................... 20
7.3.4 Task: Curriculum vitae with new content .................................................................................. 20
7.4 Messages ............................................................................................................................................... 20
7.5 Claim / disclaim a Research output ..................................................................................................... 21
8 Person information ......................................................................................................................... 25
8.1 Persons .................................................................................................................................................. 25
8.1.1 ORCID ........................................................................................................................................ 26
8.1.2 Tutorial: Edit your profile information ...................................................................................... 27
8.1.3 Automated search for publications in online sources ............................................................... 29
9 Content types .................................................................................................................................. 31
i
Table of Contents
ii
10 Research output ............................................................................................................................. 32
10.1 Metadata .............................................................................................................................................. 32
10.1.1 Type .......................................................................................................................................... 32
10.1.2 Publication state ....................................................................................................................... 33
10.1.3 Publication information ........................................................................................................... 33
10.1.4 Authors and organisations ...................................................................................................... 34
10.1.5 Publication managed by .......................................................................................................... 39
10.1.6 Journal ...................................................................................................................................... 40
10.1.7 Publisher .................................................................................................................................. 40
10.1.8 Host publication ...................................................................................................................... 40
10.1.9 Publication date ....................................................................................................................... 41
10.1.10 Keywords ................................................................................................................................ 41
10.1.11 Documents ............................................................................................................................. 41
10.1.12 Links ....................................................................................................................................... 42
10.1.13 Bibliographical note ............................................................................................................... 43
10.1.14 Events ..................................................................................................................................... 43
10.1.15 Relations ................................................................................................................................. 43
10.1.16 Visibility .................................................................................................................................. 43
10.1.17 Workflow ................................................................................................................................ 44
10.1.17.1 Confidentiality .............................................................................................................................. 46
10.1.17.2 Communication in workflows ...................................................................................................... 46
10.2 Metrics ................................................................................................................................................. 46
10.3 History and comments ....................................................................................................................... 47
11 Activities ......................................................................................................................................... 49
12 Projects .......................................................................................................................................... 50
13 Datasets ......................................................................................................................................... 53
14 Full text documents and copyright/open access-issues in Pure ................................................... 53
15 My CVs ........................................................................................................................................... 55
15.1 Curricula Vitae (CV) ............................................................................................................................ 55
16 Visualising relations ...................................................................................................................... 58
16.1 Graph of relations ............................................................................................................................... 58
17 Tutorials ......................................................................................................................................... 59
18 Adding content to Pure ................................................................................................................ 59
18.1 Before you add content ...................................................................................................................... 59
18.2 Create from template using the Submission guide .......................................................................... 62
ii
Table of Contents
iii
18.3 Import from file: RIS- and BibTeX-formats ....................................................................................... 63
18.4 Import from online source .................................................................................................................
18.4.1 Search in arXiv.org ...................................................................................................................
18.4.2 Search in CrossRef ...................................................................................................................
18.4.3 Search in Embase ....................................................................................................................
18.4.4 Search in JournalTOC ..............................................................................................................
18.4.5 Search in Mendeley .................................................................................................................
18.4.6 Search in PubMed ...................................................................................................................
64
69
69
70
71
72
73
18.4.7 Search in SAO/NASA Astrophysics Data System .....................................................................
18.4.8 Search in Scopus ......................................................................................................................
18.4.9 Search in Web of Science ........................................................................................................
18.4.10 Search in Web of Science (lite) ..............................................................................................
18.4.11 Search in WorldCat ................................................................................................................
73
75
76
77
79
19 Edit user profile ............................................................................................................................. 79
Index ....................................................................................................................................................................... i
iii
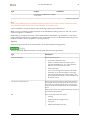
1 New in Pure
1
1 New in Pure
Description of new features, improvements and general updates for Pure.
New features
New CV functionality
CVs are now divided into four different types, each with a specialised purpose. Old CVs has been converted to
fit into the new categories.
More information here: Section 15.1
Curricula Vitae (CV)
1
2 HTML version
2
2 HTML version
An online version of the manual can be found in Help and support area of Pure.
The online version is searchable and links to tutorial screencasts are active.
Note
Only available when logged into Pure.
2
3 Browser support
3
3 Browser support
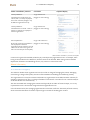
Pure is tested for compatibility with the browsers (and their successors) listed in the table below.
Browser
Comment
Internet Explorer 8
From Pure 4.15 Internet Explorer 7 will not be supported
anymore. Please be aware, that if you run IE8, 9 or 10 in
Compatibility-mode, (which equals IE7) Pure will warn you
about that - and further, layouts etc. may be affected by
this. To turn the warning off and make sure Pure runs as
expected, please run IE without Compatibility-mode.
Google Chrome
Mozilla Firefox 5
Safari 4
Table 1 Officially supported browsers
Note
As a general note it is highly recommend to keep all browsers up to date.
3
4 Introduction and concept definitions
4
4 Introduction and concept definitions
This manual introduces Pure for the Personal user - a term used for an academic or researcher. In other words,
a user of Pure with access and rights to submit own content.
The structure of the manual is as follows:
• A general introduction
• Layout description so you know where to find what
• Some recommended steps for what to do at first login combined with a description of basic functionality
• Information on your academic profile settings
• Information on your Pure user account settings
• Description of content and content list-functionality
• Detailed description of the template - the common carrier of data
• Additional functionality
In between examples and tutorials are found.
4.1 Being a Personal user in Pure
This manual describes features and functionality of Pure for the Personal user.
Pure is your authoritative single source to all your quality-assured research related affairs. You will get full
access and edit rights to your researcher profile, your research related content as Research output, activities,
datasets, project participations, funding applications, and more.
Researcher profile
All researchers in Pure has the option of adding information about your professional career, for example
your research interests, teaching, curriculum and much more. This information can be available for use, for
example at the institutions' website or in your personalised CVs, which you can create directly from Pure.
Research related content
Pure allows you to add information on all of your research related outputs, e.g. journal articles, books,
dissertations, conference outputs, projects etc. This can be done simply by importing the content from a range
of online sources or from a file/text format, for example from reference managing software. You can also add
this information by hand. Or someone can be allowed to do it on your behalf, if you do not have the proper
time for it.
Furthermore you can register all research related activities, as for example conference participation, media
communication, editor activities, esteem, and more.
All content which have some relations can be related directly to each other and afterwards be visually and
interactively displayed using the graph of relations.
Quality assurance
Content can be quality-assured using Pure's build-in workflow feature, which allows users with dedicated
qualifications and roles to approve or validate the content. This ensures the highest possible degree of
accurateness.
It may be your responsibility to forward content using the workflow.
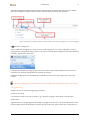
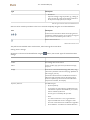
4.2 Person-, User- and Personal user
Pure has three conceptual ways of being associated with the system: As a Person (Researcher profile only),
a User (For staff with administrative tasks) and the Personal user (For researchers with a profile and tasks of
adding own content).
4
4.2 Person-, User- and Personal user
5
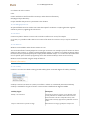
A researcher in Pure is formally known as a "Personal user". A term comprised by the concepts of a "Person"
and a "User". Each concept has an existence of its own in Pure, but put together a number of possibilities and
advanced features for the active researcher emerges.
Person
User
+
= Personal user
Login to Pure
No
Yes
Yes
Profile
Yes
No
Yes
Roles
No
Yes
Yes
Interact with content
No (Passive), but can be
added to content.
Yes (Active), limited to
assigned roles.
Yes (Active), but only own
content.
Used for
(Former/passive)
Researchers / students
Administrative staff
Researchers
Table 2 Overview of Person, User and Personal user
A more in-depth description of the concepts are found in the table below.
Concept
Description
Comment
Person
A Person has a researcher profile
with detailed information about the
employee and, if available, research
and research activities, related to the
Person. A Person is related to one or
more organisations. The profile is
usually view- and searchable from a
web portal.
All Persons are potentially available for
being added to content in Pure, as e.g.
co-author. This can not be done by the
Person itself, but must be done by a
(Personal) User with rights to create
content.
User
A User is provided with a username
and password, and is thereby able to
log in to Pure. When a User is created,
one or more roles can be assigned to
this User, which allows the User to
perform specific working tasks, e.g. to
create, edit, delete or approve / validate
content.
Users alone do not have a profile, and
are not available for being added to
content. Users with roles are mainly
used for administrative staff.
Personal user
Combining the Person and User will
result in a Personal User. Thereby a
researcher can log in to Pure and access
their personal profile and academic
content. In other words, the Personal
user would usually be all academic staff
(researchers), that needs to register
personal research related content;
publications, activities, projects etc.
Personal users can be given roles to
allow them to perform certain tasks
in Pure. The personal user is the most
often occurring user of Pure.
Table 3 Concepts of Person, User and Personal user
5
5 Layout and overview
6
5 Layout and overview
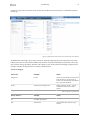
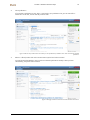
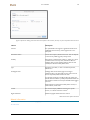
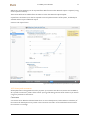
This section describes the layout of Pure as well as introduces the personal overview screen.
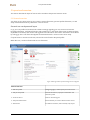
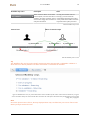
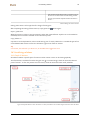
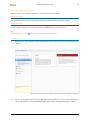
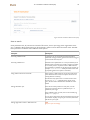
5.1 Personal overview
Your home in Pure. Gives access to your content, contact information, personal profile information, CV and
setup of automated search for publications in online sources.
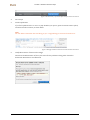
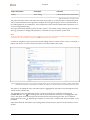
Personal user workspace and layout
In (1), your user profile can be edited. This relates to settings regarding your user account and contains
language information, notification frequency and trusted users. In the center of the screen a handsome photo
of yourself can be found, with contact- and organisational information. Parts of this information can be edited
by clicking (2). This is also from there (2) that the automated search in online sources can be setup.
If a portal exists in connection with Pure, a direct link can be found to the portal profile.
Below this area, a number of tabs holds various information.
Figure 1 Markings of where personal settings can be configured.
Personal overview
1 - Edit user profile
Change language, e-mail frequency and trusted users
2 - Edit personal profile
Personal information, employment information and
researcher profile
3 - Create or edit CV
Create or edit existing CVs
4 - Setup automated search
Feature that lets you monitor selected online sources
5 - Add content
For addition of content, either manually or by import
6
5.2 Content view and functionalities
7
Personal overview
6 - Help and support
Access to manual and screencasts as well as local support
mail
Table 4 Personal settings
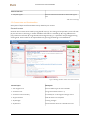
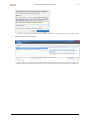
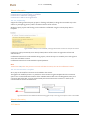
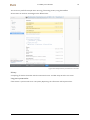
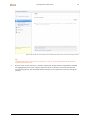
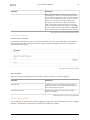
5.2 Content view and functionalities
Description of layout and functionalities mainly related to your content.
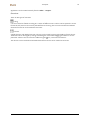
Personal content
Personal user's content can be listed by using the left menu (1). This listing can be exported in various formats
(8). For each item in the listing, a number of different information is available (2). By using different tools
(3,6) content can be found. By using the task and message area (4,5), it is possible to see pending/upcoming
working tasks. Each number can be explored further by pressing the headings in the table below.
Figure 2 Markings of where content can be seen and found.
Content layout
Description
1 - Left navigation area
Access to different types of content available
2 - Content list view
Listing of the selected content in 1)
3 - Content list view functionality
Functionality for use of navigation through content
4 - My personal tasks
Tasks that awaits to be completed
5 - My Messages
Incoming messages
6 - My favourites
Content marked as favourite is reachable from here
7
5.2 Content view and functionalities
8
Content layout
Description
7 - My history
Your latest viewed content
8 - Export (Download) in a specific format (PDF, HTML,
Word etc.)
Allows you to export the current listing of content in various
formats
Table 5 Overview of layout
8
6 Content lists
9
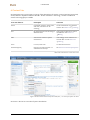
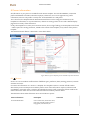
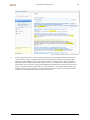
6 Content lists
Each workspace menu gives access to a listing of the selected type of content. Content listed can be searched,
sorted, filtered or exported in different formats - And for each item in the listing, a number of additional
actions and iconography is available.
Lists main features
Description
Comment
Search
Use boolean operators, search codes,
wild cards, truncations etc. for
searching
Can be combined for more powerful
Re-arrange the list order according to
different criteria.
Sorting options depends on content
characteristics. See Section 6.3
Sort
searches. See Section 6.2
Searching
Sorting
Filter
Narrow down content to specific
characteristics
Filter settings can be combined and
saved for later use. See Section 6.1
Filtering
Views
List view, matrix view
For alternative overviews
Download (Export)
Exports current listed content in a
selected format and style
See Section 6.5 Content-export options
Table 6 Main information on content lists in Pure.
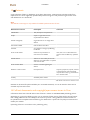
Figure 3 Selected content list functionality: Search field, filter- , sort- and export options are shown.
Each item in the list has a number of options listed below:
9
6.1 Filtering
10
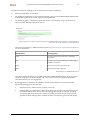
Figure 4 Explanation of content list items. This example is for Research output.
Each item in the list has a number of options:
List icons main features
Description
Comment
Visibility
See what visibility state the content has Usually used on Portals, to determine
what should be available.
Favourite
Allows you to select or de-select it as
favourite
Sorting options depends on content
Paper clip
The content has file(s) attached
See number of files by hovering the
mouse above icon
Labels can be:
Click to highlight all with same label for
quick overview.
Labels (Comes with many
types of text)
• Publication state (Research output)
only
characteristics. See Section 6.4
favourites
My
• Workflow status (If workflow on
type)
• Origin ("Written here" or "Not
written here")
Gear
Shortcuts to different actions,
depending on content and role
Only visible when hovering mouse
above each item
Graph of relations
Visual display of relations to the specific See Section 16.1 Graph of relations
piece of content
Table 7 Main information on content lists icons in Pure
6.1
Filtering
When content is listed a number of filters can be set to narrow down the content listing to certain
characteristics, for example of a specific type of output or within a defined time period. Filter configurations
can be saved and reused as needed.
As default, content in list view is filtered by the "My content" filter. For personal users, this means that listed
content is filtered to content that the researcher is associated with, typically as an author.
The result of any search- and/or filtering operation can immediately be exported as a list in one of several
formats: PDF, Word (.docx), HTML, RIS (Reference Manager), and BibTeX.
Once a filter is activated, the content list will be updated instantly.
10
6.2 Searching
11
The filter bar below the search field has a bread crumb layout that indicates which filters have been added.
Filters can be added as needed, and easily removed individually from the filter bar. See below.
Figure 5 Functionality of the filters. Add filters, edit their behaviour and save the configuration, if it is worth using again.
Save filter configuration
Once a useful filter configuration is setup, it can be saved using the pin-icon next to added filters. Save by
giving the filter configuration a fitting name. In this case it is named "Public validated content from 20132 and
is stored in the left menu. See below.
It can then be activated by clicking on name of it. The number is dynamically updated so every time some
content fits into the filter configuration, the number will increase.
If the filter configuration is not needed anymore, delete it from the menu by clicking on the x next to the
number.
Tip
A screencast showing how to use filters and save a filter configuration is available from the online manual.
6.2
Searching
All types of users can search among all types of content.
Contextual searching
It is possible to search in any type of content, e.g. in projects, by going to the Projects in the left menu.
Global search
A general search, by using the global search field in top right corner of screen, can also be done. Search result
from this global search can be filtered to a specific type of content, e.g. search results only in publications or
11
6.2 Searching
12
projects or persons etc. The search result can then be transferred to the list view for more detailed inspection
or filtering.
Figure 6 A global search. Each element in the search result can be opened.
By default when searching in Pure, search results are sorted by rating with the most important result on top.
A filter limits users to own content by default, but this filter can be switched off by the researcher if he or she
wish to search among all Output, Activities, and Projects in Pure; for the purpose of finding co-applicants, for
example. Searches can be performed in content, limited by filters.
Search strategies
Search for...
Example
Notes
Single term
Univers
Terms are automatically truncated. Find
both "Universe" and "University" as
search terms automatically are followed
by a * (See Asterisk below).
Phrase
"A phrase, for example a title"
Adding quotation marks " " around
search terms will search for exact
phrase.
Table 9 Singe term / phrase search
Search, limit to...
Example
Notes
doi
doi: 000.4.4353.453/iss.
title
title:universe
Finds content with 'universe', only in
the title
12
6.3 Sorting
13
Search, limit to...
Example
Notes
abstract
abstract:universe
Finds content with 'universe', only in
the abstract
keyword
keyword:universe
Finds content where 'universe' has
been added as keyword - or is part of a
keyword.
Table 10 Search codes
Character
Example
Notes
* (Asterisk)
Replace end of term:
Used to replaces one or more
characters, either inside or after a
search term.
ter* finds both term, terms and
terminator etc.
Replace part of term:
te*t finds both text, test and testament
? (Question mark)
Te?t finds both text, test
Used to replace only one character in
search term.
~ (Tilde)
Cla~ finds both Cha, Cao etc.
Used for finding search terms that
reminds of (in spelling).
Table 11 Wildcards
Note
You cannot use a * or ? symbol as the first character of a search.
Operator
Example
Notes
AND
term1 AND term2
Finds content with BOTH term1 or
term2
OR
term1 OR term2
Finds content with EITHER term1 or
term2
NOT
term1 NOT term2
Finds content where term1 is present
BUT NOT term2
Table 12 Boolean operators
Note
Boolean operators must be ALL CAPS. And AND is the default operator, when using two or more search terms.
Tip
To explore more and get a full overview of search options, please refer to the: Apache Lucene - Query Parser
Syntax
6.3
Sorting
13
6.4 My favourites
14
Content list order can be sorted according to different criteria depending on the type of content.
The content could e.g. be sorted after Created date, Modified date - or by Title or Type etc. In general the
sorting will be by either descending or ascending order.
Figure 7 An example of sorting options. The arrows signals whether the content is sorted from low to high or reversed. E.g. from A-Z or ZA or Most recent-oldest.
Default sorting after searching
When a search has been done the content will automatically be sorted by Ranking. This means that the most
relevant search results are shown in descending order, i.e. from most to least relevant.
6.4
My favourites
Content can be marked for later use, as a kind of sticky note, by highlighting the star-symbol, which will
organise the marked content in type-specific categories.
Anything can be marked as a favourite by a simple click on the always-available star icon. Once something
has been marked this way, it will be added to the user’s collection of such preferred content. Here, a short,
graphical overview of all favourites and, divided by content type, offers single-click access to each item.
Favourites can also be exported in true reference formats; APA, CBE, Vancouver, Harvard, etc.
Note
Marked favourites are available from the right side menu. It will only show, if some content has been marked
as favourite.
6.5 Content-export options
The result of any search- and/or filtering operation will be shown as a list, and users can immediately export
any list in one of several formats: PDF, Word (.docx), Excel (.xlsx), HTML, RIS (Reference Manager), and BibTeX.
Some formats (PDF, Word, HTML) can be downloaded in a specific citation style.
14
6.5 Content-export options
15
Figure 8 Download formats - The list has will be downloaded as PDF and a citation style should now be selected.
Other formats will be downloaded in their native format: Excel, RIS (For import in Reference Manager,
EndNote, etc.) and BibTeX (BibTeX encoded).
15
7 First time login
16
7 First time login
Language settings must be set at first login to Pure.
When you log in for the first time, a prompt will ask you to select in which language you would prefer to use
Pure. The language setting will affect the interface language as well as submission language, which will be set
to the same language. These settings can later be changed, at the user profile. More information is found in
Section 7.2 Language settings
Note
Language settings will only be possible, if Pure has more than one language implemented.
7.1 Recommended first steps
A few tasks which you are recommended to take a look at. These tasks will help to ensure that your content
and personal information is as correct and up to date as possible.
The first time you log in to Pure, it may be pre-populated with your personal information and, Research
output and projects related to you. All this data and information may be used in connection with a Pure portal
(e.g. a university website), and therefore potentially be available to the public - or you could make use of the
content for creating lists of research output, e.g. for a CV. Hence, it's important to get your data as correct and
up to date as possible.
User profile
In your User profile it is possible to setup on which types of content and actions that you want to receive
messages and e-mail notifications about. Furthermore which pending tasks you want to be able to see.
For example, you could select to receive messages on all types of content and actions, e.g. a comment has
been added. But those related to your Research outputs you'd also want to receive e-mails about, as this may
be more important to you. This type of message will typically be able to set as "Never" or "Instantly".
For more information about the setup, please refer to: Section 19 Edit user profile
Personal information
This includes information about your name, employment, contact and organisational affiliation.
Synchronised data
Synchronised data in templates has this icon next to it. This also means that if the data needs to be changed,
it must be done in the external system from where the data is synchronised. For personal information, this will
almost always be the local HR-system.
More information on person profile can be found here: Section 8 Person information
Additional personal information includes your profile information, which could cover an extended description
of your researcher profile. This information can usually be edited by yourself.
Tutorial on how to add profile information can be found here: Section 8.1.2 Tutorial: Edit your profile
information
Research related content
Any Research output that you have written, or in other ways been involved with, will usually also be imported
into Pure, if it previously has been available in other / former systems. This information is imported and
converted to Pure and it may be a very good idea to go through your content to verify that it actually is related
to you.
16
7.2 Language settings
17
If it is found that:
1.
content actually DO belong to you, then perfect!
2.
content is missing, that SHOULD belong to you (if you e.g. know they existed in your legacy systems),
then you must try to claim the content. See Section 7.5 Claim / disclaim a Research output
3.
content DO NOT belong to you (could be content where authors have the same name as you), then you
must disclaim the content. Section 7.5 Claim / disclaim a Research output
To check the content, go to the Research output-tab in the Personal workspace and check content in the
content listing. The list can be filtered, sorted, search in - and exported in various citations styles and formats.
See Section 6 Content lists
7.2 Language settings
Pure may support multiple languages, both in the user interface and as the preferred submission language.
Language
The language for the user interface can be changed, if your Pure supports multiple languages. The user
interface covers all text available in menus, headers, templates etc.
Default submission language
For Research outputs the title, subtitle, and abstract should be submitted in the original language, the
language the contribution is written in.
For example, you could select to use Pure in English, setting the language to English, but prefer to submit
content in Danish language. So, the settings should be as follows:
Figure 9 Settings for this user. Prefers English user interface but mostly submits content written in Danish.
When submission language is set to Danish, optionally an English translation can be given clicking on the
English flag icon next to the Danish - or by selecting the Translation menu point to the left.
17
7.3 Tasks
18
Figure 10 The effect of default submission language setting, as it is shown in the templates.
Note, that the submission language setting not has any influence on the interface language.
7.3
Tasks
Both researchers and administrative staff have different tasks to be completed. Using messages and Pure's task
area, all users can easily get an overview of which tasks are pending.
Figure 11 An example of available tasks for a researcher.
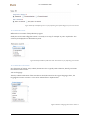
For researchers a number of tasks can be available. Please refer to the table below to see which.
18
7.3.1 Task: Pending Research output
"My personal tasks" main content Description
19
Comment
Pending Research outputs
Content that currently is in the "Entry in progress" workflow state and awaits
to be set "For validation" using the
workflow, e.g. if it still need final details
or awaits to be formally published.
Open access Research output without
full text
Submitted content is allowed to be
enriched with upload of a full textversion of the article.
This task is related to publishers'
copyright policy. These policies are
synchronised with SHERPA RoMEO.
Candidates in [Online source]
The Automated search-feature has
found new search results in one or
more selected online sources, which
now can be imported.
Requires access to online sources as
well as setup of the Automated searchfeature.
Curriculum Vitae with new content
Task is available if new Research output Requires CV-module in Pure.
can be added your your static CV. Open
CV and accept or reject new content.
Table 13 Main information on "My personal tasks" in Pure
Tip
To customise which tasks to show, edit your user profile.
The following pages explains how to solve the tasks.
7.3.1 Task: Pending Research output
Pending tasks where the workflow state need to be moved.
How to complete task
Pending content is simply the content still in the "Entry in progress"-state. This is typically due to the lack of
details yet to be entered in the template. For example it may not yet have been formally published, so no page
numbers are available yet.
Once the template has been completed and no further information can be entered, the workflow state must be
set to "For validation". Thereby the task is completed.
Task
Description
Comment
Pending Research outputs
Content that currently is in the "Entry in progress" workflow state and awaits
to be set "For validation" using the
workflow, e.g. if it still need final details
or awaits to be formally published.
Table 14 Main information on "My personal tasks" in Pure
Related information
• Section 10.1.17 Workflow
7.3.2 Task: Open access Research output without full text
Pending tasks where the workflow state need to be moved.
How to complete task
19
7.3.3 Task: Candidates in [Online source]
20
To get a list of all content which may have a full text version uploaded, press the tasks. The task is, for each
item in the list, to open the template by clicking on the title and locate the "Documents" area down the
template. Based on the SHERPA RoMEO colour, found here, the correct version of the full text can be
uploaded.
Task
Description
Comment
Open access Research output without
full text
Submitted content is allowed to be
enriched with upload of a full textversion of the article.
This task is related to publishers'
copyright policy. These policies are
synchronised with SHERPA RoMEO.
Table 15 Main information on "My personal tasks" in Pure
Related information
• Section 14 Full text documents and copyright/open access-issues in Pure
7.3.3 Task: Candidates in [Online source]
When the Automated search-feature is activated and configured, new results from the search are presented
here. Candidates are divided on each selected online source. Note, this task is only present if you have setup
the Automated search feature.
How to complete task
Get access to the list of search results by clicking on the tasks. Start an import process or delete items from the
from the list of search results to decrease the number of tasks.
Task
Description
Comment
Candidates in [Online source]
The Automated search-feature has
found new search results in one or
more selected online sources, which
now can be imported.
Requires access to online sources as
well as setup of the Automated searchfeature.
Table 16 Main information on "My personal tasks" in Pure
Related information
• Section 8.1.3 Automated search for publications in online sources
• Section 18.4 Import from online source
7.3.4 Task: Curriculum vitae with new content
When new content is created or imported and also fit into an existing static CV configuration a task can be
selected to be shown to pay attention to this.
How to complete task
Click on the task which will open the CV. Now it is possible to either accept the new content, which will place it
into the CV or reject it.
Task
Description
Comment
Curriculum Vitae with new content
Task is available if new Research output Requires CV-module in Pure.
can be added your your static CV. Open
CV and accept or reject new content.
Table 17 Main information on "My personal tasks" in Pure
7.4
Messages
Pure has an internal communication system, where messages are used to carry information between users.
20
7.5 Claim / disclaim a Research output
21
Incoming messages are available from the user interface at "My messages". They can be viewed and deleted
but not responded directly to. Messages can be selected to be received by e-mail as well.
Message title
Description
Comment
Return of '$title'
This message is send when content
has been returned, by an editor, to the
submitter or author of the content.
Note, that the submitter does not
have to be the author of the content as
content can be submitted on behalf of
others. Returned content will appear as
a new task.
You were added to '$title'
When you have been added to Research This can be the case if someone has
output as author (or co-author).
created new content and added you
as author. Or if a claimed piece of
content have you added as author (By
the Administrator of claims.
You were removed from '$title'
When you have been removed from
disclaimed Research output.
Comment on Content
This message is send when a note has
been added to a piece of content you
are related to.
New import candidates found in
[source]
This message is send when new
candidates for import, found in
selected sources.
You must mark that you want to receive
e-mails on this, where the feature is set
up in the Person profile, to receive emails
Tasks in PURE
This message is send on the selected
intervals with pending tasks. The
message contains a summary of how
many for each task type.
Only sent, when an interval, ranging
from weekly to quarterly, has been
selected in the Notification frequency
in User profile.
Table 18 Messages.
Tip
To customise which messages you want to receive, edit your user profile.
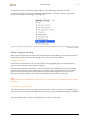
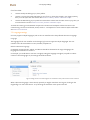
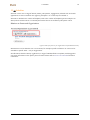
7.5 Claim / disclaim a Research output
Shows how to either claim or disclaim Research outputs by sending a message to the Administrator of claims.
Before you begin
Personal users
About this task
In the personal Research outputlist, content ons can either be missing from - or be wrongly related to. This
list, as described in Section 7.1 Recommended first steps
Procedure
1.
Claim or disclaim publications?
Option
Description
A publication is missing from my publication list
Claim - See steps 2-4 for information on how to
claim this publication
A publication is listed in my publication list - but
it is not mine
Disclaim - See step 5 for information on how to
disclaim this publication
21
7.5 Claim / disclaim a Research output
2.
22
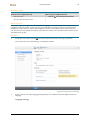
Claim publication
If you expect a publication to exist, but it is not listed in your publication list, you can search for it
within Pure. To do this, remove the "My content" filter.
Figure 12 Remove "My content" filter. This will let you see all publications, available in Pure. Now search for the expected
publication.
3.
When it is found, either click on the content-action symbol and "Claim content".
Or open the template (Perhaps, just to make sure that the publication actually is what you have
searched for), and press "Claim content".
Figure 13 Wrongly associated content can be disclaimed from this location.
22
7.5 Claim / disclaim a Research output
23
Figure 14 Or alternatively - open the template and press "Claim this content".
4.
Go to step 6.
5.
Disclaim publication
If you find a publication this is not in any way related to your person, press the content-action symbol,
and select "Disclaim content", as shown below.
Note
Do note delete content that does not belong to you. It might belong to someone else within Pure
Figure 15 Wrongly associated content can be disclaimed from this location.
6.
Notify Administrator of claims with message.
Describe to the Administrator of claims, the reason for this publication being either claimed or
disclaimed. Remember to save afterwards.
23
7.5 Claim / disclaim a Research output
24
Figure 16 A clarifying message should be send to the Administrator of claims. This shows both a claim and disclaim example.
7.
Watch out for correction message
Figure 17 When the correction has been completed by the Administrator of claims, you will be notified with a message. In this
case, the author has been added to the claimed content, and the content will now be visible at the personal user's publication list.
24
8 Person information
25
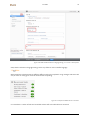
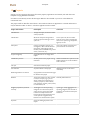
8 Person information
All information on your person is available from the Person template. This includes Metadata; a researcher
profile with detailed information about the employee, relations to one or more organisations, profile
information and more. The profile is usually view- and searchable from a web portal.
This is also from this template that the Automated search feature can be configured. Furthermore, the
template has information on any associated user, relations to existing content in Pure and a detailed displaypage with a summary of the information.
Finally, the template has a History and comments section, where a log of editing on the template can be found
- and the option for sending comments, related to the content of the template, to any editors of the person's
template.
The Automated search feature is described in more details below.
Figure 18 Person, person template, person metadata and profile information
8.1
Persons
Persons in Pure are academic staff members of different types; professors, PhDs, teaching personnel, research
assistants and more.
Pure stores all information on a Person in a template. This template contains a number of fields used to
describe the person and the person's academic profile. Some of this information may be synchronised and
not editable in Pure while some is meant to be edited by the person itself. In particular interest would be the
Profile information which can be used to exhibit the Person's academic profile in details.
The table below shows what information Pure can hold about a person:
Person information
Description
Comment
Personal Identification
First and last name, former last name,
title, post-nominals, known as (first +
last), gender, date of birth, etc.
25
8.1.1 ORCID
26
Person information
Description
Comment
ORCID
An ORCID id can be added to the
profile. Or it can be created directly
through the profile.
Institution must have an affiliation with
ORCID, before it can be created.
Employment Information
Source IDs; e.g. HR system ID, HESA
ID, Researcher ID, etc. Entry into
academic profession, start- and end
dates, retirement date, etc. Previous
national assessment submissions; e.g.
RAE 2008 panels and subpanels.
Organisational affiliations
Affiliation with departments and related Source system ID can be added; the ID
organisational units, research groups, from the source system if integrated
research student organisations, etc.
with such as system; e.g. SAP, pFACT,
Agresso.
Research student supervision
Relations to research students
Profile information
Any relevant personal and professional E.g research interests, personal profile,
information can be added as free text. teaching activities, consultancy,
previous employer, future employer,
hobbies.
Supervisor relations are specified per
organisational affiliation.
Academic & Professional qualifications Option for adding this information to
profile.
Must be enabled by administrators of
Pure.
Keywords
Used to describe the person's scientific domain and area of expertise.
Visibility
Information on persons can be limited
in visibility if needed
Table 19 Information available on persons in Pure.
Related information
• Section 8.1.2 Tutorial: Edit your profile information
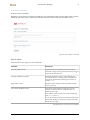
8.1.1 ORCID
An ORCID ID is a persistent digital identifier for researchers, used to distinguish them from one another and
uniquely identify them in relation to their Research outputs.
When creating a new person, there will be a section called ORCID under "Personal Identification", which have
two options:
Figure 19 If an existing ORCID ID exists, it can be added - or otherwise created.
Add existing ORCID ID
If a person does not have an ORCID ID assigned already, there will be a button to "Add existing ORCID ID".
This will open up a panel where the (previously created) ORCID ID can be entered.
26
8.1.2 Tutorial: Edit your profile information
27
It is possible to "Check" the ORCID ID that is entered in the box by pressing the button next to the text box. By
pressing the "Check" button, a new browser window will open to the public homepage of ORCID, where it tries
to look up the ORCID ID.
Once the user is happy with the entered ORCID ID, it can choose to "Apply" the ORCID ID to the person.
Pressing "Apply" will first check if the ORCID ID is of the correct format, then if the validation digit (the last
digit) is correct and finally search the ORCID server for an record with the ORCID ID. If the ORCID ID is
found, it will be attached to the person.
Create ORCID ID
Note
Only visible if system settings allows this.
If a person does not have an ORCID ID assigned then there will also be a button to "Create ORCID ID".
Pressing this button will open a panel where it will be shown what information will be used to create the new
ORCID ID. Currently only two things are used:
• The name of the person,
• The e-mail of the person.
If one of these is missing, it is shown with red text. The e-mail is found on the affiliation to an organisation
and will as default be displayed if it exists. It can also be changed or entered manually. It is optional whether to
use a personal e-mail or an institutional e-mail. You can add/change e-mail settings from the ORCID website
later on.
Pressing create on this panel will request the ORCID server to create a new ORCID record with the
information. If all goes well, the panel closes and the ORCID ID is shown.
Note
If a person already has an ORCID ID assigned, it will be shown.
Next to the ORCID ID there will be a "Show" button. The "Show" button does the same as the "Check" button
above and opens a new browser window to show the ORCID ID on the official homepage.
Edit existing ORCID ID
Note
Only possible if system settings allows this.
If a person already has an ORCID ID assigned, there will be a button to "Edit" the assigned ORCID ID. Pressing
this button will open the "Add existing ORCID ID" window as described above.
Claim new ORCID ID
Once a new ORCID ID is created, it needs to be claimed. When the request to create is sent to ORCID, an email will be sent to the e-mail address attached to the creation request. This e-mail will contain a link to be
pressed to go and claim the ORCID ID.
The profile will not show any personal information before it is claimed. If the user has not claimed within 10
days, it will be claimed automatically.
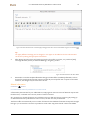
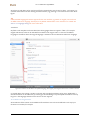
8.1.2 Tutorial: Edit your profile information
The profile information can be enriched with a number of headings where your own text can be added.
27
8.1.2 Tutorial: Edit your profile information
28
Before you begin
Roles that can complete this task
Where to go to complete this task
• Personal users
• Click on [
user name ] in top of screen
• Editor of persons
• Administrator of persons
About this task
Person profile contains all person-related information about the researcher. This includes the possibility
of adding self-defined text under a number of headings (types), about e.g. research areas, extended CV
description, spare time interests and more. This information might be used in a CV or on a web portal. This
tutorial shows how to do add this information.
Procedure
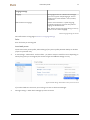
1.
To edit the profile information, click [Edit profile]
This will open a template containing all profile information.
2.
Locate the "Profile information"-heading.
Press the [Add profile information]
Figure 20 Add profile information from this heading
Note
"Profile information" can in some versions of Pure be labelled with other words.
3.
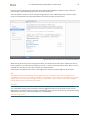
This opens a window, as shown below. From here it is possible to select a type, which equals a heading
of the text. Now text can be entered in the text field - alternatively it can be pasted either in plain text
(without formatting) or directly from Microsoft Word (with formatting). The editor window can be
expanded to full screen mode, to allow for a better overview, which is useful in case of larger amount
of text. The text field also has a range of tools that can be used to organise the text and formatting in a
more personal way. Links can be added to the text as well. Press [Create] to save the current heading. If
wanted, create another heading with another text.
28
8.1.3 Automated search for publications in online sources
29
Figure 21 Profile information with a selected Type (Heading) and free text. Text can be formatted using the icons above the text
field.
Tip
The types (different headings) can be changed, or new types can be added to the list. Administrators
can do this by editing the appropriate classification.
4.
After editing has taken place, each heading is listed in the profile. From here, it is possible to [Edit],
rearrange the order (arrows) or delete the headings, using the (-) button.
Figure 22 Profile information has been added.
5.
Remember to save the template afterwards! Changes will take effect immediately afterwards, and can
be seen for example at the Personal overview and the "My CV and profile"-tab. If a portal is associated
with Pure, the changes may be visible at this as well.
Related information
• Section 8.1
Persons
8.1.3 Automated search for publications in online sources
A functionality that searches for your added author name(s) against new occurrences of Research outputs with
the alike name, in selected online sources, within a fixed time interval.
As a personal user, the task of keeping your publication list up to date can be time consuming. By setting up
an Automated search for publications in online sources, this task can easily be facilitated.
The feature offers to automatically scan a number of selected online databases for Research outputs that might
belong to you as researcher. The result is provided as a task under "My personal tasks" named "Candidates
29
8.1.3 Automated search for publications in online sources
30
found in [source]", where [Source] equals the name of the selected database. Furthermore, the number of
search results is listed. Optionally, an e-mail can also be send to you.
Scans are based on variations of your name (and organisational units in Web of Science). Variations of your
name can be specified in the setup of the feature on the Person-profile, for each source.
Figure 23 Setup of name variations for use in Automated search-feature.
When clicking at the menu point at My personal tasks, a list of the search result can be reached. For each of
these results, you can either choose to import it to Pure - or remove it from the search result. When an item is
removed from the search result, it will not show up at future searches.
If the content already does exist in Pure, a warning that this may be a potential duplicate will be shown.
Tip
The usefulness of the automated search may depend on your used author name. The more general and
widespread your name is, e.g. "Smith", the higher risc of getting a search result that is overwhelming, and thus
might require too much time to manage. In reverse, if your name is quite unique or distinctive, the higher
chance that the search result will be more useful.
Example
If you know that your articles often are available from PubMed, you can mark PubMed as source. Add
your used author name(s), either manually or use the suggestions that Pure automatically comes up with.
Afterwards, it is possible to test the settings immediately by doing a preview of the search, and thereby making
adjustments to the name, if the search results are not satisfactory.
Related information
• Section 7.3.3 Task: Candidates in [Online source]
30
9 Content types
31
9 Content types
A number of content types are available for researchers to add to Pure.
Content type
Description
Research output
Content the researcher is responsible for. Most often
written and published but can also be non-textual and not
formally published.
Activity
Describes all activities a researcher may be involved in/with
as a person.
Press clipping
Mentions of the researcher in media, e.g. interviews or
broadcasts.
Application
Applications are related to awards and projects in Pure and
are used when academics need to applicate for funding of
research projects.
Award
Awards hold some of the same information as applications;
e.g. funder, programme, and application date. Moreover,
awards hold financial details about the award, the project's
budget, and any non-financial contributions such as
borrowed equipment.
Project
The project is considered the main information type as it
holds information about its applications and awards besides
the project description itself.
Dataset
Large collections of data, e.g. databases, survey data,
observations, measurements, and other results from
experiments.
Table 20 Content types in Pure
Note
Not all types may be available in your Pure.
31
10 Research output
10
32
Research output
Research outputs in Pure reflects a broad range of scientific productions a researcher can be responsible for,
or in other ways be related to. This includes content published in journals, books and parts hereof, papers and
outputs in connection with conferences, and more. Further, a number of non-textual outputs are available.
Each main category has a template where metadata about the specific type, e.g. an Article, can be added Each
template is designed to hold as relevant metadata as possible, which means that a Contribution to a journal
(no matter which type) is different from what a Book/Report should hold of information. For example, an
Article is published in a Journal, whereas a Book is published by a Publisher. All of these variations are taken
into account in the templates.
Template menu point
Description
Metadata
Contains a range of input fields used to describe the
specific piece of data.
Metrics
Displays citations for the content and impact factors for
the related journal. Information available depends on the
current category of Research output template.
Relations
Show relations to other content in Pure.
Display
Show the metadata in various citation and system formats.
History and comments
Comments can be added to the specific piece of content
and a log of changes is found here.
Table 21 Menu points in templates.
Related information
• Section 18 Adding content to Pure
10.1 Metadata
A closer look of which features - and practical use - that often are available at templates.
Metadata input fields can contain information, used to describe the current piece of content, e.g. an article
from a scientific journal. The information could typically be derived from the actual exemplar of the content, or
from the publisher.
As the content that the templates describes differ slightly from each other, the actual structure and range of
input fields can vary for each, though they are alike for the template types.
Required fields
When the appropriate template type has been chosen, a range of input fields must be filled out. Those marked
with a red * (asterisk) are required fields, and must be filled out before it is possible to save the content - a
warning will pop up and tell which fields that are missing, if you fails to do so. These fields will then be marked
by a bright red colour.
However, depending on local submission policies, it can be very useful to fill out additional information to
enhance the judgement of relevance and improve retrieval of the content.
10.1.1 Type
Define the intended target audience or level of the content - and if the content has been peer reviewed.
32
10.1.2 Publication state
33
Figure 24 Example of template type. This may vary depending on template category and your version of Pure.
10.1.2 Publication state
Reflects the current state of the publishers' progress.
Ideally this can be used to flag that content is currently on it's way, for example "In press" at publisher. This
value may be displayed at an attached Pure portal.
Figure 25 Example of different publication states. These values may vary depending on local needs.
10.1.3 Publication information
Key information of content. Title, subtitle, abstract etc. This is typically used to describe, identify, and assess
the relevance of the content.
Title and language
The title, subtitle and abstract of the contribution should be entered in the original language, that is, the
language the content is written in. This can be selected from a dropdown-box:
Figure 26 Selection of language the content is written in.
33
10.1.4 Authors and organisations
34
Arrow keys up and down can be used to scroll for the wanted value, press "Enter" to select - and a press on a
character will find the first value starting with that character, e.g. pressing "c" will mark Chinese in the above
figure.
Tip
Of the available languages that Pure supports for the user interface, e.g. Danish or English, one can be set
as default submission language. Thereby this is by default selected when a new submission is created. See
Section 7.2 Language settings for more information.
Translation
Key fields in the template can be translated into the languages that Pure supports. If that is, for example
English and Danish, either can be selected for translation if the original title is in Chinese. The default
language to translate to when the Original language is selected is the one selected as Submission language.
Figure 27 A translation can be added in the preferred language, here English, presuming the title and more is written in Chinese.
In example above, the content is written in Chinese and an English translation can be given. Additionally, a
Danish translation can be added too, by switching to the Danish flag in top of template. Translations can only
be given in the languages that the current version of Pure supports.
10.1.4 Authors and organisations
All contributors of the content can be added and for each their exact role can be defined. A role may by an
illustrator or translator, for example.
34
10.1.4 Authors and organisations
35
As a general rule authors should be added to content with their organisational affiliation at the time of writing
and publishing. Therefore content can be created with authors which both have a current organisational
affiliation (internal) and other authors have a current external organisation (external).
Note
Please note that in general internal persons and organisational units are marked with dark-coloured icons,
whereas external ones are marked with white-coloured icons.
Adding internal persons
Add persons by clicking either on [Add persons] or use the quick add button:
closed by clicking somewhere outside it.
- The quick add area can be
As default personal users will automatically be added to the templates.
Figure 28 Add persons to a template.
Difference is that the first (right) will add one person which must be completed and then the next can be
sought after, where as the quick-add button (left) allows for a quick search and add of persons. Editing can
then take place afterwards.
Once found it can be selected for further editing, for example for re-editing of the author name. That might be
the case if the content has been written using another variation of the name.
The role can also be specified if needed. Default value is "Author".
35
10.1.4 Authors and organisations
36
Figure 29 Start typing author name and click on person to add. Afterwards, edit the selection.
Affiliation on the Research output
Figure 30 Current affiliations are shown. Additional affiliations may be given.
The current organisational affiliation is shown and if any former affiliations existed, they would be shown too.
They will have an end date shown.
Additional affiliations can be added, for example of the content has been published while the affiliation was
with another organisational unit. This may be either another internal or an external organisation.
36
10.1.4 Authors and organisations
37
Adding external persons
If the contributor has no relation to the current institution, it must be added as an external person. Doing this,
also adds their external organisation if this information is available in Pure.
Figure 31 Start typing author name and click on external person to add. Afterwards, edit the selection.
When added their role, name variation, country, and, organisational unit can be edited.
Creating external persons
If the external person can not be found it can be created on the spot and used immediately afterwards. Click
on "Create external person" to do this.
37
10.1.4 Authors and organisations
38
Figure 32 Start typing author name and click on external person to add. Afterwards, edit the selection.
When added role, name variation, country, and organisational unit can be edited.
Add organisational unit
A contributor may not be limited to a person, but can also be an organisational unit. This unit can be added
the same way as with a person. Simply start typing the name and select the unit from the search result list.
Note
For all selected persons and / or organisational units, the content will be available at their content listing, when
it is saved.
Add group author
”Group author” involves a number of researchers working under a single group name. The name of such
group can be added as author. In cases where a Group author has been added, personal authors can be
flagged as hidden, using the Visibility-option aligned at each author.
The purpose is to make it possible to attach authors who are part of an author group but at the same time
hide them in citation formats and listings. When hidden, only the name of the Group author will be displayed.
When visible, their names and the Group author name will be displayed. Authors will be accredited in terms of
the publication, for instance in reports no matter visible or hidden.
At least one internal author, of this group, must be added as author, to be able to save the submission. The
order of the Group author in relation to the other authors can be specified using the arrows up and down.
Scenarios
Using the above it is possible to submit content with a number of different author constellations, for example
content written in connection with a previous employment. This allows a personal user to keep a complete list
of content regardless of when/which organisational relation it was written.
38
10.1.5 Publication managed by
Author constellation / Scenario
Comments
Internal publication.
Origin: Written here
Chris Robertson and all authors are
internal, that is, currently employed at
the current institution (though it may
be different organisational units).
(Flagged in content listing)
Internal publication.
Origin: Written here
Chris Robertson as internal - others as
external; co-authors are employed at
external organisations.
(Flagged in content listing)
External publication
Origin: Not written here
39
Graphical display
At the time of writing Chris Robertson (Flagged in content listing)
was employed at an external
organisation (But he wants this piece of
content on his content list, e.g. for use
with CVs and to keep his list complete).
Table 22 Author constellation / scenarios for template.
Content will in general be available (related to) any internal persons/organisational units. For example, when
listing content related to Chris Robertson, all three scenarios will be listed. When listing content related to
Department of Statistics and Modelling Science, only scenario 1 and 2 will be listed.
Related information
• Section 10.1.17 Workflow
10.1.5 Publication managed by
This selection decides which organisational unit who will be in charge of managing the content. Managing
means being in charge of the quality assurance of the metadata and handling the workflow (if present).
This organisational unit may be someone else besides any organisational units added as author relations, for
example a superjacent unit who is in charge of validation of content for a number of units. It would usually be
set for the Personal user automatically.
The roles associated with managing the content would typically be an Editor of research output, so it is very
important that such a role has been assigned relevant organisational units.
In the illustration below, the managing organisational unit has been set for the The Faculty of Social Sciences,
which means that the Editor of research output will get a new task of validating/ the content.
39
10.1.6 Journal
40
Figure 33 An organisational unit is selected to handle the workflow and what else editing is needed.
A managing organisational unit can also be set to any former organisational units, as the content might have
been written when the Author had a previous employment relation to that. This would of course require that
an Editor of research output is associated with this organisational unit, to receive the incoming task.
Only one managing organisation unit can be set.
Related information
• Section 10.1.17 Workflow
10.1.6 Journal
Journal in which the content has been published.
Add journal by searching for journal title or ISSN. As default the most frequently used journals for the
academic are presented before searching.
Or create a new journal if needed and fill in information.
Sherpa RoMEO
Note
This feature is only available if a synchronisation with the Sherpa RoMEO database has been done by
administrators of Pure.
If the selected journal is indexed in the Sherpa RoMEO database (And this information is synchronised into
Pure), the matched colour along with the publishing policy, will be displayed at the Documents part of the
template.
Related information
• Section 14 Full text documents and copyright/open access-issues in Pure
10.1.7 Publisher
Publisher by which the content has been published.
Volume, edition and place of publishing is common information to add here. But also an ISBN, which can be
either printed or electronic for e-publications.
10.1.8 Host publication
Publication in which the contribution has been published, typically as a part-of contribution like a chapter in a
book.
A host publication carries more or less the same information as a publisher. Though, it includes the option of
adding one or more editors of the work.
If both the part-of contribution and the host publication itself is submitted to Pure they can be related using
the Relations found in the template.
40
10.1.9 Publication date
41
10.1.9 Publication date
Date of formal publishing of the content.
An "Early online date" can be added for some types of content. This tells if the content has been available
online prior to formal publishing.
10.1.10 Keywords
One or more terms used to describe the current content. Terms may be picked from a structured list. or
entered as free text.
Note
Keywords may not be present or may be present in various shapes.
Structured list
May also be known as a taxonomy or thesaurus and be present as a searchable list or hierarchy, which can
be unfolded, usually from very general terms into narrower defined terms. May be structured according to
different domains.
Free text keywords
Where keywords from a structured list may not be sufficient to describe current content it may be an option to
add free text keywords, keywords defined by the author self.
Imported content from online sources can populate these fields with keywords as they are found in the online
source.
10.1.11 Documents
Attach one or more files to the content. A typical example is a full text file of the content.
Publishing policy issues
When adding a journal to a publication, it is possible to see the Sherpa RoMEO colour right away, in the
section where documents/files are attached. Here can also the current publishing policy of the publisher of the
journal be found. The information is initially displayed in a compact form, but can be expanded to provide the
full details. If the current colour/publisher allows that an electronic version of the current publication can be
attached, this will be displayed above the colour.
Content that is considered open access, but still have no electronic versions attached, is presented as a
personal task in the right hand side of the workspace, at the "My personal tasks" for personal users.
Figure 34 A journal has been added to the template which is indexed as Green in the Sherpa RoMEO database.
Documents
When possible, the entire full text of the publication can be attached, to ensure it's future availableness.
Documents are actually not limited to documents but can also be music files or datasheets etc.
41
10.1.12 Links
42
Figure 35 Options for adding a document. Due to the dynamic nature of Pure, this may vary a bit compared to the local version.
Feature
Description
File title
The uploaded file can be given a significant file title more
readable for the human eye, if the original title is nondescriptive.
Document version
Can be set to Preprint, Author version etc. This can depend
on the current publishing policy of the journal.
Visibility
Select where to make the file visible, e.g. public on a portal
or backend from Pure only. Note, this has no effect on
Embargo date, but if an embargo date has been set and
reached, the selected visibility will be valid.
Type
Specify the type of file, i.e. Text or audiovisual product,
software etc.
Embargoed until
Embargo date can be entered, again according to
publishing policy. This will make sure the content not can
be seen on portals/websites before this date.
For example, by setting an embargo date of 1/1/2015, the
file will NOT be visible on a public portal/website before this
date has been reached. It will only be available when logged
into Pure.
When that date is reached the visibility of the content, as
selected above, will be valid.
License
The content may be published according to a specific
license, i.e. Creative Commons or other.
Rights statement
(Additional) rights statement for the content.
Table 23 Document upload information
Related information
• Section 14 Full text documents and copyright/open access-issues in Pure
10.1.12 Links
42
10.1.13 Bibliographical note
43
For relations to online content.
Links
Used to add links to the full text of the content (or other relevant information).
DOI (Digital object identifier)
Unique identifier that points to a permanent online location.
10.1.13 Bibliographical note
An optional field that can be used to enter notes about specific conditions or anything else that might be
relevant to point out, regarding this submission.
10.1.14 Events
Content may have a relation to a event. This could be a conference or course, for example.
In any case, it is possible to add a relation to an event. If the event do not exist in Pure, it may be created and
used.
10.1.15 Relations
Relations can be added to other relevant content in Pure.
This can be beneficial if content/subject has a cross-type connection. For example a piece of content can have a
relation to other content, i.e. a follow-up article (Research output), or a relation to a conference (Activity) where
the article has been presented perhaps as a Paper (Another Research output- or it could cover the results of the
use of a specific piece of scanner (Equipment), which also could be related (In some versions of Pure).
Relations can be visualised using the Graph of relations.
Related information
• Section 16.1 Graph of relations
10.1.16 Visibility
Content in Pure can be marked as having limited visibility (there are several degrees of visibility available).
Visibility is used to limit access to content, most often in relation to a PurePortal (Institutional website).
Visibility is available for all types of content in Pure and has as default three degrees available:
Visibility degree
Description
Publicly - No restrictions
Content can be seen by everyone. It may depend on the
current publication or workflow state. Some customers
allow all content to be seen independent of any state.
Others prefers that only approved and published content is
visible.
Campus - Restricted to a specific IP-range
Restricted to an IP-range, typically the Campus area.
43
10.1.17 Workflow
44
Visibility degree
Description
Backend - Restricted to Pure users
Only visible from inside Pure. You need to login to Pure to
see the content.
Table 24 Visibility degrees
A fourth degree is available on certain types of content:
Confidential - Restricted to associated users and
editors
Content is only visible to users directly related:
authors and roles with access rights to the content. It
will be stated exactly who they are.
Note
Visibility can also be set for attached files documents (See Section 10.1.11 Documents).
10.1.17 Workflow
The workflow determines the assignment of the responsibility for handling workflow (send for approval /
approve / validate ) of the content, thus it is used to send content from one user for editing and other users for
validation.
The approval / validation of content, using workflows, can be seen as part of a quality assuring process which
aims to get and keep submitted data verified as correct and as up to date as possible, but also as a means for
collaboration. Users with expert knowledge can be appointed Editor roles, which would allow them to add
or supervise in e.g. getting the correct version of a fulltext of an article, if the users are experts in copyright
policies.
A workflow can be specified for each content type in Pure - a workflow for outputs, projects, esteem, external
collaborators, etc. Workflows usually exists in two variations, one for Research output, Activities, Projects etc.
and one for all types of Master data (Journals, publishers, events etc.). The latter will usually only consist of two
steps, while the first will be in three steps.
Workflow for personal users
The workflow has a start and end point, divided into a number of steps. The start point (step 1) is when a piece
of content is being created. The content will then be in the workflow state of Entry in progress in which it
can remain (and be continuously re-edited) until no further editing is necessary. As long as it is in the state
of Entry in progress, it is also shown as a Personal task. Once no more editing is necessary, it must be set in
workflow state step 2: For validation. The responsibility of the content is now pushed to another user who
can control the content and makes sure everything looks fine. At this point, the number of personal tasks,
regarding your Research outputs will also decrease by 1. Table and illustration below will summarise this
information.
Editors can at any time within the workflow process return the content to the previous (or first) step. This
can be useful if further information is needed from the submitter. A comment explaining the reason for the
change of workflow state can be added as well. See section Communication in workflows below for more details
on this.
Two steps are available for all personal users:
Workflow step status
Description
Note
The submission has been created,
and is now in the state of "Entry in
progress". However further details can
continually be added to the template,
simply by reopening it.
The responsibility for the content of the
template is at your hands. The content
is still listed at "My personal tasks".
44
10.1.17 Workflow
Workflow step status
45
Description
Note
When no further details can be added
to the template, it must be send for For
validation. An Editor of research output
will now take charge of the content and
verify the information.
The "My personal tasks" will now
be empty / one item lower.The
responsibility of handling the content
is now pushed to the Editor of research
output for further quality assurance.
Table 25 Workflow steps in Pure
Personal user
Editor of research output
Table 26 Workflow process in Pure
Tip
The "Workflow" filter can be used to identify content with status step approved or validatedFor validation. It
allows the user to identify whether it has been sent forward or returned in the workflow.
Figure 36 Workflow filter. Here, only content that has been sent for validation by the creators of the content are filtered out. (1st. green
arrow in illustration above). The content that has been returned to the creator (Red in illustration above) would be filtered out using filter
setting "Entry in progress".
Note
Due to the dynamic nature of Pure, the steps displayed above may not reflect how your version of Pure looks.
But the principle remains the same.
45
10.1.17.1 Confidentiality
46
Related information
• Section 7.3.1 Task: Pending Research output
• Section 10.1.17.2 Communication in workflows
• Section 10.1.5 Publication managed by
• Section 10.1.4 Authors and organisations
10.1.17.1 Confidentiality
Support for making selected outputs, projects or funding confidential, making them accessible only to the
authors or participating persons, editors and administrators of the content.
Research output, projects and funding can be marked as confidential using the visibility drop down in
templates.
Figure 37 When visibility is set to confidential, a message informs which users that can access/see the content.
Content can only by accessed by users directly related, editors of the content at organisational level and
administrators.
Confidential material will not be available during reports, unless the report is created by users with rights to
access the confidential content.
Confidential material will not be available at portals/websites.
Note
Trusted users can, when they access a user with confidential content, also see the confidential content.
10.1.17.2 Communication in workflows
At any step in the workflow comments can be added to the content.
Throughout the workflow process it is possible to communicate using the template's build-in Comments
option. This is located both at the bottom of the metadata-tab window and in the designated History and
comments-tab. At the later, it can be marked exactly who should receive the comment. In the first, the
comment will be send to all related users.
Figure 38 Comments can be added both when forwarding (green arrow) or returning (red arrow) the content in the workflow
Related information
• Section 10.1.17 Workflow
10.2 Metrics
46
10.3 History and comments
47
Bibliometric values (Citations) can be imported from Web of Science when Research output is imported, using
Pure's import functionality.
These values will then be available from the "Metrics" tab on the Research output template.
Impact factors and citations can also be imported into Pure by Administrators of the system, and thereby be
available without import of Research output.
Citations and impact factors
Figure 39 An example of citations and impact factors on a journal article
10.3 History and comments
All templates have an designated area with 3 purposes: 1) A comment area where comments can be added to
all or specific contributors / editors of the content. 2) A log of all editing activities of the content. 3) An area for
Long term preservation information.
Comments
A comment can be added and directed towards one or more related persons, both academics and editors, of
the content. All related persons are present in the Comments area and it can be marked who should receive
the comment as a message.
47
10.3 History and comments
48
This can be very useful for example when returning / forwarding content, using the workflow.
All comments are send out as Messages to the affected users.
Figure 40 An example of history and comments on an Article.
History
A simple log of who has done what with the content with a time- and date stamp as well as user name.
Long-term preservation
If the content is synchronised into an LTP-system (Repository), this information will be present here.
48
11 Activities
11
49
Activities
Activities in Pure cover a range of awards, esteem, participations, engagements, editorial work and media
appearances a.o. that a researcher can organise, participate in or in other ways be involved in.
Activities are divided into a number of templates, each with a number of template types. An example is an
Award, which could be a Prize or a national/international honour. A Conference participation can be
Relations to Events and Organisations
Figure 41 Select your person or your organisation as responsible for the activity.
Most Activities can be related to one or more Events, for example a specific conference. Or a Prize can be
awarded at a specific Event - or by an Organisation.
All information about the Activity is gathered in a range of metadata fields in templates, each designed to
carry exact information on the specific piece of content. Please refer to Section 10.1 Metadata for further
information.
49
12 Projects
12
50
Projects
Projects in Pure comprises three types of content: projects, applications and awards, each with their own
template carrying detailed information.
Pure does not necessarily contain all three types. Which to be included in your Pure is decided at the
institutional level.
The project itself can therefore stand alone in Pure without relations to applications or awards. Otherwise it
may be related to either an award - or both an application and an award.
Project information
Description
Comment
Classifications
The type of Project, its business nature
and any keywords
Identification
Allows for description of application
as well as option for linking to source
system ID
Source system ID; the ID number
from the source system if integrated
with such as system; e.g. SAP, pFACT,
Agresso, FP7 etc.
Participants
Primary investigator (sponsor), CoTheir role, academic ownership and
investigators, other internal academic period involved can be defined.
participants, participating research
students, external collaborators (private
sector, universities, etc.)
Project managed by
Organisational unit in charge of the
Project
Collaborative partners
As 'lead'-partner is the project-owning
institution.
Additional collaborative partners can be
added of which one can be marked as
'lead'-institution
Life cycle
Start and end dates of project
Files and links
Any files relevant to the project
Different versions can be stored
individually
Related applications and awards
Any applications and awards that might be related to the project
Relations
The project's relations to other content Manually added relations.
in Pure; its outputs (e.g. a journal
article, conference contributions, or
similar), equipment, student theses,
press clippings, impacts, prizes, awards,
or other esteem, etc.
Budget & expenditure (Financial
overview)
The budget in the same spending
categories as in the finance system
and as money is spend, the related
transactions recaptured from the
finance system and brought into Pure
via the systems integration setup
between Pure and the finance system
Spending is usually aggregated into
spending categories, but the level of
granularity can be determined by the
institution.
Keywords
Option for adding keywords to the
Project
50
12 Projects
51
Project information
Description
Comment
Visibility
Access settings
Controls external access outside of Pure
Table 27 Information on Projects in Pure
The project template contains information about the project itself: a.o. a brief description, related participants
and any related collaborators. An application template, for funding of the project will a.o. hold information on
the related applicants, any collaborators, amount applied for. And an award template holds information on a.o.
on the actual granted funding.
The project (and award, application) are most often used as a "view model", simply meant to get an overview of
data, e.g. participants or budget and expenditure, if available. And if so, the data is synchronised.
Note
Synchronised data in templates has this icon next to it. This also means that if the data needs to be changed,
it must be done in the external system from where the data is synchronised.
However the templates may be enriched by manually adding relations to other content in Pure. For example, a
project may result in a number of research outputs or activities related to the project.
Figure 42 Adding relations from the current project to research outputs in Pure. Note, the look-up box contains, as default, content that is
related to the participants on the project (if any available). The relations can also be made from the research output to the project.
The project is considered the main information type as it aggregates all information from the application and
awards, directly related to this.
The aggregated view is the default layout when a project is opened. This is called the reading layout,
symbolised by this icon: . The reading layout tries to show all relevant information in one page/place. Each
value in this layout can be clicked upon which will lead to the field containing the value. This is called the
editing layout (This icon: ). Depending on whether or not the value is synchronised into the template, it may
be edited.
Note, that underlined information in the reading layout provides access to open the content directly in a new
window.
51
12 Projects
52
Applications can be created manually from the Editor → Projects.
Overviews
There are two types of overviews:
Listing
List can be sorted or filtered according to a number of different criteria. The list can be exported in various
formats as well, based on the currently selected filters and sorting. The list can be searched and selected
elements from the list can be marked as Favourites.
Columns
A highly dynamic and detailed overview. Columns can be sorted by pressing the heading of each column.
Their order can be rearranged by clicking and holding the mouse while dragging the column to its new
placement. Columns can be removed or added using the -icon, next to the view buttons.
The columns can be searched and selected elements from the list can be marked as Favourites.
52
13 Datasets
13
53
Datasets
Large collections of data, e.g. databases, survey data, observations, measurements and other results from
experiments etc. can be organised, uploaded and preserved using Pure and presented e.g for further reuse
and collaboration on a PurePortal.
Note
The Datasets content type is only available if enabled by Administrators of Pure.
Dataset main content
Description
Comment
Identification
Title, description and optional ids
People
People or organisational units
responsible for the dataset
Dataset managed by
Organisational unit in charge of the
dataset.
Date made available
Date of release of the data.
Publisher
Any publisher in charge of publishing
the dataset.
Access to the dataset
Determine any limitations or
restrictions to the dataset.
Note, this is on an informative level
only and does not affect any uploaded
file.
Dataset location
Add DOI or url-link that points to the
dataset or more information. Or upload
a file with the data.
Access contact details
Persons to contact regarding the
dataset
Relations to other content
Descriptive terms.
Projects, equipments, outputs, activities
or other datasets, where the dataset
may have been used, e.g. as foundation
for a research article.
Visibility
Availability of the dataset.
Table 28 Main information on datasets in Pure.
Datasets can be stored for public availability at a connected PurePortal, or it can be stored so that it can be
accessed only from within Pure.
14 Full text documents and copyright/open access-issues in Pure
Information about how to handle and monitor full texts in relation to SHERPA RoMEO publishing policies.
Depending on a journal's publishing policy, you can upload a full text version of the specific piece of content
that is being added to Pure. For example, if an article for a journal is being added, the article's full text can
be uploaded to the template and be available e.g. for download on a portal. This may help communicate and
exhibit your research.
Uploading full texts in accordance with a publishing policy
53
14 Full text documents and copyright/open access-issues in Pure
54
Pure has functionality for handling the entire process. This includes 4 small steps.
1.
Add a journal/publisher to a template.
2.
The added journal/publisher is then instantly located (if it exists) in the SHERPA RoMEO-database that
holds publishing policies for a wide range of journals/publishers.
3.
The publishing policy is extracted and presented directly in the template, using a combination of
colours and text, above the Documents-section.
Figure 43 Presentation of the extracted publishing policy from SHERPA RoMEO. The information is initially displayed in a
compact form, but can be expanded to provide the full details.
The colours are divided in 4 different definitions (See http://www.sherpa.ac.uk/romeoinfo.html#colours
for more information):
RoMEO colour
Archiving policy
Green
can archive pre-print and post-print or publisher's
version/PDF
Blue
can archive post-print (ie final draft post-refereeing) or
publisher's version/PDF
Yellow
can archive pre-print (ie pre-refereeing)
White
archiving not formally supported
Table 29 Definition of SHERPA RoMEO colours
Note, Pure displays the official policy rights found at the SHERPA RoMEO website. To get more exact
conditions and policies on when a full text may - and in which version - be uploaded, you should
consult advice from your own organisation.
4.
By being given this information, the submitter can then attach a full text in accordance with the
presented publishing policy. This includes:
1.
Document version; author-version, pre-print-version etc.
2.
Embargo date; This relates to the visibility of the file (e.g. on an organisational web portal). Set
the desired visibility for the file, for when the embargo date expires. For example, by setting
an embargo date of 1/1/2013, and a visibility to "Publicly accessible" the file will be visible on
1/1/2013. Until the embargo date is reached, the file is inaccessible (e.g. from the web portal).
54
15 My CVs
55
Figure 44 When adding a full text (Or other type of file), it is possible to specify details in accordance with the
publishing policy.
3.
A manual control of embargo date can also be handled, by setting the visibility of the attached
file to a level other than "Publicly accessible". At a future date, this visibility can then manually
be changed to "Public accessible".
Related information
• Section 10.1.6 Journal
• Section 10.1.11 Documents
• Section 7.3.2 Task: Open access Research output without full text
15 My CVs
15.1
Curricula Vitae (CV)
A Curricula Vitae can hold content from Pure as Research output, Activities, a person's profile information and
custom text sections.
CVs can either be private or public or specialised as a highlighted content CV.
Type
Purpose
Limitations
Public
The public CV is used for presentation
on the public portal. Once the CV is
published it is available on the public
portal.
It is only possible to have one of these
CVs.
Private
The private CV can be used to export
your selected data from Pure to PDF
and Word.
Multiple CVs can be created.
Tip
Create CVs for different purposes: One
for different funding bodies, one for
students, one for an external profile
page, etc.
Highlighted content CV
Highlighted content will be available
It is only possible to have one of these
as part of your personal profile in the
CVs.
public web portal, if this is part of your
55
15.1 Curricula Vitae (CV)
Type
Purpose
56
Limitations
Pure. Once it is published it is available
on the portal.
Table 30 CV Types in Pure
Note
Private / Non-published CV's are confidential and only visible to the CV owner as well as related curriculum
vitae roles Administrator of Curriculum Vitae and Editor of Curriculum Vitae.
A CV is build from a number of sections, each containing a specific type of information.
When a new CV is created a number of sections can be selected thus creating a basic CV. This may in some
cases be enough for a complete CV.
Additionally you can add a new section, specify what content it should hold - e.g. publications - and choose
certain settings for that section. In addition to such content-sections, you can also add free text sections and
headlines in order to form a complete CV including narratives.
Sections
When hovering the mouse on the CV the below icon will show between existing sections:
This icon shows that additional sections can be inserted. Select from the types below.
Type
Description
Personal information
Select from these options
• Your personal profile from Pure
Either your standard information (Name, picture,
organisational affiliation etc. or a custom build one,
where you can edit text from the profile.
• Profile information
One or more headings and content from the Profile
information in your person template. Any changes
that needs to made to this text must be made in the
person template. Alternatively, a custom text block can
be inserted instead.
Lists of your content from Pure
Add any type of content to the CV. Options will only show
for the types where you actually have some content. If you
do not have any activities, then the option is not present.
Create an Activity first and afterwards, this can be added to
the CV.
Administrators of Pure can configure which types of content
that should be allowed to add.
Text
Select any of these custom text options.
• Heading
Additional custom heading in the CV
• Text section
Additional text block for free text
56
15.1 Curricula Vitae (CV)
Type
57
Description
• Periodic list
Option for adding a range of periodes, e.g. a listing of
years. For each year a text can be entered. Useful for a
list of previous employments, for example.
Table 31 Types of sections that can be added to the CV.
Sections can be moved up and down in the list or removed completely using the icons illustrated below:
Icon
Description
Arrows will move the sections above the overlying sections
or below the underlying sections. Or use mouse to drag and
drop an sections to an arbitrary place in the CV.
Remove sections from CV
Table 32 Move sections in CV.
They will become available next to each sections, when hovering the mouse above.
Editing section settings
All sections in the CV can be edited further using the
settings:
button, next to each. Types of content have these
Header
The heading of the list of content.
Filters
Limit to number, type, peer review (on Research output),
and years.
Display
Show the CV in the selected format (E.g. APA, Short, Long,
Harvard etc.) and select order of content (E.g. alphabetic on
title or by type, year etc.).
Content can also be listed as a numbered list and with or
without the type of content printed. (The listing may be
limited to a specific type of content and this information
may then be redundant, for example).
Dynamic / Static list
Two different types
• Dynamic (Default)
In a dynamic CV content listing is updated each time
new Research output has been added to your content,
and if it matches any filters set.
This way your CV will always be up to date.
• Static
In a static CV each item in a list, e.g. for Research
output is editable and can be re-arranged in order.
This order is maintained even if additional s regardless
of new additions. You will then be notified about this
57
16 Visualising relations
58
and can select to add these to the CV as static items in
the list. You can also search and add existing content.
This way you will have complete control of content in
the CV.
Table 33 Settings for content sections.
Editing other sections will simply allow for change of existing text.
After completing the editing of these sections, simply press the
button again.
Export / publish CV
When the private CV is done it can be exported in either PDF or Word format. A public CV can be marked as
Published, which will make it available on the institutional portal.
Copy / delete CV
A private CV can be duplicated in order to avoid starting over if a nearly identical CV is needed. All types of CVs
can be deleted. Both actions are found in the bottom right corner of the CV window.
Tip
A screencast, that will teach you about CVs, are available when logged into Pure.
16 Visualising relations
16.1 Graph of relations
All relations between a specific piece of content to other content in Pure can be shown graphically.
This functionality is available from either the gear icon ( ) in content listings, which will centre the selected
piece of content - or from the personal overview screen, which will centre the author itself, as default.
Figure 45 Graph of relations in Pure. The author is in focus, and relations to a number of types of content in Pure are shown.
58
17 Tutorials
59
Each piece of content can be dragged around the screen and the layout can be re-arranged. Alternate preset
layouts are available as well.
Content shown can also be double-clicked upon, which will focus on this content and reveal relations going
from this. Thereby it will be possible to do a kind of subject search in Pure - simply by showing a journal
article on a specific subject. By following relations to the authors of the article, their content can be displayed
too. If it assumed that the co-authors of an article, at least to some degree, are writing about equal or closely
related subjects, the relations can then be used to explore more. All displayed content can be opened in their
template, which will show more details on the content.
The amount of content in the graph screen can increased or decreased by selecting or de-selecting the types of
content. If the piece of content in focus is heavily related, the amount of relations will as default be limited, but
they can gradually be added.
Note, that many relations are created automatically in Pure, but quite a range of relations can be added
manually as well. The more relations created, the more rich a graph will be displayed.
Related information
• Section 10.1.15 Relations
17 Tutorials
18 Adding content to Pure
Content can be added in three ways to Pure:
Method
Description
Manually, using the submission guide
Content can be added manually into a template, through
a number of input fields. See Section 18.2 Create from
template using the Submission guide.
Import from online source
Your Research outputs might be available from an online
source, that Pure has access to. If this is the case, an import
of this could save a lot of time. See Section 18.4 Import
from online source.
Import from file
If Research outputs are available from an online source or
other database that Pure do not have access to, content
from these sources can often be downloaded in either RIS
or BibTeX formats and can then afterwards be imported
into Pure, either by uploading the text or pasting it directly
into a text field. See Section 18.3 Import from file: RIS- and
BibTeX-formats.
Remember
Remember to check if the content already exist! See Section 18.1 Before you add content.
Related information
• Section 10
Research output
18.1 Before you add content
It may be a good idea to check if the content already exist in order to avoid duplicates - and wasting own time.
1: Check your messages.
59
18.1 Before you add content
60
This might be the case if one of your co-author(s) has submitted the content prior to you. A message and
potentially an email-notification (from Pure) will be sent to all added co-authors of the publication, when
being added to content by another person.1
Figure 46 A message telling you that you have been added to a piece of content. You can open the content from the message and view it.
An example: John Smith adds a journal article to Pure and adds his co-authors James Murphy and Jim Jones
as authors to the template. Both will, upon saving the content, receive a message in Pure (and an e-mail
notification as well, if this option is enabled) providing them with information about:
1.
that they have been added to a piece of content in Pure. This way they don't have to add the content
themselves, as the content automatically will be visible on their personal list of outputs.
2.
a link to the content. This will allow them to open the template and take a look at the submitted
content. This way, they can inspect the content for any errors or missing information. They can now
collaborate about getting the best possible data quality.
• It is possible for you to exchange comments as well, by using the History and comments-tab. A
comment can be send to one or more authors, simply by clicking on the names in the list.
Figure 47 A comment can be send to one or more related persons.
2: Search for the content in question.
By removing or editing the filter "My content", you will get access to all content in Pure and can now search
after the content you intend to submit.
1 This person may also be a user in Pure with rights to add content on your or your co-authors behalf.
60
18.1 Before you add content
61
Figure 48 Filter to remove, either the setting or the filter itself (Marked by red squares).
If it is found this way, it can be claimed which will make sure it will rightfully be related to your profile. See
Section 7.5 Claim / disclaim a Research output for more information on how to claim content.
3: Monitor title duplicate check in template
Another option is that when a title is entered in a template, Pure checks for title duplicates dynamically while
you type. But even though a duplicate title is found, this does not necessarily mean that it is the same content.
You can therefore inspect it by pressing the title to open it. If it is the same content just close the template you
are working on.
Figure 49 If Pure detects a title similar to the one you are working with, it will tell you and you can inspect this to check if you are about to
add existing content.
61
18.2 Create from template using the Submission guide
62
18.2 Create from template using the Submission guide
This tutorial guides you through the process of selecting the right template.
Before you begin
It is required that you are logged in as Personal User in order to complete this tutorial. (Though, some Editorroles and Administrators can also create content, on behalf of other users)
About this task
To create content press the [Add new item]-button. This opens the Submission guide in a new window.
Figure 50 Different ways of finding the right template and type
Procedure
1.
Submission guide. This lets you choose from the latest used templates/types. The first time you see
this, you will not yet have used any templates, so the list is based on the most common used types for
the organisation. When you start using templates, these will automatically be available as the most
recently used and available for selecting at once. If more templates are selected, than can be showed on
the screen, it is possible to browse through the list, using the circle icons.
2.
If you can't find the template you are looking for, you can either start browsing through a hierarchical
category system - or simply try and search for it, using the search field.
Tip
All templates and types contains a description. This description can be helpful, when doubting which
template is correct to choose and use. Hold the mouse pointer above each template or type for about a
second to reveal a description of these.
62
18.3 Import from file: RIS- and BibTeX-formats
63
18.3 Import from file: RIS- and BibTeX-formats
Reference managing software such as Reference Manager and RefWorks a.o. as well as online sources which
Pure still can not access, can often export records in either RIS or BibTex-formats (BibTeX is native format of
references in LaTeX). This export can either be saved to a file or simply copied. Afterwards, it can be added to
Pure either by uploading the file with the exported content or by pasting the information directly into a textfield.
Before you begin
To import publications from file, you must be Personal user (Also Administrator, Administrator of- and Editor
of research outputs and Submitter of Research output can do this on behalf of others.
About this task
To import content from a file, press the big [Add new item]-button. This opens a template chooser in a new
window. Select Research output and afterwards "Import from file". Select the desired source.
Procedure
1.
To upload a file, select the "Browse"-button and select the wanted file.
2.
To paste text, copy the text from the source and paste it into the "Paste text"-field.
3.
Click "Import" next.
4.
Browse through the results (if more records have been imported) to locate the wanted publications.
5.
To import the publication, click on the Import-button.
6.
Authors - A list of the authors of the publication and a list of possible matches of internal authors from
Pure are now setup against each other. This makes it possible to match the right Pure-authors to the
current publication.
1.
2.
7.
It can be necessary to use the dropdown-box to select the right author, in case that authors are
matched nearly identical.
The same with either Journal or Publisher.
To edit/save the publication, click the Import-button
The information should now be imported into the right template. Alternatively, you must use the
template chooser to select the right template.
8.
To proceed and finish the import, select the next workflow step, and press Save
63
18.4 Import from online source
64
18.4 Import from online source
Research output can be imported directly from an online source into a template.
Before you begin
To import publications from online source, you must be Personal user (Also Administrator, Administrator ofand Editor of research outputs and Submitter of Research output can do this on behalf of others.
About this task
To import Research output from online source, press the [big green button]. (Editors can also select "New",
from the editorial "big menu" overview).This opens a template chooser, in a new window.
Tip
Also available as screencast:
How to import content from online sources
Procedure
1.
Select source - Select Research output and afterwards "Import from online source". Select the desired
source.
Figure 51 Select the online source to import from. Note that more sources might be available here.
2.
Search - Select appropriate search terms. Below the search field, for every source, a few hints on how to
search is displayed. For more elaborated examples, please refer to the pages following this tutorial.
64
18.4 Import from online source
65
Figure 52 An example of a search field, here for PubMed. Enter search terms in this field and press "Search".
Tip
Instead of searching in online sources manually, you can set up an automated search for Research
output based on your name.
3.
Browse search results and import - Research outputs that already has been imported from PubMed
are highlighted and can not be imported. Search results of no relevance can be removed from the
list by pressing the [X]. The searched for Research output can be imported in to Pure by clicking the
[Import].
65
18.4 Import from online source
66
Figure 53 Search result for a search on an author name.
4.
Author and journal match - To ensure that the content will be imported and related to the correct
internal authors in Pure, a matching of the author names from the Research output will be done
against the author database in Pure - the internal authors. If a match is found, a green "Match" is
displayed. All (if more than one) possible matches is listed in a dropdown-box. If the proposed first
listed author name isn't correct, expand the dropdown-box and select the correct from the list. From
here you can also select the current author as "External author" in case a false match is made. If no
matches are found, a red "No match" is shown. If the current Pure system has the External authorsmodule, the not matched authors will be created in this base.
66
18.4 Import from online source
67
Figure 54 Author names from the publication are matched against author names in Pure to make sure the content is related to
the correct authors.
Tip
By import of content with more than 25 authors, they are shown as summarised in the presentation
of the publication being imported. It can be toggled to show all of them or only those matched. See
illustration below:
67
18.4 Import from online source
68
Figure 55 More than 25 authors on content. Toggle this to show/hide all/only matched authors.
Note
If an author match could not be found - and the author is supposed to be found in the author
database, it is possible to replace the not-matched author inside the content template by clicking "Edit"
next to the author.
1.
The author matching procedure is also performed with the journal name. If the Journal does
not exist in Pure, it will be imported into the journal master data. The Administrator of journals
can then have to approve the new journal, though it can immediately also be attached to
content by other users.
5.
Import content - When the author and journal matches are done, press [Import]. The imported data is
then placed in a template.
6.
Right template? - Make sure that the content is placed in the correct template. Use the [Change
template] found in the top right corner of the template, to select another type, if needed.
7.
Peer reviewed? - When importing Research output from online sources the default setting for "peer
review" follows this pattern:
• When importing from Scopus, WoS and WoS lite: the default setting is set to peer reviewed (for all
publication types where the peer review is present)
• When importing from all other sources: the "peer review" setting is left empty
8.
Edit the publication - The content should be looked through to check for accuracy and can be adjusted
in case it should be necessary.
9.
Save and proceed - Select the appropriate workflow-step and save the Research output. A new Research
output can then be imported.
Related information
• Section 7.3.3 Task: Candidates in [Online source]
68
18.4.1 Search in arXiv.org
69
18.4.1 Search in arXiv.org
Guide to search in arXiv.org
arXiv is an open access database with full-text access and contains more than 820.000 e-prints. It covers the
domains of physics, mathematics, computer science, quantitative biology, quantitative economy and statistics.
Figure 56 Search interface for arXiv.org
How to search
There are two approaches to searching in arXiv.org:
1.
Search by Article-id
2.
Search by author name, words from title/abstracy
Both approaches are described in table below:
Examples
Description
Search by Article-id
All arXiv submissions are assigned a unique identifier of
the form yymm.nnnn (or arch-ive/yymmnnn for older
submissions).
yymm.nnnn;
yy=year,
mm=month,
nnnn=unique ID
e.g. 0706.0001, means 2007, July, article 1
Search by author name, words from title/abstract
Enter a number of keywords. This will find articles, if it
is found in the title, abstract or author name. Multiple
keywords can be added.
In general try to use as specific keywords as possible to
search with. Using to wide or general keywords may give a
search result with (too) many hits.
Table 34 Description of search options for arXiv.org
18.4.2 Search in CrossRef
Guide to search in CrossRef
A system developed by publishers in 2000, to ease linking between references in full text documents in online
scholarly literature, on the publishers' websites. CrossRef uses DOI to transmit link information.
69
18.4.3 Search in Embase
70
Figure 57 Search interface for CrossRef
How to search
Search for content by using a DOI (Digital Object Identifier).
Examples
Description
10.1000/182
Searches in DOI
10.1186/1741-7015-7-28
Table 35 Description of search options for CrossRef
18.4.3 Search in Embase
Guide to search in Embase.
Embase is a biomedical database with over 25 million indexed records and covers relevant and up-to-date
biomedical research, from drugs and diseases from pre-clinical studies to critical toxicological information, in
more than 7600 peer-reviewed journals, 2500 conferences and 300.000 conference abstracts.
Figure 58 Search interface for Embase
How to search
Search for articles by using one or more keywords.
70
18.4.4 Search in JournalTOC
71
Examples
Description
Title in Embase
In general try to use as specific terms from the title to
search with. Using to wide or general search terms may give
a search result with many hits.
Author names
Author names should be in the format E. Johnson or
Eric Johnson. Multiple authors should be separated by
commas.
Organisational unit affiliations
Add one or more organisational affiliation names. One
name for each field.
Setting Publication year
If the search results provides too many hits, it can be
necessary to limit the search to a publication year - or
publication year range.
If the publication year is known, then it can be added, e.g.
(from) 2010 -> (to) 2010.
If no to-year is entered, the search will search from from-year
and onwards. Equally, if no from-year is entered, the search
will search up to to-year.
Table 36 Description of search options for Embase.
18.4.4 Search in JournalTOC
Guide to search in JournalTOC
JournalTOCs is a free collection of scholarly journals Tables of Contents (TOCs) from a more than 21.000
journals and 1600 publishers. Covers a wide range of subjects. References can be fetched from these TOCs.
Figure 59 Search interface for JournalTOC
How to search
Search for articles by using one or more keywords.
Examples
Description
Search by keyword
This will find the keyword if it is found in the title, abstract
or journal name. Multiple keywords can be added.
In general try to use as specific keywords as possible to
search with. Using to wide or general keywords may give a
search result with (too) many hits.
Table 37 Description of search options for JournalTOC.
71
18.4.5 Search in Mendeley
72
18.4.5 Search in Mendeley
Guide to search in Mendeley.
Mendeley is a free reference manager and academic social network that helps scientist organise their research,
collaborate with others online, and discover the latest research. It holds more than 20 million records.
Figure 60 Search interface for Mendeley
How to search
Search for articles by using one or more keywords.
Examples
Description
Search by publication title
In general try to use as specific terms from the title to
search with. Using to wide or general search terms may give
a search result with many hits.
Search by publication id (UUID)
A Mendeley publication id has a unique identifier (UT) .
This number points to a specific record in Mendeley and
is therefor an excellent way of searching for content. An
example: 67810
Using Author's name
Add author name. Multiple names are possible, separate
them by , (comma)
Year interval of publication time
If the search results provides too many hits, it can be
necessary to limit the search to a publication year - or
publication year range.
If the publication year is known, then it can be added, e.g.
(from) 2010 -> (to) 2010.
If no to-year is entered, the search will search from from-year
and onwards. Equally, if no from-year is entered, the search
will search up to to-year.
Table 38 Description of search options for Mendeley.
72
18.4.6 Search in PubMed
73
18.4.6 Search in PubMed
Guide to search in PubMed.
PubMed contains more than 19 million records from MEDLINE and from medical scientific journals, dating
back from 1948. PubMed contains links to full-texts, either from other databases or the journals' publishers.
Note
Content must be "E-pub ahead of print", before imported into Pure.
Figure 61 Search interface for PubMed
How to search
Search with words from title, author or organisation - or use PubMedID (PMID). Several PMIDs can be used,
separate by blank space or comma, e.g. PMID1 PMID2 or PMID1, PMID2.
A search string can also be used exactly as it would be used directly in PubMed. You can search on individual
fields, which can be combined. For example: poulsen c[Author] AND rna[Title], which searches for a
specific author name combined with a title containing 'rna'.
Note
Please consult the PubMed official documentation for more information on building search strings: General
search introduction
Examples
Description
Search by publication title
In general try to use as specific terms from the title to
search with. Using to wide or general search terms may give
a search result with many hits. Use the [Title] after search
terms to restrict to Title-field.
Search by author name(s)
Add a number of author names. PubMed accepts both first
name and last name. Use [Author] after name to restrict to
Name-field.
PMID (PubMed reference number)
A unique identifier for content in PubMed. This is the most
secure way to ensure a 1-hit search result.
Table 39 Description of search options for PubMed.
18.4.7 Search in SAO/NASA Astrophysics Data System
Guide to search in SAO/NASA Astrophysics Data System
The SAO/NASA Astrophysics Data System (ADS) is a Digital Library portal for researchers in Astronomy
and Physics, operated by the Smithsonian Astrophysical Observatory (SAO) under a NASA grant. The
73
18.4.7 Search in SAO/NASA Astrophysics Data System
74
ADS maintains three bibliographic databases containing more than 9.1 million records: Astronomy and
Astrophysics, Physics, and arXiv e-prints
Figure 62 Search interface for SAO/NASA ADS
How to search
Search using a BibCode. An identifier used by astronomical systems for literature reference. It has a fixed
length of 19 characters which has the form (See table below for details):
YYYYJJJJJVVVVMPPPPA
Bibcode
Description
YYYY
Year of publication
JJJJJ
A standard abbreviation for the journal (e.g. ApJ, AJ,
MNRAS, Sci, PASP)
VVVV
The volume number (for a serial) or an abbreviation that
specifies what type of publication it is, e.g.:
• conf for conference proceedings
• meet for Meeting proceedings
• book for a book
• coll for colloquium proceedings
• proc for any other type of proceedings
M
Qualifier for publication:
• E: Electronic Abstract (usually a counter, not a page
number)
• L: Letter
• P: Ping page
• Q-Z: Unduplicating character for identical codes
PPPP
Page number. Note that for page numbers greater than
9999, the page number is continued in the m column.
A
The first letter of the last name of the first author.
Table 40 Description of search options for SAO/NASA Astrophysics Data System.
Examples
1989ApJ...342L..71R corresponds to Astrophysical Journal Letters volume 342, page. L71
1992ApJ...400L...1W corresponds to Astrophysical Journal Letters volume 400, page L1.
74
18.4.8 Search in Scopus
75
Note
Periods (.) are used to fill unused fields and to pad fields out to their fixed length if too short; padding is done
on the right for the publication code and on the left for the volume number and page number
18.4.8 Search in Scopus
Guide to search in Scopus
Scopus, an abstract and citation database, covers 21000 titles from more than 5,000 international publishers.
It contains over 50 million records from peer-reviewed research literature in the scientific, technical, medical,
social sciences, and arts and humanities fields.
Figure 63 Search interface for Scopus
How to search
There are dedicated fields for title, author and organisation. They can be combined for more precise results.
Examples
Description
Search by publication title
In general try to use as specific terms from the title to
search with. Using to wide or general search terms may give
a search result with many hits.
Search by publication id
A Scopus publication id is a unique identifier. This number
points to a specific record in Scopus and is therefor
an excellent way of searching for content. An example:
0-67649846501
Using Author's last name and initials
Some content in Scopus do not have a full author name
attached to the record, but only the last name and initial(s)
of the first name(s).
Therefore an option here is to add an author name this way,
e.g. Smith J.Multiple author names can be given, as a
new author field becomes available for name added.
Setting Publication year
If the search results provides too many hits, it can be
necessary to limit the search to a publication year - or
publication year range.
If the publication year is known, then it can be added, e.g.
(from) 2010 -> (to) 2010.
75
18.4.9 Search in Web of Science
Examples
76
Description
If no to-year is entered, the search will search from from-year
and onwards. Equally, if no from-year is entered, the search
will search up to to-year.
Setting Organisation name in Scopus
Note
Requires expert knowledge
If the organisation name is known it can be an option to
search using this. However, it is required that the searcher
is aware of how the organisation name is indexed in Scopus.
The same organisation name may exist in various forms.
Table 41 Description of search options for Scopus.
18.4.9 Search in Web of Science
Guide to search in Web of Science
Web of Science cover a wide range of databases, which together holds more than 40 million records.
The subject areas are primarily within the scope of natural sciences, though social sciences and arts and
humanities also are covered, in a lesser scale.
Important
The version of Web of Science import requires Premium license. The number of fields fetched from WoS is
greater, compared to the lite version.
Figure 64 Search interface for Web of Science
How to search
Enter publication title, id, last name and initials of first name, limit to year range, enter organisation name
as it is indexed in WoS. These options can be combined in order to narrow down the search result. The table
below provides more details on the different search options.
Examples
Description
Search by publication title
In general try to use as specific terms from the title to
search with. Using to wide or general search terms may give
a search result with many hits.
76
18.4.10 Search in Web of Science (lite)
77
Examples
Description
Search by publication id
A Web of science publication id is a unique identifier (UT in
Web of science records) and is usually a 16-digit id-number.
This number points to a specific record in Web of Science
and is therefor an excellent way of searching for content. An
example: 000267810100001. Multiple ids can be searched
by separating them with a space or semicolon ;
Using Author's last name and initials
Much content in Web of Science do not have a full author
name attached to the record, but only the last name and
initial(s) of the first name(s).
Therefore the only option here is to add an author name
this way, e.g. Smith J.Multiple author names can be
given, as a new author field becomes available for name
added.
Setting Publication year
If the search results provides too many hits, it can be
necessary to limit the search to a publication year - or
publication year range.
If the publication year is known, then it can be added, e.g.
(from) 2010 -> (to) 2010.
If no to-year is entered, the search will search from from-year
and onwards. Equally, if no from-year is entered, the search
will search up to to-year.
Setting Organisation name in Web of Science
Note
Requires expert knowledge
If the organisation name is known it can be an option to
search using this. However, it is required that the searcher
is aware of how the organisation name is indexed in Web of
Science. The same organisation name may exist in various
forms, due to inconsistent indexing during the years.
For example can a Department of Physics be indexed as
DEPT PHYS or DPT PHYS and other forms. A University
name can equally be indexed in various forms, e.g. Aalborg
University can be indexed as UNIV AALBORG or AALBORG
UNIV or ALBORG UNIV or AALBORG UNIV AAU and more.
Table 42 Description of search options for Web of Science.
18.4.10 Search in Web of Science (lite)
Guide to search in Web of Science (lite)
Web of Science cover a wide range of databases, which together holds more than 40 million records.
The subject areas are primarily within the scope of natural sciences, though social sciences and arts and
humanities also are covered, in a lesser scale.
Important
The is the lite version of Web of Science import, and it contains only a limited number of fields and imported
publications may not include these fields and may end up in the wrong PURE category!
77
18.4.10 Search in Web of Science (lite)
78
Figure 65 Search interface for Web of Science (lite)
How to search
Enter publication title, id, last name and initials of first name, limit to year range, enter organisation name
as it is indexed in WoS. These options can be combined in order to narrow down the search result. The table
below provides more details on the different search options.
Examples
Description
Search by publication title
In general try to use as specific terms from the title to
search with. Using to wide or general search terms may give
a search result with many hits.
Search by publication id
A Web of science publication id is a unique identifier (UT in
Web of science records) and is usually a 16-digit id-number.
This number points to a specific record in Web of Science
and is therefor an excellent way of searching for content. An
example: 000267810100001. Multiple ids can be searched
by separating them with a space or semicolon ;
Using Author's last name and initials
Much content in Web of Science do not have a full author
name attached to the record, but only the last name and
initial(s) of the first name(s).
Therefore the only option here is to add an author name
this way, e.g. Smith J.Multiple author names can be
given, as a new author field becomes available for name
added.
Setting Publication year
If the search results provides too many hits, it can be
necessary to limit the search to a publication year - or
publication year range.
If the publication year is known, then it can be added, e.g.
(from) 2010 -> (to) 2010.
If no to-year is entered, the search will search from from-year
and onwards. Equally, if no from-year is entered, the search
will search up to to-year.
Setting Organisation name in Web of Science
Note
Requires expert knowledge
78
18.4.11 Search in WorldCat
Examples
79
Description
If the organisation name is known it can be an option to
search using this. However, it is required that the searcher
is aware of how the organisation name is indexed in Web of
Science. The same organisation name may exist in various
forms, due to inconsistent indexing during the years.
For example can a Department of Physics be indexed as
DEPT PHYS or DPT PHYS and other forms. A University
name can equally be indexed in various forms, e.g. Aalborg
University can be indexed as UNIV AALBORG or AALBORG
UNIV or ALBORG UNIV or AALBORG UNIV AAU and more.
Table 43 Description of search options for Web of Science.
18.4.11 Search in WorldCat
Guide to search in WorldCat
Search within many libraries at once, in 1.5 billion records for a.o. books, music CDs, videos, article citations
with links to full text. Also includes authoritative research materials and digital versions of rare items that
aren't available to the public.
Figure 66 Search interface for WorldCat
How to search
Search for articles by using keywords from the title or author name. Or a combination of these.
Examples
Description
Search by title
In general try to use as specific keywords as possible to
search with. Using to wide or general keywords may give a
search result with (too) many hits.
Search by author name
Add first name and last name of the author. Multiple
authors can be added.
Table 44 Description of search options for WorldCat.
19 Edit user profile
You can edit the user profile, which contains language settings and setup of notifications for e-mail, messages
and tasks - and selection of trusted users and link to associated person profile.
79
19 Edit user profile
80
Before you begin
Roles that can complete this task
• Personal users
Where to go to complete this task
• Click on [
user name ] in top of screen
• Any user with at least one role
About this task
On your first login, you might have selected preferred language and e-mail settings. These settings can be
changed from the user profile. Furthermore can you specify which messages you want to receive, at which
frequency and which tasks you want to have displayed - and one or more users that you trust to take over
your account if you, for example are away for a period of time. Finally, the user profile holds a shortcut to the
associated person profile.
Procedure
1.
To edit the user profile, click the [
User name ]-button, found next to the [ Log out ]-button
This will open the user profile settings, in a dropdown-window.
Figure 67 Window with user profile settings
2.
Profile - All users can adjust language settings for the user interface and set the default submission
language.
Language settings
80
19 Edit user profile
81
Language settings
Language
The language for the user interface can be changed,
if your Pure supports multiple languages. The user
interface covers all text available in menus, headers,
templates etc.
Default submission language
Content can be submitted in a specific language,
if multiple languages are supported. The preferred
language can be selected here.
Note, that the submission language setting not has any
influence on the interface language.
Table 45 Language settings for all users.
More information on language in Section 7.2 Language settings.
Roles
A list of all roles you are assigned.
Associated person
Direct access to the person profile, where editing of your person profile (Personal details) can be done
(If you are a personal user).
3.
E-mail settings - Select which - and how often - you want to receive e-mails from Pure. Depending on
which (if any) roles you are assigned, the number of types and different settings can vary.
Figure 68 E-mail settings. Select which e-mails you want to receive.
If you select "Mails are never sent" you must log in to Pure to check new messages.
4.
Message settings - Select which messages you want to receive.
81
19 Edit user profile
82
Figure 69 Message settings. Select which messages you want to receive.
Message settings
Description
Message - System messages
Messages sent from the administrators of Pure. These
may also be seen at login to Pure.
Person - Comment added
When someone adds a comment to content you are
related to.
Publication - Author association changes
Messages sent out if your relation to a Research output
is changed, for example if you have claimed/disclaimed
a Research output
Table 46 Message settings
If you de-select any of the messages, you will not receive them. This can be useful if you receive a type
of message that does not concern you and/or your tasks.
5.
Task settings - Select which tasks you want to show in the right hand side of the workspace. This
means you can hide tasks that you not are directly responsible for, even though you have a role that
normally would display these tasks.
Figure 70 Task settings. Select which tasks you want to have present at "My personal tasks".
Task settings
Description
Person - Curriculum Vitae with new content
Task is available if new Research output can be added
your your static CV. Open CVs and accept or reject
content.
Publication - Import Candidate messages
When new candidates has been found, using the
automated search feature, a new task emerges and
allows you to explore and import the candidates. Note,
82
19 Edit user profile
Task settings
83
Description
requires that the automated search has been configured
in your person profile.
Table 47 Task settings
If you de-select any of the tasks, you will not be able to see them at "My personal tasks". This can be
useful if you receive a type of message that does not concern you and your tasks.
Note
Tasks that are dimmed, cannot be removed. Example is: Import Candidate messages.
6.
Trusted users - Users, you trust, can act on your behalf by using your profile.
Figure 71 Trusted users. Any user that is allowed to take over your account while you are away. Remove user, using the "Remove"icon.
This might be helpful, if you are away from work for a period of time. When this is the case, another
user can be marked as Trusted user, and can take over the identity you, and perform your working
tasks. Just remember that these users will get access and editing rights equally to yours, so they can
see and edit all the content that you can. Any new tasks will automatically be redirected to the trusted
users. Remember, when you return you should remove these users again
Press [Add user] - Search for the user, by start entering the name. This can be repeated. Press [Close]
afterwards. The user's name should now be visible below the heading. If the user should be removed
again, press the (-) button, to delete it.
Tip
You can easily reconfigure these settings by using the gear icon next to either your messages or tasks.
The icon will be visible when hovering the mouse above the number of messages/tasks.
Figure 72 Shortcut to message settings.
83
Index
i
Index
PubMed, 73
SAO/NASA ADS, 73
Scopus, 75
Web of Science, 76
Web of Science (lite), 77
WorldCat, 79
Symbols
"Not written here". See Origin
"Written here". See Origin
A
Activities, 49
arXiv.org, 69
Associated user, 25
Authors in template, 32
Automated search
Person, 29
B
BibTeX, 63
Browser Support, 3
C
Comments, 47
Confidentiality (on content), 46
Content lists, 9
Copyright issues and files, 32
CrossRef, 69
CV, 55
D
Datasets, 53
Documents, 41
E
E-mail settings, 79
Embase, 70
Export listed content
Download listed content, 14
External publication, 34
F
Filters, 10
Fulltext, Outputs, 32
Full text upload, 53
G
Graph relations, 58
Group author, 32
H
History, 47
History and comments, 47
How to search
arXiv.org, 69
CrossRef, 69
Embase, 70
JournalTOC, 71
Mendeley, 72
I
Introduction, 4
J
JournalTOC, 71
L
Language settings, 17
Long term preservation, 47
M
Managed by, 32, 39
Mendeley, 72
Messages, 20
Message settings, 79
Metadata, 32
Author in template, 34
Author role, 34
Bibliographical note, 43
Documents, 41. See also SHERPA RoMEO
colours
Early online date, 41
Events, 43. See also Relations
External author, 34
Full texts, 41. See also SHERPA RoMEO colours
Group author in template, 34
Host publication, 40
Internal author, 34
ISBN, 40, 40
ISSN, 40
Journal, 40
Keywords, 41
Links, 42
Organisation in template, 34
Publication dates, 41
Publication information, 33
Publication state, 33
Publisher, 40
Relations, 43
SHERPA RoMEO colours, 40
Type, 31, 32
My favourites, 14
O
Open Access, 53
ORCID, 26
Personal user template, 25
Origin
i
Index
"Not written here", 34
"Written here", 34
P
Person (Concept of ), 4
Personal user (Concept of ), 4
Persons, 25
Person template, 25
Placement (Deprecated). See Managed by
Projects, 50
Publication state, 32
PubMed, 73
R
ii
User profile, 79
V
Visibility, 32
Visibility of content, 43. See also Documents
W
Web of Knowledge. See Web of Science; Web of
Science (lite)
Web of Science, 76
Web of Science (lite), 77
Workflow, 44, 46
WorldCat, 79
WoS. See Web of Science; Web of Science (lite)
ReferenceManager, 63
RefMan, 63
Relations, 43
Research output, 32
RIS (Text-format), 63
S
SAO/NASA Astrophysics Data System, 73
Scopus, 75
Searching, 11
SHERPA RoMEO, 53
SHERPA RoMEO colours, 41
SHERPA RoMEO in template, 32
Sort content, 13
Submission guide, 62
Submission language, 17
T
Tasks
Candidates in [source], 20
Concept of, 18
Curriculum vitae with new content, 20
Open access Research output without full text,
19
Research output, 19
Task settings, 79
Templates, 32
Trusted user, 79
Tutorials
Claim / Disclaim content, 21
Create content from template - Introduction,
62
Edit personal profile, 27
Edit user profile, 79
How to submit content to Pure, 59, 59
Import from file: RIS- and BibTeX-formats, 63
Import from online source, 64
U
User (Concept of ), 4
User interface language, 17
ii