1
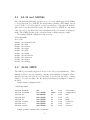
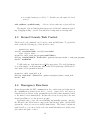
HelenOS project
user manual
Contents
Contents
2
1 Introduction
1.1 Structure of HelenOS . . . . . . . . . . . . . . . . . . . . . . . . .
3
3
2 Building HelenOS
2.1 Requirements . . . . . . . . . . . . . . . . . . . . . . . . . . . . .
2.2 Building . . . . . . . . . . . . . . . . . . . . . . . . . . . . . . . .
4
4
4
3 Boot Loading Process
3.1 IA-32 and AMD64
3.2 32-bit MIPS . . . .
3.3 IA-64 . . . . . . . .
3.4 Power PC . . . . .
.
.
.
.
.
.
.
.
.
.
.
.
.
.
.
.
.
.
.
.
.
.
.
.
.
.
.
.
.
.
.
.
.
.
.
.
.
.
.
.
.
.
.
.
.
.
.
.
.
.
.
.
.
.
.
.
.
.
.
.
.
.
.
.
.
.
.
.
.
.
.
.
.
.
.
.
.
.
.
.
.
.
.
.
.
.
.
.
5
6
6
7
7
4 Running HelenOS
4.1 Kernel Start . . . . . . . . .
4.2 Kernel Console . . . . . . .
4.3 Kernel Console Task Control
4.4 Emergency Functions . . . .
4.5 How to Do a Kernel Panic .
4.6 KLog . . . . . . . . . . . . .
4.7 IPCC - testing application .
.
.
.
.
.
.
.
.
.
.
.
.
.
.
.
.
.
.
.
.
.
.
.
.
.
.
.
.
.
.
.
.
.
.
.
.
.
.
.
.
.
.
.
.
.
.
.
.
.
.
.
.
.
.
.
.
.
.
.
.
.
.
.
.
.
.
.
.
.
.
.
.
.
.
.
.
.
.
.
.
.
.
.
.
.
.
.
.
.
.
.
.
.
.
.
.
.
.
.
.
.
.
.
.
.
.
.
.
.
.
.
.
.
.
.
.
.
.
.
.
.
.
.
.
.
.
.
.
.
.
.
.
.
.
.
.
.
.
.
.
.
.
.
.
.
.
.
8
8
8
10
10
11
11
11
.
.
.
.
.
.
.
.
.
.
.
.
.
.
.
.
2
Chapter 1
Introduction
HelenOS is a development operating system intended to be a testbed for research
in the field of operating systems and system-level programming. This manual is
a guide for building, running and enhancing HelenOS.
The system, as any other operating system, can be divided into platform independent and platform dependent parts. A user space program could be written
in such a way that it can be compiled and executed on any of the platforms HelenOS supports without any modifications. However it might work as a device
driver or perform other special tasks and thus become platform dependent.
1.1
Structure of HelenOS
The HelenOS operating system consists of three major parts:
• Kernel
• User space layer
• Boot infrastructure
3
Chapter 2
Building HelenOS
2.1
Requirements
To build HelenOS, the following build tools must be installed:
• GCC 4.1.1 + binutils 2.16.1 cross compiler environment for target platform
• python 2.3 or higher
• GNU make
• mkisofs
The GNU build environment is best downloaded, compiled and installed automatically using the shell scripts located in the kernel/contrib/toolchain directory.
2.2
Building
HelenOS features a user friendly configuration system. Once a make command
is run from the boot/ directory, a dialog driven application is started and the
developer is asked several questions regarding build configuration parameters.
The answers are saved in the file Makefile.config in the boot/, kernel/ and uspace/
directories and are automatically used for each subsequent build.
In order to modify the parameters, the user should change to the particular
subsystem directory and type make config. When the build configuration parameters are changed, the whole subsystem should be completely rebuilt. The
configuration system offers to do this automatically for the user.
4
Chapter 3
Boot Loading Process
The startup of HelenOS happens in several steps. Depending on the platform,
these steps can be either described as piggybacker loading:
1. Platform boot loader loads the piggybacker image and jumps to its entry
point.
2. The piggybacker unwraps the kernel image and the images of the initial
user space tasks, creates a boot information structure and jumps to the
entry point of the kernel.
3. The kernel initializes and runs the initial tasks according the boot information structure from the piggybacker.
If the platform supports a more sophisticated native boot loader, the multiboot
loading consists of the following steps:
1. Platform boot loader loads the kernel image and initial user space tasks,
creates a boot information structure and jumps to the entry point of the
kernel.
2. The kernel initializes and runs the initial tasks according the the boot information structure from the boot loader.
A third kind of boot loading occurs on platforms with no support from boot
loader. It is called image loading and is used mostly on simulated architectures.
1. The kernel and initial user space images are placed on well-known physical
memory locations (usually by a simulator configuration file). The execution
starts directly on the kernel entry point.
2. The kernel initializes and spawns compiled-in number of initial user space
tasks.
The following sections describe the particular features of the boot loading
process on the supported platforms. Sample configuration files for all simulators
are in the directory kernel/contrib/conf.
5
3.1
IA-32 and AMD64
On both platforms, HelenOS depends on a boot loader which supports the Multiboot Specification (e.g. GRUB). The kernel image (usually called image.iso) is
loaded by the boot loader just above the 1st megabyte of the physical memory
(the exact location is 1081344 bytes). Modules loaded by GRUB are automatically detected by the kernel and after initialization they are started as userspace
tasks. The GRUB loading is the easiest in terms of using userspace tasks.
An example GRUB configuration file menu.lst:
title=HelenOS
root (cd)
kernel /boot/kernel.bin
module /boot/ns
module /boot/init
module /boot/pci
module /boot/fb
module /boot/kbd
module /boot/console
module /boot/tetris
module /boot/ipcc
module /boot/klog
3.2
32-bit MIPS
The MIPS port is fully supported in the msim and gxemul simulators. These
simulators allow to specify a memory contents of the simulated computer. Unfortunately, the autodetection of loaded modules does not work. In order to change
number of loaded modules, the file kernel/arch/mips32/src/mips32.c must be
modified.
Sample msim configuration file:
add dcpu mips1
add
add
add
add
add
add
add
add
rwm
rom
rwm
rwm
rwm
rwm
rwm
rwm
mainmem
startmem
ns
kbd
fb
console
init
tetris
0x0
0x1fc00000
0x01000000
0x01100000
0x01200000
0x01300000
0x01400000
0x01500000
Sample gxemul command line arguments:
6
8M
1024k
1M
1M
1M
1M
1M
1M
load
load
load
load
load
load
load
load
"/dev/zero"
"image.boot"
"ns"
"fb"
"kbd"
"console"
"init"
"tetris"
gxemul -E testmips -X 0x81800000:../uspace/ns/ns 0x81900000:../uspace/kbd/kbd \
0x81a00000:../uspace/fb/fb 0x81b00000:../uspace/init/init \
0x81c00000:../uspace/console/console 0x81d00000:../uspace/tetris/tetris kernel.bin
The kernel can boot on the SGI Indy (and probably other SGI computers
with 32-bit ARC firmware). It uses ARC for output and input. When the kernel
is compiled to be loaded on the SGI Indy, an ECOFF image is created which can
be later loaded directly with ARC boot loader e.g. using BOOTP protocol.
3.3
IA-64
The IA-64 port is supported on the Ski simulator. The situation is very similar
to the MIPS loader - the loaded modules must be loaded on correct addresses in
the Ski configuration file and specified in the file kernel/arch/ia64/src/ia64.c.
Sample IA-64 configuration file:
load kernel.bin
romload ../uspace/ns/ns 0x400000
romload ../uspace/init/init 0x800000
romload ../uspace/console/console 0xc00000
romload ../uspace/fb/fb 0x1000000
romload ../uspace/kbd/kbd 0x1400000
romload ../uspace/tetris/tetris 0x1800000
romload ../uspace/klog/klog 0x1c00000
romload ../uspace/ipcc/ipcc 0x2000000
3.4
Power PC
The PowerPC boot image contains complete kernel with user tasks. The loader
build system automatically creates such image using information residing in
boot/arch/ppc32/loader/Makefile.inc. The variable COMPONENTS specifies,
which tasks will be loaded into the image.
7
Chapter 4
Running HelenOS
4.1
Kernel Start
When the HelenOS kernel starts up, it configures its output device and starts
booting. During the boot process it writes out some some lines regarding memory
size and available CPUs. The userspace drivers and tasks take over the console
as soon as the start-up activities are finished. When kernel tests are compiled in,
the userspace layer is not started.
The console driver provides 12 virtual consoles, 11 are used for applications,
console 12 is reserved for kernel console. Pressing function keys F1-F12 switches
between the consoles.
If the architecture supports framebuffer device with at least 800x600 resolution, a nice graphical console is shown. At the top of the screen, a row of buttons
for the virtual console is drawn. If the button contains console number, an application is connected to it. The red button means that there was an activity on
the terminal since it was last shown to the user.
4.2
Kernel Console
kconsole is a kernel thread operating completely in priviledged mode. It allows
the user to interact directly with the kernel and even start directly functions
inside the kernel.
The kernel console is shown by switching to console number 12. On some
platforms the kconsole screen is not restored to its previous contents. Press
enter to see kconsole’s prompt. The function keys for switching terminals do not
work in the console. In order to switch back to other consoles, use the continue
command. After executing the command, press a function key to switch to the
console of your choice.
The basic editing facilities are very similar to readline conventions. The left
and right arrows, backspace and delete keys allow convenient editing of text.
8
The history of last ten commands can be retrieved using up and down arrows.
The kernel console supports tab completion, double tab shows a list of available
commands.
The first class of commands prints useful statistics from the running operating
systems. The commands are:
zones — Prints a list of memory zones.
zone <zone number> — Prints a detailed statistics about the frame allocator.
slabs — Prints detailed statistics about the slab allocator.
scheduler — Prints out the contents of scheduler run queues for all cpus.
threads — Prints list of existing threads, including information about their
state.
tasks — Prints list of tasks along with some basic IPC information.
ipc task <taskid> — Prints detailed information about IPC queues of a particular task.
tlb — Prints contents of the Translation Lookaside Buffer on a processor (supported only on some platforms).
exc — Prints table of registered exception handlers.
The kernel contains a searchable version of its symbol table. This is used in
error processing as well as for extending functionality of the kernel console. The
following commands are supported:
symaddr <address> — Finds an address in symbol table and prints the appropriate symbol name.
call0, call1... <function> <args...> — Calls a C function function(args...).
Note that the tab-completion also works for function names. Because of
architecture calling convention, this command does not work correctly on
the ia64 platform. The arguments can be specified
• as a number or hexadecimal number: call1 task kill 8
• as a string: call1 printf ”Hello world”
• as a hexadecimal number preceeded by ’*’. The argument is then read
from the given address: call2 printf ”
• as a symbol name. In such case, the value located in the memory
location corresponding to the symbol name is used: call2 printf ”
• as a symbol name preceeded by ’&’. The address is used.
9
• as a symbol name preceeded by ’*’. In such case, the symbol is dereferenced.
set4 ¡address—symbol name¿ — Stores a 4-byte value into a given address.
The mips32, ia32 and amd64 platforms provide additional commands regarding debugging facility - set and clear hardware breakpoints and watchpoints.
4.3
Kernel Console Task Control
The kconsole call commands can be used to start and kill tasks. To repeatably
start a task, the following procedure should be used:
.... kernel boot data ....
init[8].addr=0x8027b000, init[8].size=86016
.... rest of boot data ...
kconsole> call2 task_run_program 0x8027b000 0
Calling f(0x8027b000,0): 0x80119283: generic/src/proc/task.o:task_run_program
Result: 0x80086500
To kill a task, use of the function task kill is appropriate. The taskid parameter
is a 64-bit number on all platforms, thus on the 32-bit platforms call2 should be
used with 2 32-bit parameters instead.
kconsole> call2 task_kill 8 0
Calling f(0x8,0x0): 0x801197e8: generic/src/proc/task.o:task_kill
Result: 0x0
4.4
Emergency Functions
It may happen that the IPC communication dies or that some problems arise in
the communication chain keboard driver - console - output driver. As long as at
least the keyboard driver works, pressing Escape key three times transfers control
to the kernel console immediately. Because the screen is not updated, the user
should press Enter to see the kconsole prompt.
If a kernel panic occurs, the error handling automatially switches control to
the KConsole and allows users to inspect the failed kernel online. On the SMP
system the other processors are halted immediately. The kernel contains its
symbol table, so you can probably read some useful information about the exact
place where the panic occured.
10
4.5
How to Do a Kernel Panic
Kernel panic is extremely rare in HelenOS. However, if the user wishes to simulate
it, the kernel console contains proper commands. For example, the following
command simulates a write to the unmapped address 0x4:
kconsole> set4 4 0
To test the autodebugging possibilities of the ia32 platform, the following
sequence can be executed:
kconsole> bkpts
0. 0x80032010 in (NULL)
Count(0)
kconsole> set4 0x80032010 0
**** Found ZERO on address 0x0 ****
Reached breakpoint 0:0x8011552a(generic/src/console/cmd.o:cmd_set4)
***Type ’exit’ to exit kconsole.
debug>
4.6
KLog
In order to avoid disturbing the framebuffer driver with kernel messages, a circular
buffer communication between the kernel and the userspace area is established.
Non-critical messages are sent to the KLog application. The user can see messages
about task faults and task cleanup completion.
4.7
IPCC - testing application
For the sake of thourough testing of some aspects of task activities, IPCC application allows the user to generate faulting behaviour such as page faults and
unaligned references1 .
1
Some architectures do not fault on an unaligned memory reference.
11