1
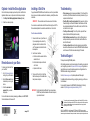
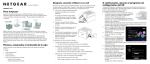
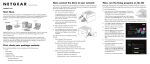
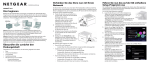
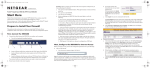
Installation Guide
NETGEAR® Stora
1. Check your Package Contents
Before starting the installation, check your package for the following items:
• NETGEAR Stora
• Power adapter
• Ethernet cable
• Installation guide
• Warranty card
• Resource CD
Note: If you purchased a diskless unit, or a unit with only one disk, first complete
and validate the installation before adding the disks. See Installing a Disk Drive for
installation instructions.
Before you begin....
Make sure that you have an Internet connection. When you have completed the
Stora installation, your network should resemble this illustration.
Estimated setup time: 15 minutes.
2. Connect the Stora to your Network
3. Run the Setup Program on the CD
The router in your network needs to have an ethernet port available to connect the
Stora unit to the router via the Ethernet cable. Your router also needs to be
configured to automatically provide an IP address for your network devices.
1. Unpack the unit and stand it on its feet—
Ethernet
be sure it has ample ventilation.
cable
Avoid putting the unit in a location where it
could be knocked over easily. Do not place
items on top of the Stora, or place any
liquids near or on top of the unit.
Running the setup program (on a Mac or PC) configures the device and makes it
ready for storing data. You also give your unit a unique name, and create your own
user name and password. Note: Mac screens might look different.
2. Connect one end of the provided Ethernet
cable to your router and the other end to
the back of the Stora unit.
3. Plug in the power adapter to a power
source and connect the other end to the
unit.
4. Press the On button on the back of your
unit. The blue light flickers while the unit
boots and obtains an IP address; then it
turns solid blue.
The LEDs on the Stora exhibit the following
behavior:
•
•
USB port
•
Note: See the NETGEAR® Stora User Manual to configure advanced features.
The link to the User Manual is on your Resource CD, and also on the NETGEAR
support site at http://kb.netgear.com/app/products/model/a_id/16165.
Power
supply
Power indicator LED on the front:
- Solid blue: Stora unit has power and is running normally.
Hard drive LEDs (HD1 and HD2) on the front:
- Solid green: Drive is operating normally.
- Solid amber: Indicates a problem with the drive.
- Blinking green: Indicates activity, such as copying data.
Ethernet Connection LEDs on the back:
- Solid amber: Indicates a 10/100M connection.
- Solid green: Indicates a 1G connection.
- Blinking green or amber: Indicates link activity.
To run the Setup program:
1. Insert the Resource CD into your computer. Wait for the
Setup program to initialize—approximately 2 minutes.
The Welcome to Stora setup screen displays.
On a PC, if the CD does not start automatically, go to My
Computer and double-click StoraSetup.exe to start the
Setup program.
2. Select your language from the dropdown list.
3. Click Step 1, Set Up Your Stora.
4. When the software license agreement
displays, click I Accept.
5. When the Registration screen
displays, enter your product key,
which is located on the small label
attached to the CD sleeve.
6. Give your Stora a name and write it
here for future reference. Click Next.
Stora name: ___________________
7. In the provided fields, create your user
name and a password. Write them
here for reference.
User name: _____________________
Password: ______________________
8.
Click Next and follow the onscreen
prompts to complete.
When the Setup screen redisplays, the
check box next to Set Up Your Stora
shows a green check mark indicating
that you have completed this step.
You can now exit and use the device.
Optional—Install the Stora Application
Installing a Disk Drive
Once the initial setup is complete, you have the option to install the Stora
Application software now, or anytime once the initial setup is complete:
1. Click Step 2 Install Desktop Applications Software (Optional).
2. Follow the on-screen prompts.
If you purchased a NETGEAR Stora with no disk drives, or with only one installed
drive, and you want to add a second drive for redundancey, carefully follow these
instructions.
•
IMPORTANT! The second drive must be the same size as the first drive.
•
Troubleshooting
You can insert a second disk drive into the Stora without turning the unit off. The
Stora automatically detects the second drive and builds it as a “mirror drive.”
To add or remove a disk drive:
1.
2.
Remote Access to your Stora
To remotely copy files to and from
your new Stora:
1. Go to http://www.mystora.com
and log in to your Stora device.
2. Enter the Stora name that you
created when you set up your
device.
3. Enter the user name and
password that you created
during setup.
3.
For more information about remotely accessing your Stora, see the NETGEAR®
Stora User Manual on the Resource CD.
January 2011
Remove the front cover of your Stora unit.
If you are replacing a drive, unlock it by
pulling down the latch on the back of the
unit. This releases the hard drive from the
locked position.
Insert the new hard drive.
a. The label on the drive needs to face the
outside of the unit.
b. Slide the disk into place in either slot
until it locks.
c. Replace the front cover.
The green LED on the front of the Stora
blinks continuously until the installed drive
build process is complete.
WARNING!! Stora formats hard drives differently than a computer does.
DO NOT swap hard drives between a Stora and a computer,
or your data will be lost.
•
•
•
CD error message. An error message could display if 1) the Power LED is
not solid blue, 2) the Ethernet cables are not securely connected, or 3) your
computer is behind a firewall.
Check the LEDs to verify correct operation. When powered on, the blue
Power button light is on. Green LEDs labeled 1 and 2 indicate which hard
drive is installed and detected. If the drive LED is amber, turn off the Stora
unit, and then turn it on again.
Turn off your Stora correctly. To turn off your Stora, press the Power
button until the blue LED blinks (about 5 seconds).
Verify the Ethernet connection. Make sure that your Ethernet cable is
securely connected to your router and to the Stora, and the LEDs on the
back of the Stora are lit.
Turn off your firewall. Make sure that the computer accessing the Stora
does not have its firewall turned on. See the NETGEAR® Stora User Manual
on the Resource CD for information about turning off the firewall.
Technical Support
Thank you for selecting NETGEAR products.
After installing your device, locate the serial number on the label of your product and
use it to register your product at http://www.NETGEAR.com/register. Registration is
required before you can use the telephone support service. Registration via the
NETGEAR website is strongly recommended.
Go to http://kbserver.netgear.com for product updates and Web support.
For additional information about setting up, configuring, and using your Stora, see
the User Manual.
For complete DoC please visit the NETGEAR EU Declarations of Conformity
website at: http://kb.netgear.com/app/answers/detail/a_id/11621/
This symbol was placed in accordance with the European Union Directive 2002/96 on the Waste
Electrical and Electronic Equipment (the WEEE Directive). If disposed of within the European Union,
this product should be treated and recycled in accordance with the laws of your jurisdiction
implementing the WEEE Directive.
©2009-2011 by NETGEAR, Inc. All rights reserved. NETGEAR and the NETGEAR logo are registered
trademarks of NETGEAR, Inc. in the United States and/or other countries. Other brand and product names are
trademarks or registered trademarks of their respective holders. Information is subject to change without notice.