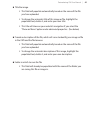
1
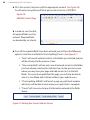
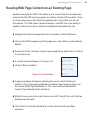
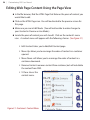
Content WHAT IS THE CMS? SITE HIERARCHY . . . . . . . . . . . . . . . . . . . . . . . . . . . . . . . . . . 5 Content . . . . . . . . . . . . . . . . . . . . . . . . . . . . . . . . . . . . . 5 Containers . . . . . . . . . . . . . . . . . . . . . . . . . . . . . . . . . . . 5 Templates . . . . . . . . . . . . . . . . . . . . . . . . . . . . . . . . . . . . 5 Pages. . . . . . . . . . . . . . . . . . . . . . . . . . . . . . . . . . . . . . 5 The File Browser . . . . . . . . . . . . . . . . . . . . . . . . . . . . . . . . . 6 ARCHIVING CONTENT . . . . . . . . . . . . . . . . . . . . . . . . . . . . . . . 7 ARCHIVING PAGES. . . . . . . . . . . . . . . . . . . . . . . . . . . . . . . . . 8 WYSIWYG . . . . . . . . . . . . . . . . . . . . . . . . . . . . . . . . . . . . . 9 Using the WYSIWYG . . . . . . . . . . . . . . . . . . . . . . . . . . . . . . 10 Pasting text from Microsoft Word. . . . . . . . . . . . . . . . . . . . . . . . 11 Global Variables. . . . . . . . . . . . . . . . . . . . . . . . . . . . . . . . 12 PAGE VIEWING MODES . . . . . . . . . . . . . . . . . . . . . . . . . . . . . . 13 Edit Mode . . . . . . . . . . . . . . . . . . . . . . . . . . . . . . . . . . . 14 Preview Mode . . . . . . . . . . . . . . . . . . . . . . . . . . . . . . . . . 14 Live Mode. . . . . . . . . . . . . . . . . . . . . . . . . . . . . . . . . . . 14 PERMISSIONS. . . . . . . . . . . . . . . . . . . . . . . . . . . . . . . . . . .15 CMS USER TASKS GETTING STARTED. . . . . . . . . . . . . . . . . . . . . . . . . . . . . . . . 16 Pop-Up Blockers. . . . . . . . . . . . . . . . . . . . . . . . . . . . . . . 17-18 ADDING WEB PAGE CONTENT TO AN EXISTING PAGE . . . . . . . . . . . . . . 19-20 Properties Tab . . . . . . . . . . . . . . . . . . . . . . . . . . . . . . . . . 21 Relationships Tab . . . . . . . . . . . . . . . . . . . . . . . . . . . . . . . .21 Categories Tab . . . . . . . . . . . . . . . . . . . . . . . . . . . . . . . . . 21 Permissions Tab . . . . . . . . . . . . . . . . . . . . . . . . . . . . . . . . 21 Versions Tab . . . . . . . . . . . . . . . . . . . . . . . . . . . . . . . . . . 22 Content REUSING WEB PAGE CONTENT ON AN EXISTING PAGE. . . . . . . . . . . . . . . 23 EDITING WEB PAGE CONTENT USING THE PAGE VIEW . . . . . . . . . . . . . 24-25 SEARCHING FOR AND EDITING WEB PAGE CONTENT USING THE LIST VIEW. . . . 26 CREATING AN HTML PAGE . . . . . . . . . . . . . . . . . . . . . . . . . . . 27-29 Advanced Properties Tab . . . . . . . . . . . . . . . . . . . . . . . . . . 30-35 ADDING IMAGES OR FILES TO THE CMS. . . . . . . . . . . . . . . . . . . . . . 36 To upload a single Image or File. . . . . . . . . . . . . . . . . . . . . . . 37-38 To upload Multiple files. . . . . . . . . . . . . . . . . . . . . . . . . . . . . 39 UPLOADING FILES OR IMAGES ASSOCIATED WITH A CONTENT STRUCTURE . . 40-42 ADDING A NEW EVENT . . . . . . . . . . . . . . . . . . . . . . . . . . . . . . 43 Finding Events that have already been entered. . . . . . . . . . . . . . . . . 43 To view Event details . . . . . . . . . . . . . . . . . . . . . . . . . . . . . . 44 Adding a New Event . . . . . . . . . . . . . . . . . . . . . . . . . . . . . 45-49 GLOSSARY. . . . . . . . . . . . . . . . . . . . . . . . . . . . . . . . . . . . . 50-51 | Dotmarketing CMS User Manual What is the CMS? The CMS, or “Content Management System,” is the platform upon which the new Mount Aloysius website has been built. The beauty of the CMS is that it separates the content on your website from the design, making it easier to maintain consistency throughout the site. It is also provides an easy, straightforward interface for people who need to maintain web content, without requiring that they know how to write html, or any other kind of code. This manual will act as a guide for CMS Users who are attempting different tasks within the CMS. Figure 1.0 Dotmarketing CMS User Manual | Site Hierarchy Content is organized in the CMS through the use of structured pieces of content, aptly called “Content Structures.” Each “Content Structure” is used to form “Pieces of Content.” Each Piece of Content that is made through the use of a particular Content Structure belongs to the same “Content Type.” Think of the Content Structure as a form. Once that form is filled out and saved, the information in it makes up a Piece of Content. All Pieces of Content made with the same form are of the same Content Type. Depending on the specific details of a Content Structure, fields can range from text entry fields, to drop down list selections. The CMS developer can also assign “required” status to certain or all fields. Within a Piece of Content, information is broken down into various fields. For example, the “Title” field is separate from the “Body” field and can be displayed independently of each other. This way, one piece of Content can be used in multiple locations by displaying different fields in each location. The fields in each Piece of Content are completely customizable and determined by a CMS developer in conjunction with CMS Administrators within your organization. Containers determine for the User the Content Type to be displayed in the specified area of the page. (Container details will be handled by CMS developers.) In addition to specifying the Content Type, the Container also indicates which fields of a particular Content Structure will be displayed. (See Figure 1.0) Templates organize the Containers on a given page by providing a framework for the content that is displayed on that page, like a blueprint. For example, a news page template would indicate where the menu container would go, where the body container would go, and where the header container would go. Pages are assigned a template when they are being created. Each page can only use one template (this is the blueprint for the page), however, one template can be used on multiple pages. For example, a generic body page template may be used on several pages of your website. For more information on pages and how to create, access, and view them, see the next section. | Dotmarketing CMS User Manual The File Browser The File Browser is a tab on the CMS that provides a visual representation of the site’s folder and file structure using a layout similar to Windows Explorer for easy navigation (See Figure 1.1). Different object types are indicated using visual icons, and can be sorted in the “List View” tab. Several options are also made available to you by right-clicking on an object to show a Context Menu for the selected area. Figure 1.1 Dotmarketing CMS User Manual | Archiving Content Archiving allows you to remove content from the website that is either no longer needed or is outdated. This content will not be deleted and can be used again at a later time. To archive pieces of content, you must be in the content tab of the CMS. Then: Select the content you wish to archive and right click. A context menu will appear. Select “Unpublish.” (See Figure 1.2) Right click the unpublished piece of content again and select “Archive” from the context menu. (See Figure 1.3) Figure 1.2 Figure 1.3 To view all archived content, click the “Show Archived Only” Box and click search. If the content needs to be used again, right click the piece of content and select “Publish” from the context menu. | Dotmarketing CMS User Manual Archiving Pages To archive pages, you must be in the file browser tab of the CMS. Then: Select the page you wish to archive and right click. A context menu will appear. Select “Unpublish.” (See Figure 1.4) Right click the unpublished page again and in the context menu select “Archive.” (See Figure 1.5) To view all archived pages, select the “Show Archived” Icon at the bottom right of the file browser. Figure 1.4 If the page needs to be used again, right click the page and select Publish from the context menu. Figure 1.5 Dotmarketing CMS User Manual | WYSIWYG WYSIWYG is a tool that is available for some fields in a Content Structure which helps those who do not know HTML code write and format content for the website. The acronym WYSIWYG stands for “What You See Is What You Get.” The WYSIWYG editor features buttons to apply boldface and italic typeface to text, create numbered and bulleted lists, and more. If you choose to use the WYSIWYG editor, you will be able to see your formatted text as it will appear on the page (before it is altered by a template). Figure 1.6 10 | Dotmarketing CMS User Manual Using the WYSIWYG To use the WYSIWYG interface, you must be in an existing piece of content in the edit mode, or adding a new piece of content. Then: Type your content into the interface just as you would any word processor (like Micorsoft Word). By clicking on the different buttons in the interface, you can apply bold face, italics, bullets or other formatting to your content. If you click on the HTML button on the top right, a new window will appear where you will see the CMS generated code that represents your formatting. (See Figure 1.7 and 1.8) Figure 1.7: Viewing HTML Source Figure 1.8: HTML Source Editor To keep the changes made, click “update.” To discard changes made, click “cancel.” Dotmarketing CMS User Manual | 11 Pasting text from Microsoft Word To insert text from Microsoft Word, click on the Paste text from Word on the top left. (See Figure 1.9) Figure 1.9: Paste text from Word A new window will appear. Using CTRL+V paste the text into the window. To accept the entered text, click “insert.” To discard the entered text, click “cancel.” (See Figure 2.0) Figure 2.0: Paste from Word 12 | Dotmarketing CMS User Manual Global Variables You can also use global variables such as tuition costs or application deadlines in your copy. By using these variables, a CMS Administrator can update the information related to that variable in one place, and the update will populate throughout the website. If you are interested in using a global variable, ask a CMS Administrator for assistance. Dotmarketing CMS User Manual | 13 Page Viewing Modes Page viewing modes are the different ways you can access, view, and modify an HTML page once you have created it (see: CMS User Tasks - Creating a New Page). To view a page in the different modes, you must first locate it within the file browser. Then: Click on the page icon, which will direct you to the Page View screen. The Page View screen exists in three modes. (See Figure 2.1) To change the viewing mode, the Tabs are located on the Left Navigation Menu. At anytime, the User may return to the CMS Home Page by clicking “CMS System” on the Left Navigation Menu. Figure 2.1: Page View Modes 14 | Dotmarketing CMS User Manual Edit Mode The Edit Mode shows the following: options to order content; location of containers on page; content currently being edited or the last working copy; empty containers; options to add/edit content and reuse content; options to remove containers; Preview Mode The Preview Mode removes the edit functions, leaving a clean view of the current content being edited Live Mode The Live Mode shows only the sections of a page that have been published as they will appear to a site visitor Dotmarketing CMS User Manual | 15 Permissions Permissions are assigned by a CMS Administrator in order to allow CMS Users to have access to the areas that pertain to them. These permissions are inherent to the page and should be changed only by a CMS Administrator unless otherwise assigned. If a CMS User is allowed to change permissions, it should be done so with caution as this will alter what other users will view and have access to when adding, editing, publishing or unpublishing content, as well as whether or not the page will be displayed on the front end. Furthermore, a CMS User will also be assigned permissions limiting access to certain tabs within the CMS itself. Some Users will have access to the entire site, while others will be limited to specific areas. For example, one User may only have access to the Events tab and its subsequent tasks, while another has access to all content within the Student Life area. 16 | Dotmarketing CMS User Manual CMS User Tasks Getting Started This manual is written for the CMS User who will be utilizing these functionalities to add or edit Content. Based on the previously established templates, containers, and their subsequent permissions, the user will be restricted to specific sections of the site by a CMS administrator. The tasks covered in this section will be those most frequently used by a CMS User. However, due to the flexibility and versatility of the CMS platform, there is more than one path to achieve the desired result. The following steps are the best-practices recommended by Dotmarketing. The structured content formatting is the basis for the idea of content reusability. A container will determine the fields of a content structure to be displayed on the page where the container is located. The same piece of content can be used on another page in another container. Each container will display different combinations of the fields contained in a piece of content. The following steps can only be performed by a CMS User with appropriate Permissions. If you find that you can not perform any of the steps, please contact your CMS Administrator. Dotmarketing CMS User Manual | 17 Pop-Up Blockers Be sure that you do not have your pop up blocker enabled since this will not allow the pop-up window to open when searching for content to reuse or for various other files and images. If using Mozilla Firefox: The pop-up blocking feature has a simple whitelist mechanism to allow certain sites to open pop-ups anyway. To add a site to the whitelist, click on “Tools” then “Options…” in the top menu bar. (See Figure 2.2) Figure 2.2: Mozilla Firefox Pop-up Setting 18 | Dotmarketing CMS User Manual Go to the “Content” tab, and click the “Allowed Sites” button. (See Figure 2.3) Figure 2.3: Mozilla Firefox Options Content Tab This will open up a new window. Enter the address of the web site and click “Allow.” Click “Close” when you are done. (See Figure 2.4) Figure 2.4: Mozilla Firefox Allowed Sites Option You will now be back at the options screen. Click “Ok” to save these changes. If using Internet Explorer: If a site opens a pop-up window that is blocked by Internet Explorer, a notification appears in the Information Bar and Status Bar and a sound is played. If you click the notification in the Information Bar or Status Bar, you see a menu with the options listed below, select the second one. Temporarily Allow Pop-ups. Reloads the page, allowing pop-up windows. Always Allow Pop-ups from this Site. Adds the current site to the Allow list. Settings. Shows more Pop-up Blocker settings menu items and gives access to the Pop-up Blocker Settings window. Dotmarketing CMS User Manual | 19 Adding Web Page Content to an Existing Page Once you have signed on to the CMS, navigate to the desired page based on its location in the folder structure using the File Browser under the Website tab. Then: Click on the HTML page to reach the page view. You will be in edit mode by default. You will see an arrangement of containers on the page dictated by the page’s template. Determine which container to which you would like to add content. Click on its container icon. A context menu will appear. (See Figure 2.5) Figure 2.5: Context Menu Select New Content from the menu. You will be directed to the Add/Edit Content page for the particular content type used in this container. The Add/Edit Content page shows only the data fields that have been associated with the content type. The data fields will be different depending on the structure and the fields to be displayed by the container. 20 | Dotmarketing CMS User Manual Fill in the content structures with the appropriate content. (See Figure 2.6) To add content using Microsoft Word, please refer to Section I: WYSIWYG Figure 2.6: Add/Edit Content Page In order to save Content, all required fields must be entered. Required fields are denoted by an asterisk. Once all the required fields have been entered, you will have the following options: Save/Save and Publish/Check Spelling/Cancel. (See Figure 2.7) “Save” will save all entered content in the folder you selected and you will be returned to the preview screen. “Save and publish” will not only save all entered content in the folder you have already selected, but will direct you to the preview screen where you may view your page and add content to it in the Edit Mode. Since you have published this page, you will also be able to view it in Live Mode and it will be visible to your website users. “Check spelling all fields” will launch a pop-up spell check window which you will be able to close when your spell check is complete. “Cancel” will cause you to lose all information entered in the fields above. Figure 2.7: Adding New Content Submit Actions Dotmarketing CMS User Manual | 21 Across the top of the Add/Edit Content page, you will see five tabs. (See Figure 2.6) You will mostly use the Properties, Relationships and Categories tabs. Properties Tab Contains all the information fields to be entered that have been designated by the Content Structure. Relationships Tab Certain Content Types will have Parent/Child Taxonomy relationships. One piece of Content can be related to another specified piece of content using this tab. Categories Tab A piece of Content can be associated with predetermined categories. This will enable the searching for Content (both on the front end and back end) to be much more accurate using the advanced search. Permissions Tab Permissions will be assigned according to the default permissions structure. Any changes to the default permissions will be made according to the site area and CMS administrator instruction. Versions Tab This tab allows you to see all versions created for the current Content and to replace the current version with an older one. 22 | Dotmarketing CMS User Manual ReusingVersions Tab (Continued) To bring a past version back and replace the current, working version simply follow these steps: Click on “Bring Back.” (See Figure 2.8) Figure 2.8: Versions When the confirmation window appears, you will have two options. (See Figure 2.9) Click Ok to bring back the version selected and make it the live version. Click Cancel if you do not wish to bring back the version selected. If you select Ok, you will be redirected to the Add/Edit Content Page. Review your changes and click “save and publish” on the Add/Edit Content Page to make the edits live. Figure 2.9: Confirmation Screen Dotmarketing CMS User Manual | 23 Reusing Web Page Content on an Existing Page Another beauty to the CMS is the ability to use content that has already been entered into the CMS and may appear in another section of the website. There are times when pieces of content are appropriate in more than one area of the website. The CMS allows content managers and CMS Users the ability to update content in one place, and have it populate throughout the site. Navigate to the desired page based on its location in the File Browser. Click on the HTML page to reach the page view. You will be in edit mode by default. Determine which container to which you would like to add content. Click on its container icon. A context menu will appear. (See Figure 3.0) Click on “Reuse Content.” Figure 3.0: Context Menu A pop-up window will appear allowing the user to search for desired content. (If you have pop-up blockers enabled in your browser, please see the section titled “Pop-Up Blockers.”) The search will be limited to the Content Type allowed by the Container. When the user enters the search terms and clicks “Search,” the results will be displayed on the right. Click “Select” on the desired item to use the content in the specified container. 24 | Dotmarketing CMS User Manual Editing Web Page Content Using the Page View In the file browser, find the HTML Page that features the piece of content you would like to edit. Click on the HTML Page icon. You will be directed to the preview screen for this page. Make sure you are in Edit Mode. (You will not be able to make changes to your Content in Preview or Live Mode.) Locate the piece of content you wish to edit. Click on the content’s menu icon. A context menu will appear with the following choices (See Figure 3.1) Edit Content: takes you to Add/Edit Content page. Move Up: allows you to rearrange the order of content in a container upward. Move Down: will allows you to rearrange the order of content in a container downward. Remove Content: removes content from container, but will not delete the content from CMS. X Close: closes the context menu. Figure 3.1: Container’s Context Menu Dotmarketing CMS User Manual | 25 If you wish to edit the actual information in this piece of Content, select “Edit Content.” You will be directed to the Add/Edit Content page for this piece of content. All previously completed fields will be populated with the information submitted earlier. Make the desired changes to your piece of content. Note that any changes made to the content will not only appear on this HTML page, but anywhere else this same content is displayed. For more information on making changes to content, see the “Adding Web Page Content to an Existing Page” section under CMS User Tasks. 26 | Dotmarketing CMS User Manual Searching for and Editing Web Page Content Using the List View On the CMS homepage, click on the “Content” tab. This page contains a Content Type search feature. (See Figure 3.2) You must select the desired Content Type and can also enter either the Content Title or the Content Identifier. The results will be displayed below the search. Figure 3.2: Content Search Once you have found the Content you wish to edit, select it by clicking the edit icon. This will take you to the Add/Edit Content Page. Refer to the “Adding Web Page Content to an Existing Page” section for how to edit content. Dotmarketing CMS User Manual | 27 Creating an HTML Page You should be in the File Browser to perform this task. (See Figure 3.3) Although this task can be performed from the page view mode, we recommend this way as best practice. Determine which folder or subfolder you want your page to live in. The folder the page lives in will determine where you find the page in the CMS and where it appears on your website. Figure 3.3: File Browser Once you have determined the appropriate folder, right click on the icon of the desired folder in the file browser to access the context menu. (See Figure 3.4) Click on New. A second context menu will appear. Figure 3.4: Context Menu 28 | Dotmarketing CMS User Manual Select HTML page. You will be directed to the Add/Edit HTML Page. (See Figure 3.5) By default, you will land on the “Basic Properties” tab. Remain on this tab. It will allow you to fill all the basic fields necessary to create an HTML page. Page/Menu Title Enter the title you wish to give to the page in this field. This title will show on the website’s navigation if you select Show on Menu under the Advanced Properties tab. (For more on Advanced Properties, see the next section.) Once you have entered the page’s title, the Page URL field will automatically populate with the same title, excluding only the spaces and any non-alphanumeric characters. Folder This field should already be populated with the name of the folder you selected to create this page in. (See Figure 3.5) Figure 3.5: Add/Edit HTML Page Page URL This field should already be populated based on the information you entered in the Page/Menu Title field. If you would like to change the automatic URL, highlight the text, delete it, and type in your own URL. Do not use spaces and restrict your URL to alphanumeric characters and underscores. Dotmarketing CMS User Manual | 29 Template Select a desired template from the drop down menu. (See Figure 3.6) Figure 3.6: Template Selection Menu A preview of the template will appear below the drop down menu. (See Figure 3.7) Figure 3.7: Template Preview 30 | Dotmarketing CMS User Manual Advanced Properties Tab As a CMS User, your tasks should only deal with three fields under the Advanced Properties tab: the Show on Menu option, the Menu Sort Order field. (See Figure 3.8) Figure 3.8: Advanced Properties Dotmarketing CMS User Manual | 31 Show On Menu If you would like the page you are creating to appear on your websites navigation, check the “Show on Menu” box. If you are creating this page in a subfolder, it will show on the website’s navigation only when the subfolder is open (when the website user is in the section of the website associated with the subfolder). Menu Sort Order If you select the Show on Menu option, the Menu Sort Order field will become active. Figure 3.9: “Show on Menu” Option Entering a number in this field it will determine where in your website’s navigation the menu item will appear. For example, if you enter a Menu Sort Order of 4, this page’s title will appear fourth on your website’s navigation menu. Note that all pages in a given folder must be numbered in order for the Menu Sort Order to function. (See Figures 3.9, 4.0 and 4.1) Figure 4.0: Folders with “Show on Menu” Feature Figure 4.1: “Show on Menu” Feature in Live Mode 32 | Dotmarketing CMS User Manual Redirect This functionality allows you to create a link that will redirect users to another page within the website or to an external page. To use a link that already exists in the CMS: Click on “Select Link.” (See Figure 4.2) Figure 4.2: Redirect Link Field The Add/Edit Link will appear. (See Figure 4.3) Figure 4.3: Add/Edit Link Page Dotmarketing CMS User Manual | 33 To select a link already saved within the CMS: Select “Browse for existing link.” A new window will appear with the CMS folders. Select the folder where the link resides in and click on the link. (See Figure 4.4) We recommend saving all links in the Global > Links folder for easy access. Select the link. This will take you back to the Add/Edit Link page. All information regarding this saved link will be populated once it is selected from the CMS. (See Figure 4.5) Figure 4.4: CMS Folder Browse To save this link, click on “Select Link” and this will take you back to the Add/ Edit HTML Page. If you choose “Cancel” the link will not be added to the HTML Page. Figure 4.5: Add/Edit Link Page Populated 34 | Dotmarketing CMS User Manual To create a new link From the Add/Edit Link Page (See Figure 4.3): Title the link. Select the folder in which the link will be saved. We recommend saving all links in the folder: global > links URL for the link: To create a link to a page within the website: Select the box labeled “Internal.” Select “Browse for content” to find the page you want to use. A new window will pop up. (See Figure 4.6) Select the correct page. To create a link to a page outside of the website (See Figure 4.7): Make sure the box labeled “Internal” is not checked. Select the protocol desired from drop down menu (ex. http://, https://, etc.). Figure 4.6: CMS Folder Browse Type in the web address. For example, www.google.com HTTPS required If you need the page you are creating to be secure, such as when creating a shopping cart, select the box labeled “HTTPS” to change the protocol for secure web navigation. This will make the web address begin with HTTPS instead of HTTP. Dotmarketing CMS User Manual | 35 Target Select from the drop down menu whether you want the link to open in a new window, same window, or a parent window. Start Date, End Date, and Metadata Information fields: For information on these, refer to your CMS Administrator. Figure 4.7 : Add/Edit Link for External URL Permissions Tab: For information on the Permissions tab contact your CMS Administrator. You may now choose to Save, Save and Publish, or Cancel your HTML Page. “Save” will store your HTML Page in the folder you have already selected. You will be directed to the preview screen, where you may view your page and add content to it in Edit Mode. You will NOT be able to view your page in Live Mode. That is, this page will not be visible to your website users. “Save and publish” will store your HTML Page in the folder you have already selected. You will be directed to the preview screen, where you may view your page and add content to it in the Edit Mode. Since you have published this page, you will also be able to view it in Live Mode and it will be visible to your website users. “Cancel” will cause you to lose all the information entered in the fields above. 36 | Dotmarketing CMS User Manual Adding Images or Files to the CMS In order to use a file or image in a piece of content, it must first be uploaded into the CMS. This also provides all content managers with a file repository from which they can use various files and images. In order to upload images and files to the CMS, follow these steps: In the file browser, navigate to the folder in which you would like to save your file or image. We recommend saving all links in the Global>Links folder for easy access. Right click on the desired folder, and a context menu will appear. Select “New” and a second context menu will appear. (See Figure 4.8) Figure 4.8: Context Menu If you wish to upload only one Image or File, select “File.” (See Figure 4.9) If you wish to upload more than one file at once, select “Multiple Files.” (See Figure 4.9) Figure 4.9: Single Image/File Upload Figure 5.0: Multiple Image/ File Upload Dotmarketing CMS User Manual | 37 To upload a single Image or File Click on the “Browse” button to the right of this field. (See Figure 5.1) Figure 5.1: Uploading a Single Image Select the image or file you wish to upload from your local files. (See Figure 5.2) Figure 5.2: File Upload Title the image. This field will populate automatically based on the name of the file you have uploaded. To change the automatic title of this image or file, highlight the populated text, delete it, and enter your own title. This title will show on your website’s navigation if you select the “Show on Menu” option under advanced properties. (See below) Provide a description of the file, which will serve to identify your image or file in the CMS and the file browser. This field will populate automatically based on the name of the file you have uploaded. To change the automatic description of this image, highlight the populated text, delete it, and enter your own description. 38 | Dotmarketing CMS User Manual Folder in which to save the file This field will already be populated with the name of the folder you are saving this file or image in. Advanced Properties (See Figure 5.3) As a CMS User, your tasks should only concern one field on this page. If you check the “Show on Menu” box, the title that you gave to this image or file will be visible on your website’s navigation. For more information on Advanced Properties, see your CMS Administrator Figure 5.3: Advanced Properties Permissions Permissions will be maintained by a CMS administrator. Save/ Save and Publish/ Cancel “Save” will upload this image or file to the CMS and make it accessible for later use. You will be redirected back to the file browser. “Save and publish” will make this image or file accessible from the CMS and it will be visible in Live Mode on any HTML page you add it to. You will be redirected to the file browser. “Cancel” will not save this image or file to the CMS, therefore it will not be accessible for future use. You will be redirected to the File Browser. Dotmarketing CMS User Manual | 39 To upload Multiple files Folder in which to save the file This field will already be populated with the name of the folder you are saving this file or image in. Select the number of files to upload. (See Figure 5.4) Select the number of files you would like to upload from the dropdown menu. The number of fields that Figure 5.4: Multiple File Upload Drop-down Menu appear on the screen are equivalent to the number you selected in step above. (See Figure 5.5) Figure 5.5 Multiple File Upload Fields For each field, browse for the desired file by clicking on the “Browse” button. Cancel/ Save/ Save and Publish “Save” will upload this image or file to the CMS and make it accessible for later use. You will be redirected back to the file browser. “Save and publish” will make this image or file accessible from the CMS and it will be visible in Live Mode on any HTML page you add it to. You will be redirected to the file browser. “Cancel” will not save this image or file to the CMS, therefore it will not be accessible for future use. You will be redirected to the File Browser. 40 | Dotmarketing CMS User Manual Uploading Files or Images associated with a Content Structure This task involves adding an image or file to the CMS through a field in the content structure. These fields will allow you to choose an image or file to be associated with the piece of content. Note that the file you select will only be displayed if your Content is in a container designed to do so. 1. If the file you would like to use is already saved in the CMS, click on the “browse” button. (See Figure 5.6) - A pop-up window of the file browser will appear. - Click on the folder or subfolder your file is saved in. - A file list or a thumbnail view of all the images in the folder will appear. (See Figure 5.7) Once you have selected a file, you will be redirected back to the Add/Edit Content page. Figure 5.6: Image Upload Context Menu Figure 5.7: Image Upload File Selection 2. If the File is a local file, not saved in the CMS, click on the “upload” button. A pop-up window of the File Upload page will appear. (See Fig. 5.8) Click on the “Browse” button to the right of this field. Select the file you wish to upload from your local files. Figure 2mm: File Upload Page Dotmarketing CMS User Manual | 41 Title the image. This field will populate automatically based on the name of the file you have uploaded. To change the automatic title of this image or file, highlight the populated text, delete it, and enter your own title. This title will show on your website’s navigation if you select the “Show on Menu” option under advanced properties. (See below) Provide a description of the file, which will serve to identify your image or file in the CMS and the file browser. This field will populate automatically based on the name of the file you have uploaded. To change the automatic description of this image, highlight the populated text, delete it, and enter your own description. Folder in which to save the file This field will already be populated with the name of the folder you are saving this file or image in. 42 | Dotmarketing CMS User Manual Advanced Properties (See Figure 5.2) As a CMS User, your tasks should only concern one field on this page. If you check the “Show on Menu” box, the title that you gave to this image or file will be visible on your website’s navigation. For more information on Advanced Properties, see your CMS Administrator. Permissions Permissions will be maintained by a CMS administrator. Save/ Save and Publish/ Cancel “Save” will upload this image or file to the CMS and make it accessible for later use. You will be redirected back to the file browser. “Save and publish” will make this image or file accessible from the CMS and it will be visible in Live Mode on any HTML page you add it to. You will be redirected to the file browser. “Cancel” will not save this image or file to the CMS, therefore it will not be accessible for future use. You will be redirected to the File Browser. Dotmarketing CMS User Manual | 43 Adding a New Event As a CMS User, you will likely also be a CMS Events User. This means that you will have access to enter event requests into the calendar for approval from an Events Administrator. Only events that have been approved by a CMS Events Administrator will appear on the calendar. All events entered by a CMS Events User will be sent to CMS Events Administrator for approval automatically. Finding Events that have already been entered When in the Events tab in the CMS you will be able to search by a number of parameters to find the event you’re looking for, or you can display all events. To search for an Event Go to the Event tab in the CMS. You will see a few different drop down menus that you can use to filter events that have already been entered into the CMS. Once you have selected your parameters, click “Filter.” Your search results will appear on the same page, below the search criteria. Events listed in blue are events which are pending approval. Events in red are events which were not approved. (See Figure 5.9) Figure 5.9: Viewing Events 44 | Dotmarketing CMS User Manual To see all Events Go to the Event tab in the CMS. In the bottom right-hand corner, there’s a link to “all.” (See Figure 6.0) Figure 6.0: Events Tab Click on that link and all events will be displayed by date and time. Events listed in blue are events which are pending approval. Events in red are events which were not approved. (See Figure 5.9) To view Event details Once you have found the event you’re looking for, either by using the search functionality or by listing all, you will be able to click on the name of the event to view the details. If you click on an event that you entered, you will see the Add/Edit Event screen. (See Figure 6.1) This will allow you to make any adjustments that are necessary. If you click on an event that you did not enter, you will see a non-editable screen with the event details. Figure 6.1: Add/Edit Event General Information Dotmarketing CMS User Manual | 45 Adding a New Event In the CMS select the Events Tab. On the bottom right hand side, click New. (See Figure 6.0) This will take you to the Add/Edit Event Page. (See Figure 6.1) Figure 6.1: Add/Edit Event General Information The event Title is the public-facing name of the event. The event Subtitle is for any additional part of the event title. For Example: Title: “Open House,” Subtitle: “President’s Day Visitation” Event Occurs is where you can identify whether an event occurs once or is a recurring event. An event must be saved before making it a recurring event. If a recurring event is being scheduled, after saving it, click on “Once” and change it to recur daily, weekly, monthly, etc. 46 | Dotmarketing CMS User Manual Audience indicates for whom the event is intended. To select multiple audiences, hold down the ctrl key while clicking to select. To display an event to all audiences, click on the first audience, scroll to the bottom of the list, and hold down the shift key while clicking on the last audience available. Calendar types will indicate where on the site the event is displayed. For example, the event may be an athletic event, and therefore will be part of the athletics calendar. To select multiple calendar types, hold down the ctrl key while clicking to select. To display an event in all calendars, click on the first calendar type, scroll to the bottom of the list, and hold down the shift key while clicking on the last calendar type available. Setup Date/Time allows you to block off some time before the event to set up. The setup date and time can be before the start time of the event or the same as the start time of the event. Select the setup date and time from the drop down menu. Start Date/Time indicates when the actual event is beginning. Select the date and time at which the event will begin from the drop down menu. If it is an all day event, select the box labeled “All Day Event.” If the event time is still not determined, select the box labeled “Time TBD.” Dotmarketing CMS User Manual | 47 End Date/Time indicates when the actual event is scheduled to end. Select the date and time at which the event will end from the drop down menu. Break Date/Time allows you to block off some time after the event to break down and clean up if necessary. The break date and time can be after the event ends or the same as the end date and time of the event. Select the break date and time from the drop down menu. Facility indicates the location of the event. Select the facility where the event will take place in from the drop down menu. If a facility you need is not available in the menu, contact a CMS Events Administrator. Web Address is an area where you can provide a separate web address for the event if there is one. The Comments/Equipment field provides an opportunity for the event organizer to make any special requests for equipment or other comments. Anything placed in this field is internal and will not be seen by those viewing the event on the front end. Show on Web Calendar Selecting this box allows the event to be displayed in the Front End Web Calendar once it has been approved by an Events Administrator. 48 | Dotmarketing CMS User Manual Contact Information (See Figure 6.2) is that for the internal contact for the event. As much information as possible should be provided within these fields. Any contact information for display on the front end should be included in the description. Figure 6.2: Contact Information from Add/Edit Event Page Description is a forward-facing field, where any additional information about the event should be added. Directions is a forward-facing field, where directions to and location of the event should be added. Dotmarketing CMS User Manual | 49 File Attachment If a file needs to be attached, such as a flyer, it needs to be saved to the CMS before it is uploaded in this section. To upload a file, select the “Browse for File” button on the bottom right of the screen. A new window will open. Find the file that you would like to upload by selecting it from the folder it resides in. (See Figure 6.3) Once you have selected the file you will be redirected back to the Add/Edit Event Page, and the file will be listed. (See Figure 6.4) Save/Cancel Figure 6.3: File Attachment for Events “Save” will save the event request and alert the Event Administrator of its need for approval. “Cancel” will not save this event request, none of the information you entered will be accessible at a later date. You will be redirected to the event search. Email Alerts You will receive an email notifying you that your request was submitted for Administrator approval. You will also receive an email once your request has been either approved or denied. Figure 6.4: CMS File Browse 50 | Dotmarketing CMS User Manual Glossary Categories – Categories are created and used to classify pieces of content including events. Your website’s users can then search for content by filtering them by category. Containers – Containers comprise the structure of a template, and are placeholders for content. Containers also determine how content will be displayed on a page. For more on this, refer to the definition of “Content Structure” below. Content Structure – Content structures hold and organize information in fields created by CMS Developers. The CMS Administrators can specify certain structures to display in specific containers. These content structures break up information into various fields (title, subtitle, description, body, etc.) and then display the appropriate fields (depending on the container it is placed in) on a particular page of your website. For example, a fully populated piece of content can be placed within a limiting container, which then may display only three or four of the fields on the page. Additionally, one piece of content can be used on several pages, and therefore in different types of containers. It is always best to populate all fields of a piece of content, so that it can be used within multiple containers (which display unique fields) without revision. Event – An event is a unique piece of content using time and date fields to distinguish it from other types of content. Unlike a regular piece of content (which can be saved in any folder and used on any page) an event is stored in a distinct database which is then used to populate a calendar. Other containers can be created to draw from the event database also. Dotmarketing CMS User Manual | 51 File Browser – The file browser provides you with a visual layout of your website’s structure. It serves as a folder tree, allowing you to determine which folder contains which pages and what content; it indicates the status of your folders, pages, and content (published, seen on menu, locked/unlocked); and it is the starting point to perform many of the tasks described in Section II. HTML Pages – HTML pages are the web pages that comprise your website. Portlet – Any given portlet is a single compartment of the CMS that gives you access to one of the system’s functionalities. For example, the Add/Edit HTML Page portlet allows you create or modify HTML pages (this is a functionality of the CMS). The CMS allows you to integrate many portlets on your user interface so that you have access to several functionalities at once. Templates – Templates are the various blueprints available to you for your website’s HTML pages. (Note: If you are a CMS developer you may be designing these templates.) These blueprints contain non page-specific information, so they are essentially empty structures that you can populate. Required Field – Determined by the development team in conjunction with the client, this field is denoted by a red star and is located within a container. A required field left blank will prevent a content item from being saved and/or published.