1
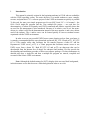
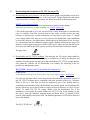
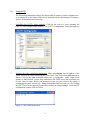
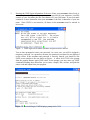
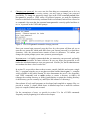
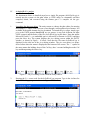
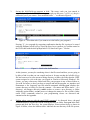
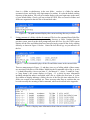
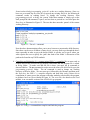
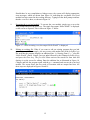
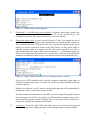
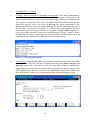
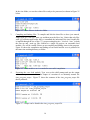
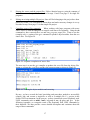
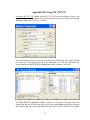
Sun Microsystems Solaris UNIX Student User Manual Release 2.02 Spring 2006 Erh-Wen Hu & Marvin Kiss Table of Contents I. Introduction .................................................................................................................... 2 II. Downloading and Installing WS_FTP LE and PuTTY ................................................... 3 III. Using PuTTY to log onto the UNIX server 1. 2. 3. 4. IV. Launching PuTTY ................................................................................................................................ 4 Entering connection information ......................................................................................................... 4 Entering UNIX login information ....................................................................................................... 5 Changing your password ..................................................................................................................... 6 A Single-file C++ Project 1. Launching the pico text editor ............................................................................................................. 7 2. Entering the C++ source program ....................................................................................................... 7 3. Saving the source program .................................................................................................................. 8 4. Finding where you are with the pwd command ................................................................................... 8 5. Displaying contents of working directory with the ls command ......................................................... 9 6. Creating a new folder with the mkdir command ................................................................................. 10 7. Moving between different directories with the cd command .............................................................. 10 8. Compiling and linking a C++ program with the GNU C++ compiler ................................................. 11 9. Executing the a.out load module ......................................................................................................... 12 10. Retrieving and editing an existing file ................................................................................................ 12 11. Printing the source program ............................................................................................................... 13 12. Printing the output result .................................................................................................................... 13 13. Logging out of the UNIX ................................................................................................................... 13 V. A Multiple-file C++ Project 1. 2. 3. 4. 5. 6. 7. Creating a folder to store all files belonging to the project ................................................................. 14 Entering source files ............................................................................................................................ 14 Compiling and linking multiple files ................................................................................................... 16 Executing the multiple-file project ...................................................................................................... 16 Printing the source code and output result........................................................................................... 17 Retrieving and editing an existing multiple-file project ...................................................................... 17 Compiling source files separately ....................................................................................................... 17 Appendix I: Frequently Used UNIX Commands ................................................................... 18 Appendix II: Frequently Used UNIX Shell Command-Line Key Strokes ............................... 22 Appendix III: Using WS_FTP LE……………………………………………………………..23 Please forward your comments/suggestions to [email protected] or [email protected]. I. Introduction This manual is primarily written for the beginning students in CS240 who are unfamiliar with the UNIX operating system. The main objective is to enable students to enter, compile, execute, and print their C/C++ software projects in the UNIX environment as quickly as possible. To this end, the same two simple programs used in our MS Visual C/C++ 6.0 manual -- the Hello World single-file program and the Time multiple-file project -- are used here for demonstration. A subset of frequently used UNIX commands and utilities especially those that are used for file management is also introduced. Because of its relative ease of use, the menudriven pico editor is used for the demonstration instead of the more popular vi and emacs editors used in the industry. The vi and/or emacs can be learned quickly as soon as students become acquainted with the UNIX environment. In order to access our powerful UNIX from a remote location such as from your home, it is strongly recommended that the users download and install WS_FTP LE and puTTy. WS_FTP LE is a file transfer utility that facilitates the file transfer between a home PC and the Department‘s UNIX server; puTTy is a Telnet program that facilitates remote access to our UNIX server from a home PC. Both WS_FTP LE and puTTy are shareware that can be downloaded from the Internet free of charge for educators and students. We first provide the downloading and installation procedure of these two software packages. We then demonstrate in detailed steps how a single-file and then a multiple-file program are entered, compiled and executed in the Solaris UNIX environment. Note: Although the default settings for PuTTy display white text on a black background, in this document we use black text on a white background in order to save ink. 2 II. Downloading and Installation of WS_FTP LE and puTTy 1. Downloading the putty software: you may first use the google search engine to look for a putty download site by entering putty as the search word. Google displays the sites where a free download is available. For example, the following is the first among many sites. PuTTY: a free telnet/ssh client Open source SSH client with remote file copying support. [Win32 (Intel and Alpha)] www.chiark.greenend.org.uk/~sgtatham/putty/ - 5k - Cached - Similar pages Click on the hyperlink to go to the site and follow screen instructions to download the putty.exe software. Note that you may want to first create a folder to store the putty software or directly store it in the root directory of any drive of your choice. To install putty, simply double click the putty.exe file you have just downloaded. If the installation is successful, the putty icon shown below should appear on the desktop (if not, just copy it to the desktop from the Windows program menu). Double clicking on the putty icon initiates a remote login session to our Solaris UNIX server where one can gain full access to services provided by the UNIX system as will be discussed later in this user manual. The putty icon: 2. Downloading the WS_FTP LE software: Note that only the LE version, which stands for the ―limited edition‖ version of the software is available free of charge for educators and students. Go to the google site and type in the search phrase WS_FTP LE, google displays sites where the software can be downloaded. For example, the following is the one possible site among many others. WS_FTP LE - Reviews and free downloads at Download.com WS_FTP LE - Transfer files over the Internet. - Review and free download at Download.com. www.download.com/3000-2160-1572132.html - 22k - Feb 2, 2006 - Cached - Similar pages Go to the site and then follow screen instructions to download the appropriate version of the WS_FTP LE software that is compatible with your operating system (e.g., Windows 2000, or XP, etc.). Note that you may be required to prove your student status by completing a questionnaire before the download can proceed. Again, the downloaded file may be stored in a pre-created a folder or simply in the root directory of a drive of your choice. To install WS_FTP LE, simply double click the downloaded file. If the installation is successful, the system displays the WS_FTP icon on the desktop (if not, just copy it from the Windows program menu) as shown below. To launch an FTP session, simply double click on the icon. The detailed operations of FTP will be discussed later in the manual. The WS_FTP LE icon: 3 III. Using PuTTy The following demonstration shows the steps needed to connect a remote computer such as your home PC to the Solaris UNIX server maintained by the Department of Computer Science, William Paterson University. 1. Launching the PuTTY telnet software: Click on the putty.exe icon (assuming the putty.exe icon is displayed the desktop). The ―puTTY Configuration‖ dialog box appears: Figure 1 – PuTTY Configuration Window 2. Entering the telnet connection information: Enter cs.wpunj.edu (the IP address of our UNIX server in the Coach House) in the ―Host Name‖ box, then select SSH protocol as shown. Click on the open command button, the ―cs.wpunj.edu – putty‖ login screen appears as shown below, you are now connected to the UNIX server and it prompts you to enter your username. Before you proceed to login, you may exercise the option of configuring the putty session (e.g., change background and text color, etc.) by clicking the PuTTY icon at the upper left corner and clicking on change settings. In the PuTTY configuration window click on Colors. Figure 2 – The UNIX login screen. 4 3. Entering the UNIX login information of the user: Enter your username where bushg is entered as shown in Figure – 3; your username is provided by your instructor; it usually consists of your last name plus the first character of your first name. If your last name contains 8 or more characters, then your username is the first 8 characters of your last name. Since UNIX is case-sensitive, all letters in the username must be entered in lower-case. Figure – 3 UNIX login screen where username and password are entered. You are then prompted to enter your password. As a new user, you will be assigned a temporary password. As a protective measure, the password you entered is not displayed on the screen. If the username and password is correctly entered, you should see the UNIX screen similar to the one shown in Figure – 4, where bash-2.03$ is the prompt from the popular Bourne again UNIX shell. At the prompt, you may enter any UNIX command including those that allow you to enter, compile, link, execute, and print the source code and output from your program. Figure – 4 Successful login; UNIX displays prompt bash-2.03$ 5 4. Changing your password: As a new user, the first thing we recommend you to do is to change your password. For security reasons, you may want to change your password periodically. To change the password, simply type in the UNIX command passwd (Note that passwd is actually a UNIX utility; for practical purpose, we make no distinction between a shell built-in and utility command in this user manual; both will are referred to as commands. Also note that the command name passwd is correctly spelled and there is no ‗or‘ in passwd! at the UNIX shell prompt: Figure -5 Use UNIX passwd command to change password. Enter your current login password, press the Enter key, the system will then ask you to enter the new password, which must differ from your current password by at least three characters. Also, the password must contain at least six characters. To confirm your change, the system prompts you to enter your new password again. Important note: it is highly recommended that you memorize your password, preferably write it down somewhere for future reference. In case you forget your password, it will burden the lab administrators to reset your password. Just like you, the lab administrators are students who have a lot of work to do! In section IV, we provide a demo on how to enter, compile, link/edit, and execute a single file C++ program using the easy to use pico text editor and the famous gnu C++ compiler widely available in the public domain. We also demonstrate the use of a few frequently used UNIX commands such as mkdir (makes or creates a directory or folder), cd (changes the working directory or folder), pwd (displays or prints the working directory or the directory you are currently in), and ls (lists the contents of a directory). Since almost all real world programs are developed and compiled as separate files, we provide in section V a demo which shows in detailed steps how a multi-file software project is compiled, linked, and executed. For the convenience of users, we provide in section VI a list of UNIX commands frequently used by beginning level software developers. 6 IV. A single-file C++ project We demonstrate below in detailed steps how a single file program (helloWorld.cpp) is entered into the system via the pico editor (a UNIX utility or command!) and then compiled, linked, and executed using the famous gnu C++ compiler via the g++ command. 1. Launching the pico text editor: The main reason we choose the pico editor for entering and editing C++ source code is its ease of use through a well-organized set of menus. It is available in the public domain for free download. To launch the pico editor, simply type pico at the UNIX prompt (bash-2.03$ on our system; it may look different on other UNIX systems) and the name of the file (helloWorld.cpp in this demo. Note that unlike Micorsoft Visual C++, no embedded space is allowed in a filename in UNIX.) and then press the Enter key. The system displays the pico editing screen within the PuTTY window, as shown in Figure – 6 below. Note that the file name helloWorld.cpp is displayed in the title bar of the pico editing window. The pico text editor is a menudriven editor where the menu is displayed at the bottom of the screen. The ‗^‘ symbol in the menu means the holding down of the Ctrl key, thus ^c means holding down the Ctrl key and then pressing the letter c key. Figure 6 - The pico editing screen within the Putty window. 2. Entering the C++ source code for the helloWorld.cpp program: Type in the six lines for the helloWorld.cpp program as shown in Figure – 7 below. Figure 7 – The source code for the helloWorld.cpp program has been entered. 7 3. Saving the helloWorld.cpp program to disk: The source code you just entered is temporarily held in the buffer. To save it permanently on disk press ^x (Ctrl + x), the pico editor asks you if you want to ―Save modified buffer …‖ as shown in Figure 8. Figure 8 – Pico editor asks if you want to save the buffer (your program). Pressing ‗Y‘, pico responds by requesting confirmation that the file is going to be stored under the filename helloWorld.cpp. Press the Enter key to confirm, pico returns control to the UNIX shell with the shell prompt bash-2.03$ shown in Figure – 9 below. Figure 9 - Back to the shell interface. At this juncture, you may be wondering where is the file stored and how you are going to be able to find it so that you can compile and run it. It turns out that the helloWorld.cpp file has been saved to your current working directory or folder, the folder that the UNIX system assigned to you at the time you logged in. Similar to Microsoft Window‘s file system, you may create many folders and store your program in any of these folders as you wish. So before we show you how to compile and run the program, we introduce and demonstrate a few frequently used file-related commands including pwd (displays the current directory or folder), ls (lists the contents – file names and folder names – of a directory), cd (changes directory), mkdir (makes or creates a new directory or folder within the current folder), and mv (moves or changes the name of a file or folder). Other useful UNIX commands related to your programming classes are discussed and summarized in the Appendix. 4. Finding where you are with the pwd UNIX command: As discussed above, the pwd command displays or prints the current working directory or folder. Enter pwd at the shell prompt and press the Enter key, the system displays /home/students/bushg as shown in Figure 10 below, where the leftmost slash / indicates the root directory of the file system; 8 home is a folder or subdirectory in the root folder; students is a folder for student accounts in home; and bushg is the login name of a student. It is also the default working directory of that student. You will get a similar display with your login name as the name of your default folder. Clearly you can see that in UNIX, files are stored in folders and folders are organized in the tree-like or hierarchical order. Figure 10 – The pwd command displays the current working directory or folder. 5. Listing contents of a folder with the ls command: The ls or list command lists all the files and folders contained within the current working directory or folder. Continue from the previous screen, enter ls at the shell prompt and press the Enter key, the UNIX system displays all the files and folders that have been previously created in the bushg working directory as shown in Figure 11 below. Notice the helloWorld.cpp we just entered is in the list. Figure 11 – The ls command displays all the file and folder names in the current folder. There are many names in Figure - 11 and there is no way of telling which of these names are associated with files or with folders. Modifying the ls command with a flag or switch –l (a dash followed by a lower case letter ‗L‘ not numeral ‗1‘, where ‗l‘ stands for ‗long‘ or ‗long format‘), the system displays in Figure - 12 a whole lot more information including whether the name is associated with a file or a folder (the first letter ‗d‘ in the first column of display indicates a folder), the size of the files, the time when the file or folder was created or last modified, etc. There are many other flags or switches that can be used to modify the meaning of the ls command, which are discussed in the Appendix. Figure 12 – The ls –l displays more information about what are stored in a folder. 9 6. Creating a new folder with the mkdir command: In a programming class such as CS240 or CS342, you are required to complete many programming projects and each of these programming projects may consist of multiple files. It is therefore highly desirable to store files belonging to a particular project in a separate folder where they can be easily and quickly located. The mkdir command allows you to create new folders in your current working directory, as illustrated below. Let‘s try to create a new folder named programming_project#1 in the current working directory /home/students/bushg. Type mkdir programming_project#1 at the shell prompt and press the Enter key as shown in Figure 13. Figure 13 – the mkdir command To see if the new folder has indeed been created, we continue in Figure 13 and enter ls at the shell prompt, the system lists all the file and folder names as shown, and the new folder programming_project#1 is indeed in the list. Opposite to mkdir is the rmdir command, which removes an existing folder. The usage of rmdir is discussed in the Appendix. 7. Moving between directories with the cd command: Without a ‗path‘ (beyond the scope of this manual) that specifies the location of a folder, all new files are stored by UNIX in the current working folder. So if you just create a new folder and want to store files in it, you need to make the newly created folder your working folder, and it is easily done through the use of the cd or change directory command, as illustrated in Figure 14 below. Figure 14 – The cd command. As shown in Figure 14, the pwd command displays /home/students/bushg as the current working directory. We then type in cd programming_project#1, press the Enter key, and then enter the pwd command again. The system now displays 10 /home/students/bushg/programming_project#1 as the new working directory. Since we have not yet created any new files in it or moved any existing files to it, the following ls command results in nothing listed. To change the working directory from programmingproject#1 to bushg, the ‗parent‘ folder that contains it, simply type at the shell prompt the cd command, a space, and two dots or periods in a row then press the Enter key, as illustrated in Figure 15. The two dots here mean the ‗parent‘ of the current working directory. Figure 15 – The cd .. command. Note the above demonstrations allow you to move between a parent and a child directory. Since there can be a tree of folders of many levels, you may need to go through the above steps repeatedly in order to get to the desired folder. A quicker way to get to where you want requires the user to specify the ‗path‘ that leads to the folder. A discussion of the path can be found in any UNIX textbook. 8. Compiling and linking the C++ program using GNU C++ compiler: We are now ready to compile and run the helloWorld.cpp program. Remember that the program file is stored in bushg folder. To make sure that the file is there, just enter the ls command as discussed before. The mv command is used to move the source file helloWorld.cpp to the programming_project#1 folder. The cd command is used to change our working directory to the new folder. We next enter g++ followed by the filename and then press the Enter key, the GNU C++ compiler compiles and then links (only if there are no compilation or syntax errors) the program with other modules referenced by the program to produced an a.out file as shown in Figure 16. The a.out file, also known as the load module, is an executable version of the helloWorld.cpp program. Figure 16 – The g++ command that compiles and links the program. 11 Should there be any compilation or linkage errors, the system will display appropriate error messages, which are absent from Figure 16, indicating the executable a.out load module has been created in the working directory. Typing ls at the shell prompt confirms that the a.out file is there, as shown in Figure 16. 9. Executing the a.out load module: To execute the a.out module, simply type a.out at the shell prompt and press the Enter key. The single line output ―Hello World!‖ is displayed on the screen as expected. This is shown in Figure 17 below. Figure 17 – After executing a.out, the output ―Hello World!‖ is displayed. 10. Editing an existing file: What if you want to edit an existing program that you had previously stored? For example, you may want to add another line in the helloWorl.cpp file such that the program displays an additional line ―A Greeting From C++.‖ after the ―Hello World!‖ phrase. Simple, just type pico followed by the filename helloWorld.cpp and press the Enter key. The pico text editor retrieves the stored file from disk and displays it on the screen for editing. Enter the addition line as illustrated in Figure 18. Compile and link the program again with the g++ command and execute the a.out load module. The screen shows the new result of execution with two output line lines. All these steps are displayed in Figures 18 and 19. Figure 18 – the pico editing window where a new line has been added. 12 Figure 19 – Output from the edited program. 11. Printing the C++ helloWorld.cpp source program: To print the source code is simple. Just type the lp (line printing) followed by the name of the file, helloWorld.cpp. This command will print the file on the default printer, Colossus in lab101a. 12. Printing the output result: As you‘ve noted in Figures 17 and 19, the outputs are part of the screen display, mixed together with commands that you entered and the responses to these commands from the UNIX system. One way to separate the outputs from the screen display is to use the ―redirection‖ feature of the UNIX system: you may ask the UNIX to send the program output to a separate text file with a name chosen by you. This is achieved through the use of the output redirection operator ‗>‘ as illustrated in Figure 20. Note that the output from the execution of a.out has been redirected (from the default monitor) to an arbitrarily named output_result disk file in the current working directory. Figure 20 – Output from the execution of a.out is directed output_result file. You may use UNIX command such as cat (the catenation command) or pico editor to display the content of the output_result file. You can also use the lp command to print the contents of the file. Notice: Never print an a.out file, since it contains binary data that will be unreadable by humans and result in a great waste of paper and ink. The lab procedures presented thus far will enable you to run single-file programs found in most of the projects in CS230, some projects in CS240 and other computer courses. Since most real world programs consist of multiple files, we next discuss with a demo how a multiple-file program gets compiled and executed. 13. Logging out: To log out of the UNIX, type either logout or exit at the shell prompt and then press the Enter key. Holding down the Ctrl key and pressing D is another method. 13 V. A Multiple-file C++ Project 1. Creating a folder to store all files belonging to the program: In the below demonstration, we will use a time program to show how a multiple-file program is dealt with in the Solaris UNIX environment. The time program displays time of the day in standard format. The program is composed of three files: the time.h file, a user-defined header file that defines the interface of the time class; the time.cpp file, which implements all the functions defined in the time class; and the main.cpp file, the driver file that makes use of the time class. As discussed in section IV, it is convenient to create a separate directory used exclusively for the storage of all files of a program. Using the mkdir command, we create a new folder and name it time in the working directory of bushg. Figure 21 shows the time folder has been created within its parent bushg folder and through the use of cd command, the time folder has been made the current working directory. Figure 21 – Using the pwd command 2. Entering files: Using the pico editor, we separately entered the code for the three files mentioned above. Figure 22 through 24 displays the code for the time.h, time.cpp, and main.cpp, respectively. Note that you may open three pico windows (running three separate pico processes) in the same manner that you opened your first by logging in the UNIX multiple times. This way, you can work simultaneously with all three windows for three different files, which is very convenient especially during a debugging session. Figure 23 – Source code for the time.h file. 14 Figure 23 – Source code for the time.cpp file. Figure 24 – Source code for the main.cpp file. 15 In the time folder, we now have three files ready to be processed, as shown in Figure 25 below. Figure 25 – Three files are in the time folder. 3. Compiling and linking files: To compile and link the three-file we have just entered, simply type g++ time.cpp main.cpp and then press the Enter key. Notice that only files with .cpp extension appear after the g++ command; the inclusion of the time.h header file is implied through the use of the C++ pre-processing directive “#include “time” in both the time.cpp and main.cpp files. Similar to a single file project, an executable load module a.out will be created if there are no compiling and linking errors in the program. Figure 26 shows the compilation and linking are successful and the a.out is produced in the same time working directory or folder. Figure 26 – Load module a.out is created after successful compilation. 4. Executing the a.out load module: Type a.out at the shell prompt and use the output redirection operator > to direct the output of execution to an arbitrarily named file time_program_output. Figure 27 shows the contents of the time_program_output file that is produced. Figure 27 – Output can be found in the time_program_output file. 16 5. Printing the source and the output files: Follow identical steps to print the contents of both the source and output files as described in steps 11 and 12 on page 13 for single file programs. 6. Editing an existing multiple-file project: Since all files belonging to the project have been placed in a folder, it is convenient to locate them and make necessary changes in a way described in step 10 on page 13 for the simple-file project. 7. Compiling source files separately. When working with large programs with many source files it is often advantageous to compile each source file separately. Using the rm command we have removed the a.out and time_program_output files. Then we use the (compile only) –c option of the g++ command to produce object modules from the two source files. See Figure 28. Figure 28—Separate compilation of source files. The next step is to use the g++ compiler to produce the a.out file from the object files. Again we execute the a.out file to produce the program output as shown in Figure 29. Figure 29—Linking the object modules and executing. By now, we have covered the basic knowledge and procedures needed to successfully compile, link, and execute a single-file as well as a multiple file C++ project in the Solaris UNIX environment. In the process, we have introduced several frequently used UNIX commands such as mkdir, rmdir, cd, pwd, ls, mv, lp, pico, and g++. In the following Appendix, we categorize some of the frequently used UNIX commands by their functions. We then provide a more detailed description and variations about the usage of these commands. 17 Appendix I: Frequently Used UNIX Commands I. Frequently used commands grouped by their functions and sorted alphabetically. (based on the book “UNIX in a Nutshell”, D. Gilly; O’Reilly & Associate, Inc.) File Management Commands: cat Join files or display the contents of a file cd Change directory chmod Change access mode on files cp Copy files file Determine a file‘s type head Displays the first few lines of a file ln Create file aliases ls List files and directories mkdir Create or make a directory more Display contents of a file by screenful mv Move or rename a file or a directory pwd Print or display current working directory rm Remove files rmdir Remove directories tail Display the last few lines of a file wc Count lines, words, and characters in a file Programming Commands: cc Compile and link a C program g++ Compile and link a C++ program with the gnu compiler lex Perform lexical analysis of a file make Manage versions of a large programming projects yacc Convert a file containing context-free grammar into tables for subsequent processing 18 Text Editors or Text Editing Commands: cut Select column of a file for display pico A simple and easy to use menu-driven text editor sort Sort or merge files vi A command-driven full-screen text editor popular among professionals Searching Commands: egrep Extended version of grep fgrep Search files for literal words find Search the system for file names grep Search files for text pattern Miscellaneous Commands: cal displays the monthly calendar clear clear the screen date Display today‘s time and date finger Display information about individual users ftp To upload and download files kill Terminate a running command or a process lp Print the content of a file man Display information about a command passwd Change password ps Show processes talk Write to others online telnet Connect to another system who Display who are currently logged in 19 II. Detailed Syntax and Usage of a Few Commands Frequently Used in CS Programming Classes ls [options] [names] If no names are given, all files and folders in the working directory are listed. If names are provided: if the name is a folder name, all files in the named folder are displayed; if it is a file name, the information about the file is displayed. The most useful options are listed below. Note that an option is an upper or lower case letter preceded by a hyphen ‗-‗; if you specify more than one option, then only a single hyphen preceding the first option is needed. Options -a -F -i -l -r -t List all files, including the hidden files (those preceeded by a ‗.‘ when displayed.) List all file and folder names and append a ‗/‘ to folder names, ‗*‘ to executable file names (such as a.out), and ‗@‘ to symbolic links. List inode of each file Long format listing, including file access permissions, ownership, size, creation or modification time, etc. List files in reverse order by name and by date List files by modification time, newest first. mv [options] source target Move files and directories around on the system or to rename them, as illustrated below: Source File File Directory Directory One or more file Options -i target name Existing file name Existing directory Existing directory Result Rename file as name Overwrite existing file with source file Rename directory as name Move directory as a sub-directory of existing one Move all files to existing directory Inquires; prompt for a y(yes) response before overwriting an existing target. rm [options] files Delete one or more files in a directory. To remove a file, one must have write permission in the directory that contains the file, but one needs not have permission on the file itself. Options -r If file is a directory or folder, remove the entire directory and all its contents, including subdirectories! So use it with care. 20 chmod [options] mode files Changes the access mode of one or more files. Only the owner of a file or a privileged user may change its mode. Create mode by concatenating the characters from who, opcode, and permission. Who is optional (if omitted, default is a); choose only one opcode. Who u g o a User Group Other All (default) Opcode + = Add permission Remove permission Assign permission (and remove permission of the unspecified fileds) Permission r Read w Write x Execute Examples: Add execute-by-user permission to file: chmod u + x file make [options] [target] Update one or more targets according to dependency instructions in a description file in the current directory. By default, this file is called makefile or Makefile. Options -q Query; return 0 if file is up-to-date; non-zero otherwise. 21 Appendix II Useful UNIX Shell Command-Line Key Strokes The following key strokes are to be used in the command-line operations only. The same key strokes in different environment, e.g., in the pico or vi editor may invoke totally different responses! Ctrl + D: logging out of a UNIX session; equivalent to typing logout or exit at the shell prompt and then pressing the Enter key. Ctrl + H: Deleting a character to the left of the cursor in the command line after the shell prompt; same as pressing the Backspace key. Ctrl + R: Redrawing the current command line. Ctrl + U: Deleting or killing the entire command line. Ctrl + W: Deleting a word to the left of the cursor in the command line. Ctrl + C: Terminating the execution of a shell command. (For example, when you typed man ls at the shell prompt, the UNIX displays in lengthy detail about the usage of the ls command. You may press Ctrl+C to terminate the screen display as soon as you‘ve obtained the needed information about the ls command.) The arrow keys: o Top: Scrolling backward through previously entered commands at the shell prompt in a sequential manner. All previously entered commands are stored in the buffer. o Down: Scrolling forward through commands stored in the buffer and stopping at the most-recently-entered command. o Left: Move the cursor to the character on its left in the command line. o Right: Move the cursor to the character on its right in the command line. 22 Appendix III: Uisng WS_FTP LE Launching WS_FTP LE: Double click the WS_FTP LE icon on the desktop (copy it from the program menu to the desktop if the icon is not there), the system displays the Session Properties dialog box in Figure - A1 below: Enter information as shown except you must enter your UNIX login name in the User ID box and your UNIX login password in the Password box. Click the OK button, the system displays the WS_FTP LE cs.wpunj.edu window in Figure - A2 below. The WS_FTP LE cs.wpunj.edu window consists of 2 two panes. The pane on the left displays the disk drives, directories, and files of your Local System (your home computer, for example); the pane on the right shows the directories and files of the Remote System 23 (our UNIX server in the Coach House). You may select any file or files in any folder on any drive of your local PC and transfer them (uploading) to any of your folders on the UNIX server. You may also transfer any of your files from the UNIX server to your local PC. Once the files are selected, the transfer is effected by clicking the arrow icon in between the two panes. In addition to file transfer, the WS_FTP LE is capable of performing many other functions for you by clicking on appropriate buttons. These buttons, including chdir, mkdir, exec, rename, delete, and refresh are grouped into a panel on the right side of each pane of the WS_FTP LE cs.wpunj.edu window. The use of these buttons is rather intuitive, so no attempt is made here to discuss it further. 24