1
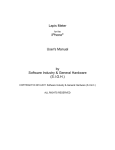
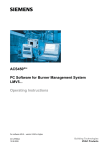
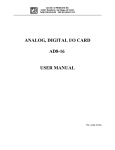
PCAN-MiniDisplay
Visualization and Recording of
Vehicle Data
User Manual
Document version 1.0.1 (2015-04-21)
PCAN-MiniDisplay – User Manual
Products taken into account
Product name
Model
Part number
PCAN-MiniDisplay
Display with three mounting pegs
IPEH-002262
PCAN-MiniDisplay
with casing
Display in casing with push buttons
IPEH-002262-KSM1
The front page shows the PCAN-MiniDisplay with three mounting pegs.
microSD™ is a trademark or registered trademark of SD-3C, LLC in the United States
of America, other countries, or both.
All other product names mentioned in this document may be the trademarks or
registered trademarks of their respective companies. They are not explicitly marked
by „™“ and „®“.
Copyright © 2015 PEAK-System Technik GmbH
Duplication (copying, printing, or other forms) and the electronic distribution of this
document is only allowed with explicit permission of PEAK-System Technik GmbH.
PEAK-System Technik GmbH reserves the right to change technical data without
prior announcement. The general business conditions and the regulations of the
license agreement apply. All rights are reserved.
PEAK-System Technik GmbH
Otto-Roehm-Strasse 69
64293 Darmstadt
Germany
Phone: +49 (0)6151 8173-20
Fax:
+49 (0)6151 8173-29
www.peak-system.com
[email protected]
Document version 1.0.1 (2015-04-21)
2
PCAN-MiniDisplay – User Manual
Contents
1
1.1
1.2
2
2.1
2.2
2.3
2.4
2.5
2.6
3
3.1
3.2
3.3
4
4.1
4.2
4.3
4.4
4.5
5
5.1
5.2
5.3
6
Introduction
5
Properties at a Glance
Scope of Supply
Connectors
J1
J2
J3
J4
J5
J6
5
6
7
External Buttons
System
USB
JTAG
microSD
Serial
7
8
8
10
10
11
Scene Definition
12
General Description of an *.ins File
Example of an *.ins File
Using Several Scenes
Steps to Operation
12
13
14
16
Prerequisites
Preparing the Memory Card
Powering On the Device
Menus
Setting the Startup Options
CAN Tracing
16
16
17
18
19
21
Recording CAN Traffic
Playing Back Recorded CAN Traffic
Using the Recorded CAN Traffic on the PC
Filtering the CAN Traffic
3
21
22
23
26
PCAN-MiniDisplay – User Manual
7
7.1
7.2
7.3
8
Menu Reference for Settings and Maintenance
27
Device Settings
Internal Statistics
Memory Card
27
29
30
Technical Specifications
31
Appendix A
CE Certificate
32
Appendix B
Dimension Drawing
33
Appendix C
File Structure on the Memory Card
34
Appendix D
Definition Files Reference
35
D.1
D.2
D.3
Scene Definition (*.ins)
Scenes Project File (*.inp)
CAN ID Filters (*.flt)
Appendix E
E.1
E.2
E.3
Model with Casing
Scope of Supply
Push Buttons
Connectors
35
53
54
57
57
58
58
4
PCAN-MiniDisplay – User Manual
1
Introduction
The PCAN-MiniDisplay is used as human-machine interface for the
visualization of CAN data. For the connection to the CAN bus, it has
a High-speed and a Single-wire CAN connector. The graphic representation of incoming CAN data is configured before using the unit
and then is performed on a TFT display. During operation the user
can switch between different scenes.
The PCAN-MiniDisplay can also be used for data logging. The data
traffic is recorded to a memory card and can be played back on the
CAN bus as well as analyzed on a PC later on.
Important note: In order to operate the PCAN-MiniDisplay, you
need a microSD memory card. This is not in the scope of
supply.
This user manual refers to the PCAN-MiniDisplay board to be used
for mounting. The peculiarities of the model with casing and buttons (IPEH-002262-KSM1) are described in Appendix E on page 57.
1.1
Properties at a Glance
CAN connection via a High-speed CAN channel (ISO 11898-2)
and a Single-wire CAN channel (SAE J2411)
Wake-up via CAN
TFT display with 320 x 240 pixel resolution
Freely configurable visualization of CAN data
Switching between multiple display configurations via push
buttons (optional)
5
PCAN-MiniDisplay – User Manual
Slot for microSD memory card (up to 32 GByte), 512 MByte card
enclosed
High-speed USB 2.0 port for access to the memory card using a
PC
Recording of incoming CAN messages to the memory card
Playback of trace files
Conversion of trace data to various output formats using
Windows software
Filtering of CAN IDs per CAN channel
Dimensions: 70 x 50 mm
Voltage supply from 7 to 30 V DC
1.2
Scope of Supply
PCAN-MiniDisplay
Connection cable assembly with open wire ends for peripherals
(power supply, field busses, digital inputs)
microSD memory card (512 MByte)
This User Manual in PDF format
Important note: In order to operate the PCAN-MiniDisplay, you
need a microSD memory card. This is not in the scope of
supply but available separately on request.
6
PCAN-MiniDisplay – User Manual
2
Connectors
The connectors on the circuit board are:
J1 External Buttons (2.1 below)
J2 System (2.2 on page 8)
J3 USB (2.3 on page 8)
J4 JTAG (2.4 on page 10)
J5 microSD (2.5 on page 10)
J6 Serial (2.6 on page 11)
For basic use, at least the power supply (J2), a CAN connection (J2),
and a microSD memory card (J5) are needed.
2.1
J1 External Buttons
3 push buttons can be connected and used to navigate through the
menus of the PCAN-MiniDisplay user interface. This is for maintenance and debugging purposes. For example a user of the PCANMiniDisplay can be enabled to do communication configuration
changes or CAN tracing.
Pin
Pin assignment External Buttons
Function
1
Down 2
Up 3
Enter 4
GND
The 3 push buttons connect each function pin (1 to 3) to GND.
7
PCAN-MiniDisplay – User Manual
2.2
J2 System
Power supply
1 High-speed CAN channel (CAN1), 1 Single-wire CAN channel
(CAN2), alternative use of external transceiver with CAN2
1 digital output, 1 digital input, 2 analog inputs
Pin
Pin assignment System
2.3
Function
1
Vb (7 - 30 V DC)
2
GND
3
Dout1
4
Din4
5
Ain1
6
Ain2
7
not connected or CAN2-RxD 1
8
CAN2_SW or CAN2-TxD1
9
CAN1_L
10
CAN1_H
J3 USB
Access the memory card in the PCAN-MiniDisplay from a PC via
USB connection. The memory card can also be accessed if the
PCAN-MiniDisplay is switched off. At startup of the device, the USB
connection is briefly interrupted.
1
TTL signal for optional external CAN transceiver
8
PCAN-MiniDisplay – User Manual
Pin
Pin assignment USB
2.3.1
Function
1
5 V USB
2
D-
3
D+
4
GND
5
GND
Unplugging the USB Connection
Before unplugging the USB cable from the PC or the PCANMiniDisplay, the device should be logged out of the operating
system. This procedure ensures that the operating system has
correctly finished a write process to the memory card of the PCANMiniDisplay.
Windows: Safely remove hardware icon in the taskbar notification area
2.3.2
Restriction for PCAN-MiniDisplay Functions
During a USB connection to a PC some functions of the PCANMiniDisplay are limited, because the device cannot access the
memory card at the same time as the connected PC:
A scene definition (instruments) cannot be loaded.
The recording and playback of CAN traffic (trace) do not work.
The commands in the Memory Card menu do not work.
9
PCAN-MiniDisplay – User Manual
2.4
J4 JTAG
Access the microcontroller for debugging purposes.
Pin assignment JTAG
2.5
Pin
Function
1
GND
2
GND
3
Reset#
4
3.3 V
5
TCK
6
TMS
7
TDO
8
TDI
9
RTCK
10
TRST
J5 microSD
Slot for a microSD memory card.
Location of the microSD card slot
on the circuit board of the PCAN-MiniDisplay (bottom view)
10
PCAN-MiniDisplay – User Manual
2.6
J6 Serial
Provides serial signals for customer-specific extensions.
Pin assignment Serial
11
Pin
Function
1
GND
2
5V
3
TxD RS-232
4
RxD RS-232
5
SCL (Software I²C)
6
SDA (Software I²C)
PCAN-MiniDisplay – User Manual
3
Scene Definition
The PCAN-MiniDisplay uses a so called scene for display of CAN
data in graphical form.
3.1
General Description of an *.ins File
A scene is a collection of instruments, labels, fonts, etc. defined in a
text file with the *.ins extension. Scenes furthermore include
bitmap graphic files (*.bmp) and font files (*.fon).
The contents of a scene definition file is divided in different sections
each containing definition entries:
[global]: common definitions for the scene
[instrumentX]: used bitmaps
[labelX]: text-based labels
[variableX]: CAN variables that are used by labels, the plotter,
and instruments
[fontX]: fonts that are used by labels
[plotterX]: line writer diagram
A reference to the keywords to be used in those sections is located
in appendix section D.1 on page 35. An example file is shown
below.
A definition file can contain comments that are lead in by double
slashes (//). All characters in a line after a double slash are ignored
as the *.ins file is interpreted by the PCAN-MiniDisplay.
During load time, the PCAN-MiniDisplay generates a binary version
of a screen definition (*.inb). That one is loaded much faster on
12
PCAN-MiniDisplay – User Manual
future use, because all conversions for panel-internal use are
already incorporated. This is the default behavior, but can be
configured in the Global section.
Altering the definition of a scene can only be done in the text-based
file.
Note: If the definition of a scene is altered, the previously
generated binary file (*.inb) must be manually deleted on the
memory card of the PCAN-MiniDisplay, so the loader sees that
a new binary must be created from the text file. If you do not
delete the binary file, your changes in the definition file will not
have any effect.
3.2
Example of an *.ins File
[global]
format=1
instruments=2
variables=1
labels=1
flashing_time=300
compress=0
[instrument1]
pictures=1
name="Background"
no_restore=1
0="Background_320_240.bmp","",0,0,0,0
[instrument2]
pictures=2
name="turn_left"
no_restore=0
offset=0,0
var_name="clig"
0="empty_28_20.bmp","",0,0,0,0
1="turn_l_28_20.bmp","",0,0,1,1
[variable1]
name="oiltemperature"
13
PCAN-MiniDisplay – User Manual
canid=779
position=8,8
frametype=0
byteorder=0
scale=0.62745
offset=-10
vartype=0
datatype=1
// ID in decimal notation
[label1]
name="Oil Temperature"
position=0,106
font_idx=3
//
length=5
fmt_string="% 4d°"
//
//
initval="----°"
fontcolor=200,200,0 //
bgcolor=0,0,0
//
lucida_13_18
Special treatment for degree character
"°" (ASCII 127)
green
black
sector=1
range=-10,124
fontcolor=200,200,0
bgcolor=0,0,0
flashing=0
sector=1
range=125,150
fontcolor=255,0,0
offcolor=127,0,0
bgcolor=0,0,0
flashing=1
3.3
Using Several Scenes
It is possible to use more than one scene on the PCAN-MiniDisplay.
Scenes can be switched by using the digital inputs (e.g. with push
buttons).
To achieve this, a list of scene definition files must be created in a
scenes project file (*.inp). This list also defines which scene is
used on startup.
14
PCAN-MiniDisplay – User Manual
A reference to the keywords to be used in those sections is located
in appendix section D.2 on page 53. An example file is shown
below.
[general]
version=1
[scenes]
scenes=4
startscene=2
1="speedo0.ins"
2="speedo1.ins"
3="picture1.ins"
4="picture2.ins"
15
PCAN-MiniDisplay – User Manual
4
Steps to Operation
On power-on the PCAN-MiniDisplay looks for the internally saved
startup options. An scene for display, the tracer for CAN recording,
or both can be started automatically.
Tip: At delivery, the PCAN-MiniDisplay is configured to start a
scene called Default.inp. Therefore, the device can be
deployed without initial user interaction via push buttons.
This chapter describes the steps to put the PCAN-MiniDisplay to
operation. Please go through each of the following sections.
4.1
Prerequisites
microSD memory card, max. 32 GByte (not in scope of supply)
PC with SD card reader (including adapter for microSD card)
or
USB connection PC to PCAN-MiniDisplay (connected to J3)
Power supply 7 to 30 V DC (connected to J2)
4.2
Preparing the Memory Card
In order to start up properly, the memory card must be formatted
with the FAT or FAT32 file system and must contain a specific directory structure. The provided DVD contains a prepared directory tree
for copying to the memory card.
16
PCAN-MiniDisplay – User Manual
Do the following to prepare the memory card:
1.
Insert the microSD memory card into the slot either of the
PCAN-MiniDisplay (if a USB connection is available) or of
your PC.
The memory card appears as an separate mass storage
device in your PC’s operating system.
2.
With the operating system, format the memory card with
the FAT or FAT32 file system. Latter is mandatory, if the
capacity of the memory card is greater than 2 GByte.
3.
Copy the MiniDisplay directory including all subdirectories and files from the provided DVD to the root directory of
the memory card. The MiniDisplay directory is located on
the DVD under the following directory:
/Tools/PCAN-MiniDisplay/MemoryCard/
For additional information, see Appendix C File Structure on
the Memory Card on page 34.
4.
Copy one or several scenes that you have created previously (see 3 Scene Definition on page 12) into the following
directory: /MiniDisplay/Scenes/
At delivery, the PCAN-MiniDisplay is configured to automatically show the following scene at power-on:
/MiniDisplay/Scenes/Default/Default.inp
5.
4.3
If prepared in a PC, remove the microSD memory card from
it and insert it into the slot of the PCAN-MiniDisplay.
Powering On the Device
The PCAN-MiniDisplay is powered on by applying a supply voltage
in the range of 7 to 30 V DC to connector J2. The device starts up
automatically. If not altered after delivery, the PCAN-MiniDisplay
shows the scene with the name Default.inp.
17
PCAN-MiniDisplay – User Manual
If the supply voltage has been applied before and the device is off
by using the corresponding menu entry, it can be started again by
activating the Down input on connector J1.
For details about the connectors see chapter 2 on page 7.
4.4
Menus
The PCAN-MiniDisplay provides a user interface with menus in
order to change the setup of functions. The navigation is done via
the digital inputs of connector J1 that can be equipped with push
buttons, for example. See section 2.1 on page 7 for details about the
connection.
Tip: The PCAN-Display with casing has the mentioned buttons
built in. See Appendix E on page 57 for more information about
this model.
Browsing through the menus and functions is done with the Up and Down buttons, a selected item is activated with the Enter button.
While displaying a scene, pressing the Enter button brings you
back to the main menu.
18
PCAN-MiniDisplay – User Manual
Tip: The use of the menus is not needed for pure display of a
scene, because basic settings can be defined in the definition
file Default.inp which is automatically loaded with delivery
settings. Thus, buttons can be omitted in that case.
4.4.1
Status Indication
While using the menus, icons on the upper right of the screen
indicate the status of the the CAN bus communication for CAN
Channels 1 (High-speed CAN) and 2 (Single-wire CAN).
Icon
Meaning
T R
CAN traffic: T = Transmit, R = Receive
Blinking:
Outgoing/incoming CAN messages
Green:
Regular traffic
Yellow, red: Faulty traffic
act
pas
off
Informs about the CAN controller status (active, passive, bus off). When
entering bus-off state, due to high (transmission) error rate, no further
CAN messages are transmitted or received. In this case, after fixing the
bus problem (e.g. a wrong CAN bitrate), a power cycle (off and on)
must be performed to reset the CAN controller.
L
The CAN channel operates in listen-only mode. This is enabled in the
device settings (see section 7.1.3 on page 28).
4.5
Setting the Startup Options
The main menu entry Startup Options gives the possibility to set
up the behavior on power-on.
Do the following to display a scene at startup:
Note: At delivery, the PCAN-MiniDisplay is configured to start a
scene called Default.inp.
19
PCAN-MiniDisplay – User Manual
1.
Click Show Scene.
2.
From the displayed directory structure, select a scene
(*.ins) or a project (*.inp) that is to be shown at startup.
In the Startup menu, the selected file is indicated in the
bottom status line.
3.
Select the checkbox on the right and set the marker 7 .
4.
Click OK.
Do the following to start tracing at startup:
1.
To the right of Start Tracer, select the checkbox and set
the marker 7 .
2.
At Tracer timeout, enter the period of time for stopping
the tracer if no CAN message is received. The never entry
leaves the tracer running.
3.
Click OK.
20
PCAN-MiniDisplay – User Manual
5
CAN Tracing
5.1
Recording CAN Traffic
¾ Menu item Trace Messages
With this function, the whole incoming CAN traffic including RTR
frames and error frames is recorded to a trace file on the memory
card of the PCAN-MiniDisplay. Also the timing is regarded.
Note: CAN tracing is only applicable to CAN channel 1 (Highspeed CAN).
Later, a trace file (file name: trc00000.btr with consecutive numbers) can be used for playback of the recorded CAN messages on
the CAN bus (see following section 5.2 on page 22). As alternative, it
is possible to convert the recording on a PC to another format for
further use and for evaluation (see section 5.3 on page 23).
Note: A filter may be applied to incoming CAN traffic only
letting through CAN messages with specific IDs. See chapter 6
on page 26 for details about filtering.
Do the following to record:
1.
Make sure that no USB connection is present between the
PCAN-MiniDisplay and a PC.
2.
Click on Start.
The recording is done to the indicated File.
3.
End the recording with Stop tracing.
21
PCAN-MiniDisplay – User Manual
Indication
Meaning
File
Name of the trace file for the current recording. The
file name (trc00000.btr) is automatically put
together with a consecutive number.
CAN queue level in %
Current and maximum fill level of the receive queue
(latter in parentheses). If the queue has reached a fill
level of 100 percent, most likely some incoming CAN
messages were not recorded.
CAN messages total
Number of CAN messages that are already recorded
to the trace file
File size
Current size of the trace file in kByte and already used
storage space in percent of the maximum possible file
size. During recording, the trace file grows in 512-byte
blocks, each containing 25 CAN messages. Thus,
1 MByte can hold 51200 CAN messages.
5.2
Playing Back Recorded CAN Traffic
¾ Menu item Play Back Trace
The PCAN-MiniDisplay can play back CAN messages from a binary
trace file (*.btr) onto the connected CAN bus. The timing of the
CAN messages, as it occurred originally during recording of the
trace file, is maintained.
Note: CAN tracing is only applicable to CAN channel 1 (Highspeed CAN).
Do the following to play back a trace file:
1.
When invoking the function, the playback type is set to a
single pass of the trace file (selection PlayOnce). In order to
set up a continuous playback of the trace file with repetition,
click on the field to switch to Infinite.
2.
Make sure that no USB connection is present between the
PCAN-MiniDisplay and a PC.
22
PCAN-MiniDisplay – User Manual
3.
Click on SelectFile and select the trace file (*.btr) for
playback from the list.
The playback starts directly after selecting the file.
4.
5.3
Click on Pause playback to do so. Now you have the
following options:
Function
Executed action
Exit
Ends the playback
Restart
Restarts the playback from the beginning of the trace
file
Continue
Continues the playback from the point where the
interruption occurred before
Using the Recorded CAN Traffic on the
PC
The recorded CAN traffic can be read by a PC via a USB connection
from the memory card of the PCAN-MiniDisplay. It is stored in
binary-coded trace files trc00000.btr (file name with consecutive
numbers) in the following directory:
/MiniDisplay/Projects/Traces/
For further use you must convert the data in an appropriate format.
The Windows program PEAK-Converter is supplied on the DVD and
on the memory card of PCAN-MiniDisplay for this purpose.
23
PCAN-MiniDisplay – User Manual
User interface of the PEAK-Converter
Possible conversion targets:
Target format
File
extension
Explanation/usage
PCAN-Trace
.trc
Text-based trace format by PEAK-System;
viewing of the data in the PCAN-Explorer or
playback of the CAN messages with the PCANTrace program.
Tip: In connection with the trace files of the
PCAN-MiniDisplay, we recommend using the
format version 1.1., because the recordings of the
PCAN-MiniDisplay only have one channel and
because this format version is usable in all
programs from PEAK-System.
Vector ASC Trace
.asc
Text-based trace format by the Vector company
that also can be used by some third-party
programs.
Character Separated .csv
Values (CSV)
Common, text-based format for import into a
spreadsheet (semicolon as separator).
For further use of the trace data proceed as follows:
1.
Connect the PCAN-MiniDisplay to the PC with the provided
USB cable. The PCAN-MiniDisplay does not need to be
powered on.
24
PCAN-MiniDisplay – User Manual
2.
Under Windows, start the PEAK-Converter.exe program
from the memory card of the PCAN-MiniDisplay which
resides in the /MiniDisplay/Tools directory.
3.
Select a trace file (file name: trc00000.btr with consecutive numbers) as source. You can find the trace files in a
project directory:
/MiniDisplay/Traces/
4.
Specify a destination file and select the desired target
format (see above).
25
PCAN-MiniDisplay – User Manual
6
Filtering the CAN Traffic
Usually all incoming CAN messages are used for a scene or a trace.
However, the CAN traffic can be filtered by a list of CAN IDs. This
function is primarily intended for use with tracing.
A filter list is defined in a text file with the .flt extension and
loaded in the device settings of the PCAN-MiniDisplay. All
mentioned IDs pass the filter, others don’t.
Do the following to apply a CAN ID filter:
1.
With a text editor, create a filter file (*.flt) listing the IDs
that can pass the filter. The format of the file is described in
the appendix section D.3 on page 54.
Tip: On delivery, the PCAN-MiniDisplay is set to use a filter file
named Default.flt.
2.
Copy the filter file to the memory card of the PCANMiniDisplay into the MiniDisplay directory. Use either a
USB connection from your PC to the device (don’t forget to
disconnect after copying) or use a card reader with your PC.
3.
If you have named your filter file Default.flt and use the
device settings from delivery, no further steps are needed.
Else, go on with the next step.
4.
On the PCAN-MiniDisplay, navigate to Device Settings
and there select either Ch.1 Filter (filter for High-speed
CAN channel) or Ch.2 Filter (filter for Single-wire CAN
channel).
5.
Select the previously created filter file (*.flt).
6.
Use OK or Save&OK to apply the changed settings.
26
PCAN-MiniDisplay – User Manual
7
Menu Reference for
Settings and Maintenance
7.1
Device Settings
Here you specify the settings for the connection to a CAN bus and
those for the use of the device.
When you have changed settings, save them permanently with
Save&OK. If you want to use the changed settings only temporarily
(during the current session), click OK. A subsequent session (after
an off-on cycle) uses the initial settings again.
7.1.1
Detect CAN bitrate
If the bitrate of the CAN bus connected to the PCAN-MiniDisplay is
unknown, the device can automatically detect it. This requires data
traffic on the CAN bus.
Bitrates from the following series are recognized (kbit/s): 1000; 800;
500; 250; 200; 125; 100; 95.2; 83.3; 50.0; 47.6; 33.3; 20.0; 10.0
7.1.2
CAN bitrate
Selection from a series of CAN bitrates, in order to correspond to the
one on the connected CAN bus.
Besides the fixed bitrate values, the list contains eight user-defined
bitrates. They are managed in the User CAN bitrates setting.
If using Single-wire CAN channel ( Ch.2), higher bitrates as the CAN
standard provides (max. 100 kbit/s) can be selected. However, this
leads to a warning and a non-working CAN communication.
27
PCAN-MiniDisplay – User Manual
7.1.3
Listen-only mode
If you want the device to not affect the traffic on the CAN bus, i.e.
use it as pure monitoring tool, the Listen-only mode must be activated (On). The device will neither acknowledge nor transmit CAN
(error) frames.
7.1.4
User CAN bitrates
To adapt to specific conditions, experts may directly access the bus
timing registers (BTR) of the integrated CAN controller. The register
settings are analog to those of a SJA1000 CAN controller operating
at 16 MHz clock frequency.
Eight user-defined entries can be edited. Each entry contains a 2byte value (4 hexadecimal digits) for the bus timing registers and an
arbitrary name. User-defined bitrates appear later with their name
in the CAN bitrate list below the fixed bitrate values.
Tip: For easier determination of the register values, the provided DVD contains a Windows program (/Tools/BRCAN.exe).
For each entry the table for editing shows the parameters that result
from the given register values: the bitrate, the sample point (SP),
and the synchronization jump width (SJW).
To reset an entry (Name = UserX, Bitrate = undef), set the BTR value
to 0000.
7.1.5
Beeper
The PCAN-MiniDisplay can give acoustic feedback to several events.
Among other, a change of the CAN bus status is signalized. The
Off setting disables the acoustic signal function of the device.
28
PCAN-MiniDisplay – User Manual
7.1.6
Show startscreen
After power-on the PCAN-MiniDisplay shows a bitmap file for a few
seconds as startscreen. You can switch off this behavior here.
It is possible to replace the bitmap file with an own one.
Properties of the startscreen
File name
Intro.bmp
Storage path on the memory card
/MiniDisplay/
Format
Windows bitmap
Resolution
320 x 240 pixels
Color depth
24 bits
7.1.7
Date & time
With Set the device date and time are adjusted. Date and time are
used when saving files to the memory card.
7.1.8
Reset file index
File names of traces to be saved get a number coming from a
counter. The current count is indicated in parentheses and can be
set to 0 by clicking Reset.
7.2
Internal Statistics
The page gives an overview about the device's internals. The
specifications are usually used for support purposes.
Furthermore, hardware functions are available for maintenance of
the device. They are described briefly in the following.
Important note: Misapplication of these functions can lead to
the unavailability of the device. Use the functions only on
request of PEAK-System's technical support.
29
PCAN-MiniDisplay – User Manual
Update Firmware
Firmware updates (*.bin) can be placed in the /MiniDisplay/
Firmware/ directory on the memory card. With the update function
a file is selected. Thereupon the update procedure is starting.
Factory Defaults
All settings are reset to their default states defined by the current
firmware.
Bootloader
Starts the boot loader for a firmware update via CAN. The screen
also shows the serial number of the PCAN-MiniDisplay.
7.3
Memory Card
The PCAN-MiniDisplay has functions to show directories and
bitmaps from the memory card.
Note: The PCAN-MiniDisplay cannot access the memory card
as long as a USB connection to a PC is established.
Show Directory
Shows the directories on the memory card in order to see which
files exist.
View Bitmap
Only bitmap files (*.bmp) are shown in the directories (e.g. from
instruments).
Click on a bitmap to view it; click again to leave the bitmap view.
30
PCAN-MiniDisplay – User Manual
8
Technical Specifications
Power supply
Supply voltage
7 - 30 V DC
Current consumption
135 mA (at 12 V) typical
Display
Type
a-Si TFT active matrix
Resolution
320 x 240 pixels
Active area
57.6 x 43.2 mm (W x L)
Memory card
Type
microSD
Max. capacity
32 GByte
File system
FAT; FAT32 if capacity > 2 GByte
Name of the USB device
PCAN-MiniDisplay
CAN busses
CAN 1
High-speed CAN (ISO 11898-2), not terminated
CAN 2
Single-wire CAN (SAE J2411)
Measures
Size
69.5 x 49.5 mm (W x L)
See also dimension drawings Appendix B on
page 33
Weight
50 g
Environment
Operating temperature
-20 - +70 °C (-4 - +158 °F)
Temperature for storage and
transport
-30 - +80 °C (-22 - +176 °F)
Relative humidity
15 - 90 %, not condensing
EMC
EN 55024:2003-10
EN 55022:2007-04
EC directive 2004/108/EG
31
PCAN-MiniDisplay – User Manual
Appendix A
CE Certificate
32
PCAN-MiniDisplay – User Manual
Appendix B
Dimension Drawing
The figure does not show the original size.
33
PCAN-MiniDisplay – User Manual
Appendix C
File Structure on
the Memory Card
The following table shows the structure of the MiniDisplay
directory tree and explains the functions.
Directory - file
Function
/MiniDisplay/
Fixed storage branch for files that are accessed by
the PCAN-MiniDisplay or that are related to the
device.
Intro.bmp
Scenes/<scene name>/
Screen at startup of the device (320 x 240 pixels).
A subdirectory with the scene name for each
scene.
*.ins
Scene definition file (see 3 Scene Definition on
page 12).
*.inb
Binary counterpart to a scene (*.ins) for faster
loading (see 3 Scene Definition on page 12).
*.inp
List of scenes for use of several scenes that are
switched by digital inputs.
*.fon
Bitmap font to be used in a scene.
*.bmp
Traces/
trc00000.btr
Firmware/*.bin
Bitmap to be used in an instrument.
Fixed subdirectory for traces that are recorded by
the PCAN-MiniDisplay.
Binary-coded trace data from the recording
function, usable for playback or otherwise after
conversion on the PC; consecutive numbering by
the internal counter.
Place files for updating the firmware here.
34
PCAN-MiniDisplay – User Manual
Appendix D
Definition Files
Reference
The keywords of the following definition files are described in this
appendix:
D.1 Scene Definition (*.ins) below
D.2 Scenes Project File (*.inp) on page 53
D.3 CAN ID Filters (*.flt) on page 54
D.1
Scene Definition (*.ins)
The following describe all available keywords for a scene definition.
They are written into a *.ins file and structured in sections. Section
names are indicated by square brackets, e.g. [global]. Entries each
are put into a line containing a keyword with an equal character (no
spaces!) and the assigned value.
D.1.1
[global] Section
format
At this time, only type 1 is supported.
format=1
bitrate0 bitrate1
Determines the bitrate of the High-speed CAN channel (bitrate0) and
the Single-wire CAN channel (bitrate1). If these keywords are
omitted, the bitrates defined in the Device Settings menu are
valid (BusOff at delivery). If a scene with a defined bitrate is closed,
that bitrate stays active.
35
PCAN-MiniDisplay – User Manual
Note: During the device’s startup, the bitrate defined in the
Device Settings menu is active for a short time before the
bitrate for the scene is enabled.
Possible bitrates (in kbit/s): 1000, 800, 500, 250, 200, 100, 95, 83, 50,
47, 33, 20, 10
bitrate0=250
bitrate1=20
instruments
Count of instruments in this scene, range: 1 … 32.
instruments=4
labels
Count of used labels, range: 1 … 64.
labels=5
variables
Count of used variables, range: 1 … 96.
variables=7
plotter
Count of used plotters, range: 1 … 4.
plotter=1
fonts
Count of additional fonts that are specified for this project, range:
1 … 27.
There are 3 internal fonts available. To use the internal fonts, use
font_idx instead of a font name. For more information, see D.1.3
[fontX] Section on page 41.
36
PCAN-MiniDisplay – User Manual
fonts=2
flashing_time
Flashing frequency for instruments with “flashing” keyword, range
50 … 2500, default 500. The value is the time in milliseconds for the
“on-time” and the “off-time”.
flashing_time=250
// 250 ms on, 250 ms off, resulting in 2 Hz
compress
Determines if the compression function is called while the scene is
loading.
Value
Description
0
When the text-based configuration file is loaded (*.ins), a
compressed version is not generated.
1
When the text-based configuration file is loaded, a binary version is
generated (*.inb). If an inb file for this scene already exists, this is
loaded instead of the text-based configuration.
Note: If the definition of a scene is altered, the previously
generated binary file (*.inb) must be deleted on the memory
card of the PCAN-MiniDisplay, so the loader sees that a new
binary must be created from the text file. If you do not delete
the binary file, your changes in the definition file will not have
any effect.
D.1.2
[instrumentX] Section
Each instrument is indicated by the [instrumentX] section delimiter,
where X is a consecutive number, starting at 1. The number of
instruments is defined by the “instruments” keyword in the [global]
section.
[instrument1]
37
PCAN-MiniDisplay – User Manual
pictures
Count of pictures per instrument, range: 1 … 99.
pictures=4
name
Name of the instrument. Only for documentation. The string must
be written with quotation marks.
name="turn_left"
var_name
Name of the variable that controls the instrument. The string must
be written with quotation marks.
var_name="speed"
initval
Determines the initial value of the instrument until the first real CAN
data for this instrument is received.
initval=267
no_restore
Determines the handling of the background while drawing.
Value
Description
0 (default)
Before the instrument sequence will be drawn, the background is
saved. Then the background could be restored before a new
instrument sequence was drawn. This can be useful if the sequences
have different sizes.
1
The picture sequence will be drawn without saving the background –
makes only sense if all pictures of the instrument have the same size
and are drawn at the same position. Used for optimization of CPU
load.
no_restore=1
38
PCAN-MiniDisplay – User Manual
restore
Same as no_restore above, but with inverted logic.
transparency
Defines whether transparency areas must be considered while
drawing.
Value
Description
0
A sequence will be drawn not regarding the background. This is used
when the background is part of the sequence.
1
While loading the *.ins file, every single picture is recalculated with
the background. Therefore, instrument0 must be defined with a
global background picture as only item with keyword “no_restore=1”.
There are 2 options available for the recalculation:
a) The picture has a “transparency“ color (RGB value 255,0,255).
b) The picture has an alpha channel. The alpha channel is defined by
a separate grayscale bitmap. The grayscale values define the
transparency of the foreground picture.
RGB value 255,255,255: foreground picture is available to 100 %,
no part of the background can be seen.
RGB value 127,127,127: foreground is available to 50 % and 50 %
of the background can be seen.
RGB value 0,0,0: no foreground picture is available, 100 % of the
background picture can be seen.
transparency=1
offset
All pictures from the picture list of this instrument will be moved in
x and y direction (offset).
1st parameter: x offset (range: 0 … 319)
2nd parameter: y offset (range 0 … 239)
offset=100,50
39
PCAN-MiniDisplay – User Manual
background
Defines an individual background picture for this instrument.
Value
Description
0
No background for this instrument.
1
The instrument has an individual background picture which will be
used if transparency=1. While loading the *.ins file, the pictures is
calculated in the background. By default (background=0) the
instrument0 is the global background picture. Nevertheless, for each
instrument an individual background picture may be defined. The
individual background picture must be the last picture of the picture
list. The background picture does not have an alpha channel, so it
replaces the global background picture from instrument0. Typically,
an individual background pictures has the same size as the single
pictures of the instrument.
background=1
update_rate
Update rate of this instrument in milliseconds. If not defined, the
default update rate of 50 ms is used. An instrument may be updated
with each new incoming CAN message. However, it could happen
that the current value is not read because of a too high update rate.
This keyword limits the update rate to ensure that the update of the
instrument stays reliable.
update_rate=500
// Redraws the instrument
// two times a second at most
Picture List
The “var_name” keyword defines a CAN signal. If this is received,
the value will be decoded. The picture will be shown which is
assigned to the decoded CAN signal.
Format of a picture list entry:
<index>=<pic-name>,<transparency-name>,<xpos>,<ypos>,<low-val>,<high-val>
40
PCAN-MiniDisplay – User Manual
Part of picture list entry
Description
<index>
Number of the picture. Must be in the range
{0 … pictures - 1}.
<pic-name>
File name of the picture without path. The picture must
be stored in the same directory where the *.ins file is
stored.
<transparency-name>
File name of the grayscale picture (alpha channel). If this
picture does not exist, an empty string "" must be
provided. File name without path (like <pic-name>).
<xpos>
x position {0 … 319}. Will be added to the parameter xOffset.
<ypos>
y position {0 … 239}. Will be added to the parameter yOffset.
<low-val>
Lowest value of data range.
<high-val>
Highest value of data range.
0="arrow_left_off.bmp","",20,100,0,3
// Show picture "arrow_left_off.bmp"
// at position x=20, y=100
// if the variable is in the range of 0 to 3
1="arrow_left_on.bmp","",20,100,4,7
// Show picture "arrow_left_on.bmp"
// at position x=20, y=100
// if the variable is in the range of 4 to 7
D.1.3
[fontX] Section
Each used font is indicated by the [fontX] section delimiter, where X
is a consecutive number, starting at 1. The number of fonts is
defined by the “fonts” keyword in the [global] section.
[font1]
font
Filename of the bitmap font. The string must written with quotation
marks. Extension of a font file name is *.fon.
font="arial_20.fon"
41
PCAN-MiniDisplay – User Manual
Currently the following fonts are available on the
PCAN-MiniDisplay:
lucida_13_18.fon
century_13_16.fon
century_16_18_numbers.fon
(only numbers from 0 to 9)
Palatino_Linotype_12_14.fon
Palatino_Linotype_16_20.fon
Palatino_Linotype_24_28.fon
Palatino_Linotype_24_32_numbers.fon
(only numbers from 0 to 9)
Palatino_Linotype_24_32_numbers_bold.fon
(only numbers from 0 to 9)
Courier_13_18_bold.fon
(bold characters)
gear_40_49.fon
(numbers from 0 to 7 are displayed as N, 1, 2, 3, 4, 5, 6, R in a
size of 40 x 49 pixels)
name
Name of the font, as a reference for an element that uses a font.
name="arial_20"
type
Type of the font. Currently only single-colored fonts with fixed size
are available (type 0).
type=0
42
PCAN-MiniDisplay – User Manual
D.1.4
[variableX] Section
Each variable is indicated by the [variableX] section delimiter,
where X is a consecutive number, starting at 1. The number of
variables is defined by the “variables” keyword in the [global]
section.
[variable1]
name
Name of the variable as a reference to be used with an instrument
or a label.
name="Speed"
channel
The channel to be used (count starts at 0). The number of supported
channels depends on source type (see “source” keyword below).
Source type
Value
Description
CAN
0
High-speed CAN
1
Single-wire CAN
AIN
0
Internal NTC
1
External input
2
External input
0
External input (e.g. switch)
DIN
channel=0
// Use first CAN channel
source
Type of source.
Available source types: CAN, AIN, DIN
source=CAN
43
PCAN-MiniDisplay – User Manual
canid
11-bit or 29-bit integer value (decimal or hex).
canid=256
canid=0x100
position
1st parameter: start bit position of the signal, range: 0 … 63
Note: The bits are counted differently in Intel and Motorola format.
2nd parameter: bit length of the signal, range: 1 … 32
position=0,8
position=8,16
// First byte of the CAN data field
// Bytes 2 and 3 of the CAN data field
frametype
Defines the CAN frame type as Standard Frame or Extended Frame.
Value
Description
0
Standard Frame (11-bit CAN ID)
1
Extended Frame (29-bit CAN ID)
frametype=0
// Standard Frame with 11-bit ID
byteorder
Defines the byte order of the CAN data.
Value
Description
0
Intel (“Little Endian”)
1
Motorola (“Big Endian”)
byteorder=0
// Intel format
muxtype
(Not yet supported)
muxval
(Not yet supported)
44
PCAN-MiniDisplay – User Manual
scale
Scale for an incoming signal value. The value will be stored as a
float (32-bit).
scale=2.5
offset
Offset for an incoming signal value. The value will be stored as a
float (32-bit).
offset=5.2
maxraw
Maximum raw value (value from CAN bus before scale/offset
calculation) with internal data type float 32-bit. Any larger value
than this is limited to this value. Use either maxraw OR maxval.
maxval
Maximum physical value (value from CAN bus after scale/offset
calculation) with internal data type float 32-bit. Any larger value is
limited to this value. Use either maxval OR maxraw.
minraw
Minimum raw value (value from CAN bus before scale/offset
calculation) with internal data type float 32-bit. Any smaller value
than this is raised to this value. Use either minraw OR minval.
minval
Minimum physical value (value from CAN bus after scale/offset
calculation) with internal data type float 32-bit. Any smaller value is
raised to this value. Use either minval OR minraw.
vartype
Datatype of variable as extracted from the raw CAN data.
45
PCAN-MiniDisplay – User Manual
Value
Description
0
unsigned, integer
1
signed, integer
2
float (32 bits)
vartype=1
A signed integer variable with an assumed bit length of 8 has a
value range from -128 to +127.
datatype
After reading a value from the raw CAN data and further calculation
with scale/offset, the resulting value is stored according to this
keyword.
Value
Description
0
unsigned, integer
1
signed, integer
2
float (32 bits)
vartype=2
The value is internally stored as a float value. This is useful if the
value is to be displayed as a fractional number (see labels).
Example of a variable
[variable1]
name="odometer"
canid=0x250
//
position=8,16 //
frametype=0
//
byteorder=1
//
scale=1.5
//
offset=0
//
vartype=0
//
//
minval=3
//
maxval=99999
//
datatype=1
//
//
CAN ID
Start bit and bit length
0: 11-bit, 1: 29-bit
0: Intel, 1: Motorola
Value=raw * scale + offset
Always float type
Representation of CAN data:
0: unsigned, 1: signed, 2: float
Lower limit is 3
Any value > 99999 is set to 99999
Representation of result:
0: unsigned, 1: signed, 2: float
46
PCAN-MiniDisplay – User Manual
D.1.5
[labelX] Section
Each text label is indicated by the [labelX] section delimiter, where
X is a consecutive number, starting at 1. The number of labels is
defined by the “labels” keyword in the [global] section.
[label1]
name
Name of label, for documentation.
name="odometer"
position
X and Y position of label.
1st parameter: X position (horizontal), range: 0 - 31
2nd parameter: Y position (vertical), range: 0 - 239
position=10,30
font_name
Name of font, reference to a font from section fonts.
font_name="Palatino_Linotype_12_14.fon"
This selects a font with a width of 12 pixels and height of 14 pixels.
See list of available fonts.
font_idx
Index of an embedded font.
Value
Description
0
“Courier_8_12”, width=8, height=12
1
“Courier_10_14”, width=10, height=14
2
“Courier_12_18”, width=12, height=18
font_idx=2
47
PCAN-MiniDisplay – User Manual
length
Length of the output string. Number of characters.
length=5
fmt_string
Format string to convert a value from a variable into the output
string. Format usage like printf programming function.
fmt_string="%02d km"
var_name
Reference to a variable from section variables.
var_name="speed"
initval
Initial value that is output after startup before a relevant variable is
received.
initval="-----"
fontcolor
Defines the color of the font in red, green, blue.
fontcolor=255,255,255
// white
bgcolor
Defines the color of the background in red, green, blue.
bgcolor=255,0,0
// red
update_rate
Defines the update rate of a label in milliseconds. Label is not
redrawn earlier than this, independent of the reception of a relevant
variable.
48
PCAN-MiniDisplay – User Manual
update_rate=100
update_rate=0
// Redraw label not faster than every 100 ms
// Updates label as fast as possible
// (each time the variable is received)
sector
The numeric range of a variable can be divided in up to 5 sectors.
For each sector a different font color and background color can be
defined. Each sector can have the “flashing” keyword set to 1 or 0.
A sector can be enabled (1) or disabled (0).
sector=1
range=0,10
fontcolor=255,0,0
offcolor=127,0,0
bgcolor=0,0,0
flashing=1
// sector enabled
sector=1
range=1,244
fontcolor=0,255,0
bgcolor=0,0,0
flashing=0
// sector enabled
sector=1
fontcolor=255,0,0
offcolor=127,0,0
bgcolor=0,0,0
flashing=1
//
//
//
//
// bright red
// light red
// black
// bright green
// black
// no flashing
sector enabled
bright red
light red
black
An 8-bit unsigned variable has a value range of 0 to 255. When the
value is within 0 to 10, the displayed value is shown in red and
flashing. In the range of 11 to 245 is displayed in green. In the range
of 245 to 255 it is displayed in red and flashing.
range
A sector is defined for a certain range.
range=20,50
This sector is valid if the variable is in the range of 20 to 50 (20 and
50 included!).
49
PCAN-MiniDisplay – User Manual
offcolor
Each sector can have the “flashing” keyword. In case the sector is
active and the label is flashing, the color toggles between
“fontcolor” and “offcolor“.
offcolor=127,0,0
// middle red
Example of a Label
[label1]
name="odometer"
position=10,30
//font_name=""
font_idx=2
length=8
fmt_string="%05d km"
var_name="odomtr"
startval="----- km"
fontcolor=0,255,0
bgcolor=127,0,0
sector=1
range=0,10
fontcolor=0,255,0
bgcolor=0,0,0
//
//
//
//
//
//
//
//
//
//
//
//
Name of label for reference
x-pos,y-pos in pixels
0,0 is top left corner
Use either font_name OR font_idx
Use integrated font 2
Number of characters of the label
Format string for printf() to convert
variable into display value
Reference to variable
Initial value that will be displayed
RGB value (bright green)
RGB value (mid red)
//
//
//
//
//
//
New sector, 1: enabled
Applicable for values within this
range
Font color if value in this range
Background color if value in this
range
flashing=0
sector=1
range=1,20
fontcolor=255,0,0
offcolor=127,0,0
bgcolor=0,0,0
flashing=1
Once the keyword “sector” is used, the parameters for “fontcolor”
and “bgcolor” are assigned to a sector.
50
PCAN-MiniDisplay – User Manual
D.1.6
[plotterX] Section
Each plotter is indicated by the [plotterX] section delimiter, where X
is a consecutive number, starting at 1. The number of plotters is
defined by the “plotter” keyword in the [global] section.
name
Name of the plotter, for reference only.
name="Vehicle Speed"
position
X and Y position of plotter.
position=100,50
size
Dimension of the plotter in pixels.
1st parameter: width
2nd parameter: height
size=100,50
plotcolor
Color of plot line in RGB.
plotcolor=255,0,0
plotcolor=127,127,127
// Color is 100 % red
// Color is mid gray
bgcolor
Background color for the area of the plotter in RGB.
bgcolor=255,255,255
// white background
enable
Enables or disables this plotter.
51
PCAN-MiniDisplay – User Manual
enable=1
channels
Number of channels for this plotter diagram. Up to 4 channels can
be displayed in a plotter. The channel indexes are used to specify
name, variable, etc.
channels=2
timespan
Time in milliseconds that the x-axis should represent.
timespan=5000
// 5 s to draw the complete diagram
var_nameX
Name of the data source. X can be 1, 2, 3 or 4 for up to 4 variables
in a plotter diagram. See “channels” keyword.
var_name1=speed
var_name2=acceleration
yminX
Minimum value of the vertical axis. A value smaller than this is
limited to this minimum.
ymin1=10
ymaxX
Maximum value of the vertical axis. A value greater than this is
limited to this maximum.
ymax2=250
52
PCAN-MiniDisplay – User Manual
D.2
Scenes Project File (*.inp)
D.2.1
[global] Section
version
Version format. Currently only 1.
version=1
D.2.2
[scenes] Section
scenes
Count of used scenes.
scenes=4
startscene
This scene will be used after startup as the default scene, default: 1.
startscene=2
List of Scenes
Format of a scenes list entry:
<index>=<filename>
The scenes are numbered consecutively, starting with 1. As
parameter, the file name of the scene must be indicated. If a scene
is defined with the keyword parameter “compress=1” and was
already loaded before, the compressed version will be used. This
helps to decrease the loading time.
[scenes]
scenes=4
startscene=2
1="speedo0.ins"
2="speedo1.ins"
3="picture1.ins"
53
PCAN-MiniDisplay – User Manual
4="picture2.ins"
D.3
CAN ID Filters (*.flt)
The use of a CAN ID filter (*.flt file) is determined in the Device
Settings menu of the PCAN-MiniDisplay. CAN IDs and ID ranges
that are listed in a filter file can pass the filter, others don’t. If the
filter sections don’t have any entries, no CAN messages can pass
the filter.
D.3.1
[global] Section
This section is obligatory and must contain the following two
keywords.
version
Version format. Currently only 1 is valid.
version=1
enable
Enables the filter. Currently only 1 is valid.
enable=1
D.3.2
[single_11bit] Section
Defines 11-bit CAN IDs that can pass the filter. An ID is indicated by
a decimal or a hexadecimal value (latter with prefix 0x). It is
recommended to list IDs in rising order.
0x100
0x250
1023
54
PCAN-MiniDisplay – User Manual
D.3.3
[range_11bit] Section
Defines 11-bit CAN ID ranges that can pass the filter. An ID is
indicated by a decimal or a hexadecimal value (latter with prefix 0x).
It is recommended to list ID ranges in rising order.
0x200-0x340
4-13
0x000-0x7ff
D.3.4
// Full 11-bit range
[single_29bit] Section
Defines 29-bit CAN IDs that can pass the filter. An ID is indicated by
a decimal or a hexadecimal value (latter with prefix 0x). It is
recommended to list IDs in rising order.
0x123
0x11111
125000
D.3.5
[range_29bit] Section
Defines 29-bit CAN ID ranges that can pass the filter. An ID is
indicated by a decimal or a hexadecimal value (latter with prefix 0x).
It is recommended to list ID ranges in rising order.
0x9000-0x10000
500-550
0x1F80000-0x1FA0000
0x0000000-0x1FFFFFF
D.3.6
// Full 29-bit range
Example of Filter.flt
[global]
version=1
enable=1
[single_11bit]
0x100
0x250
1023
55
PCAN-MiniDisplay – User Manual
[range_11bit]
0x200-0x340
4-13
0x7f0-0x7fe
[single_29bit]
0x123
0x11111
125000
[range_29bit]
0x9000-0x10000
500-550
0x1F80000-0x1FA0000
56
PCAN-MiniDisplay – User Manual
Appendix E
Model with Casing
This section describes the peculiarities of the model with casing and
push buttons (IPEH-002262-KSM1).
This product model provides an environment to facilitate the
development of configurations for the PCAN-MiniDisplay.
Model with casing and push buttons
E.1
Scope of Supply
PCAN-MiniDisplay in plastic casing with three push buttons
2 spring terminal blocks (10-pole, 4-pole)
microSD memory card (512 MByte)
This User Manual in PDF format
57
PCAN-MiniDisplay – User Manual
E.2
Push Buttons
The three push buttons Up , Down , and Enter are device-internally connected to J1 of the PCAN-MiniDisplay (see 2.1 on page 7
for details). The use depends on the current mode of the device.
Current Mode
Up Scene display
Switch to the next scene if
multiple scenes are defined
Down Leave the scene display and
show the main menu
Menus
Skip to previous or next entry
of a menu or of a list
Activate the selected entry
Off (supply voltage
applied)
No function
No function
Start device
Enter Note that the digital inputs of J1 are also available on the 4-pole
outlet.
E.3
Connectors
The model with casing provides three connectors on its back side:
Mini USB socket
4-pole connector for mating spring terminal block (J1 internally)
Pin
Function
1
Down
2
Up
3
Enter
4
GND
10-pole connector for mating spring terminal block
(J2 internally)
Pin
Function
1
Vb (7 - 30 V DC)
2
GND
58
PCAN-MiniDisplay – User Manual
2
Pin
Function
3
Dout1
4
Din4
5
Ain1
6
Ain2
7
not connected or CAN2-RxD 2
8
CAN2_SW or CAN2-TxD2
9
CAN1_L
10
CAN1_H
TTL signal for optional external CAN transceiver
59