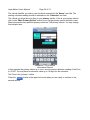
1
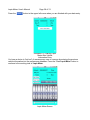
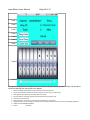
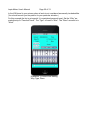
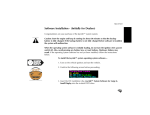
Lapis Meter
for the
iPhone®
User's Manual
by
Software Industry & General Hardware
(S.I.G.H.)
COPYRIGHT © 2010-2011 Software Industry & General Hardware (S.I.G.H.)
ALL RIGHTS RESERVED
Lapis-Meter: User's Manual
Page 2 of 74
Table of Contents
Lapis Meter..................................................................................................................................v
What does it do....................................................................................................................... v
Assumptions............................................................................................................................v
Lapis Meter Output Products.................................................................................................vii
Email Example:................................................................................................................. vii
Spreadsheet Example:......................................................................................................vii
Driving Categories.................................................................................................................... viii
Vehicle.................................................................................................................................. viii
Why.......................................................................................................................................viii
Type...................................................................................................................................... viii
Place..................................................................................................................................... viii
Caution Notes..............................................................................................................................x
The Lapis Meter Screen Layout................................................................................................. xi
Line 1......................................................................................................................................xi
Line 2......................................................................................................................................xi
Line 3......................................................................................................................................xi
Line 4......................................................................................................................................xi
Line 5......................................................................................................................................xi
Line 6......................................................................................................................................xi
Line 7......................................................................................................................................xi
Line 8......................................................................................................................................xi
Line 9..................................................................................................................................... xii
Using Lapis Meter For the First Time....................................................................................... xiv
Illustration 1: Lapis Meter Beginning Screen...........................................................xiv
Illustration 2: Enter Number of Vehicles to track...................................................... xv
Illustration 3: Keyboard appears.............................................................................. xv
Illustration 4: Entering number of vehicles to track.................................................xvi
Illustration 5: First vehicle information entry........................................................... xvii
Illustration 6: Vehicle Information Entry View......................................................... xvii
Illustration 7: First Vehicle Information Entered..................................................... xviii
Illustration 8: Enter Second Vehicle Information.....................................................xix
Illustration 9: Second Vehicle Information Entered.................................................xix
Illustration 10: Starting Lapis Meter After Vehicle Information Entry........................xx
Illustration 11: The Working Lapis Meter Screen.....................................................xxi
How To.................................................................................................................................... xxiv
Round-trip Example.............................................................................................................xxv
Monday......................................................................................................................... xxviii
Illustration 12: Monday Leaving Home.................................................................. xxix
Illustration 13: Arrive Work Setting Why, Type, Place............................................xxx
Illustration 14: Monday Way Point 1 Completed...................................................xxxii
Illustration 15: Arrive Home Adjust Odometer, Set Place....................................xxxiv
Illustration 16: Monday Final Stop........................................................................ xxxv
Tuesday......................................................................................................................... xxxv
Wednesday....................................................................................................................xxxv
Lapis-Meter: User's Manual
Page 4 of 74
Illustration 17: Wednesday Leaving Home......................................................... xxxvii
Illustration 18: Arrive Work Setting Why, Type, Place........................................ xxxviii
Illustration 19: Wednesday Way Point 1 Completed............................................xxxix
Illustration 20: Arrive Home Adjust Odometer, Set Place..........................................xl
Illustration 21: Monday Final Stop............................................................................ xli
Thursday........................................................................................................................... xli
Friday................................................................................................................................ xli
One-Way trip Example..........................................................................................................xlii
Enter a Way Point................................................................................................................. xlii
Enter a Final Stop................................................................................................................. xlii
Add a Why............................................................................................................................ xlii
Add a Type............................................................................................................................xlii
Add a Place.......................................................................................................................... xlii
Add a Vehicle-ID................................................................................................................... xlii
What is...?................................................................................................................................. xlii
A Why....................................................................................................................................xlii
A Type................................................................................................................................... xlii
A Place..................................................................................................................................xlii
Lapis Meter FAQs (frequently asked questions)......................................................................xliii
Registered Trademarks and Copyrights.................................................................................. xliv
This Manual Is Incomplete And Preliminary
Lapis-Meter: User's Manual
Page 6 of 74
Lapis Meter
What does it do
Lapis Meter (measured stones or mile stones) is an application in the S.I.G.H. "light-app"
business series.
Lapis Meter is designed to assist in the automation of tracking your mileage.
Lapis Meter will track distance and fuel for you:
•
Multiple stops
•
Multiple vehicles
•
Multiple types of trips
•
Multiple reasons for your trips
•
Multiple Destinations
•
Add vehicles, trip types, whys and places as you need them
•
Independent of units, USA or the rest of the world as long as you are consistent
•
Track when you put fuel in your vehicle and distance/unit-fuel values between fuel
stops.
•
Assists you in creating a spreadsheet of your trips.
Assumptions
A trip begins at a point-of-origin and makes, potentially, several stops before ending the trip at
a final destination. The final destination may be the point-of-origin, or it may not. That is, a trip
may be a round-trip or a one-way trip.
Lapis-Meter: User's Manual
Page 8 of 74
Round trips can be quite complex. The simple round trip above shows a trip from home to
school, to work, to a store and then a return to home. Much more complex trips are possible
as the example described below.
The Round trip could have been:
•
Home to school
•
School to work
•
Work to school
•
School to shopping
•
Shopping to relatives
•
Relatives to Theater
•
Theater to Coffee
•
Coffee to Home
It does not matter how complex the route you take nor even if it is one-way or round-trip. All
that matters is how you track your mileage.
Lapis-Meter expects you to use the following steps:
•
Verify the odometer reading at the point-of-origin (starting point)
•
Add distance entries at each way point along the way
•
At the final stop make a distance entry
•
Send information to your email address.
These simple four steps are all you need to use Lapis-Meter. There may be a requirement to
enter more information when you arrive at certain types of way-points. An example of this is
entering the fuel quantity you obtained when you fueled up at a fuel stop. Even these entries
follow the same four step pattern.
Information will be added either before starting a trip or at a destination such as a way-point
and or a final destination.
Lapis-Meter: User's Manual
Page 10 of 74
Lapis Meter Output Products
At each final stop Lapis-Meter will offer an email view allowing you to email your current
information to an email address of your choice. You may BCC and/or CC as well.
Email Example:
"Reference Number","Starting Odometer","Vehicle","Place","Purpose","Type","Odometer","Waypoint
Distance","Total Distance","Fuel Quantity","Fuel Cost","Fuel/Distance","Notes"
20110528T133835,63140,Prius,COSTCO,Personal Travel,Fuel,0000063149,9,,7.745000,3.879000,,
20110528T140029,0000063149,Prius,Wood Ranch,Personal Travel,Misc,0000063164,15,,,,,
20110528T152937,0000063164,Prius,Tom's Farms,Personal Travel,Misc,0000063167,3,,,,,
20110528T163458,0000063167,Prius,Home,Personal Travel,Misc,0000063188,21,48,,,,Notes: Lunch with Mom.
Sent from my iPhone
Spreadsheet Example:
Lapis-Meter: User's Manual
Page 12 of 74
Driving Categories
In general you only need three pieces of information to track your mileage. The vehicle you
used, the starting and ending distances, why you are making the trip and the place you end
up at.
Sometimes you might like to include some additional information. An example might be that
the “why” you are taking this trip is that you are getting repairs done on the vehicle. You might
put “Repairs” down as the “why” and if you are having your tires rotated you might put “tires”
down as the type of repair you are having done.
The way that you enter information into Lapis-Meter is by selecting the Vehicle, why you are
taking the trip, the type of why if there is a modifier to the why and finally the place you are
going to end up.
These are exactly the four selection buttons on the main screen of Lapis-Meter.
Vehicle
Vehicles represent the vehicle-ID of the individual vehicles you use. You may add or remove
vehicle-IDs from the vehicles list at any time.
You may use any string as a vehicle-ID: make, model, pet-name, number, license, VIN
number, etceteras. Any vehicle-ID that you will recognize easily.
Why
Type
Place
Lapis-Meter: User's Manual
Page 14 of 74
The next figure shows the working Lapis Meter view. There are some buzz words you should
know before you begin using Lapis Meter:
Odometer: An tool used for measuring distances. It is used here as an abbreviation of
Odometer Display, or a tool for displaying the distance measured. An odometer reading in
Lapis Meter is usually 10-digits long and may have leading-zeros shown. Sometimes
abbreviated “odo”.
Waypoint: An stop on a journey other than the starting point and destination point. An
example may be more descriptive here: You start from your home base and go the store,
followed by a restaurant, bank, fuel stop and then return to your home. Home is your starting
and ending points. The store, restaurant, bank & fuel stop are waypoints.
Final Stop or Destination: The place to which you were traveling. The place you intended to
be at the end of your travel. Your home in the above example is both the starting point and the
final stop/destination.
Vehicle-ID: The average vehicle count per family in the US, EU and other industrialized
nations is approximately two. Lapis Meter will allow you to manage your mileage for several
vehicles. But you must identify the vehicles uniquely. Not so much for use by Lapis Meter but
for distinguishing them in your spreadsheets. To uniquely identify your vehicles Lapis Meter
uses a vehicle-id. This Id can be anything that does not contain the character of a comma
(“,”). A comma is the ASCII character 44 decimal or 2C hexadecimal or Unicode character:
, It is usually the make or model of your vehicle. Supposed you own two vehicles. The
first is the “Flash-mobile” made by Torch Electric car company and the second is an old
Delorian you have named “Mr. Fusion”. You may wish to use “Flash” as the first vehicle-id and
“Mr. Fusion” as the second vehicle-id. You could just as easily call them “auto-1” and “auto-2”.
If you are running a fleet of vehicles you may wish to name them after the vehicle
identification numbers or license plate identifications of each.
Why: A reference to “why” is a reference as to why you are taking this trip. It could be almost
anything, personal business, misc. travel, Maintenance or almost anything. Again it may not
contain a comma.
Type: A travel type is usually used to clarify the “why” reference. If the Why is for
maintenance then the type may be: scheduled, tires, body work or misc. Again no comma is
allowed in the description.
Place: The place describes the waypoint or final stop. home, work, school, doctor, dentist,
holiday or almost anything else you wish for a description. Once again a comma may not be
used in the place description.
Lapis-Meter: User's Manual
Page 16 of 74
Caution Notes
There are a few conditions that are not allowed and you should be careful to avoid the
conditions.
1. Do not make a Fuel Type the
quantity and price.
The final stop does not query for fuel
2. Do not use the comma character “,” in the names of vehicles in the vehicle-ID list,
Whys list, Types list nor the Places list.
3.
Lapis-Meter: User's Manual
Page 18 of 74
The Lapis Meter Screen Layout
Line 1
On line 1 you will find “Odomtr:” and a 10-digit number followed by a vehicle-id. In the
example shown the 10-digit number is: “00000602127” and the vehicle-id is “Prius”.
Line 2
On line 2 you will find “Way Pt:” followed by a number that is followed by a “Why” description.
In the example shown the number is zero and the description is “Personal Travel”.
Line 3
On line 3 you will find “Total:” followed by a number and that is followed by a “Type”
description. In the example the number is again zero and the description is “Misc”.
Line 4
On line 4 you will find the
press the
button. When you have stopped at a waypoint you
button. Once you press this button the number on line 2 and 3 will
change.
Line 5
On line 5 you will find the “Place” description, in this example “Home” is the place.
Line 6
On line 6 you will find the
your destination.
button. Press this button when you have reached
Line 7
On line 7 you will find the
button followed by the multiple-response buttons
These buttons are mutually exclusive and may be pressed to indicate that you wish to change
the settings of the vehicle-id, Why, Type or Place descriptions.
To change any of the values you first select one of the buttons shown and then use the slider
found on line 9.
Lapis-Meter: User's Manual
Page 20 of 74
Line 8
On Line 8 you will find the odometer. Each wheel on the odometer may be rotated up or down
until the digit you desire is located in the highlighted selection bar in the middle of the
odometer. As you rotate a wheel the 10-digit number from line 1 will change to show you the
setting you just made on the odometer.
Line 9
Line 9 contains the
slider and information
button. The slider may be adjusted from the left toward the right. The first entry is always to
the left. If you slide the slider to the farthest right position you will be indicating you wish to
add to a selection setting you set on line 7 by the
selector.
To add a new Place you would first select the “Place” button and then slide the slider knob
(circle) all the way to the rightmost position. When you do this a dialog will pop up asking you
if you wish to add a new place. You will have two choices “YES” or “NO”.
Pressing the
button will display the Information page describing Lapis Meter and the
S.I.G.H. web page with the Lapis Meter icon and S.I.G.H. QR image.
(Table with Lines 1 through 9 follows this page)
Lapis-Meter: User's Manual
Line 1
Line 2
Line 3
Line 4
Line 5
Line 6
Line 7
Line 8
Line 9
Page 22 of 74
Lapis-Meter: User's Manual
Page 24 of 74
Using Lapis Meter For the First Time
The first time you open Lapis Meter you will be presented with the following screen:
Illustration 1: Lapis Meter Beginning Screen
The first thing you need to do is enter the vehicle-ids of the vehicles you will be managing.
You may use any identifier you wish (license number, make, model, “name” of the vehicle,
anything). To remain in the limited display real estate you should try to keep your identifier to
less than ten characters in length.
You may also keep track of several vehicles. The average number of vehicles per family in the
USA, EU and most other industrialized countries ranges from 1.7 to 2.1. You may keep track
of many (initially Lapis Meter assumes ten) vehicles (currently limited to 50).
The first thing you need to do is to tell Lapis Meter how many vehicles you are going to track.
Press the
screen:
button and you will be presented with the following
Lapis-Meter: User's Manual
Page 26 of 74
Illustration 2: Enter Number of Vehicles to track
When you touch the “0” in the text field you will be presented with a numeric keyboard:
Lapis-Meter: User's Manual
Page 28 of 74
Illustration 3: Keyboard
appears
In this example we will enter a two:
Lapis-Meter: User's Manual
Page 30 of 74
Illustration 4: Entering number of
vehicles to track.
Press the
button in the upper left had corner and you are ready to enter your data:
Lapis-Meter: User's Manual
Page 32 of 74
Illustration 5: First vehicle
information entry
Click on the “Enter Vehicle 1 Info” button and you will be presented with the following view:
Illustration 6: Vehicle
Information Entry View
Lapis-Meter: User's Manual
Page 34 of 74
The vehicle identifier you wish to use should be entered into the “Name:” text field. The
starting odometer reading should be entered into the “Odometer” text field.
The vehicle you drive the most often is your primary vehicle. If this is your primary vehicle
click on the “Make Primary Vehicle” switch to turn on the primary vehicle indicator. Lapis
Meter chooses the last specified primary vehicle as THE primary vehicle. You may change
this indicator later.
Illustration 7: First Vehicle
Information Entered
In this example the primary vehicle is a “Prius” and the current odometer reading of the Prius
is: 60,227. You may have an odometer value up to 10-digits for the odometer.
The Prius is the “primary” vehicle.
Press the
second vehicle.
button in the upper left corner when you are ready to continue to the
Lapis-Meter: User's Manual
Page 36 of 74
Illustration 8: Enter Second Vehicle
Information
The second vehicle in this example is a Dodge Dakota with 130,506 miles on the odometer.
And it is NOT the primary vehicle.
Illustration 9: Second Vehicle
Information Entered
Lapis-Meter: User's Manual
Press the
Page 38 of 74
button in the upper left corner when you are finished with your data entry.
Illustration 10: Starting Lapis
Meter After Vehicle
Information Entry
You have a choice to “bail-out” of the data entry here or continue by entering the previous
vehicle information into the preferences database. Press the “Start Lapis Meter” button to
continue to the working view of Lapis Meter.
Illustration 11: The Working
Lapis Meter Screen
Lapis-Meter: User's Manual
Page 40 of 74
Line 1
Line 2
Line 3
Line 4
Line 5
Line 6
Line 7
Line 8
Line 9
The layout is designed to be useable from a one-handed, one-thumb point of view. We'll go over the layout
line-by-line starting from the top left of the display:
1. Odomtr: Ten-digits representing the current Odometer of the vehicle-id shown
2. Way Pt: Current distance between last way-point and this way-point; why you made the trip.
3. Total: distance since start of trip; secondary reason for traveling
4. Way Point button to press after adjusting odometer wheel and arriving at way point.
5. The place you have arrived at.
6. Final Stop button to press when you have arrived at a destination (non way point).
7. Update Odo button you use to adjust the odometer when changing vehiclesl; tabs to select to change Vehicle/Why/Type/Place
8. LARGE 10-DIGIT SPINNING WHEELS
9. <slider>
<info-button>
Lapis-Meter: User's Manual
Page 42 of 74
When you first start Lapis Meter the primary vehicle-id will show on line 1 and the saved last
odometer reading will show on the odometer wheels. The digital representation of the
selected odometer value will show in the Odomtr: display on line 1.
How To
If you need to enter a new Why, Type, Place or Vehicle-ID you only need to do two steps:
• Make certain the proper selection button has been set (Line 7)
• Slide the information slider all the way to the right (Line 9)
You will be presented with one of the following requesters:
Add New Query Requester Views
Select “NO” to cancel the request or “YES” to confirm you wish to add a Vehicle-ID, Why, Type or Place.
Each of these has their own dialog views to allow you to enter additional information.
Lapis-Meter: User's Manual
Page 44 of 74
Round-trip Example
So...let us take a trip! Our round-trip consists of the following stops:
• Starting from Home
• Travel to Petite Priced Petrol for fuel
• Travel to work
• Travel to school for class
• Travel to coffee shop
• Travel to home
If you are wondering where this trip came from it is an arbitrary selection of typical stops
found in the life of a person living in North America, The UK or Western Europe. You might
substitute Pub for coffee shop or a restaurant, still the trip should be fairly familiar and
common place.
From your home to the “Petite Priced Petrol” location is 10-units of distance (km, US Miles,
cm, in, feet, light-years, what ever unit of distance you typically use to measure your trips).
From the “Petite Priced Petrol” location to your work is 60-units of distance.
From work to school is 15-units of distance.
From school to the coffee shop is 6-units of distance.
From the coffee shop to home is 39-units of distance.
Total round-trip distance is (10+60+15+6+39) is 130-units of distance.
You may do this trip on Tuesdays and Thursdays while doing a similar trip on Mondays,
Wednesdays and Fridays. The similar trip would be without the fuel stop except on Fridays
when you prepare for the weekend by again stoping for fuel and without the stop for classes
or coffee.
Your Monday, Wednesday trips then look like this:
• Starting from Home
• Travel to work
• Travel to home
Your Friday trip then looks like this:
• Starting from Home
• Travel to work
• Travel to Petite Priced Petrol for fuel
• Travel to coffee shop
• Travel to home
The example we'll create then will follow a week's worth of travel. This is shown on the
following page by day.
Lapis-Meter: User's Manual
Day of
Week
Monday
Tuesday
Wednesday
Thursday
Friday
Page 46 of 74
Trips
Distance
(total on last line)
•
•
•
Starting from Home
Travel to work
Travel to home
•
•
•
0
45
45
90
•
•
•
•
•
•
Starting from Home
Travel to Petite Priced Petrol for fuel
Travel to work
Travel to school for class
Travel to coffee shop
Travel to home
•
•
•
•
•
•
0
10
60
15
6
39
130
•
•
•
Starting from Home
Travel to work
Travel to home
•
•
•
0
45
45
90
•
•
•
•
•
•
Starting from Home
Travel to Petite Priced Petrol for fuel
Travel to work
Travel to school for class
Travel to coffee shop
Travel to home
•
•
•
•
•
•
0
10
60
15
6
39
130
•
•
•
•
•
Starting from Home
Travel to work
Travel to Petite Priced Petrol for fuel
Travel to coffee shop
Travel to home
•
•
•
•
•
0
45
60
21
15
137
Example of a work-week worth of travel
Fuel is obtained three times (Tuesday, Thursday and Friday). You travel 577-distance units
total and make five round-trips.
First make certain that you have entered your vehicle-id (your actual vehicle-id) for this
example and set the odometer reading for your vehicle to what ever is the actual odometer
reading of your vehicle. In the example below our vehicle-id will be “Prius” and our odometer
reading will be 60000 for ease of seeing how the distance units change during the example.
There is a video of this example on the S.I.G.H. WEB site at:
http://www.s-i-g-h.com/SIGH_2/LapisMeter_iPhoneFAQ.html
If you want to view the example without actually entering values.
Lapis-Meter: User's Manual
Page 48 of 74
Start Lapis Meter from your iPhone.
At every starting location you should first verify that the odometer reading is correctly shown
on our iPHone. For our example this should be 60000 for the Prius vehicle-id.
Drive to work. At a safe place stop and follow the four steps:
•
•
•
•
Verify the odometer reading at the point-of-origin (starting point)
Add distance entries at each way point along the way
At the final stop make a distance entry
Send information to your email address.
Monday
When you first get into your vehicle at home you should verify the odometer reading is
correct. It should 60000.
Illustration 12: Monday Leaving Home
Once you arrive at your first destination (work) you have traveled 45-distance units from
home. The example odometer reading on your vehicle is now 60045. Adjust the wheels on
the odometer face of Lapis-Meter to reflect this as shown in illustration 13.
Lapis-Meter: User's Manual
Page 50 of 74
In the USA travel to your primary place of work is not considered necessarily tax deductible.
(You should consult your tax person for your particular situation.)
For this example the trip is not special. It is considered personal travel. Set the “Why” we
made this trip to “Personal Travel”. The “Type” of travel is “Misc”. The “Place” we went to is
“Work”.
Illustration 13: Arrive Work Setting
Why, Type, Place
Lapis-Meter: User's Manual
Press the
your trip.
Page 52 of 74
button to set the “Why”, “Type”, “Place” and distance for this leg of
Illustration 14: Monday Way Point 1
Completed
Press the “Home” button to put Lapis-Meter in the background and continue using your
iPhone as you would normally during your time at work.
When you are ready to drive home start Lapis-Meter again (either from the running
background image or by pressing the Lapis-Meter icon).
Again verify your odometer is correct and drive home.
When you arrive at home the Why and Type have not changed, so simply select the Place
button and move the slider until Home is shown in the Place line.
Lapis-Meter: User's Manual
Page 54 of 74
Adjust the odometer to show the current reading from the vehicle's odometer. In our example
it would be 60090
Illustration 15: Arrive Home Adjust
Odometer, Set Place
This time press the
button. You will be presented with an Email dialog view.
Enter the email address you want to send the data to and press the Send button. You can
enter any notes you wish after the “Notes: ” indicator found on the last line of the CSV data
shown.
Lapis-Meter: User's Manual
Page 56 of 74
Illustration 16: Monday Final Stop
Once the data is sent Lapis-Meter returns to main screen. Press the “Home” button and
continue using your iPhone normally.
Lapis-Meter: User's Manual
Tuesday
Page 58 of 74
Lapis-Meter: User's Manual
Page 60 of 74
Wednesday
First we verify the odometer reading. Since we have traveled 45-distance units the example
odometer reading is now ???. Adjust the wheels to reflect this.
Illustration 17: Wednesday Leaving
Home
Again for this example our travel to work from home is not a special trip, so “Why” we made
this trip is “Personal Travel”, “Type” of travel is “Misc” and “Place” is set to “Work”.
Lapis-Meter: User's Manual
Page 62 of 74
Illustration 18: Arrive Work Setting
Why, Type, Place
Lapis-Meter: User's Manual
Press the
your trip.
Page 64 of 74
button to set the “Why”, “Type”, “Place” and distance for this leg of
Illustration 19: Wednesday Way Point 1 Completed
Press the “Home” button to put Lapis-Meter in the background and continue using your
iPhone as you would normally during your time at work.
When you are ready to drive home start Lapis-Meter again (either from the running
background image or by pressing the Lapis-Meter icon).
Again verify your odometer is correct and drive home.
When you arrive at home the Why and Type have not changed, so simply select the Place
button and move the slider until Home is shown in the Place line.
Lapis-Meter: User's Manual
Page 66 of 74
Illustration 20: Arrive Home Adjust Odometer, Set Place
Adjust the odometer to show the current reading from the vehicle's odometer. In our example
it would be ???
This time press the
button. You will be presented with an Email dialog view.
Enter the email address you want to send the data to and press the Send button. You can
enter any notes you wish after the “Notes: ” indicator found on the last line of the CSV data
shown.
Lapis-Meter: User's Manual
Page 68 of 74
Illustration 21: Monday Final Stop
Once the data is sent Lapis-Meter returns to main screen. Press the “Home” button and
continue using your iPhone normally.
Thursday
Friday
Lapis-Meter: User's Manual
Page 70 of 74
One-Way trip Example
Enter a Way Point
Enter a Final Stop
Add a Why
Add a Type
Add a Place
Add a Vehicle-ID
What is...?
This section describes what a “WHY”, “TYPE” and “PLACE” are to Lapis-Meter.
A Why
A Type
A Place
The destination of this leg of your trip.
Lapis-Meter: User's Manual
Page 72 of 74
Lapis Meter FAQs (frequently asked questions)
1. What if I don't drive one of the vehicles as the primary vehicle? My odometer reading
will not be consecutive with the previous value shown by Lapis-Meter when I select
the vehicle.
A. This is a common occurrence among both families with multiple vehicles and
businesses with fleets, small or large. Follow the simple steps below:
1. Make certain the vehicle-id is showing properly as the selected vehicle.
2. Adjust the odometer display by changing the spinning wheels.
3. Make certain the number displayed is the number you want to use for the
new odometer reading and that it matches the odometer for the vehicle-id
selected.
4. Press the
button.
5. Proceed to use Lapis-Meter as normal.
2.
Lapis-Meter: User's Manual
Page 74 of 74
Other "light-app" business applications are:
EvenTip Pro
(http://www.s-i-g-h.com/SIGH_2/EvenTipPro_iPhone.html)
http://www.s-i-g-h.com
Registered Trademarks and Copyrights
All registered trademarks belong to their respective companies. Please contact the
following companies for more information about their respective trademarks:
•
Apple, Inc., 1 Infinite Loop, Cupertino, CA USA 95014
•
Software Industry & General Hardware (S.I.G.H.), [email protected] Place the
phrase “Lapis Meter query” in the subject line of your email.