1
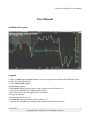
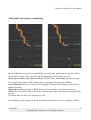
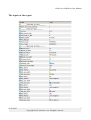
DonForex GetRichArt User Manual DonForex GetRichArt for MT4 DonForex website 'A Chart Of The Art Of Getting Rich' What is DonForex GetRichArt? A unique and innovative expert advisor for Metatrader4 that makes secondsbased charts and provides its own builtin tools in order to facilitate trading, especially manual scalping and other quicktrade technics. Since MT4 has no time frames which are lower than 1 minute, thus GetRichArt creates its own nonMT4 candles. As these candles are special candles, so “traditional” MT4 indicators can not be used on them. This is the reason that GetRichArt has its own builtin indicators. Since the goal is not to be a complete chartinchart, but a scalping EA, thus GetRichArt is equipped with only the most important tools. These tools are indicators and oneclicktrade functions. What time frames can be set on GetRichArt? Time frame can be set between 1 and 60 seconds. Feel the the market pulse! Can it be used on all instruments of MT4? Yes (forex pairs, CFDs, other instruments ...) How many charts that can be run at once? As many as you want (within your computer's capacity). Is it an offline chart? No. These candles are generated onthefly from the fresh incoming ticks which come after you started the program. Also, not just a chart, but a complete trading tool! Is it really a cash machine? It depends solely on you. With some practice you may become a confident and highly profitable trader! GetRichArt can give you all the necessary assistance to this! OK, I'm curious! Can I see trade examples? Yes, great examples and technics can be seen on this popular ForexFactory topic (thanks Billy!). Check this: GetRichArt trade examples 11/27/2015 1 Copyright 2015, donforex.com. All rights reserved. DonForex GetRichArt User Manual User Manual GetRichArt's layout: Legend: 1 and 2: Candle type selector buttons. One can select between Normal and Heiken Ashi candles by clicking on them 3: Chart time frame display 4: Local time display 5: Crosshair button (displays price/time, and measures differencies) Activate the function by clicking on the button First click on the chart designates the startpoint Drag it to measure Second click deactivates it 6: Vertical line button (and its delete button “x”)* Activate the function by clicking on the button and click on the chart 11/27/2015 2 Copyright 2015, donforex.com. All rights reserved. DonForex GetRichArt User Manual 7: Horizontal line button (and its delete button “x”)* Activate the function by clicking on the button and click on the chart 8: Trend line button (and its delete button “x”)* Activate the function by clicking on the button and draw on the chart 9: Fibonacci retracement indicator button (and its delete button “x”)* Activate the function by clicking on the button and draw on the chart 10: Andrews' pitchfork indicator button (and its delete button “x”)* Activate the function by clicking on the button and draw on the chart (1, 2 and 3) 11: Donchianchannel indicator button Activate/deactivate the function by clicking on the button 12: Bollingerbands indicator button Activate/deactivate the function by clicking on the button 13: Moving average indicator buttons (4 different settings can be used) Activate/deactivate the function by clicking on the button 14: Screenshot maker button (pictures are saved in MQL4/Files folder) 15: Brokerage's server time display 16: Chartshifting button Activate/deactivate the function by clicking on the button 17: Go to current candle button (jumps to the “youngest” bar) 18: Candle size increasing button (112) 19: Candle size decreasing button (112) 20: Auto close ON/OFF button. Closes all the trades when profit/loss target (see Inputs) has been reached 21: Version number and copyright display 22: Info Panel (see details below) 23: Trade Panel (see details below) 24: Horizontal scrolling functions (in the area where curve is displayed) First click activates the function, second click deactivates it 25: Flatten function (in the area where prices are displayed) First click activates the function, second click deactivates it Settings are modifiable on expert's Inputs tab (press F7). * You can draw as many items as you want. Delete button deletes all of them respectively. 11/27/2015 3 Copyright 2015, donforex.com. All rights reserved. DonForex GetRichArt User Manual Info Panel The content of the Info Panel: Builtin trendmeters from M1 to D1 time frames Account balance Account equity Lot sizes (buy lots, sell lots and summary lots) Number of open orders (buys, sells and summary) Profits/Losses (buys and sells) Cumulative profit/loss in currency and in pips (averaged) Info Panel can be opened and closed by clicking on its header Info Panel can be transposed (double click and drag) 11/27/2015 4 Copyright 2015, donforex.com. All rights reserved. DonForex GetRichArt User Manual Trade Panel The content of the Trade Panel: Current spread display Tradefunction buttons: BUY button SELL button REPLACE UP! button (it is a special function that only works if there is 1 open trade. E.g.: if you have a buy order, this function closes it and immediately opens a sell order, and vice versa. You can not use it if there are more open orders.) Pending order buttons (buylimit, selllimit, buystop, sellstop). Activate the proper button by clicking on it, then click on the chart to where you want your order be placed. CLOSE ALL button (closes all of your open orders immediately with the given instrument) CLOSE BUYS (closes only the buy orders with the given instrument) CLOSE SELLS (closes only the sell orders with the given instrument) CLOSE PROFITS (closes only the winner orders with the given instrument) CLOSE LOSSES (closes only the loser orders with the given instrument) DEL PENDINGS (delete all of the pending orders with the given instrument) Trade Panel can be opened and closed by clicking on its header Trade Panel can be transposed (double click and drag. Be careful with tradebuttons, grab it at spread label!) 11/27/2015 5 Copyright 2015, donforex.com. All rights reserved. DonForex GetRichArt User Manual Take profit and stop loss modifying In the GetRichArt expert there is possibility to modify take profit and/or stop loss values for orders by mouse clicks. In order for this function to work you need to set Show_Open_Orders_On_Chart and Show_TP_SL_Lines_On_Chart properties to true. The images above show a SELL order and its take profit level (around 1.50468). Leftside picture: there is an empty blue rectangle. Click on this rectangle to activate the modifyfunction. Rightside picture: rectangle is filled, it means that function is activated and you can modify the take profit value. Click on the chart to where you want your new take profit be placed. Of course, one can do it with stop loss as well. If something wrong happened, check the content of Experts tab in the Terminal window. 11/27/2015 6 Copyright 2015, donforex.com. All rights reserved. DonForex GetRichArt User Manual The inputs of the expert 11/27/2015 7 Copyright 2015, donforex.com. All rights reserved. DonForex GetRichArt User Manual Profit and loss target: must be a plus number (e.g.: if your loss target is 35 USD, you have to write 35). Break even: if you are in profit (not in loss, this is important!) and want to avoid that it may turn to losses, set Loss_Target to 0.0 and turn ON the Auto Close button. Show profit level: shows the price level on the chart where your profit/loss is in zero Price grid frequency: 1 means 1 pip, etc .. Time grid frequency: 25 means 25*Chart_Time_Frame_Seconds (e.g.: if frequency is 25 and time frame is 12 seconds, then 25*12=300 seconds=5 minutes) 11/27/2015 8 Copyright 2015, donforex.com. All rights reserved. DonForex GetRichArt User Manual Pip_Settings_Mode: two options are available (Mode_Auto and Mode_Manual). Default status is Auto mode, it works well mainly on forex pairs. If you use other instruments (e.g.: CFDs), it may require switching to Manual mode, because there is no universal formula that works well on all the instrument of different brokers (they may use different settings for the same instrument). So, if you experience that there is something wrong with pipdisplaying, just switch to Manual mode and modify Pip_Factor and/or Pip_Digit (see below). Pip_Factor: used when converting points to pips. Example of use: if you see that spread is 15, but you know that proper value has to be 1.5 (that is, tenfold difference), then set it to PipFactor_10. Pip_Digit: used for price (1 pip) grid calculation. Example of use: let's assume that EURUSD price is 1.07894. In this case the 4. decimal place (number 9) indicates the pips and the 5. decimal place (number 4) indicates the points. Since we need the pips, which is in the 4. decimal place, select PipDigit_4. An other example with a JPY pair: the price of GBPJPY is 184.567. In this case the pips are in the 2. decimal place (number 6), so we select PipDigit_2. Ask confirmation: asks your confirmation before trade actions Lazy mode: just set it to true if your CPU is weak (if it is set to true, screen refreshing is slower. Although the expert reacts to all the incoming tick and makes its calculations properly, but provides less smooth user experince as regards chart events, e.g.: when drawing trend lines, etc ..) 11/27/2015 9 Copyright 2015, donforex.com. All rights reserved.