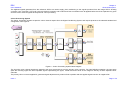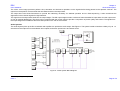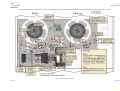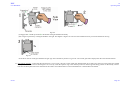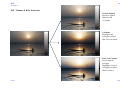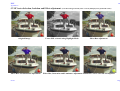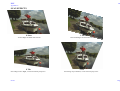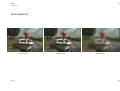
1
DSX Cintel International Ltd Watton Road WARE Film Scanner Herts SG12 0AE England tel: +44 (0) 1920 463939 fax: +44 (0) 1920 460803 e-mail: [email protected] web: www.cinteltelecine.com User Handbook Issue 1 While every effort has been made to ensure that the contents of this document are accurate Cintel International equipment is under constant review to bring about improvements in design, and a unit may differ in detail from that described. Cintel International Ltd 2004 The copyright of this document is the property of Cintel International Ltd. and the document contains proprietary information of Cintel International Ltd. It is supplied in confidence and must not be used for any purpose other than that for which it is supplied. No part of the document shall be reproduced, published or disclosed to a third party without the prior written consent of Cintel International Ltd. DSX Chapter 1 Introduction User Handbook Chapter 1 - Introduction CONTENTS Introduction Control About This Handbook Other Handbooks Cintel Other Manufacturers Options __________________ Introduction Your DSX Telecine (shown in Figure 1) is a multi-resolution film scanning system that employs the very latest imaging technology. It provides images of uncompromised quality, while maintaining the versatility that you would expect from a Cintel telecine. DSX incorporates Oliver, Dirt & Scratch Removal, Standard and High Definition, 2K HSDL & Data, 4K Data, and C-VIP, (C)olour (V)ector (I)mage (P)rocessing. C-VIP is a powerful built-in colour processing system that provides colour correction at 14-bit resolution regardless of system standard. Control Although designed to be operated from a remote control desk DSX can also be controlled and configured from the Local Control Panel where much of the desk’s functionality is replicated. DSX supports control desks from the following manufacturers: • • Da Vinci Pandora. • Tangent Please contact manufacturers for specific details. About This Handbook This handbook, DSX - User Handbook, is Volume 1 and is intended for the user and operator and provides: • • • a specification (Chapter 2), a simplified functional description (Chapter 3) and user operating details (Chapter 4). Other Handbooks Cintel Cintel can supply engineering procedure manuals following completion of a Cintel training course. Contact Cintel for further information. A Python II supplement is supplied with machines integrated with 2K and 4K data capture. Other Manufacturers This telecine can be controlled by other manufacturers’ remote control systems. For these operating details and/or details of any other equipment or option fitted to your telecine please refer to the relevant manufacturer’s documentation. Issue 1 Page 1 of 2 DSX Chapter 1 Introduction User Handbook Options The following four major options can be added to the DSX telecine: • Grace • Audio Figure 1 – DSX Telecine Issue 1 Page 2 of 2 DSX Chapter 2 Specification User Handbook Chapter 2 Specification Contents Environment Film Transport and Servo System Film Scanning System CVIP (Colour Vector Image Processor) Digital I/O Audio System1 Supplies Dimensions and Weight Cintel policy is one of continuous improvement, and the right is reserved to change specifications at any time without notice. Environment Performance will be within the specified limits when the telecine is operated in an ambient temperature between 16°C and 25°C and in a dust-free atmosphere. Recommended operating temperature range: 18 to 25°C. Film Transport and Servo System Gates 4K resolution S35/35mm and S16/16mm interchangeable film gates. Gate apertures designed to encompass maximum camera shooting apertures. Film Drive Capstan driven directly by servo-controlled motor. Feed and take-up spooling servos individually controlled to provide constant film tension. Standards/Systems Video, Standard Definition CCIR 601, CCIR 656 (4:4:4 or 4:2:2 SDI) 625 lines, 50Hz, 2:1 interlace 525 lines, 59.94Hz, 2:1 interlace. 1 If fitted Issue 1 Page 1 of 7 DSX User Handbook Chapter 2 Specification Video, High Definition 1080i 59.94/60/50 HD Serial Digital, Y.Cr,Cb (SMPTE 292M, 22:11:11), 10 bit 1080i 59.94/60/50 HD Serial Digital, (22:22:22) RGB and Y,Cr,Cb (SMPTE 292M)10 bit 720p HD Serial Digital (Varispeed to 24fps) 1080P 24sF, HD Serial Digital (22:11:11 or 22:22:22) 1080P 24, HD Serial Digital (22:11:11 or 22:22:22) Switching between HD and other standards is less than 15 seconds Data, High Resolution 2K data (2048 x 1536) or (2048 x 1556) 4K data (4096 x 3112) Film Frame Rate Standard Definition 525, 5-30fps - Precise control of speed in 0.01fps (frames per second) increments. 525, 40-50fps and (60fps with fpf option) 625, 5-30fps - Precise control of speed in 0.01fps increments 625, 33-50fps. High Definition HD Interlace Formats 5-30fps HD Progressive formats 24/25fps 2K Data Still-frame, 6fps HSDL 15fps 4K Data Still-frame, 0.3 fps Film Capacity Core mounted film up to 2,000 feet (approx. 18 inches diameter). Adapters for film spools. Issue 1 Page 2 of 7 DSX User Handbook Chapter 2 Specification Fast Running (shuttle) Continuously variable shuttle in forward and reverse modes with coherent images. Maximum speed: 10 x normal. Inching Single step, forward and reverse. Stop Mode Rapid, precise stopping with full specification quality still-frame 'active stop' picture display. Picture Stability Better than ±0.05% of film frame height between 5fps and 30fps. Film Framing (perforation nudge, 35mm only) Adjustment of framing by ±¼ frames (35mm). Adjustment of framing by ±½ frames (16mm). Film Scanning System Film Gates All gates fitted with manual focus control. Light Source Thick face plate, seven inch, high-intensity cathode ray tube de-mountable from CRT assembly. CRT assembly incorporates pre-aligned deflection coils and integral magnetic screen. Negligible x-ray radiation. Pick-up Devices Red, green and blue high-resolution solid state sensors. Digital Scan Control (applicable to 625/525 and 2K, 4K and HD) Provides film scanning for: X, Y Pan and Zoom (area magnification x 0.8 to x 4, limited to x 2 in 2K and 4K) Anamorphic unsqueeze (2:1) Rotate. Issue 1 Page 3 of 7 DSX User Handbook Chapter 2 Specification Scan Effects (applicable to 625/525 and 2K, 4K and HD) Scan effects include: Scan aspects of 4:3 and 16:9 Linear/non-linear X-Y squeeze. Digital Blanking Control Output Blanking (not applicable to 2K or 4K). X, Y, size, position and zoom range 0 to 100% of video image. Appropriate for 4:3 and 16:9 operation. Beam Current Switchable: OFF (CRT switched OFF) Low 150µA Normal 300µA. Tube Saver Mode. (Sets CRT to 150uA and defocusses the scan raster.) Geometry and Linearity Any point in the picture is within 0.25% of picture height relative to its true position. Any errors are distributed evenly. Shading (automatic) Overall Less than 1% of signal level with gamma of 0.4 over film density range of 0.0 to 3.3. Differential Less than 1% of signal level at gamma of 0.4 over film density range of 0.0 to 3.3. CRT Correction (automatic) Includes burn and grain correction, compensates for 3:1 reduction of light output at 300µA. Resolution without aperture correction 625/525 Not more than 2dB down at 400 lines in the picture centre. Corner resolution within 1dB of centre resolution at 300 lines. Does not take film losses into account. (De-rate by 1dB for S16mm). HD/2K/4K Not more than 3dB down at 800 lines in the picture centre. Corner resolution within 2dB of centre resolution at 600 lines. Does not take film losses into account. Issue 1 Page 4 of 7 DSX User Handbook Chapter 2 Specification CVIP (Colour Vector Image Processor) Digital Channel Full RGB Primary and multi-vector Secondary correction. Variable saturation 0 to 200%. Enhancement (digital) Individually adjustable red, green and blue aperture correction. 0 to +12dB maximum horizontal and vertical. 0 to -12dB negative enhancement (softening) included. Signal-to-Noise Ratios (at gamma 0.4) Measured with N.D. 1 in the vision gate, the ratio being 700mV divided by r.m.s. noise voltage. 625/525 Red: Better than 55dB. Green: Better than 60dB. Blue: Better than 55dB. HD Red: Better than 50dB. Green: Better than 50dB. Blue: Better than 50dB. 2K Red: Better than 55dB. Green: Better than 55dB. Blue: Better than 55dB. 4K Data To be advised Masking Choice of pre-set masking equations for several film stocks and user programmable masking equations for special work. Pre-set masking for Kodak film materials are: Colour Print Vision & Primetime negative Inter positive (5244 & 7244). Issue 1 Page 5 of 7 DSX User Handbook Chapter 2 Specification Digital I/0 SD Inputs CCIR 601/656 Serial links 4:4:4 or 4:2:2 external reference. Mixed sync 2V to 4V or composite video, negative going. Output CCIR 601/656 Serial links 4:4:4 or 4:2:2 (Clean and reference wipe outputs). HD Inputs Tri-Level sync Output SMPTE -292M Serial link 22:22:22 or 22:11:11 aka “4:4:4” or “4:2:2” Data 2K/4K LVDS multi-pin connection for coupling to Cintel Python II 2K only HSDL via HD “4:4:4” serial outputs Audio System2 Audio Sources 35mm COMOPT Dolby A & SR stereo, 16mm COMOPT. External stereo inputs. Internal tone generator. Frequency Response Optical 16mm: 50Hz to 7kHz, ±2dB. Optical 35mm: 50Hz to 8kHz, ±2dB. Signal-to-Noise UNweighted Optical Better than 55dB. Audio Delay 0 to 1.3 seconds. 2 If fitted Issue 1 Page 6 of 7 DSX Chapter 2 Specification User Handbook Supplies Local Supply 194-257V, 50Hz 97-129V, 50/60Hz Current Rating 20A 40A Dimensions and Weight Width: 1620mm Height: 1790mm Depth: 905mm Weight: 850Kg (net). Issue 1 Page 7 of 7 DSX Chapter 3 General Description User Handbook Chapter 3 - General Description CONTENTS Introduction Film Transport System Film Scanning System Scanning Effects Signal Conditioning System Colour Processing System Audio System Audio Monitoring Control Local Controls IN-TEXT ILLUSTRATIONS Top Level Block Diagram Film Transport System Block Diagram Film Scanning System Block Diagram Signal Conditioning System Block Diagram Colour Processing Block Diagram Audio System Block Diagram Control Block Diagram Figure 1 Figure 2 Figure 3 Figure 4 Figure 5 Figure 6 Figure 7 ____________________________ Introduction DSX is a multi-standard telecine and data scanner that combines the advantages of digital flying-spot scanning techniques with the very latest technology, to produce images of uncompromised quality regardless of the selected operating standard. The telecine is available in a standard configuration to support 525, 625 and High Definition television standards plus true 2K and 4K data output. The telecine can be divided into five major functional systems as shown in Figure 1. (See Oliver and Grace Supplements for full description of their features) Issue 1 Page 1 of 9 DSX Chapter 3 General Description User Handbook Figure 1 – Top Level Block Diagram Issue 1 Page 2 of 9 DSX Chapter 3 User Handbook General Description The Film Transport System precisely controls film position. Information derived from the film by the Film Scanning System is converted into electrical signals. These signals are subsequently digitised and conditioned by the Signal Conditioning System and then processed by the Colour Processing System. The Colour Processing System provides picture output to the selected standard. The film soundtrack is picked up by the Audio System1 to provide the audio output. Although designed to be operated from a remote control desk DSX can also be controlled and configured locally where much of the desk’s functionality is replicated. Film Transport System The Film Transport System is digitally controlled and achieves near-pin registration stability without the need for mechanical pin registration. It transfers film at a constant rate on a series of guide rollers from the feed core, through the vision gate, past the audio head (if fitted) and onto the take-up core. See Figure 2. The film is scanned by a raster from the CRT as it moves across the vision gate. Figure 2 - Film Transport System Block Diagram 1 Option Issue 1 Page 3 of 9 DSX Chapter 3 User Handbook General Description All transport mechanism components are mounted on the deck plate located behind the film transport door. This door and the lower motorised door are safety-interlocked to force the telecine into a STOP condition when either of these doors is opened. A servo-controlled sprocket-free capstan drive ensures that film velocity is constant and film handling is gentle. Capstan stability is maintained by feedback of velocity information from an optical tachometer encoder on the capstan shaft. A capstan phasing loop ensures correct picture framing by comparing pulses from the sprocket-driven encoder with station syncs. If framing is incorrect an error signal is produced; this signal is used to modify the capstan velocity to restore correct framing. When the transport is stopped the film is positioned in the vision gate to give a correctly framed picture. In this 'active stop' condition the capstan and spooling servos are enabled but stationary. The film feed and take-up cores are individually driven by separate servo-controlled D.C. motors. This reduces the effect of load variations on the capstan by maintaining the correct film tension. The speeds of the spooling motors are controlled by signals generated by encoders on compliance arms located on either side of the vision gate. In the absence of film the encoder outputs inhibit transport operation. A or B winds are automatically sensed. The film transport system provides film motion in both forward or reverse directions in 0.01fps increments up to 30fps (525, SD), 30fps (HD) and various speeds in data mode to a maximum of 6fps or (15fps with HSDL in 2K) and 0.3fps in 4K. Film can be shuttled in forward and reverse directions at up to 10 x normal speed in all modes of operation. The mechanism accommodates 16/S16mm and 35/S35mm film formats (1, 2, 3 perforation and 4 perforation) with simple substitution of the vision gate to change from 16/S162 to 35/S35. Normal, wide screen and anamorphic film is accepted. Film cores are driven through rubber pads and conversion from one gauge to another requires only the addition or removal of spacers. Film run tension is adjustable to accommodate valuable archive material. PTR (Particle Transfer Rollers) rollers are included as standard on the deck plate for film cleaning purposes. The PTRs are optional in the film lacing path. Film Scanning System The Film Scanning System scans the moving film as it passes through the vision gate. The modulated light produced by the different film image densities is processed by Oliver (See Oliver supplement for details) to recover image data from scratches and dust and is then separated into its red, green and blue constituent colours. The light is then converted into electrical signals by (A)valanche (P)hoto (D)iodes. The system consists of a digitally scanned high quality thick faceplate CRT and a simple optical arrangement with colour splitters and filters as shown in Figure 3. Using this system image resolution is only limited by the optical path and the CRT spot size. Light from the raster produced by the CRT is focused onto the film by an objective lens. A condenser lens behind the film then collects the transmitted light. The light is then passed through the Oliver scratch & dust removal system, here any image that was masked by scratches or dust is recovered, by an APD, such that it can later be added back to the original image. Then using a series of dichroic mirrors and filters, the red, green and blue components are separated and converted into electrical signals by three separate APD’s. While these APD’s are used to create the image three additional devices, the reference APD’s, are used to form an active compensation system. This system monitors the CRT face and generates signals that are used to remove all shading and fixed-pattern phosphor irregularities. Light is carried by fibre optic cables from the CRT face to the reference detectors. This system coupled together with a straight light path provides excellent signal to noise ratios and pure colorimetry at all resolutions. The mirrors, filters and APD's are housed in an enclosed cell box to eliminate the effects of external light interference; the interchangeable condenser lenses fitted onto the gate and towards the rear of Oliver are also shielded from interference by light traps. The gate light trap is user removable to assist in film lacing. 2 The 16mm and 35mm gates have adjustable format masks to cover the sound track area on 16 and 35mm material. Issue 1 Page 4 of 9 DSX Chapter 3 User Handbook General Description Scanning Effects All scanning effects are “optical”; that is, all effects are achieved by manipulating the scan. This avoids the resolution limitations experienced when processing a digital representation of the image. Scanning effects include zoom, rotation, linear and non-linear X-Y squeeze as well as many other more advanced effects. Provision is made for reproducing wide-screen or anamorphic film at any desired film and/or TV aspect ratio. Refer to the relevant control system literature for further information. Figure 3 - Film Scanning System Block Diagram Issue 1 Page 5 of 9 DSX Chapter 3 General Description User Handbook Signal Conditioning System The Signal Conditioning System accepts the modulated red, green, blue and Oliver signals from the image APD's, converts the signals to digital and applies correction in readiness for colour processing as shown in Figure 4. Figure 4 – Signal Conditioning System Block Diagram Light falling on all seven APD's produces current signals that are converted into voltage signals by the head amplifiers. Afterglow correction is then applied before being converted into 14-bit digital signals by A to D converters. Issue 1 Page 6 of 9 DSX Chapter 3 User Handbook General Description The digitised signals generated from the reference APD’s are used to apply pixel conditioning to the signals produced from the image APD’s. Shading correction, burn correction, CRT grain removal, blemish correction and Scratch and Dust concealment are all applied before the three separate red, green and blue colour channel signals are subjected to colour processing. Colour Processing System The Colour Processing System accepts the colour channel outputs from the Signal Conditioning System and outputs pictures to the selected standard and configuration. See Figure 5. Figure 5 – Colour Processing System Block Diagram The incoming colour channel signals are passed to the input store and then onto the primary colour corrector. For High Definition operation, the input store splits the incoming signal into three separate signals representing the upper, middle and lower thirds of the image for delivery to three separate colour channels. The primary colour corrector applies lift, gamma and gain adjustments by means of look-up tables and also applies signal inversion for negative film. Issue 1 Page 7 of 9 DSX Chapter 3 User Handbook General Description The colour vector image processor performs hue, saturation and luminance operations on the signals before being passed to the aperture corrector. The output from the aperture corrector feeds the anti-aliaser and then the output store. The output store uses three framestores to provide the interlacing necessary for 525/625 operation and 3:2 field sequencing. It also recombines the segmented colour channel signals for High Definition. The signal from the output store feeds into the output stages. The SD output stages contain a reference frame that takes its input either from the output store or from an external digital input. This frame can be combined with the current output to provide a comparison of picture quality and content. The signals from the output stage/s are available at the termination panels on the rear of the machine. Audio System3 The Audio System picks up the film soundtrack and amplifies it to provide the audio output. See Figure 6. The system is able to introduce a delay of up to 1.3 seconds into the output and accommodates 16mm optical, and 35mm optical mono and stereo sound. Figure 6 - Audio System Block Diagram 3 Audio capability is an option Issue 1 Page 8 of 9 DSX Chapter 3 User Handbook General Description Audio signals from the selected source, an optical sound head reader or an external input, are passed through a Dolby noise reducer and then filtered accordingly to limit the bandwidth. The signals are then digitised, subjected to a user definable digital delay of up to 1.3 seconds, converted back to analogue and adjusted for gain before being distributed to output and monitoring amplifiers. The digital delay is incorporated to compensate for the relative positions of the vision gate and audio reader. It also allows for delays introduced by downstream processing on the video path. An internally generated test tone (1kHz) is provided to test the audio path. Audio Monitoring Audio signals are monitored by the loudspeaker situated in the upper control panel and level is adjusted with the adjacent control. When stereo is selected left and right channels are combined to produce a single monaural drive. Audio can also be monitored from the rear of the machine on Termination Panel 2. These outputs can be configured for left/right or sum & diff. monitoring. Control DSX is designed to be operated remotely from a remote control desk that provides full control over all facilities. The desk, essential for full telecine operation, communicates with the telecine through an Ethernet connection. A limited amount of control is however provided at the telecine. Refer to manufacturer's literature for separate control desk operation. Local Controls Local controls are generally located on one of two control panels on the front of the machine and allow the operator to lace film and perform all basic machine functions. Details of all local controls and the most common operating procedures can be found in Chapter 4. Figure 7 Control System Block Diagram Issue 1 Page 9 of 9 DSX Chapter 4 Operating Information User Handbook Chapter 4 - Operating Information Contents General Storage Handling of Film Material Time-Limited Trial Software Control Reference Power ON/OFF Switch Defaults after Initialisation Lower Sliding Door Switch (DOOR) Lower Control Panel STOP RUN/SHUTTLE FORWARD RUN/SHUTTLE REVERSE 35mm NUDGE FRAME UP/DOWN JOG/SHUTTLE WHEEL Upper Control Panel Dedicated Controls VAC PEC CRT ON LOCAL Loudspeaker Volume Display Overview Screen-Saver Menu Navigation and Functionality Menu Hierarchy (Figure 6) Top Level Menu Pre Gamma (Figure 7) Top Level Menu Post Gamma (Figure 8) PEC Levels (Figure 9) Status and Shutdown Pages (Figure 10) Audio Menu (Figure 11) Pan / Zoom (Figure 12) Auto Alignment Menu (Figure 13) Perform Shading (Figure 14) Perform Detector Calibration (Figure 15) Time Code Reset (Figure 16) Engineering Menu #1 (Figure 17) Issue 1 Gate Code Reader Automatic (Figure 18) Gate Code Reader HD S35mm (Figure 19) Engineering Password (Figure 20) Matrix Menu Oliver (Figure21) Matrix Menu Grace Gains (Figure 22) If Option Fitted Matrix Menu Grace Detail (Figure 23) If Option Fitted Lifetime Options (Figure 24) Time Limited Options (Figure 25) Expired Options (Figure 26) Video Standard SD (Figure 27) Video Standard HD (Figure 28) Data Standard (Figure 29) Select Standard confirmation (Figure 30) Video Setup (Figure 31) Scan Effects Menu showing H Linear Keystone (Figure 32) Scan Effects Menu showing V Linear Keystone (Figure 33) Scan Effects Menu showing Focus Effects (Figure 34) Scan Effects Menu showing Rotate (Figure 35) Scan Effects Menu showing X Y Zoom (Figure 36) Engineering Menu #2 (Figure 37) APC Control Menu (Figure 38) Test Pattern Menu (Figure 39) PCC Test Pattern menu (Figure 40) Pixcon Test Pattern Menu (Figure 41) Lute (Breakout) Test Pattern Menu (Figure 42) If Option Fitted Debug File Filter Menu (Figure 43) Debug running list example (Figure 44) Debug Task Menu (Figure 45) Log Mask Menu (Showing Film selected) (Figure 46) Log Mask (None) (Figure 47) Log Mask (User) (Figure 48) CVIP Menu (Figure 49) CVIP Vector Select (Figure 50) CVIP Vector Highlight Menu (Figure 51) PCC Differential Menu (Post Lift Gamma shown) (Figure 52) PCC Differential Menu (S Gamma shown) (Figure 53) PCC Differential Menu (Knee) (Figure 54) PCC Differential Menu (Highlight shown) (Figure 55) PCC Differential Menu (Lowlight shown) (Figure 56) Anti Alias Control (Figure 57) Page 1 of 139 DSX Chapter 4 Operating Information User Handbook Engineering Menu #3 (Figure 58) Transport Configuration Menu (Figure 59) Output Blanking Menu (Figure 60) Reference Store (External shown) (Figure 61) Reference Store (Reference shown (Figure 62) Manual Shading Menu (Figure 63) Data Output LUT Selection Menu (Figure 64) If Option Fitted Data Output LUT File Load (Figure 65) If Option Fitted Data Output LUT File Delete (Figure 66) If Option Fitted Data Output Normal Mode (Figure 67) Data Output Light Log Mode (Figure 68) Data Output Light Monitor Mode (Figure 69) Data Output Prescale Log Mode (Figure 70) Data Output Prescale Monitor Mode (Figure 71) Engineering Menu #4 (Figure 72) Real-Time Clock (Figure 73) Front End Setup Menu (Figure 74) Front End Setup Blanking (Figure 75) PEC Setup Main Signal (Figure 76) PEC Setup Reference Signal (Figure 77) Archive Menu (Figure 78) Archive Load (Figure 79) Archive Save (Figure 80) Mono/Differential Video Normal (Figure 81) Mono/Differential Video Main vs Main (Figure 82) Mono/Differential Video Colour Main (Figure 83) Mono/Differential Video Main vs Ref (Figure 84) Mono/Differential Video Ref vs Ref (Figure 85) Mono/Differential Video Colour Ref (Figure 86) Scan Alignment Amplitude (Figure 87) Scan Alignment Astig (Figure 88) Scan Alignment Coils (Figure 89) Scan Alignment Dynamic Focus (Figure 90) Scan Alignment Preset Fly back (Figure 91) Scan Alignment Offset (Figure 92) Scan Alignment Pincushion (Figure 93) Scan Alignment Skew (Figure 94) Scan Alignment Static Focus (Figure 95) General Information Deck Plate Controls Film Tension Push-button Loop Guide Thumbscrew Door Safety Interlock System Gate Gate Features Focus Knob and Lock Aperture Ring Edge Guidance Lever/s Latch able Pressure Plate Actuating Arm Brake Pedal Operating Procedures Powering-Up Film scanner Daily Cleaning and Film scanner Warm-Up Selecting and Fitting Oliver Optics and a Vision Gate Lacing Film Rolls Lacing Film Loops Detector Calibration and Auto Alignment Running Film Powering-Down Invoking a Test Pattern Installing System Software (for the first time) Setting the Best Primary Colour Correction at the Local Control Panel Setting Remote Controller Base memories and Defaults Other Functionality Issue 1 Procedure 1 Procedure 2 Procedure 3 Procedure 4 Procedure 5 Procedure 6 Procedure 7 Procedure 8 Procedure 9 Procedure 10 Procedure 11 Procedure 12 Procedure 13 Page 2 of 139 DSX User Handbook Chapter 4 Operating Information Warnings Electrical supplies in excess of 50 (fifty) volts are potentially hazardous or lethal; supplies of up to 30kV exist within the DSX Film scanner. THE FILM SCANNER MUST ONLY BE OPERATED WITH ALL COVERS IN PLACE; covers and access doors that are secured with key operated locks must only be removed by qualified service personnel for maintenance purposes. The film scanner is designed so that it CANNOT be operated with either the film transport or lower sliding doors open; safety interlock switches force the film scanner into a STOP condition when either of these doors are opened. Do NOT in any way over-ride, modify or alter the operation of these switches; these switches are fitted for safety purposes and can only be over-ridden by a qualified engineer equipped with the correct service tool. Ensure that film tension is switched OFF (film tension push-button extinguished) BEFORE touching any part of the film transport mechanism. GENERAL Although designed to be operated from a remote control desk DSX can also be controlled and configured from the Local Control Panel where much of the desk’s functionality is replicated. This chapter discusses DSX functionality only; remote control desk operation (through an Ethernet link) is NOT discussed. Refer to the relevant manufacturer's documentation for control desk details. This chapter is divided into two parts: (i) A reference section. This section explains the function of the controls at the film scanner and illustrates the menus available on the hierarchical control system that is accessible from the local control panel. Some options and settings NOT covered by the procedures’ section are explained in this section. Other options are covered by separate supplements. Caution The hierarchical menu control system offers access to some functionality that is intended for engineering purposes only. A procedures’ section. This section guides the user step-by-step through the most common operations. (ii) Storage When not in use DSX should be left with both doors CLOSED. This helps to prevent dust and similar small particles from contaminating the deck plate area. Film should NOT be left laced when not in use as doing so may cause permanent film distortion. Handling of Film Material It is recommended that normal in-house procedures for handling original film material be observed. Time-Limited Trial Software This film scanner is configured in the factory to function with the software options purchased at the time of sale. These options are documented in a licence file on the configuration disk that contains: • • • a description of each fitted option, a Key (or encrypted ASCII string) that permits use of the option and an indication of the duration of the option (or key). Options fitted to your film scanner (and expired options) are displayed on the Film scanner Options Menu. Issue 1 Page 2 of 139 DSX User Handbook Chapter 4 Operating Information Key Duration and Usage There are three key types: Lifetime Key Options purchased at the time of sale are normally enabled for use with a lifetime key. 7-Day. Time-Limited Trial Key This key is designed to enable Cintel engineers to temporarily restore full functionality to the film scanner following a service call. This key will then be replaced by an appropriate key issued directly by Cintel. A 7-day key can only be issued once for any given option. 28-Day. Time-Limited Trial Key This key is designed to enable the use of an option that is in the process of being purchased. When purchased this key will then be replaced by a lifetime key issued directly by Cintel. 56-Day. Time –Limited Trial Key This key is designed to enable the use of an option that is in the process of being purchased. When purchased this key will then be replaced by a lifetime key issued directly by Cintel. 366-Day. Main Software Key. This key is issued annually and is supplied based on the terms of the license issued at the time of purchase. Issue 1 Page 3 of 139 DSX Chapter 4 Operating Information User Handbook CONTROL REFERENCE This reference section explains the functions of the controls available at the film scanner. Controls are located on the upper and lower control panels and on the deck plate as shown in Figure 96. Figure 1 Location of Controls Issue 1 Page 4 of 139 DSX User Handbook Chapter 4 Operating Information Power ON/OFF Switch Warning The power ON/OFF switch on the film scanner does NOT switch power ON/OFF to the remote control desk. Refer to relevant manufacturer’s documentation for details. The power ON/OFF switch is located at the front of the machine on the lower left-hand side. Move the switch up into the ^position to switch power ON, move the switch down into the O position to switch power OFF. Ensure that the film scanner is shutdown correctly (as described in Procedure 8) BEFORE the power is switched OFF. Caution Failure to observe the correct shutdown procedure may corrupt the internal hard drive. DSX recognizes an incorrect shutdown sequence, and at next power up will, on the local display panel, advise there had been an incorrect shutdown sequence. The DSX will then automatically check and automatically “rebuild” the hard disk contents Defaults After Initialisation When switched ON and following initialisation the following defaults apply: • CRT heaters OFF, CRT available. • EHT is OFF. • Local control is selected; LOCAL LED is illuminated. • Display shows Top Level Menu. • PEC and shading boards are NOT aligned. • Film tension is OFF. • Mechanism is in Stop condition. • Film standard is determined by vision gate selection. • Film format determined by setting at previous power-down. • Film Type will revert to Negative • Aperture correction is turned OFF. • Audio output is OFF (if option is fitted). • Some functions available via local display menu system adopt default settings. Lower Sliding Door Switch (DOOR) (DOOR) Press DOOR to open/close the lower sliding (adjacent) door. If desired the door can be operated manually with the handle. This door gives access to the CRT location and the CRT face filter drawers and mount adaptors. The door also gives access for the adjustment of gate aperture, gate focus and Oliver Condenser lenses (See Oliver Supplement for more details),. The door will open automatically if the film transport door is opened. Note: Your film scanner can be configured so that the door will not automatically close if the film transport door is closed. Refer to Cintel Customer Support department for details. Note: The sliding door switch will be disabled by the safety interlock system if a Stop command has NOT been issued. If the door switch fails to operate first press STOP. Issue 1 Page 5 of 139 DSX Chapter 4 Operating Information User Handbook Lower Control Panel The Lower Control Panel, located just below and to the right of the Film Transport Door, provides the film scanner’s film transport controls as shown in Figure 2. Figure 2 Lower Control Panel Press STOP to instantly stop film motion in either direction and at any speed. This control remains available under remote control. Press RUN/SHUTTLE FORWARD to initiate film movement from the feed core to the take-up core as follows: • Press once to transport film at selected run forward frame rate. • Press twice to transport film at selected shuttle forward frame rate. Maximum shuttle speed equates to 250 frames per second (fps) for 35mm and 500fps for 16mm. Run forward and shuttle forward frame rates are pre-determined either at the remote control desk (see manufacturer’s documentation) or at the local control panel (see Transport Configuration Menu). Auto-Stop Auto-Stop protects film from winding off the core by automatically stopping the film transport system when either end of the film is approaching. This feature is selected from the Transport Configuration Menu. Issue 1 Page 6 of 139 DSX User Handbook Chapter 4 Operating Information Press RUN/SHUTTLE REVERSE to initiate film movement from the take-up core to the feed core. This control operates in a similar manner to RUN/SHUTTLE FORWARD. 35mm NUDGE Press 35mm NUDGE to frame the film scanner picture by nudging the film (in the forward direction) in one perforation (or ¼ frame for 4 perf material) increments. This ensures that the film can be correctly framed (to ¼ frame accuracy with 4 perf material) without having to re-position the film on the sprocket. Operates in 35mm mode only. ( Nudges 3 perf material 1/3 frame, 2 perf material ½ frame) Press FRAME UP or FRAME DOWN to accurately frame the film scanner picture when film is in motion. To frame the picture when in Stop set the user framing default from the Transport Configuration Menu. Press and/or rotate the JOG/SHUTTLE WHEEL as follows: To Select Operating Mode. Press to select the Jog or Shuttle mode. The currently selected mode is shown on the upper control panel display Top Level Menu. When in Shuttle Mode. • Press to stop film transport (if running) and select Jog mode. • Rotate to vary shuttle speed in small steps up to the maximum in either direction. When in Jog Mode. • Press to select Shuttle mode. • Rotate to move one frame at a time in either direction. Issue 1 Page 7 of 139 DSX Chapter 4 Operating Information User Handbook Upper Control Panel The Upper Control Panel (shown in Figure 3) located to the right-hand side of the Film Transport Door provides access to many local control facilities primarily through the use of a hierarchical menu control system. The menus are displayed on an Electroluminescent (EL) display and are navigated/selected with the adjacent soft controls. The panel also includes a number of dedicated controls. Behind this control panel are located the CDROM and floppy disk drives for System Software and Firmware respectively. Figure 3 Upper Control Panel Dedicated Controls Press VAC to apply aperture correction to the colour channel output. The amount of correction is set by the adjacent digipot. The LED is illuminated when this mode is selected. The VAC control is only available when the display menu is at the TOP level , , Press PEC to display the PEC Control Menu (see Figure 9) on the adjacent display and allocate control of signal detector PEC levels to the three digipots (identified in Figure 5. This control is disabled when PEC level adjustment is inappropriate, for example, when the Auto Alignment Menu is selected. The adjacent LED is illuminated when this mode is selected. Note: The PEC control gives easy access to the PEC Control Menu that is embedded within the hierarchical menu control system. Issue 1 Page 8 of 139 DSX Chapter 4 Operating Information User Handbook Press CRT ON to initiate the CRT heater warm-up period. This takes approximately 30 seconds. The CRT heater must be on and warmed-up before EHT becomes available. If the CRT is switched off when the EHT is on, the EHT is automatically switched off. The warm-up sequence is illustrated in Figure 4. This control remains available under remote control. Note: The CRT heater is subjected to a timeout and will switch off automatically if the EHT is off for more than 30 minutes. Figure 4 CRT Heater Warm-up/EHT Availability Sequence Press LOCAL to select either local control at the film scanner or remote control from the remote control desk. The adjacent LED indicates the current selection: • • LED illuminated - local control. LED extinguished - remote control. Pressing LOCAL will change the availability status of functions on the film scanner; when remote control is selected all functions with the exception of CRT ON and STOP are no longer available. Loudspeaker Volume1 Determines the audio monitoring volume level of the adjacent loudspeaker. Display Overview The typical layout of the display is shown in Figure 5 1 If audio option fitted Issue 1 Page 9 of 139 DSX Chapter 4 Operating Information User Handbook Figure 5 Typical Display Layout Two rows of push-buttons, one located above the display ( to allow for adjustment of parameters as indicated on the display. ) and one below ( to ) provide access to further menus and functions. Four digipots ( to ) Screen-Saver Following a period of approximately ten minutes of local control panel inactivity the display screen-saver will be activated and the soft push-buttons disabled. All other local controls remain available. On the next button press (or rotation of a digipot) the screen-saver will be switched off and the soft push-buttons re-enabled. This set-up determines that functions available on the soft push-buttons are only accessible when the screen-saver is OFF. Note: The screen-saver displays the machine serial number and customer name, alternative screen saver text can be set in the CONFIG.TXT file. Refer to Cintel Customer Support department for details. Issue 1 Page 10 of 139 DSX Chapter 4 Operating Information User Handbook Menu Navigation and Functionality The menus are navigated with the soft push-buttons. By default the Top Level Menu is displayed. From this menu all other menus can be accessed. The menu hierarchy is shown in Figure 6 and the further menus are shown in Figures 7 to 95, these figures summarise the functionality provided by the menus. Figure 6 Menu Hierarchy Some of the menus below are interactive. Right click over the buttons with red circles to move around the menus. Buttons without red circles have a single function or their function is cyclical selection, in which case the button has the cyclic list marked adjacent to it. For further functional Information refer to Appendix Chapter 5. Issue 1 Page 11 of 139 DSX Chapter 4 Operating Information User Handbook Figure 7 Top Level Menu (Pre Gamma) Issue 1 Page 12 of 139 DSX Chapter 4 Operating Information User Handbook Figure 8 Top Level Menu (Post Gamma) Issue 1 Page 13 of 139 DSX Chapter 4 Operating Information User Handbook Fig 9 PEC Levels Issue 1 Page 14 of 139 DSX Chapter 4 Operating Information User Handbook Figure 10 Status and Shutdown Pages Issue 1 Page 15 of 139 DSX Chapter 4 Operating Information User Handbook Fig 11 Audio Menu Issue 1 Page 16 of 139 DSX Chapter 4 Operating Information User Handbook Figure 12 X Y Zoom Issue 1 Page 17 of 139 DSX Chapter 4 Operating Information User Handbook Fig 13 Auto Align Menu Issue 1 Page 18 of 139 DSX Chapter 4 Operating Information User Handbook Fig 14 Perform Auto Align Status Issue 1 Page 19 of 139 DSX Chapter 4 Operating Information User Handbook Fig 15 Perform Detector Calibration Status Issue 1 Page 20 of 139 DSX Chapter 4 Operating Information User Handbook Fig 16 Time Code Reset Confirm Issue 1 Page 21 of 139 DSX Chapter 4 Operating Information User Handbook Fig 17 Engineering # 1 Menu Issue 1 Page 22 of 139 DSX Chapter 4 Operating Information User Handbook Fig 18 Gate Code Menu Showing Automatic Selection Issue 1 Page 23 of 139 DSX Chapter 4 Operating Information User Handbook Fig 19 Gate Code Menu Showing Manual Selection Issue 1 Page 24 of 139 DSX Chapter 4 Operating Information User Handbook Fig 20 Engineering Enable Anti Alias Control Issue 1 Page 25 of 139 DSX Chapter 4 Operating Information User Handbook Fig 21 Matrix Menu, Oliver Setup Issue 1 Page 26 of 139 DSX Chapter 4 Operating Information User Handbook Fig 22 Matrix Menu, Grace Gains Setup Issue 1 Page 27 of 139 DSX Chapter 4 Operating Information User Handbook Fig 23 Matrix Menu, Grace Detail Setup Issue 1 Page 28 of 139 DSX Chapter 4 Operating Information User Handbook Fig 24 Lifetime Options Issue 1 Page 29 of 139 DSX Chapter 4 Operating Information User Handbook Fig 25 Time Limited Options Issue 1 Page 30 of 139 DSX Chapter 4 Operating Information User Handbook Fig 26 Expired Options Issue 1 Page 31 of 139 DSX Chapter 4 Operating Information User Handbook Fig 27 SD Video Standards Menu Issue 1 Page 32 of 139 DSX Chapter 4 Operating Information User Handbook Fig 28 HD Video Standards Menu Issue 1 Page 33 of 139 DSX Chapter 4 Operating Information User Handbook Fig 29 DATA Standards Menu Issue 1 Page 34 of 139 DSX Chapter 4 Operating Information User Handbook Fig 30 Standards Confirmation Issue 1 Page 35 of 139 DSX Chapter 4 Operating Information User Handbook Fig 31 Video Setup Menu Issue 1 Page 36 of 139 DSX Chapter 4 Operating Information User Handbook Fig 32 Scan Effects Menu Showing H Linear Keystone Issue 1 Page 37 of 139 DSX Chapter 4 Operating Information User Handbook Fig 33 Scan Effects Menu Showing V Linear Skew Issue 1 Page 38 of 139 DSX Chapter 4 Operating Information User Handbook Fig 34 Scan Effects Menu Showing Focus Effects Issue 1 Page 39 of 139 DSX Chapter 4 Operating Information User Handbook Fig 35 Scan Effects Menu Showing Rotate Issue 1 Page 40 of 139 DSX Chapter 4 Operating Information User Handbook Fig 36 Scan Effects Menu Showing X Y Zoom Issue 1 Page 41 of 139 DSX Chapter 4 Operating Information User Handbook Fig 37 Engineering #2 Menu Issue 1 Page 42 of 139 DSX Chapter 4 Operating Information User Handbook Fig 38 Aperture Correction Menu Issue 1 Page 43 of 139 DSX Chapter 4 Operating Information User Handbook Fig 39 Test Pattern Menu Issue 1 Page 44 of 139 DSX Chapter 4 Operating Information User Handbook Fig 40 PCC Test Pattern Menu Issue 1 Page 45 of 139 DSX Chapter 4 Operating Information User Handbook Fig 41 Pixcon Test Pattern Menu Issue 1 Page 46 of 139 DSX Chapter 4 Operating Information User Handbook Fig 42 Breakout Test Pattern Menu Issue 1 Page 47 of 139 DSX Chapter 4 Operating Information User Handbook Fig 43 Debug File Filter Menu Issue 1 Page 48 of 139 DSX Chapter 4 Operating Information User Handbook Fig 44 Debug Running Example Issue 1 Page 49 of 139 DSX Chapter 4 Operating Information User Handbook Fig 45 Debug Task Menu Issue 1 Page 50 of 139 DSX Chapter 4 Operating Information User Handbook Fig 46 Log Mask Menu Issue 1 Page 51 of 139 DSX Chapter 4 Operating Information User Handbook Fig 47 Log Mask (None) Issue 1 Page 52 of 139 DSX Chapter 4 Operating Information User Handbook Fig 48 Log Mask User Issue 1 Page 53 of 139 DSX Chapter 4 Operating Information User Handbook Fig 49 CVIP Menu Issue 1 Page 54 of 139 DSX Chapter 4 Operating Information User Handbook Fig 50 CVIP Vector Select Issue 1 Page 55 of 139 DSX Chapter 4 Operating Information User Handbook Fig 51 CVIP Vector Highlight Menu Issue 1 Page 56 of 139 DSX Chapter 4 Operating Information User Handbook Fig 52 Differential PCC Menu Issue 1 Page 57 of 139 DSX Chapter 4 Operating Information User Handbook Fig 53 Differential PCC S Gamma Issue 1 Page 58 of 139 DSX Chapter 4 Operating Information User Handbook Fig 54 Differential PCC Knee Issue 1 Page 59 of 139 DSX Chapter 4 Operating Information User Handbook Fig 55 Differential PCC Highlight Issue 1 Page 60 of 139 DSX Chapter 4 Operating Information User Handbook Fig 56 Differential PCC Lowlight Issue 1 Page 61 of 139 DSX Chapter 4 Operating Information User Handbook Fig 57 Anti Alias Control Issue 1 Page 62 of 139 DSX Chapter 4 Operating Information User Handbook Fig 58 Engineering #3 Menu Issue 1 Page 63 of 139 DSX Chapter 4 Operating Information User Handbook Fig 59 Transport Configuration menu Issue 1 Page 64 of 139 DSX Chapter 4 Operating Information User Handbook Fig 60 Output Blanking Menu Issue 1 Page 65 of 139 DSX Chapter 4 Operating Information User Handbook Fig 61 Reference Store External shown Issue 1 Page 66 of 139 DSX Chapter 4 Operating Information User Handbook Fig 62 Reference Store Reference Shown Issue 1 Page 67 of 139 DSX Chapter 4 Operating Information User Handbook Fig 63 Manual Shading Menu Issue 1 Page 68 of 139 DSX Chapter 4 Operating Information User Handbook Fig 64 Data Output LUT Selection Menu Issue 1 Page 69 of 139 DSX Chapter 4 Operating Information User Handbook Fig 65 Data Output LUT File Load confirmation Issue 1 Page 70 of 139 DSX Chapter 4 Operating Information User Handbook Fig 66 Data Output LUT File Delete confirmation Issue 1 Page 71 of 139 DSX Chapter 4 Operating Information User Handbook Fig 67 Data Output normal Mode Issue 1 Page 72 of 139 DSX Chapter 4 Operating Information User Handbook Fig 68 Data Output Light (Log Mode) Issue 1 Page 73 of 139 DSX Chapter 4 Operating Information User Handbook Fig 69 Data Output Light (Monitor Mode) Issue 1 Page 74 of 139 DSX Chapter 4 Operating Information User Handbook Fig 70 Data Output Prescale (Log Mode) Issue 1 Page 75 of 139 DSX Chapter 4 Operating Information User Handbook Fig 71 Data Output Prescale (Monitor Mode) Issue 1 Page 76 of 139 DSX Chapter 4 Operating Information User Handbook Fig 72 Engineering #4 Menu Issue 1 Page 77 of 139 DSX Chapter 4 Operating Information User Handbook Fig 73 Real Time Clock Setup Issue 1 Page 78 of 139 DSX Chapter 4 Operating Information User Handbook Fig 74 Front End Setup Menu Issue 1 Page 79 of 139 DSX Chapter 4 Operating Information User Handbook Fig 75 Front End Setup Blanking Issue 1 Page 80 of 139 DSX Chapter 4 Operating Information User Handbook Fig 76 PEC Setup Main Signal Issue 1 Page 81 of 139 DSX Chapter 4 Operating Information User Handbook Fig 77 PEC Setup Reference Signal Issue 1 Page 82 of 139 DSX Chapter 4 Operating Information User Handbook Fig 78 Archive Menu Issue 1 Page 83 of 139 DSX Chapter 4 Operating Information User Handbook Fig 79 Archive Load Issue 1 Page 84 of 139 DSX Chapter 4 Operating Information User Handbook Fig 80 Archive Save Issue 1 Page 85 of 139 DSX Chapter 4 Operating Information User Handbook Fig 81 Mono / Differential Video Normal Issue 1 Page 86 of 139 DSX Chapter 4 Operating Information User Handbook Fig 82 Mono / Differential Video Main vs Main Issue 1 Page 87 of 139 DSX Chapter 4 Operating Information User Handbook Fig 83 Mono / Differential Video Colour Main Issue 1 Page 88 of 139 DSX Chapter 4 Operating Information User Handbook Fig 84 Mono / Differential Video Main vs Ref Issue 1 Page 89 of 139 DSX Chapter 4 Operating Information User Handbook Fig 85 Mono / Differential Video Ref vs Ref Issue 1 Page 90 of 139 DSX Chapter 4 Operating Information User Handbook Fig 86 Mono / Differential Video Colour Ref Issue 1 Page 91 of 139 DSX Chapter 4 Operating Information User Handbook Fig 87 Scan Align Amplitude Issue 1 Page 92 of 139 DSX Chapter 4 Operating Information User Handbook Fig 88 Scan Align Astig Issue 1 Page 93 of 139 DSX Chapter 4 Operating Information User Handbook Fig 89 Scan Align Coils Issue 1 Page 94 of 139 DSX Chapter 4 Operating Information User Handbook Fig 90 Scan Align Dynamic Focus Issue 1 Page 95 of 139 DSX Chapter 4 Operating Information User Handbook Fig 91 Scan Align Preset Fly back Issue 1 Page 96 of 139 DSX Chapter 4 Operating Information User Handbook Fig 92 Scan Align Offset Issue 1 Page 97 of 139 DSX Chapter 4 Operating Information User Handbook Fig 93 Scan Align Pincushion Issue 1 Page 98 of 139 DSX Chapter 4 Operating Information User Handbook Fig 94 Scan Align Skew Issue 1 Page 99 of 139 DSX Chapter 4 Operating Information User Handbook Fig 95 Scan Align Static Focus Issue 1 Page 100 of 139 DSX Chapter 4 Operating Information User Handbook Deck Plate The Deck Plate (shown in Figure 96) provides controls that are associated with film lacing and are only accessible when the film transport door is open. Figure 96 Deck Plate Controls Issue 1 Page 101 of 139 DSX Chapter 4 Operating Information User Handbook Warning Ensure that film tension is switched OFF (film tension push-button extinguished) BEFORE touching any part of the film transport mechanism. Controls Film Tension Push-button Press the Film Tension Push-button to apply (or remove) tension to the film by applying (or removing) power to the spooling and compliance arm motors. The lamp in this pushbutton indicates the following status and actions. See Table I. Table I Indications Given By Film Tension Push-button Lamp Tension OFF – the compliance arms are in the film lacing/unlacing position, film (if laced) is NOT tensioned. This position must be selected before lacing or unlacing film. …with brakes ON. The spooling brakes are normally ON when tension is OFF to protect from film spillage if film is laced. …with brakes OFF. If the brake pedal is pressed the brakes will be released. Although the backplates can now be rotated manually the spooling motors driving them each offer gentle resistance to lacing. This aids film loading as it not only reduces slack in the film when laced, but also deters the user from winding the end of the film onto the destination backplate in the wrong direction when lacing. Figure 97 Compliance Arms – Lacing/Unlacing Position Issue 1 Page 102 of 139 DSX Chapter 4 Operating Information User Handbook Taking-up/Releasing Tension - tension is either being taken-up or released. Taking up tension. The compliance arms rotate in a controlled manner into the film run position to apply film tension, the spooling brakes are released and power is applied to the spooling motors (spooling mode only). This takes a few seconds. Film tension can be adjusted from the Transport Configuration Menu. Figure 98 Compliance Arms – Film Run Position Note: In the unlikely event that tension is unsuccessfully taken-up the servo system will return to the Tension OFF mode. To take-up tension again, first remove excess slack by releasing the brakes and rotating the backplates as necessary, then press the Film Tension Push-button again. Note: The LHS compliance arm is NOT disabled when in loop mode and will rotate when taking-up film tension. This does NOT interfere with loop operation. Releasing tension. The compliance arms rotate to release film tension, the spooling brakes are applied and power is removed from the spooling motors. This takes a few seconds. Tension ON (Spooling Mode) - power remains applied to the spooling motors and the spooling brakes are OFF. The compliance arms remain in the film run position so tension is applied. The film transport system is ready to accept commands (if the door is closed). This position must be selected before running film from core to core. Tension ON (Loop Mode) - the spooling brakes are OFF and the compliance arms remain in the film run position so tension is applied. The film transport system is ready to accept commands (if the door is closed). This position must be selected before running a film loop. Fault Condition – Refer to Cintel Customer Support department. Loop Guide Thumbscrew The Loop Guide (shown in Figure 99) enables film loops (normally used for test purposes) to be fitted onto the machine. This is located in the centre of the deck plate between the two backplates, as shown in Figure 96. Issue 1 Page 103 of 139 DSX Chapter 4 Operating Information User Handbook Figure 99 Loop Guide Film loops are laced round the guide roller that is adjusted to remove excess slack2 in the film. The guide roller is adjusted and locked in position by means of the loop guide thumbscrew. Door Safety Interlock System The film scanner has a safety interlock system fitted to the two front doors. If one of these doors is opened when the film scanner is transporting film the servo system will shut down and the film transport controls will be disabled. If the offending door is then closed the transport controls are re-enabled but the servo system will NOT resume its previous operating mode. Gate The film scanner can accommodate both 35/S35 and 16/S16 gates (shown in Figures 100 and 101 respectively). Provision is made to store one gate behind the Upper Control Panel. Figure 100 35mm/S35 Gate 2 A small amount of slack is required to allow the RHS compliance arm to operate effectively. Issue 1 Page 104 of 139 DSX Chapter 4 Operating Information User Handbook Figure 101 16mm/S16 Gate Gate Features Focus Knob and Lock Both gates are fitted with a manual focus knob and focus lock. These are located on the top of the gate. Adjust the optical focus for optimum focusing as shown on a picture or waveform monitor. Lock the knob by rotating the lock towards the Stop. Figure 102 Gate Focus Knob and Lock Aperture Ring Both gates have variable aperture lens. Aperture ring position is detected by a sensor built into the deck plate and can be monitored at the remote control desk (refer to relevant manufacturer’s documentation for further details). • The aperture on the 35mm gate should usually be set fully open. To ensure that the gate aperture is set fully open, rotate the aperture ring to the end of its travel so that the dot on the ring is at its lowest point as shown in Figure 100. • The lens on the 16mm gate should usually be set to 1.5. To ensure that the gate aperture is set to this position, rotate the aperture ring so that the dot on the ring is adjacent to -1.5 as shown in Figure 101. Issue 1 Page 105 of 139 DSX User Handbook Chapter 4 Operating Information Edge Guidance Lever/s Gates are fitted with edge guidance lever/s, one lever on the 35/S35mm gate (see Figure 100) and two on the 16/S16mm gate (see Figure 101). These are operated after film is laced through the gate to ensure the film is correctly seated on the skid plate. Latchable Pressure Plate Actuating Arm A latchable plate is fitted to each gate that is used to apply a pre-determined down-force to the film as it passes over the skid plate. This is intended to be used as a focusing aid for bowed stock as it helps to flatten the film. The plate is activated by the actuating knob shown in Figures 100 and 101. Brake Pedal The brake pedal is a foot-operated control used as an aid for film loading. If the pedal is pressed when film tension is OFF (the pedal is disabled when film is tensioned) the brakes will be released and the backplates will now be able to be rotated manually (albeit under the gentle resistance offered by the spooling motors – see Film Tension Pushbutton). Taking the foot off of the pedal re-applies the brakes. Note that the pedal must be released before applying film tension. Issue 1 Page 106 of 139 DSX Chapter 4 Operating Information User Handbook OPERATING PROCEDURES This section guides the user step-by-step through the most common operations. To assist navigation through the menus shown on the upper control panel display, the following notation is added at the end of an instruction to identify the path to a particular menu function: [TOP LEVEL MENU > “NEXT MENU NAME” > “NEXT MENU NAME” >], etc, where “ ” - represents a soft-button identity, “>” - should be read as “calls up menu”, “NEXT MENU NAME” - represents a menu identity. Options and settings NOT covered by these procedures are explained in the Control Reference section of this chapter. 1. Powering-Up Warning The power ON/OFF switch on the film scanner does NOT switch power ON/OFF to the remote control desk. Refer to relevant manufacturer’s documentation for details. 1.1. Switch on Power - move the power switch up into the ^position to switch power ON. The switch is located at the front of the machine on the lower left-hand side. The film scanner should NOT have film laced. The film scanner can be switched on either before or after the remote control desk. If the machine has not been shut down correctly a delay will be incurred, as data on the hard drive needs to be checked for possible corruption. 1.2. Wait for Initialisation – Wait for approximately four minutes. During this period software will be downloaded from CD-ROM and Floppy Disk, DSX will initialise and the display on the local control panel will show the Debug Menu (the Debug Menu is beyond the scope of this documentation and is NOT described in this handbook). Do NOT attempt to perform any operations during initialisation. 1.3. When this process is complete the display will show the Top Level Menu. The following defaults apply: CRT heaters OFF, CRT available. EHT is OFF. Local control is selected; LOCAL LED adjacent is illuminated. Display shows Top Level Menu. PEC and shading boards are NOT aligned. Film tension is OFF. Mechanism is in Stop condition. Film standard is determined by vision gate selection. Film format always defaults to Negative. Aperture correction is turned OFF. Audio output is OFF (if option is fitted). Functions available via local display menu system adopt default settings. Issue 1 Page 107 of 139 DSX Chapter 4 Operating Information User Handbook 1.4. Switch ON CRT Heater - Press CRT ON to switch on the CRT heater, the display will show EHT WAIT. When completed the display will show EHT READY, this takes approximately 30 seconds and indicates that EHT is now available. The CRT heater is subjected to a timeout and will switch off automatically if the EHT is off for more than 30 minutes Caution Do not leave film scanner in this mode (CRT heater switched ON, EHT switched OFF) as it could shorten CRT life. Either switch the EHT ON or the CRT heater OFF. The warm-up sequence is illustrated below: Fig 103 1.5. Switch on EHT - Press (Top Level Menu) to switch on the EHT supply. EHT will be switched on after a short delay of a few seconds; the display will show EHT ]. EHT can be switched on from menus other than the Top Level Menu (see Upper Control Panel/Menu Navigation and Functionality). ON. [TOP LEVEL MENU 2. Daily Cleaning and Film scanner Warm-Up The film scanner should be cleaned daily before operating. 2.1. Open Doors – Open the film transport door. The lower door will open automatically. Caution Take care not to scratch the surfaces identified in Para. 2.2. 2.2. Clean and Dust - During warm-up clean the capstan, rollers, spooling hub rubber pads and 16mm spacers with a lint-free cloth moistened with a mild detergent solution. Dust the CRT and the external optical surfaces of the vision gate with a camel-hair or similar brush. 2.3. Allow Film scanner to Finish Warm-Up - If possible allow a total warm-up period of at least 30 minutes. Issue 1 Page 108 of 139 DSX Chapter 4 Operating Information User Handbook 3. Selecting and Fitting Oliver Optics and Vision Gate The film scanner can accommodate both 35/S35 and 16/S16 gates. If the vision gate to be used has NOT been used before with this film scanner it is first necessary to align the CRT for use with the gate. Details for performing scan (CRT) alignment are available from Cintel service department and must only be carried out by qualified personnel. Provision is made to store one gate behind the Upper Control Panel. Fig 104 Oliver system on DSX 3.1 Oliver Relay Lens Change Referring to Figure 104, check which gate and lenses are fitted. The lenses are marked 35mm and 16mm. Changing the relay lens. Using the handle, pull the lens toward you. The lens is held lightly in place by a sprung roller. Only light force is needed to pull the lens free. Open the lens storage door and remove the other relay lens, replacing it with the relay lens that has just been removed from Oliver. Place the new relay lens into Oliver, only light force is required to overcome the sprung roller pressure Issue 1 Page 109 of 139 DSX Chapter 4 Operating Information User Handbook Figure 105 Oliver Condenser Lens 3.2 Oliver Condenser Lens Change Referring to Figure 104, remove the Light trap from between the gate and Oliver. Then remove the gate. Referring to Figure 105 note that the condenser lens is held in place by a bayonet mount. To release the lens twist it so that the bayonet pin is in line with the horizontal part of the slot. Then carefully pull the lens to the right. Note that there is another bayonet pin at the rear of the lens mount. Open the lens storage door and remove the other condenser lens, replacing it with the condenser lens that has just been removed from Oliver. Place the new condenser lens on Oliver by aligning the horizontal part of the lens slots with the bayonet pins. Gently push the lens to the left and when fully engaged rotate the lens such that the bayonet pin is at the end of the vertical slot as in Figure 105. 3.3 3.4 Issue 1 Select and Fit Gate - Fit selected gate onto film scanner as follows: Refer to figures 106 and 107 (a) Pick-up gate using the handle provided ensuring that the focus knob is uppermost. The gate can be steadied with the other hand if desired. (b) Locate top of gate A onto supporting rod B as shown in diagrams 1 and 2 Figure 106. The edge guides located either side of the rod determine an approximate left-right position. Page 110 of 139 DSX Chapter 4 Operating Information User Handbook Fig 106 (c) Engage roller C under top of latch D. The bottom of the gate should locate firmly. (d) Lock gate in position by rotating the handle to the right. See diagram 3 Figure 107. The rear of the handle will now prevent the latch from moving. Fig 107 A barcode on the rear of the gate identifies the gate type to the machine by means of a gatecode. The current gatecode is displayed on the Video Standard Menu. 3.5 Check Gate Aperture – Ensure that the gate aperture is set correctly. The lens on the 35mm gate should usually be set fully open; the lens on the 16mm gate should usually be set to 1.5. To ensure that the gate is set correctly rotate the aperture ring to the relevant position as shown opposite. Ring position is detected by a sensor built into the deck plate and can be monitored at the remote control desk. Refer to relevant manufacturer’s documentation for details. Issue 1 Page 111 of 139 DSX Chapter 4 Operating Information User Handbook 3.6 Refit light trap between the gate and Oliver Condenser lens 3.7 Cancel Scan Effects and Offsets - Cancel (reset) any scan effects or offsets (if active). This can be done locally or at the remote control desk. Refer to relevant manufacturer’s documentation for details. 4 Lacing Film Rolls Warning Ensure that film tension is switched OFF (film tension push-button extinguished) BEFORE touching any part of the film transport mechanism. 4.1 Check Film Drive is OFF - Ensure that film tension is switched OFF (film tension push-button extinguished). With tension OFF the compliance arms are in the film lacing/unlacing position and the spooling brakes are normally ON (unless released by the action of the brake) to protect from film spillage if film is laced. (Top Level Menu) to cycle through the options available on the display, NEG (Negative), POS (Positive) and IP (Inter-Positive). [TOP LEVEL 4.2 Set Film Type - Press MENU ]. 4.3 Remove Feed Core Holder - Remove the feed core holder from the spindle by pressing and holding the release lever and then pulling the holder off. 4.4 Check Backplate Rubber Spacer – For 16mm and S16mm only, ensure that the extra rubber spacer behind the backplate IS fitted; this is NOT required for 35mm or S35mm rolls. (a) To remove the spacer, remove the backplate from the spindle by pulling the backplate forwards, remove the spacer from the spindle and then re-fit the backplate. Issue 1 Page 112 of 139 DSX User Handbook Chapter 4 Operating Information (b) To fit the spacer, remove the backplate from the spindle by pulling the backplate forwards, fit the spacer ensuring that the side with the written caution faces towards the deckplate and then re-fit the backplate. See figure. 4.5 Fit Feed Roll - Fit the feed roll onto the backplate spindle. The table below shows the recommended emulsion and soundtrack orientations for each film type. 4.6 4.7 Ensure the core locates fully onto the backplate drive key. Fit Core Holder – Fit the core holder onto the spindle so that for 35mm and S35mm the SMALL boss faces towards the backplate, and for 16mm and S16mm rolls the LARGE boss faces towards the backplate. Ensure the core holder and release lever are both correctly located after fitting. 4.8 Caution Always lace film leader where possible as exposed film can be scratched by handling. 4.9 Release Spooling Brakes - Press and hold down the brake foot-pedal to release the spooling brakes. Although the backplates can now be rotated manually the spooling motors driving them each offer gentle resistance Issue 1 Page 113 of 139 DSX Chapter 4 Operating Information User Handbook 4.10 4.11 4.12 4.13 4.14 Lace Film - Taking hold of the end of the roll, lace the film according to the markings on the deck plate and attach to the take-up core. To lace through the gate first remove the light trap from front of the Oliver condenser lens area and then release the gate pressure plate to give access to the skid plate. Engage the pressure plate and replace the light trap when laced. If desired film can be laced round the PTR rollers. Check Lacing - Ensure that the film is correctly located on the sprocket and the rollers, and that there is no slack in the film path, as shown opposite. Re-apply Brakes - Release the brake foot-pedal to re-apply the brakes. Set Film Transport Mode – Ensure that Loop Mode is set to OFF. Press #1 ]. (Engineering Menu #1) to toggle between ON and OFF. [TOP LEVEL MENU > ENGINEERING MENU Caution Ensure that the film is correctly located on the sprocket before applying film tension. 4.15 Restore Film Drive and Check Lacing – Press (Film Tension Push-button) to apply power to the motors and release the spooling brakes. The backplates move into position and the compliance arms rotate in a controlled manner into the film run position to apply film tension. This takes a few seconds. When complete the pushbutton will be illuminated. (If the film’s A or B wind has changed since the previous lacing, the transport will make two attempts to tension. This is normal and part of the Auto A/B wind system) Issue 1 Page 114 of 139 DSX Chapter 4 Operating Information User Handbook 4.16 Note: In the unlikely event that tension is unsuccessfully taken-up the servo system will return to the Tension OFF mode. To re-take-up tension, first remove excess slack by releasing the brakes and rotating the backplates as necessary, then press (Film Tension Push-button) again. 4.17 4.18 4.19 4.20 4.21 Issue 1 Ensure Film is Correctly Seated on Skid Plate – Operate edge guidance lever/s as shown opposite. Engage Pressure Plate (as required) – Rotate actuating knob to align Red & White Dots. The plate applies a pre-determined down-force to the film as it passes over the skid plate. This is intended to be used as a focusing aid for bowed stock as it helps to flatten the film. Check Film Transport – Close the film transport door and press DOOR to close the lower door. Press RUN/SHUTTLE FORWARD once and allow the film to run for several seconds, then press STOP and open the doors. Check that the film lies correctly on all rollers, both compliance arms and the sprocket below the vision gate. Note: Your film scanner can be configured so that the lower door will close if the film transport door is closed. Refer to Cintel Customer Support department for details. Re-check Film Seating – Operate the edge guidance lever/s and then close the doors again. Adjust Gate Focus - Adjust the optical focus on the gate for optimum focusing as shown on a picture or waveform monitor. Rotate the focus lock lever to lock the focus. Page 115 of 139 DSX Chapter 4 Operating Information User Handbook 5 Lacing Film Loops Warning Ensure that film tension is switched OFF (film tension push-button extinguished) BEFORE touching any part of the film transport mechanism. 5.1 Check Film Drive is OFF - Ensure that film tension is switched OFF (film tension push-button extinguished). With tension OFF the compliance arms are in the film lacing/unlacing position and the spooling brakes are normally ON (unless released by the action of the brake) to protect from film spillage if film is laced. (Top Level Menu) to cycle through the options available on the display, NEG (Negative), POS (Positive) and IP (Inter-Positive). [TOP LEVEL 5.2 Set Film Type - Press MENU ]. 5.3 Lace Film Loop - Lace the film loop according to the markings on the deck plate lacing round the roller on the loop guide. The table opposite shows the recommended emulsion and soundtrack orientations for each film type. 5.4 Using the thumbscrew secure the plate that supports the roller in a position that removes excess film slack but leaves a small amount for compliance arm operation. To lace through the gate first remove the light trap between the condenser lens and the rear of the gate, then slide the film between the skid plate and pressure plate. Replace the light trap once laced. Note that the left-hand side compliance arm is not used in this mode. 5.5 Check Lacing - Ensure that the film is correctly located on the sprocket and the rollers, and that there is no slack in the film path, as shown in the figure. Issue 1 Page 116 of 139 DSX Chapter 4 Operating Information User Handbook Set Film Transport Mode – Ensure that Loop Mode is set to ON. Press #1 ]. 5.6 (Engineering Menu #1) to toggle between ON and OFF. [TOP LEVEL MENU > ENGINEERING MENU Caution Ensure that the film is correctly located on the sprocket before applying film tension. Restore Film Drive and Check Lacing – Press (Film Tension Push-button) to apply power to the compliance arm motors. The compliance arms rotate in a controlled manner into the film run position to apply film tension. This takes a few seconds. When complete the push-button will flash. 5.7 Note: In the unlikely event that tension is unsuccessfully taken-up (because of excess film slack) the servo system will return to the Tension OFF mode. To re-take-up tension, first remove excess slack and then press (Film Tension Push-button) again. 5.8 Ensure Film is Correctly Seated on Skid Plate – Operate edge guidance lever/s as shown opposite. 5.9 Engage Pressure Plate (as required) – Rotate actuating knob to align Red & White Dots. The plate applies a pre-determined down-force to the film as it passes over the skid plate. This is intended to be used as a focusing aid for bowed stock as it helps to flatten the film. 5.10 Check Film Transport – Close the film transport door and press DOOR to close the lower door. Press RUN/SHUTTLE FORWARD once and allow the film to run for several seconds, then press STOP and open the doors. Check that the film lies correctly on all rollers, the compliance arm and the vision gate sprocket. Note: Your film scanner can be configured so that the lower door will close if the film transport door is closed. Refer to Cintel Customer Support department for details. Issue 1 Page 117 of 139 DSX User Handbook 5.11 5.12 Chapter 4 Operating Information Re-check Film Seating – Operate the edge guidance lever/s and then close the doors again. Adjust Gate Focus - Adjust the optical focus on the gate for optimum focusing as shown on a picture or waveform monitor. Rotate the focus lock lever to lock the focus. 6 Automatic Alignment and Detector Calibration During the alignment process the output of the video channel is frozen. Consequently the pictures observed on the picture monitor and any other external monitor are also frozen. Automatic alignment aligns the PEC and shading boards. Warning Ensure that film tension is switched OFF (film tension push-button extinguished) BEFORE touching any part of the film transport mechanism. Warning Avoidance of external illumination Oliver is very sensitive to stray light and it is essential to avoid any external illumination, (daylight, artificial or from monitoring equipment) from falling on the film path when DSX is in use or during detector calibration and auto align. It is generally sufficient to ensure the light shield is fitted and the lower deckplate door is closed. 6.1 Detector Calibration Notes : When using a new gate for the first time and at other times when the local displays prompts, Detector Calibration will be required. A detector calibration automatically includes an Auto Align, it is therefore not necessary to perform an Auto Align after a detector calibration 6.2 Check Gate Focus - Ensure the gate is correctly focused. 6.3 Inhibit Film Drive - Ensure (Film Tension Push-button) is extinguished. The compliance arms are in the film lacing/unlacing position, film is NOT tensioned. 6.4 Remove Film from Vision Gate. 6.5 Invoke Detector Calibration. ) Press (Auto Alignment Menu). This takes a few minutes; progress is shown on the display. With Oliver it is important to note one special procedure during the calibration. At about the 50% point in the detector calibration the local panel display will prompt “Please insert calibration card”. A white card with high reflectance should be placed between the Relay Lens and the Oliver main block, with the highly reflective surface facing towards the film gate, as shown at * in Figure 105. Ensure the card covers the entire Oliver block aperture. Detector calibration should then be continued. The card should be left in place until the local panel display prompts for its removal “Please remove calibration card”. Detector calibration should then be completed Issue 1 Page 118 of 139 DSX Chapter 4 Operating Information User Handbook 6.6 6.7 6.8 6.9 Automatic Alignment Check Gate Focus - Ensure the gate is correctly focused. Inhibit Film Drive - Ensure (Film Tension Push-button) is extinguished. The compliance arms are in the film lacing/unlacing position, film is NOT tensioned. Remove Film from Vision Gate. 6.10 Automatic Alignment – Press display. (Auto Alignment Menu) to invoke automatic alignment.. Alignment takes approximately 1.5 minutes; progress is shown on the 6.11 Recommended Alignment Beam Currents As a general guide use an alignment beam current of 300µA with all film types.. 6.12 Further guidance on Beam Current settings A beam current of 300uA should be used for all film materials. A beam current of 150uA, used to potentially extend the CRT life, will reduce the performance of the scanner. Alignment Failure Alignment failure may result from incorrect PEC trip levels. To calibrate the PECs (detectors) see section 6.1 to 6.5, Detector Calibration 7 Running Film 7.1 Lace Film and Focus Gate - See Procedure 4 or 5 if necessary. 7.2 Select Operating Beam Current - Press 3 7.3 Select Audio Source - Press (Top Level Menu) to toggle between 150uA and 300uA as the operating beam current [TOP LEVEL MENU (Top Level Menu) to call-up the Audio Menu. [TOP LEVEL MENU ]. ]. Select the required options from this menu. 7.4 Check Output - Run the film, check framing, audio and video levels and adjust as necessary. 7.5 Cue Film scanner - Reverse run the film to the required starting point. 7.6 Reset Counter - Press (Top Level Menu) to reset the counter. [TOP LEVEL MENU ]. 7.7 Run Film. 3 If audio option fitted Issue 1 Page 119 of 139 DSX Chapter 4 Operating Information User Handbook 8 Powering-Down Warning Ensure that film tension is switched OFF (film tension push-button extinguished) BEFORE touching any part of the film transport mechanism. 8.1 Rewind Film - Run film back onto the feed core. If auto stop is ON (Transport Configuration Menu) the film transport system will automatically shut down when the end of the reel is neared. To run film off select shuttle again. 8.2 Check Film Transport - Ensure film transport system has stopped. 8.3 Open Film Transport Door. 8.4 Inhibit Film Drive - Ensure that film tension is switched OFF (film tension push-button extinguished). Caution Film should NOT be left laced and hence tensioned while the film scanner is out of operation. 8.5 Remove Film Core. 8.6 Close Film Transport Door. 8.7 Switch Off EHT and CRT Heater - Press CRT ON. This turns OFF both the EHT and the CRT heater. Caution The film scanner must be shut down as described below BEFORE the power is switched off. Failure to observe this procedure may corrupt the internal hard drive and delay the next switch on sequence. 8.8 Shutdown film scanner – Press and hold With Issue 1 still held press and hold , and (Top Level Menu) to display the Status Page (Action 1). simultaneously (marked SHUTDOWN) to display the Shutdown Page (Action 2). Page 120 of 139 DSX Chapter 4 Operating Information User Handbook Press (Shutdown Page) to confirm shutdown (Action 3). When complete the display indicates that the machine can now be switched off. Failure to correctly shut down the machine will incur a delay on next switch-on, as data on the hard drive needs to be checked for possible corruption. 8.9 Switch Off Power - Move power switch down into the O position to switch power OFF. 9 Invoking a Test Pattern DSX provides a selection of test patterns. These are available on the Test Pattern Menu that is shown in Figures 39-42. 9.1 Select the Test Pattern Menu - Press 9.2 Select Test Pattern – Press to (Engineering Menu #2) [TOP LEVEL MENU as required. > ENGINEERING MENU #1 > ENGINEERING MENU #2 > TEST PATTERN MENU]. can be used to alter the orientation of the pattern. 10 Installing System Software (for the first time) 10.1 Switch Power ON - Switch on the mains supply to the film scanner and then move the power switch up into the ^ position to switch power ON. The switch is located at the front of the machine on the lower left-hand side. The power must be on for the CD drive tray to operate. 10.2 Insert CDROM Disc - Open the Local Control Panel and insert the CDROM disc (System Software) into the LOWER drive. Ensure that the supplied floppy disk is always in the UPPER drive as this disk includes the film scanner configuration files. The floppy drive allows the firmware and machine configuration to be updated. Please refer to Cintel service department for further details. 10.3 Issue 1 Auto-Boot Film scanner – Switch power off and then on again to auto-boot the film scanner. Auto-booting takes approximately four minutes. During this period do NOT perform any operations. Refer to Procedure 1 for further details. Page 121 of 139 DSX Chapter 4 Operating Information User Handbook 11 Setting the Best Primary Colour Correction at the Local Control Panel 11.1 Set Colour Defaults – Press (Engineering Menu #1) to set all colour controls to their default settings. It may be beneficial to save this as a base memory or note > ENGINEERING MENU #1 ]. on the remote control desk for each film type. [TOP LEVEL MENU 11.2 Set APD Levels – Setting the APD levels maximise signal-to-noise ratio and dynamic performance. These adjustments should be made from the local control panel to ensure that the film scanner’s pre-set optimum APD levels are selected as a starting position for further adjustment and NOT any setting that may be preprogrammed in the control desk. These adjustments are essential in order to achieve the best performance from your film scanner. (i) Initial Adjustment - Press (Top Level Menu) to cycle through the options available on the display, NEG (Negative), POS (Positive) and IP (Inter-Positive). Selecting the film type automatically sets optimum APD levels for Kodak TAF: Positive, Inter-Positive or Negative Vision. [TOP LEVEL MENU ]. (ii) Fine Adjustment – Ensure that representative film* is in the gate. Press are made while viewing a waveform monitor (a) For Positive and Inter-Positive film adjust balance. on the local control panel to select the PEC Control Menu. The following adjustments (PEC BLUE) to achieve the maximum level without clipping and then adjust (PEC GREEN) and (PEC RED) for (b) For Negative film, adjustments are made while observing the black levels of the video signals. Adjust (PEC BLUE) to achieve the maximum level without clipping and then adjust (PEC GREEN) and (PEC RED) for balance. If desired increase pre-gamma lift (Top Level Menu) and gain to improve clip visibility. Reset these controls after APD adjustment is complete. * The film density should include a minimum density likely to be encountered in real transfer situations. 11.3 Set Film Masking - Set the required masking either from the local control panel (on the Log Masking Menu) or the remote control desk. Masking can be selected independently of the film type to compensate for unwanted absorption and the inter-image effects of the dyes within the given film stock. The Log Masking Menu is selected on the local control panel by pressing (Engineering Menu #2). [TOP LEVEL MENU > ENGINEERING MENU #1 > ENGINEERING MENU #2 > LOG MASKING MENU]. 11.4 Issue 1 Make Pre-Gamma Adjustments – Adjust pre-gamma lift and gain (Pre-only Mode) either from the local control panel or the remote control desk - minimal adjustments should be required to set and balance, black and white levels - very accurate colour balance is not a pre-requisite at this point. Due to the extended dynamic range of the APD’s it is not necessary for blacks and whites to be adjusted near to clip. Allow approximately 15-20% headroom for black and white levels as shown in the figure below to allow room to stretch blacks and whites when making post-gamma adjustments (Normal Mode). Page 122 of 139 DSX User Handbook Chapter 4 Operating Information Master pre-gamma lift and gain adjustments can be made on the Top Level Menu on the local control panel: press (Top Level Menu) if required to select preand ; differential adjustments can be made from the PCC Control Menu: press (Engineering Menu #2) to select the PCC Control gamma and then adjust > ENGINEERING MENU #1 > ENGINEERING MENU #2 > PCC CONTROL MENU]. Menu. Refer to Figures 52-56 for further details. [TOP LEVEL MENU 11.5 Issue 1 Make Post-Gamma Adjustments – Adjust post-gamma lift and gain (Normal Mode). These adjustments can also be performed on the local control panel. The headroom allowed when making the pre-gamma adjustments allows plenty of room to stretch blacks and whites without going into clip. Page 123 of 139 DSX Chapter 4 Operating Information User Handbook 12 Setting Remote Controller Base memories and Defaults This selection assumes some familiarity with Film scanner controllers and terminology used for DSX colour channel Figures Negative Setup Figure 1a Da Vinci PCC level Display Figure 1b Pandora PCC level Display Figure 2 a Da Vinci Gains & Lift for PEC setup Figure 2b Pandora Gains & Lift for PEC setup Figure 3 PEC gain in Negative in clip Figure 4 PEC gain in Negative best setup Figure 5a Da Vinci typical PCC levels in NEG Figure 5b Pandora typical PCC levels in NEG Positive Setup Figure 6a Da Vinci PCC level Display Figure 6b Pandora PCC level Display Figure 7 a Da Vinci Gains & Lift for PEC setup Figure 7b Pandora Gains & Lift for PEC setup Figure 8 PEC gain in Positive in clip Figure 9 PEC gain in Positive best setup Figure 10a Da Vinci typical PCC levels in POS Figure 10b Pandora typical PCC levels in POS Figure 2c Typical waveform prior to PEC adjustment Figure 5c Typical Negative balanced waveform Figure 7c Typical waveform prior to PEC adjustment Figure 10c Typical Positive balanced waveform Inter-Positive Setup Figure 11a Da Vinci PCC level Display Figure 11b Pandora PCC level Display Figure 12a Da Vinci Gains & Lift for PEC setup Figure 12b Pandora Gains & Lift for PEC setup Figure 12c Typical waveform prior to PEC adjustment Figure 13 PEC gain in Inter-Positive in clip Figure 14 PEC gain in Inter-Positive best setup Figure 15a Da Vinci typical PCC levels in IP Figure 15b Pandora typical PCC levels in IP Figure 15c Typical Inter-Positive balanced waveform 12.1 DSX utilises a unique approach to primary colour correction, enabling a large dynamic range of control and therefore the ability to deal with even the most demanding of film. To achieve results that make use of the superior benefits of DSX it is important to ensure that your controller, da Vinci, or Pogle is pre-set to optimised defaults. These can be stored in Base memories (da Vinci), or Notes (Pogle) Initial optimal adjustments ensure that the very best pictures are maintained in all respects and especially in terms of signal to noise performance and dynamic range. The important settings here are the PEC/APD controls. While Cintel ensure that the scanner is in a near optimised mode on power up and under local control, switching to remote control, by necessity, will overwrite any locally stored settings. It is therefore necessary to establish these default settings within the remote controller memory. The following describes DSX and assumes that there are no base memories or notes set within the external controllers and that an auto alignment has been carried out – for best results 300uA beam current should be used. The basic concept for driving the APD pick up devices remains similar to PMTs used in earlier generations of film scanner such as Ursa or even MK3’s. However the following includes specific references to functions available on DSX. Issue 1 Page 124 of 139 DSX Chapter 4 Operating Information User Handbook 12.2 Stage 1. – NEGATIVE FILM TYPE The controller should be set in PRE Gamma mode only, with ‘Extended PEC range’ selected if applicable. The Da Vinci GUI will indicate PRE Only mode by the ‘greying out’ of the post controls and a Red bar over the PRE control graphics. Figure 1a The Pogle GUI indicates which mode is selected within the ‘DSX’ window, and the tracker-balls turn Red. Figure 1b Select Negative (Vision) log Masking (if desired). Toggle film type to Negative mode with the scene to be transferred already in the film gate. (TAF in this example) Fig. 1a – Da Vinci Colour Bar Display (PRE ONLY mode) Fig. 1b – Pogle DSX PCC window (PRE ONLY mode) Turn the master PRE Gain control up significantly and alter the master PRE Lift control such that the black level and black clip point can be seen easily on a waveform monitor (At this point all signals will be severely white clipped!). N.B. In negative, you will initially probably only see a signal in the Red Channel. See fig. 2a, 2b & 2c Issue 1 Page 125 of 139 DSX Chapter 4 Operating Information User Handbook Fig 2a – Typical ‘expanded’ control values (Da Vinci) Fig. 2b – Typical ‘expanded’ control values (Pandora) Fig. 2c – Only red visible, all signals severely white clipped! Issue 1 Page 126 of 139 DSX Chapter 4 Operating Information User Handbook 12.3 Stage 2. – NEGATIVE FILM TYPE Adjust all the PEC/APD controls such that the signals head towards video black i.e. you appear to be turning the signal levels down. Continue to turn the signals down until it is clear that the video is becoming black clipped. N.B. At this stage we are ONLY interested in the Blacks of the signals. See figure 3 Fig. 3 – R, G & B black levels clearly in clip. Fig. 4 – PEC levels set correctly with headroom If you do not see something similar to that shown in figure 3 above it may be that you need to turn the PRE lift controls a little higher or stretch the signals further with gamma or gain (N.B. Gamma cannot be altered on Pogle whilst in Pre gamma mode). 12.4 Stage 3. – NEGATIVE FILM TYPE Now you have established where the detector clip points lie. N.B. operating in this area will result in some loss of picture information, it is now necessary to turn the signals up until the clip point is cleared and some head room allowed for as seen in figure 4. THIS IS THE OPTIMUM SETTING FOR YOUR PEC’s, THEY SHOULD NOT BE RE-ADJUSTED for the rest of this procedure. Usually this setting will be sufficiently accurate to cater for the rest of a roll but if significant exposure or stock changes occur, it should be re-checked. See Figure 4. Issue 1 Page 127 of 139 DSX Chapter 4 Operating Information User Handbook 12.5 Stage 4. – NEGATIVE FILM TYPE The PRE Lift, Gain, and Gamma controls can now be returned to more usual levels such that the blacks and whites are unclipped and balanced. See Fig. 5a, 5b & c. Fig. 5a – Typical Da Vinci Settings for PRE Gammas Fig. 5b – Typical Pogle settings for PRE Gammas Fig. 5c – Balanced RGB – Vision TAF (no Mask) Issue 1 Page 128 of 139 DSX Chapter 4 Operating Information User Handbook The main purpose of the PRE Gamma correction is to present a balanced signal to the POST Gamma corrector, giving better luminance tracking of controls. You can now switch into POST Gamma mode where creativity can take over from Technical set up. Cintel recommend that a Base memory or Note is created using the method described above for the latest Kodak Film scanner Analysis Film (TAF). 12.6 Stage 1. – POSITIVE FILM TYPE The controller should be set in PRE Gamma mode only, with ‘Extended PEC range’ selected if applicable. The Da Vinci GUI will indicate PRE Only mode by the ‘greying out’ of the post controls and a Red bar over the PRE control graphics. Figure 6a The Pogle GUI indicates which mode is selected within the ‘DSX’ window, and the tracker-balls turn Red. Figure 6b Select Relevant log Masking (if desired). Toggle film type to Positive mode with the scene to be transferred already in the film gate. Fig. 6a – Da Vinci Colour Bar Display (PRE ONLY mode) Issue 1 Fig. 6b – Pogle DSX PCC window (PRE ONLY mode) Page 129 of 139 DSX Chapter 4 Operating Information User Handbook Turn the master PRE Gain control down significantly such that the white level can be seen easily on a waveform. See fig. 7 Fig. 7b – Typical Da Vinci Settings for PEC set Fig. 7c – Typical Pogle settings for PEC set. Fig. 7a – Typical view with PRE gain turned down Issue 1 Page 130 of 139 DSX Chapter 4 Operating Information User Handbook 12.7 Stage 2. – POSITIVE FILM TYPE Adjust the RG & B PEC/APD controls such that the signals head towards white i.e. you will appear to be turning the signal level UP. Continue to turn the signals UP until it is clear that the video is becoming white clipped. N.B. At this stage we are ONLY interested in the Whites of the signal. See figure 8 Fig. 8 – R, G & B white levels clearly in clip. Fig. 9 – PEC levels set correctly with headroom If you do not see something similar to that shown in figure 8 above it may be that you need to turn the PRE Gain controls further down and readjust your PEC controls. 12.8 Stage 3. – POSITIVE FILM TYPE Now you have established where the detector clip point lies. N.B. operating in this area will result in some loss of picture information, it is now necessary to turn the signals down until the clip point is cleared and some head room allowed for as in figure 9. THIS IS THE OPTIMUM SETTING FOR YOUR PEC’s, THEY SHOULD NOT BE RE-ADJUSTED for the rest of this procedure. Usually this setting will be sufficiently accurate to cater for the rest of a roll but if significant exposure changes occur, it should be re-checked. See Figure 9. Issue 1 Page 131 of 139 DSX Chapter 4 Operating Information User Handbook 12.9 Stage 4. – POSITIVE FILM TYPE The PRE Lift, Gain, and Gamma controls can now be returned to more usual levels such that the blacks and whites are unclipped and balanced. See Fig. 10a, 10b & 10c Fig. 10a – Typical Da Vinci settings for PRE Gammas Fig. 10b Typical Pandora settings for PRE Gammas Fig. 10c – Balanced RGB – Positive TAF (no Mask) Issue 1 Page 132 of 139 DSX Chapter 4 Operating Information User Handbook 12.10 Stage 5. – POSITIVE FILM TYPE The PRE Gain and Lift controls can now be re adjusted for a ‘Flat’ grade – i.e. Balanced, unclipped Blacks and Whites. You can now switch into POST Gamma mode where creativity can take over from Technical set up! Cintel recommend that a Base memory is created using the method described above and the latest Kodak Film scanner Analysis Film (TAF). 12.11 Stage 1. – INTER-POSITIVE FILM TYPE The controller should be set in PRE Gamma mode only, with ‘Extended PEC range’ selected if applicable. The Da Vinci GUI will indicate PRE Only mode by the ‘greying out’ of the post controls and a Red bar over the PRE control graphics. Figure 6a The Pogle GUI indicates which mode is selected within the ‘DSX’ window, and the tracker-balls turn Red. Figure 6b Select Relevant log Masking (if desired). Toggle film type to Positive mode with the scene to be transferred already in the film gate. Fig. 11a – Da Vinci Colour Bar Display (PRE ONLY mode) Fig. 11b – Pogle DSX PCC window (PRE ONLY mode) Turn the master PRE Gain control down significantly such that the white level can be seen easily on a waveform. See fig. 12a, 12b &12c. Issue 1 Page 133 of 139 DSX Chapter 4 Operating Information User Handbook Fig. 12a – Typical Da Vinci Settings for PEC set Fig. 12b – Typical Pandora Settings for PEC set Fig. 12c – Typical view with PRE gain turned down Issue 1 Page 134 of 139 DSX Chapter 4 Operating Information User Handbook 12.12 Stage 2. – INTER-POSITIVE FILM TYPE Adjust the RG & B PEC/APD controls such that the signals head towards white i.e. you appear to be turning the signal levels UP. Continue to turn the signals UP until it is clear that the video is becoming white clipped. N.B. At this stage we are ONLY interested in the whites of the signal. See fig. 13 Fig. 13 – R,G & B white levels clearly in clip. Fig. 14 – PEC levels set correctly with headroom If you do not see something similar to that shown in the figure above it may be that you need to turn the PRE Gain controls further down and readjust your PEC controls. 12.13 Stage 3. – INTER-POSITIVE FILM TYPE . Now you have established where the detector clip point lies. N.B. operating in this area will result in some loss of picture information, it is now necessary to turn the signals Down until the clip point is cleared and some head room allowed for. THIS IS THE OPTIMUM SETTING FOR YOUR PEC’s, THEY SHOULD NOT BE RE-ADJUSTED for the rest of this procedure. Usually this setting will be sufficiently accurate to cater for the rest of a roll but if significant exposure changes occur, it should be re-checked. See Figure 14. 12.14 Stage 4. – INTER-POSITIVE FILM TYPE The PRE Lift, Gain, and Gamma controls can now be returned to more usual levels such that the blacks and whites are unclipped and balanced. See Fig. 15a, 15b & 15c Issue 1 Page 135 of 139 DSX Chapter 4 Operating Information User Handbook Fig. 15a – Typical Da Vinci settings for PRE Gammas Fig. 15b Typical Da Vinci settings for PRE Gammas Fig. 15c – Balanced RGB – Inter-Positive TAF (no Mask) Issue 1 Page 136 of 139 DSX Chapter 4 Operating Information User Handbook 12.15 Stage 5. – INTER-POSITIVE FILM TYPE . The PRE Gain and Lift controls can now be re adjusted for a ‘Flat’ grade – i.e. Balanced, unclipped Blacks and Whites. For DSX users you can now switch into POST Gamma mode where creativity can take over from Technical set up! Cintel recommend that a Base memory is created using the method described above and the latest Kodak Film scanner Analysis Film (TAF). 13 OTHER FUNCTIONALITY 13.1 13.2 13.3 The user,may at this time, also wish to set default scan sizes and shapes. Bear in mind that when the DSX scanner is correctly setup all scan sizes and shapes default to standards set by the film industry. Modifying these values for default storage in controllers will result in non standard scan areas being appied to the image. For operation procedures for Oliver and the Grace option please refer to the suppliment handbooks for these products. Fo further descriptions of DSX functions please refer to DSX Appendix A. ________________________________________________ Issue 1 Page 137 of 139 DSX Chapter 5 Appendix A Chapter 5 Appendix A…. An explanation of some of DSX functions Pre Gamma and Post Gamma Control. DSX includes a method of Primary colour correction that can always be optimised regardless of film density ranges. Historically Film Scanners and Telecine colour correctors have had their input colour levels defined by detector adjustment and the film’s density. Where the film exposure is technically accurate such systems provide good results. However these results rely on a specific film density range representing the full image density range. While these densities can be accommodated differently between film types; negative, intermediate and print, it is not normally possible to accommodate variable ranges within each film type. With traditional systems where the “White point” and “Black point” of the image may vary in density, either due to a non technically perfect exposure, or for artistic effect, or for a non standard film stock, the final image blacks and whites may not correspond with the expected densities. This will also mean that intermediate densities may be misrepresented. In such cases the White Level and Black level pivot points of the colour correction will be incorrect. If the Gamma is adjusted it will also move the black and white points rather than just the intermediate values. DSX overcomes these limitations by providing effectively two sets of Primary colour correction. The first corrector can be adjusted to ensure that regardless of film densities ranges a suitable White Point and Black Point can be presented to the Gamma correction and subsequent colour correctors such that these points are the genuine pivot points for the Lift Gamma and Gain of the second stage. The first colour corrector is called, logically, Pre-Gamma while the second corrector is called Post Gamma. For all operations it is best to set the Pecs such that the signal is just out of clip for the thinnest film densities, Black for Negative and White for Inter Pos and Print. Theoretically only three settings are required, one for each film type. Now as different rolls of film or different shots are graded the pre gamma controls can be set to get the best range from the images. In the real world the following are recommended. For negative operation set the pre-gamma controls such that a full density range scene occupies the entire signal range. For IP and print set the Pre-gamma controls such that the image signal occupies the mid 75% of the entire range. From this point on most control will only require Post Gamma operation. However if a scene is very flat it can be advantageous to re visit the pre-gamma controls to “boost” the range before the gamma control. The Pre & Post gamma controls can be experimented with for other settings to obtain unique looks. However remember to reset to your normal values before grading a new job as it is possible to have extreme pre-gamma settings that will cause strange post gamma control. Note. Clipping the blacks or whites in pre gamma mode will not necessarily clip the image blacks and whites in Post Gamma mode. For more details see the main user manual Procedures 11 and 12. For more details see the main user manual Procedures 11 and 12. Issue 1 Page 1 of 8 DSX Chapter 5 Appendix A PCC Gamma & Knee Functions Normal Gamma Stretch to lighten Midtones and Lowlights S Gamma. Highlights and Lowlights crushed Mid Tones stretched Knee on S Gamma moved towards Lowlight Highlights Crushed. Lowlights stretched Blacks crushed Issue 1 Page 2 of 8 DSX Chapter 5 Appendix A PCC, S Gamma, HighLight &LowLight modes Inverted S Gamma Mid Tones crushed Highlights and Lowlights stretched Highlight Mode Highlights Compressed Lowlight Mode Lowlights Compressed Issue 1 Page 3 of 8 DSX Chapter 5 Appendix A CVIP Vector Selection, Isolation and Effect adjustment Original Image Effect Hue and Saturation adjustment. Issue 1 (Note these images will only show correctly if displayed or printed in colour) Vector HSL selected using Highlight Mode Effect Hue adjustment. Effect Hue, Saturation and Luminance adjustment Additional Vectors selected and adjusted Page 4 of 8 DSX Chapter 5 Appendix A SCAN EFFECTS X Skew Vertical Edges all tilted same amount X Tilt Size change Left to Right, correct Horizontal perspective Issue 1 Y Skew Horizontal Edges all tilted same amount Y Tilt Size change Top to Bottom, correct Vertical perspective Page 5 of 8 DSX Chapter 5 Appendix A FOCUS EFFECTS Fully Focussed Issue 1 Slight Defocus Mass Defocus Page 6 of 8 DSX Chapter 5 Appendix A SCAN ALIGN Pin Cushion Skew Y Skew Static Focus Issue 1 X Skew Dynamic Focus (LHS Shown adjusted) Page 7 of 8 DSX Chapter 5 Appendix A ASTIG Bad Issue 1 Bad Good, Readjust Focus Page 8 of 8