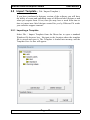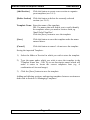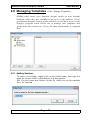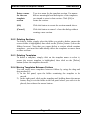
1
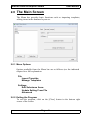
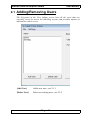
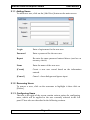
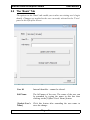
HibSoft Label Enterprise Admin
User Manual
HibSoft Label Enterprise
Admin
Version 1.0
Copyright Hibiscus PLC - 2006
Page : 1
HibSoft Label Enterprise Admin
User Manual
HibSoft Label Enterprise Admin Screenshot
Page : 2
HibSoft Label Enterprise Admin
User Manual
1.0 Introduction
The HibSoft Label Enterprise Admin program is a part of a suite of
programs providing an advanced hazardous labelling solution. The
Admin program allows you to administer which users have access to the
software suite and what actions each user can undertake.
Page : 3
HibSoft Label Enterprise Admin
User Manual
1.1 Table of Contents
Contents
Description
Page
1.0
Introduction
Introduction to the software.
3
1.1
Table of Contents
This page.
4
1.2
Opening
Software
Logging in to the software.
5
2.0
The Main Screen
Introducing the main screen.
6
2.1
Adding/Removing
Users
How to add and remove users
to/from the system.
7
2.2
The 'Basic' Tab
Changing user
password.
9
2.3
The 'Services' Tab
Assigning
users.
2.4
The 'Groups' Tab
Adding users to groups.
13
2.5
Import Template
How to Import new templates
into your software.
15
2.6
Manage Templates
3.0
Advanced Features
the
access
names
rights
and
to
11
17
Advanced features
Page : 4
19
HibSoft Label Enterprise Admin
User Manual
1.2 Opening the Software
To open the HibSoft Label Enterprise Admin Program, click on the
desktop icon or Click on the Start button then choose Programs / HibSoft
/ HibSoft AdminEnt (may vary on different versions of Windows).
You will be required to log-in to the database using a username and
password provided to you by your system administrator.
User
Your user login name - identifies you to the system and
determines your access rights.
Password
Protects your login against unauthorised. Do not give
out your password to anyone else.
Server
Identifies the database to which you wish to connect.
NB: Tampering with this setting could disable the
program.
[Logon]
Click this button to proceed - user name and password
are validate and if accepted the program will open.
[Cancel]
Click this button to cancel - program terminates.
Once you have successfully logged onto the database, the program will
open up at the label design screen.
Page : 5
HibSoft Label Enterprise Admin
User Manual
2.0 The Main Screen
The Menu bar provides basic functions such as importing templates,
editing items in the database layout etc.
2.0.1 Menu Options
Options available from the Menu bar are as follows (see the indicated
chapter for a full explanation:
File
Import Template
Manage Templates
Settings
Edit Substance Items
Update Setting From File
Advanced
2.0.2 Exiting the Program
To exit the program, click on the [Close] button in the bottom right
corner of the screen.
Page : 6
HibSoft Label Enterprise Admin
User Manual
2.1 Adding/Removing Users
The left panel of the User Admin screen lists all the users that are
currently set up to access the labelling system, and provides options to
add and/or remove users.
[Add User]
Add a new user - see 2.1.1
[Delete User]
Delete an existing user - see 2.2.2
Page : 7
HibSoft Label Enterprise Admin
User Manual
2.1.1 Adding Users
To add a new user, click on the [Add User] button on the main screen.
Login
Enter a login name for the new user.
Password
Enter a password for the new user.
Repeat
Re-enter the same password entered above (used as a n
accuracy check).
!ame
Enter the name of the new user.
[Create]
Create a new user record based on the information
entered.
[Cancel]
Cancel - close dialogue and ignore input.
2.1.2 Removing Users
To remove a user, click on the username to highlight it then click on
[Delete].
2.1.3 Configuring Users
The tabs to the right of the screen contain various option for configuring
users, which will be applied to the user currently selected in the left
panel. These tabs are described in the following sections.
Page : 8
HibSoft Label Enterprise Admin
User Manual
2.2 The 'Basic' Tab
The options on the 'Basic' tab enable you to alter an existing user's login
details. Changes are applied to the user currently selected in the 'Users'
panel to the left of the screen.
User Id
Internal identifier - cannot be altered.
Full !ame
The full name of the user. The name of the user can
be amended by typing the name in this box then
clicking on the [Update User's Name] button.
[Update User's
!ame]
Click this button after amending the user name to
store the change.
Page : 9
HibSoft Label Enterprise Admin
User Manual
[Change User's Click this button to open a dialog box to amend the
Password]
user's password (see 2.2.1).
2.1.1 Change User's Password
To access the Change Password dialogue box, click on the [Change
User's Password] button on the 'Basic' tab.
!ew Password
Enter the new password for the user.
Repeat
Re-enter the same password (used to validate the
password has been entered correctly).
[OK]
Click this button to store the change.
[Cancel]
Click this button to cancel the change.
Page : 10
HibSoft Label Enterprise Admin
User Manual
2.3 The 'Services' Tab
The Services Tab allows you to specify what access rights are to be
granted to each individual user by selecting a number of tickboxes.
Changes are applied to the user currently selected in the 'Users' panel to
the left of the screen.
Config
Tick this box to grant the user rights to configure the
system. At least one user must have Config rights.
Admin
Tick this box to grant the user Admin rights (can set
up user and change passwords).
Page : 11
HibSoft Label Enterprise Admin
User Manual
Labels
Tick this box to grant the user rights to create and
modify label designs.
Substances
Tick this box to grant the user rights to create and
modify substance information.
NB: Where substance information is linked in from an
external source only internal labelling fields (ie. extra
information stored locally) can be amended.
Page : 12
HibSoft Label Enterprise Admin
User Manual
2.4 The 'Groups' Tab
The Groups Tab is intended for future expansion of the software and has
no real function in Version 1, although you can if you wish assign users
to groups for administrative purposes.
Tickboxes
Tick one or more tickboxes to add a user to those
groups.
[AddGroup]
Click this button to create a new group.
[Delete Group]
Click this button to delete the currently selected
group.
Page : 13
HibSoft Label Enterprise Admin
User Manual
2.4.1 Adding Groups
To add a new group click on the [Add Group] button on the 'Groups' tab
to open the add group dialog box.
Group
Enter the name of the new group then click on [Ok] ro
create the group or [Cancel] to cancel.
[OK]
Click this button to create the new named group.
[Cancel]
Click this button to cancel.
2.4.2 Deleting Groups
To delete a group, click on the group name to highlight it then click on
the [Delete Group] button. You will be asked to confirm that you really
want to delete the group.
Page : 14
HibSoft Label Enterprise Admin
User Manual
2.5 Import Template ( File / Import Template )
If you have purchased a designer version of the software you will have
the ability to create and unlimited range of different label designs as and
when you require them. If not, then you may have a need from time to
time to import new label designs created for you by Hibiscus Plc under
your software support contract.
2.5.1 Importing a Template
Select File / Import Template from the Menu bar to open a standard
Windows file browser box. Navigate to the location where the template
file is stored and open it. The Template is loaded into memory and the
Template Save As box will appear.
Page : 15
HibSoft Label Enterprise Admin
[Add Section]
User Manual
Click this button to create a new section to organise
your templates (see 2.6.1).
[Delete Section] Click this button to delete the currently selected
section (see 2.6.2).
Template !ame Enter the name of the template.
NB: Use names that will enable you to easily identify
the templates when you need to retrieve them, eg.
'Small Label Non Haz'.
Click the [Save] button to save the template.
[Save]
Click this button to save the template under the name
entered above.
[Cancel]
Click this button to cancel - do not save the template.
Saving the imported Template:
1)
Select the folder or 'Section' in which you wish to store the template.
2)
Type the name under which you wish to store the template in the
'Template Name' box – NB: Try to use descriptive names which will
make it easier to locate the correct templates later (eg. A
combination of size and usage).
3)
Click the [Save] button to save the template.
Adding and deleting sections, and moving templates between sections are
dealt with in Section 2.6 Managing Templates.
Page : 16
HibSoft Label Enterprise Admin
2.6 Managing Templates
User Manual
( File / Manage Templates )
HibSoft label stores your template designs within its own internal
database where they are available to all users of the software. If you
purchased a designer version of the software you will have access to the
designer program which allows you to manage your templates and
group them into sections etc. If not, the same functionality is repeated
here.
2.61 Adding Sections
To create a new folder, simply click on the [Add] button, then type in a
name for the new folder in the dialogue box that appears.
NB: You can create new folders 'on the fly' when you use the template
'Save As' function.
Page : 17
HibSoft Label Enterprise Admin
User Manual
Enter a name
for the new
template
section
Type in a name for the template section. Use names
that are meaningful and descriptive of the templates
you intend to store in that section. Click [Ok] to
create the section.
[Ok]
Click this button to create the section named above.
[Cancel]
Click this button to cancel - close the dialog without
creating a new section.
2.6.2 Deleting Sections
To delete a folder, simply select the folder you wish to delete, ensure the
correct folder is highlighted, then click on the [Delete] button (below the
folders browser). Note that you cannot delete a section which contains
templates - you must first individually delete the templates or move them
to other sections.
2.6.3 Deleting Templates
To delete a template, simply click on the template name to select it,
ensure the correct template is highlighted, then click on the [Delete]
button (below the templates browser.
2.6.4 Moving Templates Between Folders
You can easily move templates between folders by using the drag and
drop method, ie:
1) In the left panel, open the folder containing the template to be
moved.
2) In the right panel, click on the template and, holding down the mouse
button, drag it over the folder in the left panel where you wish it to be
placed, then release the mouse button..
Page : 18
HibSoft Label Enterprise Admin
User Manual
3.0 Advanced Features ( Settings )
HibSoft Label Enterprise boasts advanced features which can be accessed
from the Settings option on the Menu Bar - including:
1.
Customisable database – additional database fields can be added as
single or multi-language options.
2.
Customisable look-ups – change the behaviour of the substance
look-up routines and/or the appearance of the returned results.
3.
Active data fields – perform calculations, look-ups etc. based on the
contents of a data field.
Customisations of this nature will normally be set up on your behalf
when the software is installed and should not be attempted by anyone
without expert knowledge of both the software and the LUA
programming language. Consequently these features are not covered here
and will be the subject of an Advanced Configuration Manual (available
on request).
Warning – tampering with these settings may invalidate your software
support.
Page : 19
HibSoft Label Enterprise Admin
Notes
Page : 20
User Manual