1
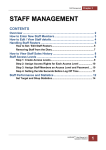
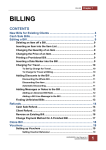
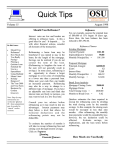
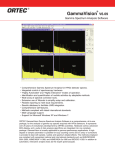
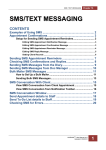
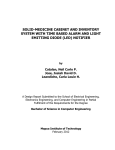
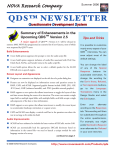
MARKETING MODULE
Chapter 12
MARKETING MODULE
CONTENTS
BULK MAILERS ................................................................................ 2
How to Set Up a Bulk Mailer ................................................................ 2
Printing and Sending Mailmerged Documents .................................. 5
EXPORTING DATA ........................................................................... 6
Exporting From an Existing HairlinkSQL Document ............................ 6
Exporting Data from HairlinkSQL to Excel ............................................ 7
Creating an Export Template ....................................................................... 7
Exporting Data Using the Export Template ................................................ 8
HAIRLINKSQL User Manual v4.5
Updated 01/05/2012
1
Chapter 12
MARKETING MODULE
BULK MAILERS
The marketing module is used to maintain contact with your clients in the form of letters, email or
SMS text messaging. For example you can send appointment reminders, specials and enticements
to visit via a communication method that can be individually selected by each client.
How to Set Up a Bulk Mailer
1. Click on the ‘Reports’ button.
2. Double-click on the ‘Bulk Mailers’ button or the ‘Reminders’ button if you are creating a
reminder letter.
3. The report properties window will open.
4. Next click on the ‘Add New’ button.
5. Click ‘Yes’ to the ‘Design New Report’ prompt.
6. In the ‘Name’ field enter the name for the letter, email or SMS (e.g. Thank You Letter).
7. From the ‘Category’ drop down list select what category the bulk mailer will appear, usually
‘Client’.
8. From the ‘Printer’ drop down list, choose the printer to which this document will print if it is a
letter, usually ‘Reports1’.
9. From the table link drop down menu choose which table link you wish to use for this
document. For simple client lists select ‘Cln -> Bil’. If you are doing a reminder or recall this
will be automatically selected.
10. Depending on the link you select you can then choose the tables to get information from in
the ‘Use Following Tables’ section. If you are doing a reminder or recall these will be
automatically selected.
11. Choose any special filters that you may wish to use. For example, if you have ticked the
billing boxes in ‘Use following tables’ and you only want to send one bulk mailer per client,
select ‘One per client’ from the drop down list.
2
HAIRLINKSQL User Manual v4.5
Updated 01/05/2012
MARKETING MODULE
Chapter 12
12. Under the ‘Use Client Marketing Tab’ section, select which clients to send documents,
emails or SMS messages to by clicking on the drop down list in each field. This section uses
the information set up in the client record.
Document
Don’t Send:
Letters will not be generated for clients.
If Address Entered:
In the client record under the ‘General’ tab, if an address
is entered, a letter will be created for that client.
If Mailers chkbox
Ticked in ‘By Post’:
In the client record under the ‘Marketing’ tab, if the
‘Mailers’ check box is ticked in the ‘Send By Mail’
section, a letter will be created for that client.
If Reminders chkbox
Ticked in ‘By Post’:
In the client record under the ‘Marketing’ tab, if the
‘Reminders’ check box is ticked in the ‘Send By Mail’
section, a letter will be created for that client.
Email
Don’t Send Emails:
Emails will not be generated for clients.
If Email Entered:
In the client record under the general tab, if an email
address is entered, an email will be created for that
client.
If Mailers chkbox
Ticked in ‘By Email’:
In the client record under the ‘Marketing’ tab, if the
‘Mailers’ check box is ticked in the ‘Send By Email’
section, an email will be created for that client.
If Reminders chkbox
Ticked in ‘By Email’:
In the client record under the ‘Marketing’ tab, if the
‘Reminders’ check box is ticked in the ‘Send By Email’
section, an email will be created for that client.
Txt / SMS
Don’t Send Smss:
SMS’s will not be generated for clients.
If Mobile Entered:
In the client record under the ‘General’ tab, if a mobile
number is entered, an SMS will be created for that client.
If Mailers chkbox
Ticked in ‘By SMS’:
In the client record under the ‘Marketing’ tab, if the
‘Mailers’ check box is ticked in the ‘Send By SMS’
section, an sms will be created for that client.
If Reminders chkbox
Ticked in ‘By SMS’:
In the client record under the ‘Marketing’ tab, if the
‘Reminders’ check box is ticked in the ‘Send By Mail’
section, an sms will be created for that client.
13. Click on the ‘SF6: New’ button to create a new letter. You may do this for each type of
communication you wish to use. e.g. a letter, email or SMS.
NOTE: In the ‘Template to Use’ section you can also choose an
existing template and you can then edit this template by clicking on the
button on the same line.
HAIRLINKSQL User Manual v4.5
Updated 01/05/2012
3
Chapter 12
MARKETING MODULE
14. You will be prompted to enter a file name for your mailer document (usually the same as the
name for the bulk mailer report you are creating), then click ‘OK’.
15. The word processor will open; enter the text for your mail merge document.
16. When you have finished, click the save button in the top left hand corner to save the
document, then click the cross in the top right hand corner to close the window.
17. Now select the ‘Exit’ button from the bottom right hand corner of the bulk mailers dialog box.
18. You have now completed setting up your bulk mailers.
Fig. 12 - 1
4
HAIRLINKSQL User Manual v4.5
Updated 01/05/2012
MARKETING MODULE
Chapter 12
Printing and Sending Mailmerged Documents
1. Click on the ‘Reports’ button from the tool bar.
2. Double-click the ‘Bulk Mailers’ button or the ‘Reminders / Recalls’ button if you are
sending reminders.
3. From the Bulk Mailers window, chose the category of the bulk mailer you wish to send.
4. Double click on the bulk mailer you wish to send and the filter page will open.
5. Choose the filters that you want to limit the search by and click the ‘F12: Next’ button to start
the search.
6. A list will be created with all the results matching the specified filters.
7. You can now finalise which clients are to receive the mailers and what form of
communication is to be used. Use the Inc, Post, Eml and SMS boxes to do this.
Inc (Include):
When unchecked the client will not be sent any type of mailer
even if the post, email or Sms boxes are ticked. When unchecked
the client’s details will change to italics.
Post:
If ticked a letter will be printed out for the client.
Eml:
If ticked the client will be sent an email.
Sms:
If ticked the client will be sent an SMS text message.
8. Once you have chosen who to send mailers to and how to send them, click on the ‘Process’
button.
9. A copy of the unmerged document will now be shown. If required you can edit the document.
If there are any SMS and email messages pending, these will be sent first, they will not be
previewed.
10. Click on the ‘Merge Preview’ button and the client’s details will be merged into the
document.
11. Click on the ‘Print’ button and the letter will be printed.
HAIRLINKSQL User Manual v4.5
Updated 01/05/2012
5
Chapter 12
MARKETING MODULE
EXPORTING DATA
Exporting From an Existing HairlinkSQL Document
Hairlink
SQL
allows you to export any report out of the application to another format.
1. Create a report and preview it.
2. Click on the export button at the top of the preview screen.
3. Choose the format and the destination for the exported file.
NOTE: The formats shown in the ‘Format’ menu will vary depending
on what applications you have installed on your machine. For most
users however, Excel or CSV should be used for documents you would
like in spreadsheet form. For text documents you should use Word or
RTF if available.
The ‘Destination’ menu selects where you would like to export the
document to. You will generally choose ‘Disk File’ here and select a
location on your hard drive to save the document, e.g. ‘My
Documents’.
4. Depending on the ‘Format’ and ‘Destination’ you choose, in the previous step, you may be
prompted with some windows asking how to save the document. These prompts will vary
depending on what format or destination you have chosen.
5. Congratulations, you can now open the document to edit, print or email.
Fig. 12 - 2
6
HAIRLINKSQL User Manual v4.5
Updated 01/05/2012
MARKETING MODULE
Chapter 12
Exporting Data from HairlinkSQL to Excel
Creating an Export Template
1. Click on the ‘Reports’ button and then on ‘Export / Spreadsheets’.
2. Click on the ‘Add New’ button.
3. Click the ‘Yes’ button to the ‘Design New Report’ prompt.
4. Choose the settings for the report.
5. In the ‘Name’ field enter a suitable report name.
6. In the ‘Category’ field choose the category the new report will appear under in the export
lists.
7. In the ‘Table Link’ field select the table link that information should be retrieved from. (For
simple client exports choose ‘Cln -> Bil’)
8. In the ‘Use Following Tables’ field select what tables you wish to search for data in. (For
simple client exports just tick the first four client fields).
9. In the ‘One Entry per…’ field select if you require one entry per item.
NOTE: If you have ticked the billing tables and only want one record
per client set this field to ‘Client’. If you have only ticked the client
fields leave this set as ‘None’.
10. Save the new report by clicking on the tick in the bottom right hand corner of the page and
then clicking ‘OK’ to the prompt.
Fig. 12 - 3
HAIRLINKSQL User Manual v4.5
Updated 01/05/2012
7
Chapter 12
MARKETING MODULE
Exporting Data Using the Export Template
1. Click on the ‘Reports’ button.
2. Click on the ‘Export / Spreadsheets’ button.
3. Double-click on the export template you wish to use.
4. The filter page will open. Choose the filters you wish to limit your search by.
5. Click ‘Next’ and the ‘Export Details’ page will open.
6. Ensure ‘Field Names in File’ is ticked.
7. Set ‘Surround Fields with’ to ‘None’.
8. Set ‘Separate Fields with’ to ‘Comma’.
9. Select the ‘Folder’ where you would like to save the file.
10. Choose a suitable ‘Filename’ for the export file.
11. Click on the ‘Export’ button.
12. Congratulations you have exported a file. You can now open this file in ‘Excel’ or ‘Notepad’
if you wish to manipulate the data further.
Fig. 12 - 4
8
HAIRLINKSQL User Manual v4.5
Updated 01/05/2012