1
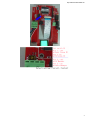
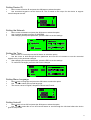
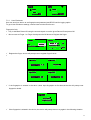
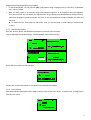
BFLEX 399U
Fingerprint Attendance and Access Control Reader
Hardware User Manual
http://ellenorzottmunkaido.hu
WARRANTY
BFLEX warrants that Software Products licensed to Customer shall, under normal use and service, and for a period of 365
days from the date of shipment of the hardware to Licensee (the "Warranty Period"), perform in all material respects in
accordance with the published specifications for such Hardware as established by BFLEX. However, BFLEX does not
warrant that the Hardware will operate uninterrupted or error free, operate in the combination with other software, meet
Customer's requirements, or that its use will be uninterrupted.
BFLEX's obligation and Customer's sole and exclusive remedy under this Hardware Warranty is limited to, at BFLEX's option,
either (i) correcting the material errors reported to BFLEX in writing by Customer during the Warranty Period and which BFLEX
is able to reproduce, (ii) replacing such defective Hardware, provided that BFLEX received written notice of such defect within
the Warranty Period, or (iii) provided that BFLEX received written notice of such defect within the Warranty Period, terminating
the License and, upon return to BFLEX of the Hardware, Documentation and all other materials provided by BFLEX under the
applicable License, providing Customer with a refund of all charges paid with respect thereto.
BFLEX shall have no warranty obligations hereunder if (a) the Hardware is altered or modified or is merged with other
hardware by Customer or any third party or (b) all or any part of the Hardware is installed on any computer equipment other
than the Designated Server or used with any operating system for which the Software is not designed.
WARRANTY DISCLAIMER - FOR HARDWARE AND/OR SOFTWARE BY BFLEX, THE FOREGOING WARRANTEES ARE
IN LIEU OF ALL OTHER WARRANTEES AND CONDITIONS, EXPRESS OR IMPLIED. BFLEX SPECIFICALLY DISCLAIMS
ALL OTHER WARRANTIES, EITHER EXPRESS OR IMPLIED, ON ANY HARDWARE, SOFTWARE OR DOCUMENTATION
INCLUDING BUT NOT LIMITED TO WARRANTIES RELATING TO QUALITY, PERFORMANCE, NONINFRINGEMENT,
MERCHANTABILITY OR FITNESS FOR A PARTICULAR PURPOSE, AS WELL AS THOSE ARISING FROM ANY COURSE
OF DEALING, USAGE OR TRADE PRACTICE. UNDER NO CIRCUMSTANCES WILL BFLEX BE LIABLE FOR ANY
INDIRECT OR CONSEQUENTIAL DAMAGES RELATED TO BREACH OF THIS WARRANTY.
Copyright © 2005-2008 BFLEX
All rights reserved. No part of this publication may be reproduced or transmitted in any form or by any means, electronic,
mechanical, photocopying, recording or otherwise without the prior permission in writing of the copyright owner
Table of Contents
1, ABOUT THIS MANUAL ................................................................................................................................................................................. 1
2, BEFORE YOU GET STARTED ...................................................................................................................................................................... 1
2.1. PACKAGE CHECKLIST ..................................................................................................................................................................................... 1
2.2. SYSTEM REQUIREMENTS ................................................................................................................................................................................. 1
2.3. DEVICE LAYOUT ............................................................................................................................................................................................. 1
2.4. SPECIFICATIONS............................................................................................................................................................................................. 2
3, INTRODUCING .............................................................................................................................................................................................. 2
4, INSTALLING.................................................................................................................................................................................................. 6
4.1. BASIC INSTALLATION ....................................................................................................................................................................................... 6
4.2. POWER ON THE DEVICE ................................................................................................................................................................................... 6
4.3. STAND-ALONE CONFIGURATION ....................................................................................................................................................................... 6
4.4. NETWORK CONFIGURATION ............................................................................................................................................................................. 7
4.5. ACCESS CONTROL CONFIGURATION (W ORKING WITH WG26 CONTROLLER) ......................................................................................................... 8
4.6. HOW TO CONNECT THE BFLEX399U TO THE ACCESS CONTROLLER? ................................................................................................................... 8
5, USING THE DEVICE........................................................................................................................... HIBA! A KÖNYVJELZ
NEM LÉTEZIK.
5.1. THE KEYPAD ................................................................................................................................................ HIBA! A KÖNYVJELZ NEM LÉTEZIK.
5.2. THE CORRECT WAY TO PRESS YOU FINGERPRINT ............................................................................................. HIBA! A KÖNYVJELZ NEM LÉTEZIK.
5.3. PASSWORD LOGGING OPTION ....................................................................................................................... HIBA! A KÖNYVJELZ NEM LÉTEZIK.
6, USING THE MENU ............................................................................................................................. HIBA! A KÖNYVJELZ
NEM LÉTEZIK.
6.1. ACCESSING THE MENU ................................................................................................................................. HIBA! A KÖNYVJELZ NEM LÉTEZIK.
6.2. MENU ACCESS – FINGERPRINT OR PASSWORD................................................................................................ HIBA! A KÖNYVJELZ NEM LÉTEZIK.
6.3. BROWSING THE MENU .................................................................................................................................. HIBA! A KÖNYVJELZ NEM LÉTEZIK.
7, MENU FUNCTIONS ............................................................................................................................ HIBA! A KÖNYVJELZ
NEM LÉTEZIK.
8.1. SETUP - DEVICE SETTINGS .......................................................................................................................... HIBA! A KÖNYVJELZ
7.1.1.
System Settings............................................................................................................................... Hiba! A könyvjelz
7.1.2.
Log Settings..................................................................................................................................... Hiba! A könyvjelz
7.1.3.
Communications .............................................................................................................................. Hiba! A könyvjelz
8.2. ENROLL – ENROLMENT ............................................................................................................................... HIBA! A KÖNYVJELZ
7.2.1.
User Enrolment ................................................................................................................................ Hiba! A könyvjelz
7.2.2.
Manager Enrolment ......................................................................................................................... Hiba! A könyvjelz
7.2.3.
User Deletion ................................................................................................................................... Hiba! A könyvjelz
7.2.4.
AllLog Delete ................................................................................................................................... Hiba! A könyvjelz
8.3. SYSTEM INFO - DEVICE SYSTEM INFORMATION ............................................................................................ HIBA! A KÖNYVJELZ
8. SOFTWARE INTERFACE ................................................................................................................... HIBA! A KÖNYVJELZ
NEM LÉTEZIK.
nem létezik.
nem létezik.
nem létezik.
NEM LÉTEZIK.
nem létezik.
nem létezik.
nem létezik.
nem létezik.
NEM LÉTEZIK.
NEM LÉTEZIK.
8.1. INSTALLING THE SOFTWARE ........................................................................................................................... HIBA! A KÖNYVJELZ NEM LÉTEZIK.
8.2. RUNNING THE SOFTWARE .............................................................................................................................. HIBA! A KÖNYVJELZ NEM LÉTEZIK.
0
http://ellenorzottmunkaido.hu
1, About this manual
This user manual will guide you through the installation of the BFLEX399u Attendance System and Access Control System.
The manual also includes information to get you started with the device interface and its usage. You will also be guided to
how you can interface the device to a computer.
2, Before You Get Started
2.1. Package Checklist
This manual comes with the following items. Please approach the dealer or distributor if you do not have any of the following:
•
BFLEX399u Attendance or Access Control Device
•
Accessories - Power adaptor, wall mount, screws and interface Cable (RJ45-dual RS485/USB),
•
CD containing the installer for Attendance System Software and a softcopy of the User manual (PDF format)
•
User manual
2.2. System Requirements
The computer that interfaces with the device needs to fulfil the following requirements.
•
Microsoft® Windows® 98SE/ME/2000/XP OS
•
800 MHz (or higher) Pentium® processor
•
128 MB RAM (minimum)
•
10MB hard disk space
•
RS232 Com Port (Standalone Configuration)
•
Ethernet RJ45 Port (Network Configuration)
•
CD-ROM drive
2.3.
Device Layout
Power Supply (Two ports: one is 12V / 1A Via PORT3 port, and another is 6V /1.5A to 12A/1.5A Via power adapter PORT1)
Note: New BFlex399U(Since 30/8/2006) can support +6V to +12V input via PORT 1.
Wiegand 26 (Output VIA PORT3 port on two lines: DATA0 and DATA1)
RS485 (Output VIA the same PORT3 port : RS485 A+,B-)
USB (Output VIA the same PORT3 port :USB (TX,RX, GND)
(It s the RS232-USB converter ,so in the software ,it s via the extra COMM port),
10M Ethernet (Via another PORT2 port)
PORT 3 descriptions:
1
http://ellenorzottmunkaido.hu
2.4. Specifications
Product
Dimensions (mm)
Sensor Size (mm)
Image Resolution
Image Quality
Module
Embedded Processor
Embedded Firmware
Interface
Fingerprint
Capacity
Templates
Image Scan Time
Verification Speed
False Acceptance Rate
False Rejection Rate
Fingerprint template size
Environment
Operating Temperature
Storage Temperature
ESD tolerance
Power Consumption
Voltage Supply
Sleep Mode
Imaging Mode
Software
Driver Support
153MM x 85MM x38MM
22mm*20mm
500 dpi
8-bit greyscale
TI(54)
BFLEX Image Processing Software
BFLEX Fingerprint Authentication
USB(RS232-USB Converter /RS485,
.
Ethernet, Wiegand26, Bell Button for extra bell
Support 3200 fingers with Group ID
Recommended 300 Fingers without Group ID (300 only by order, matching by Group ID)
< 2 seconds
< 1.5 seconds
< 0.0001 %
< 0.001 %
< 500 bytes
-5 to 60C
-10 to 65C
40 kV air discharge
6V or 12V for Attendance & Access Controller
20 µA
< 500 mA
Windows 98 SE, ME, 2000 and XP, Vista
2.5. What’s new
1. About the USB transfer port
Since BF399U, it will support to connect the device with PC by USB port, this USB connection is VIA the RS232-USB converter
inside the BF399U.
So after you finished to install the software, and then when you plug in the USB CABLE with the BF399U, the window system will
show you that there is the new hardware which need to install the driver, that’s the USB – COM port converter.
Then you will find out the COMM number, such as COM 3, or COM4…
And in the software, you can connect the device by the extra comm. Port VIA the USB port.
2. Where is the USB port on the machine.
From the following picture, you will see the same PORT3, RS232 RX and TX were not existed, and the new USB port is there now.
From the enclosed black cable, you will find the new cable ,which one side is with the USB port ,and other side is with the RJ45,
this RJ45 port is for PORT 3.
2
http://ellenorzottmunkaido.hu
3. With Relay inside
When fingerprint passed, the Relay will output the Relay sign from Port1. Then you can use it to do more things by yourself.
For example, you can use the relay sign to open the door or connect to another machine.
4. With door bell directly
New BFlex399u will support to connect with the doorbell directly from Port 4 since 30/7/2008.
5. Support 1:n. match. (Group ID function, to support >1000fingers)
The new BFlex399u can support 1:N matching, and 1:n matching.
It means that when you press the Group ID number, the BFlex399u will match the finger in one of the Group team.
For example:
When you register the finger ID as 50 or 80, which is less then 100, it means that you no need to press the Group ID number, just
press the finger directly, and then the BFlex399u will search the finger in this Group, which ID is from 1 to 99.
Actually, it will not search out the correct finger in this Group (No1 –No99) if the finger ID is out of 1- 99.
If you register the finger ID as 260, it means that you should key the Group ID “2”, and then press the finger, so the device will
search the finger from another Group (No. 200 - No. 299).
The same way, if you press the key as [2], but your finger ID is 304, so the device will not search out your finger, and you will
identify failed.
If you register the finger ID as 1520, so it means that the Group ID is “15”, so the device will match the finger between the ID from
1500 to 1599. It means that you should key [15], and then press the finger.
This solution can solve the big problem around the biometrics products: if there are lots of the finger templates, then the matching
speed will be slow, and the ACCESS REAL RATE will be very safe.
3
http://ellenorzottmunkaido.hu
4
http://ellenorzottmunkaido.hu
6. Support the selection of precision
New BFlex399u will support to select the different precision on matching, Precision 1 is the lowest level on the matching rate ,so it
means that Precision 1 is the easy way to identify .
Precision 2 is the default setting.
3, Introducing
Thank you for purchasing our Attendance series/Access Control series.
BFLEX 399u Fingerprint Attendance System offers organizations a solution to provide accurate and efficient time and labour
management. It incorporates our proprietary biometric technology to simplify logging of in/out records. BFLEX399u also
provides multilevel authorisation control to secure record and log data.
BFLEX399u Fingerprint Access Control System adds on to BFLEX399u to provide an integrated access control whereby
fingerprint verification is the core part of the system.
The manual will be organized as follow:
• Installing BFLEX 399u - A guide on how to set up the device
• Using BFLEX 399u - A guide on how to use device
• Using the Menu – A guide on how to access and use the menu
• Menu Functions - All the information about the various functions and settings available in the device
• Software Interface - Introduction to the basic software for the central controller of the devices
• Abbreviations and Jargons
Some of the jargons and abbreviations used in the device and written in the user manual are explained. They are as followed:
Baud rate
Speed of data transmission between the computer and the device. Used for communication settings
Device ID
The identification code to recognise individual device. Used for device settings
Enrolment
The process of registering a new user or manager to the device record
General Log
(GLog)
Identification
Log that contains the in/out log records
Log
A documentation of a process and event
Parity
Even or odd quality of the number of 1's or 0's in a binary code, often used to determine the integrity
of data especially after transmission. Used for communication settings
Record
A documentation of the history of recent activities
RS232-USB
A serial asynchronous serial line standard for stand-alone data transfer
Act of identifying the user from the user records
Converter
RS485
An serial line standard which specifies 2-wire, half-duplex,
communication. Used to connect multiple device in a network
Supervisor
Log
User
Log that contain records of settings change time
Verification
Act of validating the user from the user records
Upload
To transfer data or fingerprint templates to device
Read
To transfer data from device
Record ID
The identification code to recognise individual users.
differential line, multi-point
User restricted to logging in/out of system
5
4, Installing
Here are some recommendations on how you can install the device in your organisation. The device installation guide will
provide you with information on how to connect our BFLEX device in a stand-alone scenario (for single device) and in a network
environment (for multiple devices). It will also provide additional information on setting up access control system.
4.1. Basic Installation
The product will require an installation space of 220 x 154 x40 mm.
The wall-mounting bracket should be fixed on the wall according to the given dimensions.
The bracket can be fixed on a flat surface using 4 3mm-screws. If you require the wires to be concealed, the bracket will have
to be modified to accommodate internal wiring set up.
After the power supply and the rest of the wirings are connected, the device can be attached to the wall-mounting bracket by
slotting the device to the connectors.
Note: There is a locking mechanism to secure the device to the bracket at the lower end of the bracket.
4.2. Power on the device
In this version, the device can be connected with the power adapter in two ways.
•
12V/1.5A
It is 12V/1.5A. This way is only for the wiegand 26 access controller.
Actually, there is the power output from the access controller, So when you want to connect the Bflex device to the access
controller, it’s very easy and useful to connect directly to the controller’s power. This is only for PORT 3.
Of cause, if you want to use the 6V/1A adapter, you can do it too.
Note: If you use the 6V/1A adapter, and then connect the Bflex 399u with the access controller, you should connect wiegand 26
signals from Bflex399u to the controller, and at the same time, you should connect the GND from Bflex 399u to the controller too.
It s very important. (Because the Wiegand 26 signal should be in the same GND)
4.3. Stand-alone Configuration
The device can be connected directly to the computer via RS485/USB port, or Ethernet interface.
6
6
7
8
9
0
1
2
3
4
5
To connect with Port 3
876
5 43
2
1
There are several limitations when using various interfaces.
Type
USB
RS485
Ethernet
Maximum covered distance
10 metres
1200 metres
Varies with different categories/grades of cable or
HUB
If a greater coverage distance is required, additional boosters can be attached to the various configurations. Please look for
your dealers or distributors for more information on the required cable accessories.
4.4. Network Configuration
If you require multiple devices to be connected together, you may connect the devices via RS485 or TCP/IP interface.
RS485 Configuration Network
Central PC Interface
RS485 PCI board
Communication Interface
RS485 balanced line transmission
standards, half duplex operations
Maximum No. of Devices
32 (including PC)
Maximum
covered
1200 metres
distance
Device Interface
RJ45 to USB/485 port, use RS485
wirings for connections
Transmission channel
Multi-drop line or party line
1
2
3
4
5
6
7
8
9
0
1
2
3
4
5
6
7
8
9
0
6
7
8
9
0
1
2
3
4
5
1
2
3
4
5
6
7
8
9
0
TCP/IP Configurations Network
Central PC Interface
10 Ethernet port
Communication Protocol
TCP/IP
Maximum No. of Devices
N/A
Maximum
covered
Depends on transmission channel
distance
Device Interface
TCP/IP port
Transmission channel
Internet, VPN, LAN, WAN
7
Connect with HUB
If a greater coverage distance or more devices are required, additional boosters can be attached to the RS485 configuration
and additional network devices can be incorporated into the TCP/IP configuration. Please look for your dealers or distributors
for more information on the required cable and networking accessories.
1
2
3
4
5
6
7
8
9
0
1
2
3
4
5
6
7
8
9
0
1
2
3
4
5
6
7
8
9
0
4.5. Access Control Configuration (Working with WG26 controller)
The following section is intended for customers who have purchased our wiegand 26 Access Control System.
This section will recommend some access control sample set-up for users.
We will be suggesting two connection models that can be implemented with Access controller.
In our examples, we are using our Access controller with a 12 Volt Electromagnetic solenoid drop bolt (Fail-safe type). It is
recommended that a backup power system (e.g. Uninterruptible Power Supply system, UPS) be implemented in all set-ups.
Note: The contents of the following sections are intended for informational purposes only. BFLEX shall in no event accept any
liability for loss or damage suffered by any person or body due to information provided on the following sections. For users
planning on using the Fail-Secure configuration, please check the fire safety regulation present in your region before
proceeding.
4.6. How to connect the BFlex399u to the Access Controller?
Firstly, you should confirm the Wiegand 26 Port from BFLEX 399u and the controller.
Then, you should confirm if the Wiegand controller could support the 12V POWER output.
a) If the controller can support 12V power output, you should connect the 12V power to the Bflex 399u, and then connect
them with the wiegand 26 as Wiegand 26 DATA0 and DATA1.
b) If the controller can not support 12V power output, you should connect the 12V power adapter stand alone, and then
connect the BFLEX399u's Wiegand26 to the controller, at the same time; you should connect the controller’s Gnd to
Bflex 399u’s Gnd.
• Single-Device Proposed Connectivity
Single-Device Scenario
Requirements
Access control on gate
•
Identification device only at entrance
•
Push button exit mechanism
•
Logs to track entry
•
Central controlled
• Multiple-Device Proposed Connectivity
Multiple-Device Scenario
Requirements
Access control on gate
•
Identification device at entrance and exit
•
Logs to track entry
•
Central controlled
8
5, Using the device
The device has an in-built user interface to facilitate settings, enrolment and device configurations operations.
The user interface is supported by the keypad, LCD panel, and buzzer.
5.1. The keypad
Power on button
Bell
M
ESC
OK
0-9
Bell button
Main user interface menu
button
Escape button
OK button
Up button / as the function
key, changing into "Check
in"
Down button / as the
function key, changing into
"Check out"
Numeric key buttons
5.2. The correct way to press you fingerprint
These are some useful tips for using the fingerprint optical sensor.
Firstly, the fingerprint should be wet, not very dry,
•
Place the finger in the centre of the sensor
•
Press the finger fully on the sensor
•
Do not tilt finger sideway on the sensor
•
•
•
Do not place the finger on the side of the sensor
Do not place the finger at the bottom of the sensor
Do not only place the fingertip on the sensor
5.3. Password Logging Option
Alternatively, users can log into the device by keying in their password. This option is only applicable to users
whose fingerprint is not good, and is enrolled with a password.
6, Using the MENU
DS 388 offers a range of functions that allow the users to enrol and view logs. There are also functions to
tailor the device to the user’s needs.
9
The functions are arranged in the main device menu and submenus.
6.1. Accessing the Menu
The menu can be accessed by pressing the MENU button on the keypad. If a manager record exists in the
device, the device will then prompt for a Manager Verification before proceeding. This is a built-in security
feature to protect device settings and in/out records.
Device will display the Manager Verification Screen. User can log into the menu using
•
Fingerprint
•
Or Password
6.2. Menu Access – Fingerprint or Password
The device will match the user with the manager’s fingerprint
Device will display the MENU if the manager’s finger is verified.
•
Key in the manager’s Record ID, then press OK button.
•
Key in the valid password for the manager
6.3. Browsing the Menu
The menu has an interface to allow users to scroll and access submenus and options.
The interface also enables users to edit settings and delete records.
•
Use or
buttons to scroll through the menu and switch through settings parameter.
•
Use OK button to select or confirm settings
•
Use ESC button to cancel or ignore settings
•
Use 0-9 numerical keys to edit settings
7, Menu functions
The user interface menu is segmented into 3 sections to handle various functions. The menu layout can be
viewed as followed:
10
Main Menu
Enroll
Setup
System Info
User
System
User/Manager
Manager
Log Setup
Finger/Password
/Card
User Delete
Glog
Manager Clear
Menu Functions
Enroll
Functions for Enrolment and Record/Log
Management functions
Setup
Functions for Device, Log and Communication
Interface settings
System
Tally of records and logs
Info
7.1. SETUP - Device Settings
The device provides user to with the following setting options
ü
System – Setting the device configuration settings
ü
Log Setup – Setting the threshold for the capacity of logs
•
Access the menu, and move cursor to Setup
•
Press the OK button to enter Setup submenu
•
Device will display the Setup menu
•
Move cursor to required option, press OK to enter option
7.1.1. System Settings
System settings allow user to limit the number of managers, set device ID, set device language, set central
computer access option and set auto-off/sleep option. To goto System settings, choose System from the
Setup menu.
Setting Managers Limit
•
•
Move cursor to Managers and press the OK button to select the option
Use numerical keypad to set the number of managers allowed in the device
11
Setting Device ID
•
•
Move cursor to Device ID and press the OK button to select the option
Use numerical keypad to set the device ID. The ID needs to be unique for the device to support
central computer access.
Setting the Network
•
•
•
Move cursor to Network and press the OK button to select the option
Use numerical keypad to set the IP ADDRESS.
After changing the required parameter, press the ESC to set the settings.
Setting the Time
•
•
Move cursor to Time and press the OK button to select the option
Use the cursor to shift through the time parameter and use OK to increment or use the numerical
keypad to key in the parameter changes
•
After changing the required parameter, press the ESC to set the settings.
•
To confirm the changes, press the OK to save changes
Setting Menu Language
•
•
•
Move cursor to Language and press the OK button to select the option
Use or
to select the required language.
The device comes in English, Simplified Chinese and French.
Setting Auto-off
•
•
Move cursor to Auto Off and press the OK button to select the option
Use or
to select No to turn off Auto-off feature or scroll through the idle time before the device
goes to sleep mode
12
7.1.2. Log Settings
Log Setup allow user to set warning indicator for the General Log and the Supervisor Log, and set option for
re-verification.
To go to Log settings, choose Log Setup from the Setup menu.
•
•
Move cursor to Log Setup and press the OK button to select the option.
Use or
or the numerical keypad to select the number of remaining log capacity before the
warning beeps sound off.
•
Move cursor to Glog and press the OK button to select the option.
•
Use or
or the numerical keypad to select the number of remaining log capacity before the
warning beeps sound off.
7.1.3. Communications
Communication setting allow user to set the port settings for data transmission to the central computer.
Move cursor to Baudrate and press the OK button to select the option.
Setting Baud Rate
•
•
Move cursor to Baudrate and press the OK button to select the option.
Use or
or the numerical keypad to select the baud rate. You may set the baud rate to 9600bps,
19200bps or 38400bps.
•
As the default setting, it’s 19200.
7.2. ENROLL – Enrolment
The device can provide user to with the following enrolment options
Access the menu and move cursor to Enrol, then press the OK button to enter Enrol submenu
l
User – Enrol normal users
l
Manager – Enrol users with permission to enter menu settings
l
Delete – Remove user from records
13
7.2.1. User Enrolment
User can enrol into device to set fingerprint and password and RFID Card for logging option.
To go to User Enrolment settings, choose User from the Enroll menu.
Fingerprint Only
ü Key in allocated Record ID using the numerical pad or use the given Record ID and press OK
ü Move cursor to Finger 1 or Finger 2 and press the OK button to Register the finger
ü Register the finger, device will prompt user to register finger 3 times
ü
ü If the fingerprint is existed in the devie ,when input fingerprint at first time,the device will prompt user
fingerprint double.
ü If the fingerprint is existed in the device, the device will prompt users to try again in the following situation.
14
l User did not press finger properly
l User has previously enrolled in the device
ü When enrolment is successful, device will indicate the registered record ID and enrolment type (1fingerprint, P-password, 1P-fingerprint and password).
ü Press OK to save record or ignore enrolment.
ü When success to save the enrolment, you can go on to register or exit.
ü To enrolled backup fingerprint, move cursor to Finger 2 and press the OK button to backup fingerprint
ü Key in the existing Record ID that user need to add an extra fingerprint
Password Only
ü Move cursor to Password and press the OK button to input password
ü Register the password and press OK, device will prompt user to confirm the password. Press OK to
confirm
ü When enrolment is successful, device will indicate the registered record ID and enrolment type (1fingerprint, P-password, OP-fingerprint and password).
ü Press OK to save record or ignore enrolment.
ü The device will prompt users to try again in the following situation:
l User keys in a password of more than 6 digits
l User keys in a different password for the password confirm
15
Fingerprint and Password/RFID card together
ü In the Enrolll MENU, you will see the [OR] ,[OR] means using Fingerprint only or card only or password
only, can be verified.
ü Now, the other option is to verify by finger and password together, or by fingerprint and card together.
This option can be set only when you registered the finger already and card/password already inside. It
means the fingerprint should be existed, and one of card and password should be existed too under the
same ID
l To select the OR, Then press the OK button, then you will see [And]. It means that you had succeed
to set it.
7.2.2. Manager Enrolment
User can enrol to device with additional permission to access menu functions.
To goto Manager Enrolment settings, choose Manager from the Enrol menu.
Press OK can continue to add manager
Please refer to User Enrolment for information on enrolment procedures
7.2.3. User Deletion
User with sufficient permission will be able to remove user record from device. To delete user, choose Delete
from the User Menu.
16
ü Key in the record ID of the user to be deleted and press the OK button
ü The device will prompt users to try again if user keys in a invalid Record ID
ü Device will display the Record ID to be deleted and enrolment type
ü Press OK to continue
ü
ü Press OK to confirm delete, or press ESC to cancel process
ü Device will then display a record deleted screen to indicate successful delete.
ü Press OK if you want to delete more users
ü Press ESC to escape to the Enroll menu
7.2.4. Manager Clear
User can enrol to device with additional permission to access menu functions.
To goto Manager Enrolment settings, choose Manager from the Enrol menu.
ü Press OK to delete manager, the device will need some time if there are many log data
ü Press ESC to escape to the menu
7.3. SYSTEM INFO - Device System Information
Users may check the following tally of the logs and records in device.
4 User/Manager
4 Fingerprint/Password
4 GLog
ü Access the menu
ü Move cursor to System Info
ü Press the OK button to enter System Info submenu
ü Device will display the System Information menu
ü Move cursor to required option, press OK to enter option
17
ü If you move cursor to User option, presses OK, you will get how many users registered in the device.
ü If you move cursor to Finger option, press OK you will get how many finger has been registered in the
device, and contimue press OK again, you will get how many password and card have existed in the
device.
ü If you move cursor to Glog option, press OK you will get how many LOG DATA RECORDS is there in the
device.
8. Software Interface
DS device is accompanied by the Attendance System software. It is the central controlling software to
complement the functionalities of DS fingerprint device.
8.1. Installing the software
To use the software, set up the network connections according to your preference.
Install the software package in the controller computer.
Run the installation package and follow the instructions.
Launch the software.
The username is administrator and leave the password empty to log into the system.
18