1
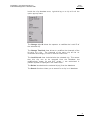
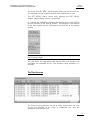
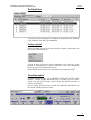
User's Manual
- Version 03.04.01 - Dec 2006
Video Playout Software
www.evs.tv
EVS AIREDIT – User Manual AirEdit 03.04.01
EVS Broadcast Equipment – December 2006
AirEdit
04/01/2007
Introduction
The AirEdit combined with EVS XT Series Server - a multi-channel,
disk-based, digital player-recorder - is definitely the ideal system for
commercial insertions / replacement, content control and video
delay (1 or 2 different time delays).
The first channel is used to record the incoming material (‘Live’).
The second simultaneously performs a random-access play-back of
previously loaded clips or of the delayed 'Live' signal. The third
access may be used by the operator to search in the recorded
material and otherwise displays the incoming signal. It can also be
used to create a second time delay. At the same time, new spots,
jingles and advertisements can be recorded with the remaining
record channels.
This user’s manual describes the operation of the Air Edit software
application. For technical information about the XT Series Server,
please refer to the “Technical Reference for EVS XT Series Server”.
1
EVS AIREDIT – User Manual AirEdit 03.04.01
EVS Broadcast Equipment – December 2006
AirEdit
04/01/2007
Chapter 1 - Cabling
The AirEdit software is installed in a workstation operating under
Windows NT 4.0 system (English or French). The communication
between the XT Series Server and the AirEdit application is done
through an RS422 connection using EVS Advanced Video Server
Protocol (AVSP).
For the cabling of the XT Series Server itself, please refer to the
Technical Reference for XT Series Server.
2
EVS AIREDIT – User Manual AirEdit 03.04.01
AirEdit
04/01/2007
EVS Broadcast Equipment – December 2006
Chapter 2 – Configuration
The complete control of the AirEdit is organized into one single
screen for recording the material, for creating and editing clips, for
forming the playlists and for sending the Playlist screenplay On Air.
Double-click on the AirEdit icon on the desktop to begin:
After a few seconds, you will enter the AirEdit application :
3
EVS AIREDIT – User Manual AirEdit 03.04.01
EVS Broadcast Equipment – December 2006
AirEdit
04/01/2007
The Menu Bar
The familiar Windows-NT Menus are located in the Menu Bar:
The File menu gives you access to a main function:
•
Load EDL : this item is only used for integration of EVS
systems. EDL file format currently supported is EVS EDL.
•
Database : this option allows to open, export, import or
clear a database. “Info” gives you some information about
the database loaded and “Execute Script” Will let you load a
database with different options. These functions should be
only used by trained EVS engineers for maintenance
operations.
The View menu allows you to configure your screen display as
desired.
•
Status Bar : this item displays or hides the Status Bar and
the Capacity left counter.
•
Playlist List : this item displays or hides the first column in
the player area.
•
Recorder/Recorder & Player/Player : this item offers 3
modes of display for your AirEdit interface: Player mode
only displays the Players, Recorder mode displays all
recorders, and Recorder & Player mode displays both
recorders and players.
4
EVS AIREDIT – User Manual AirEdit 03.04.01
AirEdit
04/01/2007
EVS Broadcast Equipment – December 2006
S h or t c ut s a r e a v a i l a b le t o q u i c k l y m o d i f y th e d i s p l a y o f
p l a y er s , r e c or d er s a nd D at a b a se :
• S H IFT + F 5: o n l y d i s p l a y s t h e r e c or ders w i n do w s an d
t o g g le s be twe e n r e cor d ers .
• S H IFT + F 6: d i s p la y s bo t h r e cor d ers a n d p l a yer s
w i n do w s.
• S H IFT + F 7 : o n l y d i s p l a ys t h e p l a y ers w i n d ow s an d
t o g g le s be twe e n p l a y er s .
• S H IFT + F 8: d i s p l a y s /h i d es t h e D a t ab as e ar e a.
•
Database : this item displays or hides the Clip/Playlists
database area.
•
OSD : this item offers you 4 options to see Genlock error
message on the OSD (!GKV), to use the default layout for
the OSD (time code, in and out, clip name), or to view/hide
time code, clip time left and playlist time left (in a playlist)
•
Hide PlayOut : this item displays or hides the PlayOut
•
MessageList : this item displays internal messages from the
AirEdit running status (message.txt file).The frequency of
the messages can be selected from level 0 (all internal
debug messages) to level 2 (error messages only)
The Tools menu opens different dialog boxes with which your entire
system is configured:
5
EVS AIREDIT – User Manual AirEdit 03.04.01
EVS Broadcast Equipment – December 2006
AirEdit
04/01/2007
• COM configuration
The COM configuration dialog box allows you to assign the serial
communication ports available on the AirEdit to the peripheral
equipment: The XT Series Server, the remote control panels and the
different VTR machines. The Baud rate selection box allows you to
define the transfer rate between the AirEdit and the XT Series
Server. Default is 115200. “Small Remote” checkboxes select the
type of remote control panel to be used. This box should be
checked if using the type of remote as described in chapter 4
(Remote Panel Description). This box should be left unchecked
when using the Remote D (larger remote with jog and t-bar).
Comment: Serial ports configuration has been tested to efficiently carry
out its functions. Please do not modify the standard configuration.
6
EVS AIREDIT – User Manual AirEdit 03.04.01
EVS Broadcast Equipment – December 2006
AirEdit
04/01/2007
• XT Server configuration (WinCfg)
The WinCfg dialog box allows you to set up the configuration of the XT
Series Server from the AirEdit. These parameters are also available from
the EVS and AVCFG applications directly on the XT Series Server system
monitor. For a more detailed description of these parameters, please refer
to the “EVS Advanced Parameters” and “AVCF G” sections of the Technical
Reference for XT Series Server.
RS422 Ports : To configure the COM ports of the XT Series Server.
RS422 Port #1 must be assigned to the EVS AVSP protocol to work with the
AirEdit. The AirEdit PC must be connected to RS422 port #1 of the XT
Series Server.
Video Channels : to configure the sharing of disk capacity between the
record channels. Click on the “Change” button in the upper part of the
window to change the number of rec and play channels.
7
EVS AIREDIT – User Manual AirEdit 03.04.01
EVS Broadcast Equipment – December 2006
AirEdit
04/01/2007
Channels Configuration (“Change” button) : The AirEdit software only
supports configurations with 2 play (PGM + Edit channel) or 3 play (PGM +
Edit channel + Preview channel for still frame of item to insert) “cut”
channels, and at least 1 record channel.
Audio Outputs : Displays the current assignment of audio output channels
of the XT Series Server.
Audio Inputs : Displays the current assignment of the audio input channels
of the XT Series Server.
8
EVS AIREDIT – User Manual AirEdit 03.04.01
EVS Broadcast Equipment – December 2006
AirEdit
04/01/2007
SDTI Network : To define the parameters of the XNet SDTI Network.
Advanced Parameters : to configure the Guardband (duration of material
beyond the IN and OUT point that will be automatically protected when
creating a clip) and other video format and hardware configuration
parameters.
9
EVS AIREDIT – User Manual AirEdit 03.04.01
EVS Broadcast Equipment – December 2006
•
AirEdit
04/01/2007
AirBox Configuration
The AirBox Configuration item opens the following dialog box and
allows you to define default settings for your AirEdit application:
Show “Parameters Clip Edition” Dialog option displays/hides the
parameters dialog box appearing after each clip creation. Note that
this window never appears when the “Clip Create Simultaneously” is
active (this option is described a few lines below).
Default In Point hh:mm:ss:fr enables or disables a default time code
value for the in point for all clips when they are created.
Delete Clip On Database Event : when this option is checked, it
automatically removes a clip from the AirEdit database when it is
deleted from the server by another user. If this option is not
checked, then a popup window appears to ask the operator whether
or not he wants to keep this clip in the database even though it is
not longer available on the XT Series Server.
Delete Clip from Database Default : if “Delete Clip On Database
Event” is not selected, when a clip is deleted from the server by
another user, a popup window appears to ask the operator whether
or not he wants to keep this clip in the AirEdit database. If the
“Delete Clip from Database Default” is checked, the the default
10
EVS AIREDIT – User Manual AirEdit 03.04.01
EVS Broadcast Equipment – December 2006
AirEdit
04/01/2007
choice in this window is to delete it from the database. If this option
is not checked, the default choice in this window is to keep it in the
database.
Fast Jog option allows you to set the speed of the Fast Jog function
on the remote panel.
Insert new clip in fist position : if this option is selected, a new clip
will be inserted in top position in the clip database. If this option is
not selected, the position of a new clip in the clip database will be
defined by the current sorting criteria.
Autoedit select ID window : if this option is selected, when creating
a clip with VTR control, a popup window appears to allow the
operator to define a name for the clip to be created. If this option is
not selected, no popup window appears and the clip name is
automatically generated.
• Delay Configuration
Minimum Delay Allowed defines the minimum delay duration that is
allowed between the live incoming program and the main program
output.
Startup Delay defines the value of the delay that must be reached
when starting the AirEdit application. The AirEdit main output will
freeze on the first recorded picture until the Startup Delay value is
reached, and then will start playing automatically.
11
EVS AIREDIT – User Manual AirEdit 03.04.01
EVS Broadcast Equipment – December 2006
AirEdit
04/01/2007
Minimum Event Duration in the Timeline defines the duration of the
shortest operation (insert, remove, replace, etc) that can be
performed in the timeline. If the operator tries to perform an
operation that leads to an event in the timeline with a duration
shorter than this parameter, the operation will be refused.
Offset For Live Insert/Mark Cue is linked to the reaction time of the
operator when performing a Live Insert or marking a cue on the live
program. The IN point for the insert or the cue point will be placed
slightly ahead. This advance is defined by this offset parameter.
Edit Timeline Channel Reference defines the time reference
displayed in the edition module to identify a frame in the timeline. A
frame in the timeline can be identified either by its OnAir Time (time
when it will play on the main program output) or by its Timecode
(time when it was recorded on the live program input).
Enable Automatic Saving Request Management For Playlists : if
option is selected, a popup window appears when leaving
playlist tab if the current playlist as been modified since the
save, to ask the operator if he wants to save this playlist in
database.
this
the
last
the
Enable GPI Management on Programmed Pauses : when
programming a pause in the AirEdit, it is possible to send GPI
triggers to an external device for Preroll and Play commands, and to
receive a GPI trigger from an external device to resume the
playback from the AirEdit.
• Category
This item gives you access to the Media and Type management.
These two key parameters are useful to organize, sort and find clips
in the database.
12
EVS AIREDIT – User Manual AirEdit 03.04.01
EVS Broadcast Equipment – December 2006
AirEdit
04/01/2007
• Clip VTR Configuration
The Clip VTR option allows you to play back a video clip from a VTR
and insert it inside a playlist. That way you can combine clips from
the XT Series Server and clips from tape inside the playlist.
Selecting the Clip VTR Configuration item opens the following dialog
box:
Default Preroll Time: The Preroll command is sent to the VTR via
the RS422 connection. Default: 10 seconds
Time to cue VTR: minimal duration to cue the VTR. Default 25
seconds
Preroll Time: The Preroll command is sent to the VTR via the
RS422 connection. Default: 10 seconds
Delay to Play: defines the delay between the input and output
channels of the server for a “Clip VTR”. Default: 3 seconds
Control VTR Default Values: If this option is selected, the values
for In, Out and Duration are used as default value to populate the
corresponding fields in the VTR control window.
•
Redundancy
Connect: to connect to the main or backup AirEdit system.
13
EVS AIREDIT – User Manual AirEdit 03.04.01
EVS Broadcast Equipment – December 2006
AirEdit
04/01/2007
Swap Main and Backup: to make the main/backup AirEdit system
become the backup/main AirEdit system.
•
Set Date
This item allows you to set date of the AirEdit application at start
up.
• Clear TC Table
This item allows to empty the TC table file when it is full. In that
case, the message TC! is showed on the OSD. This problem
happens when the Timecode source is not referenced to the same
signal used for the Video Server reference (Black Burst), or when
the Timecode source is unstable.
The Help menu opens the software information window. This window
provides information about the software version of the AirEdit
application and about the compatibility with the version of the
Multicam software that must be installed on the XT Series Server.
14
EVS AIREDIT – User Manual AirEdit 03.04.01
EVS Broadcast Equipment – December 2006
AirEdit
04/01/2007
Chapter 3 – Software management
The Recorders
The recorder is represented by a Record button and the Record
time, the duration already recorded and a lock/unlock record button.
To start and to stop the record, press the Record button.
If no TimeCode reference is entered to the XT Series Server, then
the internal PC clock of the XT Series Server is used as a
reference.
Select the corresponding tab to view the desired record channel.
Selecting ‘All’ displays all recorders.
The VTR control panel and Record er List are accessible from each
recorder tab. The standard functions needed to control a VTR are
available here: Play, Stop, Still (pause), Rewind and Fast Forward,
Preroll and preroll duration. The scrolling bar allows you to search
the tape in Jog mode or in Shuttle mode. The current status of the
VTR is continually sent back to the AirEdit for better control. The
status field indicates what the VTR is doing with a tape sequence
(Idle, Playing, Rewinding,…).
Important note : the TC of the VTR is sent to the AirEdit through the
RS422 connection between the VT R and the AirEdit PC. Do NOT
connect the LTC output of the VTR to the LTC input of the XT Series
Server. The LTC input of the XT Series Server must only be used to
lock the server to the station’s timecode reference.
Right click on the “Control VTR” tab to select the VTR you want to
control.
15
EVS AIREDIT – User Manual AirEdit 03.04.01
EVS Broadcast Equipment – December 2006
AirEdit
04/01/2007
When IN and OUT points are defined, the Auto Edit button starts the
playback of the VTR (from the IN point to the OUT point, taking into
account the preroll duration) and the record of the XT Series Server
at the same time.
The Clip VT R option allows you to blend sequences from disks and
sequences from tapes into a same playlist. It creates a virtual clip
(entry) into the database. This new Clip VTR has the same
parameters (ID, Name, Type, Duration,…) as clips coming from the
disks and can be easily found in the database, and can be inserted
in any playlists.
The Recorder List module is an automatic hands-free recorder.
Sequences of recordings can be scheduled in advance.
To create a new event (clip), press the New button. The following
dialog box appears to enter the parameters:
Parameters as Name, ID, Media, Type are standard parameters to
identify the new clip into the clips database.
Start Date, Start Time and duration are mandatory parameters to
schedule a record sequence.
Periodicity/AutoDelete
This function allows to record a live show every day and to rebroadcast it using the periodicity/autodelete parameters.
For example: The Weather Forecast recorded every day at a fixedhour is re-broadcasted several times during the following hours. The
day after, the new Weather Forecast is recorded and the old one is
deleted, and so forth.
16
EVS AIREDIT – User Manual AirEdit 03.04.01
EVS Broadcast Equipment – December 2006
AirEdit
04/01/2007
The Periodicity parameter defines the time (days, hours, minutes,
seconds, frames) of the next recording.
The AutoDelete parameter defines the time to automatically delete
an old clip. Note that the AutoDelete of the “old” clip must be
completed at least 3 seconds before the “new” clip is created
according to the Periodicity parameters, otherwise an error message
will warn the user.
The Clip Edition
The clip edition module is used to browse the recorded material and
to create clips from this material.
The Current TimeCode field allows you to enter a defined TimeCode
Reference and go to this TimeCode reference: Enter a new
TimeCode position in the TimeCode field and press Enter to
validate.
The IN, OUT and Duration fields are also editable and allows to
enter a defined IN, OUT point or a defined duration.
Creating a clip
Press the corresponding LIVE button (1, 2, 3 or 4) to visualize the
desired record channel.
Browse to the desired IN/OUT points, press the IN/OUT button to
mark the first/last frame of the clip; this can be done “on the fly” or
by accurately positioning the material with the scrolling bar (or with
the jog knob of remote).
To clear an IN/OUT point, press the CLEAR IN/CLEAR OUT button.
When the IN and OUT points of the clip have been marked, press
the Save Clip button to display the Clip Edition dialog box.
Important Note: The number of characters for the clip name must not exceed 24
characters. In order to comply with the XT Series Server operating system, ID
name(up to 8 characters) has been automatically linked to the Clip Name at the time
of the creation of this one.
17
EVS AIREDIT – User Manual AirEdit 03.04.01
EVS Broadcast Equipment – December 2006
AirEdit
04/01/2007
Media, type, creation date, clip category, or various comments can
be added to the clip for information. We can also add some default
keywords previously imported into the server. Each file (.kwd)
contains up to 200 keywords and we can assign a maximum of 3
keywords for each clip. The Rating is so to set a priority level to a
clip (from 0 to 3 stars).
If we want a particular clip to go to a specific location (folder), we
can also do so by choosing the name of that folder in this window
(i.e: NAT for national). Bin rules are also available so that the clips
made from one feed will go to the desire folder.
Press the SAVE button to enter the new clip into the Clips
Database.
Media and type can be modified in the menu Tools/Category.
In the Master Configuration menu, it is possible to disable the
automatic display of the Clip Edition dialog box. In this case, the
clip is immediately saved when clicking the SAVE button.
The Clips Database
The list of existing clips appears at the bottom of the screen in the
database area with the information/attributes assigned to each clip.
The attributes and clips are not permanent and can be modified.
Clicking on the title of a column re-organizes the list display (for
example: clicking on Clip Name title sorts the whole list in
alphabetical order, clicking on the In title sorts the clips according
18
EVS AIREDIT – User Manual AirEdit 03.04.01
EVS Broadcast Equipment – December 2006
AirEdit
04/01/2007
to the timecode of their IN point).
The Status column displays the current status for each clip: green
sign means that the clip is present on the XT Series Server and into
the clips database on the AirEdit PC. A red sign means that data or
the clip itself on the XT Series Server, are missing for playback.
The operator can hide, show and re-order selected columns. Rightclick into the title bar of the database to open the List ordering
window:
A drag and drop facility allows you to move the fields and to reorder them as desired. Double-click on a field to hide/show the
corresponding column in the database. A column is hidden when its
name is grey in the List Ordering window.
19
EVS AIREDIT – User Manual AirEdit 03.04.01
EVS Broadcast Equipment – December 2006
AirEdit
04/01/2007
Inside the clip database area, right-clicking on a clip will call the
option pop-up menu:
The Change clip ID allows the operator to redefine the Louth ID of
the selected clip.
The Change TimeCode item allows to re-define the timecode of the
IN point of a clip. The timecode of the entire clip will be recalculated accordingly, so that it remains continuous.
The Lock/UnLock item locks/unlocks the selected clip. This means
that this clip can no be removed from the Database but
modifications (name, IN and OUT points,…) are authorized. A
padlock symbol is displayed in the status field.
The Delete item deletes the selected clip(s) from the database.
The Search function allows you to search for a clip in all database
20
EVS AIREDIT – User Manual AirEdit 03.04.01
EVS Broadcast Equipment – December 2006
AirEdit
04/01/2007
The Check DataBase item checks the validity of the database
contents (Sequence-fields in the.mdb file). In order to check the
validity of the video sources, the Check DataBase function
compares the clips recorded on the disks of the XT Series Server
and the clips listed in the database of the AirEdit PC. The two lists
must be identical to be valid. It is recommended to proceed with this
checking process on a regular basis to identify/remove unavailable
clips from the database. Indeed, when deleting clips from the
server, the operator can select to keep the reference to these clips
inside the database. When selecting this option, the following
window appears:
•
•
•
•
•
The following buttons are available at the bottom of the window:
Check all: check all servers present on the SDTI network.
Check required: check only the required servers. When a new
server appears on the network, a database check must be performed
before using its clips.
Check Local: check only the local server. The local server is the
one directely connected to the AirEdit PC through the RS422
connection.
Stop: stop the database check process.
Exit : exit the database check window
Important note : the AirEdit application can work with an XT Series
Server that is part of an XNet SDTI network, but only local clips can
be used in the timeline.
21
EVS AIREDIT – User Manual AirEdit 03.04.01
EVS Broadcast Equipment – December 2006
AirEdit
04/01/2007
The Archive item sets the archiving status for the selected clip(s) to
export them to an EVS XFile or XStore system.
The Rating items is used to change the rating of the selected
clip(s). Rating can be – (none) or 1, 2 or 3 stars.
The Edit item opens the clip parameters dialog box for modification.
The Copy item copies the selected clip(s) to the clipboard in order
to paste it (them) later in a playlist. Several clips can be selected
by holding the SHIFT key when clicking.
22
EVS AIREDIT – User Manual AirEdit 03.04.01
EVS Broadcast Equipment – December 2006
AirEdit
04/01/2007
Filters
In the clips database, filters are available to refine the selection. It
is possible to associate a clip to various filters and then use these
filters to sort the database and quickly locate the desired clips.
To view the entire database without applying any filter, click on the
Rst Flt button (“Reset Filters”)
To assciate a clip to a filter, drag&drop this clip to the desired filter
button. The clip is not duplicated, it is only associated to the
corresponding filter inside the database. So you can create filters
for Sports, Jingles, Ads, …
Each filter button can be renamed: right-click on the filter button to
rename, and select the Rename op tion. A dialog box appears where
the new name of the filter can be typed.
To view only the clips associated to a filter, click on the
corresponding filter button.
The AND checkbox:
If the AND checkbox is unchecked, the database area displays the
sum of all clips contained in each of the filters currently applied.
Example: If Clip0001 is associated to filter 1, it will be displayed
when viewing the database even when filter 1 and filter 2 are
applied simultaneously.
While the AND box is checked, the database field displays a crossselection of clips contained in the selected filters. (i.e. clips present
in filter 1 AND filter 2).
Example: If Clip0002 is associated to filter 1 and filter 2, it will be
displayed when viewing the database with filter 1 and filter 2
applied. If Clip0002 is associated to filter 1 but not to filter 2, it will
not be displayed.
23
EVS AIREDIT – User Manual AirEdit 03.04.01
EVS Broadcast Equipment – December 2006
AirEdit
04/01/2007
Keywords
To import the keywords into the system, we first need to create a
document with the .kwd extension that will look like the example
shown below.
1=R.Madrid
2=Luxemburgo
3=Raul
4=Zidanne
…..
Leave empty spaces to organize the grid. We then save the file into
a disk or a USB memory pen that later we will insert into the XT.
Before running the Multicam, we go to the Advanced Parameters
(F9) in the EVS Maintenance Menu and choosing the option:
import/export keywords.
24
EVS AIREDIT – User Manual AirEdit 03.04.01
AirEdit
04/01/2007
EVS Broadcast Equipment – December 2006
Video server window:
Application Window
Title Bar
Configuration Window
Message Window
Task Bar
Start the application and then press SHIFT + F2 to open the
following window:
Then select the keyword file to use from the clip management area.
For more information regarding the settings of the video server,
please refer to Technical reference manual.
25
EVS AIREDIT – User Manual AirEdit 03.04.01
EVS Broadcast Equipment – December 2006
AirEdit
04/01/2007
Database Filter
Using the Database Filter allows us to search media by their position
on the XTs and, their camera angle, the different keywords already
associated to the clips, the rating, TC, or even by a date interval in
one or more Servers of the XNet.
The Playlist Database
Note: The playlist duration is displayed when its duration (clips duration +
transition effects) can be calculated. If one parameter (GPI, Break, Loop,…) makes
the exact calculation impossible, the playlist duration is nil.
The attributes of playlists can be re-organized. The operator can
hide, show and re-order selected columns. In order to open the List
ordering window for Playlists, right-click into the title bar of the
database
26
EVS AIREDIT – User Manual AirEdit 03.04.01
EVS Broadcast Equipment – December 2006
AirEdit
04/01/2007
This window works similarly to the List ordering window for Clips,
already described in this manual.
Into the Playlist Database area, right-click on a playlist in order to
call the playlist contextual menu
The New item opens a new playlist 01 in a player module. If no
channel is available, the system will warn the user.
The Duplicate item copies the selected playlist with the automatic
naming: playlist_name-copy. A dialog box opens to change the
playlist name.
The Delete item removes the selected playlist(s) from the database.
Multiple selections can be performed by holding the Shift key while
clicking.
The Rename item to rename the selected playlist.
The Player
Playout Area
This area displayed the On Air time line and the next clip loaded.
Depending on the mode used the first Remaining Duration field can
also display the DELAY time.
27
EVS AIREDIT – User Manual AirEdit 03.04.01
EVS Broadcast Equipment – December 2006
AirEdit
04/01/2007
The PLAY, PAUSE, NEXT, SKIP buttons affect the current time line.
The playback can be locked to ensure the broadcasting in time.
The SET DELAY button (clock icon) displays the SET DELAY
module. Default delay is set to 10 seconds.
R : enables the redundancy between the timeline of the main AirEdit
and the timeline of the backup AirEdit. All changes in the timeline
of the main system will be replicat ed to the timeline of the backup
system.
Important Note: This function clears all items previously inserted in
the time line playlist.
The new delay will take effect one second after the operator has
confirmed the command by OK. The minimum delay possible is 2
seconds.
The Time line area
The Time Line area displays the list of items coming soon. As soon
as the the playback of an items is completed, this item will
disappear from the time line.
28
EVS AIREDIT – User Manual AirEdit 03.04.01
EVS Broadcast Equipment – December 2006
AirEdit
04/01/2007
The Playlist Area
The playlist area allows you to compose a screenplay with different
clips available from the Clips database.
Creating a playlist
Select the New Playlist item from the pop-up menu (right button into
the Playlist Name square)
Or drag & drop a clip from the clip database to the clip field: a new
playlist is automatically created. Add other clips with drag&drop
facility or use the Copy/paste function.
Select SAVE item to enter the new playlist into the playlist DB
The edition module
The Edition field allows you to REMOVE, REPLACE, MUTE, HIDE,
INSERT, PAUSE (PGM), BROWSE (list), to modify the In and OUT
points of a clip (CLIP mode), and to select the IN/OUT position to
insert a clip/Playlist.
Use the Drag & Drop facility to enter the selected clip/Playlist into
the edition module (Item to Insert)
29
EVS AIREDIT – User Manual AirEdit 03.04.01
EVS Broadcast Equipment – December 2006
AirEdit
04/01/2007
Remove
Images from LIVE can be removed. Enter the IN and OUT points to
define the section to remove. The operation is taken into account as
soon as the OUT point is entered.
Replace
This command combines the “REMOVE” and “INSERT” commands.
The selection of the clip to insert and the IN position for insertion
are available in the same window.
There are 2 “REPLACE” modes that can be selected by right-clicking
on the REPLACE button :
Replace based on Clip Duration
Select the clip to insert and mark an IN point in the timeline to
define where the clip should be inserted. The whole clip will be
inserted and the equivalent duration in removed from the timeline,
starting at the IN point.
30
EVS AIREDIT – User Manual AirEdit 03.04.01
EVS Broadcast Equipment – December 2006
AirEdit
04/01/2007
Replace based on Timeline In-Out
Select the clip to insert and mark an IN and OUT points in the
timeline to define where the clip should be inserted. The clip will be
inserted and its OUT point automatically trimmed to match the INOUT interval defined in the timeline. The section between the IN
and OUT points is removed from the timeline.
Comment: As the period to remove from the LIVE equals the item
duration to insert, the Delay time remains unchanged after a
REPLACE function.
31
EVS AIREDIT – User Manual AirEdit 03.04.01
EVS Broadcast Equipment – December 2006
AirEdit
04/01/2007
Mute
This command mutes the Audio channel for a defined period. Only
the video images are displayed during this period.
Hide
This command hides the video channel for a defined period. Only
the audio channel is played back, a black pattern replaces the video
images during this period. The HIDE window is similar to the MUTE
window.
Insert
The Insert mode allows the user to insert a defined clip/playlist into
the timeline and to select the position where this clip/playlist is
inserted.
32
EVS AIREDIT – User Manual AirEdit 03.04.01
EVS Broadcast Equipment – December 2006
AirEdit
04/01/2007
IN point only:
The delayed PGM is shifted after the new clip inserted.
IN and OUT points:
When the IN and OUT points are both defined, the Insert mode acts
as a REMOVE+INSERT mode. But the delay duration is different
from the new clip duration: it equals to the duration defined by the
In and OUT points.
PGM Pause
The PGM Pause command defines a period into the time line to stop
any playback. A black pattern is displayed during this period.
Note: Duration pause is not yet available.
IN point only:
The delayed PGM stops at this point and waits for duration (if
defined) or for user operation.
IN and OUT points:
The delayed PGM stops at the IN point and waits for the OUT point
to continue
Browse
The Browse mode allows the user to browse the first frame of each
clip of a playlist. This operation is done through the keyboard (arrow
keys) or via the jog of the remote control panel.
33
EVS AIREDIT – User Manual AirEdit 03.04.01
EVS Broadcast Equipment – December 2006
AirEdit
04/01/2007
Clip
Only available in Playlist tab, not in AirEdit Timeline tab.
function allows the operator to trim a clip inside the playlist.
This
34
EVS AIREDIT – User Manual AirEdit 03.04.01
EVS Broadcast Equipment – December 2006
AirEdit
04/01/2007
Chapter 4 – Remote control panel
The remote control panel is designed to ease the Clip creation
process and the VTR control.
Remarks:
- Search entry into playlist DB : not available with this version
03.00.04
- Mark Cue Point: not available with AirEdit. For Air Edit only.
35
EVS AIREDIT – User Manual AirEdit 03.04.01
EVS Broadcast Equipment – December 2006
AirEdit
04/01/2007
Chapter 5 – Keyboard Short Cuts
Recorder.
Shift+R: Start / Stop records.
Control VTR.
ALT+V: select control VTR.
Space Bar: Pause.
<- -> : Search
Shift + <- -> : Search 5*.
Crtl + <- -> : Search 50*.
P: Play.
I: Set In.
O: Set Out.
T: Goto In.
E: Goto Out.
S: Auto Edit
Clip edit:
ALT + E: select Clip Edit
F9: Live 1.
F10: Live 2.
F11: Live 3.
F12: Live 4.
Space Bar: Pause.
<- -> : Search
Shift + <- -> : Search 5*.
Crtl + <- -> : Search 50*.
P: Play.
I: Set In.
O: Set Out.
T: Goto In.
E: Goto Out.
S: Save.
D: Duration.
R: Remain.
G: Goto TC.
36
EVS AIREDIT – User Manual AirEdit 03.04.01
EVS Broadcast Equipment – December 2006
AirEdit
04/01/2007
Database:
ALT + B: select Database.
<- -> : Search
Shift + <- -> : Search 5*.
Crtl + <- -> : Search 50*.
Del: Delete.
Enter: Edit clip.
Ctrl + U: Lock.
Alt + U: Unlock.
Ctrl + S: Search clip.
Ctrl + E: Edit clip.
Playlist:
Ctrl + Enter: Preload.
Alt + Space Bar: STOP.
<- -> : Search
Shift + <- -> : Search 5*.
Crtl + <- -> : Search 50*.
P : Play.
Space Bar : Pause.
T: Goto In.
E: Goto Out.
N: Next.
K: Skip.
Crtl + N: New Plst.
Crtl + A: Save As.
Ctrl + X: Cut.
Ctrl + C: Copy.
Ctrl + V: Paste.
Del: Delete.
Ctrl + L: Loop.
Ctrl + E: Effect.
Ctrl + S: Speed.
Ctrl + Z: Start Mode.
Playlist Edit:
ALT+M: select Playlist Edit.
Enter: Playlist Edit.
<- -> : Search
Shift + <- -> : Search 5*.
Crtl + <- -> : Search 50*.
P: Play.
I: Set In.
O: Set Out.
T: Goto In.
E: Goto Out.
S: Save.
N: Next.
B: Previous.
37
EVS AIREDIT – User Manual AirEdit 03.04.01
EVS Broadcast Equipment – December 2006
AirEdit
04/01/2007
Table of contents
INTRODUCTION...................................................................................................................................... 1
CHAPTER 1 - CABLING ......................................................................................................................... 2
CHAPTER 2 – CONFIGURATION........................................................................................................... 3
The Menu Bar ......................................................................................................................................... 4
•
COM configuration.................................................................................................................... 6
•
XT Server configuration (WinCfg)............................................................................................ 7
•
AirBox Configuration.............................................................................................................. 10
•
Delay Configuration ......................................................................................................... 11
•
Category .................................................................................................................................. 12
•
Clip VTR Configuration........................................................................................................... 13
CHAPTER 3 – SOFTWARE MANAGEMENT ....................................................................................... 15
The Recorders...................................................................................................................................... 15
The Clip Edition.................................................................................................................................... 17
The Clips Database .............................................................................................................................. 18
Keywords.............................................................................................................................................. 24
The Playlist Database .......................................................................................................................... 26
The Player............................................................................................................................................. 27
Playout Area ...................................................................................................................................... 27
The Time line area............................................................................................................................. 28
The Playlist Area................................................................................................................................ 29
The edition module ............................................................................................................................ 29
CHAPTER 4 – REMOTE CONTROL PANEL........................................................................................ 35
CHAPTER 5 – KEYBOARD SHORT CUTS .......................................................................................... 36
TABLE OF CONTENTS ........................................................................................................................ 38
38
Headquarters
EVS Broadcast Equipment - Liege Science Park - 16, rue Bois St-Jean - 4102 Ougrée - BELGIUM
Tel-: +32 4 361 7000 - Fax-: +32 4 361 7099 - Tech. line-: +32 495 284 000 - Marketing-: [email protected]
Technical support-: [email protected] - Recruitment-: [email protected] - Corporate & Investors relations-: [email protected]
Sales and Support Offices
NORTH AMERICA & LATIN AMERICA
EVS Broadcast Equipment Inc - 9 Law Drive, Suite 200 – Fairfield, NJ 07004-3233 - USA
Tel-: +1 973 575 7811 - Fax-: +1 973 575 7812 - Tech. line-: +1 973 575 7813 - [email protected]
ASIA & PACIFIC
EVS Broadcast Equipment Ltd - New Victory House, 15th Floor - 93-103 Wing Lok Street, Sheung Wan - HONG KONG
Tel-: +852 2914 2501 - Fax-: +852 2914 2505 - Tech. line-: +852 94 01 23 95 - [email protected]
EVS Broadcast Equipment - Canway Building, Rm.702A - 66 Nan Li Shi Lu - Beijing - CHINA
Tel-: +86 10 6808 0248 - Fax-: +86 10 6808 0246 - Tech. line-: +86 139 1028 9860 - [email protected]
EUROPE, MIDDLE EAST & AFRICA
EVS Belgium s.a. - Liege Science Park - 16, rue Bois St-Jean - 4102 Ougrée - BELGIUM
Tel-: +32 4 361 7000 - Fax-: +32 4 361 7099 - Tech. line-: +32 495 284 000 - [email protected]
EVS France s.a. - 32-36 rue de Bellevue - 92773 Boulogne Billancourt CEDEX - FRANCE
Tel-: +33 1 46 99 9000 - Fax-: +33 1 46 99 9009 - Tech. line-: +33 1 46 99 90 08 - [email protected]
EVS Italy s.r.l. - Via Milano 2 - 25126 Brescia - ITALY
Tel-: +39 030 296 400 - Fax-: +39 030 377 8945 - Tech. line-: +39 334 63 11 493 - [email protected]
EVS Broadcast UK Limited - Kingfisher House - 21-23 Elmfield Road - Bromley - Kent BR1- 1LT - UNITED KINGDOM
Tel-: +44 (0)20 8315 6551/2 - Fax-: +44 (0)20 8315 6560 - Tech. line-: +44 7768 792 217, +44 7973 317 414 - [email protected]
www.evs.tv