1
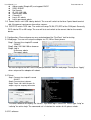
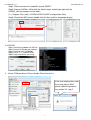
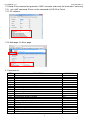
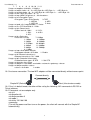
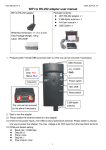
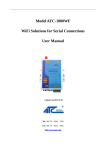
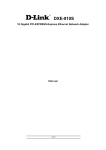
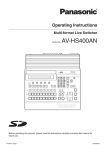
User Manual V1.1
Date: 2014.01.12
WiFi to RS-422/485 adapter user manual
Package Contents:
WiFi RS-422/485 adapter x 1
WiFi to RS-232 adapter
2 dBi dipole antenna x 1
A4 User manual x 1
USB Cable x 1
White Box Dimension: 11 x 6 x 5 (cm)
Total Package Weight: 132 g
Label: “WA-422”
1. Product profile:
Block Terminal Connector:
RX-/B RX+/A TX- TX+
Terminator: 2 pins
Open: Off
Close: On, Please connect the 2
pins with a cable to enable.
4.5 ~27VDC:
LED:
Data: Red
Status: Blue
GND (Power & Serial port)
+
Power switch
Switch:
RS485
RS422
Mini USB
Reset switch
2 dBi dipole
antenna
2. Start to use the adapter
2.1 Please fasten the external antenna to the adapter and switch RS-422 or RS-485 in right side.
2.2 There’re two power inputs, mini USB or blue 2 ports block terminal. Please switch to choose
one way to power the adapter. The max. voltage is 24 VDC input from the blue block terminal.
2.3 COM port default setting:
Baud rate: 115200 bps
Data bit: 8
Parity: none
Stop bit: 1
Flow control: none
2.4 Network default setting:
1
User Manual V1.1
Date: 2014.01.12
Adhoc mode (Simple AP) and support DHCP
SSID: R2WiFi
No Security
IP: 192.168.2.99
Socket port: 5000
Channel: 11
Log in ID: admin
Log in password: admin
2.5 Power switch: mini USB side by default. The user will switch to the blue 2 ports block terminal
side if the power input comes from other sources.
2.6 DCE/DTE switch: DCE side. The switch will swap TX,RX,CTS,RTS of the COM port. Generally,
DCE side for PC or NB setup. The user will test and switch to the correct side for the remote
device.
3. Configuration: Please choose one way and download the “TeraTerm” tool for testing.
3.1 Web page: The user will setup the adapter via PC, NB or Smart phone.
Step1: Connect the simpleAP named
“R2WiFi”
Step2: http://192.168.2.99 on browser
Step3: Log in
Username: admin
Password: admin
You can configure the WiFi and COM port parameters from the web page. Please press “Apply”
when setup and the adapter will reboot.
3.2 Telnet:
Step1: Connect the simpleAP named
“R2WiFi”
Step2: Execute telnet software
Step3: Telnet 192.169.2.99, port 23
Step4: Log in to setup by command
The telnet software will display the “telnet>” sign when log in successful. Please type “help” or
“sethelp” for online help. The command set is listed on the section 8 & 9, please check.
3.3 PC software:
2
User Manual V1.1
Date: 2014.01.12
Step1: Please connect the simpleAP named “R2WiFi”
Step2: Execute AX220xx Utility with the administrator authority by right click the
AXR2W_x64.exe program on the folder.
C: > Program Files (x86) > AX220xx RS232-to-WiFi configuration Utility
Step3: Search the WiFi device, double click the item and the setup page display.
Double click
3.4 RS-232:
Step1: Connect the adapter via RS-232
Step2: Execute COM port tool software
Step3: Set baud rate: 115200 bps
Step4: Key in “+++” and then Enter
Step5: Log in the device and setup
4. Virtual COM port driver: Please disable Flow Control first.
If the error display when add
the virtual port on Win7,
please follow the guide on
the section 3.3, step 2.
3
User Manual V1.1
Date: 2014.01.12
Disable the flow
control function.
VSP OS supported:
Windows 7/Vista/XP/2000 32-bit
Windows 7/Vista/XP 64-bit
Drag the device to the
Virtual COM ports
5. LED indication:
LED
On
Off
Flash
Red
Connect AP OK
Connect AP Fail
On receiving data
Blue N/A
Stop transmitting data On transmitting data
6. Reset button:
Press the “Reset” button over 5 seconds, the WiFi adapter will reset to default value. The LEDs will
be off for some time and then reboot to the default value. The function is the same ad the software
reset.
7. RS-422/485:
7.1 Pin-out:
Block Terminal Connector: RX-/B, RX+/A, TX-, TX+, Terminator (2 pins)
Terminator: 2 pins
Open: Off
Close: On, Please connect the 2
pins with a cable to enable.
(Top View)
4
User Manual V1.1
Date: 2014.01.12
7.2 Setup: Please connect the ground on “GND” connector and check the terminator if necessary.
7.2.1 “set rs485” command: Please set the command via RS-232 or Telnet.
7.2.2 PC software:
7.2.3 Web page: On Basic page.
8. Command set:
ITEM
1
2
3
4
5
6
7
8
9
10
11
12
13
14
15
16
17
18
19
20
21
FUNCATION
To change data mode to command mode
To change command mode to data mode
System restart
New password
New username
IP address information inquiry
System parameter save
Software reboot
E-mail configuation information
Wifi connection status
Inquiry an IP network
Wireless site survey in infrastructure mode
Interconnect Wireless network
WiFi allocation information
Easy configuration module
MAC address information
Static IP address of device server in Server mode
Subnet mask of device server
Gateway IP address of device server
DNS server IP address of device server
UART serialport parameter setting
5
COMMAND
+++
exit
reboot
passwd
username
ipconfig
saveconfig
software-reset
emconfig
connstatus
ping
sisrvy
jbss
wificonfig
ezconfig
station
set ip
set mask
set gateway
set dns
set serialport
User Manual V1.1
22
23
24
25
26
27
28
29
30
31
32
33
34
35
36
37
38
39
40
41
42
43
44
45
Date: 2014.01.12
Server/Client setting
Local server port setting
Destination port setting
DHCP enable/disable
Communication protocol
Time interval to send out serial data packet
Accessible IP Addresses Configuration Parameters
Accessible IP Mode: Enable
Current e-mail server address: XXX.com.tw
Current e-mail from address
Current e-mail to1 address
Current e-mail to2 address
Current e-mail to3 address
Auto Warning Settings
RS485 mode set
Assign host IP address
Firmware upgrade server address
Firmware upgrade file name
Display Debug Message
Transmit management data via broadcast/multicast packet
Service Set Identifier
Ad-hoc / Infrastructurt mode setting
Channel setting
If WEP encryption is selected, this selects the key length,
either WEP-64 or WEP-128 to be used.
9. Online help:
9.1 “help” command (Available for RS-232 setup only)
username: admin (default)
password: admin (default)
U1.00> help
U1.00> help
Usage: help
Usage: quit
Usage: reboot
Usage: passwd
Old Password:
New Password:
Re-enter New Password:
Usage: username <user name>
Usage: ipconfig
Usage: saveconfig
Usage: software-reset
Usage: emconfig
Usage: connstatus
Usage: ping xxx.xxx.xxx.xxx
Usage: sisrvy [ssid]
Usage: jbss <ID in sitesurvey table>
Usage: wificonfig
Usage: ezconfig
Usage: station
Usage: exit
9.2 “sethelp” command (Available for RS-232 setup only)
username: admin (default)
password: admin (default)
U1.00> sethelp
Usage: set ip <ip addr>
6
set mode
set srvport
set dstport
set dhcpclient
set connectype
set transmitimer
set accessip
set accip
set ems
set emf
set emt1
set emt2
set emt3
set aw
set rs485
set dsthn
set tftpsrv
set filename
set dbgmsg
set bmcast
set ssid
set nt
set ch
set wepklen
User Manual V1.1
Date: 2014.01.12
Usage: set mask <netmask>
Usage: set gateway <ip addr>
Usage: set dns <ip addr>
Usage: set serialport <baud rate> <data bits> <parity> <stop bits> <flow ctrl>
<baud rate>: 0: 921600
5: 9600
1: 115200
6: 4800
2: 57600
7: 2400
3: 38400
8: 1200
4: 19200
<data bits>: 0: 5
2: 7
1: 6
3: 8
<parity>:
0: Odd
2: None
1: Even
<stop bits>: 0: 1
1: 1.5
2: 2
<flow ctrl>: 0: Xon/Xoff
2: None
1: Hardware
Usage: set mode <mode>
<mode>: 0: SERVER
1: CLIENT
Usage: set srvport <port>
Usage: set dstport <port>
Usage: set dhcpclient <status>
<status>: 0: disable
1: enable
Usage: set connectype <protocol>
<protocol>: 0: TCP
1: UDP
Usage: set transmitimer <time>
<time>: time in ms
Usage: set accessip <index> <ip addr>
<index>:
index of accessible IP
<ip addr>: accessible IP address
Usage: set accip <mode>
<mode>: 0: disable
1: enable
Usage: set ems <e-mail server domain name>
Usage: set emf <e-mail address>
Usage: set emt1 <e-mail address>
Usage: set emt2 <e-mail address>
Usage: set emt3 <e-mail address>
Usage: set aw <cold start> <authentication fail> <ip changed> <password changed>
<cold start>:
0: Disable
1: Enable
<authentication fail>:
0: Disable
1: Enable
<ip changed>:
0: Disable
1: Enable
<password changed>:
0: Disable
1: Enable
Usage: set rs485 <mode>
<mode>: 1: Single Twisted Pair HD 3: Double Twisted Pair FD (Master)
Usage: set dsthn <Host name/IP>
Usage: tftpsrv <type> <ip addr>
<type>: 0: Bldr
1: MCPU
2: WCPU
Usage: set filename <type> <file name>
<type>: 0: Bldr
1: MCPU
2: WCPU
Usage: set dbgmsg <mode>
<mode>: 0: Disable
1: Enable
Usage: set bmcast <bcast> <mcast>
<bcast>: 0: Off
1: On
<mcast>: 0: Off
1: On
Usage: set ssid <Maximum 31 characters>
Usage: set nt <0 = Infra mode, 1 = Simple-AP mode>
Usage: set ch <channel index>
<channel index>
0: Auto 1: 1 2: 2 3: 3 4: 4 5: 5 6: 6
7
User Manual V1.1
Date: 2014.01.12
7: 7 8: 8 9: 9 10: 10 11: 11
Usage: set wepklen <0:64 bits, 1:128 bits>
Usage: set w64k <index = 0 ~ 3> <HEX Byte 0> <HEX Byte 1> ... <HEX Byte 4>
Usage: set w128k <index = 0 ~ 3> <HEX Byte 0> <HEX Byte 1> ... <HEX Byte 12>
Usage: set wki <WEP key index = 0 ~ 3>
Usage: set wp <WPA Passphrase, 8 ~ 63 characters>
Usage: set et <Encryption Type>
<Encryption Type> 0: No Security
3: TKIP
1: WEP64
4: AES
2: WEP128
5: Auto
Usage: set pmb <0 = Long preamble, 1 = Auto>
Usage: set rts <RTS threshold, 0 ~ 2432>
Usage: set tpl <Power level>
<Power level> 0: 100%
3: 12.5%
1: 50%
4: 6.25%
2: 25%
Usage: set dr <Data rate>
<Data rate> 0: Auto
7: 12Mbps
1: 1Mbps
8: 18Mbps
2: 2Mbps
9: 24Mbps
3: 5.5Mbps
10: 36Mbps
4: 6Mbps
11: 48Mbps
5: 9Mbps
12: 54Mbps
6: 11Mbps
Usage: set apc <Auto power control>
<Auto power control> 0: Disable 1: Enable
Usage: set bi <Beacon interval(ms)>
<Beacon interval(ms)> 20 ~ 1000
Usage: set pft <Protection frame type>
<Protection frame type>: 0: RTS
1: Self-CTS
Usage: set keyauto <key string>
Usage: set dhcpsrv <start addr> <end addr> <netmask> <gateway> <lease>
Usage: set dhcpsrvenable <status>
<status>: 0: disable
1: enable
10. One to one connection: The two WiFi adapters will be connected directly without access point.
Connect directly
Simple AP (Default)
Client (Infrastructure mode)
10.1 One is in default mode, the other will be set by the following 10.2 command via RS-232 or
Telnet software.
10.2 Command: set one adapter only.
set nt 0
set dhcpclient 0
set dhcpsrvenable 0
set mode 1
set dsthn 192.168.2.99
saveconfig
(Turn off the power and then turn on the power; the client will connect with the Simple AP
automatically.)
8