1
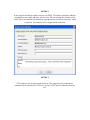
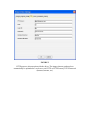
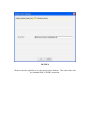
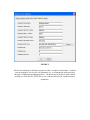
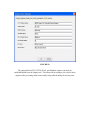
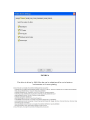
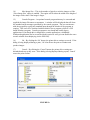
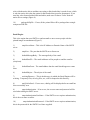
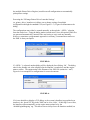
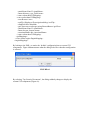
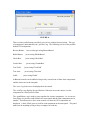
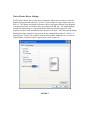
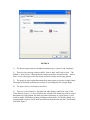
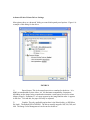
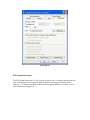
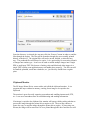
ES IMAGE PRINTER DRIVER USER
MANUAL
Overview
ES Image Printer Driver is a software printer driver that is accessible from any program
that can utilize a Windows printer. Images are produced from the driver and stored on a
specified drive and location with incremental numbers. The printer driver is flexible and
supports several image file formats such as PNG, BMP, JPEG, JPEG 2000, TIFF, MultiPage TIFF, PNM, and PDF.
FIGURE 1
It also supports sending an email to anyone via SMTP. The images printed are added as
attachments to the email, and users may type in a full text message for the body of the
email. This is accomplished by displaying a graphical user interface at print time, which
is optional. This interface can be suppressed at each print.
FIGURE 2
FTP sending is also an option with the driver. The images that are produced can
automatically be uploaded to a FTP server on any TCP/IP network (Intranet, Internet,
etc).
FIGURE 3
HTTP posts are also an option with the driver. The images that are produced can
automatically be uploaded to a web server via HTTP or HTTPS on any TCP/IP network
(Intranet, Internet, etc).
FIGURE 4
The driver has the capability to save the images into a database. This can be done with
any standard JDBC or ODBC connection.
FIGURE 5
SOAP is becoming more and more popular in today’s complex environments. It allows
various languages, web services, environments, etc., to communicate with each other
through a common programming interface. The driver has the ability to send a SOAP
message to a Web Service, HTTP Server, etc. with the files base 64 encoded inside as
parameters.
FIGURE 5b
The optional Email, FTP, HTTP, SOAP, and Database engines can easily be
enabled/disabled from the Engines tab. This allows all the settings to be kept for those
engines while preventing them from actually being utilized during the current print.
FIGURE 6
The driver is driven by XML files that can be administered for use in business
environments or for mass printing.
FIGURE 6a
Purpose
All of these options make the printer driver an excellent tool for bug reporting, problem
tracking, etc., for businesses wanting to maximize their business time. For home users,
the driver is great for printing web sites, images from other programs, emails, etc. It's also
a quick way to share screenshots with friends and family.
All businesses (small, medium, and large) deal with and rely on many other computer
programs in order to maximize their employees' time. They often utilize both, 3rd party
software, and in-house software, developed specifically for their needs. Almost all
businesses have had the experience of finding show-stopping bugs in various programs
that prevent them from getting their job done. Often time, businesses have an entire
department committed to helping the users either find work a rounds for the software,
ways to fix the software, or submit incident reports to the developers of the software.
This is a very time consuming task, not only for the computer support department, but
also the employees that use the software who must communicate the problems to the
support department in a clear manner so that the real problem can be understood. This is
where the ES Image Printer Driver can be of great aid and save businesses thousands, if
not millions, of dollars a year.
A picture can speak a thousand words, and that is exactly what the driver does. With the
simple print of any document, image, screenshot, etc., instead of the results going to a
laser printer, images are produced which can be instantly emailed to a support person,
transferred to an FTP server, or simply saved to the local computer's storage with one
simple click. All of this can happen in the background too, without requiring user
interaction, thus saving MORE time for the employees, while maximizing the
information for someone to help troubleshoot the problem.
Another common problem in a business environment is sharing information with clients'
and/or others in different departments. There are many times when files must be shared
but the receiver does not have the correct program to be able to display or view them.
Almost every business has some means of viewing images. Images are a universal way to
share information. The ES Image Printer Driver instantly allows printing of information
from any program and the production of images in several formats. These images can
then be emailed, uploaded, etc., to the receiver for their usage.
Not only can the ES Image Printer Driver do what was mentioned above, it has been
designed to easily develop and plug in other interfaces, so that businesses may tightly
integrate with their own support systems, environment, etc. If a certain interface is
important to your business, don't hesitate to ask about it, even if it is a completely custom
interface. We are dedicated to helping our clients make their businesses more economical
and to save them time. After all, time is money.
Printer Driver Settings
The driver has several standard options and settings in order to produce and save the
images created. Figure 1 refers to these options.
1)
Output Directory – This is the directory to save the produced images to. It
can be any standard Windows drive, such as ‘c:\myFiles’, or it can be a UNC pathname
such as ‘\\winserver\\C\uploadarea’. The optional button showing ‘…’ next to the Output
Directory displays a file dialog (Figure 1b below) where one can pick the directory with a
graphical user interface.
2)
File Prefix – The prefix to save each file with. This is always followed by an
incremental number automatically by the printer driver. For example, if ‘printed’ was the
prefix and 3 pages were printed, the actual file prefixes will be ‘printed_1’, ‘printed_2’,
and ‘printed_3’. The driver automatically detects filenames with the previous name if
some already existed, and continues to number from there.
3)
File Extension – The extension to save each file with. Typically this should
be the same as the actual chosen image format, but some users may choose to make this
something different. It has no impact on the actual image format produced and can be
anything.
4)
Image Format – This is the actual image format the files are saved as. The
possible choices are PNG, BMP, JPEG, TIFF, Multi-Page TIFF, PNM, and PDF.
Typically PNG files are the best choice for color prints because of the wide variety of
color formats they support. Also, PNG files use lossless compression, which means the
images produced are exact images of the data and don’t change appearance from their
compression. JPEG files can sometimes be smaller than PNG files, but the compression
is lossy, so sometimes they can appear blocky or fuzzy. TIFF images are a very popular
format used in many document imaging systems. They are probably the best choice for
black and white printed documents because of the small file sizes, lossless Group 4
compression, and universal acceptance. However, if there are ever any doubts, PNG is
probably the best bet. PDF and Multi-Page TIFF are the only formats that put all the
images into a single file (multi-page).
5)
Color Format – This is the color format the image will be saved in (if the
selected Image Format allows such a color format). The possible choices are Default,
Binary (black and white), 8 and 16 Bit Gray Scale, and 8, 16, 24, and 32 Bit color. If set
to default, the image color format will be whatever is set in the native driver settings
(Figure 8). This option will only have a true effect if the native driver prints in color. If
the native driver is set to print in black and white, this option will convert the image to
the appropriate color format but cannot produce real colors or gray scale. Printing in
color with the native driver and then converting to black and white is much slower, which
is why the native driver has the option for black and white (great for documents). If you
want any color format besides black and white, make sure to choose 'Color' from the
native driver settings (Figure 8).
6)
Abort On Recoverable Error – Sometimes the driver can detect certain types
of errors with individual files and ‘recover’, or basically skip, those files and continue on
to the next ones. If this flag is checked, the driver will attempt to do this. If not, the first
error will cause the driver to abort and not continue.
7)
Launch Default Viewer – If this flag is checked, after all the images are
produced by the driver, the default Windows program will be launched to view/handle
the images.
8)
Pass All Files to Default Viewer – This flag works in conjunction with the
‘Launch Default Viewer’ flag. It only applies when the ‘Launch Default Viewer’ flag is
checked. If this flag is checked, all files are passed as multiple separate parameters to the
Windows program. Some programs may be able to handle these multiple parameters
causing all the images to be opened/viewed instead of just the 1 st image.
9)
Show Settings Dialog – If this flag is checked, the dialog displayed in
Figures 1-6 will be displayed at print time to allow a user to control and change settings
on the fly. Sometimes, especially in businesses, administrators may not want this to
prevent the users from making a mistake and causing an error. If that is the case, this flag
should not be checked so the settings are automatically used and no dialog is presented.
10)
Store Files Locally – If this flag is checked, the images will be saved
permanently in the specified location, even after all functions are performed (such as
emailing, launching default viewer, HTTP post, etc). If it is not checked, the images will
be removed after being processed through all the functions.
11)
Auto Number Files – If checked, duplicate file names are detected and
assigned an auto number (incremented by 1). If unchecked, the file name is reused and
any existing file will be overwritten.
12)
Force Image Size – If checked, all images that are larger than the specified
max image size will be scaled down. This is useful for making thumbnails or small,
consistent image sizes.
13)
ZIP Files – If checked, all printed files will be batched up and compressed
into a single ZIP file. This can be handy when emailing, archiving, or uploading many
files and want to treat them as a single batch.
14)
Max Image Size – This is the number of pixels to scale the images to if the
‘Force Image Size’ option is enabled. The engine will fit either the width or the height of
the image to this value if the image is larger.
15)
Console Program – An optional console program that may be executed and
supplied the image file names as arguments. A window will be displayed that will show
the standard output messages generated by the console program. The user can interact
with the program by typing into standard input through the window if the program so
requires. This is not to be confused with the default viewer program, which is a GUI
based Windows program. Console programs are text based and usually legacy
applications. Even though this is designed for console applications, a traditional
Windowed application can be executed with this option as well (you can disable the extra
console window from displaying via the XML file).
16)
Ok – By clicking the ‘Ok’ button, the printer driver settings are saved. If the
dialog is being displayed during a print, ‘Ok’ also allows the print to continue and
produce images.
17)
Cancel – By clicking the ‘Cancel’ button, the printer driver settings are
discarded and stay as they were. If the dialog is being displayed during a print, ‘Cancel’
causes the print to abort.
FIGURE 1b
Email Settings
The driver has the optional ability to send an email to one or more people through
SMTP. The printed files become attachments to the email. Figure 2 refers to these
options.
1)
SMTP Server – This is the IP Address or Domain Name of the SMTP server
to use to send the email.
2)
To Email Address – This is the list of email addresses to send the email to.
The email addresses can be chained together with a comma as a delimiter. For example:
‘[email protected],[email protected]’
3)
From Email Address – This is the email address that the email appears to
come from.
4)
Subject – This is the subject/title of the email.
5)
SMTP User Name – If the SMTP server requires authentication, this is the
user name to utilize.
6)
SMTP Password – If the SMTP server requires authentication, this is the
password for the SMTP User Name supplied.
7)
Message – This is the message, or body, of the email. Since the email is sent
just like a normal email, this could be instructions, details about the printed images,
questions, etc.
8)
Notify After Send – If checked, a dialog will be displayed after an email has
been sent to the SMTP server.
FTP Settings
One more mechanism in which the driver has the optional ability to send the printed files
is by FTP (File Transfer Protocol). Figure 3 refers to these options.
1)
FTP Server – This is the IP Address or Domain Name of the FTP server that
will be receiving the files.
2)
Port – The port in which the FTP server is listening on. This is almost
always port 21.
3)
Login Id – The login id to use to make the connection.
4)
Password – The corresponding password for the login id.
5)
Remote Directory – This is the location on the remote server where the files
will be uploaded to. If the path contains subdirectories or fully qualified path, make sure
to use the proper operating system path separator ('/' vs '\').
6)
Remote File Name – This is the filename prefix to be used for the files being
uploaded. They will be assigned an incremental number in the same manner as the ‘File
Prefix’ from Figure 1, only this time it will be on the remote server.
HTTP Settings
Besides being able to utilize FTP, the driver is also able to do HTTP (Hyper Text
Transfer Protocol) posts. Figure 4 refers to these options.
1)
Server URL – This is the full URL to a web server that can accept HTTP or
HTTPS posts. The example in figure 4 is using HTTP. In order to do a secure upload,
HTTPS may be used. To compare to figure 4, the URL would be
‘https://www.myserver.com/ImageServlet’ for secure transfer. The URL is parsed the
standard way any HTTP URL is: protocol://domain_name:port/context.
Database Settings
The printed files can be automatically inserted into a database using JDBC or ODBC.
Figure 5 refers to these options.
1) Database Engine Name – This is the name of the Database Engine to utilize. This
allows for reuse of database specific settings (user, password, etc.) across multiple
configurations if the same name is specified. If a different name is specified for multiple
configurations, each will have it’s own settings.
2)
Database Table Name – The name of the table to insert into.
3) Database File Prefix Column (optional) – The name of the column to store the
filename prefix.
4) Database File Extension Column (optional) – The name of the column to store the
filename extension.
5)
Database File Bytes Column – The name of the column to store the file’s bytes.
6) Database Timestamp Column (optional) – The name of the column to store a
timestamp of when the file was saved into the database.
7) Database JDBC Driver – This is the Java class name of the actual JDBC driver to
use. On Windows, if ODBC is desired, always leave this set to
‘sun.jdbc.odbc.JdbcOdbcDriver’. If a specific JDBC driver is wanted, simply plug in the
class name and make sure the driver is in the classpath when the driver executes.
8) Database URL – The URL for the JDBC driver to connect to the database. On
Windows, if ODBC is desired, the String must always start with ‘jdbc:odbc:’ and end
with the data source name such as ‘LocalServer’.
9)
Database User – The user name to obtained connections to the database.
10) Database Password – The password for the user to obtain connections to the
database.
11) Connect – This button will automatically test the connection to the database using
the supplied settings in the dialog. If any errors occur, they will be displayed in a dialog.
SOAP Settings
SOAP is becoming more and more popular in today’s complex environments. The driver
has the ability to send a SOAP message to a Web Service, HTTP Server, etc. with the
files base 64 encoded inside as parameters. Figure 5b refers to these options.
1)
HTTP Engine Name - This is the name of the HTTP Engine to utilize. This
allows for reuse of server URL’s across multiple configurations if the same name is
specified. If a different name is specified for multiple configurations, each will have it’s
own URL
2)
SOAP Action – The SOAP action for the message.
3)
Method Name – The name of the method specified in the SOAP message.
4)
Variable Name – The name of the attribute for the file bytes (base 64
encoded String).
5)
(String).
File Variable Name – The optional name of the attribute for the file name
6)
ID Variable Name – This field is optional. It allows one to use the special
tags in the ‘ID Value’ field in order to read environment variables and other settings to
supply with the SOAP message. This is mainly used to uniquely identify a client sending
the message.
7)
ID Value – The actual value to send through the SOAP message. The tags
should be utilized here if desired. The default is ‘%host.name%’ which sends the host’s
name.
8)
Server URL – The HTTP/HTTPS URL to the SOAP receiver. This will
typically be a Web Service.
About
The about tab is simply for informational purposes about the product. It has no settings
or options.
Displaying the Printer Driver Settings Dialog
As mentioned earlier, the printer driver settings dialog will be displayed every time when
a print takes place if the ‘Show Settings Dialog’ checkbox from Figure 1 is checked. If it
is not checked, you can still display the dialog by clicking ‘Start->Programs->Everlast
Software->ES Image Printer Driver Settings’. This will display the settings and even
allow the re-checking of the ‘Show Settings Dialog’ checkbox so that it will be displayed,
once again, at print time.
Advanced Printer Driver Settings
There is an advanced way in which system administrators, power users, etc., may edit the
settings without using the printer driver settings dialog. This is possible through
modifying XML files. The printer driver utilizes several engines (self-configuring code
modules) which each have their own XML file for settings. They are all located in the
installation directory area. More specifically, if the default installation directory was
used: ‘C:\Program Files\EverlastSoftware\ES Image Printer Driver’.
The only files of importance (or usage) here are: ‘Printer Driver Engine.xml’, ‘Image
Directory Import Engine.xml’, ‘File Transfer Protocol Engine.xml’, and ‘Email
Engine.xml’.
Printer Driver Engine
This is the main engine utilized by the driver. It actually starts and uses the other engines
mentioned.
1)
ftpEngineName – The name of the FTP Engine to start. Whatever this is set
to is what named XML file it will attempt to read from (minus the file extension).
2)
emailEngineName – The name of the Email Engine to start. Again,
determines which image settings XML file to use.
3)
imageDirectoryImportEngineName – The name of the Image Directory
Import Engine to start. Again, determines which image settings XML file to use.
4)
readOnly – If set, the settings will never save, even if the print driver settings
are changed and the user clicks the ‘Ok’ button. At print time, the settings the user
changes will take place for the print, but will not be saved permanently in the XML file.
5)
removeLocalFilesAfterPrint – Sometimes administrators don’t want the
printed files to be saved locally on a user’s machine. Instead, the driver is more or less
used for just transferring the images to someone else. If that is the case, this flag should
be set to true.
6)
time.
showGUI – If true, the printer driver settings dialog will be displayed at print
7)
workingDirectory – This is the directory in which the Printer Driver Engine
will be working. Temporary files, error log files, etc., will be dumped to this directory.
8)
httpEngineName – The name of the HTTP Engine to start.
9)
httpTransactionEventParameterName – The parameter name to be used for
“before” and “after” events when sending a batch of images through a HTTP post. This
helps the post handler to determine what files are in what batches in multi-threaded
situations.
10)
httpTransactionGUIDParameterName – The parameter name for the
transaction id, again, to help determine a batch of images. A transaction id is always a
unique string (a GUID) for every batch.
11)
httpTransactionFileParameterName – The parameter name for the index
number of the file being uploaded (a counter).
12)
httpTransactionFilePathParameterName – The parameter name for the
original file path and name being uploaded.
13)
showHTTPTransactionResults – If this is set to true, a dialog will be
displayed with any text returned from the HTTP post. If false, no dialog is displayed.
14)
interfaceClass – The driver has the ability to call a Java class that is in the
classpath if it implements a special interface. This allows developers to implement their
own class to gain full control over the print process. The class is called after the files
have been produced by the driver. See the developer section for more details.
15)
nativeLibraryInterface – A Windows developer also has the option to call a
native DLL that has a special callback function. Just like the ‘interfaceClass’, the DLL
will be called after the files have been produced by the driver.
16)
useEmailEngine – If set to false, the email engine will not be used, even if it
is configured.
17)
useFTPEngine – If set to false, the ftp engine will not be used, even if it is
configured.
18)
useHTTPEngine - If set to false, the http engine will not be used, even if it is
configured.
19)
useDatabaseImportEngine - If set to false, the database import engine will not
be used, even if it is configured.
20)
useSOAPEngine – If set to false, the soap engine will not be used, even if it is
configured.
21)
ftpEngineTabVisible – If set to false, the ftp settings tab will be hidden when
the settings dialog is displayed.
22)
httpEngineTabVisible - If set to false, the http settings tab will be hidden
when the settings dialog is displayed.
23)
databaseImportEngineTabVisible - If set to false, the database settings tab
will be hidden when the settings dialog is displayed.
24)
soapEngineTabVisible - If set to false, the soap settings tab will be hidden
when the settings dialog is displayed.
25)
imageDirectoryImportEngineTabVisible - If set to false, the image settings
tab will be hidden when the settings dialog is displayed.
26)
engineSelectionTabVisible - If set to false, the engine selection settings tab
will be hidden when the settings dialog is displayed.
27)
showSystemTrayProgressIcon - If set to true, the engine will display a printer
icon in the system tray during processing. If the mouse hovers over the icon, a brief
tooltip message will be displayed describing what the engine is doing. This option only
works if Java 6.0 or greater is installed.
28)
debugMode - If set to true, the engine will log all messages produced instead
of just errors.
Image Directory Import Engine
This is the engine that saves the actual images to the local computer and converts file
formats (Figure 1).
1)
abortOnError – This is the ‘Abort on Recoverable Error’ flag from Figure 1.
If this is set to false, the engine will attempt to continue to the next file if a recoverable
error occurs on an individual file.
2)
saved.
autoRenameFileNameExtension – The extension to use for the files that are
3)
autoRenameFileNamePrefix – The prefix to use for the files that are saved.
4)
encodeFormat – The actual image format to save the images as.
5)
encodeImages – The native driver produces TIFF and BMP files. The Image
Directory Import Engine then converts them to the specified format if they are not of
those types. This can increase processing time by a small amount. If this flag is set to
false, the encode format is ignored and the files are always left as their native format.
6)
launchDefaultViewer – Once the images have been encoded, if this flag is
set, the native Windows default program that handles the specified file extension will be
launched.
7)
outputDirectory – The directory to save the images to.
8)
passAllFilesToDefaultViewer – If this flag is set to true, the filenames of all
printed images will be passed to the default viewer instead of just the 1 st filename.
WARNING: This can cause the computer to run out of memory depending on how the
program handles opening multiple files at once.
9)
workingDirectory – This is the directory in which the Image Directory
Import Engine will be working. Temporary files, error log files, etc., will be dumped to
this directory.
10)
storeFilesLocally - This flag indicates whether the files should be
permanently stored at the specified location in figure 1 or just temporarily stored until all
processing takes place (emails sent, FTP transfer, etc).
11)
forceImageSize – If true, all images that are larger than the specified max
image size will be scaled down. This is useful for making thumbnails or small, consistent
image sizes.
12)
maxImageSize – This is the number of pixels to scale the images to if the
‘forceImageSize’ flag is true. The engine will fit either the width or the height of the
image to this value if the image is larger.
13)
consoleProgram - An optional console program that may be executed and
supplied the image file names as arguments. A window will be displayed that will show
the standard output messages generated by the console program. The user can interact
with the program by typing into standard input through the window if the program so
requires. This is not to be confused with the default viewer program, which is a GUI
based Windows program. Console programs are text based and usually legacy
applications. Even though this is designed for console applications, a traditional
Windowed application can be executed with this option as well (you can disable the extra
console window from displaying via the 'showConsoleProgramOutput' setting).
14)
showConsoleProgramOutput – If true, a window will be displayed as the
console program executes, displaying the text being output and allowing user interaction.
Set this flag to false if the program to be executed is a Window (GUI) application and not
a console application.
15)
binaryTIFFCompression – The compression type to be used inside binary
TIFF files. The following options are available: 'CCITT T.6', 'CCITT T.4', 'CCITT
RLE'. The default value is ‘CCITT T.6’.
16)
colorTIFFCompression – The compression type to be used inside color TIFF
files. The following options are available: ‘PackBits’, ‘LZW’, ‘JPEG’, ‘Deflate’, ‘ZLib’.
The default value is ‘LZW’
17)
jpeg2000Compression – The compression ratio to use for JPEG 2000 files.
The value can range from 0.1 to 1.0. The lower the number the greater the compression
(at the cost of quality). The default value is 0.5.
18)
colorFormat – This is the color format the image will be saved in (if the
selected Image Format allows such a color format). The possible choices are Default,
Binary (black and white), 8 and 16 Bit Gray Scale, and 8, 16, 24, and 32 Bit color. If set
to default, the image color format will be whatever is set in the native driver settings
(Figure 8). This option will only have a true effect if the native driver prints in color. If
the native driver is set to print in black and white, this option will convert the image to
the appropriate color format but cannot produce real colors or gray scale. Printing in
color with the native driver and then converting to black and white is much slower, which
is why the native driver has the option for black and white (great for documents). If you
want any color format besides black and white, make sure to choose 'Color' from the
native driver settings (Figure 8).
19)
packageInZipFile – If true, all the printed files will be packaged into a single
compressed ZIP file.
Email Engine
This is the engine that uses SMTP to send an email to one or more people with the
printed images as attachments (Figure 2).
1)
server.
smtpServerName – This is the IP Address or Domain Name of the SMTP
2)
smtpPort – The port that the SMTP server listens on.
3)
defaultMessageBody – The message/body of the email.
4)
defaultSendTo – The email addresses of the people to send the email to
(recipients).
5)
from.
defaultSentFrom – The email address that the email should appear to come
6)
defaultSubject – The subject of the email.
7)
workingDirectory – This is the directory in which the Email Engine will be
working. Temporary files, error log files, etc., will be dumped to this directory.
8)
notifyAfterSend – If set to true, a dialog will be displayed after an email has
been successfully sent.
8)
smtpAuthentication – If set to true, the set user name and password will be
used when calling the SMTP server.
9)
smtpAuthenticationUserName – If the SMTP server requires authentication,
this is the user name to utilize.
10)
smtpAuthenticationPassword – If the SMTP server requires authentication,
this is the password for the SMTP User Name supplied.
11)
emails.
useTLS – If set to true, TLS will be used for encryption when sending
File Transfer Protocol Engine
This is the engine that uploads the images to a FTP server (Figure 3).
1)
loginId – The login id for the FTP server.
2)
password – The password for the corresponding login id.
3)
remotePort – The port in which the FTP server is listening on.
4)
remoteDirectory - This is the location on the remote server where the files
will be uploaded to. If the path contains subdirectories or fully qualified path, make sure
to use the proper operating system path separator ('/' vs '\').
5)
remoteFileName - This is the filename prefix to be used for the files being
uploaded. They will be assigned an incremental number in the same manner as the ‘File
Prefix’ from Figure 1, only this time it will be on the remote server.
6)
remoteHostName - This is the IP Address or Domain Name of the FTP
server that will be receiving the files.
7)
workingDirectory – This is the directory in which the File Transfer Protocol
Engine will be working. Temporary files, error log files, etc., will be dumped to this
directory.
Hyper Text Transfer Protocol Engine
This is the engine that uploads the images to a web server via HTTP or HTTPS posts
(Figure 4).
1)
url – The full URL to the web server that will receive the post.
SOAP Engine
This is the engine that uploads the images to a web server via HTTP or HTTPS posts
(Figure 5b).
1) httpEngineName - This is the name of the HTTP Engine to utilize. This allows for
reuse of server URL’s across multiple configurations if the same name is specified. If a
different name is specified for multiple configurations, each will have it’s own URL
2)
soapAction – The SOAP action for the message.
3)
methodName – The name of the method specified in the SOAP message.
4) variableName – The name of the attribute for the file bytes (base 64 encoded
String).
5)
fileVariableName – The optional name of the attribute for the file name (String).
6) idVariableName – This field is optional. It allows one to use the special tags in the
‘ID Value’ field in order to read environment variables and other settings to supply with
the SOAP message. This is mainly used to uniquely identify a client sending the
message.
7) idValue – The actual value to send through the SOAP message. The tags should be
utilized here if desired. The default is ‘%host.name%’ which sends the host’s name.
Database Import Engine
This is the engine that saves the files into a database (Figure 5).
1) databaseEngineName – This is the name of the Database Engine to utilize. This
allows for reuse of database specific settings (user, password, etc.) across multiple
configurations if the same name is specified. If a different name is specified for multiple
configurations, each will have it’s own settings. This name must match the Database
Engine XML file name (minus the ‘.xml’).
2)
databaseTableName - The name of the table to insert into.
3)
databaseFilePrefixColumn – The name of the column to store the filename prefix.
4) databaseFileExtensionColumn – The name of the column to store the filename
extension.
5)
databaseFileBytesColumn – The name of the column to store the file’s bytes.
6) databaseTimestampColumn – The name of the column to store a timestamp of when
the file was saved into the database.
7) moveFiles – If set to true, the printed files will automatically be removed from the
file system after being imported into the database.
Database Engine
This is the engine that stores user, password, etc., for the database (Figure 5). The
‘databaseEngineName’ in the Database Import Engine XML refer to one of these XML
files.
1) databaseName – The name of the database to connect to. Not used by the driver,
only for information.
2) databaseDriver – This is the Java class name of the actual JDBC driver to use. On
Windows, if ODBC is desired, always leave this set to ‘sun.jdbc.odbc.JdbcOdbcDriver’.
If a specific JDBC driver is wanted, simply plug in the class name and make sure the
driver is in the classpath when the driver executes.
3) databaseURL – The URL for the JDBC driver to connect to the database. On
Windows, if ODBC is desired, the String must always start with ‘jdbc:odbc:’ and end
with the data source name such as ‘LocalServer’.
4)
databaseUser – The user name to obtained connections to the database.
5) databasePassword – The password for the user name to obtain connections to the
database.
6) maxConnectionPoolSize – The total maximum number of connections to utilize for
connection pooling.
7) initialConnectionPoolSize – The initial number of connections to obtain from the
database for use in connection pooling.
8) databaseShutdownStatement – If a special statement needs to be sent to shutdown a
database after a print, the SQL statement can be set here.
In order to use a custom JDBC database driver, the classes must be in the Java classpath,
as mentioned in the ‘databaseDriver’ tag above. In order to do this, you will have to
make sure to modify a few configuration files. Make sure to add the jar file to the
‘JarFilePath’ tag in the following files:
1)
ES_FILE_SYSTEM_MONITOR.INI
2)
ES_CLIPBOARD_MONITOR.INI
3)
ES_PRINTER_DRIVER_ENGINE_SETTINGS.INI
4)
ES_PRINTER_DRIVER_LAUNCHER_ENGINE.INI
These files can be found in the installation directory.
In the ‘\windows’ directory, make sure to also add to the ‘JarFilePath’ for the
‘ES_IMAGE_PRINTER_DRIVER.INI’ file.
Once the files have been updated, a reboot may be required in order to ensure the driver
is unloaded from memory (if the File System Monitor Engine is enabled) and picks up
the new classpath.
Note: For all the mentioned XML files, only a subset of the information contained was
mentioned. The other information is system settings that should not be changed. If the
values are changed, the engines will most likely fail.
Output Text Files
In addition to producing the image files, the Windows 2000, XP, 2003, and Vista version
of the driver has the capability of producing text files. The text files will be created with
the same name as each image file with ‘.txt’ tacked on the end. The text files contain
ASCII characters of any real text printed by the application. This may be beneficial for
those wanting to search on text or perform some programmatic effects on the images
based on the text file contents. The text files also contain endline (newline) characters
but no carriage returns. Some programs, like Notepad, may not display the text files
properly because of the missing carriage returns. Most text editors can display the files
properly however (Wordpad for example).
This feature is not enabled by default. It can be enabled through the installer by checking
the ‘Output Text Files’ checkbox. It can also be enabled/disabled after the fact by
modifying the ‘\WINDOWS\ES_IMAGE_PRINTER_DRIVER.INI’ file and setting the
‘OutputText’ value equal to ‘true’ or ‘false’.
NOTE: Images of text are not real text characters, so they will not produce text files.
Printer Driver Engine Launcher
The Printer Driver Engine Launcher component is utilized by default. The launcher is a
way to present a dialog box to the user at print time, so the user may pick a specific print
configuration. Even if the launcher is enabled, no dialog box will be presented to the user
unless more than one configuration mapping exists. When the launcher is not used, the
driver will always reuse the same configuration (but that configuration can still be
changed on the fly with the graphical user interface). Often times, users will want certain
files to go to different directories. Perhaps some files should always be emailed when
they are printed, while others should be simply saved to an archive location. The user has
the power and flexibility to have completely different configurations bound to a single
text value. Each text value is mapped to a specific Printer Driver Engine. The default
‘Printer Driver Engine.xml’ file may be copied and renamed in order to have multiple
configurations. The actual mapping of the text value to the specific Printer Driver Engine
takes place in ‘Printer Driver Launcher Engine.xml’.
Here is the default setup (a single option for the user to choose from through the
launcher):
<engineMappings>
<com.everlast.engine.EngineMapping>
<text>Default</text>
<engineName>c:\Program Files\EverlastSoftware\ES Image Printer Driver\Printer
Driver Engine</engineName>
</com.everlast.engine.EngineMapping>
</engineMappings>
In order to have multiple configurations, a user may do something like the following:
<engineMappings>
<com.everlast.engine.EngineMapping>
<text>Top Security Documents</text>
<engineName>c:\Program Files\EverlastSoftware\ES Image Printer Driver\Top
Security Printer Driver Engine</engineName>
</com.everlast.engine.EngineMapping>
<com.everlast.engine.EngineMapping>
<text>Regular Documents</text>
<engineName>c:\Program Files\EverlastSoftware\ES Image Printer Driver\Regular
Printer Driver Engine</engineName>
</com.everlast.engine.EngineMapping>
</engineMappings>
Since each ‘Printer Driver Engine.xml’ file can point to other engines (Image Directory
Import Engine, Email Engine, etc), it’s possible to have any number of configurations at
any level. In fact, each Printer Driver Engine could point to the same engines if all the
settings should be the same. Changing the settings in the single XML file (pointed to by
the multiple Printer Driver Engines) would cause all configurations to automatically
pickup those settings.
Executing the ‘ES Image Printer Driver Launcher Settings’
(es_printer_driver_launcher.exe) allows one to change settings for multiple
configurations through the standard GUI (see Figures 1-5). Figure 6b demonstrates the
dialog.
The configurations may either be created manually, or through the ‘<NEW>’ selection
from the combo box. Using the dialog makes it much easier, since all required XML files
are generated automatically, instead of the user having to copy each one manually.
However, sometimes a programmatic approach is necessary, so manual intervention on
the XML is always an option.
FIGURE 6b
If ‘<NEW>’ is selected, another dialog will be displayed after clicking ‘Ok’. The dialog
asks for the friendly text value (displayed in the launcher’s combo box) and the engine
name to utilize. The engine name is the filename of the XML file (minus the ‘.xml’).
Figure 6c is an example of a configuration for secure documents.
FIGURE 6c
If it is not desirable to display a GUI dialog, or the system is headless (no graphical user
interface), the ‘showGUI’ flag in the XML can be set to ‘false’. If this flag is set to false,
the launcher will automatically use the engine name pointed to by the
‘defaultEngineMapping’ tag. This allows one to always leave the launcher enabled, but
never have it display a dialog for the user to choose, even if more than one mapping had
been set in the XML file (they are always ignored).
If the driver is enabled to output additional text files, the contents of these files may be
searched at print time to match to a specified engine based on a text value (case of the
text is ignored). The following XML tags demonstrate choosing from two different
engine mappings based on some possible string values inside the text files.
<imageTextEngineMappings>
<com.everlast.data.StringPair>
<name>Default</name>
<values>
<string>Low Security</string>
<string>Medium Security</string>
</values>
</com.everlast.data.StringPair>
<com.everlast.data.StringPair>
<name>Secure</name>
<values>
<string>High Security</string>
</values>
</com.everlast.data.StringPair>
</imageTextEngineMappings>
Either the ‘Default’ or ‘High Security’ mapping will be picked if any of those values are
found within the text files. If none of the values are found, the default settings are taken
from the Printer Driver Launcher Engine (user may or may not be presented with choice
based on other settings). In other words, it’s like the values weren’t found and the engine
operates normally as if the text files weren’t there to process.
<imageTextIndividualFiles>false</imageTextIndividualFiles>
The ‘imageTextIndividualFiles’ tag will process each image file separately based on its
individual text file if set to true. If set to false (default), all image files will be passed to
the found engine mapping based on the first value found in one of the text files.
<sendTextFiles>true</sendTextFiles>
The ‘sendTextFiles’ tag will cause the text files to be saved and processed through the
Printer Driver Engine as normal files. They will be attached to emails, uploaded via
HTTP, saved into the database, etc. If set to false, the text files are only utilized for the
automatic choosing of the engine mapping as described above and then removed
afterwards.
XML Generation
The Printer Driver Launcher Engine also has the ability to generate XML files containing
information about the processed images, machine environment, etc. This feature is
disabled by default, but can easily be enabled by setting the following:
<generateXMLFile>true</generateXMLFile>
If true, an XML file will be generated with the same filename as the first image, plus
‘.xml’ appended on the end.
Sometimes, in a business environment, it may be useful to gather some information about
the machine, user, etc. This can be done by setting the following:
<outputEnvironmentVariablesToXML>false</outputEnvironmentVariablesToXML>
By setting the flag to true, many system properties, environment variables, etc., will be
output into the XML file. A few examples are the machine name, the user name, the
system path, Java version, etc.
By default, the generated XML files are processed through the other engines (executing a
console process, emailing, http upload, etc). This can be disabled, so the XML file is
only produced in the local directory, by setting the following:
<passXMLForProcessing>false</passXMLForProcessing>
Input Gathering GUI Components
The power of the launcher does not stop there. It has the ability to have custom GUI
components displayed before the actual processing of the images takes place. This is a
feature that allows developers to potentially embed the driver in their product with
minimal customizations. It also allows businesses to gather more information from the
user to process with the images. The GUI components can be labels, text boxes, combo
boxes, radio buttons, check boxes, etc. There is even a ‘browse’ button to allow a user to
select a directory. Almost any Java component can be utilized.
The following is an example that utilizes various components (intended to be embedded
in another product that utilizes this information):
<engineMappings>
<com.everlast.engine.EngineMapping>
<text>Default</text>
<engineName>c:\Program Files\EverlastSoftware\ES Image Printer Driver\Printer
Driver Engine</engineName>
</com.everlast.engine.EngineMapping>
<com.everlast.engine.EngineMapping>
<text>Top Security Documents </text>
<engineName>Top Security Documents</engineName>
<guiMappings>
<com.everlast.data.GUIMapping>
<text>Print</text>
<toolTip>Print to a specified printer</toolTip>
<disabled>false</disabled>
<guiClass>javax.swing.JRadioButton</guiClass>
<panelName>Panel 1</panelName>
<disableAssociatedNames>
<string>directory_label</string>
<string>directory_text_field</string>
<string>browse_button</string>
</disableAssociatedNames>
</com.everlast.data.GUIMapping>
<com.everlast.data.GUIMapping>
<text>Save</text>
<toolTip>Save the images to the secure location</toolTip>
<disabled>false</disabled>
<guiClass>javax.swing.JRadioButton</guiClass>
<panelName>Panel 1</panelName>
</com.everlast.data.GUIMapping>
<com.everlast.data.GUIMapping>
<text>Both</text>
<toolTip>Print to a specified printer and save the images to the secure
location</toolTip>
<disabled>false</disabled>
<guiClass>javax.swing.JRadioButton</guiClass>
<panelName>Panel 1</panelName>
</com.everlast.data.GUIMapping>
<com.everlast.data.GUIMapping>
<text>Secure Save Location: </text>
<toolTip></toolTip>
<disabled>false</disabled>
<guiClass>javax.swing.JLabel</guiClass>
<panelName>Panel 2</panelName>
<name>directory_label</name>
</com.everlast.data.GUIMapping>
<com.everlast.data.GUIMapping>
<text></text>
<toolTip>The secure location to save the files </toolTip>
<disabled>false</disabled>
<guiClass>javax.swing.JTextField</guiClass>
<panelName>Panel 2</panelName>
<name>directory_text_field</name>
</com.everlast.data.GUIMapping>
<com.everlast.data.GUIMapping>
<text>Browse</text>
<toolTip>Displays a file navigation dialog</toolTip>
<disabled>false</disabled>
<guiClass>com.everlast.gui.swing.BrowseButton</guiClass>
<panelName>Panel 2</panelName>
<name>browse_button</name>
<associatedName>dir</associatedName>
</com.everlast.data.GUIMapping>
</guiMappings>
</com.everlast.engine.EngineMapping>
</engineMappings>
By looking at the XML, we notice the ‘default’ configuration has no custom GUI
components. Figure 6d demonstrates what the dialog looks like when that configuration
is selected.
FIGURE 6d
By selecting ‘Top Security Documents’, the dialog suddenly changes to display the
custom GUI components (Figure 6e).
FIGURE 6e
There are three radio buttons, one label, one text box, and one browse button. The type
of component is determined by the ‘guiClass’ tag. The following is a list of the possible
default GUI components:
Browse Button:
‘com.everlast.gui.swing.BrowseButton’
Radio Button:
‘javax.swing.JRadioButton’
Check Box:
‘javax.swing.JCheckBox’
Combo Box:
‘javax.swing.JComboBox’
Text Field:
‘javax.swing.JTextField’
Text Area:
‘javax.swing.JTextArea’
Label:
‘javax.swing.JLabel’
Additional controls can be added as long as they extend some of those base components,
and the classes are in the classpath.
The <text> tag is the text to be displayed on the control.
The <toolTip> tag displays the specified text if the user hovers the mouse over the
component for a brief period of time.
The <panelName> tag is used to group together the various components. As we can see
from Figure 6e, the three radio buttons are in one panel and the other components are in
another. This allows one to have some control over how the GUI components are
displayed. A basic FlowLayout is used for each component in the same panel. The panel
names can be anything as long as they are unique for each one.
The <disabled> tag makes the component not be able to receive focus or take input if set
to true.
The <associatedName> tag is currently only utilized by the browse button. It allows the
browse button to fill in the text of a specified component after a directory is chosen.
The <hideAssociatedNames> tag hides any components with the specified names if the
current component is selected (checkbox, radio button, etc).
The <disableAssociatedNames> tag disables any components with the specified names if
the current component is selected (checkbox, radio button, etc). This is why the button
appears “grayed” out in Figure 6e.
Figure 6f below shows that when ‘Both’ is selected, the browse button and text field are
enabled (components are enabled by default).
FIGURE 6f
The following is the contents of an actual XML file produced by the launcher:
<com.everlast.storage.PrinterDriverLauncherEnginePacket>
<outputDirectory>C:\printedFiles</outputDirectory>
<outputFiles>
<string>c:\printedFiles\printed_1.tif</string>
</outputFiles>
<guiInput>
<com.everlast.data.GUIInput>
<text>Print</text>
<selected>false</selected>
</com.everlast.data.GUIInput>
<com.everlast.data.GUIInput>
<text>Save</text>
<selected>false</selected>
</com.everlast.data.GUIInput>
<com.everlast.data.GUIInput>
<text>Both</text>
<selected>true</selected>
</com.everlast.data.GUIInput>
<com.everlast.data.GUIInput>
<name>directory_text_field</name>
<text>\\topsecretserver\c\secure_documents</text>
<selected>false</selected>
</com.everlast.data.GUIInput>
</guiInput>
</com.everlast.storage.PrinterDriverLauncherEnginePacket>
The <selected> tag specifies whether the component was selected or not (checkboxes and
radio buttons).
The <name> tag specifies the component.
The <text> tag specifies text of the component. This is the contents of text fields or the
actual displayed text on labels, buttons, etc. From our example, we can see the directory
the user entered is specified in this field for the ‘directory_text_field’ component.
Enable/Disable the Launcher
If it is desired to permanently enable/disable the launcher later on after install, the
following simple steps may be taken:
To disable the launcher – Rename the ‘ES_IMAGE_PRINTER_DRIVER.INI’ in the
Windows directory to ‘ES_IMAGE_PRINTER_DRIVER_LAUNCHER.INI’. Then,
rename the ‘ES_IMAGE_PRINTER_DRIVER_DEFAULT.INI’ file back to
‘ES_IMAGE_PRINTER_DRIVER.INI’.
The next step is to open the ‘File System Monitor Engine.xml’ file. The
‘printerDriverEngineName’ should be set to ‘Printer Driver Engine’.
To enable the launcher – Rename the ‘ES_IMAGE_PRINTER_DRIVER.INI’ in the
Windows directory to ‘ES_IMAGE_PRINTER_DRIVER_DEFAULT.INI’. Then,
rename the ‘ES_IMAGE_PRINTER_DRIVER_LAUNCHER.INI’ file to
‘ES_IMAGE_PRINTER_DRIVER.INI’.
The next step is to open the ‘File System Monitor Engine.xml’ file. The
‘printerDriverEngineName’ should be set to ‘Printer Driver Launcher Engine’.
File and Output Directory Tags
The ES Image Printer Driver has the ability to specify special tags in the file prefixes, file
extensions, and output directories (see Figure 1). This allows one to have great control
over where files should go and what they should be named. These special tags are
indicated by a value inside two ‘%’ characters. For example, in order to have the file be
named the current date, the following would be set in the file prefix field:
%month%-%day%-%year%
Those tags would create example filenames such as ’02-15-2005’, ’10-03-1995’, etc.
Regular characters can be mixed with tags as well. In order to have output such as
‘Printed – 02-15-2005’ and ‘Printed – 10-03-1995’, the following prefix could be used:
Printed - %month%-%day%-%year%
One could do the following in order to create a subdirectory for each file, based on the
current day, by placing the following in the file prefix field:
\%month%-%day%-%year%\printed_document
The following is a list of all the practical tags that may be used:
guid – Generates a random GUID (Globally Unique Identifier)
year – Four digit year
month – Two digit month
day – Two digit day
hour – Two digit hour
minute – Two digit minute
second – Two digit second
millisecond – Four digit millisecond
longtime – Single timestamp value to the millisecond
user.name – User name of the current user
host.name – The host name of the machine
host.address – The IP address of the host machine
user.home – The home directory for the current user
user.dir – The current user’s directory
java.io.tmpdir – The temp directory
launch.text – The text value selected by the user in the launcher
launch.engine – The engine name selected by the user in the launcher
xml.dir – The directory where the engine XML files are being utilized
log.dir – The directory where the main log XML files are being written
Native Printer Driver Settings
The ES Image Printer driver has a native component, which is the actual piece that the
Windows programs talk to directly. It has it’s own settings for color format, paper size,
DPI, etc. The dialogs for talking to the native driver can appear different from program
to program since they can all have their own unique look and feel. The sample dialogs
used in this manual may be somewhat different than what actually appears in each
program, but the overall information and concepts are the same. The first generate dialog
displayed in many programs is the general printer settings dialog (Figures 7 and 8). It
typically has a ‘Layout’ tab, which is used to select portrait, landscape, etc. as well as a
‘Paper/Quality’ tab that is used for paper source, color format, etc.
FIGURE 7
FIGURE 8
1)
The driver supports the two standard orientation types: ‘portrait’ and ‘landscape’.
2) There are also two page orders possible: ‘front to back’ and ‘back to front’. The
default is ‘front to back’, which means the images created are in normal order. ‘back to
front’ reverses the pages so the first image created is actually the last page printed.
3) The pages per sheet option determines how many pages get put into a single image.
The pages are basically scaled down versions of each image put into a single image.
4)
The paper source is irrelevant to the driver.
5) There are 2 color formats: 1-bit black and white (binary) and 24-bit color. If the
'Color Format' (Figure 1) is set to 'Default', the selected color format here will be used. If
documents are being printed, the black and white option may be a good choice. It will
result in smaller files and the printing will happen much faster. For all other things, it is
recommended to print in Color mode and select the desired color with the 'Color Format'
field from Figure 1.
Advanced Native Printer Driver Settings
Most printers have an ‘advanced’ dialog to control infrequently used options. Figure 9 is
a sample of this dialog for the driver.
FIGURE 9
1)
Paper/Output: This is the actual paper size to emulate for the driver. It is
highly recommended to select either ‘A4’ for maximum compatibility. Sometimes,
depending on the image being created and orientation, certain paper sizes fail to create
images properly. Sometimes ¾ of a page appears in one image and the other ¼ appears
in the next. To avoid this, the paper size may be adjusted.
2)
Graphic: The only applicable option here is the Print Quality, or DPI (Dots
Per Inch). The default DPI is 200x200. The driver actually supports 100, 200, 300, and
600. The Image Color Management is irrelevant for the driver.
3)
Document Options: The only option that is somewhat useful is the Color
Printing Mode. This is just another way to adjust the color format. Typically, this can be
set on the general settings of the native driver instead of having to go to the advanced
dialog.
Multiple Users On the Same System
It is common to have multiple users work on the same machine in a business
environment. In fact, it is becoming more common for home users to have different
accounts on the same computer as well. Windows XP introduced fast user switching,
which allows multiple users to be logged in at the same time. This can lead to problems
with certain programs.
The Windows spooler is shared across all users on the system, so it can be problematic
when trying to display dialogs to users. In order to prevent this issue, the ES Image
Printer Driver should be set to print directly instead of to the spooler. Figure 9b shows
the 'Advanced' properties tab for the printer. The properties dialog can be displayed by
going to the 'Printers' area in the 'Control Panel', right clicking the 'ES Image Printer
Driver', and selecting 'Properties'. In order to disable using the spooler, make sure the
'Print directly to the printer' option is selected (it wording may vary based on the
Operating System).
FIGURE 9b
File System Processor
The File System Processor (‘es_file_system_processor.exe’) is a utility that taps into the
core of the Printer Driver Engine in order to import/convert/capture images from a
directory. The Processor displays a file system navigation dialog box to allow a user to
pick the directory (Figure 10).
Once the directory is selected, the user may click the ‘Process’ button in order to send the
files through the engine. The files will be treated as though they were actually printed
directly to the driver. The original files will not be moved, deleted, or altered in any
way. The produced files will always be copies. It is a great utility for converting a bunch
of images into another type. It can even be used to embed multiple images into a single
PDF or multi-page TIFF file (beware of mixing color and black and white images in a
single TIFF because some application may not handle these properly). The files can still
be emailed, uploaded, saved into a database, etc., just like they would from a regular
print.
Clipboard Monitor
The ES Image Printer Driver comes with a tool called the clipboard monitor. It is a
program that stays resident in memory, waiting for an image to be copied to the
clipboard.
The monitor is great for easily capturing screenshots and enabling instant email, FTP,
etc. It can save tremendous time for troubleshooting and sending information.
If an image is copied to the clipboard, the monitor will popup a dialog asking whether to
process the image through the printer driver engine or not. The user may choose to
ignore the copy or send the image through the printer driver engine. If processing was
chosen, the image will be treated as if it were printed through the driver and the user will
be given the standard printer driver options. The clipboard is left undisturbed regardless
of whether the image was processed or not.
The clipboard monitor is a program named ‘es_clipboard_monitor.exe’ and can be
terminated at any time through Windows Task Manager, or disabled permanently through
the ‘Disable ES Image Printer Driver Clipboard Monitor’ shortcut in the programs menu.
Developer Interfaces
The ES Image Printer Driver has two mechanisms to call a developer’s code: A Java
class that implements an interface, and a native DLL that has a callback function. The
Java interface is available for Windows and Mac OS X developers. The DLL is only an
option for Windows developers.
Java Class
As mentioned earlier, the ‘PrinterDriverEngine.xml’ file has a tag called ‘interfaceClass’
which allows a developer to specify a Java class to execute after files have been printed.
As long as the classpath is updated to reference the class, it will be instantiated and called
properly.
The interface that the Java class must implement is called
‘com.everlast.storage.PrinterDriverEngineInterface’. It contains a single method
declaration:
public void filesPrinted(String[] fileNames);
The ‘filePrinted’ method is called after all files have been produced by the driver. The
only argument supplied is the full path to the files produced. From here, a developer can
gain full control over the print process and execute custom code (like submit the files to a
Web Service, backup to a CD drive, or ZIP them up to a special location). Whatever a
developer needs to do they can, because the control is now theirs.
In order to ensure the class is called properly, it needs to be in the classpath. This means
it can either be extracted into a directory on the file system somewhere, or inside a JAR
file. To update the classpath for the driver, the following files in the installation directory
must be updated:
1)
ES_CLIPBOARD_MONITOR.INI
2)
ES_FILE_SYSTEM_MONITOR.INI
3)
ES_FILE_SYSTEM_PROCESSOR.INI
4)
ES_PRINTER_DRIVER_ENGINE_SETTINGS.INI
5)
ES_PRINTER_DRIVER_LAUNCHER_ENGINE.INI
Finally, a single file in the Windows directory must be updated as well:
ES_IMAGE_PRINTER_DRIVER.INI
There is a property in the file called ‘JarFilePath’. Simply add the JAR file (or directory)
to the end of the string using a semi-colon as a delimiter. Do not use double quotes for
paths that contain spaces. The semi-colon is used as the delimiter so they aren’t need.
Finally, update the ‘PrinterDriverEngine.xml’ file and set the ‘interfaceClass’ value to the
fully qualified Java class name. For example: ‘com.mybusiness.MyClass’. Make sure to
reboot the machine after any changes to the INI files.
Native DLL
A DLL (Dynamic Link Library) can be called if it is in the path or qualified with its full
path to the file. The DLL must also implement a specific function called ‘filesPrinted’
that has two parameters: a char** and an int. The following is an example in C++ how to
declare the function:
extern "C" __declspec(dllexport) int filesPrinted(char** files,int count)
If the call doesn’t seem to be working, a DEF file should also be created that exports the
function to ensure the function can be found. The following is an example DEF file
called ‘export.def’ that was added to a Visual Studio project file:
LIBRARY MyLibrary
EXPORTS
filesPrinted
The DEF file explicitly exports the function so callers can find it using reflection.
Other languages can be used as long as they can make a similar declaration with the
proper calling conventions. C, for example, would not use the ‘extern “C”’ declaration as
shown above.
The first parameter, ‘char** files’ is a multidimensional array of file names. The second
parameter is the number of file names. The following is a simple code example of
looping through each file name in C++:
extern "C" __declspec(dllexport) int filesPrinted(char** files,int count)
{
for (int i=0;i<count;i++)
{
char* filename=files[i];
}
return 1;
}
Only positive numbers should be returned by the code. Zero and negative numbers are
reserved.