1
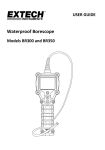
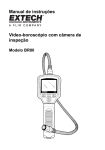
User's Guide Video Borescope Inspection Camera Model BR80 Introduction Congratulations on your purchase of the Extech BR80 Video Borescope. This instrument was designed for use as a remote inspection device. Typical applications include HVAC inspection, automotive inspection, cable routing, and boat/aircraft inspection. This meter is shipped fully tested and, with proper use, will provide years of reliable service. Cautions Do not expose the handle and display to spraying water. Switch off the Camera if the system is not in use. Please dispose of the batteries responsibly. Remove the batteries when cleaning the unit. Remove the batteries before storing the unit for an extended period of time. When batteries need replacement, replace all four of the batteries. Use only the specified battery size and type. Be sure to install the batteries with the correct polarity as indicated in the battery compartment. Exposure to high temperatures can cause the batteries to explode, therefore do not dispose of the batteries in fire. Place tape over the terminals to prevent direct contact with other objects. Please follow all applicable regulations. Description 1 2 3 4 5 6 7 8 9 10 11 Camera tube connector Battery status indicator Display monitor Cameral light intensity (+) button Image rotation button Flexible camera tube Battery compartment (bottom of handle) Camera and LED lights Handle grip Power button Camera light intensity (-) button 1 2 3 11 10 4 5 9 6 8 7 2 BR80-EU-EN-V1.0 10/11 Safety and Care Do not expose instrument (display) to moisture Switch off the instrument when not in use Remove the batteries when cleaning the instrument Replace all of the batteries at the same time Do not immerse the camera in water Store in a dry place Only the camera head and the flex tube are water resistant Warning Permanent damage to the flex tube and loss of operation will occur if the flex tube is subjected to narrow radius or sharp angle bends. Battery Installation 1. Open the battery compartment by sliding the latch at the bottom of the instrument’s handle 2. Insert four new ‘AA’ 1.5V batteries into the proper slots in the battery compartment. Proper battery orientation is indicated on the battery compartment. 3. Close the battery compartment. Note: Do not mix old and new batteries. Do not mix alkaline, standard (Carbon-Zinc), or rechargeable (Nickel Cadmium) batteries. All EU users are legally bound by the battery ordinance to return all used batteries to collection points in your community or wherever batteries / accumulators are sold! Disposal in the household garbage is prohibited! 3 BR80-EU-EN-V1.0 10/11 Operation Connect the monitor and flexible tube Connect the camera tube to the instrument body. Ensure that the keyed ends are properly aligned. Once aligned, tighten the knurled knob to hold the connection firmly in place. Start-up 1. Press the power button to switch the camera ON; if there is sufficient battery power the power indicator will illuminate and an image will appear on the LCD. 2. Insert the camera head and the flexible tube into the area to be viewed. Pre-shape the tube when inserting into areas with bends and curves. LED intensity: Four LEDs mounted on either side of the camera are used to illuminate the inspection area. Use the left (minus) and right (plus) illumination buttons to adjust the intensity. To switch the illumination off, continue to press the left (minus) button until the illumination switches off. There are 100 discrete intensity levels. Image Flip button to flip the image. The figure to the right demonstrates how Press the the image is adjusted for each button press. FLIP FLIP Auto Power OFF (APO) APO automatically witches the meter off to extend battery life. To change the APO setting, button until the ‘Clock’ icon appears. Use the flip button to step press and hold the flip through the selections (OFF, 5 minutes, and 10 minutes). The meter will return to normal operation after 3 seconds. If 5 or 10 minute APO is enabled, the clock icon will appear in the display. Battery Status Indicator The rectangular light at the top of the display area is the battery status indicator. When the indicator is red in color, the batteries are weak. When the indicator appears green in color, the batteries are charged. Warning Permanent damage to the flex tube and loss of operation will occur if the flex tube is subjected to narrow radius or sharp angle bends. Accessory tools The included accessories (mirror, hook and magnet) all attach to the camera head. Snap the tool clip into the recessed area on the camera assembly. 4 BR80-EU-EN-V1.0 10/11 Specifications Imaging Sensor LCD Screen Type Pixels Horizontal View Angle Working length Camera head diameter Shaft diameter Focus length Auto Power OFF (APO) Waterproof Capacity Power Supply Consumption Current (Max.) Dimensions Weight Operating Temperature Operating Humidity (Display) CMOS 2.36” TFT-LCD 480 x 234 50 degrees 1m (39”) 17mm (0.67”) 9mm (0.35”) 5.1 cm (2”) OFF /5 min. /10 min. selectable IP67 (imager head and tube) 4 x ‘AA’ 1.5V batteries 150mA 211 x 83 x 76mm (8.3 x 3.3 x 3”) meter body only 0.61 kg (1.35 lbs) (meter & tube) -10°C~+50°C (+14°F~+122°F) 15~85%RH Copyright © 2011 Extech Instruments Corporation (a FLIR company) All rights reserved including the right of reproduction in whole or in part in any form. 5 BR80-EU-EN-V1.0 10/11