1
User's Manual
Thank you for purchasing this product.
Read the operating instructions in order to be able
to use this product fully and safely.
After reading, keep this manual where you can
refer to it easily.
MULTIFUNCION
LUMEN
8-11301000
Contents
Names of parts ........................................................ 1
Safety precautions .................................................. 5
Make sure of these points before use................... 9
Operation
* Preparations
(Power, Seat temperature, Water temperature) .............. 11
* Functions
12
13
14
15
16
17
19
20
21
22
23
*Other refereces........................................................ 25
(Shower function, Bidet function) ....................................
(Wide range washing, Nozzle position adjusting) ............
(Drying) ............................................................................
(Deodorizing) ...................................................................
(Nozzle cleaning) .............................................................
(Toilet flushing) ................................................................
(Power saving) ................................................................
(Auto seat-open) ..............................................................
(Plasmacluster)................................................................
(Dim light) ........................................................................
(Convenient functions).....................................................
Handling precautions ............................................. 29
Maintenance
* Daily cleaning .........................................................
* Removing the toilet seat lid and cleaning ...............
* When toilet flushing is weak ...................................
* When the spray strength is weak ..........................
* Replacing the remote control unit batteries ............
31
33
34
34
35
Draining for periods of extended disuse .............. 36
Preventing freezing................................................. 37
Troubleshooting
* When you think the Shower Toilet has broken down .. 38
After sale service .................................................... 39
This manual includes important safety and use information.
Please follow the cautions given in this manual.
In case an accident occurs as a result of improper usage, we
will in no case assume responsibility for damages.
Please give this manual to the next user when you move or
give this product to another person.
Specifications.......................................................... 41
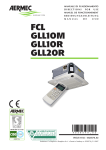
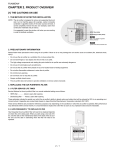
Names of parts
Overall view
Remote Control Unit
(See page 3.)
Caution
Label
Marking
Label
Names of parts
Toilet Seat Lid
Body
Power Indicator
(See below.)
Plasmacluster (ion generator) Indicator
(See below.)
Blower Vent
(See page 2.)
Body Sensor (Top)
Flush Lever
Shower Toilet Strainer
(See page 2.)
Nozzle (for posterior)
Toilet Strainer
(See page 2.)
Nozzle (for bidet)
Power Plug
Toilet Seat
Body Sensor (Bottom)
Water Shutoff Valve
Open/Close Handle
(See page 2.)
Toilet Bowl
* Operation is by remote control only.
Power indicator
Water Supply Hose
Plasmacluster indicator
Plasmacluster Lamp
Power Save Lamp
Power Lamp
1
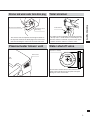
Strainer and warm water tank drain plug
Warm Water Tank
Drain Plug
The strainer removes impurities and foreign materials in
the tap water. Remove the drain plug for the warm water
tank when draining the water from the warm water tank.
Plasmacluster blower vent
Names of parts
Shower Toilet Strainer
Toilet strainer
Toilet Strainer
The strainer removes impurities and foreign materials
in the tap water. A small amount of water will pour out
when the strainer is removed, so place a wash basin
or similar container under it to catch the water.
Water shutoff valve
Open/Close Handle
Blower Vent
Use the water shutoff valve to shut off the flow of
water to the toilet. Be sure to keep this valve open
during use of the shower toilet.
2
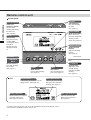
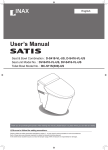
Remote control unit
Control panel
FLUSH
TOILET SEAT OPEN/CLOSE
Names of parts
(Flush buttons)
Use when flushing
the toilet.
(See page 17.)
(Toilet seat
open/close button)
Use this when
opening and closing
the toilet seat.
(See page 20.)
WIDE RANGE
(Wide range button)
Moves the nozzle
forward or backward,
washing a wider
range. (See page 13.)
STOP
(Stop button)
Stops the posterior
washing, bidet
washing and drying
operations.
Flashes when the
dim light is turned
on.
NOZZLE POSITION
(Nozzle position
buttons)
Adjust the washing
position.
(See page 13.)
SHOWER
POWERFUL
Open the lid.
MILD
STRENGTH
(Shower buttons)
Use when washing
the posterior.
(See page 12.)
LCD
BIDET
(Bidet button)
Use for bidet washing.
(See page 12.)
Dry Indicator
Indicates the air temperature of the
drying function. (See page 14.)
DRY
(Dry button)
Use when drying wet
parts. (See page 14.)
Strength Indicator
Indicates the spray strength
during posterior and bidet
washing. (See page 12.)
Battery Indicator
Displayed when the batteries
are nearly exhausted.
(See pages 25 and 35.)
* The above figure shows the case where all the indication marks are displayed at once.
* The LCD has a backlight to make it easy to see.
3
(Strength dial)
Adjusts the spray
strength during
posterior and bidet
washing.
(See page 12.)
Dim Light Indicator
Indicates when the dim
light has been turned on.
(See page 22.)
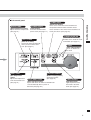
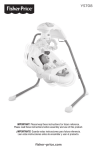
Sub-control panel
POWER SAVE
POWER ON/OFF
(Water temperature switch)
Adjusts the water temperature.
(See page 11.)
(Power button)
Turns the Shower Toilet's
power on/off. (See page 11.)
(Power save button)
Power save: Lowers the water and toilet seat
temperature while the toilet seat lid is closed.
Power off timer: Turns off the water and toilet seat
heater for 6 hours. (See page 19.)
Names of parts
WATER TEMP.
PLASMACLUSTER ION
(Plasmacluster ion button)
Provides ions to make the room
comfortable. (See page 21.)
AUTO FLUSH
(Auto flush switch)
Flushes the toilet automatically
when you rise from the toilet
seat. (See page 17.)
SEAT TEMP.
(Seat temperature
switch)
Adjusts the temperature
of the heated toilet seat.
(See page 11.)
Hr/Min
(Time setting buttons)
Use to set the time on
the clock.
NOZZLE CLEANING
AUTO SEAT-OPEN
(Nozzle cleaning button)
Cleans the nozzles.
(See page 16.)
(Auto seat-open switch)
Opens and closes the toilet seat lid and toilet
seat automatically when a person is
detected. (See page 20.)
LIGHT ON/OFF
(Dim light button)
Lights up the floor and
the inside of the toilet
bowl. (See page 22.)
4
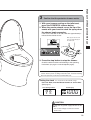
Safety precautions (Be sure to follow these precautions.)
Please read these Safety Precautions thoroughly before use in order to ensure correct use of this product.
Depending on the conditions, failure to heed the precautions concerning the items included here can have
serious consequences. Each of these items is extremely important in its connection with safety, so do not fail to
observe all of them strictly.
Safety precautions
Explanation of terms and symbols
DANGER
Indicates an imminently hazardous situation which, if not avoided, will result in
death serious injury.
WARNING
Indicates dangerous situations where the user could suffer death or serious injury
if this product is used incorrectly.
CAUTION
Indicates dangerous situations where the user could suffer minor injury or property
could be damaged if this product is used incorrectly.
"Be careful!" (This symbol is used both for the above "DANGER," "WARNING" and
"CAUTION" items. Be sure to read these cautions and obey the instructions given
along with them.)
DANGER
5
Do not pour water or cleanser inside the Shower
Toilet. Do not splash water on the body or the
power plug.
Absolutely do not allow anyone except an
authorized service technician to disassemble,
repair or modify the Shower Toilet.
* There is danger of electric shock or fire.
* There is danger of electric shock or fire, and the
Shower Toilet could malfunction, causing injury.
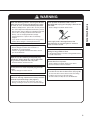
WARNING
Never operate the Shower Toilet if it has a
damaged cord or plug or if the plug is loose in the
wall outlet.
Children, elderly persons, persons who are sick, persons
who cannot adjust the temperature themselves, persons
with weak skin, persons with poor sensitivity in their skin,
persons who are taking medicines that make them
drowsy, such as sleeping medications, deeply
intoxicated persons or persons who are extremely
fatigued.
* If you remain on the heated toilet seat for a long period
of time, there is danger of low temperature burns.
* There is danger of electric shock or fire.
Attach a grounding cable securely.
* There is danger of electric shock if there is a
breakdown or current leakage.
* If there is no ground terminal in the outlet, consult
your local electrician.
Wipe off any dust adhering to the power plug
periodically. When doing this, pull out the power
plug, and then wipe it off with a dry cloth.
* Insulation defects could cause fire.
Do not pull out or insert the power plug with wet
hands.
* There is danger of electric shock.
If there is danger of the water in the Shower Toilet's
water lines freezing, implement the freeze prevention
methods to prevent damage. (See page 37.)
Safety precautions
When the following persons are using the Shower
Toilet, be sure to set the seat temperature switch
on "Low" or "Off," and take sufficient precautions.
If the supply cord is damaged,contact the
manufacture or its service agent for service in
order to avoid a hazard.
Do not use the dry button on the "Hi" or "Mid"
setting for long periods of time.
* If the drying function is used for a long period of time,
it could cause burns.
Do not connect the Shower Toilet to any water
source other than tap water.
* There is danger of electric shock or fire due to
internal corrosion in the mechanism.
When not using the Shower Toilet for an extended period, be
sure to drain the water from the Shower Toilet. (See page 36.)
* The water in the Shower Toilet could freeze and cause damage,
resulting in electric shock, fire and water leakage.
* The water could become dirty and cause skin inflammation.
* The water in the Shower Toilet could freeze and cause
damage, resulting in electric shock, fire and water leakage.
6
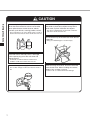
CAUTION
Safety precautions
For care of plastic parts, do not use any cleanser
other than those which are safe to use on toilet
seats (toilet cleanser, home cleanser, bleach,
benzene, paint thinner, scouring powder, cresol).
* These substances can cause plastic parts to crack or
become marred, and can cause electric shock or fire.
Do not nick, damage, carve, bend unduly, pull on,
twist, bind or place heavy objects on top of the
power cord, or pinch it between two objects.
* The above could damage the electrical conductors
and cause electric shock or fire.
Do not climb on top of the toilet seat lid or Shower
Toilet body.
* Doing so could damage it or result in injury.
If the toilet seat or the body cover is damaged,
pull the power plug out of the wall outlet and
request repairs.
* Continued use with the Shower Toilet in that
condition could cause electric shock or fire.
Do not use any power supply other than AC 230 V.
* Use of other voltages could cause electric shock or
fire.
When removing the strainer, be sure to close the
water shutoff valve. When installing the strainer,
tighten it fully so there is no gap.
* Failure to do so could result in water leakage.
230V
7
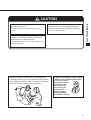
CAUTION
* Doing so could result in water leakage or cause
injury.
The body cover, toilet seat and toilet seat lid are
made of plastic. Do not bring lighted cigarettes,
ashtrays or other sources of fire near these parts.
Safety precautions
Do not bear down with your weight on or climb on
the water shutoff valve.
* Doing so could result in fire.
If hairline cracks appear in the ceramic parts of
the toilet, or if it breaks, absolutely do not touch
the damaged parts with bare hands.
* The damaged parts could cause injury. Replace it as
quickly as possible.
When small children, elderly persons, handicapped or
physically ill persons are using the Shower Toilet, please
apply adequate caution to make sure they will not operate
it improperly or do something that is dangerous.
If you hear an abnormal noise or smell
smoke or some abnormal odor during
use, pull the power
plug from the outlet
immediately, and
then contact the
store where you
purchased the
Shower Toilet or
dial ASISTENCIA
TECNICA CLIENTES.
8
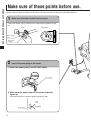
Make sure of these points before use.
Make sure of these points before use.
Before using your Shower Toilet for the first time, take a few minutes to make sure of the following points.
1
Make sure the water shutoff valve is open.
If the water shutoff valve is closed, turn the open/close handle 90° to the
left.
Open
Open State
Water Shutoff
Valve
Open/Close
Handle
2
Insert the power plug in the outlet.
1. Insert the power plug in an AC 230 V outlet.
230V
Power Plug
2. Make sure the power lamp on the power indicator
lights up.
The power lamp on the power indicator will light up (red).
Power Lamp
9
Confirm that the posterior shower works.
1. With your forearm resting on the toilet seat,
press the POWERFUL shower button.
2. When the nozzle extends, cover the tip of the
nozzle with your hand to catch the spray when
the shower begins spraying.
If the warm water tank is not full, it will take approximately 1
minute for the shower to start.
Roll up your sleeve and
rest your arm directly on
the toilet seat.
3. Press the stop button to stop the shower.
Check the other functions while looking at the operating
instructions (on page 11 and subsequent pages).
* The Shower Toilet is equipped with an occupied seat sensor that
senses when a person is sitting on the toilet seat. Posterior washing
does not operate if you do not touch the toilet seat.
Setting the clock
*Be careful with the AM and PM settings.
Press the Hour, then the Minute buttons to set the time.
(See page 4.)
Time Setting Buttons
Time Display
CAUTION
Do not use any power supply other than AC
230 V.
* Use of other voltages could cause electric
shock or fire.
10
Make sure of these points before use.
3
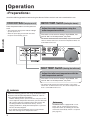
Operation
«Preparations»
Check the following operations before using the Shower Toilet to make it even more comfortable to use.
POWER ON/OFF Button (Turning the power on/off)
Press the power button to turn the power on
or off.
* The power lamp in the power indicator will light
up if the power is on.
* When the power plug is inserted in the outlet,
the power automatically goes on.
WATER TEMP. Switch (Heating the shower)
Adjust the water temperature using the
water temperature switch.
The switch can be set on 4 settings, High, Middle, Low
and Off. Set it at the temperature you prefer.
Operation
* The shower will not become warm instantly. If you set the switch
10 to 15 minutes before use, the shower temperature will be at a
comfortable level for use.
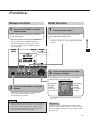
SEAT TEMP. Switch (Heating the toilet seat)
Adjust the toilet seat temperature with the
seat temperature switch.
The switch can be set on 4 settings, High, Middle, Low
and Off. Set it at the temperature you prefer.
* The toilet seat doesn't become warm instantly. If you set the
switch 10 to 15 minutes before use, the shower temperature will
be at a comfortable level for use.
WARNING
When the following persons are using the Shower Toilet,
be sure to set the seat temperature switch on "Low" or
"Off," and take sufficient precautions.
Children, elderly persons, persons who are sick, persons who
cannot adjust the temperature themselves, persons with weak
skin, persons with poor sensitivity in their skin, persons who
are taking medicines that make them drowsy, such as
sleeping medications, deeply intoxicated persons or persons
who are extremely fatigued.
* If you remain on the heated toilet seat for a long period of
time, there is danger of low temperature burns.
11
Reference
The Shower Toilet is equipped with a "seat
heater auto off" function that prevents low
temperature burns by switching off the toilet
seat heater automatically when it is occupied.
(See page 23.)
«Functions»
Shower function
1
Bidet function
Press the POWERFUL or MILD
shower button.
1
Press the bidet button.
After the tip of the nozzle extends, the shower
sprays the delicate female parts.
* There are two types of shower spray: powerful for a
strong washing effect and mild for extremely
effective washing effect with lots of warm water.
* The spray strength can also be adjusted during
shower washing.
* The spray strength can also be adjusted during bidet
washing.
Strength Indicator
2
Turn the strength dial to adjust
the spray strength.
The strength dial can adjust the shower/bidet
strength over a range of 6 steps.
3
Press the stop button to stop the
shower.
To make the
strength
weaker,
turn the dial
counterclockwise.
To make the
strength
stronger,
turn the dial
clockwise.
* An automatic self-stop function is included which
stops both posterior and bidet washing
automatically after 2 minutes.
CAUTION
* In places where the tap water pressure is low and spray
strength becomes weak, the nozzles may not extend. In
such a case, turn the strength dial to a higher setting.
* Please sit fully on the toilet seat. If you sit fully on the
seat, there will be less water splashing.
* The strength is indicated by the strength indicator in
the LCD.
Reference
The Shower Toilet is equipped with a function which
makes the spray strength weaker for persons who think
the spray strength is strong even at the weakest setting.
(See page 24.)
12
Operation
After the tip of the nozzle extends, the shower
sprays the posterior.
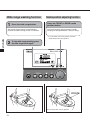
Wide range washing function
1
Press the wide range button.
The nozzle will move back and forth during
posterior or bidet washing to wash a wide area.
Nozzle position adjusting function
Press the FRONT or REAR nozzle
position button.
The nozzle position during posterior or bidet
washing can be adjusted over a total of 5 steps.
Operation
* If you stand up, the nozzle position will return
automatically to the initial position.
2
To stop wide range washing, press
the wide range button again.
Initial Position
The nozzle position can be adjusted.
13
Drying function
1
Press the dry button.
Warm air will be blown out and the parts which
were wet by the shower will be dried.
2
Press the dry button again to change
the temperature of the warm air.
Each time the button is pressed, the warm air
temperature setting changes in the sequence "Hi"
"Mid" "Lo".
* The warm air temperature is indicated in the LCD.
Operation
Warm Air Temperature
3
Press the stop button to stop the drying
function.
* A self-stop function is included that stops drying automatically after 4
minutes.
WARNING
Do not use the dry button on the "Hi" or "Mid"
setting for long periods.
* If the drying function is used for a long period of time,
it could cause burns.
Reference
* After shower use, wiping lightly with toilet paper to
remove the water drops, and then pressing the dry
switch will help you dry off faster.
* The Shower Toilet is equipped with a "Low Drying
Temperature Start" function which switches the drying
temperature from the high temperature starting pattern
to the low temperature starting pattern. (See page 23.)
14
Deodorizing function
1
Deodorizing starts when a person
stands in front of the toilet.
2
Deodorizing stops approximately 1 minute after a person
finishes using the toilet and stands up to leave.
* The Shower Toilet body is equipped with a deodorizing
cartridge.
Stops after 1 minute.
Operation
* When nobody is occupying the seat, the deodorizing
fan's capacity is increased, and draws in odors from a
wider area to eliminate them.
If you would like to turn off deodorizing
Operation method
Press the stop button and bidet button
simultaneously for 2 seconds or longer. (After
setting, a "Beep, beep" sound will be emitted.)
If deodorizing is turned off, deodorizing is not
performed. To turn it on again, press the stop
button and bidet button simultaneously for 2
seconds or longer.
15
Press simultaneously for 2 seconds or longer.
Nozzle cleaning function
Press the nozzle cleaning button.
The nozzles are cleaned for approximately 5
seconds in their retracted position. At this time,
water comes out from deep in the nozzles and
rinses them.
Operation
* This Shower Toilet wets the shower and bidet nozzles
automatically prior to spraying to make it more difficult
for them to get dirty during washing.
* This Shower Toilet is equipped with an auto cleaning
function which automatically washes the nozzles and
the area around them after shower and bidet washing.
* You can also clean the nozzles by pulling them out and
cleaning them manually. (See page 31.)
If you would like to turn the nozzle cleaning function off
Operation method
Press the nozzle cleaning button for 2 seconds or
longer. (After setting, a "Beep, beep" sound is
emitted.)
If this function is turned off, the nozzles are not
cleaned before shower and bidet washing.
Afterward, press the nozzle cleaning button for 2
seconds or longer to turn this function on again.
Press for 2 seconds or longer.
* The auto cleaning function operates.
16
Toilet flushing function
There are four ways to flush the toilet.
1. Auto full/partial flushing, in which the toilet flushes automatically after several seconds when the
person using the toilet stands up.
2. Auto flush, which flushes the toilet when the flush button on the remote control unit is pressed.
3. Manual flush, which flushes the toilet when the flush lever on the side of the body is pressed.
4. Auto male partial flushing, which flushes the toilet automatically approximately 1 second after the
user walks away from the toilet.
1. Auto full/partial flushing
Operation
1
Set the auto flush switch in the
ON position.
* Auto full/partial flushing automatically judges the amount
of time a person occupies the toilet seat, and then
performs full flushing or partial flushing. If a person
stands in front of the toilet and urinates, it judges auto
male partial flushing and activates partial flushing
accordingly. (See page 18.)
* If the toilet seat is occupied for 6 seconds or longer, but
less than 50 seconds, partial flushing is performed.
However, if shower washing is performed, full flushing is
performed even if the seat is occupied for less than 50
seconds.
2
To stop this function, set the auto
flush switch in the OFF position.
2. Auto flush
Press the FULL flush button for full flushing.
Press the PARTIAL flush button for partial flushing.
* If the PARTIAL button is pressed during a bowel
movement, the flushing operation may not be
complete.
17
Reference
Auto full/partial flushing starts automatically approximately 6
seconds after the user stands up from the toilet seat. This
start time can be changed to approximately 15 seconds after
the user stands up. (See page 23.)
CAUTION
Do not turn the power off during flushing of the toilet. If
the power is turned off or if there is a power failure during
flushing, water will just continue flowing. In such a case,
close the water shutoff valve. When the power goes on
again, the flush lever will return to its original position.
(See page 28.)
3. Manual flush
Turn the flush lever approximately
45º up toward the rear of the toilet.
Flush Lever
A "peep" sound is emitted from the body, and the toilet
is flushed automatically.
CAUTION
* The above method cannot be used to flush the
toilet when there is a power failure. Flush the toilet
using the method described for "Flushing when
there is a power failure" to flush the toilet under
such conditions. (See page 27.)
* Do not turn the flush lever in the opposite
direction. Doing so would cause the water used
for flushing to flow constantly without shutting off.
4. Auto male partial flushing
1
Set the auto flush switch in the ON
position.
Partial flushing starts automatically
approximately 1 minute after the user finishes
using the toilet and leaves.
* If the user does not stand in front of the toilet for 6
seconds or longer with the toilet seat open, the
partial flush function will not work.
2
To stop this function, set the auto
flush switch in the OFF position.
18
Operation
Approximately 45º
Power save function
The power save function includes two functions for saving power: Power save and power off timer.
Power save lowers the water temperature and toilet seat temperature at all times except when the toilet is used
(when the toilet seat lid is open).
The power off timer suppresses power consumption by turning off the warm water and toilet seat heaters for a
period of 6 hours during an extended period when the Shower Toilet is not being used. By using it together with
power save, the power saving effect can be even further enhanced.
Power save (always on)
Operation
1
Press the power save button for 2 seconds or longer.
(The indicator lamp will blink. See below.)
Power save will continue until the setting is
canceled, and the warm water temperature and
toilet seat temperature will return to their
previously set state when the toilet is used.
* Power save functions at all times
while the toilet seat lid is closed.
When power save is operating, the
indicator lamp blinks 2 times with a
0.5 second interval.
* Power save does not function while the toilet seat
lid is open. (The indicator lamp lights up.)
2
To turn off power save, press the power save button again
for 2 seconds or longer. (The indicator lamp goes off.)
Power off timer (6 hours)
1
Press the power save button.
(The indicator lamp will blink. See below.)
The water heater and toilet seat heater controls
are stopped for 6 hours after this button is
pressed. After 6 hours, the water temperature
and toilet seat temperature return to their
previously set state
* The indicator lamp blinks once every
0.5 second while the power off timer is
operating.
* When 6 hours have passed, the function
automatically returns to the originally set state and
the power save lamp changes from blinking to off.
* The power off timer can be set any number of times
in one day.
2
To cancel the timer's function midway through the 6-hour cycle,
press the power save button again. (The indicator lamp goes off.)
* While the power off timer is operating, the power
save settings cannot be canceled.
* When power save is operating, the temperature of the warm water and the toilet seat are lowered, so they may feel
cold. In such a case, cancel the power save function.
* Even when the power save button is off, leaving the toilet seat lid closed is an effective way to save power.
19
Auto seat-open function (Toilet seat and lid open/close)
A
Toilet seat and lid (Auto open/close)
1
B
Toilet seat
1
Set the AUTO SEAT-OPEN switch in
Mode “1” or “2” position.
The toilet seat will open.
Operation
"1": A user stands in front of the toilet, the toilet
seat lid opens automatically. The user leaves
the toilet, it closes after about 1 minute.
Press the TOILET SEAT
OPEN/CLOSE button.
"2": A user stands in front of the toilet, the toilet
seat and the toilet seat lid open and the user
leaves the toilet, they close after about 1
minute.
2
2
To turn off this function, set the AUTO
SEAT-OPEN switch in the OFF position.
A
To close the toilet seat, press the TOILET
SEAT OPEN/CLOSE button again.
* Even if the user leaves the toilet without pressing
the toilet seat open/close button, the seat lid (and
seat) will close in about 1 minute with the auto seatopen switch set at "1" or "2".
AUTO SEAT-OPEN switch
Body Sensor
Set at "1"
Toilet
Seat Lid
Set at "2"
B TOILET SEAT
OPEN/CLOSE button
Press the button: the
toilet seat opens.
Toilet
Seat Lid
Toilet
Seat
* When a person is detected by the body sensor and the occupied seat sensor, the toilet seat lid opens/closes
automatically.
* When a small child is using the toilet, turn the auto seat-open switch on the remote control unit in the OFF position.
In the case of a small child, the occupied seat sensor cannot detect anybody's presence, and the toilet seat lid will start to
close during use of the toilet on rare ocassions.
20
Plasmacluster function
The plasmacluster includes two modes: the clean mode, which suppresses odors and mold, etc. by providing
plus ions and negative ions in good balance, and the refresh mode, which provides large numbers of negative
ions to refresh the mind and body.
The clean mode and refresh mode switch automatically when a person is detected by the body sensor and
occupied seat sensor.
Operation
1
Press the plasmacluster ion button.
(The indicator lamp will light up.)
Ions will be provided from the outlet, and auto
operation will start.
* When a person is detected, the
plasmacluster ion generator
automatically switches to the
refresh mode and the indicator
lamp lights up green.
When a person's presence is not
detected, it switches to the clean
mode and the indicator lamp
lights up blue.
Indicator Lamp
* The ion generator operates continuously in the clean mode for
1 hour after the button is pressed, and then switches to
intermittent operation.
2
To stop operation, press the
plasmacluster ion button again.
(The indicator lamp will go off.)
* When the plasmacluster is operating, a "chirping" sound is emitted. If you notice this sound, press the plasmacluster ion
button and turn it off.
* There is a slight odor of ozone generated by the ion generator, but its concentration is minute and does not have a bad
effect on anyone's health.
21
Dim light function
1
Press the dim light switch.
(The dim light indicator will light up and the stop
button will blink.)
If a person is detected, a dim light will illuminate
the base of the toilet and the inside of the toilet
bowl.
To turn off this function, press
the light switch again.
CAUTION
This illumination is only for when a person first enters.
Be sure to turn the ceiling light on in the toilet room
when you use the toilet.
Operation
* If the person's presence ceases, the light will go off
automatically.
2
Dim Light Indicator
Reference
The dim light function detects the presence of people and lights the base
of the toilet and inside of the toilet bowl. This operation can be changed
by the following operation. (See page 24.)
* If a person is detected sitting on the seat, the base of the toilet only is
illuminated.
22
Convenient functions
Toilet seat heater auto off function
To reduce the chance of low temperature burns, the Shower Toilet has a toilet seat heater auto off
function which turns off the toilet seat heater when someone sits on the toilet seat. Use the
following procedure to enable or cancel the toilet seat heater auto off function.
Enabling or canceling
Operation
Press the stop button and POWERFUL shower button
simultaneously for 2 seconds or longer.
(After it is set, a "Beep beep" sound will be emitted.)
Release this function by repeating the same procedure.
* The toilet seat heater resumes operation automatically when
you stand up from the toilet seat.
Press simultaneously for 2 seconds or longer.
Low drying temperature start function
The dry function can be set to start on the low temperature setting. This function is convenient for
elderly persons, handicapped persons or persons who are particularly sensitive to heat. Use the
following procedure to enable or cancel the toilet seat heater auto off function.
Enabling or canceling
Press the stop button and dry button simultaneously for 2
seconds or longer.
(After it is set, a "Beep beep" sound will be emitted.)
Release this function by repeating the same procedure.
Press simultaneously for 2 seconds or longer.
Auto flushing start time
Auto flushing starts automatically approximately 6 seconds after the user stands up. This starting
time can be changed to start after approximately 15 seconds. Change the setting to the start time
you prefer using the following procedure.
Switching the flushing start time
Press the nozzle cleaning button and wide range button
simultaneously for 2 seconds or longer.
(After it is set, a "Beep beep" sound will be emitted.)
Return this setting to the original setting by repeating the same
procedure.
23
Press simultaneously for 2 seconds or longer.
Switching the dim light
The dim light illuminates the floor around the base of the toilet and the inside of the toilet when a
person is detected. This operation can be changed to illuminate the floor around the base of the
toilet only.
Press simultaneously for 2 seconds or longer.
Switching the dim light
Operation
Press the stop button and REAR nozzle position button
simultaneously for 2 seconds or longer. (When it is set, a "beep
beep" sound will be emitted.)
Return this setting to the original setting by repeating the same
procedure.
For persons who would like to make the spray strength still weaker
Persons who think the "weak" setting for the shower spray and bidet spray is still too strong can
adjust the spray strength using the following procedure.
Setting and clearing
Press the stop button and the PARTIAL flush button
simultaneously for 2 seconds or longer.
A "beep, beep" sound will be emitted and the spray
strength will become weaker.
The spray strength can be made weaker by another 4
steps, so adjust the spray strength to the desired level.
To return to the original setting, press
simultaneously for 2 seconds or longer.
* In places where the tap water pressure is low, the nozzles
may not spray water at all with the shower strength at or
near the weakest setting.
Each time the buttons are pressed, the
spray strength becomes one step weaker.
To return the setting to the original setting, press the
stop button and the FULL flush button simultaneously for
2 seconds or longer. A "beep, beep" sound will be heard
and the setting will return by 1 step. It will return by 1
step each time the buttons are pressed.
To make the spray strength weaker, press simultaneously
for 2 seconds or longer.
24
«Other references»
What is the volume of water used in a warm
shower, and what is the temperature?
Operation
* The capacity of the warm water tank is 2.0 L.
The water temperature gradually drops when
shower or bidet washing is used for a long
period. If you still desire to continue, wait about
3 minutes for the water to reheat, and then
continue.
* The shower temperature is adjusted by setting
the switch in the desired position for a constant
temperature.
Water tank internal control temperature:
Low: approx. 36ºC, Middle: approx. 38ºC,
High: approx. 40ºC.
In winter, it takes approximately 10 minutes to
heat cold water (at about 5°C) to the
appropriate temperature (about 40°C).
If you think the spray strength is set at the
weakest and the nozzle won't extend.
The Shower Toilet is designed to use the tap
water pressure to extend the nozzles and spray
water. In places where the tap water pressure is
low, the nozzles may not spray water at all with
the shower strength at or near the weakest
setting. In this case, set the spray strength at or
near the strongest setting.
(See page 12.)
Energy saving
The following items are effective to help save
energy.
* Close the toilet seat lid after use.
* Do not keep the temperature of the toilet seat or the
warm water inordinately high, but adjust it to a level
where it won't cause you discomfort.
* Adjust the temperature settings frequently to match
the air temperature.
* Use the power save functions on models equipped
with these functions.
* If you will be gone for extended periods, be sure to
turn the power off while you are away.
If there is danger of freeze damage, implement the
freeze prevention measures. (See page 37.)
What about the water pouring out near the nozzles?
Before and after cleaning and when the water
temperature switch is turned on, etc., water pours
out around the nozzles, but this is necessary due
to the shower toilet's structure and is not a sign
of breakdown.
* If water sprays under any other circumstances, or
sprays constantly, close the water shutoff valve and
pull the power plug from the wall outlet. Then,
contact the store where you purchased the Shower
Toilet or ASISTENCIA TECNICA CLIENTES.
The Shower Toilet is equipped with an occupied seat sensor.
The Shower Toilet is equipped with an occupied
seat sensor that prevents the shower from
spraying if nobody is sitting on the toilet seat.
Therefore, if you are not seated on the toilet seat,
the shower washing, bidet washing, deodorizing
and drying functions will not operate.
* If there is a power failure while you are seated on
the toilet and the power is recovered while you are
still seated there, it may be impossible for the
shower washing and other operations to function. At
such a time, stand up, and then sit down again after
waiting 1 to 2 seconds.
Remote control unit
The battery indicator will blink on the remote
control unit when the batteries are nearly
exhausted.
Replace the batteries with new ones as soon as
possible.
(See page 35 concerning battery replacement.)
Battery Indicator
25
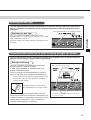
Slow down toilet seat and toilet seat lid.
Auto seat-open
To prevent the toilet seat and toilet seat lid from
being lowered forcefully, a damping mechanism is
provided to lower them gradually. If the toilet seat
or toilet seat lid is closed roughly or too forcefully,
the shower toilet could be damaged.
A body sensor is built into the shower toilet which
detects that a person is standing in front of the toilet or
not, and opens and closes the toilet seat lid
automatically.
It can detect a person if they are standing immediately
in front of the toilet, but if they are standing at an
angle, or at a certain distance from it, it cannot detect
their presence and may not open the toilet seat.
Operation
Body Sensor
A slight odor may be emitted when the
drying function is first used.
While the Shower Toilet is still new, there may be
a slight odor when using the drying function. The
odor will disappear as the toilet is used.
The Shower Toilet may interfere with
radio or television reception.
If a radio or television is brought near the Shower
Toilet, it may cause interference with reception.
In this case, move the radio or television away
from the Shower Toilet until the interference
ceases.
Condensation
Due to differences in temperature between the
room and the toilet, or between the front surface
temperature of the toilet seat or humidity, water
drops (condensation) may form on the toilet or
toilet seat. To prevent condensation, please
maintain adequate air circulation. In addition, if
condensation forms, wipe it off with a dry cloth.
* Condensation could run on the floor, causing wrinkles
in or damage to the flooring.
* This toilet is designed to make it difficult for
condensation to form, but there may be some
condensation depending on room temperature and
other conditions.
26
Flushing the toilet when there is a power failure
When a power failure occurs, the toilet cannot be flushed using the remote control unit.
Flush the toilet using the following procedure.
1. Turn the flush lever back 90°.
Water will flow from around the top of the toilet bowl
and cause the contents of the toilet bowl to wash
down to the bottom of the bowl.
Operation
2. When the contents of the toilet reach the bottom,
turn the flush lever 90° further in the same direction.
Water will flow from the bottom of the toilet bowl,
flushing the contents down the drain.
3. Return the flush lever approximately 90°.
Water will flow from around the top of the toilet bowl
and begin accumulating in the bottom of the toilet
bowl.
4. When water has accumulated sufficiently, return the
flush lever to its original position.
The flow of water will stop.
* After flushing, be sure to return the flush lever to
its original position. (If this is not done, water will
flow continuously without stopping.
Turn approx. 90°
Turn approx. 90° further.
Inside the Toilet
Return approx. 90°.
Inside the Toilet
Return to original
position.
Reference
The toilet can also be flushed by filling a bucket with water and pouring it directly into the toilet bowl.
27
Inside the Toilet
Inside the Toilet
If the flushing water runs continuously without stopping
If there is a power failure or the power goes off for some reason during flushing of the toilet, water will flow continuously.
Stop the flow of flushing water using the following procedure, and restore the toilet to normal when the power comes on
again.
1. Turn the water shutoff valve's open/close handle to
the right 90°.
The flow of flushing water will stop.
Closed State
Close
Operation
Water
Shutoff
Valve
Open/Close Handle
2. When the power comes on again, make sure the
flush lever is returned to its original position
(horizontal).
Flush Lever
3. Turn the water shutoff valve's open/close handle
90° to the left.
Press the FULL or PARTIAL flush button on the
remote control unit and confirm that flushing water
is flowing.
Open State
Open
Water
Shutoff
Valve
Open/Close Handle
28
Handling precautions
Follow these precautions in order to prevent breakdown of the Shower Toilet.
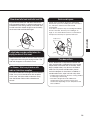
When there is danger of the water in the Shower
Toilet's water lines freezing, implement the freeze
prevention methods to prevent damage.
(See page 37.)
Do not place a stove or heater close to the
Shower Toilet body. Doing so could cause
product discoloration or damage.
In case of thunderstorms, pull the power plug out of
the outlet. Lightning surges could cause accidents or
breakdown of the Shower Toilet.
Handling precautions
Do not open or close either the toilet seat lid or
the toilet seat with great force. Doing so could
crack or otherwise damage it, causing an
electrical hazard.
Do not expose the Shower Toilet to the direct rays of
the sun. Plastic parts could become discolored by the
sunlight.
Do not cover the warm air outlet. Doing so could
cause product failure.
Do not lean against the toilet seat lid during
use. Doing so could damage it.
29
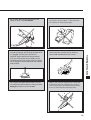
Do not attempt to flush newspaper, paper diapers,
tissue paper, sanitary napkins or other items down
the toilet that can easily clog the pipes.
If the toilet becomes clogged, clean it out using
an ordinary plunger. Do not flush the toilet when
it is clogged. (Do not press the FULL or
PARTIAL flush button on the remote control
unit, turn the flush lever on the toilet or touch
the toilet seat with your hands.) Doing so could
cause sewage to fill the toilet bowl and overflow
onto the floor.
When waste matter is adhering inside the toilet
and it cannot be washed away by flushing,
clean inside the toilet bowl with a brush.
Do not clean the toilet with hot water. Also do
not subject the toilet to impacts. Doing so could
damage the toilet or cause it to leak.
Objects such as pencils, ballpoint pens, combs and
toothbrushes will cause clogging of the soil pipe. If
such an object drops into the toilet bowl by mistake,
be sure to pull it out before flushing the toilet.
Handling precautions
Do not block the plasmacluster blower vent.
Doing so could cause breakdown.
30
Maintaining
«Daily cleaning»
CAUTION
When cleaning the Shower Toilet, be sure to turn off the power. Make sure the power
lamp in the power indicator on the body is off.
Cleaning the toilet seat, toilet seat lid and covers (plastic panels)
Dampen a soft cloth and wipe off the surfaces.
If dirt is left on the surface, it will become more difficult to remove. Wipe off the surfaces frequently
with a damp cloth.
Wiping with a damp cloth also prevents static electricity. Static electricity attracts dust particles, and
causes the surface to become dirty.
* The toilet seat lid on this Shower Toilet can be easily removed. (See page 33.)
Maintaining
Cleaning nozzles
Pull out the nozzle, and then clean it using a
toothbrush or a similar tool.
Toothbrush
* Do not pull on the nozzles unduly or cause them to
be bent.
Nozzle
WARNING
Periodically wipe off any dust adhering to the power plug.
When doing this, pull out the power plug, and then wipe it
off with a dry cloth.
* Insulation defects could cause fire.
31
DANGER
Do not pour water or cleanser inside the Shower
Toilet. Do not splash water on the body or the
power plug.
* There is danger of electric shock or fire.
CAUTION
For care of plastic parts, do not use any cleanser
other than those which are safe to use on toilet
seats (toilet cleanser, home cleanser, bleach,
benzene, paint thinner, scouring powder, cresol).
* These substances can cause plastic parts to crack or
become marred, and can cause electric shock or fire.
Maintaining
Cleaning the toilet (ceramic parts)
Immerse a plastic brush or sponge in a solution of neutral cleanser and wipe the
toilet, then rinse using cool or lukewarm water.
Do not use hot water. It could damage the toilet.
About anti-bacterial parts
Anti-bacterial plastics are used in the nozzles, toilet seat, toilet seat lid, body cover, bottom cover and flush lever. Antibacterial sheet is used in the remote control unit's switch panel and an anti-bacterial glaze is used for the toilet bowl.
32
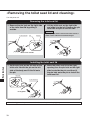
«Removing the toilet seat lid and cleaning»
Turn the power off.
Removing the toilet seat lid
1. Remove the pin hole on the right side
of the toilet seat lid by pulling it
outside.
2. Lift the toilet seat on the right side
and slide it to the left. Remove the pin
hole from the pin on the left side.
CAUTION
Toilet Seat Lid
Pin
Pin Hole
If you try to pull hard to remove the toilet seat lid, it
could crack or otherwise become damaged.
Slide
Move to the outside.
Lift up
Installing the toilet seat lid
Maintaining
1. Set the pin hole on the left side of the
toilet seat lid with the pin on the left
side of the body and fit the lid onto
the pin.
2. Move the toilet seat lid to the right,
opening it so the pin hole on the right
side is outside the pin, and then fit
the pin hole onto the pin to install the
toilet seat lid.
Pin Hole
Toilet Seat Lid
Pin
Fit Together
After cleaning, press the power button and make sure the power lamp lights up.
33
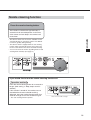
«When toilet flushing is weak»
«When the spray strength is weak»
If the toilet has been used for a long period of time and flushing begins to get weak, or the shower/bidet spray
seems to be getting weak, clean the strainers using the following procedure. (As a rule, the strainers should be
cleaned once every two years.)
Cleaning the strainers
1. Close the open/close handle on the water shutoff
valve to cut off the water supply.
Close
Water
Shutoff Valve
If the spray strength is weak
2. Turn the strainer on the bottom
right of the shower toilet body and
remove it.
Open/Close Handle
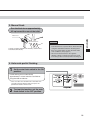
If the toilet's flushing is weak
2. Press the FULL flush button.
3. Carefully remove the side panel on the
left side of the Shower Toilet body.
A small amount of water will pour out at this time, so
place a wash basin underneath to catch the water.
Side
Panel
Maintaining
4. Turn the toilet strainer and remove it.
Shower Toilet Strainer
3. Remove the dirt adhering to the
inside of the strainer by rinsing it
with water.
A small amount of water will pour out at this time, so place a
wash basin underneath to catch the water.
Toilet Strainer
4. Return the strainer, tighten it fully.
5. Open the water shutoff valve fully.
5. Remove the dirt adhering to the inside of
the strainer by rinsing it with water.
6. Return the strainer, tighten it fully, and fit
the side panel in place.
7. Open the water shutoff valve fully, and flush the toilet.
6. Finally, perform trial operation. (See pages 9 and 10.)
CAUTION
When removing the strainer, be sure to close the water shutoff valve. When installing
the strainer, tighten it fully so there is no gap.
* Failure to do so could result in water leakage.
34
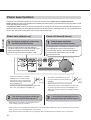
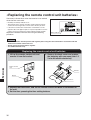
«Replacing the remote control unit batteries»
The battery indicator blinks when the batteries have reached
the end of their service life.
* Normally, the battery indicator is off.
* The batteries were used for operation checks while the remote
control unit was being made, so their service life may be short.
* If the remote control unit is mounted on a wall which is on the
opposite side of the light receptor, it may be impossible to use the
remote control even before the battery indicator begins to blink.
Replace the batteries with new ones using the following
procedure.
Battery Indicator
CAUTION
* Install the batteries with the positive and negative poles facing the correct direction in accordance with the
marks on the remote control unit case.
* Do not use old and new batteries together.
* Use alkaline batteries only.
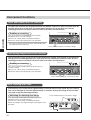
Replacing the remote control unit batteries
1. Lift up the remote control unit and
remove it from its bracket.
2. Remove the back cover and replace
the batteries with new ones (four 1.5
V size AA alkaline batteries).
–
Maintaining
Remote Control
Unit
+
+
–
–
+
+
–
Batteries
Bracket
Back Cover
3. Replace the back cover, and set the remote control unit back in its bracket on
the wall.
4. Set the time, pressing the time setting buttons.
35
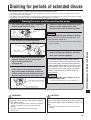
Draining for periods of extended disuse
In the following cases, be sure to drain the water from the Shower Toilet.
* If the Shower Toilet will not be used for an extended period, such as when you are away on a trip. (The water could
become dirty and cause clogging.)
* If the Shower Toilet is installed in a vacation home and that home is not being used. (In a house where nobody is living,
the temperature can drop a lot lower than expected and freezing can be caused.)
Draining the water and disconnecting the power
1. Turn off the water shutoff valve's open/close
handle to stop the flow of water.
Close
Water
Shutoff
Valve
Open/Close Handle
2. Turn the flush lever counterclockwise.
5. Tighten the warm water tank drain plug and
strainers in their original places, and
disconnect the power plug from the outlet.
CAUTION
If there is particularly great danger of freezing,
bail or pump out the water in the toilet bowl, and
place antifreeze solution in it.
* If the water only is removed, bad odors will be emitted
from the soil pipe.
Turn approx. 180°
Flush Lever
3. Remove the side panel on the left side, open
the toilet strainer and drain out the water
that is inside the flush valve.
(See page 34.)
4. Place a wash basin underneath the Shower
Toilet strainer and warm water tank drain
plug on the bottom of the body, remove the
strainer and warm water tank drain plug and
drain the water out of the warm water tank.
Warm Water Tank Drain Plug
Draining for periods of extended disuse
6. When using the toilet again, be sure to
perform trial operation (pages 9 and 10) to
make sure it functions properly.
If it freezes and the shower stops working
In the unlikely event that the water supply hose
or the water supply connection fittings become
frozen and the shower does not spray out, use a
cloth dipped in warm water, etc. to heat up the
water supply hose or water supply connection
fittings, or heat the room inside to cause it to
melt naturally.
CAUTION
Do not sprinkle hot water or blow hot air on
the water supply hose.
* It could cause damage to the water supply hose.
Shower Toilet Strainer
WARNING
When not using the Shower Toilet for an extended
period, be sure to drain the water from the Shower
Toilet. (See page 36.)
* The water in the Shower Toilet could freeze and cause
damage, resulting in electric shock, fire and water
leakage.
* The water could become dirty and cause skin
inflammation.
CAUTION
When removing the strainers, be sure that the
water shutoff valve is closed. Also, when installing
the strainers, tighten them completely so there is no
gap.
* If they are not fully tightened, it could cause water
leakage.
36
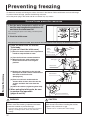
Preventing freezing
If it becomes severely cold during the winter, the water in the Shower Toilet could freeze and cause damage.
To prevent freeze damage, perform the following measures.
Leave the power plug in the outlet and do not remove it by any means.
General freeze prevention measures
1. Set the water temperature switch on Hi
and the seat temperature switch on Hi,
and close the toilet seat lid.
If you are using the power save setting, cancel the power
save function.
2. Heat the toilet room.
If the toilet room cannot be heated, drain the water out of the Shower Toilet body by the following procedure.
3. Drain the water from the Shower
Toilet body.
(If you can't heat the toilet room)
(1) Close the water shutoff valve's open/close
handle to stop the flow of water.
(2) Turn the flush lever counterclockwise
(3) When flush water stops coming out,
return the flush lever to its original
position.
Water
Shutoff
Valve
Open/Close Handle
Turn approx. 180°
Flush Lever
Preventing freezing
(4) Remove the side panel on the left side,
then open the toilet strainer and drain out
the water in the flush valve.
(See page 34.)
Toilet Strainer
(5) Place a wash basin underneath the
shower toilet strainer, then take out the
strainer and drain the water from the
body.
(6) Close the strainers, tightening them fully.
4. When using the toilet again, be sure
to perform trial operation
(pages 9 and 10).
WARNING
Shower Toilet Strainer
CAUTION
If there is danger of the water in the Shower
Toilet's water lines freezing, implement the freeze
prevention methods to prevent damage.
When removing the strainer, be sure to close the
water shutoff valve. When installing the strainer,
tighten it fully so there is no gap.
* The water in the Shower Toilet could freeze and cause
damage, resulting in electric shock, fire and water
leakage.
* Failure to do so could result in water leakage.
37
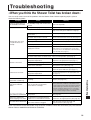
Troubleshooting
«When you think the Shower Toilet has broken down»
You can easily correct some of the problems with the Shower Toilet. Before requesting repairs, please
check the following items.
Symptom
There are water drops on
the underside of the toilet.
Cause
The humidity is high and condensation
formed.
Remedy
Wipe it off frequently.
Electricity is not being supplied to the power outlet. Check for a power failure or tripped breaker, etc.
The power switch is off.
Shower does not spray
out. (Nozzle does not
extend).
Press the power button and get the power
lamp on the body power indicator to light up.
The power plug is not inserted in the
power outlet.
Insert the power plug in the power outlet.
The water shutoff valve is closed.
Turn the water shutoff valve to the left. (See page 9).
Strainer is clogged.
Clean the strainer. (See page 34.)
The occupied seat sensor is not on.
The shower cannot be used if you don't sit down. (See page 25.)
Tap water pressure is low.
Set the shower strength on a higher strength setting. (See page 12.)
Body water supply hose or other water
supply part is frozen.
Use a cloth dipped in warm water to warm the body
supply water hose and supply water connections.
Or, increase the room temperature and let thawing
occur naturally. (See page 37.)
The remote control unit's batteries are dead.
Replace the batteries with new ones. (See page 35.)
The warm water tank is not full of water. Carry out trial operation. (See page 9.)
The water temperature is not set to an
appropriate temperature.
Shower is not warm.
Toilet seat is not warm.
Press the water temperature button and adjust the water
temperature to the appropriate level. (See page 11.)
The shower was used for a long period of time. The water takes about 3 minutes to warm. (See page 25.)
Power save is activated.
Cancel power save. (See page 19.)
The power switch is off.
Press the power button and light up the power
lamp in the power indicator. (See page 11.)
Toilet seat temperature is not set to an
appropriate temperature.
Press the seat temperature button and adjust
the toilet seat temperature to the appropriate level.
(See page 11.)
Power save is activated.
Cancel power save. (See page 19.)
The toilet seat heater auto off function is Cancel the toilet seat temperature auto off
function. (See page 23.)
operating.
The power lamp in the
body power indicator
blinks.
There is trouble with either the warm
water or the toilet seat functions.
Or it is time for a checkup.
Troubleshooting
Toilet seat becomes less
warm when seated long.
If the power lamp blinks even when the power
switch is turned off, it indicates a breakdown. Pull
the power plug from the outlet and request repairs.If
the power lamp goes off when the power switch is
turned off, it indicates that it is time for a checkup,
so have a checkup performed as soon as possible.
(You can continue using it until it is checked.)
The auto seat-open switch is in the
The toilet seat lid does not
open and close automatically. OFF position.
Set the auto seat-open switch in "1"or "2."
(See page 20.)
Water runs continuously
The flush lever is turned forward. Or,
without stopping in the toilet. trouble has occurred with the function.
Close the water supply valve, and return the
flush lever to its original position. (See page 28.)
The toilet will not flush well. The water shutoff valve is not fully
open or the strainer is clogged.
Open the water shutoff valve fully, and
clean the strainer. (See page 34.)
If you are unable to correct the trouble using the above remedies, contact the store where you purchased the
Shower Toilet or ASISTENCIA TECNICA CLIENTES.
38
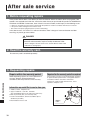
After sale service
1. Before requesting repairs
If this product breaks down, see "When you think the Shower Toilet has broken down" on page 38. If the
trouble is not repaired even after that, contact the store where you purchased this product or ASISTENCIA
TECNICA CLIENTES. Furthermore, even if there is no actual trouble, make inquiry in the following cases.
* If there are any points that are unclear even though the product is used in accordance with the user's manual.
* If the power cord is damaged or the outlet is loose.
* The outlet or the power plug and power cord are overheating.
In the above cases, if it is left as it is without correction, there is danger of some unforeseen accident
occurring, so please get some advice.
DANGER
Absolutely do not allow anyone except an authorized service
technician to disassemble, repair or modify the Shower Toilet.
* There is danger of electric shock or fire, and the Shower Toilet could
malfunction, causing injury.
2. Read the warranty card.
The warranty card is attached separately.
3. Requesting repairs
After sale service
Repairs within the warranty period
Repairs after the warranty period has expired
When requesting repairs, be sure to present the
warranty. Repairs will be performed in
accordance with the provisions of the warranty.
If the product's function can be maintained by repairing
it, repairs shall be performed on a chargeable basis in
accordance with the customer's instructions.
Charges for repairs include technical fees, travel
expenses and parts costs.
Information we would like to receive from you
1. Address, Name, Telephone No.
2. Type, Product No., Color No., Serial No.
(See the Marking label on the side of the toilet seat.)
3. Date of purchase (See your warranty card.)
4. Content of breakdown, abnormal condition (Be as
detailed as possible.)
5. Desired date for house call
39
Marking
Label
4. Minimum period for maintaining stocks of functional
parts used for repairs
The minimum period that functional parts used for repairs of the Shower Toilet are kept in stock is 6 years
after production is stopped. For repairs after this holding period has expired, please be acknowledged that
the necessary parts may not be available any more.
* Functional parts for repairs are parts which are required in order to maintain the product's function.
5. If you do not understand any points concerning this
product or concerning after sale service
Please contact the store where you purchased this product or Roca Sanitario, S.A.
Product information
Roca Sanitario, S.A.
Tel. +34 (93) 366 12 00
Repair request
ASISTENCIA TECNICA CLIENTES
Tel. +34 (93) 263 00 09
After sale service
40
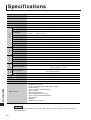
Specifications
Type
8-11301000
Maximum rating
Toilet flush system
Flushing water volume
Product dimensions
Product weight
Warm water tank capacity
Nozzles
Nozzle holes
AC 230V, 580 W, 50 Hz
Frost-free toilet: Direct valve type
Full: 6 L, Partial: 4.5 L
Width 425 mm x Depth 635 mm x Height 540 mm
Approx. 32 kg (Functioning part: Approx. 10 kg, Toilet: Approx. 22 kg)
Warm water storage 2 L
Exclusive posterior, bidet nozzles, auto slide type
Shower
For posterior: POWERFUL φ1.3 mm x 3 holes, MILD φ1.3 mm x 3 holes + φ1.0 mm x 11 holes,
For bidet:
φ1.0 mm x 12 holes.
Posterior cleaning spray volume
Powerful: 0 ~ 1.8 L/min, Mild: 0 ~ 2.0 L/min. (adjustable in 6 stages)
Bidet cleaning spray volume
0 ~ 2.0 L/min. (adjustable in 6 stages)
Water supply method
Direct connection to tap water
Warm water heater capacity
500 W
Warm water internal control temperature
Off (water temp.), Low (Approx. 36°C), Med. (Approx. 38°C) High (Approx. 40°C)
Safety devices
Air volume
Drying
Warm air heater capacity
Warm air temperature adjustment
Safety devices
Thermal fuses, Float switch to prevent empty shower operation, High temperature sensor switch.
0.4 m3/min.
0, 155, 310 W
Low, Mid, High
Thermal fuses (2)
Toilet seat
Heater capacity
Deodorizing
Deodorizing method
Chemical absorption type using a deodorizing cartridge
Deodorizing capacity
During pre- or after-deodorizing: 0.14 m3/min
While seated: 0.11 m3/min.
Surface Temperature
Temperature adjustment
Safety device
Plasma
cluster
Operation modes
Ion generator rated power
Power save function
Power cord
44 W
Off (room temp.), Low (Approx. 28°C), Med. (Approx. 36°C), High (Approx. 40°C)
4-step selectable (micro-computer controlled)
Thermal fuse
Clean / Refresh
automatically switched.
AC 100 V, 0.7 W or lower
Power save (24 hr. power save), Power off timer (auto recovery after 6 hours)
Effective length: 1.2 m
Ambient operating temperatures
0 ~ 40°C
Minimum required water pressure
0.10 MPa {1.0 kgf/cm2} (when flowing at 18 L/min.)
Specifications
Other functions
* Occupied seat sensor
* Nozzle position adjustment, wide range washing
* Nozzle cleaning
* Toilet seat/toilet seat lid slow-down
* Auto seat-open
* Auto male partial flush
* Auto full/partial flush, auto flush
* Toilet seat lid removal and installation
* Power button
* Dim light
* Backlit remote control unit
CAUTION
These product specifications are for units sold in Spain. Do not use this product in countries
other than Spain.
41
NO TIRAR
DO NOT THROW AWAY
En ROCA estamos comprometidos con la protección del medio ambiente. Por favor,
ayúdenos desechando este producto al final de su vida de forma responsable, para evitar
que determinadas sustancias contenidas en los productos eléctricos o electrónicos puedan
causar perjuicios en la salud humana y en el medio ambiente.
El símbolo del contenedor de basura tachado, reproducido arriba y sobre el producto,
significa que el mismo no debe ser desechado junto con otros residuos domésticos. Al final
de la vida del producto, el mismo deberá ser entregado, siempre de forma gratuita para Vd,
en las instalaciones de recogida habilitadas al efecto por las autoridades de su país o al
distribuidor en el que adquiera un nuevo producto equivalente o que realice las mismas
funciones que este aparato. Esta última opción puede no estar disponible en algunos
países, por lo que le rogamos consulte con las autoridades de su país los sistemas de
recogida disponibles y los puntos de recogida más cercanos a su domicilio.
De este modo, Vd. puede colaborar con la protección del medio ambiente gracias a la
reutilización y el reciclado de residuos de aparatos eléctricos y electrónicos. Por el contrario,
pueden derivarse para Vd. responsabilidades administrativas en caso de incumplimiento de
las normas de entrega del residuo de este producto.
We at ROCA are committed to protecting the environment. Please help us by disposing of
this product in a responsible way when it reaches the end of its service life, to prevent certain
substances contained in electric and electronic products from harming public health or the
environment.
The symbol reproduced above and also on the product, showing a crossed-out waste bin,
means that the product must not be thrown away with other household waste: at the end of
its service life, it must be taken at no charge to you to the waste-collection centres provided
for the purpose by the authorities in your country, or to be distributor from whom you acquire
a new product that is equivalent to or that performs the same functions as this equipment.
This latter option may not be available in some countries, and in such cases you are asked
to consult the authorities of your country regarding the waste-collection systems available
and the collection centres closest to your home.
You can thus make a contribution to protecting the environment thanks to this reuse and
recycling of electrical and electronic equipment, while failure to comply with the regulations
on the return of this product may lead to the authorities taking steps to penalize such noncompliance.
42
Roca Sanitario, S.A.
Avda. Diagonal, 513
08029 Barcelona
España
Tel. +34 (93) 366 12 00
Authorized Dealer
GCW-1074A-ES(05091)