1
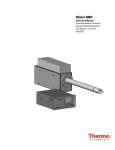
OPERATIONAL PROCEDURES – Mobile Nephelometer for Ambient PM2.5 Monitoring
Mobile Nephelometer for Ambient PM2.5 Monitoring
OPERATIONAL PROCEDURES
For use with the M903 Radiance Research Nephelometer and
Garmin GPSMAP 60Cx
Prepared by:
Karla Poplawski , Eleanor Setton and Steeve Deschenes
Spatial Sciences Research Laboratory
Department of Geography
University of Victoria
January 2010
1
OPERATIONAL PROCEDURES – Mobile Nephelometer for Ambient PM2.5 Monitoring
-TABLE OF CONTENTSPURPOSE ......................................................................................................................... III
RADIANCE RESEARCH M903 NEPHELOMETER....................................................... 1
GARMIN GPSMAP 60CX................................................................................................. 4
EQUIPMENT CHECKLIST .............................................................................................. 5
VEHICLE SETUP (QUICK CHECK) ............................................................................... 6
Setting up the GPS: ......................................................................................................... 6
Setting up the Nephelometer: .......................................................................................... 6
Connecting to Power: ..................................................................................................... 6
VEHICLE SETUP (COMPREHENSIVE) ......................................................................... 7
Setting up the Nephelometer: .......................................................................................... 7
Connecting to Power..................................................................................................... 11
DOWNLOADING THE DATA ....................................................................................... 13
GPS Data ...................................................................................................................... 13
Nephelometer Data ....................................................................................................... 14
DATA FORMATTING .................................................................................................... 17
Preparing the Nephelometer Data ................................................................................ 18
Preparing the GPS Data ............................................................................................... 20
COMBINING THE NEPHELOMETER AND GPS DATA ............................................ 26
SETTING UP THE HYPERTERMINAL CONNECTION FOR THE NEPHELOMETER
ON A NEW COMPUTER ................................................................................................ 32
SYNCHRONIZING THE NEPHELOMETER AND GPS CLOCKS ............................. 38
CHANGING THE AVERAGING TIME AND FLASH RATE ...................................... 41
APPENDICES
APPENDIX A - Mobile GPS Receiver/Data Logger GL-50S User’s Manual Version 1.5
San Jose Navigation Inc, 2006
APPENDIX B - Operation Procedures M903 Nephelometer ROM Version 2.37.20DE
Radiance Research, Seattle, WA
ii
OPERATIONAL PROCEDURES – Mobile Nephelometer for Ambient PM2.5 Monitoring
PURPOSE
This document outlines the operational procedures for measuring ambient particulate
matter (PM2.5) concentrations with a Radiance Research M903 Nephelometer and a
GARMIN GPSMAP 60Cx GPS unit, as developed by researchers at UVic’s Spatial
Sciences Research Lab.
In addition to basic operational instructions, this manual provides additional
documentation on downloading data, as well as preparing downloaded data for input into
a Geographical Information System (GIS).
Manuals for the GARMIN GPS and the Radiance Research M903 nephelometer are
included for further reference in Appendices A and B.
For technical assistance regarding general operation of equipment please contact:
Eleanor Setton or Karla Poplawski
University of Victoria Spatial Sciences Laboratory
Phone: (250) 472-4624
Email: [email protected] or [email protected]
iii
OPERATIONAL PROCEDURES – Mobile Nephelometer for Ambient PM2.5 Monitoring
RADIANCE RESEARCH M903 NEPHELOMETER
Equipment Parts:
1. Nephelometer Unit
2. 12 Volt Inverter with adapter for car lighter/charger plug
(may not look exactly like this)
3. Adaptor to Power Nephelometer Unit
4. Adaptor to Power Heater
5. Computer Connection Cables
6. Extension Cord
7. Copper Tubing with Funnel
8. Pipe Insulation Strip
1
OPERATIONAL PROCEDURES – Mobile Nephelometer for Ambient PM2.5 Monitoring
Nephelometer Unit:
2
OPERATIONAL PROCEDURES – Mobile Nephelometer for Ambient PM2.5 Monitoring
Nephelometer Ports
Display Screen
Scattering
Coefficient
(units m-1)
Date
Time
Data avg.
time constant
Operation
Mode
(15 sec data
averages)
3
OPERATIONAL PROCEDURES – Mobile Nephelometer for Ambient PM2.5 Monitoring
GARMIN GPSMAP 60CX
2
Download Cable Not Shown
4
OPERATIONAL PROCEDURES – Mobile Nephelometer for Ambient PM2.5 Monitoring
EQUIPMENT CHECKLIST
Make sure that the following equipment is on hand at the start of every data run:
Nephelometer:
Large plastic Tupperware bin
Small plastic bin
Nephelometer unit
Power adaptors (2)
Copper tubing
Funnel
Pipe insulation strip
Extension cord
Inverter with lighter/charger adapter
Data download cable
Assorted software – SERIAL to USB cd and HYPERTERMINAL cd
Bungee cords
GPS:
GPS unit
Extra AA batteries
Download cable
MapSource software cd
Other (Optional):
Map and directions
Duct tape
Notepad and pen/pencil
5
OPERATIONAL PROCEDURES – Mobile Nephelometer for Ambient PM2.5 Monitoring
VEHICLE SETUP (QUICK CHECK)
Setting up the GPS:
1. Turn on the GPS. Once signal is acquired, check it is in track mode (menu tracks Track Log on) and setup for 15 second logging.
2. Find a secure place on the dashboard.
Setting up the Nephelometer:
1. Connect the nephelometer to the power adaptor.
2. Connect the heater to the other power adaptor. (There is a special white
connector on this one).
3. Plug both adaptors into extension cord. Secure with rubber bands if necessary.
4. Secure the nephelometer into the large plastic Tupperware bin using bungee cords
to ensure it does not tip over. Place the adaptors alongside the nephelometer,
letting the white extension cord hang out.
5. Place the nephelometer in the passenger or backseat.
6. Attach the copper tubing to the air intake attached to the heater.
7. Place the copper sample tube out the window. The funnel should be secured to
the outside end using duct tape. Point the funnel down and slightly to the rear of
the vehicle. Use the pipe insulation to keep cold air out of the vehicle.
Connecting to Power:
1.
2.
3.
4.
5.
Make sure the inverter and all the connectors are properly attached.
Plug the extension cord from the nephelometer into the 12 volt inverter.
Plug the inverter into the lighter socket of the vehicle.
Start the vehicle.
Turn on the inverter, and then switch on the nephelometer. Check to make sure
that the nephelometer is “ticking” and that the fan is running. Check all
connections to the intake tube. Use duct tape as required.
6. When finished driving the route, turn off the nephelometer and GPS. Turn off the
inverter and the car engine.
These directions are repeated on the following pages including reference pictures. Please
refer to pages 7 to 16 for clarification of any of the instructions above.
6
OPERATIONAL PROCEDURES – Mobile Nephelometer for Ambient PM2.5 Monitoring
Vehicle Setup (COMPREHENSIVE)
Setting up the Nephelometer:
1. Connect the nephelometer to the power adaptor.
2. Connect the heater to the other power adaptor. There is a special white connector
on this one:
7
OPERATIONAL PROCEDURES – Mobile Nephelometer for Ambient PM2.5 Monitoring
Plug both adaptors into the extension cord. Secure with rubber bands if necessary.
3. Secure the nephelometer into the large plastic Tupperware bin using bungee cords
to ensure it does not tip over. Place the adaptors alongside the nephelometer,
letting the white extension cord hang out.
8
OPERATIONAL PROCEDURES – Mobile Nephelometer for Ambient PM2.5 Monitoring
4. Place the nephelometer in the passenger or backseat.
5. Attach the copper tubing to the air intake attached to the heater.
9
OPERATIONAL PROCEDURES – Mobile Nephelometer for Ambient PM2.5 Monitoring
6. Place the copper sample tube out the window. The funnel should be secured to
the outside end using duct tape. Point the funnel down and slightly to the rear of
the vehicle. Use the pipe insulation to keep cold air out of the vehicle.
10
OPERATIONAL PROCEDURES – Mobile Nephelometer for Ambient PM2.5 Monitoring
Connecting to Power
1. Make sure the inverter and all the connectors are properly attached (see below,
note may not look exactly the same):
Into lighter socket
2. Plug the extension cord from the nephelometer into the 12 volt inverter.
11
OPERATIONAL PROCEDURES – Mobile Nephelometer for Ambient PM2.5 Monitoring
3. Plug the inverter into the lighter socket of the vehicle.
4. Start the vehicle.
5. Turn on the inverter, and then switch on the nephelometer. Check to make sure
that the nephelometer is “ticking” and that the fan is running. Check all
connections to the intake tube. Use duct tape as required.
6. When finished driving the route, turn off the nephelometer and GPS. Turn off the
inverter and the car engine.
12
OPERATIONAL PROCEDURES – Mobile Nephelometer for Ambient PM2.5 Monitoring
DOWNLOADING THE DATA
Before downloading any data from the GPS Unit or the Nephelometer, first create a
folder on your computer where you will store your data. Always storing the data in a
designated folder makes it easier to find later, and ensures that data remain organized.
GPS Data
Connect the GPS unit to the computer with the USB cable and turn on GPS.
1. Double click the MapSource icon on your computer.
2. Go to the Tracks tab and delete any existing tracks.
3. Click on Transfer Receive from device. A new window will open, and should
quickly find the GPS device. Click on Tracks in the What to Receive box, then
click Receive. A new window should open with the message “transfer complete”.
Click OK.
4. You may see a number of ACTIVE LOG files. When you start out, the firsdt
ACTIVE LOG is created. If the GPS looses signal, it closes the first LOG, and
when signal is reacquired, a new ACTIVE LOG file is started.
5. To export the LOG files to a single text file, click on File Save As. A new
window opens, allowing you to choose a save location, a new file name (i.e.,
GPS_date) and file type (use .txt).
Once you have successfully saved the text file – open it up (use Notepad or Excel) and
check that the data are as expected. Then:
6. Close the MapSource software, do not save any changes.
7. On the GPS, in the Tracks menu, select Clear (enter) and confirm Yes.
NOTE – when there is no satellite signal, the Track Log will automatically be OFF.
You will send the GPS_date.txt file to your GIS technician.
13
OPERATIONAL PROCEDURES – Mobile Nephelometer for Ambient PM2.5 Monitoring
Nephelometer Data
1. Connect the nephelometer to an external power source (do not turn on). Do not
plug in the heater!
2. Connect the download cable to the USB Port.
3. Open the saved nephelometer setting in the Hyper Terminal program
(Programs/Accessories/Communications/Hyper Terminal/neph), or double click
the Hyper Terminal icon on your desktop and use File Open to select the
neph.ht file.
4. A blank screen will appear. Now turn on the nephelometer. Data will begin
scrolling down the screen. Hit the “s” key once and the main menu will appear,
as shown:
14
OPERATIONAL PROCEDURES – Mobile Nephelometer for Ambient PM2.5 Monitoring
5. Select the “Transfer” menu in the Hyper Terminal menu bar. Then select
“Capture Text to File”. The program will ask you for a name (i.e.,
NEPH_Date.txt) and location of the text file that will be created. Select
“Browse…” and choose a location to save the file.
6. Click “Start”. The program will now store the information that subsequently
appears on the screen as a text file in the location you specified.
7. Hit the “s” key once and then hit “enter”. This will download all the ‘unmarked’
data in the nephelometer memory in short format. Data will begin scrolling down
the screen. It will be saved to the text file you created.
8. When it has finished downloading select the “Transfer” menu in the Hyper
Terminal menu bar and select Capture text > Stop.
15
OPERATIONAL PROCEDURES – Mobile Nephelometer for Ambient PM2.5 Monitoring
9. Type “?” and hit return. This menu will appear again.
10. Type “M” to mark all the data as read and then hit “enter”. When you do this,
you will be prompted twice. Answer “y” to the first prompt (mark all records as
read y/n), and “n” to the next prompt (you don’t want to quit? y/n). The data are
now marked at this point.
11. Type “Q” and then hit “enter”. The nephelometer will now go into data-logging
mode again. You should hear it ticking. You can now turn the nephelometer
OFF. When it is turned on again it will automatically begin logging data.
12. Close the Hyper Terminal program. At the prompt, you can choose to save or not
save the session file. The text file you created has already been automatically
saved in the location you specified, so it is not necessary to save it again.
As a check, open the text file you just saved your data to, to make sure that the data
did indeed download. If not, you may have to try downloading it again. Use Notepad
or WordPad to open the .txt file. An example of what it should look like is provided
on page 25 of the manual.
The NEPH_Date.txt file can now be sent on to a GIS technician for further analysis.
16
OPERATIONAL PROCEDURES – Mobile Nephelometer for Ambient PM2.5 Monitoring
DATA FORMATTING
The text files which were created in the last section will look like the pictures below once
you open them. Clearly, they require some formatting and explanation in order to be
useable. This section will describe how to open and manipulate the files in Excel to
prepare them for use in a Geographic Information System (GIS).
Nephelometer Data
GPS Data
17
OPERATIONAL PROCEDURES – Mobile Nephelometer for Ambient PM2.5 Monitoring
Preparing the Nephelometer Data
1. Open the NEPH_Date.txt file using Excel. To do this, first start Excel, then select
File>Open. Find the nephelometer text file you saved. The Text Import Wizard
opens.
In the first screen, choose Delimited, click next.
In the second screen, choose Space, click finish.
There may be a few rows of general text that can be deleted, and often the first several
rows of nephelometer data should be deleted, as these were captured right when the
nephelometer was turned on and may not be accurate.
18
OPERATIONAL PROCEDURES – Mobile Nephelometer for Ambient PM2.5 Monitoring
2. Delete the first column, and the last four columns (see figure below – delete
columns shown as DELETE). Do this by right-clicking the letter above the
column you want to delete and selecting “delete” from the menu that appears.
Insert a row at the top and add headings to the remaining columns, as displayed in
the image below. Do this by right-clicking the number of the row (in the far left
of the window) you would like the new row inserted above and selecting “insert”
from the menu that appears.
3. Convert the BackScatter to PM_25: add the heading in the right-most column, add
the following equation:
=((G2*100000)-0.01)/0.28
to the first cell in the PM_25 column, then double-click the lower right corner of
the cell. This should automatically put the equation in the remaining cells in the
column.
Double Click
4. Save the spreadsheet as NewName.xls and minimize.
19
OPERATIONAL PROCEDURES – Mobile Nephelometer for Ambient PM2.5 Monitoring
Preparing the GPS Data
1. In Excel, open the GPS_Date.txt file. The Text Import Wizard opens. In the first
screen, choose delimited, and click finish. Before doing any re-formatting, save this file
with a new name (i.e., GPS_Date_formatted.txt).
20
OPERATIONAL PROCEDURES – Mobile Nephelometer for Ambient PM2.5 Monitoring
2. Remember, you may have a number of ACTIVE LOG files, if you lost GPS signal at
any point. Each ACTIVE LOG file will be listed in the spreadsheet. You only need to
keep the rows that start with “Trackpoint” and the Header row above the first Trackpoint
row (rows to delete are colored grey in the figure below). Keep an empty row between
the data for each ACTIVE LOG file, as this will help you to find time gaps later when
you are matching the GPS data to the nephelometer data.
3. Delete all but the Position and Time columns. Now, you’ll need to reformat these two
columns to end up with a Latitude, Longitude and Time that shows the seconds.
• Insert five new columns to the right of the Position column
• Select the Position column, and then the Data Text to Columns tool. A new
window will open. Choose fixed width and click on Next.
21
OPERATIONAL PROCEDURES – Mobile Nephelometer for Ambient PM2.5 Monitoring
•
Add break lines as shown and click Finish:
•
Delete unnecessary rows (shown in grey below):
22
OPERATIONAL PROCEDURES – Mobile Nephelometer for Ambient PM2.5 Monitoring
•
The first two columns contain the latitude coordinates – the first is the degrees,
the second is minutes.seconds. These need to be combined into degrees.minutes
(commonly called decimal degrees). Insert a new column (called Latitude) to the
right of column B, and enter the following equation into cell C2:
=A2+(B2/60)
Then, add a new column to the left of column E (called Longitude), and enter the
following equation into cell F2:
=D2+(E2/60))*-1
Fill the remaining cells with these equations – highlight the first cell with the
equation, go to the bottom of the column and shift-click on the last cell – this
should select all the cells in the column, then hit ctrl-d – this will copy the
equation all the way down.
Copy and paste ‘values’, so when we delete columns A, B, D and E, the final
values will remain in columns C and F – select the entire C column, then click
ctrl-c to copy, and then paste paste special values. Do the same for column
F.
•
Finally, use the text-to-columns tool to split the date and time. Highlight the Time
column, click on data text to columns, and when the new window opens, select
fixed width and click next
23
OPERATIONAL PROCEDURES – Mobile Nephelometer for Ambient PM2.5 Monitoring
•
Add break lines as shown, and click finish.
•
Rename the columns as appropriate, and save!!
24
OPERATIONAL PROCEDURES – Mobile Nephelometer for Ambient PM2.5 Monitoring
25
OPERATIONAL PROCEDURES – Mobile Nephelometer for Ambient PM2.5 Monitoring
COMBINING THE NEPHELOMETER AND GPS DATA
1. Finally, we are ready to combine the nephelometer and GPS data. Find the first
common time in the nephelometer file and in the GPS file
Nephelometer data:
12:07:00 PM
GPS data
(note this may not look exactly
the same as your spreadsheet):
2. Delete the rows in the nephelometer or GPS file that do not match at the
beginning. For example, you may have turned on the nephelometer before the
GPS, or the GPS may have started logging before you turned on the
nephelometer.
26
OPERATIONAL PROCEDURES – Mobile Nephelometer for Ambient PM2.5 Monitoring
delete
3. Select all the columns in the GPS file, and Copy
4. Go to the nephelometer file and put your cursor in the first empty cell in the first
empty column – use Paste Special, the choose Values and click OK.
27
OPERATIONAL PROCEDURES – Mobile Nephelometer for Ambient PM2.5 Monitoring
5. Now you should have all the records for the nephelometer and the GPS in one file –
save this as Final_Data_Date.xls
Go to the bottom of the file and check to make sure the time is still matching. Sometimes
the GPS loses signal, or perhaps the nephelometer was turned on/off during the run.
You’ll have to adjust accordingly:
•
•
Look for the first place where the mismatch occurs. Usually it is easiest to
maximize the Excel window and spreadsheet, start at the top of the file, check the
last row visible – if the nephelometer time and GPS time match, click the scroll
slider on the right to advance a page, and so on. If the last row visible does not
match, find the first record in that page where the mismatch starts.
Also, if you left a blank row in the GPS file between each ACTIVE LOG file,
then you should be able to easily see where mismatches might occur.
28
OPERATIONAL PROCEDURES – Mobile Nephelometer for Ambient PM2.5 Monitoring
EXAMPLES:
Missing nephelometer data!
Does not match GPS times.
In this case, delete the extra GPS data to match up the times with the nephelometer data.
Select the rows you want to delete, right click delete and shift cells up:
29
OPERATIONAL PROCEDURES – Mobile Nephelometer for Ambient PM2.5 Monitoring
Continue this process until the data match up:
They
now
match!
•
Finally, delete any extra rows at the bottom that do not have both nephelometer
and GPS data.
Delete
extra
Rows!
6. Do a little data quality check:
Sometimes the nephelometer will record a negative value – delete these rows as they
indicate a level at or below the detection limit, or unstable readings just after turning on
the equipment.
30
OPERATIONAL PROCEDURES – Mobile Nephelometer for Ambient PM2.5 Monitoring
3. SAVE. This file can now be easily converted for mapping using a geographic
information system.
31
OPERATIONAL PROCEDURES – Mobile Nephelometer for Ambient PM2.5 Monitoring
SETTING UP THE HYPERTERMINAL CONNECTION FOR THE
NEPHELOMETER ON A NEW COMPUTER
1. Install the SERIAL to USB driver from the CD in the software package.
2. From the Start Menu select All Programs > Accessories> Communications >
Hyper terminal, as displayed below.
32
OPERATIONAL PROCEDURES – Mobile Nephelometer for Ambient PM2.5 Monitoring
3. You will be prompted whether you would like to establish a new connection.
Give the connection a name, such as “neph” and select an icon. Then click “ok”.
4. Next, choose the COM port which corresponds to the USB connection on your
computer which you will be plugging the nephelometer into. Click “ok”.
33
OPERATIONAL PROCEDURES – Mobile Nephelometer for Ambient PM2.5 Monitoring
5. When asked to specify the properties about the selected COM port, choose 9600
as the appropriate Bits per second. Then click “ok”.
6. Exit the HyperTerminal program. You will be asked if you want to disconnect
now. Select “Yes”.
6. The program will ask if you want to save the “neph” connection. Click “Yes”.
34
OPERATIONAL PROCEDURES – Mobile Nephelometer for Ambient PM2.5 Monitoring
7. By choosing to save the neph connection, you will have added the “neph” icon
under the Hyperterminal menu:
You can now access the neph connection by going to the Start Menu > All Programs >
Accessories > Communications> HyperTerminal > neph.
Or you can create a shortcut for the desktop, as described next.
35
OPERATIONAL PROCEDURES – Mobile Nephelometer for Ambient PM2.5 Monitoring
8. Right click on “neph” and select “Create Shortcut” from the drop-down menu that
appears:
36
OPERATIONAL PROCEDURES – Mobile Nephelometer for Ambient PM2.5 Monitoring
9. There will now be another icon in the HyperTerminal menu, called “Shortcut to
neph”. Click on the shortcut, and holding the mouse button down, drag it onto the
desktop (as shown below). To access the HyperTerminal program now, all you
have to do is double-click the icon on the desktop.
37
OPERATIONAL PROCEDURES – Mobile Nephelometer for Ambient PM2.5 Monitoring
SYNCHRONIZING THE NEPHELOMETER AND GPS CLOCKS
The GPS unit receives very accurate times from the satellite signal, but the
nephelometer’s internal clock may slowly lose time. Set the nephelometer time once a
month or so using the following procedure:
1. Go to the NIST website (http://nist.time.gov/). The following screen will appear
2. Click on the “Pacific” link below the map. This is Pacific Standard Time. The
following screen will appear:
3. Connect the nephelometer to an external power source, but don’t turn it on yet.
Do not plug in the heater!
4. Connect the serial port between the nephelometer and a computer (use a USB
adaptor if necessary.
38
OPERATIONAL PROCEDURES – Mobile Nephelometer for Ambient PM2.5 Monitoring
5. Open the saved nephelometer setting in Hyper Terminal
(Programs/Accessories/Communications/Hyper Terminal/neph). Or double-click
the Hyper Terminal icon on the desktop.
6. A blank screen will appear. Turn on the nephelometer. Data will begin scrolling
down the screen. Hit “s” once and the main menu will appear, as shown:
7. Arrange your computer screen so that both the UTC website is visible and the
Hyper Terminal Screen is active and visible. The UTC time is shown to the
closest second, whereas the nephelometer clock is set to the closest minute
(although it displays seconds on the screen and in the logged file).
8.
To set the nephelometer clock, on the Hyper Terminal screen type
“T YYMMDDhhmm”. In the example below, if you want to set the clock to
3:07 AM on Dec 29, 2004 you type “T 0412290307”.
39
OPERATIONAL PROCEDURES – Mobile Nephelometer for Ambient PM2.5 Monitoring
9. Hit return at the instant that the UTC time reaches the appropriate minute.
10. The current nephelometer time will be shown on the screen at that instant, as
shown in the example below:
11. Type “Q” and then hit “enter”. The nephelometer will now go into data-logging
mode again. You should hear it ticking. You can now turn the nephelometer
OFF. When it is turned on again it will automatically begin logging data.
12. Close the Hyper Terminal program. At the prompt, you can choose to save or not
save the session file. You do not need to save.
When you turn the nephelometer back on again, the nephelometer display will show the
current time (as GMT) and the datalogger will begin logging with this time.
40
OPERATIONAL PROCEDURES – Mobile Nephelometer for Ambient PM2.5 Monitoring
CHANGING THE AVERAGING TIME AND FLASH RATE
It may be desirable on occasion to change the averaging time period for stored averages.
For instance, an averaging time of 15 seconds, 5 minutes, or 15 minutes might be more
suitable for particular applications than others. If wishing to change the averaging time,
please refer to pages 18-19 of the official M903 Nephelometer Operation Procedures
manual. The following steps provided below offer a summary of how to change the
nephelometer settings for different averaging periods:
1. Connect the nephelometer to an external power source (do not turn on). Do not
plug in the heater!
2. Connect the download cable to the USB port.
3. Open the saved nephelometer setting in the Hyper Terminal program
(Programs/Accessories/Communications/Hyper Terminal/neph) or double click
the Hyper Terminal icon on the desktop.
4. A blank screen will appear. Now turn on the nephelometer. Data will begin
scrolling down the screen. Hit the “s” key once and the main menu will appear.
5. Type in “z” and hit “enter” to enter the data logger mode.
6. To change a value, type the command letter, then a space and then the new value
and hit “enter”. For example, to change the E parameter to 25 and the H
parameter to 15 type:
E 25 H 15 and hit “enter”
7. Hit “enter” again to return to the main menu.
8. Type “Q” and then hit “enter”. The nephelometer will now go into data-logging
mode again. You should hear it ticking. You can now turn the nephelometer
OFF. When it is turned on again it will automatically begin logging data.
9. Close the Hyper Terminal program. At the prompt, you can choose to save or not
save the session file. You do not need to save.
The following table represents the settings necessary for a variety of different averaging
times:
Item
A
B
C
D
E
F
G
H
15 sec.
1 min.
5 min.
10 min.
15 min.
2
2
6
6
25
30
10
15
2
2
6
6
50
35
10
60
2
2
6
6
50
35
10
133
2
2
6
6
100
35
10
133
2
2
6
6
100
35
10
143
41