1
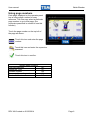
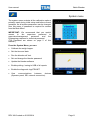
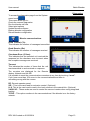
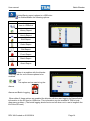
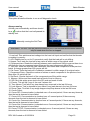
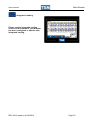
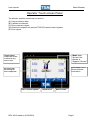
User manual Batch Blender Operator Touch screen Panel The blender operator panel may be used to: (A) View production data, (B) Calibrate the blender, (C) Enter material recipes, (D) Download recipes from optional TSM ICS central control system, (E) Print reports. Home button. Mode icon. Shows if the blender is Stopped, Paused or Running Jumps back to this screen from any other screen. Information icon. Shows blender information. Set and actual percentage for each component Go to screen option REV A6-Created on 01/05/2014 Alarm Icon Menu Icons. Page 1 User manual Batch Blender Home screen The “Touch Screen” operator panel provides easy access to all parts of the SigmaBatch Blender menu structure. Touch to enter recipe name, component percentages and job number. Displays the cause of an alarm and the time at which it occurred. Displays various reports generated by the system. This menu contains all the necessary blender calibration and configuration options. It is password protected so only authorised personnel can access any of the calibration sub-menus. From this menu it is possible to start, pause or halt the blending process. Password Setting All TSM blenders include 3 levels of password protection: Engineer Password (Default 9335). This allows access to the blender configuration area. Supervisor password (Default 5560). This allows access to the calibration and diagnostics area. Operator protection (Default 1). This allows the operator access to the recipe area. REV A6-Created on 01/05/2014 Page 2 User manual Batch Blender Blender information icon At the top right of the home screen you can see the blender information icon . Touching this icon allows the user to see the critical blender information. Please take note of the information in this screen before contacting TSM with support issues. This screen can be very useful when trouble shooting the blender, as well as the blender type, IP address and software version you can also see the last power up time and the number of batches the blender has made since the power up. SD card SD card is in position SD card is not in position Touching allows the SD card to be safely removed. (This will disable the SD card write function for 30 seconds) Warning: Never remove the SD card without disabling it first or the contents can get corrupted. The icon allows you to see what options are enabled/disabled. (see setting the license section of this manual for further information) In the right column you can see the board temperature and also if the blender is communicating to a network or any of the other TSM options that can be connected. You can also see if some other external items are connected to the main board. NET : Serial network port. I.E. cp9000 TCP: Ethernet port SEI: Extrusion control card (SEI card) LLS: Low Level Sensor card (for reading the bin sensors) OPT: Optimization (special function) V-1: Vacuum loading (integrated loading only) WD: Watch Dog Timer. Used to prevent the software from freezing or crashing. REV A6-Created on 01/05/2014 Page 3 User manual Batch Blender Blender Operation Before operating, the blender should be configured and the calibration of the weigh hopper checked. (See the quick start guide in this manual for more details.) Check the correct materials are in the material bins. Verify that the mixing chamber door is closed, (please refer to the blender safety information in the introduction section page 3-5) and that the air supply is connected. Switch Power on the blender using the switch located on the side of the blender. Enter the blend recipe setpoints. Check that the blender is not paused. See quick start guide on how to enter production setpoints. REV A6-Created on 01/05/2014 Page 4 User manual Batch Blender Recipe Entry Please see the quick start section for recipe entry information. (Optional) Auto Cleaning Cycle After a job is completed and before the next job changeover, the TSM blender offers an optional simple, easy to use the cleaning facility. The blender may clean itself automatically on recipe change or after a manual request via the operator panel. Mixer Cleaning upon Recipe Change Touch on the home page and continue change existing recipe or ‘Select’ from memory by keying in job number. Touch ’ The cleaning cycle At the end of the cleaning cycle, blender display returns to Production Summary screen. to can be enabled For molding, the blender is paused and the operator presses “1” to continue the cleaning process ‘Press Restart’ to commence new recipe. REV A6-Created on 01/05/2014 Page 5 User manual Batch Blender Using page numbers Each page displayed on the operator panel has a unique page number for easy reference. The user may select a particular page number to go to that page. (the supervisor password is needed to use this function) Touch the page number on the top left of the page as shown. Touch this icon and enter the page number Touch this icon and enter the supervisor password . Touch this icon to confirm. Sample page numbers: Load cell caibration Setting the Time Software update Communications diagnostics Blender Self test REV A6-Created on 01/05/2014 191 22 164 37 217 Page 6 User manual Batch Blender Alarms If an alarm occurs, an icon will appear on the blender icon on the home screen and the red beacon mounted on the blender frame will provide a visual warning. Some alarms may cause the blender to enter manual mode. To find the cause of an alarm touch the alarm icon on the home screen. This page displays any alarm that has occurred (or cleared), the time at which it happened and it’s current status. To remove alarms touch the “X” icon Alarm Occurred Alarm Cleared Note: Alarm's clear every time the blender is powered off. For the alarm description see page 5 of the quick start section. For more detailed information on what each alarm message means, and how to troubleshoot the alarm see the TROUBLESHOOTING section of this manual. There is a position on the NBB board to connect an external alarm (see maintenance section for a diagram). This connection is a set of relay contacts and the external alarm should have an alternate power supply. Do not try power this alarm from the NBB board. REV A6-Created on 01/05/2014 Page 7 User manual Batch Blender Reports The Reports Menu allows you to view various reports generated by the blender. A sample of each report can be found on the following pages. To access any of these screens touch the reports icon on the home screen and then the appropriate icon for the page you wish to view. Current order This report allows you to check the status of the current order. You can also reset the production order totals. Resetting order totals can be useful, (for example in the extrusion process) when you have to discard a start-up roll of scrap material that should not be included in the order total. Touch “X” to reset the order totals. Order Report The report shows all of the values for the previously completed order In order to use the order reports correctly the order totals should be reset when starting a new recipe. To reset the totals tick this box. REV A6-Created on 01/05/2014 Page 8 User manual Batch Blender Roll Report If the roll change signals are connected to the SEI card this report shows all of the values for the previously completed roll including: Start time Finish time Length Component weight Total roll weight Blender information On this screen it is possible to view the set and actual batch weights along with the open/close status of the fill valve for each component configured. Slide gate 1 open Slide gate 1 Closed Weight hopper open Weight hopper closed Mixing chamber full Mixing chamber empty Offline (optional) valve open Offline (material flow) valve closed NOTE: If the blender is paused the slide valves and weight hopper dump flap can be manually opened/closed by touching the REV A6-Created on 01/05/2014 icon. (The valve will stay open until manually closed) Page 9 User manual Batch Blender Cleaning status(optional) This screen allows the operator to view what parts of the cleaning cycle are active/inactive. Totals The Totals screen is used to display the: 1. Current total. This is a reset able total 2. Running throughout of the blender. This total is only reset if the blender is powered off. It is used to display the overall throughput of the blender. Reset the current totals. REV A6-Created on 01/05/2014 Page 10 User manual Batch Blender System menu The system menu contains all the calibration options primarily used during initial setup and before normal operation. As all system parameters can be changed from this menu; a password is required for access from the Main Menu. IMPORTANT: We recommend that you restrict access to the supervisor password to supervisor/management personnel and the Engineering password to technical personnel. (The Password are shown on page 2 of this manual.) From the System Menu, you can: Calibrate the weigh hopper. Set the time and date. Run the blender self test. Set and change the blender password Update the blender software Enable printing / saving to USB of all reports Enable the diagnostic logs/TELNET View communications between devices (Operator panel, SEI, network connection). REV A6-Created on 01/05/2014 Page 11 User manual Batch Blender Load Cell Calibration Explained (see the quick start guide for how to calibrate the load cell.) This option is used to ensure accurate weighing of material. As the procedure for calibrating the hopper is already dealt with in the Quick Start Guide, this section will only define the options contained. Tare (zero) (The blender front door must be open to tare the hopper). Hopper Weight icon – Displays the current weight in the weigh hopper. When calibrating the weight hopper the calibration weight can be entered here BW (Fill Target WT (kg)) – The batch weight can be seen here but cannot be changed. To change this it is necessary to use the engineer menu icon. The two values shown on the bottom right of the screen are: CC : This value is the Calibration constant. The blender uses this constant to calculate the weight from the load cell A/D counts. (A/D) Counts – Analog to Digital readouts from the load cell. A/D Tare Counts –Zero reference point after the hopper has been tared. (These values are useful when diagnosing the load cell.) REV A6-Created on 01/05/2014 Page 12 User manual Batch Blender Diagnostics To access the diagnostics page from the System menu touch . This menu allows you to: Check the comms diagnostics. Run the blender self test. Select print options Update blender software. Backup blender configuration Reload blender configuration Blender communications Good Transmit (Tx): This indicates the number of messages transmitted. Good Receive (Rx): This indicates the number of messages received. Checksum Error (C’Sum): This indicates that the selected unit received the response but the checksum was incorrect when the complete message was received. Timeout: This indicates the number of times that the unit was transmitted to and received no response. The counters are displayed for the Remote display, Network and the SEI It is possible to reset the communications counters at any time by touching “reset”. If you have more than 10% errors in the communications then there is something wrong with the comms. RP- Remote operator panel. SEI – This is the card used for extrusion control. (Optional) LLS- This is the card used to read in the level sensors in the material bin. (Optional) VAC81/2/3 - These cards are used to control the vacuum loaders when using integrated loading. TCP/IP – This option monitors is the communications if the blender is on the factory network. REV A6-Created on 01/05/2014 Page 13 User manual Batch Blender Printing/Saving report options to a USB drive Use the Icon to enable/disable the following options. Explanation Enable print or save to USB stick History Report Hourly Report Shift Report Order Report Roll Report Event Report Batch Report Alarm Report If there is a problem with the blender TSM may ask for one of these options to be enabled. TXT This option can be used to log the Alarms Alarms and Batch Logging When either if these options are enabled the blender will then start logging its Alarms/batch information to the SD card or USB drive. This information can be emailed to TSM to help diagnose a problem. (The batch logging should be turned off when not in use to lengthen the life of the SD card.) REV A6-Created on 01/05/2014 Page 14 User manual Batch Blender Telnet: This remote diagnostic option allows TSM to remotely connect to the blender if the blender has a working network connection. Touch REV A6-Created on 01/05/2014 to enable. Page 15 User manual Batch Blender Blender Self Test. This option allows the blender to run a self diagnostic check. Always running Ad test runs automatically and there should be a to show that the Load cell passed its stability test. Manually running the Self Test. WARNING: The Self Test will pause the blender for 25-30 seconds and therefore should only be used when the line is stopped. 1. Load cell: This switches a test voltage into the load cell input and verifies that the blender is reading it correctly. 2. A/D: Stability test is run for 10 seconds to verify that the load cell is not drifting. 3. Hopper Tare: tests the load cell’s tare value is within range of its original value. 4. Component tare: Reads the load cell between each component filling to ensure there is no drift from the time a component stops filling and the next component starts filling. 5. Tare Dev: reads the load cell tare value after each batch and compares it to the previous batch. A change greater than 200 counts will fail. 6. Cal Const: Tests the load cell’s Calibration constant is within range of its original value 7. Component Retry: Check the number of retries on each component in the previous hour. More than 10 retries will fail. 8. Std Dev’s: Checks that each of the components are filling within range. 9. Memory: Writes and then reads back a block of text to memory. 10. SD Card: this writes some text to the SD card and reads it back. 11. Events: This will fail if any of the next 3 alarms fail. 12. Tare Alarms: Test fails if any tare alarms have occurred in the last 24 hours 13. Leak Alarms: Test is deemed to have failed if any leak alarms in the last 24 hours 14. Dump Flaps: Test fails if any weigh hopper dump flap alarms in the last 24 hours 15. Comm Panel: 16. Comm SEI: Communication is checked over a 2 second period, if there are any timeouts, then the test is deemed to have failed 17. Comm LLS: Communication is checked over a 2 second period, if there are any timeouts, then the test is deemed to have failed 18. Comm Op: Communication is checked over a 2 second period, if there are any timeouts, then the test is deemed to have failed 19. Comm Net: Communication is checked over a 2 second period, if there are any timeouts, then the test is deemed to have failed 20. Comm TCP/IP: Communication is checked over a 2 second period, if there are any timeouts, then the test is deemed to have failed. REV A6-Created on 01/05/2014 Page 16 User manual Batch Blender Settings. Use this option to set the correct time, day and date. Touch the appropriate box on the Line and enter the new value. Touch the save icon to update the time. Passwords. This screen can be used to change the operator and supervisor passwords. Operator password This allows the operator access into the recipe section. Supervisor password This allows the supervisor into the recipe section and also the system settings . This password should be restricted to authorised personnel as it allows access to the blander calibration settings. See the quick start section of this manual for the factory set passwords. NOTE: It is important to make a note of the new passwords. REV A6-Created on 01/05/2014 Page 17 User manual Batch Blender Updating the blender firmware and backing up the blender configuration. The SD card is in position The SD card is missing Configuration options. 1. Save the blender configuration to the SD card. 2. Save a backup of the configuration to the SD card 3. Load the configuration from the SD card 5. Load the backup from the SD card. Updating blender software: (See software update section) 6. Load the new software version from the SD card. WARNING: Before removing the SD card you must open the screen and touch the Saving to the SD card is suspended so it is safe to remove the SD card Do not remove the SD card the blender may be saving information to the SD card. REV A6-Created on 01/05/2014 Page 18 User manual Batch Blender Integrated Loading. Please see the integrated loading section of this manual if your blender has been configured to operate with integrated loading. REV A6-Created on 01/05/2014 Page 19 User manual Batch Blender This section is used by TSM personnel and is protected by another password to stop unauthorised personnel from changing the blender settings. TSM should be consulted if any changes are needed in this section. Caution: changes to any settings inside this area may stop the blender or cause it to function incorrectly. REV A6-Created on 01/05/2014 Page 20 User manual Batch Blender Setting the Blender IP address. Touch the icon. Enter the password 9335 Touch the Then touch the icon. icon Touch as shown to set the network settings. Touch the “Save” icon when finished. REV A6-Created on 01/05/2014 Page 21 User manual Batch Blender Mode The four options in the “Mode” menu, they can be used to: Stop the blender cycling immediately Allow the blender to finish the current batch, drop it and then stop. Restart the blender. Manually start the cleaning option. WARNING: The above options do not stop the mixing motor. REV A6-Created on 01/05/2014 Page 22 User manual Batch Blender Setting a license Some options are licensed and therefore can only be changed by getting a licensed code from TSM Touch the this screen. icon to open Touch the icon to open the license screen You will need to call TSM to get a new license code but you will need to know the “Software ID” in order to get the new license code. When you get a license code from TSM touch the icon to open the keypad. Enter the license code then touch the save icon to save the license. The option should then have a beside it to show that is enabled. REV A6-Created on 01/05/2014 Page 23