1
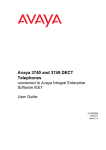
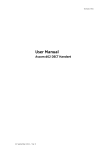
ascom
]
QUICK REFERENCE GUIDE GB
]
Ascom d81 dect Handset
Including Safety Instructions
LED Alarm button
Volume up button
Volume down button
2009-01-01
System A
Mute button
12345
Soft keys
Off-hook key
Voice mail key
Tactile key
Key lock and Upper/
Lower Case key
Microphone
Earpiece speaker
Pull-cord connector
Status bar
Header bar
Colour display
Shows the soft
key functions
Four-way
On-hook and
On/Off key
Alphanumeric keys
Sound off key
Space key
Multi-purpose connector*
*) Used for battery charging, configuration and connection of headset.
English
Display Icons
Signal strength
Battery status
Voice mail
Microphone off
Loudspeaker on
Loudspeaker off
Sound off
Headset connected
Bluetooth headset connected
Bluetooth barcode reader connected
Bluetooth enabled
New message
New message, important
2
English
Display Icons
GB
Read message
New coloured message
Read coloured message
Missed call
Incoming call
Outgoing call
System connection
Key lock
Phone lock
Handset with the product license d81 Messenger.
Handset with the product license d81 Protector.
3
Product Presentation
The d81 DECT handset is a feature-rich handset with colour
display, telephony, messaging, and Bluetooth. It is a highly
robust handset to be used in rough demanding environment, for
example the industry.
There are four handsets available:
Local phonebook
Company phonebook1
Central phonebook2
Loudspeaking function
Headset connector
Vibrator
Microphone On/Off during a Call
SMS (Short Message Services)2
Voice Mail2
Push Button Alarm2
Man-down and No-movement alarm4
Pull cord alarm3, 4
Bluetooth
d81 Messenger
EX
d81 Protector
EX
d81 Protector
Functions
d81 Messenger
• d81 Messenger, with messaging functions,
• d81 Protector, with additional alarm functions for personal
security,
• and two intrinsically safe versions; d81 Messenger EX and d81
Protector EX.
Read the “Safety Instructions” on page 14 before use.
x
x
x
x
x
x
x
x
x
x
x
x
x
x
x
x
x
x
x
x
x
x
x
x
x
x
x
x
x
x
x
x
x
x
x
x
x
x
x
x
x
x
x
x
x
x
1.This function/feature requires PDM/IMS2 2. This is a system dependent function.
3.This is a license dependent function
4. Factory option
Note: Additional functions are described in the User Manual,
Ascom d81 DECT Handset, 92644GB.
4
GB
Basic Functions
Switch on the Handset
Press and hold
lights up.
until the handset vibrates and the display
Switch off the Handset
Press and hold
“Yes“.
until the dialog Switch off? is displayed. Press
Make a Call
Dialling can be made in the following ways:
• In idle mode, enter number and press
key.
• Press
, or the “Call“ soft
and enter number. Post dial is set by default.
• Press a pre-programmed Hot key1 or Soft key.
• Dial a number from the local phonebook. Press the “Menu“
soft key, select “Contacts”
, select “Call contact”, select the
name from the list, press “Call” soft key, or
.
• Dial a number from the Central phonebook. Press the “Menu“
soft key, select “Contacts”
, select Central phonebook >
search by name/number/last result, and press search. Press
.
Answer/End a Call
When the ring signal sounds; press
press
to answer. To end the call,
.
Reject a call
When the ring signal sounds, press
stored in the Call list.
. Call information will be
1.The alphanumeric keys can be programmed with a telephone number.
5
Turn Loudspeaking Function on/off
During a call, press the soft key to turn the loudspeaking
function on, or press the soft key to turn it off.
Turn Audio Signals on/off
In idle mode, a long press on
audio signals on/off. The icon
A short press on
ring signal.
or
or
changes between
indicates a silenced telephone.
before answering a call, silences the
Turn the Microphone on/off during a Call
Press “More”, select “Microphone on/off“, press “Select“. It is
also possible to turn the microphone on/off by a long press on
or
.
Lock/Unlock the Keypad Manually
Press
to lock/unlock and then soft key "Lock” or
Yes”. The “Locked keypad” icon
indicates a locked keypad.
Change the Volume during a Call
Press
to increase the volume, and
to decrease the
volume. Or, use
and
on the Navigation key to adjust the
volume.
Charge the Battery
Charging is done in a desktop charger or in a charging rack.
Charging is indicated by orange LED. When the battery is fully
charged the LED is green and a fully charged icon
is
displayed.
While in a desktop charger, the handset is fully operational. The
handset does not vibrate in charger.
The battery can also be charged in a separate battery pack
charger.
Note: Charging below 5°C will harm the battery and shorten the
lifetime. It is NOT permitted to charge any battery in hazardous
areas. It is NOT permitted to charge the EX battery pack alone.
Remove the Battery
It is recommended to switch off the telephone before removing
the battery.
Note: It is NOT permitted to remove any battery pack in
hazardous areas.
6
GB
Menu Operation
For descriptions of all functions; see User Manual, Ascom d81
DECT Handset, TD 92644GB.
Messaging
Calls
Short cuts
Connections
Services
Profile
Settings
Contacts
Navigate the Menu
Use the Navigation key
structure.
to move around in the menu
The menus are; “Connections”, “Calls”, Short cuts”, “Services”,
“Messaging”, “Settings”, “Profiles”, and “Contacts”.
The three Soft keys below the display are used for choices in the
menu. The function of each Soft key is explained by text in the
soft key field in the display.
Contacts
Use the Local Phonebook
To find and call a contact: Press the soft key “Menu“, select
“Contacts”
, select “Call contact”. Enter the first letter in the
name or the whole name (will be displayed in Search field while
entering text), or step in the contact list. Select the name and
press the soft key “Call” or
.
To edit the contact: Select “Edit contact”, select the name and
press “Edit”. Make your changes, press “OK”, and then press
“Save”.
7
To add a contact: Select “Add contact”, select “New” or “From
call list”. Press “Add”, enter the name and press “OK”. Select
“Number”, enter the number, press “OK” and press “Save”.
To delete a contact: Select ”Delete contact”, select the name,
press “Delete”, and then press “Yes”.
Use the Central Phonebook
Press the soft key “Menu“, select “Contacts”
, and select
“Central phonebook”. Select “Search by name”, “Search by
number”, or “Last result”. Enter the first letter(s) in the first
name, and/or the first letter(s) in the family name. Press
“Search”. The Central phonebook will be searched and a list of
matching names will be displayed. You can step to the next
entry in alphabetic order by pressing on the Navigation key.
Press “More” to add contact; or press the soft key“Call” or
to
make the call.
Use the Company Phonebook
The company phonebook has to be imported via the PDM before
it will be visible in the handset. See User Manual, Ascom d81
DECT Handset, TD 92644GB.
To find and call a name: Press the soft key “Menu“, select
“Contacts”
, select “Call contact”. A contact from the
company phonebook is marked with the icon. Select name/
number and press the soft key “Call” or . Only work number is
available for the contact and it is not editable.
Soft Keys and Hot Keys
The middle and right Soft keys below the display can be defined
for specific functions such as dialling a specific number.
A long press on a Hot key can have the same function as a Soft
key. The keys “0, “2” - “9” can be programmed as a Hot key.
For more information about Soft keys and Hot keys, see User
Manual, Ascom d81 DECT Handset, TD 92644GB.
8
Messaging
GB
Receive a Text Message
When a text message is received, the LED starts flashing and the
message alert signal sounds. The icon
, and the content of
the received message is automatically displayed. The icon will
remain in the display until all new messages are opened. If the
message is received during a call, a beep notifies the user.
It is possible to reply, forward the message, call the sender, and
call number1 included in a text. It is also possible to read the
message later by pressing "Close". A received message is stored
in the Inbox. The thirty last received messages are stored in the i
box. Time and date information is included in the message.
Read a Stored Message
Press the “Menu” soft key, select “Messaging“
, select
“Inbox“. Use
and
on the Navigation key to navigate in the
list. Select message and press the soft key “View” to read the
message.
Send Message
Press the “Menu” soft key, select “Messaging“
and select
“Write new message”. Enter text, press the soft key “Send”, and
then enter a number, or press the soft key
for phonebook
look-up. Press “Send”.
Delete a Stored Message
Press the “Menu” soft key, select “Messaging“
, and
“Inbox“. Use
and
on the Navigation key to navigate in the
list. Select message and press View > More > Delete. Press the
“Yes” soft key to delete the message”.
Check Voice Mail
A new voice mail is indicated by a dialog window and the “Voice
mail message“
icon in the status bar. Only one voice mail at
the time will be displayed in the message list.
1.The number must consists of minimum 3 digits.
9
Press the “Menu” soft key, select “Messaging“
, and
“Inbox“. Select message (indicated by
in front of the
message) , press the soft key “View”. Press “Call” or
.
Alternatively:
A long press on
will call your voice mail. If the extension
number is not available, a dialog window “Voice mail number
not defined” is displayed. See User Manual, Ascom d81 DECT
Handset, TD 92644GB.
Settings
Turn the Automatic Keypad Lock on/off
Press the “Menu“ soft key , select “Settings”
, and step to
“Locks”. Select “Automatic key lock”, select “On/Off”, and press
“Back”. A locked keypad is indicated by the “Key lock” icon .
To unlock, press
, and then the "Yes” soft key.
Turn the Vibrator on/off
Press the “Menu” soft key, select “Settings”
, and step to
“Sound & Alerts”. Select “Vibrator alert“ and then select “On”,
“On if silent” (that is, the vibrator is on when the handset is
muted), or “Off”. Press “Back“.
Adjust the Ring Volume
Press the “Menu” soft key, select “Settings”
, and step to
“Sound & Alerts”. Select “Volume” and step with to increase
the volume and with to decrease it. Press “OK“ to save the
setting.
Set Different Ring Signals for Internal Call, External Call
and Callback
Press the “Menu” soft key, select “Settings”
, and step to
“Sound & Alerts”. Select “Ring signals”>"Internal call", "External
call", or "Callback". Select sound. By pressing "Play" it is possible
to listen to the different sounds. Press “Back”.
10
Alarm Settings
The alarm functionality is applicable for d81 Protector only.
GB
Press the “Menu” soft key, select “Settings”
> Alarm >
Activate alarm. Select “Pull-cord1“, Man-down”2 and/or “No2
movement“ , and then press the “Select“ soft key to change the
setting. The check box will be marked. To remove the setting,
select an alarm and then press “Select“. The check box will be
unmarked.
For more information about the alarms and additional settings,
see User Manual, Ascom d81 DECT Handset, TD 92644GB and
Configuration Manual, Ascom d81 DECT Handset,
TD 92674GB.
1.This is a license dependent function.
2.Applicable for d81 Protector with the factory option No-movement/Mandown only.
11
Alarm Operation
The alarm functionality is applicable for d81 Protector only.
The handset is provided with alarm for personal security.
Addtional alarms can be enabled in the “Settings” menu
.
For more information about the alarms and additional settings,
see User Manual, Ascom d81 DECT Handset, TD 92644GB and
Configuration Manual, Ascom d81 DECT Handset, TD92674GB.
Personal Alarm
Press the push-button
twice or more, the dialog window
"Personal Alarm" (default) is displayed. Depending on set
parameters;
•
•
•
•
•
a beep is heard
the orange LED flashes twice
the vibrator stirs
ALS sounds or a pre-defined call is established.
the handset receives a notification that the alarm has been
received by the system. This is a system dependent feature.
Test Alarm
Press and hold the push-button
until a dialog window
"Test Alarm" (default) is displayed. Depending on set
parameters;
•
•
•
•
•
a beep is heard
the orange LED flashes twice
the vibrator stirs
ALS sounds or a pre-defined call is established.
the handset receives a notification that the alarm has been
received by the system. This is a system dependent feature.
12
Accessories
GB
The following accessories for the Standard d81 are available:
•
•
•
•
•
•
•
•
•
•
Belt clip, swivel type
Standard clip
Leather casing incl. belt clip
Security cord
Pull cord
Cover plate without clip
Charging rack
Battery pack charger
Desktop chargers
Front plates (5 colours)
•
•
•
•
Headset with Microphone on boom1
Headset adaptor for Microphone on boom
Peltor hearing protection headset (optional)
EX-classified headset adaptor for Peltor standard headset
(optional)
The following accessories for EX-classified d81 are available:
•
•
•
•
•
•
•
•
•
•
Belt clip, swivel type
Standard clip
Leather casing incl. belt clip
Security cord
Pull cord
Cover plate without clip
Charging rack
Battery pack opener
Desktop chargers
EX-classified headset adaptor for Peltor standard headset
(optional)
1.Requires the headset adaptor for Microphone on Boom.
13
Safety Instructions
For safe and efficient operation of the handset, observe the
guidelines given in the Quick Reference Guide and all necessary
safety precautions when using the handset. Follow the
operating instructions and adhere to all warnings and safety
precautions located on the product, and the User Manual.
This product shall only be used with the following batteries:
• Art.No.: 660273 Battery
• Art.No.: 660274 Battery EX
Single chargers shall only be connected with power adapters
supplied by the manufacturer.
Available power adapters (Suppliers Designation) are:
• Art.No.DC3: 130160A Power supply unit, AC: 100V-240V, DC:
5V/0.65A - Europe
• Art.No.DC3: 130166A Power supply, AC: 100V-240V, DC: 5V/
1A - USA, Canada, AUS, and UK
• Art.No.DC4: 130161A Power supply unit, AC: 100V-240V, DC:
5V/2A - Europe, USA, Canada, AUS, and UK
14
EX Safety Instructions
Intrinsically safe use:
GB
0470
SIRA 10ATEX2072 IECEx SIR 10.0038
II 2G, II 2D Ex ib IIC T4 Gb Ex ib IIIC T55°C Db IP65
Tamb= -10o C to +40o C
15
Charging the EX Battery
When using in hazardous/classified areas, use an approved
battery pack only. The battery pack must be marked with art.
no.: 660274 on the label.
Charging parameters: Um = 5.25V, Im = 1.15A
For approved battery types, see certificate IECEx SIR 10.0038 or
Sira 10ATEX2072 and following supplements.
The documents above and the EC Declaration of Conformity can
be found at http://www.ascom.com/ws/ products_ws.htm and
http://www.iecex.com.
IMPORTANT: Battery charging or replacement is NOT permitted
in a hazardous area. When charging the EX classified handset, it
is only permitted to use a charger marked with DC3-AAAB/rev.
1A (or higher rev.), DC4-AAAB/rev. 3A (or higher rev.) or CR3AAAB/rev. 2A (or higher rev.) on the label. It is not permitted to
charge the EX battery pack alone.
Fastening/Removal of the EX Battery
Before using the handset the first time, lift the battery pack
upwards and remove the protection tape. Insert the battery
pack and fasten it using the provided screws that require the
provided special tool Battery pack opener.
To remove the battery pack, use the opener and untighten the
screws. Remove the battery pack by lifting it upwards. To fasten
the battery pack use the opener and tighten the screws.
IMPORTANT: Removing the battery pack is NOT permitted in a
hazardous area.
Headset in Hazardous Areas
In hazardous areas, it is only allowed to use the EX classified
headset adapter (art. no.: 660281) in combination with an EX
classified Peltor headset. The Peltor headset must be compatible
with the output parameters of the headset connector as follows:
Uo = 4.2 V
Io = 169 mA
Po = 583 mW
Co = 2.2 µF
Lo = 2.2 µH
16
Attention
• The product is housed in an enclosure that meets IP65.
However, the EX classified handset is not intended to be
immersed in dust or water.
Note: Sira has tested the enclosure to IP64. IPX5
marking is based on Ascom tests and is not
validated by Sira.
• In the case of suspected damage, do not use the EX classified
handset in a hazardous area.
• In combination with EX classified handset, use approved
battery types only. The battery must have the safety text
engraved in the plastic and must have the article number
660274.
• Make sure that the product marking corresponds to the site
requirements.
• Before installation consult the product documentation.
• National safety rules and regulations have to be observed.
• Do not use accessories to the product without ensuring that
they are suitable for use in a hazardous area.
• Modification of the product is not permitted.
• Product repair has to be done at authorised repair shops only.
GB
Regulatory Compliance Statements
Bluetooth Qualified Design ID
Bluetooth QD ID: B016451
Environmental Requirements DECT Handset
• Only use the handset in temperatures between -10o C to +55o
C (14o F to 131o F).
IMPORTANT: The EX classified handsets are
only allowed to be used in temperatures between
-10o C to +40o C (14o F to 104o F) in hazardous
areas.
• Avoid exposing the handset for direct sunlight or close to other
heat sources.
• Avoid volume levels that may be harmful to your hearing.
Exposure to excessive sound pressure from a handset's
earpiece or headset may cause permanently hearing loss.
• Do not expose the handset to open flame.
17
• Keep the handset away from excessive heat and moisture.
• Avoid sudden temperature changes to prevent condensation
in the handset. It is recommended to put the handset into an
air tight plastic bag until the temperature is adjusted, for
example, when entering or leaving a cold/heated building on a
warm/cold day.
• Protect your handset from aggressive liquids and vapours.
• Keep the handset away from strong electromagnetic fields.
• Do not place a cold handset in a charger.
Battery
• Do not immerse the battery into water. This could short-circuit
and damage the battery.
• Do not expose a battery to an open flame. This could cause the
battery to explode.
• Do not allow the metal contacts on the battery to touch
another metal object. This could short-circuit and damage the
battery.
• Do not leave a battery where it could be subjected to
extremely high temperatures, such as inside a car on a hot
day.
• Use the Desktop Charger or the wall mounted Charging Rack
for charging. Charge the battery for at least one hour the first
time you use the battery. Note that the wall mounted battery
pack charger has to be used if the battery alone is to be
charged.
IMPORTANT: When charging the EX classified
handset, it is only permitted to use a charger
marked with DC3-AAAB/rev. 1A (or higher rev.),
DC4-AAAB/rev. 3A (or higher rev.) or CR3-AAAB/rev. 2A (or
higher rev.) on the label. It is not permitted to charge
the EX battery pack alone.
• Do not charge a battery when the ambient room temperature
is above 40o C or below 5o C (above 104o F or below 41o F).
• Do not attempt to take a battery apart.
• Do not disconnect the battery unless it needs to be replaced.
• Do power the handset off before removing the battery.
Battery Disposal
• Defective batteries must be returned to a collection point for
chemical waste disposal.
18
Regulatory Compliance Statements (EU/
EFTA only)
GB
This equipment is intended to be used in the whole EU & EFTA.
This equipment is in compliance with the essential requirements
and other relevant provisions of R&TTE Directive 1999/5/EC. The
Declaration of Conformity may be consulted at:
https://www.ascom-ws.com/doc/
The handset is marked with the label
Regulatory Compliance Statements (USA
and Canada only)
FCC ID: BXZDH5BL
IC: 3724B-DH5BL
US: 9FVW4NANDH5 HAC
FCC Compliance Statements
This equipment has been tested and found to comply with the
limits for a Class B digital device, pursuant to part 15 of the FCC
Rules. These limits are designed to provide reasonable protection
against harmful interference in a residential installation. This
equipment generates, uses and can radiate radio frequency
energy and, if not installed and used in accordance with the
instructions, may cause harmful interference to radio communications. However, there is no guarantee that interference will not
occur in a particular installation. If this equipment does cause
harmful interference to radio or television reception, which can
be determined by turning the equipment off and on, the user is
encouraged to try to correct the interference by one or more of
the following measures:
• Reorient or relocate the receiving antenna.
• Increase the separation between the equipment and receiver.
• Connect the equipment into an outlet on a circuit different
from that to which the receiver is connected.
• Consult the dealer or an experienced radio/TV technician for
help.
19
This Class B digital apparatus complies with Canadian ICES-003.
Cet appareil numérique de la Classe B conforme á la norme NMB003 du Canada.
Privacy of communications may not be ensured when using this
handset.
Exposure to Radio Frequency Signals
This equipment complies with FCC radiation exposure limits set
forth for an uncontrolled environment. This device complies with
FCC SAR limit of 1.6 W/kg. The maximum SAR value measured
when used at the ear is 0.013 W/kg. The telephone has also been
tested when worn on the body using belt clip, maximum
measured SAR value in this configuration is 0.016 W/kg. This
device must not be co-located or operating in conjunction with
any other antenna or transmitter.
SE
DE
Use of non-Ascom approved accessories may violate the FCC RF
exposure guidelines and should be avoided.
Information to User
This device complies with Part 15 of the FCC Rules Operation is
subject to the following two conditions:
1
this device may not cause harmful interference, and
2
this device must accept any interference received, including
interference that may cause undesired operation.
Modifications
Changes or modifications to the equipment not expressly
approved by the party responsible for compliance could void the
user’s authority to operate the equipment.
FI
ES
IT
92667GB Ver. B, December 2010 – ascom Wireless Solutions, Sweden – Specifications are subject to change without notice
ascom
]
www.ascom.com ]