1
TM 11-5820-890-10-8
TECHNICAL MANUAL
OPERATOR’S MANUAL
SINCGARS GROUND COMBAT
NET RADIO, ICOM
MANPACK RADIO
AN/PRC-119A/D/F (NSN 5820-01-267-9482) (EIC: L2Q)
SHORT RANGE VEHICULAR RADIO
AN/VRC-87A/D/F (NSN 5820-01-267-9480) (EIC: L22)
SHORT RANGE VEHICULAR RADIO WITH SINGLE RADIO MOUNT
AN/V/R/C-87C (NSN 5820-01-304-2045) (EIC:GDC)
SHORT RANGE VEHICULAR RADIO WITH DISMOUNT
AN/VRC-88A/D/F (NSN 5820-01-267-9481) (EIC: L23)
SHORT RANGE/LONG RANGE VEHICULAR RADIO
AN/VRC-89A/D/F (NSN 5820-01-267-9479) (EIC: L24)
LONG RANGE VEHICULAR RADIO
AN/VRC-90A/D/F (NSN 5820-01-268-5105) (EIC: L25)
SHORT RANGE/LONG RANGE VEHICULAR RADIO WITH DISMOUNT
AN/VRC-91A/D/F (NSN 5820-01-267-9478) (EIC: L26)
SHORT RANGE/LONG RANGE VEHICULAR RADIO
AN/VRC-92A/D/F
(NSN
5820-01-267-9477)
(EIC:
L27)
USED WITH
AUTOMATED NET CONTROL DEVICE (ANCD) (AN/CYZ-10)
PRECISION LIGHTWEIGHT GPS RECEIVER (PLGR) (AN/PSN-11)
SECURE TELEPHONE UNIT (STU)
FREQUENCY HOPPING MUTIPLEXER (FHMUX)
Approved for public release; distribution is unlimited.
HEADQUARTERS, DEPARTMENT OF THE ARMY
1 DECEMBER 1998
TM 11-5820-890-10-8
SAFETY STEPS TO FOLLOW IF SOMEONE IS THE
VICTIM OF ELECTRICAL SHOCK.
DO NOT TRY TO PULL OR GRAB THE INDIVIDUAL.
IF POSSIBLE, TURN OFF THE ELECTRICAL POWER.
IF YOU CANNOT TURN OFF THE ELECTRICAL
POWER PULL, PUSH, OR LIFT THE PERSON TO
SAFETY USING A DRY WOODEN POLE OR A DRY
ROPE OR SOME OTHER INSULATION MATERIAL.
SEND FOR HELP AS SOON AS POSSIBLE.
AFTER THE INJURED PERSON IS FREE OF CONTACT
WITH THE SOURCE OF ELECTRICAL SHOCK, MOVE
THE PERSON A SHORT DISTANCE AWAY AND
IMMEDIATELY START ARTIFICIAL RESUSCITATION.
a
TM 11-5820-890-10-8
A lithium-sulfur dioxide (Li-SO2) battery used with Battery Box, CY-8523 series contains
pressurized sulfur dioxide (SO;) gas (rotten egg smell). The gas is toxic, and the battery MUST
NOT be abused in any way which may cause the battery to rupture.
DO NOT heat, short circuit, crush, puncture, mutilate, or disassemble the battery.
DO NOT USE any battery which shows signs of damage, such as bulging, swelling,
disfigurement. brown liquid in the plastic wrap, a swollen plastic wrap, etc.
DO NOT test Li-SO2 batteries for capacity, except as authorized.
DO NOT recharge Li-SO2 batteries.
DO NOT use water to extinguish Li-SO2 battery fires.
If the battery compartment becomes hot to the touch, if you hear a hissing sound (i.e., battery
venting), or if you smell irritating sulfur dioxide gas (rotten egg smell), IMMEDIATELY TURN OFF
the equipment Remove the equipment to a well ventilated area or leave the area.
DO NOT use a Halon type fire extinquisher on a lithium battery fire
In the event of a fire near a lithium battery(ies), rapid cooling of the battery(ies) is important. Use a
carbon dioxide (CO2) extinguisher.
DO NOT store lithium batteries with other hazardous materials and keep them away from open
flame or heat.
b
TM 11-5820-890-10-8
MANPACK LONG ANTENNA SAFETY PRECAUTIONS
WARNING
DEATH OR SERIOUS INJURY CAN OCCUR IF THE ANTENNA COMES
INTO CONTACT WITH OVERHEAD POWER LINES
Never fully extend the long antenna directly under power lines. If you must fully
extend the long antenna near power lines, power line poles or towers, or buildings
with overhead power line connections, never come closer than two times the
antenna height from the base of the power line, pole tower or building.
Stop before you get close to the power line and check for clearance before passing.
If needed, either carefully tie down the antenna or remove the antenna to make
sure that you can safety pass under the power line.
When mission permits, use the short manpack antenna during operations on the
move. If you must use the long antenna on the move, never pass under power lines
if there is any doubt about overhead clearance.
For additional safety information, refer to TB-43-0129. ‘Safety Requirements for Use
of Antenna and Mast Equipment”.
VEHICULAR ANTENNA SAFTEY PRECAUTIONS
WARNING
DEATH OR SERIOUS INJURY CAN OCCUR IF THE ANTENNA COMES
INTO CONTACT WITH OVERHEAD POWER LINES
Do not stop your vehicle under power lines.
When mobile, never pass under power lines if there is any doubt about overhead
clearance.
If you are not sure that an antenna on your vehicle will clear a power line, stop before
you get close to the power line and either carefully tie down the antenna or, if necessary, remove the antenna to make sure that you can safely drive under the power
line.
During cross-country operations, do not allow anyone to stick an arm, leg, or weapon
over the sides of the vehicle. If your antenna accidently touches a power line,
individuals who are in contact with vegetation or the ground could suffer death or
sever injury.
For additional safety information. refer to TB-43-0129, “Safety Requirements for Use
of Antenna and Mast Equipment”.
c
TM
11-5820-890-10-8
THIS PAGE INTENTIONALLY
BLANK.
d
* TM 11-5820-890-10-8
TECHNICAL MANUAL
No. 11-5820-890-10-8
HEADQUARTERS
DEPARTMENT OF THE ARMY
Washington, DC, 1 DECEMBER 1998
SINCGARS GROUND COMBAT
NET RADIO, ICOM
MANPACK RADIO
AN/PRC-119A/D/F (NSN 5820-01-267-9482) (EIC: L2Q)
SHORT RANGE VEHICULAR RADIO
AN/VRC-87A/D/F (NSN 5820-01-267-9480) (EIC: L22)
SHORT RANGE VEHICULAR RADIO WITH SINGLE RADIO MOUNT
AN/VRC-87C (NSN 5820-01-304-2045) (EIC: GDC)
SHORT RANGE VEHICULAR RADIO WITH DISMOUNT
AN/VRC-88A/D/F (NSN 5820-01-267-9481) (EIC: L23)
SHORT RANGE/LONG RANGE VEHICULAR RADIO
AN/VRC-89A/D/F (NSN 5820-01-267-9479) (EIC: L24)
LONG RANGE VEHICULAR RADIO
AN/VRC-90A/D/F (NSN 5820-01-268-5105) (EIC: L25)
SHORT RANGE/LONG RANGE VEHICULAR RADIO WITH DISMOUNT
AN/VRC-91A/D/F (NSN 5820-01-267-9478) (EIC: L26)
SHORT RANGE/LONG RANGE VEHICULAR RADIO
A N/VRC-92A/D/F (NSN 5820-01-267-9477) (EIC: L27)
USED WITH
AUTOMATED NET CONTROL DEVICE (ANCD)(AN/CYZ- 10)
PRECISION LIGHTWEIGHT GPS RECEIVER (PLGR) (AN/PSN-11)
SECURE TELEPHONE UNIT (STU)
FREQUENCY HOPPING MUTIPLEXER (FHMUX)
* This manual supersedes TM 11-5820-890-10-8, dated 28 February 1995.
i
TM 11-5820-890-10-8
TABLE OF CONTENTS
CHAP
PARA
SUBJECT
INTRODUCTION . . . . . . . . . . . . . . . . . . . . . . . . . . . . . . . . . . . .
1-1
1.1
Purpose . . . . . . . . . . . . . . . . . . . . . . . . . . . . . . . . . . . . . . . . . . . . . . . . . . . . . . .
1-1
1.2
Scope . . . . . . . . . . . . . . . . . . . . . . . . . . . . . . . . . . . . . . . . . . . . . . . . . . . . . . . . . 1-1
1-2
General Information . . . . . . . . . . . . . . . . . . . . . . . . . . . . . . . . . . . . . . . . . . . . .
1
1.3
SINCGARS RADIOS AND COMPONENTS . . . . . . . . . . . . . 2 - 1
2
2.2
2.3
Manpack (MP) Radios
. . . . . . . . . . . . . . . . . . . . . . . . . . . . .
2-14
2.4
Battery Requirements . . . . . . . . . . . . . . . . . . . . . . . . . . . . . .
2-17
2.5
Vehicular (Veh) Radios . . . . . . . . . . . . . . . . . . . . . . . . . . . . .
2-19
2.6
Single Radio Mount (SRM) Radio . . . . . . . . . . . . . . . . . . . .
2-32
2.7
2-35
2.8
Remote Control Unit (RCU) . . . . . . . . . . . . . . . . . . . . . . . . . .
Control Monitor (C-M) . . . . . . . . . . . . . . . . . . . . . . . . . . . . .
2.9
. . . . . . . . . . . . . . . . . . . . . . . . . . . .
2-39
ASSOCIATED EQUIPMENT . . . . . . . . . . . . . . . . . . . . . . . . . .
3-1
3.1
Automated Net Control Device (ANCD) (AN/CYZ-10) . . . . . . . . . . . . . . .
3-2
3.2
Precision Lightweight GPS Receiver (PLGR) (AN/PSN - 11) . . . . . . . . . .
3-4
3.3
Frequency Hopping Multiplexer (FHMUX) (TD-1456/VRC) . . . . . . . . . .
3-5
3.4
Secure Telephone Unit (STU)
3-8
3.5
Vehicular Intercommunications Set (VIC) (AN/VIC- 1). . . . . . . . . . . . . . 3 - 1 0
Handheld Remote Control Radio Device (HRCRD) . . . . . . . . . . . . . . . 3 - 1 2
3
3.6
Loudspeaker (LS-671)
. . . . . . . . . . . . . . . . .
2-8
2-37
PRINCIPLES OF OPERATION . . . . . . . . . . . . . . . . . . . . . . . .
4-1
4.1
Secure (Cipher Text) (CT) Communications . . . . . . . . . . . . . . . . . . . . . . . . .
4-2
4.2
4-4
4.3
Single Channel (SC) Communications . . . . . . . . . . . . . . . . . . . . . . . . . . . . .
Frequency Hopping (FH) Communications . . . . . . . . . . . . . . . . . . . . . . . . .
4.4
Use of Julian Date and GPS Zulu Time . . . . . . . . . . . . . . . . . . . . . . . . . . . .
4-10
4.5
4-13
4.6
Net Opening . . . . . . . . . . . . . . . . . . . . . . . . . . . . . . . . . . . . . . . . . . . . . . . . . . .
Late Net Entry . . . . . . . . . . . . . . . . . . . . . . . . . . . . . . . . . . . . . . . . . . . . . . . . . .
4.7
Periodic Updating
..............................................
4-22
4.8
Electronic Updating
............................................
4-24
4.9
Retransmission (RXMT) Operations . . . . . . . . . . . . . . . . . . . . . . . . . . . . . .
4-28
4.10
4-32
4.11
Antennas . . . . . . . . . . . . . . . . . . . . . . . . . . . . . . . . . . . . . . . . . . . . . . . . . . . . . .
Remoting Capabilities . . . . . . . . . . . . . . . . . . . . . . . . . . . . . . . . . . . . . . . . . . .
4.12
Net Management . . . . . . . . . . . . . . . . . . . . . . . . . . . . . . . . . . . . . . . . . . . . . . .
4-46
4
ii
2-2
SINCGARS Receiver-Transmitters (RT) (RT -1523 Series). . . . . . . . . . . . . .
Technical . . . . . . . . . . . . . . . . . . . . . . . . . . . . . . . . . . . . . . . . .
2.1
4-6
4-18
4-34
TM 11-5820-890-10-8
CHAP
PARA
5
SUBJECT
PAGE
OPERATOR TASKS . . . . . . . . . . . . . . . . . . . . . . . . . . . . . . . . . .
5-1
5.1
General . . . . . . . . . . . . . . . . . . . . . . . . . . . . . . . . . . . .
5-2
5.2
Start-Up Procedure . . . . . . . . . . . . . . . . . . . . . . . . . . . . . . . . . . . . . . . . . . . . . . . . . . . .
5-3
5.3
Operator Controls .
5-5
5.4
Primary Operator/Preparation Tasks. . . . . . . . . . . . . . . . . . . . . . . . .
5-28
5.5
Special Operator Tasks
5-42
5.6
Special Operator Tasks (SIP/ASIP). . . . . . . . . . . . . . . . . . . . . . . . . .
5-62
5.7
Other Operator Procedures . . . . . . . . . . . . . . . . . . . . . . . . . . . .
5-64
6
. . . . . . . . . . . . . . . . . . . . . . . . . . . .
....................................
NET CONTROL STATION (NCS) TASKS . . . . . . . . . . . . . . . 6 - 1
6.1
General . . . . . . . . . . . . . . . . . . . . . . . . . . . . . . . . . . . . . . . . . . . . . . . . . . . . . . .
6-2
6.2
NCS Responsibilities
...........................................
6-3
6.3
Primary NCS Tasks . . . . . . . . . . . . . . . . . . . . . . . . . . . . . . . . . . . . . . . . . . . . .
6-6
6.4
Special NCS Tasks
6-18
7
.............................................
SINCGARS ASSOCIATED TASKS . . . . . . . . . . . . . . . . . . . . .
7-1
7.1
General . . . . . . . . . . . . . . . . . . . . . . . . . . . . . . . . . . . . . . . . . . . . . . . . . . . . . . .
7-2
7.2
Precision Lightweight GPS Receiver (PLGR) Tasks . . . . . . . . . . . . . . . . . .
7-3
7.3
Secure Telephone Unit (STU)
7-11
7.4
a
....................................
Frequency Hopping Multiplexer (FHMUX) . . . . . . . . . . . . . . . . . . . . . . . . . .
7-17
OPERATOR MAINTENANCE . . . . . . . . . . . . . . . . . . . . . . . . . .
8-1
8.1
SINCGARS Radio Maintenance
8-1
8.2
Associated Equipment . . . . . . . . . . . . . . . . . . . . . . . . . . . . . . . . . . . . . . . . . .
8-13
8.3
Battery Requirements
8-25
..................................
..........................................
APPENDIX
A . . . . . . . . . . . . . . . . . . . . . . . . . . . . . . . . . . . . . . . . . . . . . . . . . . . . . . . . . . . . . . . . . . . . . . . . . . . A-1
B . . . . . . . . . . . . . . . . . . . . . . . . . . . . . . . . . . . . . . . . . . . . . . . . . . . . . . . . . . . . . . . . . . . . . . . . . . . B-1
C ........................................................................... C-l
E ........................................................................... E-l
INDEX . . . . . . . . . . . . . . . . . . . . . . . . . . . . . . . . . . . . . . . . . . . . . . . . . . . . . . . Index-l
iii
TM 11-5820-890-10-8
HOW TO USE YOUR MANUAL
iv
COVER
Information that you will use most often is boxed on the rear cover as well
as in the Table of Contents. The boxed information found on the rear
cover is thumb-indexed with edge marks so you can quickly refer to
that information.
TABLE OF CONTENTS
Refer to the Table of Contents to find out where information can be
found. The Table of Contents lists each chapter and major paragraph,
showing subject, paragraph, and page numbers.
CHAPTER CONTENTS
For ease of reference, each chapter begins with a chapter table of
contents showing the major paragraphs and sub-paragraphs
contained in that chapter. Paragraph and page numbers are also
provided.
SUBJECT INDEX
A subject matter index may be found at the rear of the manual. Subjects
are listed alphabetically by page number. The index is a good place to
start if you are looking for a specific item of information.
ABBREVIATIONS
For sake of brevity, this manual makes generous use of abbreviations.
Abbreviations are identified with their complete meaning at first use and
frequently thereafter. If you need the meaning of an abbreviation, it may
by found in the alphabetical listing of abbreviations found in Appendix E
at the rear of the manual.
GLOSSARY
You may refer to the Glossary, also found in Appendix E, to find the
meaning of unfamiliar terms.
NOMENCLATURE CROSSREFERENCE LIST
Although you will most frequently use common names for
items of SINCGARS equipment, if you need to know the official
nomenclature for an item it may be found in the Nomenclature
Cross-Reference List, in Appendix E.
POCKET GUIDES
Operator’s and NCS Pocket Guides supplement this manual with
information you can carry in your pocket. Use your pocket guide as a
handy reference that prevents you from having to memorize task
performance procedures.
TM 11-5820-890-10-8
CHAPTER 1
INTRODUCTION
IN THIS CHAPTER:
1.1.
1.1
PURPOSE.....................................................1-1
1.2
SCOPE . . . . . . . . . . . . . . . . . . . . . . . . . . . . . . . . . . . . . . . . . . . . . . . . . . . . . . . 1-1
1.3
GENERAL INFORMATION . . . . . . . . . . . . . . . . . . . . . . . . . . . . . . . . . . . . . . .
a.
Maintenance Forms, Records, and Reports . . . . . . . . . . . . . . . .
b. Consolidated index of Army Publications and Blank Forms . . .
c.
Reporting Equipment Improvement Recommendations (EIR) . . . . . .
d.
Reporting Errors and Recommending Improvements . . . . . . . .
e.
Hand Receipt (-HR) Manuals . . . . . . . . . . . . . . . . . . . . . . . . . . . .
f.
Security Classification and Marking . . . . . . . . . . . . . . . . . . . . . . .
1-2
1-2
1-3
1-3
1-3
1-3
1-3
PURPOSE
READY REFERENCE
Provide you with a ready reference when you need information
regarding SINCGARS (Single Channel Ground & Airborne
Radios) radios, their components, and associated equipment
which is frequently employed in conjunction with SINCGARS
radios .
For example, this Manual contains official
nomenclatures, common names, National Stock Numbers, part
numbers, and unit authorizations.
EASE OF USE
Offer essential guidance regarding the employment and operation of
SINCGARS that is easy to locate and readily understandable.
BACK-UP
Augment the operator and net control station (NCS) pocket
guides with additional guidance and information as appropriate.
1.2.
SCOPE
EQUIPMENT
This SINCGARS Operator’s Manual cover capabilities and
general specifications of SlNCGARS Ground ICOM Radios using
receiver-transmitter (RT) versions RT-1523, RT-1523A,
RT-15238, RT-1523C, RT-1523D, and RT-1523E. It covers
both Manpack and Vehicular Radios, their principal components,
Single Radio Mounts, Control Monitors, and remote control units
(RCU). SINCGARS associated items of equipment addressed in
this manual include the Automated Net Control Device (ANCD),
Precision Lightweight GPS Receiver (PLGR), Frequency
Hopping Multiplexer (FHMUX), Vehicular Intercommunications
Set (VIC-1), and Secure Telephone Unit (STU) when used to
transmit classified data from one location to another.
1-1
TM 11-5820-890-10-8
OPERATIONS
The Principles of Operation chapter covers how SINCGARS
radios and associated equipment are employed to accomplish
various communications requirements during unit mission
operations. Some specific subjects addressed are single
channel communications, frequency hopping nets, use of Julian
Date and GPS Zulu time, net openings and late net entry
methods, updating procedures, retransmission operations, use
of antennas, r e m o t e c o n t r o l o p e r a t i o n s , a n d f r e q u e n c y
management.
TASKS
Specific tasks covered in terms of sequential procedures are
Operator Primary and Special, NCS Primary and Special, plus
PLGR, FHMUX, and STU Transfer tasks. ANCD tasks are
addressed as integral parts of Operator and NCS tasks.
MAINTENANCE
Operator level maintenance pertaining to SINCGARS radios is
treated in the form of Preventive Maintenance Checks and
Services (PMCS). Essential operator maintenance requirements
for associated equipment is covered briefly and references are
cited for each.
BATTERIES
Because of the critical Importance of batteries to the operation of
SINCGARS radios and associated equipment, a Battery
Requirements section provides general guidance regarding the
number of hours of service that may be expected of various types
of batteries under differing operational conditions.
1.3.
GENERAL INFORMATION
1.3a.
Maintenance Forms, Records And Reports
DA Pam 738-750
Reports of Maintenance and Unsatisfactory Equipment.
Department of the Army forms and procedures used for equipment
maintenance will be those prescribed by DA Pam 738-750, as
contained in Maintenance Management Update.
SF 364 (ROD)
Reporting of Item and Packaging Discrepancies.
Fill out and forward SF 364 (Report of Discrepancy (ROD) as
prescribed
in
AR
735-11-2/DLAR
4140.55/SECNAVINST
4355.18/AFR 400-54/MCO 4430.3J.
SF 361 (TDR)
Transportation Discrepancy Report (TDR) (SF 361).
Fill out and forward Transportation Discrepancy Report (TDR) (SF 361)
as prescribed in AR 55-38/NAVSUPINST 4610.33C/AFR 75-18/MCO
P4610. 19D/DLAR 4500.15.
1-2
TM 11-5820-890-10-8
1.3b.
Consolidated Index Of Army Publications And Blank Forms
DA Pam 25-30
1.3c.
Reporting Equipment Improvement Recommendations (EIR)
SF 368 (EIR)
1.3d.
You can help improve this manual. If you find any mistakes or if you
know of a way to improve the procedures, please let us know. Mail your
letter, DA Form 2028 (Recommended Changes to Publications and
Blank Forms), or DA Form 2028-2 located in the back of this manual
directly to:
COMMANDER, U.S. ARMY CECOM,
ATTN: AMSEL-LC-LEO-D-SFO,
FORT MONMOUTH, NJ 07703-5007 or electronically at
www.monmouth.army.mil/cecom/lrc/pubs/2028.html, fill out the
Online 2028 form and submit it for a faster response.
Hand Receipt (-HR) Manuals
TM 10-HR
1.3f.
If your radio or associated equipment needs improvement, let us know.
Send us an EIR. You, the user, are the only one who can tell us what you
don’t like about your equipment. Let us know why you don’t like the
design or performance. Put it on an SF 368 (Product Quality Deficiency
Report), if you can obtain this form. Otherwise, use regular paper for
your report. Our interest is in what you have to tell us, and you will
receive a reply. Mail your report to: COMMANDER, U.S. ARMY
CECOM, ATTN: AMSEL-ED-PH, FORT MONMOUTH, NJ
07703 - 5007.
Reporting Errors And Recommending Improvements
DA Form 2028
1.3e.
Refer to the latest issue of DA Pam 25-30 to determine whether there
are new editions, changes or additional publications pertaining to the
equipment.
This manual has a companion document with a TM number followed by
“-HR” (Hand Receipt). The TM 11-5820-890-10-HR consists of
preprinted hand receipts (DA Form 2062) that list end item related
equipment (i.e., COEI, Bll, and AAL) you must account for. As an aid to
property accountability, additional -HR manuals may be requisitioned
from supply channels.
Security Classification And Marking
TB 380-41-5
The receiver-transmitter (RT) of the SINCGARS ICOM ground radio,
the remote control unit (RCU), and the Automated Net Control Device
(ANCD) are designated as Controlled Cryptographic Items (CCl).
Handle in accordance with TB 380-41-5.
1-3
TM 11-5820-890-10-8
THIS PAGE INTENTIONALLY
BLANK.
1-4
TM 11-5820-890-10-8
CHAPTER 2
SINCGARS RADIOS AND COMPONENTS
IN THIS CHAPTER:
2.1
SINCGARS Receiver-Transmitters (RT) (RT-1523 Series) . . . . . . . . . . .
RT Capabilities . . . . . . . . . . . . . . . . . . . . . . . . . . . . . . . . . . . . . . . . . . . . . . .
a.
b. Transmitter Characteristics . . . . . . . . . . . . . . . . . . . . . . . . . . . . . . . . . .
C.
Receiver Characteristics . . . . . . . . . . . . . . . . . . . . . . . . . . . . . . . . . . . . . . .
d.
RT Model Differences (Distinguishing Features) . . . . . . . . . . . . . . . . . .
2-2
2-2
2-3
2-4
2-4
2.2
TECHNICAL . . . . . . . . . . . . . . . . . . . . . . . . . . . . . . . . . . . . . . . . . . . . . . . . . . . . .
a. SIP/ASIP Receiver-Transmitter (RT) . . . . . . . . . . . . . . . . . . . . . . . . . . . .
b. SIP/ASIP RT Keypad . . . . . . . . . . . . . . . . . . . . . . . . . . . . . . . . . . . . . . . . . .
c . SIP/ASIP VAA . . . . . . . . . . . . . . . . . . . . . . . . . . . . . . . . . . . . . . . . . . . . . . . .
Connectors SIP RT . . . . . . . . . . . . . . . . . . . . . . . . . . . . . . . . . . . . . . .
d.
e. Connectors, ASlP RT . . . . . . . . . . . . . . . . . . . . . . . . . . . . . . . .
f.
RT Messages . . . . . . . . . . . . . . . . . . . . . . . . . . . . . . . . . . . . . . . . . . . . . . . .
RT Physical Data . . . . . . . . . . . . . . . . . . . . . . . . . . . . . . . . . . . . . . . . . . . .
g.
h. Common Connections . . . . . . . . . . . . . . . . . . . . . . . . . . . . . . . . . . . . . . . .
2-8
2-8
2-8
2-9
2-10
2-11
2-12
2-13
2-13
2.3
MANPACK (MP) RADIOS . . . . . . . . . . . . . . . . . . . . . . . . . . . . . . . . . . . . . . . . .
a.
MPGeneral . . . . . . . . . . . . . . . . . . . . . . . . . . . . . . . . . . . . . . . . . . . . . . . . .
b. MP Radio Components . . . . . . . . . . . . . . . . . . . . . . . . . . . . . . . . . . . . . . .
c.
MP Radio Physical Data . . . . . . . . . . . . . . . . . . . . . . . . . . . . . . . . . . . . . . .
d.
MP Radio Performance Data . . . . . . . . . . . . . . . . . . . . . . . . . . . . . . . . . . .
2-14
2-14
2-14
2-15
2-16
2.4
BATTERY REQUIREMENTS . . . . . . . . . . . . . . . . . . . . . . . . . . . . . . . . . . . . . . .
a.
Power Source . . . . . . . . . . . . . . . . . . . . . . . . . . . . . . . . . . . . . . . . . . . . . . .
b.
Main Power . . . . . . . . . . . . . . . . . . . . . . . . . . . . . . . . . . . . . . . . . . . . . . . . . .
C.
HUB.. . . . . . . . . . . . . . . . . . . . . . . . . . . . . . . . . . . . . . . . . . . . . . . . . . . . . . .
d.
Manpack Radio . . . . . . . . . . . . . . . . . . . . . . . . . . . . . . . . . . . . . . . . . . . . . .
e.
RCU(RT) . . . . . . . . . . . . . . . . . . . . . . . . . . . . . . . . . . . . . . . . . . . . . . . . . . . .
f.
Hold-Up Battery . . . . . . . . . . . . . . . . . . . . . . . . . . . . . . . . . . . . . . . . . . . . .
2-17
2-17
2-17
2-17
2-17
2-18
2-18
2.5
VEHICULAR (VEH) RADIOS . . . . . . . . . . . . . . . . . . . . . . . . . . . . . . . . . . . . . . 2 - 1 9
a.
General . . . . . . . . . . . . . . . . . . . . . . . . . . . . . . . . . . . . . . . . . . . . . . . . . . . . .
2-19
b. Short Range (SR) Radio Components (AN/VRC-87A/D/F) . . . . . . . . . 2-21
c.
Short Range Radio with Dismount (SR-D) Components
(AN/VRC-88A/D/F) . . . . . . . . . . . . . . . . . . . . . . . . . . . . . . . . . . 2 - 2 2
d. Long Range (LR) Radio Components (AN/VRC-90A/D/F) . . . . . . . . . 2 - 2 2
e.
Short Range/Long Range Radio Components (AN/VRC-89A/D/F) 2-23
f . Short Range/Long Range Radio with Dismount Components
(AN/VRC-91A/D/F) . . . . . . . . . . . . . . . . . . . . . . . . . . . . . . . . . . 2 - 2 4
Long Range/Long Range Radio Components (AN/VRC-92A/D/F) 2-24
g.
h.
VAA Connectors (A/B models) . . . . . . . . . . . . . . . . . . . . . . . . . . . . . . . . . 2 - 2 5
i.
VAA Connectors (C/D models) . . . . . . . . . . . . . . . . . . . . . . . . . . . . . . . . . 2 - 2 7
Cabling . . . . . . . . . . . . . . . . . . . . . . . . . . . . . . . . . . . . . . . . . . . . . . . . . . . . .
2-29
j.
k.
Vehicular Radio Physical Data . . . . . . . . . . . . . . . . . . . . . . . . . . . . . . . . . . 2 - 3 0
I.
Vehicular Radio Performance Data . . . . . . . . . . . . . . . . . . . . . . . . . . . . . . 2-31
2-1
TM 11-5820-890-10-8
2.6
SINGLE RADIO MOUNT RADIO (SRM) . . . . . . . . . . . . . . . . . . . . . . . . . . . . .
a.
SR Radio with SRM Components (AN/VRC-87C) . . . . . . . . . . . . . . . .
b. SRM Radio Physical Data . . . . . . . . . . . . . . . . . . . . . . . . . . . . . . . . . . . . .
SRM Radio Performance Data . . . . . . . . . . . . . . . . . . . . . . . . . . . . . . . . . .
C.
2-32
2-32
2-33
2-34
2.7
CONTROL, RECEIVER-TRANSMITTER (RCU) (C-11561 (C)/U) . . . . . . .
RCU Components . . . . . . . . . . . . . . . . . . . . . . . . . . . . . . . . . . . . . . . . . . . .
a.
b.
RCU Physical Data . . . . . . . . . . . . . . . . . . . . . . . . . . . . . . . . . . . . . . . . . . .
RCU Performance Data . . . . . . . . . . . . . . . . . . . . . . . . . . . . . . . . . . . . . . .
C.
2-35
2-35
2-36
2-36
2.8
CONTROL-MONITOR (CM) (C-11291/VRC OR C-11291A/VRC) . . . . . . .
CM Components . . . . . . . . . . . . . . . . . . . . . . . . . . . . . . . . . . . . . . . . . . . . .
a.
b. CM Physical Data . . . . . . . . . . . . . . . . . . . . . . . . . . . . . . . . . . . . . . . . . . . .
C.
CM Performance Data . . . . . . . . . . . . . . . . . . . . . . . . . . . . . . . . . . . . . . . .
2-37
2-37
2-38
2-38
2.9
LOUDSPEAKER (LS-671) . . . . . . . . . . . . . . . . . . . . . . . . . . . . . . . . . . . . . . . . .
a.
LS-671 Components . . . . . . . . . . . . . . . . . . . . . . . . . . . . . . . . . . . . . . . . .
b.
LS-671 Physical Data . . . . . . . . . . . . . . . . . . . . . . . . . . . . . . . . . . . . . . . .
LS-671 Performance Data . . . . . . . . . . . . . . . . . . . . . . . . . . . . . . . . . . . .
C.
2-39
2-39
2-39
2-40
2 . 1 . SINCGARS RECEIVER-TRANSMITTERS (RT) (RT-1523 SERIES)
2.1 a.
RT Capabilities
SINGLE CHANNEL
Single channel (SC) frequency modulation (FM) operation in very high
frequency (VHF) band of 30.000 to 87.975 Megahertz (MHz).
FREQUENCY HOPPING
mode
hopping (FH)
Frequency
counter-measure (ECCM) operation.
PRESET CHANNELS
Preset channels: eight for SC mode and six for FH mode, each of which
may be loaded with COMSEC and used in CT or PT mode.
DIGITAL TUNING
Quick, silent, precise, digital tuning.
VISUAL DISPLAY
Electronic visual displays provide for quick checks and prompts.
SELF-TEST (BIT)
Built-in test (BIT) provides self-test for fast checking of equipment
condition.
VOICE-DATA
Voice or digital data communication. Provides data rates of 600, 1200,
2400, 4800, and 16,000 bits per second [BPS]; also provides
enhanced data rates (1200N, 2400N, 4800N, 9600N, PCKT)
RT- 1523C/D/E only; analog data interface AD1 and TACFIRE TF.
FREQUENCIES
2320 SC frequencies.
COMSEC
Provides cipher text (CT) communications with integrated COMSEC
(ICOM) feature.
2-2
for
electronic
counter
TM 11-5820-890-10-8
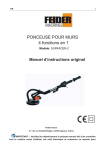
Figure 2-1. RECEIVER-TRANSMITTER (RT) (RT-1523 Series)
2.1 b.
Transmitter Characteristics
TYPICAL DUTY CYCLE
“Typical duty cycle” is defined as nine minutes of receiving or
monitoring for each one minute of transmission time; expressed as 9:1
duty cycle.
MANPACK BATTERY
With a 9:1 duty cycle, at 70 degrees F., a new manpack main power
battery (BA-5590) has a service life of approximately 10-30 hours
depending upon RT version and level of usage. (See Chapter 8 for
additional data regarding service life expectancy of manpack
batteries.)
POWER DRAIN
Manpack transmission maximum power draw is 3.25 amperes;
vehicular radio is 6.25 amperes.
CARRIER DEVIATION
Carrier deviation (voice) is 6.5 Kilohertz (KHz) with audio input of 1.4 to
140 millivolts.
2-3
TM 11-5820-890-10-8
MICROPHONE
Microphone input impedance is 150 ohms.
AUDIO
Audio input (minimum) is 1.4 millivolts normal and 0.4 millivolts for
whisper (WHSP).
SQUELCH
Squelch tone signal of 150 Hertz (Hz) is a part of all transmissions,
except when FCTN is set to SQ OFF..
2.1 c.
Receiver
Characteristics
SENSITIVITY
Radio frequency (RF) signal sensitivity is 0.35 microvolt
CHANNEL SPACING
25 KHz.
AUDIO
Audio output impedance is 600 ohms (with handset at AUD/DATA or
AUD/FILL).
SQUELCH
Receiver responds to 150 Hz tone with FCTN switch set to squelch on
(SQ ON) or load (LD) when operating in SC mode.
POWER DRAIN
Manpack receiver power draw is 225 milliamperes. Vehicular receivers
draw: 0.762 amp for short range radio; 1.094 amp for short range/long
range radio; 0.942 amp for long range radio, and 1.524 amp for long
range/long range radio.
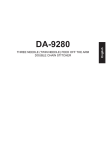
2.1d. RT Model Differences (Distinguishing Features)*
RT-1523:
Control knobs are affixed with side- positioned Allen screws
RT cover is affixed with slot-headed screws.
Last two digits of net ID may be changed by operator.
RT Mode switch is set to FH-M position to change net ID.
Sync time is loaded into RT manually via the keypad or by
electronic remote fill (ERF).
Running self-test with COMSEC in PT results in display message
of “FAIL 5.” (Changing to CT clears message.)
RT will accept ERF if sync time is less than +/- one hour different
from net sync time.
Figure 2-2. RT-1523 Features
2-4
TM 11-5820-890-10-8
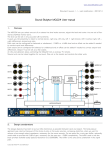
RT-1523A:
Control knobs are affixed with top-positioned Phillips screws,
RT cover is affixed with Phillips screws,
All three digits of net ID may be changed by operator.
RT Mode switch may remain in FH position to change net ID.
Sync time may be loaded electronically from an Automated Net
Control Device (ANCD), a Precision Lightweight GPS Receiver
(PLGR), manually via the keypad, or by ERF.
Running self-test with COMSEC in PT results in display message
of “GO CT” (Changing to CT clears message.)
RT will accept ERF if sync time is less than 100 days different from
net sync time.
Figure 2-3. RT-1523A Features
RT-15238:
Control knobs are affixed with side-positioned Allen screws.
RT cover is affixed with slot-headed screws.
All three digits of net ID may be changed by operator.
RT Mode switch may remain in FH position to change net ID.
Sync time may be loaded electronically from an Automated Net
Control Device (ANCD), a Precision Lightweight GPS Receiver
(PLGR), manually via the keypad, or by ERF.
Running self-test with COMSEC in PT results in display message
of “GO CT” (Changing to CT clears message.)
RT will accept ERF if sync time is less than 100 days different from
net sync time.
Figure 2-4. RT-1523B Features
2-5
TM 11-5820-890-10-8
RT-1523C:
Control knobs are affixed with side-positioned Allen screws.
RT cover is affixed with Phillips-headed screws.
All three digits of net ID may be changed by operator.
RT Mode switch may remain in FH position to change net ID.
Sync time may be loaded electronically from an Automated Net
Control Device (ANCD), a Precision Lightweight GPS Receiver
(PLGR), manually via the keypad, or by ERF
Running self-test with COMSEC in PT results in display message
of “GO CT” (Changing to CT clears message.)
RT will accept ERF if sync time is less than 100 days different from
net sync time.
New keypad with SIP features.
GPS connector.
Figure 2-5. RT-1523C Features
RT-1523D:
Control knobs are affixed with side-positioned Phillips screws.
RT cover is affixed with Phillips screws.
All three digits of net ID may be changed by operator.
RT Mode switch may remain in FH position to change net ID.
Sync time may be loaded electronically from an Automated Net
Control Device (ANCD), a Precision Lightweight GPS Receiver
(PLGR), manually via the keypad, or by ERF
Running self-test with COMSEC in PT results in display message
of “GO CT” (Changing to CT clears message.)
RT will accept ERF if sync time is less than 100 days different from
net sync time.
New keypad with SIP features.
GPS connector.
Figure 2-6. RT-1523D Features
2-6
TM 11-5820-890-10-8
RT-1523E:
Reduced size and weight.
Internal battery.
Increased battery life.
Enhanced display (Backlight selectable).
Only one front panel switch.
Spare slots for future enhancements.
Enhanced self-test (BIT).
RT Mode switch may remain in FH position to change net ID.
All three digits of net ID may be changed by operator.
Sync time may be loaded electronically from an Automated Net
Control Device (ANCD), a Precision Lightweight GPS Receiver
(PLGR), manually via the keypad, or by ERF. RT will accept ERF if
sync time is less than 100 days different from net sync time.
New keypad with SIP features.
GPS connector.
AUX connector for HRCRD/2-wire adapter.
Figure 2-7. RT-1523E Features
*Differences between RT models reflect manufacturer’s options plus product improvements
based on experience. They primarily affect radio performance and have minor impact on
operator tasks and procedures.
2-7
TM 11-5820-890-10-8
12.2.
TECHNICAL
2.2a.
SlP/ASIP Receiver-Transmitter (RT)
Enhanced Data
The SIP/ASIP RT offers enhanced data rates of 1200N, 2400N, 4800N, and
9600N BPS, where the “N” indicates new or enhanced rates The
advantages of these enhanced data rates are better accuracy, great speed,
longer range, and improved forward error correction.
New Data Modes
Two new data modes are also provided: Packet (PCKT), which supports
operations involving FBCB2 hardware and software, and RS-232 by which
data messages can be sent from SlP/ASlP RT to SlP/ASlP RT using
computers and commercial “Xmodem” communications software, a widely
used file transfer protocol.
RCU Function
The SIP/ASIP RT can be used as a remote control unit by merely selecting
the “RCU” option under the [RCU] key of the SIP/ASIP RT keypad. The RCU,
C-11561, can still be used to remotely control a SlP/ASlP radio for voice
and SINCGARS data modes, but it cannot be used for enhanced data
modes.
GPS Time Loading
A feature of the SIP/ASIP RT is the ability to load GPS time from an attached
PLGR using the very simple procedure.
Internal FSK
Detector
The SlP/ASlP RT contains an internal FSK detector circuit for use with the
‘AD1” and “TF” data rates. Use of a special CX-13808/U DMD interface
cable is no longer necessary. In addition, TACFIRE devices must be cabled
directly to the SIP/ASIP RT AUD/DATA connector.
2.2b.
SlP/ASIP RT Keypad
General
The keypad of the SIP/ASIP radio is similar to that of earlier versions except
four of the keys have been given new designations: RCU, GPS, SA, and CID.
The ASIP keypad adds a MENU and Backlight function. Each is explained
below.
RCU/(P)
The RCU key is used to select operating mode options of RT RCU, EXT, or
LDE. RT is the normal employment of the RT as a receiver-transmitter.
Selecting RCU allows the SlP/ASlP RT to be used as a remote control
device. EXT is a capability of the SlP/ASlP that allows the radio to be
controlled externally via the system connector. The ASIP radio is
automatically in EXT when proper interface and software is detected.
Selecting EXT disables the front panel controls of the RT EXT is used for
GRM-122 testing. LDE stands for local data entry and represents a future
capability of the SIP/ASIP RT to communicate with SlP/ASlP VAA regarding
data loads and requirements. This feature is currently not used.
2-8
TM 11-5820-890-10-8
GPS/(5)
The GPS key is not used; it represents a possible future capability of the
SINCGARS SlP/ASlP radio.
SA/(6)
The SA key is not used; it represents a possible future capability of the
SINCGARS SIP/ASIP radio.
ClD/(8)
The CID key is not used; it represents a possible future capability of the
SINCGARS SlP/ASlP radio.
Figure 2-8. SIP/ASlP Keypad
CLR/MENU
MENU appears on SINCGARS ASIP when key is pressed. Multiple presses
will scroll MENU.
FREQ/BACKLlGHT
ASIP radio must be in SQ ON, press key [FREQ], then CHG to change
intensity.
2.2c. SlP/ASIP VAA
Memory
The SIP/ASIP VAA contains a small microprocessor which allows data in the
form of routing tables to be stored in the SlP/ASlP VAA.
Internet
When used in conjunction with FBCB2 hardware and software, the SlP/ASlP
VAA supports internet communications among SINCGARS FH nets and
between SINCGARS and EPLRS nets. Employment of the internet feature
requires that the SIP/ASIP RT be set to the Packet data mode.
2-9
TM 11-5820-890-10-8
2.2d. Connectors, SIP RT
P1 (System)
The P1 systems connector is located on the back of the SIP RT. This
connector provides RT power and signaling interfaces.
Figure 2-9. SIP RT Connectors
J5 (GPS)
Located on the back of the SIP RT, the GPS J5 connector provides an
interface of the VAA GPS connector.
J4 (AUD/DATA)
The J4 (AUDIDATA) connector supports general data communications at
SINCGARS Data Rates of 600, 1200, 2400, 4800 and 16,000 BPS and
Enhanced Data Rates of 1200N, 2400N, 4800N, and 9600N BPS. The
RS-232 interface allows transmission of data via SINCGARS SIP radios
using computers and commercial “Xmodem” software. If not using Packet
(PCKT) data mode, or the internet controller (INC) feature of the SIP radio, all
data devices must be connected to the AUD/DATA port, not to the SIP VAA.
J3 (AUD/FILL)
Handsets used with the SIP RT may be connected to the AUD/DATA or
AUD/FILL connector. (NOTE: Handsets will not function if connected to the
front of the SIP VAA.)
2-10
TM 11-5820-890-10-8
2.2e.
Connectors, ASIP RT
P1 (System)
This connector provides RT power and signaling interfaces
Figure 2-10. ASIP RT Connectors
J6 (Auxiliary)
Used to connect HRCRD handset and two-wire adapter.
J5 (GPS)
Enables a PLGR to be connected to a manpack radio.
J3 (AUD/DATA)
The J4 (AUD/DATA) connector supports general data communications at
SINCGARS Data Rates of 600, 1200, 2400, 4800 and 16,000 BPS and
Enhanced Data Rates of 1200N, 2400N, 4800N, and 9600N BPS. The
RS-232 interface allows transmission of data via SINCGARS ASIP radios
using computers and commercial “Xmodem” software. If not using Packet
(PCKT) data mode, or the internet controller (INC) feature of the ASIP radio,
all data devices must be connected to the AUD/DATA port, not to the ASIP
VAA.
J2 (AUD/FILL)
Handsets used with the ASIP RT may be connected to the AUD/DATA or
AUD/FILL connector. (NOTE: Handsets will not function if connected to the
front of the ASIP VAA.)
J1 (Antenna)
RF Input/Output.
2-11
TM 11-5820-890-10-8
2.2f. RT Messages
“CALL’
This message appears in the display of a remoted radio when an RCU(RT)
operator presses the CALL key, and at the RCU(RT) when the remoted radio
operator presses the CALL key.
“EXT”
If your radio has been set to EXT, as an option of the RCU key menu, an
“EXT” message will be displayed. All RT front panel controls except
COMSEC are disabled. Unless you want to use the EXT feature, use the
RCU key to turn EXT mode off. The ASIP RT is always in an EXT mode as
long as it detects proper interface and software, EXT will not be displayed.
“Fail 5”
If a “Fail 5” message is displayed during power-up and BIT, it means one of
three things:
(1) You have an ANCD or other fill device connected to the RT.
Disconnecting the fill device will correct the FAIL 5 situation.
(2) You have mistakenly set the COMSEC switch to Z. Moving the
COMSEC switch to another position will correct the FAIL 5 situation.
(3) The RT tamper switch has been activatedor there is a hard COMSEC
failure, in which case you need to see your unit maintainer.
“Fail 6”
This message applies to INC and HFMUX failures.
“G”
When GPS time has been successfully loaded into the SIP/ASIP radio, the
letter “G”will be displayed. When a radio loaded GPS time is returned to SQ
ON from STBY, a blinking “G” indicates that GPS time needs to be reloaded.
Disappearance of the “G” indicates that the radio is no longer using GPS
time.
“GOPT”
Indicates that the SlP/ASlP radio has experienced a COMSEC failure;
operator must change to PT in order to continue to communicate.
“GOTST”
When this message appears, it indicates a COMSEC problem. The radio will
not transmit, receive, or fill until BIT has successfully run. If you cannot get
the RT to run BIT successfully, action by unit maintenance is needed.
“NOGPS”
This message appears when attempting to load GPS time without a GPS
device (PLGR) attached.
“NOKEY”
If you power-up your radio in CT when there are no COMSEC keys loaded,
a “NOKEY” message will be displayed and a COMSEC alarm will be heard.
Setting COMSEC to PT or loading a COMSEC key will clear the alarm.
“PT RX”
This message will be displayed whenever you have your radio in CT and
receive a PT message.
“SETDR”
For transmission operation, this message tells the RXMT operator who
selects RS-232 that an EDM data rate (1200N, 2400N, 4800N, or 9600N)
must be selected before RS232 transmissions can be started. (NOTE: All
SIP/ASIP radios using RS232 mode must be set to the same EDM data rate.)
“WAIT”
This message is displayed while BIT is running, changing to the message
“GOOD” when BIT is successful.
2-12
TM
2.29.
11-5820-890-10-8
RT Physical Data
NOTE: Weights are in kilograms; measurements are in centimeters. The numbers in parentheses
show equivalent pounds and inches. All weights are approximate; all measurements are
maximums.
Table 2-1. Receiver-Transmitter Physical Data
2.2h. Common Connections
Table 2-2. Common Connections
Handset H-250 cannot be connected to the AUD/DATA port when the Packet mode is in use.
* Connecting a PLGR to the GPS port (J5/J12) of the RT or VAA requires a special cable.
***A W-4 cable is used to connect the VAA J5 (RT-A) or VAA J4 (RT-B) for Packet data only.
l
l
2-13
TM 11-5820-890-10-8
2.3.
MANPACK (MP) RADIOS (AN/PRC-119A/D/F)
2.3a.
Manpack Radios, General
NOMENCLATURE
The term “manpack” is the common name for the soldier carried
AN/PRC-119A/D/F. (The “A/D/F” indicates this is an ICOM radio. Do
not confuse this designation with the A found in RT version and other
component numbers.)
DISMOUNT
Dismount IS the term used to indicate that the equivalent of a manpack
radio is included within the components of selected vehicular radios.
Once assembled, there is no difference between a radio referred to as
manpack and one called dismount.
2.3b.
Manpack Radio Components
1.
Antenna, manpack radio: may be AS-3683/PRC or AS-4266/PRC (long antenna).
2.
Receiver-Transmitter (RT): may be RT-1523 Series.
3.
Handset: H-250/U or Handheld Remote Control Radio Device (HRCRD) (C-12493/U).
4.
Battery Box: may be CY-8523A/B, (CY-8523C is used with the HRCRD). Not required for
ASIP RT.
5.
Battery, main power:
may be Battery, Non-Rechargeable, BA-5590/U; Battery,
Rechargeable, BB-590/U; or Battery, Rechargeable, BB-390/U.
6.
Carrying Case.
Figure 2-11. Manpack Radio Components
2-14
TM 11-5820-890-10-8
2.3c.
Manpack Radio Physical Data
NOTE: Weights are in kilograms; measurements are in centimeters. The numbers in parentheses
show equivalent pounds and inches. All weights are approximate; all measurements are
maximums.
Table 2-3. Manpack Radio Physical Data
Battery, BB-590
Antenna (long), AS-4266*
264.2 (104)
n/a
n/a
0.7 (1.5)
n/a
n/a
n/a
0.25 (0.55)
50.2 (19.8)
36.2 (14.3)
18.0 (7.1)
3.2 (7.0)
Manpack Radio (with RT-1523)**
n/a
n/a
n/a
12.6 (27.7)
Manpack Radio (with RT-1523A)**
n/a
n/a
n/a
12.8 (28.2)
Manpack Radio (with RT-1523B)**
n/a
n/a
n/a
12.1 (26.6)
Manpack Radio (with RT-1523C)**
n/a
nla
n/a
12.4 (26.9)
Manpack Radio (with RT-1523D)**
n/a
n/a
n/a
12.4 (26.9)
Manpack Radio (with RT-1523E)**
n/a
n/a
n/a
TBD
Handset, H -250
Carrying Case
*
Length of long antenna when folded is 45.7 CM (18 IN).
**
When using BA-5590 as main power battery and short antenna (AS-3683/A).
2-15
TM 11-5820-890-10-8
2.3d. Manpack Radio* Performance Data
Table 2-4. Manpack Radio Performance Data
RF PWR
TYPE COMM
II
I
RANGE**
I
VOICE
MEDIUM (M)
VOICE
HIGH (HI)
5 KM to 10 KM
DATA (600-4800 BPS)
HIGH (HI)
3 KM to 5 KM
DATA (1600 BPS)
HIGH (HI)
1 KM to 3 KM
* **
EDM DATA (1200N)
HIGH (HI)
5 KM to 10 KM
EDM DATA (4800N)
HIGH (HI)
3 KM to 5 KM
EDM DATA (9600N)
HIGH (HI)
1 KM to 3 KM
400 M to 5 KM
II
*
Above data apply equally to dismount radios and RCUs.
* * Ranges shown are for planning purposes only. They are based upon line of sight and are
average for normal conditions. Ranges depend upon location, sighting, weather, and
surrounding noise level, among other factors. Use of the OE-254 antenna will increase ranges
for both voice and data transmissions. Enemy jamming and mutual interference conditions will
degrade ranges. In data transmissions, use of lower baud rate increases the range.
*** EDM data rates are available on C, D, and E Model radios.
2-16
TM 11-5820-890-10-8
BATTERY REQUIREMENTS
2.4.
2.4a.
Power Source
DESCRIPTION
2.4b.
SIP manpack radios, including those in dismount kits of
AN/VRC-88A/D and AN/VRC-90A/D configurations, require batteries
for their main power source and hold-up (memory retention) function.
This paragraph offers users of SIP radios with general guidelines
regarding the number of hours of a particular type usage each battery
is expected to provide. These times are based on computations as well
as experience. Actual battery life will vary depending upon how long
the battery has been in storage and the temperature at the time the
battery is being used. Even so, these times offer you a basis for
planning your battery requirements.
Main Power
DESCRIPTION
Batteries used for main power in the SIP radio are:
•
Battery, Rechargeable, BB-390A/U.
•
Battery, Rechargeable, BB-590/U.
•
Battery, Non-Rechargeable, BB-5590/U (Lithium)
2.4c. HUB
DESCRIPTION
2.4d.
in SIP
T h e H o l d - U p Battery used
Non-Rechargeable, BA-5372/U (Lithium).
radios
is
Battery,
Manpack Radio
ESTIMATED BATTERY LIFE USING BA-5590, RFPWR AT HI SETTING*
Table 2-5. Manpack Radio Main Power
*
Use of HRCRD reduces times shown by approximately one-half hour.
**
Represents 9 minutes of receiving and monitoring to every 1 minute of transmitting.
*** Represents 2 minutes of receiving and monitoring to every 1 minute of transmitting.
**** In STBY, RT draws power from main battery not the HUB.
2-17
TM 11-5820-890-10-8
2.4e.
RCU(RT)
ESTIMATED BATTERY LIFE, BA-5590, FOR RT USED AS RCU
Table 2-6. SIP/ASIP RT used As RCU - Main Power
VOICE/DATA
(FH & CT)
RT-1523C
RT-1523D
RT-1523E
Normal (OPR)
TBD
TBD
TBD
Heavy (NCS)
TBD
TBD
TBD
3 Months
3 Months
3 Months
Standby (STBY)
2.4f.
Hold-Up Battery
ESTIMATED HOLD-UP BATTERY LIFE, BA-5372, SIP RADIO
Table 2-7. SlP/ASIP Radio Hold-Up Battery
USE
RT-1523
Back-Up
6 Months
RT-1523A RT-1523B RT-1523C RT-1523D RT-1523E
6 Months
6 Months
6 Months
6 Months
SINCGARS HUB and ANCD batteries look similar and can be physically
interchanged. The HUB battery is 6.5 Volts while ANCD batteries are 3
Volts each. If HUB batteries (3 of them) are mistakenly placed in the
ANCD, it will be destroyed. Placing one ANCD battery in the RT HUB
position will cause the RT to lose its fill of data.
Therefore, be sure you know which battery goes where. Always read
the label before installing either HUB or ANCD batteries!
2-18
6 Months
TM 11-5820-890-10-8
12.5.
VEHICULAR (VEH) RADIOS (AN/VRC-87A/D/F thru 92A/D/F)
2.5a.
Vehicular Radios, General
CONFIGURATIONS
There are six configurations of vehicular radios. They are:
•
Short Range (SR) Radio (AN/VRC-87A/D/F*)
•
Short Range Radio with Dismount (AN/VRC-88/A/D/F)
•
Long Range (LR) Radio (AN/VRC-90A/D/F)
•
Short Range/Long Range Radio (AN/VRC-89A/D/F)
•
Short Range/Long Range Radio with Dismount
(AN/VRC-91A/D/F)
•
Long Range/Long Range Radio (AN/VRC-92A/D/F)
*
The “A/D/F” in SINCGARS radio nomenclature means that these are ICOM radios. Do not
confuse this designation with the A in RT version or other component numbers. The “C” in radio
nomenclature indicates Single Radio Mount (SRM) radios.
COMPONENTS
The components which are used in all vehicular radio configurations
are shown below in graphic form for ease of reference. Specific
components which make up each configuration are listed under each
radio designation
1.
Receiver-Transmitter (RT) (RT-1523/A/B/C/D).
2.
Mounting Base (MB) (MT-6352/A), part of installation kit.
3.
Vehicular Amplifier Adapter (VAA) (AM-7239/A/B/C/D/E).
4.
Vehicular Antenna (AS-3900), part of installation kit.
5.
SINCGARS Low Profile Antenna (SLPA) (AS-3916), part of installation kit.
6.
Handset (HS) (H-250), part of installation kit.
7.
Loudspeaker (LS) (LS-671), part of installation kit.
8.
Power Amplifier (PA) (AM-7238/A/B).
9.
Power Amplifier Mount (PA Mt) (MT-6353).
10.
Cable (W2).
11.
Cable (W4).
12.
Control-Monitor (C-M)(C-11291A), part of installation kit.
13.
Receiver-Transmitter (RT) (RT-1523E).
Figure 2-12. Vehicular Radio Components
2-19
TM 11-5820-890-10-8
Figure 2-13. SINCGARS Radio Components
2-20
TM 11-5820-890-10-8
2 . 5 b . Short Range (SR) Radio Components (AN/VRC-87A/D/F)
1.
Receiver-Transmitter (RT) (RT-1523/A/B/C/D/E).
2.
Mounting Base (MB) (MT-6352/A), part of installation kit.
3.
Vehicular Amplifier Adapter (VAA) (AM-7239/A/B/C/D/E).
4.
Vehicular Antenna (AS-3900/3916), part of installation kit.
5.
Handset (HS) (H-250), part of installation kit.
6.
Loudspeaker (LS) (LS-671), part of installation kit.
7.
Cable (W4), connects RT to VAA.
8.
Antenna Cable (CG-3856), part of installation kit.
9.
Loudspeaker Cable (CX-13292), part of installation kit.
10.
Power Cable, part of installation kit.
Figure 2-14. Short Range (SR) Radio Components
2-21
TM 11-5820-890-10-8
Short Range Radio with Dismount (SR-D) Components (AN/VRC-88A/D/F)
2.5c.
Same as Short Range Radio, plus Dismount (Manpack) Radio.
2.5d.
Long Range (LR) Radio Components (AN/VRC-90A/D/F)
1.
Receiver-Transmitter (RT) (RT-1523/A/B/C/D/E).
2.
Mounting Base (MB) (MT-6352/A), part of installation kit.
3.
Vehicular Amplifier Adapter (VAA) (AM-7239/A/B/C/D/E).
4.
Vehicular Antenna (AS-3900/3916), part of installation kit.
5.
Handset (HS) (H-250), part of installation kit.
6.
Loudspeaker (LS) (LS-671), part of installation kit.
7.
Power Amplifier (PA) (AM-7238/A/B).
8.
Cable (W2), connects RT ANT to PA.
9.
Cable (W4), connects RT to VAA.
10.
Antenna Cable (CG-3856), part of installation kit.
11.
Loudspeaker Cable (CX-13292), part of installation kit.
12.
Power Cable, part of installation kit.
Figure 2-15. Long Range (LR) Radio Components
2-22
TM 11-5820-890-10-8
2.5e.
Short Range/Long Range Radio Components (AN/VRC-89A/D/F)
1.
2 Receiver-Transmitters (RT) (RT-1523/A/B/C/D/E).
2.
Mounting Base (MB) (MT-6352/A), part of installation kit.
3.
Vehicular Amplifier Adapter (VAA) (AM-7239/A/B/C/D/E).
4.
Vehicular Antenna (AS-3900/3916), part of installation kit.
5.
2 Handsets (HS) (H-250), part of installation kit.
6.
2 Loudspeakers (LS) (LS-671), part of installation kit.
7.
Power Amplifier (PA) (AM-7238/A/B).
8.
Cable (W2), connects RT ANT to PA.
9.
2 Cables (W4), connect RTs to VAA.
10.
2 Antenna Cables (CG-3856), part of installation kit.
11.
2 Loudspeaker Cables (CX- 13292), part of installation kit.
12.
Power Cable, part of installation kit.
Figure 2-16. Short Range/Long Range (SR/LR) Radio Components
2-23
TM 11-5820-890-10-8
2.5f.
Short Range/Long Range Radio with Dismount Components (AN/VRC-91A/D/F)
Same as Short Range/Long Range Radio, plus Dismount (Manpack) Radio.
2 . 5 g . Long Range/Long Range Radio Components (AN/VRC-92A/D/F)
1.
2 Receiver-Transmitters (RT) (RT-1523/A/B/C/D/E).
2.
Mounting Base (MB) (MT-6352/A), part of installation kit.
3.
Vehicular Amplifier Adapter (VAA) (AM-7239/A/B/C/D/E).
4.
Vehicular Antenna (AS-3900/3916), part of installation kit.
5.
2 Handsets (HS) (H-250), part of installation kit.
6.
2 Loudspeakers (LS) (LS-671), part of installation kit.
7.
2 Power Amplifiers (PA) (AM-7238/A/B).
8.
Power Amplifier Mount (PA Mt) (MT-6353).
9.
Cable (W2), connects RT ANT to PA.
10.
2 Cables (W4), connect RTs to VAA.
11.
3 Cable (CG-3856), 1 connects PA to antenna (5’) (2 are in installation kit).
12.
Cable (CX-13291), connects RT-B PA Mt to VAA.
13.
Cable (CX-13298), connects RT-A to RT-B for RXMT.
14.
Cable (CX-13303), connects RT-B PA Mt to MB.
15.
2 Loudspeaker Cables (CX-13292), part of installation kit.
Figure 2-17. Long Range/Long Range (LR/LR) Radio Components
2-24
TM 11-5820-890-10-8
2.5h. VAA Connectors (A/B models)
Figure 2-18. VAA Connectors
2-25
TM 11-5820-890-10-8
J1
RF PA Control (RT-A); provides control lines and power supply for the
RF Power Amplifier (PA).
J2
AUD/DATA-B provides for connection of handset or data device for
RT-B.
J3
AUD/DATA-A; provides for connection of handset or data device for
RT-A.
J4
DATA-B; 6-pin connector used to couple VAA J4 to RT-B AUD/DATA
port using a W-4 cable. (W-4 cable must be connected for use of J2
connector)
J5
DATA-A; 6-pin connector used to couple VAA J5 to RT-A AUD/DATA
port using a W-4 cable. (W-4 cable must be connected for use of J3
connector)
J6
SPKR; 6-pin connector used to connect LS-454 loudspeaker.
J7
RT-B System Connector; 27-pin system connector for RT-B.
J8
RT-A System Connector; 27-pin system connector for RT-A.
J9
Control-Monitor; 6-pin connector for use of a control-monitor
(C-11291).
J10
SNAP: not used.
J11
RF PA Control (RT-B); 14-pin connector for control of external RT-B
power amplifier.
E1/2A/B
Two-wire binding posts used for remote control of RT-A/RT-B via
C-11561 (RCU) or SIP RTs used as RCUs.
P1
Power connector; couples vehicle 27.5 VDC power to the intercom.
CB1
ON/OFF Switch.
DS1
Power indicator lamp.
2-26
TM 11-5820-890-10-8
2.5i.
VAA Connectors (C/D models)
Figure 2-19. SIP VAA Connectors
2-27
TM 11-5820-890-10-8
J1
RF PA Control (FIT-A); provides control lines and power supply for the
RF Power Amplifier (PA).
J3
RS-422/RS-423; 19-pin connector for full duplex connections.
J4
DATA-B; 6-pin connector used to couple VAA J4 to RT- BAUD/DATA
port using a W-4 cable. (The W-4 cable is used only for Packet data
mode operations)
J5
DATA-A; 6-pin connector used to couple VAA J5 to RT-A AUD/DATA
port using a W-4 cable. (The W-4 cable is used only for Packet data
mode operations)
J6
RS-232/RS-423; 19-pin connector that couples data transfer
equipment to the VAA; used for FBCB2 connection.
J7
RT-B System Connector; 27-pin system connector for RT-B.
J8
RT-A System Connector; 27-pin system connector for RT-A.
J9
Control-Monitor; 6-pin connector for use of a control-monitor
(C-11291).
J10
Frequency Information Connector; 12-pin connector for frequency
information interface from RT-A and RT-B. (Dual SNAP connection
for FHMUX)
J11
RF PA Control (RT-B); 14-pin connector for control of external RT-B
power amplifier.
J12
GPS In; 6-pin and coax rectangular connector interface for GPS
receivers.
J13
GPS-B; interface between GPS buffer and RT-B.
J14
GPS-A; interface between GPS buffer and RT-A.
J16
GPS RF In; interface for GPS antenna.
E1/2A/B
Two-wire binding posts used for remote control of RT-A/RT-B via
C-11561 (RCU) or SIP RTs used as RCUs.
P1
Power connector; couples vehicle 27.5 VDC power to the intercom.
2-28
TM 11-5820-890-10-8
2.5j.
Cabling
HANDSETS
Connected only to the AUD/DATA or AUD/FILL port of the SIP RT; they
will not operate if connected to the SIP/ASIP VAA.
RT-A (LOWER SHELF)
Use of a W4 cable from the RT AUD/DATA port to the VAA J5 connector
is required only for Packet data mode. The RT-A antenna is connected
with a W2 cable from the RT antenna port to the PA connector.
RT-B (TOP SHELF)
Use of a W4 cable from the RT AUD/DATA port to the VAA J4 connector
is required only for Packet data mode. The RT-B antenna is connected
from the antenna port directly to the antenna for short range radios and
from the RT antenna port to the auxiliary PA J2 connector, using cable
CG-3855/-3856, for RT-B long range radios.
COMPUTER
Connected to the AUD/DATA port of the SIP/ASIP RT. (Do not attempt to
connect your computer to the VAA; it will not work without FDCB2
software installed in the computer and tactical internet software
installed in the VAA.)
FSK DEVICES
TacFire and other FSK data devices are connected directly to the
AUD/DATA port of the RT, not to the VAA.
HRCRD
Connected to AUD/DATA or AUD/FILL on RT and to 6-pin connector
on battery box CY-8523C.
2-29
TM
11-5820-890-10-8
2.5k. Vehicular Radio Physical Data
Weights are in kilograms; measurements are in centimeters. The numbers in
NOTE:
A// weights are approximate; all
parentheses show equivalent pounds and inches.
measurements are maximums.
Table 2-8. Vehicular Radio Physical Data
LENGTH
WIDTH
HEIGHT
WEIGHT
Mounting Base (MB),
MT-6352 Series
40.9
(16.1)
40.4
(15.9)
11.1-11.7
(4.3-4.6)
9.2
(20.3)
Vehicular Amplifier Adapter (VAA),
AM -7239 Series
38.6
(15.2)
36.7
(14.4)
19.3
(7.6)
11.0
(24.3)
Vehicular Antenna,
AS - 3900
286.6
(112.8)
n/a
n/a
5.3
(11.6)
SINCGARS Low Profile Antenna
(SLPA), AS-3916
209.9
(82.6)
n/a
n/a
2.4
(5.3)
n/a
n/a
n/a
0.25
(0.55)
Loudspeaker (LS),
LS 671
10.6
(4.2)
12.6
(4.9)
16.0
(6.3)
1.1
(2.4)
Power Amplifier (PA),
AM 7238 Series
30.7
(12.1)
6.9
(2.7)
13.5
(5.3)
3.1
(6.8)
Power Amplifier Mount (PA Mt),
MT-6353
34.6
(13.6)
14.7
(5.8)
12.9
(5.1)
6.0
(13.3)
Receiver-Transmitter,
RT-1523
25.3
(10.0)
27.1
(10.7)
(8.7)
(3.4)
6.7
(14.7)
Receiver-Transmitter,
RT-1523A
25.3
(10.0)
27.1
(10.7)
8.7
(3.4)
6.9
(15.2)
Receiver-Transmitter,
RT-1523B/C/D
25.3
(10.0)
27.1
(10.7)
8.7
(3.4)
(13.7)
Receiver-Transmitter,
RT- 1523E
25.6
(10.1)
13.5
(5.3)
13.5
(5.3)
3.6
(8.0)
Control-Monitor
(C-11291)
11.8
(4.6)
15.1
(5.9)
10.1
(4.0)
1.4
(3.0)
ITEM
Handset (HS),
H-250
2-30
TM 11-5820-890-10-8
Vehicular Radio Performance Data
2.51.
Table 2-9. Vehicular Radio Performance Data
TYPE COMM
RF PWR
RANGE*
VOICE (SR or LR RADIO)
LOW (LO)
200 M to 400 M
VOICE (SR or LR RADIO)
MEDIUM (M)
400 M to 5 KM
VOICE (SR or LR RADIO)
HIGH (HI)
5KM to 10KM
VOICE (LR RADIO)
POWER AMPLIFIER (PA)
10KM to 40KM
DATA (SR RADIO)
600-4800 BPS
16000
BPS
HIGH (HI)
DATA (LR RADIO)
600-2400 BPS
4800
BPS
16000
BPS
POWER AMPLIFIER (PA)
3KM to 5KM
1 KM to 3 km
5KM to 25KM
5KM to 22KM
3KM to 10KM
**
EDM DATA (SR RADIO)
1200N -2400N BPS
4800N BPS/PCKT
9600N BPS
HIGH (HI)
EDM DATA (LR RADIO)
1200N-2400N BPS
4800N BPS/PCKT
9600N BPS
POWER AMPLIFIER (PA)
5KM to 10KM
5KM to 10KM
5KM to 10KM
20 KM to 35 KM
15KM to 25KM
10KM to 25KM
*
Ranges shown are for planning purposes only They are based upon line of sight and are
average for normal conditions. Ranges depend upon location, sighting, weather, and
surrounding noise level, among other factors. Use of the OE-254 antenna will increase ranges
for both voice and data transmissions. Enemy jamming and mutual interference conditions will
degrade ranges. In data transmissions, use of lower baud rate increases the range.
**
EDM Data rates are available on “C” and “D” model radios.
2-31
TM 11-5820-890-10-8
2.6.
SINGLE RADIO MOUNT (SRM) RADIO (AN/VRC-87C)
2.6a.
Components of Short Range (SR) Radio in Single Radio Mount (AN/VRC-87C) 1
1.
Receiver-Transmitter (FIT) (RT-1523/A*/B).
2.
Mounting Base, Electrical Equipment MT-6576 (SRM), part of installation kit.
3.
Power Supply Adapter (PSA) (MX-10862).
4.
Vehicular Antenna (AS-3900/3916), part of installation kit.
5.
Handset (H-250), part of installation kit.
6.
Loudspeaker (LS) (LS-671), part of installation kit.
7.
Battery Tray (CY -8664) (selected configurations only), part of installation kit.
a.
Battery Box (CY-8523A/B), installed in Battery Tray.
b.
Battery (BA-5590), installed in Battery Box.
8.
Cable (CX13314), connects RT to PSA.
9.
Antenna Cable (CG-3856), part of installation kit.
Loudspeaker Cable (CX- 13292), part of installation kit.
10
*
RT-1523A versions with serial numbers below 20200 cannot be used with SRM
configurations if either a VIC or LS-671 is used with that SRM radio.
Figure 2-20. Components of Short Range Radio in Single Radio Mount (SRM)
2-32
TM 11-5820-890-10-8
2.6b.
Physical Data for Single Radio Mount (SRM) Radio
NOTE: Weights are in kilograms; measurements are in centimeters.
The numbers in
parentheses show equivalent pounds and inches.
All weights are approximate; all
measurements are maximums.
Table 2-10. Physical Data, Single Radio Mount Radios
ITEM
LENGTH
WIDTH
HEIGHT
WEIGHT
Mounting Base, Electrical Equipment,
MT-6576 (SRM).
32.4
(12.8)
29.2
(11.5)
12.3
(4.8)
5.3
(11.5)
Power Supply Adapter (PSA),
MX-10862.
29.8
(11.7)
27.4
(10.8)
12.6
(5.0)
4.1
(9.0)
High Voltage Center-Fed Antenna,
AS - 3900
286.6
(112.8)
n/a
n/a
5.3
(11.6)
SINCGARS Low Profile Antenna (SLPA),
AS- 3916.
209.9
(82.6)
n/a
n/a
2.4
(5.3)
n/a
n/a
n/a
0.25
(0.55)
10.6
(4.2)
12.6
(4.9)
16.0
(6.3)
1.1
(2.4)
n/a
n/a
n/a
n/a
Receiver-Transmitter (RT),
RT-1523
25.3
(10.0)
27.1
(10.7)
8.7
(3.4)
6.7
(14.7)
Receiver-Transmitter (RT),
RT- 1523A
25.3
(10.0)
27.1
(10.7)
8.7
(3.4)
6.9
(15.2)
Receiver-Transmitter (RT),
RT- 1523B
25.3
(10.0)
27.1
(10.7)
8.7
(3.4)
6.2
(13.7)
Handset:
H-250.
Loudspeaker (LS):
LS-671.
Battery Tray,
CY-8664 (Selected configurations only).
2-33
TM 11-5820-890-10-8
Performance Data for Single Radio Mount (SRM) Radio
2.6c.
Table 2-11. Performance Data, Single Radio Mount Radios
TYPE COMM
RF PWR
RANGE*
VOICE
LOW (LO)
200 M to 400 M
VOICE
MEDIUM (M)
400 M to 5 KM
VOICE
HIGH (HI)
5KM to 10 KM
DATA 600-4800 BPS
16000
BPS
HIGH (HI)
3 KM to 5 KM
1 KM to 3 km
*
Ranges shown are for planning purposes only They are based upon line of sight and are
average for normal conditions.
Ranges depend upon location, sighting, weather, and
surrounding noise level, among other factors. Use of the OE-254 antenna will increase ranges
for both voice and data transmissions. Enemy jamming and mutual interference conditions will
degrade ranges. In data transmissions, use of lower baud rate increases the range.
2-34
TM 11-5820-890-10-8
2.7.
CONTROL, RECEIVER-TRANSMITTER (RCU) (C-11561 (C)/U)
2.7a.
RCU Components
1.
Control, Receiver-Transmitter, RCU (C-11561 (C)/U)
2.
Battery Box (CY-8523A/B)
3.
Handset (H -250)
4.
Loudspeaker (LS-685)*
Figure 2-21. Components of Control, Receiver-Transmitter (RCU)
*
This is the only loudspeaker that can be used with the RCU speaker connector.
2-35
TM 11-5820-890-10-8
2.7b. RCU Physical Data
NOTE: Weights are in kilograms; measurements are in centimeters. The numbers in
All weights are approximate; all
parentheses show equivalent pounds and inches.
measurements are maximums.
Table 2-12. RCU Physical Data
Handset
(H-250)
2.7c. RCU Performance Data
DISTANCE
The RCU is connected to a SINCGARS radio by two-wire linkage
(typically WD-1 field wire). The RCU may be located up to 4 kilometers
away from the radio being remotely controlled.
CAPABILITIES
The RCU sends to and receives from its companion SINCGARS radio
voice and data messages in either single channel or frequency
hopping mode, and in plain or cipher text.
INTERCOM
A voice intercom capability is provided between the RCU and radio
operators.
RANGE
Operating ranges of SINCGARS radios that are remotely controlled by
an RCU are the same as the bracketed ranges shown for various radio
configurations in paragraphs 2.3d and 2.51.
2-36
TM 11-5820-890-10-8
2.8.
CONTROL-MONITOR (C-M) (C-11291A)
2.8a.
C-M Components
1.
Control-Monitor (C-11291)
2.
Cable (CX-13290), connects C-M to VAA.
Figure 2-22. Components of Control-Monitor (C-11291)
2-37
TM 11-5820-890-10-8
2.8b.
C-M Physical Data
‘NOTE: Weights are in kilograms; measurements are in centimeters. The numbers in parentheses
show equivalent pounds and inches. All weights are approximate; all measurements are
maximums.
Table 2 -13. Control - Monitor Physical Data
ITEM
Control-Monitor
(C-11291)
Cable(s)
(CX-13290) (2, 9, 15, 22 feet in length)
2.8c.
LENGTH
WIDTH
HEIGHT
WEIGHT
11.8
(4.6)
15.1
(5.9)
10.1
(4.0)
1.4
(3.0)
n/a
n/a
n/a
n/a
C-M Performance Data
RADIOS
One Control-Monitor (C-M) can control up to three radios mounted in
vehicular amplifier adapters (VAA). A three-position switch controls
radio selection.
FUNCTIONS
The Control-Monitor may be used to control radio RF Power, RT Mode,
Channel, COMSEC keys, and active/standby status of C-M.
SELF -TEST
A built-in self-test enables the Control-Monitor to check its control
functions through proper manipulation of C-M controls.
RADIO CAPABILITIES
Capabilities of the radios controlled by a Control-Monitor are the same
as those for any SINCGARS radio.
2-38
TM 11-5820-890-10-8
2.9
LOUDSPEAKER (LS-671)
2.9a.
LS-671 Components
1.
Loudspeaker (LS-671)
2.
Cable (CX-13292), connects loudspeaker to MB.*
Figure 2-23. Components of Loudspeaker (LS-671)
2.9b.
LS-671 Physical Data
NOTE: Weights are in kilograms; measurements are in centimeters. The numbers in
parentheses show equivalent pounds and inches.
All weights are approximate; all
measurements are maximums.
Table 2-14. LS-671 Physical Data
ITEM
Loudspeaker
(LS-671)
Cable*
(CX-13292) (Length of 3 to 100 feet)
LENGTH
WIDTH
HEIGHT
WEIGHT
10.6
(4.2)
12.6
(4.9)
14.6
(5.8)
(E)
n/a
n/a
n/a
n/a
*
Cable ends are marked “RADIO” and “SPEAKER. ” They can be reversed physically, but the
radio/LS-671 will not operate. Be sure LS-671 cable is properly installed.
2-39
TM 11-5820-890-10-8
2.9c.
LS-671 Performance Data
PURPOSE
Used to transmit and receive voice communications in vehicular radio
configurations.
POWER SWITCH
Used to turn the loudspeaker on and off. May also be used to turn radio
power on and off when VAA CB1 is set to ON.
POWER INDICATOR
Lamp lights when power switch is set to ON.
HANDSET CONNECTOR
Provides for connection of handset.
VOLUME CONTROL
Adjusts volume level of loudspeaker or handset. To adjust loudspeaker
volume, pull control out and turn. To adjust handset volume, push
control in and turn.
J1 CONNECTOR
Enables loudspeaker to be connected to mounting base or single radio
mount using loudspeaker cable (CX- 13292).
2-40
TM 11-5820-890-10-8
CHAPTER 3
ASSOCIATED EQUIPMENT
IN THIS CHAPTER:
3.1
AUTOMATED NET CONTROL DEVICE (ANCD) (AN/CYZ-10) . . . . . . . . .
a.
ANCD Capabilities . . . . . . . . . . . . . . . . . . . . . . . . . . . . . . . . . . . . . . . . . . .
b. ANCD Characteristics . . . . . . . . . . . . . . . . . . . . . . . . . . . . . . . . . . . . . . . . .
c.
ANCD Physical Data . . . . . . . . . . . . . . . . . . . . . . . . . . . . . . . . . . . . . . . . . .
(See TM 11-5810-394-14&P for detailed operating instructions)
3-2
3-2
3-3
3-3
3.2
PRECISION LIGHTWEIGHT GPS* RECEIVER (PLGR) (AN/PSN-11) . . .
a.
PLGR Capabilities . . . . . . . . . . . . . . . . . . . . . . . . . . . . . . . . . . . . . . . . . . . .
b. PLGR Characteristics . . . . . . . . . . . . . . . . . . . . . . . . . . . . . . . . . . . . . . . . .
c.
PLGR Physical Data . . . . . . . . . . . . . . . . . . . . . . . . . . . . . . . . . . . . . . . . . .
(See TM 11-5825-291 -13 for detailed operating instructions)
3-4
3-4
3-4
3-4
3.3
FREQUENCY HOPPING MULTIPLEXER (FHMUX) (TD-1456/VRC) . . .
a.
FHMUX Components . . . . . . . . . . . . . . . . . . . . . . . . . . . . . . . . . . . . . . . . .
b. FHMUX Physical Data . . . . . . . . . . . . . . . . . . . . . . . . . . . . . . . . . . . . . . . . .
c.
FHMUX Performance Data . . . . . . . . . . . . . . . . . . . . . . . . . . . . . . . . . . . . .
3-5
3-5
3-5
3-6
3.4
SECURE TELEPHONE UNIT (STU) . . . . . . . . . . . . . . . . . . . . . . . . . . . . . . . .
a.
STU Capabilities . . . . . . . . . . . . . . . . . . . . . . . . . . . . . . . . . . . . . . . . . . . . .
b. STU Characteristics . . . . . . . . . . . . . . . . . . . . . . . . . . . . . . . . . . . . . . . . . .
STU Physical Data. . . . . . . . . . . . . . . . . . . . . . . . . . . . . . . . . . . . . . . . . . . .
c.
(See manufacturer’s user manual for detailed operating instructions)
3-8
3-8
3-8
3-9
3.5
VEHICULAR INTERCOMMUNICATIONS SET (VIC) (AN/WC-1) . . . . . . .
a. VIC Capabilities . . . . . . . . . . . . . . . . . . . . . . . . . . . . . . . . . . . . . . . . . . . . . .
b. VIC Characteristics . . . . . . . . . . . . . . . . . . . . . . . . . . . . . . . . . . . . . . . . . . .
c.
VIC Physical Data . . . . . . . . . . . . . . . . . . . . . . . . . . . . . . . . . . . . . . . . . . . .
(See TM 11-5830-340-12 for detailed operating instructions)
3-10
3-10
3-10
3-11
3.6
HANDHELD REMOTE CONTROL RADIO DEVICE (HRCRD) . . . . . . . . . . 3 - 1 2
HRCRD . . . . . . . . . . . . . . . . . . . . . . . . . . . . . . . . . . . . . . . . . . . . . . . . . . . . . 3 - 1 3
a.
*Global Positioning System
3-1
TM
11-5820-890-10-8
3.1.
AUTOMATED NET CONTROL DEVICE (ANCD) (AN/CYZ-10)
3.1 a.
ANCD Capabilities
FUNCTIONS
Capable of receiving, storing, and transferring data from ANCD to
ANCD, from ANCD to SINCGARS radios, and from ANCD to other
compatible communications/electronic equipment.
PRIMARY USE
The ANCD is used primarily for handling of COMSEC keys, FH data,
sync time, and signal operating instructions (SOI) information.
REPLACEMENT
For SINCGARS applications, the ANCD replaces COMSEC devices
such as KYK- 13, KYX- 15, and KOI- 18 as well as electronic counter
counter-measure (ECCM) fill MX- 18290.
DATA LOADS
A typical ANCD data load at the operator level consists of two loadsets
(COMSEC keys and FH data for all six radio channels), each good for
30 days of operation, plus 60 days of SOI information, structured in five
ten-day editions, containing two 5-day sets each.
CAPACITIES
When used for a single or special purpose, an ANCD can store as many
as 20 loadsets (COMSEC and FH data), and two or more
division-wide editions (10 days each). The number of smaller unit SOI
editions that can be stored in an ANCD depends entirely on the size of
the SOI extract. An ANCD will also store as many as 120 COMSEC keys
(traffic encryption key [TEK] or key encryption key [KEK]), or 280
transmission security keys (TSKs).
Figure 3-1. Automated Net Control Device (ANCD), AN/CYZ-10
3-2
TM 11-5820-890-10-8
TRADE - OFFS
When an ANCD is used for special data storage purposes, trade-offs
between the above COMSEC/FH data and SOI capacities allow the
ANCD storage capability to be tailored to specific unit requirements.
MEMO
The ANCD has the ability to receive, store, and transfer up to four short
memos, each six lines in length, with 22 characters per line.
OTAR
Over-The-Air-Rekey (OTAR) operations, both Automatic Keying
(AK) and Manual Keying (MK) Keying methods, are fully supported by
the ANCD.
BROADCAST
The method of transmitting SOI information from one location to
another electronically, known as “broadcast,” is also fully supported by
the ANCD.
SECURE PHONE
COMSEC keys, FH data, and SOI information can be sent from one
location to another through use of the ANCD in conjunction with a
Secure Telephone Unit (STU).
PLGR
The Precision Lightweight GPS Receiver (PLGR) can be loaded with
the required operational key through use of the ANCD.
3.1 b.
ANCD Characteristics
HAND-HELD
The ANCD is a hand-held electronic device.
CASE
The ANCD is housed in a weather-resistant case that provides a fill
connector, cryptographic ignition key (CIK) port, and battery access
cover as the only external openings.
LID
A hinged lid allows access to the ANCD LCD display.
KEY PAD
A 35- key keypad enables the operator receive, store, transfer, and use
ANCD data.
NIGHT VIEWING
An internal ANCD lamp enables viewing of the display and keypad
when night goggles are employed.
BACKUP MEMORY
The ANCD will retain stored data for up to two minutes to enable the
operator to change batteries when required
3.1c.
ANCD Physical Data
MEASUREMENTS
Length is
16.1 CM (6.3 IN).
Width is
11.2 CM (4.4 IN).
Height is
5.0 CM (2.0 IN).
POWER
The ANCD uses three 3-volt lithium batteries.
WEIGHT
With batteries installed, the ANCD weighs approximately 2 pounds.
3-3
TM
11-5820-890-10-8
3.2.
PRECISION LIGHTWEIGHT GPS RECEIVER (PLGR) (AN/PSN-11)
3.2a.
PLGR Capabilities
LOCATION
Through global positioning system (GPS) satellite contact, provides
accurate location information in various formats.
TIME
Through global position system (GPS) satellite contact, provides
accurate time in various formats and for various time zones.
USES
Primary use is to determine position location; secondary use is as the
primary source of sync time used in SINCGARS radios.
3.2b.
PLGR Characteristics
ANTENNA
The PLGR has a built-in antenna that can be swivelled to improve
reception.
KEY PAD
The PLGR has a keypad with twelve multifunction keys that are used to
control PLGR operation.
DISPLAY
The PLGR display contains four lines of information, with 16 characters
per line.
HANDLE
A built-in, adjustable handle facilitates reading the PLGR display and
making keypad entries while holding the device in the hand.
3.2c.
PLGR Physical Data
MEASUREMENTS
POWER
3-4
Length is
24.1 CM (9.5 IN).
Width is
10.4 CM (4.1 IN).
Depth is
6.6 CM (2.6 IN).
For primary power, the PLGR uses a 6-volt lithium BA-5800 battery,
and the memory battery is a 3.6-volt (LS-6) lithium battery.
TM 11-5820-890-10-8
3.3.
FREQUENCY HOPPING MULTIPLEXER (FHMUX) (TD-1456/VRC)
The multiplexer combines any mix of up to four low to high power frequency hopping (SINCGARS) transceivers
to a single antenna. The FHMUX unit operates across the 30.000 to 87.975 MHz frequency range. The primary
function is to extend the multiplexing capability to frequency hopping radios. In addition to the multiplexing
function, the FHMUX prevents frequency collisions and provides the selectivity necessary to attenuate any local
interfering signal which might otherwise result in degrading the receiver sensitivity. The FHMUX is digitally tuned
via the SNAP interface when controlled by a SINCGARS radio
3.3a.
FHMUX COMPONENTS
1.
Multiplexer TD-1456/VRC (FHMUX)
2.
Mounting Base
Figure 3-2. Multiplexer TD-145/VRC and Mounting Base
3.3b.
FHMUX Physical Data
NOTE: Weights are in kilograms; measurements are in centimeters. The numbers in parentheses
show equivalent pounds and inches. All weights are approximate; all measurements are
maximums.
LENGTH
WIDTH
HEIGHT
WEIGHT
Multiplexer
43.2 (17.0)
40.6 (16.0)
21.6 (8.5)
25 (56)
Multiplexer mounting base
40.6 (16.0)
41.4 (16.3)
8.9 (3.5)
8.6 (19)
ITEM
3-5
TM 11-5820-890-10-8
3.3c.
FHMUX Performance Data
Vehicular Configuration
Figure 3-5 shows a typical vehicular configuration using one multiplexer and two VRC-92A radios. The
introduction of the multiplexer into the radio system is “transparent”, that is it does not affect the way the radios
are operated. The number of vehicular antennas needed is reduced from four to one. Instead of each radio
going directly to its own antenna, the antenna connections of the four radios are routed to the multiplexer and
the multiplexer then connects to a single common antenna. To provide frequency hopping information to the
multiplexer, the SNAP control signals provided by the VAA must be connected to the multiplexer, one SNAP
cable per VAA. Vehicular DC power (22 to 32 Vdc) must also be supplied to the multiplexer through J2 on the
Power Amplifier Mount (MT-6353/VRC) or through J2 on the Mounting Base (MT-6576/VRC).
The only two operator controls on the multiplexer are the POWER switch and the RADIO PRIORITY switch. The
POWER switch must be placed in the ON position to use the FXMUX (the POWER switch can be turned ON and
left ON if the DC power is controlled remotely by CB1 on the VAA).
Figure 3-3. POWER Switch
The RADIO PRIORITY switch position is set based on the desired operating scenario. In the EQUAL position, all
four radios connected to the multiplexer will have equal communications priority. In the 1A, 1B, 2A and 2B
positions, the selected radio will have a slightly higher priority than the other radios whenever there is frequency
conflict (a frequency conflict is when two or more hopping radios want to communicate on the same frequency
at the same instant). In the RXMT(1A+1B) position, radios 1A and 1B (operating in the retransmit mode) have
higher priority than radios 2A and 2B. Normally the switch will be set in the EQUAL position, but if desired, higher
priority can be given to a critical communications link
Figure 3-4. RADIO PRIORITY Switch
The TEST position is used only for Off -Line BIT and the switch should not be placed in this position except as
directed in the -20 and -30 maintenance manuals.
3-6
TM 11-5820-890-10-8
Figure 3-5. Dual Long/Long Range (LR/LR), two AN/VW-92s) with Multiplexer
3 - 7
TM 11-5820-890-10-8
3.4.
SECURE TELEPHONE UNIT (STU)
3.4a.
STU Capabilities
PURPOSE
To enable secure (up to and including SECRET level of classification)
voice and data transmissions to be performed over commercial and
military telephone circuits.
ANCILLARY DEVICES
The ANCD may be connected to the STU to serve as the source of data
and information to be transferred via telephone.
APPLICATIONS
COMSEC key, FH data (hopset/lockout, TSK, net ID), and SOI
information may be sent over commercial and military telephone
circuits, distance unlimited.
DATA RECEIPT
At the receiving end of the STU transfer operation, data is received by
and stored in a target ANCD, available for use when required.
AVAILABILITY
STU equipment is provided primarily for peacetime, non-battlefield
use, but it can be used whenever commercial or military telephone
It is anticipated that STU transfer of
circuits are available.
SINCGARS-related key and data will be especially useful during
mobilization as well as peacetime management of widely dispersed
Reserve Component forces.
3.4b.
STU Characteristics
COMSEC
Secure telephone units require use of proper COMSEC key.
DATA RATES
Synchronous data modes are at 2400, 4800, and 9600 BPS
CIK
Interoperable Cryptographic Ignition Key (CIK) allows the use of seven
terminals.
COMPATIBILITY
STU is compatible with US commercial, DDN, and international
telephone systems.
TEMPEST
STU meets requirements of NACSIM 5100A and is in compliance with
MIL-STD-461B(RS03).
COMMERCIAL
The STU IS a commercial off -the-shelf item and is not designed for
outdoor, all-weather use.
3-8
TM 11-5820-890-10-8
3.4c.
STU Physical Data
MEASUREMENTS
Height is 6.4 CM (2.5 IN).
Width is 22.9 CM (9.0 IN).
Depth is 25.4 CM (10.0 IN).
POWER
Uses 115 or 230 Vac, 50-60 Hz, at 20 W nominal consumption.
BACK-UP POWER
Uses a lithium, industry standard BR2325 battery to prevent loss of fill
from power outage.
WEIGHT
3.6 KG (8.0 LB).
TEMPERATURE
Operating temperature ranges are 0 to 70 C (32 to 122 F).
3-9
TM 11-5820-890-10-8
3.5.
VEHICULAR INTERCOMMUNICATIONS SET (WC) (AN/VIC-1)
3.5a.
VIC Components
1.
Audio Frequency Amplifier (AM- 1780)
2.
Commander and Crewmember Control Box (C-2298)
3.
Driver Control Box (C-2297)
Figure 3-6. Components of AN/VIC-1 Intercommunication Set
3.5b.
VIC Capabilities
AM-1780
The audio frequency amplifier is the main junction box for the VIC-1
system. It provides control of DC power to associated control boxes
and to the radio system connected to the AM-1780 amplifier. It also
amplifies and controls audio signals in the intercom and radio circuits.
C-2298/C-2297
When a combat vehicle crew (CVC) helmet cord is connected to a
control box, the crewmember can select, by means of the MONITOR
switch and CVC controls, to communicate on the intercom or on a
radio.
3-10
TM 11-5820-890-10-8
3.5c.
VIC Physical Data
NOTE: Measurements are in centimeters. The numbers in parentheses show equivalent inches.
All measurements are maximums.
MEASUREMENTS
(AM - 1780)
Height is 9.6 CM (3.8 IN)
Depth is 14.6 CM (5.8 IN)
Width is 24.6 CM (9.7 IN)
MEASUREMENTS
(C-2297/C-2298)
Height is 11.4 CM (4.5 IN)
Depth is 14.6 CM (5.8 IN)
Width is 8.9 CM (3.3 IN)
3-11
TM
11-5820-890-10-8
3.6.
HANDHELD REMOTE CONTROL RADIO DEVICE (HRCRD)
The new Handheld Remote Control Radio Device (HRCRD), C-12493/U, is used with manpack radio
AN/PRC-119A/D/F and the dismount kits of vehicular radio configurations AN/VRC-88A/D/F. The HRCRD
enables the manpack operator to control the following functions of the radio using the HRCRD: Channel, RF
Power, Mode, and COMSEC. For control of these functions, access to the manpack RT is not required. The
operator can control the volume level of audio at the HRCRD by use of the thumb wheel located on the side of the
device. Also, the operator can turn the NRCRD back light on and off by pressing the round light button.
Operation of the HRCRD requires use of Battery Box, CY-8523C (for RT-1523C/D), which provides power
from the main manpack battery to the remote control handset. The cable attached to the HRCRD forms a “Y”
with one end connected to the RT AUD/DATA or AUD/FILL port and the other end to the 6-pin connector of
Battery Box CY -8523C or AUX connector of the RT- 1523E.
Although the HRCRD is intended primarily for use with manpack radios, it can be used with vehicular
configurations by connecting one end of the “Y” cable to the J9 port of the VAA. This will control the “A” radio
only.
Figure 3-7. Handheld Remote Control Radio Device (HRCRD)
3-12
TM
3.6a.
11-5820-890-10-8
HRCRD
Cabling
Connect the HRCRD “Y” cable ends to the RT AUD/FILL or AUD/DATA
port and to the 6-pin connector on Battery Box CY-8523C or AUX
connector of the RT-1523E. Only Battery Box CY-8523C may be
used with the HRCRD.
Controls
To control radio functions, press [SEL] until the required function is
highlighted (CHAN; COMSEC; RF PWR; MODE). Then press the
[DOWN ARROW] until the specific item you need appears in the
display. RT FCTN switch must be in REM for HRCRD to be functional.
Light
To turn the backlight on, press the light button. To turn the light off,
press the light button a second time.
Volume
To change the level of audio volume, rotate the volume control knob on
the side of the HRCRD to reach to level desired.
Radio Controls
For control of the other radio functions, make all the required selections
and changes using the R keypad and front panel controls.
Transmit
Press the Push-To-Talk (PTT) switch on the side of the HRCRD.
Receive
Place handset near one end and adjust volume to required level for
reception.
3-13
TM
11-5820-890-10-8
Figure 3-8. HRCRD Cables and Controls
Figure 3-9. HRCRD, Front and Rear Views
3-14
TM
11-5820-890-10-8
CHAPTER 4
PRINCIPLES OF OPERATION
IN THIS CHAPTER:
4.1
SECURE (CIPHER TEXT) (CT) COMMUNICATIONS . . . . . . . . . . . . . . . . .
a.
Integrated COMSEC (ICOM) . . . . . . . . . . . . . . . . . . . . . . . . . . . . . . . . . . .
b. Traffic Encryption Key (TEK) . . . . . . . . . . . . . . . . . . . . . . . . . . . . . . . . . . .
c.
Cipher Text Operations . . . . . . . . . . . . . . . . . . . . . . . . . . . . . . . . . . . . . . . .
4-2
4-2
4-3
4-3
SINGLE CHANNEL (SC) COMMUNICATIONS . . . . . . . . . . . . . . . . . . . . . .
Capabilities . . . . . . . . . . . . . . . . . . . . . . . . . . . . . . . . . . . . . . . . . . . . . . . . . .
a.
Limitations . . . . . . . . . . . . . . . . . . . . . . . . . . . . . . . . . . . . . . . . . . . . . . . . . .
b.
Required Usage . . . . . . . . . . . . . . . . . . . . . . . . . . . . . . . . . . . . . . . . . . . . .
c.
4-4
FREQUENCY HOPPING (FH) COMMUNICATIONS . . . . . . . . . . . . . . . . . .
Capabilities . . . . . . . . . . . . . . . . . . . . . . . . . . . . . . . . . . . . . . . . . . . . . . . . .
a.
Frequency Hopping Data . . . . . . . . . . . . . . . . . . . . . . . . . . . .
b.
.........
SyncTime
...................................................
c.
d. Advantages . . . . . . . . . . . . . . . . . . . . . . . . . . . . . . . . . . . . . . . . . . . . . . . . .
4-6
4-6
4-6
4.4
USE OF JULIAN DATE AND GPS ZULU TIME . . . . . . . . . . . . . . . . . . . . . . .
Two-Digit Julian Date . . . . . . . . . . . . . . . . . . . . . . . . . . . . . . . . . . . . . . . .
a.
Precise GPS Time . . . . . . . . . . . . . . . . . . . . . . . . . . . . . . . . . . . . . . . . . . . .
b.
Common Zulu Time . . . . . . . . . . . . . . . . . . . . . . . . . . . . . . . . . . . . . . . . . .
c.
d. Cross-Net Communications . . . . . . . . . . . . . . . . . . . . . . . . . . . . . . . . . . .
4-10
4-10
4-11
4-11
4-12
4.5
NETOPENING . . . . . . . . . . . . . . . . . . . . . . . . . . . . . . . . . . . . . . . . . . . . . . . . . .
General . . . . . . . . . . . . . . . . . . . . . . . . . . . . . . . . . . . . . . . . . . . . . . . . . . . . .
a.
Loadsets.. . . . . . . . . . . . . . . . . . . . . . . . . . . . . . . . . . . . . . . . . . . . . . . . . . .
b.
ICOM Fill of RT . . . . . . . . . . . . . . . . . . . . . . . . . . . . . . . . . . . . . . . . . . . . . . .
c.
Hot Start Procedure . . . . . . . . . . . . . . . . . . . . . . . . . . . . . . . . . . . . . . . . . .
d.
Cold
Start Procedure . . . . . . . . . . . . . . . . . . . . . . . . . . . . . . . . . . . . . . . . .
e.
4-13
4-13
4-13
4-15
4-16
4-17
4.6
LATE NET ENTRY . . . . . . . . . . . . . . . . . . . . . . . . . . . . . . . . . . . . . . . . . . . . . . . .
General . . . . . . . . . . . . . . . . . . . . . . . . . . . . . . . . . . . . . . . . . . . . . . . . . . . . .
a.
Passive Method . . . . . . . . . . . . . . . . . . . . . . . . . . . . . . . . . . . . . . . . . . . . . .
b.
Hot Start Option . . . . . . . . . . . . . . . . . . . . . . . . . . . . . . . . . . . . . . . . . . . . . .
c.
Reloading Sync Time . . . . . . . . . . . . . . . . . . . . . . . . . . . . . . . . . . . . . . . . .
d.
CUE and ERF Method . . . . . . . . . . . . . . . . . . . . . . . . . . . . . . . . . . . . . . . .
e.
4-18
4-18
4-18
4-19
4-20
4-21
4.7
PERIODIC UPDATING . . . . . . . . . . . . . . . . . . . . . . . . . . . . . . . . . . . . . . . . . . . .
COMSEC Keys . . . . . . . . . . . . . . . . . . . . . . . . . . . . . . . . . . . . . . . . . . . . . . .
a.
b. FH Data . . . . . . . . . . . . . . . . . . . . . . . . . . . . . . . . . . . . . . . . . . . . . . . . . . . . .
SOI Information . . . . . . . . . . . . . . . . . . . . . . . . . . . . . . . . . . . . . . . . . . . . . .
c.
d. SyncTime . . . . . . . . . . . . . . . . . . . . . . . . . . . . . . . . . . . . . . . . . . . . . . . . . . .
ANCD Loads and Updating . . . . . . . . . . . . . . . . . . . . . . . . . . . . . . . . . . . .
e.
4-22
4-22
4-22
4-22
4-22
4-23
4.2
4.3
4-4
4-5
4-5
4-7
4-9
4-1
TM
11-5820-890-10-8
4.8
ELECTRONIC UPDATING . . . . . . . . . . . . . . . . . . . . . . . . . . . . . . . . . . . . . . . . .
a.
Sending TEK by Over-The-Air-Rekey (OTAR) Procedures . . . . . . .
b. Sending FH Data by Electronic Remote Fill (ERF) Process . . . . . . . . .
c.
Sending SOI Information by Broadcast Method . . . . . . . . . . . . . . . . . . .
4-24
4-24
4-26
4-27
4.9
RETRANSMISSION (RXMT) OPERATIONS . . . . . . . . . . . . . . . . . . . . . . . . .
General . . . . . . . . . . . . . . . . . . . . . . . . . . . . . . . . . . . . . . . . . . . . . . . . . . . . .
a.
b. RXMT Capability Modes . . . . . . . . . . . . . . . . . . . . . . . . . . . . . . . . . . . . . . .
RXMT Procedures . . . . . . . . . . . . . . . . . . . . . . . . . . . . . . . . . . . . . . . . . . . .
c.
4-28
4-28
4-29
4-30
4.10
ANTENNAS . . . . . . . . . . . . . . . . . . . . . . . . . . . . . . . . . . . . . . . . . . . . . . . . . . . . .
Long Manpack Antenna (AS-4266A) . . . . . . . . . . . . . . . . . . . . . . . . . . .
a.
b. SINCGARS Low-Profile Antenna (SLPA) (AS-3916) . . . . . . . . . . . . . .
c.
OE-254 . . . . . . . . . . . . . . . . . . . . . . . . . . . . . . . . . . . . . . . . . . . . . . . . . . . .
4-32
4-32
4-33
4-34
4.11
REMOTING CAPABILITIES . . . . . . . . . . . . . . . . . . . . . . . . . . . . . . . . . . . . . . .
a.
Use of RCU . . . . . . . . . . . . . . . . . . . . . . . . . . . . . . . . . . . . . . . . . . . . . . . . . .
b.
Use of RT as RCU . . . . . . . . . . . . . . . . . . . . . . . . . . . . . . . . . . . . . . . . . . . .
Use of LS-671 . . . . . . . . . . . . . . . . . . . . . . . . . . . . . . . . . . . . . . . . . . . . . .
c.
d.
Use of Control-Monitor . . . . . . . . . . . . . . . . . . . . . . . . . . . . . . . . . . . . . . .
Use of Wire Line Adapter, HYX-57 . . . . . . . . . . . . . . . . . . . . . . . . . . . . .
e.
f.
Use of Remote Control Device, C2329/GRA-39 . . . . . . . . . . . . . . . . . .
4-34
4-34
4-40
4-41
4-42
4-44
4-45
4.12
NETMANAGEMENT . . . . . . . . . . . . . . . . . . . . . . . . . . . . . . . . . . . . . . . . . . . . .
Net Discipline . . . . . . . . . . . . . . . . . . . . . . . . . . . . . . . . . . . . . . . . . . . . . . . .
a.
b. Role of the NCS . . . . . . . . . . . . . . . . . . . . . . . . . . . . . . . . . . . . . . . . . . . . . .
Role of Alternate NCS . . . . . . . . . . . . . . . . . . . . . . . . . . . . . . . . . . . . . . . . .
c.
d. Special Task Performance . . . . . . . . . . . . . . . . . . . . . . . . . . . . . . . . . . . . .
Operator Proficiency . . . . . . . . . . . . . . . . . . . . . . . . . . . . . . . . . . . . . . . . . .
f.
MSE Compatibility . . . . . . . . . . . . . . . . . . . . . . . . . . . . . . . . . . . . . . . . . . . .
Role
of Signal Officers/NCOs . . . . . . . . . . . . . . . . . . . . . . . . . . . . . . . . . .
g.
4-46
4-46
4-47
4-47
4-48
4-48
4-48
4-49
4.1.
SECURE (CIPHER TEXT) (CT) COMMUNICATIONS
4.1 a.
Integrated COMSEC (ICOM)
BUILT-IN COMSEC
SINCGARS ICOM radios have COMSEC capability built-in to the RT
All that is required to achieve secure, cipher text communications is to
load the required COMSEC key.
COMSEC ALARM
The RT-1523/A/B COMSEC alarm (beeping sound) must be cleared
by pressing PTT twice in order to load COMSEC keys or continue
normal operations. The RT-1523C/D/E will generate a constant tone
and display “NOKEY”.
PLAIN TEXT CALLS
When a station operating in CT receives a call from a station using plain
text (PT), the radio inserts a soft beeping alarm over the message to let
the receiving operator know that the incoming message is not secure.
4-2
TM 11-5820-890-10-8
4.1 b.
Traffic Encryption Key (TEK)
KEY
A traffic encryption key (TEK) enables the SINCGARS radio to operate
in a secure, cipher text (CT) mode of communications. The TEK is
loaded into the SINCGARS RT from an ANCD, or other COMSEC fill
device, if desired.
CHANNELS
A TEK may be loaded into all six channels of the RT, or channel 6 may be
reserved for OTAR use, covered below. Normally, the same TEK is
loaded into all five or six channels, but any TEK may be loaded into any
channel. If, for example, it is necessary to communicate with elements
of a different division, you would load their TEK into the channel you
intend to use for that purpose.
COMPATIBILITY
In order to communicate in secure, CT mode, both the transmitting and
receiving radios must be using the same TEK. When using more than
one TEK in your radio, it is important to record which channel each TEK
is stored in.
SCROLLING
The SINCGARS radio offers the operator the ability to move TEKs from
channel to channel. The process is called “scrolling,” and it is easy to
per-form. (For detailed procedures, see Figure 4-1, below.)
(1)
Set CHAN switch to 1-5 (cannot scroll in chan 6),
where different TEK is needed
(2)
Press [CMSC] button; display shows TEK 1, TEK 2,
etc.
(3)
Press [CHG] button until TEK desired appears in
display.
(4)
Different TEK is now ready for use in channel
selected.
(5)
To return to original TEK, repeat steps (2) and (3),
or move the CHAN switch out of and back into the
operational channel.
Figure 4-1. HOW TO SCROLL TEK
4.1 c.
Cipher Text Operations
PURPOSE
The purpose of using secure, CT communications is to prevent the
enemy from intercepting friendly traffic.
POLICY
Army policy calls for the use of CT mode whenever the capability is
available.
EASE OF USE
With the built-in COMSEC feature of SINCGARS ICOM radios, ease
with which all RT channels can be loaded with TEKs and the practice of
using a common TEK throughout a division area makes secure
communication quite easy to perform.
4-3
TM 11-5820-890-10-8
4.2.
SINGLE CHANNEL (SC) COMMUNICATIONS
4.2a.
Capabilities
DEFINITION
SINCGARS is a “single channel” radio in that it can transmit or receive
on only one channel at a time. Single channel, or the SC mode of
operation, refers to the fact that only one frequency is being used for
communications.
FREQUENCIES
The SINCGARS radio will operate on 2320 different frequencies in the
range of 30.000 to 87.975 MHz, with a 25 KHz separation between
frequencies.
CHANNELS
Eight single channel frequencies can be loaded into a SINCGARS RT:
one in each numbered channel 1-6, plus one each in the CUE and
MAN channels.
LOADING
SC frequencies are loaded via the RT keypad. Although a matter of
command policy, operators are normally required to load only those SC
frequencies they are expected to need during mission operations. To
load SC frequencies, use the procedure shown in Figure 4-2, below.
(Also, see Primary Operator Task 1, “Load Single Channel Frequencies
into SINCGARS RT.“)
(1)
Set FCTN switch to LD; MODE to SC.
(2)
Select CHAN 1-6, CUE, or MAN.
(3)
Press FREQ, then CLR.
(4)
Enter 5-digit frequency.
(5)
Press STO.
Repeat for each channel to be loaded.
(6)
Figure 4-2. HOW TO LOAD SC FREQUENCIES
4-4
TM 11-5820-890-10-8
4.2b.
Limitations of SC Communications
LOCATING
When using the SC mode of communication, it is important to
remember that an enemy with direction finding capability can
pin-point your location. It may be necessary for you to move
frequently, or limit transmission times, to avoid enemy action.
JAMMING
In that the SC mode uses only one frequency at a time to send or
receive messages, the enemy may be able to jam your
communications fairly easily.
4.2c.
Required Usage
COLD START
To employ the Cold Start net opening procedure, it is necessary to use
the MAN channel for sending and receiving the electronic remote fill
(ERF) which contains FH data and sync time for frequency hopping
operations.
CUE PROCESS
When an operator needs to enter an FH net and does not have the
required FH data, or a radio with FH capability, it is necessary to “cue”
(press PTT) on CUE channel or frequency with COMSEC set to PT.
(For detailed procedure, see Figure 4-3, below.)
(1)
Calling operator sets CHAN to CUE; MODE to SC;
COMSEC to PT;
RF PWR to HI; presses PTT
(2)
Calling operator changes from PT to CT
immediately after pressing PTT
(3)
This procedure is repeated about every 15
seconds until answer is received.
(4)
Receiving NCS sees “CUE” in RT display.
(5)
NCS changes to CUE, responds in CT
(6)
NCS directs caller to change to MAN.
(7)
On MAN chan, in CT mode, NCS determines what
calling operator needs.
Figure 4-3. HOW TO “CUE” AN NCS
4-5
TM 11-5820-890-10-8
4.3.
FREQUENCY HOPPING (FH) COMMUNICATIONS
4.3a.
Capabilities
FREQUENCIES
In the frequency hopping (FH) mode of operation, the SINCGARS radio
transmits and receives on any or all of the 2320 frequencies, with 25
KHz separation, in the 30.000 to 87.975 MHz range. For best results,
1200 or more of the total 2320 frequencies are normally used.
HOPPING
In the FH mode, the SINCGARS radio uses, “hops on,” over 100
frequencies per second.
COMMUNICATING
For two or more radios operating in the FH mode to communicate, it is
essential that they contain the same set of frequencies and other
variables, commonly referred to as “FH Data”.
4.3b.
Frequency Hopping (FH) Data
HOPSET
Frequencies made available for a SINCGARS radio to hop on are called
a “Hopset.” A typical hopset consists of what remains of the total 2320
frequencies after protected frequencies, such as commercial
television, are removed. Protected frequencies are frequently referred
to as “Lockouts.” In any case, except for technical purposes, lockouts
are treated as an integral part of the hopset.
TSK
The pattern in which the radio selects frequencies to hop on is
pseudo-random, as determined by the transmission security key
(TSK). Depending upon the number of frequencies available for
hopping and the TSK itself, the exact sequence of frequencies used
during any one second will not be repeated for long periods of time.
NET ID
The remaining variable required for two or more frequency hopping
radios to communicate is called the “Net ID.” It is a three-digit number,
000-999, which controls where in the pseudo-random sequence the
radio begins to hop.
FH DATA
In shot-t, the term FH Data refers to:
integrated), TSK, and Net ID.
COMMONALITY
Typically, division-sized units use the same Hopset and TSK for all
their SINCGARS frequency hopping nets. On the other hand, each net
is assigned its own Net ID.
4-6
Hopsets (with Lockouts
TM 11-5820-890-10-8
4.3c.
Sync Time
OTHER VARIABLE
The remaining variable required for two or more frequency hopping
radios to communicate is called “Sync Time.” In addition to the FH Data
elements discussed above, communicating radios must also have the
same sync time, within plus or minus 4 seconds.
RADIO CLOCKS
In order to maintain proper sync time, the SINCGARS radio uses seven
internal clocks, a base clock plus one for each of the six FH channels.
MAN and CUE settings will display the base clock time.
LOADING TIME
For purposes of net opening, sync time can be loaded into the radio
three
ways:
electronically
from
an
ANCD or
PLGR
(RT-1523A/B/C/D/E only); manually through the RT keypad; or by
receipt of a cold start net opening ERF. All three procedures set all
seven clocks to the same sync time.
CHANNEL TIME
The plus or minus 4 seconds sync time requirement applies to each net
individually. For example, if you are operating on Channel 1, and have
proper sync time for that net, you cannot communicate on Channel 2
unless you also have the proper sync time for that net. With a separate
clock for each channel, the radio allows for time differences greater
than +/- 4 seconds among nets.
CHANGING TIME
Once your radio is operational in the FH mode, sync time can be
changed in all seven clocks by the three methods discussed above.
Sync time can be changed in a single channel, leaving other channels
unchanged, only by receipt of an ERF and storing it in the channel to be
changed.
DANGER
Nothing will take your radio OUT of a FH net quicker than changing
sync time unintentionally. Normally, a SINCGARS operator loads sync
time in preparation for net opening and does not touch the TIME button
thereafter.
4-7
TM
11-5820-890-10-8
NCS CONTROL
The NCS radio, and only the NCS radio, uses the “FH-M” MODE
position. In this mode, the NCS radio automatically brings the time of
all net radios back into synchronization every time the NCS transmits.
In short, when an operator is monitoring the operational net, there is
little or no possibility that your radio will drift out of proper sync time.
OTHER NETS
Remember that the SINCGARS radio can transmit or receive on only
one channel at a time. In order to keep your radio in sync with nets
other than your operational net, you need to check into or monitor each
of the other nets at least once every 24 hours.
COMMON SYNC TIME
With the fielding of the Precision Lightweight GPS Receiver (PLGR), all
units have been provided a ready source of highly accurate GPS time.
By opening all nets on GPS time and updating NCS RT sync time to
GPS time daily, all nets of a division, corps, or larger force are
continuously kept within the +/- 4 second window required for FH
communications. When common sync time is maintained, there is no
need to enter or monitor another net to remain within that net’s sync
time. Any net you need to enter, whether a part of your loadset or not, is
readily available without concern for sync time.
DIFFERENCES
Operational differences in terms of sync time are shown in Figure 4-4,
below.
Figure 4-4. SYNC TIME OPERATIONAL DIFFERENCES
4-8
TM 11-5820-890-10-8
4.3d.
Advantages
INTERCEPTION
In addition to the built-in COMSEC capability of the SINCGARS radio,
it confronts an enemy attempting to monitor friendly traffic with the
rapid change of frequencies over a wide range. To intercept friendly
traffic, an enemy must be able to match the FH data and sync time of
the friendly net.
JAMMING
Jamming a SINCGARS FH net can be done, but only with extraordinary
effort and commitment of equipment on the part of the enemy. Tests
have shown that even when 30% of the FH channels have been
jammed, a significant achievement, voice messages are still quite
understandable.
LOCATING
Although it is relatively easy for an enemy with direction finding
capabilities to accurately locate stations broadcasting in SC mode,
experience has shown that it is nearly impossible to determine the
location of an FH station.
FREQUENCY SHARING
SINCGARS hopsets, because of the rapidity of frequency hopping, can
include frequencies used by single channel nets and mobile
subscriber equipment (MSE). The frequency manager at division,
corps, or higher headquarters ensures best overall usage of
frequencies when developing hopsets.
COMPATIBILITY
SINCGARS radios will communicate with VRC- 12 Series radios, and
similar radios of our Allies, in the SC mode. Also, the retransmission
(RXMT) feature can be used as the interface between FH and SC nets
when appropriate.
UPDATE PERIODS
Loadsets containing TEKs and TSKs are good to use for 30 days.
ANCDs provide an additional 30 days of reserve data. In short, there is
no requirement to update data for 30 days and then the unit has
another 30 days to get their ANCDs reloaded with new data.
4-9
TM 11-5820-890-10-8
4.4.
USE OF JULIAN DATE AND GPS ZULU TIME
4.4a.
Two- Digit Julian Date
DEFINITION
Julian calendar days are normally numbered 1 through 365 or 366, with
the year appended as a fourth digit.
TWO-DIGIT DATE
The SINCGARS radio uses a special two-digit form of Julian Date as a
part of sync time. The two-digit Julian Date begins with 01 for 1
January and continues through to 00, repeating as necessary to cover
the entire year.
1 JANUARY CHANGE
In that the two-digit Julian year ends on 65, or 66 for leap year, every 1
January the Julian Date must be changed to 01. This can be done by:
(1)
The NCS sending an ERF;
(2)
Operators reloading time directly from an ANCD or PLGR; or,
(3)
Operators manually changing the date in the radio by using the RT
keypad.
CONVERSION
Dates displayed in the ANCD and PLGR take the form of
Day-Month-Year (23-09-95). When these dates are loaded into a
SINCGARS radio, they are automatically converted to the correct
two-digit Julian Date needed by the radio.
APPENDIX
Appendix A to this manual provides two-digit Julian Date calendars for
both regular and leap years.
IMPORTANCE
If your net were the only one operating in the FH mode, your NCS could
select any two-digit date for net opening. Technically, the radio will
work on any two-digit date. The importance of using the prescribed
two-digit Julian Date is when there are other FH nets operating and
you may need to contact them or they may need to contact you. Unless
both nets have the same two-digit date as a part of sync time, they
cannot communicate.
4-10
TM 11-5820-890-10-8
4.4b.
Precise GPS Time
IMPORTANCE
As with the two-digit Julian Date, the importance of having the same
accurate sync time in all FH radios is for cross-net communications. If
only one net is involved, any time will do. If you want to communicate
with nets you do not have loaded in your radio, having the same sync
time is a big advantage.
SOURCE
Global Positioning System (GPS) satellites offer SINCGARS users very
precise time by use of the Precision Lightweight GPS Receiver (PLGR).
COMMON BASE
When all FH nets are opened using precise GPS time, and when sync
time of the NCS radio is checked against GPS time daily, all nets within
a division or larger force are accessible by merely changing to the
proper net ID.
NO EXCEPTIONS
With GPS time readily available to all SINCGARS NCSs and operators,
there is no reason to use other than GPS time for SINCGARS sync time.
4.4c.
Common Zulu Time
IMPORTANCE
Zulu time is commonly used for military message dating to provide a
common basis of time around the world. Zulu time is used as basic
SINCGARS sync time to ensure that all nets are using the same time,
especially important when operating near a time zone boundary.
AVAILABILITY
The PLGR provides both local and Zulu time; either may be selected
and read or transferred directly from the device.
APPENDIX
Appendix A to this manual provides a time zone map with Zulu time
highlighted. For example, when Zulu time is 2400 hours, local time in
New York is 1900, and in California it is 1600.
4-11
TM 11-5820-890-10-8
4.4d.
Cross- Net Communications
ONE NET ONLY
Unless there is but a single FH net operating, a totally unrealistic
battlefield situation, there is great advantage from the use of common
sync time.
FH- M POSITION
The NCS radio automatically maintains sync time control
(+/- 4 seconds) for that one net.
RT CLOCKS
With a separate clock for each FH operating channel, sync time is
automatically maintained for your operational channel and the other
four or five nets you have loaded into your radio.
COMMANDERS
Commanders, aircraft crews, and others who cross unit boundaries
frequently have the need to be able to enter any net quickly and with
minimum time and effort. If the net required is loaded in a channel of
one of the operating radios, only the channel switch needs to be
changed If the net required is not loaded in one of the operating
radios, and if all nets use common COMSEC, FH data, and sync time,
only the net ID needs to be changed for secure FH communications to
begin.
MONITORING
Monitoring, or “eavesdropping” as it is some times called, across all
unit nets is essential to command and control on the modern
battlefield. SINCGARS provides the capability to monitor or enter any
net in the division so long as common COMSEC key, FH data, Julian
Date, and GPS Zulu time are properly used.
4-12
TM 11 -5820-890-10-8
4.5.
NET OPENING
4.5a.
General
NCS ROLE
The NCS of each net is responsible for opening the net at the time
required to support unit operations. NCS net opening responsibilities
include:
Announcing the date-time of opening;
Ensuring operators are provided the required COMSEC key and
FH data loads;
Sending an ERF if required; and,
Logging members into the net during opening.
NET OPERATION
A SINCGARS secure, FH net will be opened prior to the start of an
operation while the unit is still at home station or in an assembly area. It
is highly unlikely the net, once operational, will ever be completely shut
down until the exercise or operation has been completed. In combat
situations, it would be rare for an entire net to shut down.
MINIMUM RT
REQUIREMENTS
The minimum essential data required by a SINCGARS radio prior to net
opening are COMSEC key and TSK. These data elements must be
manually loaded into the radio even when an ERF is to be sent.
Maximum data that can be loaded into the radio prior to net opening
include COMSEC key, FH data, and sync time. In this case the radio is
ready to enter the secure, FH net at the opening time or when called.
4.5b.
Loadsets
DEFINITION
A “Loadset” is defined as all of the COMSEC keys (TEK and KEK) and
FH data (hopset, TSK, and net ID) required to load all six channels of
the SINCGARS radio.
UNIT-SPECIFIC
Loadsets are tailored to the needs of each net or unit, specifying by
channel where the operational net will be and what other nets will be
loaded into the remaining channels. For examples of company and
platoon loadsets, see Figures 4-5 and 4-6, below. Unit loadset
composition may be left to the discretion of each operator, but it is
normally prescribed by the unit SOP to ensure that all operators have
the same information and can readily contact other nets in the loadset.
4-13
TM 11-5820-890-10-8
CHANNEL 1
NET ID: 275
CO/TEAM COMMAND NET
CHANNEL 2
NET ID: 678
FIRE SUPPORT NET
CHANNEL 3
NET ID: 280
RIGHT FLANK CO/TEAM
CHANNEL 4
NET ID: 250
BN/TF COMMAND NET
CHANNEL 5
NET ID: 733
ATCHD ENGINEER PLT
CHANNEL 6
NET ID: 255
BN/TF ADMIN/LOG NET (OR KEK)*
Figure 4-5. EXAMPLE OF COMPANY LOADSET
CHANNEL 1
NET ID: 276
1 ST PLT
CHANNEL 2
NET ID: 277
2ND PLT
CHANNEL 3
NET ID: 278
3RD PLT
CHANNEL 4
NET ID: 275
CO/TEAM COMMAND NET
CHANNEL 5
NET ID: 678
FIRE SUPPORT NET
CHANNEL 6
NET ID: 733
ATCHD ENGR PLT (OR KEK)*
Figure 4-6. EXAMPLE OF PLATOON LOADSET
*
If a KEK is loaded in Channel 6 in preparation for use of OTAR procedures, Channel 6 may
not then be used for either voice or data communications. Sending a TEK by OTAR procedures is
normally an infrequent requirement, and Channel 6 requires FH data be loaded in order to send
an OTAR message. One solution is to load a TEK in Channel 6, use it for normal communications
until an OTAR requirement comes up, and then load a KEK from the ANCD into Channel 6.
4-14
TM 11-5820-890-10-8
RESPONSIBILITIES
Unit Signal Officers/NCOs are responsible for determining
unit-specific loadset requirements and advising the brigade or
separate battalion level Lightweight Computer Unit (LCU) operator of
those requirements.
The LCU operator, using the computer,
assembles data into loadsets and distributes them to the using units.
TF CHANGES
When changes in task organization can be anticipated, revised
loadsets are developed by the supporting LCU operator. When time
does not permit LCU operator support, using units change net ID S as
appropriate to accommodate changes in task organization.
4.5c.
ICOM Fill of RT
DEFINITION
An ICOM fill is the loading of a loadset plus sync time from an ANCD into
a SINCGARS RT (RT-1523A/B/C/D/E). (With RT-1523, sync time is
loaded via the RT keypad.) As a result of an ICOM fill, all six channels of
the radio are loaded with COMSEC key, FH data, and sync time. After
an ICOM fill is performed, the operator needs only to call the NCS to
enter the net.
PROCEDURE
Performing an ICOM fill is one of the basic tasks required of all
SINCGARS operators. The procedure is simple and requires only the
steps shown in Figure 4-7, below. (Also, see Primary Operator Task 2,
“Load COMSEC/FH Data/Sync Time into Radio Using ICOM Fill.“)
(1)
Turn radio and ANCD ON.
(2)
On ANCD, select Radio, Send, Radio, and ICOM
from the ANCD menu.
(3)
Connect ANCD to the RT with proper fill cable.
(4)
Set RT FCTN to LD; and COMSEC to CT
(5)
Press [LOAD] button on RT
(6)
All six RT channels are now loaded with
COMSEC key, FH data, and sync time (if loading
RT-1523A/B/C/D/E).
Figure 4-7. HOW TO PERFORM AN ICOM FILL
4-15
TM 11-5820-890-10-8
4.5d.
Hot Start Procedure
NCS REQUIREMENTS
NCS requirements regarding the Hot Start net opening procedure are
limited to setting the time of opening and ensuring that all net members
receive the loadset to be used and correct sync time.
LOADING THE RT
The operator participating in a Hot Start net opening performs an ICOM
fill (COMSEC key, FH data, and sync time) prior to the announced time
of net opening. That is the only preparation the operator needs to
make.
NET ENTRY
At the prescribed time for net opening, each net operator calls the NCS
and enters the secure, FH net. The Hot Start net opening procedure is
completed once all members have entered the net. An alternative
procedure is for the NCS to call net members at opening time, but
requirements remain the same. (See Figure 4-8, below, or Primary
Operator Task 3, “Perform Hot Start Net Opening,” for detailed
procedures.)
(1)
Load RT using ICOM fill procedure.
(2)
Load sync time manually if required.
(3)
Call NCS and enter CT, FH net.
(4)
When all operators have entered the net, the Hot
Start net opening is complete.
Figure 4-8. HOT START NET OPENING
PREFERRED METHOD
Because it is simple and easy to execute, the Hot Stat-t method is
generally preferred for net openings. A major advantage of the Hot
Star-t procedure is that coordination requirements are minimized, and
operators have maximum latitude regarding RT loading and net entry.
SPECIAL MEMBERS
The Hot Start procedure also recognizes that some operators, the
commander’s driver for example, may not be available at the
announced net opening time. Such special operators can enter the net
at whatever time they are available when Hot Start procedures are
used.
4-16
TM 11-5820-890-10-8
4.5e.
Cold Start Procedure
FORMER PRIMARY
Prior to the fielding of ANCDs and PLGRs, the Cold Start procedure was
the primary method of net opening.
NCS RESPONSIBILITIES
The NCS is responsible for announcing the date-time of net opening,
ensuring net members have all required COMSEC key and FH data,
and for sending the net opening ERF.
LOADING THE RT
Net operators are required to load COMSEC key and FH data into their
radios in preparation for the Cold Start ERF. Each receiving radio must
have a TSK loaded in order to receive other required FH data by ERF
SENDING THE ERF
At the prescribed time, the NCS calls the net and announces that the
net opening ERF will now be sent. To do so, the NCS merely retrieves
appropriate data from the channel where it was stored and presses
[ERF] on the RT keypad. (See Figure 4-9 below or NCS Primary Task 4
for detailed procedures.)
RECEIVING THE ERF
Receiving operators standby at the announced time with FCTN set to
LD and MAN channel selected. When the ERF is received, operators
will note the signal display jump and the RT display will show “HF XXX”.
The operator then presses [STO] followed by the channel number in
which the ERF data is to be stored.
ICOM FILL MINUS
If operators use ICOM fill procedures for their Cold Start net opening
preparations, but omit sync time, their radios will be fully operational
once the ERF loads sync time into the base clock
(1)
load SC frequency in MAN channel.
(2)
load COMSEC key and FH data into RT
(3)
Prepare radio to receive ERF: FCTN to LD,
COMSEC to CT CHAN to MAN, MODE to FH.
(4)
Standby for NCS to send ERF
(5)
When ERF is sent, note sig display activate and
display show “HF XXX.”
(6)
Press [STO] and channel number for storage.
(7)
Set FCTN to SQ ON.
(8)
Call NCS and enter the net, or wait for NCS call.
(9)
When all operators have entered the net, the Cold
Start net opening is complete.
Figure 4-9. COLD START NET OPENING
SELECTIVE USE
The Cold Start method of net opening is more demanding than the Hot
Start procedure, but it can be useful in situations where the NCS
desires to bring all operators into the net at the exact same time.
4-17
TM 11-5820-890-10-8
4.6.
LATE NET ENTRY
4.6a.
General
DEFINITION
The term “Late Net Entry” means that the operator missed the
announced net opening time and wishes to enter the net now, the
operator left the net for some reason and now wants to re-enter, or
sync time in the operator’s radio now differs by more than
+/- 4 seconds from that of the net.
METHODS
There are fours ways in which an operator can perform a late net entry,
each described below:
PREFERENCE
4.6b.
(1)
Passive method of late net entry;
(2)
The Hot Start option;
(3)
Reloading sync time option; and,
(4)
The CUE and ERF method.
All four methods are effective. The one to use is the one which best fits
your situation.
Passive Method
EASIEST
When your situation will permit use of the Passive method, it is the
easiest to use, requires minimum action on the part of the operator.
BUILT-IN CAPABILITY
The SINCGARS radio has a built-in capability to bring itself back into
the +/-4 second window.
SITUATION
The typical situation where the Passive method is most useful is when
the radio remains fully loaded with data but sync time has, for whatever
reason drifted out of the +/-4 second window. It must still be within
one minute of net sync time.
PROCEDURE
An indicator of the above situation is that no traffic is heard on the net for
some period. The operator merely presses [FREQ] on the keypad, and
then [SYNC]. The RT display shows “LF XXX”. The operator then waits
for traffic to be heard on the net, at which time the display drops the “L''
and reads a normal “F XXX.” At this point, time has been electronically
brought back into sync, and the operator is back in the net. (See
Primary Operator Task 4 for details.)
4-18
TM 11-5820-890-10-8
(1)
Note lack of traffic on net.
(2)
Press [FREQ] on RT keypad; display reads “F
xxx.”
(3)
Press [SYNC] on RT keypad; display read “LF
XXX.”
(4)
Wait to hear traffic on net; DO NOT PTT* (Note that
''L'' disappears from RT display.)
(5)
Your radio has brought you back into sync time;
you are back in the the net.
Figure 4-10. PASSIVE LATE NET ENTRY
*
If you PTT while your radio is in late net entry mode, your sync time will be thrown farther out
of sync. (RT- 1523 only)
4.6c.
Hot Start Option
NEXT EASIEST
In this option, the operator connects the ANCD to the RT and repeats
the ICOM fill procedure. It is easy to perform and takes very little time.
SITUATION
A typical situation where an operator would select this option is when
the cause of being out of the net is uncertain. In short, the problem
could be with data fill as well as with sync time.
PROCEDURE
The procedure is to select the proper menu items (four) on the ANCD,
connect the ANCD to the RT, and press [LOAD] on the RT keypad.
Sync time must be loaded manually if other than RT- 1523A/B/C/D/E is
being used.* Having repeated the ICOM fill, the operator merely
follows Hot Start procedure and re-enters the net. (See Figure 4-8 or
Primary Operator Task 3, “Perform Hot Start Net Opening,” for detailed
procedures.)
*
If possible, check ANCD sync time against PLGR GPS time. If it has been more than 24
hours since GPS time was loaded into the ANCD, time difference may exceed +/- 4 seconds. In
the worst case, load ANCD time and use passive late net entry.
4-19
TM 11-5820-890-10-8
4.6d.
Reloading Sync Time
ALSO EASY
This method calls for reloading of sync time, whether as a part of an
ICOM fill, by electronic transfer from a PLGR, or through manually
loading new sync time via the RT keypad.
SITUATION
The typical situation in which to use this method IS again where the
operator is reasonably certain that sync time is the problem. Another
factor is that the operator may not be willing to wait for traffic to be heard
(passive method) and elects this method to re-enter the net as quickly
as possible.
PROCEDURE
There are three procedures by which sync time can be reloaded:
(1)
Repeat ICOM fill that includes sync time. Procedure is the same as
that described in Figure 4-7 and Primary Operator Task 2, “Load
COMSEC/FH Data/Sync Time into RT Using ICOM Fill.”
(2) Connect a PLGR to the RT and transfer GPS time. (See PLGR
Task 3, “Load PLGR Date and GPS Zulu Time in SINCGARS RT,”
for detailed procedure.)
(3)
Determine correct GPS time from PLGR or ANCD, clear and load
new Julian Date, clear and load new hours and minutes. Press
[STO] at the time seconds are the same in the source device and
the RT. Newly loaded sync time should be within one second of
source time, otherwise try again. (See Figure 4-11, below, or
Subtasks c and d of Primary Operator Task 3, “Perform Hot Start
Net Opening,” for detailed procedures.)
(1)
Obtain running GPS time from ANCD or PLGR.
(2)
Press [TIME] on RT; display shows “DD.“
(3)
(4)
Press [CLR] on RT; display shows ”- -’”
Enter correct Julian Date; display shows “XX.”
(5)
Press [STO] on RT; Julian Date is stored.
(6)
Press [TIME] on RT; display shows “HH MM.”
(7)
Press [CLR] on RT; display shows ” _ _ _ _.”
(8)
Enter GPS HH; display shows “HH.”
(9)
(10)
Enter MM, the minute ahead of GPS time.
When RT and GPS minutes are the same (zero
seconds), press [STO] on RT.
(11)
If time stored in RT is more than one second
different from GPS time, reload sync time.
(12)
Manual loading of GPS sync time is complete.
Figure 4-11. CHANGING RT SYNC TIME
4-20
TM 11-5820-890-10-8
4.6e.
CUE and ERF Method
NOT SO EASY
The CUE and ERF method of late net entry does work, but it requires
much more of the operator than the other methods, described. It also
requires action on the part of the NCS or alternate NCS, and it involves
the use of SC transmissions with probable displacements following
each.
SITUATION
A situation in which an operator may find it necessary to use the CUE
and ERF method is when no net traffic is heard, data or sync time are
believed to be at fault, and neither an ANCD nor a PLGR is available for
reloading.
PROCEDURE
For the procedure to perform CUE and ERF method of late net entry,
see Figures 4-12 and 4-13, below, or Special Operator Task 5,
“Perform CUE and ERF Late Net Entry.”
(1)
Load CUE and MAN frequencies into RT
(2)
Set CHAN to CUE, COMSEC to PT.
(3)
Press PTT for 5 seconds (no need to talk).
(4)
Set COMSEC to CT immediately.
(5)
Wait for NCS to respond (repeat steps (2)-(4)
every 15 seconds until a response is received.
Figure 4-12. OPERATOR’S CUE & ERF PROCEDURE
To respond to the operator’s CUE and ERF request, the NCS or alternate NCS, follows the
procedure shown in Figure 4.13 (also see Primary NCS Task 5, “‘Respond to CUE Calls”:
(1)
Note “CUE” message in RT display.
(2)
Switch from operational channel to CUE.
(3)
Respond on CUE channel in CT mode.
(4)
Direct caller to MAN channel.
(5)
Upon caller’s request, send ERF on MAN channel.
(6)
Return to operational channel, and check
communications.
(7)
Immediately displace to new location if enemy is
believed to have direction finding capabilities. (Alt
NCS normally responds to CUE calls to preclude
NCS displacement.)
Figure 4-13. NCS CUE & ERF PROCEDURE
4-21
TM
11-5820-890-10-8
4.7.
PERIODIC UPDATING
4.7a.
COMSEC Keys
TEK
Traffic Encryption Key (TEK) must be updated (replaced) at least every
30 days.
KEK
Key Encryption Key (KEK) must be replaced at least every 90 days.
4.7b.
FH Data
HOPSET
Hopsets do not require periodic change and may remain unchanged
throughout an operation. Hopsets may change at any time because of
operational requirements.
TSK
Transmission Security Key (TSK) must be replaced at least every 30
days, the same frequency as TEK.
NET ID
Net IDS do not require periodic change and normally remain
unchanged throughout an operation. They may be changed at any
time for operational reasons.
4.7c.
SOI Information
DAILY
The following SOI items change every 24 hours: call signs, suffixes,
expanders, CUE frequency, MAN frequency, SC frequencies for
channels 1-6, and sign/countersign.
10 DAYS
Smoke and pyrotechnic signals change every 10 days
NO CHANGE
Unclassified call words and their associated suffixes and expanders.
DEFINITIONS
A five-day package of SOI information is called a set; a ten-day
package is referred to as an edition.
4.7d.
Sync Time
NO REQUIREMENT
There is no requirement to periodically change sync time. The only
requirement is to keep radios within a net, and nets within a command,
on the same sync time.
OPERATIONAL
The operational requirement calls for each NCS to once daily check RT
sync time against GPS time. If the difference is more than one
second, the NCS is expected to adjust the sync time in the NCS radio.
Sync time in net member’s radios can then be updated by the NCS
transmitting or merely pressing PTT several times. This sync time
updating procedure ensures that cross -net communications are
readily available to commanders and others who need them.
4-22
TM 1 1 - 5 8 2 0 - 8 9 0 - 1 0 - 8
4.7e.
ANCD Loads and Updating
ACTIVE DATA
Three SOI editions provide a using unit thirty days of SOI information for
active use. One loadset provides the using unit with 30 days of
COMSEC key and FH data.
RESERVE DATA
One reserve loadset provides the using unit 30 additional days of
COMSEC key and FH data. Two reserve SOI editions provide SOI
information good for the 30 days the active loadset is being used.
ANCD LOAD
By loading one active loadset (30 days), three active SOI editions (30
days), one reserve loadset (30 days), and two reserve SOI editions into
unit ANCDs, there are three results. The unit has all the active data,
loadset and SOI, it needs for 30 days. At the end of 30 days, the unit
changes to the reserve loadset and the last SOI edition and continues
to operate without interruption. The unit then has another thirty days
during which to reload ANCDs with new loadsets and SOI editions in
the same proportion.
UPDATE CYCLE
By making full use of the ANCD memory capacity, it is thus possible to
minimize the impact of periodic updating on operational units. With an
update requirement only every 30 days, and a thirty-day period in
which to accomplish the update, there should be little or no impact on
mission operations.
4-23
TM 11-5820-890-10-8
4.8.
ELECTRONIC UPDATING
4.8a.
Sending TEK by Over-The-Air-Rekey (OTAR) Procedures
RESTRICTION
Only TEK may be transmitted over the air using the OTAR procedure.
KEK may be distributed by physical means only.
TWO WAYS
There are two procedures by which aTEK may be sent over the air. One
is called Automatic Keying (AK); the other is Manual Keying (MK).
MANUAL KEYING (MK)
The MK OTAR procedure allows an NCS to transmit a TEK from a
source ANCD, through the SINCGARS radios, to one or more target
ANCDs. This is a useful form of OTAR in that the receiving NCS can
then distribute the new TEK to net operators by passing the ANCD
through the unit.
AUTOMATIC KEYING (AK)
The AK OTAR method transmits the new TEK from the NCS radio
directly into the target operators’ radios. An advantage of the AK
method is that the receiving operator is required to take no action at all.
A disadvantage is that the TEK and KEK in the receiving radios are
changed immediately while the sending NCS must reload that radio
with the new TEK and an updated KEK. This procedure involves some
risk of losing communications, at least in secure mode.
SENDING MK OTAR
To send a new TEK to other NCSs by using the MK OTAR process, the
sending NCS operator follows the steps shown in Figure 4-14, below
(also see Special NCS Task 3, “Send TEK to Other NCSs Using MK
Method of OTAR,” for detailed procedures):
(1)
Prepare radio to send MK OTAR: FCTN to SQ ON,
MODE to FH-M, COMSEC to CT and DATA to
OFF.
(2)
Load receiving stations KEK into NCS radios
channel 6.
(3)
Prepare ANCD to send MK OTAR: turn ANCD ON,
enter Radio, Comsec, MK, select TEK.
(4)
Connect ANCD to NCS RT using fill cable.
(5)
Direct target NCSs to standby, make special NCS
task 5 preparations, and ACK when ready for MK
OTAR.
(6)
Direct target NCSs to set RT to chan 6; press
[RCV].
(7)
Set NCS RT to channel 6 and press [SEND].
(8)
Return to operational channei.
(9)
After 30 seconds, announce OTAR complete, TEK
ID is xxxxx, effective DTG is xxxx, and obtain ACK.
(10)
Reload KEK in NCS radio; MK OTAR is complete.
Figure 4-14. SENDING MK OTAR
4-24
TM
RECEIVING MK OTAR
11-5820-890-10-8
Target NCSs perform the steps shown in Figure 4-15, below (also see
Special NCS Task 5, “Receive and Store TEK Sent by MK Method of
OTAR,” for detailed procedures).
(1)
Prepare radio to receive MK OTAR: FCTN to SQ
ON, COMSEC to CT and DATA to OFF.
(2)
Prepare ANCD to receive MK OTAR: Turn ANCD
ON, enter Radio, COMSEC, RV.
(3)
Connect ANCD to RT; ACK to NCS when ready for
MK.
(4)
When directed, set RT to Chan 6; press [RCV] on
ANCD.
(5)
Return to operational channel.
(6)
Enter Text ID; skip tag sequence.
(7)
New TEK is now stored in target NCS ANCD ready
for distribution when required.
Figure 4-15. RECEIVING MK OTAR
SENDING AK OTAR
To send a new TEK to net members by AK OTAR, the NCS will follow the
steps shown below in Figure 4-16 (also see Special NCS Task 4,
“Send TEK to Net Operators Using AK Method of OTAR”):
(1)
Prepare NCS radio for AK OTAR: FCTN to LD,
MODE to FH-M, COMSEC to CT and DATA to
OFF.
(2)
Prepare NCS ANCD to send AK OTAR: turn ON;
enter Radio, COMSEC, and AK; select key.
(3)
Alert operators to standby; press [SEND].
(4)
Load AK OTAR TEK into NCS radio: select key and
press [LOAD] / [STO]/[CHAN] on RT
(5)
Update KEK used for AK OTAR: enter VU, select
KEK; and press [RCV] on ANCD.
(6)
Load updated KEK into NCS radio: enter text ID,
Ld, and KEK; press [LOAD], [STO], and 6.
Figure 4-16. SENDING AK OTAR
FOLLOW UP ACTIONS
The NCS sending an AK OTAR needs to do two things after sending the
new TEK to net members. First, while the new TEK is automatically
loaded into receiving station radios, it must be loaded from the ANCD
into the NCS RT following the AK OTAR. Also, while the KEK in
receiving radios is automatically updated, it must be updated by the
sending NCS. (The NCS should always have his primary net’s KEK in
his RT)
4-25
TM
71-5820-890-10-8
RECEIVING AK OTAR
4.8b.
Although sending an AK OTAR demands several actions on the part of
the sending NCS, net operators need do nothing except stay off the
PlT to receive the new TEK. Special features of the AK OTAR
procedure are that the TEK in the operational channel of receiving
stations is replaced electronically by the new TEK when the AK OTAR is
sent. Also, the KEK in all receiving stations is automatically updated
(changed) at the time the AK OTAR is sent.
Sending FH Data by Electronic Remote Fill (ERF) Process
ERF UPDATE
Where the Cold Start ERF was sent on the MAN channel, an update
ERF is sent over the operational channel.
FH DATA UPDATE
To replace the FH data being used in the operational channel, the
sending NCS alerts net operations to standby, tells them in which
channel to store the ERF, and sends it. The new FH data can be loaded
in the operational channel only, or through sequential actions, into all
channels.
SENDING ERF UPDATE
The procedure for sending an ERF update is as shown in Figure 4-17,
below (also, see Special NCS Task 1, “Transmit Updated FH Data Via
Net Update ERF”):
(1)
Load new FH data into RT.
(2)
Alert net operators for ERF, where to store it, and its
effective DTG.
(3)
Net operators set FCTN to LD and standby for ERF.
(4)
NCS sets FCTN to LD; presses [LOAD] on RT;
enters channel where new FH data is stored.
(5)
NCS presses [ERF] on RT, and returns FCTN
switch to SQ ON.
(6)
Net operators standby, note activation of SIG
display, press [STO] and channel number for
storage.
(7)
NCS confirms net members receipt of the ERF.
(8)
At the time the new FH data is effective, NCS
makes a communications check using new FH
data.
Figure 4-17. SENDING NET UPDATE ERF
4-26
TM 11-5820-890-10-8
4.8c.
Sending SOI Information by Broadcast Method
DEFINITION
Broadcast is a term used for transmitting SOI information over the air
from one ANCD to another, using SINCGARS radios for transmission.
LIMITATION
Because of the amount of data involved in an SOI, normally no more
than one time period of information is sent by the Broadcast method.
This is not a limitation of the radio but a consideration that the radio is
used for other purposes.
DATA MODE
The Broadcast method uses the 1200 bits per second data rate of the
SINCGARS radio.
PROCEDURE
The procedure for sending SOI information by Broadcast Mode is as
shown in Figure 4-18, below (also, see Special NCS Task 2, “Transfer
SOI Information Using Broadcast Mode,” for detailed procedure.)
(1)
Set NCS RT to SQ ON, CT, FH-M, and DATA to
1200.
(2)
Prepare ANCD for Broadcast: select SOI data to be
sent; enter Broadcast, IDS of stations to be polled;
and new SOI et name.
(3)
Connect ANCD to AUD/DATA RT connector, and
handset to AUD/FILL connector.
(4)
Alert net operators to: Standby for Broadcast; go
to SQ ON, FH, CT, and DATA at 1200.
(5)
Direct net operators to: turn ANCD ON; enter SOI,
Receive, Broadcast, station ID, connect ANCD to
AUD/DATA connector of RT, and standby.
(6)
NCS presses [SEND] on ANCD; net operators
press [RCV] on ANCD; SOI data is transmitted.
Figure 4-18. SENDING SOI BY BROADCAST
SPECIAL FEATURE
Up to 16 stations may be polled during use of the Broadcast method.
All stations receive the transmission, but the NCS may select by identity
code those stations to be polled. At the end of the first transmission, the
ANCD determines which stations did not receive the SOI data and
rebroadcasts. After the third broadcast to polled stations, the ANCD
reports to the sending NCS any stations which still have not received
the SOI data. If the NCS does not desire to use this polling feature, it
can be shut off by entering “0.”
4-27
TM 11-5820-890-10-8
4.9.
RETRANSMISSION (RXMT) OPERATIONS
4.9a.
General
BUILT- IN CAPABILITY
The SINCGARS radio has a built-in retransmission capability which
requires only two radios and the addition of an RXMT cable
(CX-13298) for operations. Any configuration of the ground ICOM
radio can be used for retransmission. The two radios may be installed
on the same vehicle, on two separate vehicles, or two manpack
versions may be used. RXMT cables come in two lengths, 5 inches and
15 feet, to accommodate various radio configurations.
CAPABILITY MODES
There are three modes of retransmission when using SINCGARS
radios: (Each is described below.)
RXMT SITUATION
(1)
Frequency hopping net to frequency hopping net.
(2)
Frequency hopping net to single channel net.
(3)
Single channel net to single channel net.
A typical situation requiring retransmission communications is used to
illustrate the various modes and procedures. An NCS has lost, or is
about to lose, contact with one of the net stations. This could be
caused by distance or line of sight obstacles such as mountains
between the two stations. Whatever the cause, the answer is to
establish an RXMT station at a site that will enable the NCS (requesting
station) and outstation to continue, or resume, communications. In
Figure 4-19, below, note that the requesting NCS uses RADIO-A, the
outstation uses RADIO-B, and the RXMT team uses RADIO-C and
RADIO-D. In RXMT configuration, RADIO-A communicates with
RADIO-B by passing traffic through RADIO-C, the RXMT cable, and
Figure 4-19. RETRANSMISSION SITUATION
4-28
TM 11-5820-890-10-8
4.9b.
RXMT Capability Modes
FH NET TO FH NET
FH NET TO SC NET
With extensive fielding of the SINCGARS radio, FH net to FH net RXMT
links will probably be the normal mode of operation. RADIO-A and
RADIO-C use the same FH data, including net ID. Communications
between these two radios is no different than that between any two
radios of the same net. RADIO-B, which is normally a member of this
net, is out of range or has lost line of sight. In the FH to FH RXMT
operation, RADIO-B and RADIO-D use a different net ID than that
used by RADIO-A and RADIO-C. Use of the same hopset and TSK
poses no problem. When the requesting station (RADIO-A) calls the
outstation (RADIO-B) using one net ID, the message passes through
RADIO-C and the RXMT cable to RADIO-D, which then sends the
message to RADIO-B using another net ID. Other than a slight delay in
transmission and the fact that distance and obstacles are overcome,
there is no difference between direct and RXMT communications.
It is anticipated that there will be both US and Allied Forces units
equipped with SC only radios for some time. When it is necessary for a
FH net to make contact or maintain communications with a unit using
an SC net, RXMT can be useful regardless of distance or obstacles. In
the FH to SC RXMT operation, RADIO-A and RADIO-C are frequency
hopping, while RADIO-B and RADIO-D operate in the single channel
mode. RADIO-A and RADIO-C use the same FH data; RADIO-B
and RADIO-D use the same SC frequency. An FH message entering
RADIO-D reaches RADIO-B as SC traffic. A SC message entering
RADIO-C reaches RADIO-A as FH traffic.
SC NET TO SC NET
Although there should be little need for this mode of RXMT operation, it
is available if required. In this case, RADIO-A and RADIO-C operate
on a SC frequency that is at least 10 MHz different from that used by
RADIO-B and RADIO-D.
DATA SOURCES
Net ID and SC frequencies used in RXMT operations are obtained from
your SOI or unit SOP.
ANTENNAS
At the RXMT site, maximum results are attained by using two OE-254
antennas, separated as far as cabling will permit. The least satisfactory
results will be obtained if two installed antennas on the same vehicle
are used.
4-29
TM
11-5820-890-10-8
RXMT Procedures
4.9c.
NCS DESIGNATIONS
ELECTRONIC UPDATES
In that the illustrative situation makes RADIO-A an NCS, RADIO-C will
always operate in the FH position. Because RADIO-B is an outstation
in RADIO-A’s net, RADIO-B also operates in the FH mode.
RADIO-D (an RXMT radio) operates in the FH - M position and serves
as NCS for the two station net consisting of RADIO-B and RADIO-D.
OTAR and Broadcast transmissions WiII pass through an RXMT
installation, but ERF data WiII not. If it is necessary to send net FH data
to RADIO-B electronically, break the RXMT link, send the ERF to
RADIO-D using one of the net IDS or SC frequencies. RADIO-D then
sends the ERF to RADIO-B using the second net ID or SC frequency.
NOTE
RXMT MODE: When ASIP radios are used at the RXMT site and are temporarily taken out of the
RXMT mode, the RXMT cable must be disconnected until the radios are placed back into a RXMT
mode.
DATA RXMT: All data rates except PCKT may be retrans with the following provisions.
1, SDM data, TF and AD1 : No change to normal retrans procedures. Radios do not have to be set
in Data mode (data off). Mixed radios at RXMT site or outstations is permitted.
2. EDM DATA: Radios at the RXMT site have to be set to the same EDM data rates as outstations.
Only SlP/ASlP radios can be used at the RXMT site and outstations.
COMSEC SETTINGS
FH TO FH PROCEDURE
If using SINCGARS versions RT-1523A/B/C/D/E, either PT or CT
COMSEC setting may be used as desired. With a RT-1523 RXMT
station FH-SC, only the RT in “SC” must be in PT. These requirements
in no way preclude the use of CT communications between RADIO-A
and RADIO-B. When the RXMT station must be in PT it will be
necessary for RADIO-A or RADIO-B to change to PT if contact with
the RXMT team is desired.
Procedures for establishing RXMT communications between
RADIO-A and RADIO-B are as shown in Figure 4-20, below:
(1)
NCS recognizes contact with RADIO-B is lost or
soon will be; alerts RXMT crew for mission.
(2)
RXMT crew loads radios with proper FH data,
Including RXMT net ID.
(3)
RXMT crew moves to RXMT location, sets up
OE-254 antennas, establishes RADIO-C to
RADIO-D to
RADIO-B
RADIO-A
and
communications.
(4)
When ready, installs an RXMT cable between
RADIO-C and RADIO-D; sets RADIO-C and
RADIO-D to RXMT sets RADIO-D to FH-M and
RADIO-C to FH; and sets COMSEC of both radios
to CT for monitoring.
(5)
RXMT communications between RADIO-A and
RADIO-B are now established.
Figure 4-20. FH NET TO FH NET RXMT
4-30
TM 11-5820-890-10-8
FH TO SC PROCEDURE
The procedures for FH net to SC net RXMT communications are the
same except that RADIO-D uses RADIO-B’s SC frequency and may
have to be placed in PT mode if the RT- 1523 version of the SINCGARS
radio is used.
SC TO SC PROCEDURE
The procedures for SC net to SC net RXMT communications are the
same except that both RADIO-C and RADIO-D use SC frequencies,
and both RXMT radios may have to be placed in PT mode if the
RT-1523 version of the SINCGARS radio is used.
SC DISADVANTAGE
Whenever SC transmissions are required, there is the possibility that
the enemy can locate the RXMT site by using direction finding
techniques. In operational situations where the enemy IS believed to
have direction finding capabilities, an RXMT station should displace as
frequently as necessary.
EDM RXMT
Operating in the EDM mode, any rate, a SlP/ASlP RXMT station will
pass all EDM, SDM, and voice traffic. Both RXMT SlP/ASlP radios must
be set to the EDM data rate being used by the operational net. When
passing RS-232 traffic, the equivalent EDM data rate must be set in
both RXMT radios.
MIXED MODE
Mixed mode (SC to FH, and FH to SC) cannot be used in the EDM
mode. This is not a limitation because nets having SC only do not have
EDM capabilities. When mixed mode RXMT communications are
required, the solution is to use an SDM mode.
4-31
TM
11-5820-890-10-8
4.10.
ANTENNAS
4.10a. Long Manpack Antenna (AS-4266A)
SOURCE
The long manpack antenna is issued as a component of the manpack
and dismount radios. See Appendix B, this manual, for authorization
details.
EMPLOYMENT
The long manpack antenna is designed to augment the short antenna
in situations where additional range is required and your situation
permits use of a long antenna.
WARNING
Before employing the long antenna during operations or training, be
sure you understand the safety precautions.
WARNING
DEATH OR SERIOUS INJURY CAN OCCUR IF THE ANTENNA COMES
INTO CONTACT WITH OVERHEAD POWER LINES
Never fully extend the long antenna directly under power lines. If you must fully extend
the long antenna near power lines, power line pales or towers, or buildings with
overhead power line connections, never come closer than two times the antenna
height from the base of the power line, pole, tower or building.
Stop before you get close to the power line and check for clearance before passing. If
needed, either carefully tie down the antenna or remove the antenna to make sure that
you can safe/y pass under the power line.
When mission permits, use the short manpack antenna during operations on the
move. If you must use the long antenna on the move, never pass under power lines if
there is any doubt about overhear clearance.
f-or additional safety information, refer to T-B -43-0129, “Safety Requirements for Use
of Antenna and Mast Equipment. ”
Figure 4-21. MANPACK LONG ANTENNA SAFETY PRECAUTIONS
4-32
TM 11-5820-890-10-8
4.10b. SINCGARS Low-Profile Antenna (SLPA) (AS-3916)
SOURCE
The SINCGARS Low-Profile Antenna, or SLPA for short, is a part of
selected vehicular radio installation kits. Refer to SB 11-131-2 for
listings of individual kits.
EMPLOYMENT
The SLPA is designed to reduce antenna visibility, and it withstands tree
limb strikes better than the regular antenna. There is a slight reduction
in operating range of the radio when the SLPA is employed. Both
regular and SLPA antennas are provided for selected combat vehicles,
tanks for example.
SAFETY
Safety precautions pertaining to the employment of vehicle antennas
are repeated here for sake of emphasis.
W A R N I N G
DEATH OR SERIOUS INJURY CAN OCCUR IF THE ANTENNA COMES
INTO CONTACT WITH OVERHEAD POWER LINES
Do not stop your vehicle under power lines.
When mobile, never pass under power lines if there is any doubt about overhead
clearance.
If you are not sure that an antenna on your vehicle will clear a power line, stop before
you get close to the power fine and either carefully tie down the antenna or, if
necessary, remove the antenna to make sure that you can safely drive under the power
line.
During cross -country operations, do not allow anyone to stick an arm, leg, or weapon
over the sides of the vehicle. If your antenna accident/y touches a power fine,
individuals who are in contact with vegetation or the ground could suffer death or sever
injury.
for additional safety information, refer to TB-43-0129, “Safety Requirements for Use
of Antenna and Mast Equipment. ”
Figure 4-22. VEHICULAR ANTENNA SAFETY PRECAUTIONS
4-33
TM 11-5820-890-10-8
14.10c. OE-254
SOURCE
The OE-254 antenna is not a part of the SINCGARS radio system and
must be requisitioned separately. Refer to your MTO&E or TDA for the
number authorized.
EMPLOYMENT
This extended range antenna may be used with any configuration of
ground SINCGARS radios, including the manpack version. By both its
height and design, the OE-254 helps to increase the operating range
of any SINCGARS radio.
DUAL USE
When two or more OE-254 antennas are employed in the same
location, a command post for example, they should be separated by
the maximum distance permitted by cabling. When two OE-254
antennas are used with the same vehicle, as during RXMT operations
for example, it is essential that they be separated as far possible.
4.11.
REMOTING CAPABILITIES
4.1la. Use of RCU
GENERAL
The Control, Receiver-Transmitter (C-11561), or remote control unit
(RCU) as it is commonly called, provides for remote control of
SINCGARS radios for ranges up to 4 KM. The RCU is connected with
the radio by two-way field wire, and its controls, features and
operation are quite similar to those of the SINCGARS radio. SlP/ASlP
RT can be used as a RCU (LS-685 cannot be used with SIP/ASIP RT
SOURCE
The RCU is a separate issue item, similar to a SINCGARS radio
configuration. RCU details and components (battery box, handset,
and LS-685 loudspeaker) may be found in Appendix B to this manual.
COMSEC
Both the RCU and RT use a COMSEC key (TEK) to provide cipher text
capability. TEK can be loaded into the RCU from an ANCD using the
standard ICOM fill procedure by selecting “RCU” rather than ICOM
from the appropriate ANCD menu.
FH DATA
The RCU does not require FH data. When the net is operating in the FH
mode, FH data in the RT enables frequency hopping capabilities.
4-34
TM 11-5820-890-10-8
FRONT PANEL
RCU controls are as shown in Figure 4-23, below. They differ from the
RT only in the following ways:
The RCU front panel contains a speaker connector and control
(for LS-685), but has no antenna or RXMT connector.
For the RCU FCTN control, the RT “REM” position is replaced with
“ICM,” (meaning intercom).
Figure 4-23. RCU FRONT PANEL
4-35
TM 11-5820-890-10-8
CONFIGURATIONS
The RCU may be used in conjunction with a SINCGARS radio in any of
the following configurations:
Dismounted RCU to a manpack radio. (See Figure 4-24, below)
Figure 4-25. DISMOUNTED RCU TO VEHICULAR RADIO
4-36
TM 11-5820-890-10-8
Vehicular mounted RCU (located in VAA) to a manpack radio.
(See Figure 4-26, below)
Figure 4-26. VEHICULAR MOUNTED RCU TO MANPACK RADIO
Vehicular mounted RCU to vehicular radio. (See Figure 4-27,
below)
Figure 4-27. VEHICULAR MOUNTED RCU TO VEHICULAR RADIO
4-37
TM 11-5820-890-10-8
OPERATION
Only those functions which differ from the radio are described below:
Speaker Switch: turns loudspeaker ON and OFF (volume is
controlled by the RCU VOL control, which deactivates the
loudspeaker when set to WHSP mode).
FCTN TST position: provides self-test of both RCU and radio.
FCTN ICM position: allows RCU and radio operators to talk over
connecting field wire when COMSEC is set to PT.
CHAN switch: enables RCU operator to select channel 1-6, CUE,
or MAN for the companion radio.
SIG display: lights at RCU when radio receives signal. (For
RT- 1523C/E, “RCU” is displayed when the radio receives a
signal.)
HUB indicator: shows status of RCU HUB only (radio HUB must
be checked by radio operator).
BATT button: checks status of RCU manpack battery when
pressed once; checks manpack radio battery status when
pressed a second time.
CALL button: enables RCU operator to create a tone and “CALL’
message at companion radio by setting FCTN to ICM and
pressing CALL and PTT at the same time. With radio FCTN set to
REM, the radio operator can call the RCU operator my merely
pressing the CALL button and PTT at the same time.
REMOTE FUNCTIONS
The following functions can be performed by the RCU operator located
up to 4 KM away from the radio:
Single channel frequencies may be loaded and offset.
ERFs may be sent and received.
Radio MODE may be changed (SC, FH, FH-M).
Radio FCTN may be changed (radio will transmit and receive only
in the REM position).
Radio channels may be changed.
COMSEC positions of PT and CT may be selected.
COMSEC keys may be selected by scrolling.
Radio data rates may be selected.
4-38
TM 11-5820-890-10-8
OPERATING RULES
The following rules apply to the operation of the RCU in conjunction
with a SINCGARS radio. They are made necessary by the manner in
which the two components work together. It is important that they be
followed to preclude operational problems.
Ensure the RCU is turned ON before setting the radio FCTN to
REM (otherwise data will be lost in the radio).
COMSEC keys in the radio cannot be cleared from the RCU, only
at the radio.
The RCU display will show “OPEN” whenever the connecting field
wire is disconnected or cut, or when the companion radio FCTN is
set to other than REM. If the connecting field wire is disconnected
or cut, the radio automatically changes FCTN to STBY.
When the RCU FCTN is set to STBY, the radio FCTN will change to
that position after about 15 seconds.
Radio battery life condition cannot be set from the RCU, only at the
radio.
ICOM fill of the radio cannot be done remotely, only at the radio.
If vehicular radio uses a Control Monitor, it must be disconnected
before the RCU can be employed.
The normal operating position of RCU FCTN switch is SQ ON.
A “FAIL 9” message resulting from self-testing the RCU normally
indicates that the test was run in PT; change COMSEC to CT and
re-run the test. If “FAIL 9” appears after running test in CT see
unit maintenance.
4-39
TM 11-5820-890-10-8
4.11b. Use of RT as RCU
DESCRIPTION
The SlP/ASlP RT can be used as a Remote Control Unit (RCU),
replacing the C-11561 RCU. When used as an RCU, the SIP/ASIP RT
accommodates both Enhanced and SINCGARS Data Modes. If the
C-11561 RCU is used with the SIP radio, only the SINCGARS Data
Modes (SDM) may be used. Otherwise, operation of the SIP RT when
used as an RCU is identical to procedures used with RCU C-11561.
REMOTED RADIO
The FCTN switch of the remoted radio is set to “REM,” which disables
the front panel of that RT because control is exercised from the
RCU(RT). The remoted radio defaults to CT when placed in “REM”
mode.
RCU(RT) SELECTION
The FCTN of the RCU(RT) is set to SQ ON. The “RCU” feature of the
SIP/ASIP radio is selected by pressing [RCU] on the RT keypad and
then pressing [CHG] until “RCU” appears in the display.
By placing the RCU(RT) FCTN switch in the REM position, the RCU(RT)
operator can talk with the remoted radio operator over the non-secure
two-wire connection. This two-wire connection is also called an
“orderwire.”
ORDERWIRE
COMSEC
As with the C-11561 RCU, orderwire voice communications over the
two- wire connection between RCU and remoted RT are plain text, not
encrypted.
APPLICATION
The SIP/ASIP RT can be used as an RCU in all data modes, SINCGARS
(SDM) and Enhanced (EDM).
4-40
TM11-5820-890-10-8
4.11c. Use of LS-671
SOURCE
Loudspeaker, LS-671, is a part of selected installation kits. (See
SB 11-131-2 for a listing of individual kits.)
PURPOSE
The primary purpose of the LS-671 is to allow for remote transmitting
and receiving of voice communications to the length of the LS-671
cable (CX-13292) being used. Cables are available in lengths varying
from 3 to 100 feet.
FUNCTIONS
At the LS-671, these functions can be performed (see Figure 4-28,
below for controls available):
.
Radio can be turned ON and OFF by use of the power switch.
.
By connecting a handset to the LS-671 (J2), the radio can be
keyed and messages transmitted.
.
Net traffic can be monitored by proper adjustment of the
loudspeaker volume control.
Figure 4-28. Loudspeaker, LS-671
LIMITATIONS
The remote capabilities of the LS-671 complement rather than replace
those of the RCU. Where the RCU supports remote operation up to 4
KM, the LS-671 is limited to 100 feet at most. Also, the LS-671
provides for only the most basic radio control functions.
ADVANTAGES
The LS-671 is extremely useful for command posts and fire control
centers where operations personnel are performing other than radio
operator functions. The limited remote capability of the LS-671
enables such personnel to operate the radio from their work station
with minimum effort or movement, Only occasionally is it necessary for
a crewmember to move to the radio front panel to make control setting
changes.
4-41
TM 11-5820-890-10-8
4.11d. Use of Control-Monitor
SOURCE
The Control-Monitor (C-M) (C-11291) is a part of selected
installation kits. (See DA Pam 25-30 for listings of individual kits.)
PURPOSE
The purpose of the control monitor is to enable vehicle crews to operate
their radios from positions other than directly at the radios.
FUNCTIONS
One control monitor can provide for control of up to three radios, one at
a time. Most functions of the radio are included. Filling the radio with
COMSEC, FH data, and sync time are exceptions.
CONTROLS
See Figure 4-29, below, for a view of C-M controls. The function each
major control performs is described below.
Figure 4-29. CONTROL-MONITOR
4-42
TM 11-5820-890-10-8
FCTN Switch: Run self-test (TEST).
FCTN Switch (Used with the INIT switch to):
Set RF Power (RF).
Set AT MODE (RT MODE), to include turning power off.
Change channels (CHAN).
Select COMSEC key (VAR).
Select CT or PT (COMSEC).
Control status (Should read “M”).
INIT Switch: Used in conjunction with the FCTN switch to make
the changes cited above. Moving the INIT UP causes FCTN
markers to move to the right; moving it DOWN moves markers to
the left.
RADIO Switch: Selects the radio to be controlled.
Position 1 controls the RT in the A position of the VAA;
Position 2 controls the RT in the B position of the VAA, and,
Position 3 is for an RT in the A position of a second VAA.
OPERATING PROCEDURE
To place the control monitor in operation and be assured it is
performing properly, follow the steps shown in Figure 4-30, below.
(1)
Set VAA CB1 to ON; VIC (if used) to ON; RT FCTN
to REM.
(2)
Test C-M: set C-M FCTN to TEST; check
displays; must read “Gd” and “M” or “S” at end of
test.
(3)
Set RADIO switch to RT being controlled;
CONTROL must indicate “M” (if not set FCTN to
CONTROL and use INIT switch to change).
(4)
Check initial displays: RF at LO; RT MODE at SC;
CHAN at 0; COMSEC at PT; VAR blank (If display
shows “F7” lift INIT and release; “Ud” (update)
should then appear and controls show as above).
Figure 4-30. CONTROL MONITOR OPERATION
4-43
TM 11-5820-890-10-8
4.11e. Use of Wire Line Adapter, HYX-57
COMSEC
The Wire Line Adapter, HYX-57, when used in conjunction with a
KY-57, provides secure radio remote operation capability.
COMPONENTS
The Wire Line Adapter consists of local and remote units, which are
connected by field wire for operation.
CABLING
Figure 4-31, below, shows the set up for remote operation of a
SINCGARS radio using an HYX-57 and KY-57
Figure 4-31. Wire Line Adpater Set Up
4-44
TM 11-5820-890-10-8
4.1If.
Use of Remote Control Device (C-2329/GRA-39)
COMSEC
The Remote Control Device, C-2329/GRA-39, also provides for
remote operation of SINCGARS radios, but the wire line connection is
not secure.
SET UP
Figure 4-32, below, shows a typical set up using local and remote
control units, terminating as illustrated in a TACFIRE device. Various
devices can be used, including a handset.
Figure 4-32. GRA-39 SET UP
4-45
TM 11-5820-890-10-8
4.12.
NET MANAGEMENT
4.12a.
Net Discipline
IMPORTANCE
Net discipline is important for all combat net radios, but it is especially
so for SINCGARS. For the members of the net to communicate, each
radio must have the same COMSEC key, FH data, and sync time. While
the NCS radio, set to the FH - M position, automatically maintains sync
time in all net radios within the required +/-- 4 second window, use of
the FH-M position by other than the NCS can cause the net to lose
common sync time and divide into two or more nets unable to
communicate among them.
UPDATES
COMSEC keys, TSKs, and SOI information must be replaced at
prescribed intervals. Changeover from one set of data to another
demands net discipline. Changeover must take place at the time
prescribed, and the new data being introduced must be the correct
data for that time.
SYNC TIME
Net discipline is especially critical to the maintenance of exact sync
time.
Nets are opened using precise GPS time, and NCS
transmissions pull the operating sync time of net member radios to that
of the NCS radio. Also, the SINCGARS radio offers the operator the
means for reading the sync time in the radio. The ANCD and PLGR
offer the means for reloading sync time into the radio. But when
SINCGARS operators misuse their TIME control, they can be effectively
taken out of the FH net. An important aspect of operator net discipline
is to leave the TIME control alone unless there is a specific need to
make a change.
LOADING CUE FREQ
Most net operators require a CUE frequency only when they need to
perform a CUE and ERF method of late net entry. If a CUE frequency is
loaded routinely, that operator will see a “CUE” message in the radio
display every time any station sends a CUE signal. Only the NCS and
alternate NCSs should routinely load a CUE frequency. Net operators
can obtain the required CUE frequency from their ANCD when one is
needed.
4-46
TM 11-5820-890-10-8
4.12b. Role of the NCS
It is the NCS who is responsible for SINCGARS net discipline. NCS
responsibilities include:
DATA
Ensuring all net members have the correct COMSEC key, FH data, and
sync time for net operations.
NET OPENING
Opening the net at the prescribed time to support unit mission
requirements,
NET STATUS
Knowing which net operators have and have not entered the net.
SYNC TIME
Transmitting (or at least pressing PTT) often enough to ensure that net
sync time is maintained.
CUE CALLS
Ensuring that CUE calls are answered
ACCESS CONTROL
Controlling access to the net
USE OF RXMT
Employing RXMT capabilities when required.
HELP
Verbally assisting operators having trouble with task performance.
ADMIN TRAFFIC
Ensuring that administrative communications requirements do not
interfere with unit mission control communications.
ALT NCS
Making full use of alternate NCS operators to preclude distraction from
primary NCS requirements.
4.12c. Role of the Alternate NCS
NET OPENING
While the NCS sets the time of opening and logs stations into the net, it
is the Alternate NCS who follows up and brings all late entry operators
into the net.
UPDATES
When net data is updated, whether electronically or by physical
distribution, it is the Alternate NCS who maintains a radio on old data
and ensures that all net operators make the transition successfully.
CUE CALLS
It is the Alternate NCS who responds to all CUE calls, leaving the
primary NCS free to control the net.
DISPLACEMENT
Also, it is the Alternate NCS who physically changes positions shortly
following each use of SC communications to prevent enemy location
by direction finding.
NUMBER
There is no limit, other than operational, on the number of Alternate
NCSs that may be employed. The important point is that the use of
Alternate NCSs is essential if the NCS is to meet all primary net
responsibilities.
4-47
TM 11-5820-890-10-8
4.12d. Special Task Performance
OPERATOR
There are nine Special Operator Tasks, described in detail in Chapter 5.
Most net operators do not need to be able to perform these tasks.
Some operators will be required to perform only certain special tasks,
for example, retransmission operations. Those operators who do need
to perform one or more special tasks must be given extra training on an
as required, mission basis.
NCS & ALT NCS
There are five Special NCS Tasks, described in detail in Chapter 6.
These tasks involve the electronic transfer of COMSEC keys, FH data,
and SOI information from NCS to NCS, and from NCS to net operators.
Whether or not all NCS and Alternate NCS personnel need to be able to
perform any or all of these special tasks is a matter of command policy
based upon mission requirements. If an NCS or Alternate is expected
to perform any of these tasks, special training must be provided.
4.12e. Operator Proficiency
PRIMARY TASKS
There are five primary tasks that all unit SINCGARS operators must be
able to perform without assistance during unit mission operations.
They are described in detail in Chapter 5.
POCKET GUIDE
Each operator is provided a copy of TM 11-5820-890-10-6,
“SINCGARS Ground Operator’s Pocket Guide.” By carrying this guide
with them on the job and by following the procedures provided,
operators can be assured of required job task proficiency.
OPTIONS
When overall operator proficiency is low due to personnel turnover or
other factors, units may elect to have communications specialists or
designated NCOs perform selected tasks such as loading data and
sync time into radios.
COMM-EX
Whether the objective is to build or maintain SINCGARS operator
proficiency, there is no better or easier tool to use than the unit
Opening nets frequently and having
communications exercise.
operators transmit and receive realistic traffic are important
requirements. Weekly, short duration COMM-EXs, are one of the best
ways to conduct SINCGARS sustainment training for both operators
and NCS personnel. Unit sustainment training is the key to SINCGARS
proficiency.
4.12f. MSE Compatibility
DESIGN
SINCGARS and the Mobile Subscriber Equipment (MSE) System were
designed to work together on the battlefield. The two systems even
share some frequencies without interference to either.
CO-LOCATION
Some vehicles, such as command post vehicles, have both
SINCGARS and MSE radios installed. The Mobile Subscriber Radio
Telephone (MSRT) and a SINCGARS radio cannot be operated from
the same vehicle at the same time unless one or both of the antennas
are remoted.
4-48
TM 11-5820-890-10-8
4.129. Role of Signal Officers/NCOs
IMPORTANCE
The important role of unit Signal Officers and Non-Commissioned
Officers has been significantly increased with the fielding of the
SINCGARS system.
FUNCTIONS
Some of the SINCGARS-related specific functions performed by
Signal Officers and NCOs are:
Development and distribution of loadsets, including those
required to support task organization changes.
Distribution of new data in timely manner and maintenance of data
reserves.
Advising and assisting NCS personnel and unit operators as
required.
Ensuring operator and NCS job proficiency; to include conducting
training if required.
Developing and implementing unit sustainment training
programs, including periodic COMM-EXs.
Advising commander on COMSEC requirements, including
compromise recovery procedures.
Advising and assisting commanders and SINCGARS users in
equipment and system interfaces to include: AFATDS, ASAS,
CSSCS, FAADC2, IFSAS, IVIS, MCS, MSE, and TACFlRE/LlGHT
TACFIRE, as required. (See appropriate technical bulletin,
TB 11-5820-890-10 series.)
4-49
TM 11-5820-890-10-8
THIS PAGE INTENTIONALLY
BLANK.
4-50
TM 11-5820-890-10-8
CHAPTER 5
O P E R A T O R
T A S K S
IN THIS CHAPTER:
5.1
GENERAL . . . . . . . . . . . . . . . . . . . . . . . . . . . . . . . . . . . . . . . . . . . . . . . . . . . . . . . 5 - 2
5.2
START-UP PROCEDURE . . . . . . . . . . . . . . . . . . . . . . . . . . . . . . . . . . . . . . . . . . 5 - 3
5.3
OPERATOR CONTROLS . . . . . . . . . . . . . . . . . . . . . . . . . . . . . . . . . . . . . . . . . .
a.
SINCGARS Receiver-Transmitter (RT) Controls . . . . . . . . . . . . . . . . . .
b. Technical . . . . . . . . . . . . . . . . . . . . . . . . . . . . . . . . . . . . . . . . . . . . . . . . . . . .
C.
Remote Control Unit (RCU) Controls . . . . . . . . . . . . . . . . . . . . . . . . . . .
d. Automated Net Control Device (ANCD) Controls . . . . . . . . . . . . . . . . . .
Precision Lightweight GPS Receiver (PLGR) Controls . . . . . . . . . . . . .
f.
Control-Monitor (C-M) . . . . . . . . . . . . . . . . . . . . . . . . . . . . . . . . . . . . . . . .
9, Loudspeaker (LS-671) . . . . . . . . . . . . . . . . . . . . . . . . . . . . . . . . . . . . . . . .
h. Vehicular Intercommunications Set (VIC) . . . . . . . . . . . . . . . . . . . . . . . .
5-5
5-5
5-13
5-18
5-19
5-21
5-22
5-24
5-25
5.4
PRIMARY OPERATOR/PREPARATION TASKS . . . . . . . . . . . . . . . . . . . . . .
a.
Definition of Primary Operator/Preparation Tasks . . . . . . . . . . . . . . . . . .
b. Summary of Primary Operator/Preparation Tasks . . . . . . . . . . . . . . . . .
C.
Select RT Preparation Settings from MENU (Preparation TASK 1) . . .
d. Load Single Channel Frequencies into RT
(Primary Operator Task 1) . . . . . . . . . . . . . . . . . . . . . . . . . . . . . . . . .
e.
Load COMSEC/FH Data/Sync Time into RT Using ICOM Fill
(Primary Operator Task 2) . . . . . . . . . . . . . . . . . . . . . . . . . . . . . . . . .
f.
Perform Hot Start Net Opening (Primary Operator Task 3) . . . . . . . . . .
Perform Passive Late Net Entry (Primary Operator Task 4) . . . . . . . . .
g,
h.
Obtain SOI Information from ANCD (Primary Operator Task 4) . . . . . .
5-28
5-28
5-28
5-29
5.5
5.6
SPECIAL OPERATOR TASKS . . . . . . . . . . . . . . . . . . . . . . . . . . . . . . . . . . . . .
a.
Definition of Special Operator Tasks . . . . . . . . . . . . . . . . . . . . . . . . . . . . .
b. Summary of Special Operator Tasks . . . . . . . . . . . . . . . . . . . . . . . . . . . .
C.
Transfer COMSEC/FH Data from ANCD to ANCD
(Special Operator Task 1) . . . . . . . . . . . . . . . . . . . . . . . . . . . . . . . . .
d. Transfer QREF SOI Information from ANCD to ANCD
(Special Operator Task 2) . . . . . . . . . . . . . . . . . . . . . . . . . . . . . . . . .
e. Transfer Full SOI Information from ANCD to ANCD
(Special Operator Task 2 Alt) . . . . . . . . . . . . . . . . . . . . . . . . . . . . . .
f.
Perform Cold Start Net Opening (Special Operator Task 3) . . . . . . . . .
g. Receive Net Update ERF from NCS (Special Operator Task 4) . . . . . .
h.
Perform CUE and ERF Late Net Entry (Special Operator Task 5) . . . .
i.
Conduct Retransmission Operations (Special Operator Task 6) . . . . .
Send ERF as Part of RXMT Operation (Special Operator Task 7) . . . .
j.
k.
Change Net ID (Special Operator Task 8) . . . . . . . . . . . . . . . . . . . . . . . .
5-30
5-32
5-34
5-36
5-37
5-42
5-42
5-43
5-45
5-47
5-49
5-51
5-53
5-55
5-56
5-58
5-60
SPECIAL OPERATOR TASKS (SIP/ASIP) . . . . . . . . . . . . . . . . . . . . . . . . . . . 5 - 6 2
a.
Use SIP/ASIP RT as an RCU (Special Operator Task 9) . . . . . . . . . . . . 5 - 6 2
b. Send Data Via RS-232 Mode (Special Operator Task 10) . . . . . . . . . . 5 - 6 3
5-1
TM 11-5820-890-10-8
5.7
15.1.
OTHER OPERATOR PROCEDURES . . . . . . . . . .
5-64
a.
b.
C.
d.
e.
5-64
5-67
5-67
5-68
5-69
Battery Life Condition Indicator
Loading and clearing Offset Frequencies
S c r o l l i n g C O M S E C K e y s
S c a n n i n g
C a p a b i l i t y
Jamming and Anti-Jamming Actions
GENERAL 1
BY DESIGN
The SINCGARS radio was designed for ease of operation by the
non-technical (“general purpose user”) operator. Once the radio has
been put into operation and the operator has entered the net, there are
but few requirements left for the operator to perform. Technically, the
SINCGARS radio is as complex as it is capable. Operationally, it is
simple and easy for the operator to use.
TASK DIVISION
The SINCGARS radio offers many more capabilities than are routinely
employed.
Retransmission (RXMT), for example, is a built-in
SINCGARS capability, which is of great value when needed. When it is
needed, not every operator in the unit will be involved. Only a select few
operators need to be trained on this task. It is on this basis that
operator tasks have been divided into “Primary” and “Special,” as
discussed below.
TRAINING MATERIALS
The job of the SINCGARS operator has also been simplified by the
statement of task procedures in clear, easy to follow, steps. Also, the
operator is provided a small pocket guide containing abbreviated task
procedures covering all operator requirements. This pocket guide
serves as a memory jogger for the trained operator, precluding any
need to memorize any aspect of SINCGARS radio operation.
5-2
TM 11-5820-890-10-8
5.2.
OPERATOR START-UP PROCEDURE
DRAW EQUIPMENT
In a typical peacetime situation, the operator will obtain required
communications gear from a communications or supply facility.
Manpack operator’s equipment will include a main power battery in
addition to all radio components. Vehicular radio operator’s equipment
may include a “dismount” radio (including main power battery) in
addition to all of the vehicular radio components.
ANCD
Depending upon unit policy, selected operators will probably draw
ANCDs already loaded with proper COMSEC keys, FH data, and sync
time for current unit operations. When unit SOP calls for centralized
control of ANCDs, the operator is advised when and where to obtain
ANCD support.
ASSEMBLY
Operators are expected to properly assemble manpack radios and
install required vehicular radio components in preparation for net
opening.
This includes connecting cables, antennas, handsets,
loudspeakers, and any other components that are to be used.
CAUTION
YOUR RT CAN BE DAMAGED BY
IMPROPER ATTACHMENT OF MANPACK ANTENNAS
1. To avoid damage, turn the sleeve only, not the antenna.
2. Turning the antenna can destroy the antenna connector in the RT.
5-3
TM 11-5820-890-10-8
PMCS
After completing radio assembly, operators perform their Before
Operation Preventive Maintenance Checks and Services (PMCS), as
shown in Chapter 8. Performing PMCS involves checks of controls,
cables, antennas, power source, self-test, keypad, data loading, and
ability to communicate. By performing PMCS the operator is assured
that all components of the radio are working properly, or that
something needs to be fixed, by the operator or unit maintenance. The
PMCS charts found in Chapter 8 should be followed exactly in the
performance of PMCS. No operator action will pay greater dividends.
STATUS
Upon completion of Before Operation PMCS actions, the operator is
ready to load the radio with data and enter the net. The first three of the
five Primary Operator Tasks provide detailed procedures for doing just
that.
5-4
TM 11-5820-890-10-8
5.3.
OPERATOR CONTROLS
5.3a.
SINCGARS Receiver-Transmitter (RT) Controls
GENERAL
The SINCGARS radio has seven controls, plus the RT keypad and
display, for the operator to use. Several of these controls are used
infrequently, but they are available when required. Each control is
described below. See RT front panel graphic for the location of each.*
Figure 5-1. SINCGARS RT FRONT PANEL
*
Some control positions found on the RT front panel are enclosed in a box. To move the
control into or out of these positions, the operator must pull out on the control knob. These
controls are spring loaded and will return to normal position when released.
5-5
TM 11-5820-890-10-8
FCTN (FUNCTION)
This is the primary control with
which the operator determines
what function the radio is to
perform. The FCTN switch has
nine positions, as described
below.
Figure 5-2. FCTN (Function) Switch
FCTN CONTROL POSITIONS AND USES
POSITION
OFF
Z-FH
(Zero-FHdata)
STBY
(Stand By)
TST
(Test)
LD
(Load)
SQ ON
(Squelch On)
SQ OFF
(Squelch Off)
REM
(Remote)
RXMT
(Retransmit)
5-6
PURPOSE
All power IS shut off; all stored data, (COMSEC, FH. sync time, and manpack
battery life indicator) are deleted after 5 seconds; radio is completely
inoperative; position is used when radio is not is use and for storage.
Clears all FH data after 5 seconds: operator pauses in this postion for 5
seconds when setting FCTN switch to OFF.
Makes radio Inoperative but all stored data is retained; sync time is lost after 24
hours; setting FCTN to SQ ON returns radio to fully operational status. In STBY,
power IS drawn from main source. (RT-1523B/C/D/E standby time has been
Increased to 200 hours.)
This position causes RT to perform self-test of RT, data, and ECCM circuits;
test results are shown in RT display. Running RT self-test IS a routine step in
start up procedure.
The load position is required for loading SC frequencies, FH data, and
COMSEC keys; required also to receive an ERF.
This is the normal operating position of the radio for FH mode. For SC mode,
this position reduces noise.
This position IS not used for the FH mode. In the SC mode, SQ OFF helps to
bring in distant stations, to work through jamming, and to be compatible with
radios lacking squelch capability.
The REM position disables front panel controls and is required for use of the
Control-Monitor and Remote Control Unit (RCU).
Use of the RXMT position enables the RT to automatically retransmit traffic from
one radio through another. Both RTs are set to RXMT position and connected
by an RXMT cable.
TM 11-5820-890-10-8
MODE SWITCH
The MODE switch contains three
positions for selecting SC or FH
mode of operation.
It also
provides an FH-M position that
controls net sync time and is for
use by NCS personnel only.
Figure 5-3. MODE Switch
MODE SWITCH POSITIONS AND USES
POSITION
SC
(Single Channel)
FH
(Frequency Hopping)
FH-M*
(Frequency HoppingMaster)
CHAN (CHANNEL)
PURPOSE
Selection of the SC position places the radio in the single channel mode of
operation.
Selection of the FH position places the radio in the frequency hopping mode of
operation.
The FH-M position, used by NCS operators only, causes the NCS radio to
electronically keep all net radios within the plus or minus 4 second window
required for frequency hopping communications.
This control allows the operator to
select from among eight SC and
six FH channels. These preset
channels are tuned electronically
for ease of operation. Net change
is accomplished by merely moving
the switch from one channel to
another.
Figure 5-4. CHANNEL Switch
CHANNEL SWITCH POSITIONS AND USES
POSITION
PURPOSE
Channel switch positions 1 through 6 are used for SC and/or FH nets. These
channels are routinely loaded with COMSEC keys, FH data, and sync time as
required for unit communications.
CUE
With the correct SC frequency loaded in this position, an operator with a
non-FH radio is able to contact a frequency hopping net. This position may
be used for another SC net if desired.
MAN
The Manual position is required for sending and receiving the Cold Start net
opening ERF. This position also may be used for another SC net.
(Manual)
5-7
TM 11-5820-890-10-8
RF PWR (RF POWER)
This control allows the operator to
adjust the level of radio frequency
(RF) power and related range of
operation. Basic rule is to use the
least amount of RF power needed
to
communicate
with
other
stations.
Figure 5-5. RF PWR Switch
RF POWER SWITCH POSITIONS AND USES
POSITION
LO
(Low Power)
M
(Medium Power)
HI
(High Power)
PA
(Power Amplifier)
DIM CONTROL
PURPOSE
Provides voice operational range of approximately 200-400 meters. This
positron IS used extensively by units in closely deployed situations. Actual
range iS dependent upon weather, position, line of sight, Interference, and
various other factors.
Provides voice operational range of approximately 400 meters to 5 kilometers.
Manpack radio operators can conserve battery life by selecting lowest effective
RF power setting.
Provides voice operational range of approximately 5 to 10 kilometers and data
transmission range of 1 to 5 kilometers, the latter depending upon data rate
(BPS) as well as the other factors cited under LO above.
This setting applies only to vehicular long range radios using a power amplifier.
Approximate voice range provided is 10 to 40 kilometers; data range of about 5
to 25 kilometers, dependent upon the data rate being used and various other
factors.
This control enables the operator
to adjust the level of brightness of
the RT display. Turning the knob
clockwise increases the level of
light; turning it counterclockwise
dims the display light. When using
night vision goggles, DIM is to be
set fully counterclockwise.
Figure 5-6. DIM Control
VOL/WHSP
5-8
The
Volume/Whisper
control
enables the operator to adjust the
audio level.
Turning knob
clockwise increases level and
counterclockwise decreases it.
The whisper feature is activated by
pulling out on the VOL knob. In the
WHSP position, the operator can
speak softly (whisper) and the
message will be heard at a normal
audio level.
Figure 5-7. VOL/WHSP
TM 11-5820-890-10-8
COMSEC SWITCH
The COMSEC switch provides five
settings for control of RT COMSEC
mode. Only the CT position is
normally used in field operations.
Two of the positions require the
operator to pull out on the knob to
move into/ out of these settings.
Figure 5-8. COMSEC Switch
COMSEC SWITCH POSITIONS AND USES
POSITION
PURPOSE
PT
(Plain text)
This setting places the radio in plain text (not secure) mode. To prevent
accidental selection of this position, the operator must pull out on the knob to
enter or leave the setting. The radio must be set to the PT position when using
the CUE feature.
CT
(Cipher Text)
This is the primary COMSEC setting for nets operating in the secure mode. To
make use of this setting, RT must have been loaded with required COMSEC
key or keys. Use of the CT function essentially prevents the enemy from
intercepting your communications.
TD
(Time Delay)
This setting also provides for secure mode communications and is used when
needed to compensate for transmission delays. Seek the help of a
communications specialist if you think you need to use this feature of the
SINCGARS radio.
RV
(Receive Variable)
z
(Zero)
This setting may be used in some forms of Over-The-Air-Rekey (OTAR)
transmissions, but normal operator procedures do not require its use.
This position may be used to clear the RT of stored COMSEC keys by setting
the switch to Z for 5 seconds. Knob must be pulled out to enter or leave this
position. When turning the radio off by moving to OFF, it is not necessary to
use the COMSEC switch Z setting in order to clear COMSEC keys. (For
RT- 1523E, “Z” clears all data.)
5-9
TM 11-5820-890-10-8
RT DISPLAY
The RT display window located
above the keypad provides the
operator information regarding
signal strength, status of the HUB
battery and a host of operational
such
as
SC
messages
frequencies, net ID numbers, sync
time, and failure messages. This
RT display is the primary means by
which the radio communicates
with its operator
Figure 5-9. RT Display
RT DISPLAY SIGNALS AND USES
SIGNAL
SIG
(Signal)
LOW HUB
M
(Message)
INFORMATION
(For the operator)
5-10
PURPOSE
Signal strength is shown as a lighted vertical bar at the left side of the RT
display window; the higher the bar, the stronger the signal. Activation of this
bar advises the operator that traffic is on the net or that an ERF or OTAR
message has entered the radio. Continuous activation of the signal display
bar is an indication of enemy jamming or friendly interference.
When the Hold-Up Battery (HUB) becomes weak, a diamond-shaped light at
the right side of the RT display will flash; if the HUB is dead or missing, this
light will remain on. This light appears only while the RT display is active.
Some versions of the SINCGARS radio display an “M” near the right side of
the RT display indicating that traffic is being sent over the net.
Examples of some of the information the operator will receive from the RT are:
“53550” (SC frequency); “TEK 1” (COMSEC key); “ST0_” (Store where?);
“F123” (net ID); “FAIL 5” (Need to go to CT; RT- 1523 only)
TM 11-5820-890-10-8
RT KEYPAD
The RT keypad, also referred to as a keyboard, provides one of the primary
means the operator has for entering information into the radio. It also allows
the operator to obtain information from the radio.* The function of each of
the 20 keypad buttons is briefly described below. Very specific procedures
and messages are found in the operator and NCS tasks, covered in
Chapters 5 and 6.
Figure 5-10. RT KEYPAD
When entering data into the radio through the RT keypad, keep in mind
that the display will go blank about 7 seconds after your latest entry. For
example, if you load 4 numbers of a SC frequency and then pause for more
than 7 seconds, the display will go blank, and you will have to start over: If you
need to pause during data entry, continue to hold down the last button used.
The display will remain active as long as you press a key.
5-11
TM 11-5820-890-10-8
RT KEYPAD BUTTONS AND USES
KEYPAD BUTTON
PURPOSE
1 THRU 0
These keys enable the operator to enter numbers. Most frequent use is for
entry of SC frequencies. They are also used for loading sync time via the RT
keypad, and for changing net IDs.
CMSC
(COMSEC)
Press this key to determine the COMSEC key position being used; RT display
will show TEK 1 thru 5 or KEK (Channel 6).
(Star)
SYNC
FREQ
(Frequency)
DATA
ERF
(Electronic Remote Fill)
(on same key as “OFST”)
Ignore this key unless specifically directed by your SigO or NCS to use it.
It serves no purpose during normal operation of SINCGARS radios. This is
present on some models and not on others.
Press this key to activate the passive late net entry feature of the SINCGARS
radio.
This key is used to check, load, clear, and offset SC frequencies; and to check
and change net IDs.
Press this key to determine data status which can read: 600, 1200, 2400,
16000, AD1 (Analog Data 1), TF (TACFIRE), or OFF.
NCS operators press this key when sending a Cold Start or net update ERF to
net operators. It is not used by operators.
OFST
(Offset)
(on same key as “ERF”)
Used in conjunction with the FREQ and CHG buttons, this key enables the
operator to offset SC frequencies by plus or minus 5 or 10 KHz. The offset
feature of the SINCGARS radio can be used only in the SC mode.
CHG
(Change)
When used in conjunction with the DATA, OFST, or CMSC keys, this button
causes the display to scroll through available data or options.
LOUT
(Lock Out)
This key is used only by NCS personnel and is rarely needed with current
operating procedures. Operators may ignore this key.
***TIME
5-12
Press TIME once to see the Julian Date; press it a second time to see sync
time hours and minutes; press a third time to see sync time in running minutes
and seconds. Used in conjunction with the CLR and STO keys, the TIME
button allows entry of sync time via the RT keypad.
CLR
(Clear)
Used in conjunction with other keys, the CLR button enables the operator to
delete entries or stored data.
LOAD
Used to load data into holding memory and to retrieve data from permanent
memory. Also used to load radio.
STO
(Store)
Press the STO key to place data into permanent memory of the RT Use of the
STO key is the last step in various operator procedures.
TM 11-5820-890-10-8
KEYPAD BUTTON
PURPOSE
BATT
(Battery)
(on same key as “CALL’)
Used to check and set battery life condition in the manpack radio. When this
key is pressed, the RT display shows battery life indication.
CALL
(on same key as “BATT”)
This key is used to communicate between the radio and an attached RCU.
With FCTN set to REM and RT connected to the RCU, pressing CALL and PTT
at the same time causes the RCU display to show “CALL,” and an alarm is
heard in the RT and RCU handsets.
5.3b.
Technical
Receiver-Transmitter (RT) (SIP/ASIP)
Enhanced Data
The SIP/ASIP RT offers enhanced data rates of 1200N, 2400N, 4800N, and
9600N BPS, where the “N” indicates new or enhanced rates. The
advantages of these enhanced data rates are better accuracy, great speed,
longer range, and improved forward error correction.
New Data Modes
Two new data modes are also provided: Packet (PCKT), which supports
operations involving FBCB2 hardware and software, and RS-232 by which
data messages can be sent from SlP/ASlP RT to SlP/ASlP RT using
computers and commercial “Xmodem” communications software, a widely
used file transfer protocol.
RCU Function
The SIP/ASIP RT can be used as a remote control unit by merely selecting
the “RCU” option under the [RCU] key of the SlP/ASlP RT keypad. The RCU,
C-1 11561, can still be used to remotely control a SlP/ASlP radio for voice
and SINCGARS data modes, but it cannot be used for enhanced data
modes.
GPS Time Loading
An attractive feature of the SIP/ASIP RT is the ability to load GPS time from an
attached PLGR using the very simple procedure.
Internal FSK
Detector
The SIP/ASIP RT contains an internal FSK detector circuit for use with the
“AD1” and “TF” data rates. Use of a special CX-13808/U DMD interface
cable is no longer necessary. In addition, TACFIRE devices must be cabled
directly to the SlP/ASlP RT AUD/DATA connector,
5-13
TM 11-5820-890-10-8
SlP/ASIP RT Keypad
General
The keypad of the SlP/ASlP radio is similar to that of earlier versions except
four of the keys have been given new designations: RCU, GPS, SA, and CID.
The ASIP keypad adds a MENU and Backlight function. Each is explained
below.
Figure 5-1 1. SIP/ASIP KEYPADS
RCU/(2)
The RCU key is used to select operating mode options of RT, RCU, EXT, or
LDE. RT is the normal employment of the RT as a receiver-transmitter.
Selecting RCU allows the SlP/ASlP RT to be used as a remote control
device. EXT, is a capability of the SlP/ASlP radio that allows the radio to be
controlled externally via the system connector. The ASIP radio is
automatically in EXT when proper Interface and software IS detected.
Selecting EXT disables the front panel controls of the RT. EXT is used for
GRM - 122 testing. LDE stands for local data entry and represents a future
capability of the SlP/ASlP RT to communicate with SlP/ASlP VAA regarding
data loads and requirements. This feature is currently not used.
GPS/(5)
Represents a capability of the SINCGARS SlP/ASlP radio.
SA/(6)
Represents a capability of the SINCGARS SlP/ASlP radio.
CID/(8)
Represents a capability of the SINCGARS SlP/ASlP radio.
CLR/MENU
MENU appears on SINCGARS ASIP when key is pressed. Multiple presses
will scroll MENU.
FREQ/BACKLIGHT
ASIP radio must be in SQ ON, press key [FREQ], then CHG to change
intensity.
5-14
TM 11-5820-890-10-8
Connectors, SIP RT
P1 (System)
The P1 systems connector is located on the back of the SIP RT. This
connector provides RT power and signaling interfaces.
Figure 5-12. SIP RT Connectors
J5 (GPS)
Located on the back of the SIP RT the GPS J5 connector provides an
interface of the VAA GPS connector.
J4 (AUD/DATA)
The J4 (AUD/DATA) connector supports general data communications at
SINCGARS Data Rates of 600, 1200, 2400, 4800 and 16,000 BPS and
Enhanced Data Rates of 1200N, 2400N, 4800N, and 9600N BPS. The
RS-232 interface allows transmission of data via SINCGARS SIP radios
using computers and commercial “Xmodem” software. If not using Packet
(PCKT) data mode, or the internet controller (INC) feature of the SIP radio, all
data devices must be connected to the AUD/DATA port, not to the SIP VAA
J3 (AUD/FILL)
Handsets used with the SIP RT may be connected to the AUD/DATA or
AUD/FILL connector. (NOTE: Handsets will not function if connected to the
front of the SIP VAA.)
5-15
TM 11-5820-890-10-8
Connectors, ASIP RT
P1 (System)
This connector provides RT power and signaling interfaces
Figure 5-1 3. ASIP RT Connectors
J6 (Auxiliary)
Used to connect HRCRD handset and two-wire adapter.
J5 (GPS)
Enables a PLGR to be connected to a manpack radio.
J3 (AUD/DATA)
The J4 (AUD/DATA) connector supports general data communications at
SINCGARS Data Rates of 600, 1200, 2400, 4800 and 16,000 BPS and
Enhanced Data Rates of 1200N, 2400N, 4800N, and 9600N BPS. The
RS-232 interface allows transmission of data via SINCGARS ASIP radios
using computers and commercial “Xmodem” software. If not using Packet
(PCKT) data mode, or the internet controller (INC) feature of the ASIP radio,
all data devices must be connected to the AUD/DATA port, not to the ASIP
VAA.
J2 (AUD/FILL)
Handsets used with the ASIP RT may be connected to the AUD/DATA or
AUD/FILL connector. (NOTE: Handsets will not function if connected to the
front of the ASIP VAA.)
J1 (Antenna)
RF Input/Output
5-16
TM 11-5820-890-10-8
Figure 5-14. ASIP RT FUNCTION SWITCH
FUNCTION CONTROL POSITIONS AND USES
POSITION
OFF
(Zero)
STBY
(Stand By)
TST
(Test)
LD
(Load)
SQ ON
(Squelch On)
SQ OFF
(Squelch Off))
REM
(Remote)
RXMT
(Retransmit)
PURPOSE
All power is shut off; all stored data, (COMSEC, FH, sync time, and manpack
battery life indicator) are deleted after 5 seconds; radio is completely
inoperable; position is used when radio is not in use and for storage.
Clears COMSEC, after 5 seconds clears all FH data; operator pauses in this
position for 5 seconds when setting FCTN switch to OFF.
Makes radio inoperative but all stored data is retained; sync time is lost after
200 hours; setting FCTN to SQ ON returns radio to fully operational status. In
STBY, power is drawn from main source.
This position causes self-test of RT data and ECCM circuits; test results are
shown in RT display. Running RT self-test is a routine step in start up
procedure.
The load position is required for loading SC frequencies, FH data, and
COMSEC keys; required also to receive an ERE
This is the normal operating position of the radio for FH mode. For SC mode,
this position reduces noise.
This position is not used for the FH mode. In the SC mode, SQ OFF helps to
bring distant stations, to work through jamming, and to be compatible with
radios lacking squelch capability.
The REM position disables front panel controls and is required for use of the
Control-Monitor, Remote Control Unit (RCU) and HRCRD.
Use of the RXMT position enables the RT to automatically retransmit traffic from
one radio through another. Both RTs are set to RXMT position and connected
by an RXMT cable.
5-17
TM 11-5820-890-10-8
SlP/ASIP VAA
Memory
The SlP/ASlP VAA contains a small microprocessor which allows data in the
form of routing tables to be stored.
Internet
When used in conjunction with FBCB2 hardware and software, the SlP/ASlP
VAA supports internet communications among SINCGARS FH nets and
between SINCGARS and EPLRS nets. Employment of the internet feature
requires that the SlP/ASlP RT be set to the Packet data mode.
5.3c.
Remote Control Unit (RCU) Controls
FRONT PANEL
The front panel of the RCU is quite similar to that of the RT. There is one
additional control, an ON-OFF speaker switch. The only other difference is
that the REM position of the RT FCTN switch becomes ICM (intercom), used
for talking with the radio operator over the connecting field wire. RCU
operator may call RT operator by setting FCTN to ICM and pressing CALL
and PTT at the same time
Figure 5-15. RCU FRONT PANEL
5-18
TM 11-5820-890-10-8
5.3d.
Automated Net Control Device (ANCD) Controls
KEYPAD
The ANCD keypad provides the operator a 35 button keypad for
communications with the ANCD. The function of each key is briefly
explained below.
Figure 5-16. ANCD Keypad
ANCD KEYPAD BUTTONS AND USES
BUTTON
PURPOSE
A thru Z
Pressing these keys enters letters of the alphabet when LOCK LTR key is
activated.
0 thru 9
Pressing these keys enters numbers when LOCK LTR key is deactivated.
LAMP
This key activates internal ANCD light for use with night vision goggles;
lamp is not intended for use with naked eye.
5-19
TM 11-5820-890-10-8
BUTTON
ZERO
This key is used in combat emergency situations to delete all data from
the ANCD. DO NOT use the ZERO key for routine deletion of data.
MAIN
MENU
Pressing this button returns ANCD display to the main menu; provides a
quick and easy way to return to the start point of your procedure. (Will take
operator to the RDS main menu if RDS is the default application, not your
starting point.)
RCV
(Receive)
SEND
ABORT
(Abort)
Pressing this button at the proper time during data transfers causes the
data to enter the target ANCD.
Pressing this button at the proper time during data transfers causes data
to be sent from the source to the target ANCD.
This button is used to cause program being used to return to the
preceding display.
ON/
OFF
This is a simple on-off control by which the ANCD may be readily
activated and deactivated.
P UP
This key is used for scrolling and in some cases is required in lieu of up
and down arrows.
(Page UP)
BAT
(Battery)
CLR
(Clear)
DELE
(Delete)
P DN
(Page Down)
SPACE
LOCK LTR
(Lock Letter)
ENTR
(Enter)
5-20
PURPOSE
This key is not used. Low battery light comes on automatically when
batteries become weak.
Not used routinely; when prompted to do so, press this key to
acknowledge receipt of message or confirm successful operation.
This button may be used to delete individual characters when data is
being manually entered into the ANCD. Also used to delete SOI sets.
This key is used for scrolling and in some cases is required in lieu of up
and down arrows.
This key is used to enter a space and may be used to erase characters
during data entry.
When this key is activated, the word “LETTER” appears near the bottom
left of the display, and letters may be entered. To use numbers and
bottom level items, press LOCK LTR again; word “LETTER” disappears
from the ANCD display.
Use this key to select item, enter data, and to continue to the next step in an
operator procedure.
TM 11-5820-890-10-8
5.3e.
Precision Lightweight GPS Receiver (PLGR) Controls
KEYPAD
The PLGR keypad provides 12 buttons through which the operator
exercises control. This paragraph will discuss only those keys which the
SINCGARS operator may use to check and load radio sync time, and to toad
PLGR keys from an ANCD. For navigational functions, see PLGR manuals.
Figure 5-17. PLGR KEYPAD
PLGR KEYPAD BUTTONS AND USES
BUTTON
PURPOSE
0 thru 9
These keys are used to enter numbers.
ON/BRT
(On/Bright)
Pressing the ON/BRT button once turns the PLGR on; holding this key
down with PLGR on enables the operator to adjust the display
backlighting using up/down arrows.
UP ARROW
DOWN ARROW
These keys are used to change display pages, change number/alpha
field values, activate functions, and adjust brightness.
LEFT ARROW
RIGHT ARROW
These keys are used to move the cursor from field to field in the display.
MENU
Pressing the MENU key once displays first page of the system menu;
pressing it a second time displays the second page.
5-21
TM 11-5820-890-10-8
PURPOSE
BUTTON
WP
Pressing the WP key causes the Waypoint menu to be displayed.
(Waypoint)
POS
Pressing the POS key allows the Position display to be viewed.
(Position)
NAV
(Navigation)
CLR
(Clear)
With the keypad in numeric lock, the CLR key is used to move the cursor
to the left erasing wrong entries.
MARK
The MARK key is used to store present position as a waypoint.
OFF
NUM/LOCK
(Number Lock)
5.3f.
When waypoints are loaded, pressing the NAV key allows Navigation
displays to be viewed; without waypoints loaded, NAV key does not work.
Pressing the OFF key once starts a 30-second shut down process;
pressing it a second time shuts down the PLGR immediately.
Pressing NUM LOCK toggles the keypad between control and numeric
modes. An “N” is displayed at lower right when NUM LOCK IS on.
Control-Monitor (C-M)
FRONT PANEL
The front panel of the Control-Monitor provides the operator four controls
and five small displays for control of up to three radios. Controls include
FCTN (function), RADIO, INIT (initiate), and DIM switches. The five displays
show RF power, RT mode, channel, variable, COMSEC mode, and
Main-Standby Control.
Figure 5-1 8. CONTROL-MONITOR
5-22
TM 11-5820-890-10-8
CONTROL-MONITOR CONTROLS AND USES
CONTROL
PURPOSE
RADIO
This control is used to select Radio 1, 2, or 3. Positions 1 and 2 are for
RT-A and RT-B in first VAA; position 3 is for RT-A in second VA4
FCTN
This control is used for selecting test, RF power, RT mode, channel,
COMSEC variable, COMSEC mode, and main or standby status.
(Function)
TEST
RF
(Radio Frequency)
Used to run C-M self-test. Results are shown in displays. Self-test will
continue until FCTN switch is moved out of TEST position.
This control position is used to set the RF power output of the radio.
The INIT switch is used for adjusting power.
RT MODE
Used to set RT mode, including power off. INIT switch is used to make
changes. RT mode display shows operating mode.
CHAN
Used to select RT channel, including CUE and MAN. Channel display
shows channel selected; with “0” for MAN and “C” for CUE.
(Channel)
VAR
Used to select COMSEC keys.
(Variable)
COMSEC
Used to select COMSEC mode, plain text or cipher text. COMSEC
display shows PT or CT.
CONTROL
Used to change C-M from standby (S) to main (M). INIT switch is used
to make changes. Control display shows operating condition.
INIT
(Initiate)
DIM
Used with FCTN switch to change functions of RT and C-M. Moving INIT
switch up moves FCTN display to right, or increases channel number.
Moving INIT switch down moves FCTN display to left, or decreases the
channel number.
This control adjusts brightness of displays. Turning it clockwise
bnghtens displays; counterclockwise dims displays. DIM control is
turned fully counterclockwise for use of night vision goggles.
5-23
TM 11-5820-890-10-8
Loudspeaker (LS-671)
15.39.
CONTROLS
There are only two controls for the LS-671, plus a power indicator lamp.
The LS-671 allows the SINCGARS operator to perform two functions from
the loudspeaker: turn the radio on and off; and adjust the volume level of the
handset and speaker.
Figure 5-19. Loudspeaker LS-671
LOUDSPEAKER LS-671 CONTROLS AND USES
CONTROL
POWER
SWITCH
5-24
PURPOSE
This switch enables the SINCGARS radio operator to turn the radio on and off
from the loudspeaker. VAA CB1 must be set to ON.
VOLUME
CONTROL
When pushed in, this control adjusts the audio level of the handset. When
pulled out, it adjusts the volume of the loudspeaker. Turning the control
clockwise increases the volume; counterclockwise decreases it.
POWER
INDICATOR
LAMP
The Power Indicator Lamp lights when VAA CB1 is ON and LS-671 Power
Switch is turned on.
TM 11-5820-890-10-8
5.3h.
Vehicular Intercommunications Set (VIC)
CONTROLS
The main control box of the VIC (Audio Frequency Amplifier, AM - 1780)
provides five controls for main power, intercom accent, radio
transmission, and installation control. Crew boxes (C-2297 and
C-2298) provide two controls each: a function selector switch and a
volume control.
Figure 5-20. VIC CONTROLS
5-25
TM 11 -5820-890-10-8
AM - 1780 CONTROLS AND USES
CONTROLS
POWER CKT BKR
(Circuit Breaker)
ON/OFF
MAIN PWR
PURPOSE
A two-position ON/OFF switch allows the user to initiate and terminate
power to the VIC system.
Supplies power to and removes power from crew boxes (C-2297 and
C-2298).
This switch provides three power settings: normal, intercom only, and OFF.
(Main Power)
OFF
INT ONLY
(Intercom Only)
NORM
(Normal)
INT ACCENT
Removes all power from the VIC and radio system.
Allows communications among crewmembers, but does not allow use of
radios.
Supplies power to intercom and radios and is the normal position used
for VIC.
(Intercom Accent)
When ON, this switch reduces the volume level of radio traffic; intercom
volume level remains unchanged.
RADIO TRANS
This switch allows selection of transmit capabilities or listening silence.
(Radio Transmission)
CDR+CREW
Allows all crewmembers to transmit on radios.
CDR ONLY
Allows commander only to transmit on radios.
LISTENING SILENCE
INSTALLATION
5-26
Prevents transmission on radios.
This three-position switch is for use of maintenance personnel only.
Crewmembers should not move switch setting.
TM 11-5820-890-10-8
CREWBOX (C-2297&C-2298) CONTROLS AND USES
CONTROLS
FUNCTION
SELECTOR
PURPOSE
This primary switch controls access to intercom and radios “A” and “B”.
ALL
Crew can :
Talk and listen on Intercom,
Talk and listen on radio “A”, and
Listen only on radio “B”.
A
Crew can:
Talk and listen on Intercom, and
Talk and listen on radio “A”.
B
This position is not used when the SINCGARS radio is used with the VIC
system. Ignore the B position on crewboxes.
C
Commander can:
Talk and listen on intercom, and
Talk and listen on radio “B”.
Other crewmembers can:
Listen only on intercom, and
Talk and listen on radio “B”.
INT ONLY
(Intercom Only)
Crew can:
Talk and listen on Intercom, but
Cannot talk or listen on radios.
VOLUME
SIG EXT OFF
The volume control adjusts the audio level for headsets connected to that
crewbox.
This control is used only in the “SIG” position. Other settings have no
function with the SINCGARS radio.
5-27
TM 11-5820-890-10-8
5.4. PRIMARY OPERATOR/PREPARATION TASKS
5.4a. Definition of Primary Operator/Preparation Tasks
WHAT ARE THEY?
There are five tasks categorized as primary for the SINCGARS radio
operator, manpack or vehicular and one preparation task for the ASIP
These tasks enable the operator to meet all normal
radio.
communications requirements when the unit is in an operational
situation.
WHAT’S INVOLVED?
These five primary tasks involve loading the radio with required single
channel frequencies, COMSEC keys, FH data, and sync time.
Additionally, they include the use of passive late net entry and the
ANCD as the primary source of SOI information.
WHAT’S REQUIRED?
All SINCGARS radio operators are expected to be able to perform these
five primary tasks without assistance, other than reference to
TM11-5820-890-10-6
(Operator’s
Pocket
Guide).
Operator
Preventive Maintenance Checks and Services (PMCS) (see Chapter 8)
are to be performed prior to performing these tasks.
5.4b. Summary of Primary Operator/Preparation Tasks
PREPARATION TASK 1:
Select RT Preparation Setting from MENU
Required to set the ASIP radio to proper settings for other tasks. MENU
selections are Volume, Channel, Power, Mode and COMSEC. These
settings will need to change as operationally necessary.
PRIMARY TASK 1:
Load Single Channel Frequencies into RT
Required for use of single channel communications, participation in
Cold Start net opening, use of CUE and ERF method of late net entry,
and single channel frequency updates.
PRIMARY TASK 2:
Load COMSEC, FH Data, and Sync Time into RT Using
ICOM Fill
Required for secure, frequency hopping communications,
participation in Hot Start net opening, COMSEC/FH data updates, and
without sync time, participation in Cold Start net opening.
PRIMARY TASK 3:
Perform Hot Start Net Opening
Required when the net has been down, for any reason and for any
period of time, and is now to become operational at a prescribed time.
Operators load their RTs with all required COMSEC keys, FH data, and
sync time. At the prescribed time, they call the NCS and enter the net.
The Hot Start procedure may also be used when an individual operator
has been out of the net for any reason and wishes to re-enter without
resort to the CUE and ERF method of late net entry.
5-28
TM 11-5820-890-10-8
PRIMARY TASK 4:
Perform Passive Late Net Entry
Required when an operator’s radio sync time becomes greater than
plus or minus 4 seconds, but not more than one minute, different from
net sync time. The Passive Late Net Entry process enables an operator
to re-enter the net without requiring action on the part of the NCS or
other net operators.
PRIMARY TASK 5:
Obtain SOI information from ANCD
SOI information electronically stored in the ANCD replaces the paper
SOI extract. The ANCD SOI program is used when Information on nets,
suffixes, pyro/smoke, sign/countersign is needed. It may be used to
view quick reference (QREF) related items in group, time period, set,
find, and memo. It may also be used to obtain the net ID of a net that is
not a part of the loadset being used.
5.4c. Select RT Preparation Settings from MENU (Preparation TASK 1)
DESCRIPTION
This task is required to set the ASIP radio to proper settings for other
tasks. MENU selections are Volume, Channel, Power, Mode and
COMSEC. These settings will need to change as operationally
necessary. The backlight function is also covered.
DETAILED FLOWCHART
SELECT RT PREPARATION SETTINGS FROM MENU
ACTIONS
RESULTS
a. Set RT Volume
(1) Press MENU
(2) Press Digit (1 -9) for Vol
Setting (0) for Whisper Mode
Press MENU to display Vol level
Display reads WHSP if 0 selected
b. Set RT Channel
(1)
(2)
Press MENU (until CHAN)
Press Digit (1-6) for Channel
desired (0) for MAN (7) for
CUE
Display reads (1-6), (Q) for CUE,
(M) for Manual
c. Set RT Power
(1)
(2)
Press MENU (until PWR)
Press CHG for desired PWR
setting
Display reads (LO, M, HI, PA)
d. Set RT Mode
(1)
(2)
Press MENU (until MODE)
Press CHG for desired
MODE
Display reads (SC, FH, FHM)
e. Set COMSEC
(1)
(2)
Press MENU (until CMSC)
Press CHG for desired
CMSC setting
Display reads (PT, CT, TD, RV)
f. Set Backlight
(1) Place RT on SQ ON
(2) Press FREQ/Backlight
(3)
Press CHG until desired
setting
SUBTASKS
Backlight lights (4 settings Low to
High, then OFF)
Default Settings are: VOL (5), CHAN (1), PWR (LO), MODE (FH), COMSEC (CT}
5-29
TM 11-5820-890-10-8
5.4d. Load Single Channel Frequencies into RT (Primary Operator Task 1)
DESCRIPTION
The SINCGARS operator is required to perform this task in preparation
for the employment of single channel communications, participation in
Cold Start net openings, use of the CUE and ERF method of late net
entry, and for single channel frequency updates. The operator
determines the required single channel frequencies from the ANCD or
another source. These frequencies are then loaded into the radio by
use of the RT keyboard.
DETAILED FLOWCHART
Operators perform the actions shown for each subtask, in the order
shown below. Results are shown as ANCD display messages (dark
bordered boxes) or as RT display messages in the form of "Display
shows."
LOAD SINGLE CHANNEL FREQUENCIES INTO RT
ACTIONS
SUBTASKS
a. Obtain required CUE, MAN,
and/or SC freqs
(1) Turn ANCD ON
select:
Soi Radio sUpervisor
(2) Enter SOI
qRef Group Net sufX Pyro
Tmpd Set C/s Find Memo
(3) Enter TMPD
Enter Time Pd:
=> ##
(4)
qRef Group Net sufX Pyro
Tmpd Set C/s Find Memo
Select time period desired
(5) Enter QREF
b. Prepare RT for SC freq
loading
5-30
RESULTS
(1)
Set COMSEC to PT
(2)
Set MODE to SC
(3)
Set FCTN to LD
(4)
Set CHAN to CUE, MAN, or
CHAN 1-6
(Scroll to net desired; note SC
freqs needed.)*
N/A
TM 11-5820-890-10-8
ACTIONS
SUBTASKS
c. Load SC freqs*
(1) Press [FREQ]
RT display shows [00000] or
[30000]
(2) Press [CLR]
RT display shows
(3)
Enter 5-digit SC freqs
RT display shows [X X X X X]
Press [STO] (within 7
seconds)
RT display blinks once
d. Store SC freqs
e. Prepare to communicate
(SC, PT)**
RESULTS
(1)
Set FCTN to SQ ON
N/A
(2)
Set CHAN to CUE, MAN, or
CHAN 1-6
N/A
(3)
Communicate in SC, PT
mode when desired
N/A
*
ANCD contains CUE, MAN, and some SC frequencies. Other SC frequencies to be loaded
in Channels 1-6 must be obtained from your NCS or SigO.
** Operators normally do not load a CUE frequency; only NCS and alternate NCSs need to
receive CUE messages. The MAN frequency must be loaded if the Cold Start net opening
procedure is to be used. Channels 1 thru 6 are loaded with SC frequencies only when single
channel communications are known to be mission requirements. In a typical frequency hopping
net which uses the Hot Start net opening procedure, it is not necessary for the operator to load any
SC frequencies, at least until a specific need arises.
5-31
TM 11-5820-890-10-8
5.4e. Load COMSEC/FH Data/Sync Time into RT Using ICOM Fill
(Primary Operator Task 2)
This task is required in preparation for a Hot Start net opening and,
without sync time, for COMSEC/FH data updates. This task may also
be performed in preparation for a Cold Start net opening by omitting
sync time. Performance of this task involves the use of an ANCD as a
source of COMSEC keys, FH data (hopset, TSK, and net ID), and sync
time. By use of the ICOM fill procedure, COMSEC, FH data, and sync
time are simultaneously loaded into all six channels of the SINCGARS
radio. Upon completion of the ICOM fill, the radio is fully prepared for
secure, frequency hopping communications.
DESCRIPTION
DETAILED FLOWCHART
LOAD COMSEC/FH DATA/SYNC TIME INTO RT USING ICOM FILL
ACTIONS
SUBTASK
a. Prepare RT to receive an
ICOM fill
5-32
RESULTS
(1)
Set COMSEC to CT
(Press PTT twice to clear
COMSEC alarm)
(2)
Set FCTN to LD
N/A
(3)
Set CHAN to MAN
N/A
(4)
Set MODE to FH
Display shows "FILL O"
(5)
Set DATA to OFF*
Display shows “OFF”
TM 11-5820-890-10-8
SUBTASK
b. Prepare ANCD to perform
ICOM fill
ACTIONS
(1)
Turn ANCD ON
Perform ICOM fill on RT
Send Receive
sEtup Comsec Time
(3) Enter SEND
send to:
Radio Ancd Stu PC
(4) Enter RADIO
select: iCom Nonicom
Abn
Rcu** Haveq
(5) Enter ICOM
Connect to RT AUD/FILL
Connector
(6)
Connect ANCD to RT and
press down arrow
Set FCTN switch to LD on RT
(7)
Ensure FCTN is at LD and
press down arrow
Do you want to include
time?***
[↓]
Press [LOAD] on RT
(1)
Press [LOAD] button on
RT keypad and observe
Transfer in progress
(2)
Note completion of ICOM
fill data transfer
ICOM transfer successful
Load sync time manually
if required to do so
RT cannot accept time from
ANCD****
(3)
*
select:
SOi Radio supervisor
(2) Enter RADIO
(8) Enter YES
c.
RESULTS
[↓]
DATA control is found on the same key as the numeral “4.”
**
Select “Rcu” to fill a Remote Control Unit (RCU) with COMSEC keys. The procedure is
the same as that shown for ICOM radio fill but only COMSEC is loaded, not FH data. (RCU does
not require FH data.)
***
Sync time is normally included for net opening only, not for net updates. Consult your
NCS or unit SOP for exact policy to follow.
****
If the RT being used willnot accept sync time as a part of the ICOM fill, this message will
appear. When it does, the operator must then manually load Julian Date and sync time into the
radio.
5-33
TM
11-5820-890-10-8
Perform Hot Start Net Opening (Primary Operator Task 3)
5.4f.
This task is required when the net has been down for any reason and is
now to become operational at a prescribed time. This procedure may
also be used when an individual operator has been out of the net for
any reason and wishes to re-enter the net without resort to the CUE
and ERF method of late net entry. This task involves two basic steps:
loading the radio with COMSEC keys, FH data, and sync time by use of
the ICOM fill procedure (Primary Operator Task 2); and calling the NCS
in secure, frequency hopping mode to request net entry.
DESCRIPTION
DETAILED FLOWCHART
PERFORM HOT START NET OPENING
SUBTASKS
a. Load RT with COMSEC/
FH data/sync time
b. Enter net
*
ACTIONS
(1) Perform ICOM Fill
(Primary Opr Task 2)
(2)
Load sync time manually
if required by RT version*
(1)
Call NCS using CT FH
mode
(2)
Request permission to
enter the net
RESULTS
RT channels (6) are loaded with
COMSEC/FH/sync time
N/A
N/A (NCS responds)
Hot Start net opening is
completed for this operator
If the message “RT cannot accept time from ANCD” appears, go to subtasks c and d below
to manually load Julian Date and sync time. Once that has been accomplished, contact your NCS
and enter the net.
5-34
TM
SUBTASKS
c.
Load Julian Date (JD) in
RT
d. Load Sync Time in RT
11-5820-890-10-8
ACTIONS
(1) Turn ANCD ON
select:
Soi Radio sUpervisor
(2)
Enter RADIO in ANCD
Send Receive Database
sEtup Comsec Time
(3)
Enter TIME in ANCD
Julian Day: X X
(4)
Press TIME on RT keypad
one time
RT display shows "D D"
(5)
Press CLR on RT keypad
RT display show "--"
(6)
Enter XX (JD from ANCD)
RT displays shows "XX"
(7)
Press STO on RT keypad
New Julian Date IS now stored
in the radio
(1)
Press down arrow on
ANCD (see c(3) above)
ANCD Time: (running)
HH:MM:SS (eg, 22:45:15)
(2)
Press TIME on RT keypad
(two times)
RT display shows
“HH MM”
(3)
Press CLR on RT keypad
RT display shows
-- --
(4)
Enter HH from ANCD
RT display shows “HH”
(5)
Enter MM (minute ahead
of ANCD time)
RT display shows “HH MM” (Do NOT
press STO yet!)
(6)
Press STO on RT
keypad*
When ANCD and RT time are at
same MM, zero seconds
(7)
Compare RT time with
ANCD time**
Manual loading of JD and sync time
is completed
*
Time stored in the radio should be within one second of that in the ANCD: if not, repeat time
loading procedure.
**
Press [TIME] three times.
5-35
TM 11-5820-890-10-8
Pet-form Passive Late Net Entry (Primary Operator Task 4)
5.4g.
This task is required when the sync time in your radio becomes more
than 4 seconds (plus or minus), but less than one minute, different from
net sync time. Passive late net entry enables an individual operator to
re-enter the net without action on the part of the NCS or other net
operators. This task makes use of a feature built into the SINCGARS
radio and involves but two steps: placing the RT in passive late net
entry mode; and waiting for the radio to adjust its sync time to that of the
net. When this method of late net entry does not work, the Hot Start
procedure or CUE and ERF method of late net entry should be used.
DESCRIPTION
DETAILED FLOWCHART
PERFORM PASSIVE LATE NET ENTRY
ACTIONS
SUBTASKS
a.
c.
Try to contact the NCS or
another net station
There IS no response to your calls
(1)
Press FREQ on RT
keypad
RT display shows “F XXX”
(2)
Press SYNC on RT
keypad
RT display shows “LF XXX”
(1)
DO NOT press PTT while
RT is in this mode
Rt display Will continue to
show “LF XXX”
(2)
Wait until you hear traffic
on the net*
RT will drop "L" from display
(will read “F XXX” again)
Call NCS and re-enter
the net
Passive method of late net entry is
completed
Note that no traffic is
being heard on the net
b. Prepare radio for passive
late net entry
Allow RT to make
automatic adjustment
d. Re-establish contact with
net NCS
*
RESULTS
lf traffic is not heard after using the Passive Late Net Entry method for three minutes or so, use
the Hot Start procedure or CUE and ERF method of late net entry
5-36
TM 11-5820-890-10-8
5.4h.
Obtain SOI Information from ANCD (Primary Operator Task 5)
DESCRIPTION
Because the ANCD replaces the paper SOI, the operator performs this
task whenever SOI information on nets, suffixes, pyrotechnics, smoke,
or sign/countersign is required. As many as 40 Quick Reference
(QREF) items can be made available to the operator in list form. Full
SOI information is readily available for all QREF entries. Up to five time
periods (24-hour days) may be included in each QREF file.
Performance of this task involves turning on the ANCD, selecting the
SOI program, entering QREF and scrolling to the element of SOI
information desired.
DETAILED FLOWCHARTS
1.
Rules to remember in obtaining SOI information from the ANCD are:
ACTION
RESULT
ABORT
Causes ANCD to return to SOI menu
Arrow down [↓]
You must press arrow down to go to the
next screen
Arrow right/arrow left
Allows viewing of additional information
and return
Arrow up/arrow down
Allows viewing of each item
DELETE
To delete SOI set, enter SOI, then Set,
and press DELE key
ENTER (shown as ENTR)
Causes activation of the entry you have
selected
Hot keys
Capital letter of item selected, eg, sufX;
allows direct shift from QREF
to full SOI file
“J” key (for JUMP)
In Find, causes ANCD to continue search
for next item
“K” key (for KEEP)
Causes item being viewed to be stored
in QREF file
MAIN MENU
Returns you to SOI/RADIO/SUPERVISOR
menu
5-37
TM 11-5820-890-10-8
ACTION
2.
PgUP/PgDN
Moves you to top or bottom of the list
ZERO (red button)
Used in combat emergency only; DO
NOT use for deletions
To look up any of the up to 40 QREF items of SOI information contained in the QREF file. perform the
following steps:
ACTION
3.
RESULT
RESULT
Turn ANCD ON
select:
Soi Radio supervisor
Enter SOI
qRef Group Net sufX Pyro
Tmpd Set C/s Find Memo
Enter QREF
Last QREF item viewed appears in
ANCD display. Entering QREF brings
to the display a list of up to 40
specific SOI items selected from NET,
SUFX, PYRO, or C/S. Once the
QREF file has been entered, scroll up
or down to locate the SOI item
desired. Additionally, all SOI
information associated with each of
these QREF Items is available by
returning to the SOI menu (shown
above) and entering GROUP TMPD,
SET, FIND, or MEMO.
The following are examples of SOI information which may be available in a full SOI file:
a.
GROUP:
Enter Group and scroll to the SOI item desired.
(Group)
qRef Group Net sufX Pyro
Tmpd Set C/s Find Memo
TO1 Set: 52lD DEM 003
003 52ID SPT
5-38
TM 11-5820-890-10-8
b.
NET:
Enter Net and scroll to the SOI item desired.
qRef Group Net sufX Pyro
Tmpd Set C/s Find Memo
T06 1-4 FA BN W7T
C81975 M74800 0424
TO1 1-41 ADA CMD Y1Z
Callwrd. BULLDOG*
*
Cal/word is obtained by pressing right arrow, then left arrow to return to NET display.
c.
SUFFIX:
Enter sufX and scroll to the SOI item desired.
(sufX)
qRef Group Net sufx Pyro
Tmpd Set C/s Find Memo
Commander 02
27
COFS/XO
*
Expanders are found at the end of suffixes.
d.
PYRO/SMOKE:
Enter Pyro and scroll to the SOI item desired.
qRef Group Net sufX Pyro
Tmpd Set C/s Find Memo
GREEN SMOKE
Safe to land or drop supplies here*
*
Meaning of GREEN SMOKE can be obtained bypressing right arrow, then left arrow to return
to Pyro menu. You may scroll through signals or meanings, as desired, by pressing up/down
arrows.
5-39
TM 11-5820-890-10-8
e.
TIME PERIOD:
Enter Tmpd and scroll to the SOI item desired.
(Tmpd)
qRef Group Net sufX Pyro
Tmpd Set C/s Find Memo
Enter Time Pd:
=> ##
f.
SET:
Enter Set and scroll to the SOI item desired.
(Set)*
qRef Group Net sufX Pyro
Tmpd Set C/s Find Memo
select:
Choose Send Receive
Scroll ↓/↑ press
ENTR to select SOI set
[↓]
Set: (name/nr)
Edn: (name) TP: (nr)
*
A SETmay be deleted by entering Set and pressing the ANCD DELE (delete) key
g.
SIGN/COUNTERSIGN:
Enter C/s to view sign/countersign for current time period. To view
sign/countersign for other time periods, go to Tmpd and enter time
period desired
(C/s)
qRef Group Net sufX Pyro
Tmpd Set C/s Find Memo
TO1 Sign: HARDWOOD
Cntrsign: SNEAKER
5-40
TM 11-5820-890-10-8
h.
FIND:
Enter Find; then select the category of SOI item desired. If the first
item viewed is not the desired one, press “J” (for JUMP) to cause
the ANCD to continue to search for the SOI item you want to see.
(Find)
qRef Group Net sufx Pyro
Tmpd Set C/s Find Memo
Find: Net nEtid Sfx Word
Clsgn Grp gRp# Des Frq
i.
MEMO:
Enter Memo and select the memo number desired. (Each of
four memos may be six lines long, with 22 spaces on each line.)
Memos are available in QREF files as well as full SOI files. They
may be transferred from ANCD to ANCD in both full and
QREF transfers. You may both create and read memos.
(Memo)
qRef Group Net sufX Pyro
Tmpd Set C/s Find Memo
5-41
TM
11-5820-890-10-8
5.5.
SPECIAL OPERATOR TASKS
5.5a.
Definition of Special Operator Tasks
WHAT ARE THEY?
There are eight tasks categorized as special for the SINCGARS/ANCD
operator. They are “special” in that they may be performed by specially
trained operators, or they may be the responsibility of communications
specialists, NCSs, or designated NCOs. These eight tasks are
normally not required of the SINCGARS/ANCD operator to meet
routine communications requirements when the unit is in an
operational situation. Some operators may be required to perform
some of these special tasks while other unit operators will not be.
WHAT’S INVOLVED?
These special tasks involve functions that are required only
occasionally by selected stations. An example is the commander’s
driver who may be called upon to transfer data from one ANCD to
another. The commander’s driver might also be required to change net
IDS. Also, unit scouts may be required to perform retransmission
operations.
SPECIAL
OPERATOR
TASKS (SIP/ASIP)
In addition to the eight special operator tasks, there are two Special
SlP/ASlP Operator Tasks. These special SlP/ASlP tasks are: use the
SlP/ASlP RT as an RCU; and send data from one computer to another
over a SINCGARS secure, frequency hopping net using the RS-232
enhanced data feature.
WHAT’S REQUIRED?
All unit NCS personnel should be able to perform these special as well
as primary operator tasks. Training in special operator tasks is an
inherent part of unit sustainment training and is conducted on a small
group or Individual basis related to unit mission requirements.
5-42
TM 11-5820-890-10-8
5.5b.
Summary of Special Operator Tasks
SPECIAL TASK 1:
Transfer COMSEC/FH Data/Sync Time, ANCD to ANCD
This task is used when individual operators are required to load their
own ANCD with COMSEC keys, FH data, and sync time from one being
passed around the unit. (Many unit SOPS call for communications
specialists or designated NCOs to perform this task for operators. This
task is performed prior to net openings and during periodic ANCD data
updates.
SPECIAL TASK 2:
Transfer QREF SOI Information, ANCD to ANCD
This task is similar to Special Task 1 but differs in the procedure
followed. It is performed prior to net openings and during periodic
ANCD data updates. (Unit SOP determines whether operators,
communications specialists, or designated NCOs are responsible for
the function.)
SPECIAL TASK 3:
Perform Cold Start Net Opening
If an NCS finds it necessary to use the Cold Start method of net
opening, it is essential that operators be trained in this task. This task is
“special” in that it is unlikely the Cold Start net opening procedure will
be used frequently.
SPECIAL TASK 4:
Receive Net Update ERF from NCS
This task is performed when an NCS needs to update some element of
FH data, including sync time, using electronic transfer means. The
normal method of FH data updating is by physical connection of one
ANCD to another. ERF update provides a back-up procedure for
those occasions when electronic transfer is required by the tactical
situation of the unit.
SPECIAL TASK 5:
Perform CUE and ERF Method of Late Net Entry
This task is performed when sync time in the RT becomes, for any
reason, more than one minute different from that of the operational net.
Use of the CUE and ERF method is discouraged because it requires
single channel communication and special action on the part of the
receiving NCS. The Hot Start procedure works equally well, and it does
not involve SC mode or NCS action. (For RT-1523A/B versions, sync
time difference cannot exceed 100 days; for the RT- 1523 version,
difference cannot exceed 60 minutes.)
SPECIAL TASK 6:
Conduct Retransmission (RXMT) Operations
Performance of this task is required when one or more stations of a net
become out of normal SINCGARS operating range or an obstacle
blocks line of sight communications, This is a task that unit scouts, staff
vehicle drivers, and communications specialists should be able to
perform on short notice. The RXMT capability of the SINCGARS radio is
of significant value in various operational situations.
5-43
TM
11-5820-890-10-8
NOTE
DATA RXMT: All data rates except PCKT may be retrans with the following provisions.
1. SDM data, TF and AD1 : No change to normal retrans procedures. Radios do not have to be set
in Data mode (data off). Mixed radios at RXMT site or outstations is permitted.
2. EDM DATA: Radios at the RXMT site have to be set to the same EDM data rates as outstations.
Only SIP radios can be used at the RXMT site and outstations.
SPECIAL TASK 7:
Send an ERF as Part of RXMT Operation
This task is required only as a part of RXMT operations. In some
situations, it may be necessary for the RXMT operator to send an ERF to
the distant station before retransmission can be started. Any operator
held responsible for performing Special Task 6 should also be trained in
this task.
SPECIAL TASK 8:
Change Net ID
When contact with a non-loadset (not loaded in radio Channel 1
through 6) station is desired, the operator needs to be able to change to
the net ID of the desired station.
SPECIAL TASK 9:
Use SIP RT as an RCU
Allows the operator to use the SIP RT as either a Manpack RCU or
remoted radio.
SPECIAL TASK 10:
Send Data Via RS-232 Mode
Allows the operator to use any one of four enhanced data rates to
transmit and receive data messages using RS-232 mode.
5-44
TM 11-5820-890-10-8
5.5c.
Transfer COMSEC Keys/FH Data/Sync Time, ANCD to ANCD
(Special Operator Task 1)
DESCRIPTION
During preparations for net opening and during periodic updating of
COMSEC keys, FH data, and sync time stored in the ANCD, it is
necessary to transfer data from one ANCD to another. If such transfers
are not made by communications specialists or designated NCOs,
operators must be able to perform this special task.
DETAILED FLOWCHART
Operators perform the actions required in each subtask, in the order
shown. Results are shown as ANCD displays (dark bordered boxes: or
as RT displays in the form of “RT display shows...” Where appropriate,
results are expressed as explanations of occurrences.
SUBTASKS
a. Prepare Source ANCD for
COMSEC/FH transfer
ACTIONS
(1)
Turn Source ANCD ON
select:
Soi Radio sUpervisor
(2) Enter RADIO
Send Receive Database
sEtup Comsec Time
(3) Enter SEND
send to:
Radio Ancd Stu PC
(4) Enter ANCD
Loadset Database* Time
Eset
Mwod**
Key
(5) Enter DATABASE
Do you want to include time?
(Y/N)
(6) Respond YES
b.
Prepare Target ANCD for
COMSEC/FH transfer
(1)
Turn Target ANCD ON
Connect to ANCD and press
[SEND] (WAIT)***
select:
Soi Radio sUpervisor
(2) Enter RADIO
Send Receive Database
sEtup Comsec Time
(3) Enter RECEIVE
receive:
Ancd Cfd Stu PC Mx
5-45
TM
11-5820-890-10-8
ACTIONS
SUBTASKS
c. Transfer COMSEC/FH
Data/Sync Time
RESULTS
(4) Enter ANCD
Loadset Database* Time
Mwod**
Eset
Key
(5) Enter DATABASE
Do you want to delete FH and
COMSEC data?****
(6) Respond YES
Connect to ANCD and press
[RCV] (WAIT)***
(1)
Transfer in progress
Press [SEND] on Source
ANCD
Transfer successful
(2)
Within 20 seconds, press
[RCV] on Target ANCD
Transfer in progress
Transfer successful
*
You must enter “DATABASE” in order to proceed.
**
MWOD (Multiple Word Of Day) is a term used in the loading procedure for the Have
Quick radio found in selected aircraft.
***
Do not press [SEND] on Source ANCD until you are ready to press [RCV] on Target
ANCD; then press [RCV] within about 20 seconds of pressing [SEND].
****
You must enter YES in order to proceed.
NOTE:
You can c/ear your ANCD of COMSEC/FH data/sync lime by performing steps b(l)
through b(5), above.
5-46
(Y/N)
TM 11-5820-890-10-8
5.5d.
Transfer QREF SOI Information, ANCD to ANCD (Special Operator Task 2)
DESCRIPTION
This task is required in preparation for unit operations. SOI information
is passed from the brigade or higher LCU operator down to unit Signal
Officers and NCSs who develop unit-specific Quick Reference
Dissemination within units is
(QREF) files for operator use.*
accomplished by transferring SOI information from one ANCD to
another. When this special task in not performed by communications
specialists or designated NCOs, operators must be trained to perform
the data transfer. Operators who are expected to perform Special
Operator Task 1 should also be trained in this task.
DETAILED FLOWCHART
SUBTASKS
a. Prepare Source ANCD
for QREF SOI transfer
ACTIONS
(1)
Turn ANCD ON
RESULTS
select:
Soi Radio sUpervisor
(2) Enter SOI
qRef Group Net sufX Pyro
Tmpd Set C/s Find Memo
(3) Enter SET
select:
Choose Send Receive
(4) Enter SEND
Scroll (↓/↑) and press
ENTR to select SOI Set
[↓ ]
Press down arrow and
scroll to set desired
Set: (name/nr)
Edn: (name/ (tp)
[ENTR]
Press ENTR to select
Do you want to transfer
QREF?**
(Y/N)
(5)
(6)
(7) Respond YES
send to:
Ancd PC Broadcast Stu
(8) Enter ANCD
Connect ANCD to ANCD
(9)
Connect ANCDs and
press down arrow
Press [SEND] to send
(WAIT)***
5-47
TM
11-5820-890-10-8
ACTIONS
SUBTASKS
b. Prepare Target ANCD
for QREF SOI transfer
RESULTS
(1) Turn ANCD ON
select:
Soi Radio supervisor
(2) Enter SOI
qRef Group Net sufX Pyro
Tmpd Set C/s Find Memo
(3)
Enter SET
select:
Choose Send Receive
(4) Enter RECEIVE
receive from:
Ancd PC Broadcast Stu
(5) Enter ANCD
Connect ANCD to ANCD
[↓]
c. Transfer QREF SOI
from ANCD to ANCD
(6) Press down arrow
Press [RCV] to receive
(WAIT)***
(1)
Processing. Please wait.
(shows % of bytes sent)
Press [SEND] on Source
ANCD
Sending of SOI data is
completed
(2)
Within 20 seconds, press
[RCV] on Target ANCD
Processing. Please wait.
(shows number of bytes sent)
Receive operation was
successful
*
To develop a QREF file, merely scroll to the SO/ items desired and press “K” (for KEEP)
to place each item in the QREF file.
**
You must respond YES to proceed. (This screen appears only if a QREF file is stored in
your ANCD.)
***
Do not press [SEND] on Source ANCD until you are ready to press (RCV] on Target
ANCD; then press [RCV] within about 20 seconds of pressing (SEND].
NOTE:
5-48
See Special Operator Task 2 (Alternate) if you wish to transfer a full SOI information file.
TM 11-5820-890-10-8
5.5e.
Transfer Full SOI Information, ANCD to ANCD
(Special Operator Task 2 Alternate)
DESCRIPTION
Although the principal SOI transfer task involves only QREF files, there
are operators who will require full SOI information. Special Operator
Task 2 Alternate is a variation of Task 2, allowing transfer of complete
SOI files. Dissemination within the unit is still accomplished by
transferring SOI information for one ANCD to another. When this
special task is not performed by communications specialists or
designated NCOs, operators who need the full SOI information file
must be trained to perform this task.
DETAILED FLOWCHART
SUBTASKS
a. Prepare Source ANCD
for full SOI transfer
ACTIONS
RESULTS
(1) Turn ANCD ON
select:
Soi Radio supervisor
(2) Enter SOI
qRef Group Net sufX Pyro
Tmpd Set C/s Find Memo
(3) Enter SET
select:
Choose Send Receive
(4) Enter SEND
Scroll (¯/-) and press ENTR to select
Set
[↓]
(5)
Press down arrow and
scroll to set desired
Set: (name/nr)
Edn: (name)/(tp)
[ENTR]
Press ENTR to select
* Do you want to transfer
QREF?
(Y/N)
(6)
(7) Respond NO
* Do you want to specify groups to
send?
(Y/N)
(8) Respond NO
* Do you want to specify a time pd to
send?
(Y/N)
(9) Respond NO
* Include Suffix & Smoke/Pyro
data?
(10) Respond YES
send to:
Ancd PC Broadcast Stu
(11) Enter ANCD
Connect ANCD to ANCD
(Y/N)
[↓]
5-49
TM 11-5820-890-10-8
ACTIONS
SUBTASKS
b.
Prepare Target ANCD to
full SOI transfer
RESULTS
(12) Connect ANCDs and
press down arrow
Press [SEND] to send
(WAIT)***
(1) Turn ANCD ON
select:
Soi Radio sUpervisor
(2) Enter SOI
qRef Group Net sufX Pyro
Tmpd Set C/s Find Memo
select:
Choose Send Receive
receive from:
Ancd PC Broadcast Stu
(5) Enter ANCD
Connect ANCD to ANCD
Press [RCV] to receive
(WAIT)***
c. Transfer full SOI from
ANCD to ANCD
(1) Press [SEND] on
Source ANCD
Processing. Please wait.
(shows % of bytes sent)
Sending of SOI data is
completed
(2)
Press [RCV] on Target
ANCD
Processing. Please wait.
(shows number of bytes sent)
*
These screens appear only when related data is stored in the ANCD.
**
You must respond NO; you can transfer either a FULL or QREF SOI, but not at the same
time.
***
Do not press [SEND] on Source ANCD until you are ready to press [RCV] on Target
ANCD; then press [RCV] within about 20 seconds of pressing [SEND].
5-50
TM 11-5820-890-10-8
5.5f.
Perform Cold Start Net Opening (Special Operator Task 3)
DESCRIPTION
Operators will be required to perform this special task only if the NCS
elects to use the Cold Start net opening procedure. Hot Start is the
more commonly used net opening procedure. Cold Start procedures
require operators to load their radios with COMSEC keys and FH data,
stand by at the prescribed time, communicate with the NCS on the
MAN channel, set RT FCTN to LD, note when ERF is received, and
press STO and channel number to retain data. Any failure in the ERF
process prevents the operator concerned from communicating in the
frequency hopping mode. Because the Cold Start procedure is more
demanding in coordination and operator requirements, units normally
use the Hot Start procedure.
DETAILED FLOWCHART
SUBTASKS
a.
Prepare radio to receive
an ERF
b. Receive and store ERF
ACTIONS
RESULTS
(1) Load MAN (SC)
frequency into RT
(See Primary Operator Task 1)
(2)
Load RT with required
COMSEC/FH data
(See Primary Operator Task 2)
(3)
Set FCTN to LD
N/A
(4)
Set COMSEC to CT*
N/A
(5)
Set CHAN to MAN
(6)
Set MODE to FH
(1) Standby until NCS
sends the ERF
(2)
Note signal display
activate
Display shows “COLD” (ready to
receive an ERF)
N/A
N/A
Display shows “HF XXX”
(3) Press STO
Display shows “STO _”
(4) Press X (1-6)
Display shows channel entered
5-51
TM 11-5820-890-10-8
ACTIONS
SUBTASKS
c. Make communications
check
(1)
Set CHAN to X (1-6)
(2)
Set FCTN to SQ ON
(3)
Call NCS (or respond to
NCS call)**
RESULTS
(Channel where ERF was stored)
N/A
Cold Start net opening is
completed
*
The net may be opening in PT if communication security is not a consideration, but use of CT
for net opening is recommended as the best course of action.
** lf you are unable to contact your NCS, or the NCS fails to contact you, switch back to the MAN
channel and standby for the NCS to contact you on that channel.
5-52
TM 11-5820-890-10-8
5.5g.
Receive Net Update ERF from NCS (Special Operator Task 4)
DESCRIPTION
This task is performed when there is a requirement to change, or
update, some element of FH data, and the operational situation makes
it impossible or impractical to disseminate the new data by physical
connection of ANCD to ANCD. In such cases, the NCS alerts net
operators that they are to receive a net update ERF Operators then
change the RT FCTN from SQ ON to LD, remaining on the operational
channel. The NCS sends the ERF on the operational channel (not on
MAN as during a Cold Start net opening). Once the net update ERF has
been sent, the new data may be made effective immediately or stored
for later implementation. ERF, Broadcast, and OTAR constitute the
means by which FH data, SOI information, and COMSEC key (TEK
only) can be transferred electronically from one location to another.
DETAILED FLOWCHART
ACTIONS
SUBTASKS
a. Prepare to receive net
update ERF
b. Receive and store net
update ERF
RESULTS
(1)
Stay on the operational
channel
N/A
(2)
Set FCTN to LD
N/A
(1)
Standby for NCS to send
net update ERF
N/A
(2) Note signal display
activate
Display shows “HF XXX”
(3) Press STO
Display shows “STO _”
(4)
Display shows “STO X: and blinks
Enter X (1-6)*
5-53
TM
11-5820-890-10-8
ACTIONS
SUBTASKS
c. Make communications
check
(1)
Set CHAN to X (1-6)
(2)
Set FCTN to SQ ON
(3)
Call NCS, or respond to
NCS call
RESULTS
(Channel in which ERF was stored)
N/A
Net update ERF is completed**
*
The NCS will direct which channel is to be used for storing the net update ERF: If the update
is effective immediately, the ERF will be stored in the operational channel. If the update is to be
made effective at a later time, a channel other than the operational channel will be used for
storage of the ERF update data.
** It is assumed that the operator has the same COMSEC key (TEK) loaded in all operational
channels of the radio. Otherwise, the operator would have to scroll the proper TEK to the new
operational channel to have secure communications.
5-54
TM 11-5820-890-10-8
5.5h.
Perform CUE and ERF Late Net Entry (Special Operator Task 5)
DESCRIPTION
This task may be required when a radio has been out of the net for
some period. or has lost its sync time. The preferred action is to try
Passive Late Net Entry first (See Primary Operator Task 4). This method
requires the operator to load CUE and MAN frequencies, “cue” the
NCS in PT, repeat the “cue” until a response is received, switch
COMSEC to CT to receive the NCS response, use single channel
mode, and receive and store an ERF when it is sent. (A simpler method
of re-entering the net when the passive method does not work is the
Hot Start procedure (See Primary Operator Task 3.)
DETAILED FLOWCHART
SUBTASKS
a. Prepare radio to perform
CUE and ERF method
b. CUE the NCS
c. Obtain ERF
ACTIONS
RESULTS
(1)
Load CUE and MAN freqs
into RT
(See Primary Operator Task 1)
(2)
Set CHAN to CUE and
COMSEC to PT
(CUE signal goes through only
when RT is set to PT)
(1)
Press PTT for 4 or 5
seconds
(There is no need to speak)
(2)
Set COMSEC to CT at
once*
(NCS/Alt NCS will respond in
CT on CUE frequency)
(3)
Wart for NCS to respond
(CUE signal goes through only
when the net is quiet)
(4)
Repeat every 15 seconds
until NCS responds
(You have no way of knowing
if net is busy or quiet)
(1) When NCS responds,
request an ERF
(Responding NCS will direct
you to the MAN channel)
(2)
(See Special Operator Task 3
for detailed procedure)
Receive and store ERF
when sent by NCS
(3) Re-enter the net
CUE and ERF late net entry is
completed
5-55
TM
11-5820-890-10-8
5.5i.
Conduct Retransmission (RXMT) Operations (Special Operator Task 6)
This special operator task may be required whenever communications
with a net station is lost, or at risk of being lost, due to distance or
physical obstacles such as hills and mountains. Communications
specialists, scouts, staff drivers, and other operators having dual radio
configurations should be trained to perform this task whenever it is
required. The task involves communications between the requesting
NCS and the RXMT site, and between the RXMT site and the distant
station. It requires the use of two net IDS, or two SC frequencies, and
physical connection of the two RXMT radios by special retransmission
cable. Radio and frequency designations are as shown in the RXMT
graphic (See Figure 5-21).
DESCRIPTION
DETAILED FLOWCHART
ACTIONS
SUBTASKS
a. Prepare to perform
RXMT mission
b. Establish comm from
RXMT site
c. Initiate RT-A to RT-B
RXMT communications
5-56
RESULTS
(1)
Obtain required SC/FH data
for RXMT operation*
(Available in ANCD for from
unit SOP)
(2)
Load RT-C and RT-D with
SC/FH data for mission
(RT-C and RT-D require
different SC freq/Net IDS)
(3)
Move to RXMT site
(LOS communications with
RT-A and RT-B are desirable)
(1)
Call NCS on F1 using RT-C
(F1 may be net operational
channel or RXMT special)
(2)
Contact distant station
(RT-B) using RT-D**
(Relocation of RXMT site may
be required to contact RT-B)
(3)
Provide ERF to RT-B if
required
(Distant station may require FH
data/sync time)
(4)
Contact RT-B on F2 using
RT-D
(Contact between RT-B and
RT-D on F2 is essential)
(1)
Install RXMT cable between
RT-C and RT-D
N/A
(2)
Set RT-C and RT-D FCTN
switches to RXMT
N/A
(3)
Set RT-C MODE to FH
(RT-A continues to be the NCS
on F1 linkage)
TM 11-5820-890-10-8
SUBTASKS
ACTIONS
RESULTS
(4)
Set RT-D MODE to FH-M
(RT-D serves as NCS on F2;
ensure RT-B is in FH)
(5)
Set RT-C and RT-D
COMSEC to CT/PT****
(See **** below for COMSEC
switch requirements)
(6)
Request RT-A (NCS) call
RT-B using RXMT setup
RXMT mission is now being
performed*****
RXMT MODE: When ASIP radios are used at the RXMT site and are temporarily taken out of the
RXMT mode, the RXMT cable must be disconnected until the radios are placed back info a RXMT
mode.
*
RXMT may be performed as FH to FH, SC to SC, or mixed FH to SC. FH to SC mode is
particularly effective when communications between a SINCGARS net and a VRC Series-12, or
similar SC net, are required.
**
The use of two OE-254 antennas, separated as widely as feasible, may be required in
order to achieve line-of-sight communications.
***
See Special Operator Task 7 for the procedure regarding sending an ERF
****
RT-1523 version of the SINCGARS radio requires that COMSEC switches of RXMT
radios be set to PT for SC-SC and FH -SC communications. (Only the “SC” RT must be in PT.) If
the net is operating in CT, the RXMT operators can monitor only the FH portion of the traffic.
*****
In RXMT mode, RT-C and RT-D provide half-duplex communication. A handset or
speaker must be connected to both RXMT radios for both sides of a communication to be heard
by RXMT operators.
Figure 5-21. RXMT Operation
5-57
TM 11-5820-890-10-8
Send an ERF as Part of RXMT Operation (Special Operator Task 7)
5.5j.
This is not a normal operator task. It is performed only as part of an
RXMT operation. When operators are required to perform RXMT
operations, it may be necessary for them to send an ERF to the distant
station in order to establish FH communications. Sending an ERF
requires the sending operator to change from FH to FH-M, with
associated risk to net sync time if the operator fails to return to FH
immediately after sending the ERF. The ERF procedure is known by all
NCS personnel, thus the RXMT operator should be able to obtain
verbal help if needed.
DESCRIPTION
DETAILED FLOWCHART
SUBTASKS
a.
ACTIONS
Obtain data to be sent
by ERF
b. Contact distant station
c.
Prepare RT to send ERF
d. Send ERF
e. Make communications
check
5-58
RESULTS
If not already loaded, load
ERF data in RT-D*
(If net ID only, see Special Operator
Task 8 for details)
Alert RT-B RXMT data is
being sent by ERF
(ERF is sent on operational channel
used for the alert)
(1)
Set FCTN to LD
N/A
(2)
Set MODE to FH-M**
N/A
(1)
Press [LOAD] on RT
keypad
Display shows “HLD _”
(2)
Enter channel where data
IS stored
Display shows “HF XXX”
(3)
Press [ERF] on RT
keypad
Display shows “SEND”
(1)
Wait for distant station
(RT-B) to store the ERF
(20-30 seconds should be adequate)
(2)
Call RT-B and confirm
that ERF was received
(Obtain ACK from all operators who
were to receive the ERF)
TM 11-5820-890-10-8
SUBTASKS
f. Resume normal
communications
ACTIONS
(1)
Change MODE from
FH-M to FH
(2)
Set FCTN to SQ ON
(3) Continue FH, CT
communications
RESULTS
(Important to get out of FH-M after
sending the ERF)**
N/A
(Task of send an ERF is complete)***
*
Any radio may be used, but in preparing for an RXMT mission, use of RT-D is
recommended.
**
Use of RT-D on F2 (See Figure 5-21) minimizes the possibility of interfering with net
sync time. Once RXMT operations begin, RT-D must be set to FH-M as shown in Special
Operator Task 6. The best rule to follow is do not transmit in the FH-M position except to send an
ERF and for RT-D during RXMT operations.
***
If common TEK, FH data, and sync time are being used, an alternate procedure is for
RXMT operator to contact RT-B on a secure FH channel and request RT-B operator to change
to a specified net ID for purpose of RXMT operation.
5-59
TM 11-5820-890-10-8
5.5k.
Change Net ID (Special Operator Task 8)
This Special Operator Task is performed when there is a requirement to
communicate with a net, or station, which is not a part of the operational
loadset, or loadsets if more than one radio is being used.
Commanders, staff officers, drivers, and others who frequently move
about the battlefield should be able to perform this task without
assistance other than reference to the Operator’s Pocket Guide. As
noted below, the RT-1523 version of the SINCGARS radio requires
use of the FH-M position in order to change a net ID, and will allow the
operator to change only the last two digits of the net ID. Despite these
differences, the procedure for changing a net ID is essentially the
same. Use of this procedure enable the operator to contact virtually
any SINCGARS station within a division.
DESCRIPTION
DETAILED FLOWCHART
SUBTASKS
a.
b.
Prepare radio for net ID
change
Enter new net ID in RT
ACTIONS
(1)
Set MODE to FH-M*
(RT-1523 only)
(2)
Set FCTN to LD
(3)
Set CHAN to 1-6
(Do not transmit while in the
FH-M position.)
N/A
(To channel where net ID to be
changed in now stored)
(1) Press [FREQ]
Display shows “F XXX”
(2) Press [CLR]
Display shows “F - - - ”
(3)
Display shows “F XXX”
Enter new net ID
(3 digits)**
(4) Press [STO]
5-60
RESULTS
Display blinks; new net ID is
now stored
TM 11-5820-890-10-8
SUBTASKS
c. Resume normal
communications
ACTIONS
RESULTS
(1) Return MODE to FH (if
set to FH-M)
N/A
(2)
Set FCTN to SQ ON
N/A
(3)
Set CHAN to 1-6 as
desired
(New net ID is now ready for use)
*
The RT-1523 version of the SINCGARS radio requires the MODE switch to be set to the
FH-M position in order to change the net ID of any channel. Skip this step unless it is required. I f
you have to switch to FH-M, be sure to return to FH as soon as the procedure for changing
net ID is completed.
** The RT-1523 version of the SINCGARS radio will allow you to change only the last two digits
of the net ID Otherwise, the procedure for changing net IDS is the same.
5-61
TM
11-5820-890-10-8
5.6.
SPECIAL OPERATOR TASKS (SlP/ASIP)
GENERAL
In addition to the eight special operator tasks, there are two Special
SIP/ASIP Operator Tasks. These special SlP/ASlP related tasks use the
SIP/ASIP RT as an RCU; and send data from one computer to another
over a SINCGARS secure, frequency hopping net using RS-232
enhanced data feature.
Use SIP/ASIP RT as an RCU (Special Operator Task 9)
5.6a.
STEP
ACTION
RESULT
1
Ensure SIP/ASIP RT and RCU(RT) are
loaded
Prepares SIP/ASIP RT and RCU(RT) for
remote operations*
2
install two-wire kink from RCU(RT)** to
remoted radio
N/A
3
Set remoted radio FCTN switch to the
REM position
This enables the RCU(RT) to control the
remoted radio
4
Set RCU(RT) FCTN switch to SQ ON
(NOTE: FCTN positions LD, SQ OFF,
and RXMT may also be used)
5
Set RCU(RT) DATA to any position
N/A
6
Press “RCU” key on RCU(RT); and
select the RCU option
“LD”, “LDE”, “RT”, “RCU”, and “EXT”
options appear in the display (For ASIP,
“EXT” is not shown.)
7
Wait for 7 seconds; then note when
RCU(RT) display blinks
The SIP/ASIP RT is now ready to
perform as an RCU(RT)
8
Set RCU(RT) FCTN switch to the REM
positron***
This enables the RCU(RT) operator to
call the REM radio operator by wire
9
Press RCU(RT) CALL key and PTT at
same time for 4-7 seconds
Producing ring tone and CALL message
at REM RT; operators can now talk via
orderwire (not secure)
10
Set RCU(RT) to SQ ON
REM radio is now controlled by the
RCU(RT)
*
For use of a SIP RT as either a manpack RCU or a manpack remoted radio, Battery Box
CY-8523A/B is required. Battery Box CY-8523C cannot be used for manpack remote
operations, ASIP RT requires a two-wire adapter.
** The Control, Receiver-Transmitter (RCU), C-11561, may continue to be used for remote
control of a SINCGARS SIP radio when used for voice and SINCGARS data modes. It cannot be
used for enhanced data modes.
*** RCU(RT) COMSEC must be set to PT to talk on orderwire.
5-62
TM
5.6b.
11-5820-890-10-8
Send Data Via RS-232 Mode (Special Operator Task 10)
STEP
ACTION
RESULT
1
Ensure computer has required
commercial communication program
loaded*
SIP/ASIP radio will except any program
offering “Xmodem”, a widely used file
transfer protocol
2
Connect cable from computer to
AUD/DATA connector on the SIP/ASIP
RT
This data method does not require
SIP/ASIP VAA functions
3
By voice, alert receiving station that data
message is to be sent via RS-232
Also, coordinate data rate to be used if
not designated by comm program or
unit SOP**
4
Select EDM rate to be used for RS-232
transmission
See*** below for steps required to
select EDM data rate
5
Using computer, prepare data message
to be sent, or load your computer with
data
N/A
6
Check net to ensure that traffic is not
heard or noted by signal display
Need clear net to ensure that data
message goes through****
7
Follow communication program
procedures to send and receive data
messages
Control is from computer: SIP/ASIP
radio serves as data communications
carrier
*
Both sending and receiving stations must use the same or compatible “Xmodem”
communication program.
** Any one of the four enhanced data rates are used for RS-232 traffic: 1200N, 2400N, 4800N,
and 9600N (BPS). Selection is based primarily upon the distance between stations. For shorter
ranges, fast rates work well. For longer ranges, slower data rates perform better. If data is sent
through an RXMT site, RXMT radios must be set to the same EDM data rate as the outstations
* * * Select data rate using PC data transfer software (i.e. Procomm), connect PC to RT via data
cable. Select “RS-232” on RT; press ENTER on PC; PC should indicate the RT connected at xxxx,
the PC rate you selected. If a problem is encountered repeat above steps.
**** If voice mode has priority of use in your net, it may be necessary to wait for a quiet period to
send data messages. (Pressing PTT will not interupt data traffic. Doing so merely stops the
receipt of traffic at your radio).
6-63
TM 11-5820-890-10-8
5.7.
OTHER OPERATOR PROCEDURES
5.7a.
Battery Life Condition Indicator
MANPACK RADIOS
Manpack and dismount radios are battery powered. A “Battery Life
Indicator” built into the SINCGARS RT will give you an estimate of
battery usage which you must convert into an estimate of remaining
battery life.
DURING ASSEMBLY
During radio assembly, note if the main power battery is new or used. If
it is used, note the number written on the side of the battery.
IF USED BATTERY
If battery IS used, upon completion of radio assembly, load battery life
indicator (number on side of battery). No action required if battery is
new.
Set FCTN to LD, press BATT, note 00 in display, press CLR, enter
battery life indicator number, and press STO.
Battery life Indicator of used battery has now been entered into the
RT
During radio operation, you can determine an estimated status of
main battery power by following these steps.
With FCTN at SQ ON, press BATT and read battery life indicator.
A reading of 11 or higher may mean that your main battery is
nearing exhaustion. (This reading is at best a estimate based on
usage computations by the RT.)
IN COMBAT
During combat and operational missions, you may want to replace the
main battery when the battery life indicator reads 11 or higher for
RT-1523/A/B/C/D (See Figure 5-23), or 1/8 for RT-1523E, or you
may wait until your battery is exhausted before changing it. (One
indicator of a weak manpack radio battery is a signal strength display
reading of 3 or less when you PTT with RF PWR set to HI.)
FOR TRAINING
For training, continue to use your main power battery until it is
exhausted. (This is to save batteries and money.)
RECORDING USAGE
Upon completing a mission, when the main battery is to be removed,
note and record battery life on the side of the battery. The Battery Life
Indicator must be read before FCTN is set to OFF, or battery life
data will be lost.
5-64
TM 11-5820-890-10-8
HUB ROLE
In combat or training, remember that with a good HUB battery installed,
your RT will retain all stored data while you replace the main battery.
The ASIP RT does not have a HUB battery, it contains circuitry that
retains fill for 15 minutes after main power is lost (either turning off
vehicular power or changing battery). A HUB inser has been designed
for vehicular applications that will accommodate a BA-5372 or AA
batteries. The insert will insure that fill will be retained during periods
that vehicular power is turned off (listening silence or other mission
requirements).
Figure 5-22. HUB Insert
5-65
TM 11-5820-890-10-8
WORST CASE
Remember also that in the absolute worst case where you lose main
power and your HUB is dead, all you have to do is perform an ICOM fill,
including sync time, using your ANCD
The RT computes the
condition by
battery
measuring the time spent in
the receive and transmit
modes. Operating the RT in
receive m o d e f o r 2 1 0
minutes
increases
the
battery condition value by
one. Transmitting for 24
minutes also increases the
value by one. The battery
should be replaced when
the value is 11. The Battery
Life Indicator uses 12 to
indicate
the
power
exhaustion point, not hours.
For estimated hours of
battery life for different
uses, see Chapter 8. This
clock shows that for normal
(9:1 duty cycle) operations,
a reading of 3 means you
have used about 1/4 of your
battery, a reading of 6
means half the power has
been used up, 9 indicates it
is 3/4 gone, and 12
represents
exhaustion.
These are rough estimates
only, and they apply to
operators, not NCS or other
heavy radio users. A 6 could
mean power exhaustion for
a manpack NCS operator.
Figure 5-23. Battery Life Indicator Chart
5-66
TM 11-5820-890-10-8
5.7b.
Loading and Clearing Offset Frequencies
DEFINITION
The SINCGARS radio allows single channel frequencies to be offset by
plus or minus 5 or 10 KHz. When operating in the single channel mode,
this capability can be employed to help work through jamming or other
interferences.
LOADING PROCEDURE
Use the following procedure to load an offset frequency.
Load regular SC frequency (Primary Operator Task 1).
Set FCTN to SQ ON and CHAN to one to be offset
Press FREQ, then OFST, then CHG until desired offset is shown in
RT display.
CLEARING PROCEDURE
Use the following procedure to clear an offset frequency
Set FCTN to SQ ON and CHAN to one to be cleared.
Press FREQ, then OFST then CHG until RT display shows “00.”
5.7c.
Scrolling COMSEC Keys
DEFINITION
The SINCGARS radio allows you to move COMSEC keys about in
channels 1 through 5, in both SC and FH modes of communication.
This movement is called scrolling.
USE OF LOADSETS
With normal use of loadsets which align channels and COMSEC keys
according to unit needs, there is limited requirement to scroll TEKs.
EXAMPLE OF NEED
When you change net ID to contact a station in a division other than
your own, you will normally need to use that division’s TEK.
EXAMPLE OF USE
You anticipated this need and loaded the additional TEK in your
channel 5, the least used net of the loadset. To contact the other
division, you change the net ID in channel 2, and scroll TEK 5 to
CHAN 2.
SCROLL PROCEDURE
Use the following procedure to scroll TEK from one channel to another
(1-5 only; KEK cannot be moved out of channel 6.)
Set CHAN to the channel to be used.
Press CMSC (RT display shows current TEK).
Press CHG until desired TEK appears.
If COMSEC alarm is heard, press PTT twice to clear it.
Changing CHAN switch to another channel automatically returns
TEKs to their original position.
5-67
TM
11-5820-890-10-8
5.7d.
Scanning Capability
DEFINITION
The SINCGARS radio has the ability to scan up to eight single channel
frequencies ( CUE, MAN, and CHAN 1-6). When a signal is found, the
RT will lock in on that channel, and the RT display show the number of
that channel. As an operator, you can both receive and transmit on the
locked channel. When the channel has been inactive for 2.5 seconds,
the RT will automatically resume scanning.
TO START SCANNING
To start scanning, follow this procedure
Set CHAN to CUE, FCTN to SQ ON, MODE to FH, and COMSEC
to CT or PT as desired.
Press STO; RT display will show “SCAN _".
Enter the number 8 to scan all channels at the same priority. Enter
the number 0 thru 7 to establish priority for that channel. The
priority channel will be scanned more often than other channels.
RT display will show the number you entered, and scanning will
begin.
To resume scanning while a channel is locked in, press FREQ.
TO TRANSMIT
To transmit on a locked in channel, press PTT within 2.5 seconds after
net clears (or scanning will automatically resume).
To select a channel to transmit on, use RT keypad to enter desired
channel number, and channel selected will appear in the RT display..
Press PTT within 2.5 seconds of channel number appearing in display.
To transmit on the priority channel you selected, merely press PTT, and
RT display will show “CH X”, and you are ready to transmit.
TO CHECK FREQUENCY
To determine the frequency of a locked in channel, press STO, and
frequency will be shown in RT display.
TO CANCEL CHANNEL
To delete a channel from the scan sequence, enter the channel number
using the keypad, and press CLR. Scanning will resume less the
deleted channel.
TO RESTORE CHANNEL
To restore a deleted channel, enter channel number using the RT
keypad, display will show CH X, and restored channel will be included
in scanning sequence.
TO STOP SCANNING
To stop scanning, merely set CHAN from CUE to another position.
5-68
TM 11-5820-890-10-8
5.7e.
Jamming and Anti-Jamming Actions
DEFINITION
Jamming is the intentional transmission of signals that interrupt your
ability to transmit and receive. Interference is the accidental disruption
of communications by friendly sources. For practical purposes, the
following coverage of jamming includes both situations. Anti-jamming
includes any corrective action taken by the operator to work through
intentional jamming and accidental interference.
IDENTIFICATION
If you are being jammed, you may hear strong static, strange noises,
random noise, or no noise or signals at all. If you suspect you are being
jammed, look for one of the specific symptoms shown in the table
below.
SC OPERATIONS
Jamming/anti-jamming procedures for SC mode of operations are as
shown in the chart below.
JAMMING/ANTI-JAMMING PROCEDURES; SC MODE OF OPERATIONS
SYMPTOM
You hear no traffic, and you are not
transmitting. SIG display is lit and
shows a signal higher than LO.
POSSIBILITIES
ACTIONS
Your handset could be stuck,
producing a “hot mike”
situation.
Press PTT several times to free up
mike. If necessary, replace
handset with known good one.
You are being jammed. In SQ
OFF, you hear strong static or
random noise. When antenna
is disconnected, SIG display
drops and noise disappears or
is reduced.
If feasible, try to place an obstacle
between you and the enemy.
Notify your supervisor and, if
appropriate, prepare a MIJI
feeder report.
Your RT is faulty or locked up.
With handset and antenna
disconnected, your SIG display
remains lit and above LO.
Set RT FCTN to STBY position
and then back to SQ ON. If
problem continues, contact your
unit maintenance.
You hear random radio traffic. Your
SIG display is lit and shows a
signal higher than LO.
You are experiencing friendly or
enemy radio interference.
Set RT FCTN to SQ OFF and try
to communicate. Change to a
longer range antenna. If feasible,
try to place an obstacle between
you and the source of
interference. Advise NCS of your
problem.
You may or may not hear any
noise SIG display goes on and off
at regular intervals or in random
order.
You are probably experiencing
enemy sweep jamming.
Set RT FCTN to SQ OFF, and you
hear noise or static each time the
SIG display lights. If feasible, try
to place an obstacle between you
and the enemy. Advise NCS of
your problem
5-69
TM 11-5820-890-10-8
FH OPERATIONS
Jamming/anti-jamming procedures for FH operations are shown in
the chart below.
JAMMING/ANTI-JAMMING PROCEDURES; FH MODE OF OPERATIONS
SYMPTOM
POSSIBILITIES
ACTIONS
You hear loud noise or strong static
making net traffic difficult to
impossible to hear. Your SIG
display remains on or goes on and
off at regular intervals. Signal
strength is greater than LO.
You are being jammed if
disconnecting the antenna
causes the SIG display to drop
to LO and noise level is
reduced.
If feasible, try to place an obstacle
between you and the enemy.
Advise NCS of your problem.
You may be experiencing
interference from a friendly
communication system (called
a co-site problem).
Try to get interfering system shut
down momentarily to determine if
it is the source of your problem. If
it is, change your location, remote
your antenna or RT or try to place
an obstacle between you and the
interfering station.
There is a captured RT in your
net, constantly transmitting to
act as a jammer.
Press your PTT two times. Net
should clear. Advise NCS of your
action.
There is a stuck mike or bad
handset in you net that is
locked in the PTT position.
Press your PTT two times. Net
should clear. Advise NCS of your
action.
Your own handset is stuck if
you hear sidetone without
pressing PTT SIG display
drops to LO or below when
handset is disconnected.
Free up PTT or replace handset
with a known good one.
You are probably experiencing
co-site interference from a
friendly radio.
Identify interfering radio and
request operator to reduce RF
PWR setting, move your radio at
least 50 meters, or remote your
RT or antenna. Advise NCS of
your action.
You hear a constant hiss or
background noise in the handset
but no loud noise or net traffic.
You hear background popping or
static when receiving, and your
operating range is reduced. Your
SIG display is flickering.
5-70
TM 11-5820-890-10-8
CHAPTER 6
NET CONTROL STATION (NCS) TASKS
IN THIS CHAPTER:
6.1
GENERAL . . . . . . . . . . . . . . . . . . . . . . . . . . . . . . . . . . . . . . . . . . . . . . . . . . . . . . . 6 - 2
6.2
NCS RESPONSIBILITIES . . . . . . . . . . . . . . . . . . . . . . . . . . . . . . . . . . . . . . . . . 6 - 3
6.3
PRIMARY NCS TASKS . . . . . . . . . . . . . . . . . . . . . . . . . . . . . . . . . . . . . . . . . . .
a.
Definition of Primary NCS Tasks . . . . . . . . . . . . . . . . . . . . . . . . . . . . . . . .
b. Summary of Primary NCS Tasks . . . . . . . . . . . . . . . . . . . . . . . . . . . . . . . .
c.
Transfer Partial COMSEC/FH Data, ANCD to ANCD
(Primary NCS Task 1) . . . . . . . . . . . . . . . . . . . . . . . . . . . . . . . . . . . . .
d. Transfer COMSEC Key from ANCD to RT (NCS Option IA) . . . . . . . . .
e.
Designate New Default Loadset (NCS Option 1B) . . . . . . . . . . . . . . . . .
f.
Change Eset in One Channel (NCS Option 1C) . . . . . . . . . . . . . . . . . . .
g. Transfer Selected SOI Information, ANCD to ANCD
(Primary NCS Task 2) . . . . . . . . . . . . . . . . . . . . . . . . . . . . . . . . . . . . .
h.
Conduct Hot Start Net Opening (Primary NCS Task 3) . . . . . . . . . . . . .
i.
Conduct Cold Start Net Opening (Primary NCS Task 4) . . . . . . . . . . . .
Respond to CUE Calls (Primary NCS Task 5) . . . . . . . . . . . . . . . . . . . . .
j.
6.4
SPECIAL NCS TASKS . . . . . . . . . . . . . . . . . . . . . . . . . . . . . . . . . . . . . . . . . . . .
a.
Definition of Special NCS Tasks . . . . . . . . . . . . . . . . . . . . . . . . . . . . . . . .
b. Summary of Special NCS Tasks . . . . . . . . . . . . . . . . . . . . . . . . . . . . . . . .
c.
Transmit Updated FH Data via Net Update ERF
(Special NCS Task 1) . . . . . . . . . . . . . . . . . . . . . . . . . . . . . . . . . . . . .
d. Transmit SOI Information Using Broadcast Mode
(Special NCS Task 2) . . . . . . . . . . . . . . . . . . . . . . . . . . . . . . . . . . . . .
e.
Send TEK to Other NCSs Using MK Method of OTAR
(Special NCS Task 3) . . . . . . . . . . . . . . . . . . . . . . . . . . . . . . . . . . . . .
f.
Send TEK to Net Operators Using AK Method of OTAR
(Special NCS Task 4) . . . . . . . . . . . . . . . . . . . . . . . . . . . . . . . . . . . . .
Receive and Store TEK Sent by MK Method of OTAR
g.
(Special NCS Task 5) . . . . . . . . . . . . . . . . . . . . . . . . . . . . . . . . . . . . .
6-6
6-6
6-6
6-7
6-9
6-10
6-11
6-12
6-14
6-15
6-17
6-18
6-18
6-18
6-19
6-21
6-24
6-26
6-29
6-1
TM 11-5820-890-10-8
6.1.
GENERAL
CONTROL
The SINCGARS radio employs keys and variables to provide secure,
frequency hopping communications. The big advantage is that the
enemy cannot read your traffic, cannot locate your position through
direction finding, and has great difficulty in trying to jam your
communications, Control is the price to be paid for these advantages.
Each radio in a net must have the same COMSEC keys, FH data, and
sync time in order to communicate. It is the Net Control Station that
provides the required degree of control.
TASK DIVISION
NCS tasks are divided into two groups: primary and special. Primary
tasks are those that NCS personnel may be called upon to perform at
any time. The second category, special, includes tasks that may or
may not be performed depending upon command policy, tactical
situation, and state of training.
TRAINING MATERIALS
As with the job of the SINCGARS operator, the job of the NCS has also
been simplified by the statement of task procedures in clear, easy to
follow, steps. And, like the operator, the NCS is provided a small pocket
guide containing abbreviated task procedures for all operator
requirements, plus primary NCS tasks. This pocket guide serves as a
memory jogger for the trained NCS operator, precluding any need to
memorize any aspect of SINCGARS radio operation.
6-2
TM 11-5820-890-10-8
6.2.
NCS RESPONSIBILITIES
NET OPENING
It is the NCS who is responsible for opening the secure, frequency
hopping SINCGARS net. Net opening time is announced in advance to
enable operators to make proper preparations. The NCS ensures that
the net is up and fully operational in time to support unit mission
communications requirements.
ANCD
As the principal supervisor of the net, the NCS ensures that all net
operators have ready access to a fully loaded ANCD containing the
prescribed COMSEC keys, FH data (hopset, TSK, and net IDS, and
GPS-based sync time to support net opening preparations.
ASSEMBLY
NCS personnel are expected to properly assemble their own manpack
radios and install their own required vehicular radio components in
preparation for net opening.
This includes connecting cables,
antennas, handsets, loudspeakers, and any other components that
are to be used.
CAUTION
YOUR RT CAN BE DAMAGED BY
IMPROPER ATTACHMENT OF MANPACK ANTENNAS
1. To avoid damage, turn the sleeve only, not the antenna.
2. Turning the antenna can destroy the antenna connector in the RT
6-3
TM 11-5820-890-10-8
PMCS
In that NCS personnel are also operators, they are required to perform
Before Operation Preventive Maintenance Checks and Services
(PMCS), as shown in Chapter 8. Performing PMCS involves checks of
controls, cables, antennas, power source, self-test, keypad, data
loading, and ability to communicate. By performing PMCS, NCS
personnel are assured that all components of their radios are working
properly, or that something needs to be fixed, by the NCS operator or
unit maintenance. The PMCS charts found in Chapter 8 should be
followed exactly in the performance of PMCS. No NCS operator action
will pay greater dividends.
LOADING RT
When they are satisfied with the results of Before Operation PMCS
actions, NCS personnel load their own radios with data and sync time,
in preparation for net opening. The first three Primary Operator Tasks
provide detailed procedures.
NET DISCIPLINE
It falls to the NCS to maintain net discipline. This responsibility includes
controlling access to the net, maintaining an informal record of which
stations are in the net, and ensuring that messages are as brief as
possible and use proper language.
SYNC TIME
In that it is the NCS radio, set to the FH-M mode position, that
automatically keeps all of the net radios within the plus or minus 4
second window required for frequency hopping, the NCS must
transmit as often as necessary to maintain net sync time. A general rule
is for the NCS to transmit at least once every 24 hours in a very quiet net
and about every half hour in a heavy traffic net.
6-4
TM 11-5820-890-10-8
CUE RESPONSE
The NCS or an Alternate NCS is responsible for responding to “CUE”
calls. A CUE caller is one who needs an ERF to get back into the
secure, FH net, or one who has a VRC-12 type radio and must use the
SC mode to communicate. By not loading the CUE frequency, net
operators are spared the distraction of “CUE” messages appearing in
their RT displays, Also, if the enemy is credited with direction finding
capability, the NCS station that responds to a CUE call using single
channel mode, should displace Immediately after completing the CUE
response.
RXMT OPERATIONS
It is the NCS who must anticipate the need for RXMT operations, alert
the RXMT crew in time for them to make preparations and move to the
RXMT site, and maintain RXMT communications with the distant
station. It is the NCS who will also make use of RXMT capabilities to
communicate between a frequency hopping and single channel net.
ALTERNATE NCS
The NCS has a full time job maintaining net discipline and controlling
the net. An important NCS requirement is to make proper use of
Alternate NCS stations for critical functions such as responding to CUE
calls, entering late members into the net, and continuing to use old data
until all net members have changed over to updated data.
UPDATES
For periodic updates, the NCS assists the unit Signal Officer in the task
of getting some ANCDs reloaded and new data manually distributed to
net operators. On those special occasions when it is impossible or
impractical to physically disseminate new data, it falls to the NCS to
transmit TEKs, FH data, or SOI information by electronic transfer
means. Depending upon the state of training and extent of experience,
it may be necessary for the unit Signal Officer and communications
specialists to assist NCSs in the use of electronic transfer procedures.
SUMMARY OF TRANSFER METHODS
TYPE OF DATA
MODE OF
DISTRIBUTION
FH
COM
DATA
SEC
SOI
NET SYNC LOCK HOP
ID
TIME OUT
SOI
SET
TSK
TEK
KEK EXT
PHYSICAL
YES
YES
YES
YES
YES
YES
YES
YES
ERF
YES
YES
YES
YES
YES
NO
NO
NO
BROADCAST
NO
NO
NO
NO
NO
NO
NO
YES
OTAR
NO
NO
NO
NO
NO
YES
NO*
NO
Figure 7-1. Summary of Transfer Methods
*
Although the KEK in receiving radios is automatically updated during an AK OTAR transfer, a
KEK cannot be electronically transferred from one location to another:
6-5
TM 11-5820-890-10-8
6.3.
PRIMARY NCS TASKS
6.3a.
Definition of Primary NCS Tasks
WHAT ARE THEY?
There are five tasks categorized as primary for SINCGARS NCS
personnel. These five tasks, along with both Primary and Special
Operator Tasks, enable a SINCGARS NCS to meet all normal
communications requirements when the unit is in an operational
situation.
WHAT’S INVOLVED?
These five primary tasks involve partial transfer of COMSEC/FH
data/SOl information from one ANCD to another: both Hot and Cold
Start methods of net opening, and responding to CUE calls.
WHAT’S REQUIRED?
All NCS personnel are expected to be able to perform these five primary
tasks without assistance, other than reference to the NCS Pocket
Guide, TM 11-5820-890-10-7. Operator Preventive Maintenance
Checks and Services (PMCS) (see Chapter 8) are to be performed prior
to performing operator or NCS tasks.
6.3b.
Summary of Primary NCS Tasks
PRIMARY TASK 1:
Transfer Partial COMSEC/FH Data, ANCD to ANCD
Used to download selected COMSEC keys or FH data elements from
one ANCD to another. This task supplements Special Operator Task 1,
“Transfer COMSEC/FH Data From ANCD to ANCD,” which transfers
complete data loads.
PRIMARY TASK 2:
Transfer Selected SOI Information, ANCD to ANCD
Used when less than a complete SOI load is to be downloaded from
one ANCD to another. This task supplements Special Operator Task 2
Alternate, “Transfer Full SOI information From ANCD to ANCD,” which
transfers the complete SOI file.
PRIMARY TASK 3:
Conduct Hot Start Net Opening
This is the principal method used for net openings; operators load all
required data and sync time and, at the prescribed net opening time,
call the NCS and enter the secure. FH net.
PRIMARY TASK 4:
Conduct Cold Start Net Opening
This is an alternate method for opening the net. It requires operators to
load COMSEC and FH data, standby to receive an ERF containing sync
time, and properly storing the ERF It requires close coordination and
correct operator actions. It may be used in situations where the NCS
wants all operators to enter the net at the exact same time.
PRIMARY TASK 5:
Respond to CUE Calls
This task is performed whenever the “CUE” message appears in the
NCS’s RT display. In that response to a CUE message requires leaving
the operational net, transmitting in SC mode, possibly sending an ERF,
and probably displacing physically to avoid enemy direction finding,
the NCS designates an Alternate NCS to respond to the CUE call.
6-6
TM 11-5820-890-10-8
6.3c.
Transfer Partial COMSEC/FH Data, ANCD to ANCD (Primary NCS Task 1)
DESCRIPTION
In addition to transferring complete SOI files, quick reference or full
SOIs, an NCS is expected to be able to transfer partial data loads. For
example, performance of this task enables the NCS to transfer specific
loadsets, Esets, COMSEC keys, TSKs, or sync time from one ANCD to
another, This capability facilitates dissemination within the unit when
less than total data is required. There are three options associated with
this task, allowing the NCS to perform selected special functions.
DETAILED FLOWCHART
NCS personnel perform the actions required in each subtask. in the
order shown. Results are shown as ANCD displays (dark bordered
boxes), or as RT displays in the form of “RT display shows.” Where
appropriate, results are expressed as explanations of occurrences.
TRANSFER PARTIAL COMSEC/FH DATA, ANCD TO ANCD
SUBTASKS
a.
Prepare Source ANCD for
partial data transfer*
ACTIONS
RESULTS
(1) Turn ANCD ON
select.
Soi Radio sUpervisor
(2) Enter RADIO
Send Receive Database
sEtup Comsec Time
(3)
Enter SEND
send to:
Radio Ancd Stu PC
(4) Enter ANCD
Loadset** Database Time**
Key** Eset** Mwod***
(5) Enter LOADSET
select: Loadset
(name) ENTR
(6) Scroll (PgUP/PgDN) to
loadset desired, ENTR
Do you want to include time?
(Y/N)
(7)
Connect to ANCD and press
[SEND] (WAIT)****
Respond YES (unless you
want to omit time)
6-7
TM
11-5820-890-10-8
ACTIONS
SUBTASKS
b. Prepare Target ANCD for
partial data transfer
c. Perform data transfer
RESULTS
(1) Turn ANCD ON
select:
Soi Radio supervisor
(2) Enter RADIO
Send Receive Database
sEtup Comsec Time
(3) Enter RECEIVE
receive from:
Ancd Cfd Stu PC Mx
(4) Enter ANCD
Loadset Database Time
Key Eset Mwod***
(5) Enter LOADSET
Connect to ANCD and press
[RCV] (WAIT)****
(1)
Press [SEND] on Source
ANCD
Transfer successful
Press [RCV] on Target
ANCD
select: Replace iNsert
(data item name)*****
(2)
(3) Enter REPLACE
[↓]
Transfer successful
(Task IS completed)
*
When replacing or overwriting keys, new COMSEC and FH data must be named the
same as those to be replaced or overwritten.
**
You may select Loadset, Eset, Key, or Time. The item selected for transfer to the Target
ANCD must be the same as that selected for the Source ANCD.
***
MWOD (multiple word of day) is a term used in loading procedure for Have Quick
radios found in selected aircraft radios.
****
Do not press [SEND] until ready to press [RCV]. Then press [RCV] within 20 seconds
of pressing [SEND].
*****
6-8
This screen will appear only if the data item name exists in the Target ANCD.
TM
6.3d.
11-5820-890-10-8
Transfer COMSEC Key From ANCD to RT (NCS Option 1A)
DESCRIPTION
This optional task enables an NCS to transfer COMSEC keys from an
ANCD to a SINCGARS radio. It is a variation of Primary NCS Task 1.
Although the flowchart below shows the detailed procedure for transfer
of a COMSEC key to an RT, this procedure can also be used to transfer
COMSEC keys from an ANCD to a KYK-13 or KYX-15 if desired.
DETAILED FLOWCHART
TRANSFER COMSEC KEY FROM ANCD TO RT
*
Remember that CUE and MAN channels use the TEK in channel 5. Do not change this key
unless you are sure the new key is to be used for CUE and MAN channels also.
**
Connect ANCD to RT, or to KYK-13 or KYX-15.
*** The same procedure may be used for COMSEC devices.
6-9
TM
11-5820-890-10-8
Designate New Default Loadset (NCS Option 1B)
6.3e.
This optional task allows an NCS to change the designation of the
default loadset stored in the ANCD. This function is useful during
periodic updating, for example, when the current loadset is to be
replace by one which was carried in reserve in the ANCD database. By
changing the default, the NCS makes it easy for operators or
communications specialists to transfer a new loadset to other ANCDs
of the unit, or to load the default loadset into radios.
DESCRIPTION
DETAILED FLOWCHART
DESIGNATE NEW DEFAULT LOADSET
Change default loadset
RESULTS
ACTIONS
SUBTASKS
(1) Turn ANCD ON
select:
Soi Radio supervisor
(2) Enter RADIO
Send Receive Database
sEtup Comsec Time
(3) Enter SETUP
select:
iCom
Nonicom
(4) Enter ICOM*
select: Loadset None
(5) Enter LOADSET
select: Loadset
ENTR
(name)
(6)
Select loadset and press
ENTR***
(7) Press ABORT
(DI)**
Select:
Nonicom
iCom
Send Receive Database
sEtup Comsec Time
*
Also use lCOM designation when preparing to fill an RCU.
**
Loadsets are identified with a “D” indicating defaultloadset, followed by an “I” for lCOM
or an “N” for Non-ICOM.
* * *
6-10
ICOM fill will now load new/y designated loadset.
TM 11-5820-890-10-8
6.3f.
Change Eset in One Channel of RT (NCS Option 1C)
DESCRIPTION
This optional task enables the NCS to change or replace the Eset (FH
data) in one channel of the radio. The preferred solution to this change
requirement is to load a new loadset. When loading a new loadset is
infeasible, this procedure allows the FH data in one channel of the radio
to be changed without interfering with other channel loadings.
DETAILED FLOWCHART
CHANGE ESET IN ONE CHANNEL OF RT
SUBTASKS
Change Eset in one
channel of loadset
ACTIONS
RESULTS
(1) Turn ANCD ON
select:
Soi Radio supervisor
(2) Enter RADIO
Send Receive Database
sEtup Comsec Time
(3) Enter DATABASE
select: Display Modify
Remove Copy build*
(4) Enter MODIFY
select: Loadset
(name) ENTR (DI)
(5)
Select loadset and
press ENTR
Replace Delete
ESET #: (name)**
Enter REPLACE, select
ESET, and press ENTR
select: Eset
(6)
(7) Enter ESET
(8)
Select new Eset and
press ENTR
(9) Respond NO
ENTR
qUit
select: Eset
(name)***
ENTR
Modify another loadset
element?
(Y/N)
select: Replace iNsert
(name)
*
The “bUild” feature should not be used unless you are specifically trained to perform this
task. Serious database errors can occur if incorrect procedures are used.
**
At this point, select the Eset you wish to replace.
*** At this point, select your replacement Eset by name.
6-11
TM 1 1 - 5 8 2 0 - 8 9 0 - 1 0 - 8
6.3g.
Transfer Selected SOI Information, ANCD to ANCD (Primary NCS Task 2)
Although Primary Operator Tasks 2 and 2 Alternate provide for the
transfer of full or quick reference SOI Information, an NCS may at times
need to transfer only selected items of SOI information. For example, it
may be necessary to transfer only one SOI set (5 days of information).
the detailed procedure shown below uses an SOI set for the example.
Steps to be taken are the same for other categories of SOI information.
This task involves preparing the Source and Target ANCD, plus
performing the data transfer.
DESCRIPTION
DETAILED FLOWCHARTS
TRANSFER SELECTED SOI INFORMATION, ANCD TO ANCD
SUBTASKS
a.
Prepare Source ANCD for
selected SOI transfer*
(1)
ACTIONS
RESULTS
Turn ANCD ON
select:
Soi Radio sUpervisor
(2) Enter SOI
qRef Group Net sufX Pyro
Tmpd Set C/s Find Memo
(3) Enter SET
select:
Choose Send Receive
(4) Enter SEND
Scroll (↓/↑) & press ENTR to
select SOI
(5)
Press down arrow
SOI Set: (name/nr)
Edn:
(name/tp)
(6)
Press ENTR to select
SOI and edition desired
Do you want to transfer
QREF?**
(Y/N)
Do you want to specify groups
to send?
(Y/N)
(7) Respond NO
6-12
[↓]
(8) Respond YES
Scroll (¯/-) & press ENTR to
select groups
(9)
1 groups selected Keep selecting?
Press ENTR to select
groups desired
(Y/N)
(10) Respond NO (when
through selecting)
Do you want to specify a time pd
to send?
(Y/N)
(11) Respond YES
Enter Time Pd (#-#)
= > # #
(12) Enter Time Period
desired
Include Suffix & Smoke/Pyro
data?
(13) Respond YES
Send to:
Ancd P C Broadcast
(Y/N)
TM 11-5820-890-10-8
SUBTASKS
ACTIONS
(14) Enter ANCD
b.
Prepare Target ANCD for
selected SOI transfer
c. Perform transfer of
selected SOI
RESULTS
Do you want to save this new
SOI set?
(15) Respond YES
New SOI set name:
= > ??????????
(16) Enter SOI set name
Connect ANCD to ANCD
(17) Connect ANCDs and
press down arrow
Press [SEND] to send
(WAIT)***
(1) Turn ANCD ON
select:
Soi Radio sUpervisor
(2) Enter SOI
qRef Group Net sufX Pyro
Tmpd Set C/s Find Memo
(3) Enter SET
select:
Choose Send Receive
(4) Enter RECEIVE
receive from:
Ancd Pc
Broadcast
(5) Enter ANCD
Connect ANCD to ANCO
(6) Press down arrow
Press [RCV] to receive
(WAIT)***
(1) Press [SEND] on
Source ANCD
Processing. Please wait.
(shows % of bytes sent)
(Y/N)
Sending of SOI data is
completed
(2)
Press [RCV] on Target
ANCD
Processing. Please wait.
(shows number of bytes sent)
Receive operation was
successful
*
If you wish to transfer a complete SOI, refer to Special Operator Task 2 Alternate.
** If this screen appears, respond NO. Either QREF or selected SOi information can be
transferred using this procedure, but not at the same time. If you wish to transfer a QREF file, you
may use this procedure or refer to Special Operator Task 2. (To develop a QREF file, merely scroll
to SOI items desired and press “K” (for KEEP) to place each item in QREF
*** Do not press [SEND] until you are ready to press [RCV]. Then press [RCV] within 20
seconds of pressing {SEND].
6-13
TM 11-5820-890-10-8
6.3h.
Conduct Hot Start Net Opening (Primary NCS Task 3)
This task represents a basic NCS requirement, to open the SINCGARS
secure, frequency hopping net. During use of the Hot Start net opening
procedure, NCS responsibilities are primarily supervisory in that each
operator loads the radio with COMSEC keys, FH data, and sync time in
preparation for the net opening. Upon completing the ICOM fill (which
loads COMSEC, FH data, and sync time into all six RT channels), the
operator merely calls the NCS in secure, FH mode, and requests
permission to enter the net. NCS requirements are limited to ensuring
that operators are provided the required data for net opening and
respond to operator requests for net entry.
DESCRIPTION
DETAILED FLOWCHART
CONDUCT HOT START NET OPENING
ACTIONS
SUBTASKS
a.
b.
Prepare NCS radio for
Hot Start net opening
Prepare net operators for
Hot Start net opening
c. Open the net
RESULTS
(1)
Load CUE, MAN, and SC
freqs, as required
(Perform Primary Operator Task 1)
(2)
Load COMSEC keys, FH
data, and sync time*
(Perform Primary Operator Task 2)
(1)
Ensure net ANCDs are
properly loaded**
N/A
(2) Advise operators when
net is to be opened
N/A
(1)
Respond to individual
operator calls
(2) Admit individual operators
into CT, FH net
(Each operator calls as soon as
ready to enter the net)
(When all operators have
called, Hot Start is complete)
*
The ANCD automatically converts current date to a two -digit Julian Date. There is no action
required on the part of the operator.
** Unit SOP should specify if net RTs are to be loaded by individual operators or by
communications specialists and designated NCOs. Centralized loading of radios may be an
attractive solution when the state of individual operator training is a consideration.
6-14
TM 11-5820-890-10-8
6.3i.
Conduct Cold Start Net Opening (Primary NCS Task 4)
DESCRIPTION
The Cold Start net opening procedure has for most units been replaced
by the simpler, less demanding, Hot Start method covered in Primary
NCS Task 3, above. The Cold Start method remains an option for NCSs
to use if desired. The Cold Start net opening procedure requires
operators to load their radios with COMSEC keys and FH data, but not
sync time. Sync time is passed electronically from the NCS to net
members by ERF. Coordination is essential to ensure that all operators
are ready when the ERF is sent and that they properly store the data.
While the Cold Start method works, experience has shown that
coordination requirements and operator actions make it a more
demanding process than the Hot Start method. It is available for use
whenever an NCS needs to bring all operators into the net at the exact
same time.
DETAILED FLOWCHART
CONDUCT COLD START NET OPENING
SUBTASKS
a. Prepare NCS radio for
Cold Start net opening
b.
Prepare net operators for
Cold Start net opening
c. Send ERF at announced
net opening time
ACTIONS
RESULTS
(7)
Load CUE, MAN and SC
freqs, as required
(Perform Primary Operator Task 1)
(2)
Load COMSEC keys, FH
data, and sync time*
(Perform Primary Operator Task 2)
(1)
Ensure all operator RTs
are properly loaded
(Operators perform an ICOM fill
less sync time)
(2) Advise operators when
the net is to be opened
(Operators must be standing by
at exact net opening time)
(1)
Alert net that ERF is to be
sent at this time**
(Helps operators note when ERF
is received)
(2)
Press [LOAD] on RT
RT display shows “HLD”
(Get data from what chan?)
(3)
Enter channel in which
ERF data is stored
RT display shows “HF XXX,”
blinks and beeps
(4)
Press [ERF] on RT
RT display shows “SEND”
6-15
TM 11-5820-890-10-8
ACTIONS
SUBTASKS
d. Confirm receipt of ERF
e. Make communications
check
RESULTS
(1)
Allow operators time to
store the ERF
(20-30 seconds should be
adequate)
(2)
Direct operators to ACK
receipt of ERF
(NCS and operators continue
to use MAN in CT for ACK)
(1)
Direct operators to go to
SQ ON, operational chan
(Net shifts to the FH mode of
communications)
(2)
Set NCS radio to SQ ON
and operational chan
N/A
(3) Check communications
with net operators
(Note which operators do not
respond)
(4)
Cold Start is complete when all
operators have entered net
Direct Alt NCS to bring
all other operators into
net***
*
Sync time may be loaded into the radio from an ANCD, a PLGR, via ERF; or by use of the
RT keypad. The preferred method is to load exact GPS time and Julian Date directly form an
ANCD or PLGR.
**
Depending upon operational conditions and state of operator training, you may wish to
have operators acknowledge this announcement,
***
Ensure that operators understand that if they fail for any reason to enter the net at the
time the ERF is sent, they are to standby on MAN and wait for you to contact them there.
6-16
TM 11-5820-890-10-8
6.3j.
Respond to CUE Calls (Primary NCS Task 5)
DESCRIPTION
An important feature of the SINCGARS radio is its ability to be
contacted by a non-frequency hopping radio, or an FH radio lacking
data or sync time, through a process known as “CUEing.” All that is
required is for the calling radio to be on the prescribed CUE frequency,
press the push-to-talk switch, and wait for a response. This action
causes a “CUE” message to appear in the RT display of the NCS and
Alternate NCSs.
DETAILED FLOWCHART
RESPOND TO CUE CALLS
SUBTASKS
a.
Note CUE message in RT
display*
b. Assist CUE caller as
required
c. Resume normal
communications
ACTIONS
RESULTS
(1)
Switch from operational
channel to CUE, in CT
N/A
(2)
Call CUE caller using CUE
chan and CT mode
(1)
Upon contact, direct caller to
go to MAN and CT
N/A
(2)
Determine CUE caller’s
requirement
N/A
(3)
Provide CUE caller an ERF if
required**
(4)
Admit caller to net if
authorized
(1)
Return to operational
channel
(Do not leave your net if an Alt
NCS is available)
(2)
If enemy has DF capability
move to new location
(Alt NCS should be prepared to
displace frequently)
(Keep SC messages as brief as
possible)
(See Primary NCS Task 4 or
Special Operator Task 7)
N/A
*
Either the NCS or Alt NCS may respond to CUE calls. The preferred solution is for an Alt NCS
to respond to CUE calls, leaving the NCS free to control the net.
** An Alt NCS may use the FH-M position to send an ERF on the MAN channel while the NCS
continues to use FH-M on the operational channel without interfering with net sync time.
6-17
TM 11-5820-890-10-8
6.4.
SPECIAL NCS TASKS
6.4a.
Definition of Special NCS Tasks
WHAT ARE THEY?
There are five tasks categorized as special for SINCGARS NCS
personnel. These five tasks enable a SINCGARS NCS to electronically
transfer FH data (to include a TSK), SOI information, and COMSEC
keys (TEK only).
WHAT’S INVOLVED?
The preferred method of updating these categories of data is by
physical connection of ANCD to ANCD. When the tactical situation
makes physical transfer impossible or impractical, these electronic
transfer means may be used.
WHAT’S REQUIRED?
All SINCGARS NCS personnel should receive at least familiarization
In units which anticipate frequent
training in these tasks.
mission-related requirements for electronic data transfer, NCS
operators should be trained to proficiency. In that many units will but
rarely have a need to use electronic data transfer, the assistance of the
Signal Offrcer/NCOs may be required for their NCSs to perform these
tasks correctly.
6.4b.
Summary of Special NCS Tasks
SPECIAL NCS TASK 1:
Transfer Updated FH Data via Net Update ERF
Used for electronic transfer of FH data (hopset, net ID, TSK) from one
location to another, Net update ERF may also include a change in sync
time if desired.
SPECIAL NCS TASK 2:
Transmit SOI information Using the Broadcast Mode
This IS the procedure used for electronic transfer of SOI information
from one location to another. Because of the time required to transfer
SOI data by Broadcast, each transmission is normally limited to one
time period.
SPECIAL NCS TASK 3:
Send TEK to Other NCSs Using the MK Method of OTAR
This is the principal method of electronically transferring a TEK from
one location to another. The MK (manual key) procedure moves TEK
from a Source ANCD, through the Source NCS RT through the Target
NCS RT, into the Target NCS’s ANCD.
SPECIAL NCS TASK 4:
Send TEK to Net Operators Using the AK Method of OTAR
This is a method for disseminating a new TEK by electronic transfer
with a net. The procedure moves the new TEK from the NCS’s ANCD,
through the NCS’s radio, directly into the radios of net operators.
SPECIAL NCS TASK 5:
Receive and Store TEK Sent by MK Method of OTAR
This is the procedure followed by Target NCSs when a Source NCS
sends a TEK by MK OTAR (Special NCS Task 3, above). This task
enables the receiving NCSs to store the electronically transmitted TEK
in an ANCD, where it IS readily available for further distribution within the
unit when required.
6-18
TM 11-5820-890-10-8
6.4c.
Transmit Updated FH Data Via Net Update ERF (Special NCS Task 1)
DESCRIPTION
This task enables the NCS to electronically transmit new FH data to net
operators when distribution by physical connection of ANCD to ANCD
is impossible or impractical. This procedure may be used to update
(change) hopsets, TSKs, net IDS, and sync time. The task involves
alerting net operators, sending the ERF using the net operational
channel, confirming receive of the ERF, and making a communications
check when the changed FH data is put into effect.
DETAILED FLOWCHART
TRANSMIT UPDATED FH DATA VIA NET UPDATE ERF
SUBTASKS
a.
Prepare to send net
update ERF
b. Prepare net operators for
net update ERF
c. Send net update ERF
ACTIONS
RESULTS
(1)
Obtain updated FH data;
and effective time
(Obtain from SigO, ANCD, or
SOI as appropriate)
(2)
Load new FH data into
NCS radio*
(Perform ICOM fill or change
Eset in one channel)
(1)
Alert net that an update
ERF is to be sent
(Wait until the net is clear of
operational traffic)
(2)
Tell operators what
channel to store ERF
(Facilitates channel change
when data is effective)
(3) Advise operators when
new FH data is effective
(May be immediate or at a later
specified time)
(1)
Set FCTN to LD
(If NCS RT is not in FH-M, set
it there for sending ERF)
(2)
Press [LOAD] on RT
RT display show “HLD _”
(3)
Enter channel where ERF
data is stored
RT display shows “HF XXX,” blinks,
and beeps
(4)
Press [ERF] on RT
keypad
RT display shows “SEND,” beeps,
and shows “HF XXX”
(6)
Change FCTN from LD
back to SQ ON
N/A
6-19
TM
11-5820-890-10-8
ACTIONS
SUBTASKS
d. Confirm receipt of ERF
e. Make communications
check
(1)
Allow operators time to
store net update ERF
(2)
Have operators ACK
receipt of ERF
(3)
Have Alt NCS repeat ERF
if required by operators
(1)
At proper time, change to
update ERF data
(2) Check communications
using update ERF data
(3)
l
Have Alt NCS follow up
for non-responsive
operators
RESULTS
(20-30 seconds should be adequate)
N/A
(Allows NCS to control net and
continue net operations)
N/A
N/A
Net update ERF is completed
Store data to be sent by ERF in a channel other than your operational channel. Net update
ERF is transmitted over the operational channel.
6-20
TM 11-5820-890-10-8
6.4d.
Transfer SOI Information Using Broadcast Mode (Special NCS Task 2)
DESCRIPTION
This procedure enables an NCS to send SOI Information electronically
to net members wherever updating by physical connection of ANCD to
ANCD proves to be impossible or impractical. The Broadcast Mode
requires approximately two minutes to transmit one time period of a
battalion SOI extract. The procedure includes a polling feature which
allows the NCS to determine by automatic query if up to 16 net
operators (designated by special ID numbers) did or did not receive the
SOI information sent by Broadcast.
DETAILED FLOWCHART
TRANSFER SOI INFORMATION USING BROADCAST MODE
SUBTASKS
a. Prepare NCS radio to
send SOI by broadcast
b.
Prepare ANCD for SOI
data broadcast
# This screen will appear only
if QREF file is stored in ANCD
ACTIONS
RESULTS
(1)
Ensure RT is set to SQ ON,
CT, and FH-M
N/A (Normal NCS RT settings)
(2)
Change DATA from OFF to
1200
Broadcast (uses data mode set
to 1200 bps)
(1) Turn ANCD ON
select:
Soi Radio sUpervIsor
(2) Enter SOI
qRef Group Net sufX Pyro
Tmpd Set C/s Find Memo
(3) Enter SET
select:
Choose Send Receive
(4) Enter SEND
Scroll (
) & press ENTR to
select SOI set
(5) Press down arrow
SOI Set: (name)
Edn:
(name)
(6)
Press ( ) to display; and
press ENTR to select
(7) Respond NO
Do you want to transfer
QREF?#
(Y/N)
Do you want to specify groups
to send?
Y/N)
(8) Respond YES
Scroll (t/l) & press ENTR to select
groups
(9)
1 group selected keep selecting?
(Y/N)
Do you want to specify a time
pd to send?
(Y/N)
Press (t/J) to display; and
press ENTR to select
(10) Enter YES to continue;
enter NO to quit
6-21
TM 11-5820-890-10-8
ACTIONS
SUBTASKS
c. Prepare net operators
for receipt of SOI
Broadcast
6-22
RESULTS
(11) Respond YES
Enter Time Pd (# - #)
= > # #
(12) Enter Time Period; and
press ENTR
Include Suffix & Smoke/Pyro
data?
(13) Respond YES to include;
respond NO to exclude
Send to:
Ancd PC Broadcast Stu
(14) Enter BROADCAST
Enter ID for each polled ANCD;
and 0 when done*
(15) Press down arrow
Polled: 1234567890123456
= > # #
(16) Enter IDS for polling (see
example; press ENTR
Polled: 12*456**901*34*6
= > # #
(17) Enter “0” to quit
Do you want to save this SOI
set?
(18) Respond YES (to save SOI
data
New SOI set name:
= > ??????????
(19) Enter SOI set name; and
press ENTR
Connect ANCD to RT
AUD/DATA
(20) Press down arrow
Press SEND to send
(WAIT)**
(1)
Say:Standby for Broadcast
follow my instructions/ACK
Alerts net members to an
Immediate requirement
(2)
After ACK, say:Go to SQ
ON,FH, CT DATA- 1200
Ensures net radios and ANCDs
are properly prepared
(3) Say:Turn ANCD ON
select:
Soi Radio supervisor
(4) Say:Enter SOI
qRef Group Net sufx Pyro
Tmpd Set C/s Find Memo
(5) Say:Enter SET
select:
Choose Send Receive
(6) Say:Enter RECEIVE
receive from:
Ancd PC Broadcast Stu
(7) Say:Enter BROADCAST
Enter broadcast ID (1 - 16):
= > # #
(Y/N)
(Y/N)
TM 11-5820-890-10-8
SUBTASKS
ACTIONS
(8)
d. Send SOI information by
Broadcast Mode
Say:Enter SOP broadcast
- ID: and press ENTR
RESULTS
BROADCAST ID set to X
Polling: ON/OFF
(9) Say:Press down arrow
Connect ANCD to RT
AUD/DATA
(10) Say:Connect ANCD to RT
AUD/DATA; HS to Aud/Fill
(Emphasize AUD/DATA for
ANCD connection)
(11) Say:When ready, press
down arrow and ACK
Press RCV to receive
(WAIT)**
(1) Say:Standby, broadcast will
now be sent; press RCV
now; sending now
Alerts operators that broadcast is
about to be sent; coordinates
pressing of SEND and RCV
(2)
Processing. Please wait.
Press [SEND] on NCS
ANCD**
Sending of SOI data completed
*
If polling is used, the NCS ANCD will indicate which stations did and did not receive the
broadcast. If polling is not used, the NCS should have net members acknowledge receipt of SO/
data.
** Do not press [SEND] until net members are ready at your direction to press [RCV]. Then
press [SEND] within 20 seconds of having operators press [RCV].
6-23
TM 11-5820-890-10-8
6.4e.
Send TEK to Other NCSs Using MK Method of OTAR (Special NCS Task 3)
This procedure allows an NCS to transfer a TEK (not a KEK) electronically,
over-the-air-rekey (OTAR) to other NCSs. This capability IS useful
when the tactical situation or terrain makes it impossible or impractical
to pass new TEK by physical connection of ANCD to ANCD. Receiving
NCSs store the new TEK in their ANCDs. The new TEK can then be
passed to operators by physical transfer. Special NCS Tasks 3 and 5
are performed together by Source and Target NCSs, respectively.
DESCRIPTION
DETAILED FLOWCHART
SEND TEK TO OTHER NCSs USING MK METHOD OF OTAR
ACTIONS
RESULTS
(1)
Set FCTN to SQ ON
N/A
(2)
Set MODE to FH-M
N/A
(3)
Set COMSEC to CT
N/A
(4)
Set DATA to OFF
N/A
SUBTASKS
a. Prepare Source NCS
radio to send MK OTAR*
b. Prepare Source ANCD
to send MK OTAR
6-24
(1) Turn ANCD ON
select:
Soi Radio supervisor
(2) Enter RADIO
Send Receive Database
sEtup Comsec Time
(3) Enter COMSEC
Vg
Ak
(4) Enter MK
qUIT
Select key
(name/number
(5)
Press PgDN to display; and
ENTR to select
Connect to RT and press
[SEND] (WAIT)**
(6)
Connect Source ANCD to
RT using fill cable
Ld
Mk
Rv
vU
N/A
TM 11-5820-890-10-8
SUBTASKS
c.
Prepare Target NCSs to
receive MK OTAR
ACTIONS
(1)
Say:Standby for MK OTAR,
ACK
(2) After ACK, say:Make
Special NCS Task 5
preparations; ACK when
ready to receive MK OTAR
d. Send TEK by MK
OTAR***
RESULTS
Target NCSs are alerted; CT contact
is confirmed
Readies Target NCSs to receive MK
OTAR
(3)
After ACK, say:OTAR will
now be sent; after receipt
of OTAR return to chan 1
(1)
Say:Go to chan 6 now;
press [RCV] now
N/A
(2)
Go to chan 6 and press
[SEND] now
Transfer in Progress/
1 Keys Transferred
(3)
Return to chan 1
Prepares Source NCS radio for
comm with Target NCSs
(4)
Wait 30 set after sending;
say:OTAR completed;
TEK ID is XXXXX:
effective at (DTG), ACK****
Informs Target NCSs of TEK ID
and effective time; advises
Source NCS which stations did
and did not receive OTAR
Provides final coordination guidance
for MK OTAR
*
In using the MK OTAR procedure, there is considerable advantage if an Alternate NCS
takes the primary role in sending the OTAR. For example, an Alternate NCS can load the new TEK
into a second SlNCGARS radio, or into a TEK position other than that be used for the operational
net. This means that once the OTAR has been sent, the Alternate NCS can monitor
communications using both new and old TEKs, thus making it easier to bring in any stations that
missed receiving the initial OTAR.
**
Do not press [SEND] until Target NCSs are ready to press [RCV]. Then press [SEND]
within 20 seconds of directing them to press [RCV].
***
If distance or obstacles between NCS stations requires it, an RXMTstation may be used
in transmitting an MK OTAR. Transmitting and receiving stations must have the same KEK loaded
in channel 6. The fact that the RXMT link requires use of two net IDS does not change the
requirement to use the same KEK.
****
The Alternate NCS notes which stations still need the OTAR, keeps one channel on the
old TEK, and sends the MK OTAR to remaining Target NCS as contact is re-established, or at a
prescribed time.
6-25
TM
11-5820-890-10-8
6.4f.
Send TEK to Net Operators Using AK Method of OTAR(Special NCS Task 4)
This procedure enables an NCS to transfer electronically a TEK (not a
KEK) directly from the NCS ANCD to net member radios. In the AK
method, the TEK transferred to net member radios automatically, and
instantaneously, replaces the TEK being used. Also, the KEK in net
member radios is automatically updated (changed) during the AK
procedure. After sending a TEK by AK OTAR, the Source NCS must
load the new TEK. While the AK method of OTAR requires no action on
the part of receiving net members, it is quite demanding of the Source
NCS.
DESCRIPTION
DETAILED FLOWCHART
SEND TEK TO NET OPERATORS USING AK METHOD OF OTAR
a. Prepare Source NCS
radio to send AK OTAR
b. Prepare Source NCS
ANCD to sent AK OTAR
6-26
RESULTS
ACTIONS
SUBTASKS
(1)
Set FCTN to LD
N/A
(2)
Set MODE to FH-M
N/A
(3)
Set COMSEC to CT
N/A
(4)
Set DATA to OFF
N/A
(1) Turn ANCD ON
select:
Soi Radio supervisor
(2) Enter RADIO
Send Receive Database
sEtup Comsec Time
Ld
Mk
Rv
VU
(3) Enter COMSEC
vG
Ak
(4) Enter AK
Select key
quit
(name/number)
(5)
Select key
quit
(name/number)
Press PgU/PgDN to
KEK(s) desired; then press
ENTR
(6) Enter QUIT
Select key
qUit
(name/number)
(7)
Connect to RT and press
[SEND] (WAIT)*
Press PgDN to TEK
desired; then press ENTR
KEK
TM 11-5820-890-10-8
SUBTASKS
c. Send AK OTAR**
ACTIONS
(1)
(2)
RESULTS
Say:Standby for AK OTAR,
acknowledge
Target operators are alerted, CT
contact is confirmed
Press [SEND] on ANCD
Transfer in progress/
1 Keys Transferred***
Vg
Ak
d.
Load TEK sent by AK
OTAR in NCS radio
Ld
__
Mk
Rv
VU
(1) Enter LD
select:
Tek Kek
(2) Enter TEK
Select key
qUit
(name/number)
(3)
Select key
qUit
(name/number)
Press PgDN to display, and
ENTR to select
(4) Enter QUIT
Connect ANCD to RT
(5)
Connect ANCD to RT
AUD/FILL, press [J]
Press [LOAD] on RT
(6)
Press [LOAD] / [STO] /
and [X]****
1 Keys Transferred
Vg
Ak
Ld
Mk
XMT
Rv
VU
6-27
TM
11-5820-890-10-8
e.
Update KEK used for AK
OTAR
RESULTS
ACTIONS
SUBTASKS
(1)
Set FCTN to LD and
enter VU
Select key qUit
(name/number)
(2)
Press PgDN to KEK
desired; then press ENTR
Connect to RT and press [RCV]
(3)
Press RCV on ANCD
Transfer in Progress
Enter Text ID
= > ????????????????
(4)
Enter TEXT ID and
press ENTR
Key updated successfully
(5)
Press down arrow
Select key qUit
(name/number)
(6)
Press ABORT until screen
shown appears
Vg
Ak
Ld
Mk
Rv
VU
(7) Enter LD
select:
Tek Kek
(8) Enter KEK
Select key
qUit
(name/number)
(9)
Select key
(KEK X)
Press PgDN to display, and
ENTR to select
qUit
(10) Enter QUIT
Connect ANCD to RT
(11) Press down arrow
Press [LOAD] on RT
(12) Press [LOAD] / [STO] / [6]
Transfer in Progress/
1 Keys Transferred
Do not press [SEND] until net members acknowledge readiness to receive the AK OTAR
** Alternate NCS keeps radio on o/d TEK and KEK, sends AK OTAR to net members who
missed original transmission as contact is established. If Alternate NCS has a second radio, new
TEK should be loaded into that radio for monitoring of net traffic after original AK OTAR is sent.
l **
For ASIP: The sent key is automatically placed in the radio Temp Register and applied to the
operational channel. This allows instant communication on new TEK, NCS simply changes
channel out, then back into operational channel to contact any operator who did not receive the
AK. The in/out step places NCS RT back to original TEK.
l *** Load new TEK into operational channel because that is where it is stored in net members’
radios.
6-28
XMT
TM 11-5820-890-10-8
6.4g.
Receive and Store TEK Sent by MK Method of OTAR (Special NCS Task 5)
DESCRIPTION
This task is performed by Target NCSs when a Source NCS
electronically transmits a TEK using the MK method of OTAR. This
procedure allows Target NCSs to store the new TEK in their ANCDs for
physical distribution to net operators when required. The sending NCS
directs receiving NCSs to perform this task as an integral part of the MK
OTAR process. This task supplements Special NCS Task 3, “Send TEK
to Other NCSs Using MK Method of OTAR.”
DETAILED FLOWCHART
RECEIVE AND STORE TEK SENT BY MK METHOD OF OTAR
SUBTASKS
a.
Prepare radio for receipt
of MK OTAR
b. Prepare ANCD to
receive MK OTAR
ACTIONS
RESULTS
(1)
Set FCTN to SQ ON
N/A
(2)
Set COMSEC to CT
N/A
(3)
Set DATA to OFF
N/A
(1) Turn ANCD ON
select:
Soi Radio sUpervisor
(2) Enter RADIO
Send Receive Database
sEtup Comsec Time
(3) Enter COMSEC
Vg
Ak
(4) Enter RV
Connect to RT
Press [RCV] (WAIT)*
(5)
Connect ANCD to RT
AUD/FILL port
(6)
ACK to Source NCS when
ready to receive OTAR
Ld
Mk
Rv
vU
N/A
(Responds to Source NCS’s
MK OTAR instructions)
6-29
TM
11-5820-890-10-8
c.
Receive and store TEK
sent by MK OTAR
RESULTS
ACTIONS
SUBTASKS
(1)
When NCS directs, go to
chan 6, and press RCV
Load in Progress
Enter Text ID
= > ????????????????
(2)
Enter Text ID provided by
Source NCS
(3) Enter YES**
l
Do you want to skip Tag
sequence?
1 Keys Received
Do not press [RCV] until directed to do so by the Source NCS.
** The “Tag Sequence” involves many questions to which you will probably not know the
answer. Use Tag Sequence only when specifically directed to do so by the Source NCS, who will
then provide answers to the many questions involved. Otherwise, respond YES to skip the Tag
Sequence.
6-30
(Y/N)
TM 11 -5820-890-10-8
CHAPTER 7
SINCGARS ASSOCIATED TASKS
IN THIS CHAPTER:
7.1
GENERAL . . . . . . . . . . . . . . . . . . . . . . . . . . . . . . . . . . . . . . . . . . . . . . . . . . . . . . . 7-2
7.2
PRECISION LIGHTWEIGHT GPS RECEIVER (PLGR) TASKS ....................
a.
Definition of PLGR Tasks........................................................................
b. Summary of PLGR Tasks..........................................................................
C.
Obtain Date and GPS Zulu Time from PLGR (PLGR Task 1)....................
d. Manually Load PLGR Date and Zulu Time Into PLGR
(PLGR Task 2) .....................................................................................
e.
Load PLGR Date and GPS Zulu Time Into SINCGARS RT
(PLGR Task 3) ....................................................................................
f.
Load PLGR Key from ANCD into PLGR (PLGR Task 4)..........................
7-3
7-3
7-3
7-4
7-5
7-7
7-9
7.3
SECURE TELEPHONE UNIT (STU) TASKS........................................................... 7-11
a.
Definition of STU Tasks .....................................................................................7- 11
b. Summary of STU Tasks
..................................................................................7-11
C.
Send COMSEC Keys/FH Data From ANCD to ANCD via
STU (STU Task 1).................................................................................... 7-12
d.
Receive COMSEC Keys/FH Data Into ANCD Via STU (STU Task 2) .............7- 13
e.
Send SOI Information From ANCD to ANCD via STU (STU Task 3)............. 7-14
f.
Receive SOI Information Into ANCD via STU (STU Task 4)............................. 7-16
7.4
FREQUENCY HOPPING MULTIPLEXER (FHMUX) TASKS . . . . . . . . . . . . 7-17
7-1
TM 11-5820-890-10-8
7.1.
GENERAL
SCOPE
This chapter addresses three items of equipment associated with
SINCGARS operations.
PLGR
The PLGR, in addition to its primary function of determining position
location, serves as the principal source of correct Julian Date and exact
GPS Zulu time for SINCGARS net sync time. Julian Date and GPS Zulu
time can be downloaded from the PLGR by direct connection to the RT,
or by manually loading PLGR time into an ANCD, with subsequent
loading of the RT from the ANCD. Additionally, the ANCD can be used
as the source of required PLGR keys.
FHMUX
FHMUX is a development item which when fielded will allow operation
of up to four SINCGARS vehicular radios from a single antenna.
Specific guidance regarding the FHMUX will be added to this manual
when the system has been approved for fielding and firm procedures
have been developed.
STU
By connecting the STU to an ANCD, it IS possible to transfer COMSEC
keys, FH data, and SOI information over commercial or military
telephone circuits for unlimited distances. This capability enhances
SINCGARS operations for widely dispersed units, and it could be
especially useful during mobilization of Reserve Component forces.
7-2
TM 11-5820-890-10-8
7.2.
PLGR TASKS
7.2a.
Definition of PLGR Tasks
WHAT ARE THEY?
There are four PLGR tasks which enable a SINCGARS NCS to make
use of PLGR-based, GPS Zulu time for net openings and maintaining
exact SINCGARS sync time for the duration of operations, however
extended they may be.
WHAT’S INVOLVED?
These four PLGR tasks Involve reading Julian Date and Zulu time from
the PLGR, manually loading PLGR time into an ANCD, electronically
loading GPS time directly from the PLGR into a SINCGARS radio, and
loading required keys into the PLGR from an ANCD.
WHAT’S REQUIRED?
NCS personnel and operators having ready access to a PLGR should
become proficient in PLGR tasks.
7.2b.
Summary of PLGR Tasks
PLGR TASK 1:
Obtain Date and GPS Zulu Time from PLGR
This task allows an NCS, or operator having a PLGR, to obtain Julian
Date and exact GPS Zulu time directly from the PLGR.
PLGR TASK 2:
Manually Load PLGR Date and Zulu Time Into ANCD
This task enables the NCS, or operator having a PLGR, to manually
load Julian Date and GPS Zulu time into an ANCD.
PLGR TASK 3:
Load PLGR Date and GPS Zulu Time Into SINCGARS RT
This task permits an NCS or SINCGARS operator to electronically
transfer Julian Date and GPS Zulu time directly from the PLGR to the
SINCGARS radio by physical connection.
PLGR TASK 4:
Load PLGR Key From ANCD Into PLGR
This PLGR task allows an NCS or SINCGARS operator to load a key
from an ANCD into a PLGR whenever required.
7-3
TM 11-5820-890-10-8
7.2c.
Obtain Date and GPS Zulu Time From PLGR (PLGR Task 1)
DESCRIPTION
This task enables the SINCGARS NCS or operator to determine Julian
Date and GPS Zulu time directly from the PLGR
DETAILED FLOWCHART
OBTAIN DATE AND GPS ZULU TIME FROM PLGR
SUBTASKS
a.
b.
c.
Place PLGR into operation
Select proper screen and
TFOM
Read date and time from
PLGR screen
(1)
ACTIONS
RESULTS
Press PLGR [ON] key
N/A
(2) Observe PLGR perform
self-test
(No action required of NCS or
operator)
(1)
At end of self-test, note
this screen*
FIX**
18T
WK 82223e
EL-00027m
(2)
Press down arrow on PLGR;
note this screen
2124:43Z
TFOM 4***
25-12-94
SUN
Speed too slow
GS < 1 mph t/J P
(1)
Read date as
25-12-94****
(2)
Read time as 2124
hours and 43 sec Zulu
FOM 5
MGRS-New
63528n
t/1 P
N/A
PLGR Task 1
IS
completed.
*
In this section, PLGR screens are shown in double lined boxes while ANCD screens
continue to be shown as dark bordered rectangles.
**
A battery powered PLGR will automatically go to standby as soon as satellites have
been acquired.
* **
Time Figure of Merit (TFOM) of 8 or less indicates that PLGR is tracking at least one
satellite and PLGR time is GPS accurate. For TFOM 9, wait for PLGR to acquire satellites, at
which time TFOM will change from 9 to 8 or less. (When first turned on, the PLGR may take as long
as 15 minutes to acquire satellites.)
****
When the date read from the PLGR is entered into the ANCD, it is automatically
converted to the two-digit Julian Date needed for SlNCGARS sync time.
7-4
TM 11-5820-890-10-8
7.2d.
Manually Load PLGR Date and Zulu Time Into ANCD (PLGR Task 2)
DESCRIPTION
This procedure enables an NCS or SINCGARS operator to manually
load the date and time obtained from the PLGR into the ANCD. GPS
date and Zulu time can then be transferred to other ANCDs and loaded
into SINCGARS radios using the ICOM fill procedure.
DETAILED FLOWCHART
MANUALLY LOAD PLGR DATE AND ZULU TIME INTO ANCD
SUBTASK
a. Determine GPS date
and Zulu time
b. Prepare ANCD for
loading date and time
ACTIONS
(1)
Perform PLGR Task 1,
as shown above
(2)
Read date and time
from PLGR (with TFOM
of 8 or less)
(1)
Turn ANCD ON
(2) Enter SUPERVISOR
RESULTS
N/A
2124:43Z
25-12-94
Speed too slow
GS < 1 mph
TFOM 4
SUN
T/l P
select:
Soi Radio sUpervisor
Are you authorized to use this
feature?
(3) Respond YES
WARNING - This could cause
data loss
(4) Press down arrow
Are you sure you want to
continue?
(Y/N)
(Y/N)
I
(5) Respond YES
Appl Date Time Setup
Util Bit
{MAIN}
7-5
TM 11-5820-890-10-8
ACTIONS
SUBTASK
c.
Load new date and time
(1) Enter DATE
(2)
Enter new date in
form of mm-dd-yy
RESULT
Date is Sat 12-24-1994
New mm-dd-yy:
Date is Sat 12-24-1994
New mm-dd-yy:12-25-94 [ENTR]
(3) Press ENTR
Appl Date Time Setup
Util Bit {MAIN}
(4) Enter TIME
Time is 14:53:27
New hh:mm:ss:
(5)
Time is 14:53:27
New hh:mm:ss:21:25:00
Enter new time in
form of hh:mm:ss
(6) Press [ENTR] when
PLGR reads 25:00*
Appl Date Time Setup
Util Bit {MAIN}
(7) Enter APPL
SOI RADIO R D S
(8) Enter RDS
select:
Soi Radio** sUpervIsor
[ENTR]
*
Enter one minute beyond PLGR time and wait until PLGR seconds reach 00 to press ENTR
on ANCD. Because the ANCD requires time to load, you may find that pressing ENTR on the
ANCD when PLGR time reads :59 gives you a more accurate entry.
** To check the accuracy of your ANCD time entry, enter RADIO, then TIME. You can then read
ANCD time in running format and compare it with running PLGR time. If the two times are more
than one second different, reload PLGR time into your ANCD.
7-6
TM 11-5820-890-10-8
7.2e.
Electronically Load PLGR Date and Zulu Time Into RT (PLGR Task 3)
DESCRIPTION
This procedure allows an NCS or SINCGARS operator to transfer date
and time directly from directly from a PLGR into a SINCGARS radio. It
represents the preferred method of loading sync time into an RT when
a PLGR is available, especially for NCS personnel.
DETAILED FLOWCHART
ELECTRONICALLY LOAD PLGR DATE AND GPS ZULU TIME INTO RT
SUBTASKS
a. Prepare PLGR to
ACTIONS
RESULTS
(1)
Turn PLGR ON
N/A
(2)
Observe PLGR perform its
self-test
N/A
(3)
Note this PLGR screen
appear
FIX
18T
WK 82223e
EL-00027m
FOM 5
MGRS- New
63528n
t/J P
(4)
Press PLGR MENU key two
times; note this screen
DATA-XFR
DOP-CALC
SINCGARS
SV-SEL
ALERTS
KOI-18
<more> P
(5)
Press PLGR right arrow four
times to highlight SINCGARS
DATA-XFR
DOP-CALC
SINCGARS
SV-SEL
ALERTS
KOI-18
<more> P
(6)
Press PLGR down arrow to
select SINCGARS
SINCGARS
Start time fill
ACTIVATE
QUIT
SINCGARS
Start time fill
ACTIVATE
QUIT
perform transfer task
(7)
Press PLGR left arrow to
highlight ACTIVATE
(Do NOT press down arrow
yet)
7-7
TM 11-5820-890-10-8
ACTIONS
SUBTASKS
b.
Prepare RT for time
transfer from PLGR
c. Perform date/time
transfer from PLGR to
FIT
RESULTS
(1)
Connect PLGR to RT
AUD/FILL port
N/A
(2)
Set RT FCTN to LD
N/A
(1)
Press PLGR down arrow to
select ACTIVATE
SINCGARS
Press LOAD key on radio
QUIT
(2)
Press LOAD on RT
SINCGARS time fill
successful
QUIT
(3)
7-8
Press PLGR down arrow to
select QUIT
Date/time transfer is
completed
TM 11-5820-890-10-8
7 . 2 f . Load PLGR Key From ANCD Into PLGR (PLGR Task 4)
DESCRIPTION
This procedure enables an NCS or PLGR operator to transfer a PLGR
key from the ANCD to the PLGR when required.
DETAILED FLOWCHART
LOAD PLGR KEY FROM ANCD INTO PLGR
SUBTASKS
a. Prepare PLGR for loading
key
b.
Prepare ANCD for loading
PLGR key
ACTIONS
RESULTS
(1) Turn PLGR ON
N/A
(2)
Observe PLGR perform its
self-test
N/A
(3)
Note when this screen
appears
(4)
Connect W4 to PLGR, but
not to ANCD yet
FIX
18Y
WK 82223e
EL-00027m
FOM 5
MGRS- New
63528n
f/J P
N/A
(1) Turn ANCD ON
select:
Soi Radio supervisor
(2) Enter RADIO
Send Receive Database
sEtup Comsec Time
(3) Enter COMSEC
vG
Ak
Ld
Mk
Rv
VU
(4) Enter LD
select:
Tek Kek
(5)
Enter TEK, press PgDN
and ENTR to select
Select key qUit
(name/number)
(6)
Press PgUP/PgDN to view,
ENTR to select
Select key qUit
(PLGR key name)
(7) Enter QUIT
XMT
Connect ANCD to RT
(WAIT)*
7-9
TM 11-5820-890-10-8
SUBTASKS
c.
Transfer PLGR key from
ANCD to PLGR
ACTIONS
RESULTS
(1)
Press J (Do not connect
ANCD to RT)*
Press [LOAD] on RT**
(2)
Now connect W4 to ANCD
Key loaded
*
Do not connect W4 to ANCD until directed to do so by the ACTIONS column. Sequence of
task requires that you connect W4 to PLGR, then select key to be transferred, and then connect
W4 to ANCD. When you connect to W4 to the ANCD, the PLGR key is immediately transferred.
**
7-10
Ignore this reference to the RT; only the ANCD and PLGR are involved in this task
TM 11-5820-890-10-8
7.3.
SECURE TELEPHONE UNIT (STU) TASKS
7.3a.
Definition of STU Tasks
WHAT ARE THEY?
There are four STU tasks which enable an NCS or communications
specialist to transfer classified data over unlimited distances via
commercial or military telephone circuits.
WHAT’S INVOLVED?
COMSEC keys, FH data (hopsets, TSK, and net IDS), and SOI
information can be sent from ANCD to ANCD via a STU transfer.
WHAT’S REQUIRED?
It is assumed that the NCS or communications specialist performing
these tasks is fully qualified in the employment of the STU for sending
and receiving classified information. Only the four tasks shown below,
involving use of the ANCD with the STU, represent required training.
7.3b.
Summary of STU Tasks
STU TASK 1:
Send COMSEC Keys/FH Data From ANCD to ANCD Via STU
This task allows an NCS or communications specialist to send
classified COMSEC keys and FH data from an ANCD at one location to
an ANCD at another location, regardless of distance, by commercial or
military telephone.
STU TASK 2:
Receive COMSEC Keys/FH Data Into An ANCD Via STU
This task enables an NCS or communications specialist to receive and
store in an ANCD the COMSEC keys and FH data sent from another
ANCD by telephone.
STU TASK 3:
Send SOI Information From ANCD to ANCD Via STU
This task permits an NCS or communications specialist to transmit
classified SOI information from an ANCD at one location to an ANCD at
another location by telephone.
STU TASK 4:
Receive SOI Information Into An ANCD Via STU
This task allows an NCS or communications specialist to receive and
store in an ANCD that classified SOI information sent from one location
to another by telephone.
7-11
TM
11-5820-890-10-8
Send COMSEC Keys/FH Data From ANCD to ANCD via STU (STU Task 1)
7.3c.
This task allow an NCS or communications specialist to send classified
COMSEC keys (TEK and KEK) and FH data (hopsets, TSK, Net ID S)
from an ANCD at one location to one at another location, regardless of
distance, via commercial or military telephone circuits.
DESCRIPTION
DETAILED FLOWCHARTS
SEND COMSEC KEYS/FH DATA FROM ANCD TO ANCD VIA STU
a. Coordinate transfer by
STU
b. Prepare ANCD for STU
transfer
c.
Select data to send
d. Send data by STU
transfer
RESULTS
ACTIONS
SUBTASKS
(1) Contact receiver
N/A
(2) Coordinate transfer
preparations
Proper STU keys; 2400 BPS;
PT/CT voice checked
(1) Turn ANCD ON
select:
Soi Radio Supervisor
(2) Enter RADIO
Send Receive Database
sEtup COMSEC Time
(3) Enter SEND
send to:
Radio Ancd Stu P C
(4) Enter STU
Loadset* Database* Time**
Key* Eset* Mwod***
(5) Enter Loadset/Database
or Eset as desired
System high is
(U)/(C)/(S)/(TS)
(1)
Press 1, then PgUp/
PgDN to view item
select: Loadset (example)
99lNDIVA.LST
(DI)
(2)
Press ENTR to select
data item
Connect to STU and press
[SEND] (WAIT)****
(1)
Ensure receiving station is
ready for you to send
(Both STUs must be placed in
secure data mode)
(2) Press SEND
Sending final data/
Transfer successful
*
Loadset, database, key, or Eset may be selected for STU transfer.
**
Time cannot be transferred by STU.
***
The term “MWOD” (multiple word of day) is used in loading procedure for the Have
Quick radio found in selected aircraft.
****
details.
7-12
Do not press SEND until receiving station is ready to press RCV; see STU Task 2 for
TM 11-5820-890-10-8
7.3d.
Receive COMSEC Keys/FH Data Into ANCD via STU (STU Task 2)
DESCRIPTION
This task enables an NCS or communications specialist to receive and
store in an ANCD, those COMSEC keys and FH data, classified or
unclassified, sent from another location via STU over telephone lines.
DETAILED FLOWCHART
RECEIVE COMSEC KEYS/FH DATA INTO ANCD VIA STU
SUBTASKS
a. Coordinate STU transfer
b. Prepare ANCD for
STU transfer
c. Receive COMSEC/FH
data by STU transfer
(1)
ACTIONS
RESULTS
Receive initial call from
sending station
N/A
(2) Coordinate STU transfer
preparations
(Proper STU keys; 2400 BPS;
PT/CT voice checked)
(1) Turn ANCD ON
select:
Soi Radio sUpervIsor
(2) Enter RADIO
Send Receive Database
sEtup Comsec Time
(3) Enter RECEIVE
receive:
Ancd Cfd Stu PC Mx
(4) Enter STU
Loadset* Database* Time**
Key*
Eset*
Mwod***
(5) Enter Loadset/Database/
Key/Eset as desired
Connect to STU and press
[RCV] (WAIT)****
(1)
Ensure you are ready for
sender to press [SEND]
N/A
(2)
Place your STU in secure
data mode
N/A
(3)
Press [RCV] in coordination
with STU sender
Receiving final data/
Transfer successful
*
Loadset, database, key, or Eset may be selected for the STU transfer.
**
Time cannot be transferred by STU.
***
The term “MWOD” is used in loading the Have Quick radio found in selected aircraft.
****
Do not press [RCV] until sending station is ready to press [SEND].
7-13
TM 1 1 - 5 8 2 0 - 8 9 0 - 1 0 - 8
7.3e.
Send SOI information From ANCD to ANCD via STU (STU Task 3)
This task permits an NCS or communications specialist to transmit SOI
information by telephone, classified or unclassified, from an ANCD at
one location to an ANCD at another location. Proficiency of the sender
and receiver in the employment of the STU IS a prerequisite for
performance of this and the following STU task
DESCRIPTION
DETAILED FLOWCHART
SEND SOI INFORMATION FROM ANCD TO ANCD VIA STU
SUBTASKS
a. Coordinate SOI transfer
by STU
b. Prepare ANCD for STU
transfer
7-14
ACTIONS
(1) Contact receiver
RESULTS
N/A
(2) Coordinate STU
transfer preparations
(Proper STU keys; 2400 BPS;
PT/CT voice checked)
(1) Turn ANCD ON
select:
Soi Radio sUpervisor
(2) Enter SOI
qRef Group Net sufX Pyro
Tmpd Set* C/s Find Memo
(3) Enter SET*
select:
Choose Send Receive
(4) Enter SEND
Scroll (f/l) & press ENTR to
select Set
TM 11-5820-890-10-8
SUBTASKS
c.
Select SOI data to send
ACTIONS
(1)
Scroll to Identify set
Set: (name/number)
Edn, (name/time period)
(2)
Press ENTR to select
set
Do you want to transfer QREF?
Enter YES or NO**
Do you want to specify groups
to send?
(3)
(Y/N)**
(Y/N)***
(4)
Enter YES or NO***
Do you want to specify a time pd
to send?
(Y/N)***
(5)
Enter YES or NO***
include Suffix & Smoke/Pyro
data?
(6)
d. Send SOI information by
STU transfer
RESULTS
Enter YES or NO***
(Y/N)***
send to:
Ancd PC Broadcast Stu
(7) Enter STU
Connect to STU and press
[SEND] (WAIT)****
(1) Ensure receiving
station is ready for you
to send
(Both STUs must be placed in secure
data mode)
(2) Press [SEND]
Processing. Please watt
(shows % of bytes sent)
Sending of SOI data IS
completed
*
Set is selected only as an example.
**
Either full or selected data can be sent by STU transfer, but they must be sent one at a
time.
***
Any SO/ item may be selected for STU transfer.
****
Do not press [SEND] until you ensure the receiving station is ready to receive.
7-15
TM 11-5820-890-10-8
7.3f.
Receive SOI Information Into An ANCD via STU (STU Task 4)
This task allows an NCS or communications specialist to receive and
store in an ANCD, that SOI information, classified or unclassified, sent
from another station by STU.
DESCRIPTION
DETAILED FLOWCHART
RECEIVE SOI INFORMATION INTO ANCD VIA STU
a. Coordinate SOI transfer
by STU
b.
C.
Prepare ANCD for STU
transfer
Receive SOI data sent
by STU transfer
RESULTS
ACTIONS
SUBTASKS
(1)
N/A
Receive initial call from
sending station
(2) Coordinate STU transfer
preparations
(Proper STU keys; 2400 BPS;
PT/CT voice checked)
(1) Turn ANCD ON
select:
Soi Radio supervisor
(2) Enter SOI
qRef Group Net sufX Pyro
Tmpd Set* C/s Find Memo
(3) Enter SET
select:
Choose Send Receive
(4) Enter RECEIVE
receive from:
Ancd PC Broadcast Stu
(5) Enter STU
Connect to STU and press
[SEND] (WAIT)**
(1)
Ensure you are ready for
sender to [SEND]
N/A
(2)
Place your STU in secure
data mode
N/A
(3) Press [RCV] when
sender presses [SEND]
Processing. Please wait
(shows of of bytes sent)
Sending of SOI data IS
completed
7-16
*
Set is selected only as an example. Any SOI item may be selected for transfer by STU.
**
Do not press [RCV] until sending station is ready to press [SEND].
TM 11-5820-890-10-8
7.4.
FREQUENCY HOPPING MULTIPLEXER (FHMUX) TASKS
DESCRIPTION
This task allows an NCS to establish radio priority strategy for up to four
radios when FHMUX is employed.
DETAILED FLOWCHART
NCS OPERATIONS WITH MULTIPLEXER
SUBTASKS
ACTIONS
RESULTS
a. SET: POWER ON
Set: POWER toggle
switch to ON.
The POWER indicator should illuminate
continuously and the four BIT/FAULT
indicators should illuminate for
approximately five seconds after
power-on and then extinguish upon
successful completion of the self test.
The POWER ON indicator should stay
illuminated.
b. SET: RADIO PRIORITY
Get: Net Priority strategy.
N/A
Set: RADIO PRIORITY to
EQUAL to give all RTs
equal communications
priority.
OR
Set: RADIO PRIORITY to
desired RT, 1A thru 2B, to
give highest priority to a
single RT
OR
Set: RADIO PRIORITY to
RXMT 1A+1B if RT 1A
and RT 1B are in the
retransmit mode and they
are to have higher priority
than RTs 2A and 28.
7-17
TM 11-5820-890-10-8
THIS PAGE INTENTIONALLY
BLANK.
7-18
TM 11-5820-890-10-8
CHAPTER 8
OPERATOR
MAINTENANCE
IN THIS CHAPTER:
8.1
SINCGARS RADIO MAINTENANCE . . . . . . . . . . . . . . . . . . . . . . . . . . . . . . . .
a.
General . . . . . . . . . . . . . . . . . . . . . . . . . . . . . . . . . . . . . . . . . . . . . . . . . . . . .
b. PMCS Guidance . . . . . . . . . . . . . . . . . . . . . . . . . . . . . . . . . . . . . . . . . . . . .
C.
PMCS for SINCGARS Radios . . . . . . . . . . . . . . . . . . . . . . . . . . . . . . . . . .
d.
Operator Troubleshooting Guides . . . . . . . . . . . . . . . . . . . . . . . . . . . . . .
8-1
8-1
8-3
8-4
8-7
8.2
ASSOCIATED EQUIPMENT, OPERATOR MAINTENANCE . . . . . . . . . . . .
a.
PMCS for Control, Receiver-Transmitter (RCU) . . . . . . . . . . . . . . . . . .
b.
PMCS for Control-Monitor (C-M) . . . . . . . . . . . . . . . . . . . . . . . . . . . . .
C.
Vehicular Intercom (VIC) . . . . . . . . . . . . . . . . . . . . . . . . . . . . . . . . . . . . . .
d.
Loudspeaker (LS-671) . . . . . . . . . . . . . . . . . . . . . . . . . . . . . . . . . . . . . . .
e.
Automated Net Control Device (ANCD)(AN/CYZ-10) . . . . . . . . . . . . .
f.
Precision Lightweight GPS Receiver (PLGR)(AN/PSN-11) . . . . . . . . .
g.
Frequency Hopping Multiplexer (FHMUX) . . . . . . . . . . . . . . . . . . . . . . . .
h.
Handheld Remote Control Radio Device (HRCRD) . . . . . . . . . . . . . . . .
8-13
8-13
8-17
8-18
8-20
8-21
8-22
8-23
8-24
8.3
BATTERY REQUIREMENTS . . . . . . . . . . . . . . . . . . . . . . . . . . . . . . . . . . . . . . .
a.
General . . . . . . . . . . . . . . . . . . . . . . . . . . . . . . . . . . . . . . . . . . . . . . . . . . . . .
b.
Manpack Radio/RCU Main Power . . . . . . . . . . . . . . . . . . . . . . . . . . . . . .
C.
Manpack Radio/RCU Hold Up Battery (HUB) . . . . . . . . . . . . . . . . . . . . .
d. Automated Net Control Device (ANCD) Main Power . . . . . . . . . . . . . . .
e.
Precision Lightweight GPS Receiver (PLGR) Main Power/HUB . . . . . .
8-25
8-25
8-25
8-26
8-27
8-28
8.1.
SINCGARS RADIO MAINTENANCE
8.1 a.
General
BY DESIGN
Your SINCGARS radio was designed to be highly reliable and as free as
possible of maintenance requirements, especially for the operator.
Your SINCGARS radio requires no periodic maintenance services.
Preventive Maintenance Checks and Services are required of the
operator before, during, and after operations.
DEFINITION
Preventive Maintenance Checks and Services (PMCS) means
systematic caring, inspecting, and servicing of equipment to keep it in
good condition and prevent breakdowns.
8-1
TM 11-5820-890-10-8
STANDARDS
The purpose of PMCS is to ensure that your SINCGARS radios and
associated items of equipment meet Army maintenance standards,
which are summarized here as:
Equipment is fully mission capable, or;
Corrective actions are being (or have been) taken, and;
Required repairs are being made (or have been requested of the
proper maintenance level), and;
Required supplies and repair parts are on hand (or have been
requisitioned).
REQUIREMENTS
As a SINCGARS radio operator, you are expected to do the following:
Perform prescribed PMCS “Before Operations” steps each time
you place the radio into operation.
Periodically perform PMCS “During Operations” steps while the
radio is being operated.
Perform prescribed PMCS “After Operations” steps once your use
of the radio has been completed.
If authorized and able to do so, correct all faults, deficiencies, or
problems you find while performing PMCS.
If unable to correct a problem identified by PMCS, report it to your
unit maintenance personnel.
Maintain a DA Form 2404 (Equipment Inspection and
Maintenance Worksheet) on your radio as required by your unit
SOP or applicable Army Regulations regarding The Army
Maintenance Management System (TAMMS). (You do not need to
record problems that you fix.)
8-2
TM 11-5820-890-10-8
8.1 b.
PMCS Guidance
ITEM NUMBER
The numerical sequence of those parts, components, or functions of
your radio configuration that the PMCS direct be checked. “Cables” is
one example of a PMCS item.
INTERVAL
This column indicates when each check is to be made. For SINCGARS
radio configurations, only Before, During, and After (Operations) apply.
ITEM
TO BE
INSPECTED
The parts, components, or functions of your radio that the
PMCS table tells you to check. “Self-Test” is an example.
Items are shown in the order they are to be performed and may be
referred to be Item Number or Name, as desired.
PROCEDURE
The Procedure column advises you of the checks to be made and steps
to be taken. These are to be performed in the order listed in the PMCS
table.
NOT MISSION
CAPABLE IF:
The term “Mission Capable” means that your radio is on hand and
ready to perform its combat mission as pertains to the item being
checked. Your radio is “Not Mission Capable” when fault shown in this
column is encountered and you are unable to correct the problem.
Wherever a check does not have an entry in this column, problems
should be corrected if possible but do not make the radio not mission
capable.
OPERATOR’S
MANUAL
In performing your PMCS, it may be necessary, or at least helpful, to
refer to the many graphics, task performance procedures, and
explanations found elsewhere in this operator’s manual. Proper
performance of PMCS steps requires that you have been trained as an
operator, know how to make best use of your Manual and Pocket
Guide, and have had at least some experience with the radio. Although
these PMCS are not difficult to perform, they do require an
understanding of operator tasks and procedures.
8-3
TM 11-5820-890-10-8
8.1 c.
PMCS for SINCGARS Radios
PREVENTIVE MAINTENANCE CHECKS AND SERVICES FOR SINCGARS RADIOS
Item
Nr
1
2
3
8-4
When
Before
During
After
Before
During
After
Before
During
After
CONTROLS:
RF PWR
CHAN
MODE
FCTN
DIM
COMSEC
VOL
CB1 (VAA)
a.
b.
c.
d.
CABLES:
a.
RF (W2)
RF (CG-3855)
b.
RF (CG-3856)
Audio/Data
C.
(W4)
PA Power
(CX- 13303) d.
ANTENNAS:
AS - 3683
AS - 3900
AS-3916
AS - 4266
Not Fully Mission
Capable IF:
Operator
Procedure
Item to
Check/Service
Broken control does not
function properly.*
Loose control does not
function properly.*
Frozen control does not
function properly.*
Knob rnissing and control
does not function properly.*
Check for cracked or
broken controls.
Check for loose
controls.
Check for frozen
controls.
Check for missing
control knobs.
a.
Check for missing
cables.
Check for proper
installation.
Check tightness of
connectors.
Check for obvious
damage to cables.
a.
Cable is missing.
d.
Cable is damaged and
cannot be used.**
b.
Antenna is not properly
grounded.
Antenna part broken and
cannot be used.**
Antenna part is missing.
Check for proper
installation.
Check for proper
b.
grounding
(Vehicular radios).
Check for broken
C.
antenna parts.
Check for missing
d.
antenna parts.
Check for
e.
tie-downs and
antenna tips.
b.
C.
d.
a.
C.
d.
TM 11-5820-890-10-8
Item
Nr
When
4
Before
5
Before
Item to
Check/Service
POWER:
Manpack
a.
Vehicular
b.
Either radio
C.
b.
C.
Before
Main battery is missing and
cannot be replaced.
No vehicle power and cannot
be corrected.
RT display does not light.
Check for presence
of main battery.
Check for availability
of vehicle power
Move COMSEC from
Z to PT, adjust DIM,
move FCTN from
OFF to Z-FH, check
that RT display
lights.
a.
With FCTN in Z-FH,
check that display
shows “GOOD.”
Move COMSEC to
CT and check that
alarm will clear.
Move FCTN to TST
and check that RT
display shows
“GOOD” at end.
a.
RT display does not show
“GOOD.”
b.
COMSEC alarm will not clear.
c.
Self-test ends with other
than “GOOD.”
a.
Any test frequency (0-9)
cannot be entered in RT
b.
Any test frequency (0-9)
cannot be stored in RT.
b.
c.
SELF-TEST:
a.
6
Not Fully Mission
Capable IF:
Operator
Procedure
KEYPAD:
With RT set to CT, SC, LD,
and channel shown:
Press FREQ, CLR,
a.
and enter test
frequency:
31000
CUE:
MAN:
32000
CHAN 1: 43000
CHAN 2: 54000
CHAN 3: 65000
CHAN 4: 76000
CHAN 5: 87000
CHAN 6: 87975
Press STO for each
b.
entry.
8-5
TM 11-5820-890-10-8
Item
Nr
When
7
Before
8
Before
During
After
Item to
Check/Service
DATA LOADING:
SC Freq
COMSEC key
FH data
Sync time
COMM
CHECK:****
Voice/data
SC mode
FH mode
Plain text
Cipher text
RXMT mode
Not Fully Mission
Capable IF:
Operator
Procedure
a.
b.
d.
a.
b.
C.
d.
Load SC freq.
Load COMSEC key.
Load FH data.
Load sync time***
(electronic or
manual).
a.
b.
Check for sidetone.
Check voice comm
in SC- PT and
FH -CT (check SQ
OFF while in SC
mode).
If data comm is
mission-required,
check data comm in
FH -CT using
mission-related
data device.*****
If RXMT is
mission-required,
check RXMT in all
mission - related
modes.
a.
b.
Sidetone is not heard.
Cannot communicate in
SC-PT or FH-CT, voice
mode.
C.
Cannot communicate in
mission-required data mode
using mission-related data
device.
d.
Cannot retransmit in
mission-related modes.
d.
SC freq will not load.
COMSEC key will not load.
FH data will not load.
Sync time will not load.
*
“Does not function properly” means that a control will not do what it is intended to do,
for example, turning the FCTN knob does not change the radio’s function. it may be necessary to
wait until item 8 (Communications Check) to determine for sure that some controls do or do not
function proper/y.
**
“Damaged and cannot be used” means that after visual inspection or operational
check you determine that a piece of equipment, for whatever reason, is faulty and will not support
your mission requirements or presents a safety hazard.
***
Use of the ICOM fill procedure is appropriate here, but separate checks of COMSEC
keys, FH data, and sync time elements are required.
****
Operators having special requirements (NCSs for example) should check those
functions that are important to mission operations (ERF for example). Skip this step if unit SOP or
the tactical situation prohibits transmitting.
*****
Unless your mission is likely to require use of data mode or retransmission operations,
you do not need to perform these two checks.
8-6
TM 11-5820-890-10-8
8.1 d.
Operator Troubleshooting Guides
RELIABILITY
While the reliability of the SINCGARS radio has been thoroughly proven
in tests and troop unit experience, an operator can expect to encounter
some problems, especially when the radio and associated equipment
are used together for various reasons.
PROBLEMS
Four problems are experienced most often. They are:
Loading RT with COMSEC and FH data from ANCD fails
Operator is unable to contact the net NCS
Operator hears no traffic on the net.
Radio presents strange message or noise that will not clear.
CAUSES
Any of these problems may be caused by an equipment failure. But,
these problems can also be caused by operator error, improperly set
controls, weak batteries, loose connections, or use of wrong data - to cite a few reasons.
TS GUIDES
The Troubleshooting Guides which follow offer the operator systematic
procedures for identifying and eliminating common faults, helping the
operator to maintain communications.
UNIT
MAINTENANCE
When there is an equipment failure, or when your use of these
Troubleshooting Guides fails to solve the problem, contact your Unit
Maintainer.
8-7
TM 11-5820-890-10-8
OPERATOR TROUBLESHOOTING GUIDE 1
Loading RT With COMSEC/FH Data From ANCD Fails
CHECKS
STEPS
Perform ICOM Fill Again
1.
ACTIONS
(1)
Does ANCD indicate that
data is being transferred?
YES: Go to Step 2
NO: Continue
(2)
Does RT indicate that data
has been received?
YES: Problem is solved
NO: Go to Step 2
2.
Verify ANCD Data Storage
Does ANCD contain a loadset?
YES: Continue
NO: Load/replace ANCD,* cont
3.
Ensure ANCD
Functional
(1)
Is low battery light on?
YES: Replace btry, cont
NO: Replace ANCD*, cont
(2)
Does ICOM fill now load
RT?
YES: Problem is solved
NO: Go to Step 4
(1)
Is cable damaged, cut, or
broken?
NO: Continue
YES: Replace cable*, cont
(2)
Is fill cable properly
connected to ANCD & RT?
YES: Continue
NO: Reconnect, cont
(3)
Does ICOM fill now load
RT?
YES: Problem is solved
NO: Go to Step 5
(1)
Does RT pass all checks
and tests?
YES: Continue
NO: See Unit Maintenance
(2)
Does ICOM fill now load
RT?
YES: Problem is solved
NO: See Unit Maintenance
4.
IS
Ensure Fill Cable is
Serviceable
5.
Re-run SINCGARS Radio
PMCS
*
Where ACTION is to “replace” ANCD and fill cable, it is anticipatedthat the operator will
borrow such item for the purpose of troubleshooting. If borrowing is not feasible, it will be
necessary for the operator to contact Unit Maintenance to obtain a substitute item or get
assistance with the problem.
8-8
TM
11-5820-890-10-8
OPERATOR TROUBLESHOOTING GUIDE 2
Operator is Unable to Contact the Net NCS*
STEPS
1.
2.
3.
4.
5.
Verify Correct RT Control
Settings
Verify Correct COMSEC
Key is Loaded
Verify Correct Net ID is
Used
Verify Correct GPS Sync
Time is Used**
Re-run SINCGARS Radio
PMCS
CHECKS
ACTIONS
(1)
Is FCTN switch set to SQ
ON?
YES: Continue
NO: Go to SQ ON, cont
(2)
Is CHAN switch set to net
operational channel?
YES: Continue
NO: Change CHAN, cont
(3)
Is COMSEC set to CT?
(or PT if in use?)
YES: Continue
NO: Reset COMSEC, cont
(4)
Is MODE set to FH?
(or SC if in use?)
YES: Continue
NO: Change MODE, cont
(5)
Is RF PWR set properly for
NCS location?
YES: Continue
NO: Change RF PWR, cont
(6)
Is VOL set to hear NCS or
net traffic?
YES: Go to Step 2
NO: Reset VOL, go to Step 2
(1)
Is TEK loaded in operational
channel?
YES: Continue
NO: Reload/scroll TEK, cont
(2)
Can NCS now be
contacted?
YES: Problem is solved
NO: Go to Step 3
(1)
Is correct Net ID loaded in
operational channel?
YES: Continue
NO: Reload FH data, cont
(2)
Can NCS now be
contacted?
YES: Problem is solved
NO: Go to Step 4
(1)
Are ANCD and RT times
within +/- 2 seconds?
YES: Continue
NO: Use passive LNE***, cont
(2)
Can NCS now be
contacted?
YES: Problem is solved
NO: Go to Step 5
(1)
Does RT pass all checks
and tests?
YES: Continue
NO: See Unit Maintenance
(2)
Can NCS now be
contacted?
YES: Problem is solved
NO: See Unit Maintenance
*
If other traffic can be heard on the net, problem is assumed to rest with the NCS station.
**
ANCD time may not be valid if it has been more than 24 hours since ICOM fill of radio.
***
Passive late net entry (LNE).
8-9
TM 11-5820-890-10-8
OPERATOR TROUBLESHOOTING GUIDE 3
Operator Hears No Traffic on the Net
CHECKS
STEPS
1.
2.
Perform Passive Late Net
Entry (LNE)
Check VOL Control
Setting
3.
4.
5.
6.
8-10
Ensure That Handset,
Headset, LS is Working
Verify Sync Time*
Verify FH Data
Manpack Only** - Check
Main Battery
ACTIONS
(1)
Does RT display show “LF
Xxx”?
YES: Wait for traffic on net, cont
NO: Adjust DIM switch, cont
(2)
Is traffic heard and "L"
dropped from RT display?
YES: Problem is solved
NO: Go to Step 2
(1)
Is VOL set high enough to
hear traffic?
YES: Go to Step 3
NO: Adjust VOL, cont
(2)
Is traffic now heard?
YES: Problem is solved
NO: Go to Step 3
(1)
Is handset, headset, LS
operational?
YES: Go to Step 4
NO: Replace item, cont
(2)
Is traffic now heard?
YES: Problem is solved
NO: Go to Step 4
(1)
Are ANCD and RT times
within +/- 2 seconds?
YES: Go to Step 5
NO: Reload sync time, cont
(2)
Is traffic now heard?
YES: Problem is solved
NO: Go to Step 5
(1)
Is there FH data loaded in
the operational channel?
YES: Continue
NO: Reload RT, cont
(2)
Is traffic now heard?
YES: Problem is solved
NO: Continue
(3)
Is correct Net ID loaded in
operational channel?
YES: Go to Step 6
NO: Change net ID, cont
(4)
Is traffic now heard?
YES: Problem is solved
NO: Go to Step 6
(1)
Does main battery need to
bechanged?
YES: Replace battery, cont
NO: Go to Step 7
(2)
Is traffic now heard?
YES: Problem is solved
NO: Go to Step 7
TM11-5820-890-10-8
CHECKS
7.
Perform Hot Start Net
Entry***
*
ACTIONS
(1)
Do COMSEC/FH data load
in RT?
YES: Continue
NO: Go to TS Guide 1
(2)
Is traffic now heard?
YES: Problem is solved
NO: Continue****
(3)
Can NCS be contacted?
YES: Problem is solved
NO: See Unit Maintenance
ANCD time may not be valid if it has been more than 24 hours since lCOM fill of radio.
l *
For vehicular radios, skip this step and continue with Step 7. Battery power can be
checked by placing RF PWR in HI and pressing PTT. Signal display of 2 of less indicates your
battery is weak.
***
Operator has option of using CUE and ERF method of late net entry in lieu of the Hot
Start procedure if desired.
****
The possibility that there is no traffic on the net must be considered, so try to contact
your NCS to check serviceability of your radio.
8-11
TM
11-5820-890-10-8
OPERATOR TROUBLESHOOTING GUIDE 4
Radio Presents Strange Message or Noise That Will Not Clear
STEPS
CHECKS
ACTIONS
1.
Set FCTN to STBY, then
back to SQ ON
Does message/noise clear?
YES: Problem IS solved
NO: Go to Step 2
2.
Set FCTN to Z-FH*
Does display show “GOOD”?
YES: Go to Step 3
NO: See Unit Maintenance
3.
Set FCTN to OFF, wait 10
set, then back to Z-FH
Does display now show
“GOOD”?
YES: Go to Step 4
NO: See Unit Maintenance
4.
Run RT Self-Test
Does self-test result in display
showing “GOOD”?
YES: Go to Step 5
NO: See Unit Maintenance
5.
Perform ICOM Fill and
Re- enter Net
Has message/noise cleared?**
YES: Problem is solved
NO: See Unit Maintenance
*
Do not perform Steps 2 thru 5 unless the nature of your mission will permit you to be out of the
net for a short period.
** Steps 2 thru 5 are the equivalent of “re-booting” your radio. In thatthe SINCGARS radio is
basically a computer, this procedure frequent/y works when other efforts to clear a strange
message or noise do not.
8-12
TM 11-5820-890-10-8
0.2.
ASSOCIATED EQUIPMENT
SCOPE
8.2a.
This paragraph of your SINCGARS Operator’s Manual briefly
addresses the maintenance requirements of those items of equipment
most often used in conjunction with your radio. The intent of this
paragraph is to give you a summary of operator maintenance tasks and
provide appropriate references from which more detailed information
may be obtained.
PMCS for Control, Receiver-Transmitter (RCU)
DIFFERENCES
Major differences between the SINCGARS RT and RCU are these:
RCU does not accept FH data; uses that data loaded into the
companion RT
RCU has speaker connection and switch in lieu of RT RXMT and
ANT connectors.
RCU FCTN switch has an intercom (ICM) position in lieu of the RT
remote (REM) position.
RCU SIG display lights when companion RT receives a signal.
RCU [BATT] key on first press provides RCU battery life Indication,
on second press provides RT battery life indication.
If two-wire connecting RCU with RT is cut or disconnected (or RT
FCTN is not set to REM), RCU display shows “OPEN.”
8-13
TM 11-5820-890-10-8
PREVENTIVE MAINTENANCE CHECKS AND SERVICES FOR
SINCGARS REMOTE CONTROL UNIT (RCU)
(Control, Receiver-Transmitter, C- 11561 (C)/U)
Item
Nr.
When
Before
During
After
1
2
Before
During
After
CONTROLS:
SPKR
RF PWR
CHAN
MODE
FCTN
DIM
COMSEC
VOL
CABLES:
Audio/Data (W4)
Field Wire (WD1)
a.
b.
C.
d.
a.
b.
C.
d.
3
4
Before
Before
POWER:
Manpack
a.
Vehicular
b.
RCU
C.
SELF -TEST:
[Connect RCU to
RT and set RT
FCTN to REM)
a.
b.
C.
8-14
Not Fully Mission
Capable If:
Operator
Procedure
Item to
Check/Service
Broken control does
not function.*
Loose control does not
function.*
Frozen control does
not function.*
Knob missing and
control does not
function.*
Check for cracked or broken
controls.
Check for loose
controls.
Check for frozen
controls.
Check for missing
control knobs.
a.
Check for missing cable or
field wire.
Check for proper installation
of cable and field wire.
Check for tightness
of connectors.
Check for obvious damage
to cable or field wire.
a.
Cable or field wire is
missing.
d.
Cable or field wire is
damaged and cannot
be used**
Check for presence of RCU
main battery.
Check vehicle power
availability.
Move COMSEC from Z to PT,
properly adjust DIM, move
FCTN from OFF to Z-FH;
and check that RCU display
lights.
a.
Main battery is
missing; cannot be
replaced.
No vehicle power;
cannot be corrected.
RCU display does not
light.
With RCU FCTN in Z-FH,
check that RCU display
shows “GOOD.”
Move RCU COMSEC to CT
and check that alarm will
clear.
Move RCU FCTN to TST and
check that RCU display
shows “GOOD” at end.
a.
RT display does not
show “GOOD.”
b.
COMSEC alarm will
not clear.
c.
Self-test ends with
other than “GOOD.”
b.
c.
d.
b.
C.
TM 11-5820-890-10-8
Item
Nr.
5
6
item to
When Check/Service
Before
Before
KEYPAD:
(Numbers 0-9)
DATA LOADING:
SC Frequencies
COMSEC Keys
Operator
Procedure
With RCU set to CT, SC, LD, and
channel shown::
a.
Press FREQ, CLR,
and enter:
CUE:
31000
MAN:
32000
CHAN 1:
43000
CHAN 2:
54000
CHAN 3:
65000
CHAN 4:
76000
CHAN 5:
87000
CHAN 6:
87975
b.
Press STO for each entry.
Not Fully Mission
Capable If:
a.
Any test frequency
(0-9) cannot be
entered.
b.
Any test frequency
(0-9) cannot be
stored.
SC frequency will not
load in RCU.
COMSEC key will not
load in RCU.
a.
Load SC frequencies
a.
b.
Load COMSEC keys***
b.
8-15
TM 11-5820-890-10-8
Item
Nr.
Before
During
After
7
COMM CHECK:
SC Mode
FH Mode
Plain Text
Cipher Text
Voice
Data
Not Fully Mission
Capable If:
Operator
Procedure
Item to
When Check/Service
a.
b.
c.
d.
e.
Check for sidetone.
Check ability to change RT
channel from RCU.
Check voice comm in
SC-PT and FH-CT****
(Check SQ OFF while in SC
mode).
If data comm is missionrequired, check data comm
in FH-CT, using
mission-related data
device.****
Check intercomm capability
between RCU and radio.
a.
b.
c.
d.
Sidetone is not heard.
Cannot change RT
channel from RCU
Cannot communicate
in SC-PT/FH-CT
voice
mode from RCU.
Cannot communicate
in mission-required
data
mode using missionrelated data device.
*
“Does not function proper/y”means that a control will not do what it is intended to do,
for example, turning the FCTN knob does not change the radio’s function. It may be necessary to
wait until Item 7 (Communications Checks) to determine for sure that some controls do or do not
function proper/y.
**
“Damaged and cannot be used” meansthat after visual inspection or operational
check you determine that a piece of equipment, for whatever reason, is faulty and will not support
your mission requirements or presents a safety hazard.
***
Use of the ICOM fill procedure is appropriate here, but on/y COMSEC keys are loaded
into the RCU.
****
*****
Skip steps “c” and “d” if unit SOP or tactical situation prohibits transmitting.
Unless your mission is likely to require use of data mode, you do not need to perform
this check.
8-16
TM 11-5820-890-10-8
8.2b.
PMCS for Control-Monitor (C-M)
PREVENTIVE MAINTENANCE CHECKS AND SERVICES FOR
SINCGARS
CONTROL-MONITOR
(Control-Monitor (C-M), C-11291/VRC Series)
Item
Nr.
When
1
Before
During
After
2
Before
During
After
Item to
Check/Service
CONTROLS:
RADIO
FCTN
INIT
DIM
CABLES:
C-M Cable (CX-13290)
Operator
Procedure
a.
b.
c.
d.
a.
b.
c
d.
Check for cracked
or broken controls.
Check for loose controls.
Check for frozen controls.
Check for missing control
knobs.
Check for presence.
Check for proper
installation of cable.
Check for tightness
of connectors.
Check for obvious
damage to cable.
3
Before
SELF-TEST:
a.
b.
Perform C-M self-test.
Test should result in “Gd.”
4
Before
CONTROL OF
RT FUNCTIONS:
a.
b.
Check control of RF PWR.
Check control of RT
Mode.
Check control of Channel.
Check control of
COMSEC.
c
d.
Not Fully Mission
Capable If:*
*
The Control-Monitor is not essential to the operation of the SINCGARS radio with which it is
used. Problems found with the Control-Monitor during PMCS are corrected or reported to Unit
Maintenance, but they do not result in Not Fully Mission Capable determinations.
8-17
TM
11-5820-890-10-8
8.2c.
Vehicular Intercommunication Set (WC) (AN/WC-1
OPERATOR
Operator level preventive maintenance requirements and PMCS for the
VIC are covered in Chapter 3, TM 11-5830-340-12, Operator’s and
Organizational Maintenance Manual, Intercommunication Set,
AN/VIC-1.
UNIT
MAINTENANCE
Unit level preventive maintenance requirements and PMCS for the VIC
are covered in Chapter 5, TM 11-5830-340-12, Operator’s and
Organizational Maintenance Manual, Intercommunication Set,
AN/VIC-1. Unit level maintenance procedures for the VIC are also
addressed in TM 11-5820-890-20-2, Unit Maintenance Manual,
SINCGARS Ground ICOM Radio Sets.
VIC PMCS
Preventive Maintenance Checks and Services for the VIC system are
shown below for the convenience of the SINCGARS operator using a
VIC intercomm. For answers to technical questions concerning the VIC
system, see the VIC manual cited above (TM 11-5830-340-12).
NMC STATUS
Radios in VIC-1 equipped vehicles can be operated directly,
by-passing the VIC system if necessary. Intercom, however, is
essential for the safe and effective operation of the combat vehicle.
Thus, intercom is a Not Fully Mission Capable deficiency.
8-18
TM 11-5820-890-10-8
PREVENTIVE MAINTENANCE CHECKS AND SERVICES FOR
SINCGARS RADIOS USED WITH INTERCOMMUNICATIONS SET
(AN/VIC-1)
item
Nr.
When
1
Before
During
After
2
Before
During
After
Item to
Check/Service
CONTROLS:
MAIN PWR
POWER ON/OFF
INT ACCENT
RADIO TRANS
MONITOR SWITCHES
Operator
Procedure
a.
b.
c.
d.
a.
b.
d.
Before
POWER:
a.
b.
c.
d.
4
Before
During
After
Check for cracked
or broken controls.
Check for loose controls.
Check for frozen controls.
Check for missing control
knobs.
CABLES:
c.
3
Not Fully Mission
Capable If:
COMM CHECK:
lntercomm
Radio “A”
Radio “B”
a.
b.
c.
Check for missing cables.
Check for proper
installation of cables.
Check for tightness
of connectors.
Check for obvious
damage to cables.
Ensure VAA CB1 is ON.
Ensure VIC AM - 1780
circuit breaker is ON.
Turn Power Switch to
NORM.
Power lamp should light.
Check ability to talk on
Intercom from all crew
control boxes at ALL, INT
ONLY, and A; CDR only at
position C.
Check ability to talk and
listen to Radio “A” from all
crew control boxes at ALL
and A.
Check ability to listen to
Radio “B” from all crew
control boxes at ALL and
C.
a.
Intercom does
not function*
*
Although the SINCGARS radios of a combat vehicle equipped with the VIC intercom system
can operate without the VIC, many combat vehicles require the operational use of the intercom for
internal vehicle command and control. Whether your VIC system being inoperative constitutes a
Non -Mission Ready status will vary with combat vehicle type.
8-19
TM 11-5820-890-10-8
8.2d.
Loudspeaker (LS-671)
PREVENTIVE MAINTENANCE CHECKS AND SERVICES FOR LOUDSPEAKER (LS-671)
Item
Nr.
1
When
Before
During
After
Operator
Procedure
Item to
Check/Service
CONTROLS:
a.
POWER SWITCH
VOLUME CONTROL
b.
C.
d.
2
Before
During
After
CABLE:
LS-671 Cable
(CX - 13292)
a.
b.
C.
d.
3
Before
POWER:
CB1 (VAA)
LS-671 Power Switch
LS-671 Power Indicator
Lamp
4
Before
a.
b.
C.
d.
LS-671 CONTROL OF RT:
a.
RT OFF/ON
Loudspeaker Volume
Handset Volume
b.
C.
Not Fully Mission
Capable If:*
Check for cracked or
broken controls.
Check for loose
controls.
Check for frozen
controls.
Check for missing
controls.
Check for presence.
Check for proper
installation of cable.
Check for tightness
of connectors.
Check for obvious
damage to cable.
Turn LS-671 Power
Switch to ON.
Turn VAA CB1 to ON.
Check that VAA DS1
lights.
Check that LS-671
Power Indicator Lamp
lights.
Check ability to turn RT
OFF/ON from LS-671.
Check control of
LS-671 volume.
Check control of
handset volume when
connected to LS - 671.
*
The Loudspeaker LS-671 is not essential to the operation of the SINCGARS radio with
which it is used. Problems found with the LS-671 during PMCS are corrected or reported to Unit
Maintenance, but they do not result in Not Fully Mission Capable determinations.
8-20
TM 11-5820-890-10-8
8.2e.
Automated Net Control Device (ANCD) (AN/CYZ- 10)
MAINTENANCE
CONCEPT
The maintenance concept for the ANCD is for the unit level maintainer
to requisition and repair all external parts in accordance with
TM 11-5810-394-14&P. If the problem is internal, Unit Maintenance
personnel will use BIT software to determine the operational status of
the ANCD. If the BIT confirms that the ANCD faulty, the unit will turn in
the faulty ANCD through normal supply channels to the COMSEC
depot. The unit will then requisition a replacement ANCD through
normal supply channels. Also, replacement ANCDs are normally
available at brigade and higher level Signal Offices for temporary loan
to units needing replacement ANCDs. Unit SOP should indicate how
temporary replacement ANCDs are to be provided to subordinate
units.
OPERATOR
MAINTENANCE
ANCD operator maintenance tasks are:
Check for frayed cables, loose nuts or screws, correct seating of
connectors, and completeness of equipment, whenever required.
Clean the display window and keypad as necessary for clarity.
Replace the battery on an as required basis when prompted by
the ANCD LOW BAT message.
BATTERY REPLACEMENT
PROCEDURE
(1)
Using a coin or screwdriver, remove four screws and
battery compartment cover from ANCD.
(2)
Remove the battery housing from the ANCD.
(3)
Remove batteries from the battery housing and replace
them, maintaining proper polarity.
(4)
Inset-t the battery housing into the ANCD, again ensuring
proper polarity.
(5)
Install the battery cover and tighten screws to a firm setting.
(6)
Turn the ANCD ON and verify that your battery change was
successful.
Figure 9-1. ANCD Battery Replacement
8-21
TM
11-5820-890-10-8
REQUIREMENT
All ANCD users, including operators, are required to change ANCD
battery/batteries whenever change is needed. Batteries should be
changed as soon as feasible after the LOW BAT message appears in
the ANCD display window.
PROTECTING
STORED DATA
The ANCD will retain stored data for two minutes after the batteries
have been removed. This gives you plenty of time to replace the spent
batteries with new ones without risk of losing your stored data.
IF STORED DATA
IS LOST
If you lose your data while replacing batteries, you will need to have
the internal ANCD software reactivated. Should you experience this
situation, take your ANCD to your unit maintainer for reactivation and
reloading.
REFERENCES
TB 11-5820-890-12, Operator and Unit Maintenance for
AN/CYZ-10, Automated Net Control Device (ANCD).
TM 11-5810-394-14&P Operator’s; Unit, Direct Support, and
Specialized Repair Activity Maintenance Manual with Repair Parts and
Special Tools List for Automated Net Control Device.
8.2f.
Precision Lightweight GPS Receiver (PLGR) (AN/PSN-11)
OPERATOR MAINTENANCE
The replacement of main power and hold-up batteries is the primary
operator requirement in PLGR maintenance.
REFERENCE
TM 11-5825-291 -13, Operations and Maintenance Manual, Satellite
Signal Navigation Set, AN/PSN-11
8-22
TM 11-5820-890-10-8
8.2g.
Frequency Hopping Multiplexer (FHMUX)
PREVENTIVE MAINTENANCE CHECKS AND SERVICES (PMCS)
Item
Nr.
When
1
Before
Item to
Check/Service
Not Fully Mission
Capable If:
Operator
Procedure
CONTROLS:
POWER SWITCH a.
Place the POWER toggle
switch to the ON position
and verify POWER ON
indicator is illuminated.
The POWER ON
indicator does not
illuminate and stay
illuminated
OR
b.
Watch the POWER
indicator and the four
BIT/FAULT indicators. The
POWER should illuminate
continuously and the four
BIT/FAULT indicators should
illuminate for approximately
five seconds after power-on
and then extinguish upon
successful completion of the
self test. The POWER ON
indicator should stay
illuminated.
any of the four
BIT/FAULT indicators
does not illuminate
then extinguish after
five seconds.
FHMUX TROUBLESHOOTING PROCEDURES
CHECKS
STEPS
1.
Verify Power On/Bit
ACTIONS
1.
Place the POWER toggle
switch into the ON position
and verify POWER ON
indicator is illuminated.
YES: Continue
NO: Contact Maintenance
2.
Verify that the four
BIT/FAULT indicators
illuminate for approximately
five seconds and then
extinguish after power up.
The POWER ON indicator
should stay illuminated.
YES: Continue
NO: (a) Make note of the
BIT/FAULT Indicators
that are illuminated.
(b) Inform unit
maintenance of the
failure including the
status of the BIT/FAULT
indicators noted above.
8-23
TM 11-5820-890-10-8
Handheld Remote Control Radio Device (HRCRD)
8.2h.
PREVENTIVE MAINTENANCE CHECKS AND SERVICES (PMCS)
Item
Nr.
When
Before
During
After
1
2
Before
During
After
3
Before
During
After
4
Before
During
After
*
To control radio function,
press [SEL] until required
function is highlighted
(CHAN; COMSEC; RF
POWER; MODE).
Then press the [DOWN
ARROW] until specific item
you need appeares in the
display.
CONTROLS:
LIGHT:
To turn backlight on, press
the light button. To turn the
light off, press the light
button a second time.
VOLUME:
To change the level of audio
volume, rotate the volume
control knob on the side of
the HRCRD to reach desired
level.
CABLE:
CONNECTORS:
COMM CHECK
Not Fully Mission
Capable If:*
Operator
Procedure
Item to
Check/Service
a.
Check for proper installation.
b.
Check for tightness of
connectors.
C.
Check for obvious damage
to cable.
a.
Check for obvious damage
to connectors.
b.
Check for missing O-rings.
a.
Check for bent/broken pins.
a.
Check for sidetone.
b.
Check voice comm.
The POWER ON
indicator does not
illuminate and stay
illuminated
OR
any of the four
BIT/FAULT indicators
does not illuminate
then extinguish after
five seconds.
a.
Cannot transmit
or receive.
HRCRD is MlSSlON CAPABLE AS LONG AS TRASMIT AND RECEIVE FUNCTIONS ARE
OPERABLE. If controls are not functioning, place radio function switch to normal operating
position (SO ON)/(LD) and change functions via keypads/swithces.
8-24
TM 11-5820-890-10-8
8.3.
BATTERY REQUIREMENTS
8.3a.
General
POWER
SOURCE
Manpack radios, RCUs, ANCDs, and PLGRs all depend upon batteries
for their main power source. Manpack and vehicular radios, RCUs, and
PLGRs depend upon hold up batteries (HUB) for retention of stored
data when main power is interrupted.
PURPOSE
The objective of this paragraph is to offer users of SINCGARS radios
and associated equipment general guides regarding the number of
hours of a particular type usage each battery is expected to provide.
CAUTION
It is important to understand that the times presented are the result of
computations as well as experience. Hours of service will vary
depending upon how long the battery was in storage prior to use,
temperature when being used, and other factors which cannot be
clearly defined. Even so, these times offer the using unit a basis for
planning battery requirements.
SCOPE
Approximate length of expected service is stated for each item and
version of equipment, using the proper battery for each Item.
8.3b.
Manpack Radio/RCU Main Power
MAIN POWER
Main power batteries used in the manpack radio and RCU are:
.
Battery, Non-Rechargeable (Lithium) (BA-5590/U)
.
Battery, Rechargeable (BB590/U)
.
Battery, Rechargeable (BB390/U)
(Note: The BB390A/U requires the following items for recharging, PP8444A/U universal portable
charger and a BB-390 adapter (J-6358/P). A 24 volt vehicular cable is available for the
PP-8444A/U. See AAL for NSN’s. Only the Non-Rechargeable BA - 5590 is used in the following
charts.)
MANPACK BATTERY
MANPACK RADIO MAIN POWER
(BA-5590: Approximate Length of Expected Service; RF PWR in HI)
Operator usage rate is defined as 9 minutes of receiving/monitoring to every 1 minute of
transmitting, on average.
** NCS usage rate is defined as 2 minutes of receiving/monitoring to every 1 minute of
transmitting, on average.
8-25
TM 11-5820-890-10-8
RCU
BATTERY
RCU MAIN POWER
(BA-5590: Approximate Length of Expected Service; RF PWR in HI)
*
Operator usage rate is defined as 9 minutes of receiving/monitoring to every 1 minute of
transmitting, on average.
** NCS usage rate is defined as 2 minutes of receiving/monitoring to every 1 minute of
transmitting, on average.
8.3c.
Manpack Radio/RCU Hold Up Battery (HUB)
Hold-up battery used is:
HUB
.
Battery, Non-Rechargeable (BA-5372/U)
BATTERY
MANPACK RADIO/RCU HUB BATTERY
(BA-5372: Approximate Length of Expected Service)
TYPE OF USE
RT- 1523 Series
RCU
Normal Back Up
6+ Mon
6+ Mon
SINCGARS HUB and ANCD batteries look similar and can be physically
interchanged. The HUB battery is 6.5 Volts while ANCD batteries are 3
Volts each. If HUB batteries (3 of them) are mistakenly placed in the
ANCD, it will be destroyed. Placing one ANCD battery in the RT HUB
position will cause the RT to lose its fill of data.
Therefore, be sure you know which battery goes where. Always read
the label before installing either HUB or ANCD batteries!
8-26
TM 11-5820-890-10-8
8.3d.
Automated Net Control Device (ANCD) Main Power
ANCD MAIN POWER
Batteries used are:
3 Duracel (3 Volt) (BA-5123/U)*
BATTERY LIFE
ANCD MAIN POWER (Requires 3 Batteries)
(BA-5123: Approximate Length of Expected Service)
TYPE OF USE
NORMAL (primarily SOI references)
ANCD
30 Hr
HEAVY (NCS-frequent data transfers)
LOADED in OFF position
2+ Mon
*
Use of Alkaline batteries in the ANCD may cause damage to the equipment and is strongly
discouraged.
8-27
TM 11-5820-890-10-8
Precision Lightweight GPS Receiver (PLGR) Main Power/HUB
8.3e.
Batteries used are:
PLGR BATTERIES
.
Lithium, Non-rechargeable (BA-5800/U)
.
Nickel Cadmium, Rechargeable
(Rockwell #221-0134-010)
.
AA Alkaline (8), Non-rechargeable (WB101)
.
AA Lithium (8), Non-rechargeable (L-91)
.
Lithium, Non-rechargeable (HUB) (LS6 BA) (HUB)
MAIN/HUB BATTERIES
PLGR MAIN POWER AND HUB BATTERIES
(Approximate Length of Expected Service)
TYPE OF USE
BA-5800 NiCad WB101
L-91
LSGBA*
Sync Time only**
48 Hr
7 Hr
9 Hr
19 Hr
1 year
Automatic Standby (Continuous)
10 Hr
2 Hr
2 Hr
4 Hr
1 year
*
This is the HUB battery
** PLGR is used as a source of SlNCGARS sync time, to include electronic loading of RT when
required. PLGR is not used for navigation in this computation.
8-28
TM 11-5820-890-10-8
APPENDIX A
REFERENCES
This appendix lists all forms, field manuals, technical manuals,
and miscellaneous publicationreferences in this manual.
A.3.
A.4
DA Form 2028
Recommended Changes to Publications and Blank Forms.
DA Form 2028-2
Recommended Changes to Equipment Technical Publications
SF 361
Transportation Discrepancy Report (TDR).
SF 364
Report of Discrepancy (ROD).
SF 388
Product Quality Deficiency Report.
FIELD MANUAL
FM 11-32
Combat Net Radio Operations.
FM 21-11
Artificial Respiration.
FM 24-18
Tactical Single-Channel Radio Communication Techniques.
TECHNICAL BULLETlNS
TB 1 1 - 5 8 2 0 - 8 9 0 - 1 0 - 2
AN/PSC-7 Radio Set
TB 1 1 - 5 8 2 0 - 8 9 0 - 1 0 - 3
Wireline Adapter Interconnect Cable, CX-13310/VRC
TB 1 1 - 5 8 2 0 - 8 9 0 - 1 0 - 4
Variable Format Message Entry Device, AN/GSC-21
TB 1 1 - 5 8 2 0 - 8 9 0 - 1 0 - 5
Tactical Fire Direction System, AN/GSC-10
TB 1 1 - 5 8 2 0 - 8 9 0 - 1 0 - 6
Lightweight Digital Fax, AN/UXC-7
TB 1 1 - 5 8 2 0 - 8 9 0 - 1 0 - 7
Secure Net Radio Interface Unit, KY-90
TB 1 1 - 5 8 2 0 - 8 9 0 - 1 0 - 8
Battery Computer System, AN/GYK-29
TB 1 1 - 5 8 2 0 - 8 9 0 - 1 0 - 9
Digital Message Device, AN/PSG-2
TB 1 1 - 5 8 2 0 - 8 9 0 - 1 0 - 1 0
FIST-V Digital Message Device, AN/PSG-5
TB 1 1 - 5 8 2 0 - 8 9 0 - 1 0 - 1 1
Maneuver Control System (MCS)
TB 1 1 - 5 8 2 0 - 8 9 0 - 1 0 - 1 2
Lightweight TACFIRE
A-1
TM
A.5.
11-5820-890-10-8
TB 11-5820-890-10-13
Mortar Ballistic Computer, M23 (MBC)
TB 11-5820-890-10-14
Loudspeaker, LS -671
TB 11-5820-890-10-15
Operation of AN/TPQ-36 Firefinder
TB
Operation of Battery Computer System to Gun Display Unit
11-5820-890-10-16
TB 11-5820-890-10-17
Operation of AN/PSC-3 Radio Set
TB
Operation of AFATDS System AN/GYG-1 (U) 1, 2, 3, &4
11-5820-890-10-18
TECHNICAL MANUALS
TM 11-5810-394-14 & P
Operator’s; Unit, Direct Support, and Specialized Repair Activity
Maintenance Manual with Repair Parts and Special Tools List for
Automated Net Control Device.
TM 11-5820-890-10-6
SINCGARS ICOM Ground Radio Operator’s Pocket Guide
TM 11-5820-890-10-7
SINCGARS ICOM Ground Radio NCS Pocket Guide
TM 11-5825-291-13
Operations and Maintenance Manual, Satellite Signal Navigation
Set, AN/PSN-11
TM 750-244-2
Procedure for Destruction of Electronics Materiel to Prevent
Enemy Use
A.6. MISCELLANEOUS PUBLICATIONS
A-2
AR 735-244-2
Reporting of Item and Packaging Discrepancies
DA Pam 25-30
Consolidated Index of Army Publications and Blank Forms.
DA Pam 738-750
The Army Maintenance Management System.
SB 11-624
Warning Notice for Vehicles in Which Radios are Mounted.
TM 11-5820-890-10-8
JULIAN DATE CALENDAR (REGULAR YEAR)
1
2
3
4
5
6
7
8
9
10
11
12
13
14
15
16
17
18
19
20
21
22
33
24
25
26
27
28
29
30
31
2
4
5
6
7
8
9
10
11
12
13
14
15
16
17
18
19
20
21
22
23
24
25
26
27
28
29
30
31
01
02
03
04
05
06
07
08
09
10
11
12
13
14
15
16
17
18
19
20
21
22
23
24
25
26
27
28
29
30
31
32
33
34
35
36
37
38
39
40
41
42
43
44
45
46
47
48
49
50
51
52
53
54
55
56
57
58
59
60
61
62
63
64
65
66
67
68
69
70
71
72
73
74
75
76
77
78
79
80
81
82
83
84
85
86
87
88
89
90
91
92
93
94
95
96
97
98
99
00
01
02
03
04
05
06
07
08
09
10
11
12
13
14
15
16
17
18
19
20
21
22
23
24
25
26
27
28
29
30
31
32
33
34
35
36
37
38
39
40
41
42
43
44
45
46
47
48
49
50
51
52
53
54
55
56
57
58
59
60
61
62
63
64
65
66
67
68
69
70
71
72
73
74
75
76
77
78
79
80
81
82
83
84
85
86
87
88
89
90
91
92
93
94
95
96
97
98
99
00
01
02
03
04
05
06
07
08
09
10
11
12
13
14
15
16
17
18
19
20
21
22
23
24
25
26
27
28
29
30
31
32
33
34
35
36
37
38
39
40
41
42
43
44
45
46
47
48
49
50
51
52
53
54
55
56
57
58
59
60
61
62
63
64
65
66
67
68
69
70
71
72
73
74
75
76
77
78
79
80
81
82
83
84
85
86
87
88
89
90
91
92
93
94
95
96
97
98
99
00
01
02
03
04
05
06
07
08
09
10
11
12
13
14
15
16
17
18
19
20
21
22
23
24
25
26
27
28
29
30
31
32
33
34
35
36
37
38
39
40
41
42
43
44
45
46
47
48
49
50
51
52
53
54
55
56
57
58
59
60
61
62
63
64
65
01
02
03
04
05
06
07
08
09
10
11
12
13
14
15
16
17
18
19
20
21
22
23
24
25
26
27
28
29
30
31
32
33
34
35
36
37
38
39
40
41
42
43
44
45
46
47
48
49
50
51
52
53
54
55
56
57
58
59
60
61
62
63
64
65
66
67
68
69
70
71
72
73
74
75
76
77
78
79
80
81
82
83
84
85
86
87
88
89
90
91
92
93
94
95
96
97
98
99
00
01
02
03
04
05
06
07
08
09
10
11
12
13
14
15
16
17
18
19
20
21
22
23
24
25
26
27
28
29
30
31
32
33
34
35
36
37
38
39
40
41
42
43
44
45
46
47
48
49
50
51
52
53
54
55
56
57
58
59
60
61
62
63
64
65
66
67
68
69
70
71
72
73
74
75
76
77
78
79
80
81
82
83
84
85
86
87
88
89
90
91
92
93
94
95
96
97
98
99
00
01
02
03
04
05
06
07
08
09
10
11
12
13
14
15
16
17
18
19
20
21
22
23
24
25
26
27
28
29
30
31
32
33
34
35
36
37
38
39
40
41
42
43
44
45
46
47
48
49
50
51
52
53
54
55
56
57
58
59
60
61
62
63
64
65
66
67
68
69
70
71
72
73
74
75
76
77
78
79
80
81
82
83
84
85
86
87
88
89
90
91
92
93
94
95
96
97
98
99
00
01
02
03
04
05
06
07
08
09
10
11
12
13
14
15
16
17
18
19
20
21
22
23
24
25
26
27
28
29
30
31
32
33
34
35
36
37
38
39
40
41
42
43
44
45
46
47
48
49
50
51
52
53
54
55
56
57
58
59
60
61
62
63
64
65
66
A-3
TM 11-5820-890-10-8
TIME ZONE MAP
A-4
TM 11-5820-890-10-8
APPENDIX B
COMPONENTS OF END ITEM AND BASIC ISSUE ITEMS LISTS
SECTION I
INTRODUCTION
B.1. SCOPE
This appendix lists components of end item for Radio Sets AN/PRC-119A/D/F and AN/VRC-87A/D/F thru
AN/VRC-92A/D/F, and AN/VRC-87C to help you inventory items required for safe and efficient operation.
The Components of End Item List is found at Section II.
This listing is for informational purposes only and is not authority to requisition replacements. These items are
part of the end item, but are removed and separately packaged for transportation or shipment. As part of the
end item, these items must be with the end item whenever it is issued or transferred between property
accounts. The list is divided into sublistings for each radio set. Illustrations are furnished to assist you in
identifying the items.
B.3.
EXPLANATION OF COLUMNS
The following explains the columns found in the tabular listings.
a.
Column (1), Illustration Number (Illus No.). This column indicates the number of the illustration
showing the item.
b.
Column (2), National Stock Number. This column indicates the national stock number assigned to the
item and will be used for requisitioning purposes.
c.
Column (3), Description. This column indicates the federal item name and if required, a minimum
description to identify and locate the item. The last line for each item indicates the CAGEC (in
parentheses), followed by the part number.
d.
Column (4), Unit of Measure (U/M). This column indicates the measure used in performing the actual
operational maintenance function. This measure is expressed by a two-character alphabetical
abbreviation (e.g., ea, in, pr).
e.
Column (5), Quantity Required (Qty Reqd). This column indicates the quantity of the item authorized
to be used with/on the equipment.
B-1
TM
11-5820-890-10-8
SECTION II.
B-2
COMPONENTS OF END ITEM
TM 11-5820-890-10-8
SECTION II. COMPONENTS OF END ITEM
Continued
B-3
TM 11-5820-890-10-8
SECTION II. COMPONENTS OF END ITEM
Continued
B-4
TM 11-5820-890-10-8
SECTION II. COMPONENTS OF END ITEM Continued
(1)
lllus
No.
(2)
National Stock
Number
5820-01-267-9482
5820-01-421-0801
5820-01-451-8252
3
5985-01-235-9189
4
6160-01-284-4200
6160-01-304-2034
19
6160-01-424-8514
6
5965-00-043-3463
18
5895-01-432-8370
8
(3)
Description
(CAGEC) and Part Number
RADIO SET
RADIO SET
RADIO SET
****(Denotes
(4)
U/M
AN/PRC-119A (MANPACK)
AN/PRC-119D (MANPACK) ****
AN/PRC-119F (MANPACK) *****
SIP)I*****(Denotes ASIP)
Antenna Manpack:
AS-3683/PRC (80063) A3132025-1
ea
Battery Box:
CY-8523A/PRC (80063) A3018381-1*
CY-8523B/PRC (80063) A3132600-1*
*(Required for MP SIP RT as an RCU)
ea
CY-8523C/PRC (80063) A3249648-1**
**(Required for MP radio using HRCRD)
ea
Handset/HRCRD;
H-250/U (80058) (or)
Handheld Remote Control Radio Device:***
C-12493/U (80063) A3249865-1
**(Requires use of Battery Box, CY-8523C/PRC)
ea
ea
Carrying Case, Radio
(80063) A3142076-1
(80063) A3142076-2
ea
5820-01-322-3477
5895-01-461-4505
Receiver-Transmitter, Radio:
RT-1523(C)/U (80063) A3018860-1
RT-1523A(C)/U (80063) A3131300
RT-1523B(C)/U (80063) A3018860-5
RT-1523C(C)/U (80063) A3249545-1 ****(or)
RT-1523D(C)/U (80063) A3137700****
RT-1523E(C)/U (80063) A3267334 *****
ea
5820-01-234-8093
5820-01-318-7990
5820-01-365-2725
5820-01-363-6929
5820-01-410-8981
5820-01-444-1219
5820-01-267-9480
5820-01-351-5259
5820-01-451-8248
RADIO SET AN/VRC-87A (SHORT RANGE)
RADIO SET AN/VRC-87D (SHORT RANGE)****
RADIO SET AN/VRC-87F (SHORT RANGE)****
5895-01-188-8819
5895-01-304-8389
5895-01-334-3164
5895-01-421-0093
5895-01-422-8781
5895-01-444-1218
Amplifier-Adapter, Vehicular (VAA)
AM-7239/-VRC (80063) A3013365-1
AM-7239A/VRC (80063) A3132035-1
AM-7239B/VRC (80063) A3148136-1
AM-7239C/VRC (80063) A3245066-1****(or)
AM-7239D/VRC (80063) A3163600****
AM-7239E/VRC (80063) A3267335*****
12
17
5995-01-310-0335
5995-01-426-6728
Cable Assembly, Special Purpose (W4)
(80063) A3103735--7 (or)
(80063) A3255571 (RT to VAA) ****
7
5820-01-234-8093
5820-01-318-7990
Receiver-Transmitter, Radio:
RT-1523(C)/U (80063) A3018860-1
RT-1523A(C)/U (80063) A3131300
7
20
1
(5)
Qty
Reqd
ea
1
ea
ea
ea
# Denotes Dismount Components
B-5
TM
11-5820-890-10-8
SECTION II. COMPONENTS OF END ITEM Continued
(1)
Illus
No.
(2)
National Stock
Number
(3)
Description
(CAGEC) and Part Number
(4)
U/M
5820-01-267-9480
5820-01-351-5259
5820-01-351-5259
RADIO SET AN/VRC-87A
RADIO SET AN/VRC-87D (continued)****
RADIO SET AN/VRC-87F (continued)*****
5820-01-365-2725
5820-01-363-6929
5820-01-410-8981
5820-01-444-1219
5340-01-430-4723
5340-01-456-7985
RT-1523B(C)/U (80063) A3018860-5
RT-1523C(C)/U (80063) A3249545-1 ****(or)
RT-1523D(C)/U (80063) A3137700****
RT-1523E(C)/U (80063) A3267334*****
Lever, Locking (80063)
Lever, Locking (ASIP) (80063) A3256669-1*****
5820-01-267-9481
5820-01-352-1694
5820-01-452-8735
RADIO SET AN/VRC-88A (SHORT RANGE / DISMOUNT)
RADIO SET AN/VRC-88D****
RADIO SET AN/VRC-88F****
5895-01-188-8819
5895-01-304-8389
5895-01-334-3164
5895-01-421-0093
5895-01-422-8781
5895-01-444-1218
Amplifier-Adapter, Vehicular (VAA)
AM-7239/VRC (80063) A3013365-1
AM-7239A/VRC (80063) A3132035-1
AM-7239B/VRC (80063) A3148136-1
AM-7239C/VRC (80063) A3245066-1****(or)
AM-7239D/VRC (80063) A3163600****
AM-7239E/VRC (80063) A3267335*****
5995-01-310-0335
5995-01-426-6728
#
5985-01-235-9189
CableAssembly, Special Purpose (W4)
(80063) A3103735-7 (or)
(80063) A3255571 (RT to VAA) ****
Antenna Manpack:
AS-3683/PRC (80063) A3132025-1
#
6160-01 - 2 8 4 - 4 2 0 0
6160-01 - 3 0 4 - 2 0 3 4
6160-01 - 4 2 4 - 8 5 1 4
Battery Box:
CY-8523A/PRC (80063) A3018381-1* (or)
CY-8523B/PRC (80063) A3132600-1* (or)
CY-8523C/PRC (80063) A3249648-1**
6
#
5965-00-043-3463
18
5895-01-432-8370
Handset/HRCRD;
H-250/U (80058) (or)
Handheld Remote Control Radio Device:***
C-12493/U (80063) A3249865-1
8
#
5820-01-322-3477
5895-01-461-4505
Carrying Case, Radio
(80063) A3142076-1
(80063) A3142076-2
ea
Receiver-Transmitter, Radio:
RT-1523(C)/U (80063) A3018860-1
RT-1523A(C)/U (80063) A3131300
RT-1523B(C)/U (80063) A3018860-5
RT-1523C(C)/U (80063) A3249545-1 ****(or)
RT-1523D(C)/U (80063) A3137700****
RT-1523E(C)/U (80063) A3267334*****
Lever, Locking (80063)
Lever, Locking (ASIP) (80063) A3256669-1*****
ea
5820-01-234-8093
5820-01-318-7990
5820-01-365-2725
5820-01-363-6929
5820-01-410-8981
5820-01-444-1219
5340-01-430-4723
5340-01-456-7985
16
2
1
12
17
3
4
7
20
16
21
# Denotes Dismount Components
B-6
(5)
Qty
Reqd
ea
ea
ea
ea
ea
ea
ea
ea
ea
1
TM 11-5820-890-10-8
SECTION II. COMPONENTS OF END ITEM Continued
(1)
lllus
No.
(2)
National Stock
Number
(3)
Description
(CAGEC) and Part Number
(4)
U/M
(5)
Qty
Reqd
5820-01-267-9479
5820-01-420-6619
5820-01-451-8247
RADIO SET AN/VRC-89A (LONG/SHORT RANGE)
RADIO SET AN/VRC-89D****
RADIO SET AN/VRC-89F*****
Amplifier-Adapter, Vehicular (VAA)
AM - 7239/VRC (80063) A3013365-1
AM - 7239A/VRC (80063) A3132035-1
AM - 7239B/VRC (80063) A3148136-1
AM - 7239C/VRC (80063) A3245066-1**** (or)
AM - 7239D/VRC (80063) A3163600****
AM - 7239E/VRC (80063) A3267335*****
ea
1
5895-01-188-8819
5895-01-304-8389
5895-01-334-3164
5895-01-421-0093
5895-01-422-8781
5895-01-444-1218
Amplifier, Radio-Frequency: (PA)
AM - 7238/VRC (80063) A3013357-1
AM - 7238A/VRC (80063) A3132135-1
AM - 7238B/VRC (80063) A3210919-1
ea
1
5895-01-195-4844
5895-01-306-8093
5895-01-407-2627
Cable Assembly, Radio- Frequency (W2)
(80063) A3013824-21-3 (RT to PA)
ea
1
ea
ea
2
2
ea
2
ea
1
1
2
11
5995-01-304-2026
12
17
5995-01-310-0355
5995-01-426-6728
Cable Assembly, Special Purpose (W4)
(80063) A3103735 - 7 (or)
(80063) A3255571 (RT to VAA) ****
5820-01-234-8093
5820-01-318-7990
5820-01-365-2725
5820-01-363-6929
5820-01-410-8981
5820-01-444-1219
5340-01-392-0048
5340-01-456-7985
Receiver-Transmitter, Radio:
RT - 1523(C)/U (80063) A3018860-1
RT - 1523A(C)/U (80063) A3131300
RT - 1523B(C)/U (80063) A3018860-5
RT - 1523C(C)/U (80063) A3249545-1 **** (or)
RT - 1523D(C)/U (80063) A3137700 ****
RT - 1523E(C)/U (80063) A3267334 *****
Lever, Locking (80063)
Lever, Locking (ASIP) (80063) A3256669-1*****
5820-01-267-9481
5820-01-420-6618
5820-01-451-8246
RADIO SET AN/VRC-90A (LONG RANGE)
RADIO SET AN/VRC-90D (LONG RANGE)****
RADIO SET AN/VRC-90F (LONG RANGE)*****
Amplifier-Adapter, Vehicular (VAA)
AM - 7239/VRC (80063) A3013365-1
AM - 7239A/VRC (80063) A3132035-1
AM - 7239B/VRC (80063) A3148136-1
AM - 7239C/VRC (80063) A3245066-1**** (or)
AM - 7239D/VRC (80063) A3163600****
AM - 7239E/VRC (80063) A3267335*****
ea
1
5895-01-188-8819
5895-01-304-8389
5895-01-334-3164
5895-01-421-0093
5895-01-422-8781
5895-01-444-1218
Amplifier, Radio-Frequency: (PA)
AM - 7238/VRC (80063) A3013357-1
AM - 7238A/VRC (80063) A3132135-1
AM - 7238B/VRC (80063) A3210919-1
ea
1
5895-01-195-4844
5895-01-306-8093
5895-01-407-2627
7
20
16
21
1
2
# Denotes Dismount Components
B-7
TM 11-5820-890-10-8
SECTION II. COMPONENTS OF END ITEM Continued
(1)
lllus
No.
(3)
Description
(CAGEC) and Part Number
(2)
National Stock
Number
(4)
U/M
5820-01-267-9481
5820-01-420-6618
5820-01-451-8246
RADIO SET AN/VRC-90A (LONG RANGE)
RADIO SET AN/VRC-90D (LONG RANGE)****
RADIO SET AN/VRC-90F (LONG RANGE)*****
11
5995-01-304-2026
Cable Assembly, Radio-Frequency (W2)
(80063) A3013824-21-3 (RT to PA)
12
17
5995-01-310-0355
5995-01-426-6728
Cable Assembly, Special Purpose (W4)
(80063) A3103735-7 (or)
(80063) A3255571 (RT to VAA) ****
5820-01-234-8093
5820-01-318-7990
5820-01-365-2725
5820-01-363-6929
5820-01-410-8981
5820-01-444-1219
Receiver-Transmitter, Radio:
RT-1523(C)/U (80063) A3018860-1
RT-1523A(C)/U (80063) A3131300
RT-1523B(C)/U (80063) A3018860-5
RT-1523C(C)/U (80063) A3249545-1 **** (or)
RT-1523D(C)/U (80063) A3137700****
RT-1523E(C)/U (80063) A3267334******
5820-01-267-9478
5820-01-420-6621
5820-01-451-8249
RADIO SET AN/VRC-91A (LONG/SHORTRADIO SET AN/VRC-91D****
RANGE/DISMOUNT)
RADIO SET AN/VRC-91F*****
Amplifier-Adapter, Vehicular (VAA)
AM-7239/VRC (80063) A3013365-1
AM-7239A/VRC (80063) A3132035-1
AM-7239B/VRC (80063) A3148136-1
AM-7239C/VRC (80063) A3245066-1**** (or)
AM-7239D/VRC (80063) A3163600****
AM-7239E/VRC (80063) A3267335*****
ea
5895-01-188-8819
5895-01-304-8389
5895-01-334-3164
5895-01-421-0093
5895-01-422-8781
5895-01-444-1218
Amplifier, Radio-Frequency: (PA)
AM-7238/VRC (80063) A3013357-1
AM-7238A/VRC (80063) A3132135-1
AM-7238B/VRC (80063) A3210919-1
ea
5895-01-195-4844
5895-01-306-8093
5895-01-407-2627
Cable Assembly, Radio- Frequency (W2)
(80063) A3013824-21-3 (RT to PA)
ea
7
20
1
2
ea
ea
ea
ea
11
5995-01-304-2026
12
17
5995-01-310-0355
5995-01-426-6728
Cable Assembly, Special Purpose (W4)
(80063) A3103735-7 (or)
(80063) A3255571 (RT to VAA) ****
ea
ea
5985-01-235-9189
Antenna Manpack:
AS-3683/PRC (80063) A3132025-1
ea
6160-01-284-4200
6160-01-304-2034
6160-01-424-8514
Battery Box:
CY-8523A/PRC (80063) A3018381-1*
CY-8523B/PRC (80063) A3132600-1*
CY-8523C/PRC (80063) A3249648-1**
3
4
# Denotes Dismount Components
B-8
ea
(5)
Qty
Reqd
TM 11-5820-890-10-8
SECTION II. COMPONENTS OF END ITEM Continued
(1)
lllus
No.
(2)
National Stock
Number
(3)
Description
(CAGEC) and Part Number
(4)
U/M
(5)
Qty
Reqd
ea
1
ea
1
5820-01-267-9478
5820-01-420-6621
5820-01-451-8249
RADIO SET AN/VRC-91A (LONG/SHORTRADIO SET AN/VRC-91D****
RANGE/DISMOUNT)
RADIO SET AN/VRC-91F***** (continued)
6
#
5965-00-043-3463
18
5895-01-432-8370
Handset/HRCRD;
H-250/U (80058) (or)
Handheld Remote Control Radio Device:***
C-12493/U (80063) A3249865-1
8
#
5820-01-322-3477
5895-01-461-4505
Carrying Case, Radio
(80063) A3142076-1
(80063) A3142076-2
ea
1
Receiver-Transmitter, Radio:
RT-1523(C)/U (80063) A3018860-1
RT-1523A(C)/U (80063) A3131300
RT-1523B(C)/U (80063) A3018860-5
RT-1523C(C)/U (80063) A3249545-1 ****(or)
RT-1523D(C)/U (80063) A3137700****
RT-1523E(C)/U (80063) A3267334*****
Lever, Locking (80063)
Lever, Locking (ASIP) (80063) A3256669-1*****
ea
2
5820-01-234-8093
5820-01-318-7990
5820-01-365-2725
5820-01-363-6929
5820-01-410-8981
5820-01-444-1219
5340-01-430-4723
5340-01-456-7985
ea
1
5820-01-267-9477
5820-01-421-2605
5820-01-451-8250
RADIO SET AN/VRC-92A (LONG RANGE/LONG RANGE)
RADIO SET AN/VRC-92D****
RADIO SET AN/VRC-92F*****
Amplifier-Adapter, Vehicular (VAA)
AM-7239/VRC (80063) A3013365-1
AM-7239A/VRC (80063) A3132035-1
AM-7239B/VRC (80063) A3148136-1
AM-7239C/VRC (80063) A3245066-1****(or)
AM-7239D/VRC (80063) A3163600****
AM-7239E/VRC (80063) A3267335*****
ea
1
5895-01-188-8819
5895-01-304-8389
5895-01-334-3164
5895-01-421-0093
5895-01-422-8781
5895-01-444-1218
Amplifier, Radio-Frequency: (PA)
AM-7238/VRC (80063) A3013357-1
AM-7238A/VRC (80063) A3132135-1
AM-7238B/VRC (80063) A3210919-1
ea
2
5895-01-195-4844
5895-01-306-8093
5895-01-407-2627
7
20
16
21
1
2
14
5975-01-235-1962
Mounting Base, Electrical Equipment
MT-6353/VRC (80063) A3014053-1
ea
1
9
5995-01-222-4209
ea
1
10
5995-01-219-7025
ea
1
11
5995-01-304-2026
Cable Assembly, Special Purpose
CX-13291/VRC (80063) A3104037
Cable Assembly, Radio
CG-3856/VRC (80063) A3014032-3
Cable Assembly, Radio-Frequency (W2)
(80063) A3013824-21-3 (RT to PA)
ea
1
ea
2
12
17
5995-01-310-0335
5995-01-426-6728
Cable Assembly, Special Purpose (W4)
(80063) A3103735-7 (or)
(80063) A3255571 (RT to VAA) ****
# Denotes Dismount Components
B-9
TM 11-5820-890-10-8
SECTION II. COMPONENTS OF END ITEM Continued
(1)
lllus
No.
(3)
Description
(CAGEC) and Part Number
(2)
National Stock
Number
(4)
U/M
(5)
Qty
Reqd
5820-01-267-9477
5820-01-421-2605
5820-01-451-8249
RADIO SET AN/VRC-92A (LONG RANGE/LONG RANGE)
RADIO SET AN/VRC-92D****
RADIO SET AN/VRC-92F***** (continued)
5995-01-300-9324
Cable Assembly, Power
CX-13303/VRC (80063) A3014040-9 (VAA to PA)
ea
1
Receiver-Transmitter, Radio:
RT-1523(C)/U (80063) A3018860-1
RT-1523A(C)/U (80063) A3131300
RT-1523B(C)/U (80063) A3018860-5
RT-1523C(C)/U (80063) A3249545-1 **** (or)
RT-1523D(C)/U (80063) A3137700****
RT-1523E(C)/U (80063) A3267334*****
Lever, Locking (80063)
Lever, Locking (ASIP) (80063) A3256669-1*****
ea
2
5820-01-234-8093
5820-01-318-7990
5820-01-365-2725
5820-01-363-6929
5820-01-410-8981
5820-01-444-1219
5340-01-392-0048
5340-01-456-7985
ea
1
5820-01-304-2045
RADIO SET AN/VRC-87C (SINGLE RADIO MOUNT)
5
6130-01-284-4195
Adapter, Power Supply (PSA)
MX-10862/VRC (80063) A3018352-1
ea
1
15
5995-01-323-2729
Cable Assembly, Special Purpose
CX-13314/VRC (80063) A3142069-1
ea
1
Receiver-Transmitter, Radio:
RT-1523(C)/U (80063) A3018860-1
RT-1523A(C)/U (80063) A3131300
RT-1523B(C)/U (80063) A3018860-5
ea
1
13
7
20
16
21
7
5820-01-234-8093
5820-01-318-7990
5820-01-365-2725
# Denotes Dismount Components
B-10
TM 11-5820-890-10-8
SECTION III. BASIC ISSUE ITEMS
There are no Bll items associated with SINCGARS Radio Configurations.
B-11
TM
11-5820-890-10-8
THIS PAGE INTENTIONALLY
BLANK.
B-12
TM 11-5820-890-10-8
APPENDIX C
ADDITIONAL AUTHORIZATION LIST
SECTION I. INTRODUCTION
C.1.
This appendix lists additional items you are authorized for the support of Radio Sets AN/PRC-119A/D/F and
AN/VRC-87A/D/F through AN/VRC-92A/D/F and AN/VRC-87C.
C.2.
This list identifies items that do not have to accompany the radio set and that do not have to be turned in with it.
These items are all authorized to you by CTA, MTOE, TDA, or JTA.
C-3.
National stock numbers, descriptions, and quantities are provided to help you identify and request the
additional Items you require to support this equipment. The items are listed in name and grouped into
equipment types.
SECTION II. ADDITIONAL AUTHORIZATION LIST
(1)
National Stock
Number
5985-01-340-1043
5985-01-425-7305
(2)
Description
(CAGEC) and Part Number
Antenna, Manpack:
AS-4266/PRC (80063) A3167657-1 (extended range) or
AS-4266A/PRC (80063) A3256531-1
(3)
U/M
ea
ea
(4)
Qty
Auth
1
1
Bar, Latch (Locking Lever):
5340-01-430-4723
5340-01-456-7985
Bar, Latch (80063) A3256492
Bar, Latch (ASIP) (80063) A3256669-1
ea
ea
Batteries:
6135-01-214-6441
ea
6135-01-462-4442
3130-01-427-9604
5940-01-427-9710
5940-01-427-9395
Battery, Non-rechargeable, BA-5372/U (Lithium hold up)
(80058)
Battery, Non-rechargeable, BA-5590/U (Lithium manpack
primary power)
Battery, Rechargeable, BA-590/U (80058)
Battery, Rechargeable, BA-390/U Manpack primary power
(80058)
Case, Battery Assembly (80063) A3272554-1
Charger, Manpack Battery PP-8444
Adapter, AP-390
Adapter Cable, 24 VDC
ea
ea
ea
ea
5935--01-462-6624
Adapter Connector (2Wire) (80063) A3272557-1
ea
6135-01-036-3495
5135-01-063-3918
5140-01-419-8187
1
ea
ea
Control, Receiver-Transmitter:
5895-01-277-2680
C-11561 (C)/U (80058) (Initially issued with the following
components: LS-685/U 1 ea, Battery Box CY-8523A/PRC
or CY-8523B/PRC 1 ea, and Handset H-250/U 1 ea. This
issue is at time of SINCGARS fielding only).
*As Required
C-1
TM
11-5820-890-10-8
SECTION II.
(1)
National Stock
Number
ADDITIONAL AUTHORIZATION LIST
(2)
Description
(CAGEC) and Part Number
Continued
(3)
U/M
(4)
Qty
Auth
ea
*
ea
*
ea
1
ea
1
ea
1
5 9 9 5 - 0 1 - 3 5 8 - 1 0 7 8 CX-13292/VRC (80058) (50ft) (VAA to LS-671)
ea
1
5 9 9 5 - 0 1 - 3 8 2 - 6 8 6 9 CX-13292/VRC (80058) (100ft) (VAA to LS-671)
ea
1
5340-01-461-4741
Strap Assembly Hand (80063) A3274735-1
Data Transfer Device:
5810-01-343-1194
AN/CYZ-10 (ANCD) (98230)
Loudspeaker:
5 9 6 5 - 0 1 - 2 2 2 - 1 4 2 0 LS-671/VRC (80058) (Radio System)
5965-01-295-1125
LS-685/U (80058) (RCU ONLY)
Cable Assembly, Special Purpose:
5995-01-244-0016
CX-13298/VRC (80058) A3014033-1 (5 in)
ea
1
5995-01-286-2701
CX-13298/VRC (80058) A3014033-2 (15 ft)
ea
1
5995-01-303-0308
CX-13308/VRC (80058) (AN-PSG-2, 2A, 5 Adapter Cable)
ea
1
5995-01-312-7932
CX-13310/VRC (80058) (HYX-57 Adapter Cable)
ea
1
5995-01-379-9743
CX-13311/VRC (80058) (MST-20 Adapter Cable)
ea
1
5995-01-365-2519
CX-13312/VRC (80058) (AN/PSC-3 Adapter Cable)
ea
1
5995-01-323-9033
CX-13402/VRC (80058) (TACFIRE Magic Cable)
ea
1
5995-01-335-7878
CX-13404/VRC (80058) (KY-90 Adapter Cable)
ea
1
5995-01-348-2264
CX-13417/VRC (80058) (Splitter Cable)
ea
1
5995-01-387-4422
CX-13465/VRC (80058) (Digital Adapter Cable)
ea
1
5995-01-379-9689
CX-13467/VRC (80058) (ANCD Fill Cable 18 in)
ea
1
TBD
CX-13490/VRC A3210567 8 ft (FA Extender Cable)
ea
1
TBD
Cable, Special Purpose (SIP/ASIP RT to PC)
ea
1
5810-01-026-962;
HYX-57/TSEC (98230) ON241760
ea
ea
1
*
ea
1
Adapter:
5 9 3 5 - 0 1 - 4 6 2 - 6 6 2 4 Adapter, 2-wire (ASIP RCU)
INSTALLATION KIT, ELECTRONIC EQUIPMENT
MK- (mounts AN/VRC-87A/D/F throught AN/VRC-92A/D/F
Radio Sets and Ancillary equipment in vehicles) (80063)
REFER TO DA PAM 25-30 FOR LISTINGS OF INDIVIDUAL
KITS.
C-2
TM 11-5820-890-10-8
APPENDIX E
REFERENCE DATA
(Nomenclature Cross-Reference List, Abbreviations, and Glossary)
NOMENCLATURE CROSS-REFERENCE LIST
COMMON NAME
OFFICIAL NOMENCLATURE
Battery (HUB)
Battery, Non-rechargeable, BA-5372/U
Battery (main power)
Battery, BA-5590/U (Lithium)
Battery box
Battery Box, CY-8523/A/B/PRC
Battery tray
Tray, Battery, CY-8664/VRC
Cable set (FHMUX)
Cable Assembly Set, Electrical Equipment, CX-13436/VRC
Control-monitor
Control-Monitor, C-11291/A/VRC
Dismount radio
AN/VRC-88A/-91A
FHMUX
Multiplexer, Frequency Hopping, TD-1456/VRC
Field pack
Carrying Case, Radio
Fill device
Automated Net Control Device, AN/CYZ-10
Handset
Handset, H-250/U
HRCRD
Handheld Remote Control Radio Device, C-12493/U
Loudspeaker
Loudspeaker, LS-671/VRC, or LS-685/U
Manpack antenna
Antenna, Manpack, AS-3683/PRC or AS-4266/PRC
Manpack radio
AN/PRC-119A
Mounting base
Mounting Base, MT-6352/A/VRC
Power amplifier
Amplifier, Radio Frequency, AM-7238/A/B/VRC
Power amplifier mount
Mounting Base, MT-6353/VRC
Radio
Receiver-Transmitter,
Remote control unit
Control, Receiver-Transmitter (RCU), C-11561 (C)/U
Single radio mount
Mounting Base, MT-6576/VRC
Vehicular amplifier adapter
Amplifier-Adapter, Vehicular, AM-7239/A/B/C/D/E/VRC
Vehicular antenna
Antenna, Vehicular, AS-3900/VRC or AS-3916/VRC
Vehicular radio
AN/VRC-874AD/F, 87C, 88A/D/F, 89A/D/F, 90A/D/F, 91A/D/F,
92A/D/F
VIC system
intercommunications Set, AN/VIC-1 (V)
Wire line adapter
Adapter, Wire Line, HYX-57/TSEC
RT-1523/A/B/C/D/E(C)/U
E-1
TM 11-5820-890-10-8
ABBREVIATIONS
Abbreviation
Description
Abbreviation
Description
AAL
additional authorization list
CM
control monitor/centimeter
ACK
acknowledge
CMSC
communications security
AD
analog data
COEI
component of end item
AK
automatic keying
COMM-EX
communications exercise
ANCD
automated net control device
COMSEC
communications security
ANT
antenna
C/S
sign, countersign
APPL
application
CT
cipher text
ATTN
attention
CVC
combat vehicle crew
AUD
audio
DA
Department of the Army
BATT
battery
DF
direction finding
Bll
basic issue item
DN
down
BIT
built in test
DTD
data transfer device
BPS
bits per second
ECCM
electronic counter-counter
measures
BRK
breaker
EDM
enhanced data mode
BRT
bright
EIR
CAGEC
commercial and government
entity code
equipment improvement
recommendation
ENTR
enter
CCI
controlled cryptographic item
EPLRS
CDR
commander
enhanced position location
reporting system
CFD
common fill device
ER
error
CH
channel
ERF
electronic remote fill
CHAN
channel
ESET
FH data for one channel
CHG
change
EXT
external
CID
combat identification
FCTN
function
CIK
cryptographic ignition key
FH
frequency hopping
CKT
circuit
FH-M
frequency hopping- master
CLR
clear
FHMUX
frequency hopping multiplexer
CLSGN
call sign
FIST-V
fire support vehicle
E-2
TM 11-5820-890-10-8
Abbreviation
Description
Abbreviation
Description
FM
frequency modulation
LB
pound
FOM
figure of merit
LCD
liquid crystal display
FQMER
frequency management error
LD
load
FR
response failure
LDE
local control data
FREQ
frequency
LNE
late net entry
GD
good
LO
low
GOTST
go to test
LOS
line of sight
GPS
global positioning system
LOUT
lockout
GRP
LR
long range
group
HH
hours
LR/LR
long range/long range
HI
high
LTR
letter
M
medium
HR
hand receipt
MAN
manual
HRCRD
handheld remote control radio
device
MB
mounting base
HS
handset
MHZ
megahertz
HUB
hold --up battery
MK
manual keying
HZ
hertz
MM
minutes
ICM
intercomm
MP
manpack
ICOM
integrated COMSEC
MSE
mobile subscriber equipment
ID
identification
MSRT
mobile subscriber radio
telephone
IF
intermediate frequency
MT
mount
INC
internet controller
MX
fill device
INIT
initiate
N
new or enhanced data mode
INT
intercomm
NAV
navigation
IP
internet protocol
NCS
net control station
JD
Julian Date
NOGPS
GPS device not attached
KEK
key encryption key
NOKEY
required key missing
KG
kilogram
NRI
net radio interface
KHZ
kilohertz
NUM
number
E-3
TM 11-5820-890-10-8
Abbreviation
Description
Abbreviation
Description
OFST
offset
RWI
radio wire integration
OPR
operator
RXMT
retransmission
SA
situational awareness
OTAR
over-the-air-rekey
PA
power amplifier
PAM
pamphlet
SC
single channel
PC
personal computer
SDM
SINCGARS data mode
PCKT
packet
SETDR
set data rate
PLGR
precision lightweight GPS
receiver
SIG
signal
SIGO
signal officer
SINCGARS
single channel ground and
airborne radio system
PM
“permanent” memory
PMCS
preventive maintenance checks
and services
POS
position
PSA
power supply adapter
SIP
system improvement program
PT
plain text
SNAP
steerable null antenna
processor
PTRX
plain text message being
received
SLPA
SINCGARS low profile antenna
SOI
signal operating instructions
PTT
push-to-talk
PWR
power
PYRO
pyrotechnic
SOP
standing operating procedure
QREF
quick reference
SQ
squelch
RCU
remote control unit
SPKR
speaker
RCV
receive
SR
short range
REM
remote
RF
radio frequency
SR-D
short range radio with
dismount kit
ROD
report of discrepancy
SR/LR
short range/long range
RT
receiver-transmitter
RCU(RT)
SIP RT used as remote control
unit (RCU)
SR/LR-D
short range/long range radio
with dismount kit
RV
receive variable
SRM
single radio mount
E-4
TM 11-5820-890-10-8
Abbreviation
Description
Abbreviation
Description
STBY
stand by
TSK
transmission security key
STO
store
TST
test
STU
secure telephone unit
UD
update
SUFX
suffix
UTIL
utility
SYNC
synchronize
VAA
vehicular amplifier adapter
TB
technical bulletin
VAR
variable
TCP
transmission control protocol
VEH
vehicular
TD
time delay
VHF
very high frequency
TDR
transportation discrepancy
report
VIC
vehicular intercom set
TEK
traffic encryption key
VOL
volume
TF
tacfire of task force
WHSP
whisper
TM
technical manual
WP
way-point
TMPD
time period
XMIT
transmit
TRANS
transmission
YY
years
z
zero
E-5
TM 11-5820-890-10-8
GLOSSARY
E-6
TERM
DEFINITION
Alternate net control station
Net member operators designated by the NCS to complete net
openings, respond to CUE calls, displace after using SC mode if
appropriate, and take over for NCS when requested.
Automated net control device
Hand- held computer used for loading RT with COMSEC, FH data,
and sync time; also replace paper SOI.
Battery life indicator
Number read from manpack RT display providing an estimate of
battery power used and remaining.
Broadcast
Method of transmitting SOI information from one ANCD to another
using SINCGARS data mode.
Channel
RT switch positions in which COMSEC keys and FH data, or single
channel frequencies, may be loaded, stored, and used.
Cold start net opening
Method of opening a FH net in which each member loads
COMSEC and FH data and stands by for receipt of sync time sent
electronically by the NCS.
COMSEC keys
Traffic Encryption Key (TEK) and Key Encryption Key (KEK)
required for cipher text communications and over-the-air-rekey
operations.
CUE channel/frequency
SC frequency and designated channel used to contact net NCS
when caller has non-FH radio or has lost contact with the FH net;
may also be used as normal SC channel.
Electronic countercountermeasures
Use of FH technique to significantly reduce the impacts of
enemy jamming and avoid enemy direction finding capabilities.
Electronic remote fill (ERF)
Method by which an NCS electronically updates FH data of net
members and transmits sync time for cold start net openings.
Enhanced data modes
Capabilities of the SINCGARS SIP radio in which forward error
correction, speed, range, and accuracy of data transmission are
materially improved. Four enhanced data rates (1200N, 2400N,
4800N, and 9600N) and two new modes (Packet and RS-232) are
provided by the SIP/ASIP radio. Packet data mode can be used
only with the FBCB2 system.
External (used with GRM - 122)
EXT, an option found under the RCU key of the SIP radio,
represents a future capability of the radio and is not currently used.
ASIP radio is in EXT mode automatically when proper interface and
software is detected. When the radio is set to this mode, the front
panel controls of the RT are disabled, allowing control to be
performed from the peripheral device. Ensure you do not
accidentally select EXT mode. ICOM Radio versions of the
SINCGARS radio having integrated COMSEC but not equipped
with SIP features. Components are identified as RT-1523,
RT-1523A, RT-1523B and AM-7239, AM-7239A, AM -72398.
TM 11-5820-890-10-8
TERM
DEFINlTlON
FBCB2 Hardware
A term that refers to the various forms of computers used in
vehicular radio configurations for data communications during
army digitization experiments. FBCB2 computers range from
commercial off-the -shelve items to fully militarized computers.
The interface from FBCB2 computers to the SINCGARS SIP/ASIP
radio system is via an RS-232 port of the computer to the SlP/ASlP
VAA J6 connector.
FBCB2 Software
UNIX-based software developed especially for support of Task
Force XXI operations and used in FBCB2 hardware. FBCB2
software, when employed with the SIP/ASIP RT and SlP/ASIP VAA,
provides situational awareness reporting, internet operations, and
SINCGARS to EPLRS automatic interface. The host interface to the
SINCGARS SlP/ASlP radio system uses the commercial TCP/lP
family of communications protocols specified in the Army
Technical Architecture (ATA).
Frequency hopping (FH) data
Hopset, lockouts if used, TSK, net ID, and sync time required for FH
communications.
FH-Master
Mode position used by the NCS in which the NCS RT helps
maintain sync time in all net radios.
Holding memory
RT temporary memory used for loading, retrieving, and sending fill
data.
Hot start net opening
Method of opening a FH net in which net operators load all required
COMSEC, FH data, and sync time from their ANCD and merely call
the NCS to check into the net.
Internet
The terms used to indicate the capability of data messages to pass
automatically from one SINCGARS net to another and from a
SINCGARS to an EPLRS net to reach a single addressee or
broadcast sub-net. The SlP/ASIP VAA controls internet
operations through the software, addresses, and routing tables
stored in its memory. The internet capability is available only when
the SIP/ASIP radios are employed with the FBCB2 system.
lntranet replay
The capability available when packet data mode and the FBCB2
system are used which allows a single SlP/ASlP radio to relay a
data message to its addressee within the same frequency hopping
net. After the transmitting station tries unsuccessfully several times
to reach the addressee station, software in the SlP/ASlP VAA
causes the intranet relay station to retransmit the message. The
intranet feature is entirely automatic, requiring no action on the part
of the intranet relay station operator. This represents a future
capability and is currently not used.
Line of sight (LOS)
Straight line path between two radios that is required for best
communications.
Loadset
All COMSEC keys, FH data, and sync time required to load all six
RT channels for frequency hopping, cipher text mode of
communications.
E-7
TM
E-8
11-5820-890-10-8
TERM
DEFINITION
Lockouts
Feature of hopset that precludes use of selected frequencies: also
used to expand the number of frequencies contained in a hopset.
Manual channel/frequency
SC frequency and designated channel used for transmission and
receipt of ERFs during cold start net openings; may also be used
for normal SC channel.
Manpack radio
Configuration consisting of RT battery, battery box, antenna,
handset, and carrying case; carried on the back of the operator for
dismounted operations.
Net control station (NCS)
Single designated station per net requiring use of the FH-M mode
position and performance of net control tasks: assisted and
supported by designated alternate NCS stations as warranted by
operational requirements.
Net identification (ID)
Three-digit number from 000 to 999 designating specific nets
within a given TSK.
Net members
All net stations other than the NCS and designated alternate NCSs.
Offset
Feature allowing SC frequencies to be changed by plus of minus
5 or 10 KHz to reduce the effect of enemy jamming or other
interference.
Over-the-air-rekey (OTAR)
Procedure by which TEK may be electronically transmitted from
NCS to NCS, or from NCS to net members.
Packet
New data mode in which data messages are divided into frames
smaller than 1800 bytes each for processing over SINCGARS
voice/data nets. The packet data mode (PCKT) can be used only
with the FBCB2 hardware and software system.
“Permanent” memory
RT random access memory (RAM) location where data is stored
and used; data in “permanent memory may be retrieved if desired;
retention of data in “permanent” memory depends upon main
power or HUB battery.
Precision lightweight GPS
receiver (PLGR)
Hand-held device providing GPS time for use as sync time
in SINCGARS radios.
Primary tasks
Those operator and NCS tasks which are essential to adequate job
performance.
Retransmission (RXMT)
Feature of SINCGARS radio that enables SC or FH traffic to
automatically pass from one RXMT RT to another, thus increasing
the effective range to that of two radios.
Scanning
Feature of SINCGARS radio that search all SC channels for traffic;
cannot be used in the FH mode of operation.
Scrolling
Procedure by which a TEK may be move from one RT channel to
another; does not apply to key stored in channel 6.
Single channel (SC)
Mode of communication using one designated frequency.
TM 11-5820-890-10-8
TERM
DEFINITION
System Improvement Program
Process by which army materiel managers systematically improve
equipment capabilities to meet established operational
requirements. The SIP/ASIP radio is a product of a SINCGARS
System Improvement Program.
Special tasks
Those operator and NCS tasks which may be required in job
performance; these tasks entail additional training to achieve
operator proficiency.
Updating
Electronic or physical procedures by which COMSEC, FH data,
and SOI information are changed; performed at prescribed
intervals and as the need arises.
Vehicular radios
Radio configurations consisting of one or two RTs, mounting base,
vehicular amplifier adapter, power amplifier, power amplifier
adapter, power supply adapter, antennas, loudspeakers, and
handsets as appropriate; these radios are installed in vehicles
using specified installation kits.
Zero
Procedure by which stored data (COMSEC, FH data, sync time,
and SC frequencies) may be cleared from the RT.
E-9
TM 11-5820-890-10-8
THIS PAGE INTENTIONALLY
BLANK.
E-10
TM 11-5820-890-10-8
I N D E X
SUBJECT
Antennas . . . . . . . . . . . . . . . . . . . . . . . . . . . . . . . . . . . . . . . . . . . . . . . . . . . . . . . . . . . . . .
Antenna, OE-254 . . . . . . . . . . . . . . . . . . . . . . . . . . . . . . . . . . . . . . . . . . . . . . . . . . . . . .
Anti-jamming actions . . . . . . . . . . . . . . . . . . . . . . . . . . . . . . . . . . . . . . . . . . . . . . . . . .
Associated equipment maintenance . . . . . . . . . . . . . . . . . . . . . . . . . . . . . . . . . . . . . .
Automated Net Control Device (ANCD) . . . . . . . . . . . . . . . . . . . . . . . . . . . . . . . . . . .
Capabilities . . . . . . . . . . . . . . . . . . . . . . . . . . . . . . . . . . . . . . . . . . . . . . . . . . . . . . . .
Characteristics . . . . . . . . . . . . . . . . . . . . . . . . . . . . . . . . . . . . . . . . . . . . . . . . . . . . .
Loads and updating . . . . . . . . . . . . . . . . . . . . . . . . . . . . . . . . . . . . . . . . . . . . . . . . .
Main power battery requirements . . . . . . . . . . . . . . . . . . . . . . . . . . . . . . . . . . . . .
Operator controls . . . . . . . . . . . . . . . . . . . . . . . . . . . . . . . . . . . . . . . . . . . . . . . . . . .
Operator maintenance . . . . . . . . . . . . . . . . . . . . . . . . . . . . . . . . . . . . . . . . . . . . . .
Physicaldata . . . . . . . . . . . . . . . . . . . . . . . . . . . . . . . . . . . . . . . . . . . . . . . . . . . . . . .
4-32
4-34
5-69
8-13
3-2
3-2
3-3
4-23
8-27
5-19
8-21
3-3
Battery life condition indicator . . . . . . . . . . . . . . . . . . . . . . . . . . . . . . . . . . . . . . . . . . . .
5-64
Battery requirements . . . . . . . . . . . . . . . . . . . . . . . . . . . . . . . . . . . . . . . . . . . . . . . . . . .
8-25
Battery requirements, SIP . . . . . . . . . . . . . . . . . . . . . . . . . . . . . . . . . . . . . . . . . . . . . . .
2-17
Hold-Up Battery . . . . . . . . . . . . . . . . . . . . . . . . . . . . . . . . . . . . . . . . . . . . . . . . . . .
2-18
HUB
2-17
..............................................................
Main power . . . . . . . . . . . . . . . . . . . . . . . . . . . . . . . . . . . . . . . . . . . . . . . . . . . . . . . .
2-17
Manpack radio . . . . . . . . . . . . . . . . . . . . . . . . . . . . . . . . . . . . . . . . . . . . . . . . . . . . .
2-17
Power source . . . . . . . . . . . . . . . . . . . . . . . . . . . . . . . . . . . . . . . . . . . . . . . . . . . . . .
2-17
RCU (RT) . . . . . . . . . . . . . . . . . . . . . . . . . . . . . . . . . . . . . . . . . . . . . . . . . . . . . . . . . .
2-18
Broadcast procedure for SOI information . . . . . . . . . . . . . . . . . . . . . . . . . . . . . . . . . . 4 - 2 7
Cabling . . . . . . . . . . . . . . . . . . . . . . . . . . . . . . . . . . . . . . . . . . . . . . . . . . . . . . . . . . . . . . . 2 - 2 9
Change Eset in one channel (task) . . . . . . . . . . . . . . . . . . . . . . . . . . . . . . . . . . . . . . .
6-11
Change net ID (task) . . . . . . . . . . . . . . . . . . . . . . . . . . . . . . . . . . . . . . . . . . . . . . . . . . . .
5-60
Cipher Text (CT) operations . . . . . . . . . . . . . . . . . . . . . . . . . . . . . . . . . . . . . . . . . . . . . .
4-3
Cold Start net opening procedure . . . . . . . . . . . . . . . . . . . . . . . . . . . . . . . . . . . . . . . .
4-17
Common Connections . . . . . . . . . . . . . . . . . . . . . . . . . . . . . . . . . . . . . . . . . . . . . . . . . .
2-13
Common ZULU time . . . . . . . . . . . . . . . . . . . . . . . . . . . . . . . . . . . . . . . . . . . . . . . . . . . .
4-11
COMSEC Alarm . . . . . . . . . . . . . . . . . . . . . . . . . . . . . . . . . . . . . . . . . . . . . . . . . . . . . . . .
Conduct Cold Start net opening (task) . . . . . . . . . . . . . . . . . . . . . . . . . . . . . . . . . . . .
Conduct Hot Start net opening (task) . . . . . . . . . . . . . . . . . . . . . . . . . . . . . . . . . . . . .
Conduct retransmission (RXMT) operations (task) . . . . . . . . . . . . . . . . . . . . . . . . . .
Connectors, ASIP RT . . . . . . . . . . . . . . . . . . . . . . . . . . . . . . . . . . . . . . . . . . . . . . . . . . .
4-2
6-15
6-14
5-56
2-11
Connectors, SIP RT . . . . . . . . . . . . . . . . . . . . . . . . . . . . . . . . . . . . . . . . . . . . . . . . . . . . 2 - 1 0
Index-1
TM 11-5820-890-10-8
SUBJECT
Consolidated index of Army publications and blank forms . . . . . . . . . . . . . . . . . . .
Control-Monitor (C-M) . . . . . . . . . . . . . . . . . . . . . . . . . . . . . . . . . . . . . . . . . . . . . . . .
Components.. . . . . . . . . . . . . . . . . . . . . . . . . . . . . . . . . . . . . . . . . . . . . . . . . . . . . .
Operator controls . . . . . . . . . . . . . . . . . . . . . . . . . . . . . . . . . . . . . . . . . . . . . . . . . . .
Performance data . . . . . . . . . . . . . . . . . . . . . . . . . . . . . . . . . . . . . . . . . . . . . . . . . . .
Physical data. . . . . . . . . . . . . . . . . . . . . . . . . . . . . . . . . . . . . . . . . . . . . . . . . . . . . . .
Control, Receiver-Transmitter (RCU) . . . . . . . . . . . . . . . . . . . . . . . . . . . . . . . . . . . . .
Components . . . . . . . . . . . . . . . . . . . . . . . . . . . . . . . . . . . . . . . . . . . . . . . . . . . . . . .
Operator controls . . . . . . . . . . . . . . . . . . . . . . . . . . . . . . . . . . . . . . . . . . . . . . . . . . .
Performance data. . . . . . . . . . . . . . . . . . . . . . . . . . . . . . . . . . . . . . . . . . . . . . . . . . .
Physical data. . . . . . . . . . . . . . . . . . . . . . . . . . . . . . . . . . . . . . . . . . . . . . . . . . . . . . .
Cross - net communications . . . . . . . . . . . . . . . . . . . . . . . . . . . . . . . . . . . . . . . . . . . . .
1-3
2-37
2-37
5-22
2-38
2-38
2-35
2-35
5-18
2-38
2-36
4-12
CUE and ERF (Electronic Remote Fill) method of late net entry . . . . . . . . . . . . . . . 4-21
6-10
Designate new default loadset (task) . . . . . . . . . . . . . . . . . . . . . . . . . . . . . . . . . . . . .
4-24
Electronic updating . . . . . . . . . . . . . . . . . . . . . . . . . . . . . . . . . . . . . . . . . . . . . . . . . . . . .
Electronic Remote Fill (ERF) procecure for FH data . . . . . . . . . . . . . . . . . . . . . . . . . 4 - 2 6
Equipment improvement recommendations . . . . . . . . . . . . . . . . . . . . . . . . . . . . . . . 1 - 3
Frequency hopping (FH) communications . . . . . . . . . . . . . . . . . . . . . . . . . . . . . . . . . 4 - 6
Advantages . . . . . . . . . . . . . . . . . . . . . . . . . . . . . . . . . . . . . . . . . . . . . . . . . . . . . . . . 4 - 9
4-6
Capabilities . . . . . . . . . . . . . . . . . . . . . . . . . . . . . . . . . . . . . . . . . . . . . . . . . . . . . . . .
Data . . . . . . . . . . . . . . . . . . . . . . . . . . . . . . . . . . . . . . . . . . . . . . . . . . . . . . . . . . . . . . 4 - 6
4-7
Synctime . . . . . . . . . . . . . . . . . . . . . . . . . . . . . . . . . . . . . . . . . . . . . . . . . . . . . . . . . .
Frequency Hopping Multiplexer (FHMUX) . . . . . . . . . . . . . . . . . . . . . . . . . . . . . . . . . 3 - 5
3-5
Components . . . . . . . . . . . . . . . . . . . . . . . . . . . . . . . . . . . . . . . . . . . . . . . . . . . . . . .
3-6
Performancedata . . . . . . . . . . . . . . . . . . . . . . . . . . . . . . . . . . . . . . . . . . . . . . . . . . .
3-5
Physicaldata . . . . . . . . . . . . . . . . . . . . . . . . . . . . . . . . . . . . . . . . . . . . . . . . . . . . . . .
8-23
Operator maintenance . . . . . . . . . . . . . . . . . . . . . . . . . . . . . . . . . . . . . . . . . . . . . .
7-17
Tasks . . . . . . . . . . . . . . . . . . . . . . . . . . . . . . . . . . . . . . . . . . . . . . . . . . . . . . . . . . . . .
1-2
General information . . . . . . . . . . . . . . . . . . . . . . . . . . . . . . . . . . . . . . . . . . . . . . . . . . . .
1-3
Hand receipt (-HR) manuals . . . . . . . . . . . . . . . . . . . . . . . . . . . . . . . . . . . . . . . . . . . .
Handheld Remote Control Radio Device (HRCRD) . . . . . . . . . . . . . . . . . . . . . . . . . . 3 - 1 2
3-13
HRCRD . . . . . . . . . . . . . . . . . . . . . . . . . . . . . . . . . . . . . . . . . . . . . . . . . . . . . . . . . . .
8-24
Operator maintenance . . . . . . . . . . . . . . . . . . . . . . . . . . . . . . . . . . . . . . . . . . . . . .
4-16
Hot Start net opening procedure . . . . . . . . . . . . . . . . . . . . . . . . . . . . . . . . . . . . . . . . .
4-19
Option for late net entry . . . . . . . . . . . . . . . . . . . . . . . . . . . . . . . . . . . . . . . . . . . . .
ICOM Fill of Receiver-Transmitter (RT) . . . . . . . . . . . . . . . . . . . . . . . . . . . . . . . . . . . 4 - 1 5
Integrated Communications Security (ICOM) . . . . . . . . . . . . . . . . . . . . . . . . . . . . . . 4 - 2
Index-2
TM
11-5820-890-10-8
SUBJECT
Julian Date and GPS Zulu Time . . . . . . . . . . . . . . . . . . . . . . . . . . . . . . . . . . . . . . . . . .
Jamming/anti-jamming actions . . . . . . . . . . . . . . . . . . . . . . . . . . . . . . . . . . . . . . . . .
Late net entry (LNE), passive method . . . . . . . . . . . . . . . . . . . . . . . . . . . . . . . . . . . . .
Load COMSEC/FH data/sync time into RT using ICOM fill procedure (task) . . . .
Load date and Zulu time into SINCGARS Receiver-Transmitter (RT) (task) . . . .
Load Precision Lightweight GPS Receiver (PLGR) key from ANCD into
PLGR (task) . . . . . . . . . . . . . . . . . . . . . . . . . . . . . . . . . . . . . . . . . . . . . . . . . . . . . . . .
Load single channel frequencies into Receiver-Transmitter (RT) (task) . . . . . . .
Loading and clearing offset frequencies . . . . . . . . . . . . . . . . . . . . . . . . . . . . . . . . . . .
Loadsets . . . . . . . . . . . . . . . . . . . . . . . . . . . . . . . . . . . . . . . . . . . . . . . . . . . . . . . . . . . . . .
Long manpack antenna . . . . . . . . . . . . . . . . . . . . . . . . . . . . . . . . . . . . . . . . . . . . . . . . .
Long Range/Long Range (LR/LR) Radio components . . . . . . . . . . . . . . . . . . . . . . .
Long Range (LR) Radio components . . . . . . . . . . . . . . . . . . . . . . . . . . . . . . . . . . . . .
Loudspeake (LS-671) . . . . . . . . . . . . . . . . . . . . . . . . . . . . . . . . . . . . . . . . . . . . . . . . . .
Components . . . . . . . . . . . . . . . . . . . . . . . . . . . . . . . . . . . . . . . . . . . . . . . . . . . . . . .
Operator controls . . . . . . . . . . . . . . . . . . . . . . . . . . . . . . . . . . . . . . . . . . . . . . . . . . .
Operator maintenance . . . . . . . . . . . . . . . . . . . . . . . . . . . . . . . . . . . . . . . . . . . . . .
Performance data. . . . . . . . . . . . . . . . . . . . . . . . . . . . . . . . . . . . . . . . . . . . . . . . . . .
Physicaldata . . . . . . . . . . . . . . . . . . . . . . . . . . . . . . . . . . . . . . . . . . . . . . . . . . . . . . .
Maintenance forms, records, reports . . . . . . . . . . . . . . . . . . . . . . . . . . . . . . . . . . . . . .
Manpack Radio . . . . . . . . . . . . . . . . . . . . . . . . . . . . . . . . . . . . . . . . . . . . . . . . . . . . . . . .
Antenna, long . . . . . . . . . . . . . . . . . . . . . . . . . . . . . . . . . . . . . . . . . . . . . . . . . . . . . .
Components . . . . . . . . . . . . . . . . . . . . . . . . . . . . . . . . . . . . . . . . . . . . . . . . . . . . . . .
General . . . . . . . . . . . . . . . . . . . . . . . . . . . . . . . . . . . . . . . . . . . . . . . . . . . . . . . . . . .
Performancedata . . . . . . . . . . . . . . . . . . . . . . . . . . . . . . . . . . . . . . . . . . . . . . . . . . .
Physical data. . . . . . . . . . . . . . . . . . . . . . . . . . . . . . . . . . . . . . . . . . . . . . . . . . . . . . .
Hold up battery (HUB) requirements . . . . . . . . . . . . . . . . . . . . . . . . . . . . . . . . . .
Main power battery requirements . . . . . . . . . . . . . . . . . . . . . . . . . . . . . . . . . . . . .
Manually load date and Zulu time into Precision Lightweight GPS Receiver
(PLGR) (task) . . . . . . . . . . . . . . . . . . . . . . . . . . . . . . . . . . . . . . . . . . . . . . . . . . . . . .
Net Control Station . . . . . . . . . . . . . . . . . . . . . . . . . . . . . . . . . . . . . . . . . . . . . . . . . . . .
Responsibilities . . . . . . . . . . . . . . . . . . . . . . . . . . . . . . . . . . . . . . . . . . . . . . . . . . . .
Tasks, general . . . . . . . . . . . . . . . . . . . . . . . . . . . . . . . . . . . . . . . . . . . . . . . . . . . . . .
4-10
5-69
4-18
5-32
7-7
7-9
5-30
5-67
4-13
4-32
2-24
2-22
2-39
2-39
5-24
8-20
2-40
2-39
1-2
2-14
4-32
2-14
2-14
2-16
2-15
8-26
8-25
7-5
6-3
6-3
6-2
Index-3
TM 11-5820-890-10-8
SUBJECT
PAGE
Netmanagement . . . . . . . . . . . . . . . . . . . . . . . . . . . . . . . . . . . . . . . . . . . . . . . . . . . . . . .
Discipline.. . . . . . . . . . . . . . . . . . . . . . . . . . . . . . . . . . . . . . . . . . . . . . . . . . . . . . . . .
Mobile Subscriber Equipment (MSE) compatibility . . . . . . . . . . . . . . . . . . . . . .
Operator proficiency . . . . . . . . . . . . . . . . . . . . . . . . . . . . . . . . . . . . . . . . . . . . . . . .
4-46
4-46
4-48
4-48
Role of Alternate NCS . . . . . . . . . . . . . . . . . . . . . . . . . . . . . . . . . . . . . . . . . . . . . . . 4 - 4 7
Role of the NCS . . . . . . . . . . . . . . . . . . . . . . . . . . . . . . . . . . . . . . . . . . . . . . . . . . . . 4 - 4 7
Role of Signal Officers/NCOs . . . . . . . . . . . . . . . . . . . . . . . . . . . . . . . . . . . . . . . . . 4 - 4 9
Special task performance . . . . . . . . . . . . . . . . . . . . . . . . . . . . . . . . . . . . . . . . . . . . 4 - 4 8
Net opening, general . . . . . . . . . . . . . . . . . . . . . . . . . . . . . . . . . . . . . . . . . . . . . . . . . . . 4 - 1 3
Cold Start procedure . . . . . . . . . . . . . . . . . . . . . . . . . . . . . . . . . . . . . . . . . . . . . . . . 4 - 1 7
Hot Start procedure . . . . . . . . . . . . . . . . . . . . . . . . . . . . . . . . . . . . . . . . . . . . . . . . . 4 - 1 6
Obtain date and GPS Zulu time from Precision Lightweight GPS Receiver
(PLGR) (task) . . . . . . . . . . . . . . . . . . . . . . . . . . . . . . . . . . . . . . . . . . . . . . . . . . . . . .
7-4
Obtain SOI information from Automated Net Control Device (ANCD) (task) . . . 5-37
Operator . . . . . . . . . . . . . . . . . . . . . . . . . . . . . . . . . . . . . . . . . . . . . . . . . . . . . . . . . . . . . . 5 - 5
Controls . . . . . . . . . . . . . . . . . . . . . . . . . . . . . . . . . . . . . . . . . . . . . . . . . . . . . . . . . . .
Maintenance . . . . . . . . . . . . . . . . . . . . . . . . . . . . . . . . . . . . . . . . . . . . . . . . . . . . . . .
5-5
8-1
Tasks, general . . . . . . . . . . . . . . . . . . . . . . . . . . . . . . . . . . . . . . . . . . . . . . . . . . . . . . 5 - 2
Technical . . . . . . . . . . . . . . . . . . . . . . . . . . . . . . . . . . . . . . . . . . . . . . . . . . . . . . . . . . 5 - 1 3
Troubleshooting guides . . . . . . . . . . . . . . . . . . . . . . . . . . . . . . . . . . . . . . . . . . . . . . 8 - 7
Over-The-Air-Rekey (OTAR) procedures . . . . . . . . . . . . . . . . . . . . . . . . . . . . . . . . 4 - 2 4
Sending TEK by AK method of OTAR . . . . . . . . . . . . . . . . . . . . . . . . . . . . . . . . . 6 - 2 6
Sending TEK by MK method of OTAR . . . . . . . . . . . . . . . . . . . . . . . . . . . . . . . . . 6 - 2 4
Receiving TEK sent by MK method of OTAR . . . . . . . . . . . . . . . . . . . . . . . . . . . 6 - 2 9
Passive method of late net entry . . . . . . . . . . . . . . . . . . . . . . . . . . . . . . . . . . . . . . . . . . 4 - 1 8
Perform Cold Start net opening (task) . . . . . . . . . . . . . . . . . . . . . . . . . . . . . . . . . . . . . 5 - 5 1
Perform CUE and ERF (Electronic Remote Fill) late net entry method (task) . . . . 5 - 5 5
Pet-form Hot Start net opening (task) . . . . . . . . . . . . . . . . . . . . . . . . . . . . . . . . . . . . . . 5 - 3 4
Perform Passive Late Net Entry method (task) . . . . . . . . . . . . . . . . . . . . . . . . . . . . . 5 - 3 6
Periodic updating . . . . . . . . . . . . . . . . . . . . . . . . . . . . . . . . . . . . . . . . . . . . . . . . . . . . . . 4 - 2 2
Of Communications Security (COMSEC) keys . . . . . . . . . . . . . . . . . . . . . . . . . . 4 - 2 2
Of Frequency Hopping (FH) data . . . . . . . . . . . . . . . . . . . . . . . . . . . . . . . . . . . . . 4 - 2 2
Of Signal Operating Instructions (SOI) information . . . . . . . . . . . . . . . . . . . . . . 4 - 2 2
Ofsynctime . . . . . . . . . . . . . . . . . . . . . . . . . . . . . . . . . . . . . . . . . . . . . . . . . . . . . . . 4 - 2 2
Precise Global Positioning System (GPS) time . . . . . . . . . . . . . . . . . . . . . . . . . . . . . 4 - 1 1
Index-4
TM
11-5820-890-10-8
SUBJECT
Precision Lightweight GPS Receiver (PLGR) . . . . . . . . . . . . . . . . . . . . . . . . . . . . . . .
Capabilities . . . . . . . . . . . . . . . . . . . . . . . . . . . . . . . . . . . . . . . . . . . . . . . . . . . . . . . .
Characteristics . . . . . . . . . . . . . . . . . . . . . . . . . . . . . . . . . . . . . . . . . . . . . . . . . . . . .
Main power/HUB requirements . . . . . . . . . . . . . . . . . . . . . . . . . . . . . . . . . . . . . . .
Operator controls . . . . . . . . . . . . . . . . . . . . . . . . . . . . . . . . . . . . . . . . . . . . . . . . . . .
Operator maintenance . . . . . . . . . . . . . . . . . . . . . . . . . . . . . . . . . . . . . . . . . . . . . .
Physicaldata . . . . . . . . . . . . . . . . . . . . . . . . . . . . . . . . . . . . . . . . . . . . . . . . . . . . . . .
Tasks . . . . . . . . . . . . . . . . . . . . . . . . . . . . . . . . . . . . . . . . . . . . . . . . . . . . . . . . . . . . .
Tasks, definition . . . . . . . . . . . . . . . . . . . . . . . . . . . . . . . . . . . . . . . . . . . . . . . . . . . .
Tasks, summary . . . . . . . . . . . . . . . . . . . . . . . . . . . . . . . . . . . . . . . . . . . . . . . . . . . .
Preventive Maintenance Checks and Services (PMCS) . . . . . . . . . . . . . . . . . . . . .
For Control-Moniotor (C-M) . . . . . . . . . . . . . . . . . . . . . . . . . . . . . . . . . . . . . . . .
For Remote Control Unit (RCU) . . . . . . . . . . . . . . . . . . . . . . . . . . . . . . . . . . . . . . .
For SlNCGARS radios . . . . . . . . . . . . . . . . . . . . . . . . . . . . . . . . . . . . . . . . . . . . . . .
Guidance.. . . . . . . . . . . . . . . . . . . . . . . . . . . . . . . . . . . . . . . . . . . . . . . . . . . . . . . . .
Primary Net Control Station (NCS) tasks . . . . . . . . . . . . . . . . . . . . . . . . . . . . . . . . . .
Definition . . . . . . . . . . . . . . . . . . . . . . . . . . . . . . . . . . . . . . . . . . . . . . . . . . . . . . . . . .
Summary.. . . . . . . . . . . . . . . . . . . . . . . . . . . . . . . . . . . . . . . . . . . . . . . . . . . . . . . . .
Primary operator/preparation tasks . . . . . . . . . . . . . . . . . . . . . . . . . . . . . . . . . . . . . . .
Definition . . . . . . . . . . . . . . . . . . . . . . . . . . . . . . . . . . . . . . . . . . . . . . . . . . . . . . . . . .
Summary.. . . . . . . . . . . . . . . . . . . . . . . . . . . . . . . . . . . . . . . . . . . . . . . . . . . . . . . . .
Purpose of manual . . . . . . . . . . . . . . . . . . . . . . . . . . . . . . . . . . . . . . . . . . . . . . . . . . . . .
Radios, manpack . . . . . . . . . . . . . . . . . . . . . . . . . . . . . . . . . . . . . . . . . . . . . . . . . . . . . .
Radios, vehicular . . . . . . . . . . . . . . . . . . . . . . . . . . . . . . . . . . . . . . . . . . . . . . . . . . . . . . .
Receive and store Traffic Encryption Key (TEK) sent by MK method of
OTAR (task) . . . . . . . . . . . . . . . . . . . . . . . . . . . . . . . . . . . . . . . . . . . . . . . . . . . . . . . .
Receive COMSEC key/FH data into ANCD via STU (task) . . . . . . . . . . . . . . . . . . .
Receive net update ERF (Electronic Remote Fill) from Net Control
Station (task) . . . . . . . . . . . . . . . . . . . . . . . . . . . . . . . . . . . . . . . . . . . . . . . . . . . . . . .
Receive SOI information into ANCD via Secure Telephone Unit
(STU) (task) . . . . . . . . . . . . . . . . . . . . . . . . . . . . . . . . . . . . . . . . . . . . . . . . . . . . . . . .
Receiver characteristics . . . . . . . . . . . . . . . . . . . . . . . . . . . . . . . . . . . . . . . . . . . . . . . . .
Receiver-Transmitter (RT) . . . . . . . . . . . . . . . . . . . . . . . . . . . . . . . . . . . . . . . . . . . . . .
Capabilities . . . . . . . . . . . . . . . . . . . . . . . . . . . . . . . . . . . . . . . . . . . . . . . . . . . . . . . .
Model differences . . . . . . . . . . . . . . . . . . . . . . . . . . . . . . . . . . . . . . . . . . . . . . . . . .
Operator controls . . . . . . . . . . . . . . . . . . . . . . . . . . . . . . . . . . . . . . . . . . . . . . . . . . .
Physicaldata . . . . . . . . . . . . . . . . . . . . . . . . . . . . . . . . . . . . . . . . . . . . . . . . . . . . . . .
3-4
3-4
3-4
8-28
5-21
8-22
3-4
7-3
7-3
7-3
8-4
8-17
8-13
8-4
8-3
6-6
6-6
6-6
5-28
5-28
5-28
1-1
2-14
2-19
6-29
7-13
5-53
7-16
2-4
2-2
2-2
2 -4
5-5
2-6
Index-5
TM 11-5820-890-10-8
SUBJECT
Reloading sync time method of late net entry . . . . . . . . . . . . . . . . . . . . . . . . . . . . . .
Remote Control Unit (RCU) . . . . . . . . . . . . . . . . . . . . . . . . . . . . . . . . . . . . . . . . . . . . . .
Components . . . . . . . . . . . . . . . . . . . . . . . . . . . . . . . . . . . . . . . . . . . . . . . . . . . . . . .
Hold up battery requirements . . . . . . . . . . . . . . . . . . . . . . . . . . . . . . . . . . . . . . . .
Main power battery requirements . . . . . . . . . . . . . . . . . . . . . . . . . . . . . . . . . . . . .
Operator controls . . . . . . . . . . . . . . . . . . . . . . . . . . . . . . . . . . . . . . . . . . . . . . . . . . .
Performancedata . . . . . . . . . . . . . . . . . . . . . . . . . . . . . . . . . . . . . . . . . . . . . . . . . . .
Physical data. . . . . . . . . . . . . . . . . . . . . . . . . . . . . . . . . . . . . . . . . . . . . . . . . . . . . . .
Remoting capabilities . . . . . . . . . . . . . . . . . . . . . . . . . . . . . . . . . . . . . . . . . . . . . . . . . . .
Using Control-Monitor . . . . . . . . . . . . . . . . . . . . . . . . . . . . . . . . . . . . . . . . . . . . . .
Using Loudspeaker, LS-671 . . . . . . . . . . . . . . . . . . . . . . . . . . . . . . . . . . . . . . . . .
Using Receiver-Transmitter (RT) as RCU . . . . . . . . . . . . . . . . . . . . . . . . . . . . . .
Using Remote Control Device, C2329/GRA-39 . . . . . . . . . . . . . . . . . . . . . . . . .
Using Remote Control Unit (RCU) . . . . . . . . . . . . . . . . . . . . . . . . . . . . . . . . . . . .
Using Wire Line Adapter, HYX-57 . . . . . . . . . . . . . . . . . . . . . . . . . . . . . . . . . . . .
Reporting equipment improvement recommendations . . . . . . . . . . . . . . . . . . . . . .
Reporting errors and recommending improvements . . . . . . . . . . . . . . . . . . . . . . . .
Respond to CUE calls (task) . . . . . . . . . . . . . . . . . . . . . . . . . . . . . . . . . . . . . . . . . . . . .
Retransmission (RXMT) operations . . . . . . . . . . . . . . . . . . . . . . . . . . . . . . . . . . . . . . .
Capability modes . . . . . . . . . . . . . . . . . . . . . . . . . . . . . . . . . . . . . . . . . . . . . . . . . . .
General . . . . . . . . . . . . . . . . . . . . . . . . . . . . . . . . . . . . . . . . . . . . . . . . . . . . . . . . . . .
Procedures . . . . . . . . . . . . . . . . . . . . . . . . . . . . . . . . . . . . . . . . . . . . . . . . . . . . . . . .
RT Messages . . . . . . . . . . . . . . . . . . . . . . . . . . . . . . . . . . . . . . . . . . . . . . . . . . . . . . . . . .
RT Physical Data . . . . . . . . . . . . . . . . . . . . . . . . . . . . . . . . . . . . . . . . . . . . . . . . . . . . . . .
Scanning capability . . . . . . . . . . . . . . . . . . . . . . . . . . . . . . . . . . . . . . . . . . . . . . . . . . . .
Scope of manual . . . . . . . . . . . . . . . . . . . . . . . . . . . . . . . . . . . . . . . . . . . . . . . . . . . . . . .
Scrolling communications security (COMSEC) keys . . . . . . . . . . . . . . . . . . . . . . . .
Secure communications . . . . . . . . . . . . . . . . . . . . . . . . . . . . . . . . . . . . . . . . . . . . . . . .
Secure Telephone Unit (STU) . . . . . . . . . . . . . . . . . . . . . . . . . . . . . . . . . . . . . . . . . . . .
Capabilities . . . . . . . . . . . . . . . . . . . . . . . . . . . . . . . . . . . . . . . . . . . . . . . . . . . . . . . .
Characteristics . . . . . . . . . . . . . . . . . . . . . . . . . . . . . . . . . . . . . . . . . . . . . . . . . . . . .
Definition of tasks . . . . . . . . . . . . . . . . . . . . . . . . . . . . . . . . . . . . . . . . . . . . . . . . . . .
Physicaldata . . . . . . . . . . . . . . . . . . . . . . . . . . . . . . . . . . . . . . . . . . . . . . . . . . . . . . .
Summary of tasks . . . . . . . . . . . . . . . . . . . . . . . . . . . . . . . . . . . . . . . . . . . . . . . . . .
Tasks . . . . . . . . . . . . . . . . . . . . . . . . . . . . . . . . . . . . . . . . . . . . . . . . . . . . . . . . . . . . .
Security classification and marking . . . . . . . . . . . . . . . . . . . . . . . . . . . . . . . . . . . . . . .
Select RT preparation settings from MENU . . . . . . . . . . . . . . . . . . . . . . . . . . . . . . . .
Index-8
4-20
2-35
2-35
8-26
8-25
5-18
2-36
2-36
4-34
4-42
4-41
4-40
4-45
4-34
4-44
1-3
1-3
6-17
4-28
4-29
4-28
4-30
2-12
2-13
5-68
1-1
5-68
4-2
3-8
3-8
3-8
7-11
3-9
7-11
7-11
1-3
5-29
TM 11-5820-890-10-8
SUBJECT
PAGE
Send COMSEC Key/FH data from ANCD to ANCD via STU (task) . . . . . . . . . . . . .
Send data via RS-232 mode . . . . . . . . . . . . . . . . . . . . . . . . . . . . . . . . . . . . . . . . . . . .
Send ERF (Electronic Remote Fill) as part of retransmission (RXMT)
operation (task) . . . . . . . . . . . . . . . . . . . . . . . . . . . . . . . . . . . . . . . . . . . . . . . . . . . .
Send SOI information from ANCD to ANCD via Secure Telephone Unit
(STU) (task) . . . . . . . . . . . . . . . . . . . . . . . . . . . . . . . . . . . . . . . . . . . . . . . . . . . . . . . .
Send Traffic Encryption Key (TEK) to net operators using AK method of
OTAR (task) . . . . . . . . . . . . . . . . . . . . . . . . . . . . . . . . . . . . . . . . . . . . . . . . . . . . . . . .
Send Traffic Encryption Key (TEK) to other NCSs using MK method of
OTAR (task) . . . . . . . . . . . . . . . . . . . . . . . . . . . . . . . . . . . . . . . . . . . . . . . . . . . . . . . .
Short Range/Long Range (SR/LR) Radio components . . . . . . . . . . . . . . . . . . . . . .
Short Range/Long Range (SR/LR) Radio with dismount components . . . . . . . . .
Short Range (SR) Radio components . . . . . . . . . . . . . . . . . . . . . . . . . . . . . . . . . . . . .
7-12
5-63
5-58
7-14
6-26
6-24
2-23
2-24
2-21
Short Range (SR) Radio with dismount components . . . . . . . . . . . . . . . . . . . . . . . .
Short Range (SR) Radio with Single Radio Mount (SRM) components . . . . . . . .
SINCGARS associated tasks . . . . . . . . . . . . . . . . . . . . . . . . . . . . . . . . . . . . . . . . . . . .
SINCGARS low profile antenna (SLPA) . . . . . . . . . . . . . . . . . . . . . . . . . . . . . . . . . . . .
SINCGARS radio maintenance . . . . . . . . . . . . . . . . . . . . . . . . . . . . . . . . . . . . . . . . . . .
SINCGARS Receiver-Transmitter (RT) . . . . . . . . . . . . . . . . . . . . . . . . . . . . . . . . . . . .
Single channel (SC) communications . . . . . . . . . . . . . . . . . . . . . . . . . . . . . . . . . . . . .
2-22
SIP/ASIP RT Keypad . . . . . . . . . . . . . . . . . . . . . . . . . . . . . . . . . . . . . . . . . . . . . . . . . . . .
SIP/ASIP VAA . . . . . . . . . . . . . . . . . . . . . . . . . . . . . . . . . . . . . . . . . . . . . . . . . . . . . . . . . .
Special Net Control Station (NCS) tasks . . . . . . . . . . . . . . . . . . . . . . . . . . . . . . . . . . .
Definition of tasks . . . . . . . . . . . . . . . . . . . . . . . . . . . . . . . . . . . . . . . . . . . . . . . . . . .
Summary of tasks . . . . . . . . . . . . . . . . . . . . . . . . . . . . . . . . . . . . . . . . . . . . . . . . . .
2-8
2-32
7-1
4-33
8-1
2-2
4-4
Capabilities . . . . . . . . . . . . . . . . . . . . . . . . . . . . . . . . . . . . . . . . . . . . . . . . . . . . . . . 4-4
Limitations . . . . . . . . . . . . . . . . . . . . . . . . . . . . . . . . . . . . . . . . . . . . . . . . . . . . . . . . . 4 - 5
Required usage . . . . . .. . . . . . . . . . . . . . . . . . . . . . . . . . . . . . . . . . . . . . . . . . . . . . 4 - 5
Single Radio Mount (SRM) Radio . . . . . . . . . . . . . . . . . . . . . . . . . . . . . . . . . . . . . . . . . 2 - 3 2
Performancedata . . . . . . . . . . . . . . . . . . . . . . . . . . . . . . . . . . . . . . . . . . . . . . . . . . . 2 - 3 4
Physicaldata . . . . . . . . . . . . . . . . . . . . . . . . . . . . . . . . . . . . . . . . . . . . . . . . . . . . . . . 2 - 3 3
SIP/ASIP Receiver-Transmitter . . . . . . . . . . . . . . . . . . . . . . . . . . . . . . . . . . . . . . . . . . 2 - 8
2-9
6-18
6-18
6-18
5-42
5-42
5-43
5-62
Special operator tasks . . . . . . . . . . . . . . . . . . . . . . . . . . . . . . . . . . . . . . . . . . . . . . . . . .
Definition of tasks . . . . . . . . . . . . . . . . . . . . . . . . . . . . . . . . . . . . . . . . . . . . . . . . . . .
Summary of tasks . . . . . . . . . . . . . . . . . . . . . . . . . . . . . . . . . . . . . . . . . . . . . . . . . .
Special operator tasks (SIP/ASIP) . . . . . . . . . . . . . . . . . . . . . . . . . . . . . . . . . . . . . . . .
Start-up procedure . . . . . . . . . . . . . . . . . . . . . . . . . . . . . . . . . . . . . . . . . . . . . . . . . . . . 5 - 3
Index-7
TM 11-5820-890-10-8
SUBJECT
Technical . . . . . . . . . . . . . . . . . . . . . . . . . . . . . . . . . . . . . . . . . . . . . . . . . . . . . . . . . . . . . .
Traffic Encryption Key (TEK) . . . . . . . . . . . . . . . . . . . . . . . . . . . . . . . . . . . . . . . . . . . . .
Transfer COMSEC/FH data from ANCD to ANCD (task) . . . . . . . . . . . . . . . . . . . . .
Transfer COMSEC key from ANCD to RT (task) . . . . . . . . . . . . . . . . . . . . . . . . . . . .
2-8
4-3
Transmit updated FH data via net update ERF (Electronic Remote Fill) (task) .
Transmitter characteristics . . . . . . . . . . . . . . . . . . . . . . . . . . . . . . . . . . . . . . . . . . . . . . .
Two-digit Julian date . . . . . . . . . . . . . . . . . . . . . . . . . . . . . . . . . . . . . . . . . . . . . . . . . . .
Use SlP/ASIP RT as an RCU . . . . . . . . . . . . . . . . . . . . . . . . . . . . . . . . . . . . . . . . . . . . .
VAA Connectors (A/B models) . . . . . . . . . . . . . . . . . . . . . . . . . . . . . . . . . . . . . . . . . . .
VAA Connectors (C/D models) . . . . . . . . . . . . . . . . . . . . . . . . . . . . . . . . . . . . . . . . . . .
Vehicular Intercom set (VIC) . . . . . . . . . . . . . . . . . . . . . . . . . . . . . . . . . . . . . . . . . . . . .
Capabilities . . . . . . . . . . . . . . . . . . . . . . . . . . . . . . . . . . . . . . . . . . . . . . . . . . . . . . . .
Characteristics . . . . . . . . . . . . . . . . . . . . . . . . . . . . . . . . . . . . . . . . . . . . . . . . . . . . .
Operator controls . . . . . . . . . . . . . . . . . . . . . . . . . . . . . . . . . . . . . . . . . . . . . . . . . . .
Operator maintenance . . . . . . . . . . . . . . . . . . . . . . . . . . . . . . . . . . . . . . . . . . . . . .
Physical data. . . . . . . . . . . . . . . . . . . . . . . . . . . . . . . . . . . . . . . . . . . . . . . . . . . . . . .
Vehicular (Veh) radios . . . . . . . . . . . . . . . . . . . . . . . . . . . . . . . . . . . . . . . . . . . . . . . . . .
Performance data. . . . . . . . . . . . . . . . . . . . . . . . . . . . . . . . . . . . . . . . . . . . . . . . . . .
Physical data. . . . . . . . . . . . . . . . . . . . . . . . . . . . . . . . . . . . . . . . . . . . . . . . . . . . . . .
Zulutime.. . . . . . . . . . . . . . . . . . . . . . . . . . . . . . . . . . . . . . . . . . . . . . . . . . . . . . . . . . . . .
. 6-19
2-3
4-10
5-62
2-25
2-27
3-10
3-10
3-10
5-25
8-18
3-11
2-19
2-31
2-30
4-10
5-45
6-9
Transfer full SOI information from ANCD to ANCD (task) . . . . . . . . . . . . . . . . . . . . . 5 - 4 9
Transfer partial COMSEC/FH data from ANCD to ANCD (task) . . . . . . . . . . . . . . . 6 - 7
Transfer Quick Reference (QREF) SOI information from ANCD to ANCD (task) . 5-47
Transfer selected SOI information from ANCD to ANCD (task) . . . . . . . . . . . . . . . . 6 - 1 2
Transmit SOI information using Broadcast mode (task) . . . . . . . . . . . . . . . . . . . . . . 6-21
Index-8
By Order of the Secretary of the Army:
DENNIS J. REIMER
General, United States Army
Official:
Chief of Staff
Administrative Assistant to the
Secretary of the Army
05842
DISTRIBUTION:
To be distributed in accordance with the initial distribution number (IDN) 369784 requirements
for TM 11-5820-890-10-8.
U.S. GOVERNMENT PRINTING OFFICE: 1999-710-117/80152
PIN: 073599-000