1
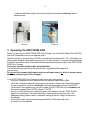
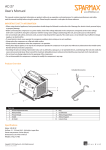
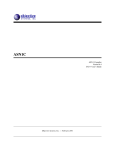
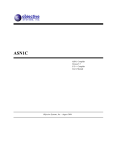
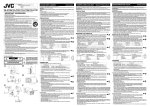
SILENTAIRE
TECHNOLOGY
8614 Veterans Memorial Drive
Houston, TX 77088-5048
832-327-9378
[email protected]
2
TROUBLE SHOOTING
1.
Safety Recommendations
Page 3
2.
Set-UP of the Spectrum 2000
Page 3
3.
Operating the Spectrum 2000
Page 4
4.
Tips for your Application
Page 5
5.
Maintenance
Page 5
6.
Troubleshooting
Page 6
3
Thank you and congratulations on the purchase of your SPECTRUM 2000,
the hottest new product in the airbrush field in years!
The SPECTRUM 2000 is built to the highest standards of craftsmanship and
should give you excellent efficiency.
If you use it properly and maintain it according to this manual, it will perform
to your fullest satisfaction for many years to come.
Please read this manual carefully and follow the instructions; this will
guarantee you a trouble free operation.
1. Safety Recommendations:
2. Set-up of the SPECTRUM 2000:
The SPECTRUM 2000 Color Changer comes assembled and requires only a few
simple connections before use:
-
-
-
connect the air hose from your compressor to the quick connect fitting
(Part # C7028), located under the Pressure Gauge of your color changer
(Picture 1).
connect the recoiled tubing (Part # C7046) to your airbrush air inlet.
if you are using a side feed airbrush, press the side feed adapter (Part # C7057,
you can buy it as an accessory) firmly into the side feed hole on your airbrush.
if you are using a bottom feed airbrush, press the tip of the connecting piece to
the airbrush (Part # C7057) firmly into the bottom feed hole (or into the hole of
the side feed adapter if using a side feed airbrush). This part fits like a color cup or
bottle and must remain immobile once it's inserted.
you should make sure the indicator slot on the manifold is positioned so it can be
easily seen (Picture 2).
4
-
rotate the dial left and right to be sure the indicator slot remains stationary, as the
selector moves.
Picture 1
Picture 2
3. Operating the SPECTRUM 2000
Before you can use your SPECTRUM 2000 Color Changer, you must fill the bottles (Part # C7045)
with color. Remember you can mix adjacent colors.
Start from the left on the tank (Part # C7030), unscrew the first bottle and fill it 1/2 - 3/4 full with your
chosen paint. Reattach the bottle firmly and move on to the next bottle. Your paint should be thinned
to airbrush consistency. Most off-the-shelf airbrush paints are thinned just right for the SPECTRUM
2000 Color Changer.
For proper operation all the bottles should be filled!
You should reserve one bottle for the solvent that is compatible with the paint that
you are using.
Do not mix oil or lacquer with water based; use all water based, or all oil or lacquer based
paint and solvent in your Color Changer!
Your SPECTRUM 2000 Color Changer is ready to have the lines primed:
- plug your compressor into an outlet and turn the pressure switch knob to ON.
- when the compressor has built up the pressure in the tank, lift the knob of the filter/regulator,
on your compressor, and turn it clockwise until the pressure-gauge shows about 25 PSI.
- lift the knob of the regulator on your color cylinder (Part # C7026) and turn it clockwise until
the pressure-gauge (Part # C7027) shows 12-15 PSI.
- line up a color-position on the connecting piece to the airbrush (Part # C7036). Pull the
trigger on your airbrush. This starts the process of priming the line for that color. The
transparent tubing makes it easy to see paint moving up the line, filling it all the way to
the airbrush.
- select all the other color positions and prime/fill all the Teflon tubes with color
or solvent up to the airbrush.
5
- once you are sure of your sequence of colors, we recommend that you apply a drop of
the corresponding color to each color-position on the dial for easy color reference.
- lift the knob of the regulator on the SPECTRUM 2000 (Part # C7026) and turn it
counterclockwise until the pressure-gauge (Part # C7027) reads 1 to 3 PSI.
- when you use your SPECTRUM 2000, start with as little pressure on the colors as possible;
it should not be operated above 15 PSI pressure on the colors.
Note: Observe all standard safety measures to protect your health before
using the SPECTRUM 2000. Wear Safety Glasses, Respirator and
ventilate your work area.
4. Tips for your application:
Your SPECTRUM 2000 Color Changer is a pressure delivery system, which will allow
you to paint with your airbrush in any position. You no longer need to worry about
spilling paint from a cup or bottle.
By adjusting the pressure on your paint supply using the regulator (Part # C7026,
Picture 3) on the tank (Part # C7030) of your SPECTRUM 2000, you can squirt, spatter
and spray as never before!
For example, if you trigger your airbrush without pushing down for air, you will have a
stream of paint!
Remove the air cap and experiment with the spatter ability you have with this system.
Rotate the connecting piece to your airbrush (Part # C7038) through each color to
familiarize yourself with the SPECTRUM 2000 operation. Stop halfway between colors
and see the results of the blend. If you have red, yellow and blue next to each other, you
can create orange and green with the color changer.
Try using different pressures on your colors and also on your airbrush. Experiment with
your new color system and you will see amazing results!
5. Maintenance:
You will notice that each bottle has a glass marble in it. This works like the marble in a spray can.
You can pick up the tank of your Color Changer (Part # C7030) now and then, and give it a ten
second shake. This will help keep the pigment from settling in the bottles.
When you're ready to paint again, shake your color changer to agitate the marbles and mix the paint.
Some paints may require removal of the bottles and stirring with a small stick. Then pressurize the
bottles, prime the lines again and start painting.
Long term storage will require you to backflush the system: lower the pressure on the bottles to 0
6
PSI, then cover the tip of the airbrush with a rubber eraser and push the trigger down and back.
When you hear the bottle “bubbling”, you will know that the line has been flushed with air. Repeat
this procedure with each color line.
The next step for long term storage will require you to remove the color from the bottles and store it in
its original container. Clean and fill each bottle of the Color Changer with the appropriate solvent for
the medium you have been using. FLUSH ALL LINES WITH CLEANER IMMEDIATELY!
Should you need to remove the SPECTRUM 2000 Color Changer from your airbrush, disconnect
the compressor from the color changer, grasp the color changer firmly with one hand, and with
the other hold the Board-Tool (Part # C7043, Accessory Package), go with the flattened surface
towards the airbrush and turn the Board-Tool gently around with the round side towards the
Connecting Piece to the Airbrush (Part # C7037). Without applying much power to the Board-Tool,
the two parts should be easily separated from each other.
6. Troubleshooting:
Trouble:
Choosing a color with the
color dial causes the color
indicator mark on the
connecting piece of the
airbrush to move with dial
Paint or solvent or air
bubbles leak around the
connecting piece to the
airbrush
(part # C7037)
Paint or solvent escapes
around the trigger of the
airbrush
A chosen paint color will
not spray
No pressure on an
individual color bottle
Probable Cause:
The connecting piece at the
airbrush is not tight enough in the
hole of the paint feed of the
airbrush
The shoulder bolt between the
teflon tubing connector and the
color dial is too loose
Airbrush has no needle seal
Needle seal of the airbrush is
defective
Pressure to the bottles is too low
preventing color from reaching the
connecting piece to airbrush
Color is too viscous
Color clogged a color tube
Paint clogged entrance of
compressed air around the Teflon
tube
Remedy:
Rests of old paint in the paint feed hole of your
air-brush can cause a slipping of the connecting
part in the paint feed hole. Clean or even scratch
out old paint from the paint feed hole of your
airbrush.
Tighten the shoulder bolt.
Check your airbrush to see if it contains a needle
seal (airbrushes without a needle seal can not be
used with the SPECTRUM 2000).
Replace defective needle seal of your airbrush.
Increase pressure on the colors.
Thin the color with solvent.
Back flush the system by increasing pressure
on the compressor and decrease pressure on
the SPECTRUM 2000, then press an eraser
rubber on the tip of the airbrush and depress
trigger completely down and back until you can
recognize bubbles coming up in the bottles.
Remove bottle and push Teflon tube one half to
one inch up and down in the bottle cap to dislodge any dried paint. Clean off the exterior of
the Teflon tube and reassemble bottle.