1
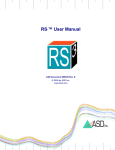
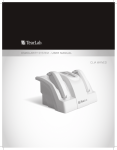
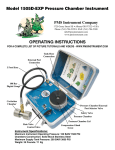
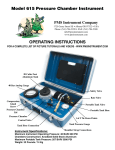
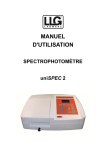
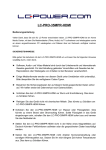
Chapter 22: General recommendations
for the use of instruments
Julian Pietragalla and Alistair Pask
1. Correct use of instruments
Instructions may vary according to the make and model
of your instrument. Refer the instrument user manual
for specific information (modes, measurement, data
download etc.), further details and clarification.
Do:
Do not:
Do ensure that the operator is familiar with each
instrument, functionality, correct approach to take data,
and expected readings before going into the field – it is
worth receiving advice and training from an experienced
user and reading the user guide.
Do not use an instrument before it has equilibrated with
ambient temperature and relative humidity (RH) as this
may affect the calibration and data. Take the instrument out
of its protective case and turn on at least 10 minutes before
starting use.
Do take measurements consistently – this is very
important. In particular, ensure that the instrument is
calibrated correctly before (and sometimes again during)
use. Keep a careful eye on the data during measurement
to guard against erroneous data, and large variations
within a plot.
Do not leave an instrument in direct sunlight/heat before
use as this can affect calibration and may cause incorrect
readings (especially for instruments with black cases).
When reading air temperature and RH, stand with your
back to the sun so as not to expose the instrument to
direct sun during measurements.
Do maintain batteries of correct type, size and polarity.
Recharge batteries fully before use (note that this may
require overnight charging). Take spare batteries to the
field to ensure that measurements are not interrupted.
Do not operate an instrument outside specified
temperature and RH range for the instrument, as
measurements taken may be incorrect (check the user
guide for specifications). Excess heat and moisture/RH
may cause permanent damage (note that instruments are
typically not water resistant).
Do ensure to take the whole repetition with the same
instrument. If more than one instrument is available,
cross-compare between instruments to check that
they are giving similar data.
Do not discard instruments after use. Remember to clean
the instrument, return it to its protective case, and to the
equipment store room. It is important that each instrument is
stored clean, dry, dust-free and in the correct protective case.
Do always make data easy to interpret/process at a later
date. For example, when taking readings with a data
logger which records only basic information, at the end
of each section take two blank readings without a sample
in the sensor chamber as an ‘end marker’.
Do not discard malfunctioning instruments when anomalies
or problems have been noted during equipment use.
Repairs and/or recalibrations to instruments may be
required which may involve returning the instrument to
the factory/specialist. This could take weeks or months.
2. Drying of samples
It is important that samples are dried to absolute
dry weight (DW), i.e., 0% moisture. The DW refers
to the sample weight reached after drying in a well
ventilated/forced-draft oven (Figure 22.1A) at 60-75°C
until constant weight (typically for at least 48h) (see
Table 22.1).
When drying samples:
• Do not mix fresh samples with dry samples.
• Organize sampling to optimize use of the oven,
and of oven space.
• Use a non-draft oven for drying open container
samples (e.g., soil moisture samples; Figure 22.1B).
126 Physiological Breeding II: A Field Guide to Wheat Phenotyping
Set dryer temperature and time depending on the type
of sample, estimated moisture content and capacity of
the dryer:
Table 22.1. General drying temperatures and times for dry
weight determination. Note that drying time may differ
according oven drying capacity.
Material
Temperature (°C) Time (hours)
Relative leaf water content
60-75
24
Grain moisture*
60-75
24-48
Biomass (maturity)
60-75
48
Root biomass
60-75
48
Biomass (emergence to grain-filling)
60-75
48-72
Soil moisture (gravimetric)
105
48
* Note that seed which potentially may be used for future trials should
not be oven dried, as drying seed at temperatures >40°C and/or for long
periods of time reduces their viability.
Notes for drying samples for nutrient and/or
metabolite analysis:
•
•
Dry biomass samples at 60-75°C for N, P, K and
water soluble carbohydrate determination.
High drying temperatures >90°C for long periods
may affect the nutrient content. Some specific
metabolites analyses (e.g., enzymes, proteins
etc.) require freeze drying of samples or heat
drying at a precise temperature and duration.
Ensure to check the specific procedural
requirements of the laboratory.
3. Accurate weighing of samples
It is essential that accurate weights are recorded for
sampled material. Poor weighing technique and/or
incorrect use of the balance will cause significant data
errors: either consistent (e.g., due to not removing the bag
‘TARE’ weight) or random (e.g., due to irregularly cooled
oven dried samples).
Note that all balances are sensitive to changes in the
environment, and that laboratory balances (both precision
and analytical) are more sensitive than field scales (i.e.,
battery powered bench balance or spring mechanical scale).
Follow manufacturer’s instructions for installation, and:
• Keep level (use inbuilt spirit level).
• Keep on a stable, non-vibrating surface (e.g., a concrete
plinth).
• Avoid areas near heaters, ovens or air conditioners.
• Avoid direct sun and air flows.
• Avoid sharing power circuits with high consumption
items (e.g., a microwave oven).
It is essential to select the type of balance according to
the capacity and resolution demanded (Table 22.2; Figure
22.2). It is often observed that samples are weighed on
inappropriate balances (e.g., weighing stems from the
partitioning of 20 culms on a large precision balance rather
than a small precision balance).
(A)
When weighing samples:
• Do not weigh hot samples direct from the oven –allow
time for sample to cool to room temperature before
weighing– to avoid incorrect readings and/or causing
damage to the balance.
Table 22.2. Recommendations for the type of balance and minimum
resolution required for the determination of sample weight of
various sample types.
Sample
(B)
Figure 22.1. Drying ovens: (A) large capacity forced-draft
oven; and, (B) small capacity non-draft oven (suitable for
drying open container samples; e.g., soil moisture samples).
2 m2 plot grain weight FW
2 m2 plot biomass FW
100 culm sub-sample FW
100 culm sub-sample DW
Sub-sample grain weight
Soil moisture (of 100 g)
20 culm stem biomass DW
200 grain FW and DW
Leaf samples for RWC
Root biomass (of 100g)
Typical
weight (g) Type of balance
>1000
>1000
500
200
50
30
20
10
<2
<2
Industrial/retail bench
Industrial/retail bench
Large precision
Medium precision
Small precision
Small precision
Small precision
Small precision
Semi-analytical
Semi-analytical
Minimum
resolution (g)
5
5
1
1
0.1
0.1
0.01
0.01
0.001
0.001
Where: FW = fresh weight; DW = dry weight; RWC = relative water content.
General recommendations
127
• Do not allow time for samples to absorb moisture
after oven drying. Once dried, samples tend towards
ambient humidity over time (this may be from hours
to days depending on the RH and type of sample).
• Samples for precision weighing may be kept in a
desiccator after drying (only appropriate for
small quantities).
• Distribute the weight of the sample evenly across the
balance plate.
• For small samples (<20 g), carefully empty the sample
from the container (i.e., the bag, envelope etc.) into
a specific weighing container (and remember to
subtract the container weight from the total weight).
• For samples >20 g, keep the sample in its container to
avoid losses (and remember to TARE the
container weight).
• Note that individual container weights may vary
slightly. Ensure to select a good, representative
TARE container.
An alternative to using a TARE container is to: (i)
subtract the average DW weight of the containers
(use 10+ empty containers to do this); or (ii) to weigh
individual containers (as for the aluminum pots in the
determination of soil moisture content, this volume,
Chapter 17).
Removing the container weight by using a ‘TARE’:
When weighing samples in containers (e.g., a bag,
envelope, tube etc.), remember to first ‘TARE’ this weight
so that the weight of this container is deducted from the
gross weight to give the sample weight. This is typically
appropriate for samples >20 g.
Multiple
Area / length
Weight
1,000,000
10,000
1,000
1
0.01
0.001
Hectare (ha)
Meter (m / m2)
Centimeter (cm)
Millimeter (mm)
Ton (t)
Kilogram (kg)
Gram (g)
Milligram (mg)
To do this:
• Select an empty container which is otherwise identical
to that of the samples (i.e., from the same box/packet,
with the same ventilation holes/staples if any, etc.).
• Dry the empty container in the oven next to samples
(for the same drying time).
• Before weighing samples, place this empty container
on the balance and press ‘RE-ZERO’/‘TARE’.
• The balance should show zero with the empty
container on the balance plate, or a negative value
when the empty container is removed (and the plate
is empty).
0.00
0.000
(A)
(B)
4. Typical ranges and units
It is recommended to keep all measurements in the
same unit system; typically on the decimal scale
(Tables 22.3 and 22.4).
Table 22.3. Useful units of measurement.
Table 22.4. Typical units of data expression.
Sample
Measured as
Expressed as
-1
Grain yield and
biomass weights
g plot
g m-2 or t ha-1
Dry weight of culms and crop
components (e.g. leaf
lamina, leaf sheath, stem)
g per 20 culm
sub-sample
g m-2 or g culm-1
Root biomass
g g soil-1
g cm3 soil-1
0
0.0
(C)
(D)
Figure 22.2. Types of balances for physiological measurements, showing: (A) semi-analytical (3 d.p.); (B) small precision (2 d.p.);
(C) medium/large precision (1 d.p.); and, (D) Industrial/retail bench balances (0 d.p.).
128 Physiological Breeding II: A Field Guide to Wheat Phenotyping
5. Suggestions on models of instruments
Reference to specific instruments is made in most
chapters. The mention of trade names and commercial
products are for information purposes only, and do not
imply endorsement by CIMMYT. Prices quoted serve
as a guideline – and will vary according to accessories,
functionalities, taxes and customs fees. Table 22.5
provides details of suggested models of instruments.
Table 22.5. Suggested models of instruments (websites accessed August 2011).
Instrument
Ceptometer
Brand
Delta-T Devices
Decagon Devices
Chlorophyll
Opti-Sciences
fluorometer
Qubit Systems
WALZ
Hansatech Intruments
Chlorophyll meter
Minolta
Field Scout
Opti-Sciences
Hansatech Intruments
Apogee
FT Green, LLC
Qubit Systems
Infrared
Sixth Sense
thermometer
Mikron
Extech
Leaf area meter
Licor
CID Bio-Science
Delta-T Devices
Leaf porometer
Delta-T Devices
Decagon Devices
Normalized difference NTech Industries
vegetation index
Holland Scientific
(NDVI) Sensor
Field Scout
Qubit Systems
Photosynthesis
LI-COR
system
PP Systems
CID Bio-Science
WALZ
ADC
Plot combine
Wintersteiger
Almaco
Sample mill (Grinder) UDY Corporation
IKA
FOSS
Thomas Wiley
Scholander pressure
Soil moisture
chamber
Equipment Corp.
Skye
PMS Instrument Company
Seed counter
Seedburo
(automatic)
Pfeuffer
Seed counter (manual) Seedburo
Soil corer set (electric Eijkelkamp Agrisearch
percussion hammer) Equipment
Soil corer (tractor
mounted)
Spectrometer
Spectroradiometer
Thresher
Vapor pressure
osmometer
Giddings Soil Sampling Co
Spectral Evolution
Ocean Optics
PP-Systems
CID Bio-Science
ASD Inc
Spectral Evolution
Almaco
EliTech Group - Wescor
Model/s
SunScan System, and SS1
AccuPAR LP-80
OS1-FL, and OS-30p
Z990 FluorPen
PAM-2500, MINI-PAM
FMS 2, Pocket-PEA
SPAD 502 Plus
CM 1000
CCM-200
CL-01
CCM-200
At Leaf
Z955 Nitrogen Pen
LT300
MI-N14
42540
LI-3100C, and LI-3000C
CI-202, and CI-203
WinDIAS 3
AP4
SC-1
GreenSeeker Hand Held
Crop Circle Handheld
CM 1000 NDVI
Z950 NDVI
6400-XT
CIRAS-2
CI-340
GFS-3000
LCpro-SD
Classic
PMC 20, SPC 20
Cyclone
MF 10.1
Cyclotec 1093
Model 4, and Mini
3000 Series, and 3005 Series
Measurement level
Canopy
Canopy
Leaf
Leaf
Leaf
Leaf
Leaf
Canopy
Leaf
Leaf
Leaf
Leaf
Leaf
Canopy
Canopy
Canopy
Leaf
Leaf
Leaf
Leaf
Leaf
Canopy
Canopy
Canopy
Leaf
Leaf/plant
Leaf/plant
Leaf
Leaf
Leaf
Plot
Plot
Grain/biomass
Grain/biomass
Grain/biomass
Grain/biomass
Leaf
Website
http://www.delta-t.co.uk/
http://www.decagon.com/
http://www.optisci.com/
http://www.qubitsystems.com/
http://www.walz.com/
http://www.hansatech-instruments.com/
http://www.specmeters.com/
http://www.specmeters.com/
http://www.optisci.com/
http://www.hansatech-instruments.com/
http://www.apogeeinstruments.com/
http://www.atleaf.com/
http://www.qubitsystems.com/
http://www.instrumart.com/
http://www.mikroninfrared.com/
http://www.extech.com/instruments/
http://www.licor.com/
http://www.cid-inc.com/
http://www.delta-t.co.uk/
http://www.delta-t.co.uk/
http://www.decagon.com/
http://www.greenseeker.com/
http://www.hollandscientific.com/
http://www.specmeters.com/
http://www.qubitsystems.com/
http://www.licor.com/
http://www.ppsystems.com/
http://www.cid-inc.com/
http://www.walz.com/
http://www.adc.co.uk/
http://www.wintersteiger.com/
http://www.almaco.com/
http://www.udyone.com/
http://www.ika.net/
http://www.foss.dk/
http://www.thomassci.com/
http://www.soilmoisture.com/
SKPM 1405/50
Model 600
801 Count-A-Pak
CONTADOR
Placement Trays
Percussion drilling set with
light electrical percussion
hammer
#15
Leaf
Leaf
Grain
Grain
Grain sample
Soil/root
http://www.skyeinstruments.com/
http://www.pmsinstrument.com/
http://www.seedburo.com/
http://www.pfeuffer.com/
http://www.seedburo.com/
http://www.eijkelkamp.com/
Soil/root
http://www.soilsample.com/
Canopy/leaf
Canopy/leaf
Canopy/leaf
Leaf
Canopy/leaf
http://www.spectralevolution.com/
http://www.oceanoptics.com/
http://www.ppsystems.com/
http://www.cid-inc.com/
http://www.asdi.com/
Canopy/leaf
Plot/bundle sample
Tissue sap
http://www.spectralevolution.com/
http://www.almaco.com/
http://www.wescor.com/
PSR-2500
JAZ
UniSpec SC, and UniSpec DC
CI-700 (leaf clip ready)
FieldSpec 3, AgriSpec, and
HandHeld 2
PSR-2500, and PSR-1100
SBT and LPT
VAPRO 5600
General recommendations
129