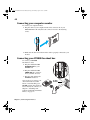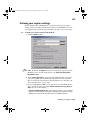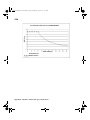
1
RT2000 Installation & User Guide.book Page 1 Monday, April 2, 2001 3:51 PM
Matrox RT2000
Installation & User Guide
March 30, 2001
10652-201-0300
RT2000 Installation & User Guide.book Page 2 Monday, April 2, 2001 3:51 PM
Trademarks • Marques déposées • Warenzeichen • Marchi registrati • Marcas registradas
Matrox Electronic Systems Ltd. ........................................Matrox®, Flex 3D™, Infinite Capture™, Matrox DVD Player™, Matrox
File Converter™, Matrox Disk Benchmark™, Matrox MediaTools™,
Matrox Video Tools™, RT2000™
Matrox Graphics Inc........................................................Matrox G200™, Matrox G400™, Matrox Millennium™,
Matrox PowerDesk™
Adobe Systems Inc. ........................................................Acrobat®, Adobe®, Photoshop™, Premiere™
Advanced Micro Devices, Inc ..........................................AMD Athlon™
Apple Computer, Inc. ......................................................Apple®, FireWire™
Inscriber Technology Corporation ....................................Inscriber®, TitleExpress™
Intel Corporation.............................................................Intel®, Pentium®
International Business Machines Corporation...................IBM®, VGA®
JVC .................................................................................Digital-S™
Microsoft Corporation .....................................................Microsoft®, Windows®, ActiveMovie™, DirectShow™, DirectX™, Video
for Windows™
Panasonic (Matsushita Electric Industrial Co.) ...................Panasonic®, DVCPRO™
Pixélan Software..............................................................Pixélan Software™, Video SpiceRack Lite™
Sonic Foundry, Inc...........................................................ACID Music™, Sonic Foundry®
Sonic Solutions................................................................cDVD™, DVDit!™, Sonic Solutions™
Sony................................................................................DVCam™
Ulead Systems, Inc. .........................................................Ulead®, Cool 3D™
Acrobat® Reader Copyright © 1987-2001 Adobe Systems Incorporated. All rights reserved. Adobe and Acrobat are trademarks of
Adobe Systems Incorporated, which may be registered in certain jurisdictions.
• (English) All other nationally and internationally recognized trademarks and tradenames are hereby acknowledged. • (Français)
Toutes les autres marques et tous les autres noms déposés reconnus nationalement ou internationalement sont également reconnus
par les présentes. • (Deutsch) Alle sonstigen national und international bekannten Warenzeichen und Produktnamen werden
hiermit anerkannt. • (Italiano) Eventuali altri nomi di prodotto menzionati in questo manuale sono dei proprietà di rispettivi
produttori. • (Español) Por medio del presente se reconocen todas las demás marcas y nombres comerciales reconocidos a nivel
nacional e internacional.
Copyright © 2001 Matrox Electronic Systems Ltd. • (English) All rights reserved. • (Français) Tous droits réservés.
• (Deutsch) Alle Rechte vorbehalten. • (Italiano) Tutti i diritti riservati. • (Español) Reservados todos los derechos.
Disclaimer Matrox Electronic Systems Ltd. reserves the right to make changes in specifications at any time and without notice.
The information provided by this document is believed to be accurate and reliable. However, no responsibility is assumed by Matrox
Electronic Systems Ltd. for its use; nor for any infringements of patents or other rights of third parties resulting from its use. No
license is granted under any patents or patent rights of Matrox Electronic Systems Ltd.
Unauthorized recording or use of broadcast television programming, video tape, or other copyrighted material may violate copyright
laws. Matrox Electronic Systems Ltd. assumes no responsibility for the illegal duplication, use, or other acts that infringe on the rights
of copyright owners.
Matrox Electronic Systems Ltd.
1055 St. Regis Blvd., Dorval, Quebec, Canada H9P 2T4
Tel: (514) 685-2630 Fax: (514) 685-2853 World Wide Web: www.matrox.com
RT2000 Installation & User Guide.book Page i Monday, April 2, 2001 3:51 PM
Thank you for choosing Matrox
Please register on our web site at www.matrox.com/video in the
RT2000 Customer Support section or fill in and mail the
included registration card to be eligible for customer support,
software updates, new product announcements, and
information on special offers and upcoming events.
RT2000 Installation & User Guide.book Page ii Monday, April 2, 2001 3:51 PM
RT2000 Installation & User Guide.book Page i Monday, April 2, 2001 3:51 PM
i
Warranty
A. Limited Warranty Statement
1 Matrox Electronic Systems Ltd. (“Matrox”) warrants to the end-user customer who provides adequate proof of purchase, that Matrox
hardware products purchased from Matrox authorized dealers will be free from defects in materials and workmanship for a period of three (3)
years from the date of purchase. This warranty applies only to the original end-user purchaser and is non-transferable. Conditions and
limitations of Matrox’s warranty are stated below.
2 Matrox’s limited warranty covers only those defects that arise as a result of normal use of the hardware and does not apply to any:
a improper or inadequate maintenance;
b incompatibilities due to the user’s hardware or software applications with or in which the Matrox product interfaces;
c product of a special or custom-made nature;
d unauthorized modification or misuse;
e improper installation, misapplication or negligence;
f operation outside the product’s environmental specifications;
g improper site preparation or maintenance;
h software;
i other causes that do not relate to a product defect;
j defects or damage suffered as a result of force majeure (including theft);
k defects or damage suffered as a result of normal wear and tear; and/or
l stolen goods.
3 If Matrox receives, during the applicable warranty period, notice of a defect in a warranted hardware product and the defective Matrox
product in question, Matrox shall at its sole option, either repair or replace the product, and shall return the repaired product or a
replacement product within a reasonable delay. The replacement product may not be new, provided that it has functionality at least equal to
that of the product being replaced.
4 This warranty is valid in any country where Matrox hardware products are distributed by Matrox or its authorized dealers.
5 This Limited Warranty Statement gives the customer specific legal rights. The customer may also have other rights which vary from state to
state in the United States, from province to province in Canada, and from country to country elsewhere in the world.
B. Limitations of Warranty
1 NEITHER MATROX NOR ANY OF ITS THIRD PARTY SUPPLIERS MAKES ANY OTHER WARRANTY OF ANY KIND, WHETHER
EXPRESSED OR IMPLIED, WITH RESPECT TO MATROX PRODUCTS. MATROX SPECIFICALLY DISCLAIMS (and the customer,
by accepting the Matrox product, specifically accepts such disclaimer and waives) ALL OTHER WARRANTIES, EITHER EXPRESSED OR
IMPLIED, INCLUDING BUT NOT LIMITED TO THE IMPLIED WARRANTIES OF MERCHANTABILITY AND FITNESS FOR A
PARTICULAR OR INTENDED PURPOSE OR USE AND THE WARRANTY AGAINST LATENT DEFECTS, WITH RESPECT TO THE
HARDWARE AND/OR SOFTWARE. MATROX FURTHER DISCLAIMS ANY WARRANTY THAT MATROX PRODUCTS, IN
WHOLE OR IN PART, WILL BE FREE FROM INFRINGEMENT OF ANY THIRD PARTY INTELLECTUAL PROPERTY OR
PROPRIETARY RIGHTS."
2 To the extent that this Limited Warranty Statement is inconsistent with the law of the locality where the customer purchases the Matrox
product, this Limited Warranty Statement shall be deemed modified to be consistent with such local law. Under such local law, certain
limitations of this Limited Warranty Statement may not apply to the consumer.
3 To the extent allowed by local law, the remedies provided in this Limited Warranty Statement are the customer’s sole and exclusive
remedies.
C. Limitations of Liability
1 EXCEPT FOR THE OBLIGATIONS SPECIFICALLY SET FORTH IN THE LIMITED WARRANTY STATEMENT, IN NO EVENT
SHALL MATROX BE LIABLE FOR:
a any direct, indirect, special, incidental, consequential, foreseeable or unforeseeable, or punitive damages, whether based on contract, tort,
delict or any other legal theory and whether advised of the possibility of such damages; and/or
b damages arising from the loss of use, data, production revenue and/or profit of in connection with the Matrox product or any business
interruption.
2 Without prejudice to the foregoing, any liability of Matrox for any breach of warranty shall be limited to the amount paid by the customer
for the defective hardware in question.
3 To the extent allowed by local law, Matrox’s entire liability and the customer’s exclusive remedy shall be the repair or replacement of any
defective product during the warranty period. Matrox does not offer any other warranty with respect to Matrox hardware or software or any
other hardware or software.
4 Customer shall be responsible for all applicable taxes, duties and customs fees on any replacement unit, as well as all transport, insurance,
storage and other charges incurred on all returned products.
A. Limited Warranty Statement
RT2000 Installation & User Guide.book Page ii Monday, April 2, 2001 3:51 PM
ii
D. Obtaining Service in North America
1 Verify that your Matrox product was installed and configured according to the information in its accompanying documentation.
2 Read the “Troubleshooting” information included with the Matrox product to see if you can solve the problem yourself.
3 If you are still experiencing difficulties, please contact your dealer where you purchased your Matrox product.
4 If you must return a Matrox product, leave the configuration as it was when you were using it, and leave all identification stickers on the
product. Pack the product in its original box and return to your Matrox dealer where the product was purchased, together with your proof of
purchase. Your Matrox dealer will return the product for you. Alternatively, if this first option is unavailable to you, you may contact the
Matrox Technical Support group who will issue a Return Merchandise Authorization (RMA) number, upon receipt of adequate proof of
purchase, and inform you of shipping instructions. DO NOT RETURN THE PRODUCT TO MATROX WITHOUT MATROX’S RMA
NUMBER AND EXPRESS AUTHORIZATION.
E. Obtaining Service outside North America
1 Verify that your Matrox product was installed and configured according to the information in its accompanying documentation.
2 Read the “Troubleshooting” information included with the Matrox product to see if you can solve the problem yourself.
3 If you are still experiencing difficulties, please contact your dealer where you purchased your Matrox product.
4 If you must return a Matrox product, leave the configuration as it was when you were using it, and leave all identification stickers on the
product. Pack the product in its original box and return to your Matrox dealer where the product was purchased, together with your proof of
purchase. Your Matrox dealer will return the product for you.
F. General
This limited warranty shall be governed by the laws of the Province of Quebec, Canada and the federal laws of Canada applicable therein and
the courts of the Province of Quebec shall have exclusive jurisdiction to hear and decide any dispute instituted by the customer in connection
with this limited warranty; the customer waives, by accepting the product, its rights to institute proceedings in connection with this warranty
against Matrox in any jurisdiction other than Quebec.
Software license agreement
Single-user products This Matrox software (the “Software”) is copyrighted by Matrox Electronic Systems Ltd. All rights are reserved.
The purchaser is granted a license to use the software only, subject to the following restrictions and limitations.
1 The license is for the original purchaser only, and is not transferable without written permission of Matrox.
2 The original purchaser may use the Software on a single computer owned or leased by the original purchaser. You may not use the Software
on more than a single machine, even if you own or lease more than one machine, without written consent of Matrox.
3 The original purchaser may make back-up copies of the Software for his or her own use only, subject to the use limitations of this license.
4 The original purchaser may not engage in, nor permit third parties to engage in, any of the following:
✄ Providing or disclosing the Software to third parties.
✄ Providing use of the Software in a computer service business, network, time-sharing, multiple CPU or multi-user arrangement to users
who are not individually licensed by Matrox.
✄ Making alterations or copies of any kind in the Software (except as specifically permitted above).
✄ Attempting to unassemble, de-compile or reverse engineer the Software in any way.
✄ Granting sublicenses, leases, or other rights in the Software to others.
✄ Making copies, or verbal or media translations, of the user’s guide.
✄ Making telecommunication data transmissions of the Software.
Matrox reserves the right to terminate this license if there is a violation of its term or default by the Original Purchaser. Upon termination, for
any reason, all copies of the Software must be immediately returned to Matrox, and the Original Purchaser shall be liable to Matrox for any and
all damages suffered as a result of the violation or default.
Limited warranty Matrox warrants to you, for a period of ninety (90) days normal use from your date of purchase, that:
1 The CD/disks on which the software is furnished and the documentation are not defective.
2 The Software is properly recorded upon the CD/disks included.
3 The documentation is substantially complete and contains all the information Matrox deems necessary to use the software.
4 The Software functions substantially as described in the documentation.
Matrox’s entire liability and your exclusive remedy shall be the replacement of any CD/Disks or documentation not meeting these warranties,
which is returned to Matrox or an authorized dealer, together with a copy of your paid receipt. The above is the only warranty of any kind, either
express or implied, including, but not limited to the implied warranties of merchantability and fitness for a particular use that is made by Matrox
on this Licensed Software. In no event shall Matrox be liable to you or to any third party for consequential, special, indirect or incidental
damages which you may incur as a result of using the licensed software, including, but not limited to, loss of data, or information of any kind
which you may experience.
Warranty
RT2000 Installation & User Guide.book Page iii Monday, April 2, 2001 3:51 PM
Contents
Chapter
1
Introducing Matrox RT2000
Welcome.............................................................................................................. 2
Matrox RT2000 features ...................................................................................... 2
Hardware supplied .............................................................................................. 3
Software supplied ................................................................................................ 3
System requirements ........................................................................................... 4
About this manual ............................................................................................... 5
Style conventions ............................................................................................... 5
Other documentation .......................................................................................... 6
Installation overview............................................................................................ 7
Chapter
2
Preparing Your System
Upgrading an existing RT2000 system .............................................................. 10
Upgrading to Windows 2000 or Windows Me ................................................. 10
Installing RT2000 for the first time.................................................................... 10
Check our web site for recommendations ........................................................ 10
New installation overview.................................................................................. 11
If you have a new computer with no display card............................................. 11
If you’re using a computer with an existing display card ................................... 11
For new systems with no existing display card.................................................. 12
Install your Millennium Flex 3D Edition card .................................................... 13
Plan your storage configuration and install your devices.................................. 16
General storage considerations......................................................................... 16
EIDE storage considerations ............................................................................. 18
Install Windows 2000 or Windows Me ............................................................. 20
About computers with multiple operating systems ............................................ 20
Set your AGP aperture size ................................................................................ 21
RT2000 Installation & User Guide.book Page iv Monday, April 2, 2001 3:51 PM
iv
Configure your DMA settings.............................................................................21
Methods of enabling DMA................................................................................21
Enabling DMA bus-mastering............................................................................22
Disable “write-back caching” on your drives ....................................................25
Install Adobe Premiere.......................................................................................27
Do not install Inscriber TitleExpress from the Adobe Premiere CD ....................27
Remove your existing display card’s device listing ............................................27
Are you ready?....................................................................................................30
Chapter
3
Installing Your RT2000 Card Set
Getting started ...................................................................................................32
Remove your display card ..................................................................................32
Connect the ribbon cable...................................................................................33
Install the card set..............................................................................................34
Connect the CD audio cable ..............................................................................36
Chapter
4
Connecting Your Devices
Connecting your computer monitor...................................................................40
Connecting your RT2000 breakout box .............................................................40
RT2000 breakout box overview..........................................................................41
Available S-Video and composite video connections.........................................42
Composite input/output connections.................................................................43
S-Video input/output connections......................................................................45
DV video device (1394 connection) ...................................................................47
Hot-plugging ....................................................................................................47
Typical RT2000 connections ..............................................................................48
DV-1394 connections.......................................................................................48
S-Video connections using same device for capture and print-to-tape ...............49
Composite connections using separate source and record devices ....................50
Contents
RT2000 Installation & User Guide.book Page v Monday, April 2, 2001 3:51 PM
v
Chapter
5
Installing Your Software
and Testing Your Hard Drives
Installation choices ............................................................................................ 52
Installing Matrox Video Tools
on a computer with Windows 2000 .................................................................. 52
Installing Matrox Video Tools
on a computer with a new copy of Windows Me.............................................. 56
Upgrading from a previous version of Matrox Video Tools
on a computer with Windows Me..................................................................... 58
Uninstall previous version of Matrox Video Tools ............................................. 58
Testing the performance of your hard drives .................................................... 60
Installing the Matrox DVD Player ...................................................................... 62
Installing Inscriber TitleExpress......................................................................... 63
Installing Ulead Cool 3D ................................................................................... 63
Installing Sonic Foundry ACID Music ................................................................ 63
Installing Sonic Solutions DVDit! LE.................................................................. 64
Installing the Matrox VFW software codecs
on a computer without the RT2000 hardware .................................................. 64
Removing and re-installing Matrox Video Tools ............................................... 65
Chapter
6
Configuring Your System
for Use with Matrox RT2000
Monitor setup .................................................................................................... 68
Disabling energy saving mode .......................................................................... 68
Display setup ..................................................................................................... 70
Accessing the Matrox PowerDesk property sheets ............................................ 70
Audio setup........................................................................................................ 71
Using Windows Volume Control with the
Matrox RT Mixer ............................................................................................ 73
Contents
RT2000 Installation & User Guide.book Page vi Monday, April 2, 2001 3:51 PM
vi
Notes on your Millenium Flex 3D Edition card..................................................76
Display driver updates ......................................................................................76
Do not overclock..............................................................................................76
Available display resolutions .............................................................................76
Chapter
7
Defining Your Adobe Premiere Settings
Important—Do not press Ctrl+Alt+Delete
while running Premiere on Windows 2000 .......................................................78
A note about running other programs with Adobe Premiere.............................78
Loading project presets ......................................................................................78
Setting up your scratch disks .............................................................................79
Defining your General settings ..........................................................................80
Selecting your NTSC setup level for analog video..............................................83
Selecting your editing aspect ratio.....................................................................84
Selecting your realtime Adobe Premiere transitions...........................................84
Selecting your AVI file creation method for large clips in Windows 2000 ..........86
Defining your Video settings ..............................................................................87
Defining your Audio settings..............................................................................89
Defining your Capture settings ..........................................................................90
Defining your Export Movie settings..................................................................94
Selecting your MPEG-2 I-frame video quality ....................................................97
Selecting your MPEG-2 IBP options ...................................................................98
Setting up DV-1394 device control ..................................................................100
Exporting your Adobe Premiere Timeline to DV tape ......................................101
Preparing your tapes for recording ..................................................................101
Preparing your Timeline for recording.............................................................101
Exporting to DV tape with device control........................................................102
Things you need to know about using DV-1394 devices .................................103
About Matrox Infinite Capture and creating
video clips greater than 2 GB ..........................................................................105
Creating a production in 16:9 format ..............................................................106
Contents
RT2000 Installation & User Guide.book Page vii Monday, April 2, 2001 3:51 PM
vii
Chapter
8
Setting Up Realtime Effects with Adobe Premiere
Available effects............................................................................................... 108
How to place your effects for optimal results ................................................. 109
How to apply a Matrox transition.................................................................... 110
How to apply a Matrox video effect ................................................................ 111
Using common controls in the plug-in ............................................................ 112
Previewing your effects .................................................................................. 114
Using text boxes and sliders ........................................................................... 115
Selecting colors .............................................................................................. 116
Creating a 2D/3D DVE ..................................................................................... 117
Creating a 3D tile............................................................................................. 119
Creating a distortion effect .............................................................................. 121
Creating a page curl......................................................................................... 122
Creating a particle effect ................................................................................. 123
Creating an organic wipe................................................................................. 125
Adding your own organic wipe patterns ......................................................... 126
Creating a colorization effect........................................................................... 128
Using the custom colorization settings ............................................................ 129
Transforming your clip .................................................................................... 131
Using the transform controls........................................................................... 132
Using the Transform menu............................................................................. 133
Transforming a clip using the Preview Window .............................................. 134
Cropping your effect........................................................................................ 135
Using the crop controls .................................................................................. 136
Using the Crop menu..................................................................................... 136
Cropping an effect using the Preview Window ............................................... 137
Working with keyframes.................................................................................. 138
Using the effect controls for keyframes ........................................................... 138
Creating new keyframes................................................................................. 140
Modifying keyframes...................................................................................... 140
Resetting a track to default settings ................................................................. 140
Contents
RT2000 Installation & User Guide.book Page viii Monday, April 2, 2001 3:51 PM
viii
Selecting keyframes ........................................................................................140
Copying and moving keyframes ......................................................................141
Pasting attributes of a keyframe (“selective paste”) ..........................................141
Deleting keyframes .........................................................................................143
Saving and loading keyframe files ...................................................................143
Interpolating between keyframes ....................................................................144
Keyboard shortcuts .........................................................................................147
Setting up realtime graphics overlays ..............................................................148
Setting up realtime speed changes ..................................................................150
When you’ll need to render your effects..........................................................151
Chapter
9
Rendering Matrox Video for Windows AVI Files
Overview ..........................................................................................................154
Using VFW programs without the RT2000 hardware ......................................154
Before you start rendering ...............................................................................155
Selecting color space conversion options ........................................................156
Rendering material to a Matrox VFW .avi file ..................................................157
Chapter
10
Using Matrox MediaTools
About Matrox MediaTools................................................................................160
Preparing your tapes for use with MediaTools ................................................160
Starting Matrox MediaTools.............................................................................161
Using the Matrox MediaTools interface...........................................................162
Using the MediaTools pop-up menu...............................................................164
Navigating through clips with the transport controls ........................................165
......................................................................................................................166
Using the time code fields ..............................................................................166
Defining your capture settings .........................................................................169
Selecting your video and audio drives.............................................................170
How MediaTools assigns clip names ...............................................................171
Contents
RT2000 Installation & User Guide.book Page ix Monday, April 2, 2001 3:51 PM
ix
Scanning and capturing clips........................................................................... 171
Capturing individual clips............................................................................... 172
Creating a batch capture list............................................................................ 173
Scanning clips ................................................................................................ 173
Adding clips to a batch capture list ................................................................. 174
Capturing clips from a batch capture list ........................................................ 175
Editing clips ..................................................................................................... 175
Updating and recapturing clips....................................................................... 175
Changing a clip’s In and Out icons ................................................................. 176
Working with the clip list................................................................................. 176
Adding clips ................................................................................................... 176
Saving and loading a clip list........................................................................... 177
Copying clips ................................................................................................. 177
Moving clips .................................................................................................. 177
Deleting clips ................................................................................................. 178
Detaching and resizing the clip list ................................................................. 179
Grabbing a single-frame image ....................................................................... 180
Exporting your clip list to an Adobe Premiere project..................................... 181
Keyboard shortcuts.......................................................................................... 182
Chapter
11
Using the Matrox File Converter
About the Matrox File Converter ..................................................................... 184
Converting your files ....................................................................................... 185
Commands for working with conversion lists .................................................. 186
Notes............................................................................................................. 187
Chapter
12
Using Inscriber TitleExpress
Overview.......................................................................................................... 190
Creating a simple title ..................................................................................... 191
Remarks ........................................................................................................... 193
Contents
RT2000 Installation & User Guide.book Page x Monday, April 2, 2001 3:51 PM
x
Chapter
13
Using Ulead Cool 3D
Overview ..........................................................................................................196
Required settings to create a title for use with Adobe Premiere......................197
Tips on creating titles.......................................................................................199
Chapter
14
Using Sonic Foundry ACID Music
Overview ..........................................................................................................202
Getting started in ACID Music .........................................................................203
Saving your project for use in Adobe Premiere................................................203
Chapter
15
Using Sonic Solutions DVDit! LE
and the Matrox DVD Player
Overview ..........................................................................................................206
Exporting material for your DVD project .........................................................207
Creating a DVD volume ...................................................................................210
Playing your DVD volume using the Matrox DVD Player ................................213
Chapter
16
RT2000 Troubleshooting
Problems, possible causes, and solutions........................................................216
Up-to-date information ..................................................................................216
Possible solutions............................................................................................216
Multiple solutions ...........................................................................................216
Appendix
A
Creating an RT2000 Hardware Profile
Creating a specific RT2000 hardware profile...................................................240
Contents
RT2000 Installation & User Guide.book Page xi Monday, April 2, 2001 3:51 PM
xi
Appendix
B
Data Rates and A/V Disk Space Requirements
DV/MPEG-2 qualities and required disk space................................................ 244
Audio sampling and required disk space ........................................................ 244
Recommended MPEG data rates for distribution on DVD-R or CD-R ............ 245
Appendix
C
Using Additional Millennium
Flex 3D Display Resolutions
Available display resolutions ........................................................................... 248
Appendix
D
RT2000 Specifications
Matrox RT2000 codec card specifications....................................................... 254
Video............................................................................................................. 254
Audio ............................................................................................................ 254
Environmental specifications .......................................................................... 254
Millennium Flex 3D Edition specifications ...................................................... 255
Features ......................................................................................................... 255
Video specifications ....................................................................................... 255
Environmental specifications .......................................................................... 255
Appendix
E
RT2000 Glossary
Glossary of terms............................................................................................. 258
Appendix
F
RT2000 Customer Support
Getting the most support ................................................................................ 270
Register your RT2000..................................................................................... 270
Keep up to date with our web site.................................................................. 270
Contacting us ................................................................................................... 271
Contents
RT2000 Installation & User Guide.book Page xii Monday, April 2, 2001 3:51 PM
xii
Appendix
G
Matrox Around the World
Worldwide Headquarters ...............................................................................274
Europe, Middle East, Africa.............................................................................274
France ............................................................................................................274
Germany ........................................................................................................274
Asia Pacific .....................................................................................................274
Index............................................................................................. 275
Contents
RT2000 Installation & User Guide.book Page 1 Monday, April 2, 2001 3:51 PM
Introducing Matrox RT2000
This chapter outlines some of the features of your RT2000, lists the
contents of your kit, and explains the organization of your RT2000
documentation.
C
h
a
p
t
e
r
RT2000 Installation & User Guide.book Page 2 Monday, April 2, 2001 3:51 PM
2
Welcome
Thank you for purchasing Matrox RT2000. Discover a whole new universe of
digital video: realtime editing, superior effects technology, the latest compression
and distribution formats, and the industry’s leading content creation software, all
available in an affordable realtime video editing package.
Matrox RT2000 features
✃
Lets you work with two video streams and a 32-bit, uncompressed graphics
layer in real time.
✃
Native DV and MPEG-2 editing.
✃
Realtime, broadcast-quality 2D/3D digital video effects (DVEs) and
transitions.
✃
3D DVE powered by Matrox Flex 3D.
✃
Choose from organic wipes, 2D and 3D DVEs, page curls, 3D tiles,
distortions, and particle effects, as well as transparency effects—in real time
without rendering!
✃
Analog and digital video input/output—S-Video, composite, 1394.
✃
MPEG-2 output for distribution applications such as DVD authoring.
✃
Integrated Matrox Millennium Flex 3D Edition display card drives your
high-performance desktop.
✃
Stereo audio input/output synchronized to video ensures perfect lip-sync.
✃
Complete content creation software suite for nonlinear video editing, titling,
audio editing, and DVD authoring.
✃
Matrox Infinite Capture overcomes the Windows Me 2-GB AVI file size
limit by providing seamless capture and playback of unlimited file size
within Adobe Premiere.
✃
Hard disk benchmark utility ensures optimal system performance.
✃
Matrox Video Player lets you play back any of your Matrox video clips with
audio.
✃
Matrox File Converter lets you convert your MPEG-2 or DV clips to various
formats.
Chapter 1, Introducing Matrox RT2000
RT2000 Installation & User Guide.book Page 3 Monday, April 2, 2001 3:51 PM
3
Hardware supplied
RT2000 codec card
Millennium Flex 3D
Edition card
Breakout box
MARVEL
TO TO
Out
Videoboard
TO RT board
RT2000 cable
Ribbon cable
4-to-6 pin
1394 cable
CD audio cable
Software supplied
✃
Matrox Video Tools Includes the necessary drivers for Matrox RT2000,
the realtime plug-in for Adobe Premiere, the Matrox Disk Benchmark
program, the Matrox File Converter, Matrox MediaTools, and the Matrox
Video Player.
✃
Adobe Premiere
✃
Adobe Photoshop LE
✃
Sonic Foundry ACID Music
✃
Inscriber TitleExpress
✃
Ulead Cool 3D
✃
Sonic Solutions DVDit! LE
✃
Matrox DVD Player
A nonlinear video editing program. Premiere includes
several web export programs that you can use to export your projects to
various web-optimized formats.
A digital photo image editor (provided on your
Adobe Premiere CD-ROM).
A music composition program.
A television-quality character generator.
A 3D titling program.
An interactive DVD creation program.
A software DVD player (provided on your Matrox
RT2000 CD-ROM).
Hardware supplied
RT2000 Installation & User Guide.book Page 4 Monday, April 2, 2001 3:51 PM
4
System requirements
Matrox RT2000 requires the following minimum system configuration:
1
✃ Microsoft Windows 2000 (Service Pack 1 is recommended) or Windows
Me (Millennium Edition) operating system.
✃
✃
✃
✃
✃
✃
✃
✃
Intel Pentium II CPU, 350 MHz or AMD Athlon CPU.2
Physical RAM:
✄ 256 MB physical memory (RAM) for Windows 2000 or Windows Me on
systems with motherboards limited to 64-MB AGP aperture.
✄ 128 MB physical memory (RAM) for Windows Me on systems with
motherboards that support 128- or 256-MB AGP aperture.
Free PCI slot.
500 MB of free space for software installation on system drive.
Separate hard drive for A/V content.
16-bit soundcard.
CD-ROM drive for software installation.
Video camera or VCR.
Certain complex realtime effects may require a more powerful system. For
optimal system performance, we recommend the following configuration:
✃ Pentium III or AMD Athlon CPU, 750 MHz or faster.
✃ DV video camera (to use 1394 connections).
✃ NTSC or PAL video monitor.
¯Note All Matrox RT2000 effects will run on a properly configured computer that
meets the minimum system requirements outlined above. Some of the complex
effects, however, may cause dropped frames during playback. For those cases, you
can use the Force render option to ensure smooth playback without dropped
frames. For more information, see “Using common controls in the plug-in” on
page 112.
Check our web site for equipment information
For up-to-date information about recommended computer systems,
motherboards, and other RT2000-compatible devices such as DV cameras and
soundcards, please see the RT2000 Customer Support section of our web site at
www.matrox.com/video.
1
2
All Matrox testing and validation of compatible motherboards and computer systems is
carried out using Windows 2000 with Service Pack 1.
The current generation of Intel Celeron processors cannot be used with RT2000 because they
have a 66-MHz Front Side Bus whereas RT2000 requires at least a 100-MHz FSB.
Chapter 1, Introducing Matrox RT2000
RT2000 Installation & User Guide.book Page 5 Monday, April 2, 2001 3:51 PM
5
About this manual
This manual explains how to install and use your Matrox RT2000 system and
included software.
Installation and configuration
Chapters 1 to 6 explain how to install your RT2000 hardware and software, as
well as how to configure your system for use with Matrox RT2000.
Using your video editing software
Chapters 7, 8, and 9 give you instructions for getting the most from your video
editing software, including how to use the RT2000 realtime plug-in for Adobe
Premiere.
Additional software
Chapters 10 to 15 give you instructions for using the additional software that
comes with your RT2000 kit.
Troubleshooting
Chapter 16 provides some possible answers if you have trouble installing or
operating your Matrox RT2000 system.
Other information
In Appendices A through E, you can find information about creating an RT2000
hardware profile, A/V disk space requirements, additional Millennium Flex 3D
display resolutions, specifications, and a glossary of terms.
Support and sales offices
Appendices E and F provide contact information for RT2000 customer support
and Matrox sales offices around the world.
Style conventions
The following style conventions are used in this manual:
✃ The names of files, directory paths, and manuals appear in italics. For
example:
The data is stored in the sample.wav file.
The file is located in your C:\Windows\System directory.
✄ Please refer to your Adobe Premiere User Guide.
✄
✄
✃
Menus and commands that you need to choose are displayed in the form
Menu > Command. For example, File > Save means click File in the menu
bar, then click Save in the menu that appears.
About this manual
RT2000 Installation & User Guide.book Page 6 Monday, April 2, 2001 3:51 PM
6
✃
The names of keys are displayed in small capital bold letters, such as the
CTRL key.
✃
A plus (+) sign is used to indicate combinations of keys and/or mouse
operations. For example:
✄
CTRL+C means to hold down the CTRL key while pressing the C key.
✄
SHIFT+click means to hold down the SHIFT key while you click an item
with the mouse.
Other documentation
In addition to this manual, you have access to other documents.
Last-minute information
Any important information that wasn’t available for inclusion in the manual by
publication time is provided to you in one or both of the following:
✃ The Readme file installed with the software in the Matrox Video Tools
folder.
✃
Printed Release Notes packaged with the manual.
Other electronic documents
The following electronic documents are also available:
✃ Online help installed on your hard drive.
✃
A PDF version of this manual, located in the \Docs directory on your Matrox
RT2000 CD.
Web site
We update the Customer Support section of our web site on a regular basis. You
can always find the most up-to-date information about your RT2000 there. Click
on the support link at www.matrox.com/video.
Chapter 1, Introducing Matrox RT2000
RT2000 Installation & User Guide.book Page 7 Monday, April 2, 2001 3:51 PM
7
Installation overview
The following steps summarize the installation procedure for your Matrox
RT2000 system.
°Important Please read the detailed instructions in each chapter before
attempting the installation.
1 Prepare your system for the RT2000 installation. See Chapter 2, “Preparing
Your System.”
2 Install your RT2000 hardware. See Chapter 3, “Installing Your RT2000 Card
Set.”
3 Connect your computer monitor, breakout box, and other external devices.
See Chapter 4, “Connecting Your Devices.”
4 Install the device drivers and the rest of the software. See Chapter 5,
“Installing Your Software and Testing Your Hard Drives.”
5 Configure your system for RT2000. See Chapter 6, “Configuring Your
System for Use with Matrox RT2000.”
About this manual
RT2000 Installation & User Guide.book Page 8 Monday, April 2, 2001 3:51 PM
8
Your notes
Chapter 1, Introducing Matrox RT2000
RT2000 Installation & User Guide.book Page 9 Monday, April 2, 2001 3:51 PM
Preparing Your System
This chapter provides you with essential steps to prepare your
computer system for a successful RT2000 installation.
C
h
a
p
t
e
r
RT2000 Installation & User Guide.book Page 10 Monday, April 2, 2001 3:51 PM
10
Upgrading an existing RT2000 system
If you’re upgrading software on a computer with RT2000 already installed, the
steps you carry out depend on whether you’re planning to use Windows 2000 or
Windows Me (Millennium Edition).
Upgrading to Windows 2000 or Windows Me
If you plan to upgrade your existing RT2000 system to Windows 2000 or
Windows Me, you must uninstall your Matrox Video Tools and remove your
RT2000 codec card before attempting to install Windows. Once you’ve carried
out these two steps, proceed to “Install Windows 2000 or Windows Me” on
page 20.
Installing RT2000 for the first time
The following sections assume you’re installing RT2000 hardware and software
on a new computer or a computer that hasn’t been used before with RT2000.
If you haven’t yet purchased your new computer, be sure to check our system
recommendations, as detailed in the next section.
Check our web site for recommendations
We’re constantly testing the latest available computer systems and motherboards
that meet or exceed the recommendations outlined in “System requirements” on
page 4. To read the test results and recommendations on configuring these
systems for use with RT2000, you can check the System Recommendations in
the RT2000 Customer Support section of our web site at www.matrox.com/
videoweb/support.
If you’re purchasing a new system for use with RT2000, this information can
help you choose the best system for your needs. If you already have a computer
you intend to use with RT2000, the recommendations may help you configure
your system properly.
Chapter 2, Preparing Your System
RT2000 Installation & User Guide.book Page 11 Monday, April 2, 2001 3:51 PM
11
New installation overview
In order to ensure a successful RT2000 installation and trouble-free operation
afterwards, there are certain things you must do to prepare your system before
installing your RT2000 hardware and software.
The exact installation procedures you should follow depend on whether you’ll be
installing your RT2000 hardware in a new computer system with no display card,
or in a system with an existing display card. The following lists provide an
overview of the steps required. These are explained in greater detail later in this
chapter.
If you have a new computer with no display card
Many RT2000 users will purchase a new computer system without a display card
because the RT2000 card set already comes with a card optimized for use in your
RT2000 video editing system, the Matrox Millennium Flex 3D Edition card.
1 Install your Flex 3D display card by itself and connect your computer
monitor (do not install the RT2000 codec card yet!). See page 13.
2 Plan your storage configuration and install your devices. See page 16.
3 Install Windows 2000 or Windows Me on your system drive. See page 20.
4 Set your AGP aperture size. See page 21.
5 Configure your DMA settings, making sure DMA is enabled for all DMAcapable devices and especially your A/V drive(s). See page 21.
6 Disable “write-back caching” on your hard drives. See page 25.
7 Install Adobe Premiere. See page 27.
If you’re using a computer with an existing display card
Many other RT2000 users will want to use their card set in an existing computer
or else in a new system that comes from the factory pre-configured with another
display card. In this case, you must remove the existing card and its software
drivers before installing the RT2000 card set.
1 Make sure you’ve installed Windows 2000 or Windows Me on your system
drive.
2 Plan your storage configuration and install your devices. See page 16.
3 Set your AGP aperture size. See page 21.
4 Configure your DMA settings, making sure DMA is enabled for all DMAcapable devices and especially your A/V drive(s). See page 21.
New installation overview
RT2000 Installation & User Guide.book Page 12 Monday, April 2, 2001 3:51 PM
12
5 Disable “write-back caching” on your hard drives. See page 25.
6 Install Adobe Premiere. See page 27.
7 Remove your existing display card’s device listing. See page 27.
¯Note Certain Matrox PCI display cards can be re-installed later in an RT2000
system for use as a secondary display. Make sure you first install and configure
all your RT2000 hardware and software. For an up-to-date list of cards you can
use as well as detailed instructions, see the RT2000 Customer Support section of
our web site at www.matrox.com/videoweb/support.
For new systems with no existing display card
If your system already has a display card, skip this section and proceed to “Plan
your storage configuration and install your devices” on page 16.
In order to install Windows and configure your new system for use with the
RT2000 card set, you must install the Millennium Flex 3D Edition display card
by itself. Once you’ve carried out all necessary system preparations, you can
install the RT2000 codec card as explained in the next chapter.
³Warning Static electricity can severely damage electronic parts. Before
touching any electronic parts, drain the static electricity from your body. You
can do this by touching the metal frame of your computer. Hold each card by
its edges and avoid touching its circuitry.
Chapter 2, Preparing Your System
RT2000 Installation & User Guide.book Page 13 Monday, April 2, 2001 3:51 PM
13
Install your Millennium Flex 3D Edition card
1 Find the AGP slot for your Flex 3D card. Most computers have different
types of expansion slots. Your computer manual should identify the location
of each type of expansion slot in your computer.
2 Remove the bracket corresponding to the AGP slot. Save the screw for the
Flex 3D card’s mounting bracket.
Back of
computer
AGP slot
PCI slot
ISA slot
³Warning Inserting your Flex 3D card into the
wrong type of slot could damage your card, your
computer, or both.
Flex 3D
card
3 Connect the end of the ribbon cable without the ferrite block to the
corresponding connector near the top edge of your Flex 3D card.
³Warning Pressing together incorrectly
aligned connectors can damage them.
The connectors on the ends of the ribbon
cable and the connectors on the Matrox
cards are designed to attach to each
other in only one way. Before pressing
connectors together, make sure all pins
and holes are correctly aligned. After
the pins and holes are aligned, make
sure the connectors are firmly pressed
together.
¯Note Do not connect the other end of the
ribbon cable with the ferrite block to your
RT2000 codec card until instructed to do so
in the next chapter.
For new systems with no existing display card
RT2000 Installation & User Guide.book Page 14 Monday, April 2, 2001 3:51 PM
14
4 Insert your Flex 3D card.
a Position your card over the AGP slot.
b Push the card in firmly and evenly until it’s fully seated in the slot.
5 Using the fastening screw, secure the Flex 3D card bracket to the computer
frame.
Flex 3D card
6 Plug the cable for your computer monitor into connector #1 on your Flex
3D card (this is the connector closest to the fastening screw).
Chapter 2, Preparing Your System
RT2000 Installation & User Guide.book Page 15 Monday, April 2, 2001 3:51 PM
15
°Important If you connect your monitor into connector #2 you won’t have
any computer display! Connector #2 is used for your RT2000 breakout box.
1
2
7 Make sure the other end of the monitor cable is properly connected to your
monitor.
8 Proceed to the remaining sections of this chapter to plan your storage device
connections, configure your DMA settings, and install software that needs to
be on your system before installing all your Matrox RT2000 hardware and
software.
For new systems with no existing display card
RT2000 Installation & User Guide.book Page 16 Monday, April 2, 2001 3:51 PM
16
Plan your storage configuration and install your
devices
You should plan how you’ll set up your storage devices and then connect them
accordingly. If you’re installing your RT2000 card set in an existing system, you
may have to reconfigure your storage connections for proper performance. If you
have a new system, it’s important to set up your system right the first time. For all
cases, the instructions in this section will help you avoid problems or having to
repeat procedures later on.
General storage considerations
Storage plays a vital role in the overall performance of your Matrox RT2000
system. Without adequate storage for your audio and video clips, your system
will not work properly.
Certain issues, such as what to store on your A/V drives, use of the 32-bit File
Allocation Table (FAT32), and disk fragmentation, are important to the use of
both EIDE and SCSI storage devices with Matrox RT2000.
A separate Audio/Video (A/V) drive
To use the Matrox RT2000, you must store your audio, video, and graphics files
on an A/V drive reserved solely for this purpose. Windows frequently needs to
access your system drive for various reasons, so attempting to store your audio/
video files on your system drive will provide unacceptable performance. The
throughput requirements for editing and playback of video alone can place heavy
demands on your system’s storage devices, but typically your video projects will
include audio and/or graphics files as well.
If you have more than one A/V hard drive on your system, you can maximize
Matrox RT2000 performance by storing your graphics and audio files on one
EIDE or SCSI A/V drive, and your video files on another.
Also, your system’s virtual memory paging (swap) file must be stored on your
system drive and not on your A/V drive. For information on how to configure
your system’s virtual memory, see your Windows documentation.
Storage information on our web site
Most hard drives and controller cards manufactured in the past year should be
suitable for use in your Matrox RT2000 system. For more information on storage
recommendations, and a list of any devices we’ve found to be unsuitable for use
with RT2000, see the Customer Support section of our web site at
www.matrox.com/videoweb/support.
Chapter 2, Preparing Your System
RT2000 Installation & User Guide.book Page 17 Monday, April 2, 2001 3:51 PM
17
Recommended file systems
Both Windows 2000 and Windows Me provide the option of formatting your
drives using the FAT32 file system. Windows 2000 also offers the NTFS file
system.
✃ Windows Me
Your A/V drives must be formatted using FAT32 for use
with Matrox RT2000.
✃
Windows 2000 Your A/V drives must be formatted using FAT32 or NTFS
for use with Matrox RT2000. We recommend using NTFS because it
overcomes FAT32 file size limitations.
³Warning If you plan to have both Windows 2000 and Windows Me installed
on your computer, keep in mind that files saved on drives formatted with
NTFS are unreadable by Windows Me.
For information on how to format your storage devices using FAT32 or NTFS,
see your Windows documentation.
Disk defragmentation
It’s important to make sure that your storage does not become too fragmented.
Overly fragmented drives will lead to a major reduction in your system’s
performance, which will in turn seriously reduce the RT2000’s ability to work
properly.
°Important To ensure that your storage is operating at optimal levels,
defragment your hard drives regularly (once a month at least).
For information on how to defragment your storage devices, see your Windows
documentation.
Hard drive performance
The Matrox Disk Benchmark program tests the minimum sustained data rates
supported by your hard drives. This lets you determine if your drives are suitable
for storing your video and audio clips, and for running your RT2000 software
(Matrox Video Tools). At the end of the Matrox Video Tools installation, the disk
benchmark program automatically starts.
You must use a fast drive for storing your clips in order to obtain realtime
performance with Adobe Premiere. You also need a fast system drive for quick
access to various effects files, etc. For information on the disk benchmark
program, see “Testing the performance of your hard drives” on page 60.
ATA 100 support on Windows 2000
The initial release of Windows 2000 and Service Pack 1 for Windows 2000 do
not support ATA 100 (Mode 5) for IDE hard disks. All ATA 100 IDE hard disks
Plan your storage configuration and install your devices
RT2000 Installation & User Guide.book Page 18 Monday, April 2, 2001 3:51 PM
18
that are used with Windows 2000 default to ATA 66 (Mode 4). A fix is available
from Microsoft by searching for “ATA 100” in the Microsoft Knowledge Base
Search at http://search.support.microsoft.com.
EIDE storage considerations
In addition to most SCSI devices, almost all recent EIDE storage devices are able
to meet the data throughput requirements of your Matrox RT2000 system.
However, it is important to make sure that you’re taking advantage of your
EIDE device’s full capabilities by enabling DMA bus-mastering. Without the
use of DMA bus-mastering technology, most EIDE devices will be too slow to
obtain realtime performance when using Adobe Premiere on Matrox RT2000.
Planning your connections
You can have only two EIDE devices on each of the two controller connections
found in most PCs. In order to achieve the optimal performance, both devices
connected by the same ribbon cable to a controller should be DMA capable.
Most new EIDE drives are capable of DMA bus mastering. However, some CDROM drives are not. Therefore, you should avoid connecting a non-DMA CDROM drive to the same controller as your A/V drive. Your system drive should
still perform at an acceptable level for RT2000 if you must connect it on the same
controller as a non-DMA CD-ROM drive, as in the case of having separate audio
and video drives.
The following diagrams provide recommended configurations for various
systems.
¯Note In the following diagrams, devices without the DMA checkbox are not
DMA capable.
Optimal basic system: Single Audio/Video drive with DMA-capable CD-ROM drive
Chapter 2, Preparing Your System
RT2000 Installation & User Guide.book Page 19 Monday, April 2, 2001 3:51 PM
19
Single Audio/Video drive with non-DMA CD-ROM drive
Optimal system with separate audio and video drives
and a DMA-capable CD-ROM drive
Plan your storage configuration and install your devices
RT2000 Installation & User Guide.book Page 20 Monday, April 2, 2001 3:51 PM
20
Separate audio and video drives on Controller 2 with DMA enabled.
System drive and non-DMA CD-ROM drive on Controller 1
¯Note Please refer to your device documentation for details on connecting and
configuring each device.
Install Windows 2000 or Windows Me
If you already have an existing display card and an installed version of Windows
2000 or Windows Me on your system, you can skip this section and proceed to
the next section “Set your AGP aperture size.”
1 Make sure your RT2000 codec card is not installed in your computer when
you install your Windows software. If it is, Windows will attempt to install
software drivers for it. This could cause software conflicts when you install
your RT2000 software.
2 Install your Windows software as explained in its documentation.
3 Proceed to the following sections, which help you configure your system for
RT2000 installation.
About computers with multiple operating systems
It’s possible to install your RT2000 card set in a computer with two operating
systems (traditionally called a dual-boot setup). For the RT2000, you could have
a Windows 2000/Windows Me setup. In order for this to work, you must install
your two operating systems on two separate disk partitions and install two
copies of all software such as Matrox Video Tools, Adobe Premiere, etc.—once
for each operating system with the installed software on the same partition as its
operating system.
Chapter 2, Preparing Your System
RT2000 Installation & User Guide.book Page 21 Monday, April 2, 2001 3:51 PM
21
Set your AGP aperture size
For optimal performance from your RT2000 system to work properly, you should
set your AGP aperture size to 128 megabytes (MB) or greater in your system
BIOS.
¬ To set your AGP aperture size:
1 Restart your computer.
2 Before Windows starts, press F1 or DELETE to enter the BIOS setup.
3 Once in the BIOS, find the AGP aperture size setting, and make sure it is set
to 128 MB or greater. Refer to your computer’s manual if you need help
locating this setting.
4 Press F10 to save and exit, then press ENTER to continue.
°Important If your computer’s BIOS does not have an AGP aperture size setting
or you’re unable to increase the setting to at least 128 MB, you should update
your BIOS with the latest version from your computer’s or motherboard’s
manufacturer (usually available for downloading from the manufacturer’s web
site).
You may find, however, that on some systems you can’t set your AGP aperture
size to 128 MB or greater, even after updating your computer’s BIOS to the latest
version. If this is the case, you must have at least 256 MB of physical RAM
installed in your computer to use RT2000.
Configure your DMA settings
¯Note If your system uses only SCSI hard drives, you can skip this section and
proceed to “Install Adobe Premiere” on page 27.
If your system has an EIDE hard drive for audio/video files, you must enable
DMA bus-mastering, or your A/V drive will not be able to support the data
throughput requirements of video editing and playback on Matrox RT2000.
Methods of enabling DMA
How you enable DMA bus-mastering depends on the equipment in your system.
There are three main approaches.
Automatic DMA enabling
Some motherboards with built-in EIDE controllers
automatically detect when a device connected to them is DMA capable and thus
automatically enable DMA bus-mastering for that device. In this case, the DMA
Set your AGP aperture size
RT2000 Installation & User Guide.book Page 22 Monday, April 2, 2001 3:51 PM
22
checkbox in the device’s property page may not be available. Consult your
motherboard documentation for details.
DMA enabling utilities
Several motherboard manufacturers ship their product
with a small software program you need to run in order to enable DMA. In this
case, the DMA checkbox or option in the device’s property page may not be
available. Consult your motherboard or computer documentation for instructions
on using the utility program.
Windows device drivers In many cases, you can enable DMA bus-mastering
directly within Windows. This is explained in the following section.
Enabling DMA bus-mastering
If your computer uses Windows device drivers for DMA bus-mastering, you must
enable DMA for your storage devices.
¬ To enable DMA in Windows 2000:
1 Right-click My Computer, then choose Manage.
2 Select Device Manager.
3 Click the plus sign next to IDE ATA/ATAPI controllers.
4 Right-click the Primary
IDE Channel and
choose Properties.
5 Click the Advanced
Settings tab.
6 Under Device 0 and
Device 1 in the
Transfer Mode box,
select DMA if available.
Click OK.
7 Repeat this procedure
for the Secondary IDE
Channel.
8 Restart your system.
Chapter 2, Preparing Your System
RT2000 Installation & User Guide.book Page 23 Monday, April 2, 2001 3:51 PM
23
¬ To enable DMA in Windows Me:
1 Right-click My
Computer, then
choose Properties.
2 Click the Device
Manager tab.
3 Click the plus sign
next to CDROM.
4 Select your CDROM drive from
the list, then click
Properties.
5 Click the Settings
tab, then select
DMA. Click OK.
6 Windows displays a
standard warning
message about
enabling DMA.
Click OK.
Configure your DMA settings
RT2000 Installation & User Guide.book Page 24 Monday, April 2, 2001 3:51 PM
24
7 Double-click Disk
drives.
8 Select the first drive
from the list, then
click Properties.
9 Click the Settings
tab, then select
DMA. Click OK.
10 Windows displays a
standard warning
message about
enabling DMA.
Click OK.
11 Repeat this
procedure for all
your drives.
12 Restart your
system.
°Important Once you’ve restarted your system, you must go back in and check
each drive and the CD-ROM drive to make sure the DMA box is still checked.
✃
If the DMA box for your A/V drive is not checked, you must either
reconfigure it so that DMA is enabled or else replace the drive with a unit
that is DMA capable.
✃
If the DMA box for your CD-ROM is not checked, make sure it is not
connected to the same controller as your A/V drive (see “Planning your
connections” on page 18).
✃
If the DMA box is not checked for any of your devices, you may need to
update your system’s BIOS. For details on how to obtain a BIOS update,
contact your system’s manufacturer.
Chapter 2, Preparing Your System
RT2000 Installation & User Guide.book Page 25 Monday, April 2, 2001 3:51 PM
25
Disable “write-back caching” on your drives
To improve the performance of your A/V drives and the reliability of the RT2000
disk benchmark program, you should disable “write-back caching” for all your
drives as follows:
¬ To disable “write-back caching” in Windows 2000:
1 Right-click My computer, then choose Manage > Device Manager.
2 Click the plus sign next to Disk drives.
3 Right-click the drive you wish to configure, then choose Properties.
4 Click the Disk Properties tab.
5 Clear Write cache enabled, then click OK.
Disable “write-back caching” on your drives
RT2000 Installation & User Guide.book Page 26 Monday, April 2, 2001 3:51 PM
26
¬ To disable “write-back caching” in Windows Me:
1 Right-click My Computer.
2 Choose Properties > Performance > File System > Troubleshooting.
3 Select Disable write-behind caching for all drives, then click OK.
¯Note You’ll be prompted to restart your computer for the change to take
effect.
Chapter 2, Preparing Your System
RT2000 Installation & User Guide.book Page 27 Monday, April 2, 2001 3:51 PM
27
Install Adobe Premiere
You must install Adobe Premiere before installing your RT2000 card set and the
rest of the software. If you don’t do so, you won’t be able to install your RT2000
software.
Do not install Inscriber TitleExpress from the Adobe
Premiere CD
A version of Inscriber TitleExpress is included in the first installation menu when
you insert the Adobe Premiere CD. This is a non-realtime version of
TitleExpress. Therefore, do not install it. Make sure you install TitleExpress
from the Inscriber TitleExpress CD included in your RT2000 kit.
¬ To install Adobe Premiere:
1 Close all Windows programs.
2 Insert the Adobe Premiere installation CD into your CD-ROM drive.
3 When the setup program starts, follow the onscreen instructions. If Windows
doesn’t automatically start the setup program, you can start it manually as
follows:
a Choose Start > Run.
b In the resulting dialog box, type e:\premiere\setup (where e: represents your
CD-ROM drive), and click OK.
°Important When you install the RT2000 software (that is, Matrox Video
Tools), RT2000 files will be added to your Adobe Premiere’s Plug-ins folder on
your hard drive. Therefore, if you later re-install Adobe Premiere to a different
directory, you’ll need to also re-install Matrox Video Tools.
Remove your existing display card’s device listing
¯Note If you just installed your Millennium Flex 3D card in a system that did
not have a display card, skip this section and proceed to the next section.
Windows maintains a list of all configured devices in Device Manager. Whenever
you restart your system, Windows attempts to initialize all devices listed there.
Even if the physical device has been removed, Windows may launch certain
software files that can conflict with your new display card’s software later in the
installation process.
Install Adobe Premiere
RT2000 Installation & User Guide.book Page 28 Monday, April 2, 2001 3:51 PM
28
Before removing your existing display card and installing the RT2000 card set,
you must remove the existing display card’s device name from the Windows
Device Manager. This will prevent problems with system stability later on.
°Important Before removing your display card’s device listing, make sure
you’ve changed your computer’s AGP aperture size to the required setting as
explained in the section “Set your AGP aperture size” on page 21.
Chapter 2, Preparing Your System
RT2000 Installation & User Guide.book Page 29 Monday, April 2, 2001 3:51 PM
29
¬ To delete the card’s device listing in Windows 2000:
1 Right-click My Computer, then choose Manage.
2 Select Device Manager, then click the plus sign beside Display adapters.1
3 Uninstall all listed display adapters (right-click each, then select Uninstall).
4 Click OK. When prompted to restart your computer, click No.
¬ To delete the card’s device listing in Windows Me:
1 Right-click My Computer, then choose Properties.
2 Click the Device Manager tab.
3 Click the plus sign next to Display adapters.1
4 Delete all listed display adapters (click each, then choose Remove).
5 Click OK. When prompted to restart your computer, click No.
°Important Make sure you do not restart your computer when prompted after
removing the device listing. You’ll shut down your computer at the end of the
next section.
1
If your existing display card’s software drivers weren’t properly installed, the device may
appear in a section called Other devices. If so, click the plus sign beside it.
Remove your existing display card’s device listing
RT2000 Installation & User Guide.book Page 30 Monday, April 2, 2001 3:51 PM
30
Are you ready?
After you’ve installed Adobe Premiere (and removed your existing display card’s
listing from Device Manager, if needed) go back over the steps in this chapter and
make sure you’ve carried out all necessary preparations.
Have you . . .
✃
Installed and connected your storage devices?
✃
Set your system’s AGP aperture size to 128 MB or greater in your
computer’s BIOS? If this isn’t possible, do you have 256 MB of physical
memory installed in your computer?
✃
Configured your DMA settings, making sure DMA is enabled for your EIDE
storage devices?
✃
Disabled “write-back caching” for all your drives?
✃
Installed Adobe Premiere?
✃
Removed any existing display card’s device name from Windows Device
Manager?
If you’ve prepared your system for RT2000 installation, shut down Windows and
turn your computer’s power off before proceeding to the next chapter.
Chapter 2, Preparing Your System
RT2000 Installation & User Guide.book Page 31 Monday, April 2, 2001 3:51 PM
Installing Your RT2000 Card Set
This chapter describes how to install your RT2000 hardware in your
computer.
C
h
a
p
t
e
r
RT2000 Installation & User Guide.book Page 32 Monday, April 2, 2001 3:51 PM
32
Getting started
For information specific to your computer, such as how to remove its cover, see
your computer manual.
³Warning Static electricity can severely damage electronic parts. Before
touching any electronic parts, drain the static electricity from your body. You
can do this by touching the metal frame of your computer. Hold each card by
its edges and avoid touching its circuitry.
Remove your display card
This section describes removing your existing display card.
¯Note If you already installed your Matrox Millennium Flex 3D Edition display
card as detailed in the previous chapter, you can skip this section and proceed to
“Connect the ribbon cable” on page 33.
1 Turn off your computer and disconnect your monitor from it.
2 Remove your computer cover.
3 Remove the screw fastening the display card’s bracket to your computer’s
rear panel.
4 Remove the display card from your computer; save the fastening screw.
Display card
CS
A
BLA
H BLA
H
H BLA XZC
V
H
H BLA XZC
H XZCV
V
BLA
BLA
LIN
E IN
MIC
LIN
E OU
SP
Chapter 3, Installing Your RT2000 Card Set
KR
T
RT2000 Installation & User Guide.book Page 33 Monday, April 2, 2001 3:51 PM
33
Connect the ribbon cable
Attach the ribbon cable between the Millennium Flex 3D Edition display card
and the RT2000 codec card. The supplied ribbon cable is polarized and includes a
ferrite block closest to the end that’s connected to the RT2000 codec card.
1 If you didn’t already do so in the previous chapter, attach the end without the
ferrite block to the corresponding connector near the top edge of your Flex
3D Edition display card.
2 Attach the other end with the ferrite block to the corresponding connector
near the top edge of your RT2000 codec card.
RT2000-PCI card
Flex 3D-AGP
card
³Warning Pressing together incorrectly aligned connectors can damage
them. The connectors on the ends of the ribbon cable and the connectors
on the Matrox cards are designed to attach to each other in only one way.
Before pressing connectors together, make sure all pins and holes are
correctly aligned. After the pins and holes are aligned, make sure the
connectors are firmly pressed together.
Connect the ribbon cable
RT2000 Installation & User Guide.book Page 34 Monday, April 2, 2001 3:51 PM
34
Install the card set
Choose the appropriate expansion slots for your Matrox RT2000 card set.
1 Most computers have different types of expansion slots. Choose a PCI slot
for your RT2000 card, and the AGP slot for your Millennium Flex 3D card.
Your computer manual should identify the location of each type of
expansion slot in your computer.
2 Remove the brackets from the slots you intend to use. Save the screws for the
mounting brackets.
Back of
computer
AGP slot
PCI slot
ISA slot
PCI card
AGP card
³Warning Inserting your Matrox RT2000 card set into the wrong type of
slots could damage your cards, your computer, or both.
Chapter 3, Installing Your RT2000 Card Set
RT2000 Installation & User Guide.book Page 35 Monday, April 2, 2001 3:51 PM
35
3 Insert your card set.
a Position your RT2000 card over the PCI slot you’ve chosen, and your
Millennium Flex 3D card over the AGP slot.
b Push the cards in firmly and evenly until they’re fully seated in their slots.
c Using the fastening screws, secure the brackets of your two cards to the
computer frame.
Flex
3Dcard
RT2000 card
CS
A
BLAH
BLAH
BLAH
BLAH
BLAH
BLAH
XZ
XZ
XZ
CV
CV
CV
LINE
SP
EA
LINE
IN
KE
RS
OUT
Install the card set
RT2000 Installation & User Guide.book Page 36 Monday, April 2, 2001 3:51 PM
36
Connect the CD audio cable
To be able to monitor audio through your PC speakers while working with Adobe
Premiere, while preserving the audio capabilities of your CD-ROM drive and
your soundcard, you must connect the RT2000 codec card to your soundcard.
¯Note The following instructions apply to most hardware combinations.
However, some soundcards may have different audio connectors. Consult your
soundcard’s documentation for details.
If your soundcard has an auxiliary input (AUX), this is the audio path:
CD-ROM
Drive
CD-in
Sound
Card
PC
Speakers
AUX-in
RT 2000
Card
If your soundcard doesn’t have an auxiliary input, this is the audio path:
CD-ROM
Drive
Sound
Card
PC
Speakers
CD-in
RT 2000
Card
On your RT2000 card, the audio connectors are at the top of the card, close to the
mounting screw. The white connector is for input and the black connector is for
output:
Input
Output
(white) (black)
Chapter 3, Installing Your RT2000 Card Set
RT2000 Installation & User Guide.book Page 37 Monday, April 2, 2001 3:51 PM
37
1 If your soundcard has an auxiliary (AUX) input connector, use the supplied
CD audio cable to connect your RT2000 card’s audio output (black
connector) to your soundcard’s AUX-in connector, while leaving your CDROM connected to the soundcard.
To CD-ROM drive
RT2000 card
Soundcard
2 If you have only one audio connector on your soundcard:
a Disconnect the cable from your CD-ROM output and connect that end to
the CD audio-out connector (black) on your RT2000 card.
b Take the supplied CD audio cable and connect one end to the free CD audioin connector (white) on your RT2000 card, and connect the other end to the
matching CD audio connector on your CD-ROM drive.
To CD-ROM drive
Cable previously connected
to CD-ROM drive
RT2000 card
Soundcard
Connect the CD audio cable
RT2000 Installation & User Guide.book Page 38 Monday, April 2, 2001 3:51 PM
38
3 Put your computer cover back on. Your RT2000 card set is now installed.
°Important Don’t restart your computer until you’ve connected your computer
monitor and breakout box (as explained in Chapter 4, “Connecting Your
Devices”) and until you’re ready to install your Matrox RT2000 software. Once
you restart, Windows detects your new hardware and will prompt you to install
the required device drivers (see Chapter 5, “Installing Your Software and Testing
Your Hard Drives”).
Chapter 3, Installing Your RT2000 Card Set
RT2000 Installation & User Guide.book Page 39 Monday, April 2, 2001 3:51 PM
Connecting Your Devices
This chapter shows how to connect your monitor and other external
devices to your computer.
C
h
a
p
t
e
r
RT2000 Installation & User Guide.book Page 40 Monday, April 2, 2001 3:51 PM
40
Connecting your computer monitor
To connect your computer monitor:
1 Plug the cable for your computer monitor into connector #1 on your
Millennium Flex 3D card (this is the connector closest to the fastening
screw).
1
2
2 Make sure the other end of the monitor cable is properly connected to your
monitor.
Connecting your RT2000 breakout box
To connect your RT2000
breakout box cable:
1 Plug the end labelled TO
RT2000 board into your
RT2000 card.
2 Plug the end labelled TO
VIDEO OUT into connector
#2 on your Flex 3D card.
3 Plug the other end into the
RT2000 breakout box.
You can choose to connect your
other external devices either
before or after installing your
RT2000 software. For details on
how to install your software, see
Chapter 5, “Installing Your
Software and Testing Your Hard
Drives,” on page 51.
Chapter 4, Connecting Your Devices
To VGA
monitor
RT2000 Installation & User Guide.book Page 41 Monday, April 2, 2001 3:51 PM
41
RT2000 breakout box overview
Your RT2000 card set comes with a breakout box. With this box, you can access
the connections to your external devices more easily. This is useful for changing
your connection setup.
RT2000
cable
connector
OUTPUT
Audio
Left
Right
Composite
S-Video
Right
Composite
Left
RT2000
Audio
S-Video
INPUT
RT2000 breakout box overview
RT2000 Installation & User Guide.book Page 42 Monday, April 2, 2001 3:51 PM
42
Available S-Video and composite video connections
The RT2000 breakout box has two composite video connectors (one input and
one output), and two S-Video connectors (one input and one output). Most video
equipment uses composite video, but some devices (for example, S-VHS VCRs)
use S-Video, which provides a higher quality video signal.
If you have a video device with S-Video connectors, you should use the Matrox
S-VIDEO IN and S-VIDEO OUT connectors on your breakout box. You can use
the Matrox S-Video connectors instead of—or in addition to—the composite
video connectors. If you use composite and S-Video connectors, you can connect
up to four video devices to the RT2000 at the same time (two input and two
output).
RT2000 video output is simultaneous on its composite (VIDEO OUT) and
S-Video (S-VIDEO OUT) lines. Both video input types can be connected at the
same time, but only one video input signal at a time can be used by RT2000. You
need to select either the composite video input or the S-Video input signal in
Adobe Premiere. For more information, see “Defining your Capture settings” on
page 90.
Composite
S-Video
S-Video
Composite
S-VIDEO
OUT VIDEO OUT
Input
Chapter 4, Connecting Your Devices
L - AUDIO - R
OUT
Output
RT2000 Installation & User Guide.book Page 43 Monday, April 2, 2001 3:51 PM
43
Composite input/output connections
1 To connect your composite video source (for capturing material), use either a
composite audio/video (RCA) cable or three separate cables with RCA
connectors.
a Connect the video output from your composite device to the yellow
VIDEO IN jack on the RT2000 breakout box.
b Connect the left audio output channel of your device to the white
L-AUDIO IN jack on the breakout box.
c Connect the right audio output channel of your device to the red
AUDIO IN-R jack on the breakout box.
¯Note If your video device has only one audio connector, use the left audio
connector on the cable.
VIDEO IN
L - AUDIO IN - R
S-VIDEO
Video camera
or player
VIDEO
OUT
AUDIO
OUTR
L
RT2
0
00
Composite input/output connections
RT2000 Installation & User Guide.book Page 44 Monday, April 2, 2001 3:51 PM
44
2 To connect your composite video recorder, use another composite (RCA)
audio/video cable or three more separate cables with RCA connectors.
a Connect the yellow VIDEO OUT jack on your breakout box to the video
input on your video recorder.
b Connect the white L - AUDIO OUT jack on your breakout box to the left
audio input of your video recorder.
c Connect the red AUDIO OUT - R jack on your breakout box to the right audio
input of your video recorder.
S-VIDEO
OUT VIDEO OUT
L - AUDIO - R
OUT
Video
recorder
VIDEO
IN
AUDIO
IN R
L
3 To display the output from Matrox RT2000 on your NTSC or PAL video
monitor1, you can connect your video monitor to the breakout box or your
recorder. For an illustration of typical composite connections that you can
use, see “Composite connections using separate source and record devices”
on page 50.
1
You can use a TV in place of an NTSC or PAL video monitor. If your TV has a TV/VIDEO
input switch, set it to VIDEO.
Chapter 4, Connecting Your Devices
RT2000 Installation & User Guide.book Page 45 Monday, April 2, 2001 3:51 PM
45
S-Video input/output connections
1 To connect your S-Video source (for capturing material), use an S-Video
cable, as well as two cables with RCA connectors for audio.
a Connect the video output from your S-Video device to the S-VIDEO IN jack
on the RT2000 breakout box.
b Connect the left audio output channel of your device to the white
L-AUDIO IN jack on the breakout box.
c Connect the right audio output channel of your device to the red
AUDIO IN - R jack on the breakout box.
¯Note If your video device has only one audio connector, use the left audio
connector on the cable.
VIDEO IN
L - AUDIO IN - R
S-VIDEO IN
Video camera
or player
AUDIO S-VIDEO
OUT
OUT
L
R
RT2
000
S-Video input/output connections
RT2000 Installation & User Guide.book Page 46 Monday, April 2, 2001 3:51 PM
46
2 To connect your S-Video recorder, use another S-Video cable and two more
cables with RCA connectors for audio.
a Connect the S-VIDEO OUT jack on your RT2000 breakout box to the video
input on your video recorder.
b Connect the white L-AUDIO OUT jack on your breakout box to the left audio
input of your video recorder.
c Connect the red AUDIO OUT-R jack on your breakout box to the right audio
input of your video recorder.
Video
recorder
3 To display the output from Matrox RT2000 on your NTSC or PAL video
monitor1, you can connect your video monitor to the breakout box or your
recorder. For an illustration of typical S-Video connections that you can use,
see “S-Video connections using same device for capture and print-to-tape”
on page 49.
1
You can use a TV in place of an NTSC or PAL video monitor. If your TV has a TV/VIDEO
input switch, set it to VIDEO.
Chapter 4, Connecting Your Devices
RT2000 Installation & User Guide.book Page 47 Monday, April 2, 2001 3:51 PM
47
DV video device (1394 connection)
Use the supplied 4-to-6 pin cable to plug your DV-1394 device (such as a DV
camcorder or DV deck) into either of the 1394 connectors on the RT2000 card.
The 4-to-6 pin cable will work with most DV devices. Some DV-1394 devices
have 6-pin connectors (in this case, you’ll have to supply your own 6-to-6 pin
cable). For a list of compatible DV-1394 devices, see the RT2000 Customer
Support section of our web site at www.matrox.com/videoweb/support.
²Caution Use extra care when plugging in or unplugging the 4-to-6 pin connector.
It’s very easy to bend the connector pins inside your DV-1394 device, rendering it
useless. Use only minimal force.
1 Plug the 4-pin end of the cable into your DV-1394 device.
2 Plug the 6-pin end of the cable into one of the two 6-pin 1394 connectors on
your RT2000 card.
BL
BL
BL
AH
BL
AH
BL
AH
BL
AH
XZ
AH
XZ
AH
XZ
CV
CV
CV
LINE
IN
MI
C
LINE
O UT
SP
KR
Hot-plugging
Your DV-1394 device can be plugged into or unplugged from the RT2000 card at
any time; there’s no need to turn off your computer when connecting or removing
your device.
°Important The RT2000 card currently supports only one DV-1394 input
connection at a time. If you wish to capture material from different DV-1394
devices, you must turn off the first device before turning on the second. When
connecting your DV-1394 device, make sure it is turned off. Once you’ve
connected your device, you can turn it on and it will be ready for use. Do not try
to swap DV-1394 devices while performing a capture in Adobe Premiere.
DV video device (1394 connection)
RT2000 Installation & User Guide.book Page 48 Monday, April 2, 2001 3:51 PM
48
Typical RT2000 connections
The following illustrations show some typical audio and video connections for
capturing and printing to tape. In these illustrations, we’ve connected a video
monitor (NTSC or PAL) to view the signal that is being captured or recorded, and
we’re monitoring audio from the soundcard to the PC speakers (requires the CD
audio cable to be connected, as explained on page 36).
DV-1394 connections
DV-1394 Device
OUT
To LINE IN on soundcard
AUDIO R
AUDIO L
VIDEO
To RT2000
S-VIDEO
DV VIDEO
RT2000 breakout box
RT2000 cable
To RT2000 & G400
RT2000 CABLE
CONNECTOR
VIDEO IN
R
L
Video monitor
or television
AUDIO OUT
AUDIO IN
L
R
IN
VIDEO
VIDEO OUT
S-VIDEO
IN
S-VIDEO
OUT
PC Speakers
L
Chapter 4, Connecting Your Devices
R
To LINE OUT from
soundcard
RT2000 Installation & User Guide.book Page 49 Monday, April 2, 2001 3:51 PM
49
S-Video connections using same device
for capture and print-to-tape
PC Speakers
To LINE OUT from
soundcard
R
L
RT2000 breakout box
RT2000 cable
To RT2000 & G400
RT2000 CABLE
CONNECTOR
VIDEO IN
R
L
AUDIO IN
AUDIO OUT
L
R
VIDEO OUT
Video monitor
or television
IN
VIDEO
S-VIDEO
IN
S-VIDEO
OUT
S-Video VCR
OUT
IN
S- VIDEO
AUDIO L
AUDIO R
VIDEO
Typical RT2000 connections
RT2000 Installation & User Guide.book Page 50 Monday, April 2, 2001 3:51 PM
50
Composite connections using separate source and
record devices
To LINE OUT from
soundcard
Chapter 4, Connecting Your Devices
RT2000 Installation & User Guide.book Page 51 Monday, April 2, 2001 3:51 PM
Installing Your Software
and Testing Your Hard Drives
This chapter explains how to install the software required to use your
Matrox RT2000, including Matrox Video Tools and other applications
provided with your RT2000 kit. It also explains how to test the
sustained data rates supported by your hard drives.
C
h
a
p
t
e
r
RT2000 Installation & User Guide.book Page 52 Monday, April 2, 2001 3:51 PM
52
Installation choices
For Matrox Video Tools version 3.0, you have several installation options
depending on your specific situation.
✃ Install Matrox Video Tools 3.0 on a computer with a new copy of Windows
2000 (clean install). See the next section.
✃
Install Matrox Video Tools 3.0 on a computer with a new copy of Windows
Me (clean install). See page 56.
✃
Upgrading an earlier version of Matrox Video Tools to version 3.0 on a
computer with a Windows Me. See page 58.
Installing Matrox Video Tools on a computer with
Windows 2000
If you’re installing your RT2000 on a computer with Windows Me, see page 56.
¯Note Please make sure that no 1394 devices are connected to your computer
during the Matrox Video Tools Setup process.
1 Make sure your user profile on Windows 2000 has Administrator privileges
or log onto Windows 2000 using an account with Administrator privileges.
Otherwise, you will not be able to install any software!
2 Please make sure you’ve prepared your computer as instructed in the
preceding chapters. This includes:
✄
Preparing your system.
Plan your storage configuration and install your devices.
Install Windows 2000.
Install Adobe Premiere.
✄
Installing your RT2000 codec card.
✄
Connecting your devices.
3 Turn on your computer and insert the Matrox RT2000 installation CD in
your CD-ROM drive. If you installed your Millennium Flex 3D card in a
new system as detailed in “For new systems with no existing display card”
on page 12, skip to step 5.
Chapter 5, Installing Your Software and Testing Your Hard Drives
RT2000 Installation & User Guide.book Page 53 Monday, April 2, 2001 3:51 PM
53
4 Windows reports finding a “VGA controller.”
²Caution If your system previously used an older Matrox G-series card
(G100 or G200), you may be prompted to insert a disk to install another version
of the Matrox G400 drivers. Simply click OK and then Cancel when prompted
to provide a path to the file. This will allow you to continue the installation in
standard VGA mode. Matrox Video Tools Setup will install the proper driver
for your display card later in the process. Do not try to manually install driver
files from your RT2000 CD. Doing so will cause software conflicts.
a When the “Add New Hardware Wizard” starts, click Next to start the
installation process.
b The wizard asks you to choose between searching for a suitable driver or
displaying a list of known drivers. Be sure to select Search for a suitable
driver for my device (recommended) and then click Next.
c and then Next again when prompted to search for a driver.
d When the wizard prompts you to
select locations for its search, make
sure all the location check boxes are
not selected.
This restricts the search to the
standard VGA driver that’s already
running.
e The search finds the standard VGA driver and prompts you to accept this
choice. Click Next to continue.
f Click Finish and then Yes to restart your computer. Your system will start
with a display resolution of 640×480.
5 If you have a Plug-and-Play monitor, Windows detects it after your computer
restarts. Follow the onscreen instructions to install the required driver.
Installing Matrox Video Tools on a computer with Windows 2000
RT2000 Installation & User Guide.book Page 54 Monday, April 2, 2001 3:51 PM
54
6 Windows now detects a new “Multimedia Controller” (that is, your RT2000
codec card). The “Add New Hardware Wizard” starts again so that you can
install the required driver.
a Click Next to start the installation process. and then Next again when
prompted to search for a driver.
b The wizard asks you to choose between searching for a suitable driver or
displaying a list of known drivers. Be sure to select Search for a suitable
driver for my device (recommended) and then click Next.
c When the wizard prompts you to
select locations for its search, select
CD-ROM drive so that Windows can
find the RT2000 codec card software
on your RT2000 CD.
d Click Next to start the search for the driver on the CD-ROM drive.
e The search locates the RT2000 driver and prompts you to accept this choice.
Click Next to continue. After Windows copies the necessary files to your
computer, click Finish.
7 Windows now detects the 1394 Host Controller on your RT2000. In most
cases, Windows automatically installs the necessary drivers for this device.
On some computers, the “Add New Hardware Wizard” may appear. If so, click
Next to start the installation process. Be sure to select Search for a suitable
driver for my device (recommended) and then click Next. Leave all the
Optional search locations check boxes blank to restrict the search to the
Windows driver database already installed on your computer by Windows.
Follow the onscreen instructions to install the driver.
8 After you restart your computer, Windows prompts you to re-insert your
Matrox RT2000 CD in your CD-ROM drive. Windows automatically starts
the Matrox Video Tools Setup program, which installs the Millennium Flex
3D Edition display card drivers (if not already installed), Microsoft DirectX,
and various other essential RT2000 software components. Follow the
onscreen instructions.
9 When the Matrox Video Tools software installation is complete, Setup offers
you a choice of installing the Pixélan SpiceMaster demo, installing the RT
wallpaper as your default desktop wallpaper, and viewing the Matrox RT
Readme file. Choose the items you want and follow onscreen instructions.
Chapter 5, Installing Your Software and Testing Your Hard Drives
RT2000 Installation & User Guide.book Page 55 Monday, April 2, 2001 3:51 PM
55
10 You’ll be prompted to restart your computer for the changes to take effect.
¯Note Upon restarting, your display will be configured to use the Millennium
Flex 3D Edition display at a resolution of 1024×768 pixels.
11 The Matrox Disk Benchmark program starts after your computer restarts.
This program tests the speed of your hard drives and reports the results. For
details on using this program, see “Testing the performance of your hard
drives” on page 60.
12 When you’ve finished testing your hard drives, you can install other software
that came with your RT2000 kit.
Installing Matrox Video Tools on a computer with Windows 2000
RT2000 Installation & User Guide.book Page 56 Monday, April 2, 2001 3:51 PM
56
Installing Matrox Video Tools on a computer with a
new copy of Windows Me
If you’re installing your RT2000 on a computer with Windows 2000, see page 52.
¯Note Please make sure that no 1394 devices are connected to your computer
during the Matrox Video Tools Setup process.
1 Please make sure you’ve prepared your computer as instructed in the
preceding chapters. This includes:
✄
Preparing your system.
Plan your storage configuration and install your devices.
Install Windows 2000.
Install Adobe Premiere.
✄
Installing your RT2000 codec card.
✄
Connecting your devices.
2 Turn on your computer and insert the Matrox RT2000 installation CD in
your CD-ROM drive. If you installed your Flex 3D card in a new system as
detailed in “For new systems with no existing display card” on page 12, skip
to step 4.
3 Windows Me recognizes the Millennium Flex 3D display card as a Standard
VGA Adapter. Accept this configuration and click Next. Your system will
start with a display resolution of 640×480.
4 Windows now detects your “1394 Host Controller.”
a When the “Add New Hardware Wizard” starts, leave the automatic search
selected and click Next to start the driver installation.
b The wizard finds a suitable driver and installs it from files already located
on your system drive.
5 Windows now detects a new “PCI Multimedia Device” (that is, your RT2000
codec card). The “Add New Hardware Wizard” starts again so that you can
install the required driver.
a The wizard allows you to choose to automatically search for driver files or
manually enter their location. Make sure the automatic search is selected.
Click Next to continue.
b Windows finds the files on your CD-ROM and copies the necessary files to
your computer. Click Finish.
Chapter 5, Installing Your Software and Testing Your Hard Drives
RT2000 Installation & User Guide.book Page 57 Monday, April 2, 2001 3:51 PM
57
c You must now restart your computer as prompted before continuing your
installation.
6 After restarting, Windows automatically starts the Matrox Video Tools Setup
program, which installs the Millennium Flex 3D Edition display card driver
(if not already installed), Microsoft DirectX, the realtime plug-in for Adobe
Premiere, and various other essential RT2000 software components. Follow
the onscreen instructions.
7 When the Matrox Video Tools software installation is complete, Setup offers
you a choice of installing the Pixélan SpiceMaster demo, installing the RT
wallpaper as your default desktop wallpaper, and viewing the Matrox RT
Readme file. Choose the items you want and follow onscreen instructions.
8 You’ll be prompted to restart your computer for the changes to take effect.
¯Note Upon restarting, your display will be configured to use the Millennium
Flex 3D Edition display at a resolution of 1024×768 pixels.
9 The Matrox Disk Benchmark program starts after your computer restarts.
This program tests the speed of your hard drives and reports the results. For
details on using this program, see “Testing the performance of your hard
drives” on page 60.
10 When you’ve finished testing your hard drives, you can install other software
that came with your RT2000 kit.
Installing Matrox Video Tools on a computer with a new copy of Windows Me
RT2000 Installation & User Guide.book Page 58 Monday, April 2, 2001 3:51 PM
58
Upgrading from a previous version of Matrox Video
Tools on a computer with Windows Me
If you’re installing your RT2000 on a computer with Windows 2000, see page 52.
If you’re installing your RT2000 on a computer with a new installation of
Windows Me, see page 56.
Uninstall previous version of Matrox Video Tools
°Important Before you can install the new version of Matrox Video Tools, you
must uninstall any previous version from your computer. You can do this by
choosing Start > Programs > Matrox Video Tools > Uninstall. If you attempt to
install the new version without first uninstalling the previous version, you’ll be
prompted to perform the uninstall.
1 Uninstall Matrox PowerDesk (choose Start > Programs > Matrox
PowerDesk->Matrox PowerDesk Un-install or use the Add/Remove
Programs in Windows Control Panel).
2 Remove the following devices from the Windows Device Manager (to access
the Device Manager, right-click the My Computer icon, choose Properties
and click the Device Manager tab):
✄
Display adapters: G400Flex3D.
✄
MatroxMMedia: MatroxRT2000Loader.
✄
Sound Video and Game controllers: RT2000.
3 Shutdown and restart your computer.
4 Windows Me recognizes the Millennium Flex 3D display card as a Standard
VGA Adapter. Accept this configuration and click Next. Your system will
start with a display resolution of 640×480.
5 Windows now detects your “1394 Host Controller.”
a When the “Add New Hardware Wizard” starts, leave the automatic search
selected and click Next to start the driver installation.
b The wizard finds a suitable driver and installs it from files already located
on your system drive.
6 Windows now detects a new “PCI Multimedia Device” (that is, your RT2000
codec card). The “Add New Hardware Wizard” starts again so that you can
install the required driver.
a Insert the Matrox RT2000 installation CD in your CD-ROM drive.
Chapter 5, Installing Your Software and Testing Your Hard Drives
RT2000 Installation & User Guide.book Page 59 Monday, April 2, 2001 3:51 PM
59
b The wizard allows you to choose to automatically search for driver files or
manually enter their location. Make sure the automatic search is selected.
Click Next to continue.
c Windows finds the files on your CD-ROM and copies the necessary files to
your computer. Click Finish.
d You must now restart your computer as prompted before continuing your
installation.
7 After restarting, Windows automatically starts the Matrox Video Tools Setup
program, which installs the Millennium Flex 3D Edition display card driver,
Microsoft DirectX, the realtime plug-in for Adobe Premiere, and various
other essential RT2000 software components. Follow the onscreen
instructions.
8 When the Matrox Video Tools software installation is complete, Setup offers
you a choice of installing the Pixélan SpiceMaster demo, installing the RT
wallpaper as your default desktop wallpaper, and viewing the Matrox RT
Readme file. Choose the items you want and follow onscreen instructions.
9 You’ll be prompted to restart your computer for the changes to take effect.
¯Note Upon restarting, your display will be configured to use the Millennium
Flex 3D Edition display at a resolution of 1024×768 pixels.
10 The Matrox RT2000 Disk Benchmark program starts after your computer
restarts. This program tests the speed of your hard drives and reports the
results. For details on using this program, see the next section.
11 When you’ve finished testing your hard drives, you can install other software
that came with your RT2000 kit.
Upgrading from a previous version of Matrox Video Tools on a computer with Windows Me
RT2000 Installation & User Guide.book Page 60 Monday, April 2, 2001 3:51 PM
60
Testing the performance of your hard drives
The Matrox Disk Benchmark program tests the sustained data rates supported by
your hard drives. This lets you determine if your drives are suitable for storing
your video and audio clips, and for running the Matrox Video Tools software.
°Important By testing your drives, you’ll know which ones are capable of
capturing and playing back clips without dropping frames. To use an EIDE drive
for storing clips, you must enable DMA bus-mastering on the drive as explained
in the section “Enabling DMA bus-mastering” on page 22.
¯Note Depending on the size of your drives, the disk benchmark test may take
more than 30-60 minutes to complete!
When you install Matrox Video Tools, the disk benchmark program starts
automatically. You can run this program at any time to test your drives as follows:
1 Choose Start > Programs > Matrox Video Tools > Disk Benchmark. This
displays the following dialog box:
2 From the list of hard drives connected to your computer, select the drives you
want to test. Use CTRL+click to select drives in any order, or SHIFT+click to
select a range of drives.
¯Note Only your writable hard drives appear in the list. All FAT32-formatted
drives (the format required for Matrox RT2000) are identified with a green
icon to the left of the drive’s name.
3 Under Test Settings for All Selected Drives, drag the slider to set the size
of the test files to be created. When Fill x% of disk capacity is selected, you
can set the file size according to a percentage of the total available disk space
on the drives you’re testing.
°Important To get accurate results for a tested drive, it must be nearly
empty so that the test files fill about 80% of the drive’s total capacity.
Because the performance of a drive progressively decreases as you get closer
Chapter 5, Installing Your Software and Testing Your Hard Drives
RT2000 Installation & User Guide.book Page 61 Monday, April 2, 2001 3:51 PM
61
to the inner section of the drive (the remaining 20%), you must test a large
area to ensure that the results reflect the drive’s true capabilities.
4 To start the disk performance test, click the Start Test button. The test
progress is displayed in a dialog box:
5 Click Skip Test to bypass the test of the drive, and move on to the next
chosen drive. Click Abort All to stop the test altogether.
6 The test results appear as a range of data rates for each of the test types:
✄
Single Write
Tests drive performance for writing a single video file.
✄
Single Read
Tests drive performance for reading (playing back) a single
video file.
✄
Tests drive performance for reading two video files
simultaneously (this technique is used to support A/B roll edits in your
projects).
Dual Read
The lowest number is the maximum data rate the drive will always be able to
achieve. The middle number is the average data rate your drive can achieve.
The highest number is the maximum data rate your drive can achieve under
optimum conditions. Use the lower (conservative) number as a guideline
when selecting the video quality for creating .avi files on Matrox RT2000 to
be sure you don’t exceed the data rate your drive is capable of achieving.
¯Note DV clips are created at a fixed data rate of about 3.5 MB/sec. This
means that to support DV clips, your A/V drive must be capable of sustaining
about 3.5 MB/sec per stream. When you create MPEG-2 I-frame clips, you
can select a quality level ranging from lowest to highest quality at a data rate
of about 3.5 MB/sec. You can therefore create MPEG-2 clips at a lower video
quality if needed to match your A/V drive’s capabilities.
Testing the performance of your hard drives
RT2000 Installation & User Guide.book Page 62 Monday, April 2, 2001 3:51 PM
62
7 After you have completed your test, check the color of the icons under the
Status heading:
✄
A green icon indicates that the drive is a good choice for use as an A/V
drive, maintaining a data rate of at least 4 MB/sec per stream throughout
each of the different test types.
✄
A yellow icon indicates that the drive is an acceptable A/V drive, but is not
recommended. Using this drive may result in frames being dropped when
you capture or play back clips.
✄
A red icon indicates that the drive is not adequate for use as an A/V drive.
8 Click OK to save the results of the test.
¯Note The test files will be deleted automatically from your drives when the test
has finished. If the test ends abnormally, such as during a power failure, the test
files (named FirstVideo1.tmp, FirstAudio1.tmp, FirstVideo2.tmp, and so on) will
remain in the root directory of each tested drive. You should delete these files from
your drives.
Installing the Matrox DVD Player
To install the Matrox DVD Player:
1 Close all Windows programs.
2 Insert your Matrox RT2000 installation CD in your CD-ROM drive.
3 Start Windows Explorer, then go to the Utilities\MatroxDVDPlayer folder on
your CD-ROM drive.
4 Double-click the setup.exe file.
5 Follow the onscreen instructions.
For information on using the Matrox DVD Player, see the program’s online Help.
To play back a DVD Volume that you created using Sonic Solutions DVDit! LE,
see “Playing your DVD volume using the Matrox DVD Player” on page 213.
Chapter 5, Installing Your Software and Testing Your Hard Drives
RT2000 Installation & User Guide.book Page 63 Monday, April 2, 2001 3:51 PM
63
Installing Inscriber TitleExpress
To install Inscriber TitleExpress:
1 Close all Windows programs.
2 Insert the TitleExpress installation CD in your CD-ROM drive.
3 When the setup program starts, follow the onscreen instructions. If Windows
doesn’t automatically start the setup program, you can start it manually as
follows:
a Choose Start > Run.
b In the resulting dialog box, type e:\setup (where e: represents your CDROM drive), and click OK.
For information on Inscriber TitleExpress, see Chapter 12, “Using Inscriber
TitleExpress.”
Installing Ulead Cool 3D
To install Ulead Cool 3D:
1 Close all Windows programs.
2 Insert the Cool 3D installation CD in your CD-ROM drive.
3 When the setup program starts, follow the onscreen instructions. If Windows
doesn’t automatically start the setup program, you can start it manually as
follows:
a Choose Start > Run.
b In the resulting dialog box, type e:\setup (where e: represents your CDROM drive), and click OK.
For information on Ulead Cool 3D, see Chapter 13, “Using Ulead Cool 3D.”
Installing Sonic Foundry ACID Music
To install Sonic Foundry ACID Music:
1 Close all Windows programs.
2 Insert the Acid Music installation CD in your CD-ROM drive.
3 When the setup program starts, follow the onscreen instructions. If Windows
doesn’t automatically start the setup program, you can start it manually as
follows:
a Choose Start > Run.
b In the resulting dialog box, type e:\setup (where e: represents your CDROM drive), and click OK.
Installing Inscriber TitleExpress
RT2000 Installation & User Guide.book Page 64 Monday, April 2, 2001 3:51 PM
64
For information on Acid Music, see Chapter 14, “Using Sonic Foundry ACID
Music.”
Installing Sonic Solutions DVDit! LE
To install Sonic Solutions DVDit! LE:
1 Close all Windows programs.
2 Insert the DVDit! LE installation CD in your CD-ROM drive.
3 When the setup program starts, follow the onscreen instructions. If Windows
doesn’t automatically start the setup program, you can start it manually as
follows:
a Choose Start > Run.
b In the resulting dialog box, type e:\setup (where e: represents your CDROM drive), and click OK.
For information on DVDit! LE, see Chapter 15, “Using Sonic Solutions DVDit!
LE and the Matrox DVD Player.”
Installing the Matrox VFW software codecs on a
computer without the RT2000 hardware
The Matrox VFW software codecs let you render (compile) and play back
RT2000-compatible .avi files in your Video for Windows programs without
having the RT2000 hardware installed in your computer.
¯Note If you have the RT2000 hardware, you do not need to install the VFW
software codecs because Matrox Video Tools installs all the required Matrox
codecs on your system.
¬ To install the Matrox VFW software codecs:
1 Close all Windows programs.
2 Insert your Matrox RT2000 installation CD in your CD-ROM drive.
3 Choose Start > Run.
4 In the resulting dialog box, type e:\utilities\vfwsoftwarecodec\setup (where
e: represents your CD-ROM drive), and click OK.
5 Follow the onscreen instructions. An information box indicates when the
installation is complete.
°Important If you later decide to install the RT2000 hardware in your computer,
you must remove the Matrox VFW software codecs from your system (using
Chapter 5, Installing Your Software and Testing Your Hard Drives
RT2000 Installation & User Guide.book Page 65 Monday, April 2, 2001 3:51 PM
65
Add/Remove Programs in Windows Control Panel) before installing your
RT2000 hardware and software.
Removing and re-installing Matrox Video Tools
You can remove the Matrox Video Tools software from your computer at any
time by choosing Start > Programs > Matrox Video Tools > Uninstall.
¬ To re-install the software, run the Matrox Video Tools Setup program as
follows:
1 Close all Windows programs.
2 Insert your Matrox RT2000 installation CD in your CD-ROM drive.
3 Choose Start > Run.
4 In the resulting dialog box, type e:\setup.exe (where e: represents your CDROM drive), and click OK.
5 Follow the onscreen instructions.
¯Note If you’re re-installing the RT2000 software from a revised CD and some
files on your system are out of date, the Matrox Video Tools Setup program will
update the files for you.
Removing and re-installing Matrox Video Tools
RT2000 Installation & User Guide.book Page 66 Monday, April 2, 2001 3:51 PM
66
Your notes
Chapter 5, Installing Your Software and Testing Your Hard Drives
RT2000 Installation & User Guide.book Page 67 Monday, April 2, 2001 3:51 PM
Configuring Your System
for Use with Matrox RT2000
This chapter presents important information on how to configure
various settings on your computer for use with Matrox RT2000.
C
h
a
p
t
e
r
RT2000 Installation & User Guide.book Page 68 Monday, April 2, 2001 3:51 PM
68
Monitor setup
If you have a Plug-and-Play monitor, Windows should automatically use the
correct settings for your specific monitor model.
¬ To make sure the correct monitor is selected in Windows:
1 Right-click your Windows desktop background, then click Properties >
Settings. Check the monitor name listed under Display.
2 In Windows Me, if the monitor name listed doesn’t match your monitor,
select a new monitor name by clicking Advanced > Monitor > Change, and
follow the onscreen instructions.
For more information on Windows monitor settings, see your Windows
documentation.
¬ If you want to customize your Windows monitor settings:
1 Access the PowerDesk Monitor Settings property sheet by clicking
Properties > Settings > Advanced > Monitor Settings.
2 Depending on what you want to do, click one of the buttons in the Monitor
settings selection method box, then follow the onscreen instructions.
³Warning If incorrect software monitor settings are applied, some monitors
can be permanently damaged. For more information, see your monitor’s
manual.
Disabling energy saving mode
To ensure that your RT2000 system works correctly, your monitor’s energy
saving features must be turned off. To disable these features:
1 Right-click your Windows desktop background, then click Properties >
Screen Saver.
2 At the bottom of the dialog box, under Energy saving features of monitor,
click Power or Settings.
Chapter 6, Configuring Your System for Use with Matrox RT2000
RT2000 Installation & User Guide.book Page 69 Monday, April 2, 2001 3:51 PM
69
3 Select Never for all the settings. You can save this power scheme as RT2000,
as in the following example:
4 Click Apply, then OK.
Remarks
✃
If you’re using BNC connectors with a Plug-and-Play monitor, the Plug-andPlay feature of your monitor can’t be used. To use the Plug-and-Play feature
of your monitor instead of the BNC connectors, use the 15-pin connector at
the back of your monitor.
✃
Matrox monitor settings are based on Windows monitor settings. If you
change your Windows monitor settings, you may have to reselect or readjust
your Matrox monitor settings.
Monitor setup
RT2000 Installation & User Guide.book Page 70 Monday, April 2, 2001 3:51 PM
70
Display setup
After checking your monitor’s software settings, you can change your color
palette, display resolution, and other display settings.
¬ To change your color palette and display resolution for use with Adobe
Premiere:
1 Right-click the Windows desktop background, then click Properties >
Settings.
2 Under Colors, select either High Color (16 bit) or True Color (32 bit).
Matrox RT2000 does not support any other color palette setting for realtime
video editing with Adobe Premiere.
3 Under Screen area, drag the slider to select a display resolution of at least
1024x768. Don’t select a resolution higher than 1280x1024 when using a
16-bit color palette, or 1024x768 when using a 32-bit color palette.
°Important To ensure that the dialog boxes in the Matrox RT2000 realtime
plug-in for Adobe Premiere display correctly, you must select a display
resolution of at least 1024x768. You must also set your Display Properties to use
Small Fonts and one of the Windows Standard schemes.
For more information on changing your Windows Display Properties, see your
Windows documentation.
Accessing the Matrox PowerDesk property sheets
Many other display controls are available on the Matrox PowerDesk property
sheets. You can identify these sheets by the icon ( ) on the tab.
¬ To access the Matrox PowerDesk property sheets:
1 Double-click the QuickDesk icon ( ) on your Windows taskbar, or rightclick your Windows desktop background, then click Properties > Settings >
Advanced. If you’re using a multi-display desktop, select a display before
clicking the Advanced button.
2 Click the tab for the PowerDesk sheet you want, such as the Options tab to
enable or disable PowerDesk features and performance options.
For more information on using Matrox PowerDesk, see the Matrox PowerDesk
online guide. To view this document, click the Information property sheet, then
click Help or View Readme File.
Chapter 6, Configuring Your System for Use with Matrox RT2000
RT2000 Installation & User Guide.book Page 71 Monday, April 2, 2001 3:51 PM
71
Audio setup
By connecting your soundcard to your CD player and the RT2000 card (as
described on page 36), you can monitor audio on your PC speakers while
working with Matrox RT2000. To take advantage of the RT2000 audio/video
capabilities when playing back clips in Adobe Premiere, you must configure your
system’s audio settings as explained in this section.
¬ To configure your multimedia audio settings:
1 Choose Start > Settings > Control Panel.
2 Double-click the Sounds and Multimedia icon.
3 On the Audio tab, make sure your soundcard is selected as the Preferred
device for Playback and Recording, similar to the following:
Soundcard selected
as preferred device
Audio setup
RT2000 Installation & User Guide.book Page 72 Monday, April 2, 2001 3:51 PM
72
¬ To check your CD and auxiliary audio playback volume settings:
1 Double-click the speaker icon on the Windows taskbar.
¯Note
If you don’t see the speaker icon on your Windows taskbar, run
Sounds and Multimedia from the Windows Control Panel, select Show
volume control on the taskbar, then click OK.
2 Choose Options > Properties.
3 From the Mixer device list, select your soundcard.
4 Select the Playback option, under Show the following volume controls,
select CD Audio and Auxiliary, then click OK.
5 Make sure that the mute boxes are not selected for CD Audio and Auxiliary,
and that the Volume sliders are set to acceptable levels (if you’re not sure,
start with the slider about a quarter of the way up and increment it until the
level is acceptable):
¯Note All audio previewed in Adobe Premiere is output through the RT2000 card
to both the breakout box and your PC speakers. For the best performance, use only
48-kHz, 16-bits/sample (stereo) .wav files in your Premiere projects. Audio other
than 48 kHz is upsampled on playback in Premiere.
Chapter 6, Configuring Your System for Use with Matrox RT2000
RT2000 Installation & User Guide.book Page 73 Monday, April 2, 2001 3:51 PM
73
Using Windows Volume Control with the
Matrox RT Mixer
You can use the Windows Volume Control to adjust the audio levels of the clips
you capture and play back from the Timeline in Adobe Premiere. Please note,
however, that you won’t be able to preview the audio volume changes on capture,
but you will hear your changes on playback.
¬ To adjust the volume levels for the Matrox RT Mixer:
1 Double-click the speaker icon ( ) on the Windows taskbar.
¯Note
If you don’t see the speaker icon on your Windows taskbar, run
Sounds and Multimedia from the Windows Control Panel, select Show
volume control on the taskbar, then click OK.
2 Choose Options > Properties.
3 From the Mixer device list, select Matrox RT Mixer.
Capture
volume
4 To change the capture volume, select Recording and Master Record, then
click OK.
Audio setup
RT2000 Installation & User Guide.book Page 74 Monday, April 2, 2001 3:51 PM
74
5 Make sure the Mute check box is cleared, and adjust the Master Record
Volume slider as needed.
¯Note By default, the Master Record slider is at the lowest position,
representing 0 dB gain. This means you can amplify the capture volume, but
not attenuate it.
6 Choose Options > Properties.
7 To change the playback volume, select Playback and Master Out, then click
OK.
Chapter 6, Configuring Your System for Use with Matrox RT2000
RT2000 Installation & User Guide.book Page 75 Monday, April 2, 2001 3:51 PM
75
8 Make sure the Mute check box is cleared, and adjust the Master Out Volume
slider as needed:
¯Note The default setting for the Master Out slider is full volume. You can
therefore only attenuate the playback volume.
9 When you’ve finished adjusting the volume levels, close the dialog box.
Audio setup
RT2000 Installation & User Guide.book Page 76 Monday, April 2, 2001 3:51 PM
76
Notes on your Millenium Flex 3D Edition card
Your Matrox Millennium Flex 3D Edition display card is designed to work with
your RT2000 system. This is the only display card you’ll need in your system.
There are some points to keep in mind regarding the use of your Flex 3D display
card.
Display driver updates
If you need to download a display driver update for your Millenium Flex 3D
card, you must download the driver from the RT2000 section of the Matrox
Video web site at www.matrox.com/video, not from the Matrox Graphics web
site. Display drivers obtained from the Matrox Graphics (mga) web site are not
compatible with your Flex 3D card.
Do not overclock
Overclocking programs may increase the clock speeds that display drivers use,
but can render your system unstable or damage your equipment. Your Matrox
RT2000 warranty will be voided if you use any overclocking program.
Available display resolutions
For a complete list of the display resolutions available with your Millennium Flex
3D Edition card, see “Available display resolutions” on page 248.
Chapter 6, Configuring Your System for Use with Matrox RT2000
RT2000 Installation & User Guide.book Page 77 Monday, April 2, 2001 3:51 PM
Defining Your Adobe Premiere
Settings
This chapter explains how to define various settings for using your
Matrox RT2000 with Adobe Premiere. This includes specifying your
project and export movie settings, and setting up DV-1394 device
control.
C
h
a
p
t
e
r
RT2000 Installation & User Guide.book Page 78 Monday, April 2, 2001 3:51 PM
78
Important—Do not press Ctrl+Alt+Delete while
running Premiere on Windows 2000
While running Adobe Premiere with Matrox RT2000 on a Windows 2000
system, make sure you do not press CTRL+ALT+DELETE. Doing so will cause
your RT2000 system to stop working (but you may be able to save your project).
You’ll then have to restart your system and restart Premiere.
A note about running other programs with Adobe
Premiere
For the best performance, don’t run any other programs at the same time as
Adobe Premiere. Screen savers and programs that use a large amount of system
memory, such as most paint and compositing applications, can cause problems if
you run them at the same time as Adobe Premiere.
Loading project presets
The Matrox realtime plug-in for Adobe Premiere includes project presets that
you can load to immediately apply appropriate RT2000 settings.
¬ To load an RT2000 project preset:
1 Start Adobe Premiere. The Load Project Presets dialog box appears:
Chapter 7, Defining Your Adobe Premiere Settings
RT2000 Installation & User Guide.book Page 79 Monday, April 2, 2001 3:51 PM
79
2 From the Matrox DV or Matrox MPEG-2 folder, select the preset that
matches the type of project you want to create.
3 Click OK to apply the settings. You can customize your project settings as
explained in the following sections.
Setting up your scratch disks
When specifying the location of your scratch disks in Adobe Premiere, make sure
you follow the recommendations in your Adobe Premiere User Guide. For
example, store your video and audio files on an A/V drive used exclusively for
that purpose. To enhance performance, store your audio files and graphics on an
A/V drive separate from your video files.
¬ To specify your scratch disks:
1 Choose Edit > Preferences > Scratch Disks and Device Control.
2 Under Scratch Disks, select an A/V drive that passed the Matrox RT2000
disk benchmark test for Captured Movies, Video Previews, and Audio
Previews. For details on using the disk benchmark program, see “Testing the
performance of your hard drives” on page 60.
°Important Your Captured Movies drive and Audio Previews drive must
match the video and audio drives, respectively, that you select for your
General settings as explained in “Defining your General settings” on
page 80.
3 Click OK to save your preferences.
¯Note For information on setting up device control for your DV camera or deck,
see “Setting up DV-1394 device control” on page 100.
Setting up your scratch disks
RT2000 Installation & User Guide.book Page 80 Monday, April 2, 2001 3:51 PM
80
Defining your General settings
To specify your General settings for editing in Adobe Premiere on Matrox
RT2000:
1 Choose Project > Project Settings > General.
2 From the Editing Mode list, select Matrox RT.
3 Click the Advanced Settings button. This displays the Matrox General
Settings dialog box:
Chapter 7, Defining Your Adobe Premiere Settings
RT2000 Installation & User Guide.book Page 81 Monday, April 2, 2001 3:51 PM
81
4 Under Drives, specify your video and audio drives as follows:
✄
From the Video drive list, select the A/V drive you use to store captured
video clips in Adobe Premiere (that is, your Captured Movies drive).
✄
From the Audio drive list, select the drive where you want Adobe Premiere
to store the .wav files associated with video clips you create on Matrox
RT2000 (that is, your Audio Previews drive). The default setting is Same
as video, meaning that when you capture or export video with audio, the
audio will be stored in a .wav file on the same drive as the video (.avi) file.
However, if your system is set up to use a separate audio drive, you can
choose to store your .wav files onto that drive.
5 Under Analog Setup (NTSC), select the setup level you want for your NTSC
analog video. For example, select 0 IRE (DV-compliant) when using
DV-1394 devices that follow the Japanese NTSC standard. For details, see
“Selecting your NTSC setup level for analog video” on page 83.
6 Under Default Cropping for Effects, select Enable cropping and specify in
pixels the default cropping values that you want to be applied each time you
create an effect using the Matrox realtime plug-in. For example, if garbage
video or black lines appear at the left and right edges of your video, you’ll
want to crop these edges so that they’re not visible in your effects. Be aware
that your new crop settings will be applied only to subsequent clips you add
to the Timeline (that is, clips already on the Timeline won’t be affected).
°Important Unless you need cropping to be applied to your clips, make
sure that Enable cropping is not selected. This improves system
performance.
7 Under Editing Aspect Ratio, select the aspect ratio that matches your source
material. For example, select 4:3 if your video was recorded using the
standard TV screen format. For details, see “Selecting your editing aspect
ratio” on page 84.
8 In most cases, leave Enable video preview during export selected, which
lets you preview the video you’re exporting to tape on your computer
monitor. Some systems and DV-1394 devices, however, don’t support this
option. If you’re unable to perform an export to tape, try clearing Enable
video preview during export. The preview will be disabled on your
computer monitor, but you can preview the video on your camcorder’s
viewfinder and on your NTSC or PAL monitor (assuming you’ve connected
the analog video output of yourDV-1394 device to your video monitor).
¯Note If you clear Enable video preview during export after a failed
DV-1394 export to tape, you’ll need to restart your computer before starting
the export to tape again.
Defining your General settings
RT2000 Installation & User Guide.book Page 82 Monday, April 2, 2001 3:51 PM
82
9 Under Error Reporting, select Report dropped frames if you want to be
warned each time frames are dropped when you play back video from the
Timeline. Otherwise, clear this option. We recommend that you leave
Report dropped frames selected so that you’ll be aware of any performance
issues with your system.
10 To select which Adobe Premiere transitions you want to play back in real
time, click Select Transitions. In the provided dialog box, you can select
many transitions native to Adobe Premiere (see “Selecting your realtime
Adobe Premiere transitions” on page 84).
11 If you’re using Windows 2000, you can specify how you want Premiere to
create .avi files for large clips (see “Selecting your AVI file creation method
for large clips in Windows 2000” on page 86).
¯Note When running Windows Me, Matrox Infinite Capture will always be
used to create large clips on Matrox RT2000. For details about this feature,
see “About Matrox Infinite Capture and creating video clips greater than 2
GB” on page 105.
12 For the best performance on most systems, leave Accelerated graphics
transfer selected. You should clear this option only if you find that certain
Matrox effects, such as particles, display artifacts or don’t display at all, or
the Matrox Effect Setup dialog box sometimes takes a very long time to
open (about 40 to 60 seconds). Any change to this option will only take
effect the next time you start Premiere.
13 Click OK to save your settings and return to the Project Settings dialog box.
You can specify additional General settings as explained in your Adobe
Premiere User Guide.
Chapter 7, Defining Your Adobe Premiere Settings
RT2000 Installation & User Guide.book Page 83 Monday, April 2, 2001 3:51 PM
83
Selecting your NTSC setup level for analog video
Most commercial DV cameras that have a 1394 interface follow the Japanese
specification for analog NTSC video, where the black level (setup) is 0 IRE. The
standard setup level for analog NTSC video in North America, however, is
7.5 IRE.
The black level used for the digital bit stream is the same for both Japanese and
North American video equipment. This means that when you capture DV video
over the 1394 interface on Matrox RT2000, the video is captured at the correct
black level. When you play back the captured clips on your NTSC monitor,
however, you may find that the video appears too bright or colors appear to be
washed out. This is because the default setup level for the analog output of
Matrox RT2000 is 7.5 IRE, whereas your DV camera’s analog output uses the
Japanese setup level of 0 IRE.
¬ To change the setup level of your analog NTSC video on Matrox RT2000:
1 Choose Project > Project Settings > General.
2 Click the Advanced Settings button.
3 Under Analog Setup (NTSC), select one of the following setup levels. This
affects both the analog video input and output.
Applies a setup level of 0 IRE. You should select
this option only when working with a commercial DV-1394 device that uses
the Japanese analog NTSC setup of 0 IRE. For example, if the video appears
too bright when you play back DV clips on your NTSC monitor, you can
change the setup to 0 IRE to output your DV clips at the correct brightness.
✄
0 IRE (DV-compliant)
✄
7.5 IRE
Applies the standard NTSC setup level of 7.5 IRE.
¯Note If your DV-1394 device has a different NTSC setup level for input and
output, you can switch the setup level as needed before capturing clips or
exporting to tape. If you’re not sure which setup level your DV-1394 device
uses for input and output, check with your device’s manufacturer.
4 Click OK to return to the Project Settings dialog box. Your new setup level
will take effect only after you restart your computer.
Defining your General settings
RT2000 Installation & User Guide.book Page 84 Monday, April 2, 2001 3:51 PM
84
Selecting your editing aspect ratio
To specify the aspect ratio of the material you’re editing on Matrox RT200:
1 Choose Project > Project Settings > General.
2 Click the Advanced Settings button.
3 Under Editing Aspect Ratio, select the aspect ratio that matches your source
material. This ensures that your effects will be displayed with the correct
proportions.
Select this if your video was recorded using the standard TV screen
format.
✄
4:3
✄
16:9 Select this if your video was recorded using the widescreen 16:9
format.
°Important If the editing aspect ratio isn’t set correctly, certain effects may
appear distorted (that is, squeezed or stretched horizontally). Make sure you
create all animations, titles, and graphics for your production using the same
aspect ratio as your source video. For example, when creating your own
organic wipe patterns for use in a widescreen production, make sure you
create your organic wipes with a 16:9 aspect ratio. For more information, see
“Creating a production in 16:9 format” on page 106.
4 Click OK to return to the Project Settings dialog box.
Selecting your realtime Adobe Premiere transitions
All of the Matrox transitions are realtime, whereas Adobe Premiere’s transitions
require rendering. With the Matrox realtime plug-in, however, you can select
which Adobe Premiere transitions you’d like to play back in real time.
1 Choose Project > Project Settings > General.
2 Click the Advanced Settings button.
Chapter 7, Defining Your Adobe Premiere Settings
RT2000 Installation & User Guide.book Page 85 Monday, April 2, 2001 3:51 PM
85
3 Under Realtime Premiere Transitions, click the Select Transitions button.
4 In the provided dialog box, select the transitions you want to play back in
real time. Matrox provides realtime playback by emulating Premiere’s
non-realtime version of these transitions. If you don’t like a realtime
transition, you can clear (deselect) it to revert to Premiere’s version that
requires rendering.
¯Note Some Premiere transitions let you apply various settings that may
cause frames to be dropped during realtime playback. If this happens, you
should clear those transitions to turn off the realtime playback.
5 Click OK to return to the Matrox General Settings dialog box, then click
OK again to return to the Project Settings dialog box.
Defining your General settings
RT2000 Installation & User Guide.book Page 86 Monday, April 2, 2001 3:51 PM
86
Selecting your AVI file creation method for large clips
in Windows 2000
When using Matrox RT2000 on a Windows 2000 system, you can specify how
you want Premiere to create .avi files for large clips. To do this:
1 Choose Project > Project Settings > General.
2 Click the Advanced Settings button.
3 Under AVI File Creation for Large Clips (>2 GB), select one of the
following:
✄
Use Matrox Infinite Capture Select this if you want to use the Matrox
Infinite Capture feature to create clip sequences of 2-GB .avi files. These
clips are compatible with Video for Windows programs as well as
Windows 98 and Windows Me (for details, see “About Matrox Infinite
Capture and creating video clips greater than 2 GB” on page 105).
✄
Create standard Windows AVI Select this if you want to create standard
Windows .avi files that are not limited to 2 GB. To use this option, your
video and audio drives must be formatted using the Windows NTFS file
system. You’ll have problems capturing clips larger than 2 GB on
FAT32-formatted drives.
4 Click OK to return to the Project Settings dialog box.
Chapter 7, Defining Your Adobe Premiere Settings
RT2000 Installation & User Guide.book Page 87 Monday, April 2, 2001 3:51 PM
87
Defining your Video settings
Your project’s Video settings determine the compression format for playing back
video from the Timeline. On Matrox RT2000, you can set your Timeline’s
compression format to DV at a fixed data rate of 25 Mb/sec, or to the MPEG-2
I-frame format at a selected video quality up to 25 Mb/sec. For a clip to play back
in real time, it must match your Timeline’s compression format (DV or
MPEG-2). Therefore, it’s important to select a compression format that matches
the type of clips you’ll be using in your production.
For example, to create a production using DV clips captured from your DV-1394
device, set the compression format to DV. To work with MPEG-2 I-frame clips
captured from your composite or S-Video device, set the compression format to
MPEG-2 I-frame. If you want to use a mix of clips captured from your DV-1394
device and your analog devices (composite and S-Video), capture all your clips to
DV format and set your Timeline’s compression format to DV.
¬ To specify your project’s Video Settings on Matrox RT2000:
1 Choose Project > Project Settings > Video.
2 From the Compressor list, select the codec that matches the compression
format you want for playing back video from the Timeline. This codec will
be used to render your preview files when playing back non-realtime effects.
Renders video to DV or DVCAM format.
✄
Matrox DV/DVCAM
✄
Matrox DVCPRO
✄
Matrox MPEG-2 I-frame Renders video to MPEG-2 intra-frame format
using the 4:2:2 Profile @ Main Level at a selected video quality.
Renders video to DVCPRO format.
¯Note The Matrox MPEG-2 IBP codec is also available from the Compressor
list, but you cannot use this codec to play back video from the Timeline. You
can, however, select this codec to export video to an .avi file for use with
Defining your Video settings
RT2000 Installation & User Guide.book Page 88 Monday, April 2, 2001 3:51 PM
88
DVDit! LE (see “Defining your Export Movie settings” on page 94). To play
back your Matrox MPEG-2 IBP files, use the Matrox Video Player.
3 To select your MPEG-2 I-frame video quality, click the Configure button.
For details on the available settings, see “Selecting your MPEG-2 I-frame
video quality” on page 97.
4 From the Frame Rate list, select 29.97 if you have an NTSC system, or 25 if
you have a PAL or SECAM system.
5 From the Pixel Aspect Ratio list, select the setting that matches the aspect
ratio of the material you’re editing:
✄
D1/DV NTSC (0.9)
For NTSC material that uses the standard TV screen
format.
✄
D1/DV NTSC Widescreen 16:9 (1.2)
For NTSC material that uses the
widescreen 16:9 format.
✄
D1/DV PAL (1.067)
For PAL material that uses the standard TV screen
format.
✄
D1/DV PAL Widescreen 16:9 (1.422)
For PAL material that uses the
widescreen 16:9 format.
6 Click OK to save your settings.
°Important To ensure realtime playback of your production, don’t mix MPEG-2
clips with DV clips. If you mix the two types in the Timeline, the clips that don’t
match your Timeline’s compression format will require rendering to play them
back. For example, if your Timeline’s format is set to MPEG-2 I-frame, any DV
clips will be rendered to MPEG-2 I-frame format.
Chapter 7, Defining Your Adobe Premiere Settings
RT2000 Installation & User Guide.book Page 89 Monday, April 2, 2001 3:51 PM
89
Defining your Audio settings
When you set your project’s Editing Mode to Matrox RT (see “Defining your
General settings” on page 80), your project’s Audio settings are automatically set
to 48000Hz, 16 Bit - Stereo, Uncompressed.
You can specify additional Audio settings in this dialog box as explained in your
Adobe Premiere User Guide.
°Important The Interleave setting is not applicable because Matrox RT2000
does not create files with interleaved audio and video. Instead, separate video and
audio files are created. When using other programs to create clips that you’ll be
using in your Adobe Premiere projects, make sure you save your audio to
separate .wav files (that is, don’t include the audio in your .avi files). Matrox
RT2000 does not support .avi files that include audio. For the best performance,
use only 48 kHz, 16-bits/sample (stereo) .wav files in Adobe Premiere.
Defining your Audio settings
RT2000 Installation & User Guide.book Page 90 Monday, April 2, 2001 3:51 PM
90
Defining your Capture settings
Matrox RT2000 lets you capture your video to DV format at a fixed data rate of
25 Mb/sec, or to MPEG-2 format at a selected video quality. Video captured from
your DV-1394 device over the 1394 interface is captured in native DV format.
Your analog (S-Video and composite) video can be captured to DV, MPEG-2
I-frame, or MPEG-2 IBP format.
For example, if you don’t have a lot of available disk space, you may want to
capture your analog video to MPEG-2 I-frame format at a low quality level, and
then recapture your video at a higher quality when you’re ready to create your
final production. You may also want to capture video to MPEG-2 IBP format to
create files for use with the DVDit! LE authoring program.
¬ To specify your settings for capturing material in Adobe Premiere on Matrox
RT2000:
1 Choose Project > Project Settings > Capture.
2 From the Capture Format list, select Matrox Capture.
3 If you’ll be capturing audio with your video, make sure that both Capture
Video and Capture Audio are selected.
¯Note Your captured audio will be saved as a separate .wav file in the same
directory as your .avi file, either on the same drive as the .avi file or on your
separate audio drive as indicated by your General settings. When you import
your .avi file into Adobe Premiere, the clip’s .wav file will automatically be
imported for you, and when you place the .avi file into a video track, the
associated audio will be added to the audio tracks.
Chapter 7, Defining Your Adobe Premiere Settings
RT2000 Installation & User Guide.book Page 91 Monday, April 2, 2001 3:51 PM
91
4 To select the device from which you want to capture material, click the
Video Input button.
5 From the Video Source list, select Composite, S-Video (Y/C), or DV-1394.
For example, to capture your composite input to Matrox RT2000, select
Composite. To capture material from your DV-1394 device over the 1394
interface, select DV-1394.
¯Note If you want to capture material from your DV camera or deck using
device control over the 1394 interface, you must set up the device control as
explained in the section “Setting up DV-1394 device control” on page 100. If
you don’t set up this device control, you can capture your clips by manually
controlling your DV-1394 device.
6 If you selected DV-1394 as your video source, select which DV stereo audio
streams you want to capture. Each stereo stream is saved as a separate .wav
file. For example, if you capture only one DV stereo stream, the audio stream
of your stereo clip will be saved as filename.wav. If you choose to capture
both DV stereo streams, the second audio stream will be saved as
filename_2ndStream.wav.
Defining your Capture settings
RT2000 Installation & User Guide.book Page 92 Monday, April 2, 2001 3:51 PM
92
°Important When you import your .avi file into Adobe Premiere, the clip’s
.wav file will automatically be imported for you. You’ll need to import the
_2ndStream.wav file separately.
7 Under Source Type, specify the type of analog equipment you’re using:
Select this if your source device is broadcast-quality,
such as a device with a built-in time base corrector (TBC). This allows
RT2000 to reproduce the input signal as-is, without degradation.
✄
Broadcast-quality
✄
Consumer-quality
Select this if your source device doesn’t have a time
base corrector or meet broadcast-quality standards. RT2000 will then filter
the input signal to increase tolerance for sync pulse instability.
8 Under VCR Tracking, the Tight setting gives you the best results with most
analog source tapes. When using poor-quality analog tapes, select Looser to
improve the video playback, similar to when you adjust the tracking on your
home VCR.
9 Click OK to return to the Project Settings dialog box.
10 To adjust the proc amp settings for the analog (S-Video or composite) video
that you’ll be capturing, click the Proc Amps button.
11 Use the proc amp controls as needed to adjust the incoming analog video
signal before starting the capture. To return a control to its factory default
setting, click the Def button.
Adjusts the tint of the colors in the picture.
✄
Hue
✄
Chroma
✄
Level Adjusts the difference in brightness between the lightest and darkest
areas of the picture.
✄
Setup
Adjusts the vividness (saturation) of the picture’s colors.
Adjusts the level of black in the picture.
Chapter 7, Defining Your Adobe Premiere Settings
RT2000 Installation & User Guide.book Page 93 Monday, April 2, 2001 3:51 PM
93
12 Click OK to save your proc amp changes and return to the Project Settings
dialog box.
13 To select the video compression format (video quality) you want for your
captured material, click the Format button. This displays the Matrox
Capture Format Settings dialog box:
14 From the Format list, select the format to which you want your video to be
captured.
Captures video to DV or DVCAM format.
✄
DV/DVCAM
✄
DVCPRO
✄
MPEG-2 I-frame
✄
MPEG-2 IBP Captures video to MPEG-2 IBP format using the Main
Profile @ Main Level at a selected data rate. Files created using this format
are not supported in your Adobe Premiere project, but can be used for DVD
authoring with Sonic Solutions DVDit! LE. To play back your Matrox
MPEG-2 IBP files, use the Matrox Video Player.
Captures video to DVCPRO format.
Captures video to MPEG-2 intra-frame format using the
4:2:2 Profile @ Main Level at a selected video quality.
¯Note If you selected DV-1394 as your video source, video will be captured
in native DV format over the 1394 interface. To capture material from your
DV-1394 device to MPEG-2 I-frame or IBP format, you must capture the
device’s S-Video or composite input to Matrox RT2000.
15 To configure your MPEG-2 settings, click the Configure button. For details
on the available settings, see “Selecting your MPEG-2 I-frame video
quality” on page 97 or “Selecting your MPEG-2 IBP options” on page 98.
16 Once you’ve configured your MPEG-2 settings, click OK to return to the
Project Settings dialog box. You can specify additional Capture settings as
explained in your Adobe Premiere User Guide.
¯Note Matrox RT2000 does not report dropped frames during capture (that is,
Premiere’s Report dropped frames option is not supported for capturing clips).
Defining your Capture settings
RT2000 Installation & User Guide.book Page 94 Monday, April 2, 2001 3:51 PM
94
Defining your Export Movie settings
Adobe Premiere lets you export video from the Timeline to a single .avi file that
you can use for purposes such as DVD authoring with DVDit! LE, distribution on
CD-ROM, and publishing on the web. Several software codecs are included with
Adobe Premiere so that you can export your video to different formats. Your
Matrox RT2000 system adds the Matrox DV, MPEG-2 I-frame, and MPEG-2 IBP
codecs to the ones included with Premiere. Because the Matrox codecs use your
RT2000 hardware to accelerate rendering, they can export video much faster than
when you use a software codec.
¯Note You can use the web export plug-ins included with Adobe Premiere to
export your production to various web-optimized formats. For details on using
these plug-ins, see your Adobe Premiere User’s Guide as well as each plug-in’s
online Help or PDF documentation.
¬ To export your Adobe Premiere production to an .avi file on Matrox RT2000:
1 Choose File > Export Timeline > Movie, then click the Settings button.
2 From the File Type list, make sure that Matrox RT is selected.
¯Note You can click Load to load a Matrox preset for exporting video on
Matrox RT2000. In any case, you should read the following steps to ensure
that you understand all the required export options.
3 From the menu at the top of the dialog box, select Video.
Chapter 7, Defining Your Adobe Premiere Settings
RT2000 Installation & User Guide.book Page 95 Monday, April 2, 2001 3:51 PM
95
4 From the Compressor list, select the codec that matches the video format
you want for your exported file:
Renders video to DV or DVCAM format.
✄
Matrox DV/DVCAM
✄
Matrox DVCPRO
✄
Matrox MPEG-2 I-frame
✄
Matrox MPEG-2 IBP Renders video to MPEG-2 IBP format using the
Main Profile @ Main Level at a selected data rate.
Render video to DVCPRO format.
Renders video to MPEG-2 intra-frame format
using the 4:2:2 Profile @ Main Level at a selected video quality.
°Important The Matrox MPEG-2 IBP codec creates files suitable for DVD
authoring, such as for use with the Sonic Solutions DVDit! LE authoring
program. Files created using this codec, however, are not supported in your
Adobe Premiere project. You can play back your Matrox MPEG-2 IBP files
using the Matrox Video Player.
5 To configure your MPEG-2 settings, click the Configure button. For details
on the available settings, see “Selecting your MPEG-2 I-frame video
quality” on page 97 or “Selecting your MPEG-2 IBP options” on page 98.
6 From the Frame Rate list, select 29.97 if you have an NTSC system, or 25 if
you have a PAL or SECAM system.
7 From the Pixel Aspect Ratio list, select the setting that matches the aspect
ratio of the material you’re editing:
✄
D1/DV NTSC (0.9)
For NTSC material that uses the standard TV screen
format.
✄
D1/DV NTSC Widescreen 16:9 (1.2)
For NTSC material that uses the
widescreen 16:9 format.
Defining your Export Movie settings
RT2000 Installation & User Guide.book Page 96 Monday, April 2, 2001 3:51 PM
96
✄
D1/DV PAL (1.067)
For PAL material that uses the standard TV screen
format.
✄
D1/DV PAL Widescreen 16:9 (1.422)
For PAL material that uses the
widescreen 16:9 format.
8 If your Timeline’s compression format matches your export format, do not
select Recompress. This optimizes the speed of the export and quality of
the video because realtime segments that have no effects will be copied
directly to disk without recompression. If, however, you want to export an
MPEG-2 Timeline at a different video quality (such as to export high-quality
video at a lower quality), you must select Recompress to recompress the
exported video at the new quality setting.
9 Click OK to save your export settings.
¯Note Exported audio will be saved as a separate .wav file in the same directory
as your .avi file, either on the same drive as the .avi file or on your separate audio
drive as indicated by your General settings.
Chapter 7, Defining Your Adobe Premiere Settings
RT2000 Installation & User Guide.book Page 97 Monday, April 2, 2001 3:51 PM
97
Selecting your MPEG-2 I-frame video quality
When you select the MPEG-2 I-frame format to render or capture material in
Adobe Premiere, you can specify your desired video quality.
1 To select your MPEG-2 I-frame video quality, click Configure. This
displays the following dialog box:
2 To select the video quality you want, drag the Quality slider. The data rate at
which your video is compressed is determined by the quality you select and
the complexity of the video. For example, very complex video compressed at
a very high quality will use a much higher data rate (and more disk space)
than average video compressed at a low quality. At the highest quality
setting, the data rate is about 25 Mb/sec.
3 Click OK to save your settings.
Selecting your MPEG-2 I-frame video quality
RT2000 Installation & User Guide.book Page 98 Monday, April 2, 2001 3:51 PM
98
Selecting your MPEG-2 IBP options
When you select the MPEG-2 IBP format to render or capture video using Adobe
Premiere, you can specify various options for the MPEG-2 compression.
1 To select your MPEG-2 IBP options, click Configure. This displays the
following dialog box:
2 Under Preset Configuration, select one of the following:
Sets the MPEG-2 IBP options to recommended DVDcompliant presets. Select this if you’re exporting video to a file for use with
DVDit! LE or any other DVD authoring program. For the best video quality,
you should select a data rate according to the length of your exported project
and the size of your distribution medium (see “Recommended MPEG data
rates for distribution on DVD-R or CD-R” on page 245).
✄
DVD-compliant
✄
Custom Lets you select any configuration from the available MPEG-2
IBP options. Before selecting a custom configuration, make sure that it’s
supported by the program you’ll be using with your exported file.
3 Under Data Rate Settings, select one of the following bit rate types:
✄
Constant bit rate (CBR) Video is compressed at exactly the data rate you
select. This is useful when you need to limit or predict the size of your .avi
file. However, if your video is very complex (such as scenes with lots of
Chapter 7, Defining Your Adobe Premiere Settings
RT2000 Installation & User Guide.book Page 99 Monday, April 2, 2001 3:51 PM
99
movement or many colors), you’ll need to select a high data rate to avoid
having frames of very blocky video in your .avi file.
✄
Video is compressed at varying data rates based
on the complexity of the video. The data rate you select is used as the average
target data rate for the compression.
Variable bit rate (VBR)
4 Drag the Data rate slider until your desired data rate is displayed. The higher
the data rate you select, the better the video quality will be.1
°Important The maximum recommended DVD-compliant data rate is 7.0
Mbits/sec (0.83 MBytes/sec), which should give you good results with most
DVD authoring programs. If you select a higher data rate, be aware that it
may not be supported by your authoring program. For charts of
recommended data rates, see “Recommended MPEG data rates for
distribution on DVD-R or CD-R” on page 245.
5 If you selected Custom from the Presets list, you can customize the GOP
structure of the MPEG-2 compression as follows:
✄
GOP length
Determines the number of frames in the GOP (Group of
Pictures).
✄
Subgroup length Determines the subgroup length of B-frames and/or Pframes in the GOP, after the initial I-frame. A subgroup of 3 appears as
“BBP,” a subgroup of 2 appears as “BP,” and a subgroup of 1 gives you only
P-frames after the initial I-frame.
6 Click OK to save your settings.
1
When selecting the data rate for a Matrox codec, be aware that a megabit (Mb) is equal to
1,000,000 (1000 × 1000) bits, and a megabyte (MB) after binary conversion is equal to
1,048,576 (1024 x 1024) bytes.
Selecting your MPEG-2 IBP options
RT2000 Installation & User Guide.book Page 100 Monday, April 2, 2001 3:51 PM
100
Setting up DV-1394 device control
With Matrox RT2000, you can take advantage of the DV-1394 device control on
your DV camera or deck when capturing or recording material in Adobe
Premiere. To set up this device control:
1 Choose Edit > Preferences > Scratch Disks and Device Control.
2 Under Device Control, select Matrox DV Device Control.
3 If you have an NTSC system, click Options. In the provided dialog box,
select the format that matches the time code format on your DV tapes (Drop
Frame or Non-drop Frame).
4 Click OK. You can now use device control when capturing or recording
material using your DV-1394 device.
For details on how to capture material in Adobe Premiere, see your Adobe
Premiere User Guide. To record your Adobe Premiere Timeline onto DV tape
using device control, see “Exporting your Adobe Premiere Timeline to DV tape”
on page 101.
°Important Matrox DV Device Control can be used when capturing or
recording material over the 1394 interface, and also when capturing the analog
input from your DV-1394 device, such as the composite input. If you want to
capture material from a composite or S-Video deck, make sure you select None
under Device Control.
Chapter 7, Defining Your Adobe Premiere Settings
RT2000 Installation & User Guide.book Page 101 Monday, April 2, 2001 3:51 PM
101
Exporting your Adobe Premiere Timeline to DV tape
You can export DV material from your Adobe Premiere Timeline to tape using
device control over the 1394 interface on Matrox RT2000.
Preparing your tapes for recording
To use DV-1394 device control, the tape on which you’ll be recording your DV
material must contain continuous and consecutive time code. You can stripe your
entire tape with time code by recording black video for the duration of the tape.
To do this, insert a blank tape into your camcorder, put the lens cap on, then
record up to the end of the tape.
Preparing your Timeline for recording
✃
To export your Timeline to tape over the 1394 interface, you must set the
compression format of your Timeline to Matrox DV/DVCAM to record to a
standard DV device, or Matrox DVCPRO to record to a DVCPRO device. To
do this, choose Project > Project Settings > Video and make sure that the
appropriate Matrox codec is selected from the Compressor list.
✃
The DV-1394 device control is not frame-accurate when recording material
onto tape. Therefore, you’ll need to add some black video to the start and
end of the Timeline region you want to record onto tape. You can easily do
this by extending the work area bar beyond the start and end of your
Timeline for the amount of black you want to be recorded.
✄
At the start of the region you want to record, you may need to add up to 10
seconds of black depending on the capabilities of your device.
✄
At the end of the region you want to record, add about one second of black.
If you find that too much black is being recorded onto tape, simply reduce the
duration of black accordingly.
¯Note If you’d like to record colorbars at the start of your project, you can
add the Colorbars NTSC.tga or Colorbars PAL.tga clip to your Timeline.
These files are available in the Bonus\Samples\NTSC or Bonus\Samples\PAL
directory on your RT2000 CD-ROM.
Exporting your Adobe Premiere Timeline to DV tape
RT2000 Installation & User Guide.book Page 102 Monday, April 2, 2001 3:51 PM
102
Exporting to DV tape with device control
To export your Timeline to tape over the 1394 interface:
1 Make sure your DV device is properly connected, and that you’ve selected
Matrox DV Device Control in Adobe Premiere’s Preferences dialog box as
explained in “Setting up DV-1394 device control” on page 100.
2 If you’re using a camcorder, switch it to VTR Mode and load a tape that
you’ve striped with time code into the cassette compartment.
3 Open the project you want to export to tape.
4 Drag the work area bar (the yellow bar flanked by gray arrows) so that it
covers the section you want to be exported. You can extend the work area bar
beyond the start and end of your Timeline to record black for the duration of
the extension.
5 Choose File > Export Timeline > Export to Tape. This displays the
following dialog box:
6 Select Activate recording deck.
7 If you’d like to specify a starting time code for the recording, select Insert
and enter a time code in the @ time code box. On an NTSC system, use
colon separators to enter a non-drop frame time code (for example,
01:15:10:12), or semicolon separators to enter a drop-frame time code (for
example, 01;15;10;12).
Chapter 7, Defining Your Adobe Premiere Settings
RT2000 Installation & User Guide.book Page 103 Monday, April 2, 2001 3:51 PM
103
°Important The only options supported in the Export To Tape dialog box
are Activate recording deck and @ time code to specify where you want the
recording to start. For example, selecting the Color bars or Play black
option will not record color bars or black onto your tape, and regardless of
which Insert options you select, both audio and video will be recorded.
8 Click OK to start the export to tape.
Things you need to know about using DV-1394
devices
Please keep the following points in mind when using a DV-1394 device with
Matrox RT2000 to capture or record DV material in Adobe Premiere:
✃
Set your camcorder to either Camera Mode (to capture live video), or VTR
Mode (to capture from tape or record material onto DV tape). When in
Camera Mode, make sure that the cassette compartment is empty to avoid
possible auto-shutdown of the camera.
✃
Captured DV audio is sampled at a rate of 48 kHz, 16-bits/sample, and saved
as .wav files on your computer. Any audio recorded at a lower sampling rate
or bit depth will be resampled to these values. For the best results, it’s
recommended that both your camcorder and DV deck be able to support
16-bit, 48 kHz audio.
✃
To use DV-1394 device control, your DV tapes must contain continuous and
consecutive time code, and all material on the tape must be recorded at the
same speed. Leaving blank gaps between recorded material results in
discontinuous time code. To avoid this problem, stripe your entire tape with
time code before recording your source material (see “Preparing your tapes
for recording” on page 101). The existing time code will be used when you
shoot your footage and any gaps between sections of recorded material will
have continuous time code.
✃
The DV-1394 device control requires about six seconds of preroll before
capturing material. Therefore, don’t record material that you want to capture
within the first six seconds of your DV tape.
✃
When using DV-1394 device control, you won’t be able to hear the audio
you’re capturing or recording unless you monitor the audio from the device’s
built-in speaker (if present), or connect the audio output from your DV-1394
device to your soundcard as shown on page 48. Alternaltely, you could
connect the audio output directly to external speakers.
Things you need to know about using DV-1394 devices
RT2000 Installation & User Guide.book Page 104 Monday, April 2, 2001 3:51 PM
104
✃
When using DV-1394 device control, the running time code display in
Adobe Premiere may temporarily stop. This has no effect on your captured
clips. When the display resumes, the correct time code will be displayed.
✃
When capturing clips from a DV-1394 device, be aware that there is a slight
delay in the video displayed in the Movie Capture window. For example,
you may notice that lip sync is not maintained between the video in the
Movie Capture window and the audio from your DV-1394 device. This
problem occurs only during the capture process, and will not affect your
captured clip when you play it back. To accurately select your In and Out
points during capture, look at the video displayed in your camera’s
viewfinder, or connect the analog output from your DV-1394 device to an
NTSC or PAL video monitor to view the video that you want to capture.
✃
When performing a batch capture, you’ll see video in the preview window
while the clips are being captured, but not while Adobe Premiere searches
for each clip’s In point. If you’ve connected the analog output from your
DV-1394 device to an NTSC or PAL video monitor, you’ll see the video
being played on your video monitor. You may want to use the toggle
switches on your video monitor to switch between viewing the output from
your DV-1394 device and the output from the RT2000 breakout box.
✃
The DV-1394 device control does not support the Preroll Time and
Timecode offset settings when capturing material, nor does it support the
Insert and Preroll options when recording to tape (both video and audio will
be recorded starting at your selected time code).
Chapter 7, Defining Your Adobe Premiere Settings
RT2000 Installation & User Guide.book Page 105 Monday, April 2, 2001 3:51 PM
105
About Matrox Infinite Capture and creating
video clips greater than 2 GB
The Matrox Infinite Capture feature lets you overcome the 2-GB .avi file size
limit of Windows Me by providing seamless creation and playback of video clips
of unlimited size in Adobe Premiere. This means that when you capture or export
video to an .avi file on Matrox RT2000, the operation won’t stop when you
exceed a size of 2 GB on a Windows Me system. Instead, Adobe Premiere creates
a sequence of .avi files, each not larger than 2 GB. These files are compatible
with Windows 98, Windows Me, and Video for Windows programs.
The first 2-GB of video is stored to the .avi file and directory you specify, while
the remaining files in the sequence are stored in a corresponding subdirectory.
For example, if you capture a 7-GB video clip to a file named Demo.avi on
D:\Video, here’s how the .avi sequence will be saved:
✃
D:\Video
Contains Demo.avi (2 GB).
✃
D:\Video\Demo.avi.seq Contains Demo.avi.2.avi (2 GB),
Demo.avi.3.avi (2 GB), and Demo.avi.4.avi (1 GB).
The Demo.avi.seq subdirectory will also contain a file named Demo.avi.lst that
provides information about the clip sequence, such as which files are in the
sequence, and each clip’s duration in frames. To work with this clip in Adobe
Premiere, you need to import only the Demo.avi file. Premiere will use the
Demo.avi.lst file to locate the remaining files in the sequence, and then treat the
Demo.avi file as a single 7-GB video clip.
°Important Do not edit or delete a clip’s .lst file. Doing so will cause problems
when you try to use the clip in Adobe Premiere. If you later move your clips to a
different drive, make sure you also move all the associated sequence
subdirectories (that is, keep the same directory structure).
Although Adobe Premiere can seamlessly create and play back video clips that
are greater than 2 GB on your RT2000 system, Video for Windows programs and
programs running under Windows 98 and Windows Me limit you to working
with maximum 2-GB .avi files. If you want to import a clip that’s greater than
2 GB into a non-Matrox program, you’ll need to import each of the clip’s .avi
files (for example, Demo.avi, Demo.avi.2.avi, Demo.avi.3.avi and so on). The
program will then treat each .avi file as a separate clip.
°Important If you want to edit an .avi sequence using a program other than
Adobe Premiere, do not change the clip’s duration, and make sure you save the
clip to the same location. Otherwise, you’ll have problems using the clip in
Adobe Premiere.
About Matrox Infinite Capture and creating video clips greater than 2 GB
RT2000 Installation & User Guide.book Page 106 Monday, April 2, 2001 3:51 PM
106
If you’re using a Windows 2000 system with NTFS-formatted video and audio
drives, you can create standard Windows .avi files that are not limited to 2 GB.
For details on selecting the file creation method you want to use, see “Selecting
your AVI file creation method for large clips in Windows 2000” on page 86.
Creating a production in 16:9 format
When editing on Matrox RT2000, you can choose to work with source video
that’s been recorded in either the 4:3 standard TV screen format, or the
widescreen 16:9 format. To create a production in 16:9 format on Matrox
RT2000, do the following:
1 Record your video onto tape with your camera set to the widescreen 16:9
format. The video will be recorded as horizontally compressed 4:3 video.
2 Start Adobe Premiere, then set your editing aspect ratio to 16:9 as explained
in the section “Selecting your editing aspect ratio” on page 84. This ensures
that the effects you create on Matrox RT2000 will be displayed with the
correct proportions when viewed in 16:9 format.
3 Capture your video clips as you normally would. Select the 16:9 display
option on your NTSC or PAL video monitor to “unsquish” the video and
play it back in widescreen format without distortion.
4 If you create animations, titles, or graphics (including organic wipe patterns)
for your production using a program that lets you set the pixel aspect ratio,
use the appropriate setting for 16:9 display:
✄
On an NTSC system, set the pixel aspect ratio to 1.185.
✄
On a PAL system, set the pixel aspect ratio to 1.422.
If you can’t set the pixel aspect ratio, create your image at 853×480 (NTSC)
or 1024×576 (PAL), then resize it to 720×480 (NTSC) or 720×576 (PAL).
When you resize the image, your text or graphic will appear elongated on
your computer screen.
5 Edit your production as you would a standard 4:3 production. Be aware that
if your video monitor is displaying in 4:3 format, certain effects may appear
elongated because of the horizontal scaling. Setting your monitor to 16:9
will display the effects with the correct proportions.
6 Record your finished production onto tape. Remember that you’ll need a
monitor capable of displaying material in 16:9 format to properly view your
master tape.
Chapter 7, Defining Your Adobe Premiere Settings
RT2000 Installation & User Guide.book Page 107 Monday, April 2, 2001 3:51 PM
Setting Up Realtime Effects
with Adobe Premiere
This chapter explains how to set up realtime effects using the Matrox
realtime plug-in for Adobe Premiere.
C
h
a
p
t
e
r
RT2000 Installation & User Guide.book Page 108 Monday, April 2, 2001 3:51 PM
108
Available effects
The Matrox realtime plug-in for Adobe Premiere lets you:
✃ Set up spectacular realtime 2D and 3D effects and transitions, using up to
two video clips and a 32-bit graphics layer. The plug-in includes 3D tiles,
particles, distortions, page curls, organic wipes (including Pixélan
Software’s Video SpiceRack Lite), and 2D/3D DVE effects such as picturein-picture, tumbles, and spins.
✃
Set up over 60 Adobe Premiere transitions in real time.
✃
Transform and crop your realtime effects by adding or modifying keyframes.
✃
Add realtime graphics overlays using 32-bit single-frame .tga files with an
alpha-key channel, or Inscriber .icg files.
✃
Add realtime fade effects using Adobe Premiere’s Fade control on clips
placed in a superimpose track.
✃
Add realtime speed changes to video clips (forward motion only).
Realtime means that you can play back and record your effects onto tape without
having to render them. This gives you creative freedom to experiment with
different effects and change your mind as often as you want. You’ll instantly see
the changes you make on your NTSC or PAL video monitor. Effects in Adobe
Premiere other than those listed above are not realtime, and therefore require
rendering.
When you install the Matrox realtime plug-in, the Matrox effects are added to
Adobe Premiere so that you can include them in your video productions. You set
up Matrox effects in your productions the same way as other effects included
with Adobe Premiere. For example, you apply a Matrox transition to your clips
just as you would any other type of transition, except that the dialog box provided
lets you create a Matrox transition, as is explained in this chapter.
For instructions on how to apply Adobe Premiere effects to your productions,
refer to your Adobe Premiere User Guide. For details on selecting which Adobe
Premiere transitions you want to play back in real time, see “Selecting your
realtime Adobe Premiere transitions” on page 84.
°Important To use the Matrox realtime plug-in, you must have defined your
Adobe Premiere settings for use with your Matrox system, as explained in
Chapter 7, “Defining Your Adobe Premiere Settings.”
Chapter 8, Setting Up Realtime Effects with Adobe Premiere
RT2000 Installation & User Guide.book Page 109 Monday, April 2, 2001 3:51 PM
109
How to place your effects for optimal results
All the Matrox effects require a certain amount of preload time that’s determined
by the capabilities of your system (both CPU and storage). To ensure the
smoothest playback from the Adobe Premiere Timeline, use the following
guidelines when setting up your realtime effects:
✃
Leave a gap of at least two seconds between the end of one Matrox particle
or distortion effect and the start of the next.
Two-second gap between
particle and distortion effects
✃
Arrange all other Matrox effects, cuts, and single-frame .tga graphics on
your Timeline with a minimum duration of one second between the starting
point of each clip.
One second between the
starting point of each clip
¯Note The preceding guidelines are based on the minimum system configuration
(see “System requirements” on page 4). You may be able to reduce the duration
requirements with a higher performance system. If you need to place your clips
close together, and your system is reporting dropped frames, you can export the
clips from the Timeline to an .avi file, then replace the corresponding section on
the Timeline with your exported file.
How to place your effects for optimal results
RT2000 Installation & User Guide.book Page 110 Monday, April 2, 2001 3:51 PM
110
How to apply a Matrox transition
In Adobe Premiere, all of the transitions can be found in the Transitions palette.
By default, the Matrox transitions are found in the Matrox folder.
An easy way to create a Matrox transition is to drag the desired effect from the
Transitions palette to the Transition track of the Timeline (between clips on the
Video 1A and 1B tracks, as shown below).
°Important The first time you apply a Matrox transition to clips during a work
session, a Cross Dissolve transition is applied by default. To set up your Matrox
transition, double-click the transition’s icon on the Timeline. To change the
default transition, see your Adobe Premiere User Guide.
Chapter 8, Setting Up Realtime Effects with Adobe Premiere
RT2000 Installation & User Guide.book Page 111 Monday, April 2, 2001 3:51 PM
111
How to apply a Matrox video effect
The Matrox realtime plug-in for Adobe Premiere allows you to apply many video
effects to your clips. To apply a Matrox video effect to a clip, drag the desired
effect from the Video effect palette onto the clip in the Timeline (by default, the
Matrox video effects are found in the Matrox folder):
The Matrox Effect Setup dialog box automatically opens to let you set up your
effect.
¯Note To edit a Matrox video effect that you’ve applied to a clip, make sure the
clip is selected on the Timeline, then select Setup beside your effect in the Effect
Controls palette. This brings you back to the Matrox Effect Setup dialog box.
How to apply a Matrox video effect
RT2000 Installation & User Guide.book Page 112 Monday, April 2, 2001 3:51 PM
112
Using common controls in the plug-in
When you apply a Matrox realtime effect, a dialog box similar to the following
appears (the resulting dialog box depends on the type of effect that you apply):
✐
✑ ✒ ✔
✕
✖
✗
✘
These items are common to most Matrox effect setup dialog boxes:
✐ Directory This directory tree holds all of the effects for each transition or
video effect type. If any effects have been added or deleted since the last
time you selected a directory, a dialog box will appear with a summary of the
changes.
✑ Transform tab
Click this tab to display the Transform dialog box, where
you can apply various settings to transform your clip, such as to resize and
rotate your clip. For details on the available transform settings, see
“Transforming your clip” on page 131.
✒ Crop tab
Click this tab to display the Crop dialog box, where you can
apply crop settings to your effect, such as to remove unwanted edges. For
details on using the crop settings, see “Cropping your effect” on page 135.
Chapter 8, Setting Up Realtime Effects with Adobe Premiere
RT2000 Installation & User Guide.book Page 113 Monday, April 2, 2001 3:51 PM
113
Effect List
This section provides a small sample (icon) representing each
effect. Simply click an effect to select it. If you’re creating a transition, “A”
and “B” represent your clips on the Video 1A and 1B tracks, respectively. If
you’re creating a video effect, “A” represents the clip on which you’re
applying the effect, and “B” represents your underlying (background) image
on the lower tracks.
✔ Preview Window
Allows you to see the result of your chosen effect. Your
effect will also be displayed on your NTSC or PAL video monitor.
✕ Effect modifiers
By selecting Allow changes, you can change various
settings for the effect (these will differ for certain transitions and video
effects). These settings are active for the duration of your clip.
✖ Effect controls
Several controls are provided in this section to let you
move around to different points on your clip:
✄
Tracks and Ruler The tracks represent the progression of your effect over
time, with the Ruler above the tracks denoting your effect’s frame numbers.
You can create keyframes on the tracks to change a clip’s settings over time,
such as to make a clip progressively shrink and expand. For details, see
“Working with keyframes” on page 138.
✄
Positioner You use the Positioner (red vertical bar) to preview an effect
by dragging it across the Ruler (scrubbing), or to specify at which frame
you want to create a keyframe on the track. To move the Positioner to a
particular frame, enter the frame number in the Current frame box, or click
the frame on the Ruler. You can also right-click the Positioner or Ruler to
display a pop-up menu with commands for moving the Positioner.
✄
Zoom buttons You use the + or – zoom button to zoom in or out on the
tracks. You can use this feature to find a certain frame, or range of frames,
within your effect.
✗ Reverse
Select this to reverse the direction of the pattern for your selected
effect.
✘ Force render
Select this to force your effect to be rendered when you
return to the Timeline. Certain effects, particularly particle effects, are
difficult for some systems to play back in real time without dropping frames.
If you find that this is happening, select Force render. The effect will appear
with a red bar over it when you return to the Timeline, forcing you to render
the effect to play it back. Once rendered, the effect will play back smoothly.
Selecting Force Render does not require the effect to be rendered to preview
it in the effect setup dialog box.
Using common controls in the plug-in
RT2000 Installation & User Guide.book Page 114 Monday, April 2, 2001 3:51 PM
114
The following table lists keyboard shortcuts for zooming the tracks and moving
the Positioner.
Keyboard shortcuts
Zoom In
F4
Next Frame
F7
Zoom Out
F3
First Frame
CTRL+F6
Zoom to Extent
SHIFT+F3
Last Frame
CTRL+F7
Previous Frame
F6
Previewing your effects
There are several ways to preview your effects:
✃ Preview your entire effect
Click the Preview button at the bottom of the
dialog box.
✃
Preview a specified range On the Ruler, click the frame number where
you want your preview to start. Then hold down the SHIFT key while
clicking the frame number where you want your preview to end. Your
selected range becomes highlighted on the Ruler. Click the Preview button
to view the range you’ve specified. To clear the selected range, CTRL+click
the Ruler.
✃
Start a preview at a specified frame On the Ruler, double-click the
frame number where you want your preview to start. Your effect is played
from this point until its end.
✃
Scrub through your effect
effect you want to preview.
✃
Preview only one track’s effects Hold down the F2 key while using any
of the preceding methods for previewing your clip. Your clip is shown with
only the effects of the highlighted track applied.
Drag the Positioner through the section of the
Chapter 8, Setting Up Realtime Effects with Adobe Premiere
RT2000 Installation & User Guide.book Page 115 Monday, April 2, 2001 3:51 PM
115
Using text boxes and sliders
Text boxes and sliders are provided to let you adjust the settings for most of the
Matrox effects. For example, the Softness text box and slider in the Page Curls
dialog box let you create a soft edge for your effect.
Slider
To adjust a setting, do one of the following:
✃
Enter the value you want directly in the text box.
✃
Drag up and down within the text box.
✃
Click inside the text box, then press the up and down arrow keys. You can
also use the PAGE UP and PAGE DOWN keys to adjust the value by 10 at a
time.
✃
Drag the slider to the left or right. For a faster but less precise adjustment,
SHIFT+drag the slider.
¯Note To return a text box and slider to its default setting, click the
or CTRL+click the slider or slider bar.
button,
Using common controls in the plug-in
RT2000 Installation & User Guide.book Page 116 Monday, April 2, 2001 3:51 PM
116
Selecting colors
Several Matrox effects provide a “color picker” button to let you choose the color
you want for the effect, such as the border color for a 2D/3D DVE.
Color picker
button
When you click a
button, the Color dialog box appears:
✑
✐
✐ Color refinement box
✑ Luminance bar
¬ To select your color:
1 Click one of the basic colors on the left side of the dialog box, or click the
color you want inside the Color refinement box.
2 Adjust your color’s luminance by clicking inside the Luminance bar or by
dragging the arrow beside it.
3 Alternatively, if you know your desired color’s Hue, Saturation, and
Luminance values, or Red, Green, and Blue values, you can enter them in the
corresponding text boxes.
Chapter 8, Setting Up Realtime Effects with Adobe Premiere
RT2000 Installation & User Guide.book Page 117 Monday, April 2, 2001 3:51 PM
117
Creating a 2D/3D DVE
When you apply a Matrox 2D/3D DVE, the 2D/3D DVEs dialog box appears:
¬ To set up a 2D/3D DVE:
1 Choose the type of effect you are looking for in the Directory. For example,
click the PiP Effects folder under 3D DVE Effects to display a list of
available 3D picture-in-picture effects.
2 Click the particular effect you want from the Effect List.
3 To see a preview of your effect at any time, click the Preview button.
4 To create a border or soft edge on your clip, select Allow changes, then use
the Border modifiers as follows:
✄
Colors Click the first
button to select the border color you want. To
create a border consisting of a gradient between two colors, select the option
beside the second
button, then click that button to select your other color.
For details on how to select colors, see “Selecting colors” on page 116.
✄
Width
✄
Softness
Sets the width of the border, in pixels.
Lets you adjust the softness of the edge or border on your clip.
The higher the softness value, the less sharp the edge or border becomes.
Creating a 2D/3D DVE
RT2000 Installation & User Guide.book Page 118 Monday, April 2, 2001 3:51 PM
118
5 To display a shadow behind your clip, make sure that Allow changes is
selected, then use the Shadow modifiers as follows:
Click the
✄
Color
✄
Transparency
✄
X Offset
✄
Y Offset
✄
Z Offset
button to select the color of your shadow.
Sets the transparency of your shadow. Levels range from
opaque (0) to fully transparent (100).
Sets the position of your shadow with respect to the horizontal
edges of your clip. Negative numbers move the shadow to the left, and
positive numbers move the shadow to the right.
Sets the position of your shadow with respect to the vertical edges
of your clip. Negative numbers move the shadow to the bottom, and positive
numbers move the shadow to the top.
Sets the depth of your shadow behind your clip.
6 If you want to apply or change various transform settings, such as to change
your clip’s size, position, and rotation settings, see “Transforming your clip”
on page 131.
7 When you are satisfied with your effect, click OK to return to your Timeline.
Chapter 8, Setting Up Realtime Effects with Adobe Premiere
RT2000 Installation & User Guide.book Page 119 Monday, April 2, 2001 3:51 PM
119
Creating a 3D tile
When you apply a Matrox 3D tile, the 3D Tiles dialog box appears:
¬ To set up a 3D tile:
1 Choose the type of effect you are looking for in the Directory.
2 Click the particular effect you want from the Effect List.
3 To see a preview of your effect at any time, click the Preview button.
4 To change the settings for your selected 3D tile pattern, select Allow
changes, then use the 3D tile modifiers as follows:
Sets the number of rows in your 3D tile pattern.
✄
Rows
✄
Columns
✄
Spread
✄
Softness
Sets the number of columns in your 3D tile pattern.
Determines the number of tiles that rotate at the same time.
Sets the softness on the border of your clip and on the edges of
the tiles.
✄
Rotation Type
Select a type from this list to change the orientation of the
3D tile pattern.
Creating a 3D tile
RT2000 Installation & User Guide.book Page 120 Monday, April 2, 2001 3:51 PM
120
5 If you want to apply or change various transform settings, such as to change
your clip’s size, position, and rotation settings, see “Transforming your clip”
on page 131.
6 When you are satisfied with your effect, click OK to return to your Timeline.
Chapter 8, Setting Up Realtime Effects with Adobe Premiere
RT2000 Installation & User Guide.book Page 121 Monday, April 2, 2001 3:51 PM
121
Creating a distortion effect
When you apply a Matrox distortion effect, the Distortions dialog box appears:
¬ To set up a distortion:
1 Choose the type of effect you are looking for in the Directory.
2 Click the particular effect you want from the Effect List.
3 To see a preview of your effect at any time, click the Preview button.
4 To adjust the softness on the border of your clip, select Allow changes, then
drag the Softness slider.
5 If you want to apply or change various transform settings, such as to change
your clip’s size, position, and rotation settings, see “Transforming your clip”
on page 131.
6 When you are satisfied with your effect, click OK to return to your Timeline.
Creating a distortion effect
RT2000 Installation & User Guide.book Page 122 Monday, April 2, 2001 3:51 PM
122
Creating a page curl
When you apply a Matrox page curl, the Page Curls dialog box appears:
¬ To set up a page curl:
1 Choose the type of effect you are looking for in the Directory.
2 Click the particular effect you want from the Effect List.
3 To see a preview of your effect at any time, click the Preview button.
4 To create a soft edge on your page curl, select Allow changes, then drag the
Softness slider.
5 If you want to apply or change various transform settings, such as to change
your clip’s size, position, and rotation settings, see “Transforming your clip”
on page 131.
6 When you are satisfied with your effect, click OK to return to your Timeline.
Chapter 8, Setting Up Realtime Effects with Adobe Premiere
RT2000 Installation & User Guide.book Page 123 Monday, April 2, 2001 3:51 PM
123
Creating a particle effect
When you apply a Matrox particle effect, the Particles dialog box appears:
¬ To set up a particle effect:
1 Choose the type of effect you are looking for in the Directory.
2 Click the particular effect you want from the Effect List.
3 To see a preview of your effect at any time, click the Preview button.
4 To change the settings for your effect, select Allow changes, then use the
particle effect modifiers as follows:
Sets the progression of the effect. The higher the spread, the closer
to the beginning of your clip the particles start to explode. For example, a
spread of 100 indicates that all particles start to explode at the first frame
of the clip, and a spread of 20 indicates that all particles explode by the 80%
point of the clip.
✄
Spread
✄
Speed
✄
Border Softness
✄
Seed Sets the random behavior of the pattern. Each value (from 0 to100)
represents a different random pattern.
Sets the speed at which the particles explode.
Sets the softness on the border of your clip.
Creating a particle effect
RT2000 Installation & User Guide.book Page 124 Monday, April 2, 2001 3:51 PM
124
✄
Vanishing Particles
Select this to make the particles vanish after they
explode.
Select this to soften the edges of the particles that
haven’t exploded yet.
✄
Particle Softness
✄
Reverse Sequence
Select this to reverse the pattern of the effect.
5 If you want to apply or change various transform settings, such as to change
your clip’s size, position, and rotation settings, see “Transforming your clip”
on page 131.
6 When you are satisfied with your effect, click OK to return to your Timeline.
Chapter 8, Setting Up Realtime Effects with Adobe Premiere
RT2000 Installation & User Guide.book Page 125 Monday, April 2, 2001 3:51 PM
125
Creating an organic wipe
When you apply a Matrox organic wipe, the Organic Wipes dialog box appears:
¬ To set up an organic wipe:
1 Choose the type of effect you are looking for in the Directory.
2 Click the particular effect you want from the Effect List.
3 To see a preview of your effect at any time, click the Preview button.
4 To create a soft edge on the border of your organic wipe, select Allow
changes, then drag the Softness slider. The higher the value, the less sharp
the edge of your organic wipe becomes.
5 When you are satisfied with your effect, click OK to return to your Timeline.
¯Note
The Matrox organic wipes are not transformable (that is, the
Transform track is not available when setting up organic wipes). You can,
however, add your own patterns as explained in the next section.
Creating an organic wipe
RT2000 Installation & User Guide.book Page 126 Monday, April 2, 2001 3:51 PM
126
Adding your own organic wipe patterns
You can create your own organic wipe patterns and add them to the Matrox plugin for use in your projects. Organic wipes use grayscale gradient patterns to
switch from one image to another by gradually revealing the second image in a
certain pattern. A progressive transition occurs between your initial image (Video
1A), represented by the white areas of your gradient pattern, and your final image
(Video 1B), represented by the black areas.
The following pattern is used for the 2-Corner Diag organic wipe in the Matrox
plug in:
✐
✑
When you apply this organic wipe, you’ll see it affect your clips halfway through
the transition like this:
✐
✑
✐Video 1A
Chapter 8, Setting Up Realtime Effects with Adobe Premiere
✑Video 1B
RT2000 Installation & User Guide.book Page 127 Monday, April 2, 2001 3:51 PM
127
Creating a subdirectory for your new organic wipes
Your new organic wipes must be added to a subdirectory where you installed
Matrox Video Tools. If you chose the default location when you installed Matrox
Video Tools, your Matrox organic wipes will be installed at:
Program Files\Matrox Video Tools\Effects\Organic Wipes
Under the Organic Wipes directory, create a new subdirectory in which to store
your own organic wipe patterns, such as:
Program Files\Matrox Video Tools\Effects\Organic Wipes\My Patterns
°Important To create your own organic wipe patterns for use in a
widescreen production, create them with a 16:9 aspect ratio. For more
information, see “Creating a production in 16:9 format” on page 106.
Creating your own organic wipe patterns in Adobe Photoshop LE
1 Start Adobe Photoshop LE, then choose File > New.
2 In the New dialog box, define the size of your image:
✄
For an NTSC image, select 720 pixels for Width and 480 pixels for Height.
✄
For a PAL image, select 720 pixels for Width and 576 pixels for Height.
¯Note If you want to create an organic wipe for use in a widescreen (16:9)
production, create your image at 853×480 (NTSC) or 1024×576 (PAL), then
resize it to 720×480 (NTSC) or 720×576 (PAL). When you resize the image,
your graphic will appear elongated on your computer screen.
3 Choose Image > Mode, then select Grayscale and 8 bits/channel.
4 Create your organic wipe pattern using any of the tools in the toolbox. The
gradient tools, however, work best for creating organic wipe patterns.
5 When finished, choose File > Save As, name your file, select Targa [*.tga,
*.vda, *.icb, *.vst] as the file type, and select your subdirectory under the
Organic Wipes directory.
6 When you open your subdirectory within the Matrox realtime plug-in for
Adobe Premiere, you’ll see that the new effect was found, and an icon of
your pattern will be added to the Effect List.
¯Note While these instructions are for creating organic wipe patterns with Adobe
Photoshop LE, you can use any image-editing software—as long as you specify
the correct image size, select 8-bit grayscale, and save your pattern as a .tga file.
If your program provides the option of saving your .tga file as Compressed or
Uncompressed, make sure you select the Uncompressed option.
Creating an organic wipe
RT2000 Installation & User Guide.book Page 128 Monday, April 2, 2001 3:51 PM
128
Creating a colorization effect
When you apply a Matrox colorization effect, the Colorization dialog box
appears:
¬ To set up a colorization effect:
1 Choose the type of effect you are looking for in the Directory.
2 Click the particular effect you want from the Effect List.
¯Note If you want to modify your clip without using any of the pre-created
settings, select the Dud Effect.
3 To change the settings for your selected colorization effect, click the
Custom Colorization tab or the Color track. For details on each of the
available settings, see “Using the custom colorization settings” on page 129.
4 To see a preview of your effect at any time, click the Preview button.
5 When you are satisfied with your effect, click OK to return to your Timeline.
Chapter 8, Setting Up Realtime Effects with Adobe Premiere
RT2000 Installation & User Guide.book Page 129 Monday, April 2, 2001 3:51 PM
129
Using the custom colorization settings
To specify custom colorization settings, click the Custom Colorization tab or the
Color track. You can modify the following settings:
¯Note By default, the Positioner is in the middle of the clip region on the Color
track. Any settings that you change (except Photo Negative) creates a keyframe
behind the Positioner. If you want to create a keyframe at a different frame, move
the Positioner to where your want your settings to take place. For details on how
to change a clip’s colorization settings over time by creating and editing keyframes,
see “Working with keyframes” on page 138.
Adjusts the brightness (luminance) of your image.
✃
Brightness
✃
Contrast Adjusts the difference in brightness between the lightest and
darkest areas of your image.
¯Note If you will be changing the settings for Color Gain or Color Addition,
you may want to adjust the Brightness and Contrast settings afterwards, such
as to improve the overall brightness of your clip.
Select this to create a photo negative effect by inverting
the luminance and chrominance information of your clip. This setting is
active for the duration of your clip.
✃
Photo Negative
✃
Color Gain and Color Addition (Red, Green, Blue) You can use the
controls under Color Gain and Color Addition to individually fine-tune the
colors of your image.
✄
The Color Gain controls for Red, Green, and Blue let you increase or
decrease the intensity of a particular color present in your image. For
example, increasing the Red value increases only the red color component
of your image, without affecting the other colors.
✄
Color Addition lets you adjust all colors in your image by a given amount
of Red, Green, or Blue. For example, increasing the Red value increases
the amount of red throughout your entire image.
Creating a colorization effect
RT2000 Installation & User Guide.book Page 130 Monday, April 2, 2001 3:51 PM
130
✃
Color Gain and Color Addition (Alpha) The Alpha controls under Color
Gain and Color Addition let you adjust the transparency levels of your
image’s alpha channel. You can use these controls for any clip in which there
is alpha-key information (that is, .tga and .icg clips on Video 2 or higher).
You can also use the Alpha controls to adjust the transparency of .avi clips
(these clips are assumed to have a 100% opaque alpha component).
✄
Use the Alpha control under Color Gain to adjust the opaque and semitransparent areas of the alpha-key information in your image. When you
increase the Alpha Gain, fewer and fewer alpha values are included in the
key (that is, fewer alpha values become partially transparent, giving you a
sharper-edged key). When you decrease the Alpha Gain, the opaque and
semi-transparent areas become more transparent, giving you a softer key.
✄
Use the Alpha control under Color Addition to adjust all of the alpha-key
values of your image (from 100% transparent to 100% opaque). For
example, drag the Alpha Addition slider to the right to make all the alpha
values more opaque, or drag the slider to the left to make all the alpha values
more transparent.
¯Note Adjustments always apply to Color Gain first, so any changes you make
to the Color Addition controls take into account the amount of gain specified. If
you adjust the Color Gain controls after making changes to the Color Addition
controls, you won’t see the effect of your changes in the Preview Window.
Chapter 8, Setting Up Realtime Effects with Adobe Premiere
RT2000 Installation & User Guide.book Page 131 Monday, April 2, 2001 3:51 PM
131
Transforming your clip
To apply various transform settings to your clip, such as to resize, position, and
rotate your clip, click the Transform tab or the Transform track in the setup
dialog box for your Matrox effect:
✃
Position Lets you position your clip on x-y-z coordinates (horizontal,
vertical, depth).
✃
Size
✃
Offset
✃
Rotation
Lets you resize your clip.
Lets you move the pivot point for rotating your clip.
Lets you set the number of spins of the clip on its x, y, or z axis.
You can adjust the transform settings in the following ways:
✃
Use the transform controls to select the settings you want.
✃
Choose commands from the Transform menu to set a particular size and
position, such as half-screen size in the bottom-right corner.
✃
Work directly in the Preview Window using your mouse. For example, you
can click and drag to resize, rotate, or position your clip.
Transforming your clip
RT2000 Installation & User Guide.book Page 132 Monday, April 2, 2001 3:51 PM
132
¯Note Many of the Matrox effects, such as 2D/3D DVEs, already have transform
settings defined as keyframes on the Transform track. For details on how to change
a clip’s transform settings over time by creating and editing keyframes, see
“Working with keyframes” on page 138.
Using the transform controls
You can use the text boxes or sliders to position, resize, or rotate your clip. For
information on how to use the text boxes and sliders, see page 115.
¬ There are four types of transform settings that you can work with:
✃ Position
Use these controls to position your clip on the x (horizontal), y
(vertical), and z (depth) axes. Values of (0,0,0) pixels align the center of your
clip with the center of the screen, and positions are measured from this point.
You can enter positive or negative pixel values to move your clip right or left
(x), up or down (y), and forward or backward (z).
✃
Use these controls to make your clip smaller or larger. Full-screen
size is represented as 100%. You can shrink your clip to 0% or enlarge it to
1000%. Note, however, that by enlarging your clip, the resolution may
become blurry. You can adjust the size controls individually, or if you select
Fixed aspect ratio, you only need to adjust one axis, and the others
automatically take the same value. Adjusting the percentage on the x and y
axes changes your clip’s width and height, respectively. You’ll only notice
adjustments to the z axis when you have depth in your effect, such as in the
particle effects.
✃
Offset and Rotation
Size
Use the Offset controls to set the pivot point, or
center of rotation, of your clip. When Rotation settings are applied, your clip
spins around this point. You can use positive or negative pixel values to
offset your clip on the x (horizontal), y (vertical), and z (depth) axes. Each
rotation of 360° produces one spin on the selected axis. You can have
positive or negative rotation from -3600° to 3600°, which is equal to -10 to
10 spins, depending on the direction you want your clip to rotate.
Chapter 8, Setting Up Realtime Effects with Adobe Premiere
RT2000 Installation & User Guide.book Page 133 Monday, April 2, 2001 3:51 PM
133
In the illustrations below, notice how different Offset values can affect the
rotation of the cube.
Z
Z
X
X
Y
Figure 1: Offset at 0,0,0
Y
Figure 2: Offset at 100,0,0
In Figure 1, the Offset values are (0,0,0), so the center of rotation for the cube is
where the x, y, and z axes meet. In Figure 2, the Offset value for the x axis is set
to 100, thus moving the cube and the pivot point to the right, so when the cube is
rotated, it has a wider arc when spinning around the axes.
Using the Transform menu
You can also resize and position your clip by choosing commands from the
Transform menu, located below the Preview Window.
Restores your clip to its default settings (full-screen size of 100%,
and all other transform controls at 0).
✃
Default
✃
Use Safe Title Area
✃
DVE Size
✃
DVE Position Lets you select a preset to position your clip, such as
Bottom Right. If Safe Title Area is selected, it will serve as the reference for
Restricts the DVE Position presets (see below) to the
Safe Title Area. This is the central area of the screen where you can safely
position your clip to be sure it will be visible on all monitors.
Lets you select a preset to resize your clip. The presets range
from full-screen down to invisible.
positioning your clip. If it isn’t selected, your clip will be positioned relative
to the entire screen area.
Transforming your clip
RT2000 Installation & User Guide.book Page 134 Monday, April 2, 2001 3:51 PM
134
Transforming a clip using the Preview Window
In the Preview Window, you can use your left or right mouse button to resize,
position, and rotate your clip.
°Important You must first select the type of transform settings you want to
adjust by clicking the appropriate button (Position, Size, Offset, or Rotation).
Alternately, you can use keyboard shortcuts to select the transform setting you
want. Press Q for Position, W for Size, E for Offset, or R for Rotation. You’ll
notice that the values will change for the selected controls as you drag the mouse
in the Preview Window.
The following table shows the available mouse controls for working in the
Preview Window.
Action
Result
Left mouse button
Adjusts x and y axes
SHIFT+left mouse button, drag left or right
Adjusts x axis only
SHIFT+left mouse button, drag up or down
Adjusts y axis only
Right mouse button
Adjusts z axis only
For example, if you want to alter the position of your clip on the y axis only, first
click the Position button, then press and hold SHIFT while dragging the mouse
up or down in the Preview Window.
Chapter 8, Setting Up Realtime Effects with Adobe Premiere
RT2000 Installation & User Guide.book Page 135 Monday, April 2, 2001 3:51 PM
135
Cropping your effect
To apply crop settings to your Matrox effect, click the Crop tab or the Crop track
in the setup dialog box for your effect:
¯Note The default crop settings that you specify in the Matrox General Settings
dialog box (see page 81) are applied to all your Matrox effects. You can customize
the crop settings for individual effects by defining keyframes at any point on the
Crop track. For details on how to change an effect’s crop settings over time by
creating and editing keyframes, see “Working with keyframes” on page 138.
You can adjust the crop settings in the following ways:
✃
Use the crop controls to crop any edge by a given number of pixels.
✃
Choose a command from the Crop menu to crop your effect by a preset
amount.
✃
Crop directly in the Preview Window using your mouse.
Cropping your effect
RT2000 Installation & User Guide.book Page 136 Monday, April 2, 2001 3:51 PM
136
Using the crop controls
The controls under Crop Settings let you crop any edge of your effect. You can
enter the values you want in the text boxes or drag the appropriate sliders (Left,
Right, Top, Bottom):
Using the Crop menu
You can also crop your effect using commands from the Crop menu, located
below the Preview Window:
✃
Full Screen
Sets your effect to full-screen size (that is, no cropping is done
to the image).
✃
Crop Analog Video Crops the thin black borders that appear along the
edges of video that’s been captured from an analog source. These borders
typically appear at the right and bottom edges of your image.
✃
Crop Using Project Defaults
✃
Enlarge Lets you enlarge the visible area of your image by decreasing the
cropping on all edges by a given percentage.
✃
Reduce Lets you reduce the visible area of your image by increasing the
cropping on all edges by a given percentage.
Re-applies the default cropping values you
defined for your project (that is, your General settings in Adobe Premiere, as
explained on page 81).
Chapter 8, Setting Up Realtime Effects with Adobe Premiere
RT2000 Installation & User Guide.book Page 137 Monday, April 2, 2001 3:51 PM
137
Cropping an effect using the Preview Window
In the Preview Window, you can use your left and right mouse buttons to crop
any edge of your effect:
The following table shows the available mouse controls for cropping in the
Preview Window.
Action
Result
Left mouse button, drag up or down
Adjusts the top edge
Left mouse button, drag left or right
Adjusts the left edge
Right mouse button, drag up or down
Adjusts the bottom edge
Right mouse button, drag left or right
Adjusts the right edge
Both mouse buttons
Moves the cropped image
You’ll notice that the values will change for the crop controls as you drag the
mouse in the Preview Window.
Cropping your effect
RT2000 Installation & User Guide.book Page 138 Monday, April 2, 2001 3:51 PM
138
Working with keyframes
A keyframe is a frame at which you’ve defined one or more effect settings to take
place in a clip. The settings start at the frame where you define them, and remain
active on the clip until you define a later keyframe to turn off or change the
settings. This allows you to control the occurrence and duration of your effect
settings. By interpolating between keyframes, you create gradual transitions
between different settings for an effect.
¯Note The following sections explain how to use the Matrox realtime plug-in to
work with keyframes. Be aware that the Matrox effects do not support Adobe
Premiere’s keyframes that are applied on the Timeline.
In the following sections, we explain how to:
✃
Use the effect controls to work with keyframes.
✃
Perform basic operations such as creating, copying, cutting, and pasting
keyframes.
✃
Interpolate between keyframes.
Using the effect controls for keyframes
Several controls are provided at the bottom of the Matrox effect setup dialog
boxes to let you work with and view the keyframes in your clip:
✑
✐
✒
✔
✐ Tracks and Ruler
The tracks represent the progression of your clip over
time, with the Ruler above the tracks denoting your clip’s frame numbers.
Keyframes can be created on all tracks except the topmost track. You can
click a track to switch to its corresponding dialog box. For example, clicking
the Transform track displays the Transform dialog box.
✑ Keyframe symbols
Whenever you change an effect setting, a symbol such
as
appears on the appropriate track, representing the keyframe you’ve
created. For example, in the preceding illustration, the
symbol on the
Transform track at frame 0 represents a transformation created at the
beginning of the clip. For more information, see “Creating new keyframes”
on page 140.
Chapter 8, Setting Up Realtime Effects with Adobe Premiere
RT2000 Installation & User Guide.book Page 139 Monday, April 2, 2001 3:51 PM
139
✒ Positioner
You can use the Positioner to indicate where you want to create
a keyframe. You can also preview an effect by dragging the Positioner as
explained in “Previewing your effects” on page 114. To move the Positioner
to a particular frame, enter the frame number in the Current frame box, or
click the frame on the Ruler.
Zoom buttons
You can zoom in or out to view keyframes by clicking the
Zoom buttons or by pressing the F4 or F3 key, respectively. Depending on
your zoom setting and the length of your clip, only a portion of your clip
might be displayed inside the tracks. If this is the case, you can scroll
forward or backward through the runoff portion of your clip by dragging the
Positioner.
✔ Right-click pop-up menus
You can right-click any of the effect controls
to display a context-sensitive pop-up menu. For example, if you right-click
the Ruler, a pop-up menu appears that includes the Zoom to Extent
command, which zooms your clip to fill the entire length of the tracks.
Right-clicking the Positioner or the Ruler displays a pop-up menu that
includes commands for moving the Positioner, such as Snap, which makes it
easier to drag the Positioner onto a keyframe or vice versa.
The following table lists keyboard shortcuts for zooming the tracks and moving
the Positioner. For a complete list of shortcuts available for working with
keyframes, see “Keyboard shortcuts” on page 147.
Keyboard shortcuts
Zoom In
Zoom Out
Zoom to Extent
Previous Keyframe
Next Keyframe
Previous Frame
Next Frame
First Frame
Last Frame
Snap
F4
F3
SHIFT+F3
F5
F8
F6
F7
CTRL+F6
CTRL+F7
S
Working with keyframes
RT2000 Installation & User Guide.book Page 140 Monday, April 2, 2001 3:51 PM
140
Creating new keyframes
¬ To create a keyframe:
1 In the Matrox effect setup dialog box, click the tab or track where you want
to create your keyframe.
2 Move the Positioner to the frame in your clip where you want the settings to
take place. By default, the Positioner is at the middle of the clip region when
you first apply a Matrox effect.
3 Adjust the settings as needed. As soon as you adjust a control, a keyframe is
created on the corresponding track, behind the Positioner:
Modifying keyframes
¬ To edit a keyframe:
1 Double-click the keyframe. The current settings for the keyframe are
displayed in the dialog box.
2 Change the settings as needed. To apply default transform or crop settings to
the keyframe, choose Default from the Transform or Crop menu.
Resetting a track to default settings
To reset a track to its default settings, right-click the track and choose Reset
Track Data from the pop-up menu. Resetting clears all keyframes from the track,
including those that were pre-defined, and restores the default settings.
Selecting keyframes
Many operations that you can perform on a keyframe, such as copying and
deleting, require you to select the keyframe first. You can select keyframes using
any of the following methods:
✃
Select a single keyframe by clicking it, or moving the Positioner to it when
the track is highlighted.
✃
Select more than one keyframe by holding down the CTRL key while
clicking the keyframes you want to select.
Chapter 8, Setting Up Realtime Effects with Adobe Premiere
RT2000 Installation & User Guide.book Page 141 Monday, April 2, 2001 3:51 PM
141
✃
Select a range of keyframes by clicking the first keyframe, then holding
down the SHIFT key while clicking the last keyframe you want in the range.
✃
Select all keyframes on a track by pressing CTRL+A when the track is
highlighted, or right-clicking the track and choosing Select All.
Copying and moving keyframes
¬ To copy selected keyframes to a new location, do one of the following:
✃ Press CTRL+C or right-click the selection and choose Copy from the pop-up
menu. Move the Positioner to the destination frame, then press CTRL+V or
right-click the track and choose Paste at Current Frame.
✃
CTRL+drag the selected keyframes to a new location on the track.
¬ To move selected keyframes, do one of the following:
✃ Press CTRL+X or right-click the selection and choose Cut from the pop-up
menu. Move the Positioner to the destination frame (this frame can be in a
different clip or for a different effect), then press CTRL+V or right-click the
track and choose Paste at Current Frame.
✃
Drag the selected keyframes to a new location on the track.
If a keyframe exists at your destination frame, it will be replaced with the pasted
keyframe.
¯Note For details on how to paste only certain attributes of a keyframe, see the
next section. You can also save all keyframes on a track to a file, then load the file
to apply your settings to other clips. For details on how to do this, see “Saving and
loading keyframe files” on page 143.
Pasting attributes of a keyframe (“selective paste”)
You can copy and paste some or all of the attributes of a single keyframe to
selected keyframes. The attributes you choose to paste replace the corresponding
attributes of the destination keyframes. This is called a “selective paste,” and is
particularly useful when you want to make changes to a complex series of
keyframes in a clip.
Working with keyframes
RT2000 Installation & User Guide.book Page 142 Monday, April 2, 2001 3:51 PM
142
For example, let’s say you’ve created a series of Transform keyframes on a clip,
where each keyframe uses all of the transform controls but with different Size
settings. Your keyframe sequence might appear as follows:
If you later decide that you’d like all the keyframes to have the same Size setting
as the keyframe at frame 0, you could easily fix the sequence by pasting the
initial keyframe’s Size onto the other keyframes as follows:
1 Right-click the keyframe containing the settings you want to paste. For this
example, that would be the keyframe at frame 0 on the Transform track.
2 Choose Copy from the pop-up menu that appears.
3 Select the keyframes to which you want to paste the copied settings. You can
CTRL+click individual keyframes to select them, or use SHIFT+click to
select a range of keyframes.
4 Right-click any of the selected destination keyframes, then choose Selective
Paste from the pop-up menu that appears. This displays a dialog box
containing settings available for pasting, similar to the following:
¯Note The dialog box that appears depends on what type of keyframe you’re
pasting.
5 Select the settings you want to paste. For this example, you would select
only Size.
Chapter 8, Setting Up Realtime Effects with Adobe Premiere
RT2000 Installation & User Guide.book Page 143 Monday, April 2, 2001 3:51 PM
143
6 Click OK. Your destination keyframes are updated with the settings you
selected, while retaining all other attributes.
Deleting keyframes
¬ To delete a keyframe selection, use one of the following methods:
✃ Press the DELETE key.
✃
Drag the selection vertically off the tracks.
✃
Right-click the selection and choose Delete or Cut from the pop-up menu.
To delete all keyframes on a track, right-click the track and choose Delete All
from the pop-up menu.
Saving and loading keyframe files
The Save Keyframes command lets you save all keyframes on a track to a file.
You can then use the Load Keyframes command to load that file and apply the
keyframes to other clips in your video production. This is useful for building a
library of complex or frequently used keyframe sequences.
For example, after creating a complex series of keyframes to perform a 3D DVE
tumble, you can save your keyframe sequence to a file, then load that file
whenever you want to apply the same tumble to another clip in your project. You
may also want to exchange your saved keyframes with other Matrox users.
¬ To save all keyframes on the currently selected track to a file:
1 Press CTRL+S or right-click the track and choose Save Keyframes from the
pop-up menu.
2 In the provided dialog box, specify the file to which you want to store the
keyframes. Your file will be given the extension .Trackname.Kft, such as
.Transform.Kft if you’re saving keyframes on the Transform track.
¬ To load saved keyframes to the currently selected track:
1 Press CTRL+O or right-click the track and choose Load Keyframes from the
pop-up menu.
2 In the provided dialog box, select the file you want to load. This file must
contain keyframes belonging to the current track. For example, you can load
only transform keyframes to the Transform track, and load only crop
settings to the Crop track.
¯Note Any keyframes presently on the track will be replaced by the loaded
keyframes.
Working with keyframes
RT2000 Installation & User Guide.book Page 144 Monday, April 2, 2001 3:51 PM
144
Interpolating between keyframes
Interpolating between two or more consecutive keyframes on the same track
enables you to create a gradual transition from one keyframe’s settings to the
next.
In the following sections we explain:
✃
How interpolation works.
✃
Considerations for creating an interpolation sequence.
✃
Linear and spline interpolation.
✃
How to turn interpolation on and off.
How interpolation works
Interpolations are performed between different settings for an effect. For
example, if you defined a size of 25% at the start of a clip and a size of 100% at
the end of the clip, interpolating between the two keyframes makes your clip
gradually increase in size from 25% up to full-screen size.
The speed of the transition between two consecutive keyframes depends on the
amount of space (time) between them. For example, if you have a large amount
of space between keyframes, the transition will occur slowly. Alternately, if your
keyframes are close together, the transition will occur quickly.
Interpolating between different transform settings enables you to make a clip
shrink, expand, tumble, and/or move across the screen.
Considerations for creating an interpolation sequence
By default, a spline interpolation is set between consecutive keyframes created
on the same track. For an explanation of spline interpolation, see the next section.
As you create new keyframes, each keyframe is initialized to the same settings as
the one to the immediate left on the track. This makes it easy for you to define an
interpolation sequence in ascending order (from left to right). If you add a new
keyframe between two interpolated keyframes, however, the new keyframe’s
settings will be calculated according to the adjacent keyframes. For example, if
you add a keyframe between a size setting of 0% and 50%, the size for the new
keyframe will be set to 25%.
Linear and spline interpolation
There are two types of interpolation that you can apply to a keyframe — linear or
spline. Linear interpolation means that the transition between effect settings
occurs in even, linear increments. For example, let’s say you have two linearly
interpolated keyframes 75 frames apart with Size settings of 0% and 75%,
Chapter 8, Setting Up Realtime Effects with Adobe Premiere
RT2000 Installation & User Guide.book Page 145 Monday, April 2, 2001 3:51 PM
145
respectively. When you play back your clip, the size of your clip increases
between these two keyframes at a steady rate of 1% per frame.
If you have three or more interpolated keyframes, linear interpolation might not
give the results you want. Spline interpolation gives you a smoother transition
based on the settings of all keyframes. For example, if you add a third keyframe
(with Size at 100%) to the example given in the previous paragraph, the
difference between linear and spline interpolation can be illustrated as follows:
Linear interpolation
Spline interpolation
100%
100%
75%
75%
50%
50%
50
100
150
200
FRAME
50
100
150
200
FRAME
Notice how spline interpolation reduces the abruptness in the rate of interpolation
between the keyframes. Spline interpolation is particularly useful for creating
smooth transitions when you move a clip to different locations on the screen.
Creating keyframes outside the clip region
Because spline interpolation is affected by both the number of keyframes and the
distance (frames) between them, you may find it helpful to create keyframes
outside the clip region on the track. For example, you could start your
interpolation sequence several frames before your clip starts to make the spline
calculations start earlier.
To display the area outside the clip region, right-click the track and turn off
Display Clip Region Only. Then drag the Positioner forward or backward to
scroll to the area outside the clip.
Area before clip starts
Clip region
Area beyond end of clip
Working with keyframes
RT2000 Installation & User Guide.book Page 146 Monday, April 2, 2001 3:51 PM
146
Turning interpolation on and off
As previously mentioned, a spline interpolation is set by default between
consecutive keyframes created on a track. You may, of course, choose to turn off
interpolation or change the interpolation type.
To turn off or reset interpolation, right-click the keyframe or a range of selected
keyframes, then choose Interpolation Type > None, Linear, or Spline from the
pop-up menu that appears.
Depending on the location of a keyframe in a sequence and whether or not
interpolation is set, the keyframe will be represented as follows:
First keyframe in an interpolation sequence.
Intermediate keyframe in an interpolation sequence.
Last keyframe in an interpolation sequence.
Keyframe that is not in an interpolation sequence.
¯Note Newly created keyframes will be assigned the same interpolation setting
as that of the keyframe to the immediate left on the track.
Chapter 8, Setting Up Realtime Effects with Adobe Premiere
RT2000 Installation & User Guide.book Page 147 Monday, April 2, 2001 3:51 PM
147
Keyboard shortcuts
The following table provides a complete list of keyboard shortcuts available for
working with keyframes in the Matrox effect setup dialog boxes.
Keyboard shortcuts
Zoom In
Zoom Out
Zoom to Extent
Select All
Cut
Copy
Paste at Current Frame
Selective Paste
Delete
Save Keyframes
Load Keyframes
Previous Keyframe
Next Keyframe
Previous Frame
Next Frame
First Frame
Last Frame
Snap
Position
Size
Offset
Rotation
F4
F3
SHIFT+F3
CTRL+A
CTRL+X
CTRL+C
CTRL+V
CTRL+SHIFT+V
DELETE
CTRL+S
CTRL+O
F5
F8
F6
F7
CTRL+F6
CTRL+F7
S
Q
W
E
R
Working with keyframes
RT2000 Installation & User Guide.book Page 148 Monday, April 2, 2001 3:51 PM
148
Setting up realtime graphics overlays
You can add a realtime alpha-keyed graphics layer to your production (such as a
title overlaid onto a video clip). To do this, you create a .tga file using any
graphics program that supports an alpha channel, such as Ulead Cool 3D or
Adobe Photoshop. You can also create an .icg file using Inscriber TitleExpress, as
explained in Chapter 12, “Using Inscriber TitleExpress.” For details on creating
titles with Ulead Cool 3D, see Chapter 13, “Using Ulead Cool 3D.”
°Important For your graphics layer to play back in real time in Adobe Premiere,
it must be a .tga or Inscriber .icg file with the following attributes:
✃
32-bit, single-frame, uncompressed.
✃
Full-screen resolution of 720×480 for an NTSC image, or 720×576 for a
PAL image.
¬ To set up your realtime graphics overlay:
1 Import the .tga or .icg file into your Adobe Premiere project.
2 Place the clip in your Timeline on a superimpose track (Video 2 or higher).
Graphics overlay
Underlying video
clip
3 If your clip is a .tga file, right-click your clip on the superimpose track, then
choose Video Options > Transparency.
¯Note If your clip is an .icg file, it will automatically be alpha-keyed if you
place it on Video 2 or higher.
4 In the Transparency Settings dialog box, choose Alpha Channel as the
Key type, then click OK to return to your Timeline.
Remarks
✃
You can change the duration of your graphics overlay by dragging its
borders. For example, to make your graphics overlay the same length as your
underlying video clip, drag its left or right border until your clip is the
Chapter 8, Setting Up Realtime Effects with Adobe Premiere
RT2000 Installation & User Guide.book Page 149 Monday, April 2, 2001 3:51 PM
149
desired length. To change the default duration of your single-frame graphics
overlays, choose Edit > Preferences > General and Still Image.
✃
You can add a realtime fade to your graphics overlay using Adobe
Premiere’s Video Opacity rubberband control, such as to fade-in and fadeout as shown below:
Rubberband
control
Setting up realtime graphics overlays
RT2000 Installation & User Guide.book Page 150 Monday, April 2, 2001 3:51 PM
150
Setting up realtime speed changes
The Matrox realtime plug-in lets you apply realtime speed changes to your video
clips in Adobe Premiere (forward motion only). For example, you can choose to
speed up or slow down a video clip to create a special effect, or to fill a gap in
your production. For instructions on how to apply speed changes to your clips,
see your Adobe Premiere User Guide.
°Important Be aware that because your Matrox RT system uses a frame-based
architecture, your realtime speed changes, particularly slow-motion, can produce
unwanted jerky motion. If this is the case, you can improve your speed changes
by applying Premiere’s field processing options. To do so, right-click your clip,
then choose Video Options > Field Options. You can experiment with Always
deinterlace and Flicker removal to see which gives you the best results.
The Always deinterlace and Flicker removal options require you to render your
clip. Therefore, we suggest that you take advantage of the realtime speed changes
to preview your project only (that is, set the pace of your project and see how
your speed change looks on a clip). When you’re ready to produce your final
production, you can apply field processing and render your speed changes for the
best possible results. For more details on the field processing options, see your
Adobe Premiere User Guide.
Chapter 8, Setting Up Realtime Effects with Adobe Premiere
RT2000 Installation & User Guide.book Page 151 Monday, April 2, 2001 3:51 PM
151
When you’ll need to render your effects
In many cases, your Matrox effects will play back in real time. You will,
however, need to render your effects when you do any of the following:
✃ Choose to export your production to an .avi file.
✃
Select Force render when you set up the effect in the Matrox effect setup
dialog box (see page 113).
✃
Simultaneously use more than two video clips (.avi files) and one graphics
clip.
✃
Use a graphics clip other than a single-frame .tga or .icg file (such as a .tga
sequence, or an .icg roll or crawl), or a .bmp file.
✃
Add a software effect or transition, such as an Adobe Premiere video effect
or non-realtime transition. For details on selecting which Adobe Premiere
transitions you want to play back in real time, see “Selecting your realtime
Adobe Premiere transitions” on page 84.
✃
Apply an Adobe Premiere key type other than None or Alpha Channel.
✃
Apply a speed change using a negative value to play the clip in reverse.
✃
Apply any field processing options to a clip, such as Always deinterlace or
Flicker Removal.
✃
Apply a freeze-frame effect to a clip using the Frame Hold command with
the Deinterlace option selected (rendering won’t be required if you clear the
Deinterlace option).
✃
In the same segment, create more than:
✄
one realtime video effect or transition,
✄
one Adobe Premiere realtime fade, or
✄
one realtime graphics overlay.
For example, you can combine a Matrox page curl with an Adobe Premiere fade
and a graphics overlay, and play back the segment in real time. If, however, you
add another realtime effect such as a 2D/3D DVE or an Adobe Premiere Cross
Dissolve, you’ll have to render the segment to play it back.
¯Note Non-realtime segments of the Timeline (that is, areas that require
rendering) are identified by a red line above the time ruler.
When you’ll need to render your effects
RT2000 Installation & User Guide.book Page 152 Monday, April 2, 2001 3:51 PM
152
Your notes
Chapter 8, Setting Up Realtime Effects with Adobe Premiere
RT2000 Installation & User Guide.book Page 153 Monday, April 2, 2001 3:51 PM
Rendering Matrox Video for
Windows AVI Files
This chapter explains how to render video to a Video for Windows .avi
file using the codecs provided with your Matrox RT2000 system.
C
h
a
p
t
e
r
RT2000 Installation & User Guide.book Page 154 Monday, April 2, 2001 3:51 PM
154
Overview
When using Video for Windows programs to render (compile) material to an .avi
file, such as in the case of a completed video production or an animation, you can
use any of the codecs provided on your Matrox RT2000 system to create a
Matrox .avi file.
The Matrox codecs let you create .avi files in DV/DVCAM format, DVCPRO
format, or MPEG-2 intra-frame format using the 4:2:2 Profile @ Main Level at a
selected data rate (video quality). For example, you may want to render an
animation to Matrox DV/DVCAM format so that you can record it onto DV tape.
You could also use your Video for Windows program to render video to a Matrox
.avi file so that you can import the file as a realtime clip into your Adobe
Premiere projects on Matrox RT2000.
In this chapter, we’ll explain the various settings you need to make when using a
Video for Windows program to create a Matrox .avi file. For details on exporting
video from Adobe Premiere to a Matrox .avi file, see “Defining your Export
Movie settings” on page 94. Using Adobe Premiere to export video on your
Matrox RT2000 system lets you overcome the 2-GB .avi file limit of Video for
Windows programs (see “About Matrox Infinite Capture and creating video clips
greater than 2 GB” on page 105).
¯Note Be aware that .avi files do not have an alpha-key channel for storing
transparency information. If you want to render an animation containing
transparency information so that it can be alpha-keyed using your nonlinear editing
program, you should render the animation to a series of .tga files, not to an .avi
file. You can import a .tga sequence into Adobe Premiere and alpha-key the
sequence after placing it onto a superimpose track, but your sequence will not play
back in real time. If you render a single-frame .tga file with an alpha-key channel,
however, you can set up a realtime graphics overlay in Adobe Premiere as explained
in the section “Setting up realtime graphics overlays” on page 148.
Using VFW programs without the RT2000 hardware
If you installed the Matrox Video for Windows (VFW) software codecs (see
“Installing the Matrox VFW software codecs on a computer without the RT2000
hardware” on page 64), you can render and play back RT2000-compatible .avi
files using your Video for Windows program without having the RT2000
hardware in your computer.
Chapter 9, Rendering Matrox Video for Windows AVI Files
RT2000 Installation & User Guide.book Page 155 Monday, April 2, 2001 3:51 PM
155
Before you start rendering
Before you start rendering material to a Matrox .avi file, make the following
settings in your Video for Windows program:
✃
Set the frame rate for rendered material to 29.97 frames per second for
NTSC video, or 25 frames per second for PAL video.
✃
Set the frame size of your rendered material to full-screen: 720×480 for
NTSC video, or 720×576 for PAL video.
✃
To render a video production at a quality that’s different from the one at
which your clips were created, all your clips must be recompressed at the
new quality level during the rendering process. If your program provides an
option for controlling compression, set this option to “Always recompress”
when rendering.
✃
If you’ll be rendering audio, set your program to render audio to a separate
.wav file (that is, don’t include the audio in your .avi file).
✃
For best results, make sure you clear your program’s “Data rate limit”
option for rendered material. This ensures that your .avi files will be
rendered at the particular video quality you select.
✃
If you’re using Adobe Premiere, set the Fields for rendering to Lower Field
First for NTSC video, or Upper Field First for PAL video.
¯Note Before rendering a lot of material, check that your rendered animations and
transitions such as wipes and slides play back smoothly. If they appear jumpy, try
adjusting the field dominance or field order for your rendered material. For
example, if your transitions appear jumpy with the field dominance set to “Odd
field” or “Field 1,” try switching the setting to “Even field” or “Field 2.”
Before you start rendering
RT2000 Installation & User Guide.book Page 156 Monday, April 2, 2001 3:51 PM
156
Selecting color space conversion options
When you render material to an .avi file using a Matrox VFW codec, you can
determine how you want the luminance levels and chroma information to be
processed during the color space conversion that’s performed during the render.
¯Note The default settings for color space conversion provide good results for
most applications. We recommend that you change these settings only when
needed for special purposes.
¬ To select the color space conversion options you want:
1 Choose Start > Settings > Control Panel > Sounds and Multimedia.
2 If you’re using Windows 2000, do the following:
a Click the Hardware tab. Under the list of devices, select Video Codecs.
b Click Properties, then the Properties tab and select Matrox Codecs.
c Click Properties, and then Settings.
3 If you’re using Windows Me, do the following:
a Click the Devices tab. Under the list of devices, click the plus sign beside
Video Compression Codecs, then select any of the Matrox codecs. (Your
settings will apply to all the Matrox VFW codecs.)
b Click Properties, and then Settings.
4 In the provided dialog box under Color Space Conversion, select the
options you want:
✄
Standard Renders video using standard broadcast luminance levels.
Super black and super white luminance levels are clipped.
✄
DV-compliant Renders video using luminance levels appropriate for DV
material. This ensures that the super white luminance levels of your video
are retained.
✄
Expanded
Renders video using the full range of luminance levels. Super
black and super white luminance levels are retained. You may want to use
Chapter 9, Rendering Matrox Video for Windows AVI Files
RT2000 Installation & User Guide.book Page 157 Monday, April 2, 2001 3:51 PM
157
this setting, for example, to render material on which you’ll be applying
luminance key effects.
°Important
When rendering RGB graphics, selecting Expanded or
DV-compliant will create super black and/or white in your rendered images.
For example, if you select Expanded, all black in your RGB graphics will
become super black, and white will become super white. To render your
RGB graphics with standard black and white levels, set your luminance
range to Standard.
✄
Chroma Filtering and Chroma Interpolation
Select these options to
adjust the chroma bandwith of RGB graphics. This improves images that
have abrupt changes between different colors, such as a blue box on a black
or white background. You should select these options for most animation
and compositing work (computer-generated material). For most video
editing programs, however, it’s best that you not select these options. If you
find that your rendered images appear to be blurred, try clearing one or both
of these options.
5 Click OK to save your settings. Any change you make to your selected
luminance range setting (such as switching from Standard to Expanded)
will only take effect the next time you start your VFW program.
Rendering material to a Matrox VFW .avi file
When you render material to an .avi file, such as when you render a finished
video production or an animation, you must select the compressor (codec) you
want to create the file. The compressor determines the quality of your rendered
video. Refer to your program’s documentation for instructions on how to select a
compressor for your .avi file.
¬ To create a Matrox Video for Windows .avi file:
1 Select one of the following codecs from your program’s list of available
compressors:
Renders video to DV or DVCAM format.
✄
Matrox DV/DVCAM
✄
Matrox DVCPRO
✄
Matrox MPEG-2 I-frame
Renders video to DVCPRO format.
Renders video to MPEG-2 intra-frame format
using the 4:2:2 Profile @ Main Level at a selected data rate.
¯Note If you installed the Matrox VFW codecs on a system without the
Matrox RT2000 hardware, the Matrox M-JPEG and Matrox DVCPRO50
codecs will also be available. These codecs are used to create clips for Matrox
Rendering material to a Matrox VFW .avi file
RT2000 Installation & User Guide.book Page 158 Monday, April 2, 2001 3:51 PM
158
DigiSuite systems only. M-JPEG and DVCPRO50 clips are not supported on
Matrox RT2000.
2 To select your MPEG-2 data rate (video quality), click your program’s
Configure button. The dialog box similar to the following appears:
3 Drag the slider until your desired data rate (video quality) is displayed. The
higher the data rate you select, the better the video quality will be.1
°Important If you’re selecting an MPEG-2 I-frame data rate on a system
without the Matrox RT2000 hardware, you’ll be able to select a data rate up
to 50 Mbits/sec. Matrox RT2000, however, supports MPEG-2 I-frame clips
with a maximum data rate of 25 Mbits/sec. If you want to use your clip with
Matrox RT2000, take care not to select a data rate higher than 25 Mbits/sec.
4 Click OK to save your selection. The quality you selected will be used each
time you render material with your program, until you change the quality
again.
¯Note Depending on the capabilities of your system, you may not be able to
smoothly play back video rendered at a high quality using your Video for Windows
program. For the best playback performance, use a DirectShow program such as
Adobe Premiere with your Matrox RT2000 system.
1
When selecting the data rate for a Matrox codec, be aware that a megabit (Mb) is equal to
1,000,000 (1000 × 1000) bits, and a megabyte (MB) after binary conversion is equal to
1,048,576 (1024 x 1024) bytes.
Chapter 9, Rendering Matrox Video for Windows AVI Files
RT2000 Installation & User Guide.book Page 159 Monday, April 2, 2001 3:51 PM
Using Matrox MediaTools
This chapter explains how to use Matrox MediaTools to scan and
capture clips from your DV-1394 device, create a batch capture list,
grab single-frame images from your DV tape, and export clips to an
Adobe Premiere project.
C
h
a
p
t
e
r
RT2000 Installation & User Guide.book Page 160 Monday, April 2, 2001 3:51 PM
160
About Matrox MediaTools
Matrox MediaTools is a fully-featured DV capture application that allows you to
perform automatic, unattended DV tape scanning and batch capture. With
MediaTools, you can:
✃
Automatically scan and capture clips from a DV tape into .avi and .wav files
on your computer.
✃
Automatically scan an entire DV tape to create a batch capture list.
✃
Capture clips from a batch capture list at a later time, and adjust the In and
Out points of clips prior to capturing.
✃
Use onscreen transport controls to navigate quickly and easily through clips
on tape or clips on disk.
✃
Grab single-frame images and save them as .tga or .avi files, such as to
create photo montage sequences.
✃
Edit the In and Out points of clips and recapture them.
✃
Change the order of clips in your clip list by simply dragging and dropping
clips into the sequence you want.
✃
Export your clip list to an Adobe Premiere project where you can add
Matrox realtime effects.
¯Note Your clips are captured in native DV format (that is, Matrox DV/DVCAM
or DVCPRO format).
Preparing your tapes for use with MediaTools
The tapes you use with MediaTools must contain continuous and consecutive
time code, and all material must be recorded at the same speed. Leaving blank
gaps between recorded material results in discontinuous time code. To avoid this
problem, stripe your entire tape with time code before recording your source
material. You can stripe your entire tape by recording black video for the duration
of the tape. To do this, insert a blank tape into your camcorder, put the lens cap
on, then record up to the end of the tape.
¯Note MediaTools requires about six seconds of preroll before capturing material.
Therefore, don’t record material that you want to capture within the first six
seconds of your DV tape.
Chapter 10, Using Matrox MediaTools
RT2000 Installation & User Guide.book Page 161 Monday, April 2, 2001 3:51 PM
161
Starting Matrox MediaTools
Before you start Matrox MediaTools, make sure that your DV-1394 device is:
✃
Properly connected and turned on.
✃
Set to VTR mode.
✃
Loaded with a striped tape. To avoid problems, make sure your tape is not at
the end.
¬ To start Matrox MediaTools:
1 Close any program you have running that uses your Matrox RT2000, such as
Adobe Premiere or the Matrox Video Player.
2 Choose Start > Programs > Matrox Video Tools > Matrox MediaTools.
¯Note The first time you start MediaTools, the Options dialog box will be
displayed. You can choose to display this dialog box each time you start
MediaTools. For information on the Options dialog box, see “Defining your
capture settings” on page 169.
3 To close the Options dialog box and start working with MediaTools, click
OK.
Starting Matrox MediaTools
RT2000 Installation & User Guide.book Page 162 Monday, April 2, 2001 3:51 PM
162
Using the Matrox MediaTools interface
When you start MediaTools, a dialog box similar to the following appears:
✐
✒
✑
✔
✕
✘
✖
✗
Here’s a brief description of the MediaTools dialog box:
✐ New tab
Use this tab to scan and capture new clips to add to your clip list,
and create batch capture lists. For more information, see “Scanning and
capturing clips” on page 171.
✑ Edit tab
Use this tab to capture clips in a batch capture list, edit and
recapture clips, and update clip information. For details, see “Capturing clips
from a batch capture list” on page 175 and “Editing clips” on page 175.
✒ Preview Window
Allows you to preview clips on tape or clips on disk.
Your clips are also displayed on your NTSC or PAL video monitor.
Chapter 10, Using Matrox MediaTools
RT2000 Installation & User Guide.book Page 163 Monday, April 2, 2001 3:51 PM
163
VTR and Disk buttons
These buttons let you switch between VTR mode,
where you can control your DV-1394 device and play back clips on tape, and
Disk mode, where you can play back captured clips in your clip list.
✔ Clip identification area
This section contains several items to help you
identify your clips.
Displays the name that you’ve assigned to the DV tape in your
DV-1394 device.
✄
Tape ID
✄
Clip ID
✄
Comment
Displays the base name for your new clips when using the New
tab, or the name of the currently selected clip when using the Edit tab. For
details, see “How MediaTools assigns clip names” on page 171.
Lets you enter comments that help you distinguish between
clips in your clip list.
✕ Transport controls
A set of common transport controls that lets you
easily navigate through clips on tape and clips on disk. For more
information, see “Navigating through clips with the transport controls” on
page 165.
✖ Clip list
A numbered list of clips and their properties. As you scan or
capture clips in MediaTools, your clips are automatically added to the clip
list. The clip list can be docked to the MediaTools dialog box or float freely
as a resizable window. For more information on using the clip list, see
“Working with the clip list” on page 176.
✗ Status bar
Displays information about the operation you’re currently
performing in MediaTools, such as clip information during a scan or capture.
✘ Float/dock clip list button
This button lets you dock the clip list to the
MediaTools dialog box, or detach the clip list so that you can move and
resize it. For more information, see “Detaching and resizing the clip list” on
page 179.
Using the Matrox MediaTools interface
RT2000 Installation & User Guide.book Page 164 Monday, April 2, 2001 3:51 PM
164
Using the MediaTools pop-up menu
When you right-click anywhere in the clip list, a pop-up menu appears containing
commands for working with MediaTools.
All commands present in the MediaTools pop-up menu are described in this
chapter.
Chapter 10, Using Matrox MediaTools
RT2000 Installation & User Guide.book Page 165 Monday, April 2, 2001 3:51 PM
165
Navigating through clips with the transport controls
MediaTools includes a common set of transport controls for navigating through
clips on tape and clips on disk. You indicate the type of material you wish to
control by selecting VTR or Disk. In VTR mode, the transport controls are used to
navigate through clips on your DV tape. In Disk mode, the transport controls are
used to control playback of clips from your hard drive (that is, .avi and .wav files
for clips in your clip list).
The transport controls are much like those on your VTR:
Loop button
Positioner
Most of these controls perform standard transport functions, but some can be
used for special tasks:
✃
Shuttle/seek Drag the slider on the Positioner to shuttle through your
tape or any clip in your clip list.
✃
Cue to In or Out point on disk Click the Rewind or Fast Forward button
to cue to the beginning or end of a clip on disk. Press SHIFT+Mark In/Out to
cue to the In or Out points of a clip.
✃
View frame-by-frame
button.
✃
Play a clip on disk repeatedly
button.
Click the Frame Reverse or Frame Advance
Click the Loop button, then click the Play
¯Note You can play back selected clips by right-clicking the clip list and
choosing Play from Tape or Play From Disk from the pop-up menu. If
multiple clips are selected in the clip list, the clips play back according to their
assigned number (order) in the clip list. You can also play back any captured
clip by double-clicking the clip in the clip list.
Using the Matrox MediaTools interface
RT2000 Installation & User Guide.book Page 166 Monday, April 2, 2001 3:51 PM
166
Keyboard shortcuts
Disk mode
VTR mode
Play
Rewind
Fast Forward
Frame Advance
Frame Reverse
Stop
Loop
K
L
B
Z
X
’ (apostrophe)
; (semicolon)
V
A
Using the time code fields
The time code fields display the In and Out points and duration of your clips.
Clear button
The following sections describe how to:
✃
Mark In and Out points.
✃
Edit the time code fields.
✃
Change the time code fields’ format.
Marking In and Out points
To define a clip’s In and Out points, you can either mark them as explained in this
section, or you can type the In and Out points directly into the time code fields as
explained in the next section.
To mark the In and Out points of your clip, do one of the following:
✃
Play your material and click the Mark In or Mark Out button when you see
the frame where you want your clip to start or end, respectively.
✃
For increased precision, stop your clip at the appropriate frame and click the
Mark In or Mark Out button.
Chapter 10, Using Matrox MediaTools
RT2000 Installation & User Guide.book Page 167 Monday, April 2, 2001 3:51 PM
167
You can cue to your In or Out point on tape by SHIFT+clicking the Mark In
or Mark Out button.
Keyboard shortcuts
Mark In
Mark Out
Cue In
Cue Out
M
, (comma)
SHIFT+Mark In
SHIFT+Mark Out
Editing the time code fields
When you type a time code in an empty or highlighted time code field, the
numbers fill each section sequentially from right to left (frames, seconds,
minutes, and hours), and separators are placed for you between the sections.
If you enter a value that exceeds the two-digit limit for a section, the appropriate
time code will be calculated when you press the TAB key. For example, if you
type 9005 (90 seconds, five frames) and press TAB, it will be calculated as
00:01:30:05 (one minute, 30 seconds, five frames) on an NTSC system.
When at least two time code fields are defined, MediaTools automatically
calculates the remaining field. For example, once you’ve defined the In and Out
points for a clip, its duration will be calculated for you.
To clear all the time code fields, click the clear button.
Changing the time code display
A value in a time code field can be displayed and entered as a time code or a
specific number of frames. The first time you run MediaTools, the fields display
time codes. To toggle between the two formats, press CTRL+SHIFT while the
insertion point (flashing vertical bar) is in any time code field.
For example, on an NTSC system, you could change a value of 24:04 (24
seconds, 4 frames) to 724 frames by pressing CTRL+SHIFT. You could then edit
the field in frames and switch back to time codes again by pressing CTRL+SHIFT.
Using the Matrox MediaTools interface
RT2000 Installation & User Guide.book Page 168 Monday, April 2, 2001 3:51 PM
168
The time code format of your DV tape is indicated by the separator between the
seconds and frames digits in the time code fields as follows:
✃
A semicolon ( ; ) indicates drop frame.
✃
A colon ( : ) indicates non-drop frame.
¯Note MediaTools automatically detects the time code format on your DV tape.
If MediaTools is unable to determine the format, you’ll be prompted to select the
format that matches the format on your DV tape.
Chapter 10, Using Matrox MediaTools
RT2000 Installation & User Guide.book Page 169 Monday, April 2, 2001 3:51 PM
169
Defining your capture settings
Before capturing clips with MediaTools, you need to specify various capture
settings, such as your video and audio drives where you want MediaTools to store
your captured clips, and the file creation method you want to use for large clips.
¬ To define your capture settings for MediaTools:
1 Click the Options button.
¯Note By default, the Options dialog box is configured to pop up every time
MediaTools starts. To turn off this feature, clear Show this dialog when
MediaTools starts.
2 Under Capture Directories, specify the drive and folder where you want to
store your captured video and audio clips. By default, all video and audio
files are saved in the same folder. For more information, see “Selecting your
video and audio drives” on page 170.
3 If you’re using Windows 2000, you can specify how you want MediaTools to
create .avi files for large clips. Under AVI File Creation for Large Clips (>2
GB), select one of the following:
✄
Create standard Windows AVI Select this if you want to create standard
Windows .avi files that are not limited to 2 GB. This option will be available
only if your selected video and audio drives are NTFS-formatted.
Defining your capture settings
RT2000 Installation & User Guide.book Page 170 Monday, April 2, 2001 3:51 PM
170
✄
Use Matrox Infinite Capture Select this if you want to use the Matrox
Infinite Capture feature to create clip sequences of 2-GB .avi files. These
clips are compatible with Video for Windows programs as well as Windows
98 and Windows Me. For details about this feature, see “About Matrox
Infinite Capture and creating video clips greater than 2 GB” on page 105.”
¯Note When running Windows Me, Matrox Infinite Capture will always be
used to create large clips on Matrox RT2000.
4 Under 1394 Audio Capture, select which DV stereo audio streams you want
to capture. Each stereo stream is saved as a separate .wav file. For example,
if you capture only one DV stereo stream, the audio stream of your stereo
clip will be saved as clipID.wav. If you choose to capture both DV stereo
streams, the second audio stream will be saved as clipID_2ndStream.wav.
5 Under Miscellaneous, you can select the option to rewind your DV tape if
no In point is specified prior to starting a scan and capture. If you don’t
select this option, MediaTools will start scanning and/or capturing from the
tape’s current position.
6 Click OK to save your settings and return to the MediaTools dialog box.
Selecting your video and audio drives
You can select your video and audio drives by typing the drive and folder name
directly into the Video and Audio boxes, or by using the Browse button.
Lock icon
To ensure the best capture and playback performance of your clips, save them on
one of your A/V drives. By default, Video and Audio are set to use the same
folder. To specify a different video and audio folder, click the small lock icon.
MediaTools will save your video and audio clips in a subfolder with the same
name as the Tape ID. For example, if you selected V:\MediaTools as your video
and audio folders, all audio and video clips from tape “MyTape” will be saved in
V:\MediaTools\MyTape.
Chapter 10, Using Matrox MediaTools
RT2000 Installation & User Guide.book Page 171 Monday, April 2, 2001 3:51 PM
171
How MediaTools assigns clip names
When using the New tab, Clip ID displays the base name for your new clips. For
example, if the Clip ID is “MyClip,” MediaTools will assign the name
MyClip000.avi to the first new video clip you capture, and continue naming clips
sequentially (for example, MyClip001.avi, MyClip002.avi, etc.). Each clip’s
audio will be saved as corresponding .wav files, such as MyClip001.wav,
MyClip002.wav, etc. Before scanning or capturing new clips, you can change the
Clip ID to any base name you like.
When editing clips using the Edit tab, Clip ID displays the name of the selected
clip in the clip list. You can change the name by typing a new name in the Clip ID
box on the Edit tab, then clicking Update. You can also change a clip ID directly
in the clip list by typing a new name in the clip’s Clip ID box, then pressing
ENTER.
¯Note Changing the clip ID for a captured clip will not change the name of the
clip’s .avi and .wav files.
Scanning and capturing clips
With MediaTools, you can automatically scan and capture clips from a DV tape.
Scanning the tape identifies all the individual clips on your tape based on when
the DV-1394 device started recording and when it stopped. Capturing saves the
clips as .avi and .wav files on your computer’s hard drive, which you can later
export to an Adobe Premiere project (see “Exporting your clip list to an Adobe
Premiere project” on page 181).
¬ To scan and capture clips from your DV tape:
1 In the MediaTools dialog box, click the VTR button. A “Getting tape
information” message is displayed.
2 In the Tape ID box, type a name for the tape presently loaded in your
DV-1394 device. In the Clip ID box, type the base clip name you’d like to be
assigned to your clips. For more information, see the previous section, “How
MediaTools assigns clip names.”
3 Mark or type in the In and Out points to identify where you want the
scan/capture to start and stop.
¯Note If you don’t set an In point, MediaTools will start scanning from the
current tape position, or rewind your tape before starting the scan/capture if
you selected that option in the Options dialog box.
4 Click Scan/Capture.
Scanning and capturing clips
RT2000 Installation & User Guide.book Page 172 Monday, April 2, 2001 3:51 PM
172
5 Each time the video sequence on the tape changes, the clip is captured and
added to the clip list. Each clip also appears with time code information and
an icon representing the first and last frames of the clip.
6 To stop the scan/capture before the Out point is reached (or if you left the
Out point blank), click the Stop and Mark Out button.
¯Note You can identify captured clips by the small video and audio icons (
in the clip list.
)
Capturing individual clips
¬ To capture individual clips from your DV tape:
1 In the MediaTools dialog box, click the VTR button. A “Getting tape
information” message is displayed.
2 In the Tape ID box, type a name for the tape presently loaded in your
DV-1394 device. In the Clip ID box, type the base clip name you’d like to be
assigned to your clip. For more information, see “How MediaTools assigns
clip names” on page 171.
3 Mark or type in the In and Out points of the clip you want to capture.
¯Note If you don’t set an In point, MediaTools will start capturing from the
current tape position, or rewind the tape before starting the capture if you
selected that option in the Options dialog box.
4 Click Capture.
5 MediaTools will start capturing the clip. To stop the capture before the Out
point is reached (or if you left the Out point blank), click the Stop and Mark
Out button.
6 Your captured clip is added to the clip list with time code information and an
icon representing the first and last frames of the clip.
Chapter 10, Using Matrox MediaTools
RT2000 Installation & User Guide.book Page 173 Monday, April 2, 2001 3:51 PM
173
Creating a batch capture list
A batch capture list is a list of clips with defined In and Out points for clips on
tape that you have not yet captured. There are two ways to create a batch capture
list with MediaTools. You can automatically scan your DV tape to create a batch
capture list of clips on your tape, or you can specify the In and Out points of
individual clips on tape, and add them to your clip list.
Scanning clips
¬ To create a batch capture list of scanned clips from your DV tape:
1 In the MediaTools dialog box, click the VTR button. A “Getting tape
information” message is displayed.
2 In the Tape ID box, type a name for the tape presently loaded in your
DV-1394 device. In the Clip ID box, type the base clip name you’d like to be
assigned to your clips. For more information, see “How MediaTools assigns
clip names” on page 171.
3 Mark or type in the In and Out points to identify where you want the scan to
start and stop.
¯Note If you don’t set an In point, MediaTools will start scanning from the
current tape position, or rewind your tape before starting the scan if you
selected that option in the Options dialog box.
4 Click Scan.
5 Each time the video sequence on the tape changes, the clip is added to the
clip list with time code information and an icon representing the first and last
frames of the clip.
6 To stop the scan before the Out point is reached (or if you left the Out point
blank), click the Stop and Mark Out button.
7 If you want to save your batch capture list so that you can capture the clips at
a later time, right-click the clip list and choose Save As. For more
information on saving and loading clip lists, see “Saving and loading a clip
list” on page 177.
8 When you’re ready to capture your clips, see “Capturing clips from a batch
capture list” on page 175.
¯Note
“Scanned only” clips have only a small tape icon (
) in the clip list.
Creating a batch capture list
RT2000 Installation & User Guide.book Page 174 Monday, April 2, 2001 3:51 PM
174
Adding clips to a batch capture list
¬ To define individual clips that you want to add to your batch capture list:
1 In the MediaTools dialog box, click the VTR button. A “Getting tape
information” message is displayed.
2 In the Tape ID box, type a name for the tape presently loaded in your
DV-1394 device. In the Clip ID box, type the base clip name you’d like to be
assigned to your clips. For more information, see “How MediaTools assigns
clip names” on page 171.
3 Use the transport controls to navigate through clips on tape in your DV-1394
device.
4 Specify the In and Out points for your clip using any of the following
methods:
✄
Mark or type in the In and Out points of your clip, then click Add To List
to add the clip to your clip list.
✄
Mark or type in the In point of your clip, then click Add to List. MediaTools
will cue to the In point of the clip and begin playing the tape until you click
Stop and Mark Out.
✄
Mark or type in the Out point of your clip, rewind your tape to where you
want your clip to start, then click Add To List. MediaTools will use the
tape’s current position as the In point.
5 Continue adding new clips until you’ve completed your batch capture list.
6 If you want to save your batch capture list so that you can capture the clips at
a later time, right-click the clip list and choose Save As. For more
information on saving and loading clip lists, see “Saving and loading a clip
list” on page 177.
7 When you’re ready to capture your clips, see the next section, “Capturing
clips from a batch capture list.”
Chapter 10, Using Matrox MediaTools
RT2000 Installation & User Guide.book Page 175 Monday, April 2, 2001 3:51 PM
175
Capturing clips from a batch capture list
¬ To capture clips from your batch capture list:
1 In the MediaTools dialog box, click the VTR button. A “Getting tape
information” message is displayed.
2 Click the Edit tab.
3 Select the clips you want to capture in the clip list. If you want to capture all
your clips, right-click the clip list and choose Select All.
4 Click Capture.
5 If needed, you’ll be prompted to load the appropriate tape in your DV-1394
device. MediaTools will start capturing the selected clips in the order in
which they appear on the tape. All selected clips in the clip list will be
captured unless you click Stop and Mark Out to stop the capture.
Editing clips
You can edit the In and Out points of a captured clip and recapture it. You can
also update the Clip ID and Comment information for clips in your clip list.
¯Note You can only edit and recapture clips that you originally captured in
MediaTools.
Updating and recapturing clips
¬ To edit and recapture a clip:
1 In the MediaTools dialog box, click the VTR button. A “Getting Tape
information” message is displayed.
2 Select a captured clip that you want to edit in the clip list. MediaTools will
automatically switch to the Edit tab.
3 Mark or type in new In and Out points, or a new clip duration.
4 To update the information in the time code fields, click Update. A warning
message is displayed to warn you that changing the In and Out points of the
clip requires the clip’s files to be deleted from your hard drive. Click Yes to
change the In and Out points of the clip.
5 To recapture the clip, click Capture.
6 If needed, you’ll be prompted to load the appropriate tape in your DV-1394
device. MediaTools will cue to the In point of the clip and capture it.
7 To stop the capture before the Out point is reached (or if you left the Out
point blank), click the Stop and Mark Out button.
Capturing clips from a batch capture list
RT2000 Installation & User Guide.book Page 176 Monday, April 2, 2001 3:51 PM
176
¯Note
The Update button can also be used to update the Clip ID and the
Comment by simply typing in the text boxes and clicking Update. For more
information on the clip ID, see “How MediaTools assigns clip names” on
page 171.
Changing a clip’s In and Out icons
In and Out icons are the small icons representing the first and last frames of a clip
in the clip list. These icons can be changed to better represent your clip.
¬ To change the In and Out icons of scanned or captured clips in the clip list:
1 Use the transport controls to play back your clip in the Preview Window and
on your NTSC or PAL video monitor.
2 When you see the frame you want for the In icon, click Grab In Icon.
MediaTools automatically updates the icon.
3 When you see the frame you want for the Out icon, click Grab Out Icon.
Working with the clip list
The following sections explain how to add new clips to the clip list, save and load
clip lists, copy, move and delete clips, and how to detach and resize the clip list.
Adding clips
You can add a clip or a series of clips (.avi files) to the clip list using any of the
following methods:
✃
On the New tab, enter valid In and Out points in the time code fields, then
click Add To List. For more information about this feature, see “Adding
clips to a batch capture list” on page 174.
✃
Drag an .avi file from a file management program, such as Windows
Explorer, to the clip list. If you’re adding clips to an existing clip list, you
can drag them to the bottom of the clip list, or place them in a specific
position using the methods described in the section “Moving clips” on
page 177.
✃
Right-click the clip list, then choose Import Clip from the pop-up menu (or
double-click an empty area of the clip list). In the Open dialog box, select
the .avi files you want to import, then click Open.
Chapter 10, Using Matrox MediaTools
RT2000 Installation & User Guide.book Page 177 Monday, April 2, 2001 3:51 PM
177
¯Note Clips that have associated .wav files will have their audio included in the
clip list.
Saving and loading a clip list
To save a clip list, right-click the clip list. Choose Save As from the pop-up menu
to save your current clip list as a .dvl file.
You can load a clip list (.dvl) using any of the following methods:
✃
Right-click the clip list. Choose Open Clip List or Open Recent to select a
recently-opened clip list.
✃
Drag a .dvl file from a file management program, such as Windows Explorer,
to the clip list.
✃
Double-click the .dvl file in Windows Explorer to start MediaTools and load
the clip list. Make sure that MediaTools is not running when you do this.
¯Note If you load a .dvl file to a clip list that already contains clips, it will replace
the current clip list.
Copying clips
You can copy a clip or a series of clips in the clip list using either of the following
methods:
✃
Select the clips you want to copy, right-click the clip list, then choose Copy
from the pop-up menu. Select a clip in the clip list, then choose Paste to
paste the copied clips above the currently selected clip.
✃
Select the clips you want to copy, then CTRL+drag the clips and drop them
into the sequence you want.
¯Note When copying clips, a clip’s .avi and .wav files are not copied, only the
reference to the clip on tape is copied. MediaTools assigns the -Copy extension to
the Clip ID of the copied clips.
Moving clips
You can change the order of clips in the clip list, such as to arrange clips in the
order you want them to play back when using the Play From Tape or Play From
Disk command. To rearrange your clips, do any of the following:
✃
Select the clips you want to move, then drag and drop them into the sequence
you want. If you drag clips up in the clip list, the clips are inserted above the
black line. If you drag clips down in the clip list, the clips are inserted below
Working with the clip list
RT2000 Installation & User Guide.book Page 178 Monday, April 2, 2001 3:51 PM
178
the black line. Releasing the mouse button places the clips in the list and
ripples the position of all subsequent clips in the clip list.
✃
Select the clips you want to move, then right-click the clip list. Choose Cut
from the pop-up menu to cut the clips. Select a clip in the clip list, then
choose Paste to paste the clip above the currently selected clip.
Deleting clips
Select the clips you want to delete, right-click the clip list, then choose one of the
following from the pop-up menu:
✃
To delete only the selected clips from the clip list, choose Delete Clip Only.
✃
To delete the selected clips and their corresponding files from your hard
drive, choose Delete Clip+File.
✃
To delete only the files for the selected clips from your hard drive (the clips
will remain in your clip list), choose Delete File Only.
¯Note When you choose to Delete File Only, MediaTools keeps the reference
to the clip on tape in case you want to recapture the clip at a later time.
Keyboard shortcuts
Delete Clip Only
Delete Clip + File
Delete File Only
Chapter 10, Using Matrox MediaTools
DELETE
SHIFT+DELETE
CTRL+DELETE
RT2000 Installation & User Guide.book Page 179 Monday, April 2, 2001 3:51 PM
179
Detaching and resizing the clip list
You can change the size of your clip list to suit your needs. First, detach the clip
list from the MediaTools dialog box by clicking the Float/dock clip list button
(
) above the clip list. Now the clip list can be freely moved and resized. To
resize the clip list, drag the sides or corner of the clip list as needed. You can also
use the standard Windows Maximize and Restore buttons in the top right corner
of the window.
After resizing, MediaTools will automatically rearrange the clips in the clip list.
To dock the clip list back to the MediaTools dialog box, click the Float/dock clip
list button, or click the Close button in the top right corner of the Clip List
window. Once the window is docked again, MediaTools will remember the
previous size and location of the clip list for the next time you detach the clip list.
Working with the clip list
RT2000 Installation & User Guide.book Page 180 Monday, April 2, 2001 3:51 PM
180
Grabbing a single-frame image
You can grab single-frame (still) images and save them as .tga or .avi files to use
in your Adobe Premiere projects.
¬ To grab a single-frame image from a clip on tape or a clip on disk:
1 Use the transport controls to play back your DV tape, or double-click a
captured clip in the clip list to play it back.
2 In the MediaTools dialog box, click the Grab Image button to open the Grab
Image dialog box. Drag the Grab Image dialog box to the side so that it
doesn’t obscure the Preview Window.
3 When the frame you want is displayed in the Preview Window, click the
Grab button.
4 If you notice flickering in your image, you can choose to grab only one of
the fields. Under Grab Field, select Field 1 or Field 2. One field contains the
odd-numbered scan lines in the frame, and the other field contains the evennumbered lines. Select the field that best displays your image. MediaTools
interpolates between the two consecutive scan lines to create the missing
field.
5 If you’ll be saving your image as an .avi file, select the compression format
you want from the AVI Format list.
Chapter 10, Using Matrox MediaTools
RT2000 Installation & User Guide.book Page 181 Monday, April 2, 2001 3:51 PM
181
6 Click Save or Save As to save the image as a .tga or an .avi file. Saving your
images as .avi files lets you create realtime transitions between your stills in
Adobe Premiere, such as to create photo montages.
¯Note
If you do not specify a file name in the Save As text box, or if you select
Auto Save, MediaTools will assign a default name to the first grabbed image (such
as MyImage01.tga or a name based on the last name you used) and continue naming
images sequentially.
Exporting your clip list to an Adobe Premiere project
You can export all or selected clips from the clip list directly to a new Adobe
Premiere project (.ppj file).
1 Select the clips you want to export using CTRL+click, or select a range of
clips using SHIFT+click.
2 Right-click the clip list. Choose Export to Premiere from the pop-up menu.
A message is displayed asking if you want to export all clips in the clip list,
or export selected clips. Choose Export All to export all clips, or choose
Export Selected to export only selected clips.
3 In the Save As dialog box, enter the directory and file name for the project
you want to export. Click Save.
4 Close MediaTools and start Adobe Premiere. You can now open the Adobe
Premiere project you created and add Matrox realtime effects.
Exporting your clip list to an Adobe Premiere project
RT2000 Installation & User Guide.book Page 182 Monday, April 2, 2001 3:51 PM
182
Keyboard shortcuts
The following table provides a complete list of keyboard shortcuts available for
using the MediaTools transport controls and performing other operations.
Keyboard shortcuts
Disk mode
VTR mode
Play
Rewind
Fast Forward
Frame Advance
Frame Reverse
Stop
Loop
Delete Clip Only
Delete Clip + File
Delete File Only
Import Clip
Select All
Cut
Copy
Paste
New Clip List
Open Clip List
Save Clip List
Export to Premiere
Chapter 10, Using Matrox MediaTools
K
L
B
Z
X
’ (apostrophe)
; (semicolon)
V
A
DELETE
SHIFT+DELETE
CTRL+DELETE
CTRL+I
CTRL+A
CTRL+X
CTRL+C
CTRL+V
CTRL+N
CTRL+O
CTRL+S
CTRL+E
RT2000 Installation & User Guide.book Page 183 Monday, April 2, 2001 3:51 PM
Using the Matrox File Converter
This chapter provides an overview of the Matrox File Converter and
explains how to convert your video and audio files to various formats.
C
h
a
p
t
e
r
RT2000 Installation & User Guide.book Page 184 Monday, April 2, 2001 3:51 PM
184
About the Matrox File Converter
The Matrox File Converter is an easy-to-use program for converting your
MPEG-2 or DV video files and associated audio files to various formats. You can
select any of the following conversion types:
✃
Matrox MPEG-2 IBP AVI + WAV → MPEG-2 Program
Converts your Matrox MPEG-2 IBP .avi and associated .wav files to .mpg
MPEG-2 Program files that conform to ISO 13818-1. You can use your new
.mpg files for distribution on the web, video servers, networks, etc.
✃
Matrox MPEG-2 AVI → MPEG-2 Elementary Converts your Matrox
MPEG-2 (IBP or I-frame) .avi files to .m2v MPEG-2 Elementary files that
conform to ISO 13818-2. You can use your .m2v files with DVD authoring
programs that don’t support Matrox MPEG-2 .avi files.
✃
Matrox DV AVI + WAV → VFW DV AVI Converts your Matrox DV
.avi and associated .wav files to Video for Windows DV .avi files with
interleaved audio. The DV, DVCAM, and DVCPRO formats are supported.
The advantage of this new .avi file is that your video and audio tracks are
included in one file for easy use with your Video for Windows programs.
✃
VFW DV AVI → Matrox DV AVI + WAV Converts any Video for
Windows DV .avi file to separate Matrox DV .avi and .wav files. These files
will play back in real time when using Adobe Premiere with the Matrox
realtime plug-in.
Chapter 11, Using the Matrox File Converter
RT2000 Installation & User Guide.book Page 185 Monday, April 2, 2001 3:51 PM
185
Converting your files
To start the Matrox File Converter, choose Start > Programs > Matrox Video
Tools > Matrox File Converter.
¬ To convert your files:
1 From the Conversion Type list, choose a conversion type.
2 To select the destination folder where you want your converted files to be
saved, click Browse beside Destination Folder.
3 To select the files you want to convert, click Browse beside Source Files. In
the displayed dialog box, select files of the appropriate format for your
selected conversion type. You can use CTRL+click or SHIFT+click to select
multiple files. You can also drag source files into the Source Files section
from Windows Explorer.
4 To select the folder where you store your source audio files (.wav files), click
Browse beside Audio Source Folder.
Converting your files
RT2000 Installation & User Guide.book Page 186 Monday, April 2, 2001 3:51 PM
186
¯Note A green icon beside a file name in the Source Files section indicates
that the file is of the correct format for the selected conversion type. A red icon
indicates that the file is not the correct format and therefore can’t be converted.
5 Click Convert. A dialog box displays a progress report of the conversion.
6 Your converted files (video and audio, if applicable) are saved to your chosen
destination folder. The file naming convention is as follows:
✄
MPEG-2 Program files keep the same file name as the source file, but the
extension changes to .mpg.
✄
MPEG-2 Elementary files keep the same file name as the source file, but
the extension changes to .m2v.
✄
VFW DV AVI files have _VFW_DV appended to the name of the
destination file. For example, the source files Demo.avi and Demo.wav are
converted to a file named Demo_VFW_DV.avi.
✄
Matrox DV AVI + WAV files have _Matrox_DV appended to both the
destination .avi and .wav files. For example, the source file Demo.avi is
converted to Demo_Matrox_DV.avi and Demo_Matrox_DV.wav.
Commands for working with conversion lists
Once you have added your source files for a selected conversion type, you can
save this grouping as a conversion list (.cl file). You can then reload this list at
any time to add or remove files and resave it.
To display commands for working with conversion lists, right-click a
Conversion Type in the Conversion List section. Choose the command you
want from the displayed pop-up menu:
✃
Load List Allows you to open a list that you have
already saved.
✃
Save List
Saves the currently selected list as a .cl
file.
✃
Clear List Removes all lists from the Conversion
List section.
✃
Insert Clone List Inserts a copy of the selected list to
the Conversion List section.
To create a new conversion list at any time, simply click New List. You can then
select the conversion type, source files, and other settings for the conversion you
want to perform.
Chapter 11, Using the Matrox File Converter
RT2000 Installation & User Guide.book Page 187 Monday, April 2, 2001 3:51 PM
187
Notes
✃
The Matrox File Converter does not support a DV file for conversion if it is
greater than 2 gigabytes (GB), or an MPEG-2 file if it is greater than 4 GB.
✃
When using the conversion type Matrox MPEG-2 IBP + WAV → MPEG-2
Program, source files with data rates greater than 7 Mbits/sec are not
supported.
✃
When using the conversion type Matrox MPEG-2 IBP + WAV → MPEG-2
Program or Matrox DV AVI + WAV → VFW DV AVI, you only need to select
your source .avi files. The associated .wav files are added automatically,
provided that you select the correct Audio Source Folder.
✃
If you’re using the conversion type VFW DV AVI → Matrox DV
AVI + WAV, your converted audio files will be placed in the same folder as
your converted video files. If you keep your audio files on a separate drive,
you can move your new .wav files to your audio drive once the conversion is
complete.
Converting your files
RT2000 Installation & User Guide.book Page 188 Monday, April 2, 2001 3:51 PM
188
Your notes
Chapter 11, Using the Matrox File Converter
RT2000 Installation & User Guide.book Page 189 Monday, April 2, 2001 3:51 PM
Using Inscriber TitleExpress
This chapter provides an overview of Inscriber TitleExpress and
explains the required settings for creating realtime titles that you want
to include in your Adobe Premiere projects.
C
h
a
p
t
e
r
RT2000 Installation & User Guide.book Page 190 Monday, April 2, 2001 3:51 PM
190
Overview
TitleExpress is a television-quality character generator that lets you create stills,
rolls, and crawls for your Adobe Premiere projects on Matrox RT2000.
TitleExpress offers extensive typographic and color controls for design
flexibility. You can create your title by using one of the many pre-designed
templates, or create your title from scratch. Because TitleExpress works from
inside Adobe Premiere, and saves your titles directly to Premiere’s project bin,
you’ll save a lot of time and effort while producing professional titles for your
video projects.
Once in Premiere, you can start TitleExpress by choosing Project > Create >
Inscriber TE Title:
✐
✑
✒
Here’s a brief description of the Inscriber TitleExpress window:
✐ CG Toolbar
This toolbar consists of the Title Template list, where you
can select any of the available pre-defined title templates, the Title Type list
(where you can choose a title type of Still, Roll, or Crawl), and the Center all
text button.
Chapter 12, Using Inscriber TitleExpress
RT2000 Installation & User Guide.book Page 191 Monday, April 2, 2001 3:51 PM
191
✑ Workspace
This is where you see your titles as you create them. There is a
safe title area to work in.
✒ CG Attributes
These tabbed pages contain various editing modifiers:
Use this to specify your type specs, such as font type, font
height and width, as well as attributes for applying a shadow or edging to
your text.
✄
Attributes
✄
Color
✄
Styles
✄
Text Edit
Lets you set face, edge, and shadow colors, as well as correct illegal
colors. You can also apply transparency and gradients to the colors of your
text, and select a background image for your title.
Shows some of the available text styles that you can use to apply
various CG Attributes to your title. To see a list of all the styles, right-click
on any style chip, then select Open Style Library.
Use this tab to edit your text or work with your own list of
commonly used text items, such as names.
¯Note For complete details on the CG Attributes, refer to the How To section of
the TitleExpress online Help by choosing Help > Help Topics.
Creating a simple title
¬ To see how easy it is to create a simple title, follow these steps:
1 From Adobe Premiere, choose Project > Create > Inscriber TE Title.
2 From the TitleExpress Title Template list in the CG Toolbar, select the predefined template 1104 Lower Third 4:
3 A message pops up to confirm that you want to change the current layout.
Click OK. You also have the option of preserving any text contents that you
were using from a previous title template in the same TitleExpress session.
4 From the Title Type list in the CG Toolbar, select Still.
5 In the workspace, select the word Heading.
Creating a simple title
RT2000 Installation & User Guide.book Page 192 Monday, April 2, 2001 3:51 PM
192
6 Type over Heading with your name.
7 In the workspace, select Subheading.
8 Type over Subheading with the name of your city.
9 To change the style of your text, select the text in the workspace, then click
the Style tab. You can select any of the style chips to replace the style of your
text. You can also right-click any style chip, and select Open Style Library
to see a list of all the available TitleExpress styles.
10 If you want to add a background image to your title, click the Color tab, then
click the empty Background image chip. In the provided dialog box, you can
select and preview the background image you want.
Background
image chip
¯Note You can move or resize your text by dragging the sides or corners of
your text box in the workspace.
11 When you’re satisfied with your title, choose File > Save to Premiere. The
following dialog box appears:
Chapter 12, Using Inscriber TitleExpress
RT2000 Installation & User Guide.book Page 193 Monday, April 2, 2001 3:51 PM
193
12 Choose a folder, name your file, and click Save. Your title is saved as an .icg
file. TitleExpress closes, and your title is automatically placed in your Adobe
Premiere project bin.
13 Drag your title to the Timeline. If you place your title on Video 2 or higher,
an Alpha Channel key is automatically applied.
°Important TitleExpress works as a plug-in for Adobe Premiere and not as a
stand-alone program. Therefore, do not leave TitleExpress open while editing in
Premiere. Always save your title and quit TitleExpress before returning to your
work in Premiere.
For complete details on using Inscriber TitleExpress, including a list of keyboard
shortcuts, refer to the program’s online Help (choose Help > Help Topics).
Remarks
✃
Stills created by the above method of choosing Project > Create > Inscriber
TE Title play back from your Timeline in real time. Rolls or Crawls need to
be rendered.
✃
If you need to edit a title that you have already created, simply double-click
the .icg title on the Adobe Premiere Timeline to re-enter TitleExpress, where
you can make your changes and resave the title.
✃
You can also save your TitleExpress still title as a .tga file to be imported
into Premiere. Your title will play back in real time provided that you export
it from TitleExpress as a 32-bit uncompressed .tga.
✃
You can add an Inscriber TitleExpress title to a clip as a Premiere filter as
well (choose Clip > Filters > Inscriber TE Title). With this method, you’ll
see your underlying video clip in the TitleExpress work area as you create
your title, but the resulting clip will not play back in real time from your
Timeline.
Remarks
RT2000 Installation & User Guide.book Page 194 Monday, April 2, 2001 3:51 PM
194
Your notes
Chapter 12, Using Inscriber TitleExpress
RT2000 Installation & User Guide.book Page 195 Monday, April 2, 2001 3:51 PM
Using Ulead Cool 3D
This chapter provides an overview of Ulead Cool 3D and explains the
required settings for creating realtime titles that you want to include in
your Adobe Premiere projects.
C
h
a
p
t
e
r
RT2000 Installation & User Guide.book Page 196 Monday, April 2, 2001 3:51 PM
196
Overview
Ulead Cool 3D is a 3D titling program that lets you create still and animated titles
for your videos, presentations, reports, and web pages. Included in the program
are numerous preset and customizable effects. You can also import pre-created
logos that have been saved as .emf or .wmf files.
When you start Cool 3D, you see the program workspace:
✐
✑
✒
The workspace is divided into numerous sections:
✐ Toolbars There are a number of toolbars that provide options and
commands that you commonly use while working on your project. These
include a Text Toolbar for editing and formatting text, and an Attribute
Toolbar to specify settings for your effect.
✑ Edit Window
Where you see your titles and effects. The size of the
window can be adjusted by choosing Image > Dimensions.
✒ EasyPalette Directory
The directory of all the preset effects. Use it to
select a category to be seen as thumbnails.
EasyPalette
Thumbnails of each effect in a directory. Simply double-click
a thumbnail to apply it to your title.
Chapter 13, Using Ulead Cool 3D
RT2000 Installation & User Guide.book Page 197 Monday, April 2, 2001 3:51 PM
197
¬ To see how easy it is to create a simple title, follow these steps:
1 Click the Insert Text tool
and type your name into the text box. Click
OK.
2 Choose a directory from the EasyPalette Directory.
3 Drag a thumbnail to the Edit Window to apply the effect to your title.
4 If you want to use your title as a graphics overlay in Adobe Premiere, set
your image dimensions and save your title as explained in the next section,
“Required settings to create a title for use with Adobe Premiere.”
For complete details on using Ulead Cool 3D, refer to the c3d2manual.pdf and
c3d25manual.pdf files on your Ulead Cool 3D CD-ROM.
Required settings to create a title for use with Adobe
Premiere
To create a title to be used as a realtime graphics overlay with transparency in
your Adobe Premiere project:
1 Start Ulead Cool 3D, then set the dimensions for your title by choosing
Image > Dimensions.
✄
For an NTSC title, set Width to 720 and Height to 480 Pixels.
✄
For a PAL title, set Width to 720 and Height to 576 Pixels.
Required settings to create a title for use with Adobe Premiere
RT2000 Installation & User Guide.book Page 198 Monday, April 2, 2001 3:51 PM
198
2 When you are ready to save your title, choose File > Create Image Files >
TGA file.
3 Under TGA Options, make sure Transparent background is selected.
¯Note
If you want to create an animated sequence, select Save image
sequence. Then from the Frame type box, select Field Order A for an NTSC
animation, or Field Order B for a PAL animation. Be aware that animated
sequences are not supported in real time and will need to be rendered in Adobe
Premiere.
4 Name your file and click Save. For instructions on how to set up your
graphics overlay in Adobe Premiere, see “Setting up realtime graphics
overlays” on page 148.
Chapter 13, Using Ulead Cool 3D
RT2000 Installation & User Guide.book Page 199 Monday, April 2, 2001 3:51 PM
199
Tips on creating titles
Here are some suggestions for you to consider to create effective titles for your
video productions:
✃ Don’t place your title too close to the edges of the Edit Window or your
title’s extremities might not be visible when viewed on a standard monitor or
television set. The area in which you can safely place text to be sure it won’t
be hidden is called the safe title area.
✃
Use a font of 20 points or larger. Fonts smaller than 20 points are usually
illegible as titles in a video production.
✃
Sans serif fonts tend to show up better than fonts with serifs, and bold fonts
are preferable to normal or italic fonts.
✃
Try not to use any thin horizontal lines because they might flicker on your
monitor.
✃
If you are creating a title with a background, the color of the title should
contrast well with its background color. A black or gray background is
recommended since many colors, especially highly-saturated colors like
pure red, often appear to “bleed” onto a light-colored background.
Tips on creating titles
RT2000 Installation & User Guide.book Page 200 Monday, April 2, 2001 3:51 PM
200
Your notes
Chapter 13, Using Ulead Cool 3D
RT2000 Installation & User Guide.book Page 201 Monday, April 2, 2001 3:51 PM
Using Sonic Foundry ACID Music
This chapter provides an overview of Sonic Foundry ACID Music and
explains the required settings for creating .wav files that you want to
use in your Adobe Premiere projects.
C
h
a
p
t
e
r
RT2000 Installation & User Guide.book Page 202 Monday, April 2, 2001 3:51 PM
202
Overview
ACID Music is a music-making program that allows you to produce, arrange, and
edit music tracks. It gives you amazing flexibility by offering unlimited tracks
and many professional features. Your ACID Music CD-ROM includes hundreds
of Loops (clips of sound that can be strung together) in a vast array of
instruments and styles.
When you start ACID Music, you see the ACID Music window:
✐
✒
✑
Here’s a brief description of the main sections in the ACID Music window:
✐ Track List Contains the master controls for each Track. From here you
can adjust the mix and reorder the Tracks.
✑ Track View
Contains the arrangement of the Audio Events. This is where
most of your work is done.
✒ Toolbar Contains buttons for the most commonly used tasks.
Media Explorer Use this section to find and preview Loops and other
audio from within ACID Music. Click the Properties tab to view the
properties of Tracks, or the properties of Events on a Track.
Chapter 14, Using Sonic Foundry ACID Music
RT2000 Installation & User Guide.book Page 203 Monday, April 2, 2001 3:51 PM
203
Getting started in ACID Music
Included on your ACID Music CD-ROM is a full User Manual and Tutorial.
Please refer to it for detailed information on using ACID Music, as we will be
covering only the basics here.
¬ To start making music right away:
1 Find a Loop that you want to use in the Media Explorer section. Click a file
for a preview.
2 To add the Loop to the Track List, double-click the Loop or drag it to the
Track List.
3 To add events to the Loop’s Track View, click the Paint Tool (
), then
drag across the empty Track in the Track View. Each Event appears as a
waveform that represents one or more copies of your Loop. The black
indents at the top and bottom of the Event signify repetitions of the Loop.
4 Add any other Loops you want to the Track List and paint Events as you like.
5 You can modify each Track in the Track View by using tools from the
toolbar:
–Draw Tool
Allows you to add, delete, and edit Events in the Track
View, as well as adjust the in and out points of an event.
–Erase Tool
Allows you to “spot erase” sections of an Event, or
erase the entire Event.
6 Each Event in your Track List can be edited for length, location, tempo, key,
and other attributes. For example, if you click the Draw Tool, then right-click
an Event, you can adjust the volume for that Event only.
7 Press the Play All
from the start.
button in the toolbar at any time to hear your project
Saving your project for use in Adobe Premiere
Once you have a completed project that you wish to save:
1 Choose File > Save As.
2 From Save as type, select Mixed Wave File [*.wav].
3 From Attributes, select 48,000 Hz, 16-bit, Stereo.
4 Name your file, then click Save.
Getting started in ACID Music
RT2000 Installation & User Guide.book Page 204 Monday, April 2, 2001 3:51 PM
204
Your notes
Chapter 14, Using Sonic Foundry ACID Music
RT2000 Installation & User Guide.book Page 205 Monday, April 2, 2001 3:51 PM
Using Sonic Solutions DVDit! LE
and the Matrox DVD Player
This chapter provides an overview of Sonic Solutions DVDit! LE and
explains the required settings for creating DVD content from your
Adobe Premiere projects. It also explains how to use the Matrox DVD
Player to play back the DVD volumes you create with DVDit! LE.
C
h
a
p
t
e
r
RT2000 Installation & User Guide.book Page 206 Monday, April 2, 2001 3:51 PM
206
Overview
Sonic Solutions DVDit! is a DVD authoring program that lets you create
interactive content on your PC and publish it on DVD-R or CD-R. DVDit! LE is
specifically tailored for use with your Matrox RT2000.
DVDit! LE allows you to output your DVD project to the following formats:
✃ DVD discs are the DVD files as they are written to recordable DVD-R or
CD-R disc.
✃
✄
DVD-R discs work with any set-top or PC-based DVD player. The discs
can contain up to two hours of high-quality video.
✄
CD-R discs work only with some PC-based DVD players, and can contain
about 15 to 20 minutes of high-quality video. A special cDVD player is
included with DVDit! LE, that you can copy onto a CD-R with your DVD
video, so that your project can be played back on any PC.
DVD volumes are folders containing video and audio files, as well as
information used by a PC-based DVD player. You can create a DVD volume
on any computer media (for example, on your hard drive), and play the files
using any PC-based DVD player, such as the Matrox DVD Player included
with your RT2000 kit. The DVD volume is useful for testing your project
before you create a DVD disc.
Chapter 15, Using Sonic Solutions DVDit! LE and the Matrox DVD Player
RT2000 Installation & User Guide.book Page 207 Monday, April 2, 2001 3:51 PM
207
Exporting material for your DVD project
The first step to creating a DVD is to get some video material onto your A/V
drive. You use Adobe Premiere to either capture or export the desired video to an
MPEG-2 IBP.avi file. Once you have some MPEG-2 IBP video material, you can
use DVDit! LE to create your DVD.
¬ To export material for your DVD project:
1 Start Adobe Premiere.
2 Open the project from which you want to export material.
3 Drag the ends of the work area bar (the yellow bar flanked by gray arrows)
so that it extends over the length of the area you want to export.
Work area bar
4 Choose File > Export Timeline > Movie, then click the Settings button.
5 From the File Type list, select Matrox RT.
6 From the Range list, select Work Area.
Exporting material for your DVD project
RT2000 Installation & User Guide.book Page 208 Monday, April 2, 2001 3:51 PM
208
¯Note You can select Entire Project if you want to export your entire
Timeline, rather than the area selected with the work area bar.
7 Make sure that both Export Video and Export Audio are selected if you
want to export video with associated audio.
8 From the menu at the top of the dialog box, select Video.
9 From the Compressor list, select Matrox MPEG-2 IBP (Export Only).
10 Click the Configure button. This displays the MPEG-2 IBP Options dialog
box:
Chapter 15, Using Sonic Solutions DVDit! LE and the Matrox DVD Player
RT2000 Installation & User Guide.book Page 209 Monday, April 2, 2001 3:51 PM
209
11 From the Presets list, select DVD-compliant. This sets the MPEG-2 IBP
options to recommended DVD-compliant presets that are suitable for use
with DVDit! LE.
12 Click OK to return to the Export Movie Settings dialog box.
13 Name your .avi file and save it to your A/V drive. You may want to create a
folder on your A/V drive for your DVDit! exports.
14 Quit Adobe Premiere once the export is complete.
For more information on exporting video, see “Defining your Export Movie
settings” on page 94, as well as your Adobe Premiere User Guide.
Exporting material for your DVD project
RT2000 Installation & User Guide.book Page 210 Monday, April 2, 2001 3:51 PM
210
Creating a DVD volume
✐
✑
✒
✐ Video Monitor ✑ “First play” placeholder ✒ Palette Window
You can use DVDit! LE to create a DVD volume, which can be played using a
PC-based software DVD player (for example, the Matrox DVD Player). The
following steps explain how to create a simple DVD volume. For complete
details on how to use DVDit! LE, see your DVDit! User Manual (provided in
PDF format on your DVDit! LE CD-ROM).
1 Start DVDit! LE.
2 In the Project Planner that opens, click Start a New Project.
3 In the next dialog box, under
Choose a Video Format,
select MPEG2 (DVDcompliant). Click Finish.
Chapter 15, Using Sonic Solutions DVDit! LE and the Matrox DVD Player
RT2000 Installation & User Guide.book Page 211 Monday, April 2, 2001 3:51 PM
211
4 Click the Backgrounds button on the Palette Window. Notice that the
default theme backgrounds are automatically loaded. Select a background by
dragging it to the “First play” placeholder.
5 Click the Buttons button on the Palette. Drag any button to the Video
Monitor.
6 Click the button in the Video Monitor to resize it. A white border with
handles now appears. Drag any of the eight handles to resize the button
vertically, horizontally, or diagonally.
¯Note You can use CTRL+click to select multiple buttons and resize them
simultaneously.
7 Click the Media button. Start Windows Explorer, locate the .avi file (and
.wav file, if applicable) that you exported from Adobe Premiere, and drag it
to the Palette Window. Right-click the .avi file and click Play to watch it
play back in the Video Monitor. Right-click the .wav file and click Play to
listen to it.
8 Drag the video file from the Media section of the Palette and drop it on the
button you added to the Video Monitor. This creates a link between the
button and the video. Drag the corresponding audio file to the same button.
To see what media is linked to your button, right-click anywhere in the
Video Monitor and choose Show Button Links. Notice that the file names
are listed. Right-click anywhere in the Video Monitor and choose Hide
Button Links to return to the normal view.
¯Note You can also create buttons by simply dragging any thumbnail from
the Media section of the Palette and dropping it directly on the Video Monitor.
A rectangular button with the thumbnail superimposed on the front will be
created.
9 Click the Text button on the Palette. The default list of all the font styles on
your computer appears. Select a font style and drag it to the Video Monitor.
The word “Text” appears in the font style you’ve chosen.
10 Double-click the word “Text” to highlight it for editing. Enter your own text.
Once you are finished entering your text, click anywhere in the Video
Monitor to see the end result.
11 Click your text to resize it. Choose Effects > Text Properties to apply color
and shading effects to your text. Experiment with various settings. Click OK
when you are finished.
Creating a DVD volume
RT2000 Installation & User Guide.book Page 212 Monday, April 2, 2001 3:51 PM
212
¯Note You can link video material or still images to text, just as you can with
buttons. Simply drag the media material and drop it on the text.
12 Click the Play button on the Palette Window to preview your DVD project.
Preview mode simulates how the DVD project will respond once it’s
completed. You can click the buttons on the Video Monitor to test the video
clips or still images. Notice how the buttons and text become highlighted
when you place the mouse pointer over them. The Remote Control behaves
just like a real remote control, with buttons for play, stop, skip, menu, and
title. Close the Remote Control when you are finished.
13 Choose File > Save to save your project.
14 Choose Build > Make DVD Folder to build your DVD volume. In the Path
section, click Browse to name your folder and specify your video drive. All
the other settings can be left as is:
15 Click OK. Your DVD volume will now start to build. When it is complete,
click OK.
16 Quit DVDit! LE.
Chapter 15, Using Sonic Solutions DVDit! LE and the Matrox DVD Player
RT2000 Installation & User Guide.book Page 213 Monday, April 2, 2001 3:51 PM
213
Playing your DVD volume using the Matrox DVD
Player
Browse button
The Matrox DVD Player is an easy-to-use yet powerful software DVD player,
that offers you all the functionality of a set-top player.
¬ To play your DVD volume on the Matrox DVD Player:
1 Choose Start > Programs > Matrox DVD Player > Matrox DVD Player.
2 To select your DVD volume, click the Browse button. Locate the video_ts
folder where you saved your DVD volume, and select video_ts.ifo.
3 Right-click the Matrox DVD Player window. Choose Video Size > Full
Screen. This setting takes full advantage your monitor’s viewable area.
4 You can now play your DVD project as though it were a real DVD. Click the
buttons you created to play the video.
5 When you’re finished, close the Matrox DVD Player.
Playing your DVD volume using the Matrox DVD Player
RT2000 Installation & User Guide.book Page 214 Monday, April 2, 2001 3:51 PM
214
Your notes
Chapter 15, Using Sonic Solutions DVDit! LE and the Matrox DVD Player
RT2000 Installation & User Guide.book Page 215 Monday, April 2, 2001 3:51 PM
RT2000 Troubleshooting
This chapter provides some possible answers if you have trouble
installing or operating your RT2000 system.
C
h
a
p
t
e
r
RT2000 Installation & User Guide.book Page 216 Monday, April 2, 2001 3:51 PM
216
Problems, possible causes, and solutions
Up-to-date information
The following pages contain information about the most common
problems solved by our RT2000 Customer Support department.
These solutions are also available on our web site at
www.matrox.com/videoweb/support in the RT2000 Customer
Support section. As new information becomes available, we’ll
add it there first, so it’s always a good idea to check the site on a
regular basis.
Possible solutions
Many of the troubleshooting items listed here, as well as others
not included, could be solved by upgrading all of your hardware
and software to the latest available versions. For hardware such as
your motherboard, soundcard, and storage devices, check the
manufacturers’ web sites for the latest updates that you can
download and install. As for Matrox hardware and software,
check the RT2000 Customer Support section of our web site for
the latest updates and patches.
Multiple solutions
Some of the problems identified here may have more than one
possible cause, and there are frequently several possible
solutions. Solution instructions may vary depending on your
operating system (Windows 2000 or Windows Me).
³Warning
Chapter 16, RT2000 Troubleshooting
Never open your computer system when its power is on!
RT2000 Installation & User Guide.book Page 217 Monday, April 2, 2001 3:51 PM
217
Installation/configuration
The cards do not fit
Possible cause New or unused slots If you’re installing your cards in new or
previously unused slots, there may be considerable resistance as the
cards slide into the slots. This is normal.
Solution Install carefully Make sure that the cards are perfectly aligned
with the slots and push them in firmly but gently until they’re
correctly seated.
Computer doesn’t display information or start after Millennium
Flex 3D display card is installed
Possible cause 1 Monitor connected to wrong connector on Flex 3D card
Solution Connect monitor to connector #1 Make sure your computer
monitor is connected to connector #1 on the back of your Flex 3D
card (this is the connector closest to the fastening screw).
Possible cause 2 Card not properly installed
If your card isn’t properly installed in
your computer, some electrical connections between the card and
the motherboard may not be made. The gold contacts on your Flex
3D may also be smudged.
Solution Install carefully Make sure your Flex 3D card is properly
installed. Specifically, make sure the contacts are clean and the card
is firmly inserted in its expansion slot and that all connections to it
are firmly in place. If your motherboard isn’t aligned perfectly with
the computer case, you may need to install your Flex 3D card
without the fastening screw.
Possible cause 3 Other display adapter in your computer
There may be an
unsupported display adapter in your computer, either on a separate
card or built into your motherboard.
Solution 1 Remove other card If another display card is plugged into an
expansion slot, remove its listing from Windows Device Manager
(do not restart your computer when prompted), then remove the
card from your computer.
Solution 2 Disable built-in display adapter If a display adapter is built into
your computer motherboard, your system may not have
automatically disabled it when you inserted your Flex 3D card.
Check your system or motherboard manual for instructions on how
to disable your computer’s built-in display adapter.
Problems, possible causes, and solutions
RT2000 Installation & User Guide.book Page 218 Monday, April 2, 2001 3:51 PM
218
Possible cause 4 Incorrect BIOS version
Your computer BIOS (Basic Input/Output
System) may not be up to date. For more information on your
computer BIOS, see your system manual.
Solution Update BIOS Re-install your previous display card and, if
possible, update your computer BIOS. This can usually be done
with software from the manufacturer of your computer. Contact
your system vendor or manufacturer to get a BIOS update for your
computer.
¯Note To get the correct BIOS update, you may need to know the
serial number your computer displays when it restarts. This number
is usually in the lower-left corner of the display. To pause the
restarting to read the serial number, press the PAUSE key. Press the
space bar to resume restarting.
Wrong color balance, screen image off-center, or no picture at all
Possible cause 1 Wrong adjustments
Your monitor’s video controls may be
improperly set.
Solution Adjust your equipment Adjust your monitor’s controls
(brightness, contrast and so on). For more information, see your
monitor manual.
Possible cause 2 Your monitor may not be properly connected.
Solution 1 Connect monitor power cable Make sure the monitor’s power
cable is firmly in place.
Solution 2 Check VGA cable connection to computer Make
sure the 15-pin connector to your Flex 3D card is
firmly in place (connector #1), and that the pins on
the connector are not damaged.
Solution 3 Check connection to back of monitor Make sure the connection
to the back of the monitor is firmly in place. This could be a 15-pin
or BNC connection.
If your monitor uses BNC
input, make sure the Red
(R), Green (G), Blue (B),
Horizontal Sync
(HSYNC —white or gray
wire), and Vertical Sync
(VSYNC —black wire) connections are firmly in place and plugged
into the correct input.
Chapter 16, RT2000 Troubleshooting
RT2000 Installation & User Guide.book Page 219 Monday, April 2, 2001 3:51 PM
219
Possible cause 3 Incorrect monitor settings
If your monitor uses BNC input, one
or more connection settings may be incorrect.
Solution Check monitor settings Set each of your monitor’s RGB input
and sync switches (if available) to 75 ohms, with the sync set to
“external.” These controls are usually switches on the back of your
monitor.
Possible cause 4 Incorrect software settings If display problems occur after the
startup screen of your operating system, your software monitor
settings may be incorrect.
Solution Check software settings Make sure correct software monitor
settings are selected.
After the startup screen, or after display settings are changed,
the screen image is garbled or unusable (blank screen, rolling or
overlapping screen images)
Possible cause 1 Unsupported settings
The Flex 3D display driver may be trying
to use settings your monitor doesn’t support. This can happen if a
monitor was never selected in the software and the display
resolution was changed to one your monitor doesn’t support, or if
the monitor connected to your computer was changed without the
software settings being changed. It is also important for your
monitor to have the correct drivers. Check your monitor
manufacturer’s web site for more information.
³Warning If incorrect software monitor settings are applied, some
monitors can be permanently damaged. For more information, see
your monitor manual.
Solution Reset driver settings
¬ To reset driver settings in Windows 2000:
1 Press CTRL+ALT+DEL twice to restart your computer.
2 Before Windows starts, press F8 for the Windows startup menu
to appear. If F8 doesn’t work, try pressing and holding CTRL
before Windows starts.
3 Select “Safe mode,” then press ENTER.
4 Right-click the Windows desktop background, then choose
Properties > Settings.
5 Move the Screen area slider down to its lowest setting
(640 x480 pixels), then click OK.
Problems, possible causes, and solutions
RT2000 Installation & User Guide.book Page 220 Monday, April 2, 2001 3:51 PM
220
6 Restart your computer normally.
7 Restore your original display settings (see step 4).
¬ To reset driver settings in Windows Me:
1 Press CTRL+ALT+DEL twice to restart your computer.
2 Before Windows starts, press F8 for the Windows startup menu
to appear. If F8 doesn’t work, try pressing and holding CTRL
before Windows starts.
3 Select “Safe mode,” then press ENTER.
4 Right-click the Windows desktop background, then choose
Properties > Settings.
5 Move the Screen area slider down to its lowest setting
(640 x 480 pixels), then click OK.
6 Restart your computer normally.
7 Make sure the correct monitor is selected in Windows.
8 Make sure you’re not using inappropriate monitor setting
customizations: Access the PowerDesk Monitor Settings
property sheet, then click Delete all customizations.
9 Restore your original display settings (see step 4).
Possible cause 2 Missing files
Files on your system may have been deleted or
corrupted.
Solution Install display driver After you’ve made sure that your Matrox
RT2000 hardware is properly installed, try re-installing your Flex
3D Edition display driver.
¬ To install the Flex 3D display driver in Windows 2000:
1 Right-click My Computer, then choose Manage.
2 Select Device Manager.
3 Click the plus sign next to Display adapters.
4 Right-click your Matrox card’s name, and choose Properties,
then click the Driver tab.
5 In the provided dialog box, click the Update Driver button.
6 Insert your Matrox RT2000 CD in your CD-ROM drive.
Chapter 16, RT2000 Troubleshooting
RT2000 Installation & User Guide.book Page 221 Monday, April 2, 2001 3:51 PM
221
7 The Update Device Driver Wizard starts. Click Next. The
recommended choice will be checked, click Next. Select
Specify a location, click Browse, choose the
support\G400Flex3D directory on your CD-ROM drive, then
click Next.
8 Follow the onscreen instructions to re-install your Matrox Flex
3D Edition display drivers.
9 When prompted, click Yes to restart your computer.
¬ To install the Flex 3D Edition display driver in Windows Me:
1 Right-click My Computer, then select Properties.
2 Click the Device Manager tab.
3 Under Display adapters, select your Matrox card.
4 Click the Properties button, then the Driver tab.
5 In the provided dialog box, click the Update Driver button.
6 Insert your Matrox RT2000 CD in your CD-ROM drive.
7 The Update Device Driver Wizard starts. Click Next. The
recommended choice will be checked, click Next. Select
Specify a location, click Browse, choose the
support\G400Flex3D directory on your CD-ROM drive, then
click Next.
8 Follow the onscreen instructions to re-install your Matrox Flex
3D Edition display drivers.
9 When prompted, click Yes to restart your computer.
After restarting computer, Windows warns that the display card isn’t
configured correctly
Possible cause Conflicts with other drivers You may have a conflict because of
previously installed display cards.
Solution Delete and re-install Delete the listing for all existing display
cards and re-install the Flex 3D Edition display driver.
¬ To delete and re-install your display driver in Windows 2000:
1 If Windows prompts you to start the Add New Hardware
Wizard, click Cancel. (If you start the Wizard, it will not
detect your display card.)
2 Right-click My Computer, then choose Manage.
3 Select Device Manager.
Problems, possible causes, and solutions
RT2000 Installation & User Guide.book Page 222 Monday, April 2, 2001 3:51 PM
222
4 Click the plus sign next to Display adapters.
5 Delete all listed display adapters (right-click each, then click
Uninstall), then click OK. Click Yes to restart your system.
6 After your system restarts, your Flex 3D Edition card will be
detected, and the display driver installed.
7 When the installation is complete, click Yes to restart your
computer.
¬ To delete and re-install your display driver in Windows Me:
1 If Windows prompts you to start the Add New Hardware
Wizard, click Cancel. (If you start the Wizard, it will not
detect your display card.)
2 Right-click My Computer, then choose Properties.
3 Click the Device Manager tab.
4 Click the plus sign next to Display adapters.
5 Delete all listed display adapters (click each, then click
Remove), then click OK. Click Yes to restart your system.
6 After your system restarts, your Flex 3D Edition card will be
detected, and the display driver installed.
7 When the installation is complete, click Yes to restart your
computer.
Chapter 16, RT2000 Troubleshooting
RT2000 Installation & User Guide.book Page 223 Monday, April 2, 2001 3:51 PM
223
Matrox Video Tools Setup warns that your Matrox driver is not installed
correctly
Possible cause Driver not installed When Windows first detected your RT2000
card as a Multimedia Controller, you may not have installed the
driver correctly.
Solution Install RT2000 driver Follow these steps to install your RT2000
driver:
¬ To install the RT2000 driver in Windows 2000:
1 Right-click My Computer, then choose Manage.
2 Select Device Manager.
3 Under Other devices, select Multimedia Controller.
4 Right-click, then select Uninstall.
5 Click OK.
6 Insert your Matrox RT2000 CD in your CD-ROM drive, then
restart your computer.
7 Windows now detects a new “Multimedia Controller” (that is,
your RT2000 codec card). The “Add New Hardware Wizard”
starts so that you can install the driver for your RT2000 card.
8 To install the driver for your RT2000 card and continue with
the Matrox Video Tools installation, see “Installing Matrox
Video Tools on a computer with Windows 2000” on page 52.
Problems, possible causes, and solutions
RT2000 Installation & User Guide.book Page 224 Monday, April 2, 2001 3:51 PM
224
¬ To install the RT2000 driver in Windows Me:
1 Right-click My Computer, then choose Properties.
2 Click the Device Manager tab.
3 Under Other devices, select PCI Multimedia Device (it will
have an exclamation point beside it), then click Delete.
4 Click OK.
5 Insert your Matrox RT2000 CD in your CD-ROM drive, then
restart your computer.
6 Windows now detects a new “PCI Multimedia Device” (that is,
your RT2000 codec card). The “Add New Hardware Wizard”
starts so that you can install the driver for your RT2000 card.
7 To install the driver for your RT2000 card and continue with
the Matrox Video Tools installation, see “Installing Matrox
Video Tools on a computer with a new copy of Windows Me”
on page 56.
Chapter 16, RT2000 Troubleshooting
RT2000 Installation & User Guide.book Page 225 Monday, April 2, 2001 3:51 PM
225
Using Adobe Premiere
Video file playback is jerky (dropping frames)
Possible cause 1 DMA may not be enabled on your A/V drive
If your A/V drive is
an EIDE device and DMA bus-mastering is not enabled, your drive
won’t be able to support realtime video editing on Matrox RT2000.
Solution Enable DMA Make sure that DMA is enabled for all EIDE
devices. See page 21 for more details.
Possible cause 2 Wrong drive or system not powerful enough You may not be
using your A/V drive for playback, or your system is not powerful
enough for realtime video editing.
Solution 1 Use the correct drive Make sure you are using a separate
A/V drive that has passed the Matrox RT2000 Disk Benchmark
tests. For a list of recommended drives, see the RT2000 Customer
Support section of our web site at www.matrox.com/videoweb/
support.
Solution 2 Check settings for scratch disks In Premiere, make sure your
scratch disks are properly set up for your A/V drives by choosing
Edit > Preferences > Scratch Disks and Device Control. For more
information, see “Setting up your scratch disks” on page 79.
Solution 3 Use Force render option Some of the complex realtime Matrox
effects may cause dropped frames during playback. For those cases,
you can use the Force render option to ensure smooth playback
without dropped frames. For more information, see “Using common
controls in the plug-in” on page 112.
Possible cause 3 Matrox effects too close Your Matrox realtime effects are placed
too close together on the Timeline.
All the Matrox effects require a certain
amount of preload time that’s determined by the capabilities of your
system (both CPU and storage). For details on how to place your
effects for optimal results, see page 109.
Solution Place effects apart
Possible cause 4 Fragmented drive Your A/V drive may be badly fragmented.
Solution Defragment Try defragmenting your A/V drive. To defragment a
hard disk, choose Start > Programs > Accessories > System
Tools > Disk Defragmenter. For more information on how to
defragment your storage devices, see your Windows
documentation.
Problems, possible causes, and solutions
RT2000 Installation & User Guide.book Page 226 Monday, April 2, 2001 3:51 PM
226
Possible cause 5 Other programs running
You should not run any other programs
at the same time as Premiere. Screen savers and programs that use a
large amount of system memory, such as most paint and
compositing applications, can cause problems if you run them at the
same time as Adobe Premiere.
Solution Quit all other programs Make sure you quit all other programs
you have running at the same time as Premiere.
Possible cause 6 Motherboard drivers not updated Your motherboard or chipset
drivers may not be up to date.
Solution Update drivers Update drivers. For an updated list of
recommended motherboard and chipset drivers, see the RT2000
Customer Support section of our web site at www.matrox.com/
videoweb/support.
Graphics or organic wipes are slow to load or cause Adobe Premiere to
freeze
Possible cause 1 Graphics not transferring properly from hard drive to AGP
memory For the best performance on most systems, accelerated
graphics transfer must be enabled in the Matrox General Settings
dialog box in Adobe Premiere. A few systems, however, require
accelerated graphics transfer to be disabled.
Solution Enable or disable accelerated graphics transfer In Adobe
Premiere, do the following:
1 Choose Project > Project Settings> General.
2 From the Editing Mode list, select Matrox RT.
3 Click the Advanced Settings button.
4 In the displayed dialog box, make sure that Accelerated
graphics transfer is selected unless you find that the Organic
Wipes dialog box takes a very long time to display (about 40 to
60 seconds) when you apply or edit a Matrox organic wipe.
Chapter 16, RT2000 Troubleshooting
RT2000 Installation & User Guide.book Page 227 Monday, April 2, 2001 3:51 PM
227
Possible cause 2 Software or drivers not installed correctly
Adobe Premiere or
Matrox Video Tools software, or Flex 3D display driver may be
corrupted or not installed correctly.
Solution Re-install software or drivers Uninstall Matrox Video Tools and
Adobe Premiere. Re-install Premiere, then re-install Matrox Video
Tools.
Possible cause 3 RT2000 codec card moved You may have physically moved your
RT2000 codec card without re-installing Matrox Video Tools.
Solution Re-install Matrox Video Tools If you’ve moved your RT2000
card, you’ll have to uninstall and re-install Matrox Video Tools.
Possible cause 4 Motherboard drivers not updated Your motherboard or chipset
drivers may not be up to date.
Solution Update drivers Update your drivers. For an updated list of
recommended motherboard and chipset drivers, see the RT2000
Customer Support section of our web site at www.matrox.com/
videoweb/support.
Adobe Premiere displays error message “Could not load Matrox RT
Plug-in” after installing Matrox Video Tools
Possible cause 1 Check ribbon cable connection
Your ribbon cable may not be
properly connected.
Solution Connect ribbon cable Make sure your ribbon cable is properly
attached and secured to both the RT2000 card and your Flex 3D
display card.
Possible cause 2 Check RT2000 breakout box cable connection Your RT2000
breakout box cable may not be properly connected.
Solution Connect your RT2000 breakout box cable Make sure that your
RT2000 breakout box cable is properly attached to connector #2 on
your Flex 3D display card, the RT2000 codec card, and the breakout
box.
Possible cause 3 IRQ sharing problem Your RT2000 card may be sharing IRQs
with other devices.
Solution 1 Separate IRQs In Windows Device Manager, try to separate your
RT2000 from other devices. You may have to change the slot of the
card that’s sharing IRQs with your RT2000.
Problems, possible causes, and solutions
RT2000 Installation & User Guide.book Page 228 Monday, April 2, 2001 3:51 PM
228
Solution 2 Create hardware profile
To free up IRQs and resources in a
specific Hardware Profile for the RT2000, see Appendix A,
“Creating an RT2000 Hardware Profile,” on page 239.
Possible cause 4 Software or drivers not installed correctly
Adobe Premiere or
Matrox Video Tools software, or Millennium Flex 3D display driver
may be corrupted or not installed correctly.
Solution Re-install software or drivers Uninstall Matrox Video Tools and
Adobe Premiere. Re-install Premiere, then re-install Matrox Video
Tools.
Adobe Premiere freezes when using DV-1394 device control
Possible cause 1 IRQ sharing problem
Your RT2000 and/or DV-1394 drivers
may be sharing IRQs with other devices.
Solution 1 Separate IRQs In Windows Device Manager, try to separate your
RT2000 and DV-1394 drivers from other devices. You may have to
change the slot of the card that’s sharing IRQs with your RT2000 or
DV-1394 driver.
Solution 2 Create hardware profile To free up IRQs and resources in a
specific Hardware Profile for the RT2000, see Appendix A,
“Creating an RT2000 Hardware Profile,” on page 239.
Possible cause 2 Non-compatible device
You may be using a non-compatible DV1394 device.
Solution Use only compatible DV-1394 devices For an updated list of
compatible DV-1394 devices, see the RT2000 Customer Support
section of our web site at www.matrox.com/videoweb/support.
¯Note Some compatible devices don’t support device control.
However, you’ll be able to manually control your device for capture
or recording onto tape.
Possible cause 3 Wrong time code on DV tapes Your DV tape may not have
continuous time code.
Solution Use only continuous time code tapes To use DV-1394 device
control, your DV tapes must contain continuous and consecutive
time code.
Chapter 16, RT2000 Troubleshooting
RT2000 Installation & User Guide.book Page 229 Monday, April 2, 2001 3:51 PM
229
Unable to save entire project to disk
Possible cause 1 Scratch disks not set to A/V drive
You may not have set up your
scratch disks properly in Premiere.
Solution Specify your scratch disks In Adobe Premiere, you can check
your scratch disks by choosing Edit > Preferences > Scratch Disks
and Device Control. For more information, see “Setting up your
scratch disks” on page 79.
Possible cause 2 Fragmented drive Your A/V drive may be badly fragmented.
Solution Defragment Try defragmenting your A/V drive. To defragment a
hard disk, click Start > Programs > Accessories > System Tools
> Disk Defragmenter. For more information on how to defragment
your storage devices, see your Windows documentation.
Possible cause 3 Not enough space Your A/V drive may not have enough space to
save your project.
Solution Free some space
Remove unnecessary files not related to your
project to free up some space, or install a larger A/V drive.
Possible cause 4 IRQ sharing problem
Your RT2000 drivers may be sharing
IRQs with other devices.
Solution 1 Separate IRQs In Windows Device Manager, try to separate your
RT2000 drivers from other devices. You may have to change the slot
of the card that is sharing IRQs with your RT2000 driver.
Solution 2 Create hardware profile To free up IRQs and resources in a
specific hardware profile for the RT2000, see Appendix A,
“Creating an RT2000 Hardware Profile,” on page 239.
Problems, possible causes, and solutions
RT2000 Installation & User Guide.book Page 230 Monday, April 2, 2001 3:51 PM
230
Capture issues
Can’t capture with DV-1394, Y/C, or composite input
Possible cause 1 Incorrect connections to breakout box
You may not have
properly connected your video camera or deck to the breakout box.
Solution Check connections Make sure you have properly connected your
devices to the breakout box. See Chapter 4, “Connecting Your
Devices.”
Possible cause 2 Incorrect settings
Settings in Adobe Premiere may not be
correct.
Solution Make sure settings are correct In Premiere, make sure that you
have selected the proper video input for your device in Project >
Project Settings > Capture. If using a DV-1394 device for capture,
make sure that Matrox DV Device control is set in Edit >
Preferences > Scratch Disks and Device Control.
Possible cause 3 Non-compatible device
You may be using a non-compatible DV1394 device.
Solution Use only compatible DV-1394 devices For an updated list of
compatible DV-1394 devices, see the RT2000 Customer Support
section of our web site at www.matrox.com/videoweb/support.
Possible cause 4 IRQ sharing problem
Your RT2000 and/or DV-1394 drivers
may be sharing IRQs with other devices.
Solution 1 Separate IRQs In Windows Device Manager, try to separate your
RT2000 and DV-1394 drivers from other devices. You may have to
change the slot of the card that is sharing IRQs with your RT2000 or
DV-1394 driver.
Solution 2 Create hardware profile To free up IRQs and resources in a
specific hardware profile for the RT2000, see Appendix A,
“Creating an RT2000 Hardware Profile,” on page 239.
Possible cause 5 Device drivers not installed correctly
Your device drivers may
be corrupted or not installed correctly.
Solution 1 Re-install device drivers Uninstall your DV device and re-install
your drivers.
Chapter 16, RT2000 Troubleshooting
RT2000 Installation & User Guide.book Page 231 Monday, April 2, 2001 3:51 PM
231
Solution 2 Re-install software or drivers
Uninstall Matrox Video Tools and
Adobe Premiere. Re-install Premiere, then re-install Matrox Video
Tools.
Possible cause 6 DV device shows up as Imaging device Windows Device
Manager may recognize your DV device as an imaging device.
You’ll have to remove your DV device as
an imaging device and re-install the driver.
¬ To re-install the device driver in Windows 2000:
1 Turn on your DV-1394 device and insert the Matrox RT2000
installation CD in your CD-ROM drive. Windows detects new
hardware when you restart.
Solution Re-install device driver
2 Right-click My Computer.
3 Select Manage.
4 Select Device Manager.
5 Click the plus sign beside Imaging devices.
6 Right-click Microsoft DV Camera and VCR, then select
Uninstall.
7 A message will appear about uninstalling the device, click OK.
8 Choose Action > Scan for hardware changes.
9 The Found New Hardware Wizard starts. Click Next.
10 Select Search for a suitable driver for my device
(recommended), click Next.
11 Under Optional search locations make sure nothing is
selected, and click Next.
12 Windows will automatically find the c:winnt\inf\dvcam.inf
driver file. Click Next.
13 Click Yes to continue.
14 The Found New Hardware Wizard dialog box will appear. You
now have the proper driver installed. Click Finish to exit.
15 Your DV device should now be listed under Sound, video and
game controllers in your Device Manager.
¬ To re-install the device driver in Windows Me:
1 Turn on your DV-1394 device.
2 Right-click My Computer, then choose Properties.
Problems, possible causes, and solutions
RT2000 Installation & User Guide.book Page 232 Monday, April 2, 2001 3:51 PM
232
3 Click the Device Manager tab.
4 Click the plus sign beside Imaging devices.
5 Select your DV device, then click Remove.
6 Click Refresh. You may be prompted to insert your Windows
CD-ROM.
7 Your DV device should now be listed under Sound, video and
game controllers.
Chapter 16, RT2000 Troubleshooting
RT2000 Installation & User Guide.book Page 233 Monday, April 2, 2001 3:51 PM
233
Export issues
Unable to export to tape via DV-1394
Possible cause 1 Non-compatible device
You may be using a non-compatible DV1394 device.
Solution Use only compatible DV-1394 devices For an updated list of
compatible DV-1394 devices, see the RT2000 Customer Support
section of our web site at www.matrox.com/videoweb/support.
Possible cause 2 Video preview during export enabled
On certain systems export
to tape will not work if video preview during export is enabled.
Solution Disable video preview during export Clear Enable video
preview during export in the Matrox General Settings dialog box
(choose Project > Project Settings > General > Advanced
Settings). Be aware that the preview will be disabled on your
computer monitor. You’ll still be able to preview the video you’re
exporting on your NTSC or PAL video monitor, assuming you’ve
connected the analog video output of your DV-1394 device to your
video monitor.
¯Note If you clear the Enable video preview during export option
after a failed DV-1394 export to tape, you'll need to restart your
computer before starting the export to tape again.
Possible cause 3 Using Print to Video
You may be trying to print to video instead
of exporting to tape.
Solution Use Export to Tape In Adobe Premiere, choose File > Export
Timeline > Export to Tape.
Problems, possible causes, and solutions
RT2000 Installation & User Guide.book Page 234 Monday, April 2, 2001 3:51 PM
234
Audio issues
Sound doesn’t capture or print to tape, video files play back with no
sound, or sound output is distorted or too loud
Possible cause 1 Incorrect adjustments If the sound problem is with a particular
device (for example, TV or speaker), the volume control on the
device itself may need adjusting.
Solution 1 Adjust volume Adjust the volume control on the device.
Solution 2 Bad connections Audio cables may be loose or incorrectly wired.
Solution 3 Check connections
Make sure your soundcard cables are
properly connected. See page 36 for details.
Possible cause 2 Incorrect adjustments in Windows
Your soundcard’s software
settings may be incorrect. Specifically, input or output may be
disabled, or volume levels may be too low or too high.
Solution Check adjustments Make sure your soundcard’s Windows
software settings are correct:
1 Double-click the speaker icon ( ) on the Windows taskbar.
¯Note If you don’t see the speaker icon on your Windows taskbar,
run Sounds and Multimedia from the Windows Control Panel,
select Show volume control on the taskbar, then click OK.
2 Choose Options > Properties.
3 Click the Recording button, enable all check boxes in the list
box, then click OK.
4 For the each of the controls (Line-in, Microphone, etc.), make
sure the Volume slider levels are okay (if you’re not sure, try
half level), and the Mute check boxes are enabled.
5 Click Options > Properties.
6 Click the Playback button, enable all check boxes in the list
box, then click OK.
7 For each of the controls (Line, Wave, etc.), make sure the
Volume sliders are at one-quarter to one-half levels (if you’re
not sure, try half level), and the Mute check boxes are cleared.
8 Close the dialog box.
Chapter 16, RT2000 Troubleshooting
RT2000 Installation & User Guide.book Page 235 Monday, April 2, 2001 3:51 PM
235
Possible cause 3 RCA cables not properly attached
You may not have attached
your audio cables to the breakout box.
Solution Re-attach cables Make sure that your RCA audio cables are
securely attached and in the proper jacks on your RT2000 breakout
box.
Possible cause 4 RT Mixer settings muted Your RT Mixer settings may be muted
or the volume sliders may be too low.
Solution Check settings Make sure the RT Mixer settings are correct:
1 Double-click the speaker icon on the Windows taskbar.
¯Note If you don’t see the speaker icon on your Windows taskbar,
run Sounds and Multimedia from the Windows Control Panel, select
Show volume control on the taskbar, then click OK.
2 Choose Options > Properties.
3 From the Mixer device list, select Matrox RT Mixer.
4 To change the capture volume, select Recording and Master
Record, then click OK.
5 Make sure the Mute check box is cleared, and adjust the
Master Record Volume slider as needed.
6 Choose Options > Properties.
7 To change the playback volume, select Playback and Master
Out, then click OK.
8 Make sure the Mute check box is cleared, and adjust the
Master Out Volume slider as needed.
No audio output from the PC speakers or breakout box
Possible cause Bad connections Audio cables may be loose or incorrectly wired.
Solution Check connections Make sure your soundcard cables are properly
connected (see page 36 for details), and that all audio connections to
the breakout box are correct (see Chapter 4, “Connecting Your
Devices”).
Problems, possible causes, and solutions
RT2000 Installation & User Guide.book Page 236 Monday, April 2, 2001 3:51 PM
236
Windows cannot play .wav files
Possible cause No soundcard installed A Windows message will appear if you try
to play any system sounds or any non-RT2000 related sounds,
without having a soundcard installed.
Solution Install a soundcard Make sure you have a soundcard, and that it is
installed correctly.
Chapter 16, RT2000 Troubleshooting
RT2000 Installation & User Guide.book Page 237 Monday, April 2, 2001 3:51 PM
237
DVD/CD authoring
DVD video playback is jerky (skipping frames)
Possible cause Slow player Your DVD drive may be too slow.
Solution Enable DMA If you’re using Windows Me and your DVD drive
supports DMA transfers, enable this feature.
¯Note If your DVD supports DMA and you’re using Windows 2000,
DMA will automatically be enabled. Not all DVD drives support
DMA well. For more information, see the documentation that came
with your DVD drive.
¬ To enable DMA for a DVD drive in Windows Me:
1 Right-click My Computer, then choose Properties.
2 Click the Device Manager tab.
3 Click the plus sign beside Disk drives, then double-click the
name of the DVD drive you’re using.
4 Click Settings, then enable the DMA check box.
5 Click OK > OK > Yes to restart your computer and for changes
to take effect.
Can’t play certain DVD videos
Possible cause Wrong region settings A DVD video may not play back because
the region setting on your DVD player doesn’t match the region
code on the DVD-ROM disc. DVD players and videos use region
codes to prevent the playback of video that was intended only for a
certain region or market.
Solution Get correct version To get a copy of a DVD video that’s
compatible with the region code of your DVD player, contact the
vendor of that video.
Problems, possible causes, and solutions
RT2000 Installation & User Guide.book Page 238 Monday, April 2, 2001 3:51 PM
238
Your notes
Chapter 16, RT2000 Troubleshooting
RT2000 Installation & User Guide.book Page 239 Monday, April 2, 2001 3:51 PM
Creating an RT2000 Hardware
Profile
This appendix explains how to free up IRQs and resources by creating
a specific RT2000 hardware profile.
A
p
p
e
n
d
i
x
RT2000 Installation & User Guide.book Page 240 Monday, April 2, 2001 3:51 PM
240
Creating a specific RT2000 hardware profile
The following section explains how to free up IRQs and resources by creating a
specific RT2000 hardware profile. For more information about creating hardware
profiles for other purposes, see your Windows documentation.
¬ To create an RT2000 hardware profile in Windows 2000:
1 Right-click My Computer, then choose Properties.
2 Click the Hardware tab.
3 Click the Hardware Profiles button.
4 Make sure Profile 1 (Current) is highlighted, then click Copy.
5 Name your new configuration (RT2000, for example). Click
OK > OK.
6 Restart your computer. When you’re presented with a choice of profiles,
select the RT2000 profile you just created.
7 Once in Windows, right-click My Computer, choose Manage, then select
Device Manager.
8 Click the plus sign next to System devices.
9 Right-click each device not essential for video editing with the RT2000, then
select Uninstall. When prompted to Confirm Device Removal, click OK.
10 Do not restart your computer until you’ve removed all of the unnecessary
devices. When you restart, and on all subsequent Windows startups, you’ll
have the choice of starting in your original configuration (if you want to
access all your devices) or your RT2000 configuration (if you want to work
on video editing).
¬ To create an RT2000 hardware profile in Windows Me:
1 Right-click My Computer, then choose Properties.
2 Click the Hardware Profiles tab.
3 Make sure Original Configuration is highlighted, then click Copy.
4 Name your new configuration (RT2000, for example). Click
OK > OK.
5 Restart your computer. When you’re presented with a choice of profiles,
select the RT2000 profile you just created.
6 Once in Windows, right-click My Computer, choose Properties, then select
Device Manager.
7 Click the plus sign next to System devices.
Appendix A, Creating an RT2000 Hardware Profile
RT2000 Installation & User Guide.book Page 241 Monday, April 2, 2001 3:51 PM
241
8 Highlight each device not essential for video editing with the RT2000, and
click Remove. When prompted to Confirm Device Removal, select
Remove from specific configuration, and make sure RT2000 is selected.
9 Do not restart your computer until you’ve removed all of the unnecessary
devices. When you restart, and on all subsequent Windows startups, you’ll
have the choice of starting in your original configuration (if you want to
access all your devices) or your RT2000 configuration (if you want to work
on video editing).
RT2000 Installation & User Guide.book Page 242 Monday, April 2, 2001 3:51 PM
242
Your notes
Appendix A, Creating an RT2000 Hardware Profile
RT2000 Installation & User Guide.book Page 243 Monday, April 2, 2001 3:51 PM
Data Rates and A/V Disk Space
Requirements
This appendix provides the approximate disk space requirements for
capturing or rendering material on your Matrox RT2000 system. It also
includes charts showing the recommended MPEG data rates for
distribution on DVD-R or CD-R.
A
p
p
e
n
d
i
x
RT2000 Installation & User Guide.book Page 244 Monday, April 2, 2001 3:51 PM
244
DV/MPEG-2 qualities and required disk space
The following table shows approximately how much disk space you’ll need per
minute of video captured at various qualities using the DV and MPEG-2 IBP
compression schemes on your Matrox RT2000 system.
Video
Quality
Data Rate1 Data Rate2 Compression
(Mb/sec) (MB/sec)
Ratio
File Size
(MB/min)
Min/1 GB3
of storage
DV4
25.0
2.98
5:1
178.0
5.8
MPEG-2 IBP
2.0
0.24
61.7:1
14.0
73.0
MPEG-2 IBP
7.0
0.83
17.8:1
49.8
20.6
MPEG-2 IBP
9.0
1.07
13.8:1
64.0
16.0
MPEG-2 IBP
12.0
1.43
10.4:1
86.0
12.0
MPEG-2 IBP
15.0
1.79
8.3:1
107.0
9.6
1
In this calculation, a megabit (Mb) is equal to 1,000,000 (1000 × 1000) bits.
2
In this calculation, a megabyte (MB) is equal to 1,048,576 (1024 × 1024) bytes.
3
In this calculation, a gigabyte (GB) is equal to 1024 megabytes (MB), the conventional value used for calculating storage.
4
DV includes the DV, DVCAM, and DVCPRO formats.
¯Note The data rate for MPEG-2 I-frame video is determined by the quality you
select and the complexity of the video. At the highest quality setting, the data rate
is about 25 Mb/sec.
Audio sampling and required disk space
The following table shows how much disk space you’ll need per minute of audio
sampled on your Matrox RT2000.
Sampling
Rate
Bits per
Sample
Type
File Size
(MB/min)
48 kHz
16
Stereo
11
Appendix B, Data Rates and A/V Disk Space Requirements
Min/1 GB of
Storage
93.1
RT2000 Installation & User Guide.book Page 245 Monday, April 2, 2001 3:51 PM
245
Recommended MPEG data rates for distribution on
DVD-R or CD-R
The following charts show the data rate you should select when creating MPEG
files to get the best video quality for your DVD projects. These data rates are
calculated according to the length of your project and the size of your distribution
medium. When disk space is not an issue, such as when your project is short,
you’ll get the best quality using a high constant bit rate (that is, 7 Mbits/sec).
When disk space is at a premium, you should use a variable bit rate.
At data rates of 2 Mbits/sec and higher, you can create an MPEG-2 IBP .avi file
using Adobe Premiere on your Matrox RT2000 system as explained in “Defining
your Export Movie settings” on page 94. At data rates lower than 2 Mbits/sec,
you’ll need to create an MPEG-1 file. You can do this using the Save for Web
export option in Adobe Premiere. For details on this option, see your Adobe
Premiere User Guide.
¯Note These charts assume that your DVD project includes 48-kHz, 16-bit stereo
audio.
Mbits/sec
Recommended data rates for 4.7-GB DVD
Time (minutes)
Constant bit rate
Variable bit rate
Recommended MPEG data rates for distribution on DVD-R or CD-R
RT2000 Installation & User Guide.book Page 246 Monday, April 2, 2001 3:51 PM
246
Mbits/sec
Recommended data rates for 650-MB CD-ROM
Time (minutes)
Constant bit rate
Variable bit rate
Appendix B, Data Rates and A/V Disk Space Requirements
RT2000 Installation & User Guide.book Page 247 Monday, April 2, 2001 3:51 PM
Using Additional Millennium
Flex 3D Display Resolutions
This appendix lists all the display resolutions available with your
Millennium Flex 3D display card. This includes resolutions that are
supported only when you’re not using your Matrox RT2000 for video
editing purposes.
A
p
p
e
n
d
i
x
RT2000 Installation & User Guide.book Page 248 Monday, April 2, 2001 3:51 PM
248
Available display resolutions
This section provides a complete list of the display resolutions available with
your Millennium Flex 3D display card. Most of these resolutions, however, are
not supported when using your Matrox RT2000 system for video editing.
✃
The display resolutions available depend on software monitor settings.
Different software monitor settings have different resolutions available to
them, and so some of the resolutions listed in the following tables may or
may not be available to you.
✃
The maximum refresh rates listed in this section have been rounded and are
based on a monitor with a maximum horizontal refresh rate of 130 kHz.
Depending on your monitor, refresh rate capabilities may vary. For
information on the capabilities of your monitor, see your monitor’s
documentation.
Appendix C, Using Additional Millennium Flex 3D Display Resolutions
RT2000 Installation & User Guide.book Page 249 Monday, April 2, 2001 3:51 PM
249
Maximum display resolution
Aspect ratio Display resolution
4:3/5:4 (standard) 2048× 1536
16:9/16:10 (wide screen) 1920 × 1200
Maximum vertical refresh rate (Hz1)
Aspect ratio Display resolution
4:3/5:4 (standard)
16:9/16:10 (wide screen)
a
1
300-MHz RAMDACa
640×480
800×600
1024×768*
1152×864*
1280× 1024*
1600×1200
1800×1440
1920×1440
2048×1536
200 Hz
200 Hz
160 Hz
140 Hz
120 Hz
100 Hz
80 Hz
75 Hz
70 Hz
856 ×480
1280×720
1600×1024
1920×1080
1920×1200
200 Hz
160 Hz
120 Hz
100 Hz
90 Hz
These display resolutions are supported for realtime editing with Adobe Premiere.
Based on a monitor with a maximum horizontal refresh rate of 130 kHz.
Available display resolutions
RT2000 Installation & User Guide.book Page 250 Monday, April 2, 2001 3:51 PM
250
Maximum horizontal refresh rate (kHz1)
Aspect ratio Display resolution
4:3/5:4 (standard)
16:9/16:10 (wide screen)
a
300-MHz RAMDAC a
640× 480
800× 600
1024× 768*
1152 × 864*
1280× 1024*
1600× 1200
1800× 1440
1920× 1440
2048× 1536
130 kHz
130 kHz
130 kHz
130 kHz
130 kHz
130 kHz
120 kHz
115 kHz
110 kHz
856 × 480
1280× 720
1600× 1024
1920× 1080
1920× 1200
130 kHz
130 kHz
130 kHz
115 kHz
115 kHz
These display resolutions are supported for realtime editing with Adobe Premiere.
Maximum 3D display resolutions
Color palettea
Double-buffering
without Z-buffering
Double-buffering with
16-bit Z-buffering
Double-buffering with
32-bit Z-buffering
64 K colors (16-bit)
2048 × 1536
2048 × 1536
2048 × 1536
16 M colors (32-bit) 2048 × 1536
2048 × 1536
1800 × 1440
a
1
3D acceleration is only available with a 16- or 32-bit color palette.
Based on a monitor with a maximum horizontal refresh rate of 130 kHz.
Appendix C, Using Additional Millennium Flex 3D Display Resolutions
RT2000 Installation & User Guide.book Page 251 Monday, April 2, 2001 3:51 PM
251
Supported VESA modes
In the table below, VESA modes supported by your Flex 3D are indicated by a
VESA mode number. Many SuperVGA DOS programs use VESA modes.
Display resolution
640× 480
640× 480
800× 600
1024× 768
1280× 1024
1600× 1200
16 colors
—
(VGA)
102
—
—
—
256 colors
100
101
103
105
107
11C
32K colors
—
110
113
116
119
11D
64K colors
—
111
114
117
11A
11E
16M colors
—
112
115
118
11B
—
Available display resolutions
RT2000 Installation & User Guide.book Page 252 Monday, April 2, 2001 3:51 PM
252
Your notes
Appendix C, Using Additional Millennium Flex 3D Display Resolutions
RT2000 Installation & User Guide.book Page 253 Monday, April 2, 2001 3:51 PM
RT2000 Specifications
This appendix provides specifications for your RT2000 card set.
A
p
p
e
n
d
i
x
RT2000 Installation & User Guide.book Page 254 Monday, April 2, 2001 3:51 PM
254
Matrox RT2000 codec card specifications
Video
Inputs 1394 6-pin
Composite video (CVBS), RCA jack
S-Video (Y/C), mini-DIN
NTSC, PAL, and SECAM
Outputs 1394 6-pin
Composite video (CVBS), RCA jack
S-Video (Y/C), mini-DIN
NTSC and PAL
Video formats ITU-R601 YUV 4:2:2
NTSC: 720x480 at 30 frames/sec
PAL/SECAM: 720x576 at 25 frames/sec
Video overlay Programmable NTSC and PAL video-in-a-window
support on console at 60/50 fields/sec.
Video codec Multi-format, C-Cube DVxpress-MX25 codec supports
single-stream capture and dual-stream playback
DV, DVCAM, DVCPRO, NTSC 4:1:1, PAL 4:1:1 and
4:2:0
MPEG-2 4:2:2P @ ML I-frame from 10 to 25 Mb/sec
MPEG-2 MP@ML IBP output
Audio
Synchronization to video SMPTE-272M and AES11-1991 compliant
Analog audio input/output Unbalanced stereo (1 pair RCA in, 1 pair RCA out)
Sampling method 16 bit, 48 kHz, 64× oversampling
Environmental specifications
✃
✃
✃
✃
✃
✃
Minimum/maximum ambient operating temperatures: 0 to 55º C
Minimum/maximum storage temperature: –40 to 75º C
Maximum altitude for operation: 3,000 meters
Maximum altitude for transport: 12,000 meters
Operating humidity: 20 to 80% relative humidity (non-condensing)
Storage humidity: 5 to 95% relative humidity (non-condensing)
Appendix D, RT2000 Specifications
RT2000 Installation & User Guide.book Page 255 Monday, April 2, 2001 3:51 PM
255
Millennium Flex 3D Edition specifications
Features
Graphics chip Matrox G400 (256-bit DualBus)
3D features VCQ2 (Vibrant Color Quality2), environment-mapped bump
mapping, stencil buffering, anisotropic filtering,
bilinear filtering, trilinear filtering, alpha blending, antialiased vectors, vertex fogging, table fogging, specular highlighting, 16-bit Z-buffering, 32-bit Z-buffering,
single buffering, double buffering, triple buffering, texture
mapping, MIP mapping, Gouraud shading
Main RAMDAC 300 MHz
Secondary RAMDAC 135 MHz
Memory 32 MB
Memory type SGRAM
Card type Compatible with AGP 2× and AGP 4× systems a
AGP form factor ATX
a
These cards are compatible with AGP 2× and AGP 4× systems and can achieve a peak
AGP transfer rate of 532 MB/sec.
Video specifications
✃
Separate sync monitors only.
✃
The video follows the PS/2 standard, with no sync on RGB, and no blanking
pedestal. Black or blank – 0.0 V; White – 0.700 V.
✃
There are five connections to a monitor that uses BNC (Bayonet Nut
Connect) connectors – R, G, B, HSYNC (white or gray wire), and VSYNC
(black wire).
Environmental specifications
✃
Minimum/maximum ambient operating temperatures: 0 to 55º C
✃
Minimum/maximum storage temperature: –40 to 75º C
✃
Maximum altitude for operation: 3,000 meters
✃
Maximum altitude for transport: 12,000 meters
✃
Operating humidity: 20 to 80% relative humidity (non-condensing)
✃
Storage humidity: 5 to 95% relative humidity (non-condensing)
Millennium Flex 3D Edition specifications
RT2000 Installation & User Guide.book Page 256 Monday, April 2, 2001 3:51 PM
256
Your notes
Appendix D, RT2000 Specifications
RT2000 Installation & User Guide.book Page 257 Monday, April 2, 2001 3:51 PM
RT2000 Glossary
This glossary defines many of the terms used in this manual and in
related Matrox RT2000 documentation.
A
p
p
e
n
d
i
x
RT2000 Installation & User Guide.book Page 258 Monday, April 2, 2001 3:51 PM
258
Glossary of terms
Use this glossary as a reference for many of
the basic terms in your RT2000 manual and
related documentation.
Numerics
1394
See IEEE-1394.
2D Short for two-dimensional. An image
that has height and width only.
3D Short for three-dimensional. An object
in three dimensions has height, width, and
depth. Various techniques are used to show
3D images on 2D surfaces like your computer
screen.
3D tile A Matrox effect that uses rotating
tiled patterns with various numbers of rows
and columns.
4:2:2P@ML 4:2:2 Profile@Main Level.
An international standard video compression
profile introduced by MPEG-2. It supports
4:2:2 luminance/chrominance sampling at up
to 720×608 pixel resolution, and data transfer
rates up to 50 Mb/sec (5.96 MB/sec). This
profile is used for high-quality distribution
and for archiving. See also MP@ML.
A
A/B roll Typically, A/B roll is an editing
technique where scenes or sounds on two
source reels (called roll A and roll B) are
played simultaneously to create dissolves,
wipes, and other effects. On nonlinear editing
systems, A/B roll refers to using two source
streams (.avi, .wav, .tga, and so on) to create
an effect.
accelerated print-to-disk The process of
rendering to an .avi file a realtime sequence
of effects on Matrox RT2000. This is the
Appendix E, RT2000 Glossary
fastest type of rendering available on Matrox
RT2000. See also multi-layer compositing.
AGP slot Connection slot to a type of
expansion bus found in most current
computers. The AGP slot is used to house the
display card.
aliasing A display characteristic of
computer-generated text or graphics that
appears as jagged or stair-stepped edges on
diagonal lines. See also anti-aliasing.
alpha key An effect that makes parts of a
foreground image fully or partially
transparent based on alpha (transparency)
values stored within the image’s file, so that
an underlying image can show through.
analog component video See component
video.
analog signal A video or audio signal that
varies continuously, as opposed to a digital
signal which varies only by fixed steps.
anti-aliasing A technique that smooths
jagged edges in computer-generated text or
graphics.
artifacting A video defect in which old
information remains in the display even as
new information is being updated.
aspect ratio A width-to-height ratio. For
example, a 12-by-9-inch image has an aspect
ratio of 4:3 (four-to-three). Most TV screens
have a 4:3 aspect ratio. HDTV screens have a
16:9 aspect ratio.
RT2000 Installation & User Guide.book Page 259 Monday, April 2, 2001 3:51 PM
259
assemble editing Recording new video
and audio material sequentially onto tape.
Because all the signals are recorded (video,
audio, and control track), the new material
completely replaces any previously recorded
material on the tape. See also insert editing.
attenuation A decrease in an electrical
signal’s amplitude.
AVI Audio Video Interleaved. A video file
format designed for the Microsoft Windows
environment. See also codec.
A/V drive A hard drive capable of storing
high-bandwidth audio/video data.
B
B-frame (Bi-directional frame) A frame
created during the MPEG or MPEG-2 IBP
compression process. A B-frame is generated
by forwards and backwards referencing of the
P-frames and I-frames respectively, which
allows it to have the highest compression ratio
of the three frame types. B-frames contain
only predictive data (that is, not enough data
to make up an entire picture), and therefore
cannot be edited independently. See also Iframe (Intra-frame) and P-frame (Predicted
frame).
BIOS Basic Input/Output System settings
for system components, peripherals, etc. This
information is stored in a special batterypowered memory and is usually accessible for
changes at computer start-up.
bitmap A graphics image in which a set of
values defines each pixel’s relative brightness
and color.
blackburst A composite video signal that
combines the sync information of a basic
video signal with a pure black signal. Used as
a reference in synchronizing the different
video sources in a system. Also called color
black.
Blue Book standard
See DV.
burnt-in time code Time code that’s
superimposed onto each frame of video,
generally created using the overlay feature of
a VTR. Used for rough-cut and edit-list
processing. Also called burn in.
bus A shared set of hardware lines that lets
different parts of your computer transfer
information between one another. A card
inserted into an expansion slot of your
computer makes an electrical connection to
the bus and effectively becomes part of your
computer system.
C
capture The process of digitizing video or
audio material, usually from a VTR, and
storing it in a file on a hard disk.
character generator A device or computer
program used to create text that can be
overlaid onto video.
chroma key An effect that makes portions
of a foreground image fully or partially
transparent based on the color of that image
(or another source), so that an underlying
image can show through. See also key source,
self-key, and filled key.
chrominance The color portion of a video
signal that carries the hue and saturation
information. See also luminance.
codec Compressor/decompressor. A
processor that compresses video to reduce its
file size by eliminating redundancies in
information. It also decompresses files to play
them back.
RT2000 Glossary
RT2000 Installation & User Guide.book Page 260 Monday, April 2, 2001 3:51 PM
260
color bars A standard test signal that
appears as a series of vertical rows of color by
which the chrominance and video levels of a
camera’s output or a recorded signal can be
checked.
compile See render.
component video A video signal having
separate channels for the video information,
as opposed to a combined (composite) signal.
composite video A video signal
containing luminance and chrominance
information that has been combined using a
video standard such as NTSC or PAL. See
also component video.
contrast The difference in brightness
between the lightest and darkest areas of an
image on the screen.
control track A continuous, stable, lowfrequency signal recorded onto tape. It is used
to identify frame locations and control the
playback of the video signal.
crawl Sideways movement of text across a
screen. See also roll (1).
cut A direct switch from one video and/or
audio source to another.
D
Digital-S A professional variant of the DV
format developed by JVC that uses a data rate
of 50 Mb/sec (5.96 MB/sec), which is double
the data rate of most other DV formats. Video
is sampled at 4:2:2 for both NTSC and PAL
sources to give enhanced chroma resolution.
It uses a 1/2” metal particle tape.
digital signal A signal representing video
or audio information as binary digits that can
be easily regenerated with no noise or
distortion. See also analog signal.
Appendix E, RT2000 Glossary
Digital Video
See DV.
digitize To convert analog information,
such as a video signal from a VTR, into
digital information that can be processed and
stored by a computer.
DirectX A Microsoft developed program
that enables interfaces to support advanced
hardware features without being written
specifically for each hardware model.
DirectShow (formerly called ActiveMovie) is
part of DirectX.
display card A card that has its own
memory and processor to handle graphics and
enhance display capabilities, such as your
Matrox G400 card. Also called graphics
accelerator card or graphics card.
dissolve A transition in which one image
smoothly fades to another image. It is
characterized by the gradual ending of one
image occurring simultaneously with the
gradual beginning of another.
distortion effect A Matrox effect that uses
blurry or textured patterns to warp an image.
driver Software that controls a device, such
as a display card, and enables it to work with
other software.
drop-frame time code For NTSC video,
time code is normally produced by a
generator that counts at 30 frames per second.
NTSC color signals, however, actually have a
display frequency rate close to 29.97 frames
per second. Drop-frame time code
compensates for this time difference by
dropping two frames from the count every
minute except for every tenth minute so that
the time code matches clock time.
DV Digital Video. A standard digital bit
stream and compression format (known as the
RT2000 Installation & User Guide.book Page 261 Monday, April 2, 2001 3:51 PM
261
DVE Digital Video Effect. Generally, an
effect that resizes and repositions a picture on
the screen.
Blue Book standard) used to record video and
audio onto a digital tape. DV is intra-frame
based, saving each frame separately, and uses
a fixed 5:1 compression ratio to reduce the
size of video files. DV’s data rate is fixed at
25 Mb/sec (2.98 MB/sec). Video is sampled
at 4:1:1 for NTSC sources or 4:2:0 for PAL
sources. See also DVCAM, DVCPRO,
DVCPRO50, and Digital-S.
E
DVCAM A professional variant of the DV
format developed by Sony that records a 15
micron track on a metal evaporated (ME) tape
at a data rate of 25 Mb/sec (2.98 MB/sec).
Video is sampled at 4:1:1 for NTSC sources
or 4:2:0 for PAL sources.
EISA slot Connection slot to a type of
computer expansion bus found in some
computers. EISA is an extended version of
the standard ISA slot design.
DVCPRO A professional variant of the DV
format developed by Panasonic that records
an 18 micron track on metal particle tape at a
data rate of 25 Mb/sec (2.98 MB/sec). Video
is sampled at 4:1:1 for both NTSC and PAL
sources.
DVCPRO50 A professional variant of the
DV format developed by Panasonic that uses
a data rate of 50 Mb/sec (5.96 MB/sec),
which is double the data rate of most other
DV formats. Video is sampled at 4:2:2 for
both NTSC and PAL sources to give enhanced
chroma resolution. It uses the same type of
tape as DVCPRO.
DVD Digital Versatile Disk or Digital
Video Disk. A type of compact disk that can
hold from 4.7 gigabytes (GB) to 17 GB of
information. The greatest advantage that
DVD has over CD is that it can store video as
well as audio and computer data. For video
storage, DVD uses MPEG-2 compression, to
provide better quality than standard VHS.
Edit Decision List (EDL) A file containing
a list of edit decision statements used to create
a video production.
edit master The first generation (original)
of a final edited tape.
expansion slot Electrical connection slot
mounted on a computer's motherboard (main
circuit board). It allows several peripheral
devices to be connected inside a computer.
F
fade to black A transition commonly used
to signify the end of a scene, in which an
image or sound smoothly fades to a black
screen or silence (also called a fade-out
transition). Similarly, you could start a new
scene with a fade up from black (or fade-in)
transition.
field One-half of the horizontal lines
needed to make a complete scan of an
interlaced video frame. In the NTSC system,
two consecutive fields of 262.5 lines each
create a frame of 525 scan lines. In the PAL
system, two consecutive fields of 312.5 lines
each create a frame of 625 scan lines.
filled key A key effect in which the key
source image is different from the foreground
image. Areas not keyed (that is, not made
transparent) in the key source image are filled
with the corresponding areas of the
foreground image. Contrast with self-key.
RT2000 Glossary
RT2000 Installation & User Guide.book Page 262 Monday, April 2, 2001 3:51 PM
262
FireWire Apple Computer’s original
implementation of the technology that would
be standardized as IEEE-1394 in 1995.
Flex 3D A fully programmable architecture
that applies 3D texture mapping to video
using a Matrox 3D graphics accelerator chip
and graphics memory. See also texture
mapping.
frame A single video image. An interlaced
video frame is comprised of two consecutive
fields (the odd and even fields).
G
graphics overlay Text or a graphics image
that’s superimposed on video.
genlock The process of synchronizing the
timing between different video signals by
generating a new video signal that is timelocked to the sync of the original signals.
Genlock devices enable computer text and
graphics to be superimposed onto video. See
also blackburst.
GOP Group of Pictures. The sequence of I,
B and/or P-frames produced during MPEG or
MPEG-2 compression. This sequence of
frames contains all of the information
required to reproduce a complete video
segment. The longer the GOP, the less
editable it is.
H
hard key A key effect in which areas of the
keyed image are either completely transparent
or completely opaque, creating a hard edge
between the keyed image and background
image. See also soft key.
hue The tint or tone of a color. For
example, the difference between the color
green and red is its hue.
Appendix E, RT2000 Glossary
I
IBP compression
See MPEG-2 IBP.
IEEE-1394 An international standard data
transfer protocol created by Apple Computer
under the FireWire trademark and
standardized by the Institute of Electrical and
Electronics Engineers (IEEE). It enables
simple, low-cost, realtime data transfer
between computers and consumer and
prosumer electronics products, such as DV
camcorders and DV decks. Commonly
referred to as 1394.
I-frame compression
frame.
See MPEG-2 I-
I-frame (Intra-frame) A frame created
during the MPEG or MPEG-2 compression
process that contains all the information
required to reproduce a complete image. It
allows random access points within a video
stream, and acts as a reference point for Bframes and P-frames to be built. I-frames are
editable because they contain enough data to
construct an entire video frame, unlike Bframes or P-frames. See also MPEG-2 IBP,
B-frame (Bi-directional frame), and P-frame
(Predicted frame).
Infinite Capture A method of overcoming
the 2-GB file size limit of Windows 98 or
Windows Me by providing seamless capture
and playback of video clips of unlimited size
within Adobe Premiere.
insert editing Recording new video and/or
audio material onto a prerecorded (or striped)
tape. Insert edits can be made in any order,
unlike assemble edits, which must be made
sequentially.
RT2000 Installation & User Guide.book Page 263 Monday, April 2, 2001 3:51 PM
263
inter-frame compression A video
compression method that compares a series of
frames in a video sequence and removes the
redundant data. Inter-frame compression
treats all the frames in the sequence as an
interdependent group. As a result, most of the
frames can’t be edited independently. Also
called temporal redundancy reduction.
Contrast with intra-frame compression. See
also GOP.
interlaced scanning A method of creating
a video image by scanning only the odd
numbered lines on the screen in one pass, then
the even numbered lines in the next pass. Two
passes are therefore required to create a
complete frame of video. Non-interlaced
scanning displays the odd and even lines
sequentially so that the complete image is
displayed in one pass. NTSC and PAL
displays are interlaced, VGA displays are
non-interlaced.
interpolate To create a gradual transition
between different Matrox transform settings
applied to a clip. See also keyframe.
intra-frame compression A video
compression method that removes redundant
information from within a frame. Intra-frame
compression treats each frame of a video
segment independently. Several video
compression formats use the intra-frame
method. These include Motion-JPEG, DV,
and MPEG-2 I-frame. Also called spatial
redundancy reduction. Contrast with interframe compression. See also I-frame (Intraframe).
ISA slot Connection slot to a type of
computer expansion bus found in most
computers. It’s larger in size than the PCI
slots found on most current computers and
provides connections to the slower ISA bus. A
variation found in some newer computers is
the EISA bus.
J
JPEG (pronounced “jay-peg”) Joint
Photographic Experts Group. A compression
and storage standard used for still, digital
images. See also Motion-JPEG.
K
keyframe A particular frame at which one
or more transform settings have been defined
on a clip using the Matrox realtime plug-in.
Settings applied at a keyframe remain active
on the clip until a later keyframe is defined to
turn off or change the settings. See also
interpolate.
key source The image that contains the
colors or luminance values on which you key
to create a chroma or luminance key effect.
L
LTC Longitudinal Time Code. Time code
that is generally encoded as an audio signal
onto a linear audio track of a tape. This type
of time code can be read only while the tape is
moving. See also VITC.
luminance The brightness portion of a
video signal. The luminance of a pixel
determines its brightness on a scale from
black to white. See also chrominance.
luminance key An effect that makes
portions of a foreground image fully or
partially transparent based on the luminance
of that image (or another source), so that an
underlying image can show through. See also
key source, self-key, and filled key.
RT2000 Glossary
RT2000 Installation & User Guide.book Page 264 Monday, April 2, 2001 3:51 PM
264
M
mark in
mark out
To select the first frame of a clip.
To select the last frame of a clip.
MIP mapping In 3D graphics, a rendering
technique where a texture is stored at multiple
resolutions. See also texture mapping.
M-JPEG
See Motion-JPEG.
Motion-JPEG A compression and storage
standard used for motion video. The JPEG
compression process is applied to each video
field, in succession. Also called M-JPEG.
MP@ML Main Profile@Main Level. An
MPEG-2 video compression profile that
supports 4:2:0 luminance/chrominance
sampling at up to 720×576 pixel resolution,
and data transfer rates up to 15 Mb/sec (1.79
MB/sec). This profile is used for broadcast
transmission and distribution on DVD. See
also 4:2:2P@ML.
MPEG A video compression standard that
specifies a series of compression profiles and
image resolution levels, introduced in 1990 by
the Motion Picture Experts Group. MPEG
takes advantage of the redundancy inherent in
video data through a combination of interframe and intra-frame redundancy reduction.
The MPEG standard supports data transfer
rates of up to 1.5 Mb/sec (0.2 MB/sec). Also
called MPEG-1. See also MPEG-2, interframe (IBP) compression, and intra-frame (Iframe) compression.
MPEG-1 See MPEG.
MPEG-2 A video compression standard that
improves upon the MPEG standard by
supporting data rates of up to 100 Mb/sec (12
MB/sec), scalable modes, field or frame
searching, and much larger screen sizes. See
also inter-frame (I-frame) compression, intra-
Appendix E, RT2000 Glossary
frame (IBP) compression, 4:2:2P@ML, and
MP@ML.
MPEG-2 IBP An MPEG-2 compression
type that uses inter-frame compression to
create a group of I, B, and P-frames. Used for
broadcast transmissions and distribution on
DVD. See also GOP and inter-frame
compression.
MPEG-2 I-frame An MPEG-2
compression type that uses only intra-frame
compression (that is, only I-frames are
created). Used for high-quality distribution
and for archiving. See also intra-frame
compression.
multi-layer compositing The process of
rendering a sequence that contains multiple
layers of realtime effects on Matrox RT2000
for the purpose of playing back the effects or
saving them to an .avi file. This type of
rendering isn’t as fast as an accelerated printto-disk, but is faster than when you render
sequences containing software effects.
N
nonlinear editing Random access editing
that generally uses video and audio clips
stored on disks. Nonlinear editing programs
let you rearrange and edit clips without
having to redo the entire production, and
provide instant cueing to any frame in a clip
without waiting for tapes to rewind.
NTSC National Television Systems
Committee. The NTSC RS-170A standard
defines a method of broadcasting a color
signal that can be received by both
monochrome and color TVs. It uses a
composite interlaced display comprised of
525 scan lines per frame, refreshed at a rate of
approximately 30 frames per second.
RT2000 Installation & User Guide.book Page 265 Monday, April 2, 2001 3:51 PM
265
Broadcast systems in North America and
Japan use the NTSC standard.
depends on the number of pixels on the
screen.
O
Plug-and-Play A hardware standard for
auto-configuration. It refers to the ability of
computer hardware to detect and configure
expansion devices such as your Matrox
RT2000 card. Windows 98 and Windows Me
support Plug-and-Play.
organic wipe A wipe effect that uses a
grayscale gradient pattern to switch from one
image to another by gradually revealing the
second image according to the pattern.
P
PAL Phase Alternate Line. A video standard
that uses a composite interlaced display
comprised of 625 scan lines per frame,
refreshed at a rate of 25 frames per second.
This is the broadcast video standard for most
of Europe.
particle effect A Matrox effect in which a
clip breaks apart or explodes in a number of
patterns.
PCI slot Connection slot to a type of
expansion bus found in most current
computers. It is smaller in size than older ISA
slots and provides connections to the highspeed PCI host bus.
P-frame (Predicted frame) A frame
created during the MPEG or MPEG-2 IBP
compression process. A P-frame is created by
using motion vectors to predict the
differences between it and the closest
previous I-frame or P-frame. This forward
prediction allows for higher compression than
with I-frames, but not as high as with Bframes. P-frames, like B-frames, contain only
predictive data and therefore cannot be edited
independently. See also I-frame (Inter-frame)
and B-frame (Bi-directional frame).
pixel Picture element. The smallest portion
of an image that can be written to a display.
Each pixel in an image represents a single dot
on the computer screen. A picture’s resolution
proc amp An electronic device that adjusts
the different aspects of a video signal, such as
its hue, saturation, and contrast.
R
realtime effect An effect that is played
back instantly, without having to be rendered
by an editing program. Compare with
software effect.
render To compute an image or effect using
a nonlinear editing, compositing, or
animation program. The result is generally
saved in a file on the computer. Also called
compile.
RGB video A component video signal that
uses three signals to carry the separate Red,
Green, and Blue channels of colored images.
roll Vertical movement of text across the
screen. Also called scroll. See also crawl.
2. Unwanted vertical roll of a video image,
indicating unstable sync.
RS-232 A non-differential serial data
transmission standard used for computer
connections.
RS-422 A differential serial data
transmission standard that is often used for
linking video production equipment (VTRs,
mixers, etc.). Because this standard is
differential, RS-422 connections are less
RT2000 Glossary
RT2000 Installation & User Guide.book Page 266 Monday, April 2, 2001 3:51 PM
266
subject to interference and noise than RS-232
connections.
S
saturation A measure of the depth of a
color. Fully saturated colors are vivid, while
colors that lack saturation look washed out or
faded.
scroll
See roll (1).
striping a tape Preparing a tape for editing
by recording continuous control track, time
code, and a video signal (such as black or
color bars).
S-Video A component video signal in
which the luminance (Y) and chrominance
(C) information are separate. S-VHS
videocassette recorders use the S-Video
format. Also called Y/C video.
SECAM Séquentiel Couleur Avec Mémoire
(sequential color with memory). A color
television system developed in France and the
former USSR. It uses a composite interlaced
display comprised of 625 scan lines per
frame, refreshed at a rate of 25 frames per
second. The color difference signals are
transmitted sequentially on alternate lines. On
Matrox RT2000, SECAM can be used for
video input only.
sync A circuit or signal that directs the
electron gun in a camera or TV picture tube to
hold a picture steady on the screen. It also
synchronizes the electronics of other video
equipment.
self-key A key effect in which the key
source image is also the foreground image.
Contrast with filled key.
T
serial control A method of remotely
controlling a device via a data line. The
control data is transmitted in serial form (that
is, one bit after another).
soft key A key effect that has a fuzzy, soft
edge or semi-transparent areas. See also hard
key.
software effect An effect that must be
rendered by an editing program before it can
be played back. Compare with realtime
effect.
soft wipe A split screen or wipe effect with
a soft border or edge where the two images
join.
spatial redundancy reduction See intraframe compression.
Appendix E, RT2000 Glossary
sync generator An electrical device that
generates sync (timing) signals used to
synchronize video equipment and keep
pictures stable on the screen.
TBC See time base corrector.
temporal redundancy reduction See
inter-frame compression.
texture mapping A display technique
where bitmaps (textures) are placed (mapped)
onto 3D surfaces to make objects look more
realistic.
time base corrector (TBC) An electronic
device that, when connected to the output of a
VTR, corrects the stability and timing of the
VTR’s playback video. This is achieved by
stripping the unstable horizontal and vertical
sync pulses from the video signal, and
replacing them with new, clean sync pulses.
time code A sequential code number
assigned to successive video frames on tape.
Each frame has its own time code, which is
electronically encoded on the tape in the form
RT2000 Installation & User Guide.book Page 267 Monday, April 2, 2001 3:51 PM
267
hours:minutes:seconds:frames. See also dropframe time code, LTC, and VITC.
timeline The graphical representation
(normally a horizontal line) of a video
sequence. It is usually divided into
hours:minutes:seconds:frames, and is used to
position video, audio, graphics, and video
effects that make up the sequence.
transform settings Settings that let you
change the position, size, and rotation of a
clip in the Matrox realtime plug-in. Transform
settings can be applied on the x, y, and z axes
of a clip. See also keyframe.
perpendicular to the horizontal (x) and
vertical (y) axes. The x-y-z coordinate system
is used in computer graphics for creating
models with height, width, and depth, and for
moving models in 3D space.
Y
Y/C video
see S-Video.
Y, R-Y, B-Y video An analog component
video signal comprised of three channels: Y
(luminance), R-Y (red minus luminance), and
B-Y (blue minus luminance).
V
VITC Vertical Interval Time Code. Time
code that is encoded onto the vertical
blanking interval of a video signal. VITC can
be read by a VTR whenever an image is
displayed, but not usually during high-speed
operation. See also LTC.
Voice over Narration added to a video
segment and mixed in louder than the original
background sounds.
W
WAV An audio data file format developed
by Microsoft and IBM. This format is the
standard for Windows and can be played by
most applications that can support sound.
wipe A transition in which one image is
gradually replaced by another image that is
revealed in a given pattern. For example, the
second image could be revealed from the top
of the screen downwards until it fills the
entire screen. See also organic wipe.
X
x-y-z coordinate system A 3D positioning
system that includes a third (z) axis running
RT2000 Glossary
RT2000 Installation & User Guide.book Page 268 Monday, April 2, 2001 3:51 PM
268
Your notes
Appendix E, RT2000 Glossary
RT2000 Installation & User Guide.book Page 269 Monday, April 2, 2001 3:51 PM
RT2000 Customer Support
This appendix explains how to reach us if you need customer support.
A
p
p
e
n
d
i
x
RT2000 Installation & User Guide.book Page 270 Monday, April 2, 2001 3:51 PM
270
Getting the most support
If you have a problem that you’re unable to solve by referring to your RT2000
documentation, please contact your Matrox RT2000 representative. He or she
should be able to help you quickly correct any installation or system
configuration problem.
If your representative is unable to solve your problem, contact Matrox for further
information and assistance.
Register your RT2000
Only customers who’ve registered their RT2000 are eligible to receive customer
support. You can easily register on our web site at www.matrox.com/video in the
Customer Support section.
Registering your RT2000 also entitles you to free software updates, special
promotional offers, and access to the Matrox RT2000 User Forum, our dynamic
web forum for users who want to share their experiences and learn more about
the RT2000.
Keep up to date with our web site
In addition to registering your RT2000, our web site offers you up-to-the-minute
information about Matrox products, free software updates, access to our support
databases, and a complete list of computer equipment compatible with the
RT2000 platform. Be sure to place our site in your favorites or bookmarks:
www.matrox.com/video
Appendix F, RT2000 Customer Support
RT2000 Installation & User Guide.book Page 271 Monday, April 2, 2001 3:51 PM
271
Contacting us
Matrox is proud to offer worldwide technical support. Please use the contact
information for your area.
¯Note The following numbers are subject to change. For up-to-date contact
information, always check our web site at www.matrox.com/video.
United States & Canada
Telephone .............................................................................................. 1 514 822-6245
Fax ........................................................................................................ 1 514 685-2853
Email...................................................................................rt2000support@matrox.com
Europe, Middle East, & Africa
Telephone
Calls from the U.K................................................................................... 01753 665686
Calls from France................................................................................... 01 45 60 88 66
Calls from Germany.............................................................................. 089 62 17 05 70
Calls from Italy ............................................................................................. 02 5253099
Calls from the rest of Europe, the Middle East, & Africa..................... +44 1753 665686
Fax
From the U.K............................................................................................ 01753 665599
From Italy ................................................................................................... 02 52534045
From the rest of Europe, Middle East, & Africa.................................. +44 1753 665599
Email
From Italy .........................................................................................supporto.3g@treg.it
From the rest of Europe, the Middle East,
& Africa .......................................................................rt2000.tech.europe@matrox.com
All other countries
Telephone .............................................................................................. 1 514 822-6245
Fax ........................................................................................................ 1 514 685-2853
Email...................................................................................rt2000support@matrox.com
Contacting us
RT2000 Installation & User Guide.book Page 272 Monday, April 2, 2001 3:51 PM
272
Your notes
Appendix F, RT2000 Customer Support
RT2000 Installation & User Guide.book Page 273 Monday, April 2, 2001 3:51 PM
Matrox Around the World
This appendix provides contact information for Matrox sales offices
around the world.
A
p
p
e
n
d
i
x
RT2000 Installation & User Guide.book Page 274 Monday, April 2, 2001 3:51 PM
274
Worldwide Headquarters
Matrox Electronic Systems Ltd., Video Products Group
1055 St. Regis Blvd
Dorval, Quebec
Canada, H9P 2T4
tel: 800 361-4903 (North America)
514 685-2630 ext. 2636 (Worldwide)
fax: 514 685-2853
Email: [email protected]
Europe, Middle East, Africa
Matrox Video and Imaging Technology Europe
Sefton Park
Stoke Poges
Buckinghamshire
SL2 4JS
United Kingdom
tel: +44 (0)1753 665577
fax: +44 (0)1753 665599
Email: [email protected]
France
Matrox France SARL
2, rue de la Couture
Silic 225
94528 Rungis Cedex
tel: +33 (0)1 45 60 62 00
fax: +33 (0)1 45 60 88 65
Email: [email protected]
Germany
Matrox Electronic Systems GmbH
Inselkammerstraße 8
D-82008 Unterhaching bei
Munchen, Germany
tel: +49 (0)89 61 44 74 57
fax: +49 (0)89 61 49 74 3
Email: [email protected]
Asia Pacific
Matrox Asia Liaison
Beijing Representative Office
#1608, 138A Haidian Road
Beijing, China 100086
Tel: (86-10) 62564853
Fax: (86-10) 62536251
Email: [email protected]
Note The above information is subject to change. For up-to-date contact information,
always check our web site at www.matrox.com/video.
Appendix G, Matrox Around the World
RT2000 Installation & User Guide.book Page 275 Monday, April 2, 2001 3:51 PM
Index
Numerics
1394 connector
connecting DV camera to 47
2D/3D DVE
creating 117
placing for optimal results 109
3D tile
creating 119
placing for optimal results 109
3D titles
creating using Cool 3D 196
A
A/V drives
defragmenting 17
EIDE considerations 18
FAT32 17
general considerations 16
NTFS 17
planning EIDE connections 18
planning setup of 16
space for captured audio 244
space for captured video 244
testing performance of 60
Accelerated graphics transfer
enabling/disabling 82
ACID Music
audio attributes 203
installing 63
making music 203
overview 202
saving WAV files 203
Adobe Photoshop LE
using to create organic wipe patterns 127
Adobe Premiere
Audio settings 89
Capture settings 90
Export Movie settings 94
exporting clips from MediaTools 181
exporting material for DVD 207
exporting Timeline to DV tape 101
General settings 80
installing 27
loading Matrox project presets 78
preparing Timeline for recording to DV
tape 101
required color palette and display
resolution 70
selecting realtime Premiere transitions 82,
84
setting up DV-1394 device control 100
setting up scratch disks 79
using ACID Music to create WAV files
for 203
using Cool 3D to create titles for 197
using DV-1394 devices with 103
using TitleExpress to create titles for 190
Video settings 87
See also Realtime plug-in for Adobe Premiere
AGP aperture size
setting 21
Aspect ratio
See Editing aspect ratio
ATA 100
fix for support by Windows 2000 17
Audio drive
selecting in Adobe Premiere 81
selecting in MediaTools 169, 170
Audio sampling
disk space requirements 244
Audio settings
Aux and CD audio 72
for Adobe Premiere 89
for WAV files used in Adobe Premiere 203
playback volume control 72
sounds and multimedia audio properties 71
Audio specifications
RT2000 codec card 254
Aux audio playback settings 72
AVI files
creating using Matrox Infinite Capture 105
creating using MediaTools 160, 171, 172,
175, 180
RT2000 Installation & User Guide.book Page 276 Monday, April 2, 2001 3:51 PM
276
exporting using Adobe Premiere 94, 207
rendering using VFW programs 154, 157
selecting method for creating large clips 82,
86, 169
B
Breakout box
connecting 40
overview 41
C
Capturing using Adobe Premiere
specifying settings for 90
Capturing using MediaTools
batch capturing 173–175
capturing individual clips 172
creating a batch capture list 173
preparing tapes for 160
scanning and capturing 171
specifying settings for 169
Card installation
before you begin 11
connecting CD audio cable 36
connecting ribbon cable 33
identifying slots 34
inserting card set 35
removing existing display card 32
CD audio cable
connecting 36
CD audio playback settings 72
CD-R 206
recommended data rates 245
Chroma filtering and chroma interpolation
for rendering to VFW files 157
Color palette
changing 70
Color space conversion options
for rendering to VFW files 156
Colorization effect
creating 128
Composite video device
as source in Adobe Premiere 91
available connections 42
Index
connecting recorder 44
connecting source 43
typical connections 50
Compressor
selecting for VFW render 157
selecting in Adobe Premiere 87, 95
Computer
storage considerations 16, 18
system requirements 4
Computer monitor
connecting 40, 218
disabling energy saving mode 68
settings for 68
Connections
breakout box 40
composite video 42, 43
computer monitor 40, 218
DV-1394 47
EIDE devices 18
S-Video 42, 45
typical audio and video 48
Converting files
using the Matrox File Converter 184
Cool 3D
creating a title 197
installing 63
overview 196
saving TGA files 198
settings for use with Adobe Premiere 197
tips on creating titles 199
Crop track
crop settings 135
Cropping
default setting for Matrox effects 81
Cropping a clip
using the crop controls 136
using the crop menu 136
using the Preview Window 137
Customer support ii, 270
RT2000 Installation & User Guide.book Page 277 Monday, April 2, 2001 3:51 PM
277
D
Device Manager
removing old display card from 27
Disk Benchmark program
running 60
Disk defragmentation 17, 225, 229
Disk space requirements
for captured audio 244
for captured video 244
Display card
removing existing 27
Display resolution
available with Millennium Flex 3D card 248
changing 70
Distortion effect
creating 121
placing for optimal results 109
DMA bus-mastering
enabling 21
Drivers
installing RT2000 device drivers 52
Drives
testing performance of 60
DV-1394 device
as source in Adobe Premiere 91
connecting 47
typical connections 48
using with Adobe Premiere 103
DV-1394 device control
setting up in Adobe Premiere 100
DVD drive
enabling DMA transfers 237
DVD formats
DVD discs 206
DVD volumes 206
DVD Player
See Matrox DVD Player
DVD volume
creating 210
playing 213
DVDit! LE
creating a DVD volume 210
exporting material from Adobe
Premiere 207
installing 64
overview 206
using the Matrox DVD Player 213
DVD-R 206
recommended data rates 245
E
Editing aspect ratio
creating production in 16:9 format 106
selecting 81, 84
Effect tracks
resetting to default settings 140
EIDE
enabling DMA bus-mastering on drives 21
storage considerations 18
Environmental specifications
Millennium Flex 3D card 255
RT2000 codec card 254
Error reporting
for dropped frames during video
playback 82
Exporting
clips from MediaTools to Adobe
Premiere 181
Matrox clips in Adobe Premiere 94
to DV tape using Adobe Premiere 101
F
FAT32 17
Force render option 113
G
Graphics overlays
creating using Cool 3D 197
creating using TitleExpress 191
placing for optimal results 109
setting up in Adobe Premiere 148
Index
RT2000 Installation & User Guide.book Page 278 Monday, April 2, 2001 3:51 PM
278
H
Hard drive performance 17
Hard drives
testing performance of 60
Hardware
supplied with Matrox RT2000 3
Hardware profile
creating 240
I
ICG files
creating using TitleExpress 191
Infinite Capture
See Matrox Infinite Capture
Inscriber TitleExpress
See TitleExpress
Installation
overview 7, 11
Installing software
See Software installation
Internet
Matrox WWW site 270
IRQ
creating a hardware profile 240
K
Keyboard shortcuts
for Adobe Premiere realtime plug-in 114,
147
Keyframes
copying and moving 141
creating new 140
creating outside clip region 145
deleting 143
interpolating between 144, 146
keyboard shortcuts for working with 147
linear interpolation 144
modifying 140
pasting attributes of 141
saving and loading 143
selecting 140
spline interpolation 144
Index
using effect controls 138
working with 138
KFT files
saving and loading 143
L
License agreement ii
Luminance range settings
for rendering to VFW files 156
M
Matrox
contacting us 271
WWW site 270
Matrox DV Device Control
setting 100
Matrox DV/DVCAM codec
selecting for VFW render 157
Matrox DVCPRO codec
selecting for VFW render 157
Matrox DVD Player
installing 62
playing DVD volumes 213
Matrox File Converter
conversion list commands 186
converting files 185
overview 184
Matrox Infinite Capture 105
Matrox MediaTools
about 160
batch capturing clips 173–175
capturing individual clips 172
changing In/Out icons 176
clip ID and clip names 171
clip list 176
adding clips 176
copying clips 177
deleting clips 178
detaching and resizing 179
moving clips 177
saving and loading 177
creating a batch capture list 173
defining capture settings 169
RT2000 Installation & User Guide.book Page 279 Monday, April 2, 2001 3:51 PM
279
Disk button 163, 165
editing clips 175
grabbing a single-frame image 180
keyboard shortcuts 182
marking In/Out points 166
pop-up menu 164
preparing your tapes 160
recapturing clips 175
scanning and capturing clips 171
scanning clips 173
starting 161
time code fields
editing 167
marking In/Out points 166
time code display 167
transport controls 165
using the MediaTools interface 162
VTR button 163, 165
Matrox MPEG-2 I-frame codec
configuring for VFW render 158
selecting for VFW render 157
See also MPEG-2 I-frame video quality
Matrox PowerDesk
accessing property sheets 70
Matrox RT2000
data rates and required disk space 244
Disk Benchmark program 60
features 2
glossary 258
hardware supplied 3
installation overview 7
software supplied 3
storage considerations 16, 18
system requirements 4
Matrox transitions
applying realtime 110
Matrox VFW software codecs
installing 64
Matrox video effects
applying realtime 111
Matrox Video Tools
installing 52
removing and re-installing 58, 65
MediaTools
See Matrox MediaTools
Millennium Flex 3D card
connecting to breakout box 40
display driver updates 76
display resolutions 248
environmental specifications 255
features 255
installing in new system 12
overclocking 76
video specifications 255
Monitor settings 68, 218, 219, 220
MPEG data rates
recommended for DVD-R or CD-R 245
MPEG-2 Elementary files
using the Matrox File Converter 184
MPEG-2 IBP options
selecting in Adobe Premiere 98
MPEG-2 I-frame video quality
selecting in Adobe Premiere 88, 97
selecting in VFW programs 158
MPEG-2 Program files
using the Matrox File Converter 184
Multimedia audio settings 71
N
NTFS 17
NTSC setup level
selecting for analog video 81, 83
O
Organic wipe
adding your own patterns 126
creating 125
placing for optimal results 109
P
Page curl
creating 122
placing for optimal results 109
Index
RT2000 Installation & User Guide.book Page 280 Monday, April 2, 2001 3:51 PM
280
Particle effect
creating 123
placing for optimal results 109
Plug-and-Play
monitor settings 68
PowerDesk
See Matrox PowerDesk
Proc amps
adjusting in Adobe Premiere 92
Project presets
loading for Matrox RT2000 78
R
Realtime plug-in for Adobe Premiere
adding your own organic wipe patterns 126
applying a Matrox transition 110
applying a Matrox video effect 111
available effects 108
color selection 116
common controls 112
copying and moving keyframes 141
creating a 2D/3D DVE 117
creating a 3D tile 119
creating a colorization effect 128
creating a distortion effect 121
creating a page curl 122
creating a particle effect 123
creating an organic wipe 125
creating keyframes 140
default crop settings 81
deleting keyframes 143
forcing Matrox effects to render 113
graphics overlays 148
interpolating between keyframes 144, 146
keyboard shortcuts 114, 147
linear interpolation 144
modifying keyframes 140
pasting keyframe attributes 141
placing effects for optimal results 109
previewing effects 114
resetting a track to default settings 140
saving/loading keyframes 143
selecting keyframes 140
Index
selecting realtime Premiere transitions 82,
84
sliders and text boxes 115
speed changes 150
spline interpolation 144
using effect controls for keyframes 138
using the Crop track 135
using the Transform track 131
when you need to render effects 151
working with keyframes 138
Rendering using Adobe Premiere
forcing Matrox effects to render 113
selecting compressor 87, 95
selecting MPEG-2 IBP options 98
selecting MPEG-2 I-frame video quality 88,
97
when you need to render effects 151
Rendering using VFW programs
before you start 155
selecting color space conversion options 156
selecting compressor 157
selecting MPEG-2 video quality 158
Reporting dropped frames
during video playback 82
Ribbon cable
connecting to cards 33
RT2000 breakout box
See Breakout box
RT2000 codec card
audio specifications 254
connecting to breakout box 40
environmental specifications 254
video specifications 254
RT2000 User Forum 270
S
Service
returns ii
Setup level
selecting for NTSC analog video 81, 83
Software
license agreement ii
supplied with Matrox RT2000 3
RT2000 Installation & User Guide.book Page 281 Monday, April 2, 2001 3:51 PM
281
Software installation
Inscriber TitleExpress 63
Matrox DVD Player 62
Matrox VFW software codecs 64
Matrox Video Tools 52
Sonic Foundry ACID Music 63
Sonic Solutions DVDit! LE 64
Ulead Cool 3D 63
Sonic Foundry ACID Music
See ACID Music
Sonic Solutions DVDit! LE
See DVDit! LE
Sounds and Multimedia audio settings 71
Speed changes
setting up realtime in Adobe Premiere 150
Storage considerations
EIDE 18
general 16
Style conventions 5
S-Video device
as source in Adobe Premiere 91
available connections 42
connecting recorder 46
connecting source 45
typical connections 49
System configuration
troubleshooting 226
System requirements 4
T
Technical support
See Customer support 270
Testing hard drive performance 60
TGA files
creating using Cool 3D 198
creating using MediaTools 180
TitleExpress
creating a title 191
installing 27, 63
overview 190
Titles
creating using Cool 3D 197
creating using TitleExpress 191
placing for optimal results 109
tips for creating in Cool 3D 199
Transform track
transform settings 131
Transforming a clip
using the Preview Window 134
using the transform controls 132
using the Transform menu 133
Troubleshooting 215
Adobe Premiere 225
audio issues 234
capture issues 230
DVD/CD authoring 237
export issues 233
getting updated information 216
installation/configuration 217
U
Ulead Cool 3D
see Cool 3D
Upgrading
previous versions of Matrox Video Tools 58
V
Video drive
selecting in Adobe Premiere 81
selecting in MediaTools 169
Video for Windows programs 154
rendering Matrox AVI file 157
Video for Windows software codecs
installing 64
Video preview during export to tape
enabling/disabling on computer monitor 81
Video quality
disk space requirements 244
selecting in Adobe Premiere 88, 93, 97, 99
selecting in VFW programs 158
Video specifications
Millennium Flex 3D card 255
RT2000 codec card 254
Volume control playback settings 72
Index
RT2000 Installation & User Guide.book Page 282 Monday, April 2, 2001 3:51 PM
282
W
Warranty i
WAV files
audio drive in Adobe Premiere 81
audio drive in MediaTools 170
captured audio in Adobe Premiere 90
captured audio in MediaTools 170
creating in ACID Music 203
exporting using Adobe Premiere 96, 208
Widescreen format
editing material on Matrox RT2000 106
Windows 2000
fix for ATA 100 support 17
installing 20
installing RT2000 software for 52
upgrading to 10
Windows Me
installing 20
installing RT2000 software for 56
upgrading to 10
Write-back caching
disabling 25
WWW site 270
Index