Download ScreenPlay Manual

Transcript
Introduction
1
INTRODUCTION
Information in this document is subject to change without notice.
Companies, names, and data that are used in examples are fictitious unless
otherwise noted. No part of this document may be reproduced or
transmitted in any form or by any means—electronic or mechanical—for
any purpose without the express written permission of Applied Magic Inc.
© 2000 Applied Magic Inc.
ScreenPlay and Sequel use code from the Free Type Project.
ScreenPlay and Sequel contain software code which is protected by U.S. and
international copyright laws. Applied Magic retains ownership to all
copyrights. The purchaser has a limited license to use the software code only
as sold with ScreenPlay and Sequel. Any modifications, copying, reverse
engineering or other use not authorized by law, this license or the express
written consent of Applied Magic is strictly prohibited. Unauthorized
reproduction or distribution of copyrighted material in the United States is
subject to civil and criminal remedies pursuant to Title 17 of the United
States Code.
ScreenPlay, Sequel, Applied Magic, Grimoire, White Magic, and ColorGard
are trademarks of Applied Magic, Inc. Pixélan Software and Video SpiceRack
PRO are trademarks of Pixélan Software. Rapid Transits is a trademark of
Kermit Woodall and are copyright © 2000 by Kermit Woodall. Other
trademarks belong to their respective owners.
Patents pending in the United States and worldwide relating to ScreenPlay
and Sequel.
Document No. 365055-001
Printed in the United States of America
Table of Contents
Introduction
Welcome
Registration
Regulatory Information
Safety Precautions
Video Formats
Connecting Your Video Editing Unit
Package Contents
Optional Features
Front Panel
Rear Panel
Making Connections
Basic Connections
Connection to a Standard TV or Broadcast Monitor
Connection to an S-Video TV or Broadcast Monitor
Connection to a VGA Computer Monitor
Connection to a SCART TV or Monitor
Connection to an Audio System
Connection to a VCR with Standard Output
Connection to a VCR with S-Video Output
Connection to a Camcorder with Standard Output
Connection to a Camcorder with S-Video Output
Connection to a Camcorder with DV-1394 (ScreenPlay only)
System Basics
2
1
3
3
3
6
9
10
10
11
11
13
15
17
17
17
18
18
18
19
20
20
21
21
22
Keyboard
Mouse
Identifying Parts of the Screen
22
26
27
Operating Your Video Editor
31
Powering Up
Powering Down
Capturing (Recording) Material
Starting a Project
Using the Editor Screen
Backing Up a StoryBoard
Restoring a Backed Up StoryBoard
Using the Graphics Screen
Completing Your Project
Customizing Your System
Using the Setup Screens
31
31
32
35
36
56
56
57
62
63
63
Troubleshooting
Specifications
66
67
Limited Warranty
Obtaining Service
69
70
Index
Tutorial
71
77
Introduction
3
Welcome!
Congratulations on your selection of an Applied Magic video editing system.
Now you can enjoy the performance of top-of-the-line editing systems without
the high prices or technical headaches.
Registration
In addition to retaining your sales receipt and the warranty information
supplied in this booklet, please complete and mail the limited warranty
registration card.
Regulatory Information
Warning
The unauthorized modification of any unit and the sale and use of any such
unit is prohibited by law. Any such modification or alteration of this product
or any unauthorized use of ScreenPlay or Sequel could subject the user and/or
seller and/or party modifying the unit to fines, imprisonment, and civil
damages.
Federal Communications Commission Radio and Television
Interference Statement for a Class A Device
This equipment has been tested and found to comply with the limits for a
Class A digital device, pursuant to part 15 of the FCC rules. These limits are
designed to provide reasonable protection against harmful interference in a
residential installation. This equipment generates, uses, and can radiate radio
frequency energy and, if not installed and used in accordance with
instructions, may cause harmful interference to radio communications.
However, there is no guarantee that interference will not occur in a particular
installation.
If the equipment does cause harmful interference to radio or television
reception, which can be determined by turning the equipment off and on, try
to correct the interference by one of the following measures:
■
Reorient or relocate the receiving antenna.
■
Increase the separation between the equipment and receiver.
■
Connect the equipment to an outlet on a circuit different from that to
which the receiver is connected.
■
Consult the dealer or an experienced radio/TV technician for help.
Changes or modifications not expressly approved by Applied Magic could
void the user’s authority to operate the equipment.
Introduction
4
This product was FCC certified under test conditions that include the use of
shielded I/O cables and connectors between system components. To be in
compliance with FCC regulations, use shielded cables and connectors, and
install them properly.
Responsible Party:
Applied Magic Inc.
5845 Owens Avenue
Carlsbad, CA 92008
U.S.A.
Manufacturer:
SMS
9877 Waples Court
San Diego, CA 92121
U.S.A.
Declares that the products:
■
ScreenPlay (a nonlinear video editor)
■
Sequel (a nonlinear video editor)
Declaration of Conformity Statement
(Per 47 CFR, Section 2.906 as amended)
Complies with the requirements of 47 CFR, Part 15 for Class A equipment:
■
15.107(a) Conducted Limits (0.15-30 MHz)
■
15.109(a) Radiated Emission Limit (30-1000MHz)
Additional Information: To be in compliance with FCC regulations, the user
must use shielded cables and connectors and install them properly.
Introduction
5
European Union Declaration of Conformity Consumer Audio
Associated Equipment
EU Directives Covered by this Declaration:
■
89/336/EEC Electromagnetic Compatibility Directive, as amended by
92/31/EEC & 93/88/EEC 72/23/EEC Low Voltage Equipment Directive, as
amended by 93/68/EEC.
Products covered by this declaration: ScreenPlay Nonlinear Video Editor,
Sequel Nonlinear Video Editor.
Basis on which conformity is being declared: The products identified above
comply with the requirements of the above EU Directives by meeting the
following standards:
■
EN55013: 1997 EMC emissions test requirements for “Consumer Audio
Associated Equipment” as follows: Mains Terminal Disturbance Voltage Test
(Clause 3.2, 150 kHz - 30 MHz); Disturbance Power Tests (Clause 3.5, 30
MHz - 300 MHz).
■
EN50082-1: 1992 IEC801-2(1984) IEC 801-3 (1984) IEC 801-4 (1988)
EMC immunity tests per the “Essential Protection Clause” of the EMC
Directive as follows: Electrostatic Discharge (8 kV Air discharge); RF
Immunity (3 V/m 27-500 MHz CW); Fast Transient immunity (1 kV AC
line; 0.5 kV I/O lines>3m).
■
EN 60950 (1993), IEC 950 (1993) Safety of Information Technology
Equipment, Including Electrical Business Equipment.
Authority:
Applied Magic, Inc. Europe AG
Schulhausstrasse 27
CH-8600 Dubendorf, Switzerland
Applied Magic Inc:
5845 Owens Avenue
Carlsbad, CA 92008
U.S.A.
Attention: The attention of the specified, purchaser, installer, or user is
drawn to special measures and limitations about usage, which must be
observed when the product is taken into service to maintain compliance with
the above directives. Details of these special measures and limitations are on
page 7 of this user manual.
Introduction
6
Safety Precautions
Use the following guidelines to protect your ScreenPlay or Sequel unit and
your personal safety. Keep the safety and operating instructions for future
reference. Pay attention to all warnings on the equipment and in the
instructions.
The lightning flash with the arrowhead symbol, within an
equilateral triangle, is intended to alert the user to the
presence of non-insulated dangerous voltage within the
product’s enclosure that may be of sufficient magnitude to
constitute a risk of electrical shock to persons.
Caution: Risk of electrical shock. Do not open.
The exclamation point inside an equilateral triangle is
intended to alert the user to the presence of important
operating and maintenance (service) instructions in the
literature accompanying the product.
Caution: To reduce the risk of electrical shock, do not
remove cover or front. Refer servicing to qualified service
personnel. This installation should be made by a qualified
service person.
Introduction
7
Multiple Voltage Equipment
The power cord included with your ScreenPlay or Sequel is for use with
standard U.S. VAC supplies. If it is necessary to operate the product in the
U.S.A. with a 220 VAC supply, a UL-listed power cord must be used. For
countries outside the U.S.A., it is required to use a power cord that complies
with the electrical standards established by that country.
Warning
■ To prevent fire or shock hazard, do not expose this equipment to rain or
moisture. Do not spill food or liquids on the unit.
■
To prevent electric shock, plug unit and peripheral power cables into
grounded power sources. Do not use adapter plugs or remove the
grounding prong on the three-prong plug. If you use an extension cable, it
must have a three-prong plug.
■
To prevent electrical shock, do not use the electrical power plug (polarized)
with an extension cord, receptacle, or other outlet unless the blades can be
fully inserted to prevent blade exposure.
■
Do not overload power outlets and extension cords. This can result in a fire
risk or electrical shock.
■
Cables connected to the unit should not exceed two meters in length. Make
sure nothing rests on the cables, and make sure they cannot be stepped on
or tripped over.
■
Use a surge suppressor or line conditioner to protect your electronic
equipment.
■
Do not push any objects into the openings of the unit. This can cause
electric shock by shorting out interior components.
Ventilation and Placement
■ Do not block or cover the slots and openings of the unit. They provide
ventilation and protect it from overheating.
■
Keep the unit away from radiators and heat sources. Do not block cooling
vents by placing the unit in a closed-in wall unit or on a bed, sofa, or rug.
■
Do not place this product on an unstable surface such as a cart, stand,
tripod, bracket, or table. It may fall, causing serious injury to a person or to
the unit itself.
Cleaning
Do not use liquid or aerosol cleaners. Use a damp cloth to clean the exterior
enclosure.
Introduction
8
Ergonomics
■ If you have connected a monitor to your video editing unit, place the
monitor directly in front of you, approximately two feet away at eye level or
slightly lower when you are sitting down, and adjust the screen to
minimize glare.
■
Place the keyboard directly in front of you. Use a properly adjusted chair
with a good back support, and sit erect with feet on the floor, arms hanging
naturally at your sides, and forearms horizontal with wrists in a neutral
position while using the keyboard.
■
Vary your work activities, and take breaks so that you do not work for
extended periods of time.
Repairs and Service
For assistance on return or repair, refer to the sections entitled “Limited
Warranty” and “Obtaining Service.” Do not try to service this product yourself.
If you open or remove the cover, you may be exposed to dangerous voltage or
other hazards.
Introduction
9
Video Formats
There are three standards for video in the world, NTSC, PAL, and SECAM.
The following is a listing of formats in alphabetical order by country.
Abu Duabi (PAL)
Afghanistan (PAL)
Albania (SECAM)
Algeria (PAL)
Antigua (NTSC)
Antilles (NTSC)
Argentina (PAL-N)
Aruba (NTSC)
Australia (PAL)
Austria (PAL)
Azores (PAL)
Bahamas (NTSC)
Bahrain (PAL)
Bangladesh (PAL)
Barbados (NTSC)
Belgium (PAL)
Bermuda (NTSC)
Bolivia (NTSC)
Bosnia-Herzegovina (PAL)
Brazil (NTSC or PAL-M)
Brunei (PAL)
Bulgaria (SECAM)
Burma (NTSC)
Cameroon (SECAM)
Canada (NTSC)
Canary Islands (PAL)
Cayman Islands (NTSC)
Channel Islands (PAL)
Chile (NTSC)
China (PAL)
Columbia (NTSC)
Congo (SECAM)
Costa Rica (NTSC)
Croatia (PAL)
Cuba (NTSC)
Curacao (NTSC)
Cyprus (PAL)
Czech Republic (PAL)
Denmark (PAL)
Djibouti (SECAM)
Dominican Republic (NTSC)
Dubai (PAL)
Egypt (SECAM)
El Salvador (NTSC)
Equador (NTSC)
Finland (PAL)
France (SECAM)
French Guyana (SECAM)
Gabon (SECAM)
Germany (East) (SECAM)
Germany (West) (PAL)
Ghana (PAL)
Gibraltar (PAL)
Greece (SECAM)
Greenland (PAL)
Guadeloupe (SECAM)
Guam (NTSC)
Guatemala (NTSC)
Haiti (NTSC)
Honduras (NTSC)
Hong Kong (PAL)
Hungary (SECAM)
Iceland (PAL)
India (PAL)
Indonesia (PAL)
Iran (SECAM)
Iraq (SECAM)
Ireland (PAL)
Israel (PAL)
Italy (PAL)
Ivory Coast (SECAM)
Jamaica (NTSC)
Japan (NTSC)
Jordan (PAL)
Kenya (PAL)
Korea (North) (PAL)
Korea (South) (NTSC)
Kuwait (PAL)
Laos (PAL)
Lebanon (SECAM)
Liberia (PAL)
Libya (SECAM)
Luxembourg (PAL)
Madagascar (SECAM)
Madeira (PAL)
Malaysia (PAL)
Malta (PAL)
Martinique (SECAM)
Mauritius (SECAM)
Mexico (NTSC)
Monaco (PAL)
Mongolia (SECAM)
Morocco (SECAM)
Mozambique (PAL)
Namibia (PAL)
Netherlands (PAL)
New Zealand (PAL)
Nicaragua (NTSC)
Nigeria (PAL)
Norway (PAL)
Oman (PAL)
Pakistan (PAL)
Panama (NTSC)
Paraguay (PAL-N)
Peru (NTSC)
Philippines (NTSC)
Poland (PAL)
Polynesia (SECAM)
Portugal (PAL)
Puerto Rico (NTSC)
Qatar (PAL)
Reunion (SECAM)
Romania (SECAM)
Russia (SECAM)
Saban (PAL)
Saipan (NTSC)
Sarawak (PAL)
Saudi Arabia (SECAM)
Senegal (SECAM)
Sierre Leone (PAL)
Singapore (PAL)
Slovak Republic (SECAM)
Slovenia (PAL)
South Africa (PAL)
Spain (PAL)
Sri Lanka (PAL)
Sudan (PAL)
Surinam (NTSC)
Swaziland (PAL)
Sweden (PAL)
Switzerland (PAL)
Taiwan (NTSC)
Tanzania (PAL)
Thailand (PAL)
Tibet (PAL)
Trinidad (NTSC)
Turkey (PAL)
Uganda (PAL)
United Arab Emirates (PAL)
United Kingdom (PAL)
USA (NTSC)
Uruguay (PAL-N)
Venezuela (NTSC)
Yemen (PAL)
Zaire (SECAM)
Zambia (PAL)
Zanzibar (PAL)
Zimbabwe (PAL)
Connecting Your Video Editing Unit
10
CONNECTING YOUR VIDEO EDITING UNIT
Package Contents
Check to make sure that you receive the following components.
If any items are missing or damaged, refer to the sections entitled “Limited
Warranty” and “Obtaining Service.”
■
ScreenPlay/Sequel Unit
■
Wired Keyboard (PS/2)
■
Mouse (PS/2)
■
Power Cord
■
SRCA A/V Cable Set (your video
editing unit may be packaged with
separate audio and video cables)
■
S-Video Cable
■
User Manual and Registration Card
■
Software CD
NOTE:
Your video editing system was shipped with a CD containing sample
transitions from two third-party software developers. You also have the
option of purchasing additional transitions from these companies.
Rapid Transits, produced by Kermit Woodall, are a form of video transition
known as a Gradient Transition. These are carefully constructed and saved
in the proper resolution and image format necessary for the ScreenPlay
system. Rapid Transits are designed for use by Wedding and Event
videographers and can be purchased on-line at rapidtransits.v-share.com.
Video SpiceRack PRO transitions, produced by Pixélan Software, are a wide
variety of top-rated, fresh, super-softenable “spice” transitions which allow
you to form terrific directional dissolves and other beautifully subtle effects,
as well as serving as dynamic mattes to seamlessly flow other ScreenPlay
effects. Hundreds of additional Pixélan Software transitions, including a
wide range of organic effects, are available through the Applied Magic web
site at www.applied-magic.com.
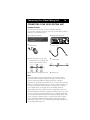
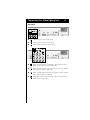
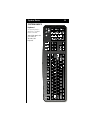
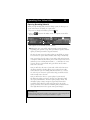
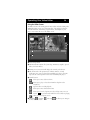
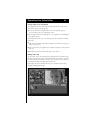
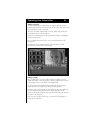
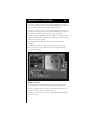
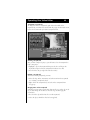
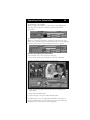
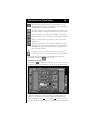
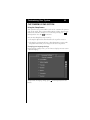
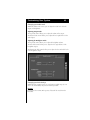
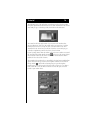
Connecting Your Video Editing Unit
11
Optional Features
While the cordless keyboard is not shipped with every unit, it is available as
an optional feature.
NOTE:
The illustrations within this manual depict the ScreenPlay video editing
unit. If you have purchased the Sequel video editing unit, you may notice
that your unit varies slightly from these illustrations.
Front Panel
CD-ROM drive — Accepts CD-ROM disks.
INFRARED (IR) lens — Transmits/receives signals to/from optional
cordless keyboard.
POWER INDICATOR — Glows green when unit is powered on.
HARD DISK INDICATOR — Glows red when hard disk reads or writes
data.
IR FEEDBACK INDICATOR — Glows amber when receiving signal from
cordless keyboard.
Connecting Your Video Editing Unit
12
(ScreenPlay only/optional for Sequel)
Type II PC Card (sometimes called PCMCIA) slot for
importing digital still photos. The PC Card slides only
partially into this opening. When the card has been inserted, a
message will appear on-screen, indicating that the system has
recognized the card. If your PC Card contains many files, it may take
slightly longer for this message to appear.
Receives composite signal (video and audio L, R) input from
standard camcorder.
Accepts S-Video input from S-VHS camcorder or VCR.
(ScreenPlay only/optional for Sequel) DV-1394 I/O that connects to
a digital camcorder.
Provides headphone audio (adjustable through the Audio Levels
screen).
Accepts microphone input.
Connecting Your Video Editing Unit
13
Rear Panel
S-Video output to TV’s S-Video input.
S-Video output to VCR’s S-Video input.
S-Video input from VCR’s S-Video output.
Video and audio outputs to TV/monitor. Top output is for video,
middle for left audio, bottom for right audio.
Video and audio outputs to VCR. Top output is for video, middle
for left audio, bottom for right audio.
Video and audio inputs from VCR. Top input is for video, middle
for left audio, bottom for right audio.
Audio inputs from external CD or tape audio source (top is left
audio; bottom is right audio).
Connecting Your Video Editing Unit
14
Audio and video “out” for SCART connection to a European TV.
Video “out” for connection to VGA computer monitor.
SCSI for connection to external storage devices. Use shielded
SCSI cables.
For connection to mouse.
For connection to keyboard.
Other serial connections for optional MIDI.
Turns power on and off.
is off;
is on.
Power supply fuse. Do not remove.
Plug appropriate power cord here and plug other end into wall outlet.
Connecting Your Video Editing Unit
15
Making Connections
First, you will need to connect your unit to your keyboard and mouse. To do
this, refer to the following information:
BASIC CONNECTIONS
This section describes the basic connections made
between your unit, your keyboard, and your mouse.
Page 17
Next, you will want to connect your unit to a TV or Monitor. Your video
editing unit offers a variety of connection options, which are detailed as
follows:
CONNECTING TO A STANDARD TV OR BROADCAST MONITOR
This section describes the connection between your unit
and your TV or broadcast monitor.
Page 17
CONNECTION TO AN S-VIDEO TV OR BROADCAST MONITOR
This section describes a higher-quality connection
between your unit and your TV or broadcast monitor.
Page 17
CONNECTION TO A VGA COMPUTER MONITOR
This section describes how to connect your unit to a VGA
monitor.
Page 18
CONNECTION TO A SCART TV OR MONITOR
This section describes how to connect your unit to a
European SCART TV or Monitor.
Page 18
Your video editing unit also offers an additional audio connection:
CONNECTION TO AN AUDIO SYSTEM
This section describes how to connect your unit to your
audio system.
Page 18
Connecting Your Video Editing Unit
16
When you plan to capture (record) or output your video, you will want to
connect a VCR or camcorder:
CONNECTION TO A VCR WITH STANDARD OUTPUT
This section describes the connection between your unit
and your VCR.
Page 19
CONNECTION TO A VCR WITH S-VIDEO OUTPUT
This section describes a higher-quality connection
between your unit and your VCR.
Page 20
CONNECTION TO A CAMCORDER WITH STANDARD OUTPUT
This section describes the connection between your unit
and your camcorder.
Page 20
CONNECTION TO A CAMCORDER WITH S-VIDEO OUTPUT
This section describes a higher-quality connection
between your unit and your camcorder.
Page 21
CONNECTION TO A CAMCORDER WITH DV-1394
(SCREENPLAY ONLY)
This section describes the digital connection between
your unit and your camcorder.
Page 21
CAUTION
Do not cover the vent holes on the unit. Do not use this equipment in
a manner not specified by the manufacturer.
Connecting Your Video Editing Unit
17
Basic Connections
port on the rear panel to the mouse
port on the rear panel to the keyboard
Power outlet on the rear panel to the power supply
Connection to a Standard TV or Broadcast Monitor
Your video editing unit can be connected to a standard TV or broadcast
monitor.
on the rear panel to the composite input on the TV/monitor
on the rear panel to the left and right audio input on the TV/monitor
Connection to an S-Video TV or Broadcast Monitor
Your video editing unit can be connected to an S-Video TV or a broadcast
monitor to obtain better picture quality for editing purposes.
on the rear panel to the S-Video input on the TV/monitor
on the rear panel to the left and right audio inputs on the TV/monitor
Connecting Your Video Editing Unit
18
Connection to a VGA Computer Monitor
Your video editing unit can be connected to a computer monitor if desired.
on the rear panel (15-pin high-density port) to the input on a
VGA monitor
NOTE:
For audio connections, refer to the section entitled “Connection to an Audio
System” (below).
Connection to a SCART TV or Monitor
Your video editing unit can be connected to a European SCART TV or
monitor.
on the rear panel to the SCART input on the TV/monitor for video
and audio
Connection to an Audio System
on the rear panel to audio left and right “out” on the audio system
Connecting Your Video Editing Unit
19
Connection to a VCR with Standard Output
To capture (record) video from a VCR with composite connections into the
video editing unit or output video onto a tape, make the following
connections.
For capturing/recording:
on the rear panel to the composite output on the VCR
on the rear panel to the left and right audio outputs on the VCR
For mastering:
on the rear panel to the composite input on the VCR
on the rear panel to the left and right audio inputs on the VCR
Connecting Your Video Editing Unit
20
Connection to a VCR with S-Video Output
To capture (record) video from a VCR with S-Video connections into the video
editing unit or to master output, make the following connections.
For capturing/recording:
on the rear panel to the S-Video output on the VCR
on the rear panel to the left and right audio outputs on the VCR
For mastering:
on the rear panel to the S-Video input on the VCR
on the rear panel to the left and right audio inputs on the VCR
Connection to a Camcorder with Standard Output
From camcorders with composite connections:
on the front panel to the composite video output on the camcorder
on the front panel to the left and right audio outputs on the
camcorder
Connecting Your Video Editing Unit
21
Connection to a Camcorder with S-Video Output
From camcorders with S-Video connections:
on the front panel to the S-Video output on the camcorder
on the front panel to the left and right audio outputs on the camcorder
Connection to a Camcorder with DV-1394 (ScreenPlay only/optional
for Sequel)
To capture (record) video from camcorders with DV-1394 digital output into
the video editing unit, make the following connection.
From camcorder with DV-1394 connection:
on the front panel to the DV-1394 output on the camcorder
External Storage Devices
Additional storage devices, such as removable media or external hard drives,
can be connected to your video editing system through the SCSI port on the
rear panel of the unit.
System Basics
22
SYSTEM BASICS
Turn off the unit before
you connect or
disconnect the
keyboard.
A custom keyboard is
supplied as a standard
feature of the unit.
Keyboard
System Basics
23
Press this key to prepare your video editing unit for shutdown.
Cut – Remove a selected item and store it in the memory.
Copy – Copy a selected item to the memory.
Paste – Paste the cut or copied item(s) from the memory.
Duplicate – Duplicate an item (no additional hard disk space is utilized).
Select All – Select all items in an area (for example, Clips in a StoryBoard or
Clips in a bin).
New Drawer – Add a new drawer or sub-drawer to any bin.
Extract Frame – Turn the current frame into a still picture clip. To capture an
entire frame, use the Control + Extract Frame or Alt + Extract Frame
commands (see “Creating a Still Image” on page 50).
Master – Switch to Master mode to play an entire StoryBoard using the full
screen without showing the on-screen controls (five seconds of black will
appear at the beginning and end of video).
Clips – A short-cut key to display the Clips bin in the Editor screen.
Transitions – A short-cut key to display the Transitions bin in the Editor
screen.
Graphics – A short-cut key to display the Graphics bin in the Editor screen.
Effects (Color/Special) – A short-cut key to display the Special and Color
Effects bins in the Editor screen. The first time you press this button, the
Special Effects bin will appear. On the second press, the Color Effects bin
appears.
Display Editor screen.
Display Graphics screen.
Display Setup screen.
Merge – Combines selected items on a StoryBoard.
Sync – Synchronizes all currently selected items on a StoryBoard and keeps
their relation to each other fixed, regardless of other changes to the
StoryBoard (see “Insert Editing” on page 51).
Unsync – Unsynchronizes all currently selected items on a StoryBoard.
Delete – Delete a selected item.
Undo – Undo last operation.
Redo – Redo last undone operation.
/ / / Directional keys to relocate a selected item in a desired
direction. Pressing these keys while in the capture screen will cause the
capture control panel to move around the screen.
System Basics
24
Full Screen – Puts the system in full screen mode, so playback of video will
fill the entire screen and no on-screen controls will appear. Pressing this key
again will turn off the full screen mode.
Go to the beginning (or “in-time”) of a selected video. Pressing
Shift +
will take you to the beginning of a StoryBoard.
Go to the end (or “out-time”) of a selected video. Pressing Shift +
will take you to the last clip on a StoryBoard.
Rewind rapidly through the selected video in one second
increments.
Pause play of video.
Fast Forward through the selected video in one second increments.
Access the record screen. Record video source to the hard drive.
Stop play of video.
Play selected Clip or StoryBoard from the beginning.
Rewind one frame.
Use the Break/Split key to stop recording the current Clip and
immediately begin recording a new clip.
Advance one frame.
Play selected Clip, StoryBoard, or StoryBoard part from current
cursor/pointer position.
Set Key Frame – Selects the video frame to be used as a thumbnail to
represent that video. When playing a video clip or when the video is paused,
press this key to select a particular frame to use as the thumbnail representing
the clip in the bin and on the StoryBoard.
Set In – Create an “in” marker based on the position of the video cursor bar
(see “Cursor Bar” on page 28).
Set Out – Create an “out” marker based on the position of the video cursor
bar (see “Cursor Bar” on page 28).
Details – Switch between Detail view and StoryBoard view.
Help – Accesses on-screen help text.
System Basics
25
Keyboard Shortcut Keys
Alt + Extract Frame
Extracts a complete frame of video from the source clip,
but reverses the field dominance to eliminate jitter that
may be seen when using Control + Extract Frame.
Tab
Aligns the beginning of the selected audio clip or title with
the current StoryBoard Cursor Bar position (the audio clip
or title must be highlighted).
Control + Tab
Aligns the end of the selected audio clip of title with the
current StoryBoard Cursor Bar position (the audio clip or
title must be highlighted).
Shift +
Jump to the last video clip on the StoryBoard.
Shift +
Jump to the beginning of the StoryBoard.
System Basics
26
Mouse
The mouse is a device used to position the on-screen pointer and to make
on-screen selections. At the top of the mouse are a LEFT button and RIGHT button. Turn off the unit before you connect or disconnect the mouse.
Once you connect and power up your unit, if you move the mouse over a
smooth surface, you can position the on-screen pointer anywhere on the
viewing screen. If you position the on-screen pointer so that it rests on top of
an on-screen item, you will be able to perform an action on that item:
■
Most of the time, you will be asked to select the item. This means that you
should click the left mouse button (quickly press and release it once).
■
To select an item by double clicking, click the left button twice.
■
If you right click on an item, a pop-up screen will appear with choices that
are related to the object you have clicked. The pop-up screen disappears
when you click the left button elsewhere on the screen.
■
If you select an item, keep the left mouse button depressed, and move the
mouse, you can “drag” the selected item around the screen. When you
move the item to a place where you want it to stay you can “drop” the item
by releasing the left mouse button.
System Basics
27
Identifying Parts of the Screen
The following information will give you an introduction to the on-screen
elements of your video editing unit. Please keep in mind that the on-screen
elements may change slightly as you work with the system — when a
selection is not available, it may appear dark gray, or when an item is selected,
its appearance will vary slightly.
Bin
A bin is a type of screen that contains the resource material for building your
project. Examples include video and audio Clips, Graphics, Transitions,
Special Effects, etc. There are various types of bins, depending upon what they
contain. Bins also contain sub-sections called Drawers.
System Basics
28
Buttons
Your video editor’s buttons are small objects displayed on the screen that you
can select to perform various functions.
Check Boxes and Checklists
Check boxes and checklists resemble check boxes on a questionnaire.
You can select them to mark or unmark them.
Clips
Clips allow you to gain access to video or audio Clips. Video Clips appear as
images, while audio Clips appear as audio speaker icons.
You can move Clips from a bin to a drawer (or back again) by dragging the
Clips to the new location, and you can move the Clips from one drawer or
sub-drawer to another (see “Drawers” on page 29).
As you begin to create a project, you will drag these Clips from the bin to the
StoryBoard.
Cursor and Pointer
When you are typing in a text area, the pointer appears as a cursor. You can
move this cursor anyplace within the text area and type the appropriate
symbols where you need them.
Cursor Bar
The Cursor bar is a triangle with attached vertical line that crosses the Video
Clips, Graphics, and Audio Clips tracks in the StoryBoard screen. It marks
your current position along your project “timeline” and can be moved to
anyplace along the “timeline.”
System Basics
29
Drawer
A drawer is a sub-section of a bin, and you can even have sub-drawers
within drawers. You can organize the Clips in a bin by storing them in
drawers so that you can find them more easily.
To move a clip to a drawer, simply drag the clip to the drawer icon and
drop it.
Scroll Bars
Scroll bars allow you to move new information into view if the amount of
information contained by the screen is too large to view at a single glance.
Click on the arrows to reveal different portions of a screen, or click and drag
on the center portion of the scroll bar to quickly move to a different portion
of the screen.
Sliders
A slider is a control that you can select and move to gradually choose
between two options — gradually increasing the amount of one option
while decreasing the other.
System Basics
30
Text Window
A text screen allows you to type in text using the keyboard.
Tabs
Your video editing unit holds many types of information on its various onscreen areas, and some of these screens have a tab located at the screen’s edge
to help you keep track of the different types of information you are using.
Like tabs in a file drawer, you can gain access to more information by
selecting a tab.
Operating Your Video Editor
31
OPERATING YOUR VIDEO EDITOR
Powering Up
To power up your unit, find the power switch located on the rear panel.
Move the power switch to the on position.
NOTE:
indicates on,
indicates off.
After a minute or so, the Editor Screen will appear, indicating that you can
begin using your unit.
Powering Down
To power off your unit:
1. Press the
key on the keyboard. This will allow the system to save your
current settings.
2. Move the power switch on the rear panel of the unit to the off position.
NOTE:
Another way to prepare for shutdown is to right click within the viewing
screen and select shutdown from the pop-up which appears.
Operating Your Video Editor
32
Capturing (Recording) Material
When you begin working with your video editing system, the first step is to
capture video material for editing. To capture video:
1. If you are not already in the Editor, press the
2. Select the
displayed.
button on the Editor screen. The Capture screen will be
key.
The capture screen contains several controls:
Within this area, you will be asked to make several selections
regarding your system’s setup, what you wish to capture, and the
quality at which you wish to capture material.
The first selection you need to make is what you would like to capture.
You can choose to capture Video & Audio, Video Only, or Audio Only.
Next, you need to select the source of your video. Click on the box next
to the phrase which describes where you’ve connected your video source
(whatever you are recording material from, i.e., a camcorder). Of course
if you’ve chosen to capture Audio Only, you will not need to make a
video source selection.
Next you will select the source of your audio. Click on the box next to
the phrase which best describes where you’ve connected your audio
source (whatever you are recording audio material from, i.e., a stereo).
Of course if you’ve chosen to capture Video Only, you will not need to
make an audio source selection.
Next you will need to choose a capture quality for your material.
The higher the quality you choose, the more space this material will
take up on your hard drive. The lowest quality setting is Demo, and
the highest quality setting is Corporate (Sequel only) or Broadcast
(ScreenPlay only). When you click on the box next to the capture
quality you choose, notice that the “Remaining Time” indication on the
lower right-hand corner of the capture control panel changes.
ScreenPlay only
The final setting you’ll need to make is your capture rate. This setting tells the
system how many fields per second you would like to capture.
Operating Your Video Editor
33
This area enables you to name the video clip which you are
recording. You can name the clip now, or later within the Details
screen (see page 49).
The
,
and
is being recorded.
allow you to control the material which
record
stop
break (split)
Select this checkbox to display an audio
adjustment control area on-screen.
controls volume
controls L & R balance
Select this checkbox to display the video
adjustment control area on-screen.
controls brightness
controls contrast
controls saturation
NOTE:
The video adjustment control is not available for video captured through
Digital I/O.
Timecode In indicates the current timecode of the incoming clip
(if the clip has associated VITC or DV timecoding).
Record Duration indicates the total duration of the current clip
being recorded.
Remaining Time indicates the approximate number of minutes
remaining on all system drives.
NOTE:
When you change the quality level for your captured material (in area A,
on page 32), the Remaining Time indication changes. This indication
will help you determine how much recording time you have left.
L&R indicate the levels of the left and right stereo channels or
your incoming audio.
Select this icon to return to the main Editor screen.
Operating Your Video Editor
34
3. Press the Play key on the device from which you will be capturing video.
4. Select the
key on the keyboard or on the Record screen when you
want to begin recording.
5. Select the
key on the keyboard or on the Record screen when you
want to stop recording. Each time you press this key, the new clip which
you’ve just recorded will be placed in the Clips bin.
6. Use the
on the keyboard or on-screen when you want to break the
clip you are recording into smaller pieces.
7. When you have recorded as many Clips as you want, select
to the Editor screen. Your Clips will be stored in the Clips bin.
to return
NOTES:
■ If you have purchased the ScreenPlay video editing system or Sequel with
the DV option, you can capture digital audio or video using your DV
connection. To do so, you must select DV as your source in the capture
screen.
■
If you have set up drawers within the Clips bin, make sure you enter the
capturing screen from the bin or drawer where you want your incoming
Clips to be saved. You can also organize your Clips into drawers later, if
you wish to do so.
NOTES:
The
/
/
Control + /
viewing area.
■
/ keys can be used to move the capture screen.
will move the capture screen to the top or bottom of your
■
The capture screen can be minimized, so as to obscure less of the video
area behind it. To minimize the screen, simply select the
icon.
■
To restore the capture screen to full size, select the
Control +
/
icon.
can be used to minimize and maximize the capture screen.
Operating Your Video Editor
35
Capturing Material from Audio CDs:
Audio tracks can be directly imported to your video editing unit from CDs.
1. Press
on the keyboard to return to the Editor screen (Audio tracks
cannot be imported from a CD within the capture screen).
2. Open the CD drawer on the front panel of the unit, and insert an
audio CD.
3. After a few moments, the Select Audio CD Tracks screen will appear.
4. Select the track(s) that you would like to install.
5. Select Install. (To install all the tracks from the CD, simply select Install
All.)
6. Audio tracks will be installed directly from CD to your system’s hard drive.
Installation will take approximately 75% of real time (a one minute file will
be installed in 45 seconds).
7. After installation, the audio Clips will appear in the Clips bin.
NOTES:
■ Material cannot be imported from CDs (or any removable media) while the
capture screen is displayed.
■
JPEGs, bitmaps and TrueType fonts can also be imported from CD (or any
removable media) to your system. Files must be named with the “.jpg,”
“.bmp,” or “.ttf” extension, and must be placed within the root directory of
the disk.
Starting a Project
When beginning a new project, you’ll want to start in the Editor. If the Editor
is not already displayed on your screen, press the
key to display it.
1. Left click on the horizontal StoryBoard tab.
2. A pop-up will appear, indicating the StoryBoards which are currently
available.
3. Select the StoryBoard you would like to work on.
Operating Your Video Editor
36
Using the Editor Screen
The Editor screen is the starting point for most audio and video editing tasks.
Within the Editor screen, you can preview Clips, edit and play back video,
and add Transitions, Color Effects, Special Effects, and Graphics to your
project. Let’s review the areas of the Editor screen:
Selected Clip’s Name
The Materials Bin contains all of your Clips, Transitions, Graphics, Special
Effects, and Color Effects.
Viewing screen (1/4 screen) will display the currently selected item.
The current time of the preview item, in hours, minutes, seconds,
and frames. Note: Once you have begun working on a project, this time
represents the current position of the cursor bar within your project.
Control buttons
allows you to move back one frame.
allows you to play a selected item from the Clips bin or the
StoryBoard.
stops the video or audio playback.
allows you to move forward one frame.
allows you to break a clip into two selected Clips. Note: You can
use the
key to break video while the selected video is playing.
takes you to the Capture screen.
The Editor
, Graphics
to these different screens.
, and Setup
tabs allow you to navigate
Operating Your Video Editor
37
The horizontal StoryBoard title tab allows you to navigate to other
StoryBoards by either left clicking on the tab (a pop-up with available
StoryBoards listed will appear) or clicking on the left or right arrow buttons
beside the tab (the StoryBoards will rotate in order). Right click on the
horizontal StoryBoard tab to access a series of StoryBoard-related options,
including adding a new StoryBoard. Your video editing system allows you
to work on up to six projects at one time.
Select Details from the pop-up when you want to name a StoryBoard.
The StoryBoard area is a StoryBoard timeline which includes a video clips
track, graphics track, and two audio tracks, a Details tab, and a cursor to
help you navigate through your StoryBoards.
To scroll quickly through your StoryBoard, press the shift key on your
keyboard while clicking on the appropriate / cursor on your
StoryBoard. To scroll even more quickly, press shift + Control while clicking
on the cursor.
Operating Your Video Editor
38
Using the Materials Bin
The Materials bin provides access to five bins, which contain audio and video
Clips, Transitions, Graphics, Color Effects, and Special Effects.
There are three ways to display the available bins:
■
Click the center of the top line of the Materials bin screen to display a
pop-up list showing all five selections.
■
Select the right or left arrow button on the top line of the Materials bin
screen to scroll through the five bins, one after the other.
■
Press the corresponding key on the keyboard (Clips, Transitions, Graphics,
Effects Color/Special).
Bins can also contain sub-sections, called drawers, and even sub-drawers
within drawers. You can use these drawers and sub-drawers to organize your
materials in the method most convenient to you.
Operating Your Video Editor
39
To create a drawer:
1. Using the left and right arrow buttons, or the Materials bin pop-up,
navigate to the bin you would like to create the new drawer within.
2. Right click on any clip within the bin, then select New Drawer from the
options displayed in the pop-up, or simply press the New Drawer key on
the keyboard.
The new drawer will appear.
3. If you would like to rename your drawer, right click on the new drawer,
then select Details from the options displayed in the pop-up.
The drawer Details screen will appear.
Operating Your Video Editor
40
4. Click in the name area and highlight the default name, then type in the name
of your choice.
Using the Clips Bin
The Clips bin contains your video and audio Clips. You can use the scroll bar at
the right side of the Clips bin to navigate to additional Clips.
NOTES:
■ When you select a video clip, that clip will appear in the viewing area, and
the name and time code for that clip will appear above the viewing area.
■
You can drag video and audio Clips to new locations within the Clips bin or
onto the StoryBoard for use in a project.
■
You can select two or more Clips at once by selecting the first clip, pressing
the Shift key, and keeping it depressed as you select additional Clips. This
allows you to move, cut, copy, or delete multiple Clips at once.
■
You can duplicate, cut, copy, and paste Clips stored in the Clips bin.
■
To delete a clip from your Clips bin, simply select that clip, then press the
Delete key on the keyboard or right click on the clip and select Delete.
Operating Your Video Editor
41
Using the Transitions Bin
The Transitions bin displays all of the transition types. You can use the scroll
bar at the right side of the Transitions bin to navigate to additional
transitions.
NOTES:
■ You can drag transitions to new locations within the bin or for placement
between video Clips in your StoryBoard project.
■
You can duplicate, copy, and paste transitions stored in the Transitions
bin.
■
If you wish to create a custom transition, duplicate a transition which
already exists on your system. Next, select the duplicate transition and
click on the Details tab. Within the Details screen, you can change many
characteristics of the transition, including the border width, border color,
duration, softness, and name of the transition.
■
To delete a duplicate or customized transition from the bin, select it and
press the Delete key on the keyboard or right click on the transition and
select Delete. You cannot delete factory-installed transitions from the bin
if there is no duplicate. However, the system does allow you to delete
user-installed transitions.
Using the Graphics Bin
The Graphics bin contains all of the graphics created within the Graphics
screen (see “Using the Graphics Screen” on page 57). You can use the scroll
bar at the right side of the Graphics bin to navigate to additional graphics.
NOTES:
You can drag graphics to new locations within the bin or onto the
StoryBoard for incorporation in your project.
■
■
You can duplicate, cut, copy, and paste graphics stored within the
Graphics bin.
■
To delete a graphic from the bin, select it and press the Delete key on the
keyboard or right click on the graphic and select Delete.
■
You can double click on a graphic to open this graphic within the
Graphics screen.
Using the Color Effects Bin
The Color Effects bin displays all of the color effects. You can use the scroll
bar at the right side of the Color Effects bin to navigate to additional color
effects.
NOTE:
You can drag color effects to a new location within the bin or for placement
on a video clip on your StoryBoard.
Operating Your Video Editor
42
Using the Special Effects Bin
The Special Effects bin contains all of the special effects. You can use the
scroll bar at the right side of the Special Effects bin to navigate to additional
special effects.
NOTES:
■ You can drag special effects to a new location within the bin or for
placement on video Clips on your StoryBoard.
■
You can create custom special effects based on some of the special effects
provided on your system. To do so, duplicate a special effect that already
exists in your system. Next, select the duplicate special effect and click on
the Details tab. Within the Details screen, you can change many
characteristics of the special effect.
Operating Your Video Editor
43
Editing Video on the StoryBoard
The StoryBoard title tab is located above the StoryBoard area of the screen.
This tab has two types of pop-up lists:
■
If you left click on the StoryBoard bar, a list of StoryBoards appears.
You can work on up to six StoryBoards at once.
■
If you right click on the StoryBoard bar, a list of options for controlling the
StoryBoard appears.
The StoryBoard is where you create video projects. The StoryBoard contains
four tracks:
■
The first track is where video Clips, Transitions, Color Effects, and Special
Effects can be placed.
■
The second track is the graphics track. Graphics and Titles can be placed in
this area.
■
The final two tracks are where audio Clips can be placed.
Adding a video clip
To add a video clip to the StoryBoard, drag and drop the clip from the Clips
bin onto the video Clips track, at the location where you want it to appear in
relation to the other video Clips. You may add a clip to the end of a track, or
you can drop it between existing Clips on the track.
Video Clips can also be moved from one place to another on the track by
dragging and dropping the Clips.
Operating Your Video Editor
44
Adding an audio clip
To add an audio clip to the StoryBoard, drag and drop the clip from the Clips
bin onto either of the two audio Clips tracks, in the position that you wish.
Aligning an audio clip
To make an audio clip start at the beginning of a particular video clip and
continue for the duration of that video clip, drop the audio clip on top of the
video clip in the video Clips track. The label for that audio clip will appear in
the first free audio clip track directly under that video clip, and it will have
the same start and stop time as the video clip.
Once you place an audio clip in the track, you can move it by dragging it to a
new location in the track.
You can also drag the beginning or end of the track to extend the length of
time it will play (up to the maximum length of the audio clip).
If you want an audio clip to begin at a particular point within your video,
move your cursor bar to the appropriate location, then highlight the audio
clip and press the Tab key. Notice that the audio clip “snaps” into position.
If you want an audio clip to end at a particular point within your video, move
your cursor bar to the appropriate video location, then highlight the audio
clip and press Control + Tab. Notice that the audio clip “snaps” into position.
Operating Your Video Editor
45
Adding a transition
To add a transition to the StoryBoard screen, drag and drop the desired
transition from the bin to a location between the two video Clips on the video
Clips track that you want to transition.
To replace an existing transition with a new one, simply drag and drop the
new transition on top of the existing one.
To remove a transition, drag it off the StoryBoard and drop it, or highlight it
and press the Delete key.
Once a transition has been placed, it can be previewed instantly in the
viewing area.
All transitions can be viewed in real time. However, many users find
transitions often look smoother when merged.
Adding a graphic
First, you will need to create the graphic, using the Graphics screen (see
“Using the Graphics Screen” on page 57). Once the graphic has been created
in the Graphics screen, it will appear in the Graphics bin.
To add a graphic to the StoryBoard, drag and drop the graphic from the
Graphics bin onto the Graphics track in the position you desire.
To make a graphic appear during an entire video clip, drop the graphic onto
the video clip in the video Clips track. The graphic will appear in the
Graphics track directly under the video clip and will have the same start and
stop times as the video clip.
Once you place a graphic on the track, you can move it by dragging it to a
new location on the track.
Operating Your Video Editor
46
If you want a graphic to begin at a particular point within your video, move
your cursor to the appropriate video location, then highlight the graphic and
press the Tab key. Notice that the graphic “snaps” into position.
If you want a graphic to end at a particular point within your video, move
your cursor to the appropriate video location, then highlight the graphic and
press Control + Tab. Notice that the graphic “snaps” into position.
You can also drag the beginning or end of the graphic to extend the length
of time it will be displayed in either direction. There is no limit to the length
of time you can display a graphic.
Once a graphic has been placed, it can be previewed instantly in the
viewing area.
(ScreenPlay only) Only one graphic can be displayed at any given time
unless you merge the graphic with the video (see “Merging Items on the
StoryBoard” on page 49).
Adding a color effect
To add a color effect to the StoryBoard, drag and drop the desired color
effect from the bin onto the desired video clip in the video Clips track.
To replace an existing color effect with a new one, drag and drop the new
color effect onto the video clip, and it will replace it.
To remove a color effect from a video clip, drag and drop the Normal Effect
onto the video clip.
Operating Your Video Editor
47
Additional variations of a color effect can be achieved by highlighting the
video clip (with the associated color effect) and going to the Details screen,
then adjusting the brightness, contrast, saturation, and (ScreenPlay only) RGB
settings.
Adding a special effect
To add a Special Effect to the StoryBoard, drag and drop the desired special
effect from the bin onto the desired video clip in the video Clips track.
The special effect will replace the transition on both sides of the video clip.
NOTE:
Once you achieve the Special Effect look that you want, you can add
transitions after using the Merge feature (see “Merging items on a StoryBoard”
on page 49).
To replace an existing special effect with a new one, drag and drop the special
effect onto the video clip, and it will replace it.
To remove a special effect from a video clip select the right-hand portion of
the special effect within the video track and press Delete on the keyboard.
Operating Your Video Editor
48
A Special Effect that has been added to a clip can be fine-tuned in the Details
screen (see “Special Details for Special Effects” on page 54).
NOTE:
The Sequel video editing system includes a limited number of the special
effects illustrated above.
Using the Cursor Bar
You can drag the cursor bar back and forth on the StoryBoard to observe the
video and audio at your own pace. This is often referred to as “scrubbing.”
Using the
,
keys on the keyboard moves the cursor one frame at a time.
Opening a New StoryBoard
To open a new StoryBoard, right click in the middle of the StoryBoard tab, and
then select New StoryBoard. Your video editing system allows you to work on
up to six StoryBoards at a time.
Operating Your Video Editor
49
To Rename a StoryBoard
To change the name of a StoryBoard, right click in the middle of the
StoryBoard tab, and then select Details from the pop-up. In the Details screen,
replace the old name with your desired StoryBoard name.
Clearing a StoryBoard
After you have completed a project, you will want to clear the StoryBoard to
begin a new project.
1. Highlight a clip on the StoryBoard then press the Select All key on the
keyboard (or right click on the StoryBoard and choose Select All).
2. Press the Delete key (or right click and select Delete).
Deleting a StoryBoard
To delete an existing StoryBoard, you must:
1. Delete all Clips, Effects, Transitions, and other items from the StoryBoard
(see “Clearing a StoryBoard” above).
2. Right click on the StoryBoard tab, and select Delete StoryBoard from
the pop-up.
Merging Items on the StoryBoard
Sometimes you may want to apply more than one effect to a video clip. To do
so, you must merge the first effect to the video clip, and then apply the
second effect.
1. Place the video clip and the first effect on the StoryBoard.
2. Select the clip (to which the effect has been applied).
Operating Your Video Editor
50
3. Press the Merge key on the keyboard. The Merge will begin.
4. Once the Merge is complete, you will have the option to replace the current
StoryBoard items with the new, merged clip. Select YES. The new, merged
clip will also be stored in the Clips bin.
5. You may now apply a second effect or a transition to the clip.
NOTES:
■ If you are merging two Clips with a transition, you should select these
items, right click, and choose Enhanced Merge. This will create a smoother
transition between Clips.
■
Sequel is capable of merging a clip with one effect. ScreenPlay is capable of
multi-layering by merging multiple effects with each clip.
Merging a Transition
In order to create a smoother transition, you may want to perform a merge on
your transition. To do so:
1. Select the transition on your StoryBoard.
2. Right click on the transition and select Enhanced Merge from the pop-up or
simply press the Merge key on the keyboard.
After the Merge is complete, the transition will appear with a green, star-like
symbol on it, indicating the item has been merged. If you enter the Details
screen and modify some aspect of the transition, the symbol will disappear,
indicating that the item is no longer merged. Of course, you can apply the
merge again once you’ve achieved the look you want.
NOTE:
If you select the “Auto merge transitions when mastering” option in the View
Options screen (see page 64), your Transitions will automatically be merged
when you press the Master key. The Auto Merge feature allows you to create your
project in real time, then walk away while the Transitions automatically merge.
Creating a Still Image
You can create a still image from one of your video Clips.
1. Select a video clip.
2. Place the cursor so the frame you would like to create a still image of
appears in the preview window.
3. Press the Extract Frame key on the keyboard.
4. The still image will be added to the bottom of your Clips bin and can be
incorporated into your project.
Operating Your Video Editor
51
NOTES:
■ The extracted image created by pressing the Extract Frame key consists of
one field. For higher resolution still images you may want to try using
Control + Extract Frame or Alt + Extract Frame (depending on the source
of the video being used, one of these commands may create a better still
image than the other). Each of these commands will extract a full frame
from the source video.
■
The default length of a still image is five seconds. The length of the clip can
be adjusted in the Details screen.
Insert Editing (ScreenPlay only)
Insert Editing is commonly used in interviews, when the scene changes from
the person being interviewed to a view of what is being discussed, and then
back to the interviewee. In this video technique, it is important that the
individual’s lips remain synchronized with their words. To place a video clip
between two other Clips, while keeping the sound for the Clips synchronized:
1. Place a video clip on the StoryBoard.
2. Extract the audio from the clip by right clicking on the clip and selecting
Extract Audio.
3. Split the clip into two Clips by selecting the video again, then placing the
cursor bar in the video clip and selecting the
command.
4. Select the two video Clips and the audio clip and press Sync on the
keyboard. Notice that an “S” appears on each item, indicating it has
been synchronized.
5. Drag and drop another piece of video between the two video Clips
currently on the StoryBoard.
6. Within the Details screen, you can adjust the lengths of the video Clips on
either side of the inserted video. Doing so will change the “In”/”Out” points
of the split Clips, while keeping the inserted clip intact.
The relationship of these Clips with the audio will remain synchronized as
you adjust the video details.
NOTE:
You can insert as many Clips as you would like between the split Clips, as
long as their combined duration is shorter than the combined length of the
split Clips. The system will not allow you to insert video Clips that are longer
than the combined duration of split Clips.
Operating Your Video Editor
52
Fine-tuning in the Details Screen
The Details screen can be used to make fine adjustments to your project. You
can perform detailed editing of audio and video Clips, Transitions, Graphics,
Color Effects, and Special Effects. To use the Details screen:
1. Select the item from a bin or from the StoryBoard that you would like to
view in detail.
2. Click on the Details tab or press the Details key on the keyboard. The
Details on-screen settings will appear:
The Details screen is made up of the following elements:
This area displays the name of the item you have selected. You can change
the name of the item by selecting and typing over the current name.
This area displays the current time code for the position of the cursor bar
within the timeline of the selected item. You can move the cursor bar
(scrub) to any position along the timeline of the selected item, in order to
precisely line up your “in” or “out” point.
This is a timeline of the item you have selected. In addition to the cursor,
the timeline shows an “in” marker and an “out” marker (indicated as two
small cursors) for the selected item. You can drag the cursor bar and the
two markers to new positions within the timeline.
If you click the arrows to the left and right of the timeline, you will move to
the previous item and the next item (respectively) on the StoryBoard or
within the bin in the Editor screen. For example, if you originally selected a
clip from the Clips bin, pressing the right arrow will cause the next clip
from the Clips bin to appear in the Details screen.
Operating Your Video Editor
53
The In button displays the time code of the “in” marker on the timeline.
You can change the position of the “in” marker by entering a new time
code and pressing the Enter key on the keyboard. Or, if you would like for
your “in” marker to be the same as your cursor bar position, simply select
the “in” button and the two will be aligned.
The Out button displays the time code of the “out” marker on the timeline.
You can change the position of the “out” marker by entering a new time
code and pressing the Enter key on the keyboard. Or, if you would like for
your “out” marker to be the same as your cursor bar position, simply select
the “out” button and the two will be aligned.
The Key button only affects video Clips. The key frame is a frame of the
video which is used to identify that video clip. To set a key frame, you can
either:
1. Type in the time code of the key frame which you would like to set
and then press the Enter key on the keyboard, or
2. Move the cursor bar to the position along the timeline where you
would like to set your key frame, then select the Key button to set that
key frame.
The Dur button indicates the duration of the selected item. You can change
the duration time in two ways:
1. Select the time code area, type in the desired duration, and press Enter
on the keyboard (this will cause the “out” marker to move the time
you’ve indicated), or
2. Place the cursor bar where you would like the clip to end, then select
the Dur button (this will cause the cursor to move to the same place as
the “out” marker along the timeline).
The left area of the Details screen contains many adjustable controls. The
controls that appear in this area depend on the type of item for which you
are viewing the details. For specific information about these controls, see
“Adjusting Special Details” below.
If you are working with a clip from the StoryBoard, this time indicates the
time on the StoryBoard. This feature is useful for aligning elements to a
position on the StoryBoard.
Adjusting Special Details
The left side of the Details screen contains special details which differ
depending on the type of item for which you are viewing the details.
Operating Your Video Editor
54
Special Details for a Video or AV Clip
When you are viewing the details of a video or an AV clip, the left side of
the screen includes special adjustments for ColorGard™ (brightness, contrast,
and saturation), color correction, and White Magic™.
Special Details for an Audio Clip
When you are viewing the details of an audio clip, the left side of the screen
includes special adjustments for volume, balance, and audio levels (Sequel
only) or the audio envelope (ScreenPlay only).
The audio envelope allows you to fade the music clip “in” and “out”. The
audio envelope also allows you to perform more complex features, such as
ducking or pulling down sound.
On the right side of the audio details area, you can also scrub audio and set
“in” and “out” times.
When you are working with an audio clip in the Details area, the preview
screen will appear black.
Special Details for Transitions
When you are viewing details for a transition, the left side of the screen will
vary based on which transition you have selected. Some of the details you
may see include transition envelope (which allows you to adjust the fade of
a clip) (ScreenPlay only), border width, border color, shadow width, soft
edge width, and paper color.
(ScreenPlay only) The transition envelope allows you to control the mix of
the transition. For example, a wipe can be adjusted to come in from the
center of the screen, then pause (with video playing on either side), then
progress through the transition.
Operating Your Video Editor
55
Special Details for Special Effects
When you apply a Special Effect to a video clip, you must highlight the
video clip and select Details to modify the Special Details from the
Special Effect.
Special Details for Graphics
When you are viewing the details for a graphic, the left side of the screen
allows you to adjust the Graphic Controls (Sequel only) or the Title Envelope
(ScreenPlay only), which is used for fading into and out of a graphic.
Automatically Adjusting the White Balance
You can instantly correct the color balance of any clip.
1. Select the clip to which you would like to make color adjustment.
2. Click on the Details tab. The Details screen will appear.
3. Scroll through the options at the left side of the screen until you see
White Magic™.
4. Click on the Pick White button.
5. Click on the part of the picture which should be white.
You will instantly see that color adjustments which have been made as a
result of your white balance, in the viewing screen. You can instantly play
through the clip to ensure that the color is appropriate.
Operating Your Video Editor
56
If the clip does not look balanced to you, you can fine tune the color
adjustments within the Details screen by scrolling up to the RGB controls
(located above White Magic™) (ScreenPlay only).
You can restore the original color of the clip by selecting Reset Color in the
Details screen.
Backing Up a StoryBoard
If you have connected an external hard drive to your system, you can
backup a StoryBoard to this hard drive. To do so, follow the steps below.
1. Right click on the StoryBoard tab of the StoryBoard you want to backup.
2. Select “Backup StoryBoard” from the pop-up.
3. You must select whether you would like a “Full” or “Optimized” backup.
A Full Backup saves the entirety of each clip that is used on your
StoryBoard. An Optimized Backup saves only a portion of each clip used
on your StoryBoard (how much of each clip is saved can be determined
by you).
4. If you select Full, you are prompted to enter a StoryBoard name, and then
you can prompt the system to carry out the backup. The system will tell
you how much hard drive space is required for this backup.
If you select Optimized, you are asked to enter additional information.
First you must enter a Handle Length — this is the number of frames
before your “In” point and after your “Out” point that you would like to
have saved with each clip.
Next, you can enter a StoryBoard name, and then you can prompt the
system to carry out the backup. The system will tell you how much hard
drive space is required for this backup.
Restoring a Backed Up StoryBoard
If you have saved a StoryBoard to an external hard drive, you can restore
this StoryBoard to your system by following the steps below.
1. Navigate to a currently unused StoryBoard.
2. Right click on the StoryBoard tab.
3. Select “Restore StoryBoard” from the pop-up.
4. The system will prompt you to choose the StoryBoard you would like to
restore.
5. Once you click on “Restore StoryBoard”, the StoryBoard will
automatically be saved into the formerly blank StoryBoard on your
system.
NOTE:
All the Clips used in this StoryBoard will be restored in a Drawer (with the
same name as your StoryBoard) within your Clips bin.
Operating Your Video Editor
57
Using the Graphics Screen
The Graphics screen allows you to create graphic elements for your project.
To access the Graphics screen, either press the
key on the keyboard,
or select the
tab on the screen.
The blank drawing area in the center of the screen is where you will preview
the appearance of your graphic and draw all of the elements which you wish
to add to your graphic.
Surrounding the drawing area are several drawing buttons. These are the
tools which you will select to create your graphic.
Select this button when you would like to save your current
graphic to the Graphics bin and begin working on a new graphic.
Select this button when you would like to work on a graphic
which has already been saved to your Graphics bin. You can also
open a graphic from the Graphics bin by double clicking on it.
This tool is used to select an item within the drawing area. First,
select this tool, then point and click on the item you would like to
select. You will notice four “handles” appearing around the item,
indicating that it is currently selected.
This tool is used to create text. First, select this tool, then click in the
drawing area where you want to add text. This creates a starting
point for the text. If you do not select an entry point for the text, the
text will automatically be entered on the center of the screen. Next,
you can type in the desired text.
This tool is used to draw rectangles. Simply select the tool, and then
you can draw a rectangle anywhere on the drawing area.
Rectangles can be resized using the
tool.
Operating Your Video Editor
58
This tool opens the Graphic Effects pop-up, in which you can
change the effects of several of your drawing tools. See “Adjusting
Your Drawing Tools” below for more details.
This tool is used to create an outline around a selected object. Note:
the outline should be a different color from the object to be visible.
This tool is used to create a drop shadow behind a selected object.
This tool is used to create a 3-D image of a selected item (extrusion).
This tool is used to move a selected object to the top layer in the
drawing area.
This tool is used to move a selected object to the back layer in the
drawing area. To select an item which is placed on the back layer of
the drawing area, simply select the item on the top layer and then
press Tab on the keyboard.
Use this tool to select a color for the fill of your text or graphic.
Use this tool to select a color for the outline of your text or graphic.
You can right click on the Graphics screen background to change the
background color when the
icon is selected.
Adjusting Your Drawing Tools
By selecting the
icon within the Graphics screen, you can access a pop-up
which allows you to make adjustments to the effects of your drawing tools.
Outline Style allows you to adjust the thickness of outlines within your
drawings. It also allows you to determine whether the outlines should
appear surrounding a filled ( ) or transparent ( ) area (related to the
rectangle drawing tool only). Text cannot be rendered with a transparent fill.
Operating Your Video Editor
59
Shadow Darkness and Shadow Depth allow you to adjust the appearance of
drop shadows within your graphics. The four arrows at the right side of this
area allow you to set which direction the drop shadow appears in relation to
your graphic.
Extrude Color and Extrude Depth allow you to adjust the appearance of
3-D images within your graphics. The four arrows at the right side of this
area allow you to set which direction the 3-D effect appears in relation to
your graphic.
Modifying the Look of Your Text
Below the drawing area are tools which will help you to create your desired
style of text.
First, you can select from a number of different fonts, within the text popup. Your current font setting is displayed at the bottom of the Graphics
screen.
You can also set a specific point size for the text.
Then, you can designate that the text appear as bold, italic, or underlined.
By selecting the
you can access the Text pop-up, which allows you to
modify the font and size of your text. Also within the Text pop-up is an
Aspect Ratio setting. By changing the Horizontal and Vertical values within
the Aspect Ratio setting, you can make the text taller or wider. The preview
area within this pop-up allows you to preview the look of your text.
Operating Your Video Editor
60
Symbols and special characters can by typed in the Graphics screen. To do
so, set the font to Arial Bold or Arial Rounded and hold down the Magic key
while typing in a three-digit code (as listed below).
Magic key + 161
¡
Magic key + 206
Î
Magic key + 232
è
Magic key + 169
©
Magic key + 207
Ï
Magic key + 233
é
Magic key + 174
®
Magic key + 209
Ñ
Magic key + 234
ê
Magic key + 177
±
Magic key + 210
Ò
Magic key + 235
ë
Magic key + 188
Magic key + 211
Ó
Magic key + 236
ì
Magic key + 212
Ô
Magic key + 237
í
Magic key + 190
1/4
1/2
3/4
Magic key + 213
Õ
Magic key + 238
î
Magic key + 191
¿
Magic key + 214
Ö
Magic key + 239
ï
Magic key + 192
À
Magic key + 217
Ù
Magic key + 241
ñ
Magic key + 193
Á
Magic key + 218
Ú
Magic key + 242
ò
Magic key + 194
Â
Magic key + 219
Û
Magic key + 243
ó
Magic key + 195
Ã
Magic key + 220
Ü
Magic key + 244
ô
Magic key + 196
Ä
Magic key + 221
Y
´
Magic key + 245
õ
Magic key + 197
Å
Magic key + 223
ß
Magic key + 246
ö
Magic key + 198
Æ
Magic key + 224
à
Magic key + 248
ø
Magic key + 199
Ç
Magic key + 225
á
Magic key + 249
ù
Magic key + 200
È
Magic key + 226
â
Magic key + 250
ú
Magic key + 201
É
Magic key + 227
ã
Magic key + 251
û
Magic key + 202
Ê
Magic key + 228
ä
Magic key + 252
ü
Magic key + 203
Ë
Magic key + 229
å
Magic key + 253
y
Magic key + 204
Ì
Magic key + 230
æ
Magic key + 255
ÿ
Magic key + 205
Í
Magic key + 231
ç
Magic key + 189
You can also type hypertext characters within the Graphics screen.
Alt + C ©
Alt + R ®
Alt + T ™
´
Operating Your Video Editor
61
By changing the font to Monotype Sorts and typing the letters listed below,
you can type the following symbols:
A
✡
N
✮
a
❁
n
■
1
✑
B
✢
O
✯
b
❂
o
❏
2
✒
C
✣
P
✰
c
❃
p
❐
3
✓
D
✤
Q
✱
d
❄
q
❑
4
✔
E
✥
R
✲
e
❅
r
❒
5
✕
F
✦
S
✳
f
❆
s
▲
6
✖
G
✧
T
✴
g
❇
t
▼
7
✗
H
★
U
✵
h
❈
u
◆
8
✘
I
✩
V
✶
i
❉
v
❖
9
✙
J
✪
W
✷
j
❊
w
◗
0
✐
K
✫
X
✸
k
❋
x
❘
L
✬
Y
✹
l
●
y
❙
M
✭
Z
✺
m
❍
z
❚
NOTE:
To access additional symbols, try holding down the Magic key while typing
three-digit numbers between 000 and 256.
Saving Your Graphics to the Graphics Bin
When you want to save a graphic to the Graphics bin, you can:
1. Select New to create a new graphic. The graphic you are currently
working on will be saved to the Graphics bin and a blank drawing screen
will open.
2. Select Open to open a current graphic. The graphic you are currently
working on will be saved to the Graphics bin and a pop-up will appear,
allowing you to select another graphic to work on.
3. When you exit the Graphics screen, the graphic you are currently
working on will automatically be saved to the Graphics bin.
When you have finished creating your graphics, you can select the
tab
to return to your work-in-progress. All the graphics that you have created
are in the Graphics bin, and can now be dragged and dropped onto your
StoryBoard.
Operating Your Video Editor
62
Adjusting the Placement of Your Graphic
When you apply a graphic from the Graphics bin, it will appear centered
over the video to which it is applied. To modify the placement of the
graphic, click on the graphic within the preview area of the Editor screen,
and drag it to the desired position.
Completing Your Project
When you have completed working with your video and are ready to put it
onto tape, follow these steps:
1. If you’re not already in the Editor screen, press the
the keyboard.
key on
2. Press the Master key on the keyboard. The video will begin to play
through from the beginning in full screen. The video signal is output
simultaneously to all video outputs. The system will automatically insert
five seconds of black video before the video begins and after the video is
complete.
3. Press the Record key on the recording device you are using (VCR,
camcorder, etc).
4. Press the Stop key on your recording device when the video is finished.
NOTE:
The screen will be blank for approximately five seconds after the Master key
is pressed. Do not press the Record key on your recording device until the
screen has blacked out.
Customizing Your System
63
CUSTOMIZING YOUR SYSTEM
Using the Setup Screens
Your system has setup screens which can be used to customize the system to
your specific needs. These screens include Language Settings, View Options,
Audio Levels and Drive Settings. To access the setup screens, press
on
the keyboard or select the
tab on-screen.
You can move through the setup screens by:
1. Selecting the right and left arrow buttons at the top of the screen, or
2. Selecting the screen name will cause a drop-down menu to appear. This
drop-down menu allows you to navigate to the other setup screens.
Changing your Language Settings
In the Language Settings screen, you can choose to display on-screen text in
a different language.
To implement the language change, press
Restart.
on the keyboard, then select
Customizing Your System
64
Changing your View Options
Within the View Options screen, you can tailor the following items to suit
your taste:
1. Set pointer speed — adjusts the speed at which the pointer moves across
the screen.
2. Set double click speed — adjusts the sensitivity of the mouse, so it
accepts a faster or slower double click from you.
3. Show hover help messages — allows you to turn on or off the help that
pops up when your pointer rests on an object.
4. Show warning when deleting unused material — prompts the system to
warn you whenever you are about to delete materials which have not
been used on a StoryBoard. The system will automatically warn you
when you attempt to delete materials which have been used on a
StoryBoard.
5. Auto merge transitions when mastering — prompts the system to
automatically merge your transitions before outputting your video.
Merging the transitions results in a smoother video transition.
Customizing Your System
65
Changing your Audio Levels
Within the Audio Levels screen, you can adjust the audio levels for both
output and headphones.
Adjusting Output Audio
The top slider control allows you to adjust the volume of the output.
The bottom slider control allows you to adjust the left / right balance of the
audio output.
Adjusting the Headphone Audio
The top slider control allows you to adjust the headphone volume.
The next slider control allows you to adjust the left / right balance of the
headphone output.
The bottom two slider controls allow you to adjust the bass and treble levels
of the headphone output.
Changing your Drive Settings
Within the Drive Settings screen, you can change your disk usage (to save
data to an external disk), and you can reformat your disk.
CAUTION:
If you choose the “Format Disk” option, all data will be erased from the
hard drive.
Troubleshooting
66
Problem
Remedy
Unit captures video, but not audio.
Within the capturing screen, ensure that
the system is set to capture Video and
Audio. Also ensure that the correct audio
source is selected.
Unit captures audio, but not video.
Within the capturing screen, ensure that
the system is set to capture Video and
Audio. Also ensure that the correct video
source is selected.
Unit will not allow a transition to be
added to a video clip with an effect
attached to it.
To implement a transition, you must first
merge the effect and the video clip. Right
click on the items, then select “Fast
Merge.” The two items will be merged
together as one item. The system will ask
you if you want the new clip to replace
the existing clip on your StoryBoard.
Select “Yes.” After the two items have
been merged, you can add a transition to
the clip.
Video adjustment settings are not
available in the capture screen.
When you capture video using the
DV-1394 connection, these video settings
will not be available.
Text created within the Graphics screen
cannot be selected.
Make sure you use the selection tool
and click on the text to select it.
You are having difficulty recording
material from or to a DV camcorder.
1. Always start the recording device first,
and then start the device that is
sending the signal to be recorded.
2. Go to the Capture screen and make
sure “DV” is selected as the source for
both video and audio.
3. Always navigate to the Capture screen
of your system before starting up your
DV camcorder.
Transitions are not “smooth” in
appearance.
Try merging your transitions (see
“Merging a Transition” on page 50).
A rectangle created in the Graphics screen
cannot be resized.
Rectangles with Drop Shadow or
Extrusion effects applied to them cannot
be resized. Try deactivating these effects,
resizing the rectangle, and then
reactivating the effects.
If the above remedies do not correct the problem, please contact the Applied Magic technical
support team at (760) 931-6401. When you contact Applied Magic’s technical support team,
you will be asked to provide your unit’s serial number. The serial number can be found on
the bottom of your unit. Please write the serial number in the space provided for future
reference.
Serial Number: ________________________
Specifications
67
ScreenPlay Specifications
SIGNAL INPUT
Video Connections
2 S-Video (Y/C)
2 Composite
Digital I/O (DV-1394)
Audio Connections
VCR L/R (RCA)
Camcorder L/R (RCA)
AUX Audio L/R (RCA)
Microphone
SIGNAL OUTPUT
Video Connections
2 S-Video (Y/C)
2 Composite
VGA
SCART (RGB)
Digital I/O (DV-1394)
Audio Connections
VCR L/R (RCA)
Monitor L/R (RCA)
Stereo Headphone
INTERNAL PROCESSING
Internal Video Format
16-bit YUV capture: 4:2:2 ITU-BT.601 (CCIR.601)
Timecode Format
VITC
Compression Technology
Wavelet (hardware CODEC)
Compression Ratio
Variable Quality Settings from 5:1 (broadcast quality) to 25:1
(demo quality)
System Format
NTSC 525/60 Hz or PAL 625/50 Hz
Sampling Resolution
ITU-BT.601 (CCIR.601) 720 x 480 NTSC, 720 x 576 PAL
Internal Video Transfer Rate
20 MB/sec
Peak Compressed Video Rate
4+ MB/sec
Processor
Power PC Microprocessor
Gamma Correction
Real-time 24-bit
Audio Format
16-bit Stereo
Audio Mixer
4 Stereo (8 Mono) Playback Mixer
Editing Control/Data Entry
Custom-wired Keyboard
Optional Infrared Keyboard
Mouse
MECHANICAL
Media Entry/Access
48X CD-ROM Drive
Overall Dimensions
(HxWxD) 3" x 17" x 15.1" (7.6cm x 43.2cm x 38.4cm)
Weight
14 lbs. (6.4 kg)
Power Supply
International Wide Range, 100-240 VAC, 47-63 Hz, 3A max
Power Consumption
60W max
30W typically
EXTERNAL CONNECTIVITY
Keyboard Port
Mouse Port
Serial Port
Ultrawide SCSI Port
Type II PC Card Slot
Digital I/O (DV-1394)
Design and specifications are subject to change without notice.
Specifications
68
Sequel Specifications
SIGNAL INPUT
Video Connections
2 S-Video (Y/C)
2 Composite
Optional Digital I/O Upgrade (DV-1394)
Audio Connections
VCR L/R (RCA)
Camcorder L/R (RCA)
AUX Audio L/R (RCA)
Microphone
SIGNAL OUTPUT
Video Connections
2 S-Video (Y/C)
2 Composite
VGA
SCART (RGB)
Optional Digital I/O Upgrade (DV-1394)
Audio Connections
VCR L/R (RCA)
Monitor L/R (RCA)
Stereo Headphone
INTERNAL PROCESSING
Internal Video Format
16-bit YUV capture: 4:2:2 ITU-BT.6 or (CCIR.601)
Timecode Format
VITC
Compression Technology
Wavelet (hardware CODEC)
Compression Ratio
Variable Quality Settings from 8:1 (corporate quality) to 25:1
(demo quality)
System Format
NTSC 525/60 Hz or PAL 625/50 Hz
Sampling Resolution
ITU-BT.601 (CCIR.601) 720 x 480 NTSC, 720 x 576 PAL
Internal Video Transfer Rate
20 MB/sec
Peak Compressed Video Rate
2.5 MB/sec
Processor
Power PC Microprocessor
Gamma Correction
Real-time 24-bit
Audio Format
16-bit Stereo
Audio Mixer
4 Stereo (8 Mono) Playback Mixer
Editing Control/Data Entry
Custom-wired Keyboard
Optional Infrared Keyboard
Mouse
MECHANICAL
Media Entry/Access
48X CD-ROM Drive
Overall Dimensions
(HxWxD) 3" x 17" 15.1" (7.6 cm x 43.2 cm x 38.4 cm)
Weight
14 lbs. (6.4 kg)
Power Supply
International Wide Range, 100-240 VAC, 47-63 Hz, 3A max
Power Consumption
60W max
30W typically
EXTERNAL CONNECTIVITY
Keyboard Port
Mouse Port
Serial Port
Ultrawide SCSI Port
Optional Type II PC Card Slot
Optional Digital I/O (DV-1394)
Design and specifications are subject to change without notice.
Specifications
69
LIMITED WARRANTY
Applied Magic, Inc. (the “Company”) warrants this digital video editing
product (the “Product”) against defects in materials and workmanship for a
period of one (1) year from the date of original purchase.
Limitation of Implied Warranties
1. For a period of one (1) year from the date of purchase, the Company will
repair defects in the Product at no charge at a Company authorized service
facility. After this one (1) year period, you must pay for all parts, labor and
shipment charges.
2. In addition, for a period of one (1) year from the date of purchase, the
Company will replace, at no charge, a defective Product with a new or
rebuilt Product.
This warranty only covers the hardware components packaged with the
Product. This warranty does not cover any damage due to accident, misuse,
abuse or negligence. This warranty is valid only in the United States.
To obtain warranty service during the initial one (1) year period, the defective
Product must be returned along with written authorization to a Company
factory service center or dealer.
This warranty extends only to you, the original purchaser. It is not
transferable to anyone who subsequently purchases the Product from you.
We suggest that you retain the dealer’s dated bill of sale or Purchase Order as
evidence of the date of purchase.
REPAIR OR REPLACEMENT AS PROVIDED UNDER THIS WARRANTY IS
YOUR EXCLUSIVE REMEDY. THE COMPANY SHALL NOT BE LIABLE FOR
ANY INCIDENTAL OR CONSEQUENTIAL DAMAGES FOR BREACH OF
ANY EXPRESS OR IMPLIED WARRANTY ON THIS PRODUCT. EXCEPT TO
THE EXTENT PROHIBITED BY APPLICABLE LAW, ANY IMPLIED
WARRANTY OF MERCHANTABILITY OR FITNESS FOR A PARTICULAR
PURPOSE ON THIS PRODUCT IS LIMITED IN DURATION TO THE
DURATION OF THIS WARRANTY.
Some states do not allow the exclusion or limitation of incidental or
consequential damages, or allow limitation on how long an implied warranty
lasts, so the above limitations or exclusion may not apply to you.
This warranty gives you specific legal rights and you may also have other
rights that vary from state to state.
For the name of your nearest authorized Company service facility or Company
factory service center within the continental U.S.A., contact:
Applied Magic, Inc.
(888) 624-4255
Specifications
70
THE COMPANY MAKES NO EXPRESS WARRANTIES BEYOND THOSE
STATED IN THIS LIMITED WARRANTY STATEMENT. THE COMPANY
DISCLAIMS ALL OTHER WARRANTIES, EXPRESS OR IMPLIED,
INCLUDING WITHOUT LIMITATION IMPLIED WARRANTIES OF
MERCHANTABILITY AND FITNESS FOR A PARTICULAR PURPOSE. SOME
STATES OR JURISDICTIONS DO NOT ALLOW LIMITATIONS ON IMPLIED
WARRANTIES, SO THIS LIMITATION MAY NOT APPLY TO ALL
CONSUMERS.
THE COMPANY’S RESPONSIBILITY FOR MALFUNCTIONS AND DEFECTS
IN HARDWARE IS LIMITED TO REPAIR AND REPLACEMENT AS SET
FORTH IN THIS LIMITED WARRANTY STATEMENT. THESE LIMITED
WARRANTIES GIVE CONSUMERS SPECIFIC LEGAL RIGHTS, AND THEY
MAY ALSO HAVE OTHER RIGHTS, WHICH VARY FROM STATE TO STATE
OR JURISDICTION.
THE COMPANY DOES NOT ACCEPT LIABILITY BEYOND THE REMEDIES
SET FORTH IN THIS LIMITED WARRANTY STATEMENT OR LIABILITY
FOR INCIDENTAL OR CONSEQUENTIAL DAMAGES INCLUDING,
WITHOUT LIMITATION, THE LOSS OF ANTICIPATED BENEFITS OR
PROFITS RESULTING FROM THE PURCHASE OR USE OF THE PRODUCT,
ANY LIABILITY FOR PRODUCTS NOT BEING AVAILABLE FOR USE, OR
FOR LOST DATA OR SOFTWARE. SOME STATES OR JURISDICTIONS DO
NOT ALLOW THE EXCLUSION OR LIMITATION OF INCIDENTAL OR
CONSEQUENTIAL DAMAGES, SO THIS EXCLUSION OR LIMITATION MAY
NOT APPLY TO YOU.
Obtaining Service
Direct requests for technical help and update information to the Applied
Magic Customer Service Department, 5845 Owens Avenue, Carlsbad, CA
92008, (760) 931-6401.
Index
A
71
T
I
Aspect Ratio, 59
In, 51, 53, 80, 81
Timecode In, 33
Audio, 12, 13, 14, 15, 18,
32, 35, 51, 65, 67, 68, 72,
73
Insert Editing, 51
Transitions, 23, 41, 45, 54,
64, 79
J
JPEGs, 35
Audio CDs, 35
Audio Levels, 65
Language, 63
Audio System, 18
B
M
Bin, 27, 36, 38, 40, 41, 42
Master, 19, 20, 62, 64
Bitmaps, 35
Maximize, 34
Break, 24, 33, 36
Merge, 23, 50, 51, 64
Brightness, 33, 47, 54
Minimize, 34
Broadcast Monitor, 15, 17
Monitor, 8, 13, 14, 15, 17,
18, 67, 68
C
Camcorder, 12, 16, 20, 21
Capturing Video, 32, 72
CD-ROM, 11, 35, 67, 68
Clips, 23, 28, 32, 33, 34, 40,
43, 54
Materials Bin, 38
N
Normal Effect, 46
O
Out, 24, 52, 53, 80
Outline Style, 58
Color correction, 54
Color Effect, 23, 36, 38, 41,
43, 46
P
Paste, 23
ColorGard™, 54
PC Card Slot, 12, 67, 68
Contrast, 33, 47, 54
PCMCIA SLOT, 12, 67, 68
Cursor Bar, 25, 28, 44, 46,
48, 50, 51, 52, 53
Pointer, 26, 28, 64
Power, 11, 14, 17, 31
Cut, 23
Copy, 23
R
Record, 19, 20, 21, 32, 33,
34, 61, 62, 72, 74, 82
D
Delete, 23, 40, 41, 49
Record Duration, 33
Details, 37, 39, 52, 53, 54,
55
Redo, 23
Remaining Time, 33
Double click speed, 64
Reset Color, 55
Drawer, 23, 29, 34, 38, 39
Duplicate, 23, 40, 41, 42
DV, 12, 16, 21, 33, 34
S
SCART TV, 15, 18
Select All, 23
E
Editor, 23, 31, 32, 33, 34, 36
Service, 70
Extrude Color, 59
Setup, 63
Envelope, 54, 55, 81
Shadow Darkness, 59
Extract Audio, 51
Shadow Depth, 59
Extract Frame, 23, 25, 50, 51
Special effect, 23, 42, 47,
54
F
Still image, 23, 50
Full Screen, 24, 80, 82
G
Graphics, 23, 36, 41, 45, 57,
58, 59, 60, 74, 75
H
Headphone Audio, 12, 65
Hover help, 64
Troubleshooting, 67, 68
TrueType fonts, 35
L
stop, 33, 36
StoryBoard , 36, 37, 40, 41,
42, 43, 44, 45, 46, 47, 48,
49, 50, 51, 52, 56, 60, 78,
79, 80, 81
S-Video, 12, 13, 15, 16, 17,
20, 21
Sync, 23, 51
TV, 13, 14, 15, 17, 18
U
Undo, 23
Unsync, 23
Unused Material, 64
V
VCR, 13, 16, 19, 20, 62, 72,
73
VGA, 14, 15, 18
Video, 9, 32, 33, 43, 54, 72,
73, 75, 82
View Options, 64
Volume, 65
W
White Magic,™ 54, 55
Tutorial
72
This Tutorial is intended to help you get started editing video with your
Applied Magic video editing system.
Capturing Material
You need to acquire some material to edit. If you haven’t already done so, turn
on your ScreenPlay, wait for the Editor screen to appear, then press the red
Record key on the keyboard.
The Capture screen appears. The Capture Control Panel occupies a
rectangular area in the bottom third of the screen.
In order to view and capture material, you may need to change some settings
within the Capture Control Panel. On the left side of the screen are several
settings. You can navigate through these settings using the scroll bar (located
to the right of the settings).
1. The first selection you’ll make is what you’d like to capture. If you want to
capture only audio or only video from an external source, select “Video
Only” or “Audio Only.” If you want to capture video with its accompanying
sound track, select “Video & Audio.”
2. Next, you will need to select your video source (this is only necessary if
you’ve selected “Video Only” or “Video & Audio” in Step 1). Select the
input to which you’ve connected your VCR (or other video source
equipment).
Tutorial
73
3. Now you will need to select your audio source (this is only necessary if
you’ve selected “Audio Only” or “Video & Audio” in Step 1). Select the
input to which you’ve connected your VCR (or other audio source
equipment).
4. Next you should select a capture quality for your video. The capture quality
settings listed here instruct the system to compress the video data at
different levels.
If you have purchased the ScreenPlay video editing unit, you will be able to
choose capture qualities ranging from Demo (lowest quality) to Broadcast.
If you have purchased the Sequel video editing unit, you will be able to
choose capture qualities ranging from Demo (lowest quality) to Corporate.
The capture quality you’ve selected will not be evident in the video you
view in the Capture screen.
5. (ScreenPlay only) If you have purchased the ScreenPlay video editing unit,
you can now choose a capture rate for your video. The options to choose
from are 60 fields/sec and 30 fields/sec.
As soon as you’ve made these settings, you are ready to begin capturing
material.
Press the Play button on the video deck connected to your video editing unit.
If you see your material on the ScreenPlay monitor, you’ve set up your system
correctly. If there’s no picture, check the connections between your video deck
and your video editing unit, and then repeat steps 1-5.
Just to see how things work, click on the
button to capture some of
the video you already have playing. After ten or fifteen seconds, click on the
button.
Tutorial
74
Congratulations. You’ve just captured a video clip to the hard drive. We’ll
need a second clip for our exercise, so click on the
button, wait fifteen
seconds or so, and then click on the
button.
You can reduce the size of the Record screen by pressing the
button. You
can also move the Record screen around the screen using the four Arrow keys
on your keyboard. To return to the larger Record screen, press the
button.
When you’re finished capturing, click on the
main editing screen.
button to return to the
Creating a Graphic
On the right side of the Editor screen you should see three tabs. Click on the
middle tab to switch to the Graphics screen. Your monitor will display an
empty Graphics screen.
Tutorial
75
Click on the
button then click near the left side of the empty frame in the
middle of the screen. A white vertical bar appears. The vertical bar is just a
clue to indicate that what you type will appear on the screen; it’s not saved as
part of your title. Type the word “Video!” Your screen now looks something
like the picture below.
It doesn’t matter exactly where on the screen you type your title. Your system
makes it easy to move the title into new positions when you add the title to
your program.
Click on the
button in the upper left corner of the screen, then click on
the word you just typed. The four little squares at the corners of the title
confirm that it is selected. Once you’ve selected a text element, you can use
the tools along the bottom of the Graphics screen to change typeface, size, and
other attributes.
While white lettering works in many situations, color can be used to really
draw attention to your titles. Click on the Fill Color Selector ( ) in the lower
right corner of your screen, just above the Outline Color Selector ( ). The
Fill Color screen that appears has two control areas that allow you to select
the shade and brightness of the color that will fill the selected lettering.
Tutorial
76
The right-most area of the Fill Color screen shows you the color that results
from your adjustments in the other two areas. Click around in the two control
areas until you get a color that you like, then click on the OK button.
The control in the lower right corner of your screen is the Outline Color
Selector. When you click on it, the Outline Color screen appears. If it looks
familiar, that’s because it’s exactly the same as the Fill Color screen. Click
around in the two control areas on the left side of the screen until you get a
color that complements your fill color choice, then click OK.
If your lettering doesn’t show the outline color, it’s because outlines are turned
off. You’ll find the Outline Enable Control
at the top of the group of three
effects buttons on the left side of the screen. Click on the button to enable
outlines for the selected title element.
The strength of the outline effect is controlled by the four buttons with hollow
squares located in the top section of the Graphics Controls screen. Click on
the Up Arrow (
) in the Effects buttons group to open the Graphics
Control screen, then click on one of the four choices at the top to see how it
looks. Click OK to close the Effects Control screen so that you can see the
results of your outline choice.
Tutorial
77
Your video editing system has two more effects that you can apply to your
title elements: Drop Shadows and Extrusions. Drop shadows can provide a
subtle separation between your text and the picture behind it. Click on the
Drop Shadow button
to enable drop shadows on the text you have
selected. The controls for the drop shadow effect are also contained in the
Effects Controls screen, in the middle group of controls. The upper slider
controls the darkness of the shadow, and the lower slider adjusts the
shadow’s distance (depth) from the lettering.
An extrusion effect lets you give objects a 3-D look by creating the illusion
of depth. Clicking on the Extrude button
enables the effect on the text
you have selected. The bottom group of controls on the Effects Controls
screen contains the controls for this effect. These settings allow you to select
the color of the extrusion, the depth of the extrusion, and the direction in
which the extrusion emerges. Go ahead and experiment with different
settings and watch the results in the preview region above the Cancel
button. Click OK when you’re satisfied with the extrusion settings. Feel free
to turn off or leave on any of the effects settings to achieve a look you are
happy with.
You’ve created your first graphic. Click on the Editor tab
side of the screen to continue your learning exercise.
on the right
Editing Your Video
You’re ready to edit. Your screen should look like the picture below. If the
Clips bin is not visible in the upper left corner of your screen, press the
Clips key on the top row of your keyboard (or click on the arrows to the
right/left of your bin heading) to make it appear.
Tutorial
78
The StoryBoard screen occupies the bottom third of the screen. It has four
horizontal bands that represent “tracks”. The top track, which is a little larger
than the other three, is a StoryBoard where you place video Clips. This is how
you put a story together — determine which video Clips you want to use in
your program, then drag and drop them on the StoryBoard in chronological
order. The second track receives your Graphics. Audio Clips, like music,
sound effects or voice over, can be added to the third and fourth timeline
tracks.
You may have noticed that the StoryBoard area has a tab labeled StoryBoard
#1. The arrows on either side of this label allow you to select a different
StoryBoard — you can have up to six StoryBoards in progress at one time.
You can also name your StoryBoards. Hold your pointer over the StoryBoard
tab and click with the right mouse button and select Details. In the very
middle of the Details screen, right at the top is the name field. Click within
the name field, and use your keyboard to change the name to Exercise. Press
the Enter key after you’ve changed the name, and the tab that was labeled
StoryBoard #1 now reads Exercise. Click on the StoryBoard tab (now labeled
Exercise) to close the Details screen.
Start your show by fading up from black. Point your mouse into the black
space above the word Black in the Clips Bin. Click once. The border around
the Black clip glows orange to indicate that it is selected for action. Drag the
Black clip down to the first track in the StoryBoard screen and release it.
See how the Black clip snapped to the left side of the Video Clips track? Drag
the two Clips down to the same track. Even if you don’t place them directly
next to the Clips that are already there, they snap into place. Your screen
should now look like the picture below.
Tutorial
79
That’s all it takes to put a show together. You can press the
key at this
point and the Clips you’ve placed on the StoryBoard timeline will play in
sequence.
The default transition between Clips in the StoryBoard is a cut, which is
represented by the brown box between Clips. To start our program though,
we want to add a dissolve so that the untitled clip appears to fade in. Here’s
how to make that happen. Press the Transitions key on the top row of your
keyboard. Drag the Dissolve transition into the brown box between the
Black clip and the first clip and drop it there. Want to see how the dissolve
looks? All you have to do is press the
key (or click on the black video
clip and select
). If you press the Full Screen key on the keyboard,
then the
key, you can watch your program play back in real time on the
full screen.
Effective video programs are usually composed of many elements: video
Clips, Transitions, Titles, Effects, and audio Clips. Master editors fine-tune
each of these elements in the programs that they produce, so it is important
for an editing system to facilitate these adjustments. With your Applied
Magic video editing unit, you simply click on an element, then press the
Details key (on the right side of the keyboard), or the Details tab above the
StoryBoard (on the right side), to access these adjustments.
When you capture a video clip, you don’t have to be concerned about
capturing just the bit you think you’ll need for your program. In fact, it’s
usually more efficient to capture more of each clip than you think you’ll
need. This gives you more flexibility when you’re actually putting the clip
into your program, because you can precisely adjust the starting and ending
frames of each clip to fit your concept.
Take a look at the trimming facilities. Click on a video clip on the
StoryBoard and press the Details key on your keyboard. The Details screen
appears over the StoryBoard.
Tutorial
80
Right under the clip’s title is a pair of nested inverted triangles. The larger
triangle (the Cursor Bar) is a position indicator, and the smaller triangle
marks the “in” point of the clip. When you play the clip, the larger triangle
travels between the “in” and the “out” markers to represent the location in
the clip where the currently displayed picture can be found. You can use
your mouse to drag the “in” and “out” markers to new locations, or you can
trim your video by “scrubbing” (dragging the Cursor Bar with your mouse)
to a desired location and then clicking on the In or Out button. The system
also lets you precisely choose your “in”/”out” points on a frame-by-frame
basis by clicking on the
button or the
button. These functions are
also available from the right side of the keyboard. The Set In and Set Out
keys set the “in” and “out” point to match the current location of the Cursor
Bar.
Let’s fine-tune our exercise project. You should have the Details screen for
the untitled clip open on your screen. Scrub through the clip until you find
an event that can serve as the beginning for our video. Pick a spot that’s at
least one second into the actual clip. When you find a spot you like, press
the Set In key on your keyboard.
The real power of this system is that you’re free to experiment with your
edits without waiting for a machine to catch up. As soon as you make your
changes you can see them. Click on the StoryBoard tab, which is labeled
Exercise if you’ve been following the tutorial. Press the
, then the
key
to see how the change you just made affects the program.
Remember the graphic you created a few minutes ago? It’s time to add it to
your show. Press the Graphics key on the top row of the keyboard. The
Graphics bin is now shown in the upper left corner of your screen and the
title we previously created should be visible within it. Click on the title and
drag it down onto the first video clip on the StoryBoard. Use your mouse to
drag the StoryBoard’s Cursor Bar into the clip so that you can see “Video!” in
the viewing area in the upper right quadrant of your screen. Here’s a really
neat feature: you can use your mouse to place the title anywhere on the
screen within your program. Just click and drag the title (“Video!”) around
the Viewing screen. Give that a try, then press the
key to see how the
program looks with the title.
Tutorial
81
Did you notice how the title was visible for the entire length of the clip?
It’s a nice title, but let’s shorten it up a bit. You can adjust the duration of
the title in two ways. You can make a rough adjustment by dragging one
of the sides (indicated by three vertical lines) of the title clip left or right
on the StoryBoard with your mouse. Or, you can make very precise
adjustments by invoking the Details screen for the selected title.
Let’s open the Details screen for our title. Click on the title bar on the
StoryBoard, then press the Details key. You can make coarse adjustments
to the title’s duration by dragging the smaller inverted triangle below the
clip’s title. The value shown in the Duration Field (labeled Dur) shows the
number of hours, minutes, seconds and frames the title will occupy. You
can click on the
and
buttons on screen (or press the
and
keys on the keyboard) to make frame-accurate duration adjustments. Go
ahead and adjust the duration for the title to ten seconds.
Fading a Title
(ScreenPlay only)
You can also fade your titles “in” and “out”. The Title Envelope controls
the opacity/transparency of the title. The initial condition of the envelope
shows a straight horizontal line across the top of the region, indicating
that the title will be shown with constant, maximum opaqueness. Use
your mouse to drag the left side of the horizontal line down to the lower
left corner of the envelope region so that you have a straight sloping line.
Select the fade-in point by dragging the larger inverted triangle under the
clip’s title. Move it so that the displayed value in the Current field is one
second (00:00:01:00). Did you notice the thin vertical line moving in the
Title Envelope region on the left side of the Details screen? While holding
down the Control key, click on the slider on the far left-hand side of the
Title Envelope screen. Did you notice a green box appear at the exact
point where the Envelope Line crosses the vertical line? This enables you
to put inflection points in your envelope at precise points in time. As you
move the slider up and down, notice the green box (Inflection Point)
moves up and down along the vertical line. Now move it all the way to
the top, allowing the title to fade in to maximum opaqueness. New
Inflection points can be easily created by pointing and clicking anywhere
along the envelope line. Create another point a short distance in from the
right-most point, then drag the right-most point down to the bottom.
Congratulations, you have just created a simple fade in, fade out
envelope, which should look similar to the picture below.
Tutorial
82
Outputting your Video
You’re just about finished with the exercise. You have acquired material from
the video source, you have built a title, and you have cut it all together to
make a short program. If you are going to play this program for other
people, you will probably need to record it on videotape for delivery to your
audience. First, you connect a videotape recorder to the video editing unit’s
outputs if you haven’t already done so. Second, you put a tape into your
recorder and start recording. The third step is pressing the Master button on
the keyboard which inserts five seconds of black video and plays your
complete project in Full Screen mode to all outputs. The final step is
watching your program, so that when it ends you can press the Stop button
on the videotape recorder.
Congratulations! You’ve just made a video production using your new video
editing system.