1
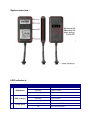
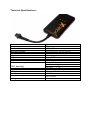
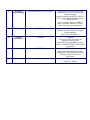
X-Track 2000 MK2 Outdoor vehicle GPS tracking system Introduction : Thank you for buying the X-Track outdoor GPS tracking system. We take great pride in designing each of our products. Our goal is to provide high-end rugged products. We strive to improve our quality by using up-to-date high performance technology. At X-Systems we reinvest 100% of our earnings back into the company. This enables us to support research and development to ensure our reliability in the future. We advise you to read this manual carefully as we will guide you through the functions of the system. Instructions about the GPS tracking system will be given and in about 2 minutes you will enjoy the possibilities of this tracking product. Please read through the User’s Manual before using. When you use the product, we think you have read through this manual. The information provided in this manual, is as accurate as possible after being revised carefully. If any printing error or translating mistake occurred in the manual, our company would not bear the outcome due to such mistake or error. The X-Track 2000 is hi-tech product, including operating system and the software provided by the third parties. The producer has fulfilled its obligation in the manufacturing of hardware and in the developing and applying of software to ensure the product works normally. If there is something wrong with the product, the producer will shoulder the repair responsibility against the Quality Warrant and will not make any compensation to the property and economy losses incurred from using the product. The ownership and copyright of the manual belong to our company. The manual is not allowed to replicate or translate in whole or in part for any commercial activity. Our company reserves the final explanation right to the manual contents. GPS navigating equipment works by receiving the signals from geostationary satellites for positioning. It may not receive the signals inside the room or in dense buildings, and the signals under viaduct may fade. When receiving signals from geostationary satellites, the GPS navigating equipment is corresponding to different satellites in different locations, which is called “ephemeris”. An ephemeris covers 300KMs at most. If an ephemeris is confirmed in Location A, you move over 300km with your X-Track it will shut off, the X-Track will be under another ephemeris. In high speed moving, it is a little difficult for GPS tracking system to search satellite. You’d better stop or slow down your vehicle to search satellite to determine your location. Index : -‐ Included in box checklist -‐ First use guide -‐ System overview -‐ LED Indicators -‐ Technical specifications -‐ Command functions -‐ Functions overview -‐ Working status -‐ Sim card installation -‐ Power requirements -‐ Wiring diagram -‐ Trouble shooting -‐ User-friendly tips -‐ Maintenance record -‐ X-Track account activation Included in box checklist : The X-TRACK box should contain the following below listed items after unboxing. -‐ -‐ -‐ One X-TRACK 2000 GPS tracking system. Vehicle charger (cable set) Bold set (includes a screwdriver) If any of the above articles is broken or missing, please contact immediately the distributor or retailer where you purchased the X-Track. First use guide : This paragraph is important to read before using the X-Track GPS tracking system. To make sure all functions are ready for use, you must go through the 6 steps below. 1. Open the packing box and check the items. If the items are not complete, please contact X Map Systems. 2. Purchase a phone sim card. This may be a prepaid sim or sim-only contract card. 3. Install the sim card; see sim card installation guide for more information. 4. Put the X-Track on a hidden place. 5. Connect the X-Track 2000 to the power source. 6. Enjoy your X-Track. 【Note】The installation repair should be made by our company authorized personnel or professional maintenance person from the distributor or retailer. Without our company’s permission, do not install, disassembly and assembly, or repair. Otherwise, you will lose the warranty service right. System overview : LED indicators : ID 1 2 3 LED GSM (blue) GPS (orange) Power (red) Status Note Solid on GSM is valid Blinking GSM is invalid Standby Off Solid on GPS is valid Blinking GPS is invalid Standby Off On Connected 9-36V Off Not connect power Technical Specifications : Dimension Weight Operation Tempature Operation Voltage Operation Current Humidity GSM frequenties GPRS GPS Sensitivity Acquisition Sensitivity Position Accuracy TTFF ( Open Sky ) GSM/GPS Antenna LED Indicator Data Transmit Non-movement Detection Mileage report 87(L) x 43 (W) x 14(H) mm 45 g -30 C +70 C 9-36v DC 22mA (12V DC), 12mA (24V DC) 20% - 80% 850/900/1800/1900 MHz Class12 UDP -159dBm -144dBm 10m (2D RM) Cold Start: < 38s Warm Start : < 32s Hot Start: < 2s Built-in design GSM-green, GSM-blue, Power-red TCP, SMS Movement alarm based on built-in 3D motion sensor Track by time/distance interval Command Functions : To set the function send a text message to the X-Track with the below listed commands. Item Function Command Explanation: 1 Center number setting Add center number: CENTER,A,center number# CENTER,A,13927497492# Note: Center number used for receiving alarms, reset, engine cut and set parameters. Delete center number: CENTER,D# CENTER,D# 2 Inquiry location 123 or POSITION# 123 or POSITION# Note: Under Chinese language settings it will reply the location in Chinese, with English settings it will reply in English. Please check language settings first. 3 Inquiry Longitude and latitude WHERE# WHERE# Note: Will reply current longitude, latitude, time, speed and X-track device code. 4 Inquiry Google map link URL# URL# Note: Will reply <Datetime: 10-10-14 13:30:30> http://maps.google.com/maps?q=N 22.540885,E113.95265 5 GPS time interval setting TIMER,time interval# TIMER,10# (means time interval of GPS uploading is 10 seconds) [range: 10-60 seconds], default is 10 seconds Note: Will reply set timer ok. 6 Engine Cut RELAY,1# RELAY,0# RELAY,1# (means power engine cut) RELAY,0# (means recover power engine cut) Note: Will reply Relayed enable OK! Note: need the Cut relay to support this function (optional for the X-Track) 7 Vibration alarms setting VIBRATION,vibration sensitivity,alarm mode# VIBRATION,2,3# (means vibration sensitivity is 2, alarm via calling and SMS message) Vibration sensitivity range [0 to 5], 0 means switch off alarm. Alarm mode: 1 phone, 2 SMS, 3 phone and SMS Note: Will reply set timer ok. 8 Speeding Alarm Setting SPEADING,speed, alarm mode# SPEEDING,120,3# (means speed sensitivity is 2, alarm via calling and SMS message) Speed sensitivity range [60 to 220], if as 0 means switch off speed alarm, e.g.: SPEADING,0# Alarm mode: 1 phone, 2 SMS, 3 phone and SMS, default as mode 1. Note: Will reply set speeding ok. 9 Reset Setting RESET# RESET# This will reset the device to original factory settings. Note: Will reply reset ok. 10 Inquiry parameters PARAM# PARAM# This commands is to check all settings of the X-Track. Note: Will reply with IMEI number, APN, IP, TIMER, CENTER, LANG, GMT information. 11 Inquiry Status STATUS# STATUS# Note: Will reply with battery level, GSM signal, GPS signal, Relay status, Charger status, ACC status information. 12 Language LANG,type# LANG,1# Chinese LANG,0# English Functions Overview : X-Track 2000 has power functions to be added. Such as: Fleet Management, Living Tracking, History, New Message, Received Message, Photo Management, OBD Information, Device Parameters Setting, Geo-fence Area Setting, Geo-fence Warning Setting, POI Management, Group Manager, Vehicle Manager, Driver Manager, Vehicle Status Reports, Parking Reports, Speeding Reports, Alarm Warning Reports, Fuel Consumption Reports, Vehicle Mileage Reports, Geo-fence Reports, Tanker Reports, Travel Reports, Driver Mileage Reports, Temperature Reports, RFID Reports, Taxi Reports, Loading and Unloading Reports, Account Management, Authority Management and so on. Key features: - Visualize all the units (atv, side by side, motor, cars, scooters, ships, and other vehicles with power supply) at the same time, multiple units display. - Real time GPS position tracking - Complete route report. Daily, Weekly, Monthly. - Vehicle real time status display - User adjustable settings Working status : -‐ Power on: when the device is “power on”, the red LED should be in constant glow; the green GPS LED and the blue GSM led should be “solid on”. -‐ Power off: pull off the power plug then “power off” the device. -‐ Sim card installation : 1. Discharge the cover of the X-Track device 2. Choose SIM card. Please insert a SIM card to the device. Please take X Map Systems advice as reference (SIM card should be enabled to GPRS and SMS functions and make sure the PIN code the SIM card has been disabled.*) 3. Uncover the SIM card holder. 4. Insert the SIM card, see for reference the image above. 5. Insert the SIM card holder. 6. Place the cover back on the X-Track and use the supplied bolts. 7. Install the device in the hidden place of the atv, motor or car; Note: The SIM card cannot be inserted in wrong way; The SIM card must be with GPRS function and enough deposit if you use a prepaid card. 8. The X-Track device must be installed professionally by the distributor or retailer. 【Note】Please install the device in the hidden place as followings: Under Front windshield; in the front instrument panel; under back windshield; Avoid being placed with signal radiators like reverse sensor; the device has GSM antenna 【Relative information】You could check your provider for more information about the disablement of the SIM card PIN code. Power requirements : - The device power supply is DC 9-36V. The red line is positive pole while the black line is negative pole. - The negative pole of power supply connects with ground or the metals. Please do not connect with other ground lines. - When finishing the power supply wire connection, please make the plug of power supply to the device. Wiring digram : 1. The device power supply is DC 9-36V. The red line is positive pole and black line the is negative pole. White line is for the optional engine cut. 2. The positive pole connects with the positive (+) pole of the battery. 3. The negative line connects with the negative (-) pole, ground or the metals. 4. The white line can be connected to an optional relay connector. If you don’t have the optional connector please do not use the white wire. 5. After finishing the wiring connect the power supply plug to the device. Trouble shooting : 1. The device is not online or offline on the web platform. 2. First, please check the three LED working state. If possible, you can call the device’s SIM card number to check. If not connected, the device is out of signal. If you remind that you have used a prepaid card the device SIM card may be out of deposit, please make deposit by the telecom provider or with a contract the provider has disabled the number. If remember the device is on power off, please turn back the device power and proceed as followings: Check if the red LED is in constant glow. If the LED is dark, please check the power connecting. If fuse is broken, please return the device to the seller. If the blue GSM LED is not in constant glow, please check the installation of SIM card. 3. Please check the offline area in order to judge if the network problem of operators. 4. When GPS cannot receive the signals, please drive in the open sky and ensure there is no metal thins on the device. 5. When the device cannot receive any GSM signal, please check the SIM card installation. 6. The red LED is not glowing when “power on”. check the fuse of the power line. If the fuse is fused, please change the fuse. 7. If one of the following items isn’t the problem please contact immediately the distributor or retailer where you purchased the X-Track. User-friendly tips : If you use a prepaid SIM card or have a low monthly data subscription service on your contract with your provider, then we advise the following settings. Please change the interval upload time to a different setting with more seconds between the upload times. For example set the interval to 30 or 60 seconds, TIMER,30# or TIMER,60#. Maintenance record : FIRST MAINTENANCE Unit: IMEI number: Date: Distributor or retailer: Unit exterior condition: (check on stone damage, mud or anything else that could make the GPS work less functional) Unit interior condition: (check on stone damage, moisture, dust or anything else that could make the GPS work less functional) Maintenance advisement: (Write the description of the maintenance advisement and supply this information to the client.) Fault statement: (Write the description of the fault and supply this information to X Map Systems.) SECOND MAINTENANCE Unit: IMEI number: Date: Distributor or retailer: Unit exterior condition: (check on stone damage, mud or anything else that could make the GPS work less functional) Unit interior condition: (check on stone damage, moisture, dust or anything else that could make the GPS work less functional) Maintenance advisement: (Write the description of the maintenance advisement and supply this information to the client.) Fault statement: (Write the description of the fault and supply this information to X Map Systems.) X-Track account activation : In order to successfully use your X-Track GPS tracking device we need the following below listed information to activate a account on your X-Track. Please send this information to our support team by the online form on our website, they will active your personal account within 48 hours. First name (required): Second name (required): Your e-mail address (required): Phone number (from the SIM-card used in the X-Track): Your provider: APN address: Requested username: Second option for username: Password: If some provider information isn’t supplied some functions of the X-Track could be disabled. If you don’t request a personal username and password, the X-Systems support team will generate one username and password for you. Note: you can always change the password, the username is unchangeable after the account has been activated. The mobile account X-Track platform could be visited on www.xmapsystems.com/login