1
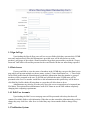
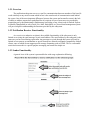
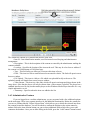
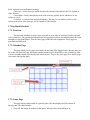
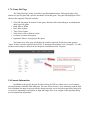
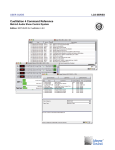
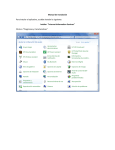
Harlan Broughton
Stephen Link
CSE 4939
Team 4
UCMB-IMS User Manual
1. End-User Manual
1.0 Introduction
1.1 Site Map
1.2 Registration Page
1.3 Sign-in Page
1.4 Data Access
1.4.1 Edit User Accounts
1.5 Notification System
1.5.1 Overview
1.5.2 Notification Receiver Functionality
1.5.3 Sender Functionality
1.5.4 Adminstrator Mode
1.6 Members-Only System
1.6.1 Overview
1.6.2 Functionality
1.6.3 Administrative Features
1.7 Pep Band Scheduler
1.7.1 Overview
1.7.2 Calendar Page
1.7.3 Game Page
1.7.4 Game Slot Page
1.8 General Information
2. Administrators
2.0 Introduction
2.1 Design of System
2.1.1 Silverlight
2.1.2 WCF Services
2.1.3 SQL Server
2.2 Hardware
2.3 Set Up
2.3.1 Required Hardware and Software
2.3.2 Silverlight Application
2.3.3 WCF Services
2.3.4 SQL Server
2.4 Troubleshooting
1. End-User Manual
1.0 Introduction
The UCMB-IMS is designed to handle all the data needs of the University of Connecticut
Marching Band. Most of the system can only be accessed by members of the UCMB. In order to gain
access an end-user must fill out the registration form and submit it. Once the registration is approved by
the band administration the user will be able to log in and access the rest of the system. Details about
this process can be found in the registration page section of this user manual.
The UCMB-IMS system is broken down into six sections. These sections are: Registration,
Login, Data Access, Members-Only, Notification, Pep-band Scheduler. Only the first two of these
sections can be accessed without logging in. The other four sections require the user to log in and will
display data based on the user logged in and that user’s permissions. Below is a detailed description of
how to use each section.
1.1 Site Map
1.2 Registration Page
Upon loading the Members Registration Page users will see several text boxes that request
data required for membership in the UCMB. Each of these text boxes must be filled in to the best of the
member’s knowledge to ensure accuracy of information and inventory in the band.
• If a member is unsure about a specific field they may leave it blank but are encouraged to
later go back in fill in the correct information when they know it.
• Members will be required to fill in three fields; Peoplesoft Number, UConn E-Mail address,
and password. These are used to ensure users are of UConn and indeed who they say they
are.
• If a member would like to start over or register for the band at a different time they may hit
cancel and clear the form or navigate away from the page.
1.3 Sign-In Page
Upon loading the Sign-In Page users will see two text fields which they can enter their UCMB
user name and password. Once this information is provided users will be allowed access to the
member’s only pages of the website. Should a member forget their password they can hit the “Forgot
Password” link which will send the password to the e-mail listed with the user name being requested.
1.4 Data Access
If users would like to view the roster of members in the UCMB they can go to the Data Access
page which will present multiple text boxes (name, section, UConn classification, etc…). These fields
can be filled in and when the submit button is pushed the information about the member or group of
members will be presented to the user. If all fields are left blank the entire UCMB roster will be
presented to the user. If a member would like to edit information on their profile they will be able to
click Edit My Profile which will bring them to a page that will allow them to do so.
Administrators may also log in so they may query the server to output data to be imported into
File Maker. This option allows administrators such as Dr. Bruen to use the IMS without completely
changing their computing requirements.
1.4.1 Edit User Accounts
Upon loading the Edit User account page users will be presented with a drop box that will
contain all available fields to edit information. When the user has entered the information they wish to
change they may click Save. After Save is clicked they may choose another field to change if they
wish.
1.5 Notification System
1.5.1 Overview
The notification subsystem serves as a tool for communication between members of the band. It
works similarly to any email account which in fact is the actual mode of communication used behind
the scenes. One of the most important differences between the system and an email account is the lack
of ability to address anyone but a predefined list of recipients in case of most users (as provided by
permissions set by the administrator). Rudimentary knowledge of any client (such as Outlook Express
or Mozilla Thunderbird) or web (Gmail, Live Mail, HuskyMail, etc.) based email management system
will prove helpful in understanding the functions provided by the subsystem.
1.5.2 Notification Receiver Functionality
As a receiver (or otherwise recipient), the available functionality of the subsystem is only
limited to receiving an email message at your email address. The email address by the subsystem is the
same one you have used during registration. Any messages received through this system will only be
limited to text content, no attachments or special formats are allowed to maintain compatibility with all
clients, some of which do not support special message formatting such as HTML. This is a reasonable
restriction because this is a special purpose messaging tool meant for simple use.
1.5.3 Sender Functionality
A general view of the system is presented below with usage explanation following.
As a regular user, you will find the interface of the subsystem very clear and easy to use. On the
main page you will be presented with three different controls which will help you compose the
message.
• Recipient list control allows you to pick from a list of recipients (user groups or users) you
may address based on your position in the band and any additional permissions set by your
administrator. You may make a single selection, or select multiple recipients.
• Message subject text box allows you to specify the text which will appear in the subject line of
email being sent.
• Message content text box allows you to specify the actual content of the message (only plain
text is allowed, no attachments).
Once you are satisfied with the content of the fields you may send the message using the “Send”
button located under the message content field. You should now receive an on screen confirmation if
everything went well. Note: The system is unable to verify that every recipient has actually received the
message, but can only report any error which may occur up until the email is sent. Although email
transmission failures are very rare, they do occur sometimes, so if your message is critical make sure to
send repeat notices or employ an additional communication tool.
1.5.4 Administrator Mode
If you are an administrator within the system, upon entering the page you will be presented with
a link to an additional interface which allows you to set any special permissions for users who have the
ability to send messages through the system. Here you can search for any individual user by email and
modify his or her permissions for access to the sender functionality of the system which specify who
the user may include in the recipient list. Note that you may not remove permissions granted by rank
within the band, for example you may not take away the ability of a section leader to email his or her
section. You may only modify these default permissions for a specific user by changing the user rank
within the system.
1.6 Members-Only System
1.6.1 Overview
The members only page subsystem allows you to access any custom content uploaded by any of
the site administrators. This also serves as the default page to which the application takes you upon log
in if you have not requested any other page specifically. Content is subdivided into three categories
which are links, file uploads, and video streams. No special background knowledge is required to
effectively use this subsystem, but familiarity with media players may be useful but is not required due
to ease of use of the page.
1.6.2 Functionality
When you enter the members only pages subsystem you will be greeted with the following
interface. It is very simple, and presents only the available content sorted by the date of submission (the
latest content is shown at the top of the list).
The content list contains five columns that describe each item:
• Item Id – Item identification number, used for internal record keeping and administrator
management.
• Description – This is the description of the content as entered by the administrator making the
content available.
• Location – Specifies the location of the item on the web. This may be a local server address if
the content is of VideoStream or FileUpload type.
• Type – This field tells you what type of resource this item refers to:
• Link – This item is a link to content located on an outside website. The link will open in a new
browser window.
• File Upload – This item is a link to a file which was uploaded locally to the server. The
uploaded content will launch from a new browser window.
• Video Stream - This item is a video link, which will open in an integrated player shown in the
image above. Note that the player will only be shown when a video stream is selected. The player has a
standard interface used by any modern media player such as Windows Media Player therefore it is very
simple and intuitive to use.
• Timestamp – Specifies when the item was added to the list.
1.6.3 Administrative Features
If you are logged in as a website administrator, you are presented with a few additional options
on the main page. There is no separate interface for the additional functionality. Below the content list
you can see a button labeled “Delete Selected Item” which allows you to delete the selected item from
the content list and the database. You will be asked to confirm the deletion as the action cannot be
undone. Below the item deletion button you can see three additional fields which allow you to add
content to the database. Once you are done filling in the fields, press the “Add Content” button located
below and wait for a confirmation message.
• Item type – Select item type which describes the content being added (Link, File Upload, or
Video Stream).
• Description – Briefly describe the item so the user may quickly decide whether he or she
wishes to view it.
• Location – Location of the item on the internet. This may be a an address relative to file
system of the server if the item type is File Upload or Video Stream.
1.7 Pep Band Scheduler
1.7.1 Overview
The pep-band scheduler section is only accessible to users who are associated with a pep band
in the current year. The pep-band scheduler helps both pep-band members and administrators deal with
attendance of pep-band games. There are three pages within this sub-component. These pages are
described in detail below.
1.7.2 Calendar Page
This page displays every game associated with the band of the logged in user. Because there is a
lot of data, the game info may not display and the buttons may be disabled for a few seconds. In order
to move to another month click the forward or back arrows. To go to the game page for a specific page
click on the link for that game.
1.7.3 Game Page
This page displays data related to a specific game. The data displayed will be shown in
the top panel. This data includes:
• Game ID: the unique id number for this game. Reference this when talking to an
•
•
•
•
•
•
•
administrator about a specific game.
Band: Blue or White
Date: Date of game.
Time: Time of game.
Team: Men’s team or Women’s team.
Location: Location of this game.
Opponent: Who we are playing in this game.
The attendance area on the lower half of the screen will display differently for different logged
in users.
If you are a member of a pep-band you will see an attendance list of all the people attending the
game from your section. You will also see a “Register” or “Unregister” button. Clicking this button will
add or remove your name from the attendance sheet. Note: If all the slots are full for this game you will
be unable to register. There will also be a button to subscribe to notifications. If you subscribe for
notifications you will receive an email as soon as a spot opens up in the current game.
If you are an administrator you will see the attendance lists of all sections. Every slot will either
have a name or the word “Open” to indicate that no one is assigned for this spot. Each slot is also a link
to a page with more options related to that slot.
1.7.4 Game Slot Page
The Game Slot Page is only accessible to pep-band administrators. This page displays data
related to a specific game and a specific attendance slot in that game. The game data displayed will be
shown in the top panel. This data includes:
•
•
•
•
•
•
•
Game ID: the unique id number for this game. Reference this when talking to an administrator
about a specific game.
Band: Blue or White
Date: Date of game.
Time: Time of game.
Team: Men’s team or Women’s team.
Location: Location of this game.
Opponent: Who we are playing in this game.
The bottom area of the page will display the member registered for this slot in this game or
“Open” if there is no one registered for this slot. To unregister the member, click “Unregister”. To add a
member to this slot pick a name from the drop down list and then click “Register”.
1.8 General Information
In addition to the specific designs for each section, the IMS as a whole uses a set of common
security functions within the IMS subsection. The crux of this security is in its interaction with the SQL
Server database; the input is encrypted before being sent to the server and is decrypted after being read,
so security is maintained in all aspects of input and output. Here is an example of the algorithm being
used on registration information.
2. Administrators
2.0 Introduction
The UCMB-IMS is designed to handle all the data needs of the University of Connecticut
Marching Band. Most of the system can only be accessed by members of the UCMB. Public
information will be placed on the main website. The only pages accessible to users without login data
are the Register page and the Login page. These pages need to be accessible to the outside so that users
can create credentials for the first time and log in each time they access the system.
2.1 Design of System
The UCMB-IMS is based of the Microsoft Silverlight platform. The system is broken into three
sections which are the Silverlight Application, the Windows Communication Foundation (WCF)
Services and the Simple Query Language (SQL) Server database. Below is a short description of each
of these sections:
2.1.1 Silverlight
The Silverlight Application is built in Silverlight 3 using the Navigation Framework and Microsoft
Expression Blend to edit visually. The application is hosted on an html webpage that references the
Silverlight .xap file. A .xap file is a compressed version of a Silverlight application. When a user loads
the html page it runs the .xap file inside the user’s browser. In order to update the website with new
version of code you must first compile the new code. A new .xap file will be automatically created and
stored in the Bin folder of the IMS project. This file then needs to be copied to the folder containing the
website. After this is done the website should now run the new Silverlight code.
To make changes to the Silverlight code you must have Visual Studio with Silverlight 3 installed. Open
the solution in Visual Studio and you should see all the projects associated with this system. The code
has been commented to give administrators a better idea of what can be changed. Administrators should
only edit code in areas designated by comments. Editing code in other areas could potentially break the
system. Below is a description of what each project in the solution does and where an
administrator should go to make changes to the code.
Six projects, each corresponding to a web page (DataAccess, LogIn, MembersOnly,
NotificationSystem, PepBandScheduler, and Register) contain pages under those system and code
associated with those pages. There are also references to libraries and services that these classes and
pages need. Any changes or additions to a sub-system should be done within that sub-system’s project
folder. New pages should be added to the Pages folder and any other code should be in the main folder
for that sub-system. The IMS project is the start up project for the Silverlight application. It contains
the main page and the toolbar that is present on every page and links between the different sub-systems.
This page also contains references to all the services used in the project. Any changes related to the
webpage in general or the toolbar on the top of every page should be made in this folder. If any services
references are added to a sub-system they must also be added here in order for the service to work.
2.1.2 WCF Services
WCF Services are the middle layer of the project and are used to connect the Silverlight Application to
the SQL Server database. The WCF Services have to be hosted in a separate webpage from the
Silverlight Application. This webpage has a reference to the “WCFService” class which contains all the
code used by the services. The webpage also has .svc files for each service that is hosted. The .svc files
connect the clients to the code of the services. In order to update a service you need to change the code
in WCFService and then recompile it. You may also need to update the reference to the service in the
Silverlight Application. To add a new service you will need to create the necessary classes in
WCFService and create a .svc file on the website that references the class in WCFService.
To make changes to a WCF service you must change the code of the associated class in WCFService. If
you add methods or change the signature of a method you must also add those changes to the interface
associated with the service (generally the same name with an “I” before it). The interface is how the
service is presented to the Silverlight client and therefore must match how the service code is actually
written.
2.1.3 SQL Server
The system uses SQL Server 2008 for storing all the necessary data. In order to add or change data a
user will need to use SQL Server Management Studio to connect to the database. The database is
generally secured with a password, as well as the option for additional encryption on the specific
database via options in SQL Server 2008. Speak to the website administrator if you need access to the
database.
The SQL Server database holds all the data used in the UCMB-IMS. The database (and the entire
system in general) is designed to be easily updated. Many of the drop-down menus in the system get
their data from the database rather than having this information hard-coded into the system. By doing
this, these drop-down menus will be updated whenever the database is updated and all the drop-down
menus will stay consistent. Below is a description of the tables and columns found in our database.
Note: (PK) indicates the primary key for this table. (FK) indicates a foreign key to another table.
• Band : A specific band that exists for one season. Each season a new band will have to be created.
• Id (PK): Unique Id of this band
• Year : The year this band is associated with. This refers to the year the band begins.
• Type (FK): A char indicating the type of band (marching, blue, white…)
• BandType : A type of band (marching, blue, white …)
• Id (PK): Unique character or string associated with this type
• Name : Name of this type of band
• Game : A specific basketball game that the band is attending,
• Id (PK): Unique id of this game
• BandId (FK): Id of band associated with this game
• Date : Date of game.
• Time : Time of game.
• Location : Location of game.
• MenWomen : Whether this game is a men’s or women’s game.
• Opponent : Name of opponent in this game.
• Game_Slot : An opening for a specific game that may be filled by a member. Each game will have a
certain number of slots per section. A game slot for one game has a different id then a game slot for
another game.
• SlotId (PK): Unique id of this game slot
• GameId (FK): Game this slot is associated with
• MemberId (FK): Member filling this spot (or null if it is an empty slot)
• SectionId (FK): Section this slot is assigned to.
• Section : A section of the band usually associated with the instrument the member plays.
• ID (PK): Unique character or string associated with this section.
• SectionName: The name of this section.
• Members : A member of the UCMB-IMS system.
• Id (PK): Unique Id for this member
• fName : First name.
• lName : Last name.
• peoplesoft: Peoplesoft number.
• street : Street of home address.
• city : City of home address.
• state : State of home address.
• zipCode : Zip code of home address.
• bdMonth : Month of birthday.
• bdDay : Day of birthday.
• bdYear : Year of birthday.
• homePhone : Home telephone number.
• cellPhone : Cell phone number
•
•
•
•
•
•
•
•
•
•
•
•
•
•
•
•
•
•
•
•
•
•
•
•
•
campusAddress : Address on UConn campus.
email : Email address.
IM : Instant message name.
newspaper : Newspaper local to member’s home.
hs : High school member attended.
hsDirector : Director of the member’s high school.
hsdm : Whether or not the member was a drum major in high school.
hssl : Whether or not the member was a section leader in high school
hsRegional : Number of years member was in an All-Regional band.
hsAllState : Number of years member was a part of an All-State band.
hsMarchingXp : Amount of marching band experience.
classification : Year of college the member is in.
major : Major.
InstrumentId (FK): Id of primary section user is in.
OtherInstId (FK): Id of secondary section a user may be in.
height : Height
weight : Weight
uconnAwards : Any awards the member has received from UConn.
otherInfo : Miscellaneous information.
pw : Password
username : User Name
verified : Whether or not the user is verified by the Band Office.
sectionLeader :Whether or not this member is a section leader.
council : Whether or not this member is a member of the band council board.
upperLeadership : Whether or not this member is part of the upper leadership.
2.2 Hardware
The physical system is set up on a Windows XP laptop that is located in Harlan's dorm. This
server contains all the code used for both the Silverlight website and the WCF Services. The code can
be accessed by Visual Studio 2008 SP2 which is also stored on the server. This server contains the
compiled versions of both these sets of code and the ability to host the compiled versions of the code.
The Silverlight code is compiled into a .xap file and then hosted on an html page. The server uses
Internet Information Services 5.1 (IIS) to host the html page so it can be accessed from the internet.
The WCF services are hosted on a different port of IIS so that they can also be accessed from the
internet. The server also contains the SQL Server database that contains all the necessary data. This
database is already constructed and contains an initial data set. The database is also set up to be
connected to from the internet.
2.3 Set Up
There are a significant number of steps to set up the application on a new server. The three major parts
of the application all need to be set up. This includes the Silverlight application, the WCF services and
the SQL Server database. Technically these three parts can each be hosted on separate servers, but it is
simpler to set them all up on one. This manual will describe the scenario where all three parts are set up
on a single server.
2.3.1 Required Hardware and Software
•
•
•
•
Windows Server or Windows XP PC (with good connection to internet)
IIS 5.1 or later
SQL Server 2005 or later
Visual Studio 2005 or later (for editing and compiling code)
2.3.2 Silverlight Application
Open up the IMS solution containing all the necessary code. The references to the WCF
services may have to be updated to reference the new WCF services. Make sure the IMS project is set
as the startup project and compile the code. This should compile all the other projects except for the
WCFServices project. Assuming there are no errors, the entire executable application will be saved in a
.xap file in the IMS project. If you haven’t already, run the initial set up for IIS. Create a new website
using port 80 (should be default). Create an index.html page to be the main page of the website. In the
body of index.html add the following lines:
<form id="form1" runat="server" style="height:100%">
<div id="silverlightControlHost">
<object data="data:application/x-silverlight-2,"
type="application/x-silverlight-2" width="100%" height="100%">
<param name="source" value="IMS.xap"/>
<param name="onError" value="onSilverlightError" />
<param name="background" value="white" />
<param name="minRuntimeVersion" value="3.0.40624.0" />
<param name="autoUpgrade" value="true" />
<a
href="http://go.microsoft.com/fwlink/?LinkID=149156&v=3.0.40624.0" style="text-decoration:none">
<img
src="http://go.microsoft.com/fwlink/?LinkId=108181" alt="Get Microsoft Silverlight" style="borderstyle:none"/>
</a>
</object><iframe id="_sl_historyFrame"
style="visibility:hidden;height:0px;width:0px;border:0px"></iframe></div>
</form>
This is will set up the page to run the Silverlight application IMS.xap. It also will prompt the user’s
browser to upgrade to Silverlight if Silverlight is not already installed. Copy and paste the file
IMS/IMS/bin/debug/IMS.xap to the same folder as index.html. This will allow the website to send the
application file to the client computer when the website is loaded. Note: If you would like to add this
web application to an existing website, create the webpage and application in the same way and link to
the page from the website.
2.3.3 WCF Services
The code for the WCF services is located in the WCFServices project in the IMS solution. The code
may have to be updated to refer to the new SQL Server instance and new authentication information. In
order to host these services you will need to create a new website. Using IIS set up a website and assign
it to a port (you should not use port 80 as this is generally reserved for html traffic). After the website is
created you will need to do a couple steps to host the WCF services. Make sure the WCFServices code
is compiled and then do the following steps:
1. Using Visual Stuido create a reference in the new website folder to the WCFServices
project,
2. Copy and paste the app.config file from the WCFServices project to the website folder
and rename it Web.config.
3. For each service create a file called “ServiceName.svc” where ServiceName is the
name of the service. In this file put the following line:
<%@ ServiceHost Language="C#" Debug="true" Service="WCFService.Service" %>
Where WCFService.Service refers to the service in WCFServie.
4. Create a file called crossdomain.xml and place in the root of the website the hosts the
WCFServices. In this file include the following lines:
<?xml version="1.0" ?>
<!DOCTYPE cross-domain-policy (View Source for full doctype...)>
<cross-domain-policy>
<site-control permitted-cross-domain-policies="all" />
<allow-access-from domain="*" secure="true" />
<allow-http-request-headers-from domain="*" headers="*" secure="true" />
</cross-domain-policy>
Note that Steps 2 and 3 can be used to host a service if a new service has been created.
2.3.4 SQL Server
In order to use SQL Server a server instance must be installed on the Windows Server or
Windows PC. Insert the install disk or mount the .iso file and follow the steps in the installation
process. During installation, make sure the server can be accessed from the internet and that you create
new authentication information (do not use the default Windows User Account). After the server has
been created, add the provided database to the server. This database will contain all the tables, as well
as an initial data set that will allow select user’s to log in and start adding data right away.
2.4 Troubleshooting
If you have any problems that cannot be answered by this user manual please contact Harlan Broughton
or Stephen Link.