1
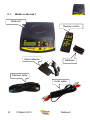
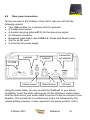
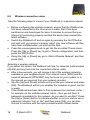
SolutionsRadio Ltd. Motorenweg 5-k 2623CR Delft (The Netherlands) Tel: +31 15 262 59 55 Fax: +31 15 257 15 95 E-mail: [email protected] URL : www.solutionsradio.com Webbox2 V2.07 published on 8 March 2013 Copyright 2013 No part of this publication may be reproduced and/or made public by means of printing, photocopying, microfilm or any other way without a prior written permission from SolutionsRadio (www.orionwebbox.org). SolutionsRadio reserves the right to alter the publication at any time, without prior notice. The most recent version of this document can be found at www.orionwebbox.org. voice enabled by Acapela Table of contents Important instructions........................................................1 1 What is a Webbox2?.......................................................2 2 Internet is needed............................................................3 3 How to connect the headset?..........................................4 4 Operating the front panel and remote control.................5 5 Using the Webbox2.........................................................7 6 Installation......................................................................14 Frequently asked questions............................................23 Annex A: The Exterior ....................................................26 ANNEX B: Pause and Reset menu.................................29 ANNEX C: Advanced configurations...............................32 ANNEX D: Specifications................................................34 IMPORTANT INSTRUCTIONS Please observe the following guidelines: Avoid contact with water. This can cause a short circuit! Do not attempt to open the Webbox2! If the device does not function properly, contact your supplier. Do not cover or put anything on top of the Webbox. This will make the loudspeaker inaudible. If you move the Webbox2 from a cold environment to a warm one, wait two hours before using it to give any moisture which may have collected on the device time to dry. The Webbox2 satisfies all relevant European safety requirements. Detailed information about this can be found on our website at: www.orionwebbox.org 1 © March 2013 Webbox2 1 WHAT IS A WEBBOX2? The Webbox2 is an online multimedia player developed especially for people with a visual impairment. It enables you to listen to a large amount of topical information and entertainment via Internet. The device only has a few buttons and all the instructions are spoken. It is therefore possible to operate the device entirely by touch and hearing. This makes it an innovative and convenient device for people with a visual disability or for elderly people without any computer skills. An Internet connection, not a computer, is required to use the Webbox2! The Webbox enables you to listen to the latest news, a daily newspaper, teletext, spoken TV subtitles, radio stations, talking books and a great deal more. The Webbox2 is very easy to use. The Webbox2 serial number The serial number. This 5-digit number can be found on the type plate on the bottom panel of the Webbox2. This serial number is important for memberships and subscriptions. This number is spoken under the heading ‘Information’. Good to know: The Webbox2’s programme offering can be adapted to your wishes and can be expanded. For some subscriptions, you will need to contact the relevant content provider yourself. The Webbox2 playlist (programme offering) can be adapted and/or expanded to you personal wishes. © March 2013 Webbox2 2 2 INTERNET IS NEEDED The Webbox2 is ready to use instantly upon delivery. If required, the device configures itself. The only thing you have to do is to unpack the device and connect it. Settings have been kept to a minimum in order to make the device easy to use for everyone. The Webbox2 makes use of an Internet connection. There are various suppliers who supply Internet using ADSL technology via telephone lines. It is usually also possible to obtain such a connection through your local cable television company. This is also called broadband Internet. If this is your first connection, you will receive a modem or router from your supplier. You should either install and activate this yourself or have your supplier do it for you. Things you should know: An Internet supplier is called a network supplier. The English term often used for this is ‘provider’ or ‘Internet service provider’ (ISP). Before you can use your Webbox2, you must have an Internet connection. This Internet connection can also be wireless as the Webbox2 is equipped with facilities to enable this option (called Wi-Fi). Your supplier can advise you about this. 3 © March 2013 Webbox2 3 HOW TO CONNECT THE HEADSET? You can connect a headset or deaf loop system to the back of the Webbox2 (see also paragraph ). Headset connection Please note: If you connect a headset or deaf loop system to the phones output of your Webbox2, the loudspeaker will automatically switch off. You can use the volume control button of your Webbox2 as normal to regulate the volume of your headset. Please note: If you use a wireless headset, make sure that the volume control button is turned up loud enough. This is particularly important if there are long silences (for example during spoken TV subtitling used in some countries) as the headset can switch itself off automatically and will only switch back on when the audio signal returns and if the volume is set loud enough. © March 2013 Webbox2 4 4 OPERATING THE FRONT PANEL AND REMOTE CONTROL Volume control and pause knob Display screen Up button Down button Error indicator light lamp Connection light On/Off light OK button On/Off button Back button Front panel: see Attachment A for a textual explanation. 5 © March 2013 Webbox2 Mute / pause On/Off button Tone Speed Volume Sleep mode Information button Shortcuts Up button OK button Fast backwards button Fast forward button Down button Back button Remote control: see Attachment A for a textual explanation. © March 2013 Webbox2 6 5 USING THE WEBBOX2 Please note: Read Chapter before connecting the Webbox for the first time. 5.1 Switching the machine on After the Webbox2 has been connected to the electric socket and to Internet, switch on the device by pressing the [On] button on the Webbox2. (This button is the farthest one to the right at the bottom). You can also use the remote control; the [On] button is at the top on the far right. When you switch the device on, the [On] indicator light turns green and within a second you will hear the ‘on’ tone. After about 10 seconds you will hear a ‘start’ melody. The Webbox2 will automatically seek a connection to Internet; the yellow INTERNET indicator light will then light up. The Webbox2 will seek the most current data and incorporate these into the menu. You can switch the device off by pressing the [On] button again. The green and yellow lights will then turn off and you will hear a short ‘off’ tone. 5.2 Pause menu Regardless of what the Webbox2 is playing, you can always make use of the so-called ‘Pause menu’ by pressing the volume/pause knob. By pressing the [Up] and [Down] buttons, you can scroll through this ‘Pause menu’ to find all sorts of information and options relevant to the programmes as well as to general settings relating to operation of the device. See also ‘Annex B: Pause and Reset menu’. You can leave the ‘Pause menu’ by pressing the volume/pause knob again or by pressing the [Back] button. (Or you can choose ‘Continue playing’). You can also obtain the 'Information’ in this menu by pressing the [Info] button on your remote control. 7 © March 2013 Webbox2 5.3 Louder and softer After you have turned the device on, the Webbox2 will seek contact with Internet and the Webbox2 will read the playlist to you. The volume may be set too loud or too soft. Use the volume/pause knob on the Webbox2 to adjust the sound to louder or softer. This is the large round knob on the front of the device (or VOLUME +/- on your remote control). 5.4 How use the spoken programme guide The Webbox2 reads the choices from the main menu to you, when it has connected to the internet. The list may depend upon optional subscriptions you have chosen. The main menu varies per country and can include: 1. Shortcuts This is a list of subjects that the Webbox2 can quickly jump to and start playing. 2. Current affairs e.g. news, weather report, daily paper, teletext and other topical programmes 3. Spoken television subtitling …from TV broadcasting stations which support spoken subtitling (and if applicable to your country). 4. Talking books With the following options: Library for the Blind and Visually Impaired and Radio Plays. 5. Radio stations Public, regional, commercial and foreign radio stations, theme channels, recorded programmes (podcasts, and the like). 6. Club news Here you will find information from club newsletters. 7. Information Here you will find previously available announcements and an abbreviated manual for the Webbox2. If the Webbox is reading the playlist menu and you wish to select something from this (talking books for example) then you simply press the [OK] button – the button at the far left on the front panel of the Webbox2 or the [OK] key on the remote control – as soon as you hear ‘talking books’. If during reading of the main menu, you do not press the [OK] button, then the list of choices will be repeated. This will continue to happen until you make a choice. © March 2013 Webbox2 8 5.5 Adjusting speed or tone The speed or tone of many of the programmes played by the Webbox2 can be adjusted (however, this does not apply to a radio station for example). These settings can be altered during playing by pressing the volume/pause knob; the Webbox then stops playing. Using the [Up] and [Down] buttons you can choose the options in the ‘Pause menu’ that relate to this (see also Annex B: Pause and Reset menu). For example, if you pause while playing a talking book, you can choose Speed and Tone from the menu here. If you choose ‘Tone’, you can then use the same buttons to select from a few steps up or down (-20, -10, normal, +10, +20) after which you select the [OK] button to confirm your choice. Adjusting the speed works the same way. The remote control allows you to adjust speed or tone directly by pressing + or -. 5.6 Configuring the sleep mode If you want the Webbox2 to stop playing and turn off automatically at a set time, then you can choose that in the ‘Pause menu’. While listening to a book for example, press the volume/pause knob and then choose Sleep mode using the [Up] or [Down] buttons. You can set a time between 10 and 120 minutes. On the remote control, the sleep mode button [Zzz…] switches this on immediately using the number of minutes last configured. When the Webbox2 is restarted, this last setting is inactive and may need to be re-activated if necessary. The Webbox2 will stop playing when the set number of minutes is reached and you will hear a clock-ticking. The sleeptimer is reset to the same number of minutes when you press the [OK] button within 30 seconds. The timer will also be reset at any time by pressing the [Zzz..] button on the remote control. The Webbox2 will switch off when you do not take any action during these 30 seconds of clock-ticking. 9 © March 2013 Webbox2 5.7 The item most recently listened to Pressing the [Shortcuts] key on the remote control will take you to your list of Shortcuts (see also paragraph 6.11). Pressing the [Shortcuts] key again will take you to the most recently listened to item. Alternatively, you can also switch on the ‘Continue at start up’ setting; the Webbox2 will then automatically start playing the programme you were last listening to when you turned the device off (if possible). This setting can be found in the ‘Pause menu’ under Device-configuration>Speed dial (see also paragraph 5.12). 5.8 Media menu (USB, SD, CD…) The Webbox2's default function is to play out content made available through Internet, such as a daily talking paper, spoken TV subtitling or radio stations. However, if other media are available from which something can be played out, this will appear in the ‘Media menu’ when the device is switched on. Depending upon the available media, you will be able to choose from: - Shortcuts - USB stick - CD player - Memory card - Internet menu Tip: Is a certain book available online and on your SD card or USD stick? ...in that case it will still resume at the point you left of, no matter whether you were reading online or from your local SD/USB storage. Tip: Go to the 'Media menu' in front of the spoken programme guide (Internet) by pressing the [Back button] several times. Restart the Webbox2 if you do not find the medium to which you have connected in the 'media menu'. What do you do if you accidently select something you do not want? Then press the [Back] key. This is the middle key at the bottom on the © March 2013 Webbox2 10 front panel of Webbox 2 itself or the button in the left bottom corner of the remote control. The Webbox2 will then automatically return to the previous menu and read the options again. When you have selected one of the options – talking books for example – then after a short silent pause, the Webbox2 will begin reading the choices available within that selection. If the Webbox reads something that you want to listen to, press the [OK] button on the Webbox2 or on your remote control and the Webbox2 will select that option. If you are listening to a programme and you want to listen to something else in the list, use the [Up] or [Down] button to jump to it. 5.9 Interrupt listening / pause mode You can interrupt your listening by pressing the volume button on the Webbox or by briefly pressing the [Pause] button on the remote control. The Webbox2 will then be in the pause mode. Listening can be resumed by pressing that button again. 5.10 Navigating in (DAISY) talking books The Webbox2 enables you to navigate newspapers, magazines, books, etc. with a Daisy structure in a very innovative way. You can have the Webbox2 start a new chapter or article by pressing the [Up] button. You can go back to a chapter or article by pressing the [Down] button. By pressing the [OK] button, you can go down a level (if this exists). If, for example, you hear ‘Chapter 2’ and you press [OK] you can then navigate through the articles found in Chapter 2. Using the [BACK] button, you can return to the level above the one you were in and choose another chapter. Of course, if you do not use the keys, the book will be read from front to back. Fast forward or backwards in the text In the pause position, you can use the volume/pause knob to jump through the text of a chapter. If you turn the knob to the left, you will go back through the text. If you turn the knob to the right, you will go forward in the text. Each serration will slide you 10 seconds forwards or 11 © March 2013 Webbox2 backwards in time (the Webbox will tell you what the new time position is). If you press the volume knob again, the reading will begin where you set it using the volume knob. To confirm this, you can also press the [OK] button. On the remote control, you use the [<<Left] or [>>Right] button for this. Please note: Fast forward and backwards only works within a chapter. Bookmarks The Webbox2 automatically remembers where it was in a book, newspaper, magazine or other pre-recorded programme. If you return to a particular programme, the Webbox2 will pick up where it left off. It makes no difference whether you get there by way of the programme guide or by way of the shortcut list. Navigation then works as described above. 5.11 External CD player If you want to play a CD with a DAISY book or other audio, you can connect an external (laptop) CD-player on one or both USB connectors in the Webbox2 rear-panel (when in doubt, please inform with us for the types we have already tested). Some CD players get power from their own mains adapter, some from a single USB port in the Webbox2, but most will have a so called Y-cable to draw power from both USB ports. The Webbox2 will also remember the resume-point (bookmark) when using such an external CD-player. 5.12 Shortcuts Navigating within the spoken programme guide has been kept as simple as possible. However, it can be made even simpler by selecting shortcuts from a list of favourite subjects (things you listen to frequently). You can find this list in the programme guide under Shortcuts. You will find your most recently listened to programmes listed in alphabetical order. In the ‘Pause menu’ under Device-configuration>Shortcuts, you can determine how long this list is (the default is 10) and whether to manage them manually or let the Webbox2 create them automatically. Automatic shortcuts © March 2013 Webbox2 12 By default, the Webbox2 will automatically create a shortcut if you listen to a particular subject for more than one minute. Manual shortcuts If you are playing a subject and you want to make a shortcut to it, select ‘Make a shortcut’ in the ‘Pause menu’ or keep the volume/pause knob pressed until the Webbox2 resumes playing. Removing shortcuts Press the volume/pause knob on your Webbox or select the [Pause] button on your remote control when you hear the title of the shortcut or while you listen to the content that the shortcuts points to. In the ‘Pause menu’, you can then select ‘Remove shortcut'. If the shortcut referred to a book, the bookmark in the book will hereby also be removed. So should you listen to the book again, the Webbox2 will start at the beginning. It is also possible to remove all shortcuts and bookmarks in one go. (Please note: This is an option for advanced users); 'ANNEX B: Pause and Reset menu' describes this. Shortcut settings You can select the option Shortcuts in the ‘Pause menu’ under Deviceconfiguration at any time . - ‘The number of shortcuts displayed’: Of the 50 shortcuts retained, you can choose to have only the 10, 20, 30, 40 or 50 most recent ones displayed in the list (the default is 10). The shortcuts are displayed in alphabetical order. - Managing shortcuts: Here you choose whether shortcuts should be set automatically or that you wish to do this yourself manually. - ‘Continue playing after start up’: If this function is activated, the Webbox2 will start up where it left off prior to switching off. 13 © March 2013 Webbox2 6 INSTALLATION © March 2013 Webbox2 14 6.1 What's in the box? Webbox2 Remote control Mains adapter Batteries Ethernet cable Audio cable 15 © March 2013 Webbox2 6.2 The Internet connection The Webbox2 makes use of an Internet connection. A supplier of broadband internet is called a ‘provider’ or ‘Internet service provider’ (ISP). Before you can use your Webbox2, you must already have an Internet connection. If this is your first connection, you will receive a modem or router from your supplier. You or your supplier will have to install this first. What this means is that the modem/router will be connected by cable to the connection point on your cable television or the telephone line in your home. The connection point in modern homes can usually be found in the meter cupboard. After installation, the modem/router will first need to be activated by your network provider. Then the Webbox2 will have to be connected to the modem/router through a so-called Ethernet cable (wired) or through a wireless (Wi-Fi) connection. If your modem/router has been installed in the meter cupboard and you are connecting a wired cable to your Webbox2, then the cable for the connection will have to be laid from the meter cupboard to the spot where your Webbox2 has been placed. In some cases, the modem is only suitable for connecting one computer. If so, then it does not have a so-called routing functionality at its disposal. If this is the case, then you will also need a so-called router* that will function as the link between the modem and the Webbox2. The router, too, will have to be installed and configured first before you can make a connection. Your ISP can provide you with information about this. If your Webbox2 makes use of a wireless Internet connection (Wi-Fi), then a modem/router that supports wireless Internet is required. Some Internet *) You can order a pre-configured router from your Webbox2 supplier; this router is furnished with a separate manual to make its configuration easier. © March 2013 Webbox2 16 subscriptions include a ‘wireless modem’. In such cases, a router has always been built in. When configuring the modem/router, it is important to be aware of the transmission channel being used. We recommend that you select automatic channel choice for this. In order to secure the connection you will moreover need to configure the so-called WPA or WEP code. See the manual (further down) for more information about this subject. Internet subscriptions change constantly. Ask your preferred network provider about these. 6.3 Connect the Webbox2 First of all take the Ethernet cable and connect it to the Webbox2 and your Internet provider's modem, even if you plan to use the Webbox2 wirelessly. Insert the round mains adapter plug into the back of the Webbox2 entrance and then plug the adapter itself into the electric socket. If you want to use the remote control: Open the lid at the back of the remote control and insert the batteries. Make sure the batteries follow the positive and negative poles indicated. See the instructions further down for connecting your wireless network adapter. Tip: 17 If you connect the Webbox2 audio output (2x RCA plug) to your stereo, you can either switch off the speaker temporarilyby turning the volume down to 0 using the volume/pause knob, or by default in 'Pause Menu>Device Configuration>Advanced Menu>startup volume. Another solution for this is to put a loose plug into the headset socket of your Webbox2. The internal loudspeaker will then be turned off automatically. © March 2013 Webbox2 6.4 Rear panel connectors On the rear side of the Webbox 2 from left to right you will find the following sockets: Two USB sockets, for a memory stick for example; A headphones socket; A double tulip plug (phone/RCA) for the stereo line signal; An Ethernet connector; Recessed reset button (see ANNEX B: Pause and Reset menu) Slot for an SD card; Connection for power supply. headset network connection net adapter 2x USB stereo socket Reset button SD card Using the audio cable, you can connect the Webbox2 to your stereo installation. Insert the audio cable plugs into the Webbox’s audio socket. Use the other end of your audio cable to connect to the line socket of your amplifier. This socket has a constant level and is not influenced by the volume setting (however, it does respond to the pause position ’mute’). © March 2013 Webbox2 18 6.5 Wireless connection setup Take the following steps to connect your Webbox2 to a wireless network: Before configuring the wireless network, ensure that the Webbox has first been connected to the internet via a cable, that it has been switched on and has played for about 5 minutes to ensure that your Internet is functioning properly and that the device has received the latest software. Switch the Webbox2 off and on again by pressing the On/Off button and wait until you receive a spoken report. Any new software will then have been installed when you start up this time. Press the volume/pause knob to get into the so-called ‘Pause menu’. Press the [Up] or [Down] key to get to ‘Device configuration’ and then press the [OK] button. Using the [Up] or [Down] key go to ‘Add a Wireless Network’ and then press [OK]. Selecting a wireless network If you select this option, the Webbox2 will look for networks, both wireless (WLAN) and any found via the connected network cable. After a few seconds, you will receive a list of the wireless networks available in your neighbourhood. This network name (SSID) and the required password (WPA/WEP) may be found on your modem or in the manual you received from your network provider. Use the [Up] and [Down] buttons until you find your network and press [OK]. The Webbox2 will tell you whether the reception is good, normal or weak. If the Webbox2 has been able to find a password on a known router – for example via the installed network cable – then you will hear 'A password is available for this network; do you want to use this?' Press the [Up] or [Down] button to indicate whether or not you wish to use a password (choose 'Yes' or ‘No') and then press [OK]; you can also choose to continue with the input procedure which follows below: 19 © March 2013 Webbox2 If it is a secure network connection, then the Webbox2 will ask you for the password. A list of letters and numbers will be made available to you; you can use them to fill in the password. If you have WEP: A-f, 0-9 and ready! If you have WPA: a-z,A-Z,0-9,some special characters and ready! ready! character You can either use \/ [UP] and /\ [DOWN] buttons or the volume/pause knob to look for and choose the correct characters (the input character is the one to the far right in the line right at the bottom). Each time you have found the correct character, press [OK]; the password will appear character by character to the left in the screen. You can erase a last character by pressing the [Back] key. When you have finished inserting the password, look for ‘ready’ (final character) and press the [OK] key. You will hear the password you have fully inserted, after which the network will be activated. The Webbox2 will tell you that the configuration has been added and that the network is ready for use (press the [Back] key 3 times to return to the ‘Pause menu’. Good to know: In addition to these menu-driven options, data for the wireless network can also be inserted by using the following sockets (see ‘Annex C: Advanced settings’ for details): A settings.ini file on an SD card Windows-generated data on a USB stick Known pre-programmed networks like ‘owbbelkin’ and ‘wifiaccess-point’ or via networks indicated by the helpdesk © March 2013 Webbox2 20 21 If you do not succeed in getting a connection to a wireless network, try to get the Webbox2 to work by connecting the Ethernet cable to your modem or router. The settings for the wired or wireless Internet connection can be erased by pressing the submerged [Reset] key using a paperclip for example. The [Reset] button is the opening next to the SD card at the rear of the unit. In the following ‘Reset menu’ (see Annex B: Pause and Reset menu) you should select ‘Remove all network…’ or ‘… wireless settings’. If an Ethernet cable is connected to the Webbox2, it will be given priority above a wireless network. If the cable is disconnected, then the Webbox will automatically shift to wireless (Wi-Fi) communication. If the Webox2 cannot find your network, first check if your modem is sending out a network name (SSID) and if it has been positioned near enough. The range is usually between 3 to 15 metres depending upon the situation. The Webbox2 supports WLAN networks with a WEP and WPA key; these conform to the IEEE 802.11b, g and n standards. If no network can be found, the text [The chosen list is empty...] will appear, in that case contact your network provider for advice. The Webbox2 supports the following wireless network security standards: - WEP64/128 - WPA-PSK+TKIP - WPA2-PSK+AES WPA2 is the best supported method in the Webbox2 and it is also the safest. So choose WPA2 if your modem or router provides this possibility. If your modem or router allows you to choose between WPA+WPA2 TKIP+AES, then the device works in “migration state”. This means that both WPA1/TKIP and WPA2/AES are supported. The Webbox2 will automatically select one or the other. PSK stands for “Pre Shared Key” (also sometimes called ‘personal'). This is the standard method for inserting a security key. In contrast to the ‘Radius’ or ‘Enterprise’ method, this method can theoretically only be used by companies. © March 2013 Webbox2 WEP can be problematic because four security keys can be defined. The Webbox2 only works with the first key, normally also the only one that is inserted. WEP security keys must be inserted as so-called hexadecimal numbers. In addition to numbers, this code can also consist of the letters A up to and including F (case-insensitive; WEP64 requires the input of 10 and WEP128 requires the input of 26 hex-numbers). Some modems or routers have special brand-specific settings. We recommend that you change nothing here. 6.6 Your network doesn't support DHCP By default, the Webbox2 assumes that your modem supports the socalled DHCP-procedure by which the Webbox2 is automatically allocated an IP address. If this is not the case, then a fixed address must be inserted. Sometimes, for example, the IT department of an organisation also needs a fixed address for the Webbox2 in order to allocate certain rights to the network. Within the ‘Pause menu’, go to ‘Device-configuration>Advanced menu’. Depending upon whether the Webbox2 is connected to the cable or wireless network, select ‘Cabled network’ or ‘Wireless network’. Using the following option ‘DHCP’ you can activate operation using a fixed IP address (DHCP=off), or indeed operation using the automatic IP address allocation of the network (DHCP=on). If the above-cited option ‘DHCP’ is turned ‘off’, then you must configure the following data: IP address (e.g. 192.168. 117. 100) IP netmask (e.g. 255.255.255.0) Network gateway (e.g. 192.168.117.1) DNS server 1 (e.g. 192.168.117.100) DNS server 2 (optional, e.g. 8.8.8.8) If needed, ask the IT department for these data. Please note: A fixed IP address is rarely used. In 99.9 % of all cases an automatically selected IP address is used (DHCP=on)! © March 2013 Webbox2 22 FREQUENTLY ASKED QUESTIONS Should you have any questions or problems with the Webbox2, please read the following frequently asked questions first: When I press the ON/OFF button, the green light does not light up. What do I do? Check if the network adapter has been connected correctly. If it has: Check that other devices that have been connected to the same electric socket are also functioning. If they are not: Replace the fuse in your meter cupboard. If they are: Contact your Webbox 2 supplier. When I press the ON/OFF button, the Webbox2 does not look for a connection to Internet. What do I do? Check if the Ethernet cable and/or the router have been connected correctly. Turn the modem or router off and then on again, for example by taking the cable out of the electric socket. If that does not help: Phone your network provider and inform him of your problems with the network. If there are no problems: Contact your Webbox2 supplier. When I press the ON/OFF button, nothing happens. If none of the above helps, remove the connection cable out from the electric socket for a few seconds and then reconnect it. The yellow light lights up, but I do not hear anything. What do I do? If the yellow light is blinking, then the Webbox2 is still busy. If the yellow light lights up constantly, turn up the volume (using volume/pause knob) on the device or on the remote control. If that does not help: Press the volume control to undo the mute position. If that does not help: Check if a headset or audio cable is still connected to the Webbox2. If they are: Remove them. The Webbox’s sound is distorted. What causes that? If there is a cell phone lying in the vicinity of the Webbox2, then move it away. If there is a base station near your phone (or a wireless headset). Then move it away. Is there is a laptop with wireless Internet near the Webbox2, then move it away. 23 © March 2013 Webbox2 The Webbox2 is not functioning or it is functioning abnormally. Your Webbox2 may need to be reset. This can be resolved by restarting your Webbox2 using the factory configurations (not yet implemented). Turn the device off and then on again while you press the [Reset] button down using a paper clip for example. (The [Reset] button is the opening next to the SD slot on the rear of the device). The text [Factory default?] will now appear in your screen. Now press the [OK] button within a few seconds in order to confirm the procedure. The wireless connection is no longer working. Switch the Webbox2 off and then on again. Also switch the modem or router off and then on again, for example by removing the cable out of the electric socket. Try getting the Webbox2 to operate by connecting the Ethernet cable you have been supplied directly to the modem or router. If this works, you can try to reconnect to the wireless network again. Check the settings of your modem or router to see if the channel choice is set up automatically, or to a specific channel number. If it is set to a specific number, change the setting to automatic (the router itself will then look for an available channel). If necessary consult your network provider. The subtitling is not being spoken even though it is visible on the television screen. There are programmes in which the text is an integral part of the film itself. If this is the case, the subtitling signal is not available to us and the Webbox 2 cannot therefore provide a spoken version. Image and subtitling are not synchronous If the spoken subtitling and the TV subtitles are not synchronous, you can report this to your Webbox2 supplier. They will be able to configure this for you remotely. © March 2013 Webbox2 24 If I play a recorded programme or DVD, the spoken subtitling does not work. That is correct; only subtitling of live programmes is available. A radio station does not work any longer Try it again later. It could be that the radio station temporarily does not have enough capacity available. I have frequent drop outs This is caused by problems in the network. You should contact your network provider, if this occurs while the Webbox2 is operating through a network cable. Check the distance between your modem/router and the Webbox2 if it does work properly through a cable, but not wirelessly. Any walls or floors in between those two also have a negative influence on the reception quality of your wireless network. Try to move the Webbox2 closer to the modem/router to see if the problem changes. A neighbouring wireless network may also interfere with yours. Changing the transmission channel inside your router may help. The router supplier can provide you the information about how to do that. 25 © March 2013 Webbox2 ANNEX A: THE EXTERIOR There are five buttons and one dial on the front panel of your Webbox2. The [On/Off] button can be found on the bottom right-hand side. To the left of this, there are two buttons: To the far left is the [OK] button and in the middle there is the [Back] button. Use the [OK] button to select items from the Webbox’s menus. The [Back] button is used to go back one step in the previous menu until you have returned to the Main menu. Above the [OK] button, you will find two buttons. They are the arrow or [Up] and [Down] buttons. You can use these to jump through the menus or to move (zapping) from station to station. The volume/pause knob is used to regulate the volume. If you press this knob briefly, you will pause in the spoken text. If you then press one of the up and down arrows, you will be given a number of extra options in this so-called ‘Pause menu’. You can, for example, slow down or accelerate the speed with which a text is read, set up the tone or the sleep mode. The Information function gives you more information about the book or programme that you are listening to, for example its playing time, amount of time passed and so on. For radio stations it will give you the name of the broadcaster and increasingly often also the title and artist of the music that is playing at that moment in time (if the station support meta-data). To the left of the front panel of the device, you will also see a display. You do NOT need this display because the Webbox2 tells you everything. If you are still able to see something, then you can look at it while the device speaks. Menus and other options are also displayed on this screen whilst they are read out loud. © March 2013 Webbox2 26 All of these functions can also be accessed using the included remote control. Top of the device In the middle of the top of the Webbox2, you will find a high quality speaker. This speaker is turned off when you connect a headset. The Webbox2 can also be connected to a stereo amplifier. In the middle of the front panel there is an infra-red receiver to operate the remote control. Back panel If you turn the Webbox2 around and turn its back panel towards you, you will find the following connections, starting from left to right: 27 A net adapter connection for the wall socket; A slot for the SD memory card; A submerged ‘reset’ button behind a small ‘paper clip’ hole; A network connection for a fixed connection to Internet. (Thanks to the built-in WiFi antenna it is also possible to connect to Internet wirelessly); Two RCA plug connections (one above the other) for an external stereo system; A headset connection (3.5 mm plug); Two USB connections for memory sticks or an external CD player. © March 2013 Webbox2 The remote control There are 17 buttons on the remote control. At the top left is the mute or pause button. At the top right there is the On/Off button. Below these, there is a row of 3 double buttons, the left of which is for regulating the volume, the middle control tone and the right are for regulating speed. Below these is a row of 3 buttons; the left one is an Information button; the middle one is for activating sleep mode and the right one directs the Webbox2 to your list of shortcuts (press twice for most recently used shortcut). Below these, there is a cross with 5 buttons. The middle button is the [OK] button. The top and bottom are the Up and Down buttons and the left and right are for moving fast Forward and Backward. Finally, in the bottom left corner is the Back button. © March 2013 Webbox2 28 ANNEX B: PAUSE AND RESET MENU By pressing the volume/pause knob briefly you can put the Webbox2 in pause mode. When you then press the [Up /\] or [Down \/] buttons, you will hear the options provided by the ‘Pause menu’. Depending upon the type of programme you were listening to when you chose to pause, this menu will show you information and settings valid or relevant to that programme. Besides this, you will also find settings and information of general validity or relevance. Between the SD card slot and the connection for the network cable, you will find the submerged [Reset] button. If you press this while the Webbox2 is on (for example with a paperclip), you will enter the ‘Reset menu’. In this menu you can erase settings like ‘Speed dial’, ‘Wireless network’, etc. Pause menu Press the Volume button The Webbox will say ‘Pause’ (if you then turn the volume button, this will result in time jumps). (Press the Volume button again if you want to return to normal operation right away). Press [Up] or [Down] for the following options Continue playback Information Erase this shortcut (when a shortcut to this content is available) Speed: -50.. -10, normal, +10.. +50 Tone: -20, -10, normal, +10, +20 Sleep timer: 10... 120 minutes 29 © March 2013 Webbox2 Device configuration Add a wireless network Shortcut menu How to manage shortcuts Resume playback at startup The amount of shortcuts shown Advanced menu Ethernet Ethernet DHCP: on/off IP-address, netmask, gateway, DNS1, DNS2 Wireless network Wireless DHCP: on/off IP-address, netmask, gateway, DNS1, DNS2 Startup volume Buffersize: Fast, normal, safe Restart Shutdown Device status Summary info Ethernet Wireless network Serial number Time Software version Operating system Artificial voice © March 2013 Webbox2 30 Reset menu Please note: In this menu, settings that are important to the operation of the device can be erased. During use, press the submerged [Reset] button behind the hole in the back panel next to the SD card. The Webbox2 will then say ‘Reset menu'. Use the [Up] and [Down] buttons and then the [OK] button to select: Restore factory settings; any changed settings such as tone, speed, etc. are restored to the factory values. Remove speed dials and bookmarks; the speed dials to go to areas in the spoken guide and bookmarks to a specific time in the content are removed. Remove network settings: Erase all network settings in ‘Pause menu >Device configuration>Advanced menu’ Remove all wireless network settings: All the wireless networks which have been configured will be erased Restart: The Webbox2 will be restarted. Full reset Please note: In this menu, settings that are important to the operation of the device can be erased. Press and hold the submerged [Reset] button behind the hole in the back panel next to the SD card, while you switch on the unit. Let go of the reset button when you hear the 'off' tone (or the 'on' tone again). All settings will now be reset to factory values and thus may need to be corrected afterwards. 31 © March 2013 Webbox2 ANNEX C: ADVANCED CONFIGURATIONS Configuring via an SD card (not yet implemented) If an SD card is input with a settings.ini file, the following settings are adopted: Inputting WPA and SSID via settings.ini: Open a new text file and input the exact SSID (network name) and WPA key (password) precisely as bellow: [wireless] ssid="owbbelkin" passphrase="orionwebbox" Then save the text file to a SD card or a USB stick under the name ‘settings.ini’ and plug this into the Webbox2. The network concerned will be added to the list automatically and is ready for use. © March 2013 Webbox2 32 Configuring via a USB stick The Webbox2 looks for certain configurations on a USB stick: Insert WPA and SSID via a Windows7 USB stick: To prepare a USB stick with WPA data under Windows 7, do the following: Plug the USB flash station into the computer Ensure that the PC has an Internet connection via the desired network Click on the Windows icon found at the far left bottom in the taskbar Type ‘network centre’ in the textbox ‘Programmes and search files’ and press [Enter] In the left-hand part of the window, click on Manage wireless networks Select the connected network and right click on it; click on Properties and then under Connections click on ‘Copy this profile to a USB flash station’. Select the USB device station and click on ‘Next’ You will then be informed ‘Network configuration copied to USB flash station’ Click on ‘Close’ Plug the USB into the operating Webbox2. The network concerned will be added to the list automatically and is ready for use. Windows XP does not provide this option. Configuring via the webpage (Not yet implemented) 33 © March 2013 Webbox2 ANNEX D: SPECIFICATIONS Network protocol Ethernet connector type WLAN/WiFi security IPv4 en IPv6 10/100 baseT RJ45 with cabledetect- and activity-LED IEEE802.11b/g/n WEP, WPA-TKIP, WPA2-AES, WPS-PB USB, SD en CD 2x USB-A v1.0 full-speed connector in rear panel (maximum current 500mA per connector), USB flash-memory sticks and drives supported partition table MBR or EFI GPT, 1x SD slot standard SD-SC, SD-HC en SD-XC USB CD player tested: Samsung SE-S084 (powered by 2x USB), SE208ab/tsbs (powered by 2x USB), Plextor PX-608CU (own power adapter), Sunplus DS8A4S (own power adapter), LG GP30-NB40 (powered by 2x USB) Audio decoder Algoritms Bitrate Sample freq. # of channels © March 2013 MPEG 1&2 layer III mp3 (CBR+VBR+ABR), WMA 4.0;4.1;7;8;9; all profiles(5-384 kbps) MPEG4 / 2 AAC-LC(+PNS), HE-AAC v2 (Level 3) (SBR + PS), Ogg-Vorbis, WAV (PCM+IMA ADPCM) 8kbps-1.7Mbps 8; 11.05; 16; 22.8; 24; 32, 44.2; 48 kHz 1 (mono) or 2 (stereo) Webbox2 34 Content Playlist: Additional data Spoken books Text Audio Frequency range Signal-to-noise Distortion Speaker Line-out connector type fixed level Headphones connector type adjustable level plug detection General Power Operational temp. Storage temp. Dimensions Weight Approval 35 m3u, asx, pls, xml, smil shoutcast/icecast meta data DAISY Online, DAISY Talking Books (PDTB2 for download), ncc snd ncx navigation files supported DAISY2.02, DAIS3 (ANSI/NISO Z39.86) plain tekst or HTML converted to speech 20 - 20.000 Hz (depending on bitrate) 80 dB 0.2% typical (bitrate dependant) High-performance type, 900mW, 3 inch 2x RCA (‘cinch’) 400 mVrms nominal Mini stereo jack 3.5mm 2x 100 mW (2x 8 Ohm) speaker switches off when headphones are inserted 5.2V 15W (3W nominal) 100-240 V, 50-60 Hz adapter enclosed -10°C to +40°C -20°C to +60°C 200x220x80 mm 0.9kg CE, FCC, UL © March 2013 Webbox2 © March 2013 Webbox2 36