1
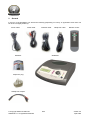
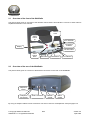
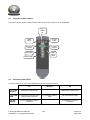
Extended manual for the WebRadio Software version 1.06.222 Version 3.5, April 2006 1 IMPORTANT INSTRUCTI ONS BEFORE USE .................................................................................. 4 1.1 OTHER INFORMATION ................................................................................................................... 4 1.2 D EVIATIONS ................................................................................................................................ 4 2 GENERAL ...................................................................................................................................... 5 2.1 OVERVIEW OF THE FRONT OF THE W EB RADIO .................................................................................. 6 2.2 OVERVIEW OF THE REAR OF THE W EB RADIO .................................................................................... 6 2.3 USING THE REMOTE CONTROL ....................................................................................................... 7 2.4 FUNCTIONS OF THE LE DS ............................................................................................................. 7 3 BASI C FUNCTIONS ........................................................................................................................ 8 3.1 SWITCHING ON AND OFF ............................................................................................................... 8 3.2 ADJUSTING THE VOLUME LEVEL ...................................................................................................... 8 3.3 CHOOSING A PROGRAM ................................................................................................................ 9 4 NAVIGATION WITHIN MENUS ...................................................................................................... 10 4.1 EDITING A PARAMETER OR SETTING IN THE MENU ............................................................................ 11 4.2 EDITING OF ( TELEPHONE) NUMBERS OR TEXTS WITHIN THE MENU ...................................................... 11 4.3 SPECIAL CHARACTERS WITHIN TELEPHONE NUMBERS ...................................................................... 11 4.4 INFORMATION............................................................................................................................ 11 5 CONNECTING THE WEBRADIO ................................................................................................... 12 5.1 CONNECTING TO A DSL OR ANOTHER BROADBAND NETWORK ............................................................ 12 5.1.1 CONNECTING TO AN A DSL- OR CABLE MODEM......................................................................... 12 5.1.2 CONNECTING TO A ROUTER .................................................................................................. 13 5.1.3 CONNECTING TO A W IF I M ODULE .......................................................................................... 13 5.2 CONNECTING TO AN ANALOGUE TELEPHONE LINE OR IS DN PAB X ..................................................... 15 5.2.1 CONNECTING THE W EBRADIO TO AN ANALOGUE TELEPHONE LINE............................................... 15 5.2.2 CONNECTING THE W EBRADIO TO AN ANALOG PAB X ................................................................ 15 5.2.3 CONNECTING THE W EBRADIO TO AN ISDN LINE ...................................................................... 15 5.3 CONNECTING TO AN AUDIO INSTALLATION ...................................................................................... 15 6 EDITING S ETTINGS ..................................................................................................................... 16 6.1 EDITING THE DEFAULT VOLUME .................................................................................................... 16 6.2 ENABLING LINE OUT / DISABLING THE INTERNAL SPEAKER ................................................................. 16 6.3 ENABLING THE MUTE FUNCTION OF THE VOLUME KNOB ..................................................................... 17 6.4 SETTING THE NETWORK CONNECTION MODE .................................................................................. 17 6.5 SETTING AN ALTERNATIV E CONNECTION MODE................................................................................ 17 6.5.1 CHANGING THE TELEPHONE NUMBER ..................................................................................... 18 6.5.2 SETTING A PRE- DIAL 0 ......................................................................................................... 18 6.6 USING ETHERNET ...................................................................................................................... 19 6.7 PROGRAMMING AN EXTRA PLAYLIST .............................................................................................. 20 6.8 USING THE TELEPHONE TOGETHER WITH THE W EB RADIO ................................................................. 21 6.8.1 MANUALLY CHANGING EXTENSION PICKUP DETECTION............................................................... 21 6.8.2 AUTOMATICALLY CHANGING EXTENSION PICKUP DETECTION ....................................................... 21 6.9 SETTING THE TIME LIMITER .......................................................................................................... 23 6.10 SETTING THE COUNTRY CODE OF THE MODEM ................................................................................ 23 6.11 R ESTORING FACTORY SETTINGS .................................................................................................. 23 7 USING OTHER INTERNET PLATFORMS ...................................................................................... 24 8 FIRMWARE UPDATE BY LOCAL SERV ER ................................................................................... 24 8.1 AUTOMATIC UPDATE OF FIRMWARE ............................................................................................... 24 © Copyright Solutions Radio BV WebRadio™ is a registered trademark 2/32 Version 3.5 April 2006 8.2 9 SETTINGS IN THE SERVER ........................................................................................................... 24 IN CAS E OF P ROBLEMS ............................................................................................................. 25 9.1 PROBLEMS WITH POWER SUPPLY ................................................................................................. 25 9.2 PROBLEMS WITH DIALING ON THE ANALOG TELEPHONE..................................................................... 25 9.3 PROBLEMS WITH THE TEL EPHONES ............................................................................................... 25 9.4 PROBLEMS WITH THE AUDIO ........................................................................................................ 26 9.5 PROBLEMS WITH RECEIVED STREAMS ............................................................................................ 26 9.6 PROBLEMS WITH THE E THERNET CONNECTION ................................................................................ 27 10 SERVI CE AND CONTACT DETAILS ............................................................................................. 30 APPENDIX 1 ........................................................................................................................................ 31 APPENDIX 2 .................................................................................. ERROR! BOOKMA RK NOT DEFINE D. © Copyright Solutions Radio BV WebRadio™ is a registered trademark 3/32 Version 3.5 April 2006 1 Important instructions before use Never cover the top or rear of the unit. Check whether the mains supply has the same volt age as mentioned on the label at the bottom of the unit (110VA C or 230VA C). Connect the WebRadio to the power outlet only with the supplied power cable. Ensure the WebRadio is placed on a dry spot; avoid all contact with water. Under no circumstances open the unit without disconnecting power first. If problems occur, contact your supplier. If the WebRadio is placed from a cold environment int o a warm environment, do not use the WebRadio for about 2 hours, because of condensation inside the device. 1.1 Other information When the WebRadio is switched off wit h the ON/OFF button, a minimal power consumption is required for the standby function (so that the WebRadio can be switched on using the remote control). When required, switch off the WebRadio completely by removing the power plug from the power outlet. The WebRadio complies with the relevant CE requirements: EN55022 and E N55024 for Electromagnetic Compatibility and E N60950 for safety of information tec hnology equipment. Furt her on, t he device complies with part 15 of the FCC rules. Operation is subject to the following conditions: the device will not cause harmful interference, and the device must accept any interferenc e received including interference that may cause undesired operation. The manufacturer of WebRadio is Solutions Radio BV in The Hague, Netherlands. Cont act details can be found in chapter 10. The operation and settings of the WebRadio can be changed without prior notice. All paramet ers and information required for the WebRadio to work with the Solutions Radio s erver have been programmed in its software. If, for what ever reason the unit does not work directly, then return to factory default. See paragraph 6.11. After enabling the unit, it should be able make a connection without a problem. 1.2 Deviations For some applications deviating settings are possible. The structure of the menu in this manual can deviate from the menu in the WebRadio. Due to customer requirements changes can be made in the operation and settings of the WebRadio, these can be effected in existing units by firmware updat e. © Copyright Solutions Radio BV WebRadio™ is a registered trademark 4/32 Version 3.5 April 2006 2 General In the box of the WebRadio you will find the following (depending on country or application some items can be left of are slightly different): Power cable: Audio cable: Ethernet cable: Batteries: Telephone cable: Remote control: WebRadio: Telephone plug: Headphone Adapter: © Copyright Solutions Radio BV WebRadio™ is a registered trademark 5/32 Version 3.5 April 2006 2.1 Overview of the front of the WebRadio The picture below gives an overview of the different control buttons and indicators. The use of each button is explained elsewhere in this manual. Volume knob Select station up Error Indicator Connection Indicator Display On-/Off-button Select station down 2.2 OK-button Back-button On Indicator Overview of the rear of the WebRadio The picture below gives an overview of the different connectors on the rear of the WebRadio. Telephone socket Telephone line socket Audio connectors Network socket Mains socket By using an adapter cable the audio connectors can also be used for a headphones. See paragraph 6.2. © Copyright Solutions Radio BV WebRadio™ is a registered trademark 6/32 Version 3.5 April 2006 2.3 Using the remote control The buttons on the remote control have the same function as the buttons on the WebRadio. Select station up Mute button On-/Offbutton Decrease Volume Increase Volume OK-button Select station down Back-button 2.4 Functions of the LEDs The three LE Ds on the front of the WebRadio have the following functions: On Green LED (ON/ OFF) WebRadio is switched on Yellow LED (LINE) A connection is pres ent and a stream is being received Red LED (ERROR) Blinking WebRadio is switched off A connection is being made It is not possible to make a connection © Copyright Solutions Radio BV WebRadio™ is a registered trademark Off No connection is made It is possible to make a connection 7/32 Version 3.5 April 2006 3 Basic functions For normal use of t he WebRadio there are some basic functions. These functions are explained in this chapter. 3.1 Switching on and off The devic e can be switched on and off by pressing the red On/Off-button on the front of the WebRadio or by pressing the On/Off-button on the remote control. The green LED next to the On/Off -button is lit to indicate that the WebRadio is switched on. After switching on the WebRadio, it sets up a connection to the program listed in the playlist as choice 1. For a different playlist, see paragraph 6. 7. The WebRadio always starts with the default volume level. This level can be adjusted to another fixed value, or it can be set that it will start on the same level the last time of listening. More info in paragraph 6.1. During use, the unit can be s witched off by pressing the On/Off-button on the front of the WebRadio or by pressing the On/Off-button on the remote cont rol. Two safety systems automatically switch the unit off: Once an audio stream stops, e.g. at the end of a broadcast, the unit automatically switches off after 5 minutes. During normal use the WebRadio will s witch off by the “time limiter” function after a pre -defined time. More info about this in paragraph 6.9. By default this time is set to 3 hours. In both cases the unit can be switched on again by pressing the On/Off-button on the WebRadio or on the remot e control. 3.2 Adjusting the volume level Adjust the volume of a broadc ast either by turning the volume knob on the WebRadio or by pressing the VOL+ and VOL- buttons on the remote cont rol. When adjusting the volume, the level will be indicated on the display. The volume setting applies to bot h the int ernal speaker, as well as to the speaker boxes of the connected Audio installation. It is possible to disable the internal speaker and select “line out” or “headphones”, as explained in paragraph 6.2. In the case of “line out” the level of the audio on the connectors at the back of the unit is fixed. When “headphones” is selected, the level is variable and the volume setting applies to the equipment connected to the audio connectors on the back, normally a headphones connected via an optional adapter cable. The broadcast can be muted by pressing the volume knob (if this setting is activated) or by pressing the Mute-button on the remote control. By pressing one of these buttons again, the original volume will be restored. By default, this function of the volume knob is disabled. To enable it, see paragraph 6.3. © Copyright Solutions Radio BV WebRadio™ is a registered trademark 8/32 Version 3.5 April 2006 3.3 Choosing a program When the WebRadio is switched on, it will play the first item in the playlist. To select another pres et in the playlist press the ▼ - and ▲-buttons on the WebRadio, or press CH+ or CH - on the remote cont rol. By doing this, you are scrolling through the playlist. The titles of the programs are shown on the display. When the display shows the selected program, you will not hear its sound directly, Because the connection to that server has yet to be made. Setting up a connection t o the server will start 5 seconds after t he last choice of a program has been made (i.e. without pressing the OK button), or the connection will be made directly after pressing the OK-button. To make a new connection will take about 10 to 15 seconds on a telephone connection. It will take only a few s econds when using a A DSL or ot her broadband network connection. While changing from program to program, there will be a short silenc e between t he old program and the new program. In addition to the pre-programmed URLs, you can also enter alternative URLs . See paragraph 6.7 for det ails. For all URLs the same telephone or network connection is used. During connection set-up and retrieving the audio data the yellow Line LE D on the WebRadio will blink. As soon as a connection is made the y ellow Line LE D will be lit constantly. If it is not possible t o make a connection, the Red Error LE D will light up. © Copyright Solutions Radio BV WebRadio™ is a registered trademark 9/32 Version 3.5 April 2006 4 Navigation within menus This chapter will explains how parameters in t he menu can be altered. A ppendix 1 displays the complete structure of the menu. The basic structure is as following: Mainmenu │ └─Sub-menu │ └─Option └─[Value] During normal use you can always enter the MENU by pressing the OK -button. By pressing the OK -button for 3 seconds the main menu will appear. By pressing the ▼- and ▲-buttons or by turning the volume knob you can navigate through the menu. By pressing the OK-button or by pressing t he volume knob you can enter a sub-menu. By pressing the Back-button you can leave a sub-menu. The menu has a number of main items, which all have a number of sub-items. The main items are: Generic Basic settings for the speak er and sound volume. Network In this menu the connection mode can be set: telephone modem or Ethernet (network), telephone number, username and password. Playlist In this sub-menu the playlist can be altered. By default the Solutions Radio playlist has been entered here. The playlist is stored and maintained on a Solutions Radio server. Information In this sub-menu information such as software version, serial number and connection parameters is presented. Nothing in this menu can be altered. Special In t his sub-menu you can res et the WebRadio to its default settings. More info about t his in paragraph 6.11. By entering a password, it is also possible to enter the maintenance menu. In this locked sub -menu some advanced settings can be altered. The password to use for maintainers is 92929. For users i t is 01234. © Copyright Solutions Radio BV WebRadio™ is a registered trademark 10/32 Version 3.5 April 2006 4.1 Editing a parameter or setting in the menu To alter a parameter or setting you must enter the menu. Do this by pressing the OK button. To be able to edit the setting that is being shown on the display, you must again press the OK -button. The actual value of the setting is shown wit h square brackets („[„ and „]‟) around it. The value of the setting can now be chang ed to a new value by pressing the ▼ - and ▲-buttons, or by turning the volume knob. To store a new value, you must press the OK -button. The value will now be shown on the display without square brackets around it. By pressing the Back-button while editing a value, the editing can be undone, and the old value will be restored. After editing a setting, leave the menu by pressing the Back -button a few times. If a setting has been changed which requires a restart of the WebRadio, this will be shown on the displ ay. You are expected to shut down and restart the WebRadio to put the changes into effect. It is not necessary to unplug the power cable. 4.2 Editing of (telephone) numbers or texts within the menu If there is a setting with text or a telephone number that you want to edit, you can do this by following the procedure shown above t o navigate to t hat setting. Editing the setting will be quite different though. A cursor will appear below the first character. By pressing the ▼ - and ▲-buttons or by turning the volume knob the character will change. By pressing the OK -button, you will move on to the next character. Repeat this, until you reac h the end of the text. Please note that with text or telephone numbers you should always end the text with a sign, to mark the end of the text. To shift one position to the left wit hin a text, you should select the sign. By pressing the OK -button, the cursor will move one character to the left. To delete a character select the | sign. By pressing the OK -button the currently selected character will be deleted from the text. The characters to the right will all shift one position to t he left. To insert a character within a text, you should select the | sign. After pressing the OK-button, the character on the cursor position and all of the characters to the right will pass one position to the right. On the position of the cursor a new character can now be selected. 4.3 Special characters within telephone numbers When editing a telephone number, there are special characters that can be used such as the number sign (#) and an asterisk (*). These characters can be used if the telephone number requires it. The hyphen ( -) can be used to make a number more legible, it only has an optical function. The comma (,) can be used as a short pause. To extend the pause, enter multiple commas next to each other. A comma directly at the start of a number will activate the blind-dial function. When enabled, the telephone modem will not wait for a dial tone, before it starts dialing. 4.4 Information Via the menu option “Information” you can see a lot of details on t he WebRadio, such as serial number and actual firmware, plus information about the last connections that have been used. These details are listed in Appendix 1, structure of the menu. © Copyright Solutions Radio BV WebRadio™ is a registered trademark 11/32 Version 3.5 April 2006 5 Connecting the WebRadio The WebRadio can be connected to two different communication net works, an analogue telephone line or as a broadband network connection such as (A)DSL. Both methods are explained below. Further on, the connection to an audio installation is explained in this chapter. 5.1 Connecting to ADSL or another broadband network Connect the WebRadio t o the mains with the s upplied power cable. You should connect the WebRadio with the supplied Ethernet cable to an A DSL- or cablemodem, a router or a WiFi module, as explained below. The t elephone cable and plug are not used in t his configuration nor is the telephone connected to the WebRadio. Check that your Internet S ervice P rovider (ISP ) supports DHCP. By default t he WebRadio requires a DHCP server. This means that an IP address is automatically assigned to t he WebRadio. This function can be switched off. In that case you have to enter the IP address, DNS server and gateway manually. See paragraph 6.5.2 for more details. Some ISPs save the MA C addresses of the device last connected to the Internet connection. When connecting another device e.g. a WebRadio to that connection, then this should be mentioned to your ISP. The ISP recomm ended by Solutions Radio, does not save the MA C addresses of any device connected to the Int ernet connection. The WebRadio can be used with this provider without a problem. If an ADSL or cable subscription is supplied wit h the WebRadio then this has been s et for normal use of the WebRadio. If in addition to the WebRadio, you would like to connect a P C to t he Internet or if you would like to use the WebRadio for many hours a day, it is advisable to alter your Int ernet account accordingly, for example, wit h a higher data limit. Check this with your ISP. The WebRadio does not support the so -called password per Internet s ession. If a name and password is required for every Internet session, this function should be disabled by your ISP, before you are able to use the WebRadio. 5.1.1 Connecting to an ADSL- or cable modem In most situations the WebRadio will be connected directly to the ADS L- or cable modem. This modem must support 10Mbps Ethernet. Use the supplied Ethernet cable. © Copyright Solutions Radio BV WebRadio™ is a registered trademark 12/32 Version 3.5 April 2006 5.1.2 Connecting to a router If you wish t o connect more devices to your ADSL - or cablemodem, then a router is required to relay the Internet connection. Please note, that this router must support 10Mbps Ethernet. To determine the type of router to be used, in case of doubt c ontact your ISP. Normally connect the WebRadio with a “straight” Ethernet cable (use a “crossed” Ethernet cable only when connecting the WebRadio directly to a PC). If you are using a corporate or home net work, the firewall should not block outgoing ports. Note that this is the default setting for practically most routers! 5.1.3 Connecting to a WiFi Module You can also connect the WebRadio to a WiFi adapt er. There are many different WiFi adapters on the market today, but you can only use a WiFi module that converts an Ethernet port t o WiFi (so called Wireless Ethernet Bridges). These WiFi bridges creat e a transparent wireless connection bet ween two wired networks. They can be configured using a PC with a browser. The right settings are dependent on the type of wireless network and are different for each wireless network. To configure your WiFi adapter, see the manual supplied with it (in the future it will also be possible to configure specific WiFi bridges only using the WebRadio). © Copyright Solutions Radio BV WebRadio™ is a registered trademark 13/32 Version 3.5 April 2006 Configuring a WiFi bridge consists of the followi ng steps: Connect the WiFi bridge to a PC or laptop with an ethernet cable. Put the WiFi bridge in configure mode. Configure the ethernet adapter of the PC or laptop according to the requirements of the Wifi bridge. Configure the WiFi bridge using the PC o r lapt op. Turn the WiFi bridge into operation mode (out of configure mode). Configure the ethernet adapter of your PC or lapt op according to the requirements of the wired net work. Test the wireless network connection with the PC or laptop and confirm the o peration of the wireless network is operational and functioning. If operation is successful turn the WiFi bridge off, connect it to the WebRadio, turn the WiFi adapter on, and finally turn the WebRadio on. Some aspects have to be noted: Take care that DHCP is activated in the wired net work, otherwise a fixed IP -address has to be programmed in the WebRadio. Some WiFi bridges remember the MA C address of the device that is connected to them. In this way the WebRadio may not work properly, as it might have a di fferent MAC address than the device used to configure it. Check this in the manual of the WiFi module. In general, read the manual of the WiFi bridge carefully. In case of problems, contact the supplier of your WiFi bridge. © Copyright Solutions Radio BV WebRadio™ is a registered trademark 14/32 Version 3.5 April 2006 5.2 Connecting to an analogue telephone line or ISDN PABX Connect the WebRadio to the mains with the supplied power cable. Connect the telephone line input of the WebRadio to the main telephone connection. The existing telephone should be connected to the telephone output on the rear of the WebRadio. 5.2.1 Connecting the WebRadio to an analogue telephone line If an alarm or emergency call installation is present, it should be connected bet ween the main telephone connection and the WebRadio, as shown below. Normally the telephone number that will be dialed has been pre-programmed, however, it is possible to change the number. For more details, see paragraph 6.5.1. Alarm or Emergency call (optional) Phone 5.2.2 Main Telephone socket Connecting the WebRadio to an analog PABX If the PAB X requires a pre-dial 0 to obt ain an outside line, this should be activated in the WebRadio. For more information on this subject, see paragraph 6.5.2. If the PAB X requires a different pre-dial digit to obtain an outside line, this should be programmed as part of the telephone number. In this case the pre-dial digit and the telephone number must be separated by a dial pause, by inserting a “comma”. For more det ails, see paragraphs 4.3 and 6.5.1. The WebRadio has a function to detect lifting the handset of a connected telephone. In this case the WebRadio disconnects and leaves the line to the t elephone. This “extension voltage drop” function can best be disabled when using a PAB X. More information about disabling this function in paragraph 6. 8. 5.2.3 Connecting the WebRadio to an ISDN line The WebRadio has been designed for an analogue t elephone line, however, it can be used o n an ISDN line by using a so-called Terminal Adapter. In this case the WebRadio must be connected to the analog port of the adapter. When using an ISDN PAB X, use an analog port on the PAB X. Connection is the same as connection to an analog PAB X (see above). 5.3 Connecting to an audio installation An external amplifier, audio installation or a headphone can be connected to the WebRadio. By connecting the amplifier or audio installation via the audio cable, or the headphone via the adapter cable to the WebRadio, the sound from the WebRadio can be heard through the amplifier or the headphone. In that case, the internal speaker of the WebRadio should be switched off. This can be done in two ways: For an external amplifier the setting “line out” should be used, the audio level in that case is fixed at maximum volume. However, when the setting “headphone” is selected, the level is variable and the volume can still be adjusted on the WebRadio by operating the volume knobs. How t o set these options is explained in paragraph 6.2. © Copyright Solutions Radio BV WebRadio™ is a registered trademark 15/32 Version 3.5 April 2006 6 Editing settings How to edit default settings, is explained in this chapter. This chapter assumes that you know how to navigate within the menu and how to edit settings. If this is not the case then read chapter 4. If you choose Factory defaults all settings will be restored to the default value. 6.1 Editing the default volume It is possible to change the default volume in the menu which is what you hear when s witching on the WebRadio. Either choose a value bet ween 0 and 50, or activat e the option that the WebRadio will return to the volume setting that was last used. Menu:Generic │ └─Default volume └─[Variable] (0 to 50 or Last) 6.2 Enabling line out / disabling the internal speaker By default the internal speaker of the WebRadio is switched on. In this case the audio signal is also available on the audio connectors at the back of the unit. The level of both are simult aneously controlled by the volume knob on the WebRadio, or by pressing VOL+ or VOL- on the remote cont rol of the WebRadio. It is possible to connect the WebRadio to an external amplifier or a audio installation. In thi s case the int ernal speaker can be switched off and the volume on the audio connectors at the back set to the maximum, fixed volume. This can be done by selecting “line out ” in the menu. It is also possible to connect headphones via an adapter cable to the WebRadio. In this case the int ernal speaker should be switched off as well. This is done by selecting “headphones” in the menu, now the audio volume is adjustable by the volume knob on the WebRadio or by pressing VOL+ or VOL- on the remote control. Devices with a serial number higher than 15000 have an automatic switch function. When the headphones are connected wit h the adapter cable to t he audio connectors, the internal speaker is switched off. When the headphones are disconnected, the speak er is switched on again. This function is depending on the impedance of the headphones, should it not work properly, the speaker can be switched of by menu. The example below shows where to switch off the internal speaker and adjust line output using the volume button. For example when using an external amplifier: Menu:Generic │ └─Audio ├─[Speaker] ├─[Headphones] └─[Line out] © Copyright Solutions Radio BV WebRadio™ is a registered trademark 16/32 Version 3.5 April 2006 6.3 Enabling the mute function of the volume knob If required, the mute function of t he volume knob (pus h button) can be enabled. By default this function is disabled. This is to prevent one from accidentally muting the audio by pressing the volume knob while turning it. Menu:Generic │ └─Mute on button └─[On] 6.4 Setting the network connection mode Within this option you c an select the way a c onnection should be made. The WebRadio will use the settings of the selected profile. The example below shows that modem profile 2 is selected as default connection: Menu:Network │ └─Connection mode └─[Via modem 2] 6.5 Setting an alternative connection mode By default the correct settings have been made to c onnect t o your supplier‟s platform. This applies both to a network connection as well as a telephone connection. To set up an alternative connection is explained in the following paragraphs. © Copyright Solutions Radio BV WebRadio™ is a registered trademark 17/32 Version 3.5 April 2006 6.5.1 Changing the telephone number If you do not want to use the pre-programm ed telephone number, you c an enter an alternative telephone number and access codes. The preferred option is to do so under modem profile 2. Edit the following settings: Menu:Network │ └─Modem profile 2 │ ├─Phonenumber │ └─[Selectable] │ ├─Username │ └─[Selectable] │ └─Password └─[Selectable] The minimum settings for a modem profile (1 or 2) are an ISP telephone number, username and password. For more information about the value of these settings, contact your local supplier or y our ISP. The desired modem profile should also be set as the default connection mode. If you would like to use modem profile 2, the default connection mode should be set like this: Menu:Network │ └─Connection mode └─[Via modem 2] Sometimes it is required to set a pre-dial 0 before the telephone number. This is explained in paragraph 6.5.2. However, in some situations another pre-dial digit is required. In this case the pre -dial digit must be programmed as a part of the telephone number and separated by a dialing pause by inserting one or more comma‟s. The insertion of dialing pauses is ex plained in paragraph 4.3: “special characters within telephone numbers”. In this paragraph it is also explained how you can activate so-called blind dialing. 6.5.2 Setting a pre-dial 0 If the WebRadio is going to be connected to a PAB X, for which it is necessary to dial a 0 to get an outside line, then this should be enabled in the WebRadio. Edit the setting as follows: Menu:Network │ └─Pre-dial 0 └─[On] © Copyright Solutions Radio BV WebRadio™ is a registered trademark 18/32 Version 3.5 April 2006 6.6 Using Ethernet Normally the default connection mode of t he WebRadio is set as Ethernet. In this mode, the DHCP function of the net work is used. This means an IP address is automatically assigned t o the WebRadio. The user will not have to do anything to make this happen. However, if a DHCP server is not available, it is possible to disable this in the WebRadio, and enter an IP address, Gateway and DNS server data in the WebRadio manually: Menu:Network │ └─Ethernet │ ├─DHCP │ └─[Off] │ ├─IP address │ └─[Selectable] (example: │ ├─Netmask │ └─[Selectable] (example: │ ├─Default gateway │ └─[Selectable] (example: │ ├─DNS Server 1 │ └─[Selectable] (example: │ └─DNS Server 2 └─[Selectable] (example: 192.168.0.2) 255.255.255.0) 192.168.0.1) 192.168.0.1) 192.168.0.1) These settings depend on the network in which they are being used. Ask the net work administrat or for the correct settings. The desired Ethernet settings have to be set as the default connection mode. In order to connect via Ethernet, the connection mode should be set as follows: Menu:Network │ └─Connection mode └─[Ethernet] © Copyright Solutions Radio BV WebRadio™ is a registered trademark 19/32 Version 3.5 April 2006 6.7 Programming an extra playlist The playlist is maintained by your loc al supplier. In the playlist all stations which are available for listening are listed. The advantage of a remote playlist compared t o a fixed local playlist, is that the playlist can easily be altered remotely. Inform your contact person of any c hanges you require. When next switching on the WebRadio, it will automatically retrieve the correct playlist. This (playlist) URL is entered by default in Entry no 1. In the example below an extra playlist is added: Menu:Playlist │ └─List no 2 │ ├─Entry 2 URL │ └─[Selectable] (example: http://www.solutionsradio.nl/playlist.pls) └─Entry 2 Name └─[Selectable] (example: Radio station 1) The URL that should be ret rieved automatically after start up is set in the following option: Menu:Playlist │ └─Default station └─[Entry no 2] It is not possible to use multiple playlists at the same time. © Copyright Solutions Radio BV WebRadio™ is a registered trademark 20/32 Version 3.5 April 2006 6.8 Using the telephone together with the WebRadio If the WebRadio is used on a single telephone line, this line will be engaged while using the WebRadio. The WebRadio has an “extension pickup detection”, here called “extension voltage drop” det ection. This function will detect, during use of the WebRadio, when the handset of the telephone is picked up. Then the WebRadio will automatically disconnect the c urrent connection and make the line available for a normal telephone call. Whether this function is enabled by default depends on the used firmware. Of course, the WebRadio can be switched off manually, to use the telephone. It is not poss ible to receive incoming c alls when the WebRadio is switched on and connected to a telephone line. Callers will hear an engaged signal. The WebRadio has a facility to detect lifting of the handset of the connected analog telephone. In this case the modem is disconnected and the line is handed over to the t elephone. This only works for outgoing c alls. In addition to this, for use in some countries a “call waiting” function will be activated. In this case incoming calls are signalled on the WebRadio. When is this case the modem is disconnected manually, the waiting incoming call can be ans wered by the telephone. 6.8.1 Manually changing extension pickup detection If this function is enabled, the WebRadio will continuously measure the voltage on the telephone line. If the handset of the telephone is picked up, this voltage will change. The WebRadio will notice this and release the line. The value of this voltage change is different for every telephone. In most cases 2 V olt is the correct value. This value has been set as default. If this option does not function correctly, you should alter the value or disable it. An example to disable the function: Menu:Special │ └─Maintenance (Pincode 92929) │ └─Extension v.drop └─[Off] If a PAB X is used, the ”extension voltage drop” function should be dis abled. 6.8.2 Automatically changing extension pickup detection It is also possible that the WebRadio automatically det ermines the right voltage drop value and accepts this value as default. For proper measuring the value for aut omatic detection, the normally used telephone line and analog telephone must be connected to the back of the WebRadio. The procedure for t his function is explained here. First go to the following menu option: Menu:Special │ └─Maintenance (Pincode 92929) │ └─Line test └─[Execute] Further instructions are described on the next page. © Copyright Solutions Radio BV WebRadio™ is a registered trademark 21/32 Version 3.5 April 2006 Action to be done: The display show s: Press OK button onc e Line test One moment... After a few seconds the display shows Pickup phone Next Pick up the telephone and press the OK button once Line test One moment... After a few seconds the display shows Drop phone Next Put down the rec eiver and press the OK button once Measurements 4883 725 614 * Press the OK-button again Use value [No] Press the ▼-button once Use value [Yes] Press the OK-button once Line test Next Restart to Activate changes Press the Back-button 3 times * Explanation of the numbers: the first value represents the voltage on the line without a connec tion (about 48 volts). The second number represents the voltage when the WebRadio uses the line (about 7 volts). The third number represents the voltage when t he WebRadio uses the telephone line and the phone is picked up. The difference between the last two numbers is the value that has to be set (In this case about 1 Volt). For safety the WebRadio lowers this value to 70%. This value will be used for the “Extensio pick up detection” function (0.7 Volt) If the WebRadio is connected via Ethernet (network co nnection) t his function has no use. The WebRadio is not connected to a phone. If multiple telephones are connected to the telephone line, or you are using simple or c heap telephones, it is advisable to switch t his function off or let the correct value be determined by the WebRadio. If you are using an analog or IS DN PAB X, switch off the functions. © Copyright Solutions Radio BV WebRadio™ is a registered trademark 22/32 Version 3.5 April 2006 6.9 Setting the time limiter The time limiter has a default playing time of the WebRadio of 3 hours. This time limiter function prevents unnecessary keeping the line occupied of connection costs being made, should you forget to switch off the WebRadio when using a telephone line. It also avoids unnecessary network traffic when using Ethernet. This time limiter function can be disabled or set to another value bet we en 1 and 12 hours. This is possible with the following option: Menu:Special │ └─Maintenance (Pincode 92929) │ └─Time limiter └─[Selectable to the desired number of hours, or off] 6.10 Setting the country code of the modem E very country has specific modem settings. In general the WebRadio has been set for the country in which i t will be used. With this option the country code can be altered, for instance when the unit will be used in another country. It is prohibited to set this option to a wrong country code or an incorrect value. For possible deviations, contact Solutions Radi o. Altering this option can be done in this option: Menu:Special │ └─Maintenance (Pincode 92929) │ └─Modem country └─[Selectable by country code] 6.11 Restoring factory settings If you are not sure which settings are active or if the WebRadio somehow does not function properly anymore, you can always restore the default factory settings. Restoring the default settings works like this: Switch off the WebRadio. Press the B ack-button and keep it pressed. Switch on the WebRadio. On the display you will be asked if you are sure you want to restore to default settings. Rel ease the Back-button and press the OK-button. The default settings will be restored. A second way to restore to the default settings is: Another way to restore defaults: Press the OK-button and keep it pressed as you switch on the WebRadio. After a few seconds the menu will appear. Go to the menu option Special and s elect the option Factory defaults. Confirmation will be asked. Press the OK-button to actually restore the default settings. Menu:Special │ └─Factory defaults └─[Execute] By restoring the default settings, all altered settings will be overwritten to the default settings. If you are using altered settings in the WebRadio, these must be altered manually after restoring the default settings. Please note: If directly after restoring the default settings, the default settings are restored a second time, it will take much longer to do so. This is because WebRadio will now double -check the settings during and after restoring them. © Copyright Solutions Radio BV WebRadio™ is a registered trademark 23/32 Version 3.5 April 2006 7 Using other Internet platforms In priciple all settings to use the WebRadio are set as default inside the device, either by the producer, or by the local supplier. To use the WebRadio in a different situation, these settings can be altered in the menu. Connection mode (what connection mode should be used to cont act the s erver, for example: modem profile 1, modem profile 2 or Ethernet). Detailed settings for the selected connection mode (these are settings such as the phone number t o be dialed, ISP account settings, etc.). The playlist or the URLs that will be used. It should be noted, that these changes have t o be done carefully. If you are not used to modems and internet equipment, leave this to somebody with adequate experience. If you have any problems, you can always restore the default settings. See paragraph 6.11 for more det ails. 8 Firmware update by local server In special cases, such as for servic e and programming purposes, it is possible to load firmware directly via the Ethernet connection. Press both ▼- and ▲-buttons toget her, immediately after s witching on the WebRadio. Then the update procedure will start, guided by text in the display. The unit must not be switched off during this progress, unless a message in the display asks for. For this option, it is necessary to have a local server with a firmware update. For any required changes in the firmware contact your local supplier. 8.1 Automatic update of firmware The firmware of the WebRadio can be updated remotely. If necessary Solutions Radio can provide t he new firmware on its platform. Immediately after switching the unit on and after a connecting has been established to the server, the new firmware will be automatically downloaded and stored inside t he WebRadio. In the display a message will be displayed t hat you must not switch off the unit. However, no user interaction is necessary during this action. 8.2 Settings in the server A number of settings that influence behaviour of the WebRadio, such as playlist options, are programmed in the server. They can not be changed via the WebRadio‟s menu, neither by the user, nor by service personnel. However, your loc al supplier has the ability to have this kind of settings changed when required. In this case, contact your local supplier. © Copyright Solutions Radio BV WebRadio™ is a registered trademark 24/32 Version 3.5 April 2006 9 In case of problems In case of problems you can contact your local supplier, but before you do so, you should check the following: 9.1 Problems with power supply When after pressing the On/Off key the gre en LE D does not lit, please check: 9.2 Is the cable to the mains connected? Problems with dialing on the analogue telephone line When after pressing the On/Off key, the green LE D lits but the unit does not start dialing, please check: Is the telephone line in use by a telephone? When the unit starts dialing but always gives a failure message in the display: Check whether the telephone numbers are right (see par. 186.5.1). When the unit is connected to a PAB X it might be required to dial a “0” or another pre -dial code in advance of the telephone number (see par. 6.5.2). When the unit starts dialing but often gives the message “busy” in the display: 9.3 The telephone operator or the Internet Service Provider might be very busy. Problems with the telephones The connector of the telephone line cable does not fit in the “LINE” connector: Check whether this is a normal analogue telephone line. Maybe you have to use an adapter for the telephone line. The unit can not be connected to a so -called “Voice-over-IP” connection such as Skype. The unit does not react when from the telephone the handset is picked up: Is the telephone connected to the telephone line? Is the Extension Pickup Det ection (EPD) function switched off (s ee par. 6.8.1)? Is the EPD function not sensitive enough (s ee par. 6.8.2)? The unit disconnects when the handset is picked up but I don‟t hear a dialing tone: © Copyright Solutions Radio BV WebRadio™ is a registered trademark 25/32 Version 3.5 April 2006 When the telephone is connected directly to the line, the unit will disconnect when the handset is picked up, but the the handset must be picked up a second time in order to receive dial tone Is the telephone line connected to the connector marked “LINE” and the telephone t o the connector with the telephone symbol, on the back of the unit? When there is an incoming call, the unit do not switch off: Maybe the Call Waiting function is de -activat ed (see par. 6.8)? The Call Waiting function might not be supported by your operator (c ontact your local supplier)? 9.4 Problems with the audio In the display I see that I receive an audio stream but I don‟t hear anything: Is the volume knob turned to the right? Maybe the sound is muted with the MUTE key on the Remote Cont rol (see par. 6.3)? Is the internal loudspeaker switched off (see par. 6.2)? Maybe the stream you are connected to is working but silent? The unit is connected to my audio system but I do not hear the audio: Is the cable between the unit and the audio system properly connected? Maybe the “line out” settings are not correct (see par. 6.2)? I do hear the audio but there is a lot of abnormal hum or noise: Is a wireless telephone placed in the direct neighborhood of the unit? Is a base station for a wireless headphone in the neighborhood of the unit? Is a PC or notebook with wireless LAN (WiFi) in the neighborhood? 9.5 Problems with received streams There are “hicks” in the audio stream: The connection might not be optimal; switch the unit off and on again and try again. The network might be very busy, try at another time. Check the baud rate, this should be better than 24kbps (see par. 4.4). I do hear an audio stream but after some time it becomes silent and the unit switches off: © Copyright Solutions Radio BV WebRadio™ is a registered trademark 26/32 Version 3.5 April 2006 Maybe the transmission has been ended, try again. The stream might be switched off; in this case the unit switc hes itself off after some time in order to release the telephone line (you can change this parameter, see par. 6.9). After some hours of listening the units switches off: There is a security timer that switches off after some hours of listening (you can change or deactivat e the oparameters of this time limiter, see par. 6.9). Is there a possibility for logging of events in the unit? There is some logging in the unit but this can only be read by specialized service personnel. Your provider has in some situations the possibility to log events in t he audio server; in case of problems, pleas e contact the servic e desk . 9.6 Problems with the Ethernet connection I connected to an Ethernet port on my network but it does not work: Check the settings in the menu under Network, Ethernet. For your connection to succeed it is essential to know in advance the restrictions on the router/firewall within your net work; here are a few helpful pointers: Is a DHCP server present in the network? If so, this will give the IP address to the Webradio. If not, make sure you have the following information about the net work to which you are connecting the Webradio, so that you can enter the IP address manually: - Free IP address - Netmask - Gateway - 1 or 2 DNS servers These settings should then be entered in the Webradio. Does the Internet connection use a proxy? If this is the case, the Webradio will not be able to work in this network, as it cannot connect to the Internet. NA T (network address translation) is the preferred method to connect the Webradio to the Internet. Are port 80 and ports above 8000 open for Internet connections? P ort 80 (http) is required to receive the playlist. Other ports, above 8000, are commonly used to connect to streaming servers. Ensure that these are open and available. To test the default playlist, it is possible to contact our server. This is done as follows: - Open Winamp (Windows Media Player can not be used for playlists) - Press Crtl+L or select Open URL from the file menu. - Enter the following URL: http://playlist.solrad.nl/test.pls. - The playlist you receive should have about 4 items. - If Winamp plays the streams, the Webradio should (in practice) also be able to play the streams. All streams should be available most of the time. The Webradio uses a 10Mbit Ethernet link. Ensure your net work supports this speed. © Copyright Solutions Radio BV WebRadio™ is a registered trademark 27/32 Version 3.5 April 2006 9.7 Some Ethernet connections support PPP-over-Ethernet. The WebRadio can not be connected directly to the Ethernet port, but a rout er must be connected between the WebRadio and the Ethernet port. General questions Is it possible to use the WebRadio for different kinds of subscriptions ? Yes, that is very simple to do. The use of the WebRadio is logged and registered in a cent ral database. In this way it is possible for y our service provider to have fixed fee subscriptions or subscriptions where you pay for what you use. For which applications can the WebRadio system be used? In principle the possibilities are endless. You can use the WebRadio system for every application that needs to distribute audio to a closed-us er-group over the Internet/Intranet. Is it possible to allow access only to registered customers? Yes, that is very simple. Only WebRadios registered in the central database are allowed access to the network. Each WebRadio identifies itself automatically with a unique ID code and password. Your Service P rovider can register to which programmes you have access. What is the level of audio quality being used? The websystem supports standard audiostreams up to 384kbps. However, a 24kbps stream already has a reasonable good quality and a 128kbps stream is comparable to CD quality. Which audio format is used? The standard WebRadio system uses the renowned MP3 audio format. Units wit h a s/n higher than 15000 also support WMA. Can I accept a call whilst listening with the WebRadio connected to the phone line? If you are listening to the radio and you are being phoned, the phoning party will hear an „engaged‟ signal, if connected to a normal t elephone line. If the WebRadio is connected to ADSL or IS DN then you can accept a call while listening to the WebRadio. However, if Call Waiting is implemented in your country then you can accept a call whilst listening to the WebRadio. Can the WebRadio be connected to the existing hifi installation at home or to a headphones? Yes, on the back of the unit there is an output for a standard audio cable for connection to the hifi installation. This cable is supplied with the WebRadio. With an optional adapter cable it is possible to connect a headphones; in units with a s/n higher than 15000 the internal speaker is switched off when the headphones are connected. Is it possible to make a phone call while listening with the WebRadio connected to the phone line? © Copyright Solutions Radio BV WebRadio™ is a registered trademark 28/32 Version 3.5 April 2006 Yes, if you wish to make a phone call while listening, pick up the receiver and dial the required number. The WebRadio will be switched off automatically. If you wish t o continue listening after t he call, switch the WebRadio ON again.. Is the WebRadio easy to use? During development of the WebRadio special attention was paid to the us er interface. The WebRadio is very easy to use. Besides the ON/OFF button there is a volume knob, which when turned increases or decreases the volume. The WebRadio also has two other buttons, which enable one t o choose other stations (program plus or minus ). The WebRadio has a clear LCD display which indicates the station being listened to. A simple remote control is also enclosed with the WebRadio. What do I need to operate the WebRadio? The minimal requirements are a telephone connection and a connection to the mains. Depending on the number of hours you will be listening to the WebRadio, it could be worth while to consider having a (A)DSL connection or other type of Int ernet access. What is the warranty on the WebRadio? The standard warranty period on the WebRadio is one year. © Copyright Solutions Radio BV WebRadio™ is a registered trademark 29/32 Version 3.5 April 2006 10 Service and contact details For more information you can visit the producer‟s web sit e: www.solutionsradio.com. For questions or problems you first have to contact your local supplier. For any remaining questions you can contact Solutions Radio B.V.: Solutions Radio B.V. Service Department Motorenweg 5-k 2623 CR DELFT The Nederlands +31 (0)15 – 262 59 55 www.solutionsradio.com © Copyright Solutions Radio BV WebRadio™ is a registered trademark 30/32 Version 3.5 April 2006 Appendix 1 structure of the menu After entering the menu, you will see the menu option Generic. The structure of the menu is presented below. The default settings are underlined. It is possible that the default settings for your WebRadio are different than those shown here: Generic │ ├─Default volume │ ├─[0..50] (15) │ └─[Last] │ ├─Audio │ ├─[Speaker] │ ├─[Headphones] │ └─[Line out] │ └─Mute on button ├─[On] └─[Off] © Copyright Solutions Radio BV WebRadio™ is a registered trademark Network │ ├─Connection mode │ ├─[Via Ethernet ] │ ├─[Via modem 1] │ ├─[Via modem 2] │ └─[None] │ ├─Ethernet │ │ │ ├─DHCP │ │ ├─[On] │ │ └─[Off] │ │ │ ├─IP address │ │ └─[Selectable] │ │ │ ├─Netmask │ │ └─[Selectable] │ │ │ ├─Default gateway │ │ └─[Selectable] │ │ │ ├─DNS Server 1 │ │ └─[Selectable] │ │ │ └─DNS Server 2 │ └─[Selectable] │ ├─Modem profile 1 │ │ │ ├─Phonenumber │ │ └─[Selectable] │ │ │ ├─Username │ │ └─[Selectable] │ │ │ └─Password │ └─[Selectable] │ ├─Modem profile 2 │ │ │ ├─Phonenumber │ │ └─[Selectable] │ │ │ ├─Username │ │ └─[Selectable] │ │ │ └─Password │ └─[Selectable] │ └─Pre-dial 0 ├─[On] └─[Off] 31/32 Version 3.5 April 2006 Playlist │ ├─Default station │ ├─[Entry no 1 ] │ ├─[Entry no 2] │ ├─[Entry no 3] │ ├─[Entry no 4] │ └─[Entry no 5] │ ├─Entry no 1 │ │ │ ├─Entry 1 URL │ │ └─[Selectable] │ │ │ └─Entry 1 Title │ └─[Selectable] │ ├─Entry no 2 │ │ │ ├─Entry 2 URL │ │ └─[Selectable] │ │ │ └─Entry 2 Title │ └─[Selectable] │ ├─Entry no 3 │ │ │ ├─Entry 3 URL │ │ └─[Selectable] │ │ │ └─Entry 3 Title │ └─[Selectable] │ ├─Entry no 4 │ │ │ ├─Entry 4 URL │ │ └─[Selectable] │ │ │ └─Entry 4 Title │ └─[Selectable] │ └─Entry nr 5 │ ├─Entry 5 URL │ └─[Selectable] │ └─Entry 5 Titlel └─[Selectable] Information │ ├─Firmware version │ ├─Build version │ ├─Bootloader │ ├─Nut/Os │ ├─Serial Number │ ├─MAC address │ ├─IP adres │ ├─Netmask │ ├─Gateway │ ├─DNS Server 1 & 2 │ ├─DHCP Server │ ├─Received total │ ├─Buffer size │ └─Global- & IP-Timeout Special │ ├─Factory defaults * │ └─[Execute] │ └─Maintenance (Pincode 92929) ** │ ├─Extension v.drop │ └─[Selectable] (2.0 volt ) │ ├─Line Test │ └─[Execute] │ ├─Time limiter │ └─[Selectable] (3 hours ) │ ├─Auto power on │ ├─[On] │ └─[Off] │ ├─Modem country │ └─[Selectable] │ └─Test URLs └─[Execute] * Only available if the OK-button is pressed when switching on the WebRadio ** Some items are also visible and can be changed by using the “user password” 01234 © Copyright Solutions Radio BV WebRadio™ is a registered trademark 32/32 Version 3.5 April 2006