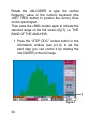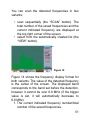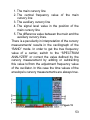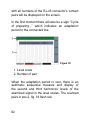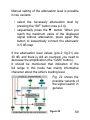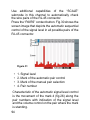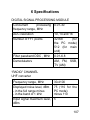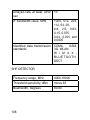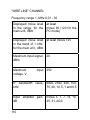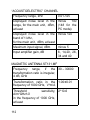
1
ST 131
“PIRANHA – II”
ST 131N
Multifunctional
counter surveillance
devices
TECHNICAL DESCRIPTION &
OPERATION MANUAL
CERTIFICATE
© TS-Market
Contents
Introduction..................................................... 3
1. General Characteristics.............................. 3
2 Control and Indicators of ST 131............... 24
3 Modes, submodes and options ................. 30
4 Operation of ST131................................... 65
5. The main unit's software update ............ 106
6 Specifications ......................................... 107
7. Acceptance Certificate ........................... 114
8 Warranty obligations ............................... 115
Appendix 1.................................................. 116
2
Introduction
ST 131 “Piranha-II” is a multifunctional detection
device designed for detection and localization of
special technical means for surreptitious obtaining
of information.
ST 131N is a multifunctional detection device that
has all components and capabilities of ST 131
“Piranha-II”, but also has option for detection of
nonlinear transfer in wire circuits.
Hereinafter, unless otherwise specified, ST 131
“Piranha-II” and ST131N referred as ST131.
Prior to running ST131, read carefully this manual
and keep it for further reference.
Any part of this document can be changed without
prior notice.
1. General Characteristics
1.1 Purpose and main features
The purpose of the multifunctional detection device
ST 131 “Piranha II” is to detect and localize special
technical means (STM) intended for surreptitious
obtaining of information as well as to indicate
natural and artificial information leakage channels.
ST 131 is able to detect the following main types
of STM:
3
Radio-emitting STM, particularly:
• Radio microphones including devices for data
storage and transmission (so called “impulse”
STM) and for Frequency Hopping Spread
Spectrum (FHSS)
• Telephone re-transmitters
• Radio stethoscopes
• Video cameras equipped with radio transmitter
• Unauthorized mobile telephones and modems
of CDMA, GSM, UMTS, DECT standards as
well as devices using digital transmission
channels of WLAN and BLUETOOTH
standards.
• STM that include devices designed for spatial
high-frequency irradiation
• Radio beacon intended to track moving objects
STM that transmit data through wire lines:
• field lines of AC main, subscriber telephone
lines, lines of fire and burglar alarms.
STM that transmit data within infrared
frequency band.
4
STM that transmit data within ultrasonic
frequency band.
ST 131 designed to detect the following natural
and artificial information leakage channels:
Acoustic data transmission channel occurred :
• as a result of acoustoelectric conversion
(“microphonic effect”) in wire lines of different
purposes
• due to absence or lack of noise insulation in
the examined premises.
1.2 Configuration of ST 131
Basic set
•
•
•
•
•
•
Main unit
UHF Converter «ST131.UHF»
Wire line adapter «ST131.AWL»
UHF antenna «ST131.UHF.A»
Telescopic antenna
Set of probes + “Alligator” clips +“Ground”
cable
• Power supply unit (2 items)
5
•
•
•
•
•
•
•
•
•
•
Main unit holder
Main unit shoulder strap
Tripod
USB cable
Hex key
AA batteries (8 pieces)
Headphones
CD with software
Attenuator (only for ST131N)
Technical description and user manual
Option set
• SHF antenna-detector «ST131.SHF»
• Infrared sensor «ST131.IF»
• Magnetic field sensor «ST131.MF»
6
1.3.1 Main unit
Functions of sockets and control elements are
shown on main unit pictures.
1. «I/O» Connection of UHF Converter ST131.
UHF, SHF detector ST131.SHF and infrared
sensor ST131.IR.
2. «GEN» Output of probing signal generator
(only for ST1331N)
3. «СH2» Connection of converters of “Acoustic”
channel and magnetic sensor ST131.MF.
4. «СH1» Connection of a wire line adapter
ST131.AWL.
7
1. Line output
2. 3.5mm jack socket for headphones
3. Volume control
4. Battery compartment covers
5. Power switch
6. Socket for connection of power supply unit
7. USB port
There is a thread hole at the bottom of the main
unit, it is used to connect the main unit holder
and the shoulder strap. Here you can also see
information about the product number as well as
polarity of the batteries that you should know while
installing them in the battery compartment.
8
1.3.2 Software
The Software of the “ST131
ANALYZER – PRO” essentially
expands the capabilities of
the product to analyze and
process signals.
Figure 1.
This Software has:
• Spectral oscillographic vector analysis,
“waterfall”
• Signal database
• MONITORING with advanced pre-settings
Figure 1
• Stream record of signals to HDD
• Special detection algorithms
For detailed information about the program's
capabilities and instruction, please, refer to the CD.
PC requirements
• Processor: dual-core processor with frequency
2 GHz and faster.
• Memory: at least 1 Gb
• Monitor: at least 1280х1024; wide-screen is
recommended.
• Ports: USB 2.0.
• OS: Windows 7, Windows Vista, Windows XP.
9
1.3.3 UHF Converter «ST131.UHF»
UHF Converter converts radio signals within the
frequency range 30 MHz – 4400 MHz.
ST131.UHF is connected to the main unit through
the «I/O» connector.
1. SMA connector
2. Power and battery discharge indicator
3. Power switch
4. Indicator of quality connection with the main
unit.
5. Thread 1/4”.
6. Battery compartment cover.
There is a power supply socket at the end of the
UHF Converter's handle.
10
1.3.4 Wire line adapter «ST131.AWL»
ST131.AWL is a monoblock unit that includes:
• reducing transformer voltage converter that
works within the frequency range 0.01-30 MHz
• low-frequency differential amplifier that works
within the acoustic frequency range 0.3-15
kHz.
• switching unit controlled by the main unit that
connects the necessary contact pairs of the
RJ-45 connector. The connection is made
not only to the most common pairs
of combinations, but also to
selectable variants set
by the user.
1. Sockets for probes
2. Contact “GROUND”
3. RJ-45 connector
4. «LINE» line voltage indicators
5. «PWR/LINK» indicator of power and data
exchange with the main unit
6. «OVERLOAD» input overload indicator
11
At the bottom part of the adapter there are clamps
for the holder and the shoulder strap of the main
unit.
While establishing the connection to the main unit,
follow the connection “Adapter-Main unit”, «СН1СH1», «CH3-CH2», «I/O-I/O».
Сhoose «WIRE LINE channel (0.01-30MHz)»
from the channels' list to analyze signals within the
frequency range 0.01-30 MHz.
Choose «DLA (0.3-15 kHz)» from the channels'
list to analyze signals within the frequency range
0.3-15 kHz.
Connection to the examined line is made through:
• RJ – 45 connectors (3), that provide connection
to ETHERNET and telephone line with pointto-point connection if necessary
• sockets for measuring probes (1) that provide
connection to other types of wire links using
additional clips.
12
After pressing the context button “COMM” on the
main unit, you can choose variants of commutation
of wire pairs connected to the RJ-45 connector:
Combinations «4-5», «3-6», «1-2» and «7-8» are
the most likely variants.
You can choose by pressing « » and « »buttons.
Press «ENT» or VALCODER to confirm your
choice.
SELECT- random pairs (with exception of similar
pairs to prevent short circuit):
• “1 number cont.(1-8)”: Keyboard input of the
first contact number
• “2 number cont.(1-8)”: Input of the second
number.
The set pair is indicated under the sign “SELECT”.
The pair of contacts set for analysis is indicated in
the pos. 6.
13
“NEGATIVE”/ “POSITIVE” - polarity changing of
the connected wire pairs.
“NO CONN.” - disconnection from the examined
line.
ST131.AWL ensures safe operation if voltage is
less than 250V in input connectors.
Attention! During operation of ST131.AWL, strictly
observe the rules of electrical safety to avoid
electric shock.
1.3.5 Infrared sensor «ST131.IR»
This sensor includes a photodiode receiver and
preamplifier.
The sensor connects to the main unit through the
«I/O» connector.
At the front surface of the frame there is a thread
intended to connect a special holder to the rotation
gear.
14
1.3.5.1 Holder
The holder is intended to assist in searching of IR
transmitting equipment installed, for example, at
the outer side of a window in the direction “from
the window”. The holder consists of four sections
with the overall maximum length of 900 mm. The
rotating gear quickly sets the necessary viewing
angle within 180°.
1.3.6 SHF antenna-detector «ST131.SHF»
ST131.SHF consists of the log-periodic antenna
and SHF detector-amplifier integrated in one body.
There is a 1/4” screw hole on the handle intended
to connect the tripod.
It is connected to the «I/O» connector of the main
unit.
15
1.3.7 Magnetic field sensor «ST131.MF»
The sensor consists of a ferrite antenna, a
preamplifier and a handle with a built-in battery
compartment.
1. 1/4” screw hole
2. Power on and battery discharge indicator
3. Power switch
4. Battery compartment cover.
On the opposite side there is a mode switch.
There is a socket for the power supply unit at the
end of the handle.
16
ST131.MF operates in two modes:
• “MAGNETOMETER” (the mode switch is in the
«MAG» position). Magnetizing field strength
(induction) is measured in this mode.
• “GRADIOMETER” (the mode switch is in
the «GRAD» position). This mode measures
difference between the fields' strength in two
points on the magnetic axis that are positioned
symmetrically from the center. This essentially
weakens the remote power sources of
magnetic field as well as other interference
effects (acoustic, vibroacoustic, etc.)
ST131.MF is connected to the connector «CH2»
of the main unit.
1.3.8 UHF antenna «ST131.UHF.A»
ST131.UHF.A is a broadband
passive antenna.
It is connected to the input
connector UHF Converter
ST131.UHF.
17
1.4 Package
The product is packed in a special impactresistant waterproof black case (dimensions are
400X304X165). Special polyurethane foamed
lodgements are installed to provide comfortable
and safe placement of the product's components
in the case. Components are placed as shown in
the picture below.
1. Power supply unit
(2 items)
2. Main unit
3. UHF Converter
ST131.UHF
4. Alligator clips
5. Set of probes + “Ground” cable + a telescopic
antenna
6. Wire line adapter «ST131.AWL»
7. SHF antennae-detector ST131.SHF
8. Infrared sensor ST131.IF + holder
9. Tripod
10. 8 AA batteries + a hex wrench
11. USB cable
18
1. Main unit shoulder
strap
2. Headphones
3. Main unit support
4. UHF antenna ST131.
UHF.A
1.5 Detection channels
ST 131 has four detection channels.
Detection channel
Frequency range
RADIO
30-4100
MHz
4000-18000 MHz
WIRE
0.01-30
0.3-15 kHz
OPTICAL
770-1650 nm
MHz
ACOUSTOELECTRIC 0.01-125 kHz
Press the “SET” button and select the line
“Channel Selection” in the Menu to access the list
of the channels.
19
1.5.1 “Radio” Channel
This channel receives and processes radio signals
within the frequency range 30 – 18000 MHz.*
Use UHF converter «ST131.UHF» + UHF antenna
«ST131.UHF.А» to operate within the frequency
range 30-4100 MHz. SHF detector “ST131.SHF”
expands the frequency range up to 18 GHz.
1.5.2 “Wire” channel
This channel receives and processes the signals
transmitted by the wire lines of different purposes
(electric power line, telephone network, computer
networks, fire and burglar alarm networks, etc.)
that could be de-energized as well as energized
with DC or AC voltage of up to 250 V.
Use the «ST131.AWL» wire line adapter to connect
the examined lines.
*Use the “Wire” channel with the included telescopic or other antenna of the
same frequency range to analyze radio signals within the frequency range
0.01-30 MHz.
20
1.5.3 “Optical” channel
This channel receives and processes emissions
in the optical band. Infrared sensor «ST131.IF» is
intended to operate in this channel.
1.5.4 “Acoustoelectric” channel
This channel receives, amplifies and analyzes
signals within the frequency range 10 Hz-125 kHz.
Ultrasonic signal is converted into an audio signal
using frequency translation.
Use of acoustic converters of any type depends on
the tasks considering the channel's parameters.
1.6 Power supply of ST 131
1.6.1 Main unit
The main unit of ST 131 is powered by six AA
batteries (accumulators) or by the power supply
unit. A fully colored battery pictogram
indicates that the batteries are fully charged.
Colorless and crossed out symbol
indicates
the fully discharged batteries. Energy-rich batteries
of “Energizer” type are preferred.
21
Under average operating conditions (backlight
is on 50% of the time, volume is at 50% of the
nominal), the life time of one battery pack is at
least 5 hours. It is allowed to use only one battery
compartment (three batteries). But operation time
reduces to 1 hour.
In order to change the batteries, unscrew the
battery compartment cover using the wrench
included in the set. Then replace the batteries with
the new ones, observing the correct polarity (see
markings on the bottom lid of the main unit).
1.6.2 UHF converter «ST131.UHF»
UHF converter is powered by two AA batteries
(accumulators) or by the power supply unit.
When the batteries are discharged, constant
glow of the indicator “ON/LOW BAT” will start to
flash on and off every second. The life time of the
“Energizer” type battery is at least two hours.
In order to change the batteries, unscrew the
battery compartment cover, then replace them with
the new ones, observing the correct polarity (see
markings inside the battery compartment).
22
1.6.3 Magnetic antenna "ST131.MF"
ST131.MF is powered by two AA batteries
(accumulators) or by the power supply unit. The
battery discharge is indicated by gradually autodimming indicator “PWR”.
The life time of the “Energizer” type batteries is at
least thirty hours.
In order to change the batteries, unscrew the
battery compartment cover, then replace them with
the new ones, observing the correct polarity (see
markings inside the battery compartment).
23
2 Control and Indicators of ST 131
2.1 Control
Context buttons (4)
Purpose
of
the
context buttons “F1””F5” depends on the
selected
detection
channel, the operating
mode and indicated at
the bottom line of the
display.
Function buttons (5)
“Full” - switch on the “FULL RANGE” mode
“BND” - switch on the “BAND” mode
“DMD” - switch on the “DEMODULATION” mode
“L” - switch on the “Scale” submode
“MEA” - access the measuring functions
24
Power switch switches on/off the main unit.
Volume control controls the level of the audio
output signal of the built-in speaker, line output
and headphones. Adjustment is available only in
certain mode (volume control symbol is indicated
in pos.4, fig.2). Numeric relative value of the level
(0-99) is indicated in position 5.
Press the «>O<» button to set automatically the
screen-size display of the current spectrogram and
oscillogram.
Press the ► and ◄ buttons to set the maximum
value of the displayed signal level and to scale the
display of the oscillogram vertically. One press
changes this value by 5 dB in the pos.3, fig.5. Thus,
it provides the amplitude image shift. Decrease this
value to display the signal that is out of the screen
edges. Increase this value to display, for example,
a low signal with a high one in the background.
Press the «./R» button to reset the accumulation
results when using the peak detector.
25
2.2 Indication
General elements of indication are:
1. Short title of the current channel
2. Mode
3. Submode
4. Overload indicator*
5. Volume control availability indicator
6. Relative current volume level
7. Battery charge indicator
Figure 2
Overload results in inaccurate operation of the
product, including the possible display of this
signal's fake side effects.
*This sign indicates that at the entrance of the main unit there is a signal that
exceeds the acceptable maximum input signal for this channel. The event
time is set in the MENU (p.2.3).
26
To fix the problem, follow the steps:
1. if it is possible, switch off the signal source
2. gradually decrease the value of the input
amplifier (the “УСИЛ.” context button),
then hold the «>O<» button until the sign is
disappeared. The “RADIO” channel, beside
the amplifier, also has the attenuator that,
in case of overload, can be connected by
pressing the «>O<» button to the auto
calculated level (5 - 30 dB in 5 dB step). That
is why in this channel it is preferred to use the
attenuator first - press the «>O<» button- if that
does not work, decrease the amplifier. Also it
is possible to manually set the attenuation
level by the pressing the “INFO” button (see
2.4 for details).
It is necessary to notice that the source of the
overload could be signals that are out of limits of
the examined band (the “BAND” mode), but they
are still in the operating range of this channel
(the “FULL RANGE” mode ). That is why the sign
“OVERLOAD” can be indicated when the signal
is not on the displayed spectrogram. In this case,
switch to the “FULL RANGE” mode in order to find
the source of the overload.
27
2.3 Main menu
Press the “SET” button to enter the MENU.
Figure 3
«LPF demodulation» - select the cut-off
frequency of the first-order filter at the output of the
demodulator.
“Gain out” - to choose the line output signal
level and headphones. A default option is “AGC”
- automatic gain control.
“More indicat. of overloading” - this setting
promptly indicates the overload when it reaches
the pos. 4, fig. 2. The default time delay is
five seconds. As a rule, band and out-of-band
impulse interference causes short indication
of the overload. This option also switches on
the additional indication of the displayed signal
output when it is out of the screen edges (the sign
“pinning”), because in some specific situations it is
hard to see that on the screen.
28
«Disable the probe ident.» - switch off the function
of identification and diagnostic of the external
converters ST131.UHF, ST131AWL and ST131.IR.
2.4 Information
Press the «INF» button to access the current
settings and additional installations.
Figure 4
«Ver. X.X.XX» – a new firmware version of the
main unit
“RANGE” - select a dynamic indication range
(Available variants 30, 60 and 120 dB).
«STEP DDC» - frequency step of ANALYSIS BAND
(0.01,0.1, 1,10,100,1000,10000 kHz and band)
«STEP DMD» – frequency step of DEMODULATION
BAND (1, 10, 100 ,1000, 10000 HZ and band)
“ATTENUAT” - select the attenuation level of the
UHF converter ST131.UHF (0 – 30 dB).
“MEMORY” - access to the information window of
nonvolatile memory distribution of the main unit. If
chosen, it flashes on red.
29
3 Modes, submodes and options
ST 131 has:
• Three modes: “FULL RANGE”, “BAND”,
“DEMODULATION”.
• Four
submodes:
“SCALE”,
“AUTO
ANALYZING”,
“MEMORY”
and
“MEASUREMENTS”.
• Four
options:
“OSCILLOGRAPH”,
“SUBSTRACTING THE SPECTRUM”, “DIGIT”
and “NONLINEAR JUNCTION DETECTOR”
(only for ST131N).
3.1 The “Full range” mode
There is an auto entry to this mode after you chose
the channel from the channels' list in the MENU or
after you pressed the button “FULL” (except for the
range “RADIO 4000-18000 MHz”).
In general, this mode makes visual estimation
(volume control is available only in the “OPTICAL”
and “ACOUSTIC” channels) of the loading level of
the selected channel's range as well as decides to
switch to:
30
• detailed examination of the range's sections in
the “BAND” mode
• analysis of the specific frequencies using the
“AUTOMATIC ANALYSIS” submode
In this mode the horizontal resolution of the display
and the frequency step are the following: in the
“RADIO” channel - 32 MHz/pixel, in the “WIRE”
channel – about 156 kHz.
1. Low frequency
range
2. High frequency
range
3. Maximum high
value of the
Figure 5
displayed signal
level.
4. Values of the level and the center frequency
of the maximum displayed signal in the
frequency spectrum*.
5. Averaged value of the displayed noise level
6. The selected wire pair of the RJ-45 connector
(only for the “WIRE” channel)
* The frequency spectrum is understood to be the value setting of
frequencies divisible the horizontal resolution of the display. For example,
as far as the “RADIO” channel is concerned this value is 32 MHz (the value
is displayed in the mode “ BAND” in the fig.6, pos.5). That is why indication
of the frequency value in the fig. 5, pos.4 means that the maximum signal
ranges 128+/- 32 MHz.
31
Functions of the context buttons
Below are the all possible variants of the context
buttons' functions for all the channels in this mode.
The buttons' variants are different in every channel.
«COMM» - access to selection of the wire pairs in
the “WIRE” channel (see p. 1.3.4 for details)
«GAIN» - different fixed values are provided to
amplify the input amplifier, as well as automatic
gain control (“AGC”).
«DIFF» - switch-on of the spectrum subtraction
function
«DIGIT» - access to the option «DIGIT» in the
“RADIO” channel (refer to p. 3.9).
3.2 The “BAND” mode
This mode analyzes in detail signals in the selected
band.
The swath reduction increases the horizontal
resolution as well as the signal-to-noise ratio
inversely proportional to the band.
Press the «BND» button to enter this mode.
32
Refer to fig.6 to see the screen image after the
first pressing the «BND» button. This is the
intermediate stage of this mode – selection of the
mode section for the detailed analysis.
Figure 6
1. Cursory lines of the analyzed band's edges
2. Cursory line of the analyzed band's central
frequency
3. The signal level value corresponding to the
position of the central cursory line
4. The value of the analyzed band width
5. The value of the screen horizontal resolution,
i.e. the band width per pixel.*
* If the analyzed band is selected, the frequency step is indicated
in this place.
33
Rotate the VALCODER or type the central
frequency value on the numeric keyboard (the
«SET FREQ button) to position the cursory lines
on the spectrogram.
Then press the «BND» button again to indicate the
selected range on the full screen (fig.7), i.e. THE
BAND OF THE ANALYSIS.
1. Press the “STEP DDC” context button in the
information window (see p.2.4) to set the
band step (you can control it by rotating the
VALCODER) in the full range.
Figure 7
34
Functions of the context buttons
The following context buttons are added in this
mode:
“BAND” - select the analyzed band value. Possible
values depend on the selected detection channel.
«SET FREQ» - set the central frequency value of
the analyzed band using the numeric keyboard.
Keep in mind that if the band width is over 6.8 MHz,
the set frequency value will be divisible by 4MHz, if
the band width has smaller value, it will correspond
to the set value.
Press the ► or ◄ button to cancel the typed
value. Press the «ENT» to confirm your request.
In order to sequentially scan the full frequency
range with the selected analyzed band:
• press the «+» and «-» buttons with the
frequency step is equal to the analyzed band
width;
• to rotate the VALCODER, while the step is set
in the “INFORMATION” window (p.2.4) and is
indicated in pos.1, fig.7.
35
Press the “BAND” button to center the swath on
the screen. In order to display the spectrogram
section, located, for example, at the edge of the
screen, you need to move this section in the center
of the screen. You can make this using the cursory
lines of the “CURSORY CHANGES” option. Press
the “MEA” button and then the VALCODER. Set
the cursory line appeared on the screen in a place
that you want to move in the center of the screen.
Then press the “BND” button to automatically
move the set place of the cursory line in the center
of the screen.
3.3 The “Demodulation” Mode
This mode is mainly indented for sound control
of a demodulated signal. Press the “DMD” button
to enter and exit the mode, the cursory lines will
appear and the volume control will switch on.
1. Demodulator
2. The frequency step
36
Figure 8
In order to select the position of the cursory lines on
the spectrogram:
• rotate the VALCODER in 1 pixel width step;
• press the «SET FREQ.» button and type the
frequency value on the numeric keyboard (this
value will automatically set in the center of the
screen).
Functions of the context buttons
«DEMOD» - select the demodulator. You can
choose АМ, FM, LSB or USB.
«BDMD» - select the demodulation band. Bands
from 2.5 kHz to 150 kHz are available for the
volume control. The band of 6.8 MHz provides just
the displaying/scan of the demodulated signal. In
general this band identifies the analogue television
video signal.
37
«FINE» - precise adjustment of the central
frequency of the demodulation. If selected,
it flashes red, and the frequency step value
(fig.8, pos.2) is selected from the values of the
demodulation step (see. p.2.4).
Press the “MEA” button to switch to the oscillogram
of the demodulated signal using the opportunities
of the “MEASUREMENTS” submode. Press again
the “MEA” button to return to the previous indication
(the spectrogram of the range or the band).
While you are in the “AUTOMATIC ANALYSIS”
submode, press the "DMD" button to analyze the
signal corresponding the position of the marker
(fig.9, pos.3).
3.4 The “Automatic Analysis” submode
This submode is intended to:
• extract the signals that exceed the threshold
set by the user;
• create the database of the detected signals in
the “RADIO” channel.
38
Figure 9
Press the “A” button to enter the submode. Press
any function button to exit the submode.
1. The marker stop frequency value
2. The line of the THRESHOLD level
3. The marker
4. The signal level in the position of the marker
When you press the “A” button, you will see a
threshold line (2) on the screen as well as the
marker (3) at the top of the screen (if the signal
level is above the threshold line).
Rotate the VALCODER to set the level of the
THRESHOLD line.
39
Functions of the context buttons
“TYPE” - set the type of the THRESHOLD line.
You can choose between a straight line (LINE) and
a curve line (ENVELOPE) that repeats the signals'
envelope line. The default type of the threshold
line is “THE SPECTRUM ENVELOPE” that is set
automatically considering the loading level of the
spectrum and its degree of variation. The straight
line is preferred in the detailed analysis of the
signals.
“BACK – change the direction of the marker's
movement.
Press the “DMD” button to quickly move to the
volume control of the extracted signal. In this case
the product switches to the “DEMODULATION”
mode with the central frequency of the
demodulation band corresponding to the position
of the marker. Press the “A” button to move to the
next the signal that exceeds the threshold.
While working in the “FULL RANGE” mode, Press
the “BND” button to switch to the “BAND” mode
with the central frequency of the analyzed band
40
corresponding to the position of the marker. In
practice this will provide “an electronic magnifier”
with the resolution corresponding to the selected
band.
Press the “FULL” button and then press the “A”
button to return to scanning of the signals in the
“FULL RANGE” mode using this submode.
Switching on of the spectrum subtraction function
clearly indicates a new signal that did not exist at
the moment when the function was switched on.
3.4.1 Function of the automatic creation of the
signal database (only for the “RADIO” channel,
30-4100 MHz).
The result of this function's work is the creation of
the detected signals' database that you can scan
and edit in the “MEMORY” submode (see p.3.6).
While you are in the “FULL RANGE” mode and
in the “AUTO ANALYSIS” submode, press the
“SCAN” button to access this function.
BEGIN FREQUENCY – the initial value of the
analysis frequency
41
END FREQUENCY – the ending value of the
analysis frequency
FREQUENCY STEP – the fixed frequency step
SQUELCH LEVEL – the threshold level value
relative to the spectrum average envelope.
DETECTED FREQUENCY – the current detected
frequency value of the signal
DETECTED FREQUENCY NUMBER – the
number of the detected frequencies.
COMPLETED – the current value of the process's
completion in %.
Figure 10
42
Functions of the context buttons
«SET FREQ» - set the frequency range of the
automatic analysis. When pressed, you can select:
- the range that was set before this function was
selected (CURRENT);
- selectable setting of the initial (BEGIN) and
ending (END) frequency of the analysis.
«THRESHOLD» - adjust the threshold that had
been set before you entered this function. You can
choose +/- 1 and 5 dB.
“START” - start to create a database
“STOP” - stop the operation
Select the frequency range and press the
“START” button to start the function. Intermediate
performance will be displayed in the fields
“DETECTED FREQUENCY” and “DETECTED
NUMBER” on the screen.
43
After the analysis is done, you will this sign on
the screen: “The analysis is completed. All the
detected frequencies are saved. Press any
button to continue.” The number of the detected
frequencies will be displayed.
If the number of the detected frequencies is
unreasonably small or large, you can promptly
correct the threshold level (the “SQUELCH” button)
and use this function again.
3.5 The “Scale” submode
This submode is intended to display the signals'
level in the form of a multisegment scale.
Press the “L” button to enter and exit the submode.
The “SCALE” submode is the main variant that
displays signals for the RADIO” channel 4 – 18
GHz and is an auxiliary variant for other channels.
In fact, this submode is a graphical interpretation of
the signal level that aims to locate the STM in the
immediate search.
In general, the indication principle and the search
44
method in this submode are similar to such
widespread detection devices of the STM as
broadband field detectors.
In this submode, the maximum signal level can
be displayed in the “FULL RANGE” and “BAND”
modes. While you are in this submode, you can
also set the central frequency of the view/scan
using the numeric keyboard (the “SET FREQ.”
button).
The fig.11 shows the screen of the “RADIO”
channel 30-4100 MHz in the “FULL RANGE”
mode:
1. Numeric scale calibration
2. Scale of the signal level
3. Value of the level and the signal's central
frequency
Figure 11
45
Figure 12
The fig.12 shows the screen of the “RADIO”
channel 30-4100 MHz in the “BAND” mode:
1. Value of the lower, central and upper
frequencies of the analysis
2. Value of the analyzed band
Press the «>0<» button to set the scale relative to
the noise level.
Press «<» and «>» buttons to move the scale
horizontally.
Increase in the number of segments that flash red
simultaneously will correspond to close proximity
of the emitting source (taking into account the
features of the specific channel). If the scale is
fully filled with the red segments and the emitting
source is not found, press again the «>0<» button.
While working in the “WIRE” channel, this submode
has additional functions that are described in the
paragraph “OPERATION OF ST131”.
46
3.6 The “Memory” submode
This submode is intended to:
• save a screen shot in the nonvolatile memory
of the product and then the saved image can
be displayed on the screen or used as a pattern
for the “SUBSCTRUCTING THE SPECTRUM”
option (see p.3.11).
• scan or edit the signal database that was
created using the function of auto database
creation (only for the “RADIO 30-4100 MHz”
channel, see p.3.4.1).
Press the “M” button to enter the submode. In this
case the product proceeds to operation with the
screen images in all channels, except the "RADIO
30 – 4100 MHz" channel (see p.3.6.1).
While operating in the "RADIO 30 – 4100 MHz"
channel, the functions of the context buttons are
the following:
“SCREEN” - work with the screen images
“RD SCAN” - scan and edit the signal database
This provides the opportunity to select the
47
operation either with the screen images or the
signal database (see p.3.6.2).
Press the “INFO” button and the “MEMORY”
context button to check the memory usage.
3.6.1 Operation with the screen images
While working with the screen images, the
functions of the context buttons are the following:
“SAVE” - save the image. The screen images are
saved in a sequential order in a current group from
001 to 999. These groups are formed according to
the current CHANNEL and the MODE of operation.
“LOAD” - select the saved image from the list
and display it. Press the «>» and «<» buttons to
navigate through the list.
When the saved image is displayed, the
background color of the screen will change to light
green.
48
Figure 13
You can just load the images that belong to the
operating channel and mode. You can check
general information about the number of the saved
images in the “INFORMATION”
window (p.2.4).
An additional context button “DIFF” is displayed
after an image has been loaded. Press this
button to subtract the saved spectrogram from the
current one and automatically exit the “MEMORY”
submode. (see p.3.9).
“ERASE” - select variants to delete the images.
After pressing this button, you will see the submenu
with the following variants of deletion:
49
“CURRENT IMAGE” - delete the current loaded
image;
“CURRENT GROUP IMAGES” - delete the current
group of images;
“ALL IMAGES” - delete all images;
“NO ERASE” - do not delete;
“EXIT” - exit this submode with the settings of the
saved image. This provides the opportunity to
promptly operate with the actual signals displayed
under conditions of the saved image.
3.6.2 Operation with the signal database
Press «RD SCAN» to enter the signal database.
The functions of the context buttons are the
following:
“VIEW” - scan sequentially the saved bands of the
analysis with the central frequency
“LIST” - switch to the list of the detected
frequencies. Press the «►» and «◄» buttons to
navigate through the list. Press the “ENT” button
to confirm your request. Press any button to exit.
“DELETE” - delete the current frequency from the
list.
50
You can scan the detected frequencies in two
variants:
• scan sequentially (the “SCAN” button). The
total number of the saved frequencies and the
current indicated frequency are displayed at
the top right corner of the screen.
• select from the automatically created list (the
“VIEW” button).
Figure 14
Figure 14 shows the frequency display format for
both variants. The value of the detected frequency
is the center of the screen. The displayed band
corresponds to the band set before the detection,
however it cannot be over 6.8 MHz (if the bigger
value is set, it will automatically decrease to
6.8 MHz).
1. The current indicated frequency number/total
number of the saved frequencies.
51
3.7 The “Measurements” submode
Press the “MEA” button to activate this submode.
The functions of the context buttons in the “FULL
RANGE” and “BAND” modes will be the following:
«OSC» - switch to the signal time-domain
representation (see p.3.8).
“DRAW” - select the type of the spectrum display: a
continuous spectrum or a spectrum envelope.
“WINDOW” - switch on the window Henning
function to improve the resolution of the weak
signals with the strong ones in the background
(except the “FULL RANGE” mode of the “RADIO”
channel). If selected, it flashes red.
In the “DEMODULATION” mode after the “MEA”
button has been pressed, the functions of the
context buttons are changed as well as there is
a switch to the oscillogram of the demodulated
signal.
Press the VALCODER to display the cursory line
and open the cursory measurements.
Rotate the VALCODER to move the cursory line in
one pixel step of the screen horizontal resolution.
52
1. The main cursory line
2. The central frequency value of the main
cursory line
3. The auxiliary cursory line
4. The signal level value in the position of the
main cursory line
5. The difference value between the main and the
auxiliary cursory lines.
There is a peculiarity in interpretation of the cursory
measurements' results in the oscillograph of the
“BAND” mode. In order to get the true frequency
value of a carrier, switch to the “SPECTRUM
ANALYZER” or correct the value defined by the
cursory measurement by adding or subtracting
this value to/from the adjustment frequency value
of the oscillator. In this case the time values of the
envelope's cursory measurements are always true.
Figure 15
53
Functions of the context buttons
“INTERVAL” - activate the mode of the relative
cursory measurements. Press the button and
rotate the VALCODER, the auxiliary cursor will
appear on the screen.
“RUN” - activate the display updating (if selected,
it flashes red).
“PAUSE” - pause the drawing of the image
(if selected, it flashes red).
3.8 The “Oscillograph” option
This option is intended to analyze the signals in the
time domain.
Press the “MEA” button and then press the “OSC”
context button to enter this option.
The option is unavailable from the “FULL RANGE”
mode of the “RADIO” channel and the bands'
values of more than 65 MHz in the “BAND” mode
of this channel.
54
Figure 16
1. The time segment value per 1 indication point
2. The adjustment frequency value
3. The time segment length on the full screen
4. The vertical time base value
5. The mean square value of the signal level
6. The “Peak-to-peak” value of the signal level
Functions of the context buttons
“SPECTR” - switch to the spectrogram
Press sequentially F3 to select the following
functions:
“HORIZON” - activate an access to change the
time base horizontally. Rotate the VALCODER to
change it.
“FREQ” - activate an access to change the
central frequency value of the examined signal's
band (only for the “BAND” mode). Rotate the
VALCODER to change it.
55
“TRIGGER” - activate the indication of the
synchronization level line. Rotate the VALCODER
to vertically change the position of the line.
“TR.TYPE” - select the synchronization conditions:
« >» - the synchronization will take place, if the
signal momentary values are higher the set level
«< » - the synchronization will take place, if the
signal momentary values are lower the set level
Press sequentially F5 to select the display variants
of the synchronization results:
“TRIGGER” - the synchronization is switched off.
“TRGAUT” - the oscillogram is dynamically
displayed on the screen if the synchronization
conditions are met.
“TRGONE” - if the synchronization conditions are
met, the oscillogram is “frozen” and is ready for the
cursory measurements.
Press the «>O<» button to automatically center the
oscillogram on the screen.
Press «>» and «<» buttons to vertically scale the
oscillogram display.
56
3.9 The “Spectrum Subtraction” option
This option indicates the results of the spectrums'
subtraction. This goal is reached by two ways:
• remember the current spectrum, then
subtract it from a spectrum got from new
measurements.
Press the “DIFF” context button to activate
the option. Thereafter only new signals will be
displayed on the screen.
• subtract the spectrogram saved in the
product's memory from the current one.
In order to do that you should:
• enter the “MEMORY” submode by pressing
the “M” button;
• select the image saved earlier by pressing
the «>» and «<» buttons and then load it by
pressing the “LOAD” context button. Press
the “ENT” button on the numeric keyboard to
confirm your request.
• press the “DIFF” context button.
57
3.10 The “DIGIT” option
This option is intended to detect the radiotransmitting devices with the known data
transmission standards and to measure the signal
level of the base stations.
You can enter this option through the “RADIO”
channel by pressing the “DIGIT” context button.
At that, the automatic scanning will take place as
well as the signal level indication of mobile devices
of all standards. Manual selection of the standards
is also provided.
1. Graphical display of the signal average level in
the frequency range set by the standard.
2. Pointer of the selected standard (only for
manual selection).
3. Standards of the digital data transmission
Figure 17
4. Numerical relative value of the signal level
exceeding the current threshold in dB.
58
Figure 17
Functions of the context buttons
“BASE” - select the measurement of the base
stations' level
“AUTO” - sequentially automatically scan all
standards (if selected, it flashes red).
“SET.FREQ.” - press this button to measure the
values of the signal band's center frequencies
for the 3G and WiMAX standards (depends on a
service provider and location).
Press the ">0<" button to set the indication
threshold. With that, numerical values of the
threshold levels are shown in the position of
the level's digital display. In the case of the auto
scanning, all standards will be zeroed, in the case
of manual selection, only the selected one will be
zeroed.
59
You can also manually set the threshold level by
pressing the +" and "-" buttons with the displayed
threshold current value.
Press the «>» and «<» buttons or rotate the
VALCODER to manually set the necessary
standard. Press the “AUTO” context button to
switch to the manual mode, the button backlight
will change to black, or press any of these «>» and
«<» buttons.
The signal level of the terminal devices and the
base stations of the given standard is indicated by
the following complementary criteria:
• Detecting of radio-frequency emission in the
frequency range of the terminal devices or the
base stations of the given standard;
• Correspondence of the detected signal's time
parameters to the given standard (except for
CDMA and 3G).
Press the “MEA” button to switch to the oscillogram
of the selected signal. The default display settings
are optimized for this signal.
60
3.11 The “NONLINEAR JUNCTION DETECTOR” option (only for ST 131N)
This option is intended to check the phone line and
the alarm lines, except for the 220V power lines.
It analyzes the wire lines for the STM that include
radioelectronic elements (connected directly to
the examined line) with nonlinear characteristics:
diodes, transistors, etc. As a rule, they are the
elements of the power sources and protection
against the input over-voltage. There are different
types of the telephone re-transmitters powered by
the telephone networks, adapters for connection to
the phone lines.
The operating principle is based on injection of
a stable sinusoidal signal in the line and on the
analysis of the third harmonic's presence which
indicates that a nonlinear element is connected to
the line.
The option is activated from the MENU by pressing
the “SET” button and selecting from “SELECT
CHANNELS AND OPTIONS”.
When this option is selected, the signal level scales
61
with all numbers of the RJ-45 connector's contact
pairs will be displayed on the screen.
In the first moment there will also be a sign “Cycle
of preparing...” which indicates an adaptation
period to the connected line.
Figure 18
1. Level scale
2. Number of pair
When the adaptation period is over, there is an
automatic sequential measure and display of
the second and third harmonics' levels of the
examined signal in the level scales. The scanned
pairs in pos.2, fig. 18 flash red.
62
Figure 19
1. Second harmonic level
2. Third harmonic level
3. Mark of the pair's manual selection
4. Numerical relative value of the signal level
Press the «>O<» button to automatically vertically
equalize the levels of the displayed harmonics, use
the «» and «» buttons to set it manually.
You can also manually select the pair by rotating
the VALCODER (the controlled pair is indicated by
the mark 3 in fig. 19).
Press the VALCODER to switch to the detailed
analysis of the selected pair (see fig.20). Press the
VALCODER again to return.
63
Figure 20
Functions of the context buttons
“GEN” - switch on the test signal generation (if
switched on, it flashes red).
“RESTART” - the forced adaptation
“RANGE” - select the value of the indication
dynamic range.
You can also sequentially select the pairs, while
the pair condition is displayed in detail, by rotating
the VALCODER. The number of the analyzed pair
will be changed at the top left corner: “CURRENT
PAIR X-X”.
An excessive level of the test signal's third
harmonic (pos.2, fig.19) means that the radio
electronic device with nonlinear radio elements in
the input circuits is connected to the examined line.
64
4 Operation of ST131
It should be mentioned that compared to the
state-of-the-art personal computer, computational
capabilities of the main unit's processor are
obviously limited.
Use the special software “ST131 ANALYZER.PRO”
to take full advantage of the ST 131 capabilities.
4.1 Operation of the “RADIO” channel
4.1.1 Prestarting
0.01-30 MHz range
procedures
for
the
Connect the supplied telescopic antenna or any
other antenna of the same range to the “CH1”
socket of the main unit.
Switch on the main unit and switch off the
identification of external converters (MENU“ADVANCED SETTINGS”). Then select the “WIRE
LINE 0.01-30 MHz” channel.
65
4.1.2 Prestarting procedures for the 30-4100
MHz range
Insert the batteries in the UHF converter ST131.
UHF (see p.1.7) or connect the power unit.
Connect the UHF antenna ST131.UHF.A.
Connect the UHF converter to the “I/O” connector
of the main unit.
Switch on ST131.UHF by moving the power switch
to the “ON” position.
Be sure that the “LINK” indicator has flashed once
and the “ON/LOW BAT” indicator lights constantly.
Switch on the main unit and select the “RADIO 304100 MHz” channel from the MENU.
After that during several minutes you will see the
identification and checking process of ST131.
UHF accompanied by the screen-savers that
sequentially replace each other “CONNECT UHF
CONVERTER” and “TEST UHF CONVERTER”.
On completion, the information on the screen
will correspond to the “FULL RANGE” mode.
This mode sequentially scans the range, and the
“LINK“of ST131.UHF indicator flashes on and
off every second. If you select the “BAND” or
“DEMODULATION” modes, this indicator does not
flash (the scanning process is stopped).
66
4.1.3 Prestarting procedures for the 4000-18000
MHz range
Connect the SHF detector ST131.SHF to the “I/O”
connector of the main unit.
Switch on the main unit and select the “RADIO
4-18 GHz” channel from the MENU.
4.1.4 Operation of the 30-4100 MHz range
Press the “INF” button to see the following default
pre-settings of this mode:
Band (BANDDDC)
6.8 MHz
Demodulation band
1MHz
Demodulation band step
(STEPDMD)
20kHz
Indication dynamic range
(SCALE)
60 dB
Averaging (DETECT)
PEAK X 8
Demodulator (DEMOD)
AM
GAIN IN
19dB
67
Before you start operation, you need to set an
optimum variant of the spectrogram indication.
Press the «>o<» button to optimize the image of
signals on the screen.
Figure 21
1. Overload indication
2. Attenuation level
3. Gain level
The «>o<» button in the “RADIO” channel, opposed
to other channels, also provides elimination of the
input overload using the controllable attenuator of
the UHF converter. After the sigh “OVERLOAD” is
displayed (pos.1), you need to press the «>o<»
button (without changing the gain) to set an
automatically determined attenuation level ( 5 - 30
dB in 5 dB step) indicated in pos.2, fig.21.
68
Manual setting of the attenuation level is possible
in two variants:
• select the necessary attenuation level by
pressing the “INF” button (see p.2.4);
• sequentially press the ▼ button. When you
reach the maximum value of the displayed
signal without attenuation, press again this
button to sequentially connect the attenuator
in 5 dB step.
If the attenuation level values (pos.2, fig.21) are
30 dB, and there is still an overload, you need to
decrease the amplification (the “GAIN” button).
It should be mentioned that indication of the
full range in this mode has mainly informative
character about the ether's loading level.
Fig. 22 shows the
possible variants of
the signal search in
general.
Figure 22
69
This block diagram depicts variants in red color
that are the fastest, but therefore less desirable, as
regards to a signal undetection probability.
For initial search use the “FULL RANGE” mode as
the product enters this mode automatically after
the “RADIO 30-4300 MHz” channel is selected.
This mode scans the full range in 32 MHz step in a
single cycle. The time between the two spectrums'
displays is 400 ms. The maximum harmonic in
the 64 MHz band is displayed on the screen. The
harmonic width is 152 kHz.
If it is possible, you should keep the detection
operations in secret and create conditions to
activate the remote controlled STM during the
process. For example, simulate an important
meeting using the corresponding accompanying
audio. Obviously, this recommendation is very
general. A real-life situation can demand a far
better preparation, for example, if hidden video
cameras are likely installed in your premise.
Otherwise the remote controlled STM (including
the STM based on the GSM, DECT, WLAN and
BLUETOOTH standards) could be switched off
and therefore stay undetected.
70
All radio-transmitting devices should be also
switches off in the examined and controlled
adjoining premises: the base stations and phones
of microcellular network, radio stations, Wi-Fi and
Bluetooth modems should be disconnected from
the power sources.
Fig. 21 shows the typical screen image in an urban
setting. As we can see, the modern city is filled
with legal radio signals (mobile network, TV, radio)
of a reasonably large level that almost not allow
to effectively detect, for example, a narrow-range
or a wide-range signal of the STM while visually
analyzing the spectrogram.
Use the “SPECTRAL SUBTRACTION” option to
quickly detect a signal in this mode. In order to
do this, press the “DIFF” button while you are in
the center of the examined premise or about ten
meters from it. This provides the memorization of
the current spectrum that will be then subtracted
from a spectrum got from new measurements.
Thus, when you approach the examined area, you
will see only new signals on the screen. And this
will be the first evidence that the signal source is in
a close detection area. Your moving will make little
71
effect on the level of signals that are definitely far
from the examined area.
An alternative variant: preliminary save the signal
spectrum in the product's permanent memory, and
then use it as a reference signal for subtraction
(see p.3.9). In this case, for example, when you
re-examine the area, you do not need to subtract
the signal beforehand – the reference signal is
selected from the memory in any place of the
examined area.
This option is also useful when you are searching
for a nonstationary signal source. For example, the
STM with acoustic start, remote control, automatic
accumulation and subsequent transmission of data
in indefinite period of time. In order to detect the
above-mentioned STM, switch on this function, do
not move ST 131 in the examined premise, and
control the signal appearance.
72
Figure 23
Sequentially go round the premise to detect the
radio-transmitting STM. The UHF converter and
the UHF antenna should be oriented in different
planes and turned in a smooth slow manner. The
distance between the antenna and interior objects
depends on the assumed radiant power of the STM
and, if possible, should be minimal.
We can give the following approximate number
to estimate the distance: when operating in this
mode, the distance for positive detection of the
narrow-range STM of 1 mW is about 10 cm.
Approaching the signal source you will see a
spectrum line or lines superimposed on the
subtracted spectrum. Fig. 23 shows the detection
of the narrow-range signal.
“DIGIT” is an important context button that provides
access to the “DIGIT” option (see p.3.10). We
recommend to use this option when you repeatedly
go round you premise and manually sequentially
select the standards.
Within the framework of this channel, the review of
searching possibilities of the “FULL RANGE” mode
can be considered as completed.
73
The switch to the “BAND” mode is necessary, even
if the STM was detected in the “FULL RANGE”
mode. It is a common practice to install on purpose
a power and easy detected STM along with the
more professional one that is far harder to detect.
This mode scans the range only in the selected
bands of 1024 - 256 MHz.
The “64 MHz” band is intended to detect pulse
trains as well as one-shot signals.
There is no scanning in the bands from 6.8 MHz
to 0.5 kHz, a prompt spectrum analysis is provided
by increasing the signal-to-noise ratio inversely
proportional to the band. For comparison: in the
“FULL RANGE” mode the displayed noise level is
at least 85 dBm, and in the “BAND” mode (if the
selected band is 6.8 MHz) – at least 110 dBm. As
we can see, a win in sensitivity is 20 dB, and in
resolution - in more than 1000 times. The further
analyzed band reduction increases this value.
74
In a “classic” case of detection of the narrow-range
frequency-modulated signal shown in fig.23, you
can switch to its detailed analysis in the “BAND”
mode by following these two variants:
• Use the “AUTOMATIC ANALYZING” submode.
Press the “A” button to automatically set the
cursor on the detected frequency (fig.24).
Then press the “BND” button to automatically
set the central cursor selection line of the
BAND center frequency on the detected signal
(fig.25). Press the “BAND” context button to
set the band of, for example, 6.8 MHz. Press
again the “BND” button to display the band of
6.8 MHz width with the detected signal in the
center of the screen (fig.26). Press the «>0<»
button to optimize the image.
Figure 24
75
• Manually set the cursor of the
“BAND” mode on the detected signal.
Press the “BND” button and, after the cursor
line appeared, set the cursor line on the signal.
And as it was described in the first variant,
press again the “BND” button to display the
band of 6.8 MHz width with the detected signal
approximately in the center of the screen.
Figure 25
In order to control the volume of the detected
signal, switch to the “DEMODULATION” mode by
pressing the “DMD” button. In this case you will
see the cursor lines of the volume control and hear
the sound from the built-in speaker or from the
headphones which are always preferred (fig.27). In
this mode there is a default band, the broadest for
the volume control, - 150 kHz. It is quite enough,
knowing that the sound in the premise is the source
76
of the phonogram that you are listening. If you
need to increase the quality of sound reproduction
and if the detected signal's band width is visually
obviously smaller, decrease the demodulation
band (the “BAND DMD” context button).
Access to fine setting of the signal frequency (the
Figure 26
«FINE» context button) provides more accurate
adjustment than that of the cursor lines. After
pressing this button, the signal center frequency
is tuned in the step set in the “INFORMATION”
window (the «INF» button, the “STEP DMD”
context button) of up to 1 Hz.
The volume control has limited possibilities as the
method that identifies the state-of-the-art STM.
The classic STM created with the help of analog
modulation methods (in most cases it is the
frequency modulation) can be identified without
fail. The volume control is also useful in creation of
the legal broadcasting and communications radio
stations' archive.
77
The “Acoustic feedback” method also has limited
possibilities. The method is based on appearance
of the positive acoustic feedback between the
microphone of the radio-transmitting STM and the
speaker of the ST 131 main unit (if you are using
this method, set the volume level at least ѕ of the
maximum value). This effect is only applied for
radio microphones with general modulation types:
amplitude and frequency (narrow-range or widerange). And in the case of the frequency modulation,
the effect is based on the presence of the incidental
amplitude modulation in the frequency-modulated
signal (if the radio microphone is of high quality, the
effect will be low or it can be absent). If the acoustic
feedback is appeared, you will hear an indicative
“howl”, its tune and intensity will be changing while
the speaker of the main unit is approaching the
radio microphone.
In the STM with digital modulation types there will
be no correlation between the background sound
of the examined premise and the signal in the
headphones.
However, after specific training, the acoustic
control of the digital signal is an additional identifier
78
of the signal type, and sometimes it is faster than
the visual control.
The wide range of the "ST131 ANALYZER.PRO”
program's features such as simultaneous record
of the signal image and sound, creation of the
quadrature WAV file will significantly facilitate the
task.
Press the “MEA” button to view the oscillogram
of the demodulated signal, while you are in the
“DEMODULATION” mode.
In order to view the full range and its segments,
you should define the analyzed band first. The
selection depends on many factors such as a priori
information about the probable frequency range
of the STM in use, the ether's “impurity” level,
the latest update, etc. It is reasonable to check
the wide bands of 1026 MHz-256 MHz using the
“SPECTRAL SUBTRACTION” option, by analogy
with the “FULL RANGE” mode operation. The band
of 6.8 MHz and lower provide an increase in the
spectral resolution and in the detection range.
79
Press the "+/-" buttons to sequentially view the
range segments with the set band. Also press
these buttons to switch to the next or previous
segment of the range.
In the “BAND” mode you can selectively view by
typing the value of the center frequency span (the
«SET FREQ» button) on the numeric keyboard
or by setting the cursor lines on the segment of
interest and then pressing the VALCODER to
confirm your request.
Thereafter, if you need to increase the resolution
and/or the signal-to-noise ratio, you can always
change the transmission band value by pressing
the “BND” button (the change will be made
relatively the center frequency).
To detect the low-power narrow-range signals of
the STM located in the frequency domain, near the
power legal radio-frequency radiation sources, you
need to give special attention to these frequency
ranges. In order to do that, you should use the
values of the analyzed band of at least 6.8 MHz.
Fig. 28 depicts the screen with the narrow-range
signal located in a close proximity to the signal
80
of the base station GSM 900. In this example the
analyzed band value is 6.8 MHz. If the values are
large, the signal will not be detected.
Detection of the FHSS signals is connected to
the analysis of the signal fragments appeared in
different frequency domains during operation time
of the STM.
Use the “SCALE” submode (see p.3.5) to detect
the signal source.
4.1.3.1 Detection of the radio-frequency pulses
The problem of the RF pulse detection can be
figuratively divided into two boundary tasks:
• Detection of a single radio pulse in indefinite
period of time, for example, during twentyfour hours. Considering the purpose of the
product, the sources of such pulse signals are
the STM with prior accumulation and further
transmission of data through the radio channel
(so called “pulse transmitters”).
• Detection of the pulse train that is constant in
time. The STM with the pulse modulation can
be referred to this type of the STM.
81
These tasks call the need to detect pulses with
wide operation range, period and, as a rule,
unknown value of the radiation frequency. No
doubt, detection of the single radio pulse is the
most difficult task.
We strongly recommend to use the “ST 131
ANALYZER.PRO” software as the detection
process of such signals takes a long period of time.
This signal type can be detected in the frequency
(spectrogram) and in the time (oscillogram)
domain.
Using the spectrogram provides an opportunity
to analyze the full frequency range (the “FULL
RANGE” mode) or its segments (the “BAND”
mode) of the “RADIO” channel. You need to use
peak detectors (the PEAK detector is the most
effective one).
Disadvantage of this detection variant is the
lower (compared to the analysis in the time
domain) detectivity and lack of information about
parameters of the radio pulses – duration and
period (information about frequency and level is
available).
82
To estimate detectivity, we can provide the
following numbers:
• The single radio pulse of 400 ms duration is
detected in all modes without loss.
• In the “FULL RANGE” mode, the pulse train
with the pulse width of 0.1 ms and over, and
the duty cycle of 1:1 is detected without loss;
if the duty cycle is 1:100, the detection time
will take about 30 sec, 1:1000 – over 500 sec.
• Decrease in the analyzed band will increase
detectivity. If the band is 6.8 MHz or less, the
duty cycle is 1:1000, the detection time will be
about 60 sec.
Use the oscillograph option (see p.3.8) to detect
the radio pulses, if you have information about the
radio pulse's carrier frequency that you got after
working with the spectrum or in a different way.
This limitation is valid for the main unit. There is no
such limitation while working with the program –
the scanning of the selected frequency range with
analysis in the time domain has been implemented.
In this control method there are available
parameters of the registered pulse or the pulse
train such as width and period.
83
The “PULSE” function (as a special case of the
“OSCILLOGRAPH” option) is preferred to detect
the pulse trains of long duration. Select the «64
PULSE» band to activate the function.
This function provides:
• the broadest band of the simultaneous
analysis that is 64 MHz
• inconstant value of the sample accumulation
maximum time. The “MAX.TIME” context
button was added to change these
values. The available values are the
following: 0.1, 0.8, 3.2, 13, 52, and 208 ms.
If the sample values are maximum, the product's
response to pressing on the buttons sharply slows
down, of up to 1 sec.
• minimum time for indication, transmission and
processing of the received signals.
Selection of the sample accumulation maximum
time value allows the user to choose between the
detection and the accurate display of the pulse
train with a short pulse duration, and the accurate
display of the pulse train with a long pulse duration.
84
Figure 28
In order to detect the radio pulses using
oscillograph, do the following:
• Select the center frequency of the analyzed
band. Select the position of the cursor lines of
the “BAND” mode on the spectrogram (see fig.
6 p.3.2) or, when you are in the oscillogram,
press the «SET FREQ» context button and
type the frequency value on the numeric
keyboard.
Figure 29
85
The switch to the oscillogram indication is automatic
in the “64 PULSE” band. If the analyzed band
has other values, select the “MEASUREMENTS”
submode by pressing the “MEA” button and press
the “OSC” context button.
• To stop the signal, switch to the measurement
by pressing the “MEA” button (only for the “64
PULSE” band). Then press the “F3” context
button to select “TRIGGER”. Set the line of the
synchronization level using the VALCODER at
the level exceeding the noise level.
• Set the trigger in the “TR.ONE” position (the
“F5” button).
• If necessary, make the cursor measurements,
press the VALCODER and follow the operation
description of the cursor lines, refer to the
“Measurements” submode.
• In order to record the signal image in the
product's memory, press the “M” button
and follow the operation description of the
product's memory, refer to “Operation with the
screen images”.
To estimate detectivity, we can provide the
following numbers:
86
While using the “PULSE” function, the pulse train
with the pulse width of 0.1 ms and over, and the
duty cycle of 1:1 is detected without loss; if the duty
cycle is 1:100, the detection time will take about 3
sec, 1:1000 – over 50 sec.
If the band is 6.8 MHz, the pulse train with the pulse
width of 0.1 ms and over, and the duty cycle of 1:1
and 1:100 is detected without loss; if the duty cycle
is 1:100, the detection time will take 1 sec, 1:1000
– at most 2 sec.
Additional recommendations
While searching for the STM intended for the audio
data transmission, take into account the real audio
intercept zone based on a microphone sensitivity.
Except for special cases, it is no more than 20
meters. As a rule, they try to install the STM as
close as possible to a site of negotiations - inside
a chief executive's table or inside the interior
objects that are in close proximity to it. Therefore,
the father from this site, the more likely that the
detected signal is dangerous (except for the STM
installed in the phone lines).
87
Simultaneous operation of ST 131 and the
nonlinear junction locator is not allowed.
If a car is an object of detection, you should
correctly choose a place to carry out the detection
process, where there is a decrease in the
electromagnetic background level. Thus, this place
has to be far from radiating communication tools,
telecasting and broadcasting, also from large
reflective (reradiative) surfaces – metal barriers,
house walls, garages, other cars.
4.1.4 Operation of the 4000-18000 MHz range
When you select this channel, the screen
information will correspond to the “SCALE”
submode (see p.3.5) with the simultaneous volume
control of the detected signal's acoustic frequency
range.
Pre-settings (press the “INFO” button to view):
Band
1.25 MHz
Demodulation band
15 kHz
Indication dynamic range
30 dB
Averaging
PEAKX8
Demodulator
АМ
88
While searching for the sources of radiation, follow
the recommendations below:
• Axis of the SHF-detector should be directed
to the examined space with a 30 cm distance
between the end of the log-periodic antenna
and the interior objects;
• Smoothly move the SHF-detector along the
examined objects, also make circular motions
about the main axis (it is necessary for
measurement of the radiation sources' a priori
unknown polarization).
Use the “MEASUREMENT” function to visually
estimate the detected signals and make
measurements. Press the “MEA” button to switch
to the “OSCILLOGRAPH” option (see p.3.7).
Thereafter press the “SPECTRUM” context button
to switch to the signal spectrogram (you can find
the description of possibilities in p.3.10).
Rotate the VALCODER to change the analyzed
band.
89
Additional recommendations
The legal sources of radiation are almost absent in
the given frequency range. The exceptions are the
5.6 GHz band and burglar and fire alarm sensors.
That is why any radiation presented in this range
should be carefully examined, and either the
source of radiation will be found, or there will be
a substantiated statement about the source that is
out of the controlled area limits.
4.2 Operation of the “WIRE LINE” channel
4.2.1 Prestarting procedures
Connect the ST131.AWL wire line adapter (WLA)
to the ST 131 main unit. Connect the analogous
sockets.
Switch on the main unit and select the “WIRE
LINE” (0.01-30 MHz) channel from the MENU
to operate in the high-frequency range or the
“WIRE LINE” (0.3-15 kHz) to operate in the audiofrequency range.
As the ST131.AWL is indicated, information
appeared on the screen will correspond to the
“FULL RANGE” mode.
90
You can connect the WLA to the examined line:
• through the connecting probes
• by connecting the examined line directly to the
RJ-45 connector.
Do not connect simultaneously the connecting
probes and the RJ-45 connector pins to
different lines. This could cause the equipment
failure, as the lines will appear to be in galvanic
connection with each other (the probes pin is
always connected to the WLA input).
If there is a voltage of over 5 V in the line, the
“LINE” LEDs located on the top cover of the WLA
will flash. If two LEDs flash, then there is an AC
voltage in the line, one LED – a DC voltage. The
light intensity depends on the voltage level in the
line.
The PWR/LINK indicator during the connection
and operation processes flashes constant green.
The indicator flashes on and off every second
during the settings transfer from the main unit such
as selection of the RJ-45 connector pairs and an
amplification constant of the WLA input amplifier.
Connect the telescopic antenna to the “CH1”
socket to analyze the radio frequency signals.
91
4.2.2 Operation of the 0.01-30 MHz range
This mode checks the examined lines for presence
of the high-frequency signal, and then detects
the source of radiation. All types of the wire lines
are to be tested: power, phone, alarm lines, data
transmission networks and lines of unknown
purposes.
The radio signals are also controlled by the
telescopic antenna.
The screen information will correspond to the
“FULL RANGE” mode with the following presettings (press the “INFO” button to view the
information):
Span
6.8 MHz
Span frequency step
10 kHz
Demodulation band
10 kHz
Demodulation band frequency 100 GHz
step
Indication dynamic range
60 dB
Detector
PEAKX8
Demodulator
AМ
Input amplifier gain
19 dB
92
In general, the sequence of the modes' usage
correspond to the “RADIO” channel.
There is an access to the “OSCILLOGRAPH”
option in the “FULL RANGE” mode that allows, for
example, to promptly test the received signal for
presence of pulse components.
In order to connect the lines using the RJ45 connector (see p.1.4), check all possible
combinations of the wire pairs. If the line has a
terminal unit, for example, a telephone set, we
recommend to provide a point-to-point connection
of the adapter and check the condition of all taken
wire pairs when the phone is lifted and put down.
Use the “SCALE” submode to view the signal level
in the form of a multi-segment scale. Fig. 41 shows
the screen image that you will see after pressing
the “L” button.
Figure 30
93
Use additional capabilities of the “SCALE”
submode in this channel to automatically check
the wire pairs of the RJ-45 connector.
Press the “PAIRS” context button. Fig.30 shows the
screen image that depicts the automatic sequential
control of the signal level in all possible pairs of the
RJ-45 connector.
Figure 31
•
•
•
•
1. Signal level
2. Mark of the automatic pair control
3. Mark of the manual pair selection
4. Pair number
Characteristic of the automatic signal level control
is the movement of the mark 4 (fig.26) along the
pair numbers with indication of the signal level
and the volume control on the pair where the mark
is standing.
94
In order to manually select the pair, rotate the
VALCODER, the 4 and 5 marks will coincide
horizontally. Rotate the VALCODER to select the
pair.
In order to control the selected pair in detail, press
the “PAIRS” button with the switch to the indication
corresponding to fig.26. Press again the “PAIRS”
button to return to the automatic control.
Press the «>O<» button to automatically adjust
the signal levels vertically, press «▲» and «▼»
buttons – to do it manually.
Additional recommendations
Before checking the power lines, we recommend
to switch off all consumers and search the premise
for the STM connected to the power line.
Inner holes of the outlet boxes are the most likely
places where they can be located. You should
connect the ST 131 to all the outlets in the premise,
as the premise (and the data transmission from the
premise as well) can be supplied with power from
different phases.
95
After checking the power lines, you should check
the power strips, extension cords and other energy
consuming devices by connecting them to the
power supply network one by one. In the case use
the “SPECTRAL SUBTRACTION” function which
allows you to see signals that were absent before.
While checking the subscriber telephone lines, you
should also determine, if the line is used to transmit
acoustic information from the premise due to the
linear high-frequency imposing. An unmodulated
stable probing signal in the line is an indicator of
the linear high-frequency imposing.
For convenience in nonstationary operation
conditions, use the shoulder strap of the main unit
with preliminary installed the WLA.
Figure 32
96
4.2.3 Operation of the 0.3-15 kHz range
The presence of audio signals in the examined
lines is checked by this range. High sensitivity
and differential connection of the input amplifier
provide the detection of signals from such devices
as a “passive” microphone (without batteries) or a
loudspeaker operating in a reverse “microphone”
mode.
When you first select this channel, the screen
information will correspond to the “FULL RANGE”
mode with the following pre-settings (press the
“INFO” button to view):
Indication dynamic range
30 dB
Averaging
AVERX8
Input amplifier gain
26 dB
The “BAND” and “DEMODULATION” modes are
inactive in this range, the volume control is active
in the full range.
In general, the above-stated recommendations
can be used in this “audio” range. In addition you
should ground the WLA to prevent interference in
power lines appeared as the 50 GHz harmonics
while working with standard low voltage equipment.
97
Connect the contact 2 using the “Ground” cord to
the ground bar of the examined equipment.
Although the limit input voltage is 250V, it makes
no sense to control the presence of signals of the
audio frequency range in the power lines of 220 V
because of inevitable overload of the input amplifier
(due to presence of harmonics in the network in the
given frequency range).
4.3 Operation of the “OPTICAL” channel
Connect the “ST131.IR “ IR sensor to the «I/O»
connector of the main unit.
Select the “OPTICAL” channel from the MENU.
When you first select this channel, the screen
information will correspond to the “FULL RANGE”
mode with the following pre-settings (press the
“INFO” button to view):
Span
210 kHz
Span frequency step
100 GHz
Demodulation band
10 kHz
Demodulation band frequency step 10 GHz
Indication dynamic range
60 dB
Detector
PEAKx8
Demodulator
AМ
98
Use the “SCALE” submode (see p.3.5) to search
directly using the volume control as a priority
(taking into account the below-listed interference
sources).
Smoothly changing spatial orientation of the
IR sensor, examine the premise considering a
directional diagram of the IR sensor (30°) and a
presumably quite narrow directional diagram of the
IR signal source.
It should be mentioned that, opposed to the
“RADIO” and “WIRE LINE” channels, this channel
has an output for audio control of the direct acoustic
signal in the “FULL RANGE” mode. This provides
a quick detection of optical radiation modulated by
the acoustic signal without a carrier.
Use the “MEASUREMENTS” function (the
“MEA” button) to visually estimate the detected
signals. Press the “MEA” button to switch to the
“OSCILLOGRAPH” option (p.3.7) with indication of
the detected signal's time parameters.
Further, if necessary, press the “SPECTRUM”
context button to switch to the signal spectrogram,
you can use possibilities of the “FULL RANGE”,
“BAND” and “DEMODULATION” modes.
99
Additional recommendations
There are two main variants of information leakage
with the use of infrared radiation. One of them is
created using the STM transmitting intercepted
information in the infrared band. The second
variant is based on radiation of window glasses by
a directive beam of the infrared source
as well as on reception of a reflected signal
modulated by the premise acoustics.
Particular characteristic of the infrared STM is
the need to provide “the line-of-site” between the
transmitter and the receiver of infrared radiation.
That is why the transmitter radiation could get
outside the premise through the windows or directly
from them (if the transmitter is installed right in the
window). Considering these characteristics, the
promise's windows should be the starting place
in your search for compromising signals. Use
the SPECIAL HOLDER (see p.1.3.5.1) to detect
the STM installed in the windows. Install the IR
sensor on the holder, direct the receiver part of the
transmitter toward the premise.
In this channel the interference sources are solar
radiation, electroluminescent lamps, incandescent
100
light bulbs connected to the power line with highfrequency spurious components. If possible,
during the detection process, avoid the direct
sunlight penetration in the premise and switch off
the light sources.
4.4. Operation of the “Acoustoelectric”
channel
4.4.1 Microphone setting-up procedures
Connect the microphone, corresponding to
the input parameters of this channel (refer to
“Specifications”) to the “CH2” socket. In order to
examine signals in the field of ultrasonic frequency,
use special microphones, for example, of the 40BE
type with a microphone preamplifier of the 12AL
type manufactured by the G.R.A.S. company.
4.4.2 Magnetic field sensor ST131.MF settingup procedures
Insert new batteries in ST131.MF (see p.1.7.4).
Connect ST131.MF to «СH2» socket of the main
unit.
Switch on ST131.MF by moving the power switch
to the “ON” position.
Be sure that the power indicator flashes (pos.2).
101
4.4.3 Working with microphone
Select the “Acoustoelectric” channel from the
MENU to operate with the microphone.
When you select this channel, the screen
information will correspond to the “FULL RANGE”
mode (see p.3.1). The default pre-settings are the
following (press the “INFO” button to view):
Span
20 kHz
Span frequency step
100 GHz
Demodulation band
8 kHz
Demodulation band frequency step 10 GHz
Indication dynamic range
60 dB
Detector
AVERx32
Demodulator
AМ
Input gain
AUTO
Select the necessary frequency range by:
• rotating the VALCODER. In this case the
upper range value is limited to: 125, 62.5,
31.25, 15.62 and 7.812 kHz.
• using the standard switch through the modes
FULL RANGE – BAND – DEMODULATION.
102
Within the framework of this channel this
variant is used to analyze the ultrasonic
signals (over 20 kHz) transferred in the audible
spectrum.
The first variant is intended for operation in the
acoustic frequency range, the second variant – in
the ultrasonic one.
4.4.4 Operation of the magnetic field sensor
ST131.MF
Rotate the VALCODER to select the necessary
frequency range (0.01-15.62 kHz).
Use ST131.MF to mainly search for spurious
low-frequency
electromagnetic
radiation
appeared when office appliances and other
communications
electronics
equipment
(computers, intercommunication devices, soundreinforcement systems, tape-recorders, phones,
etc.) are operating.
Potential sources of the spurious low-frequency
magnetic fields should be checked separately.
In spite of high sensitivity of the sensor, distance
103
between the sensor and the examined object
should be minimal, if possible, provide touch
proximity. You should examine the object by
moving the sensor along its surface and changing
the spatial orientation.
The audio control through the headphones is the
main control variant.
4.5 Operation of the “Nonlinear junction
detector” option
Connect the wire line adapter ST 131.AWL.NJ to
the ST 131 main unit in accordance with the block
diagram using the supplied attenuator.
Figure 33
In order to get consistent results, you should switch
the examined line's both ends off the external
sources and consumers as well as off obvious
loads, and the line length should not be over 200m.
104
Connect ST 131.AWL.NJ to the examined line by
directly connecting to the RJ-45 connector or to the
probes.
After selection of the “Nonlinear junction detector”
option from the Menu, the signal level scales with
all numbers of the RJ-45 connector's contact pairs
will be displayed on the screen.
When the adaptation process to the connected
line is over, you will see the automatic sequential
measurement and display of the second and third
harmonics of the test signal in the level scales.
The increased level of the test signal's third
harmonic is the characteristic proving that a
radioelectronic device with nonlinear radio
elements in the input circuits is connected to the
examined line.
105
5. The main unit's software update
Switch on ST131 by pressing and holding the
“ENT” button. The following sign should appear on
the screen:
UPDATE FIRMWARE MODE
Firmware current version: Ver. X.X.XX.XX
Connect with the PC to update firmware
Connect ST 131 to the computer using the USB
cable (the USB driver has to be pre-installed).
Select the necessary software version at the
manufacturer's site and launch the program.
Watch the loading process on the screens of your
computer and ST 131.
106
6 Specifications
DIGITAL SIGNAL PROCESSING MODULE
Concurrent
processing 0.01-30
frequency range, MHz
ADC resolution
10, 14 and 16
Number of FFT points
32768
(for
the PC mode)
512 (for main
unit)
Filter passband DDC , MHz
0.01-6.8
Demodulators
АМ, FM, SSB,
TV (АМ)
“RADIO” CHANNEL
UHF converter
Frequency range, MHz
30-4100
Displayed noise level, dBm
- in the full range minus
- in the band of 1 kHz
75 (110 for the
PC mode)
minus 110
Input signal maximum level, 5
dBm
107
Analysis rate, at least, GHz/ 10
sec
IF bandwidth value, MHz
1024, 512, 224,
112, 54, 28,
6.8, 2.5, 0.63,
0.15, 0.075,
0.04, 0.001 and
0.0005
Identified data transmission CDMA, GSM,
standards
3G, WLAN
W i M A X ,
B L U E TO O T H ,
DECT
SHF DETECTOR
Frequency range, MHz
4000-18000
Threshold sensitivity, dBm
minus 65
Beamwidth, degrees
60-90
108
“WIRE LINE” CHANNEL
Frequency range 1, MHz 0.01 - 30
Displayed noise level in the at least
range, for the main unit, minus 90 (120
dBm
for the PC
mode)
Displayed noise level in the at least minus
band of 1 kHz, for the main 125
unit, dBm
Maximum input signal, dBm
20
Maximum input voltage, V
250
IF bandwidth value, kHz
6800,
2500,
630, 150, 75, 40,
10, 5, 1 and 0.5
Input amplifier gain, dB
minus 5, 1, 7,
13, 19, 25, 31,
AGC
109
“WIRE LINE” CHANNEL
Frequency range 1, MHz 0.01 - 30
Displayed noise level at least
in the range, for the minus 90 (120 for the
main unit, dBm
PC mode)
Displayed noise level at least minus 125
in the band of 1 kHz,
for the main unit, dBm
Maximum input signal, 20
dBm
Maximum
voltage, V
input 250
IF bandwidth value, 6800, 2500, 630, 150,
kHz
75, 40, 10, 5, 1 and 0.5
Input amplifier gain, minus 5, 1, 7, 13, 19,
dB
25, 31, AGC
110
Frequency range 2, kHz 0.3 – 15
Displayed noise level in the at least minus
range for the main unit, dBm 115 (140 for the
PC mode)
Maximum input signal, dBm
20
Input amplifier gain, dB
14, 26, 38, 44,
50, 56, AGC
Common-mode
ratio at least, dB
rejection 60
Maximum input voltage, V
250
“OPTICAL” CHANNEL
Dynamic range, dB, at least
75
Bandwidth, kHz
0.1-1500
INFRARED SENSOR ST131.
Spectral range, nm
770-1600
Angle of view, degrees
30
Wire length, m
1.5
111
“ACOUSTOELECTRIC” CHANNEL
Frequency range, kHz
0.01-125
Displayed noise level in the minus 100
range, for the main unit, dBm, (148 for the
at least
PC mode)
Displayed noise level in the minus 120
band of 1 kHz,
for the main unit, dBm, at least
Maximum input signal, dBm
minus 5
Input amplifier gain, dB
6, 14,20, 26,
34 and 40
MAGNETIC ANTENNA ST131.MF
Frequency range, if the 30 – 30000
transformation ratio is irregular,
4 dB, GHz
Transformation ratio in the 1.00±0.01
frequency of 1000 GHz, V*m/A
Threshold
sensitivity, 2*10-6
A/m*GHz1/2
in the frequency of 1000 GHz,
at least
112
NONLINEAR JUNCTION DETECTOR
Test signal frequency, kHz
150-220
MAIN UNIT
Dimensions , mm
190x97x50
Indication
3.5” 240x320,
262144 colors
Interface
USB 2.0 20 Mbit/s
Input current, А
0.4-0.6
Power supply
6 batteries/
accumulators AA
113
7. Acceptance Certificate
Multifunctional detection device
ST 131 № _______________
satisfies technical requirements of TU (Russian:ТУ)
6684-09-67533935-10 and is ready for use.
Date of manufacture _________________ L.S.
114
8 Warranty obligations
8.1 The Manufacturer warrants that every
product meets all specification requirements and
workmanship for a period of 12 months from the
date of sale.
8.2 The Manufacturer is obliged to repair the
product, its accessories and additional parts, at no
charge to you within the warranty period as well
as replace the device, if it failed to function or its
characteristics do not satisfy the specifications.
8.3 No charge will be made for repair (adjustment)
or replacement of the product, if the Buyer
observes the operation instructions, transportation
and storage conditions, if the product and its
accessories have not been damaged, and if the
warranty card is filled out correctly.
8.4 This warranty shall only apply to the product, if
the Buyer provides the warranty card with the note
of sale made by the Manufacturer and its Dealer
as well as certified by an official round stamp of a
standard pattern.
115
Appendix 1
Selection of signal averaging variants.
1. You should use linear averaging to analyze
stationary signals (in the pop-up window they are
specified as AVERx8, x16, x32 and x64).
2. Peak averaging with linear reduction (in the popup window they are specified as PEAKx8, x16,
x32) is applied to nonstationary signals.
In this averaging the reduction coefficient is 4 times
larger than the increase coefficient. You can use
this to point out nonrandom signals.
3. Holding (accumulation) of spectral peaks (PEAK)
is used if it is necessary to register a rare signal or
a pulse train when the time of its appearance is
unknown. Press the «.\R» button on the numeric
keyboard to reset the accumulation results.
116