1
User Guide, v8.3
GlobalSCAPE, Inc. (GSB)
Corporate Headquarters
Address:
4500 Lockhill-Selma Road, Suite 150
San Antonio, TX (USA) 78249
Sales: 1-210-308-8267
Sales (Toll Free): 1-800- 290-5054
Technical Support: 1-210- 366-3993
Web Support: http://www.globalscape.com/support/
© 1996-2009 GlobalSCAPE, Inc. All Rights Reserved
September 17, 2009
Table of Contents
About CuteFTP Lite ....................................................................................................... 7
Installing and Removing the Software ........................................................................ 7
Activating CuteFTP ....................................................................................................... 9
Troubleshooting Product Activation ........................................................................................................ 9
Frequently Asked Questions ...................................................................................... 11
CuteFTP Lite's Interface ............................................................................................. 15
Configuring CuteFTP .................................................................................................. 15
Local and Remote Pane Views ............................................................................................................ 15
Displaying the Site Manager ................................................................................................................. 15
Displaying Folder Contents .................................................................................................................. 16
Displaying the Connection Log ............................................................................................................. 16
Displaying Transfer Items ..................................................................................................................... 16
Changing How Files and Folders are Displayed .................................................................................. 16
Configuring Startup Options ...................................................................................... 17
Configuring Display Settings ................................................................................................................ 17
Log Display and Capture Settings ........................................................................................................ 18
Specifying the Default Language .......................................................................................................... 19
Creating a Customized Language File ........................................................................................... 20
Keyboard Shortcuts .............................................................................................................................. 21
Connecting to Sites..................................................................................................... 23
Configuring Internet Connection (DUN/LAN) Settings ......................................................................... 23
Making Your First Connection - Connecting to a Site Using the Connection Wizard .......................... 24
Connecting to Sites in the Site Manager .............................................................................................. 26
Configuring Tolerance Options ............................................................................................................. 27
Configuring How CuteFTP Handles Symbolic Links ............................................................................ 28
Configuring Navigation Options ............................................................................................................ 28
Transferring Files in Binary or ASCII Mode .......................................................................................... 29
Save Local or Remote Path as Default ................................................................................................ 30
Displaying a Specific Folder when Connecting to a Site ...................................................................... 31
Configuring Connection Options ........................................................................................................... 32
Storing and Modifying Site Configuration ................................................................ 33
Backing Up Site Configurations ............................................................................................................ 33
Modifying Site Properties ...................................................................................................................... 33
Site Properties - General Tab ........................................................................................................ 33
iii
CuteFTP Lite, v8.3
Site Properties - Type Tab ............................................................................................................. 34
Site Properties - Actions Tab ......................................................................................................... 36
Site Properties - Options Tab ......................................................................................................... 36
Changing a Site's Connection Settings or Login Information ............................................................... 37
Changing the FTP Port ......................................................................................................................... 38
Designating a Site's Server Type ......................................................................................................... 39
Changing the Data Connection Type (Port or PASV) .......................................................................... 40
Correcting Times for Sites in Different Time Zones ............................................................................. 40
Removing a Site from the Site Manager .............................................................................................. 41
Specifying Whether to Save a Site's Information - Caching ................................................................. 41
Forcing Upper or Lower Case Filenames on Upload ........................................................................... 42
Creating and Using Bookmarks ............................................................................................................ 43
Saving and Deleting Log Files .............................................................................................................. 45
Transferring Files and Folders ................................................................................... 47
Transferring Graphic Files .................................................................................................................... 47
Queuing Files and Folders for Transfer ................................................................................................ 47
Removing Successful Transfers from the Queue Automatically .......................................................... 48
Removing Items from the Queue Pane ................................................................................................ 48
Transfer Queue Icons ........................................................................................................................... 49
Transferring Files in Order .................................................................................................................... 49
Stopping Transfers ............................................................................................................................... 50
Resuming Transfers ............................................................................................................................. 51
Transferring Files in Binary or ASCII Mode .......................................................................................... 51
Improving Slow Transfers ..................................................................................................................... 53
Specifying Time CuteFTP Waits after a Transfer Completes .............................................................. 53
Preserving the Local Time Stamp ........................................................................................................ 54
Transfer Settings .................................................................................................................................. 54
Managing Files and Folders ....................................................................................... 55
Opening, Editing, Renaming, and Deleting Files .................................................................................. 55
Viewing File and Folder Properties ....................................................................................................... 56
About CHMOD Permissions .................................................................................................... 57
Viewing and Editing HTML Files ........................................................................................................... 58
Updating or Refreshing Folder Listings ................................................................................................ 58
Listing Files and Folders in Order ......................................................................................................... 59
Changing How Files and Folders are Displayed .................................................................................. 59
Moving Items from One Folder to Another on a Remote Server .......................................................... 60
Changing File and Folder Permissions on Remote Sites ..................................................................... 60
iv
Table Of Contents
Finding Files and Folders ..................................................................................................................... 60
Troubleshooting .......................................................................................................... 63
Troubleshooting Tips ............................................................................................................................ 63
Using Error Messages and Logs to Troubleshoot ................................................................................ 64
FTP Status and Error Codes ................................................................................................................ 65
Cannot Close Data Transfer Gracefully ............................................................................................... 67
Cannot Initiate Data Transfer ............................................................................................................... 67
Cannot Resolve Host Name ................................................................................................................. 68
Child Transfer Failed ............................................................................................................................ 68
Not Enough Credits to Download ......................................................................................................... 68
Permission Denied................................................................................................................................ 69
Port Already in Use Error with Dial-up VPN ......................................................................................... 69
Failed to Establish Data Socket............................................................................................................ 69
Error 421 Messages ............................................................................................................................. 70
Installshield Error 1628: Failed to Complete Script-Based Installation ................................................ 70
Cannot Connect to Server .................................................................................................................... 71
Cannot See Remote Files or Folders ................................................................................................... 72
Copy and Paste Functions Remove File from the Remote Folder ....................................................... 72
Transferring to Case-Sensitive Servers ............................................................................................... 73
Conserve Local File Time Feature does not Work Properly when Connected to Serv-u FTP Server . 73
Using CuteFTP behind a Router .......................................................................................................... 74
Using CuteFTP with Norton Internet Security 2004 ............................................................................. 74
Truncated Listings ................................................................................................................................ 75
Firewall Problems ................................................................................................................................. 75
Socket Error 2000 ................................................................................................................................. 75
Getting Help ................................................................................................................. 77
GlobalSCAPE Support Center.............................................................................................................. 77
Finding Information in the Help............................................................................................................. 78
Searching the User Guide or globalscape.com ............................................................................. 78
Printing a Help Topic ...................................................................................................................... 79
Sharing Topic Links from the Online Help ..................................................................................... 79
Using the Knowledge Base .................................................................................................................. 80
®
GlobalSCAPE, Inc. CuteFTP Lite version 8 License .......................................................................... 81
v
CuteFTP Lite, v8.3
vi
About CuteFTP Lite
CuteFTP Lite is a Windows-based File Transfer Protocol (FTP) application that allows you to use FTP
without having to know all the details of the protocol itself. CuteFTP Lite simplifies FTP by offering a userfriendly Windows interface instead of a cumbersome command-line utility. CuteFTP Lite gives novice PC
users the ability to upload, download, and edit files on remote FTP servers around the world.
Installing and Removing the Software
System Requirements
Windows 2000, Windows XP, Windows Server 2003, Windows Server 2008, or Windows Vista.
An Internet connection
Microsoft Internet Explorer 5.5 or higher
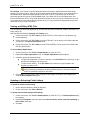
To install CuteFTP on your computer
1. Do one of the following:
Download and save CuteFTP from http://www.globalscape.com/downloads/, then doubleclick the executable to run the installer.
Place the installation CD in your DVD/CD-ROM drive. Installation should begin
automatically. If your DVD/CD-ROM drive does not support automatic installation:
a. Double-click My Computer located on the desktop.
b. Double-click the DVD/CD-ROM drive icon.
c.
Double-click the Setup.exe icon.
2. Follow the wizard instructions.
To remove CuteFTP from your computer
1. Click Start > Settings > Control Panel, then click Add/Remove Programs.
2. Click CuteFTP Lite.
3. Click Add/Remove.
4. Follow the wizard instructions. You are offered the option of retaining your site configuration and
logs, in case you are reinstalling or moving the application to a different computer.
For information about installing CuteFTP on Windows Vista, see Knowledge Base article #10278 on the
GlobalSCAPE support pages.
7
Activating CuteFTP
CuteFTP must be activated within 30 days or it will no longer function. When prompted, provide the serial
number you received when you purchased the product. You can use either your first and last name or
your company name. After you have provided the information, you can view your activation information on
the main menu by clicking Help > About CuteFTP.
To ensure your software is activated accurately, provide all of the optional details that are requested so
that we can confirm your eligibility for technical support or any upgrades that may become available in the
future.
Your serial number can be found on the invoice you received by email or on your product packing if
you obtained a boxed version. If you have lost your serial number, you can request a copy using
GlobalSCAPE's Lost Serial Number form. Customer Support can locate your serial number if you
provide your name, address, order ID, or any other pertinent data that might help us locate your
original purchase record.
When you enter your registration information, it will be transmitted to GlobalSCAPE via the Internet.
As part of the registration, the software assigns a unique number to your computer based on system
information and reports this number to us. We use this data to help us prevent the program from
being copied onto more computers than permitted by the license.
To register successfully, you must be connected to the Internet and have administrator
privileges on your computer. If a firewall or proxy server is in use, the network administrator
should ensure port 80 is open during the registration process.
To activate CuteFTP
1. On the Welcome screen, click Enter Serial Number or, on the main menu, click Help > Enter a
serial number. The Registration wizard appears.
2. In the Serial Number box, provide the serial number, then click Next.
3. Provide your name, email address, company name, and other details, then click Next.
4. To save a backup of the serial key in text format on a local drive, click Backup and Print
Registration Data. This information is useful if you change computers and need to install the
software on the new computer.
5. In the Backup Registration Location dialog box, browse for the folder in which you want to save
the backup, then click OK.
6. Click Finish.
Troubleshooting Product Activation
If activation fails, try the following resolutions:
Invalid Serial Number - The serial number must be entered exactly as it appears on your invoice or
label. It is not case sensitive. If you received a digital invoice, avoid typing errors by copying the serial
number to the Windows clipboard and then paste it (CTRL+V) into the serial number box in the
registration wizard.
Serial Number Entered for the Wrong Product type - Serial numbers are specific to a particular
product. Double-check your invoice to see which product and version you purchased. Compare that to the
product name and version shown in the About dialog box or on the splash screen. If they do not match,
then download the correct product from the GlobalSCAPE website. If you have accidentally purchased
the wrong product, then contact the GlobalSCAPE support team.
9
CuteFTP Lite, v8.3
Registration Unable to Complete due to a Network Problem - Because activation takes place over the
Internet, CuteFTP must be able to connect to our registration server to complete the activation process. If
it cannot connect or complete the process, it will prompt you with various alternatives. You can email us
certain information and we will reply with an unlock code or you can register via a Web form, which also
provides you with an unlock code. The final alternative is to continue as an "unverified" registration, which
means that we will honor the serial number you provided as valid for now and attempt to complete the
activation process later once a connection to the registration server is secured (checked at application
startup).
Lost Serial Number - If you cannot locate your serial number, you can obtain a copy from GlobalSCAPE
Support. If you still have the original email address used to purchase the software, on the main menu,
click Help > Locate a lost serial. If you no longer have access to that email account or do not recall
which email address you used, contact customer service department and provide your name, address,
order ID or any other pertinent data that might help us locate your original purchase record.
10
Frequently Asked Questions
How do I set up a connection to my FTP Server?
What is my FTP Host Address?
What is my user name and password?
How do I upload my files with CuteFTP?
How do I transfer files from one site to another (CuteFTP Professional only)?
How do I navigate the directory tree in CuteFTP?
How do I change the permissions of my files (CHMOD)?
How do I delete files from my server?
Why can I not connect to my FTP site?
Does CuteFTP support SSL (FTPS) and SSH2 (SFTP)?
How do I connect if I am behind a firewall?
Why are my files not transferring?
How do I remove files from CuteFTP that have finished transferring?
What is the Transfer Engine (TE)?
How do the various versions of CuteFTP differ?
How can I get a copy of CuteFTP?
How long does it take to download?
What sort of support do you offer for CuteFTP?
How can I best describe my problem if I contact technical support?
Refer to Troubleshooting for answers to problems frequently encountered.
How do I set up a connection to my FTP Server?
First time users should use the Connection Wizard, which will ask you for a Label for the site and the rest
of the login information provided to you by your Web Hosting Provider.
What is my FTP Host Address?
A host address will be in the format of ftp.mywebsite.com. This information is assigned by your Web
Hosting Provider. If you do not know the FTP address, contact your Web Hosting Provider or Internet
Service Provider. Many ISPs provide FTP configuration information on their Web site. For an example of
what to look for, go to http://help.yahoo.com/l/us/yahoo/geocities/gftp/gftp-09.html. A similar help page
should be available from the company that is hosting your web site.
What is my user name and password?
Your Web Hosting Provider or Internet Service Provider assigns this information. If you need to find out
what this information is, you can contact them and they will be able to give that information back to you.
How do I upload my files with CuteFTP?
First, you must configure and connect to your site. Once connected, you can upload your files by
browsing to the directory where your files are located on the left pane, click the files you want to upload,
then drag them to the corresponding folder in the right pane (the server side). You will see the upload
progress of your files in the Queue window.
11
CuteFTP Lite, v8.3
More on transferring files and folders.
How do I transfer files from one site to another?
In CuteFTP Professional, connect to two different servers. In the first server window, click the files you
want to transfer, then drag and drop these files to the second server window. The files will be transferred
from the first server to the second server. This feature is not available in CuteFTP Home or CuteFTP Lite.
How do I navigate the directory tree in CuteFTP?
The Local pane, located on the left side of the interface, shows files and folders on your computer. The
Remote pane, located on the right side of the interface, shows you the directories of the site to which you
are logged in. You can navigate your drives in the same fashion as in Windows Explorer.
How do I change the permissions of my files (CHMOD)?
Connect to your server using CuteFTP. Click to select the file whose permissions you want to change,
then right-click the selection and click Properties. The options for the permissions are located at the
bottom of the Properties dialog box. Only servers that support the CHMOD command allow you to
change permissions. You cannot change permissions on servers that do not support CHMOD.
Refer to Viewing File and Folder Properties for more information regarding CHMOD.
How do I delete files from my server?
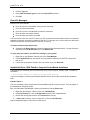
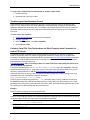
To delete files from your server, click the file you want to delete, then press Delete. You can also rightclick the file and click Delete, or you can click the file then click the Delete icon
on the toolbar.
Why can I not connect to my FTP site?
If you have tried to log into your FTP site and have been unsuccessful, a message appears telling you
that CuteFTP could not log in. Click Details to view the exact error message sent to you by the server.
Contact your Internet Service Provider or your Web Host Provider with this error message and they will be
able to assist you in getting connected. GlobalSCAPE Technical Support does not have access to your
Internet Service Provider/Web Host Provider's FTP information.
See Troubleshooting for more information
Does CuteFTP support SSL (FTPS) and SSH2 (SFTP)?
CuteFTP Professional supports SFTP, which is a component of SSH2. Professional and Home editions
both support SSL. CuteFTP Lite does not support SSL or SSH. Check with your server administrator or
ISP to verify that the server you are connecting to supports SSL or SFTP (SSH2).
You cannot connect with SFTP simply by configuring the proxy settings in Global Options. CuteFTP does
not support using SFTP through a proxy server that is not a SOCKS proxy server. Non-SOCKS servers
are "protocol dependent," meaning that if it's an FTP server, you must use FTP and if it's an HTTP server,
you must use HTTP. SOCKS proxy servers are not protocol dependent. A SOCKS proxy server works for
any TCP/IP socket connection, so the protocol should not matter.
How do I connect if I am behind a firewall?
If you are behind a firewall and you cannot connect, you will need to set up CuteFTP to connect through
that firewall. On the main menu, click Tools > Global Options > Connection node. Click either SOCKS4
& 5 or Proxy Server and complete the information. If you are unsure if you are behind a proxy firewall or a
socks firewall, or are not sure of the specific settings for that firewall, consult your system administrator or
Internet Service Provider for the correct settings. (Since servers can have a variety of configurations,
GlobalSCAPE Technical Support will not have that information.)
12
Frequently Asked Questions
Why are my files not transferring?
If a message appears that says your files could not transfer, click Details to view the exact error message
sent to you by the server. Contact your Internet service provider or your Web hosting provider with this
error message.
See Troubleshooting for more help.
How do I remove files from CuteFTP that have finished transferring?
To remove items from the Queue Window that have already transferred or will not transfer, on the main
menu, click Tools > Queue > Remove all. All of the items are removed from the Queue window. (Or your
can right-click in the Queue Window, then click Remove Selected, Remove Finished, or Remove All.)
What is the Transfer Engine (TE)?
CuteFTP uses a Transfer Engine (TE) to transfer files, which is completely independent of the main
application interface. You can configure CuteFTP Professional and Home to continue to transfer files
even after the main CuteFTP interface is exited. In CuteFTP Lite, the TE shuts down and all in-progress
transfers stop if the application is closed. CuteFTP Professional offers a COM interface to the Transfer
Engine that allows application developers to develop custom FTP solutions.
How do the various editions of CuteFTP differ from one another?
All editions of CuteFTP allow you to connect to FTP sites to transfer files. CuteFTP Professional provides
extra security, automation, and management tools, such as the Transfer Engine (TE) interface, and
capabilities for SFTP, HTTPS, site-to-site transfer, multi-part transfers, and more. Visit the comparison
page at http://www.globalscape.com/cuteftp/compare.asp for more information.
How can I get a copy of CuteFTP?
All editions of CuteFTP are available by download from our Web site at
http://www.globalscape.com/downloads/.
How long does it take to download?
Download time depends on your modem speed. On a regular 56K modem, CuteFTP takes about 7
minutes. The time to download decreases as your connection speed increases.
What sort of support do you offer for CuteFTP?
Free online self-help resources are available for all users at the GlobalSCAPE Help Center. Visit the
GlobalSCAPE Help Center for up-to-date information about all of the technical support options available
to you.
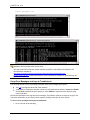
How can I best describe my problem if I contact technical support?
If you are having a transfer or connection problem, reproduce the problem, then copy and paste the log in
to our online support request form or your Web Hosting Provider/Internet Service Provider.
13
CuteFTP Lite, v8.3
14
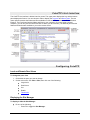
CuteFTP Lite's Interface
The CuteFTP Lite interface is divided into four panes. The upper pane displays the Log and the bottom
pane displays the Queue. You can choose to hide or display the Log pane and Queue pane. The two
center panes represent the folders and files available on local and remote drives, much like Windows
Explorer. The Local pane lists the folders and files on your computer. (If you are using a shared
computer, you can only see the folders and files to which you have access.) The Remote pane lists the
folders and files that are available to you on the remote server.
Configuring CuteFTP
Local and Remote Pane Views
To change the pane view
1. Click within the pane you want to change.
2. On the main menu, click View > View, then click one of the following:
Large Icons
Small Icons
List
Details
Thumbnails
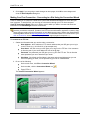
Displaying the Site Manager
To display or hide the Site Manager
Do one of the following:
o
Press F4 to toggle the Site Manager.
15
CuteFTP Lite, v8.3
o
On the main menu, click Tools > Site Manager > Display Site Manager.
If you are connected to a site when you choose to display the Site Manager, a confirmation prompt
appears to warn you that you will be disconnected from the site.
Displaying Folder Contents
To view listings in a parent folder
1. Click in the pane where you want to view the parent folder.
2. Click the Move up icon
.
To update (refresh) a folder listing
1. Display the folder.
2. Click in the pane where the folder is displayed.
3. Do one of the following:
On the main menu, click View > Refresh.
Right-click, then click Refresh.
Press F5.
Displaying the Connection Log
Messages between the local computer and the server are stored in the Log.
To display the connection log
On the main menu, click View > Show Panes > Log Pane (or press ALT+2).
The log for the active session is displayed above the local and remote panes.
Displaying Transfer Items
The Queue Window displays items ready for transfer, in transit, or just transferred.
To display or hide queued files and folders
On the main menu, click View > Show Panes > Queue Pane (or press ALT+2) .
Changing How Files and Folders are Displayed
You can display files and folders with large or small icons, in a list, or with file size and date-modified
details.
Large Icons - Displays files and folders as large icons
Small Icons - Displays files and folders as small icons
List - Displays files in a list, but no folders, and no details
Details - Displays files and folders in a list with the file or folder size, type, and date modified
To display files and folders as large icons, do one of the following:
Right-click in the Local or Remote pane, then click View > Large Icons.
16
Configuring CuteFTP
On the main menu, click View > View > Large Icons.
To display files and folders as small icons, do one of the following:
Right-click in the Local or Remote pane, then click View > Small Icons.
On the main menu, click View > View > Small Icons.
To display files in a list, but no folders, and no details, do one of the following:
Right click in the Local or Remote pane, then click View > List.
On the main menu, click View > View > List.
To display files and folders in a list with the file or folder size, type, and date modified, do one of
the following:
Right-click in the Local or Remote pane, then click View > Details.
On the main menu, click View > View > Details.
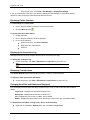
Configuring Startup Options
Configure startup options on the General node in Global Options.
To configure startup options
1. On the main menu, click Tools > Global Options.
2. Click the General node.
3. In the Startup events area, click the down arrow next to On startup then click one of the
following:
Click Display Site Manager to display the Site Manager automatically when launching
CuteFTP.
Click Connect to last connected site from Site Manager to automatically connect and
display the last site to which CuteFTP was connected when you last closed the interface.
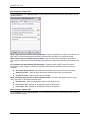
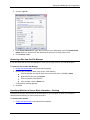
Configuring Display Settings
The display settings determine the way in which toolbars, icons, and fonts appear in dialog boxes.
To configure CuteFTP display settings
1. On the main menu, click Tools > Global Options (or press ALT+F7).
2. Expand the Display node. The Display options appear.
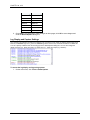
3. To sort file lists by the value of each digit or by whole number values, in the Sorting area, select
one of the following options:
o
To sort file lists by the value of each individual digit, select Use standard lexicographic
sorting for alphanumeric file names.
o
To sort file lists by whole number value, select Use Smart Sorting for alphanumeric file
names.
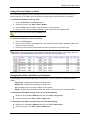
Smart Sorting always lists file names with smaller numbers first. For example, A2
comes before A12. David Wincelberg developed Smart Sorting. CuteFTP uses it by
default. Standard Lexicographic sorting lists file names using one character at a time
reading from left to right. For example, A12 comes before A2. MS Windows uses
Standard Lexicographic sorting by default.
17
CuteFTP Lite, v8.3
Smart Sorting Standard sorting
FileA1.ext
FileA1.ext
FileA2.ext
FileA12.ext
FileA6.ext
FileA2.ext
FileA9.ext
FileA20.ext
FileA12.ext
FileA21.ext
FileA20.ext
FileA6.ext
FileA21.ext
FileA9.ext
4. Click Apply if you are going to make changes to other pages; click OK to save changes and
close the Global Options dialog box.
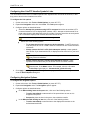
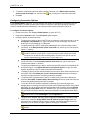
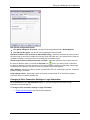
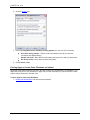
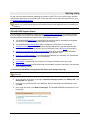
Log Display and Capture Settings
The connection and transfer information that appear in the Log pane is color coded. By default, STATUS logs are in
blue text, COMMAND logs are in green text, ERROR logs are in maroon text, and other information is in black text.
You can a specify a different color for each log type in the Global Options dialog box. You can also change the
display font type (e.g., Arial), font style (e.g., Bold), size (e.g., 10pts), and script (e.g., Western)..
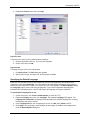
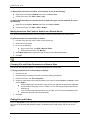
To access the log display and log saving options
1. On the main menu, click Tools > Global Options.
18
Configuring CuteFTP
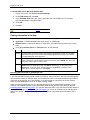
2. Expand the General node, then click Logs.
Log text colors
To specify a new color for all log window status messages
1. Click the applicable color icon. The color picker appears.
2. Click a color, then click OK.
Log text fonts
To change the style of text in the log windows
1. Click Select Font. The Font dialog box appears.
2. Specify the font type, font style, size, and script then click OK.
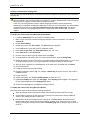
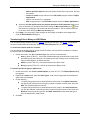
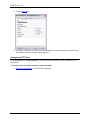
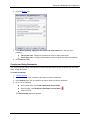
Specifying the Default Language
CuteFTP's user interface resources are independent from the main application executable and are
contained in a file called Default.lng. You can modify the text and dialogs displayed in the program or
localize the entire resources in order to use CuteFTP in your own language. The Global Options dialog
box Language page is used to select the language file. If you have the applicable language pack
installed for the operating system, CuteFTP will support the language and special characters.
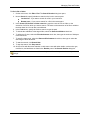
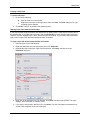
To specify which language file to use
1. On the main menu, click Tools > Global Options (or press ALT+F7).
2. Expand the Display node, then click Language. The available Language Files appear. The
Language File Information list displays information about the selected language file, including
the language and version number.
3. In the Language File list, click a language file to use, click OK, then restart CuteFTP.
4. Click Apply if you are going to make changes to other pages; click OK to save changes and
close the Global Options dialog box.
19
CuteFTP Lite, v8.3
Creating a Customized Language File
You can use tools such as Microsoft Visual Studio and Resource Hacker to create your own customized
language file.
This topic is for advanced users only. Do not attempt if you are unfamiliar with Visual Studio or
Resource Hacker. The procedure below is provided as a courtesy. GlobalSCAPE Technical Support
does not provide support for Visual Studio or Resource Hacker.
CuteFTP's License Agreement contains specific language prohibiting reverse engineering,
decompiling, or otherwise modifying the application or any one of its components. You are permitted
to modify the resource file for your own personal use on your own system only. You are not
allowed to distribute your modified resource file to anyone other than GlobalSCAPE Technical
Support.
To modify the resource file using Microsoft Visual Studio
1. Locate the default.lng file in the CuteFTP installation folder.
2. Make a copy of this file in the same folder and rename it with a dll extension. For example:
custom.dll.
3. Launch Visual Studio.
4. On the main menu, click File > Open. The Open dialog box appears.
5. In the Look in box, locate the CuteFTP installation folder.
6. In the Files of type field, click Executable Files (.exe; .dll; .ocx).
7. In the Open as box, click Resources.
8. Click the resource dll file you just created, then click Open.
9. In Visual Studio's main editor, click one of the resource folders, such as String Table.
10. Modify the resource strings. Take care to not modify dynamic string placeholders (i.e. %d or %s)
or escape sequences (\n). The "&" sign represents a mnemonic and must remain intact.
11. After you have completed your modifications, on the main menu, click File, then click Save.
12. Close Visual Studio.
13. Locate the resource dll you just modified.
14. Change its extension back to lng. For example: custom.lng. Be sure to save it in the CuteFTP
installation folder.
15. Launch CuteFTP.
16. On the main menu, click Tools > Global Options (or press ALT+F7).
17. Expand the Display node, then click Language. The Language options appear. The language
file you created appears in the Language File column.
18. Click the new language file, click OK, then restart CuteFTP.
To modify the resource file using Resource Hacker
Follow the same steps as above with the following exceptions:
When opening the dll file in Resource Hacker, select Win32 PE files as the Files of type.
As you edit the resources of each node in the resource tree, make sure to select COMPILE
SCRIPT after making changes to that node.
Remember to save your changes (on the main menu, click File > Save). Resource Hacker
automatically makes a backup of the original dll file. All other steps are the same as in Visual
Studio, including the naming of the file back to something.lng and the steps on how to load it in
CuteFTP.
20
Configuring CuteFTP
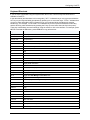
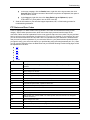
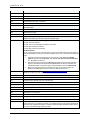
Keyboard Shortcuts
If you are more comfortable using the keyboard than the mouse, numerous keyboard shortcuts are
available in CuteFTP.
In the table below (and elsewhere in this user guide), "ALT+" indicates that you are to press and hold the
ALT key on your keyboard while simultaneously pressing one or more other keys. "CTRL+" indicates that
you are to press and hold the CTRL (Control) key on your keyboard while simultaneously pressing
another key. For example, "CTRL+SHIFT+D" indicates that you are to press and hold the Control Key
and the Shift key, while simultaneously pressing the D key (to move items down the list in the queue).
These key combinations are used instead of using the mouse to click in the interface. For example, press
ALT+F to activate the File menu; press CTRL+C to copy selected text.
Key
Function
Backspace
Move to parent folder
Number Pad +
Group select
Number Pad -
Group deselect
Number Pad *
Invert selection
Tab
Moves focus between tabs (documents) in the active pane group
Delete
Delete selected object
Esc
Cancel transfer
F1
Help
F2
Rename
F3
Find next
F4
Switch between Site Manager and Local Drives tabs
F5
Refresh active pane
F8
Display folder information
F9
Cancel transfer
Alt+Enter
Folder, file, or site properties
Alt+Up Arrow
Move to parent folder
Alt+F7
Display Global Options dialog box
Alt+0
Toggle show Site Manager /Local Pane view
Alt+1
Toggle show Queue /Log Pane
Alt+2
Hide or display individual log window (same as F12)
Alt+Q
Exit
CTRL+A
Select All
CTRL+C
Copy
CTRL+D
Change remote folder
CTRL+E
Execute file
CTRL+F
Find
CTRL+J
Launch Connection wizard
CTRL+M
Make new folder
CTRL+N
New FTP Connection
CTRL+O
Open (new document)
CTRL+Q
Add current path as new bookmark
21
CuteFTP Lite, v8.3
Key
Function
CTRL+R
Reconnect
CTRL+T
Connect to selected site
CTRL+W
View file
CTRL+X
Cut
CTRL+F8
Quick Connect
CTRL+~ (tilde)
Move focus between left, right and bottom panes
CTRL+PAGE
DOWN
Download
CTRL+PAGE UP
Upload
CTRL+Tab
Move focus right to left among open connections and documents
CTRL+ENTER
Edit selected document (also creates a line-break when in the integrated editor's Find/Replace
utility)
CTRL+ALT+T
Toggles Thumbnail view
CTRL+SHIFT+B
Change item queue order (place at bottom)
CTRL+SHIFT+D
Change item queue order (move down one)
CTRL+SHIFT+T
Change item queue order (move to top)
CTRL+SHIFT+U
Change item queue order (move up one)
SHIFT+F4
Disconnect
22
Connecting to Sites
The topics below describe the various methods for connecting to sites to transfer files.
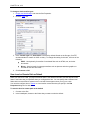
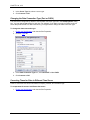
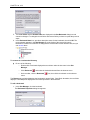
Configuring Internet Connection (DUN/LAN) Settings
CuteFTP automatically detects which method you use to connect to the Internet. You must have a
network connection configured on the computer on which you are using CuteFTP in order for it to detect
the settings.
If you connect to the Internet with a phone modem, you are using Dial-Up Networking (DUN). If
you have a modem connection configured, it will detect it and allow you to use it. If you do not
have a modem installed, the modem options are not available.
If you connect to the Internet with a cable modem, DSL modem, or through a computer network,
you are using a Local Area Network (LAN). If you have a LAN connection, it will detect it and
allow you to use it. If you do not have a LAN connection, the LAN options are not available.
If CuteFTP does not detect your modem, search the Microsoft Window's help file (Start > Help and
Support) for "Make an Internet Connection."
To access Dial-up and Network settings
1. On the main menu, click Tools > Global Options (or press ALT+F7).
2. Expand the Connection node, then click DUN/LAN. The DUN/LAN options appear.
3. Configure options as described below.
If you connect to the Internet with a cable modem, DSL modem, or through a computer
network, click Connect to the Internet using a LAN.
If you connect to the Internet using a modem over regular telephone lines, click Connect to
the Internet using a modem.
If you are using a dial-up connection, configure the following options:
o
In the Use the following Dial-Up Networking connection box, click the dial-up
connection you want CuteFTP to use. The list includes every dial-up connection
on the local computer that is available in Windows. Many computers list only one.
o
To display the dial-up connection user name and password whenever CuteFTP
attempts a connection, select the Show authentication window (requires user
input) check box. Clear this check box to stop the display of the dial-up
connection user name and password when CuteFTP attempts a connection.
o
To display messages when an error occurs with the dial-up connection, select
the Show error prompts (requires user interaction) check box. Clear this
check box to stop the display of error messages from the dial-up connection.
o
To disconnect from the Internet automatically when CuteFTP or the Transfer
Engine shuts down, select the Disconnect from the Internet upon program
exit check box. Clear this check box to keep the Internet connection active after
CuteFTP shuts down.
o
To specify how many times CuteFTP tries to establish a dial-up connection to the
Internet after a connection fails, in the Number of times to attempt connection
box, specify from 0 to 1000 attempts.
o
To specify how long in seconds CuteFTP waits between attempts to establish a
dial-up connection to the Internet, in the Number of seconds to wait between
attempts box, specify from 0 to 1000 seconds (1000 seconds equals almost 17
minutes).
23
CuteFTP Lite, v8.3
4. Click Apply if you are going to make changes to other pages; click OK to save changes and
close the Global Options dialog box.
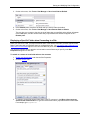
Making Your First Connection - Connecting to a Site Using the Connection Wizard
CuteFTP allows you to connect to a Web site to upload and download files between a server and your
local computer. To transfer files, you must log on to that server through your FTP client computer.
CuteFTP Connection Wizard helps you to define a site to which you want to connect and saves the
information in the Site Manager for future connections.
The Internet Service Provider (ISP) or Web Hosting Provider to which you want to upload files
provides you with the username, password, and FTP account information required to connect to their
server. Many providers offer this information on their Web support pages. Refer to the GlobalSCAPE
Knowledge Base articles at http://kb.globalscape.com/ for information about FTP connections to your
AOL or Roadrunner accounts or search your provider's support pages for keyword ftp.
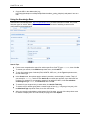
To connect to an FTP site
1. Gather the information that you need to make a connection:
Host Address - the IP address or FTP domain address that your ISP gave you to log in
to the FTP site (e.g., 64.243.64.21 or ftp.example.com).
User Name - the user name your ISP gave you to log in to the FTP site. Your username
is often the part of your email address in front of the @ sign.
Password - the password your ISP gave you to log in to the FTP site. This is often the
same password you use to download your email.
Site Name - By default, the Site Name is the same as the Host Address, but you can
name it anything you want; it is not provided by your ISP or GlobalSCAPE.
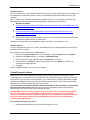
2. Do one of the following:
On the main menu, click File > Connection Wizard.
On the toolbar, click the Connection Wizard icon
Press CTRL+J.
The CuteFTP Connection Wizard appears.
24
.
Storing and Modifying Site Configuration
3. In the Host Address field, type the IP address or FTP domain address that your ISP gave you to
log in to the FTP site.
4. The address that you typed in the Host Address field appears in the Site Name field. You can
leave it as is, or type a descriptive name for this site. The site name will appear on the Site
Manager tab.
5. Click Next. The login page appears
6. In the User Name box, type the user name your ISP gave you to log in to the FTP site.
7. In the Password box, type the password your ISP gave you to log in to the FTP site.
8. Specify a login method from the following options.
Normal - The user name and password are mandatory to connect to a site.
Anonymous - The site does not require any user name and password.
Double - The user name and password are required twice to connect to a site.
9. Click Next. The Connecting to Site message appears.
If you need to change the host address or do not want to log in, click Cancel.
If the connection fails, an error message appears. Click Yes to close the message, then
click Back to verify/correct the host address, username, and password. (If the connection
fails again, refer to Troubleshooting.)
10. After you are connected to the FTP site, the default folders page appears.
11. In the Default Local Folder field, click the folder icon
to browse for the default folder from
which you want to upload/download files to/from the server.
12. In the Default Remote Folder field, type the path of the remote folder from/to which you want to
upload files.
13. Click Next. The Connection Completed page appears.
14. Click Finish. Cute FTP connects to the site and saves the site in the Site Manager.
For subsequent connections to this FTP site, refer to Connecting to a Site.
Refer to Configuring Connection Options for details of how to configure the number of simultaneous
connections you will allow from CuteFTP, number of times CuteFTP tries to connect to a site before
giving up, how long CuteFTP should wait before attempting a new connection after a failed connection,
and so on.
25
CuteFTP Lite, v8.3
Connecting to Sites in the Site Manager
After you have connected to a site in the Connection Wizard, you can later connect to the site from within
the Site Manger.
To connect a site in the Site Manager
1. Display the Site Manager. A list of sites to which you have previously connected appear in the
Remote pane.
2. Right-click a site, then click Connect, double-click the site, or press CTRL+T. The Login dialog
box appears.
3. Type the Username and Password provided to you by the server administrator.
4. In the Password protection box, click an encryption option, if required by the server (Not
encrypted, MD4, MD5).
26
Storing and Modifying Site Configuration
5. If you want to connect automatically next time, select the Do not show this prompt again check
box. If you select the check box, then when you right-click the site, then click Connect, doubleclick the site, or press CTRL+T, the Login dialog box will not appear. Instead, CuteFTP will
attempt to connect you to the site using the login credentials that you provided for the previous
connection.
6. Click OK. CuteFTP connects to the site.
Configuring Tolerance Options
Some servers treat PASV mode and links differently than others. Configure from the tolerance options to
help CuteFTP connect to these servers.
To configure the Tolerance settings
1. On the main menu, click Tools > Global Options (or press ALT+F7).
2. Expand the Navigation node, then click Tolerance. The Tolerance options appear.
3. Configure options as described below.
When using PASV mode, select the Use correct timing of PASV mode command check
box. This option works with most FTP servers. If you are having difficulty connecting in
PASV mode, clear this check box.
To use the Print Working Directory (PWD) command to determine which remote folder is
currently open on the server, select the Use PWD to determine current folder check box.
Clear this check box and CuteFTP attempts to determine the current remote folder based
upon the relative location from the root login folder. If your server does not support PWD,
clear this check box.
To send the absolute path to the file to complete delete, download, or upload file operations,
select the Use absolute paths for DELE, RETR, and STOR commands check box (e.g.,
"RETR /pub/cuteftp/cuteftp.exe"). If your server does not support absolute path names for
these commands, clear this check box, and CuteFTP will send the relative path to the file
instead (e.g., "RETR cuteftp.exe").
To use the complete absolute path to retrieve the listings for a folder, select the Use
absolute paths for the LIST command check box. For example: "LIST /pub/cuteftp". If your
server does not support absolute path names for the LIST command, clear this check box,
and CuteFTP will use the relative file path to retrieve the listings for a folder (e.g., "LIST").
To retrieve a list of just file names for each folder, select the Use NLST instead of LIST
(retrieves an abbreviated listing) check box. The list does not include time stamps, file
size, or other details. Clear this check box to use the LIST command and retrieve a list with
details for each file and folder.
To continue login attempts if the server returns permanent errors (5xx) inappropriately, such
as when the server is full or busy, select the Treat 5xx errors as 4xx errors during login
check box. To accept permanent errors, stop further connection attempts, and avoid being
banned for hammering, clear this check box.
Selecting this option may result in being banned from a server. CuteFTP will repeatedly
try to connect to the server (according to retry and retry delay settings). If the retry delay
period is set too low, these repeated attempts may end up being considered
"hammering," and the server administrator or service may ban your accounts.
4. Click Apply if you are going to make changes to other pages; click OK to save changes and
close the Global Options dialog box.
27
CuteFTP Lite, v8.3
Configuring How CuteFTP Handles Symbolic Links
You can determine how CuteFTP handles symbolic links. Symbolic links are similar to shortcuts, in that
they point to items in other locations on a server.
To configure the Link options
1. On the main menu, click Tools > Global Options (or press ALT+F7).
2. Expand the Navigation node, then click Links. The Links options appear.
3. Configure options as described below.
Select the Attempt link resolution using LIST-L command check box to send the LIST-L
command instead of LIST to display folder contents. LIST-L attempts to list the actual file or
folder rather than the link that points to the file or folder. Clear this check box to send just the
LIST command to display folder contents and leave links in the list.
Servers are not always able to resolve links using LIST-L.
Select one of the following options:
o
Try to determine the link's target type by its extension - CuteFTP tries to tell
if the link points to a file or a folder. CuteFTP treats the link as if it were the item it
references.
o
Always assume the link is a file (don't attempt to resolve) - treats symbolic
links as files. If you download the link, it displays as a file with size 0 in your local
folder.
This option is useful when you download large directories or folders with
many files and subfolders.
o
Always assume the link is a folder (don't attempt to resolve) - treats
symbolic links as folders that you can double-click to see folder contents.
CuteFTP attempts to show the actual path of a file or folder link in the
Remote pane, in the Name column. For example, a link to a file called
archive.zip might display as .3/networks/bbs_info/archive.zip.
4. Click Apply if you are going to make changes to other pages; click OK to save changes and
close the Global Options dialog box.
Configuring Navigation Options
To configure the navigation options
1. On the main menu, click Tools > Global Options (or press ALT+F7).
2. Expand the Navigation node. The Navigation options appear.
3. Configure options as described below.
In the When adding items to the queue box, click one of the following actions:
o
Transfer immediately to start transfer of the queued item as soon as it is
dropped in the queue.
o
Suspend to place the item in the queue, but to hold the transfer.
In the When double-clicking an item box, click one of the following actions:
o
28
Transfer immediately to send the item to the displayed remote site or the
default download folder
Storing and Modifying Site Configuration
o
Add to queue & suspend to place the double-clicked item in the queue, but hold
the transfer
o
Launch in viewer to open the item in the File Viewer program chosen in Helper
Applications
o
Open to run the item if it is a program
o
Edit to open the item in the File Editor program chosen in Helper Applications
Select the Use the logical parent (not physical parent) on CDUP command check box to
return to the folder you just linked from when clicking the Move up directory icon
. Clear
this check box to change to the actual folder the item resides in, and not a folder with a link
to the item, when clicking the Move up directory icon.
4. Click Apply if you are going to make changes to other pages; click OK to save changes and
close the Global Options dialog box.
Transferring Files in Binary or ASCII Mode
You can specify binary or ASCII mode for a session, globally (per file type), and per site. All extensions
are sent in binary mode unless they are listed in the ASCII extensions list, as described below.
To choose the transfer mode for a session
You can change the transfer type for a single CuteFTP session. Once CuteFTP is restarted, it reverts to
the transfer type set in Global Options.
1. On the main menu, click File > Transfer Type, then click one of the following:
Auto (or press CTRL+F1) - Auto is the default transfer type, and sends files in the mode
specified for each file's extension. All extensions are sent in binary mode unless they are
listed in Global Options, as described below.
ASCII (or press CTRL+F2) - files will be transferred in ASCII mode.
Binary (or press CTRL+F3) - files will be transferred in Binary mode.
To transfer specific file types in ASCII mode
1. On the main menu, click Tools > Global Options (or press ALT+F7). The Global Options dialog
box appears.
2. Expand the Transfer node, then click ASCII Types. A list of the file types that are transferred in
ASCII mode are displayed.
3. Do the following:
To specify file types that are to be transferred in ASCII mode, in the ASCII extensions
list, type the file extension for the file type you want to transfer in ASCII mode, then click
Add. The extension appears in the list.
To specify file types that are to be transferred in binary mode, in the ASCII extensions
list, click the extension of the file type that you want to transfer in binary mode, then click
Remove. Removing the file type from the ASCII extensions list will cause that type of
file to be transferred in binary mode.
4. Click OK.
29
CuteFTP Lite, v8.3
To change a site's transfer types
1. Display the Site Manager and view the Site Properties.
2. Click the Type tab.
3. In the Transfer type box, Auto-detect is selected by default. Based on the file type, CuteFTP
decides whether to transfer in ASCII or binary. To change this setting for this site, click one of the
following:
ASCII - Used primarily for transfer of text-based files such as HTML, text, and other
documents.
Binary - Used primarily for data type transfers such as pictures and other graphics or
files that do not have line feeds.
4. Click Connect or OK.
Save Local or Remote Path as Default
When you connect to a site, your My Documents folder is the default local folder, and the default remote
folder is the folder that you specified when you configured the site. You can specify that a different local
folder and/or remote folder to appear in the Local and Remote panes when you log in to a site.
You can also configure sites to switch to a local and/or remote filter that you specify in the Site
Properties dialog box for each site.
To save the local or remote path as the default
1. Connect to the Site.
2. In the Local pane, browse to the folder that you want to make the default.
30
Storing and Modifying Site Configuration
3. On the main menu, click Tools > Site Manager > Save Local Path as Default.
4. In the Remote pane, browse to the folder that you want to make the default.
5. On the main menu, click Tools > Site Manager > Save Remote Path as Default.
The next time you connect to the site, the local folder that you specified as the default will appear
in the Local pane, and the remote folder that you specified as the default will appear in the
Remote pane.
Displaying a Specific Folder when Connecting to a Site
When you connect to a site, your My Documents folder is the default local folder, and the default remote
folder is the folder that you specified when you configured the site. You can specify that a different local
folder and/or remote folder appear in the Local and Remote panes when you log in to a site.
You can also configure sites to switch to a local and/or remote filter that you specify in the Site
Properties dialog box for each site.
To switch to a remote or local folder when a site connects
1. Display the Site Manager and view the Site Properties.
2. Click the Actions tab.
3. To switch to a specified remote folder when CuteFTP connects, in the When client connects,
switch to this remote folder box, type the remote folder name, prepended with a forward slash.
For example, type /mywebsite.
31
CuteFTP Lite, v8.3
4. To switch to a specified local folder when CuteFTP connects, in the When client connects,
switch to this local folder box, click the folder
icon to browse to a select the local folder.
5. Click OK.
Configuring Connection Options
In the Global Options dialog box, you can configure the number of simultaneous connections you will
allow from CuteFTP, number of times CuteFTP tries to connect to a site before giving up, how long
CuteFTP should wait before attempting a new connection after a failed connection, and so on.
To configure connection options
1. On the main menu, click Tools > Global Options (or press ALT+F7).
2. Expand the Connection node. The Connection options appear.
3. Configure options as described below.
To specify the number of times CuteFTP tries to connect to a site before giving up, in the
Connection retry attempts box, type or select the number of attempts. You can set
CuteFTP to try connecting up to 1,000 times.
To specify how long CuteFTP waits before attempting a new connection after a failed
connection, in the Delay between retries in seconds box, choose up to 1,000 seconds
(about 17 minutes).
CuteFTP does not automatically retry after fatal errors, such as a host unreachable
(invalid IP address or host name), or upon receiving a socket 1006n error, which
usually has to do with the client not being able to connect to the host for various
reasons (firewall blocking, network error, host is down, etc.).
To specify how long CuteFTP waits for an unresponsive server before it stops attempting
a new connection, in the Connection timeout in seconds box, type or select up to
1,000 seconds (about 17 minutes).
To specify the address that you want to send to servers that require an email address for
anonymous log ins, in the Email address for anonymous logins box, type the email
address. By default, CuteFTP sends a simulated email address.
To display a pop-up window with information from the server when initial connections are
successful, select the Display the server's welcome message check box. Clear this
check box to skip the server's successful connection message.
To send the QUIT command from CuteFTP no matter how you choose to disconnect,
select the Send QUIT command before disconnecting check box. Clear this check box
to disconnect without sending the QUIT command.
To use the UPnP NAT interface (available in Windows XP) to provide proper port
mapping when connecting securely from behind a NAT/firewall using PORT mode (rather
than PASV, due to the remote host also being behind a NAT/firewall), select the Enable
port mapping using UPnP check box. Without UPnP, you would need to manually set
the port range in the client and also enable and forward them in the NAT/firewall device.
You can choose Max connections, Delay between retries, and Retry attempts for
individual sites. In the Site Manager, click the Options tab.
To specify an IP address and define a port range when establishing connections using
PORT mode, select the Assign PORT mode IP address and port range check box,
then specify the IP address and port range. Typically, this setting should be turned off.
Optionally, you can specify a range of ports for issuing port commands.
Use local port range when you have a defined limited number of open ports on your
firewall.
32
Storing and Modifying Site Configuration
4. Click Apply if you are going to make changes to other pages; click OK to save changes and
close the Global Options dialog box.
Storing and Modifying Site Configuration
Backing Up Site Configurations
CuteFTP can back up your site configuration and save the backup file in any directory you specify. It is a
good idea to back up this data in case you need to restore your setup.
To back up the configurations in Site Manager
1. On the main menu, click Help > Backup Personal & Registration Data.
2. Specify the location to save your backup data. CuteFTP create backup files (key.reg, serial.txt,
and sm.dat) in the location you specified.
3. You are prompted to print out your registration information. If you click Yes, the following
information prints to your default printer:
Instructions for restoring your registration (using key.reg)
Instructions for restoring your Site Manager configuration (using sm.dat)
Your registration number
(This same information is saved in the backup file serial.txt.)
Modifying Site Properties
You can change a number of connection settings for individual sites in the Site Manager. The changes
made to sites in the Site Manager only affects the individual site.
To change site properties or settings
1. Display the Site Manager and view the Site Properties.
2. Click the General, Type, Actions, or Options tab.
3. Modify the site properties, then do one of the following:
Click Connect to connect to the site.
Click OK to save the changes without connecting.
Click Cancel to abort the changes.
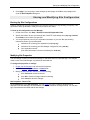
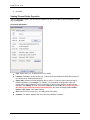
Site Properties - General Tab
On the General tab of the Site Properties, you can modify the name (Label) by which the site is
displayed in the Site Manager, the host address, username, password, and login method. You can also
type comments that are saved with the site settings.
33
CuteFTP Lite, v8.3
Label - Type a descriptive name for the site, as it will appear in the Site Manager.
Host address - Type the address to which you will connect for this site. The address can be a domain
name, such as ftp.example.com, or an IP address, such as 192.168.125.210. If you do not know the
address, your hosting provider or system administrator should be able to provide it to you. Many ISPs
provide FTP configuration information on their Web site. For an example of what to look for, go to
http://help.yahoo.com/l/us/yahoo/geocities/gftp/gftp-09.html. A similar help page should be available from
the company that is hosting your web site.
Username - Type the username given to you by your hosting provider.
Password - Type the password given to you by your hosting provider.
Comments - Type any notes about the site that you want to save with the site.
Login method:
Click Normal if the server requires your user name and password for a connection.
Click Anonymous if the server does not require a user name and password for a connection.
Click Double if you need to supply your user name and password twice for a connection.
Connect - Saves site changes and connects to the site.
OK - Saves changes and closes Site Properties.
Cancel - Cancels changes and closes Site Properties.
Help - Opens the online help.
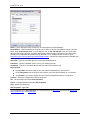
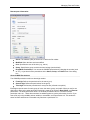
Site Properties - Type Tab
On the Type tab of the Site Properties, you can synchronize the time zone, and define the server type,
data connection type, and transfer type.
34
Storing and Modifying Site Configuration
Port - The default port number appears (e.g., FTP = 21) You can change the number if the default is not
correct for your site. Contact your ISP/Web service provider for the correct port number.
Server type - If you keep the default of Auto-detect, CuteFTP tries to determine what kind of server is at
the site. If you have connection problems, or you know what kind of server is at the site, you can choose
from the list that includes UNIX, UNIX compatible, Windows NT, and many others.
Data connection type - Click Use global settings. CuteFTP uses the connection type set in Global
Options > Transfer. You can also specify PORTor PASV connection mode.
Transfer type - Specify the transfer type you set in Global Options or one of the following:
Auto-detect: Based on the file type, CuteFTP decides whether to transfer in ASCII or binary.
ASCII: Used primarily for transfer of text-based files such as HTML, text, and other documents.
Binary: Used primarily for data type transfers such as pictures and other graphics, or files those
do not have line feeds (carriage returns).
Server time zone - Specify No Offset if the server is in the same time zone as yours. If the server is in a
different time zone, specify it here. These time zones do not account for Daylight Saving Time. To
account for Daylight Saving Time, choose a time zone one hour ahead of the server's time zone. For
example, if you are connecting to a server in Central Daylight time, set the time zone to Eastern Standard
Time.
Time Zone Synchronization - Select the Automatically detect check box to enable time zone
synchronization.
The Time Zone Synchronization feature helps in synchronizing time for all of the time zones. For
example, if you set the time zone to CST, then during daylight savings the difference in the time occurs.
In that case, you select the time zone one hour ahead of the server's time zone.
Time Zone synchronization feature helps in comparing the time of the file when it is uploaded on the
remote server to the local computer time, rounding to the nearest 30 minutes. The difference in the time is
the Time Zone offset.
The CuteFTP shall automatically detects the remote server time zone and synchronize it with the local
computer time zone when a file is transferred.
By default the Automatically detect check box is not selected.
35
CuteFTP Lite, v8.3
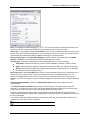
Site Properties - Actions Tab
On the Actions tab of the Site Properties, you can specify the actions to take when you connect to and
upload to the site.
When client connects, switch to this remote folder - Type the full path to any folder on the remote site,
and CuteFTP will automatically open the folder in the Remote Pane when you connect to the site.
When client connects, switch to this local folder - Type or browse to the full path for any folder on
your computer, and CuteFTP will automatically open the folder in the Local Pane when you connect to the
site.
For navigation use the following caching options - Caching means CuteFTP stores the site list
information on your computer, so when you navigate to different files and folders, you do not have to
reconnect.
Use cache during session - Store the site's information only until you close the connection.
Always use cache - Store the site's information and keep it even after you disconnect.
Do not use cache - Never store the site's information.
When uploading, apply this rule to files and folder names - Use this to change file names to upper
case, lower case, or to keep the case the same.
Preserve case - Keep all uploaded file names in their original case.
Force lower case - Change all uploaded file names to small letters.
Force upper case - Change all uploaded file names to all capitals.
Site Properties - Options Tab
On the Options tab of the Site Properties, you can specify the number of retry attempts, delay between
retries, and other options.
36
Storing and Modifying Site Configuration
Site-specific configuration options
Use global settings for all options - the site will use the parameters set in Global Options
Use site specific option - the site will use the parameters set on this tab.
Use NLST instead of LIST (retrieves an abbreviated listing) - Select this check box to get only a list of
file names and no other file information from the site. Clear this check box if you want the site to send you
complete file listings, including file size, file modified date, and folder names.
Use the logical parent (not physical parent) on CDUP - Select this check box if you want to return to
the previous directory when you clicked the Up folder icon
, even if you clicked a link or shortcut in
the previous directory. Clear this check box to go back to the parent directory for this folder, which might
not have been the directory you were in when you jumped to the current directory.
Retry attempts - Specify the number of times you want CuteFTP to try connecting to this site, if there is a
problem making a connection.
Delay between retries - Specify the number of seconds you want CuteFTP to wait before retrying a
connection after a connection attempt fails.
Changing a Site's Connection Settings or Login Information
On the General tab of the Site Properties dialog box, you can change the connection or login
information for the selected site.
To change a site's connection settings or login information
1. Display the Site Manager and view the Site Properties.
37
CuteFTP Lite, v8.3
2. Click the General tab.
3. Change the information as needed, then click Connect to accept the changes and connect to the
site or OK to accept the changes without logging in.
Changing the FTP Port
On the General tab of the Site Properties, you can change the connection or login information for the
selected site.
To change a site's connection settings or login information
1. Display the Site Manager and view the Site Properties.
38
Storing and Modifying Site Configuration
2. Click the Type tab.
3. In the Port box, type a new port number, then click Connect to accept the changes and connect
to the site or OK to accept the changes without logging in.
Designating a Site's Server Type
You can improve compatibility with individual sites by designating the type of server used for that site.
To designate server type
1. Display the Site Manager and view the Site Properties.
2. Click the Type tab.
39
CuteFTP Lite, v8.3
3. In the Server Type list, select a server type.
4. Click Connect or OK.
Changing the Data Connection Type (Port or PASV)
The sites are all configured by default to use the data connection type set in the Global Options dialog
box. You can change that setting for each site. For example, if you want to connect in PASV mode to a
server that prefers PORT for data connections, you might need to change the data connection type.
To change the data connection type
1. Display the Site Manager and view the Site Properties.
2. Click the Type tab.
3. In the Data Connection Type box, click Use PORT or Use PASV.
4. Click Connect or OK.
Correcting Times for Sites in Different Time Zones
CuteFTP uses time zone offset information for display, transfer, and overwrite logic.
To compensate for servers in different time zones
1. Display the Site Manager and view the Site Properties.
40
Storing and Modifying Site Configuration
2. Click the Type tab.
3. In the Server time zone list, select the server's time zone. Alternately, select the Automatically
detect check box, and CuteFTP will determine the time zone from the system clock.
4. Click Connect or OK.
Removing a Site from the Site Manager
If you have sites defined in the Site Manager to which you no longer connect, you can delete them.
To remove a site from the Site Manager
1. Display the Site Manager and view the Site Properties.
2. Click the site you want to delete, then do one of the following:
Click the site that you want to delete, then on the main menu, click File > Delete.
Right-click the site, then click Delete.
On the keyboard, press DELETE.
On the toolbar, click the Delete icon.
A confirmation message appears.
3. Click Yes.
Specifying Whether to Save a Site's Information - Caching
Caching means CuteFTP stores the site list information on your computer, so when you navigate to
different files and folders, you don't have to reconnect.
To specify cache options
1. Display the Site Manager and view the Site Properties.
41
CuteFTP Lite, v8.3
2. Click the Actions tab.
3. In the For navigation use the following caching options box, click one of the following:
Use cache during session - Store the site's information only until you close the
connection (the default setting).
Always use cache - Store the site's information and keep it even after you disconnect.
Do not use cache - Never store the site's information.
4. Click Connect or OK.
Forcing Upper or Lower Case Filenames on Upload
By default, all file names upload to the site in the case in which you created them. For consistency, you
might want to force all of your filenames to upper case or lower case when you upload the files. Certain
servers require filenames in all lower case.
To force upper or lower case filenames.
1. Display the Site Manager and view the Site Properties.
42
Storing and Modifying Site Configuration
2. Click the Actions tab.
3. In the When uploading, apply this rule to files and folder names box, click one of the
following:
Force lower case - Change all uploaded file names to lower-case letters.
Force upper case - Change all uploaded file names to upper-case letters (all capitals).
4. Click Connect or OK
Creating and Using Bookmarks
You can have special entries called bookmarks associated with sites that open a specific local or remote
folder, or both the folders.
To create a bookmark
1. Connect to a site.
2. In the Local pane, click or browse to the folder you want to bookmark.
3. In the Remote pane, click or browse to the remote folder you want to bookmark.
4. Do one of the following:
On the main menu, click Tools > Bookmark current folder.
On the toolbar, click Bookmark > Bookmark current folder
.
Press CTRL+Q.
The Set bookmark dialog box appears.
43
CuteFTP Lite, v8.3
5. The Local folder and the Remote folder are displayed in the Set Bookmark dialog box and
cannot be changed. To change the local folder and remote folder you have to repeat the previous
steps.
6. In the Bookmark Name box, provide a descriptive name for the bookmark, then click OK. The
new bookmark appears in the Site Manager as a sub-listing of the remote site's entry.
Bookmarks created in this manner are assigned the remote folder as their default name, but you
can rename them.
To connect to a bookmarked directory
Do one of the following:
o
Double-click a bookmark displayed as a sub-item under the site name in the Site
Manager.
o
Click Bookmark
o
On the toolbar, click the Bookmark
menu.
and select the desired bookmark from the shortcut menu.
icon, then click the bookmark on the shortcut
The Remote pane reloads displaying the bookmark's remote folder, if specified; otherwise, the root folder
displays. The Local pane displays the local folder specified in the bookmark.
To edit a bookmark
1. In the Site Manager, click the bookmark.
The Bookmark Properties dialog box appears.
44
Storing and Modifying Site Configuration
3. To change the remote folder, in the Remote path box, type a new remote path.
4. To change the local folder, in the Local Path box, type or browse for a new local path.
5. Click OK.
To rename a bookmark
1. Click the bookmark.
2. Type a new name, then press ENTER.
To remove a bookmark
1. Click the bookmark, then do one of the following:
On the main menu, click File > Delete.
Right-click the bookmark, then click Delete.
On the toolbar, click the Delete icon
.
A confirmation message appears.
2. Click Yes.
Saving and Deleting Log Files
You can specify where to save log files and how often to delete them.
To configure the log file settings
1. On the main menu, click Tools > Global Options (or press ALT+F7).
2. Expand the General node, then click Log Files. The Log Files options appear.
3. Configure the options as described below.
To specify the location at which logs are saved, in the Log path box, click the folder icon
to browse for the folder or type a different path.
To delete log files automatically at time intervals you specify, select the Delete saved
logs every check box. Specify whether to delete files after a specified number of days,
hours, or minutes. Clear the check box to keep all log files or if you plan to delete them in
other ways.
To remove all log files from your log folder that are currently not in use, click Delete all
logs.
Logs for active sessions are not deleted.
45
CuteFTP Lite, v8.3
46
Transferring Files and Folders
Transferring files and folders between sites is quick and easy. Besides just clicking and dragging the item
that you want to transfer, you can also:
Multi-select and drag items as group. (SHIFT + click for contiguous items; CTRL + click for noncontiguous items.)
Drag items to the Queue to upload them later.
To upload files (transfer from a local to remote computer)
1. Connect to a remote site.
2. In the Local pane, locate the files or folders that you want to upload.
3. Click and hold the mouse button while dragging the item(s) from the Local pane to the Remote
pane or Queue pane.
4. Release the mouse button. The items are copied (not moved) to the remote server or to the
Queue pane for later uploading.
To download files (transfer from a remote to a local computer)
1. Connect to a remote site.
2. In the Remote pane, locate the files or folders that you want to download.
3. Click and hold the mouse button while dragging the item(s) from the Remote pane to the Local
pane or Queue pane.
4. Release the mouse button. The items are copied (not moved) to your local location or to the
Queue pane for later downloading.
For the procedures for file and folder management, see Managing Files and Folders.
Transferring Graphic Files
If you are uploading or downloading graphic files, thumbnail view makes it convenient to preview the
images right in CuteFTP so you can select the ones you want before you transfer them.
To turn on thumbnail view
1. Click in the pane (local or remote) that you want to change to thumbnail view.
2. Do one of the following:
On the main menu, click View > View > Thumbnails.
At the top of the Local or Remote pane, click the Thumbnail icon
.
Thumbnail view supports previews of GIF, JPG, or BMP files, but not PNG files.
You can adjust how CuteFTP handles thumbnail images in the thumbnail cache settings in Global
Options. For more information, refer to the procedure in Log File Settings for configuring thumbnail
cache options.
Queuing Files and Folders for Transfer
CuteFTP allows you to drag items to the queue to download them later. From within the queue pane, you
can also stop, resume, or restart a transfer. For a description of the icons that appear in the Queue pane,
see Transfer Queue Icons.
47
CuteFTP Lite, v8.3
To display or hide the queue
1. On the main menu, click View > Show Panes.
2. Click Queue Pane or click ALT+1 to display or hide it.
To add items to the queue
1. Connect to a site. (You cannot drag items to the queue unless you are connected to a site.)
2. Locate the files or folders you want to upload or download in your local or remote pane.
3. Drag the selected items to the transfer queue window.
4. Repeat as necessary. You can also connect to other sites and add files and folders to the queue.
5. Once you have finished adding items to the transfer queue, you can change queue item attributes
if desired, such as destination path, transfer type, scheduling, and so on by clicking the item, then
pressing ALT+ENTER.
6. To change the transfer priority of an item, click it, then drag it up or down in the queue. A blue line
appears to indicate where the item will be placed.
7. When you are ready to begin processing the queue, do one of the following:
On the main menu, click Tools > Queue > Transfer All.
Click to select one or more items in the queue, then click Tools > Queue > Transfer
Selected.
Right-click in the queue, then click Transfer All.
Click to select one or more items in the queue, then right-click the selection and click
Transfer Selected.
Removing Successful Transfers from the Queue Automatically
As old items build up in the queue, it can consume large amounts of memory.
To remove successful transfers from the queue automatically
1. On the main menu, click Tools > Global Options (or press ALT+F7).
2. Expand the Transfer node, then click Events. The Events options appear.
3. Select the Remove successful transfer items from the queue automatically check box to
erase items from the queue after they have transferred. Clear the check box to keep items in the
queue even after they have transferred.
4. Click Apply if you are going to make changes to other pages; click OK to save changes and
close the Global Options dialog box.
Removing Items from the Queue Pane
You can remove items from the queue that are queued for transfer, that have completed transfer, or that
have failed transfer. To remove completed transfers from the Queue pane automatically, refer to
Removing Successful Transfers from the Queue Automatically.
To remove selected items from the queue
1. Click to select one or more items in the queue, then do one of the following:
On the main menu, click Tools > Queue > Remove Selected.
Right-click the selection and click Remove Selected.
Press DELETE.
48
Transferring Files and Folders
A confirmation message appears.
2. Click Yes.
To remove completed transactions from the queue
1. Do one of the following:
On the main menu, click Tools > Queue > Remove Finished.
Right-click in the Queue pane, then click Remove Finished.
A confirmation message appears.
2. Click Yes.
To clear everything from the queue
1. Do one of the following:
On the main menu, click Tools > Queue > Remove All.
Right-click in the Queue pane, then click Remove All.
A confirmation message appears.
2. Click Yes.
Transfer Queue Icons
The queue icons are displayed next to each item in the Queue pane.
Icon Description
The item is in the queue but a transfer has not been attempted or scheduled.
The item is in the queue and a transfer has been scheduled, but has not yet occurred.
This item's transfer is starting.
There is an existing file of the same name in the destination folder and you will have to decide whether to
Overwrite the existing file, Skip the transfer, Resume an interrupted transfer, Rename the file you are
transferring, or Numerate the file you are transferring.
The item transfer is in progress; this usually appears for large transfers.
The item transferred successfully.
The transfer has been interrupted, but CuteFTP is still trying to complete the transfer.
The item has been skipped, usually because you chose to skip it manually.
You have stopped the transfer while it was in progress. You can still Resume this transfer.
The server has refused to transfer the item. The transfer log will show an ERROR:> message with a more
information.
Transferring Files in Order
You can see the order in which queued items transfer at the left end of the Queue pane. The numbers in
the column indicate the order of transfer. By default, files transfer in the same order that they are added to
the queue.
To transfer items in the order added
1. Sort the Local or Remote pane by clicking on the corresponding column header (Name, Time,
Size, etc.)
49
CuteFTP Lite, v8.3
2. In the Local or Remote pane, click the item(s) to transfer, then drag the selected items into the
queue. Note that the items are ordered in the same way they were sorted prior to adding them to
the queue.
3. Right-click in the Queue pane, then click Transfer All. CuteFTP transfers the files in the order
reflected by the numbers in the left column of the queue.
To set a specific transfer order
1. Move transfer items to the Queue pane as described above.
2. Click the pound sign (#) column header to sort the items by their transfer order.
3. Click an item in the queue.
4. On the main menu, click Tools > Queue > Change Order.
To transfer the selected item first, click Move to Top (or press CTRL+SHIFT+T).
To transfer the selected item last, click Move to Bottom (or press CTRL+SHIFT+B).
To transfer the selected item before the previous item in the queue, click Move Up One
(or press CTRL+SHIFT+U).
To transfer the selected item after the following item in the queue, click Move Down One
(or press CTRL+SHIFT+D).
You can also change an item's place in the transfer order by clicking and dragging the item up or
down in the queue. A blue line indicates where the item's new position in the queue will be after you
release the mouse.
Stopping Transfers
You can stop in-progress transfers, remove items from the queue, and reset failed transfers. To resume
or restart a transfer, refer to Resuming Transfers.
To stop a transfer
1. Click the item(s) in the queue to be stopped.
2. On the main menu, click View > Stop (or press ESC).
To remove items queued for transfer
1. Click an item in the Queue pane.
2. Do one of the following:
On the main menu, click Tools > Queue > Remove Selected.
Select one or more items in the queue, then right-click the selection and click Remove
Selected.
Press DELETE.
A confirmation message appears.
3. Click Yes.
50
Transferring Files and Folders
Remove All deletes every file from the queue. Remove Finished deletes all of the items from the
queue that have completed their transfer.
The shortcut keys ESC or F9 stop active transfers. Press ESC once to stop the last command (be it
a transfer or connection request). Press ESC repeatedly to cycle through active transfers and/or
connections and stop them one by one. You can also select multiple items in the queue and press
ESC to stop them. Press DELETE to stop and remove selected queue items.
Resuming Transfers
CuteFTP automatically attempts to resume interrupted transfers caused by lossy connection, serverkicked users, a slow server, and so on. CuteFTP does not auto-resume interrupted transfers when the
remote server is unreachable (i.e., there is no connection available, the server is down, or for any other
reason). In those situations, you must manually resume the transfer.
In you have not shut down and restarted CuteFTP since the interruption took place, CuteFTP
assumes that the transfer is within its original context and attempts to resume it from the point it left
off. If the transfer is no longer in the original context, CuteFTP prompts you to overwrite the
destination file, that is, to start over again.
To resume a stopped transfer
Click the stopped item in the queue, then do one of the following:
o
On the main menu, click Tools > Queue > Transfer Selected.
o
Right-click the item, then click Transfer Selected.
To reset a failed transfer
Click the stopped item in the queue, then do one of the following:
o
On the main menu, click Tools > Queue > Reset Selected.
o
Right-click the item, then click Reset Selected.
o
To restart the transfer, click Tools > Queue > Transfer Selected.
o
Right-click the item, then click Transfer Selected.
Transferring Files in Binary or ASCII Mode
You can specify binary or ASCII mode for a session, globally (per file type), and per site. All extensions
are sent in binary mode unless they are listed in the ASCII extensions list, as described below.
To choose the transfer mode for a session
You can change the transfer type for a single CuteFTP session. Once CuteFTP is restarted, it reverts to
the transfer type set in Global Options.
1. On the main menu, click File > Transfer Type, then click one of the following:
Auto (or press CTRL+F1) - Auto is the default transfer type, and sends files in the mode
specified for each file's extension. All extensions are sent in binary mode unless they are
listed in Global Options, as described below.
ASCII (or press CTRL+F2) - files will be transferred in ASCII mode.
Binary (or press CTRL+F3) - files will be transferred in Binary mode.
To transfer specific file types in ASCII mode
1. On the main menu, click Tools > Global Options (or press ALT+F7). The Global Options dialog
box appears.
51
CuteFTP Lite, v8.3
2. Expand the Transfer node, then click ASCII Types. A list of the file types that are transferred in
ASCII mode are displayed.
3. Do the following:
To specify file types that are to be transferred in ASCII mode, in the ASCII extensions
list, type the file extension for the file type you want to transfer in ASCII mode, then click
Add. The extension appears in the list.
To specify file types that are to be transferred in binary mode, in the ASCII extensions
list, click the extension of the file type that you want to transfer in binary mode, then click
Remove. Removing the file type from the ASCII extensions list will cause that type of
file to be transferred in binary mode.
4. Click OK.
To change a site's transfer types
1. Display the Site Manager and view the Site Properties.
2. Click the Type tab.
3. In the Transfer type box, Auto-detect is selected by default. Based on the file type, CuteFTP
decides whether to transfer in ASCII or binary. To change this setting for this site, click one of the
following:
ASCII - Used primarily for transfer of text-based files such as HTML, text, and other
documents.
Binary - Used primarily for data type transfers such as pictures and other graphics or
files that do not have line feeds.
4. Click Connect or OK.
52
Transferring Files and Folders
Improving Slow Transfers
If you are experiencing slow transfer speeds, try fine tuning CuteFTP as described below.
Tweak the receive and send buffers
Setting these buffers allow you to fine tune transfers over high latency or lossy connections like those
over satellite links or with legacy CDMA wireless connections. It is unlikely you will ever need to adjust
this setting, but if you have problems with successful transfers and suspect the latency or quality of the
connection is at fault, try tweaking these buffers. The receive buffer holds data until CuteFTP is ready to
read it; the send buffer holds data until it can be sent to the server. Typically, both send and receive
buffers should be set to the same size. The default is set at 65536 bytes, the normal maximum window
size of TCP. You can measure the latency and estimate the available bandwidth with network monitoring
tools. There is some guesswork involved, as most tools are not entirely accurate, but they can guide you
to finding a sweet spot where transmissions are successful. If you have a lossy connection, try lowering
the buffer size. If you have high latency, a higher buffer size might help.
Normally, the optimal buffer size is your bandwidth times the latency of the link. So,
bandwidth (in bits) * latency (round trip time in seconds) = socket buffer
size (in bits)
Convert bits to bytes (bits divided by 8 equals bytes) for the buffer size.
So, if your bandwidth is 1,536,000 bps and you have a latency of 200ms (.2 seconds), your socket buffers
should be set to 38400:
1536000*.2=307200 bits
307200/8=38,400 bytes
You can also try halving or doubling the buffer size. For example, if the buffer is set to 65536 (64kb), try
32768 (32kb).
1. On the main menu, click Tools > Global Options.
2. Click the Transfer node.
3. In Receive buffer and Send buffer boxes, change the values as needed. (See guidelines
above.)
4. Click Apply if you are going to make changes to other pages; click OK to save changes and
close the Global Options dialog box.
Specifying Time CuteFTP Waits after a Transfer Completes
You can configure CuteFTP to keep a thread open for a specific number of seconds after a transfer is
complete. Leaving data connections open allows more transfers to use the same connection, avoiding the
need to open new connections.
To specify the wait time that CuteFTP
1. On the main menu, click Tools > Global Options (or press ALT+F7).
2. Expand the Transfer node, then click Events. The Events options appear.
3. In the Close the file transfer thread n seconds after the transfer is finished box, specify the
time that CuteFTP will wait to close the data connection after a transfer is complete. Specify a
time between 0 and 1,000 seconds.
4. Click Apply if you are going to make changes to other pages; click OK to save changes and
close the Global Options dialog box.
53
CuteFTP Lite, v8.3
Preserving the Local Time Stamp
You can configure CuteFTP to keep a downloaded file's time stamp the same on the local computer as it
is on the server and keep an uploaded file's time stamp the same on the server as it is on the local
computer.
To access transfer event settings
1. On the main menu, click Tools > Global Options (or press ALT+F7).
2. Expand the Transfer node, then click Events. The Events options appear.
3. Select the Preserve remote time stamp for downloaded files check box to keep a downloaded
file's time stamp the same on the local computer as it is on the server. Clear the check box to
allow the local computer to give downloaded files a new time stamp.
4. Select the Preserve the local time stamp for uploaded files if the server allows MDTM check
box to keep an uploaded file's time stamp the same on the server as it is on the local computer.
Clear the check box to allow the server to give uploaded files a new time stamp.
The FTP command MODIFICATION TIME (MDTM) can be used to determine when a file on
the server was last modified. The Internet Engineering Task Force (IETF) does not endorse
using MDTM to modify a remote file's time stamp; however, quite a few servers support it.
CuteFTP attempts the command when requested and reports errors in the log (if any).
5. Click Apply if you are going to make changes to other pages; click OK to save changes and
close the Global Options dialog box.
Transfer Settings
To access transfer settings
1. On the main menu, click Tools > Global Options (or press ALT+F7).
2. Expand the Transfer node. The Transfer options appear.
3. Configure options as described below.
In the Reconnect and resume in box, specify the time that CuteFTP waits to try again
after an interrupted or failed download. Select a time between 0 and 1,000 seconds
(about 17 minutes).
In the Roll back (retry at byte offset) box, specify the number of bytes prior to the
transfer failure CuteFTP resends when attempting to finish an interrupted transfer. Select
between 0 and 65536 bytes.
In the Receive buffer and Send buffer boxes, specify the number of bytes for the send
and receive buffers. The default setting for both send and receive is 65536 bytes. It is
unlikely you will ever need to adjust these settings, but if you have problems with dropped
transfers, you can use them to fine tune transfers over high latency or lossy connections
like those over satellite links or with legacy CDMA wireless connections. For more, refer
to Improving Slow Transfers.
4. Click Apply if you are going to make changes to other pages; click OK to save changes and
close the Global Options dialog box.
54
Managing Files and Folders
Opening, Editing, Renaming, and Deleting Files
You can manage your files on both local and remote drives from within CuteFTP.
Because of the way in which various type of servers handle files and to make file maintenance easier,
keep the following in mind when naming your files and folders:
Keep names short. Some servers only allow a certain number of characters.
Create meaningful names using whole words to avoid ambiguity and so that you do not have to
open a file to know what it is. For example, a year after you create a Web page for your friend's
cat, Greta, you are more likely to know what pictures-of-greta.htm contains versus
pog.htm.
Use lowercase for names. Some servers are case sensitive.
Names should never contain spaces or special characters (? * / \ : ; < > , and so on ). If you want
to make filenames easier read, use hyphens or underscores; however, underscores are hidden if
the filename is turned into a hyperlink.
For most Web sites, the main page must be called index.htm or index.html. If you rename it
main.htm, it might not work.
To open a file
1. Click a file in Local Drives or the Remote pane.
2. On the main menu, click File > Open, or click the Open icon
or runs the file.
. The applicable program opens
To edit a file (HTML)
1. Click a file in Local Drives or the Remote pane.
2. On the main menu, click File > Edit or View. The file opens in the HTML editor that you have
specified in Global Options.
3. Make any desired changes.
4. On the main menu, click File > Save.
To rename a file
1. Click a file in Local Drives or the Remote pane.
2. On the main menu, click File > Rename or right-click the file and click Rename.
3. Type a new name for the file, then press ENTER.
4. The renamed file is highlighted and the sequence of the file is changed alphabetically. For
example, if the file name was S.txt, and the name of the file is changed to A.txt, then the
sequence of the file changes. The file A.txt appears where all files starting with alphabet A
appear.
If you change the extension when you rename the file, you may not be able to open the file in the
proper program.
To delete a file
1. Click a file in Local Drives > Remote pane.
2. On the main menu, click File > Delete. A confirmation message appears.
55
CuteFTP Lite, v8.3
3. Click Yes.
Viewing File and Folder Properties
Just as in Windows Explorer, you can view the properties of any file or folder by right-clicking the file, then
clicking Properties.
Local pane information:
Type: Kind of item (e.g., HTML document, File Folder)
Location: Path where the file resides (e.g., C:\Documents and Settings\user1\My Documents; on
the remote server, displays the directory)
Opens with: Indicates in which application the file opens. To open ALL files of that type with a
different application, click Change. For example, if your computer is configured to open GIF
(image) files in Internet Explorer, but you want them to open in Paint Shop Pro so that you can
edit them, click Change, scroll to or browse for psp.exe, then click OK. This change will affect
ALL files on your computer that have that extension; the same as clicking Tools > Folder
Options > File Types in Windows Explorer.
Size: Size of the file or folder (e.g., 43.1 MB (45,281,728 bytes))
Contains: For folders, displays how many files and subfolders it contains
56
Managing Files and Folders
Remote pane information:
Server: The address (URL) of the server on which the file resides
Modified: When the item was last modified
User: Specifies the user of the item (e.g., owner)
Group: Specifies the group to which the item belongs (can be blank)
Read/Write Permissions: You can set the CHMOD permissions by changing the number (such
as 777), or just check off the permissions in the Owner, Group, and Public area of the dialog
box.
About CHMOD Permissions
The CHMOD permission mask is a three-digit number.
First digit: Defines the permissions for the owner (you).
Second digit: Defines the permissions for the group.
Third digit: Defines the permissions for everyone else (referred to as public).
Each digit works the same for each group of users: the owner, group, and public. What you set for one
digit has no effect on the other two digits. Each digit is made up of the three Read, Write, and Execute
permissions. The Read permission value is 4, the Write permission value is 2, and the Execute
permission value is 1. These three numbers are added together to get the permissions for a file. If you
want a file only to be readable and not writable or executable, set its permission to 4. This works the
same for Write and Execute. Executable only files have a permission of 1.
57
CuteFTP Lite, v8.3
For example, if you want a file to have Read and Write permissions, add the Read and Write values
together (4+2) and you get 6, which is the permissions setting for Read and Write. If you want the file to
have Read, Write, and Execute permissions, use the value 7 (4+2+1). Do this for each of the three
permission groups and you get a valid CHMOD mask. If you want your file to have Read, Write, and
Execute permissions (4+2+1) for yourself; Read and Execute (4+1) for your group; and Execute (1) only
for everyone else, you would set the file permissions to 751. (Or just select the appropriate check boxes
under Owner (you), Group, and Public.)
Viewing and Editing HTML Files
You can specify a third-party application to view and edit files (such as Notepad, EditPlus, Microsoft Front
Page, and so on).
Note the difference between Opening and Viewing a file:
On the main menu, click File > Open (or press CTRL+E). The file opens in your browser (e.g.,
Internet Explorer).
On the main menu, click File > View (or press CTRL+W). The file opens in the HTML editor that
you specify in the Helper Applications node.
On the main menu, click File > Edit (or press CTRL+ENTER). The file opens in the HTML editor
that you specify below.
To access Helper Applications
1. On the main menu, click Tools > Global Options (or press ALT+F7).
2. Expand the Helper Applications node. The Helper Applications options appear.
3. Configure options as described below.
To specify the application in which to view files, in the File Viewer box, browse for or type
the path to the program you want to use.
To open files for editing, , in the File editor box, browse for or type the path to the
program you want to use.
When you edit remote files, CuteFTP launches the editor and then monitors the
folder containing the temporary file being modified. After you save your changes,
CuteFTP uploads the changes to the server.
4. Click Apply if you are going to make changes to other pages; click OK to save changes and
close the Global Options dialog box.
Updating or Refreshing Folder Listings
To update or refresh a folder listing
1. Click in the pane where the folder is displayed.
2. On the main menu, click View > Refresh.
To update remote folder listings automatically
1. On the main menu, click Tools > Global Options (or press ALT+F7). The Global Options dialog
box appears.
2. Expand the Navigation node, then select the Auto-refresh the remote pane after uploading a
file or folder check box.
3. Click OK.
58
Managing Files and Folders
Listing Files and Folders in Order
You can sort the display of the files and folders in the Remote, Local, and Queue panes. Sorting is for
ease of finding a file or folder; it does not affect the transfer order of the files/folders in the Queue.
To sort files and folders in order by name
1. Click in the Remote or Local Drives pane.
2. On the main menu, click View > View > Details.
3. Click the Name column header in the Remote or Local drives pane.
4. Each time you select the column header the items are sorted in the opposite order.
You can sort by any column when in Details view.
To sort files and folders in order in the Queue
1. Click in the Queue pane.
2. Click a column header in the Queue pane. The transfer items are listed in alphabetic order of the
selected column's contents.
3. Each time you select the column header the items are sorted in the opposite order.
The order items are listed in the Queue is not necessarily the order in which they transfer. The
numbers in the left-most column of the Queue indicate the order of transfer. For example, when the
Queue is sorted alphabetically by Item Name, the transfer order stays the same.
Changing How Files and Folders are Displayed
You can display files and folders with large or small icons, in a list, or with file size and date-modified
details.
Large Icons - Displays files and folders as large icons
Small Icons - Displays files and folders as small icons
List - Displays files in a list, but no folders, and no details
Details - Displays files and folders in a list with the file or folder size, type, and date modified
To display files and folders as large icons, do one of the following:
Right-click in the Local or Remote pane, then click View > Large Icons.
On the main menu, click View > View > Large Icons.
To display files and folders as small icons, do one of the following:
Right-click in the Local or Remote pane, then click View > Small Icons.
On the main menu, click View > View > Small Icons.
59
CuteFTP Lite, v8.3
To display files in a list, but no folders, and no details, do one of the following:
Right click in the Local or Remote pane, then click View > List.
On the main menu, click View > View > List.
To display files and folders in a list with the file or folder size, type, and date modified, do one of
the following:
Right-click in the Local or Remote pane, then click View > Details.
On the main menu, click View > View > Details.
Moving Items from One Folder to Another on a Remote Server
You can move selected items from one remote folder to another remote folder on the same server.
To move items from one remote folder to another
1. Connect to the site, then open a folder on the remote site.
2. Select items in the folder.
3. Do one of the following:
On the main menu, click Edit > Move to Folder.
Right-click the file, then click Move to.
4. In the Move items to box, specify the path at which to save the selected items.
5. Click OK.
CuteFTP does not create the folder. If the folder does not exist, an error message appears.
Changing File and Folder Permissions on Remote Sites
You can set who can open, change, or delete files and folders on remote sites.
To change permissions for a remote file(s) or folder(s)
1. Connect to a site.
2. Select the file(s) or folder(s) for which you want to change permissions.
3. On the main menu, click File > Properties.
4. Select the check boxes next to the permissions you want for yourself (Owner), a Group of users,
and the Public.
When multiple items are selected, a gray check mark signifies the permission is granted
for some files in the group, but not in others. You can still change the permission for the
whole group.
If you cannot change permissions for a file or folder, the FTP server administrator must
modify your account or the file permissions.
5. Click OK.
Finding Files and Folders
CuteFTP Site Search function allows you to search local and remote drives and folders for files based on
all or part of the filename with wildcard support, modification date or date range, and file size or size
range.
60
Managing Files and Folders
To find a file or folder
1. On the main menu, click Edit > Find. The Search Results dialog box opens.
2. Next to Search in, specify whether to search on the local or remove pane.
Local drives - If you want to search for a file in your local drive.
Remote pane - If you want to search for a file in the remote pane.
3. In the Search for the files or folder named box, type the name of a file or folder, or the
extension of a file for which you want to search. The name or the extension of the file is added to
the drop-down list. You can also use wildcards.
4. In the Look in box, specify the folder to search or type the path.
5. To include the subfolders in the target folder, select the Search subfolders check box.
6. To define the file size, select the File size between check box, then type the number of kilobytes
in the text boxes.
7. To specify a date range, select the Date modified between check box, then type or select the
date range in which to search.
8. To start the search, click Search Now.
9. To stop the search, click Stop search.
10. All of the files with the same extension or with same name with other details, such as size, type,
modified on, and attributes are listed in the Results pane of the Search Results dialog box.
Find and Find Next are not case sensitive and only search from the top to the bottom of your
listings.
61
CuteFTP Lite, v8.3
62
Troubleshooting
Troubleshooting Tips
A common file transfer error is the inability to connect to the server. To test your connection, you can use
the ping and tracert utilities.
Ping and tracert are DOS command-line utilities that you can use to troubleshoot connection problems.
Third-party applications are also available that do basically the same thing, but provide a graphical
interface for those who are not comfortable entering commands at a command prompt.
Ping - When you ping a remote host, your computer sends "echo request" packets to the target
host and listens for "echo response" replies. Ping also estimates the round-trip time, generally in
milliseconds, records any packet loss, and prints the ping statistics when finished.
Tracert - Tracert is used to determine the route taken by packets across an IP network. This is
useful to determine where the connection problem exists, whether with your CuteFTP
configuration, at the server, or somewhere in between, such as blocking by a firewall.
TCPView is a Windows utility, available for free on Microsoft TechNet at
http://www.microsoft.com/technet/sysinternals/Utilities/TcpView.mspx.
To use ping or traceroute
1. On the Windows task bar, click Start > Run. The Run dialog box appears.
2. In the Run box, type cmd, then click OK. The Windows Command Prompt appears.
3. At the prompt, type the command and then the IP address or domain name of the server to which
you are trying to connect.
For example, to test that you are using ping correctly, try pinging the GlobalSCAPE web site and
do a tracert to the Gmail server, as shown in the illustrations below:
ping www.globalscape.com
-or-
63
CuteFTP Lite, v8.3
tracert www.gmail.com
Windows XP SP1 will not respond to an echo request on the public Internet, but you should have
updated to SP2 to get the latest security fixes.
The ping command function has several switches available, as described in the Windows XP
documentation available at
http://www.microsoft.com/resources/documentation/windows/xp/all/proddocs/enus/ping.mspx?mfr=true. At that same address, click in the table of contents for more Windows XP
troubleshooting tips.
Using Error Messages and Logs to Troubleshoot
You can help resolve errors by recording information from error messages and log files.
The Log pane appears at the top of the interface.
A standard error dialog box includes a short error message and two buttons, Cancel and Details.
Click Cancel to dismiss the error dialog box. Click Details to expand the error dialog to show
more information.
Review the information in the logs and error messages. The problem could be as simple as a typo in the
connection information, or the remote server might be refusing connection for some reason.
To use an error messages and logs to troubleshoot
1. Do one or both of the following:
64
Troubleshooting
In the error message, click the Details button, right-click in the log text area, then click
Copy All Text. The entire contents of the window is copied to the clipboard, then paste it
into an email or text file.
In the Log pane, right-click, then click Copy Entire Log to Clipboard (or press
CTRL+SHIFT+C), then paste it into an email or text file.
2. Send the information to your technical support department, ISP, or Web hosting provider for
troubleshooting assistance.
FTP Status and Error Codes
CuteFTP displays FTP status codes in the log window. The codes are numbered according to their
category. Some codes represent errors, while most codes simply communicate the status of the
connection. Below are brief explanations for the most common status and error codes They are provided
here to point you in the right direction for solving your FTP errors. For example, if you receive a 331 error,
you can look at the table below and see that a 331 error indicates that your username is authorized and
now you need to provide a password. If you received a 530 error, your password was rejected (because
you typed it wrong, your account is expired, you provided the wrong username/password pair, etc.). Often
you can type the description from the table below into your ISP/Web Hosting Provider's help pages to find
an explanation for the error.
100
200
300
400
500
10000
Code
Description
100 Series
The requested action is being initiated, expect another reply before proceeding with a new
command.
110
Restart marker reply.
120
Service ready in nn minutes.
125
Data Connection already open, transfer starting.
150
File status okay, about to open data connection.
200 Series
The requested action has been successfully completed.
200
Command okay.
202
Command not implemented, superfluous at this site.
211
System status, or system help reply.
212
Directory status.
213
File status.
214
Help message.
215
NAME system type. (Where NAME is an official system name from the list in the Assigned
Numbers document.)
220
Service ready for new user.
221
Service closing control connection. Logged out if appropriate.
225
Data connection open; no transfer in progress.
226
Closing data connection. Requested file action successful (for example; file transfer or file
65
CuteFTP Lite, v8.3
Code
Description
abort).
227
Entering Passive Mode.
230
User logged in, proceed.
250
Requested file action okay, completed.
257
"PATHNAME" created.
300 Series
The command has been accepted, but the requested action is on hold, pending receipt of
further information.
331
User name okay, need password.
332
Need account for login.
350
Requested file action pending further information.
400 Series
The command was not accepted and the requested action did not take place, but the error
condition is temporary and the action may be requested again.
421
Error 421 Service not available, closing control connection.
Error 421 User limit reached
Error 421 You are not authorized to make the connection
Error 421 Max connections reached
Error 421 Max connections exceeded
Possible Solutions
You can receive that 421 error if the FTP server you are connected to limits the total number of
connections available or limits the connections available to one user. There are three things you
can do:
1. Limit the number of connections to any one FTP site: Click Tools, click Global
Options, then click the Connection node. Set Per site max connections /transfers
to 1. (By default it is set to 2.)
2. Remove items from the queue. The Queue pane displays items ready for transfer, in
transit, or just transferred. Sometimes the Queue pane can become cluttered with
unfinished transfers. To clear the queue, right-click within it, then click Remove All.
3. Make sure only one instance of CuteFTP is running on your system. Open the
Windows Task Manager and see if CuteFTP is listed more than once.
425
Cannot open data connection. Try changing from PASV to PORT mode. Check your firewall
settings. Try making an HTTP connection.
426
Connection closed; transfer aborted.
450
Requested file action not taken. File unavailable (e.g., file busy).
451
Requested action aborted: local error in processing.
452
Requested action not taken. Insufficient storage space in system.
500 Series
The command was not accepted and the requested action did not take place.
501
Syntax error in parameters or arguments.
502
Command not implemented. The server does not support this command.
503
Bad sequence of commands.
504
Command not implemented for that parameter.
530
Not logged in. Your password is being rejected, contact the server administrator.
532
Need account for storing files.
550
Requested action not taken. File unavailable (e.g., file not found, no access) or permission
denied. This error is not caused by CuteFTP. If you believe that your FTP account privileges or
permissions are configured incorrectly, contact the technical support department at the remote
FTP site or your Web hosting company for help.
66
Troubleshooting
Code
Description
552
Requested file action aborted. Exceeded storage allocation (for current directory or data set).
This error is not caused by CuteFTP. There is not enough disk space available to you on the
remote FTP server. The most common cause for this error is that the limited disk space
allocated for your individual FTP account is already in use. This error may also appear when
disk space appears to be available but the file being uploaded is large enough so that if it were
uploaded, it would cause your disk space quota to be exceeded. To resolve this error, you can
increase the space available by deleting unnecessary files from the remote server or by making
arrangements with your Web hosting provider or FTP account administrator for additional disk
space.
553
Requested action not taken. File name not allowed. Try changing the file name, or getting rid of
spaces in the file name. This error is not caused by CuteFTP. The file name is not allowed by
your server. Many FTP servers have restrictions on file names. If your file name contains
special characters, symbols, or spaces in the file name, it might be rejected by the remote FTP
server. The remote FTP site may also be rejecting a particular file based on the file type or
extension. To resolve this error, if the file name contains special characters, symbols, or
spaces, you will need to rename the file before you can upload it. Rename the file using only
alpha-numeric characters and no spaces. For more information, refer to Opening, Editing,
Renaming, and Deleting Files. Note: If you change the file name, you will also need to
change links in Web pages that point to that file name.
10,000 series
Winsock error codes
10054
Connection reset by peer. The connection was forcibly closed by the remote host.
10060
Cannot connect to remote server (Generally a time-out error). Try switching from PASV to
PORT mode, or try increasing the time-out value (See Reconnect and resume in Transfer
settings)
10061
Cannot connect to remote server. The connection is actively refused by the server. Try
switching the connection port.
10066
Directory not empty. The server will not delete this directory while there are files/folders in it.
10068
Too many users, server is full. Try connecting later. If the problem persists, contact the server
administrator.
Cannot Close Data Transfer Gracefully
If the error message "Cannot close data transfer gracefully" is generated after a download is complete, it
indicates that CuteFTP has received all the data it needs, but the server is still sending information. Since
that data is still transmitting, CuteFTP forces the connection to close.
Cannot Initiate Data Transfer
If you receive this error from a server, it could indicate one of the following problems:
The site you are trying to log into requires a special user name and or password in order to
transfer files.
o
Contact the administrator of the site, and find out if you need to use a special user name
or password, and whether or not you can access that site.
The permissions on the site are incorrect, so even though your user name and password are
correct, you are unable to upload or download.
o
Contact the administrator of the site, and make sure that your user name and password
have read and write permissions set correctly.
You cannot upload because the server you are sending to is full and will not allow more files to be
uploaded.
67
CuteFTP Lite, v8.3
o
Delete files that are no longer used or ask the administrator for more space on the
system.
The file name you are using has a space or a character that the server will not allow.
o
Double-check with the administrator of your site about which characters are accepted on
your server, and rename the files to an acceptable name. For example, some Web
hosting providers only allow lower-case characters, no spaces, and the files must be
named htm instead of html. Many hosting providers list this information on their Web
sites.
A communication error is occurring between the FTP host and your computer, making data
transfer impossible.
o
If CuteFTP has worked in the past, change nothing and wait a little while to see if the
problem is caused by Internet traffic. If this is the first time you are trying to connect, try
using the other hosts types rather than Auto-detect.
Cannot Resolve Host Name
The Cannot Resolve Host Name message is displayed when CuteFTP cannot make a connection to the
FTP host address that you specified when you set up the connection. It could be compared to browsing to
a Web site that either is not up at the moment or does not exist. There are several ways to approach this
situation:
Make sure you are connected to the Internet. If you are not connected to the Internet, you will
need to connect before you can connect to any FTP sites.
Make sure you typed in the FTP Host Address correctly. This would be just the host address of
the server. For example, if you were given an FTP Host Address in the format:
ftp://ftp.yourhost.com, you would only type ftp.yourhost.com. Also be sure there is
nothing after the host address, especially slashes ("/") indicating subdirectories. If the server does
not automatically put you in your default directory when you log in to it, then you can add the
directory into the "Default Remote Directory" box when configuring this site.
If you are using CuteFTP Home or Lite, make sure you are not trying to connect to a HTTP server
such as http://www.cuteftp.com. You cannot connect to a HTTP (web) server with CuteFTP Home
or Lite. If you do not know the FTP Host Address for your site, you will need to contact your
server administrator for more information. GlobalSCAPE support staff does not know or keep
track of FTP host addresses of every ISP/Web server.
If all of these options fail with the same results, contact the server administrator of the site to which you
are attempting to connect to in order to resolve the problem.
Child Transfer Failed
If you attempt to transfer a folder or directory and see this error, it simply means that an item or items
within the folder failed to transfer. You can check your connection log to find a more detailed error
describing why the item failed to transfer.
Not Enough Credits to Download
You may not be able to download from some FTP sites until you have uploaded something to them. In
other words, you have to give them a file before they give you one -- a type of file trading. Most of these
"ratio sites" have a text file that explains how to upload files to them to get credits. If you have any
problems, contact the administrator of the site. (GlobalSCAPE does not have this information.)
68
Troubleshooting
Permission Denied
Every time an FTP account (for uploading your Web pages) is opened, your server determines all the
things that you are allowed to do, like upload, download, write to a file, delete a file, make new directories,
etc. If permissions have not been set up correctly, you will not be able to upload your files to the server. If
you receive this message, your server administrator has not established your permissions correctly.
Contact the server administrator to reset the permissions.
If none of the transactions you try with CuteFTP seem to be completed, refer to the log pane for any
entries that are colored red or any messages indicating a potential problem. You can copy the contents of
the log into an email or text file to send to your administrator or Web hosting provider.
Refer to FTP Error Codes for information about error codes.
Port Already in Use Error with Dial-up VPN
If you are connecting to a Virtual Private Network through a modem and receive the Port already in use
error when trying to connect, you might need to correct your connection settings.
To review/correct connections settings
1. On the main menu, click Tools > Global Options.
2. In the left pane, expand Connection, then click DUN/LAN.
3. In the right pane, click Connect to the Internet using a LAN. CuteFTP uses an existing
connection defined on your computer.
4. Click OK.
If Connect to the Internet using a LAN is already selected, verify your computer's VPN settings.
To verify your computer's connection settings
1. Do one of the following:
In the Windows Control Panel, click Internet Options.
In Internet Explorer, click Tools > Internet Options.
2. Click the Connections tab. The connection settings for one or more internet connections appear
on this tab.
3. The Dial-up and Virtual Private Network settings box displays dial-up and VPN connections
that are defined on your computer.
4. Click LAN Settings to view the local area network settings.
Changing any of these settings can cause your computer to lose its connection to your network
and/or the Internet. Do not change them unless you know what they should be. Your network
administrator, Web hosting provider, or Internet Service Provider (ISP) can provide you with this
information. GlobalSCAPE does not have this information; however, many ISPs provide this
information on their Web sites.
Failed to Establish Data Socket
This error usually occurs when trying to connect in PASV mode to a site that only accepts PORT mode
connections. Change the connection type from PASV mode to PORT mode to connect to the site.
To switch from PASV to PORT mode
1. In the Site Manager, click the problem site.
2. On the main menu, click File > Properties.
69
CuteFTP Lite, v8.3
3. Click the Type tab.
4. In the Data connection type list, select the Use PORT check box.
5. Click OK.
Error 421 Messages
Common 421 errors include:
Error 421 Service not available, closing control connection.
Error 421 User limit reached
Error 421 You are not authorized to make the connection
Error 421 Max connections reached
Error 421 Max connections exceeded
You can receive a 421 error if the FTP server you are connected to limits the total number of connections
available or limits the connections available to one user. To clear the error, remove items from the Queue
Pane and make sure only one instance of CuteFTP is running.
To remove items from the Queue Pane
Sometimes the Queue Pane can become cluttered with unfinished transfers. To clear the queue,
right-click inside the Queue Pane, then click Remove All.
To verify only one instance of CuteFTP is running on your system.
1. Right-click on the Windows Task bar, then click Task Manager.
2. On the Applications tab, view the list of running tasks to determine if CuteFTP is listed more
than once.
3. If more than one instance is listed, click one of them, then click End Task.
Installshield Error 1628: Failed to Complete Script-Based Installation
The following error message can occur at run time when you are trying to uninstall, repair, or update an
installation.
Error 1628: Failed to complete script based install.
This error message is caused by the Windows Installer Service and is often caused by the installation
itself.
Possible Cause 1
This error message is often caused when the uninstallation log file becomes corrupt. This can happen if
the installation is somehow corrupt.
Fix: In the Windows Task Manager, end the process that is running IDriver.exe:
1. Right-click the Windows Task bar, then click Task Manager.
2. On the Processes tab, click the Image Name column to sort it alphabetically.
3. Review the running processes to see if idriver.exe is running.
4. If idriver.exe is running, click it or right-click it, then click End Process.
Run the installation again to see if the error still occurs.
70
Troubleshooting
Possible Cause 2
This error can also occur if the Windows Installer Service is not properly configured on your computer or if
the installation is created with a newer version of the Windows Installer Service than the one on your
computer.
Fix: To fix this issue, install the latest Windows Installer Service on your computer. Instructions and
download links for the Windows Installer are listed below, sorted by operating system.
Windows 95/ 98/ Me:
http://www.microsoft.com/downloads/details.aspx?displaylang=en&FamilyID=CEBBACD8-C0944255-B702-DE3BB768148F
Windows NT 4.0 or 2000:
http://www.microsoft.com/downloads/details.aspx?FamilyID=4b6140f9-2d36-4977-8fa16f8a0f5dca8f&DisplayLang=en
Windows XP:
Windows XP contains Windows Installer version 2.0. You should not have to install the Windows
Installer Service (MSI engine) on Windows XP.
Restart your computer and run the installation again to see if the error continues to occur.
Possible Cause 3
This error message may also occur if a file in the Temp directory is conflicting with the files used by the
installation while it is running.
Fix: Delete the entire contents of the Temp directory:
1. Double-click the My Computer icon on your desktop, or right-click Start, then click Explore.
2. Navigate to the Temp directory, for example, C:\Windows\Temp.
3. Click in the directory, then right-click and click Select All (or CTRL+A).
4. On the toolbar, click Delete or right-click the selection, then click Delete (or CTRL+X). A
confirmation message appears.
5. Click Yes.
Run the installation again to see if the issue is resolved.
Cannot Connect to Server
Making one or more minor configuration changes usually solves connection problems quite easily.
In the Log pane, a complete list of all communications and commands between CuteFTP and the FTP
server to which you are trying to connect appear. If you cannot connect, at least one ERROR message
appears in the Log pane in red text, which you probably need to scroll up to see. That error message
should tell you the specific reason why you cannot connect.
The most common connection problem is that the Host Address, the User Name or the Password
has been entered incorrectly. Make sure all three pieces of information exactly match what the
administrator of the Server you are connecting with provided.
GlobalSCAPE does not provide you with an FTP server, username, or password for uploading
files. The Internet Service Provider/Web Hosting Provider to which you want to upload files
provides you with the username, password, and FTP account information required to connect to
their server. Most Internet Service Providers/Web Hosting Providers have this information
available on their Web pages.
If you cannot connect to your server:
1. Verify that the destination server name and IP address is correct
71
CuteFTP Lite, v8.3
2. Verify that the connection port number is correct (on the Type tab of Site Properties). For
example, for FTP connections, it is usually port 21.
3. The remote server may be temporarily or permanently inaccessible (try again later).
4. Try pinging the address (see Troubleshooting Tips for details).
5. If you are using a router, verify the router is up and running (check by pinging it and then ping an
address outside of the router).
6. Do a traceroute to the destination to verify all routers along the connection path are operational
(see Troubleshooting Tips for details).
7. Verify that your Windows network connection is setup properly. (Can you connect to the
Internet?)
8. Verify that your local software or hardware firewall is not blocking outbound connections
originating from CuteFTP.
9. Verify that your anti-virus software is not at fault (try disabling it).
Cannot See Remote Files or Folders
If you cannot see your directory listing or files, you can try these solutions then attempt to connect again.
Your connection log shows a LIST-L command instead of the normal LIST
1. On the main menu, click Tools > Global Options (or press ALT+F7).
2. Expand the Navigation node, then click Links. The Links options appear.
3. Clear the Attempt link resolution using LIST -L command check box, then click OK.
Change connection type
1. Display the Site Manager and view the Site Properties.
2. Click the Type tab.
3. In the Data connection type box, click Use PASV.
4. Click Connect or OK.
If you still cannot connect, follow the same steps, but click Use PORT.
Change server Host type
1. Display the Site Manager and view the Site Properties.
2. Click the Type tab.
3. In the Server type box, click the first server type in the list (Unix).
4. Click Connect or OK.
If that does not work, try the next server type on the list.
Copy and Paste Functions Remove File from the Remote Folder
FTP Servers do not support the Copy command. If you copy a file from a folder in the Remote pane and
then try to paste it in any folder in the Remote pane itself, you are moving the file from the original folder
to that folder or to a new location on the server. FTP protocol does not allow you to retain the original file
and create a copy in other folder in the remote location. You can use the Cut and Paste commands to
restore the original file. This is a limitation of the FTP protocol, not CuteFTP.
The copy command is available, because you can copy files from the Remote to the Local pane, to
the queue, etc.
72
Troubleshooting
To copy a file or folder from one remote folder to another remote folder
1. Download the file.
2. Upload the file to the new location.
Transferring to Case-Sensitive Servers
Some case-sensitive servers treat two files with same name but different case as two different files.
CuteFTP is not case-sensitive and, when uploading or downloading files, it treats two files with same
name and different case as the same file. For example, if you want to upload TEXT.txt file and a text.txt
file already exists on the server, then it will see the files as the same and prompt you to overwrite the
text.txt file.
To set a site as case sensitive
1. Display the Site Manager and view the Site Properties.
2. Click the Type tab.
3. In the Server type list, click Unix-compatible.
4. Click Connect or OK.
Conserve Local File Time Feature does not Work Properly when Connected to
Serv-u FTP Server
The MDTM command is designed to be used for retrieving a file's time from the server. However,
CuteFTP and various other FTP clients use the MDTM command to change (set) an uploaded file's
timestamp. The standard documenting the MDTM command (http://www.ietf.org/rfc/rfc3659.txt) makes no
provisions for using the MDTM command to set the file time stamp, so various clients and servers have
implemented the command differently.
Turn off this feature when connecting to Serv-U or other FTP servers that modify the time sent as
part of the MDTM set sequence.
The typical command syntax is MDTM YYYYMMDDHHMMSS FILENAME, where the HHMMSS is either the
client's actual local time zone or, in the case of some FTP clients, GMT (Greenwich Mean Time), which
mimics the retrieve behavior of MDTM as documented in section 2.3 of the standard.
Certain servers, such as Serv-u, have extended the MDTM command even further, adding a time zone
parameter to the end of the MDTM command, as follows:
MDTM YYYYMMDDHHMMSS[+-TZ] FILENAME
CuteFTP does not support this proprietary [+-TZ] parameter. Also, CuteFTP sends the local time for
the HHMMSS portion of the MDTM command sequence, not the GMT time. Unfortunately, Serv-u (and
potentially other FTP servers) expect the time to be sent in GMT, and automatically adjust the time for the
file, causing it to be different than what the client expected.
Example
CuteFTP retrieves a listing. File time shows 8:55 AM:
-rw-rw-rw-
1 user
group
20249 May 14 08:55 Reports.cfc
CuteFTP does an MDTM retrieve time to determine what the remote file's time is. Notice the server sends
12:55 PM, adding 4 hours due to the server's time difference and GMT:
COMMAND:>
MDTM Reports.cfc
213 20040514125501
CuteFTP uploads the replacement file:
STOR Reports.cfc
73
CuteFTP Lite, v8.3
CuteFTP issues an MDTM command to set the time according the actual date and LOCAL time of the file,
12:55 PM:
COMMAND:>
MDTM 20040514125501 Reports.cfc
Subsequently, CuteFTP retrieves the list from the server, with the time of 8:55 AM.
-rw-rw-rw-
1 user
group
20249 May 14 08:55 Reports.cfc
Notice that the server did not write the timestamp as 12:55, as requested. Instead, it assumed the
timestamp was in GMT and subtracted 4 hours.
Using CuteFTP behind a Router
In most cases, CuteFTP does not have any problems working behind a router. If you are having
problems, try transfering in PASV mode.
To perform transfers in PORT mode or for secure transfers, refer to your router's documentation for
information on how to configure the router for such transfers.
If connections or transfers still fail, try one or more of the following possible solutions:
1. Ask the FTP server's administrator if the server and its network are configured to allow FTP in
PASV mode.
2. Review the router documentation for information on how to set it up for FTP or how to open the
appropriate ports. FTP generally uses port 21.
3. Define a port range for CuteFTP.
4. Use UPnP (if your NAT or router supports it) to establish a connection properly.
5. Turn on port mapping.
Using CuteFTP with Norton Internet Security 2004
If you have Norton Internet Security 2004 installed on the same computer as CuteFTP, you will need to
adjust a setting in the Norton program to allow CuteFTP to make connections and transfers.
Allowing CuteFTP to make connections will not compromise the other security settings in Norton Internet
Security 2004.
Also see the Knowledge Base article regarding Norton Internet Security 2005.
To use CuteFTP with Norton Internet Security 2004
1. Open Norton Internet Security 2004. You can open it by clicking the Norton Internet Security icon
on your task bar.
2. In the Norton Internet Security window, select Personal Firewall.
3. In the lower right, select Configure. A dialog box with tabs appears.
4. Click Programs tab.
5. In the Manual Program Control section, scroll down to find the ftpte.exe row.
6. Right-click in the Internet Access column of the ftpte.exe row, then click Permit All.
7. Click OK. Norton Internet Security 2004 should now allow CuteFTP to make connections and
transfers.
74
Troubleshooting
Truncated Listings
If you connect to a server and the log displays the message 266-Options: -1 or 226 Output truncated to
2000 matches, the server cannot display more than 2000 items in file listings. This is a limitation of the
server to which you are connecting, not CuteFTP.
Firewall Problems
Outgoing connections can be affected by the presence of firewall or anti-virus software on the local
computer or network connection. Either one can block the ports needed to make a successful FTP
connection to a remote server.
If you are using a personal firewall software package, configure it so that ports 20 and 21 are open (not
blocked). It may also be necessary to grant specific permission for CuteFTP to access those ports. If you
need help configuring your personal firewall software, consult the documentation or the support section of
their Web site.
Symantec (Norton) support site:
http://www.symantec.com/techsupp/support_options.html
McAfee support site:
http://www.mcafeehelp.com
Socket Error 2000
This error generally occurs when port 21 is blocked on your computer. The port could be blocked by a
firewall or a proxy server that has not been configured properly. Generally you'll see a log like this:
STATUS:> Connecting to server xxx.xxx.x.xx (ip= xxx.xxx.x.xx)...
ERROR:> Can't connect to remote server. Socket error = #2000.
ERROR:> Timeout (60000ms).
STATUS:> Waiting 30 seconds......
To avoid this error, open port 21 to inbound and outbound traffic. Most often a firewall (such as those
from MacAfee, Norton or the built-in Windows XP firewall) is blocking inbound or outbound TCP traffic on
port 21.
For more error code information, refer to Knowledge Base article 10140 at
http://kb.globalscape.com.
75
Getting Help
For the most up-to-date information regarding this version of CuteFTP; to view version history, updates,
and activation instructions; to download a PDF of this user guide; and for other self-help resources, visit
the GlobalSCAPE Support Center.
After release of the product, the online help is updated as errors and omissions are identified;
therefore, you should visit the Support center when the help in the application does not answer your
questions.
GlobalSCAPE Support Center
For fast answers to most questions, please visit the GlobalSCAPE Help Center. Our Customer Service
team can answer your questions about software activation and registration or help with order problems.
Personal technical assistance for CuteFTP Lite is not available by phone.
The GlobalSCAPE User Forum is a great place to find information or seek help from the global
community of GlobalSCAPE customers and product experts.
The GlobalSCAPE Knowledge Base (KB) is a database of information on our products.
Subscribe to the RSS feed to keep abreast of the latest KB articles. Copy and paste this URL
http://kb.globalscape.com/rssfeed.aspx into your RSS feed reader. (See below for examples.)
Subscribe to GlobalSCAPE Email Announcements Sign up for the GlobalSCAPE Newsletter,
press releases, product announcements, and other GlobalSCAPE news.
Recover a Lost Serial Number - If you know the email address you used when you activated the
software, we can send it to you at your new address.
Contact Customer Service. .
Order Status - Complete the online email form to request information about your order.
CuteFTP support pages provide downloads, documentation, activation instructions, and the latest
news regarding CuteFTP.
To add the GlobalSCAPE Knowledge Base RSS feed to your Google home page
The procedures below are provided as an example; see your feed reader's online help for specific
instructions.
1. Sign in to your Google home page, then, in the upper right area of the page, click Add Stuff.
2. At the top center of the page, to the right of Search Homepage Content, click Add by URL. The
Add by URL form appears.
3. In the text box, provide the URL of the RSS feed, http://kb.globalscape.com/rssfeed.aspx, then
click Add.
4. In the upper left corner, click Back to Homepage. The GlobalSCAPE RSS feed appears on your
home page.
77
CuteFTP Lite, v8.3
To add the RSS feed to Microsoft Outlook 2007
1. On the main menu, click Tools > Account Settings.
2. On the RSS Feeds tab, click New.
3. In the New RSS Feed dialog box, type or paste the URL of the RSS Feed. For example,
http://kb.globalscape.com/rssfeed.aspx.
4. Click Add.
5. Click OK.
Microsoft Office Online provides a tutorial on RSS feeds.
Finding Information in the Help
You can find information in the online or application help in several ways:
Hyperlinks - Clickable text that opens another topic or a Web page.
Related Topics - Listed at the bottom of many topics, lists other topics relevant to the current
topic.
Using the Contents, Search, or Favorites, tabs, do the following:
Tab
Description
Contents Contains the table of contents. Click a main heading (represented by a book icon) to display
pages that link to topics, and click each subheading (represented by a page icon) to display
the corresponding topic in the right pane.
Search
Use the search pane or the Search box in the toolbar to locate words or phrases within the
content of the topics. Type the word or phrase in the text box, press ENTER, then click in the
list of topics, click the topic you want to view.
Favorites (This option is not available in the Web help.) You can add a frequently viewed topic to the
Favorites tab in the application's help. Click Add to add the topic you are viewing to the
Favorites tab. To remove a topic, click the topic then click Remove. To display a topic,
double-click it or click the topic, then click Display.
Searching the User Guide or globalscape.com
When searching, try several different searches using different words for the same concept. For example,
if you want help with creating a script, search for script, vb, batch, and so on. Also, we have attempted to
provide intuitive names for the topic titles, and the Index and Table of Contents contain the topic titles of
every topic in the help file. So, in this example, if you are looking for a procedure on how to create a
script, click the Index tab and scroll to the topic Creating Scripts.
When you search globalscape.com, you are searching across all of GlobalSCAPE products, not just
CuteFTP. For targeted searches, try the application's help file first, then the online help file, then the
Knowledge Base, then the user forum. You can also search the PDF. If you still cannot find the answer to
your question, contact GlobalSCAPE Technical Support. Be sure to let us know that you had problems
finding your answer in any of our self-help resources so that we can provide better information in the
future.
78
Getting Help
Printing a Help Topic
To print a Help topic:
1. Do one of the following:
Click the Print icon in the toolbar.
Right-click in the topic (in the right pane), then click Print. The Print dialog box for your
operating system appears.
2. Click Print. The topic is printed to the specified printer.
Sharing Topic Links from the Online Help
In the online (HTML) help, the address bar displays the IP address (URL) of the help file, not the URL of
the specific topic. If you right-click in the topic, then click Properties, you can copy the URL of the topic;
however, the URL displays only the topic, without the table of contents. The procedure below describes
how to send a topic's URL that also displays the table of contents.
To copy a topic URL that includes the table of contents
1. Open the topic in your Web browser.
2. Right-click within the topic (the right frame), then click Properties.
3. Highlight the URL for the topic, right-click the selection, click Copy, and then close the
Properties dialog box.
4. Right-click in the address bar of your browser, click Paste, and then press ENTER. The topic
displays, but not the table of contents (TOC).
5. If you want to see the topic AND the TOC, click Show. The URL will update in the address bar
and the TOC will appear to the left of the topic.
79
CuteFTP Lite, v8.3
6. Copy the URL in the address bar (e.g.,
http://help.globalscape.com/help/cuteftp8/index.htm#toc_getting_help.htm) and paste it into an email.
Using the Knowledge Base
GlobalSCAPE's Knowledge Base, http://kb.globalscape.com, provides information in HOW TOs, FAQs,
and other types of articles. Many of the articles are created as a result of assisting customers with
configuration and troubleshooting.
Search Tips:
For the most comprehensive search for articles specific to CuteFTP type cuteFTP, then click Go.
To narrow your search, in the Within drop-down menu, click CuteFTP.
To only find certain types of articles (FAQ, HOWTO, INFO, etc.), in the Type drop-down menu,
click an article type.
In the Search area, the options apply to where it searches, not the display of results. That is, if
you search for cuteftp and then click Article ID, no results are returned, since Article IDs are
numbers. For example, if you wanted to search for an article ID 10070, in the For solutions
containing box type 10070, click Article ID, then click Go.
To search for your keyword only in article titles, click Article Title Only.
To search only for articles going back a certain length of time (e.g., 3 days ago, last year), click
the Maximum Age drop-down menu, then click the interval.
After your search results display, at the bottom left of the page, you can click a drop-down menu
to choose to display from 10 to 100 results per page, then click Update.
80
GlobalSCAPE, Inc. CuteFTP® Lite version 8 License
THIS SOFTWARE IS LICENSED, NOT SOLD. YOU MAY USE THIS SOFTWARE ONLY AS
DESCRIBED IN THIS AGREEMENT.
IF YOU DO NOT AGREE TO THE TERMS OF THIS AGREEMENT, DO NOT INSTALL THE
SOFTWARE OR USE ANY REGISTRATION NUMBER THAT WAS PROVIDED WITH THE SOFTWARE.
YOU MAY CONTACT THE WEB SITE OR STORE WHERE YOU PURCHASED THE LICENSE FOR A
REFUND IF APPLICABLE.
1. SOFTWARE. The capitalized term "Software" refers to the object code for the computer program
known as CuteFTP Lite, any updates, supplemental code or programs provided to you by GlobalSCAPE
with or in connection with CuteFTP Lite, the user's manual and Help file, any components, any related
media and printed materials, and any related "online" or electronic documentation.
2. GRANT OF LICENSE. Evaluation License. If you acquired the license for the Software on an
evaluation or trial basis, you may use the Software without charge for the evaluation period. Your
evaluation period begins on the day you install the Software. You must pay the license fee and register
your copy to continue to use the Software after the evaluation period. To pay the license fee and register
your copy, you should visit www.globalscape.com or an authorized sales agent. For so long as the
Software is the most current version of CuteFTP Lite distributed by GlobalSCAPE, you may give exact
copies of the evaluation Software to anyone. You may not charge any fee for the copy or use of the
evaluation Software itself, but you may charge a distribution fee that is reasonably related to any cost you
incur distributing the evaluation Software (e.g. packaging). You must not represent in any way that you
are selling the Software itself. Your distribution of the evaluation Software will not entitle you to any
compensation from GlobalSCAPE. You must distribute a copy of this license with any copy of the
Software and anyone to whom you distribute the Software is subject to this license. You may not remove
any copyright, trademark, or reservation of rights language displayed on, in, or with the Software.
Registered License. When you purchase a license, you will be provided with a registration number. You
must enable the registered license for the Software by entering the registration number as prompted by
the Software. The term of the license is perpetual unless you purchased a limited term license. You may
install and use one copy of the registered Software on the number of computers for which you have
purchased a separate license as indicated on the invoice or sales receipt. If the Software is installed on a
network server or other storage device, you must purchase a license for each separate computer on
which the Software is used or accessed. A license for the Software may not be shared by alternating use
of the Software between different computers. If you acquired the Software for a reduced price as an
upgrade from a previous version of the Software, you may no longer use the previous version. The
primary user of a computer for which a license has been purchased may access the Software via a
remote technology, and may make and use one copy of the Software on his or her portable computer.
You may also make one copy of the Software for back-up or archival purposes. Otherwise, you may not
copy the Software in whole or in part. You may permanently transfer all of your rights under this license if
the recipient agrees to the terms of this license, you destroy any copy of the Software not transferred to
the recipient, and, if the Software was licensed to you at a reduced price as an upgrade from a previous
version, you destroy any copy of any previous version that is not transferred to the recipient. If you
purchased the Software on a multi-user basis, you may permanently transfer your rights to one person
only, but that person may use the Software on that number of computers for which you purchased a
license.
3. RESTRICTIONS. You may not reduce the Software to human readable form, reverse engineer, decompile, disassemble, merge, adapt, or modify the Software, except and only to the extent that such
activity is expressly permitted by applicable law notwithstanding this limitation. You may not rent, lease, or
lend the Software. You may not use the Software to perform any unauthorized transfer of information,
such as copying or transferring a file in violation of a copyright, or for any illegal purpose.
81
CuteFTP Lite, v8.3
4. SUPPORT SERVICES. GlobalSCAPE may provide you with support services related to the Software.
Use of support services is governed by the user manual, online documentation, and other GlobalSCAPE
materials, as they may be modified from time to time. GlobalSCAPE may use any information you provide
as part of obtaining support services for its business purposes, including product support and
development.
5. INFORMATION COLLECTION. The Software includes a feature that assigns a unique number to your
computer based on system information. The Software reports this number to us when you install the
Software, enter your registration number, or both. The Software may also identify and report to us your
Windows language-identifier setting, IP address, and the date and time of installation and/or registration.
We use this information to count the number of installations, detect piracy of the Software, and develop
rough statistical data regarding the geographic location of our users. If you register our Software, we tie
this information to the personally identifiable information that we have about you.
6. TERMINATION. This license terminates if you fail to comply with its terms and conditions. If your
license terminates, you must destroy all copies of the Software. The termination of this license does not
limit GlobalSCAPE's other rights it may have by law.
7. INTELLECTUAL PROPERTY. You acknowledge that you have only the limited, non-exclusive right to
use and copy the Software as expressly stated in this license and that GlobalSCAPE retains title to the
Software and all other rights not expressly granted. You agree not to remove or modify any copyright,
trademark, patent, or other proprietary notices that appear, on, in, or with the Software. The Software is
protected by United States copyright, patent and trademark laws, and international treaty provisions.
8. EXPORT RESTRICTIONS. You may not export or re-export the Software in violation of the export laws
of the United States, or the applicable laws of any other jurisdiction. Among other things, U.S. laws
provide that the Software may not be exported or re-exported to certain countries that are embargoed or
restricted or to certain restricted persons. Embargoed and restricted countries currently include Cuba,
Iran, Iraq, Libya, and Sudan.
9. NO WARRANTIES: TO THE EXTENT PERMITTED BY APPLICABLE LAW, THE SOFTWARE AND
ANY SUPPORT SERVICES ARE PROVIDED "AS IS" WITHOUT WARRANTY OF ANY KIND, EITHER
EXPRESS OR IMPLIED, INCLUDING, WITHOUT LIMITATION, THE IMPLIED WARRANTIES OF
MERCHANTABILITY, FITNESS FOR A PARTICULAR PURPOSE, OR NONINFRINGEMENT. IF
APPLICABLE LAW REQUIRES A WARRANTY, THE REQUIRED WARRANTY IS LIMITED TO NINETY
(90) DAYS FROM YOUR RECEIPT OF A COPY OF THE SOFTWARE. COMPUTER PROGRAMS ARE
INHERENTLY COMPLEX, AND THE SOFTWARE MAY NOT BE FREE OF ERRORS. THE SOFTWARE
IS PROVIDED WITH ALL FAULTS AND THE ENTIRE RISK AS TO SATISFACTORY QUALITY,
PERFORMANCE, ACCURACY AND EFFORT IS WITH YOU.
10. LIMITATION OF LIABILITY. GLOBALSCAPE IS NOT LIABLE TO YOU FOR ANY
CONSEQUENTIAL, SPECIAL, INCIDENTAL, OR INDIRECT DAMAGES OF ANY KIND ARISING OUT
OF THE DELIVERY, PERFORMANCE, OR USE OF THE SOFTWARE, EVEN IF GLOBALSCAPE HAS
BEEN ADVISED OF THE POSSIBILITY OF SUCH DAMAGES. UNLESS APPLICABLE LAW
PROVIDES OTHERWISE, GLOBALSCAPE'S LIABILITY FOR ANY CLAIM RELATED TO YOUR
PURCHASE OF A LICENSE FOR OR USE OF THE SOFTWARE, WHETHER IN CONTRACT, TORT,
OR ANY OTHER THEORY OF LIABILITY WILL NOT EXCEED THE GREATER OF U.S. $5.00 OR THE
LICENSE FEE PAID BY YOU.
11. U.S. GOVERNMENT. The Software is commercial computer software developed solely at private
expense. The rights of civilian and non-civilian agencies of the U.S. Government to use, disclose and
reproduce the Software are governed by the terms of this License. Publisher is GlobalSCAPE, Inc., 4500
Lockhill-Selma Road, Suite 150, San Antonio, Texas, 78249, USA.
12. SECURITY. You agree that GlobalSCAPE is not liable to you for security breaches resulting from your
use of the Software. The security of the Software depends primarily on you selecting a secure password
and keeping it confidential. You should not select a password that may be easily discovered by others.
For example, you should not use a word or sequential series of numbers. We recommend a random
choice of at least 6 mixed alpha and numeric characters, with variations between upper and lower case.
82
End User License Agreement
13. AUDIT. You agree that on GlobalSCAPE's request you will certify in writing your compliance with the
terms of this license, including your use of the Software only on the number of computers/servers
licensed.
14. ASK.COM TOOLBAR END USER LICENSE TERMS. If you have chosen to install the ask.com
search toolbar with CuteFTP, review the ask.com toolbar End-User License Terms and Privacy Policy at
http://about.ask.com/en/docs/about/ask_eula.shtml.
15.MISCELLANEOUS. This license is governed by the laws of the State of Texas, U.S.A. This license is
not governed by the United Nations Convention of Contracts for the International Sale of Goods. You
agree to submit to the jurisdiction of courts sitting in the State of Texas for all purposes. Sole and
exclusive venue for any dispute arising under or relating to this agreement shall be in a court sitting in
Bexar County, San Antonio, Texas. This license constitutes the complete and exclusive agreement
between us, notwithstanding any provision in any purchase order or other written document, except for
our except for the definition of any evaluation period or limited term license appearing on the Web or
other documentation accompanying the license and the statement of the number of separate user license
fees for which you have paid as described in Section 2, above. This license may only be modified by a
written document signed by GlobalSCAPE. No GlobalSCAPE dealer or distributor is authorized to
change the terms of this license. If any provision of this license is held to be unenforceable, the remainder
of the license shall not be affected, and the unenforceable provision shall be reformed to the extent
necessary to make the provision enforceable. If you are located outside the United States, then the
following provision applies: Les parties aux présentés conferment leur volonté que cette convention de
même que tous les documents y compris tout avis qui SHY rattaché, soient redigés en langue anglaise.
(Translation: "The parties confirm that this Agreement and all related documentation is and will be in the
English language.")
Should you have any questions concerning this license, or if you desire to contact GlobalSCAPE for any
reason, please contact GlobalSCAPE by mail at: GlobalSCAPE, Inc., 4500 Lockhill-Selma Road, Suite
150, San Antonio, Texas, 78249, USA, by telephone at: (210) 308-8267, or by electronic mail from:
http://support.globalscape.com.
83