1
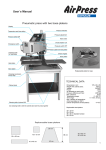
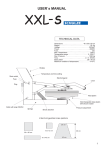
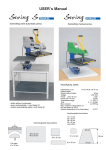
User’s Manual
TECHNICAL DATA
Dimensions . . . . . . . . . . . 23 x 28 x 33 cm
Weight . . . . . . . . . . . . . . .. . . . . . .. .13 kg
Voltage . . . . . . . . . . . . . . . . . . . . 230VAC
Power . . . . . . . . . . . . . . . .. . . . . . . 330 W
Fuse . . . . . . . . . . . . . . . . . . . . . . . . . . 6A
Max. temperature . . . . . . . . . . . . . . 210°C
Temperature range . . . . . . . . . 50 - 210°C
Heating sleeve . . . . . . . . . ..105 x 230 mm
Max. press surface . . . . . . . 85 x 190 mm
Diameter of cups . . . . . . . . . . 78 - 85 mm
An automatic mug-press for cups with two flexible jaws,
which create absolute equal pressure. The device will open
automatically when the press procedure is completed and
lift the finished cup upwards out of the heating sleeve’s
heating zone. The euro-patented opening mechanism
makes sure that working is now a lot more comfortable.
Optional:
- Correction sleeve for cups 72 mm
- Heating sleeve for beer jugs 95 mm
Lifting gear
Flexible jaws
Hating sleeve
Pressure Adjustment
Opening for trouble-free
replacement of the heating sleeve
Main switch
Fuse 6A
Lever to close
the press
Power supply line 230VAC
Case
Display
Before you switch on the device, please check if your socket is in proper
condition and if the grounding wire is connected properly.
Afterwards you have to read this USER`s MANUAL carefully.
SWITCH ON
The green toggle switch activates the press. The pilot lamp in the switch is shining. The display shows
the current temperature of the heating sleeve and the red LED 1 is shining. The heating sleeve will heat
immediately until the indicated initial temperature is reached.
PRESSURE ADJUSTMENT
You can change the pressure strength with the little knob on the left clamping jaw. Make sure the press
is open when regulating the pressure. Since you cannot read off the pressure you will have to regulate
manually in the first place. Afterwards you do a hardproof test and if necessary change the pressure
accordingly. Never close the press without a cup! This may lead to overheating of the heating element!
ATTENTION
After each change you should close the press with a cup to check the new pressure setting.
Damages due to excess pressure settings are excluded from the guarantee.
And therefore we assume no liability for heating sleeves which have been damaged due to excess
pressure.
MAINTENANCE
All maintenance works should be done when the device is switched off.
You have to pull the plug out of the socket beforehand.
CLEANING
The device should be cleaned with a soft cloth. Use domestic dish washing liquid or window cleaning liquid.
Scrubbing sponges, solvents or petrol are not recommended.
Replacement of heating sleeve
The press has to be cold! Use the main switch to turn off the device and pull the plug out of the socket.
Open the plate at the back to replace the heating sleeve. Pull out the little jack. Push the sleeve out of the
holder and carefully pull out the connection cable. Take the new heating sleeve and carefully insert the
connection cable into the duct. Then you have to clamp the new heating sleeve into the holder. Connect
the jack and close the opening at the back of the device. Check if the sleeve is working properly.
This press may only be operated by trained staff after reading the user’s manual.
Settings
1. Push the confirmation button for 5 seconds until LED1 is blinking.
2. LED1 is blinking and the display shows the preset initial temperature.
Programming mode has been switched on.
3. Use buttons + or - to set new initial temperature.
4. Push the confirmation button.
The display shows the preset press temperature.
Use buttons + or - to set new press temperature.
+ -
Confirmation
LED 1
4. Push the confirmation button.
The display shows the preset time.
Use buttons + or - to set new time.
5. Push confirmation button to deactivate programming mode.
The press will apply the new settings.
The settings will even be saved when the press is switched off.
Checking of adjusted settings
The initial temperature of the heating sleeve is shown
on the display( press is open).
Push button + or - to check press temperature.
The display will show the currently adjusted press temperature.
Push the - button to check the adjusted time.
The display will show the currently adjusted time setting.
Example for sublimation: initial temperature 110°C
press temperature 180°C
time 240 sek.
+
Confirmation
Put the cup with the transfer onto
the lifting gear and push it down.
LED 1
Never close the press without a cup!
This may lead to overheating of the heating element!
How to insert cup
1
-
2
Put the cup in the middle of the sleeve
before you close the press.
3
Release the lever. The press will open
automatically when the press procedure
is completed.
N
0
L
230VAC
1F25
FILTER
S10
S10 Hauptschalter / Wlacznik glówny / main switch
S1 time start. . . . . . . . . . . . . . . (bialy / weiss / white )
F1 Sicherung / fuse 6A
6A
F1
230VAC - 12VDC +
F2
1,0A
schwarz/czarny
Schwarz/czarny/black
Blau/niebiesk/bluei
Rot/czerwony/red
Netzteil / zasilacz / power supply unit 12 VDC
HEATER
F
mini-fit
4 pin
PT-100
Elektromagnet/
electro magnet
Grün/green
Heizmanchette / plyta grzewcza / heating sleeve
Heizelement
Grzalka
heating element
Schwarz/czarny/black
Rot/czerwony/red
Rot/czerwony/red
Braun/brazowy/brown
Weiss/bialy/white
Weiss/bialy/white
Schwarz/black
Mug-O-matic
0 - 210°C
Schwarz/czarny/black
S1 S + + -
12V
DIGITAL THERMOREGULATOR
Mug-O-Matic
SCHALTPLAN / POLACZEÑ
SCHEMATIC (electrical diagram)
E
TESTING REPORT
o
Base (paint, lubrication, etc.)
o
Heat and base platens, symmetry, silicone, teflon
o
Hours of work at 220°C . . . . . . .
o
Electrical connection, grounding wire, power cable
o
Test with transfer foil
o
Electronics, max temperature 220° C, inspection of all functions o
o
Hours of work at 180 °C . . . . . . .
o
Temperature tolerance at 180°C . . . . - / . . . . . +°C
o
Warning stickers
Packaging
Serial number . . . . . . . . . . . . . . . . . . . .
EC declaration of conformity - According to the EC directive 89/37 EC
The Walter Schulze GmbH
Schmalenbachstr.15
12057 Berlin
hereby declares as European agent for the manufacturer Romanik that the following described machine:
heat press. . . . . . . . . . . . . . . serial number . . . . . . . . . . . .
accords to the terms of the following EC directives:
Machine directive ( 89/37)
Low voltage directive (72/23)
EMV-directive (89/336)
Used standards and technical specifications:
EN 292-1, EN 292-2 “safety of machines”
EN 60204-1 “electrical equipment of machines”
Berlin . . . . . . . . . .
__________________________
Peter Meidinger
CEO