1
DIGITAL TORQUE GAUGE
MODEL BTGE
OPERATING INSTRUCTION
BTGE
BTGE Model
To use this product properly and safely, please read this manual carefully before use. If you have
any question about the product and its operations, please contact your nearest distributor or
TOHNICHI MFG. CO., LTD.
■ DIGITAL TORQUE GAUGE MODEL BTGE
Safety Precautions
To customers: Before using this product, please read this operating instruction carefully to use it
properly. If you have any question, please contact your nearest distributor or TOHNICHI MFG.
CO., LTD. This operating instruction should be stored in a safe place.
Safety Symbol
This symbol is used for drawing attention to "safety precautions". If you see this symbol
in this operating instruction, attention should be paid to safety. Take preventative
actions according to the description and conduct "safe operations and proper control".
Signal Words
The signal words are the headers which indicate the level of hazard that should be known for
human safety and in handling devices. The signal words for safety are "Danger", "Warning" and
"Caution" depending on the level of hazard to human. The signal words are used with the safety
symbol to indicate the following situations.
"
Danger": Indicates an imminently hazardous situation which, if not avoided, will result in
death or serious injury.
"
W
Warning": Indicates a potentially hazardous situation which, if not avoided, could result in
death or serious injury.
"
Caution": Indicates a potentially hazardous situation which, if not avoided, may result in
minor or moderate injury.
1
■ DIGITAL TORQUE GAUGE MODEL BTGE
Warning
• Do not use this instrument in an atmosphere of flammable gas or steam.
· Use in such an atmosphere may cause a fire.
• Disassembly or modification of the instrument is prohibited.
· It may result in loss of safety, degradation in functions, shortening of product life, or failure.
• Do not heat or throw batteries into fire.
· Batteries may explode if they are heated or thrown into fire.
• Consider the environment of the workplace.
· Do not use the instrument body and battery in the rain or in damp or wet places.
Use in such a place may cause an electric shock or smoking.
· Do not use the instrument in a place where inflammable liquid or combustible gas is present.
Use in such a place may cause an explosion or fire, resulting in an accident.
• Be sure to use the specified accessories or options.
· Do not use any accessory or option other than those specified in this operating instruction.
Use of any unspecified accessory may result in accident or injury.
2
■ DIGITAL TORQUE GAUGE MODEL BTGE
Caution
• Be sure to use a coin shaped lithium battery CR2450 for power source.
· Do not use any other battery than that specified in this operating instruction.
• When inserting the battery, be careful to ensure correct polarity.
• Do not use or store the instrument in places subject to high temperature, high humidity,
dust, water which may enter the instrument, strong vibration or unstableness.
· Use or storage in such a place may cause a failure in the instrument body.
• Store in an appropriate place when not in use.
· Store the instrument in a dry and lockable place. Otherwise, an injury or accident may be
caused. Do not store the instrument body and batteries in a place where the temperature
may exceed 50°C. Storage in such a place may degrade batteries, causing smoking or
ignition.
• For safe and efficient operation, conduct the work with a torque value suited to the
capacity of the instrument.
· Work with a torque value beyond the capacity may cause an accident.
• Do not use the instrument for any purpose other than that specified.
· Use for any purpose other than that specified may result in an injury.
• Carefully perform maintenance of the instrument.
· For replacement of accessories, follow their operating instructions. If you don't follow the
operating instruction, it may cause a failure.
• Always keep the grip dry and clean and free of oil or grease.
· Otherwise, it may result in an injury.
• Check the parts for damage.
· Before use, fully check the case and the other parts for damage and make sure that the
instrument operates normally and fulfills the specified functions.
· Check the parts and all other portions that may affect the operation for damage, abnormality
and installation status.
· For replacement or repair of a damaged case and other parts, contact your nearest
distributor or TOHNICHI MFG. CO., LTD.
3
■ DIGITAL TORQUE GAUGE MODEL BTGE
• For proper and safe use
· Do not use any battery other than that specified.
· Avoid shock or vibration to this instrument.
· Do not use this product in an environment other than that specified in the operating
instruction.
· Before use, make a pre-operation inspection and check the settings.
· If this product gets wet with water or grease, it may break down or burn out. Be careful not
to drop water or grease.
· Do not let this product fall or bump. It may result in damage or failure.
· Use this product within the measurement range specified in the operating instruction.
· Be sure to conduct a periodic inspection.
· Before make measurement, make sure that "zero" is displayed.
· Be sure to perform a daily inspection and calibration at intervals decided in your company.
Should this product give out abnormal smell or catch fire during use, stop using it
immediately. Then, move the line checker to a safe place and contact your nearest distributor
or TOHNICHI MFG. CO., LTD.
4
■ DIGITAL TORQUE GAUGE MODEL BTGE
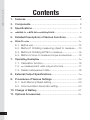
Contents
1. Features.......................................................................... 6
2. Components................................................................... 6
3. Specifications................................................................. 7
4. Names of Parts and Descriptions ................................. 8
5. Detailed Descriptions of Various Functions..................10
6. How to Use.....................................................................12
6-1. Before use ...............................................................12
6-2. Method 1 Rotating measuring object to measure .....13
6-3. Method 2 Rotating BTGE to measure.......................14
6-4. Method 3 How to measure torque screwdriver.........15
7. Operating Examples ......................................................16
7-1. Calculation function..................................................16
7-2. All measurement data output at a time .....................17
7-3. Delete measurement data ........................................18
8. External Output Specifications......................................19
9. Procedures of Various Settings .....................................20
9-1. Auto Memory/Reset setting......................................20
9-2. Communication baud rate setting ............................20
10. Change of Battery ..........................................................21
11. Optional Accessories.....................................................22
5
■ DIGITAL TORQUE GAUGE MODEL BTGE
Features
(1) Digital torque gauge integral with the digital display.
(2) Hand-held type microcapacity torque meter for measuring the clockwise and
counterclockwise torque.
(3) The angle of the torque display can be adjusted according to the working posture.
(4) The integral-type display that has excellent ease of operation and workability.
(5) This torque gauge is best suited for measurement of small torque for precision machines,
electronic instruments, etc. and for assembly work.
(6) It also can be used to check torque screwdrivers.
(7) Its tip forms a three-jaw chuck, which can clamp an object to be measured.
(8) It is equipped with a stopper against excessive load.
(9) Up to 999 measurement data can be stored. Data can be automatically counted by the
auto memory function.
(10) For the counted data, the number of samples, maximum value, minimum value and mean
value can be displayed.
(11) A coin shaped lithium battery (CR2450) is adopted for power source. Continuous operation
time is 10 hours. The battery remaining indicator is provided.
(12) Data can be transmitted directly to PC through the USB interface.
(13) This instrument has CE marking for international use including EU.
Components
1) Main unit.......................................................................1 set
2) Coin shaped lithium battery (CR2450), which is inserted
into the body before shipment ......................................1 pc
3) Operating instruction ....................................................1 pc
4) Carrying case ...............................................................1 pc
6
■ DIGITAL TORQUE GAUGE MODEL BTGE
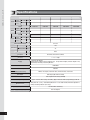
Specifications
Model
BTGE10CN
BTGE20CN
BTGE50CN
BTGE100CN
BTGE200CN
Torque Min. to Max. cN·m
Newton measurement
range
1 digit cN·m
2 to 10
4 to 20
10 to 50
20 to 100
40 to 200
0.01
0.02
0.05
0.1
0.2
Model
BTGE1KM
BTGE2KM
BTGE5KM
BTGE10KM
BTGE20KM
Torque Min. to Max. kgf·cm
Metric measurement
range
1 digit kgf·cm
0.2 to 1
0.4 to 2
1 to 5
2 to 10
4 to 20
0.001
0.002
0.005
0.01
0.02
Model
BTGE09I
BTGE1.8I
BTGE4.4I
BTGE9I
BTGE18I
Torque Min. to Max. lbf·in
American measurement
range
1 digit lbf·in
0.2 to 0.9
0.4 to 1.8
1 to 4.4
2 to 9
4 to 18
0.001
0.002
0.005
0.01
0.02
Chuck Diameter Range
Overall length
ø1 to 8.5
mm
130
Outside diameter mm
75
Dimension
Weight Approx.
7
kg
0.65
Dicrection
Clockwise and counterclockwise
Accuracy
± 2 % + 1 digit
Display
7 segment LCD display
Counter value: 3 digits (character height 3 mm) Torque value: 4 digits (character height 7 mm)
Unit, Battery remaining, measuring direction
Measurement Mode
PEAK/RUN
Data Memory
999 data
Statistical Processing
Number of samples, maximum value, minimum value, mean value
Data Output
USB output (USB mini B terminal)
Power
Coin shaped lithium battery (CR2450)
Continuous Operating Hours
Approx. 10 hours when using coin battery, Approx. 50 hours when using battery pack BP-C1
Other Functions
Auto power off (3 min), Auto Memory/Reset 0.5 to 5 seconds variable, Auto Zero adjustment,
Battery remaining indicator (in 4 steps)
Operating Temperature Range
0 to 40°C Non condensing
Display Turning Range
0 to 163 degrees
■ DIGITAL TORQUE GAUGE MODEL BTGE
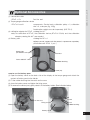
Names of Parts and Descriptions
(11)
(12)
(13)
(10)
(1) (2) (5) (3)
(6) (7)(4)
(8)
(1) Liquid Crystal Display
(9)
[Details of Display]
Displays the counter, auto memory, battery Counter
Battery remaining
Unit
remaining indicator, unit and torque value.
(2)
ON/OFF
Power Switch
Turns the power to ON/OFF. When the power
is turned ON, key checks are conducted.
Measuring
Direction
(3)
Torque
Auto memory
ON
Count Forward Key
Moves the counter forward by one or continuously to read out a measured data. After the
count forward key is pressed long by 15 consecutive data, the counter can be moved
forward by +10 data.
(4)
Count Backward Key
Moves the counter backward by one or continuously to read out a measured data. After the
count backward key is pressed long by 15 consecutive data, the counter can be moved
backward by -10 data.
8
■ DIGITAL TORQUE GAUGE MODEL BTGE
(5)
MEM
Memory Key
Stores the measured data and moves the counter forward by one. The displayed
measurement data is output to the external output device. When auto memory (0.1 to 5
sec.) is effective, Memory key cannot be used.
(6)
MD
Mode Key
This is a key for selecting the computing start position when the counter indicates a
number other than 000, the number of samples, maximum value, minimum value or mean
value. Keep pressing the key for 2 seconds to make various settings (auto memory/reset,
communication baud rate).
(7)
C
Clear Key
In the PEAK mode, this key is used to reset the peak value or to delete the stored data.
In the RUN mode, auto zero adjustment is performed.
(8) External Output Terminal
This is the terminal for connecting the USB connection cable (option).
(9) Reset Switch
If any display error or malfunction occurs, press the reset switch.
(10) Battery Cover
A coin shaped lithium battery (CR2450) is contained inside the cover.
(11) Three-jaw Chuck
Clamps the object to be measured.
(12) Chuck Holder
This is a holder which clamps the object to be measured with the three-jaw chuck and
tightens the chuck.
(13) Fixing Groove
This is a groove which is used to fix the torque gauge body to a jig, etc.
9
■ DIGITAL TORQUE GAUGE MODEL BTGE
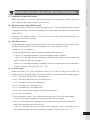
Detailed Descriptions of Various Functions
(1) Continuous display (RUN mode)
When the counter is set at 000, the torque increases as torque load is applied, and if the
load is released, the torque display is returned to 0.
(2) Maximum value display (PEAK mode)
When the counter is set at any value in the range of 001 - 999, the torque increases as load
is applied, and even if the load is released, the display holds the maximum torque value
(PEAK HOLD).
However, if the torque is about 7.5% or less of the maximum measurement torque, the
display goes into the RUN mode.
(3) Auto Zero function
In the continuous display (RUN mode), press the clear key to activate the auto zero function.
(However, the torque load must be within about 10% of the maximum value.)
<<When "Err 9" is displayed>>
• Under no load condition, press the power switch and the clear key.
· If the "Err 9" message disappears, the torque gauge functions properly.
· If the "Err 9" message remains displayed, press the reset switch, and then press the
power switch and the clear key again.
· If the "Err 9" message still remains displayed, the sensor or the plated circuit may have a
problem. Contact TOHNICHI MFG. CO., LTD.
(4) Error message
When the power is OFF, press the power switch to ON. Then, the key check function will
activate. If there is anything wrong with the key functions, the following error message appears.
<<Err 1: The Count Forward Key is left depressed>>
<<Err 2: The Count Backward Key is left depressed>>
<<Err 3: The Memory Key is left depressed>>
<<Err 4: The Clear Key is left depressed>>
<<Err 5: The Mode Key is left depressed>>
<<Err 8: There is something wrong with the internal memory.>>
Err 1 to 5, or 8 is displayed
• Turn off the power switch. Then, without touching any key, turn on the power again.
· If the "Err" message disappears, the torque gauge functions properly.
• If the "Err" message remains displayed, turn off the power, and then press the power
switch and the clear key at the same time.
· If the "Err" message still remains displayed, the membrane switch, the plated circuit or
the internal memory may have any problem. Contact TOHNICHI MFG. CO., LTD.
10
■ DIGITAL TORQUE GAUGE MODEL BTGE
(5) Auto Memory/Reset function
The measurement value held as the maximum value (PEAK HOLD) is automatically stored
within a given setting range (0.1 to 5 sec. later) and the counter moves forward by one.
If the Auto Memory/Reset function is not used, set the time at 0.0 sec.
(6) Auto Power OFF function
If no key operation is conducted or no torque load (10% or less of the maximum
measurement value) is applied for 3 minutes, the power is turned off.
When the battery alarm "- - - -" occurs, regardless of the above condition, the power will be
turned off within one minute.
(7) Remaining battery indicating function
The LCD indicates the remaining battery status in 4 steps.
· There is enough battery remaining.
· The remaining battery amount is not enough. The battery life is half of
the full operating time.
· It is almost time to replace the battery.
Battery alarm
There is no battery remaining. Immediately charge the battery. "----" is
displayed on the LCD, and any switch other than the power switch
cannot be operated. In one minute after this battery alarm occurs, the
power will be turned off.
* Stored data and various settings are not deleted even if the battery is dead.
(8) Over torque alarm
If the torque exceeds about 105% of the maximum measurement torque, the torque value
and "- - - -" are displayed by turns repeatedly and a buzzer sounds.
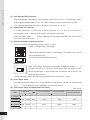
(9) Over torque alarm and peak hold start torque
Model
11
TTorque Range
1digit
Unit (cN·m)
105% of max torque
10% of max torque
Over torque alarm
Peak hold start torque
Max. auto zero value
Min.
Max.
BTGE10CN
2.00
10.00
0.01
10.50
1.00
1.00
BTGE20CN
4.00
20.00
0.02
21.00
2.00
2.00
BTGE50CN
10.00
50.00
0.05
52.50
5.00
5.00
BTGE100CN
20.0
100.0
0.1
105.0
10.00
10.00
BTGE200CN
40.0
200.0
0.2
210.0
20.00
20.00
■ DIGITAL TORQUE GAUGE MODEL BTGE
How to Use
6-1. Before use
· Before using the torque gauge, open the display portion and remove the battery insulating
sheet.
Battery cover
Display portion
Battery insulating sheet
Pull out
· Turn on the power of the torque gauge and make sure that there is enough battery remaining.
· If the battery indicator is flashing, change the battery.
12
■ DIGITAL TORQUE GAUGE MODEL BTGE
6-2. Method 1 Rotating measuring object to measure
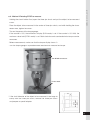
· Using the fixing groove, fix the torque gauge to the jig table.
· Holding the chuck holder fixed, open the three-jaw chuck and put the object to be measured
in the chuck.
· Place the object to be measured in the center of three-jaw chuck, and while holding the chuck
holder fixed, tighten the chuck.
· Turn on the power of the torque gauge.
· If the counter is 000, the continuous display (RUN mode) is set. If the counter is 001-999, the
maximum value hold (PEAK mode) is set. It works bi-directionally.
· Before measurement, make sure that the torque display shows 0.
· Turn the object to be measured in a predetermined direction and measure the torque.
Turn the measuring object to measure.
Object to be measured
Fix the torque gauge.
Precautions on measurement
* If the object to be measured is not chucked in the center, an accurate torque cannot be
measured. Before measurement, make sure that the object is chucked in the center.
* If the three-jaw chuck is turned without fixing the chuck holder, the twisting force may be
conveyed directly to the instrument body, resulting in damage to the body. Fix the chuck
holder securely before measuring.
13
■ DIGITAL TORQUE GAUGE MODEL BTGE
6-3. Method 2 Rotating BTGE to measure
· Holding the chuck holder fixed, open the three-jaw chuck and put the object to be measured
inside.
· Place the object to be measured in the center of three-jaw chuck, and while holding the chuck
holder fixed, tighten the chuck.
· Turn on the power of the torque gauge.
· If the counter is 000, the continuous display (RUN mode) is set. If the counter is 001-999, the
maximum value hold (PEAK mode) is set. Both clockwise and counterclockwise torque can be
measured.
· Before measurement, make sure that the torque display shows 0.
· Turn the torque gauge in a predetermined direction and measure the torque.
Turn BTGE to measure.
Fix the work.
31
* If the shaft diameter of the object to be measured is too large to
9
and prepare a special adapter.
ø25
M35 P=15
ø62
clamp with the three-jaw chuck, remove the three-jaw chuck
14
■ DIGITAL TORQUE GAUGE MODEL BTGE
6-4. Method 3 How to measure torque screwdriver
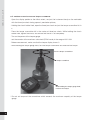
· Open the display portion to the fullest extent, and put the instrument body on the worktable
with the three-jaw chuck facing upward. (See below picture)
· Holding the chuck holder fixed, open the three-jaw chuck and put the torque screwdriver bit in
it.
· Place the torque screwdriver bit in the center of three-jaw chuck. While holding the chuck
holder fixed, tighten the chuck, and ensure that the bit is set completely.
· Turn on the power of the torque gauge.
· Set the counter at the maximum value hold (PEAK mode) in the range of 001-999.
· Before measurement, make sure that the torque display shows 0.
· While holding the torque gauge fixed, turn the torque screwdriver and measure the torque.
Turn the torque screwdriver.
Torque screwdriver
While holding the torque gauge fixed,
measure the torque.
* Do not set torque of the screwdriver which exceeds the maximum capacity of the torque
gauge.
15
■ DIGITAL TORQUE GAUGE MODEL BTGE
Operating Examples
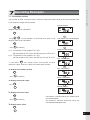
7-1. Calculation function
The number of data, maximum value, minimum value and mean value of the measurement data
in the specified range are calculated.
Memory display
Using
, set the counter at the upper limit value in the
range of data to be calculated.
Press
MD
.
Using
, set the counter at the lower limit value in the
range of data to be calculated.
Press
(Press
MD
Calculation start number display
.
Flashing
C
to cancel.)
Ex.1) To calculate in the range of 001-200:
Set the counter at 200, press the MD key, and set Stt at 001.
Ex.2) To calculate in the range of 101-200:
Set the counter at 200, press the MD key, and set Stt at 10.
Number of data display
Max. value display
As you press MD , the display shows the number of data,
maximum value, minimum value and mean value in order.
To display the number of data
Press
(Press
MD
Min. value display
.
C
to cancel.)
Mean value display
To display maximum value
Press
(Press
MD
.
C
to cancel.)
Memory display
To display minimum value
Press
(Press
MD
.
C
to cancel.)
* Calculation is performed for the PEAK HOLD
measurement data.
* The maximum, minimum and mean values are
calculated with absolute value.
To display mean value
Press
(Press
MD
C
.
to cancel.)
16
■ DIGITAL TORQUE GAUGE MODEL BTGE
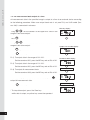
7-2. All measurement data output at a time
All measurement data in the specified range is output at a time to an external device according
to the following procedure. Make sure output baud rate is set (See P20) and USB Cable (Part
No. 384) is connected in advance.
Memory display
Using
, set the counter at the upper limit value in the
range of data to be output.
MD
Press
Using
.
, set the counter at the lower limit value in the
range of data to be output.
MD
Press
(Press
C
Output start number display
to proceed to next.
to cancel.)
Ex.1) To output data in the range of 001-200:
Number of data display
Set the counter at 200, press the MD key, and set Stt at 001.
Ex.2) To output data in the range of 101-200:
Set the counter at 200, press the MD key, and set Stt at 101.
Data output start
Ex.3) To output all measurement data:
Set the counter at 999, press the MD key, and set Stt at 001.
When the display shows the number of data, press
to
output all measurement data.
(Press
C
Data output completion
to cancel.)
* To stop data output, press the Clear key.
While data is output, any other key cannot be operated.
17
Number of data display
■ DIGITAL TORQUE GAUGE MODEL BTGE
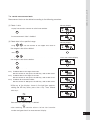
7-3. Delete measurement data
Measurement data can be deleted according to the following procedure.
(1) Delete 1 data
Memory display
Display the counter number of data to be deleted.
Press
C
to delete.
The measurement data is deleted.
(2) Delete data in the specified range
Memory display
Using
, set the counter at the upper limit value in
the range of data to be deleted.
Press
MD
.
Using
, set the counter at the lower limit value in
Clear start number display
the range of data to be deleted.
Press
(Press
MD
C
.
Flashing
to cancel.)
Ex.1) To delete data in the range of 001-200:
Set the counter at 200, press the MD key, and set Stt at 001.
Ex.2) To delete data in the range of 101-200:
Set the counter at 200, press the MD key, and set Stt at 101.
Ex.3) To delete all measurement data:
Set the counter at 999, press the MD key, and set Stt at 001.
Number of data display
Max. value display
Min. value display
While any of the displays shown in the right box appears,
holding the MD key down, press the C key. Then, release
both keys.
Mean value display
Measurement data memory is deleted.
After deleting, the counter returns to the start counter
number and goes back to measurement display.
18
■ DIGITAL TORQUE GAUGE MODEL BTGE
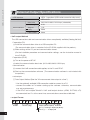
External Output Specifications
USB Interface
Connector
Serial Interface
Baud rate
Data length
USB1.1 compliant (USB-serial conversion chip used)
USB mini B
2400/4800/9600/19200 bps (selectable)
8 bits
Stop bit
Parity
Flow control
1 bit
None
None
• USB Output Method
The USB connection cable and communication driver are optionally available (Catalog No.384).
· Preparation (PC)
(1) Install the communication driver to a USB-compliant PC.
(The communication driver is contained in the CD-ROM supplied with the product.)
(2) Make settings of the PC port and communication format.
(For the installation procedure and communication settings, see the instruction manual in
the CD-ROM.)
· Preparation (BTGE)
(3) Turn on the power of BTGE.
(4) Select the communication baud rate. (2400/4800/9600/19200 bps)
· Communication
(5) Connect the USB connection cable (option) to the PC and BTGE.
(6) Start up the communication software. (The communication software is not included with
the product.)
· Data output
(7) Data Output Method (See the "All measurement data output at a time".)
* Use the optionally available USB connection cable to connect to a PC.
* Connect the cables to PC before starting up the sofrware. Otherwise, communication
may not be established.
* If the BTGE and multiple Tohnichi's USB serial output devices (CEM3, R-DT999, ST2)
are connected to a PC at the same time, communication cannot be established.
• Output Format
Header
Counter (3fig)
Torque (decimal point) Delimiter
plus (+): nothing is displayed (blank).
minus (-): "-" is displayed.
19
■ DIGITAL TORQUE GAUGE MODEL BTGE
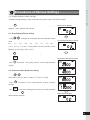
Procedures of Various Settings
This chapter explains various settings.
* Before making settings, make sure that the counter shows 000 (RUN mode).
MD
Press
for over 2 seconds till the mode setting display
Measurement display
appears. Then, release the MD key.
9-1. Auto Memory/Reset setting
Using
, change the setting for the Auto Memory/Reset
(1) Auto Memory/Reset setting
timer.
(0.0 ⇔ 0.1 ⇔ 0.2 ⇔ 0.3 ⇔ 0.4 ⇔ 0.5 ⇔ 1.0 ⇔ 2.0 ⇔3.0 ⇔
4.0 ⇔ 5.0 ⇔ 0.0 sec.) If you prefer manual memory (Auto
Memory is not used.), set it as 0.0.
Press
MD
Press
MEM
Press
C
to proceed to next without saving.
to save the setting and proceed to next.
(2) Communication baud rate setting
to cancel. The display returns to the measurement
display.
9-2. Communication baud rate setting
Using
, change the setting for the communication
baud rate. (2400 ⇔ 4800 ⇔ 9600 ⇔ 19200 ⇔ 2400)
MD
to return to the measurement display without
MEM
to save the setting and return to the measurement
(Press
saving.)
Press
display. (Press
C
to cancel. The display returns to the
Measurement display
measurement display.)
20
■ DIGITAL TORQUE GAUGE MODEL BTGE
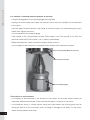
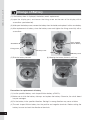
Change of Battery
(1) If the battery alarm is displayed, the battery needs replacement.
(2) Open the display part, and loosen the fixing screw on the rear of the display with a
screwdriver. (See below left)
(3) Slide open the battery cover, remove the battery from the holder, and replace it with a new battery.
(4) After replacement of battery, close the battery cover and tighten the fixing screw fully with a
screwdriver.
Coin shaped
lithium battery
Screwdriver
Fixing screw
Battery cover
Slide
(5) Slide the battery forward.
Battery cover
(6) Keeping the battery forward, pull it up.
Precautions for replacement of battery
(1) Use the specified battery: Coin shaped lithium battery (CR2450).
(2) Make sure to slide the battery sideways and replace the battery. Otherwise, the circuit board
may be damaged.
(3) Put the battery in the specified direction. Setting it in wrong direction may cause a failure.
(4) The coin shaped lithium battery has the positive and negative terminals. Before setting the
battery, be sure to check the direction of terminals.
21
■ DIGITAL TORQUE GAUGE MODEL BTGE
Optional Accessories
(1) Connection cable
· BTGE → PC
Part No. 384
(2) Torque gauge calibration device
· BTGTCL150CN
Components: Device body, calibration pulley x 2, calibration
wire x 3, scale pan (5g, 100g)
Combination weights are sold separately. (WS-TCL2)
(3) Calibration adapter for BTGE Catalog No. 807
Note) For calibration of BTGE, the calibration device (BTGTCL150CN) and the calibration
adapter (Catalog No. 807) are needed.
(4) Battery pack
Catalog No. BP-C1
Batteries are not supplied with the product. Prepare ones separately.
(AA alkaline cells LR03 2 pcs.)
Battery box
(AA alkaline cells 2pcs.)
Contact
Power ON/OFF switch
Rubber bushing
Cord (1m)
How to use the battery pack
(1) Open the battery cover on the back side of the display of the torque gauge and attach the
contact of battery pack to the holder.
(2) Fit the rubber bushing into the notch on the case.
(3) Close the battery cover and tighten the fixing screw.
(4) To remove the contact part, gently rotate it in the battery holder. (See indication below)
Cord
Notch on the case
Fixing screws
Battery holder
Contact
Cord
Case
Rubber bushing
Battery cover
22
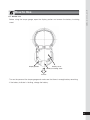
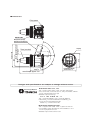
■ Dimensions
Fixing groove
73°
Display
Three-jaw chuck
ø78
ø66
Chuck operating diameter
ø1 to ø9
Approx. 130
Maximum turning
position of the display
90°
3
Body 72
Overall length Approx. 130
Dodecagon width
across flats 75
Designs and specifications are subject to change without notice.
■ TOHNICHI MFG. CO., LTD.
TEL: +81-(0)3-3762-2455 FAX: +81-(0)3-3761-3852
2-12, Omori-kita, 2-Chome Ota-ku, Tokyo 143-0016, JAPAN
E-mail: [email protected]
Website: http://tohnichi.jp
■ N. V. TOHNICHI EUROPE S. A.
TEL: +32-(0)16-606661 FAX: +32-(0)16-606675
Industrieweg 27 Boortmeerbeek, B-3190 Belgium
E-mail: [email protected]
Website: http://www.tohnichi.be
■ TOHNICHI AMERICA CORP.
TEL: +1-(0)847-272-8480 FAX: +1-(0)847-272-8714
677 Academy Drive, Northbrook, Illinois 60062, U. S. A.
E-mail: [email protected]
Website: http://www.tohnichi.com